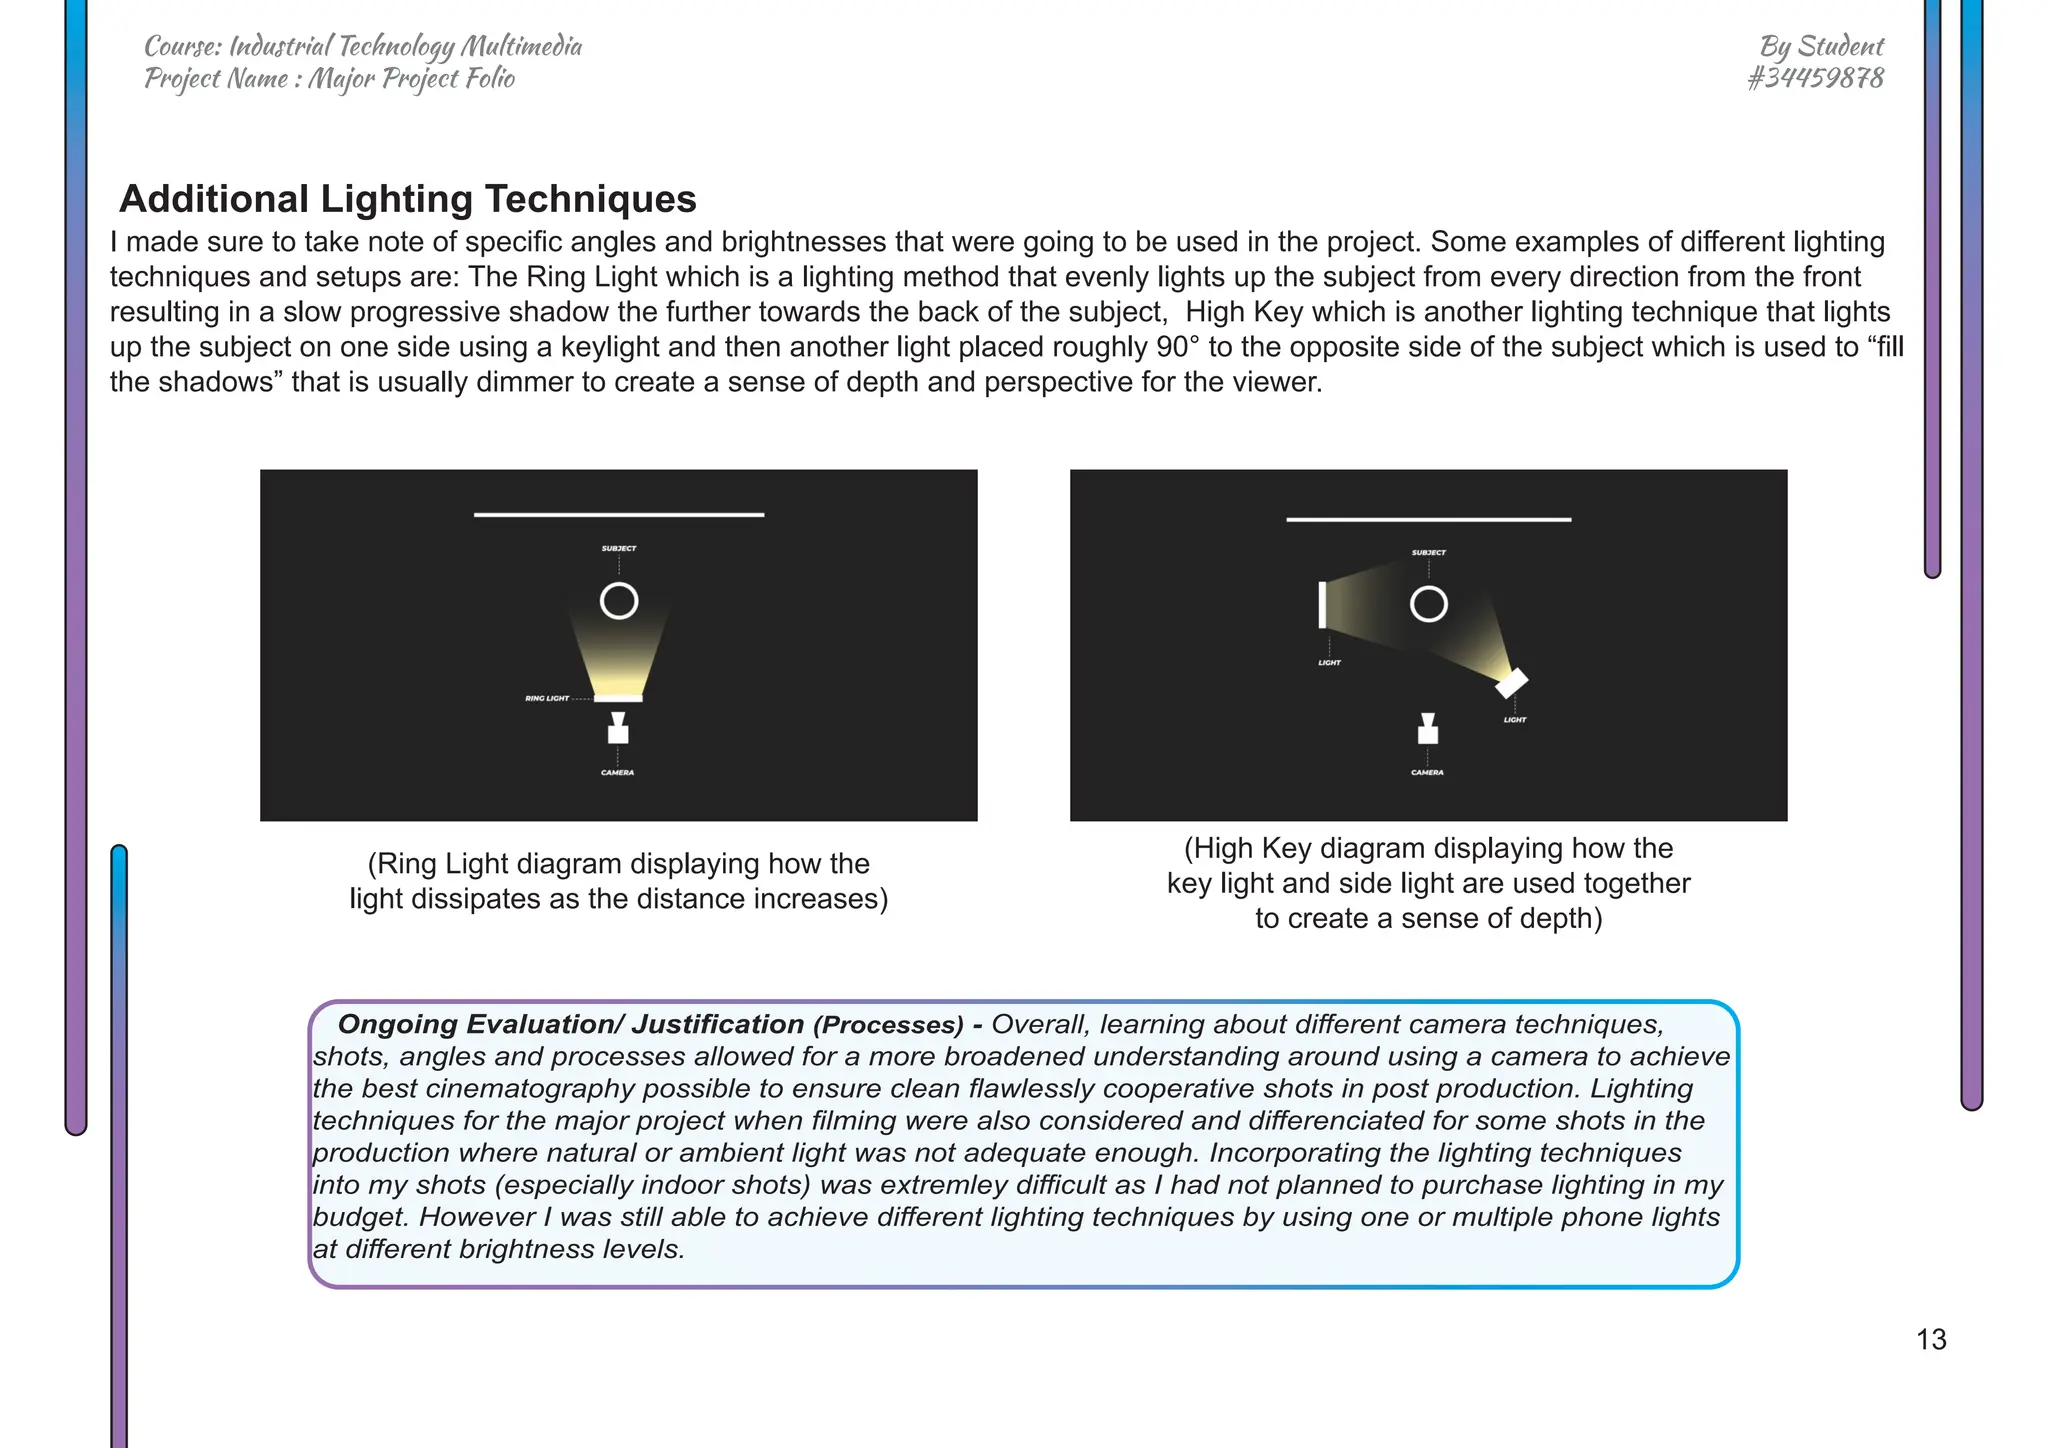
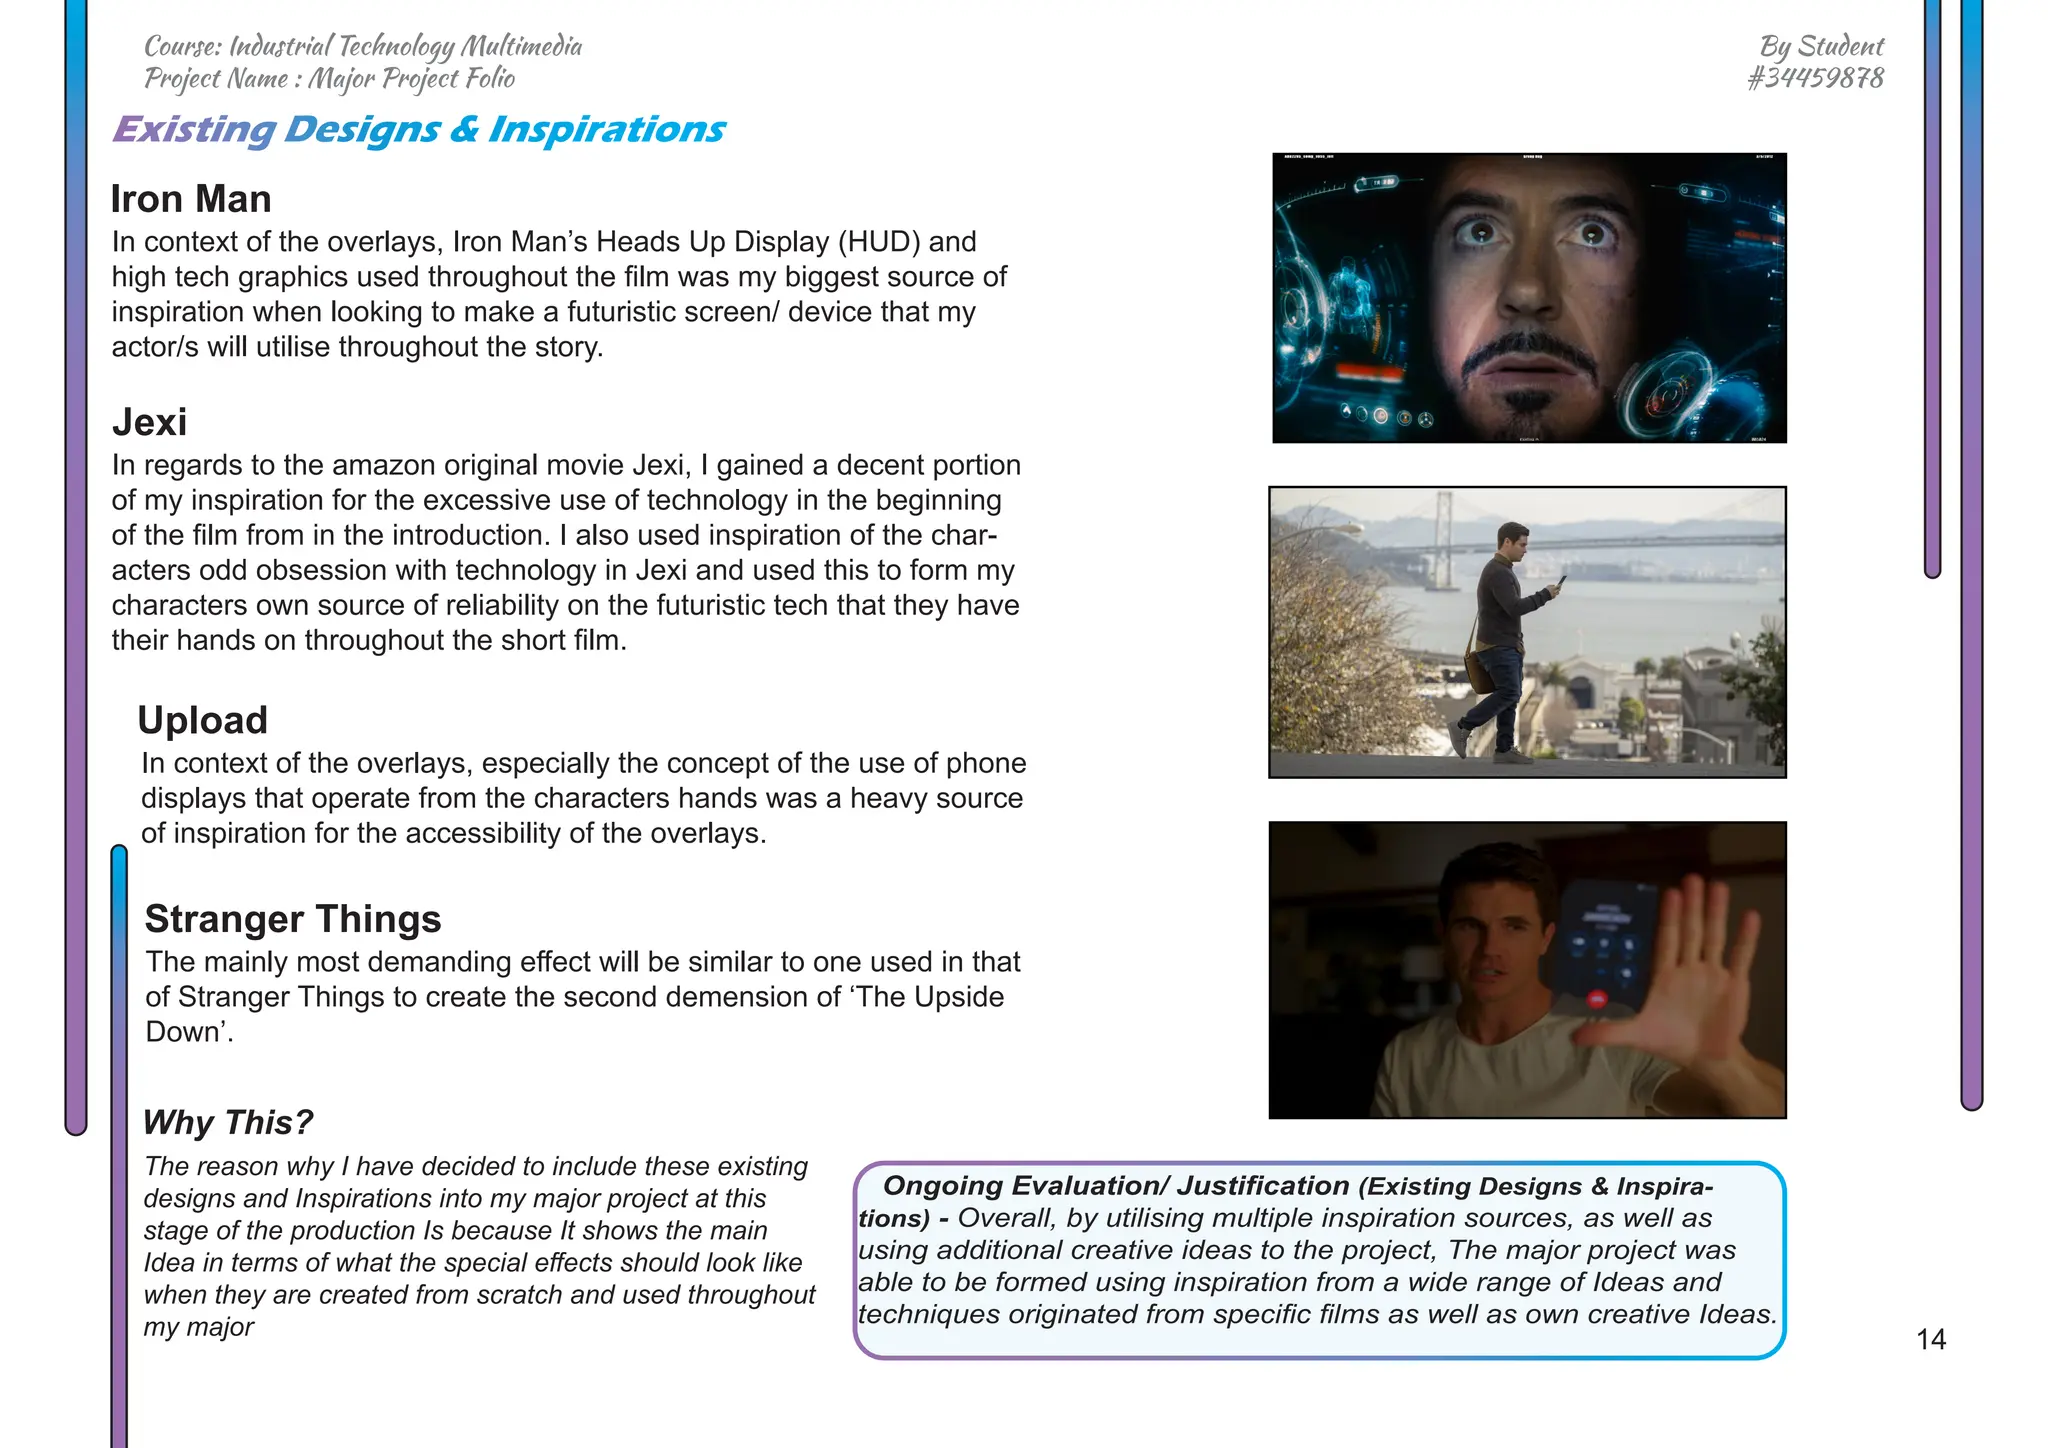
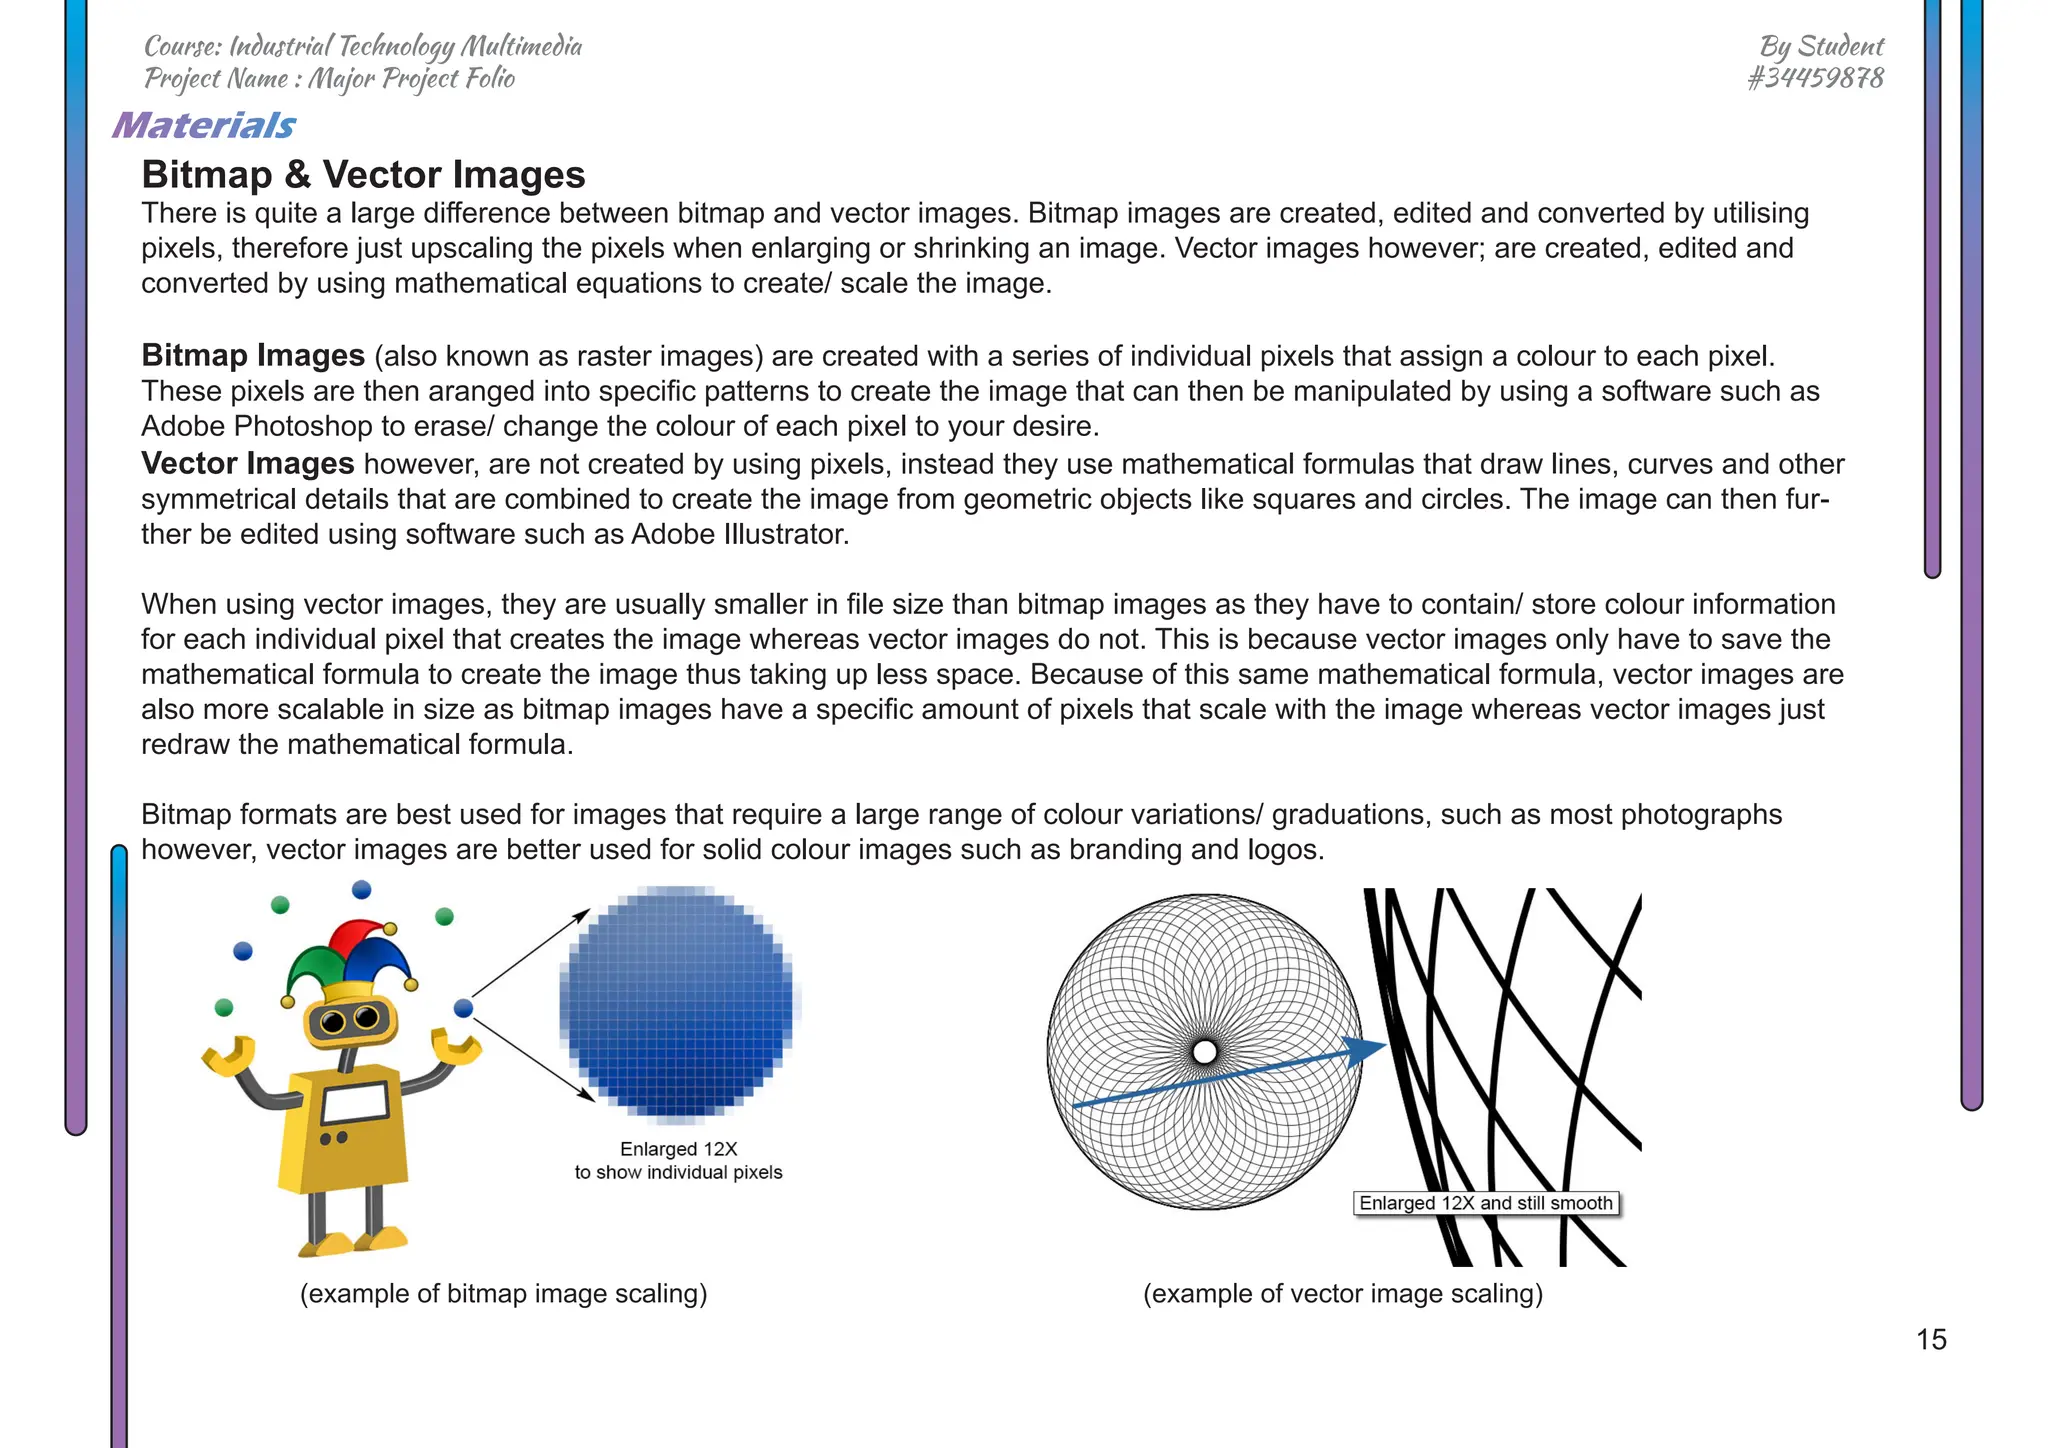
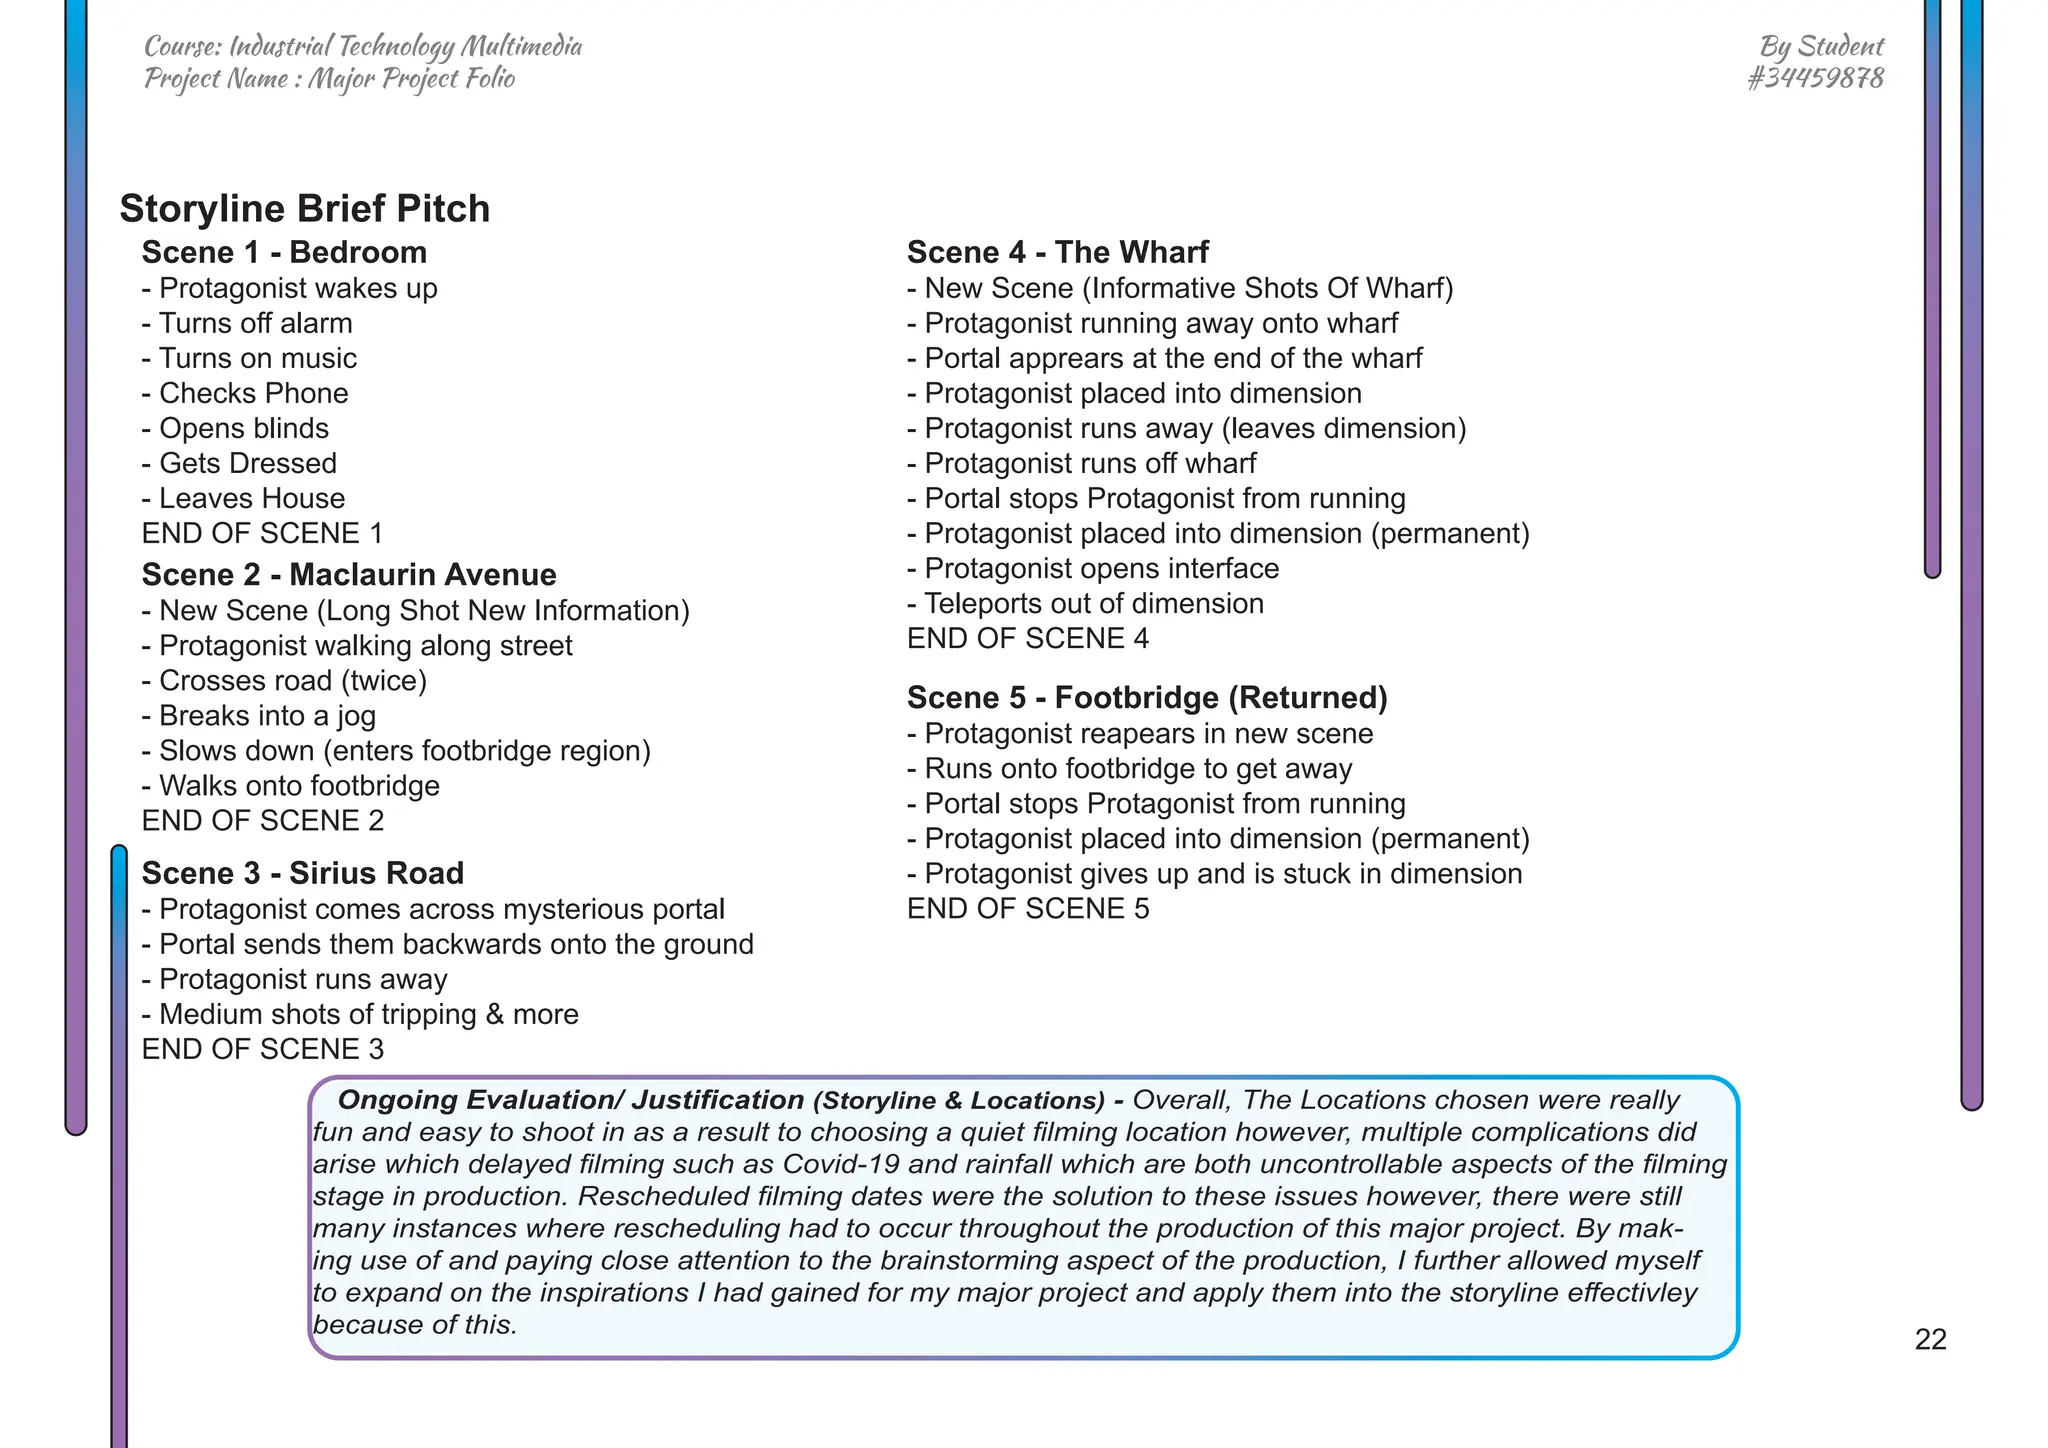
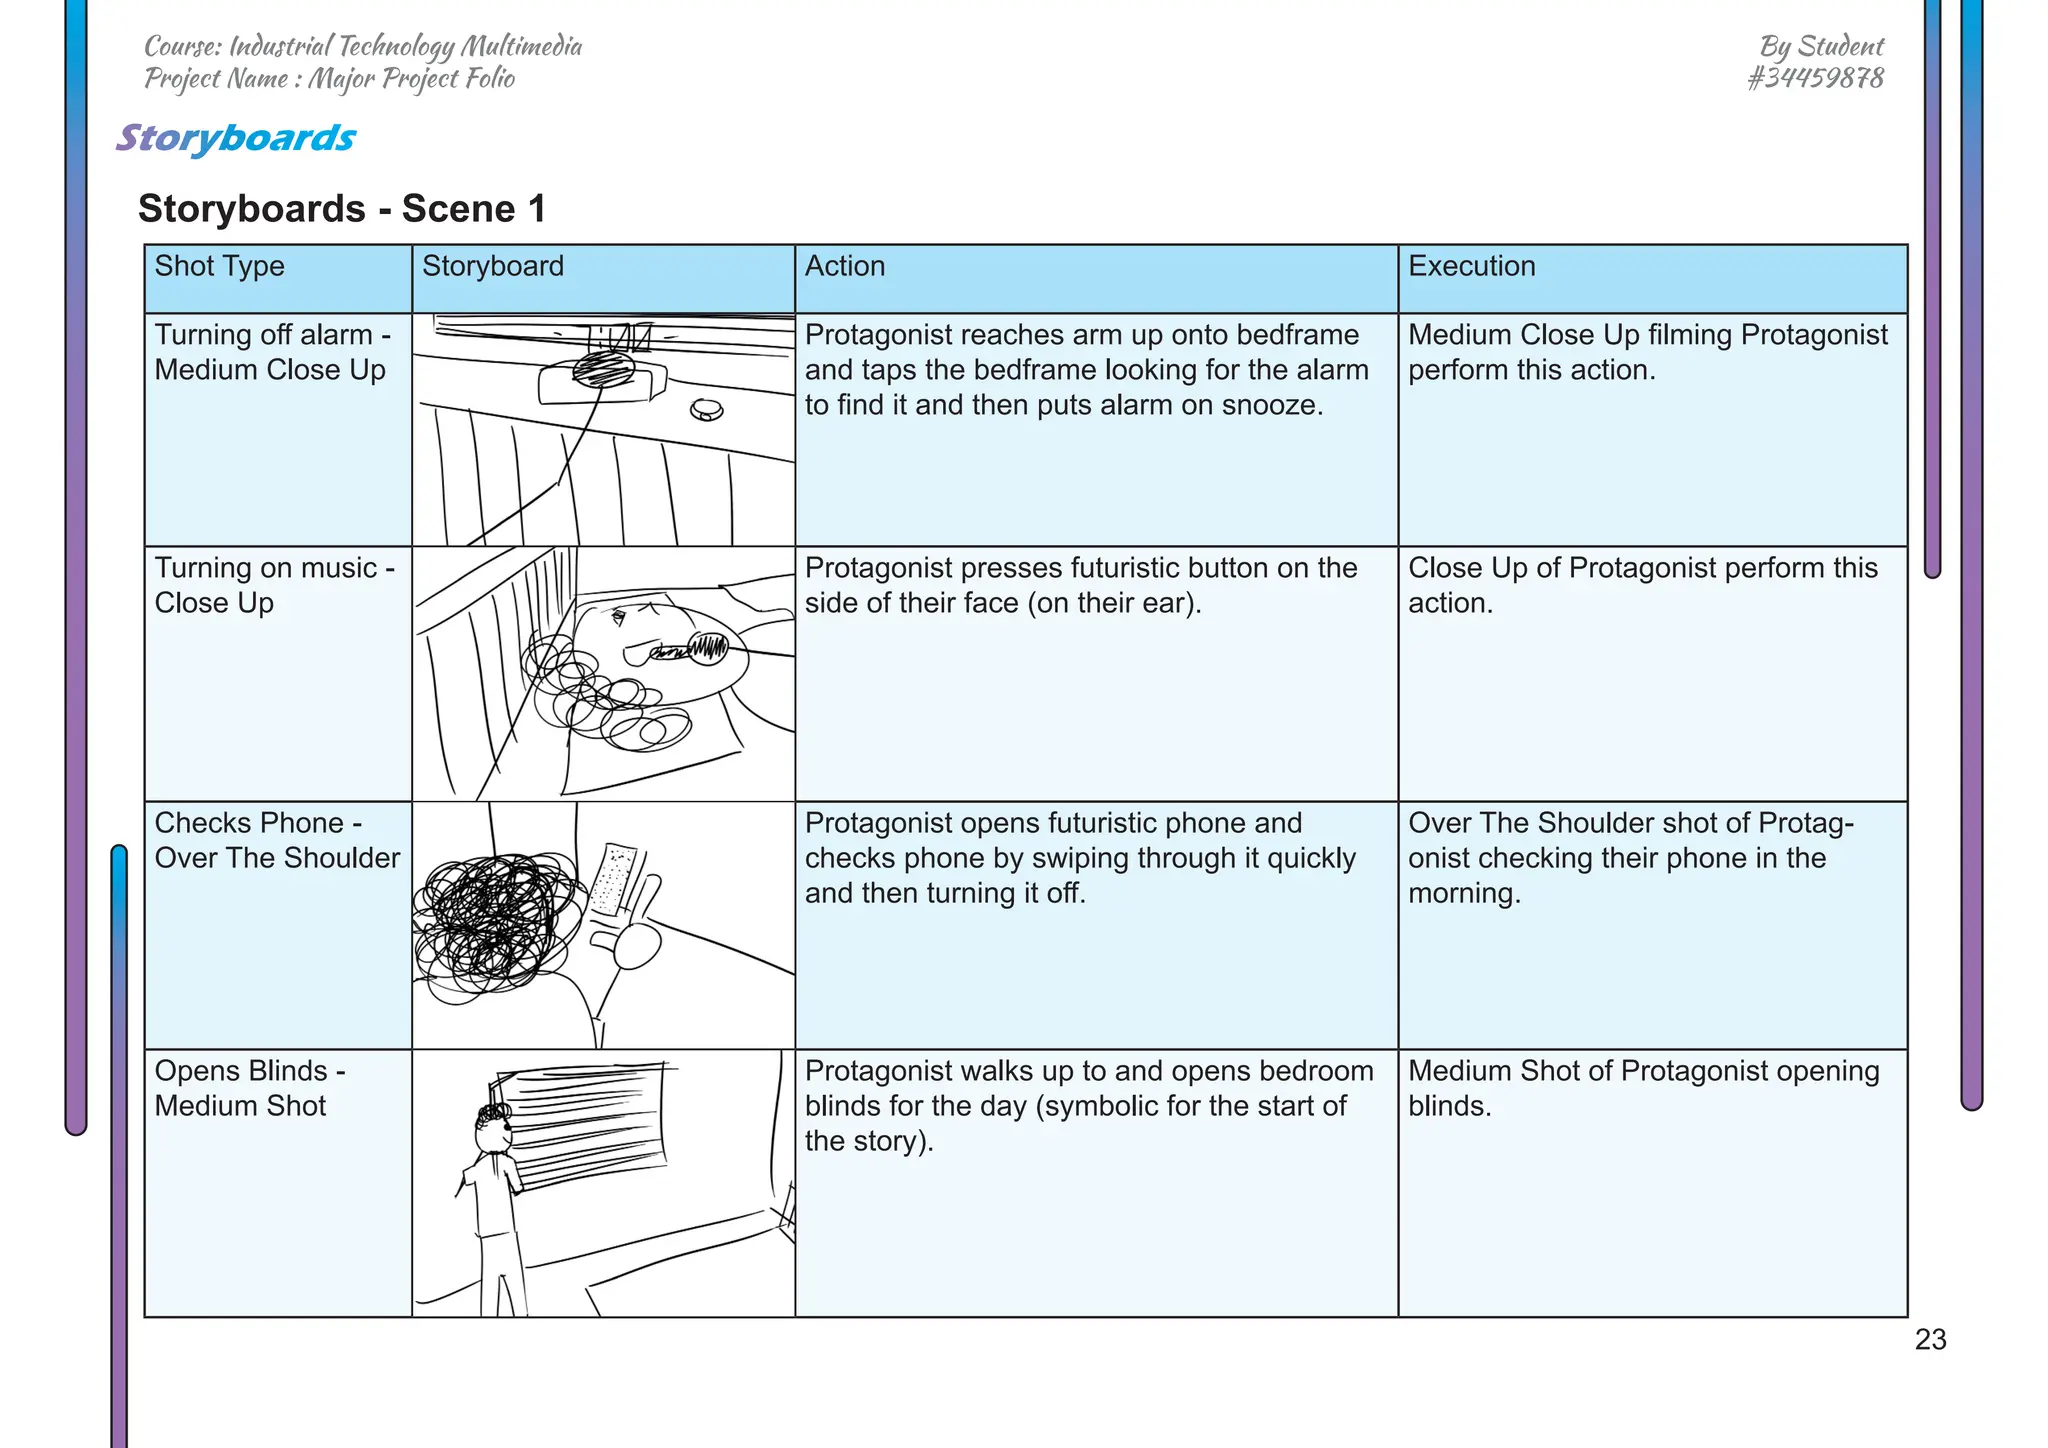
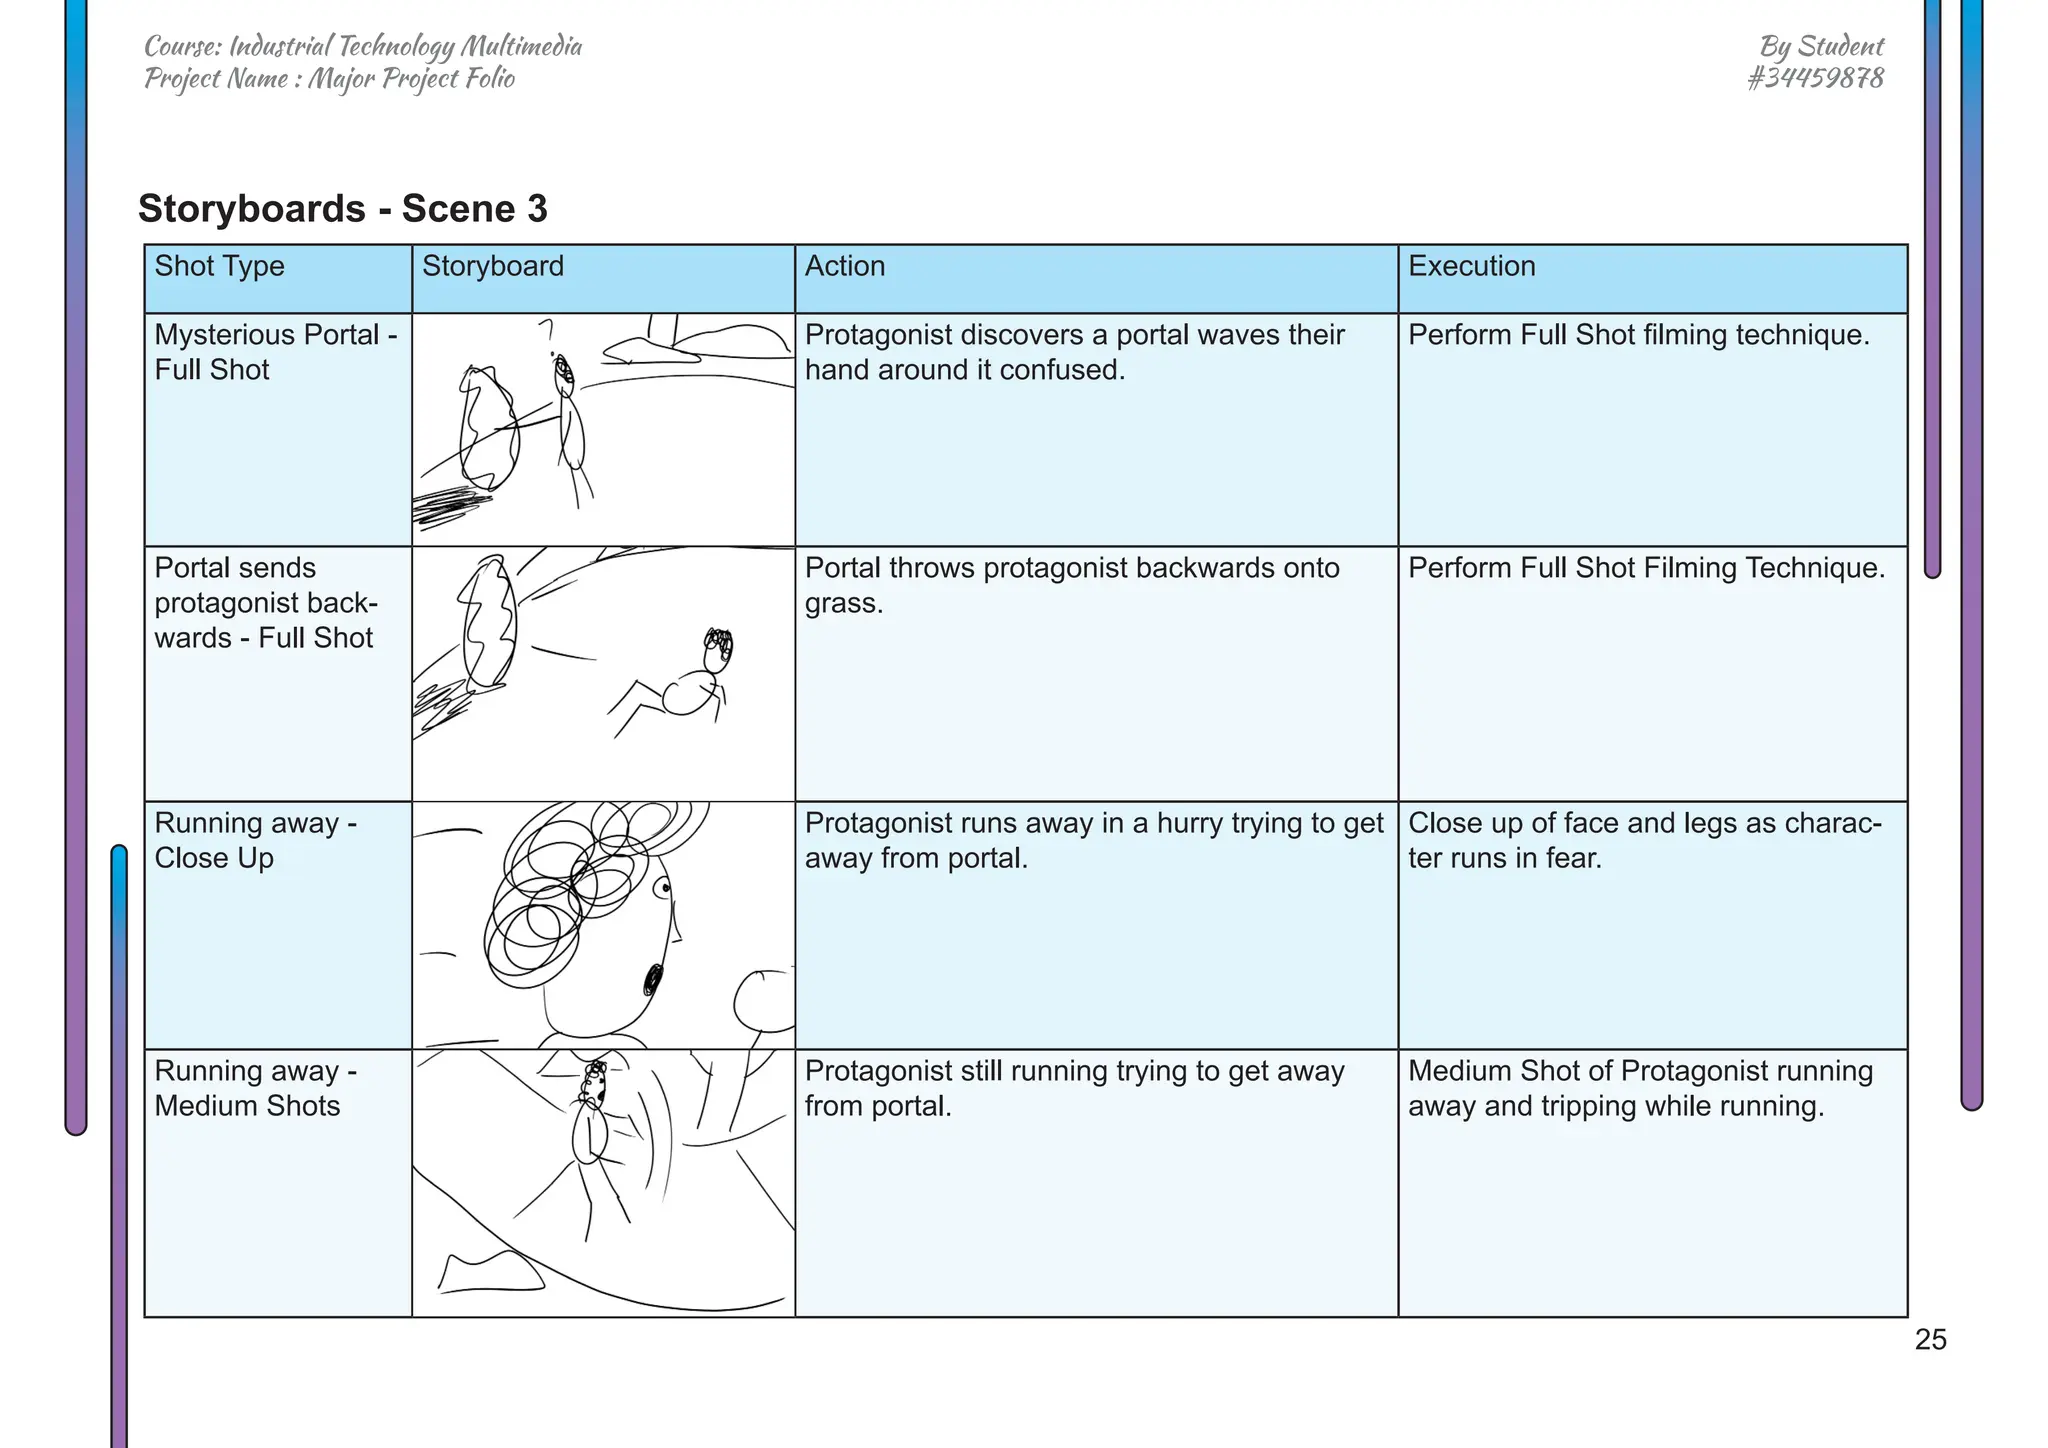
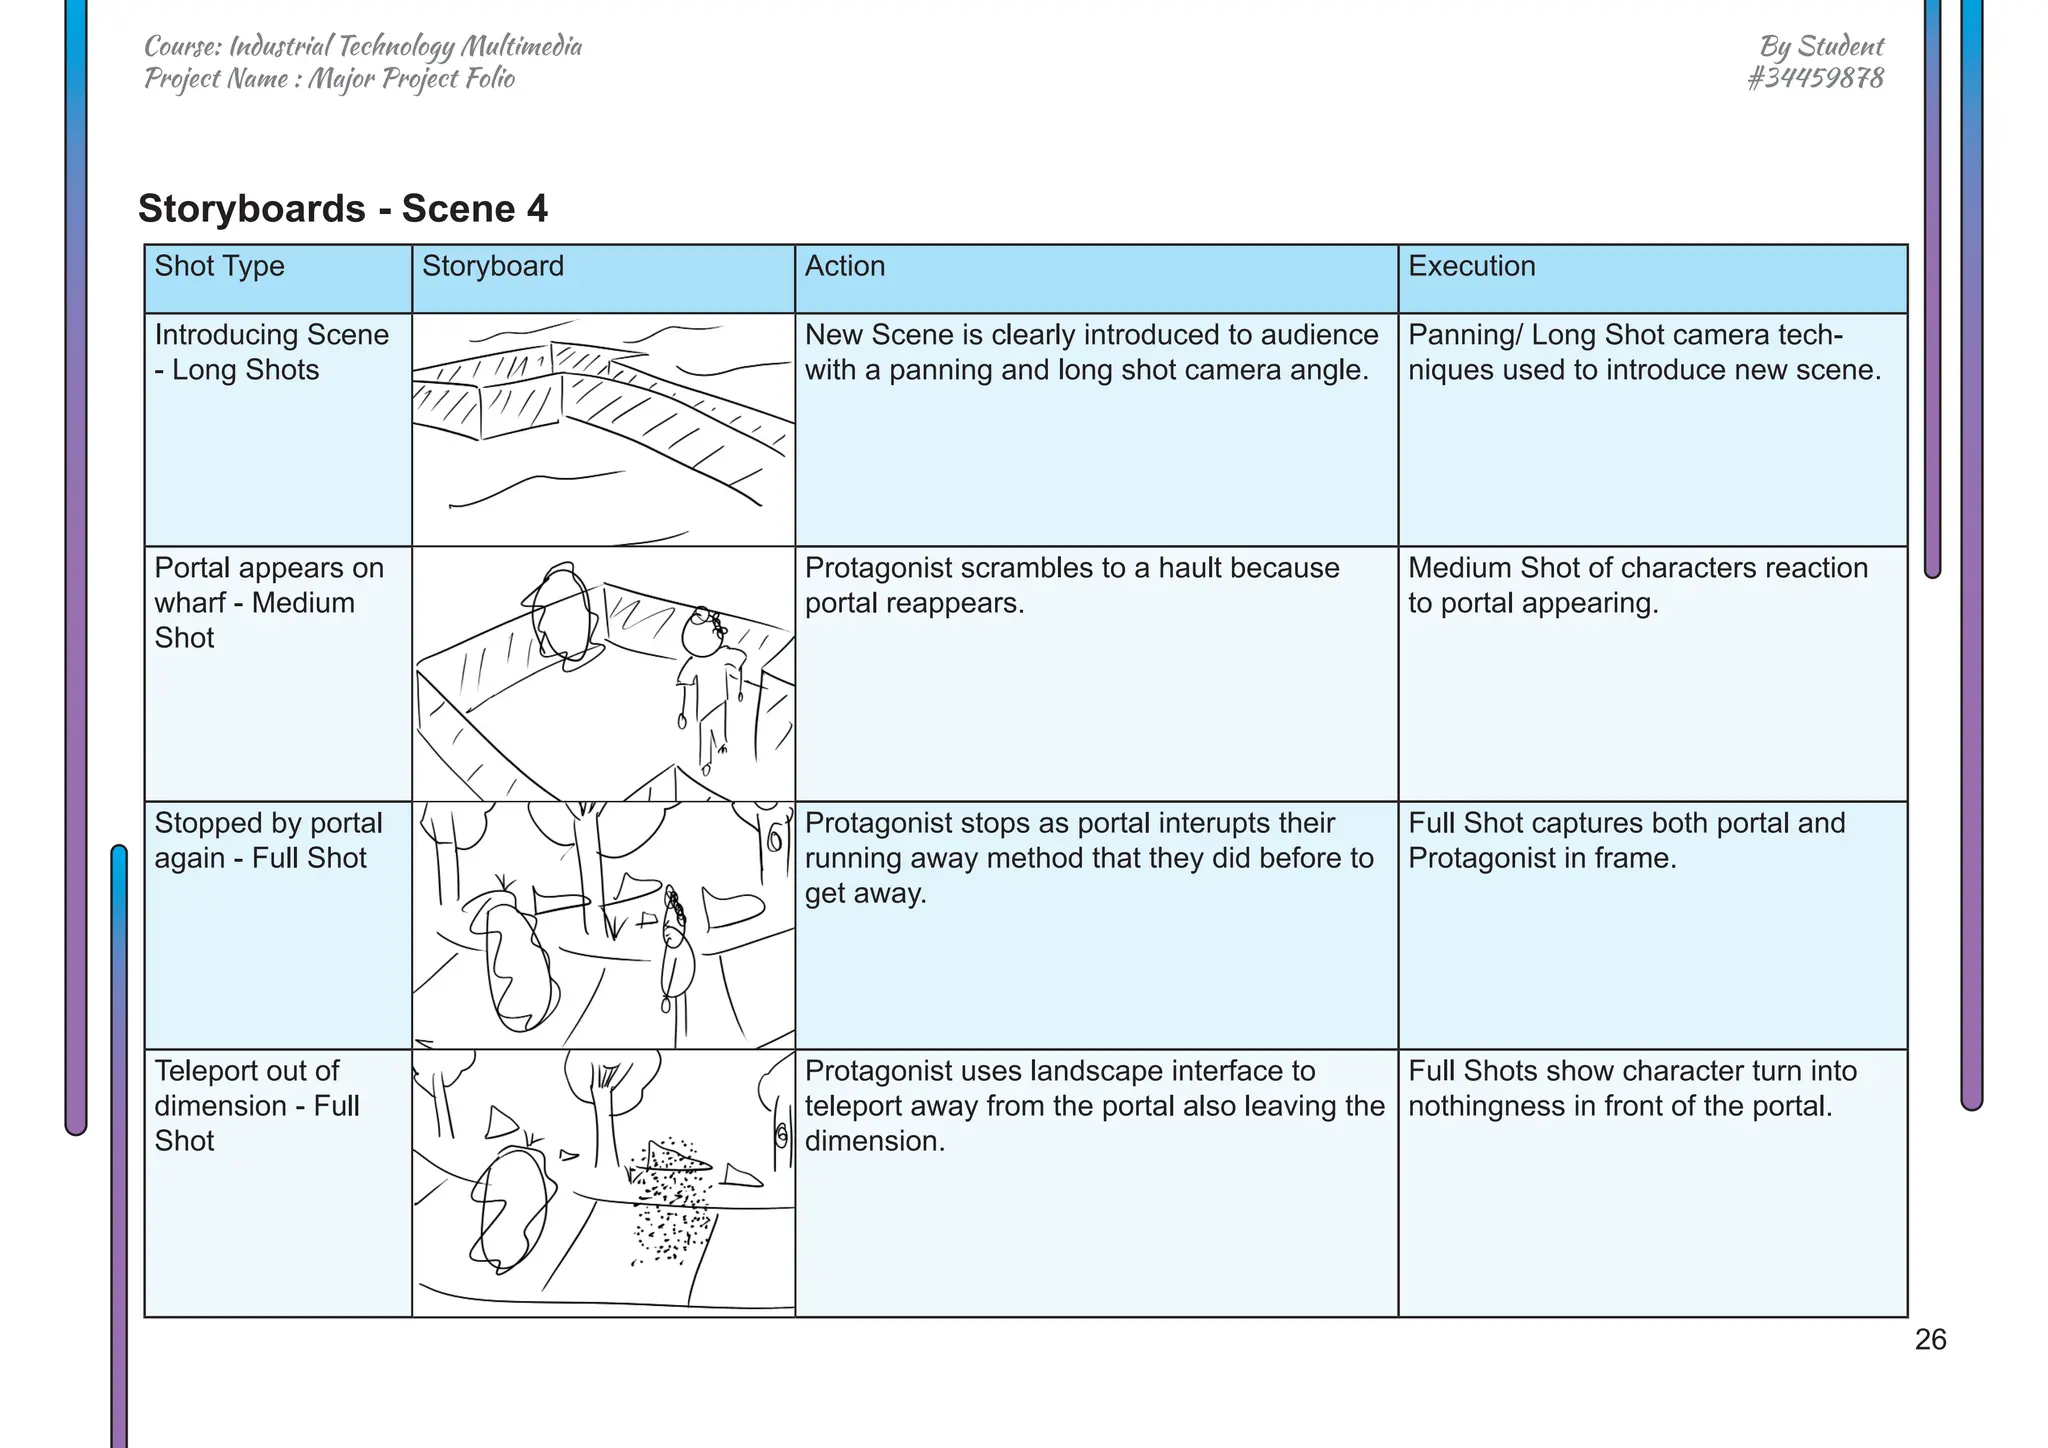
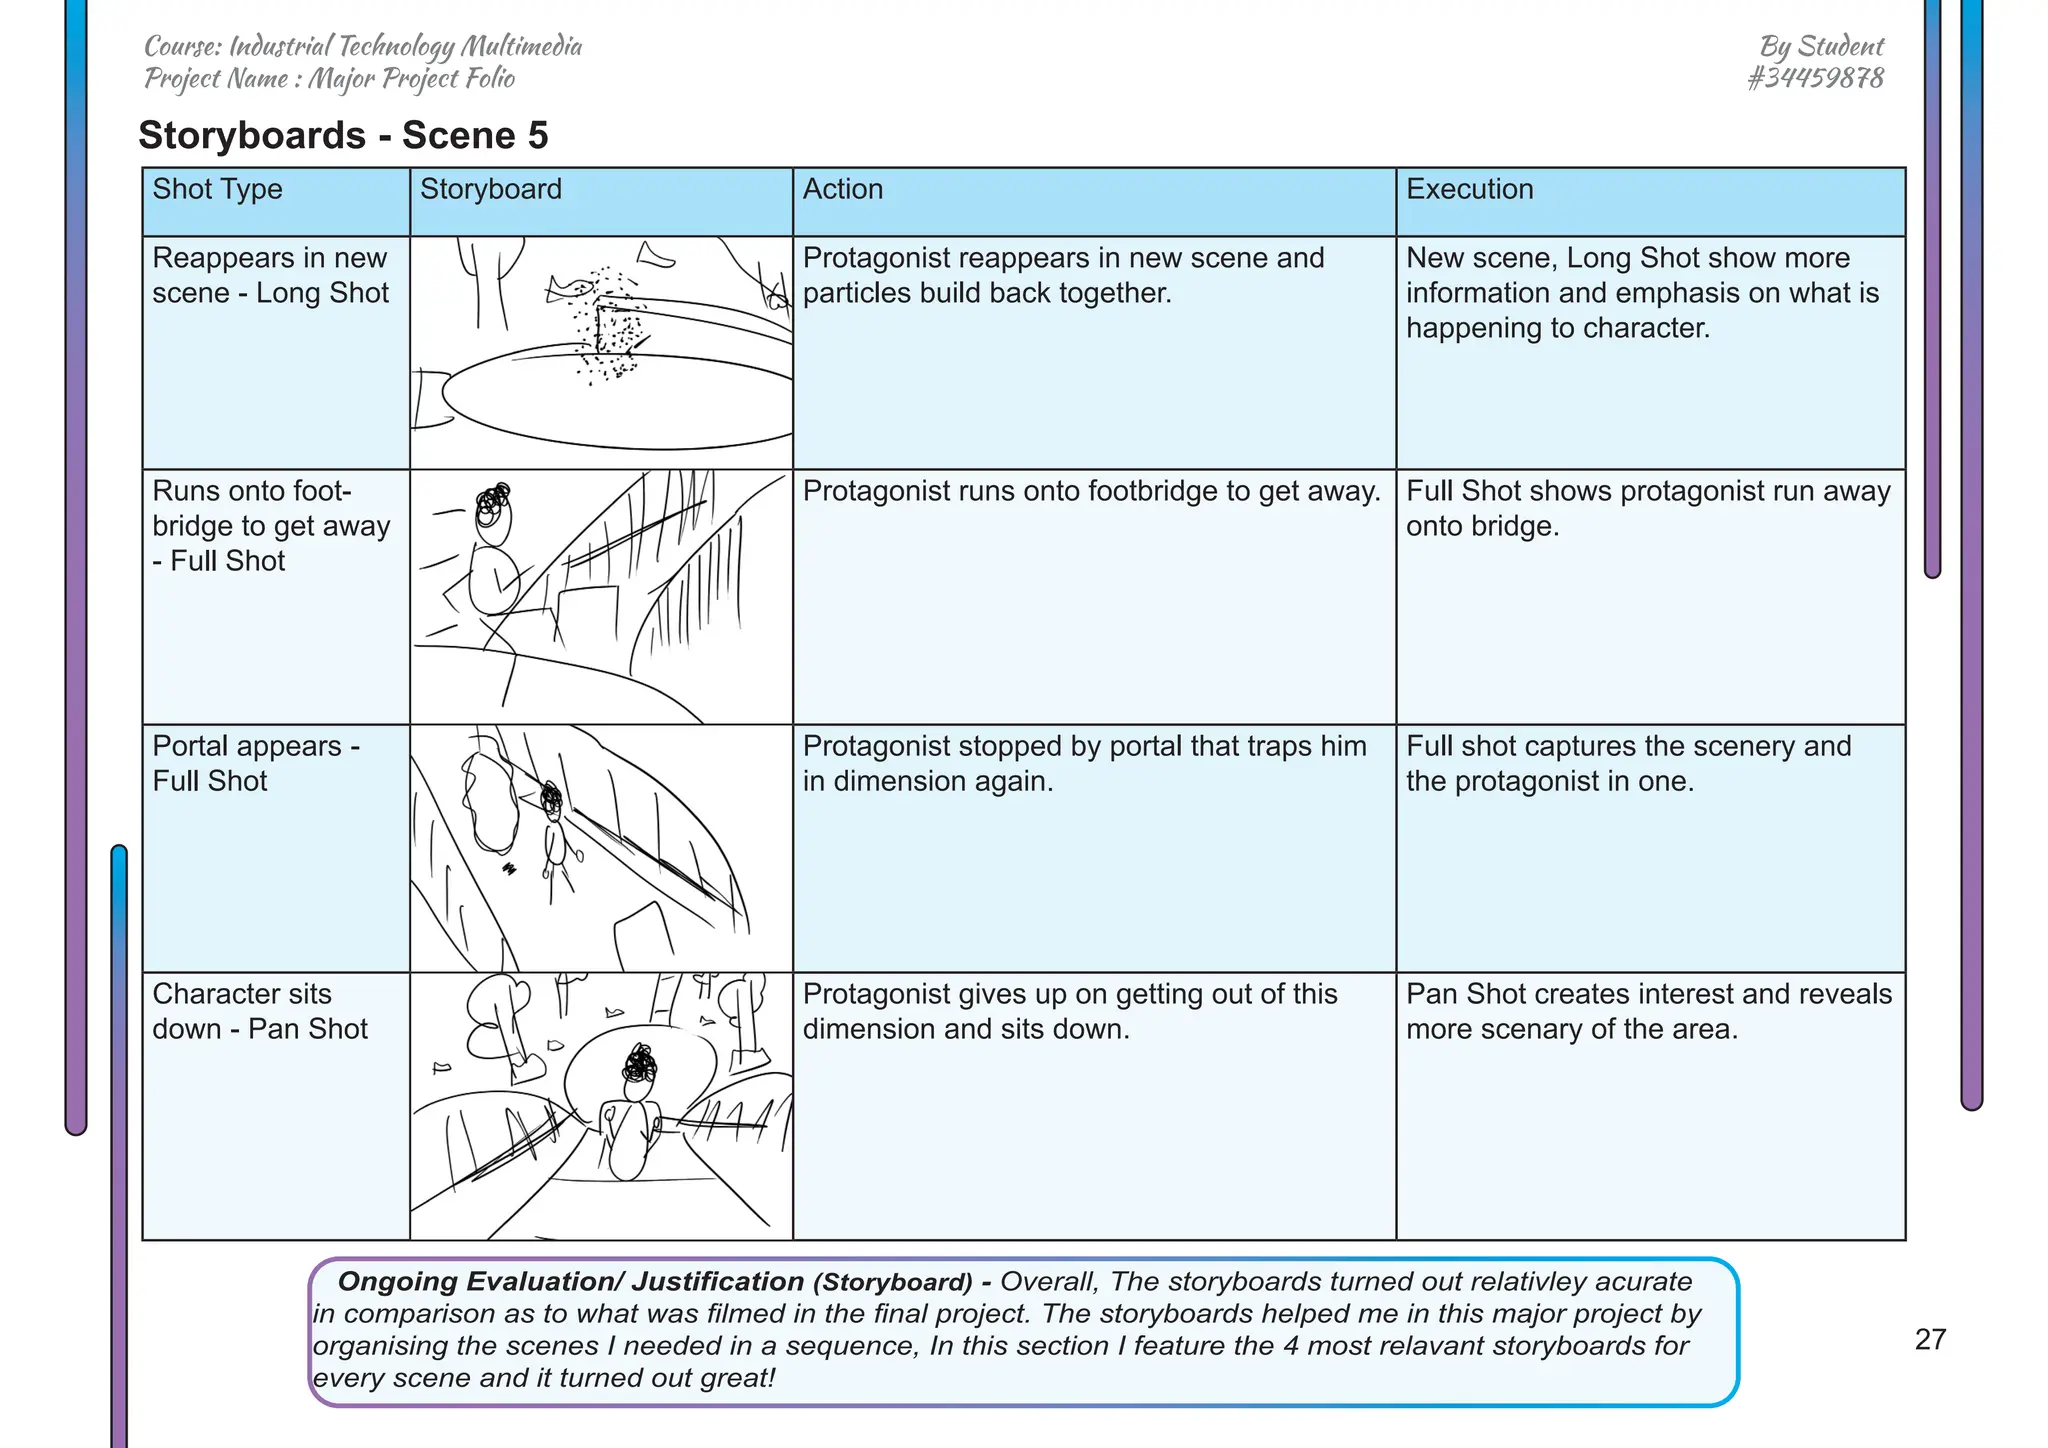
This document outlines a student's major project folio for an Industrial Technology Multimedia course, which will involve creating a short horror/adventure film. It includes research conducted on cameras, memory cards, hardware, software and filming techniques. Production details are provided on storyboarding, prototyping, and time/budget plans for managing the project.
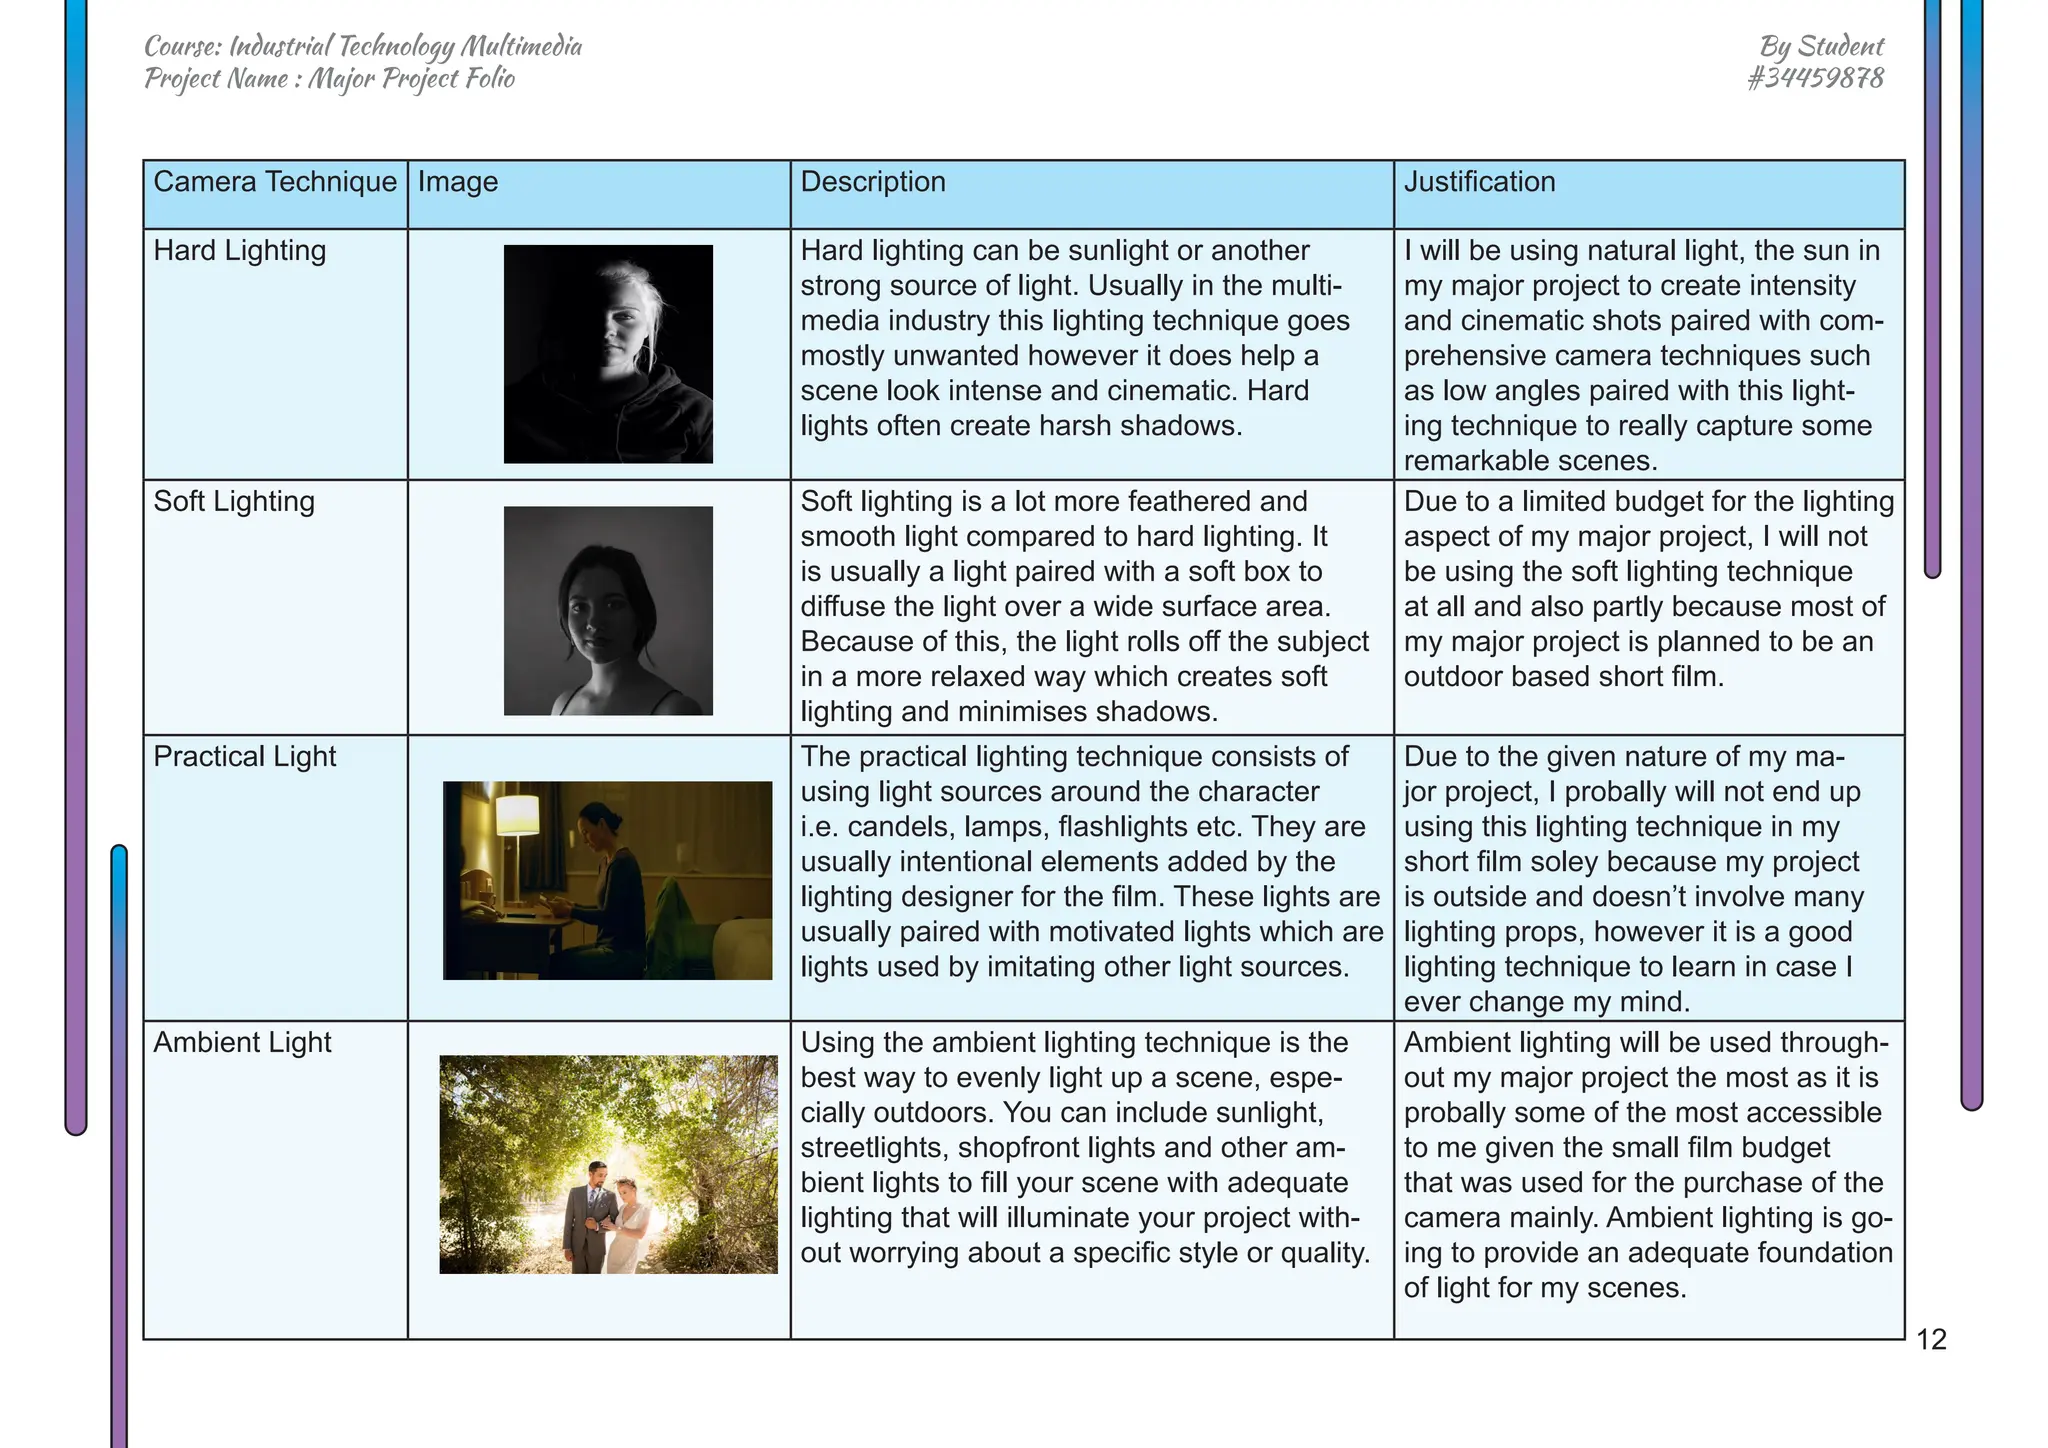


![28
By Student
#34459878
Course: Industrial Technology Multimedia
Project Name : Major Project Folio
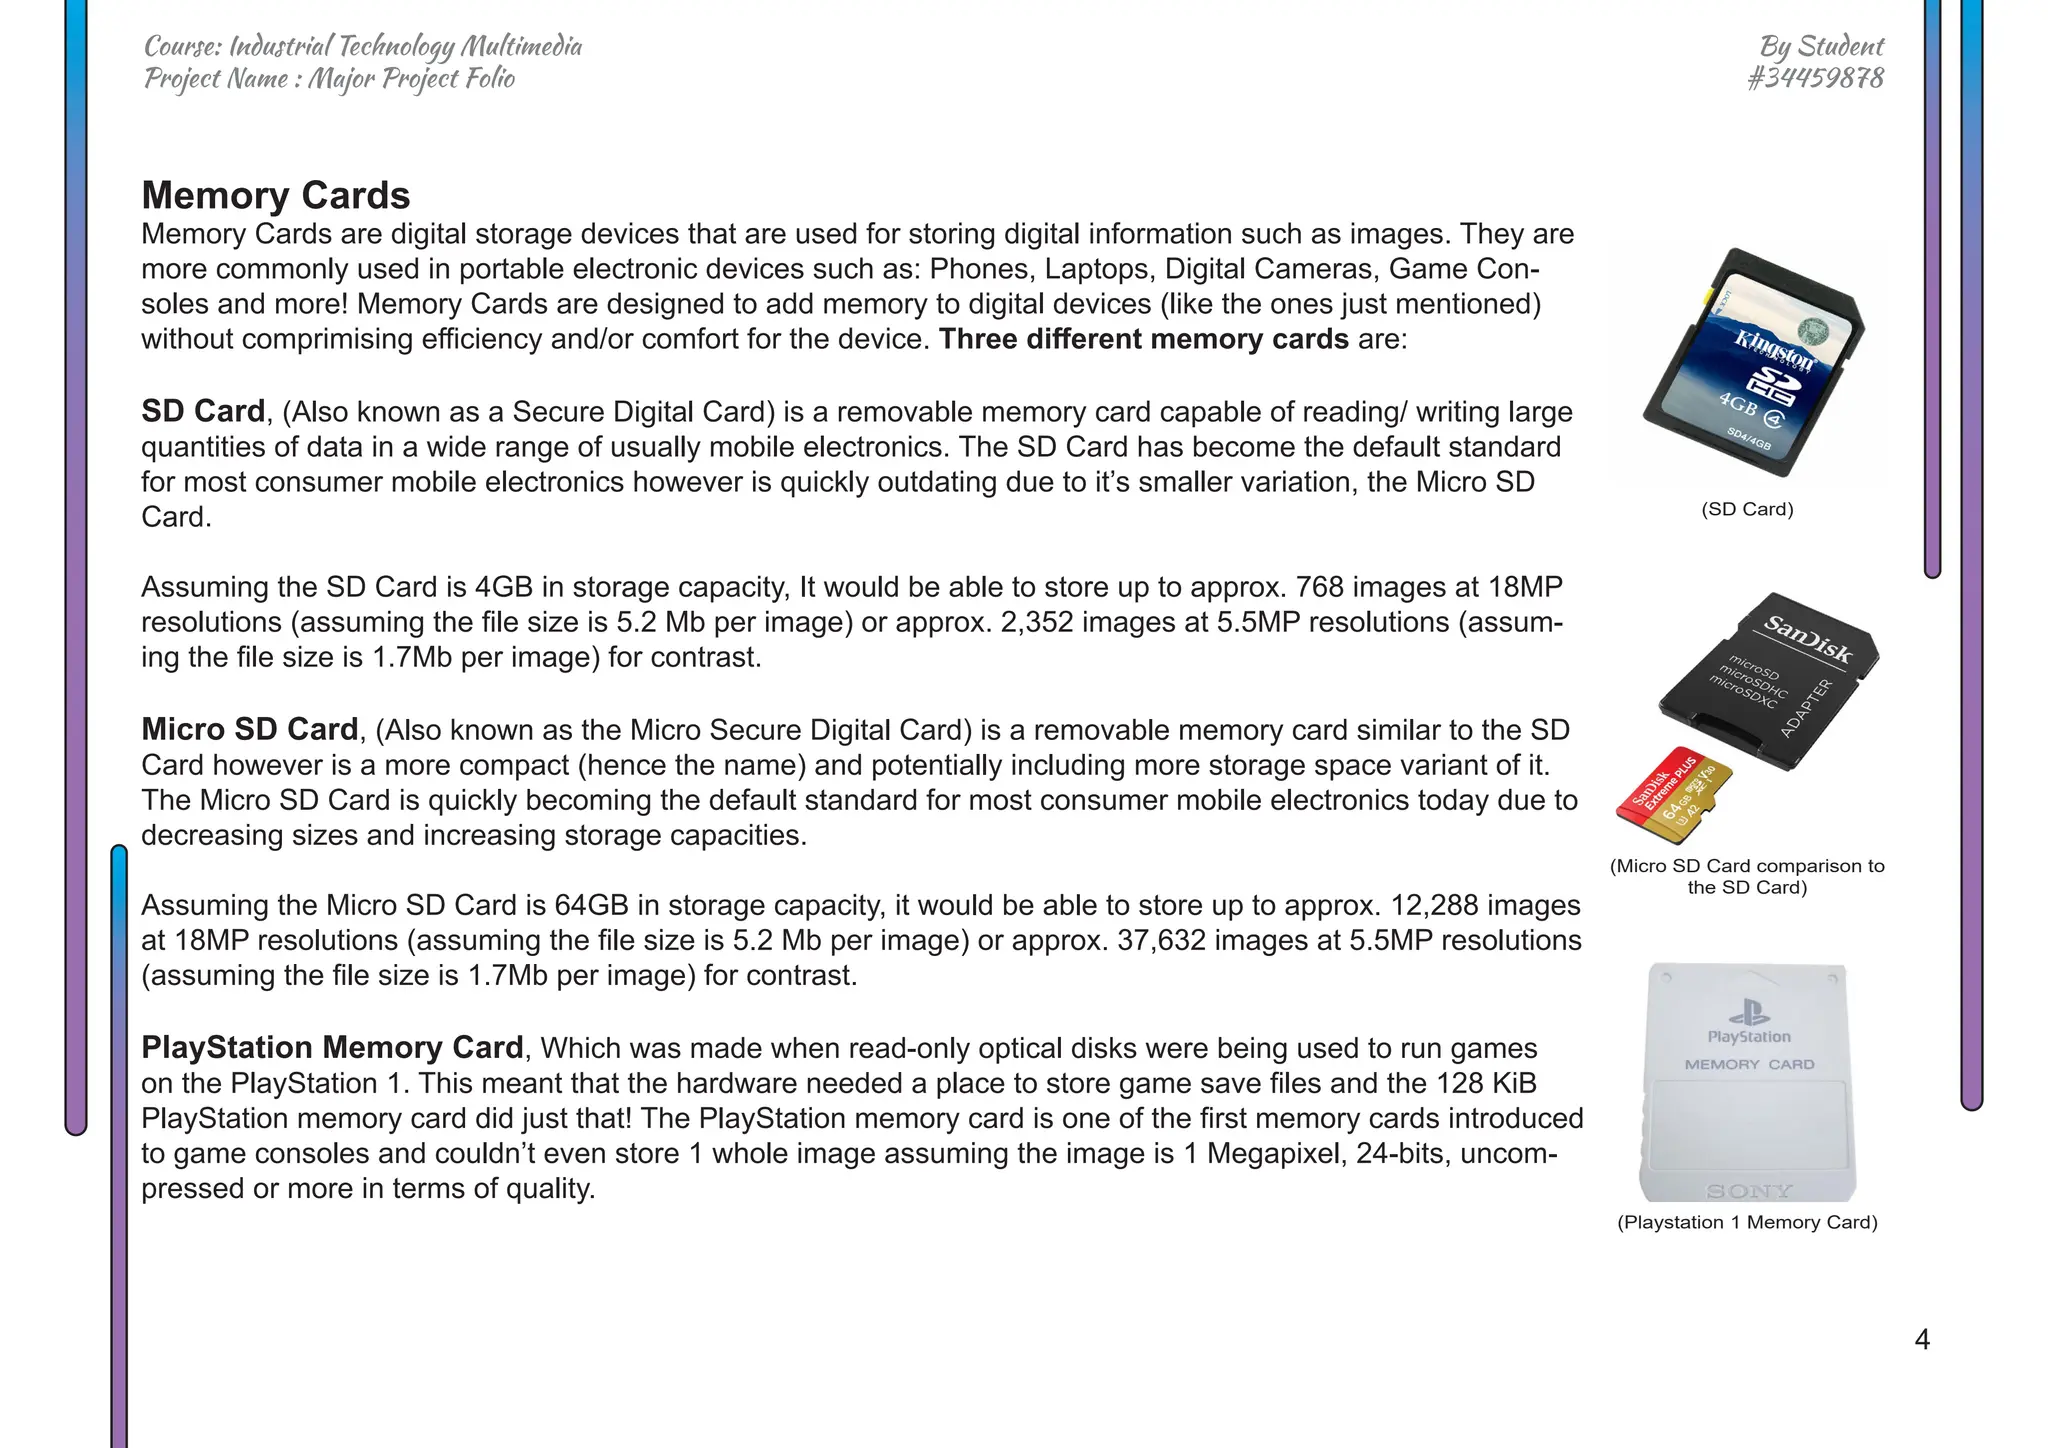
Portal
For the Portal effect, since my goal was to make
this the most obvious and commonly used special
effect in the production, I put a lot of time into it
and making sure It looked seemless and perfect.
This special effect was also one of the most de-
manding of the project featuring well over 30 ef-
fects all together to make it!
When thinking about the creation of the Portal be-
fore even touching After Effects I knew I could cre-
ate a spherical like portal shape with [CC Sphere]
and [Warp] and so I used that as a foundational
thought when thinking about how I was going to
create my portal inside After Effects!
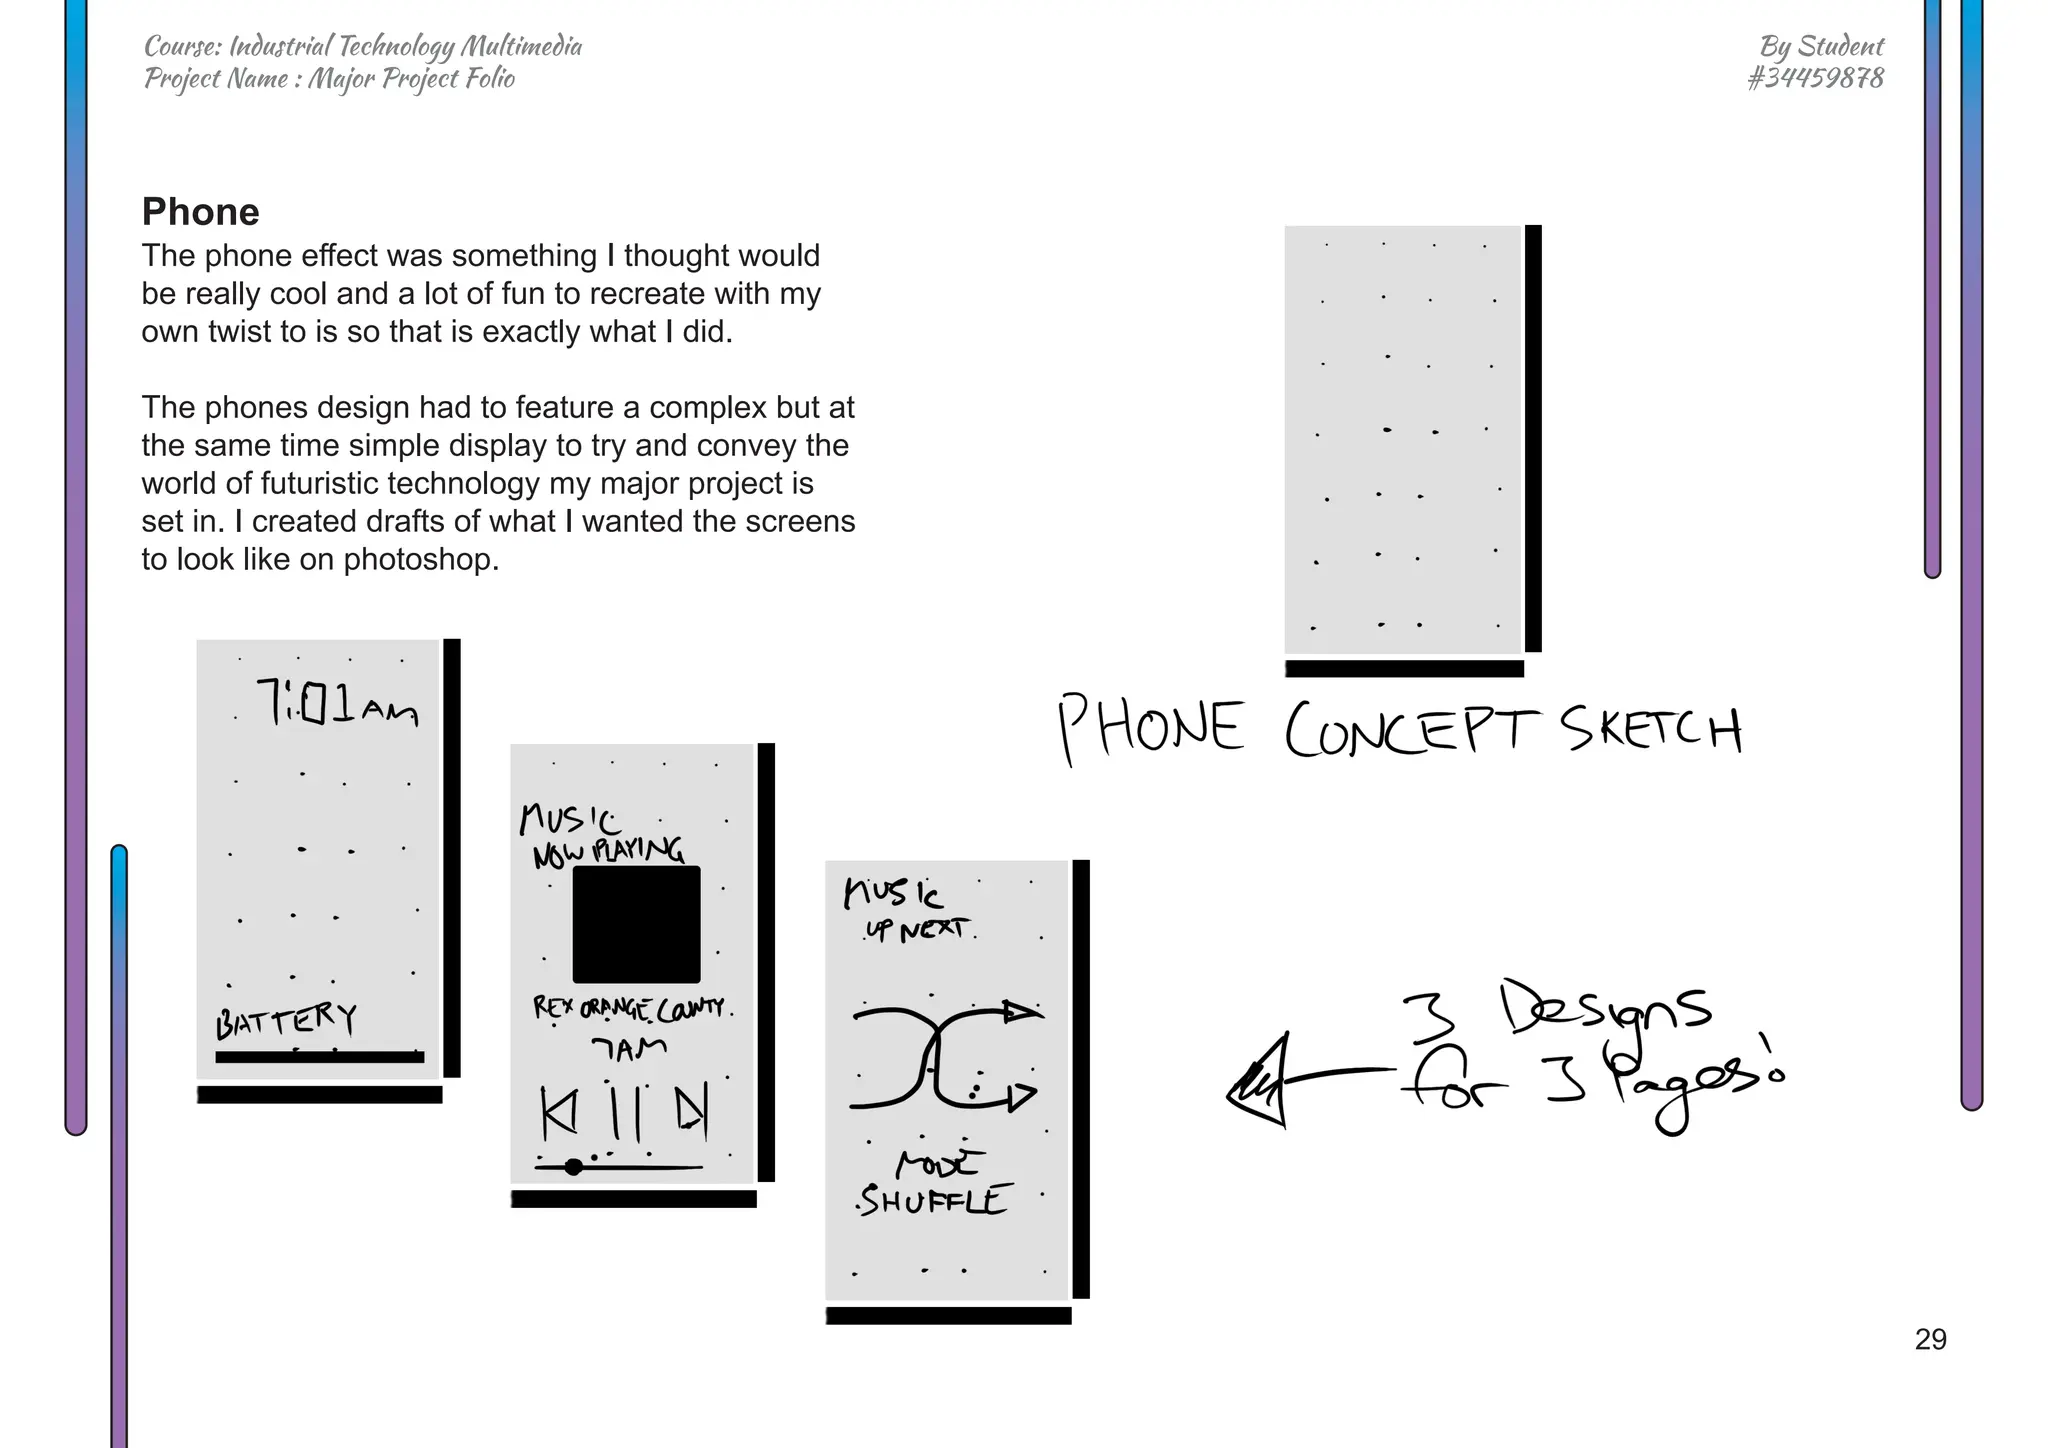
Prototypes, Models & Concepts](https://image.slidesharecdn.com/majorprojectfinal-231115033714-566fb41c/75/MAJOR_PROJECT_FINAL-pdf-29-2048.jpg)


![32
By Student
#34459878
Course: Industrial Technology Multimedia
Project Name : Major Project Folio
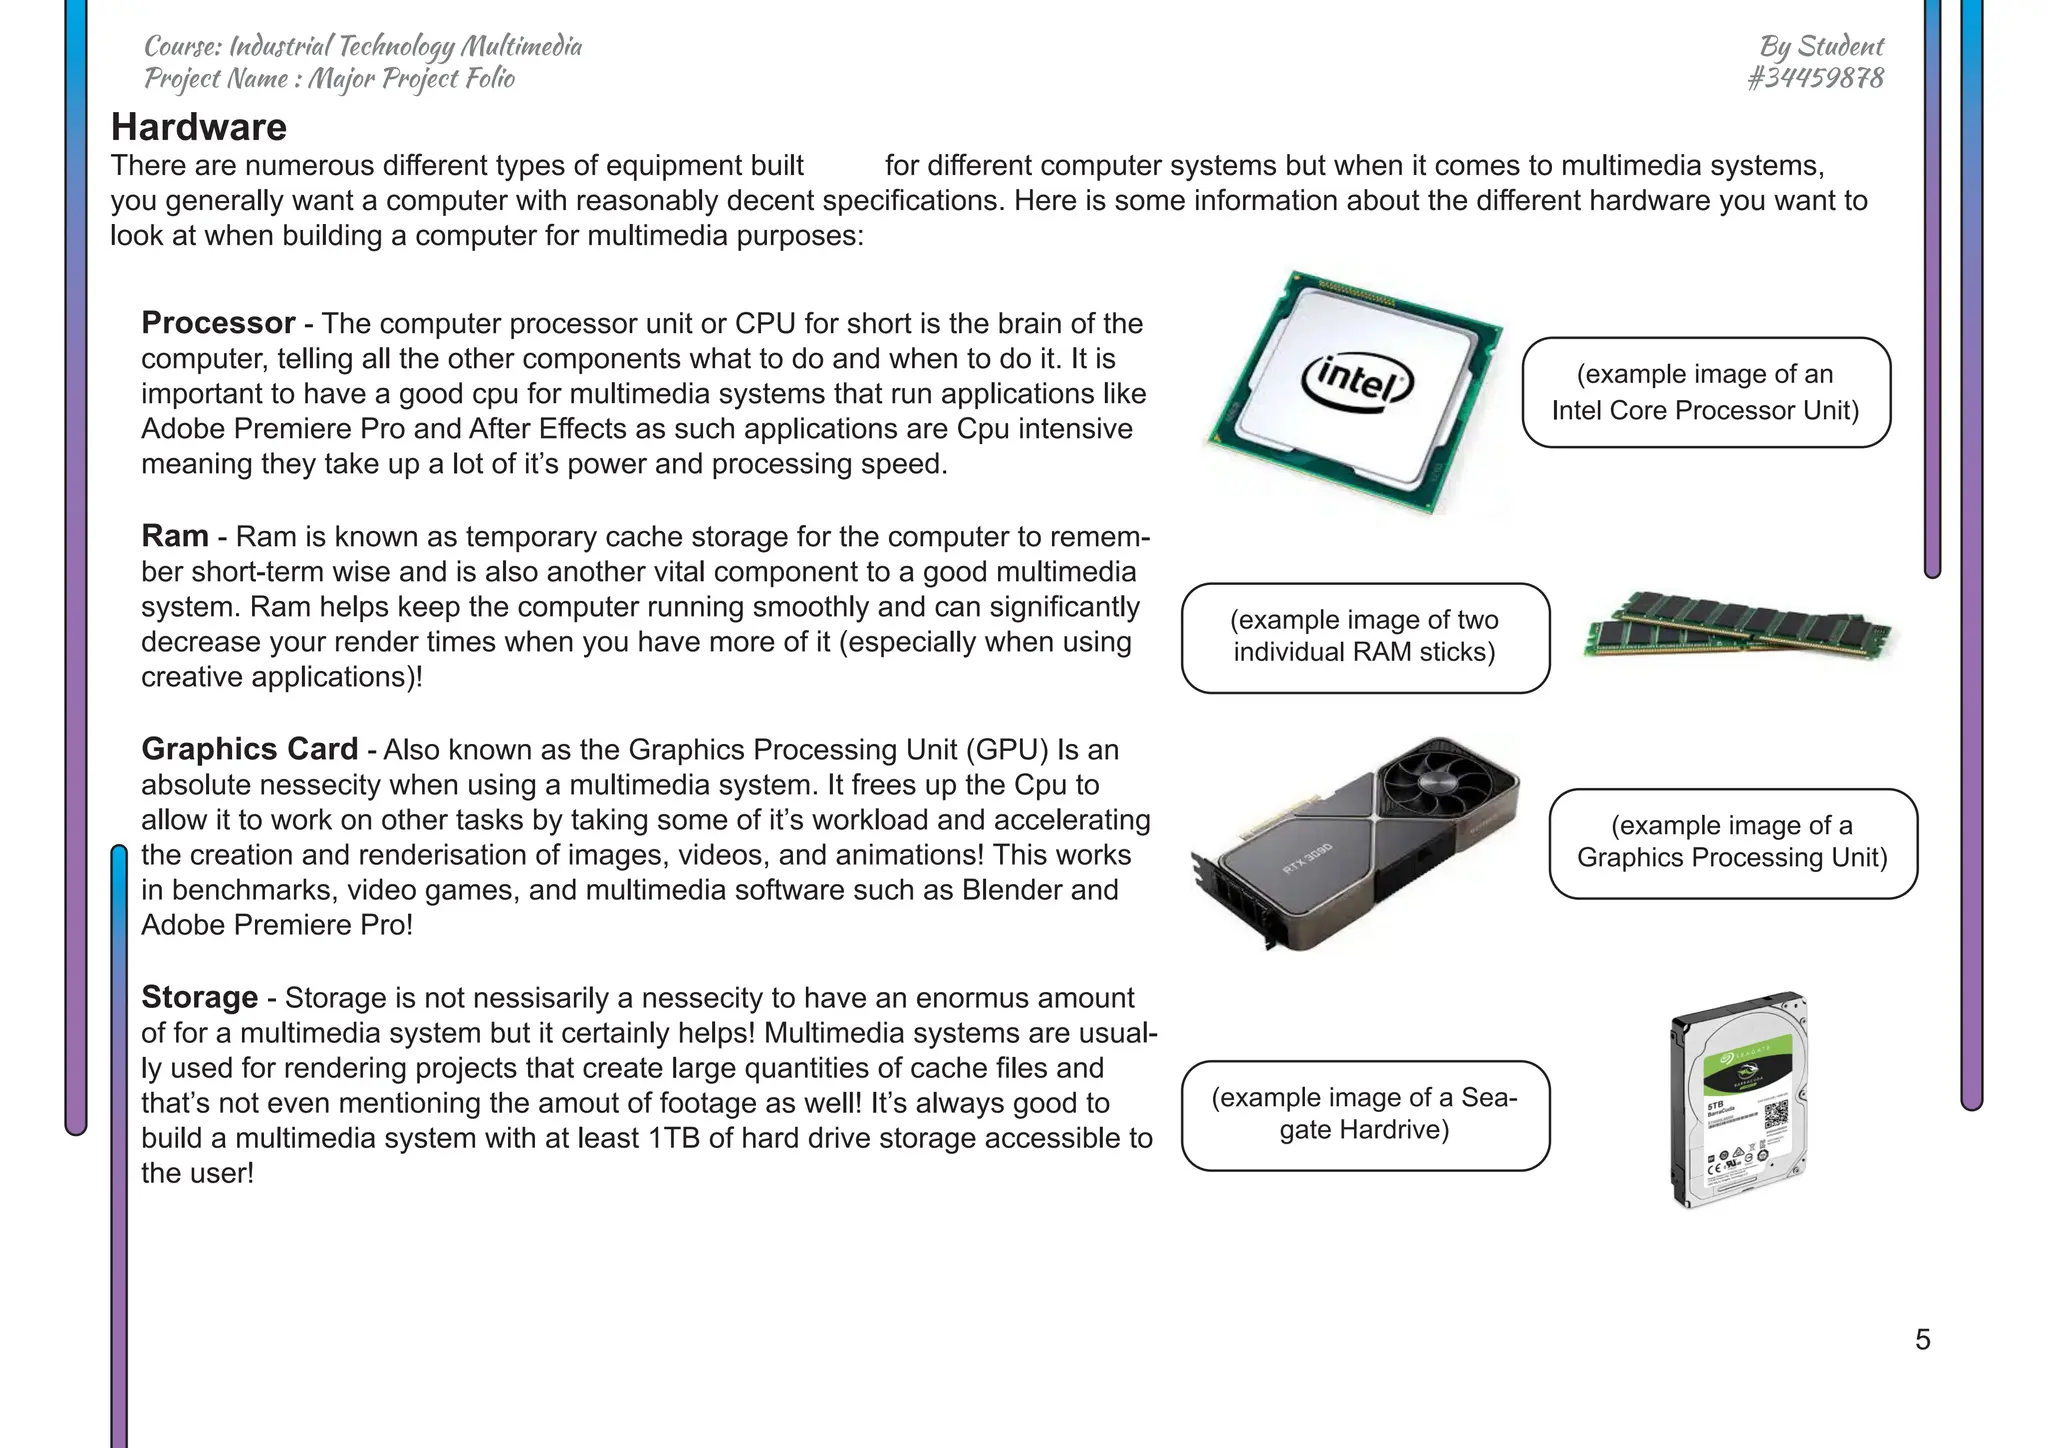
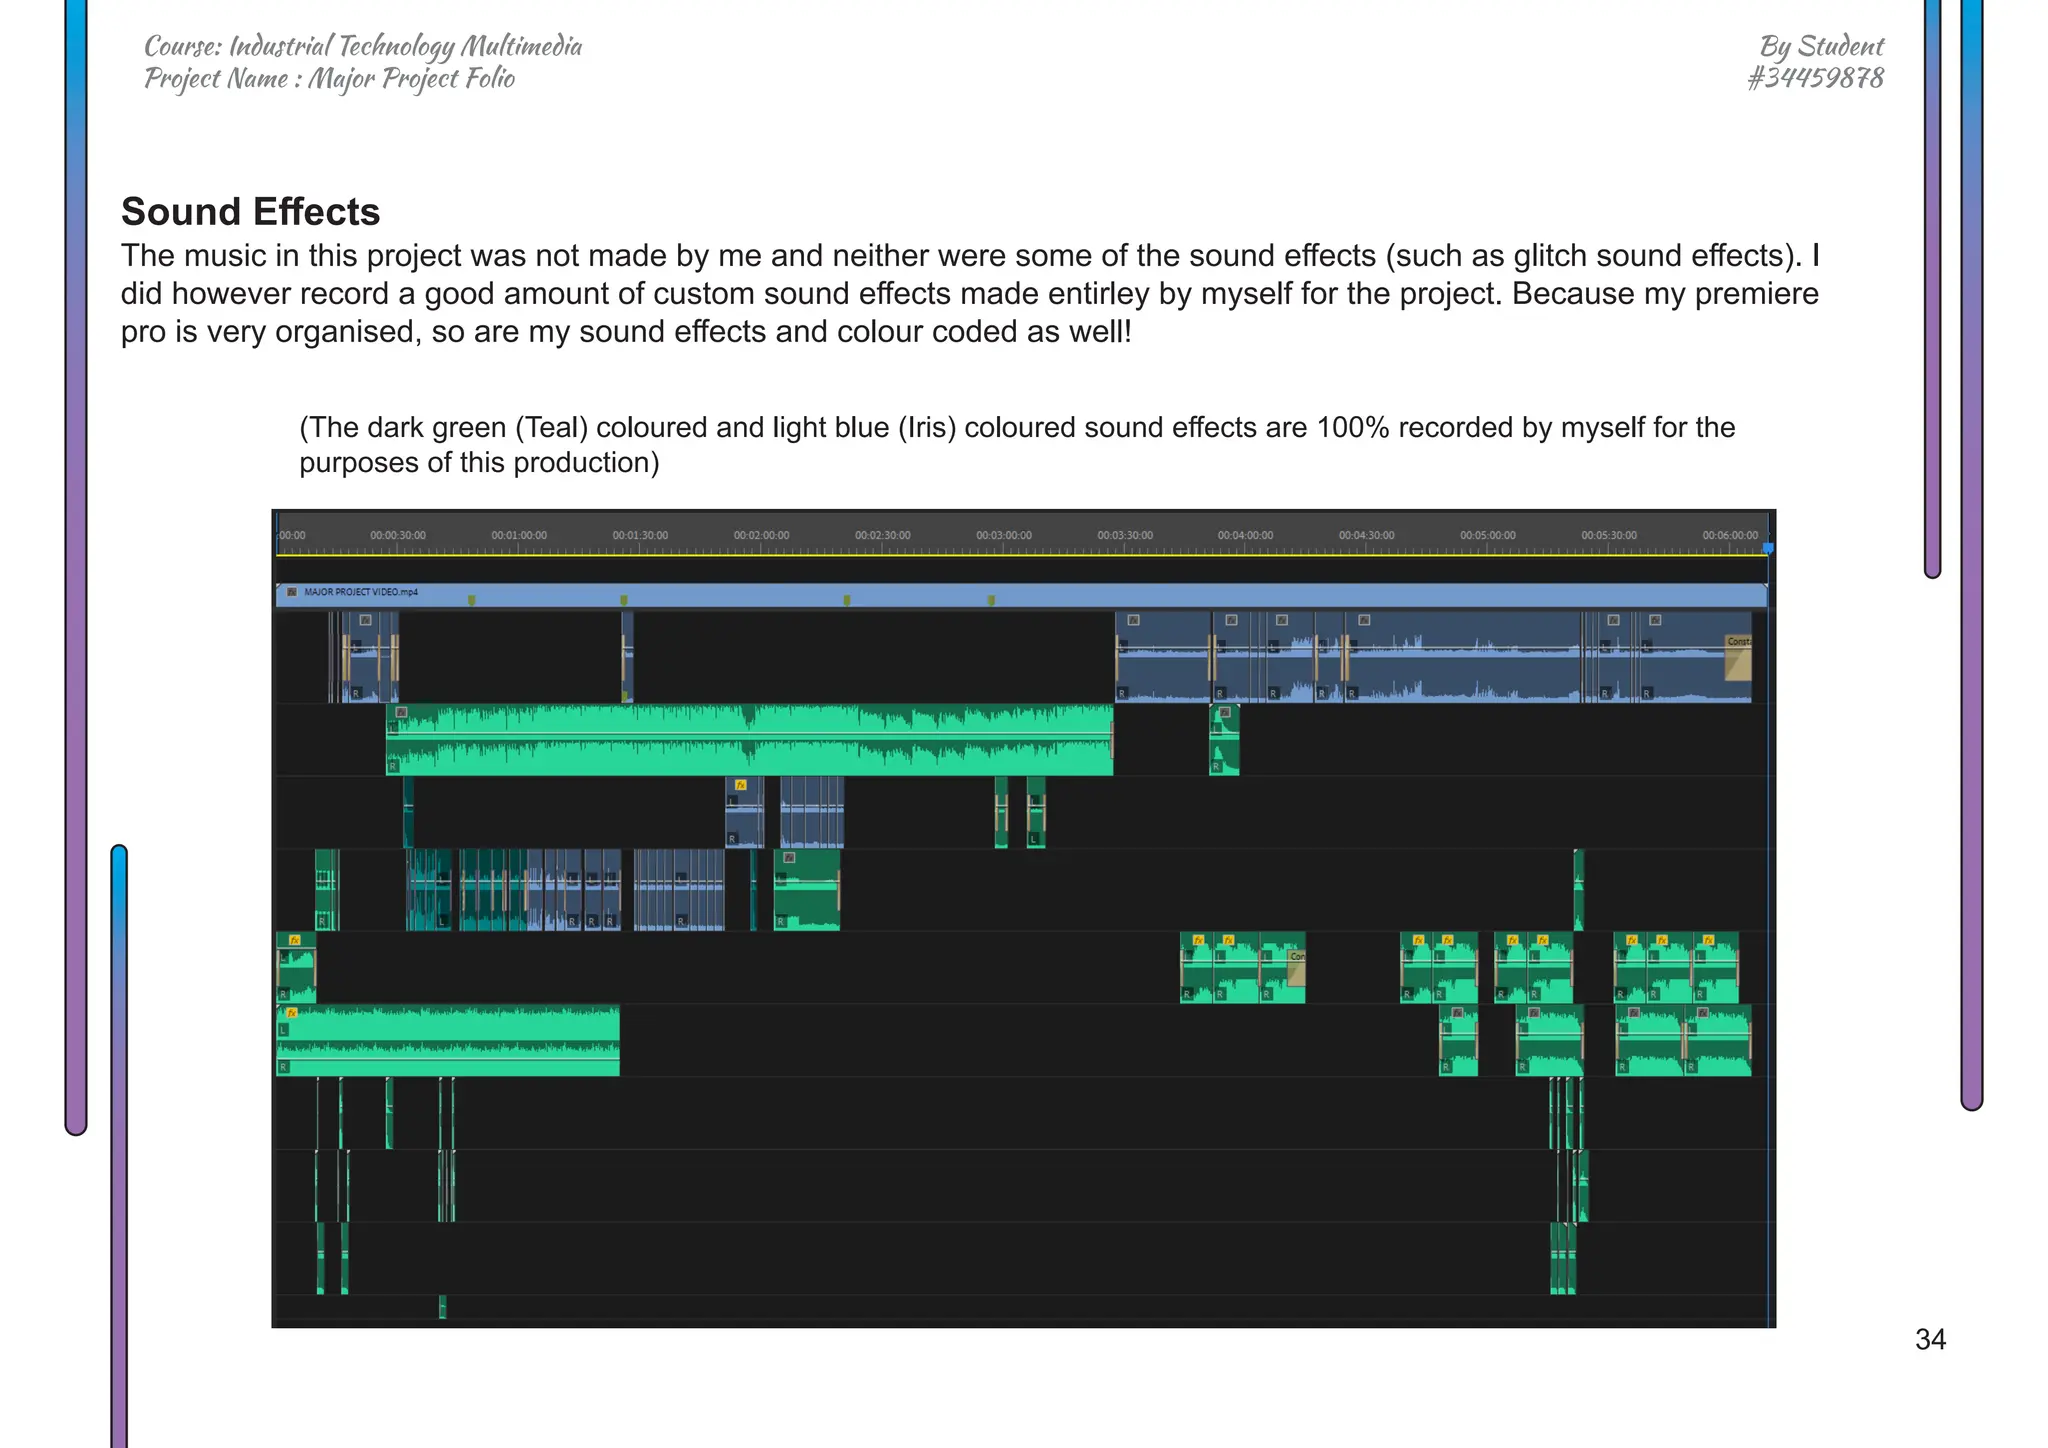
Evidence Of Production
Sequencing & Additional Premiere Pro Effects
The clips were sequenced in Premiere Pro and this is because of Premiere Pro’s rendering saving capability which al-
lows me to play the project back smoothly after rendering which is suprisingly handy. Sequencing the clips together was
a breeze, getting all the footage together and then cutting it down and trimming the clips etc. After cutting the clips down
I added a [Warp Stabilise] effect to any clip that appeared like it could use a bit more stability and doing this allowed
even my recorded videos with the camera stabiliser look butter smooth. Additional effects I added while I was at it in the
sequencing process in Premiere Pro was adding two adjustment layers, applying crop to make the project have a more
movie feel for one of them, and the other a colour correction using Premiere Pros built in Lumetri Colour.
(Organised and structured timeline with renamed layers according to effect layer)](https://image.slidesharecdn.com/majorprojectfinal-231115033714-566fb41c/75/MAJOR_PROJECT_FINAL-pdf-33-2048.jpg)
![33
By Student
#34459878
Course: Industrial Technology Multimedia
Project Name : Major Project Folio
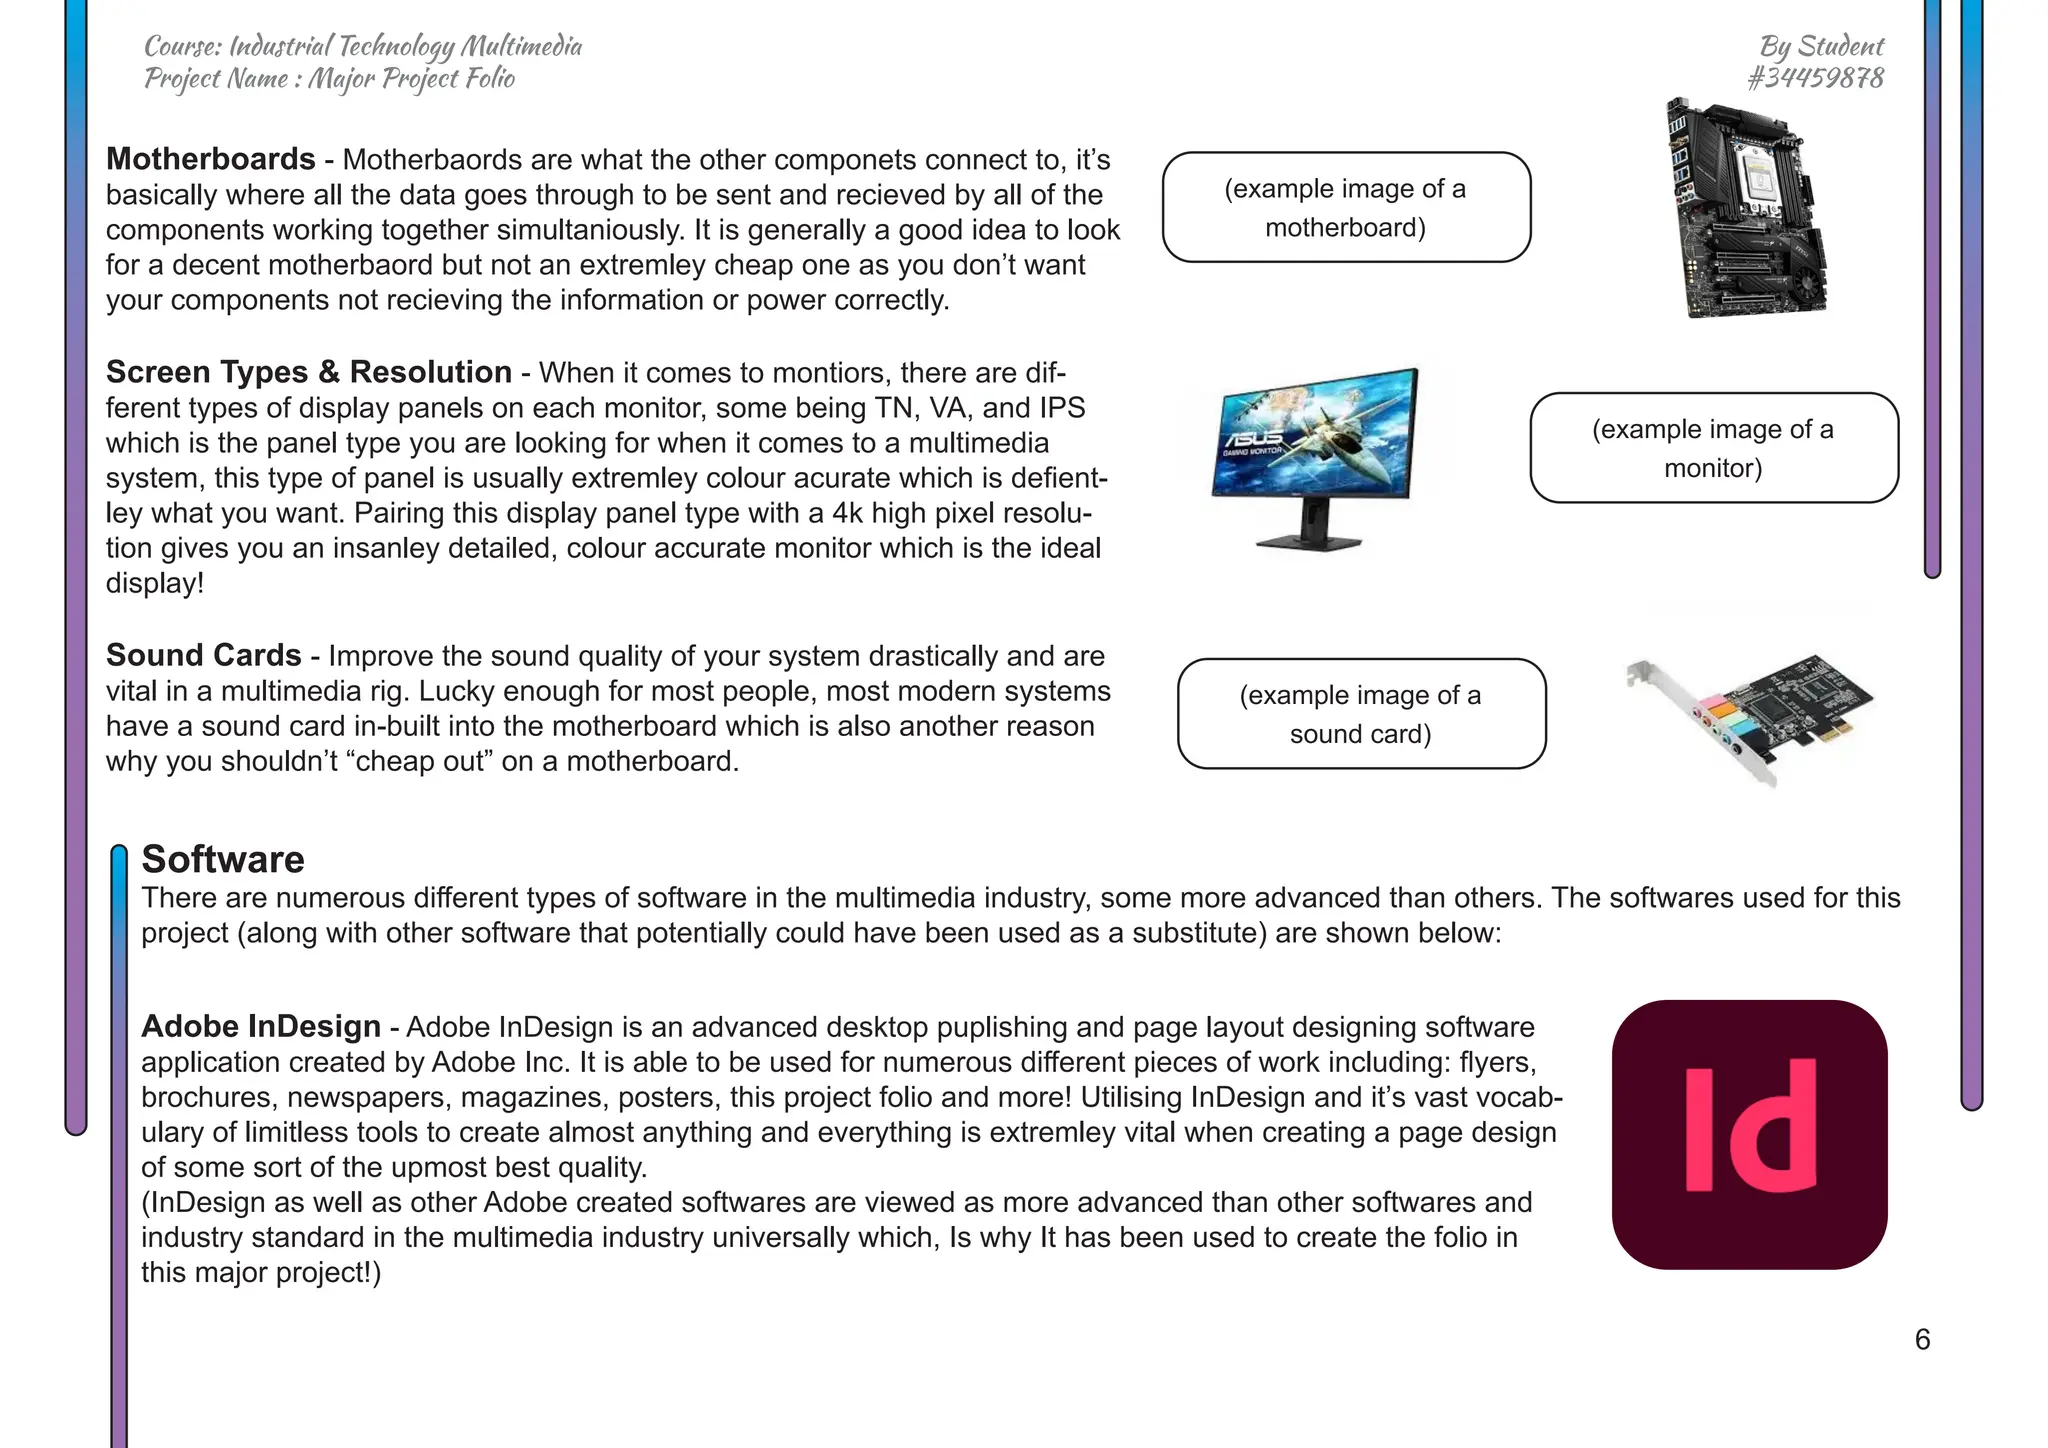
Intro Creation
The Intro of the major project was made with an Adobe Dynamic Link After Effects file, I added a [Camera Lens Blur] with
a blur radius of 15 to the background, bebas text, aligned it so it was centered and set the blending mode of the text to
overlay. I also added a [Glow], [VR Glow] and [VR Chromatic Abberations] to the text to make it a bit more interesting. The
fade from black fade in is called a gradient wipe and I opened the graph editor to change the speed values to my prefer-
ence. In after effects we change the speed values so specifically like this because it gives us more control over the final
outcome the project will give us.
(Feel free to observe the effects added to the text layers in the Image below)](https://image.slidesharecdn.com/majorprojectfinal-231115033714-566fb41c/75/MAJOR_PROJECT_FINAL-pdf-34-2048.jpg)
![35
By Student
#34459878
Course: Industrial Technology Multimedia
Project Name : Major Project Folio
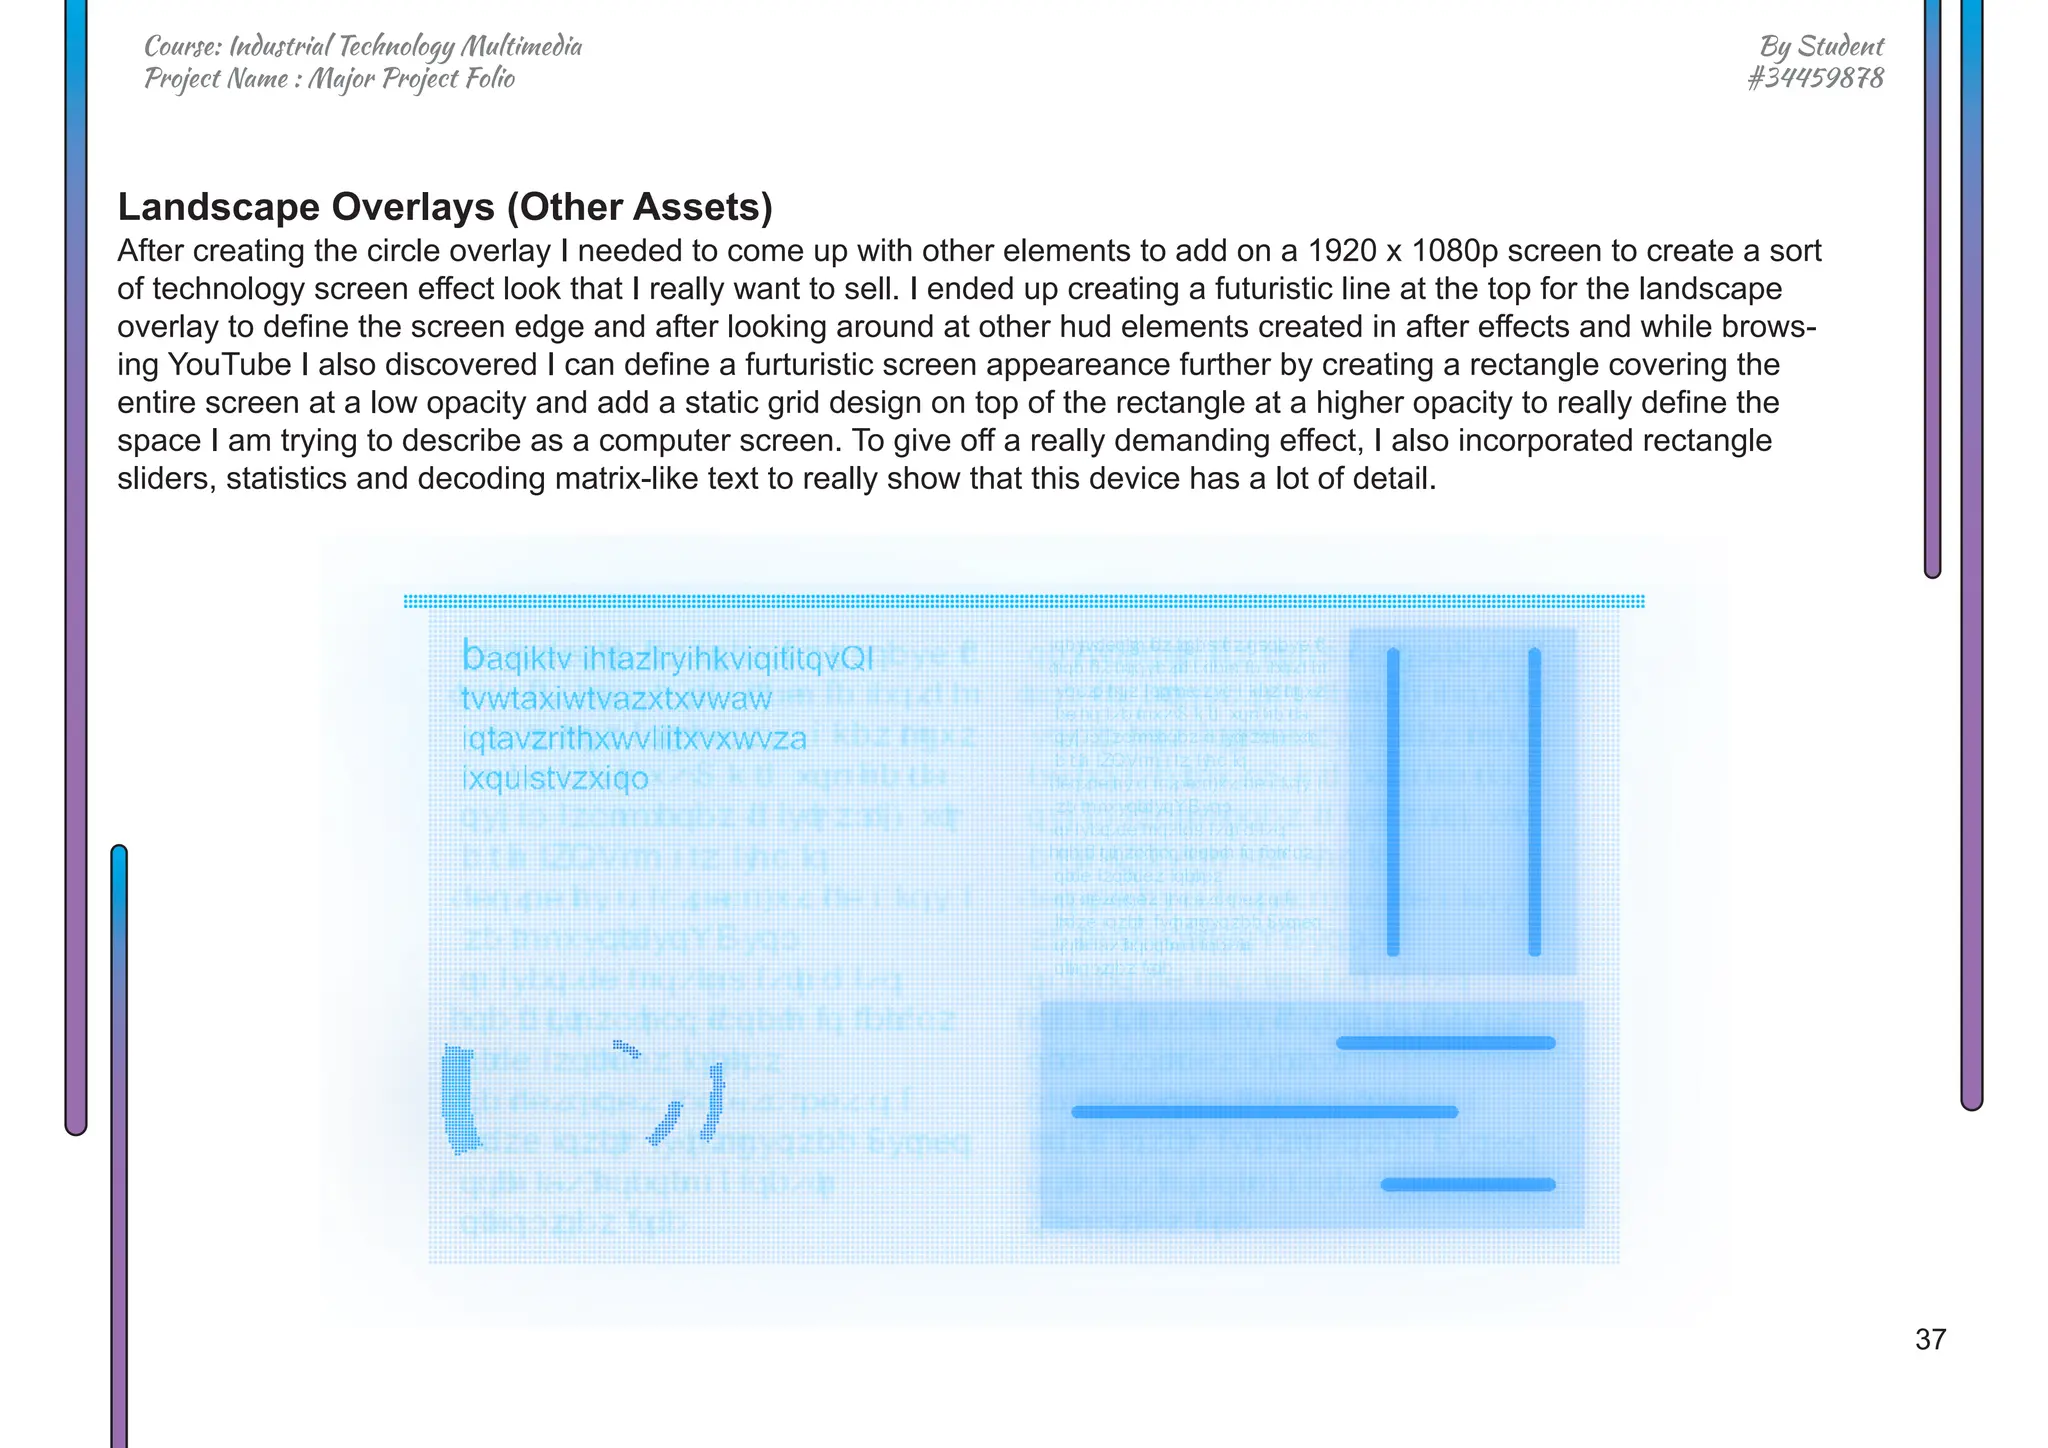
Landscape Overlays (Circle)
The first thing I did when thinking of my overlays was knowing that I wanted to make them from scratch. I would learn how
to use After Effects in different ways, learn new effects and overall expand and broaden my infinite horizon when work-
ing in Adobe After Effects. Especially when the roots of making these overlays from scratch really challenged my current
know-how. The coolest looking aspect of the hud effect overlay in my opinion is the multiple circles spinning around in
different movements that makes the content look super high-tech and futuristic which is what I was aiming to achive in my
major project. I found a YouTube tutorial where I learnt how to create this multiple circles effect (I even learnt scripting for
some effects!) and then proceeded to use my current knowledge to further polish and really sell the tech looking element
as I will walk through right now!
Evidence of me watching YouTube video
and putting into action learning how to create a
shape with the elipse tool and then [Radial Wipe]
Effect inside Adobe After Effects. (I even addded
slight colour variations to assist in giving off
the blue tech effect I was going for!)](https://image.slidesharecdn.com/majorprojectfinal-231115033714-566fb41c/75/MAJOR_PROJECT_FINAL-pdf-36-2048.jpg)
![36
By Student
#34459878
Course: Industrial Technology Multimedia
Project Name : Major Project Folio
Landscape Overlays (Circle Effects)
Using my ever expaning knowledge of Adobe After Effects, After creating the [Radial Wipe] circles I used a series of ef-
fects I had been planning to utilise since the start of this project. To capture the pixel/blocky look I used an effect called
[CC Ball Action] and set the ball size to 42 with a grid spacing of 3 and to top it off I added a [VR Glow] to boost the bright-
ness/ colour and add a glow. I ended up also adding a [Hue/Saturation] effect as well as adding [Motion Blur] to the asset
to make slight adjustments and assist in making the final product look polished! I applied these effects to many of my
other assets to capture the same technology based theme of the overlay.
Evidence of effects being used in overlay creation and final cap-
tures of overlay circle on right side of the page. (Fun Fact - This overlay
was animated in this project, check previous page for a screenshot of
how I used keyframes and code to make it!)](https://image.slidesharecdn.com/majorprojectfinal-231115033714-566fb41c/75/MAJOR_PROJECT_FINAL-pdf-37-2048.jpg)
![39
By Student
#34459878
Course: Industrial Technology Multimedia
Project Name : Major Project Folio
Portal Special Effect
To create my portal, I started with a clean slate on an empty project with just an opened composition and named it Por-
tal, this was key in my organisational process for sustaining an effective and efficient major project production in post. I
first created a solid and then added a [Fractal Noise] and [CC Sphere} to it, duplicated this solid and on the above solid
changed the blending mode to screen. Then on the bottom solid I added a [Glow] and a [CC Radial Fast Blur] which really
helps with the compositing and make the portal feel like it’s actually in the video. I of course had to give the portal it’s oval
shape instead of a spheretical shape so to do this I added a [Warp] with the warp style set to bulge and the bend at 35.
Now after that we have this :)
Now, we could have just left the portal at that indeed, but what I did
is created a lightsaber like border for my portal using nothing but
After Effects. The effects lists are too long to go over in the folio so
I will be talking about it in further detail in my demonstration video!
(here is the effects lists of the lightsaber effect added to my portal)
RESULT:](https://image.slidesharecdn.com/majorprojectfinal-231115033714-566fb41c/75/MAJOR_PROJECT_FINAL-pdf-40-2048.jpg)
![40
By Student
#34459878
Course: Industrial Technology Multimedia
Project Name : Major Project Folio
Dimension Special Effect
Very much like the Portal Effect, I also started with an individual composition for this special effect. I started with a black
solid and applied a [Fraactal Noise] to it and adjusted it to my liking before changing the blending mode to screen. I then
created particles with another black solid followed by [CC Particle World] and [Glow], after this I added an adjustment
layer and created a colour correction that I liked and added one last black solid on top with an expression on the opactiy
saying [wiggle (30,10)-90] this makes the black solid flicker on and off and mimic a flicker on top of the effect to make it
feel more alive! Although the effect looks pretty bland when it is alone, it will sure as hell look amazing when you have a
video layer underneath it! Another thing worth noting is that these special effect compositions were imported into other
compositions for easy access and efficiency.
RESULT:](https://image.slidesharecdn.com/majorprojectfinal-231115033714-566fb41c/75/MAJOR_PROJECT_FINAL-pdf-41-2048.jpg)


![Reading Techniques [Autosaved].pptxReading Techniques [Autosaved].pptx](https://cdn.slidesharecdn.com/ss_thumbnails/readingtechniquesautosaved-251211193055-b8821f9d-thumbnail.jpg?width=640&height=640&fit=bounds)


