List View Components in
Odoo 18
Enterprise
Enterprise
Introduction
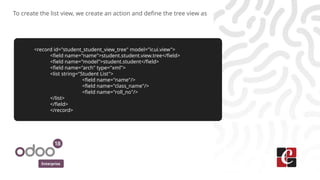
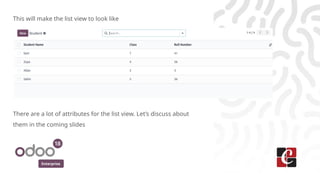
In Odoo, there are many types of views possible like List view, Kanban
view, Calendar view, Pivot view, Search view, etc.
The major change that introduced in the Odoo 18 technical part in
creating views is the tag <tree> got replaced with the <list> for
creating list views.
Enterprise
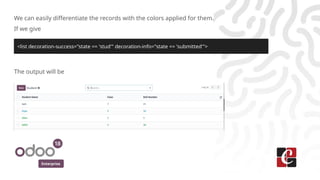
Let’s consider a custom model named student.student using
the py code
from odoo import fields, models
class Student(models.Model):
_name = 'student.student'
name = fields.Char("Student Name")
class_name = fields.Char("Class")
roll_no = fields.Char("Roll Number")
state = fields.Selection([('new','New'),('submitted', 'Submitted'),
('stud','Student')], "Roll Number")
Enterprise
To create the list view, we create an action and define the tree view as
<record id="student_student_view_tree" model="ir.ui.view">
<field name="name">student.student.view.tree</field>
<field name="model">student.student</field>
<field name="arch" type="xml">
<list string="Student List">
<field name="name"/>
<field name="class_name"/>
<field name="roll_no"/>
</list>
</field>
</record>
Enterprise
This will make the list view to look like
There are a lot of attributes for the list view. Let’s discuss about
them in the coming slides
Enterprise
● string : This attribute shows a title name for the view when we
open it without a name that targets a new dialog.
● create(boolean): Allows or restricts the record creation in the view.
The default value is True.
● edit(boolean): Allows or restricts the record modification in the
view. The default value is True.
<list string="Students">
<list string="Students" create="0">
<list string="Students" edit="0">
Enterprise
● delete(boolean): Allows or restricts the record deletion in the view.
The default value is True.
Eg: In our list view, the delete button will become invisible as
<list string="Students" delete=””0>
Enterprise
● import(boolean): Allows or restricts the record importing. The
default value is True.
The button for importing will be invisible if we set it as 0
<list string="Students" import="0">
Enterprise
● export_xlsx(boolean): Allows or prevents the exporting of the excel
files of the record set.
The button for that will be missing in the view then.
<list string="Students" export_xlsx="0">
Enterprise
● editable(string): Allows or restricts the inline editing of records
directly within the list view. This can have either the values: top or
bottom. For ‘top’, the new records are created at the top of the list
and for ‘bottom’, the new records are created at the bottom of the
list.
<list string="Students" editable="bottom">
Enterprise
● multi_edit(string): Allows or restricts the batch editing to apply a
single field value across multiple records simultaneously.
When we edit the field and enter a value, a confirmation dialog box
appears, which
updates the selected records with the same value.
<list string="Students" multi_edit="1">
Enterprise
● open_form_view(string): This adds a button at the end of each
row to open the record in form view. It has effect only if the view
is editable.
Here, in our example, the button comes like
<list string="Students" editable=”top” open_form_view="1">
Enterprise
● default_group_by(string): If no grouping is done for the current
view through the action or current search, this attribute will
group the records assigned with the field name.
Here, in our example, the view will be like
<list string="Students" default_group_by="state" expand="1">
Enterprise
● default_order(string): This is a list of field names, separated by
commas, that overrides the ordering set by the model's _order
attribute.
Here, in our example, the view will be like
<list string="Students" default_order="roll_no desc" >
Enterprise
● limit(integer): This sets a limit for the number of records to display
at a time. By default it is 80 for the list and 40 for x2many.
This will show the records as
<list string="Students" limit="2">
Enterprise
● groups_limit(integer): This sets a limit for the number of groups in
list view to display at a time. To make this work, we need to apply
the ‘default_group_by’ attribute also so that the records get grouped
first.
This shows the list view as
<list string="Students" default_group_by=”state” groups_limit="1">
Enterprise
● decoration-<style>: This attribute is used to apply conditional
formatting to rows in a list view. It allows developers to
dynamically style rows based on certain conditions, making it
easier for users to identify important or actionable records.
Here, the <style> represents the styling class to be applied
(e.g., danger, success, warning). condition/expression is to be
evaluated for each record. If the condition evaluates to True,
the decoration is applied.
The common syntax is as
<list decoration-<style>="condition">
Enterprise
The common styles are
1. decoration-it – ITALICS
2. decoration-bf – BOLD
3. decoration-danger – LIGHT RED
4. decoration-primary – LIGHT PURPLE
5. decoration-info – LIGHT BLUE
6. decoration-warning – LIGHT BROWN
7. decoration-muted – LIGHT GRAY
Enterprise
We can easily differentiate the records with the colors applied for them.
If we give
The output will be
<list decoration-success="state == 'stud'" decoration-info="state == 'submitted'">
For More Info.
Check our company website for related blogs
and Odoo book.
Check our YouTube channel for
functional and technical videos in Odoo.
Enterprise
www.cybrosys.com

List View Components in Odoo 18 - Odoo Slides

  • 1.
    List View Componentsin Odoo 18 Enterprise
  • 2.
    Enterprise Introduction In Odoo, thereare many types of views possible like List view, Kanban view, Calendar view, Pivot view, Search view, etc. The major change that introduced in the Odoo 18 technical part in creating views is the tag <tree> got replaced with the <list> for creating list views.
  • 3.
    Enterprise Let’s consider acustom model named student.student using the py code from odoo import fields, models class Student(models.Model): _name = 'student.student' name = fields.Char("Student Name") class_name = fields.Char("Class") roll_no = fields.Char("Roll Number") state = fields.Selection([('new','New'),('submitted', 'Submitted'), ('stud','Student')], "Roll Number")
  • 4.
    Enterprise To create thelist view, we create an action and define the tree view as <record id="student_student_view_tree" model="ir.ui.view"> <field name="name">student.student.view.tree</field> <field name="model">student.student</field> <field name="arch" type="xml"> <list string="Student List"> <field name="name"/> <field name="class_name"/> <field name="roll_no"/> </list> </field> </record>
  • 5.
    Enterprise This will makethe list view to look like There are a lot of attributes for the list view. Let’s discuss about them in the coming slides
  • 6.
    Enterprise ● string :This attribute shows a title name for the view when we open it without a name that targets a new dialog. ● create(boolean): Allows or restricts the record creation in the view. The default value is True. ● edit(boolean): Allows or restricts the record modification in the view. The default value is True. <list string="Students"> <list string="Students" create="0"> <list string="Students" edit="0">
  • 7.
    Enterprise ● delete(boolean): Allowsor restricts the record deletion in the view. The default value is True. Eg: In our list view, the delete button will become invisible as <list string="Students" delete=””0>
  • 8.
    Enterprise ● import(boolean): Allowsor restricts the record importing. The default value is True. The button for importing will be invisible if we set it as 0 <list string="Students" import="0">
  • 9.
    Enterprise ● export_xlsx(boolean): Allowsor prevents the exporting of the excel files of the record set. The button for that will be missing in the view then. <list string="Students" export_xlsx="0">
  • 10.
    Enterprise ● editable(string): Allowsor restricts the inline editing of records directly within the list view. This can have either the values: top or bottom. For ‘top’, the new records are created at the top of the list and for ‘bottom’, the new records are created at the bottom of the list. <list string="Students" editable="bottom">
  • 11.
    Enterprise ● multi_edit(string): Allowsor restricts the batch editing to apply a single field value across multiple records simultaneously. When we edit the field and enter a value, a confirmation dialog box appears, which updates the selected records with the same value. <list string="Students" multi_edit="1">
  • 12.
    Enterprise ● open_form_view(string): Thisadds a button at the end of each row to open the record in form view. It has effect only if the view is editable. Here, in our example, the button comes like <list string="Students" editable=”top” open_form_view="1">
  • 13.
    Enterprise ● default_group_by(string): Ifno grouping is done for the current view through the action or current search, this attribute will group the records assigned with the field name. Here, in our example, the view will be like <list string="Students" default_group_by="state" expand="1">
  • 14.
    Enterprise ● default_order(string): Thisis a list of field names, separated by commas, that overrides the ordering set by the model's _order attribute. Here, in our example, the view will be like <list string="Students" default_order="roll_no desc" >
  • 15.
    Enterprise ● limit(integer): Thissets a limit for the number of records to display at a time. By default it is 80 for the list and 40 for x2many. This will show the records as <list string="Students" limit="2">
  • 16.
    Enterprise ● groups_limit(integer): Thissets a limit for the number of groups in list view to display at a time. To make this work, we need to apply the ‘default_group_by’ attribute also so that the records get grouped first. This shows the list view as <list string="Students" default_group_by=”state” groups_limit="1">
  • 17.
    Enterprise ● decoration-<style>: Thisattribute is used to apply conditional formatting to rows in a list view. It allows developers to dynamically style rows based on certain conditions, making it easier for users to identify important or actionable records. Here, the <style> represents the styling class to be applied (e.g., danger, success, warning). condition/expression is to be evaluated for each record. If the condition evaluates to True, the decoration is applied. The common syntax is as <list decoration-<style>="condition">
  • 18.
    Enterprise The common stylesare 1. decoration-it – ITALICS 2. decoration-bf – BOLD 3. decoration-danger – LIGHT RED 4. decoration-primary – LIGHT PURPLE 5. decoration-info – LIGHT BLUE 6. decoration-warning – LIGHT BROWN 7. decoration-muted – LIGHT GRAY
  • 19.
    Enterprise We can easilydifferentiate the records with the colors applied for them. If we give The output will be <list decoration-success="state == 'stud'" decoration-info="state == 'submitted'">
  • 20.
    For More Info. Checkour company website for related blogs and Odoo book. Check our YouTube channel for functional and technical videos in Odoo. Enterprise www.cybrosys.com