Il documento fornisce una guida dettagliata per lo sviluppo di un gioco utilizzando Unity, includendo istruzioni per la creazione di scenari, elementi di gioco e controlli. Viene spiegato il processo di aggiunta di oggetti come ostacoli, veicoli e elementi interattivi, insieme alla gestione della fisica e della logica di gioco tramite script. Inoltre, vengono forniti suggerimenti su come gestire il timer e la punteggiatura, culminando nella creazione di un Game Manager per coordinare il gioco.


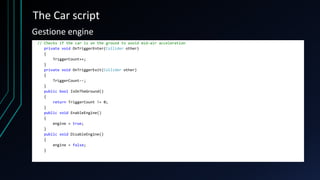
![The Car script
public class CarSimulator : MonoBehaviour
{
public float Speed = 12f;
public float TurnSpeed = 180f;
public Transform[] FrontWheels;
public Transform[] RearWheels;
public int TriggerCount = 0;
public bool engine;
private Rigidbody m_Rigidbody;
private int maxWheelsRotation = 20; //degree
Definizione membri pubblici e privati classe](https://image.slidesharecdn.com/lezione6aprile-170408093003/85/Lezione-6-aprile-GameLab-13-320.jpg)