SlideShare a Scribd company logo
1 of 4
1. Merancang model form seperti dibawah. Memilih menu File - New - New Project - Pilih Visual C# -
mengisi Name dan Solution Name dengan "Image2" - klik OK. Pada design form di bawah ini
komponen toolbox yang digunakan antara lain adalah:
6 buah Button. Name Button diubah menjadi btn_load, btn_copy, btn_flip_h, btn_flip_v,
btn_90, dan btn_180. Text Button diubah menjadi Load, Copy, Flip Horisontal, Flip
Vertikal, Rotate 90, dan Rotate 180.
5 buah PictureBox. Size Mode diubah menjadi StretchImage.
OpenFileDialog
2. Memasukkan script berikut dengan cara double klik pada bagian form yang kosong.
using System;
using System.Collections.Generic;
using System.ComponentModel;
using System.Data;
using System.Drawing;
using System.Linq;
using System.Text;
using System.Windows.Forms;
namespace Image2
{
public partial class Form1 : Form
{
Bitmap objBitmap;
Bitmap objBitmap1;
public Form1()
{
InitializeComponent();
}
Nama : Arif Rahman Aziz (7410040005)
Kelas : 3 D4 IT A
Percobaan : Percobaan 1.2 Fungsi Setpixel dan Getpixel untuk Copy dan Flip Citra
private void btn_load_Click(object sender, EventArgs e)
{
DialogResult d = openFileDialog1.ShowDialog();
if (d == DialogResult.OK) {
objBitmap = new Bitmap(openFileDialog1.FileName);
pictureBox1.Image = objBitmap;
}
}
private void btn_copy_Click(object sender, EventArgs e)
{
objBitmap1 = new Bitmap(objBitmap);
for (int x = 0; x < objBitmap.Width; x++)
for (int y = 0; y < objBitmap.Height; y++) {
Color w = objBitmap.GetPixel(x, y);
objBitmap1.SetPixel(x, y, w);
}
pictureBox2.Image = objBitmap1;
pictureBox3.Image = objBitmap1;
pictureBox4.Image = objBitmap1;
pictureBox5.Image = objBitmap1;
}
private void btn_flip_h_Click(object sender, EventArgs e)
{
objBitmap1 = new Bitmap(objBitmap);
for (int x = 0; x < objBitmap.Width; x++)
for (int y = 0; y < objBitmap.Height; y++)
{
Color w = objBitmap.GetPixel(x, y);
objBitmap1.SetPixel(objBitmap.Width - 1 - x, y, w);
}
pictureBox2.Image = objBitmap1;
}
private void btn_flip_v_Click(object sender, EventArgs e)
{
objBitmap1 = new Bitmap(objBitmap);
for (int x = 0; x < objBitmap.Width; x++)
for (int y = 0; y < objBitmap.Height; y++)
{
Color w = objBitmap.GetPixel(x, y);
objBitmap1.SetPixel(x, objBitmap.Height - 1 - y, w);
}
pictureBox5.Image = objBitmap1;
}
private void btn_90_Click(object sender, EventArgs e)
{
objBitmap1 = new Bitmap(objBitmap.Height, objBitmap.Width);
for (int x = 0; x < objBitmap.Width; x++)
for (int y = 0; y < objBitmap.Height; y++)
{
Color w = objBitmap.GetPixel(x, y);
objBitmap1.SetPixel(objBitmap.Height - 1 - y, x, w);
}
pictureBox3.Image = objBitmap1;
}
private void btn_180_Click(object sender, EventArgs e)
{
objBitmap1 = new Bitmap(objBitmap);
for (int x = 0; x < objBitmap.Width; x++)
for (int y = 0; y < objBitmap.Height; y++)
{
Color w = objBitmap.GetPixel(x, y);
objBitmap1.SetPixel(objBitmap.Width - 1 - x, objBitmap.Height - 1 - y,
w);
}
pictureBox4.Image = objBitmap1;
}
}
}
Analisa :
Bitmap objBitmap1;
Untuk penampung data gambar maka ditambahkan satu obyek bitmap baru di class Form1.
objBitmap1 = new Bitmap(objBitmap);
for (int x = 0; x < objBitmap.Width; x++)
for (int y = 0; y < objBitmap.Height; y++) {
Color w = objBitmap.GetPixel(x, y);
objBitmap1.SetPixel(x, y, w);
}
pictureBox2.Image = objBitmap1;
pictureBox3.Image = objBitmap1;
pictureBox4.Image = objBitmap1;
pictureBox5.Image = objBitmap1;
Script di atas berfungsi untuk meng-copy file image yang di-load di PictureBox1 ke PictureBox yang
lain. Sebelum file image dimasukkan ke dalam PictureBox, terlebih dulu menginisialisasi komponen
image hasil (objBitmap1) adalah sama dengan image asal (objBitmap) kemudian menentukan
panjang dan lebar dari image asal. Setelah diperoleh panjang dan lebar, proses berikutnya adalah
membaca data RGB dari pixel(x,y) image asal dan dilanjutkan dengan memberikan nilai warna RGB
pada pixel(x,y) dalam objBitmap1.
objBitmap1 = new Bitmap(objBitmap);
for (int x = 0; x < objBitmap.Width; x++)
for (int y = 0; y < objBitmap.Height; y++){
Color w = objBitmap.GetPixel(x, y);
objBitmap1.SetPixel(objBitmap.Width - 1 - x, y, w);
}
pictureBox2.Image = objBitmap1;
Script di atas membuat gambar akan tercopy secara flip horisontal pada PictureBox2. Pada dasarnya
proses flip horisontal adalah meletakkan titik horisontal secara berkebalikan dimana setiap pixel x
pada gambar asal (objBitmap) akan diletakkan di pixel width-(x+1) pada gambar hasil (objBitmap1).
objBitmap1 = new Bitmap(objBitmap);
for (int x = 0; x < objBitmap.Width; x++)
for (int y = 0; y < objBitmap.Height; y++){
Color w = objBitmap.GetPixel(x, y);
objBitmap1.SetPixel(x, objBitmap.Height - 1 - y, w);
}
pictureBox5.Image = objBitmap1;
Script di atas membuat gambar akan tercopy secara flip vertikal pada PictureBox5. Proses flip
vertikal adalah meletakkan titik vertikal secara berkebalikan dimana setiap pixel y pada gambar asal
(objBitmap) akan diletakkan di pixel height-(y+1) pada gambar hasil (objBitmap1).
objBitmap1 = new Bitmap(objBitmap.Height, objBitmap.Width);
for (int x = 0; x < objBitmap.Width; x++)
for (int y = 0; y < objBitmap.Height; y++){
Color w = objBitmap.GetPixel(x, y);
objBitmap1.SetPixel(objBitmap.Height - 1 - y, x, w); }
pictureBox3.Image = objBitmap1;
Script di atas membuat gambar akan tercopy secara rotate / diputar 90 derajat pada PictureBox3.
Proses rotate 90 derajat adalah meletakkan setiap pixel x pada gambar asal (objBitmap) menjadi
pixel height-(y+1) pada gambar hasil (objBitmap1).
objBitmap1 = new Bitmap(objBitmap);
for (int x = 0; x < objBitmap.Width; x++)
for (int y = 0; y < objBitmap.Height; y++){
Color w = objBitmap.GetPixel(x, y);
objBitmap1.SetPixel(objBitmap.Width - 1 - x, objBitmap.Height - 1 - y, w);
}
pictureBox4.Image = objBitmap1;
Script di atas membuat gambar akan tercopy secara rotate / diputar 180 derajat pada PictureBox4.
Proses rotate 180 derajat adalah meletakkan setiap pixel x dan pixel y pada gambar asal (objBitmap)
menjadi pixel width-(x+1) dan pixel height-(y+1) pada gambar hasil (objBitmap1).
3. Output Program.
Gambar di samping adalah proses load gambar ke
PictureBox.
Gambar di samping adalah proses meng-copy gambar ke
PictureBox.
Gambar di samping adalah proses meng-copy dan
melakukan flip horisontal, flip vertikal, rotate 90, serta
rotate 180.

More Related Content

Viewers also liked

Lapres 1.1 7410040005
Lapres 1.1   7410040005Lapres 1.1   7410040005
Lapres 1.1 7410040005Ismi Aziz
 
Peraturankerjakimpalan
PeraturankerjakimpalanPeraturankerjakimpalan
PeraturankerjakimpalanAjaa Tahir
 
Presentation glocal_discovery_general
Presentation glocal_discovery_generalPresentation glocal_discovery_general
Presentation glocal_discovery_generalGlocalDiscovery
 
การสร้างวีดีโอจาก Power point
การสร้างวีดีโอจาก Power pointการสร้างวีดีโอจาก Power point
การสร้างวีดีโอจาก Power pointI'am Faii
 
ส่วนประกอบของเว็บไซต์ที่ดี
ส่วนประกอบของเว็บไซต์ที่ดีส่วนประกอบของเว็บไซต์ที่ดี
ส่วนประกอบของเว็บไซต์ที่ดีI'am Faii
 
Direcció EstratèGica P U N T 2
Direcció EstratèGica   P U N T 2Direcció EstratèGica   P U N T 2
Direcció EstratèGica P U N T 2Magda Cayón Costa
 
Konsep toharah
Konsep toharahKonsep toharah
Konsep toharahAjaa Tahir
 

Viewers also liked (10)

Lapres 1.1 7410040005
Lapres 1.1   7410040005Lapres 1.1   7410040005
Lapres 1.1 7410040005
 
Peraturankerjakimpalan
PeraturankerjakimpalanPeraturankerjakimpalan
Peraturankerjakimpalan
 
Presentation glocal_discovery_general
Presentation glocal_discovery_generalPresentation glocal_discovery_general
Presentation glocal_discovery_general
 
Unix
UnixUnix
Unix
 
Arvutikaitse
ArvutikaitseArvutikaitse
Arvutikaitse
 
การสร้างวีดีโอจาก Power point
การสร้างวีดีโอจาก Power pointการสร้างวีดีโอจาก Power point
การสร้างวีดีโอจาก Power point
 
ส่วนประกอบของเว็บไซต์ที่ดี
ส่วนประกอบของเว็บไซต์ที่ดีส่วนประกอบของเว็บไซต์ที่ดี
ส่วนประกอบของเว็บไซต์ที่ดี
 
Direcció EstratèGica P U N T 2
Direcció EstratèGica   P U N T 2Direcció EstratèGica   P U N T 2
Direcció EstratèGica P U N T 2
 
Konsep toharah
Konsep toharahKonsep toharah
Konsep toharah
 
Slideshare
SlideshareSlideshare
Slideshare
 

Similar to Lapres 1.2 7410040005

Tugas Photosop vs Matlab
Tugas  Photosop vs MatlabTugas  Photosop vs Matlab
Tugas Photosop vs MatlabCacak_Deik
 
Tutorial membuat spanduk_dengan_photoshop
Tutorial membuat spanduk_dengan_photoshopTutorial membuat spanduk_dengan_photoshop
Tutorial membuat spanduk_dengan_photoshopsalmon7301
 
Laporan pratikum v mulmet
Laporan pratikum v mulmetLaporan pratikum v mulmet
Laporan pratikum v mulmetrahmi wahyuni
 
Membuat game j2 me nuril
Membuat game j2 me nurilMembuat game j2 me nuril
Membuat game j2 me nurilNorel_Brew
 
05-Operasi-dasar-pengolahan-citra-2021 (1).pptx
05-Operasi-dasar-pengolahan-citra-2021 (1).pptx05-Operasi-dasar-pengolahan-citra-2021 (1).pptx
05-Operasi-dasar-pengolahan-citra-2021 (1).pptxnyomans1
 
Building A Simple Robot in VREP
Building A Simple Robot in VREPBuilding A Simple Robot in VREP
Building A Simple Robot in VREPLusiana Diyan
 
Aplikasi program komputer grafik
Aplikasi program komputer grafikAplikasi program komputer grafik
Aplikasi program komputer grafikfahlevizha
 
Langkah untuk reka bentuk peta homestay menggunakan google drawing.potx
Langkah untuk reka bentuk peta homestay menggunakan google drawing.potxLangkah untuk reka bentuk peta homestay menggunakan google drawing.potx
Langkah untuk reka bentuk peta homestay menggunakan google drawing.potxSoftinn Solutions
 

Similar to Lapres 1.2 7410040005 (11)

Tugas Photosop vs Matlab
Tugas  Photosop vs MatlabTugas  Photosop vs Matlab
Tugas Photosop vs Matlab
 
Tutorial membuat spanduk_dengan_photoshop
Tutorial membuat spanduk_dengan_photoshopTutorial membuat spanduk_dengan_photoshop
Tutorial membuat spanduk_dengan_photoshop
 
Laporan pratikum v mulmet
Laporan pratikum v mulmetLaporan pratikum v mulmet
Laporan pratikum v mulmet
 
Membuat game j2 me nuril
Membuat game j2 me nurilMembuat game j2 me nuril
Membuat game j2 me nuril
 
Modul 2 teks, gambar & grafik
Modul 2   teks, gambar & grafikModul 2   teks, gambar & grafik
Modul 2 teks, gambar & grafik
 
05-Operasi-dasar-pengolahan-citra-2021 (1).pptx
05-Operasi-dasar-pengolahan-citra-2021 (1).pptx05-Operasi-dasar-pengolahan-citra-2021 (1).pptx
05-Operasi-dasar-pengolahan-citra-2021 (1).pptx
 
Modul visual c++
Modul visual c++Modul visual c++
Modul visual c++
 
Building A Simple Robot in VREP
Building A Simple Robot in VREPBuilding A Simple Robot in VREP
Building A Simple Robot in VREP
 
Animasi
AnimasiAnimasi
Animasi
 
Aplikasi program komputer grafik
Aplikasi program komputer grafikAplikasi program komputer grafik
Aplikasi program komputer grafik
 
Langkah untuk reka bentuk peta homestay menggunakan google drawing.potx
Langkah untuk reka bentuk peta homestay menggunakan google drawing.potxLangkah untuk reka bentuk peta homestay menggunakan google drawing.potx
Langkah untuk reka bentuk peta homestay menggunakan google drawing.potx
 

Lapres 1.2 7410040005

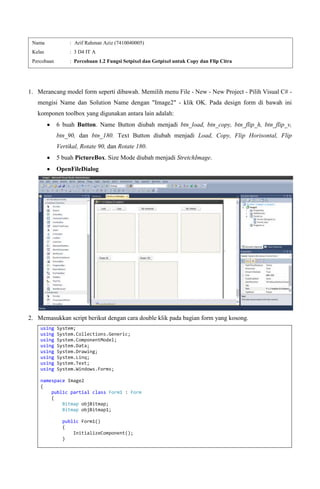
  • 1. 1. Merancang model form seperti dibawah. Memilih menu File - New - New Project - Pilih Visual C# - mengisi Name dan Solution Name dengan "Image2" - klik OK. Pada design form di bawah ini komponen toolbox yang digunakan antara lain adalah: 6 buah Button. Name Button diubah menjadi btn_load, btn_copy, btn_flip_h, btn_flip_v, btn_90, dan btn_180. Text Button diubah menjadi Load, Copy, Flip Horisontal, Flip Vertikal, Rotate 90, dan Rotate 180. 5 buah PictureBox. Size Mode diubah menjadi StretchImage. OpenFileDialog 2. Memasukkan script berikut dengan cara double klik pada bagian form yang kosong. using System; using System.Collections.Generic; using System.ComponentModel; using System.Data; using System.Drawing; using System.Linq; using System.Text; using System.Windows.Forms; namespace Image2 { public partial class Form1 : Form { Bitmap objBitmap; Bitmap objBitmap1; public Form1() { InitializeComponent(); } Nama : Arif Rahman Aziz (7410040005) Kelas : 3 D4 IT A Percobaan : Percobaan 1.2 Fungsi Setpixel dan Getpixel untuk Copy dan Flip Citra
  • 2. private void btn_load_Click(object sender, EventArgs e) { DialogResult d = openFileDialog1.ShowDialog(); if (d == DialogResult.OK) { objBitmap = new Bitmap(openFileDialog1.FileName); pictureBox1.Image = objBitmap; } } private void btn_copy_Click(object sender, EventArgs e) { objBitmap1 = new Bitmap(objBitmap); for (int x = 0; x < objBitmap.Width; x++) for (int y = 0; y < objBitmap.Height; y++) { Color w = objBitmap.GetPixel(x, y); objBitmap1.SetPixel(x, y, w); } pictureBox2.Image = objBitmap1; pictureBox3.Image = objBitmap1; pictureBox4.Image = objBitmap1; pictureBox5.Image = objBitmap1; } private void btn_flip_h_Click(object sender, EventArgs e) { objBitmap1 = new Bitmap(objBitmap); for (int x = 0; x < objBitmap.Width; x++) for (int y = 0; y < objBitmap.Height; y++) { Color w = objBitmap.GetPixel(x, y); objBitmap1.SetPixel(objBitmap.Width - 1 - x, y, w); } pictureBox2.Image = objBitmap1; } private void btn_flip_v_Click(object sender, EventArgs e) { objBitmap1 = new Bitmap(objBitmap); for (int x = 0; x < objBitmap.Width; x++) for (int y = 0; y < objBitmap.Height; y++) { Color w = objBitmap.GetPixel(x, y); objBitmap1.SetPixel(x, objBitmap.Height - 1 - y, w); } pictureBox5.Image = objBitmap1; } private void btn_90_Click(object sender, EventArgs e) { objBitmap1 = new Bitmap(objBitmap.Height, objBitmap.Width); for (int x = 0; x < objBitmap.Width; x++) for (int y = 0; y < objBitmap.Height; y++) { Color w = objBitmap.GetPixel(x, y); objBitmap1.SetPixel(objBitmap.Height - 1 - y, x, w); } pictureBox3.Image = objBitmap1; } private void btn_180_Click(object sender, EventArgs e) { objBitmap1 = new Bitmap(objBitmap); for (int x = 0; x < objBitmap.Width; x++) for (int y = 0; y < objBitmap.Height; y++) { Color w = objBitmap.GetPixel(x, y); objBitmap1.SetPixel(objBitmap.Width - 1 - x, objBitmap.Height - 1 - y, w); } pictureBox4.Image = objBitmap1;
  • 3. } } } Analisa : Bitmap objBitmap1; Untuk penampung data gambar maka ditambahkan satu obyek bitmap baru di class Form1. objBitmap1 = new Bitmap(objBitmap); for (int x = 0; x < objBitmap.Width; x++) for (int y = 0; y < objBitmap.Height; y++) { Color w = objBitmap.GetPixel(x, y); objBitmap1.SetPixel(x, y, w); } pictureBox2.Image = objBitmap1; pictureBox3.Image = objBitmap1; pictureBox4.Image = objBitmap1; pictureBox5.Image = objBitmap1; Script di atas berfungsi untuk meng-copy file image yang di-load di PictureBox1 ke PictureBox yang lain. Sebelum file image dimasukkan ke dalam PictureBox, terlebih dulu menginisialisasi komponen image hasil (objBitmap1) adalah sama dengan image asal (objBitmap) kemudian menentukan panjang dan lebar dari image asal. Setelah diperoleh panjang dan lebar, proses berikutnya adalah membaca data RGB dari pixel(x,y) image asal dan dilanjutkan dengan memberikan nilai warna RGB pada pixel(x,y) dalam objBitmap1. objBitmap1 = new Bitmap(objBitmap); for (int x = 0; x < objBitmap.Width; x++) for (int y = 0; y < objBitmap.Height; y++){ Color w = objBitmap.GetPixel(x, y); objBitmap1.SetPixel(objBitmap.Width - 1 - x, y, w); } pictureBox2.Image = objBitmap1; Script di atas membuat gambar akan tercopy secara flip horisontal pada PictureBox2. Pada dasarnya proses flip horisontal adalah meletakkan titik horisontal secara berkebalikan dimana setiap pixel x pada gambar asal (objBitmap) akan diletakkan di pixel width-(x+1) pada gambar hasil (objBitmap1). objBitmap1 = new Bitmap(objBitmap); for (int x = 0; x < objBitmap.Width; x++) for (int y = 0; y < objBitmap.Height; y++){ Color w = objBitmap.GetPixel(x, y); objBitmap1.SetPixel(x, objBitmap.Height - 1 - y, w); } pictureBox5.Image = objBitmap1; Script di atas membuat gambar akan tercopy secara flip vertikal pada PictureBox5. Proses flip vertikal adalah meletakkan titik vertikal secara berkebalikan dimana setiap pixel y pada gambar asal (objBitmap) akan diletakkan di pixel height-(y+1) pada gambar hasil (objBitmap1). objBitmap1 = new Bitmap(objBitmap.Height, objBitmap.Width); for (int x = 0; x < objBitmap.Width; x++) for (int y = 0; y < objBitmap.Height; y++){ Color w = objBitmap.GetPixel(x, y); objBitmap1.SetPixel(objBitmap.Height - 1 - y, x, w); }
  • 4. pictureBox3.Image = objBitmap1; Script di atas membuat gambar akan tercopy secara rotate / diputar 90 derajat pada PictureBox3. Proses rotate 90 derajat adalah meletakkan setiap pixel x pada gambar asal (objBitmap) menjadi pixel height-(y+1) pada gambar hasil (objBitmap1). objBitmap1 = new Bitmap(objBitmap); for (int x = 0; x < objBitmap.Width; x++) for (int y = 0; y < objBitmap.Height; y++){ Color w = objBitmap.GetPixel(x, y); objBitmap1.SetPixel(objBitmap.Width - 1 - x, objBitmap.Height - 1 - y, w); } pictureBox4.Image = objBitmap1; Script di atas membuat gambar akan tercopy secara rotate / diputar 180 derajat pada PictureBox4. Proses rotate 180 derajat adalah meletakkan setiap pixel x dan pixel y pada gambar asal (objBitmap) menjadi pixel width-(x+1) dan pixel height-(y+1) pada gambar hasil (objBitmap1). 3. Output Program. Gambar di samping adalah proses load gambar ke PictureBox. Gambar di samping adalah proses meng-copy gambar ke PictureBox. Gambar di samping adalah proses meng-copy dan melakukan flip horisontal, flip vertikal, rotate 90, serta rotate 180.