Introduction to JSP
•JSP (Java Server Pages) is a technology developed by Sun Microsystems
(now Oracle) that allows developers to create dynamic web content using
Java. It is an extension of Servlets, offering a more flexible and readable way
to embed Java logic within HTML.
• Unlike Servlets, which require Java code for everything, JSP allows
developers to use special JSP tags to integrate Java logic within an HTML
page. This makes JSP a preferred choice for web applications requiring
dynamic content generation.
• JSP is a server-side programming language that combines HTML, XML, Java
Servlet, and JavaBeans technologies into one highly productive technology.
It allows developers to develop reliable, high-performance, platform-
independent web applications, and dynamic websites. It has access to the
entire family of Java APIs and can be considered an extension of the Servlet.
3.
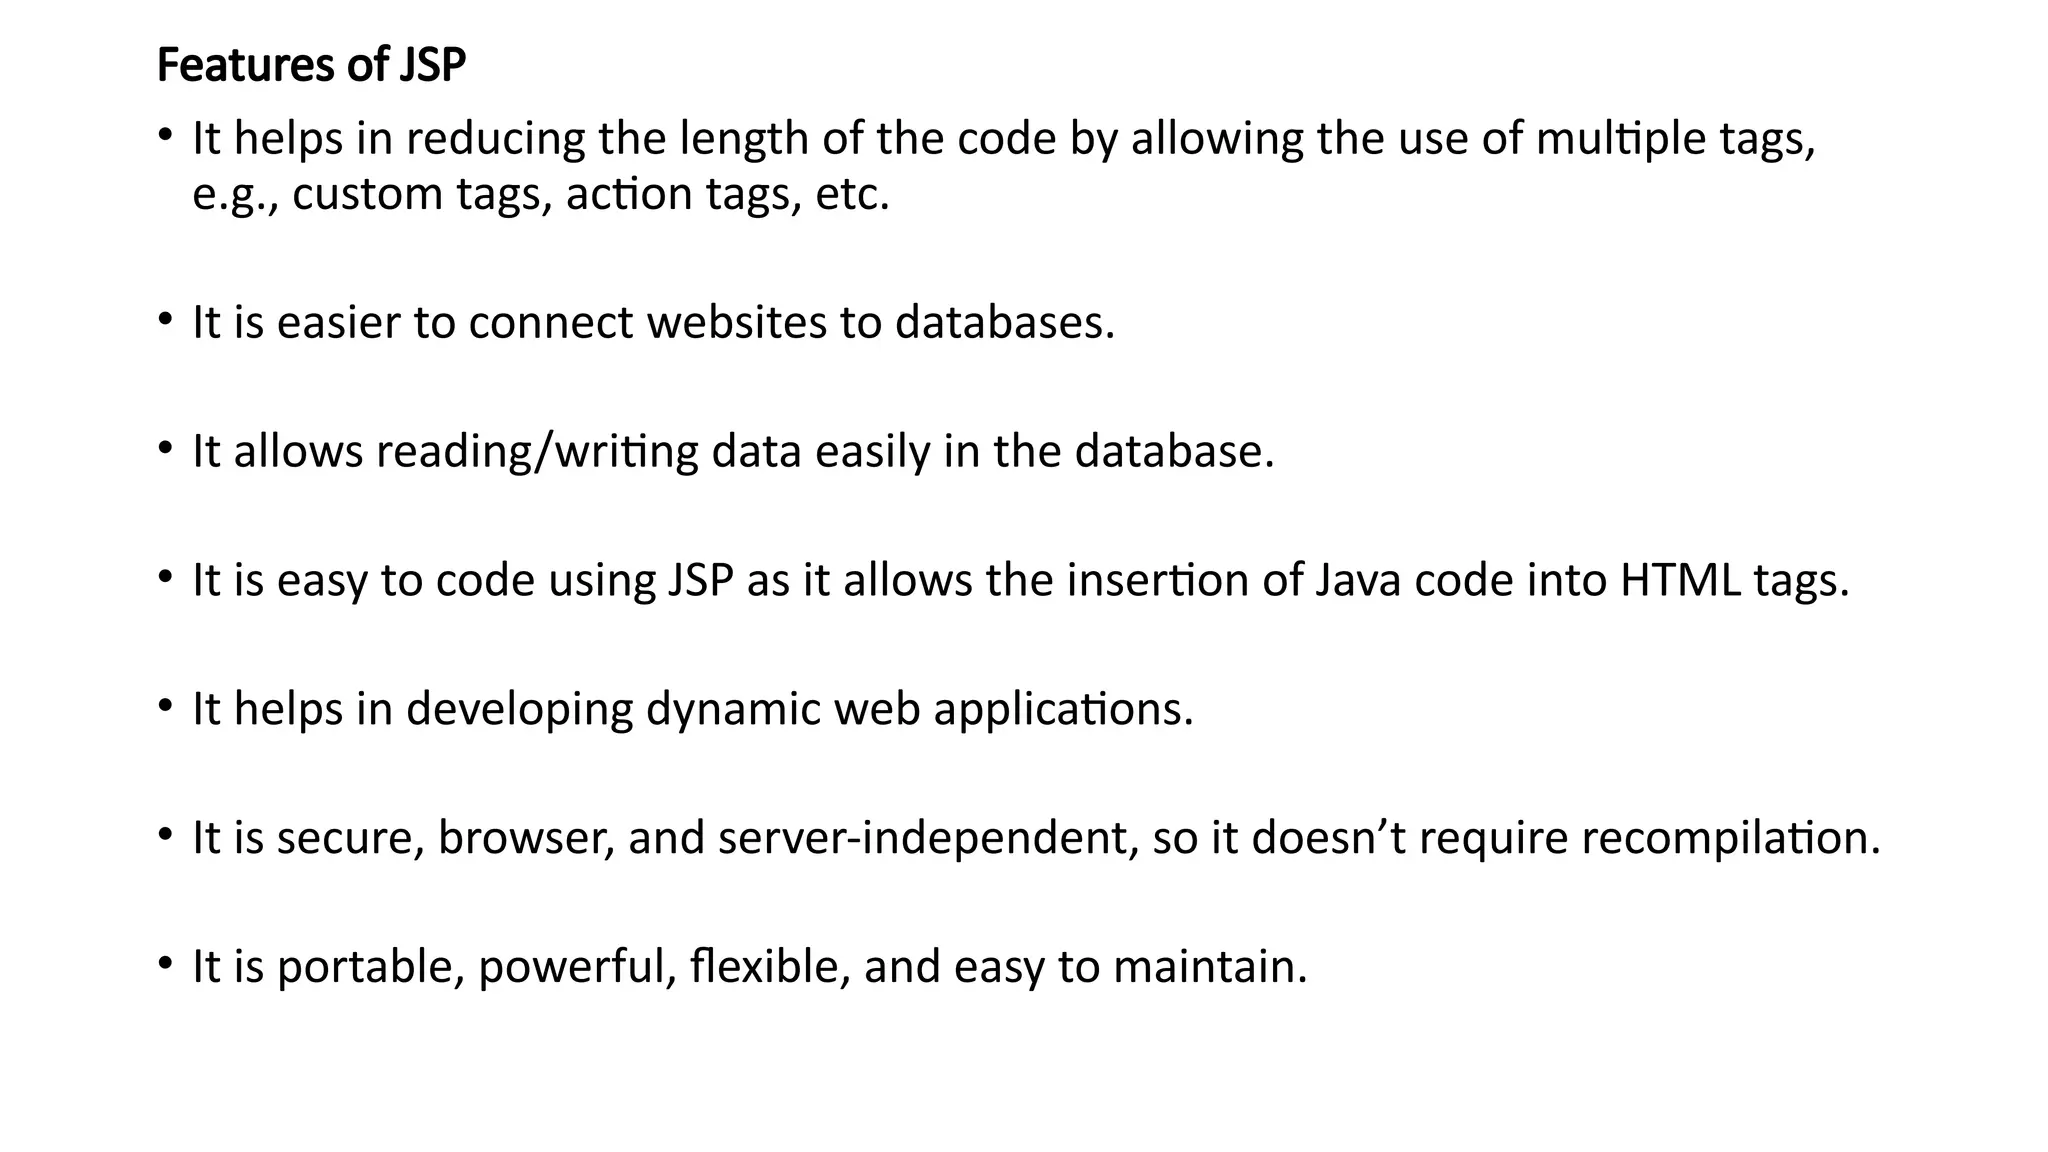
Features of JSP
•It helps in reducing the length of the code by allowing the use of multiple tags,
e.g., custom tags, action tags, etc.
• It is easier to connect websites to databases.
• It allows reading/writing data easily in the database.
• It is easy to code using JSP as it allows the insertion of Java code into HTML tags.
• It helps in developing dynamic web applications.
• It is secure, browser, and server-independent, so it doesn’t require recompilation.
• It is portable, powerful, flexible, and easy to maintain.
4.
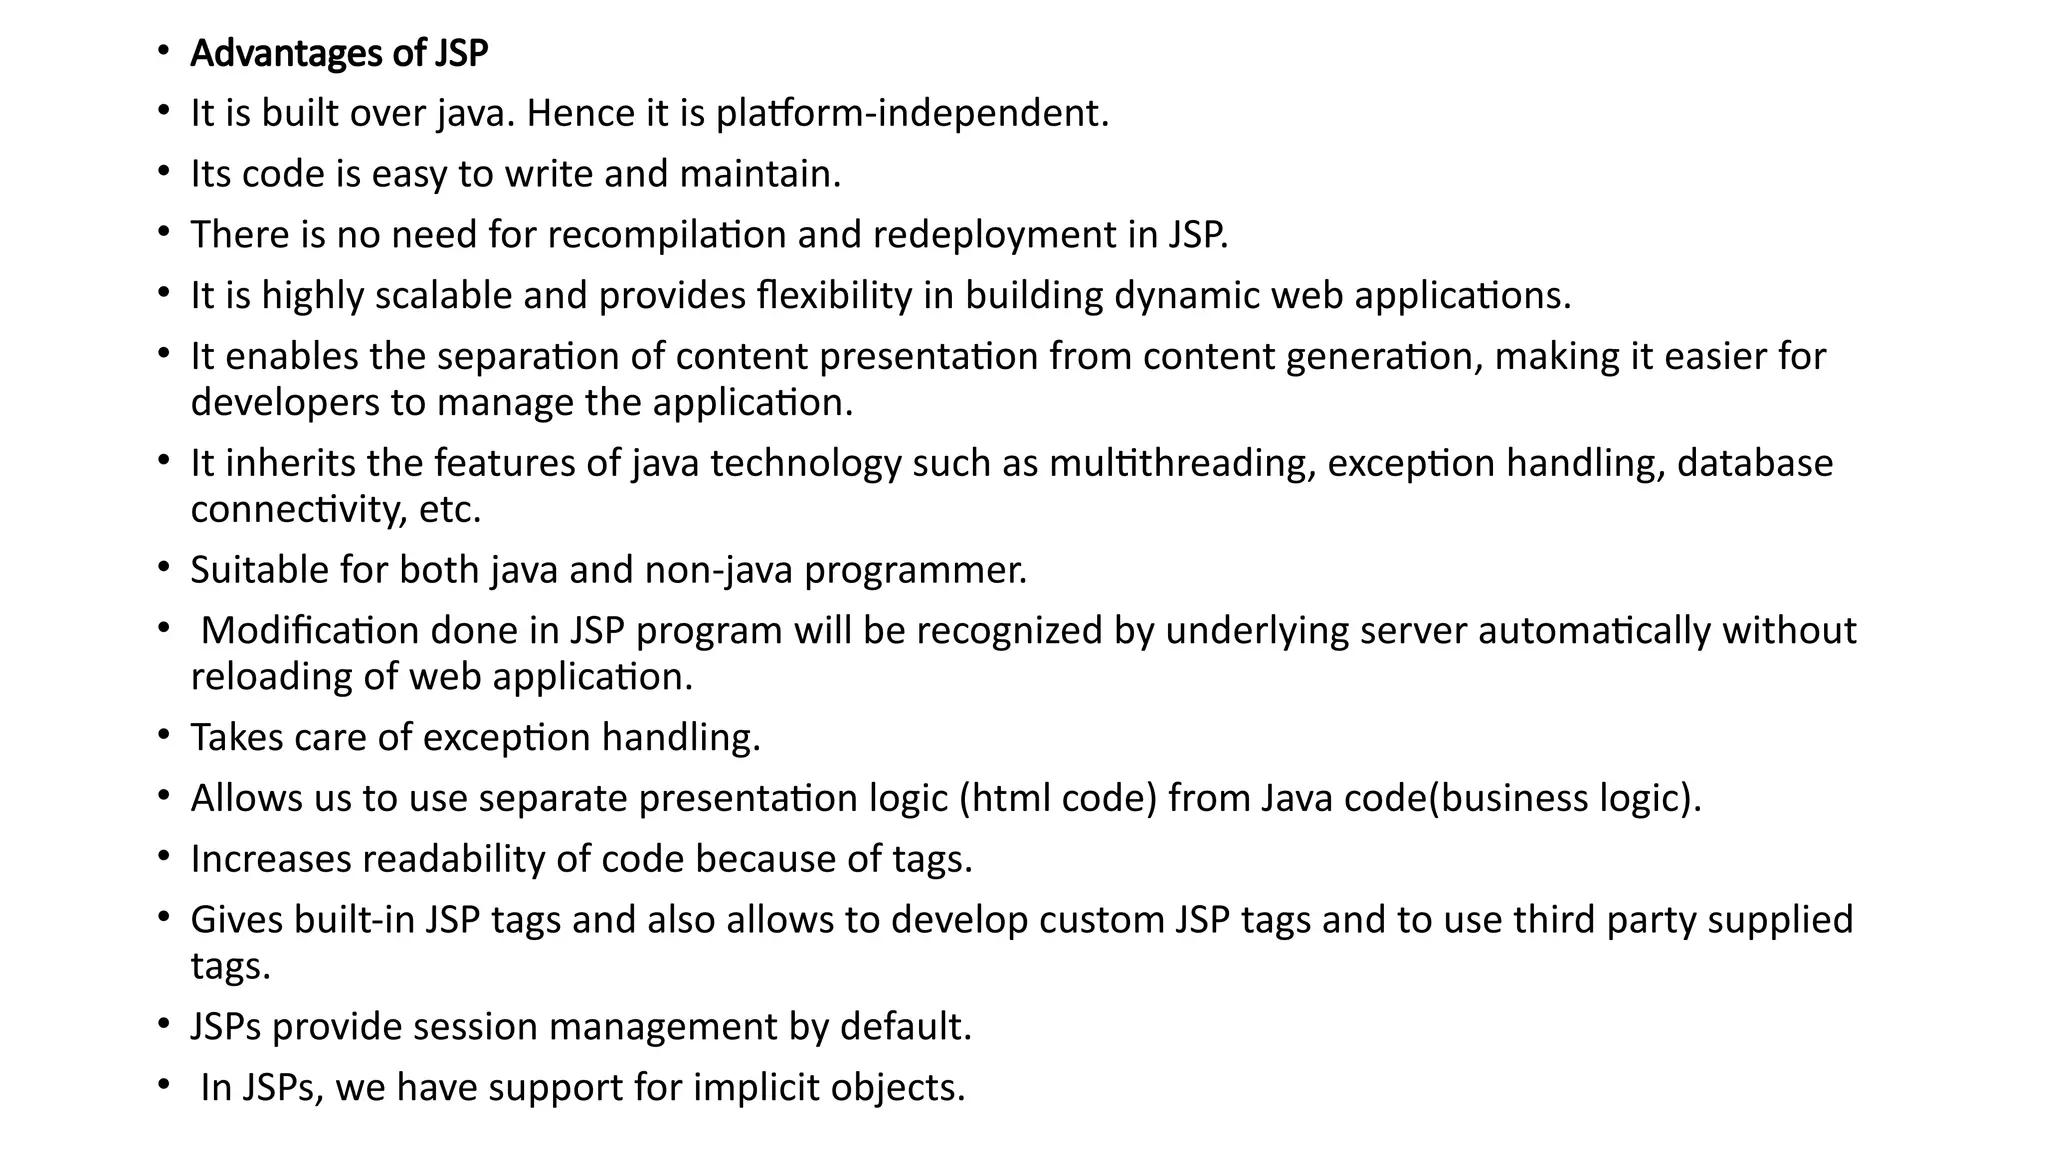
• Advantages ofJSP
• It is built over java. Hence it is platform-independent.
• Its code is easy to write and maintain.
• There is no need for recompilation and redeployment in JSP.
• It is highly scalable and provides flexibility in building dynamic web applications.
• It enables the separation of content presentation from content generation, making it easier for
developers to manage the application.
• It inherits the features of java technology such as multithreading, exception handling, database
connectivity, etc.
• Suitable for both java and non-java programmer.
• Modification done in JSP program will be recognized by underlying server automatically without
reloading of web application.
• Takes care of exception handling.
• Allows us to use separate presentation logic (html code) from Java code(business logic).
• Increases readability of code because of tags.
• Gives built-in JSP tags and also allows to develop custom JSP tags and to use third party supplied
tags.
• JSPs provide session management by default.
• In JSPs, we have support for implicit objects.
5.
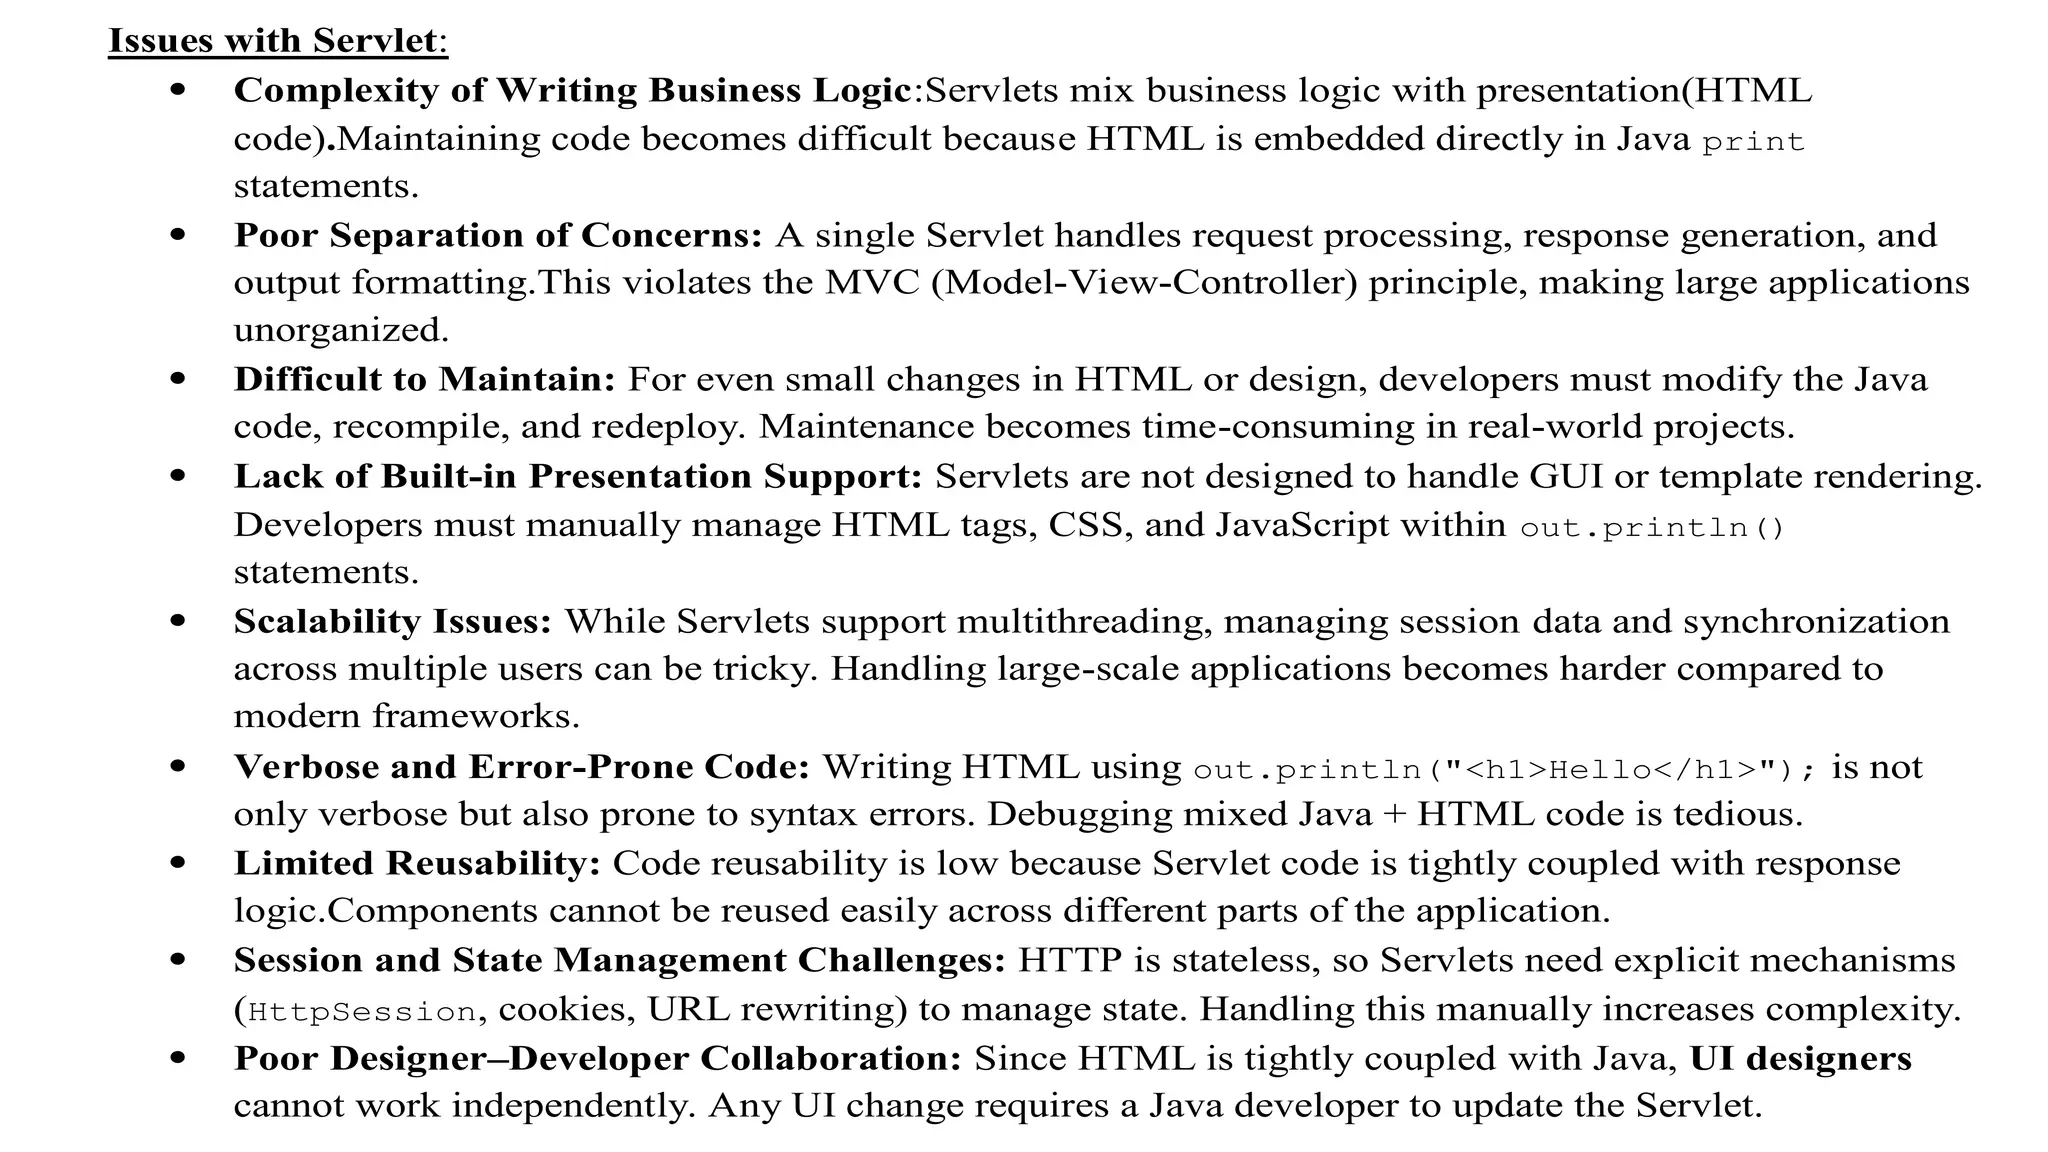
Issues with Servlet:
Complexity of Writing Business Logic:Servlets mix business logic with presentation(HTML
code).Maintaining code becomes difficult because HTML is embedded directly in Java print
statements.
Poor Separation of Concerns: A single Servlet handles request processing, response generation, and
output formatting.This violates the MVC (Model-View-Controller) principle, making large applications
unorganized.
Difficult to Maintain: For even small changes in HTML or design, developers must modify the Java
code, recompile, and redeploy. Maintenance becomes time-consuming in real-world projects.
Lack of Built-in Presentation Support: Servlets are not designed to handle GUI or template rendering.
Developers must manually manage HTML tags, CSS, and JavaScript within out.println()
statements.
Scalability Issues: While Servlets support multithreading, managing session data and synchronization
across multiple users can be tricky. Handling large-scale applications becomes harder compared to
modern frameworks.
Verbose and Error-Prone Code: Writing HTML using out.println("<h1>Hello</h1>"); is not
only verbose but also prone to syntax errors. Debugging mixed Java + HTML code is tedious.
Limited Reusability: Code reusability is low because Servlet code is tightly coupled with response
logic.Components cannot be reused easily across different parts of the application.
Session and State Management Challenges: HTTP is stateless, so Servlets need explicit mechanisms
(HttpSession, cookies, URL rewriting) to manage state. Handling this manually increases complexity.
Poor Designer–Developer Collaboration: Since HTML is tightly coupled with Java, UI designers
cannot work independently. Any UI change requires a Java developer to update the Servlet.
6.
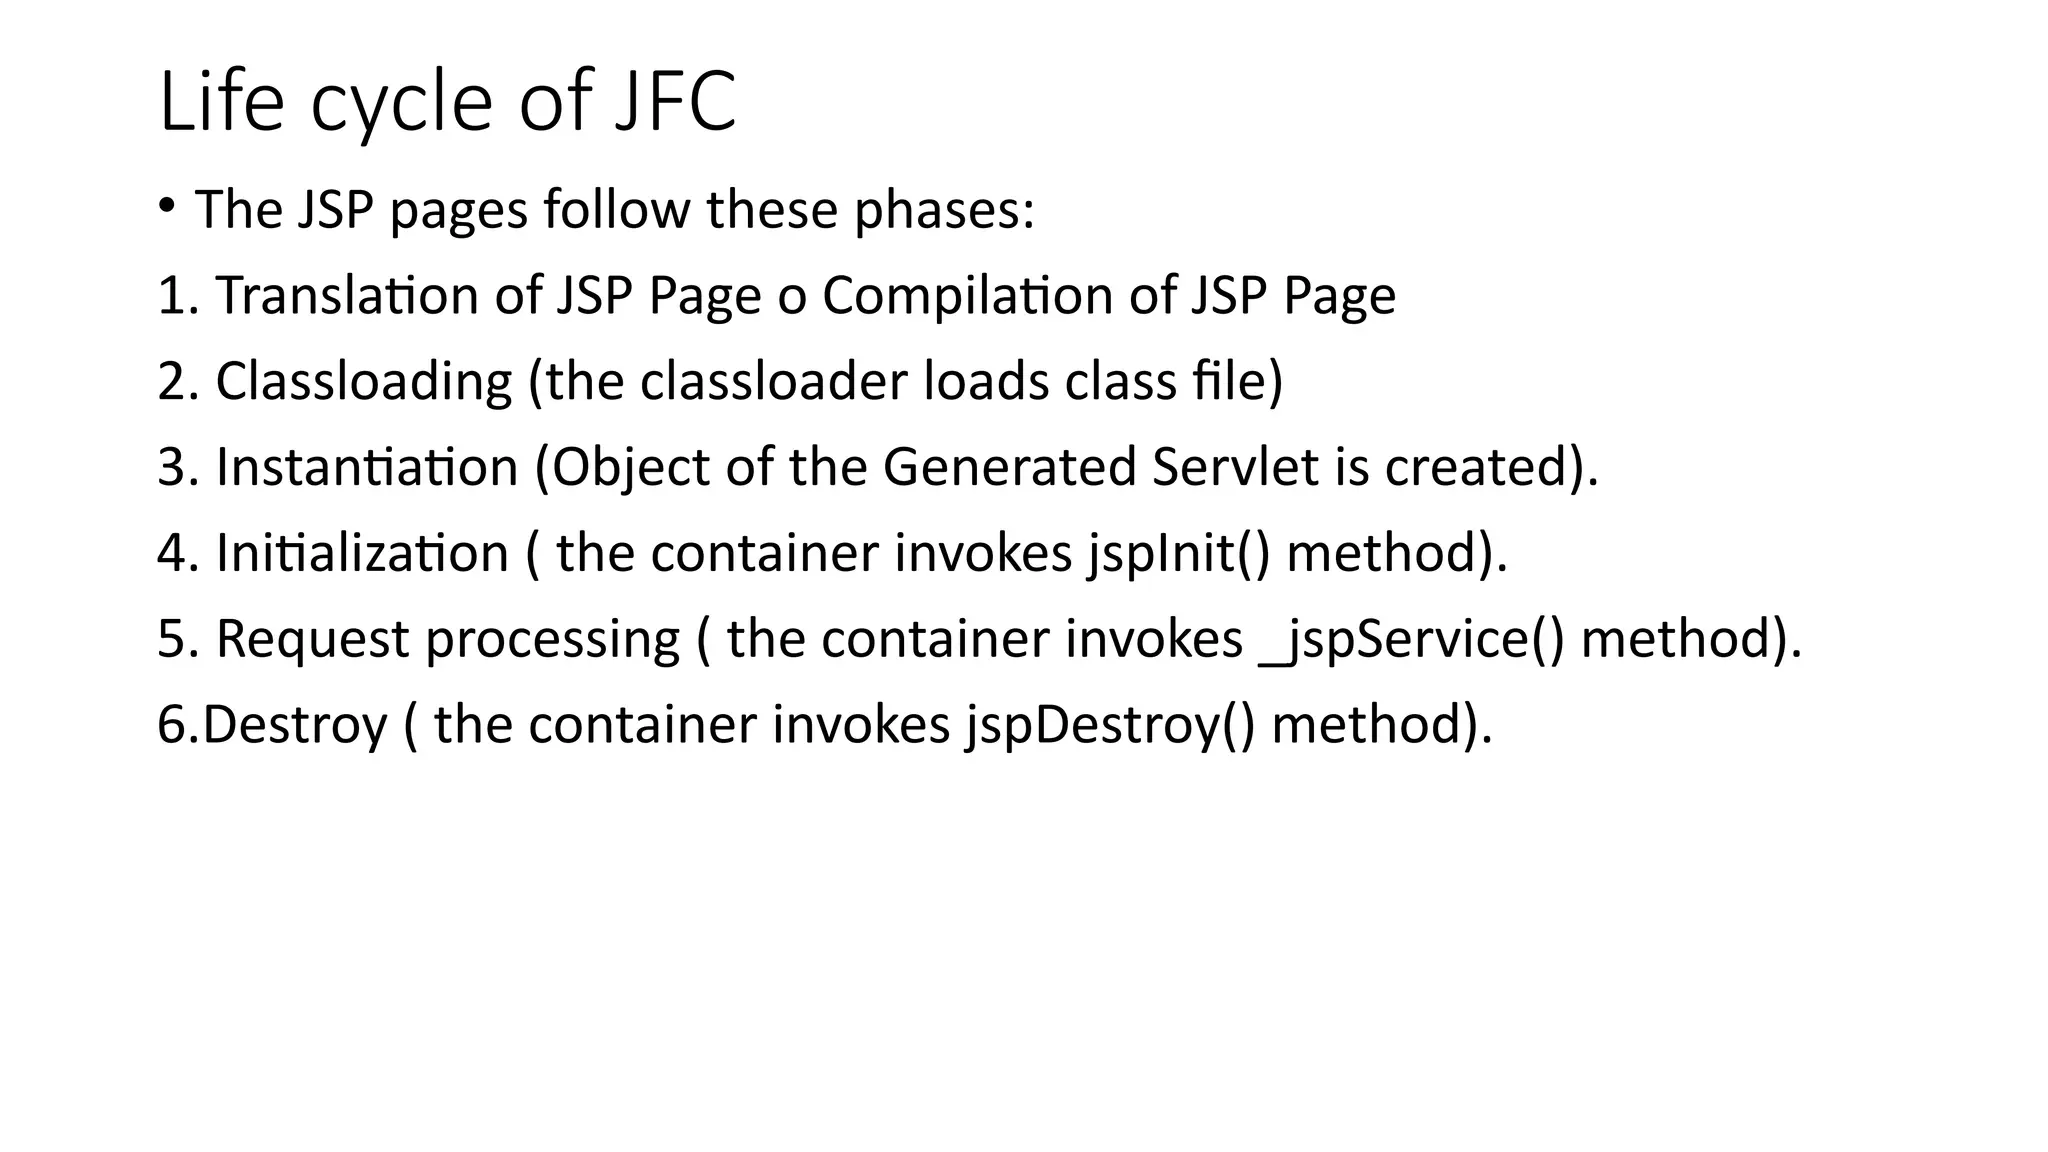
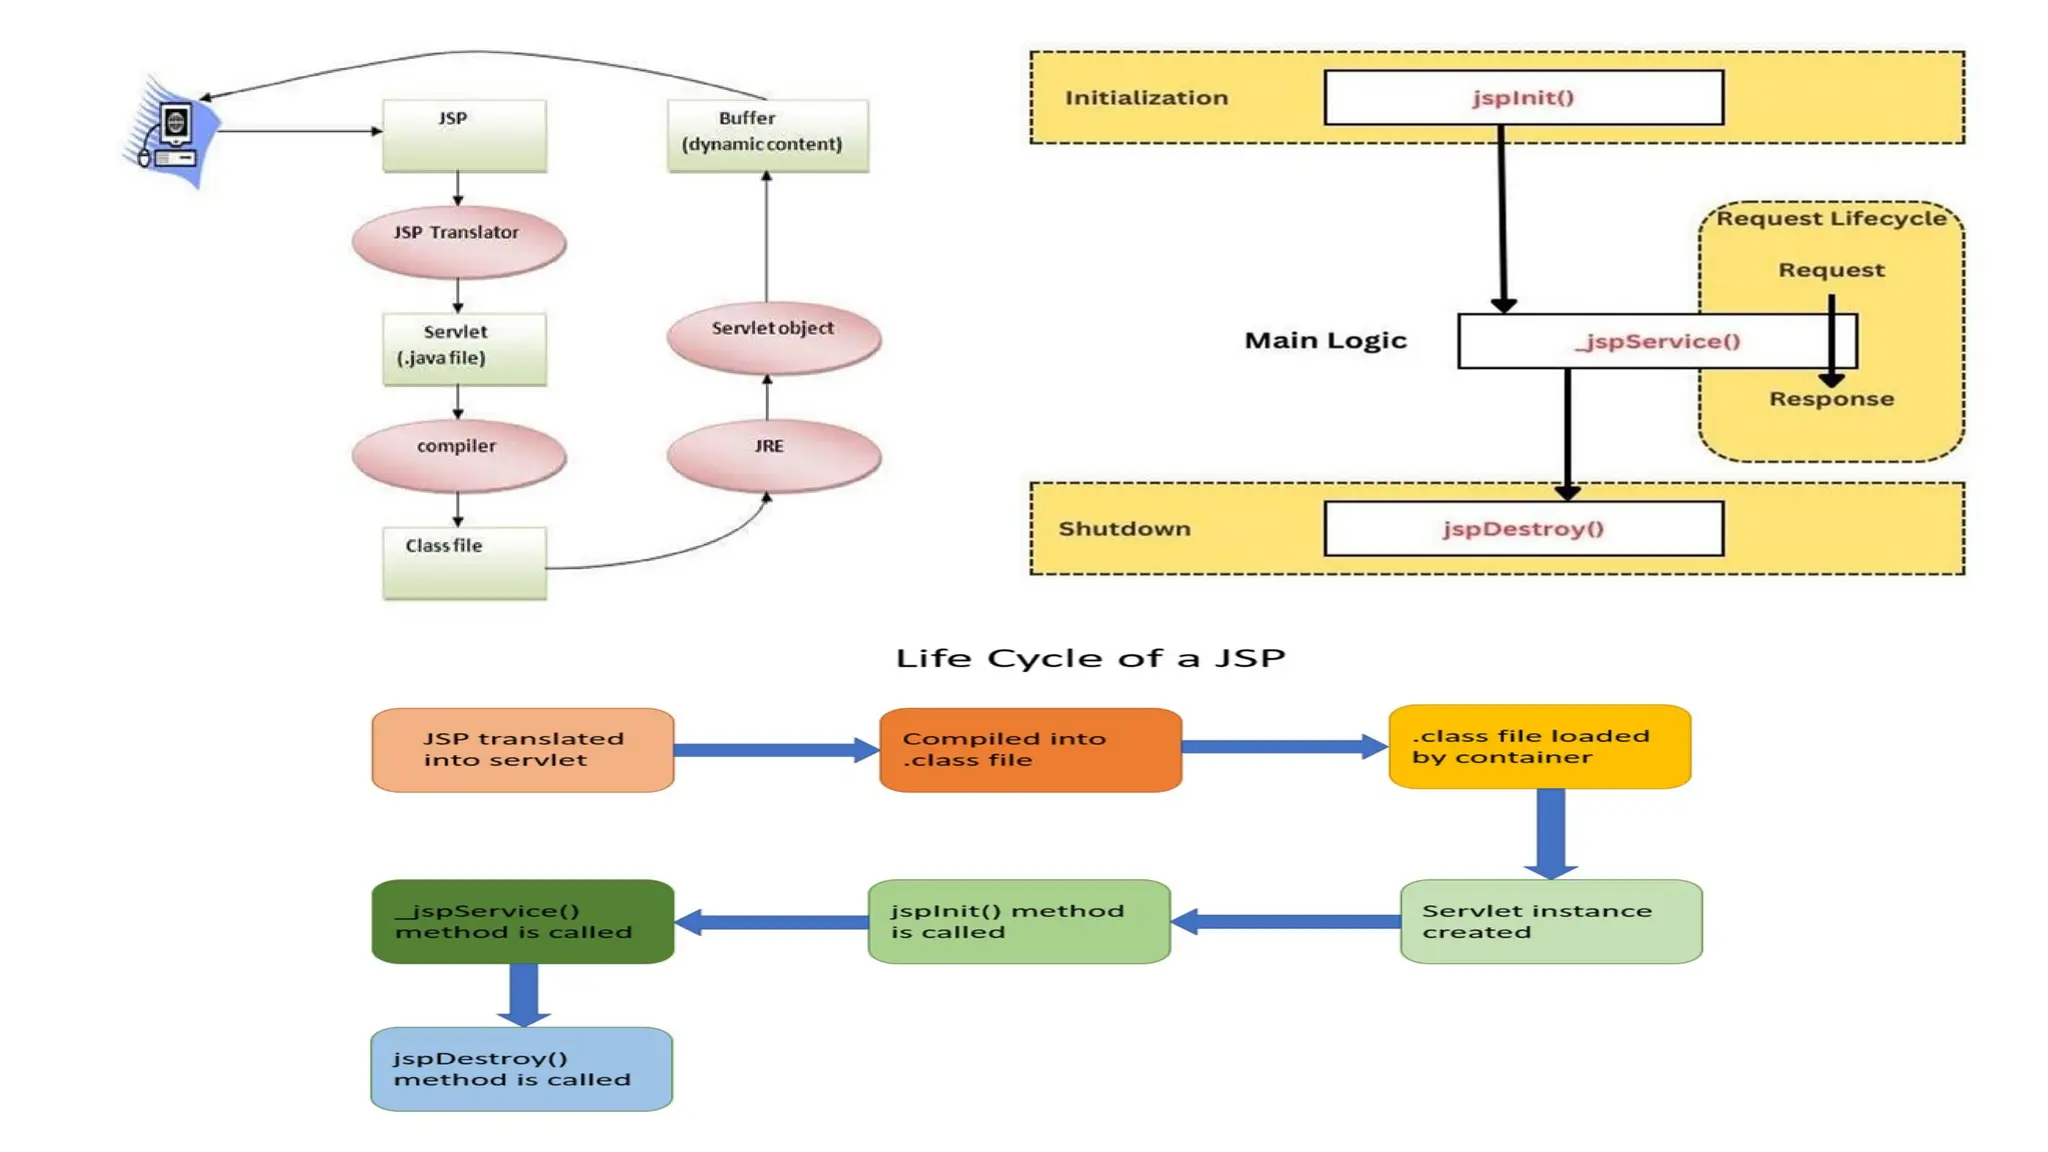
Life cycle ofJFC
• The JSP pages follow these phases:
1. Translation of JSP Page o Compilation of JSP Page
2. Classloading (the classloader loads class file)
3. Instantiation (Object of the Generated Servlet is created).
4. Initialization ( the container invokes jspInit() method).
5. Request processing ( the container invokes _jspService() method).
6.Destroy ( the container invokes jspDestroy() method).
8.
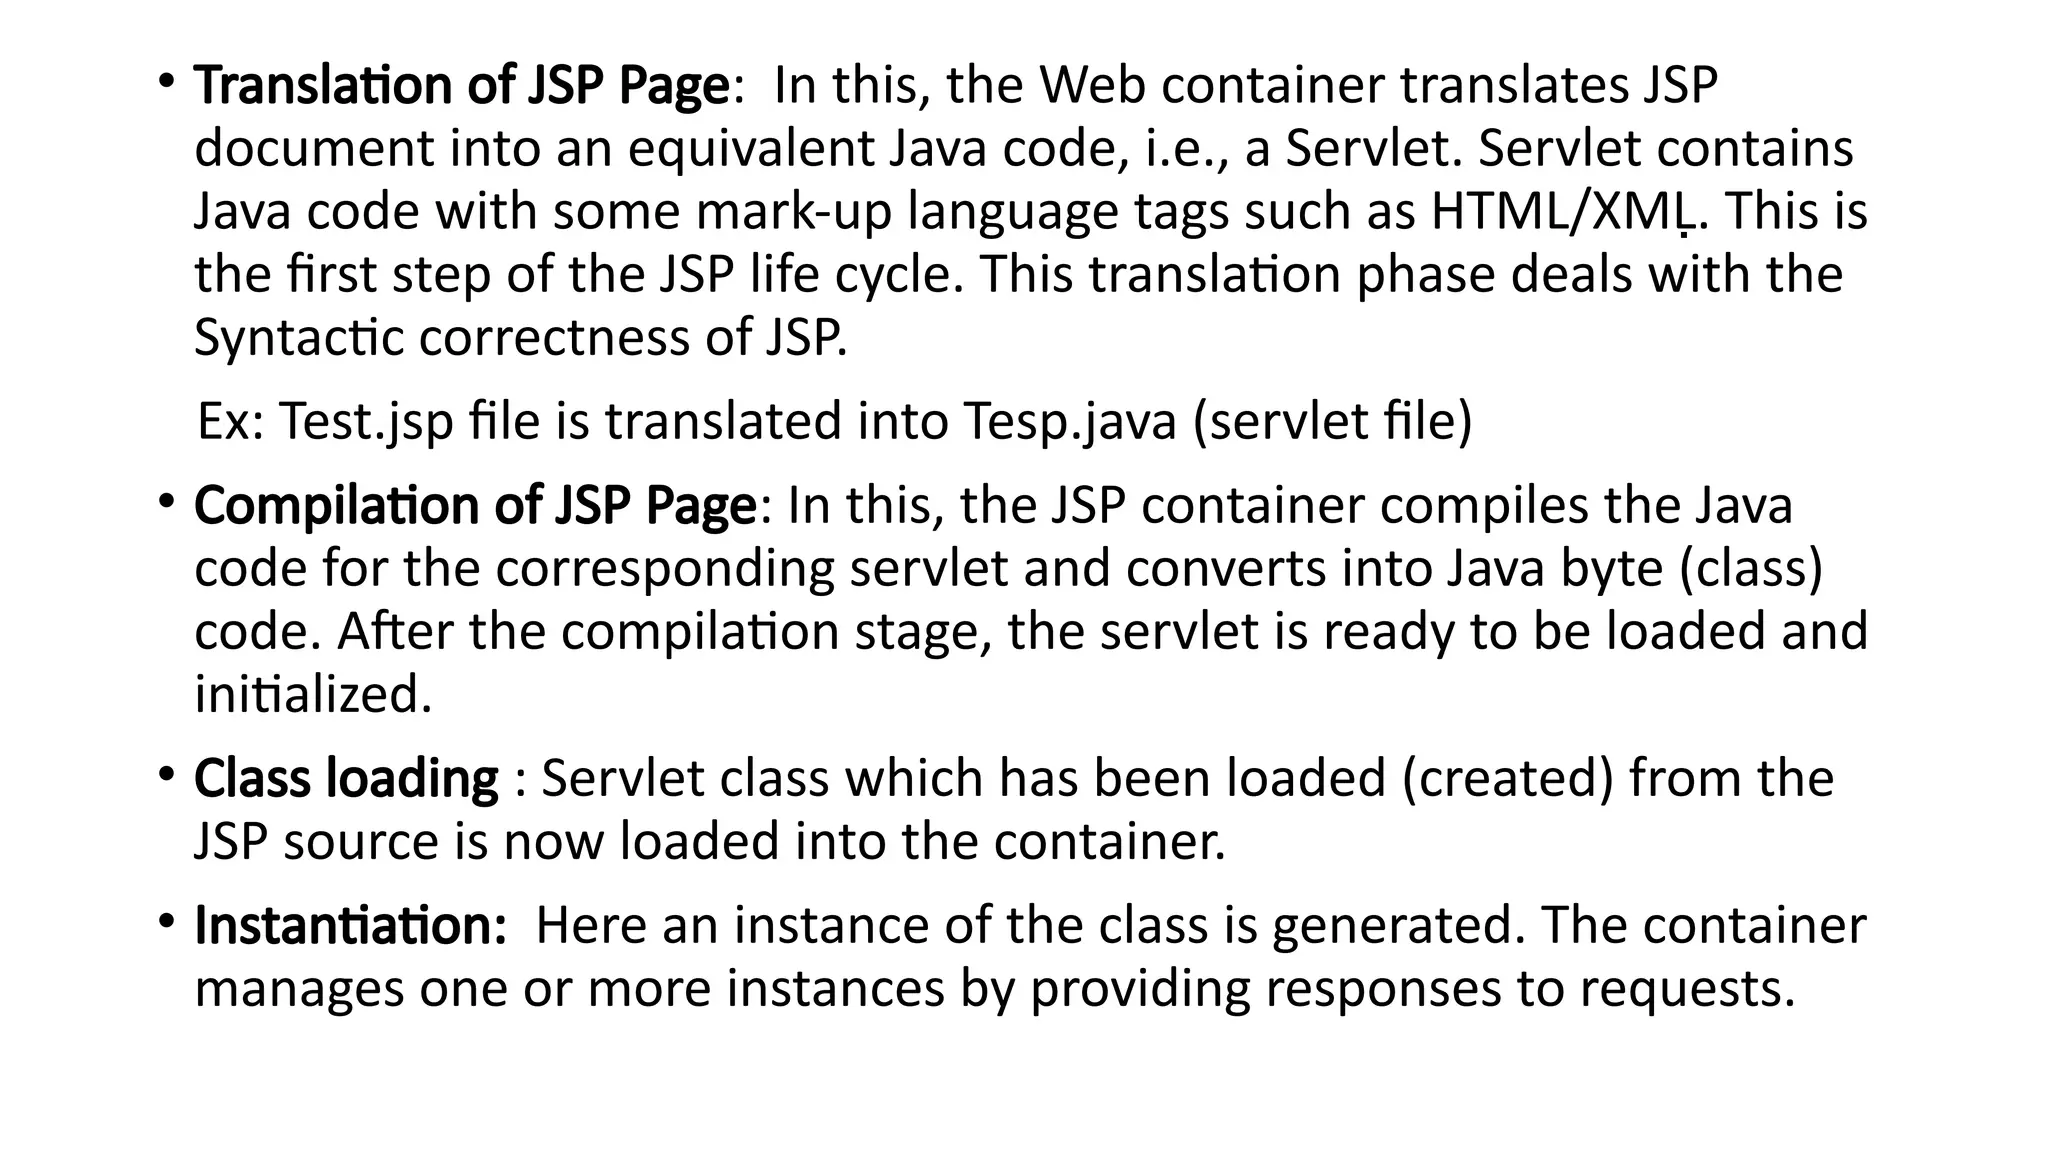
• Translation ofJSP Page: In this, the Web container translates JSP
document into an equivalent Java code, i.e., a Servlet. Servlet contains
Java code with some mark-up language tags such as HTML/XML. This is
the first step of the JSP life cycle. This translation phase deals with the
Syntactic correctness of JSP.
Ex: Test.jsp file is translated into Tesp.java (servlet file)
• Compilation of JSP Page: In this, the JSP container compiles the Java
code for the corresponding servlet and converts into Java byte (class)
code. After the compilation stage, the servlet is ready to be loaded and
initialized.
• Class loading : Servlet class which has been loaded (created) from the
JSP source is now loaded into the container.
• Instantiation: Here an instance of the class is generated. The container
manages one or more instances by providing responses to requests.
9.
• Initialization: jspInit()method is called only once during the life cycle
immediately after the generation of Servlet instance from JSP.
• Request processing: jspService() method is used to serve the raised
requests by JSP. It takes request and response objects as parameters.
This method cannot be overridden.
• JSP Clean-up: In order to remove the JSP from the use by the
container or to destroy the method for servlets jspDestroy()method is
used. This method is called once, if you need to perform any cleanup
task like closing open files, releasing database connections
jspDestroy() can be overridden.
10.
1.jspInit()
• This isdeclared on the JSP page. This method is called only once in the
complete lifecycle of JSP. This is used to initialize configuration params in a
deployment descriptor. This method can be overridden using a JSP declaration
scripting element.
public void jspInit()
{
// Initialization code...
}
• When a container loads a JSP it invokes the jspInit() method before servicing
any requests. If you need to perform JSP-specific initialization, override the
jspInit() method
• Typically, initialization is performed only once and as with the servlet init
method, you generally initialize database connections, open files, and create
lookup tables in the jspInit method.
11.
2._jspService()
• It isinvoked by the JSP container for each client request. This method passes
the request and response objects. It cannot be overridden, and hence, it starts
with an underscore. It is defined and declared in the HttpJspPage interface.
• Whenever a browser requests a JSP and the page has been loaded and
initialized, the JSP engine invokes the _jspService() method in the JSP.
• The _jspService() method takes an HttpServletRequest and an
HttpServletResponse as its parameters as follows:
void _jspService(HttpServletRequest request, HttpServletResponse response) {
// Service handling code...
}
• The _jspService() method of a JSP is invoked on request basis. This is
responsible for generating the response for that request and this method is
also responsible for generating responses to all seven of the HTTP methods,
i.e., GET, POST, DELETE, etc.
12.
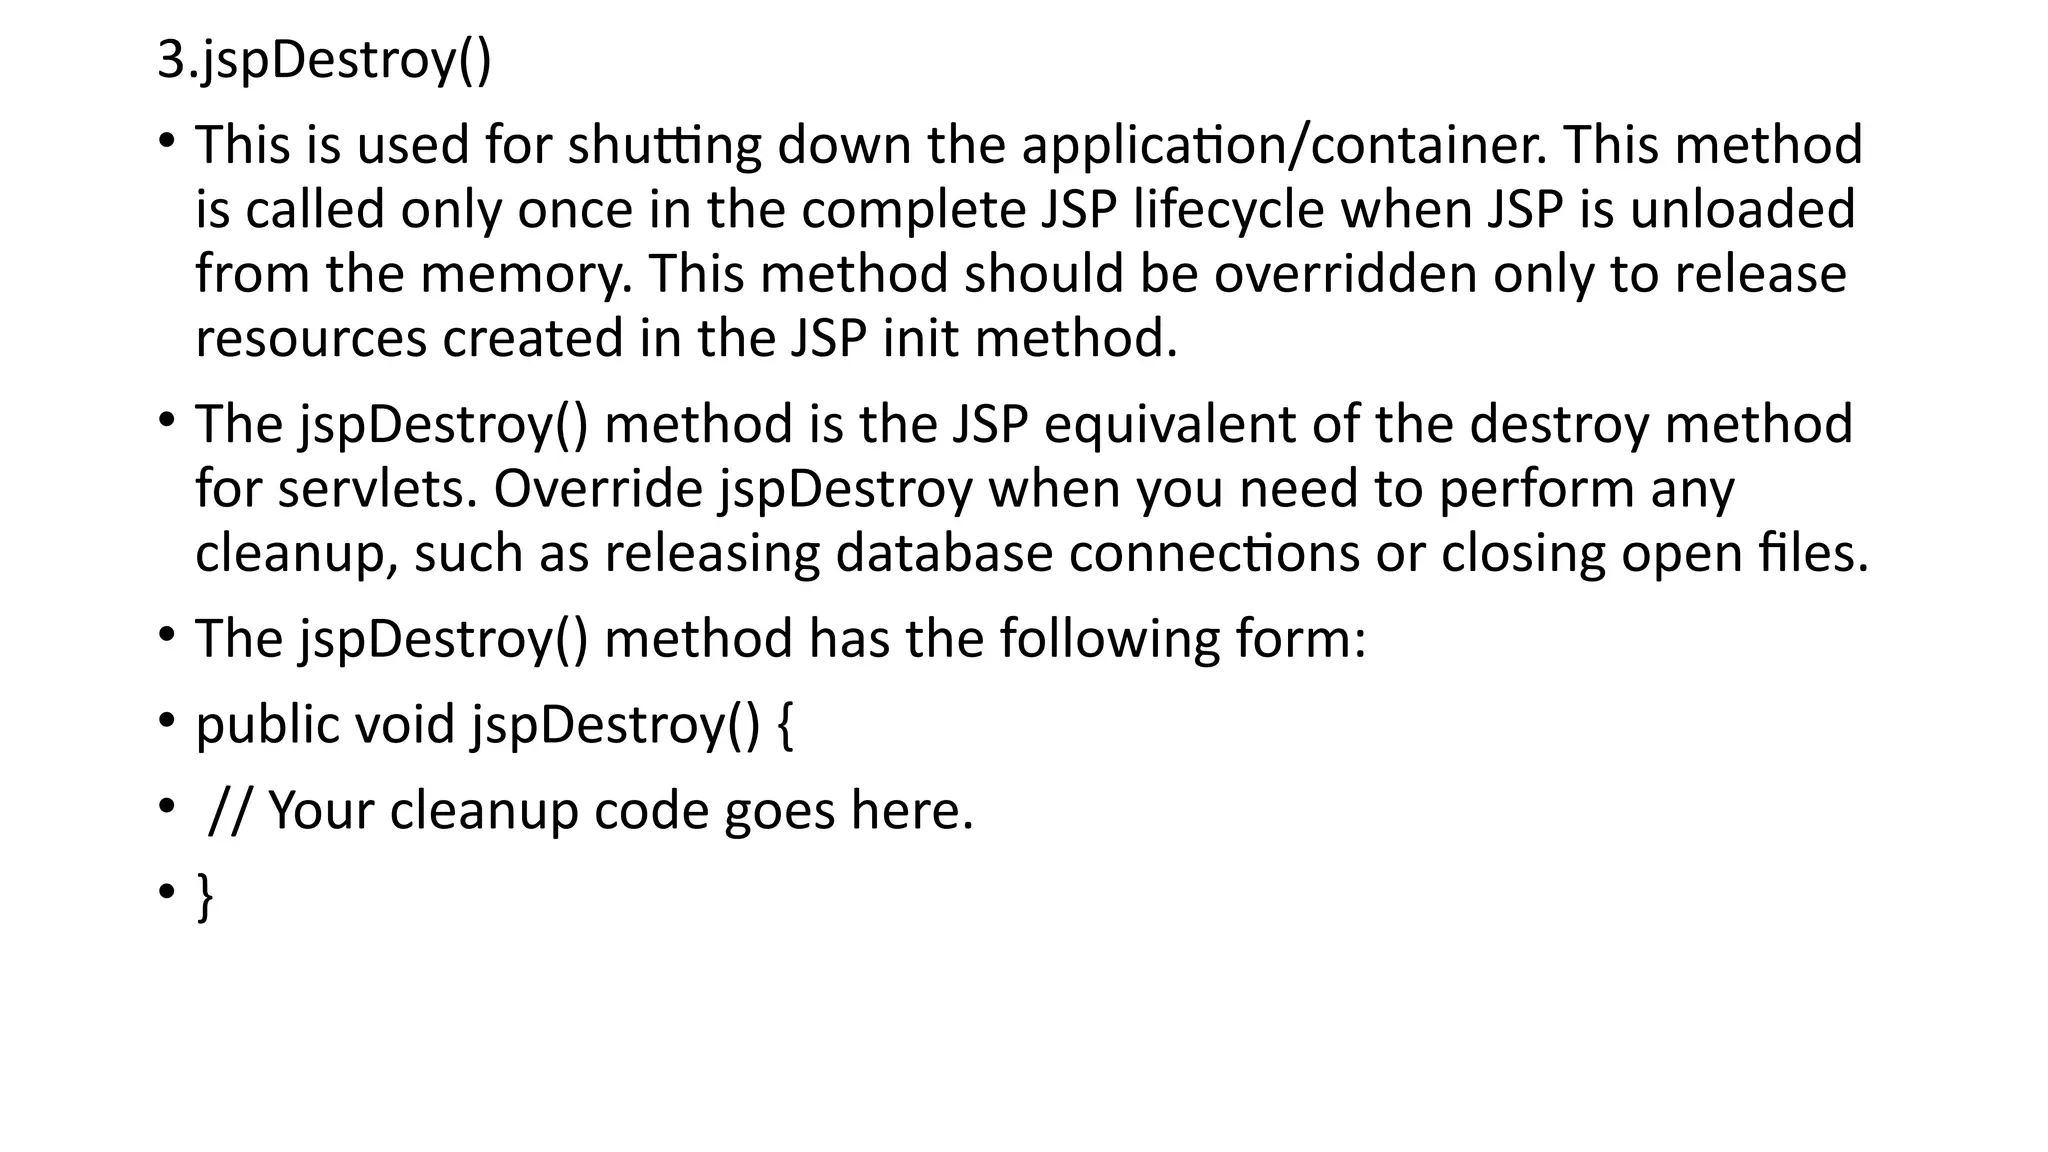
3.jspDestroy()
• This isused for shutting down the application/container. This method
is called only once in the complete JSP lifecycle when JSP is unloaded
from the memory. This method should be overridden only to release
resources created in the JSP init method.
• The jspDestroy() method is the JSP equivalent of the destroy method
for servlets. Override jspDestroy when you need to perform any
cleanup, such as releasing database connections or closing open files.
• The jspDestroy() method has the following form:
• public void jspDestroy() {
• // Your cleanup code goes here.
• }
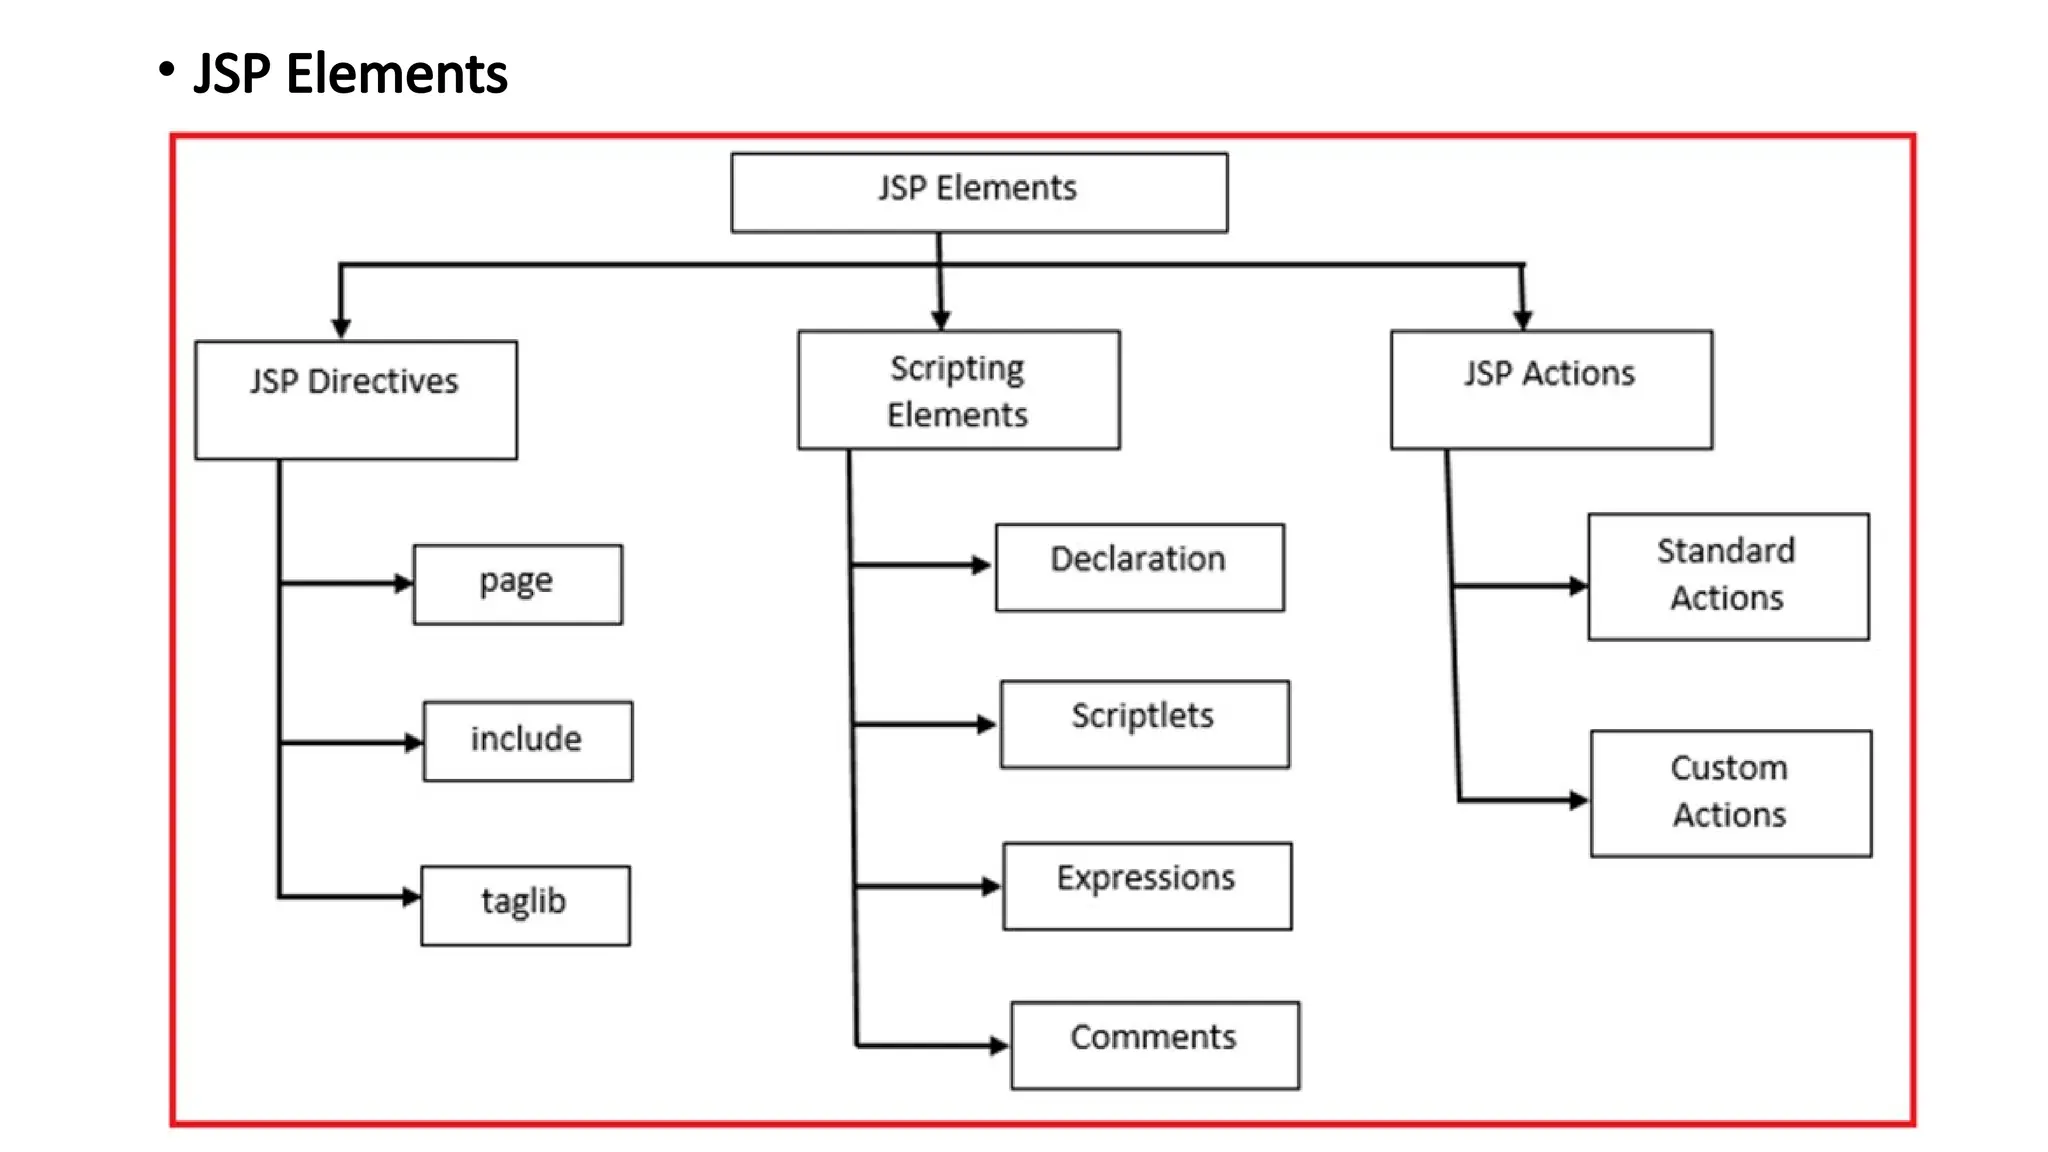
JSP Scripting Elements:
•JSP scripting elements are one of the most vital elements of a JSP code. These <
% %> tags contain JSP scripting elements. These tags are of the utmost
importance as, at the time of translation, the JSP engine will consider anything
inside these tags. Only this code will convert to Java code. Code other than this
is plain or HTML text.
• The scripting elements thus help to embed java code to the HTML, CSS,
JavaScript code. There are three main subdivisions of scripting elements in JSP.
• There are three types of Scripting Elements:
1.Declarations: Declaration of the form that is inserted into the body of the
servlet class, outside of any existing methods.
2.Scriptlets: Scriptlets of the form that are inserted into the servlets service
method.
3.Expressions: Expressions of the form that are evaluated and inserted into out
15.
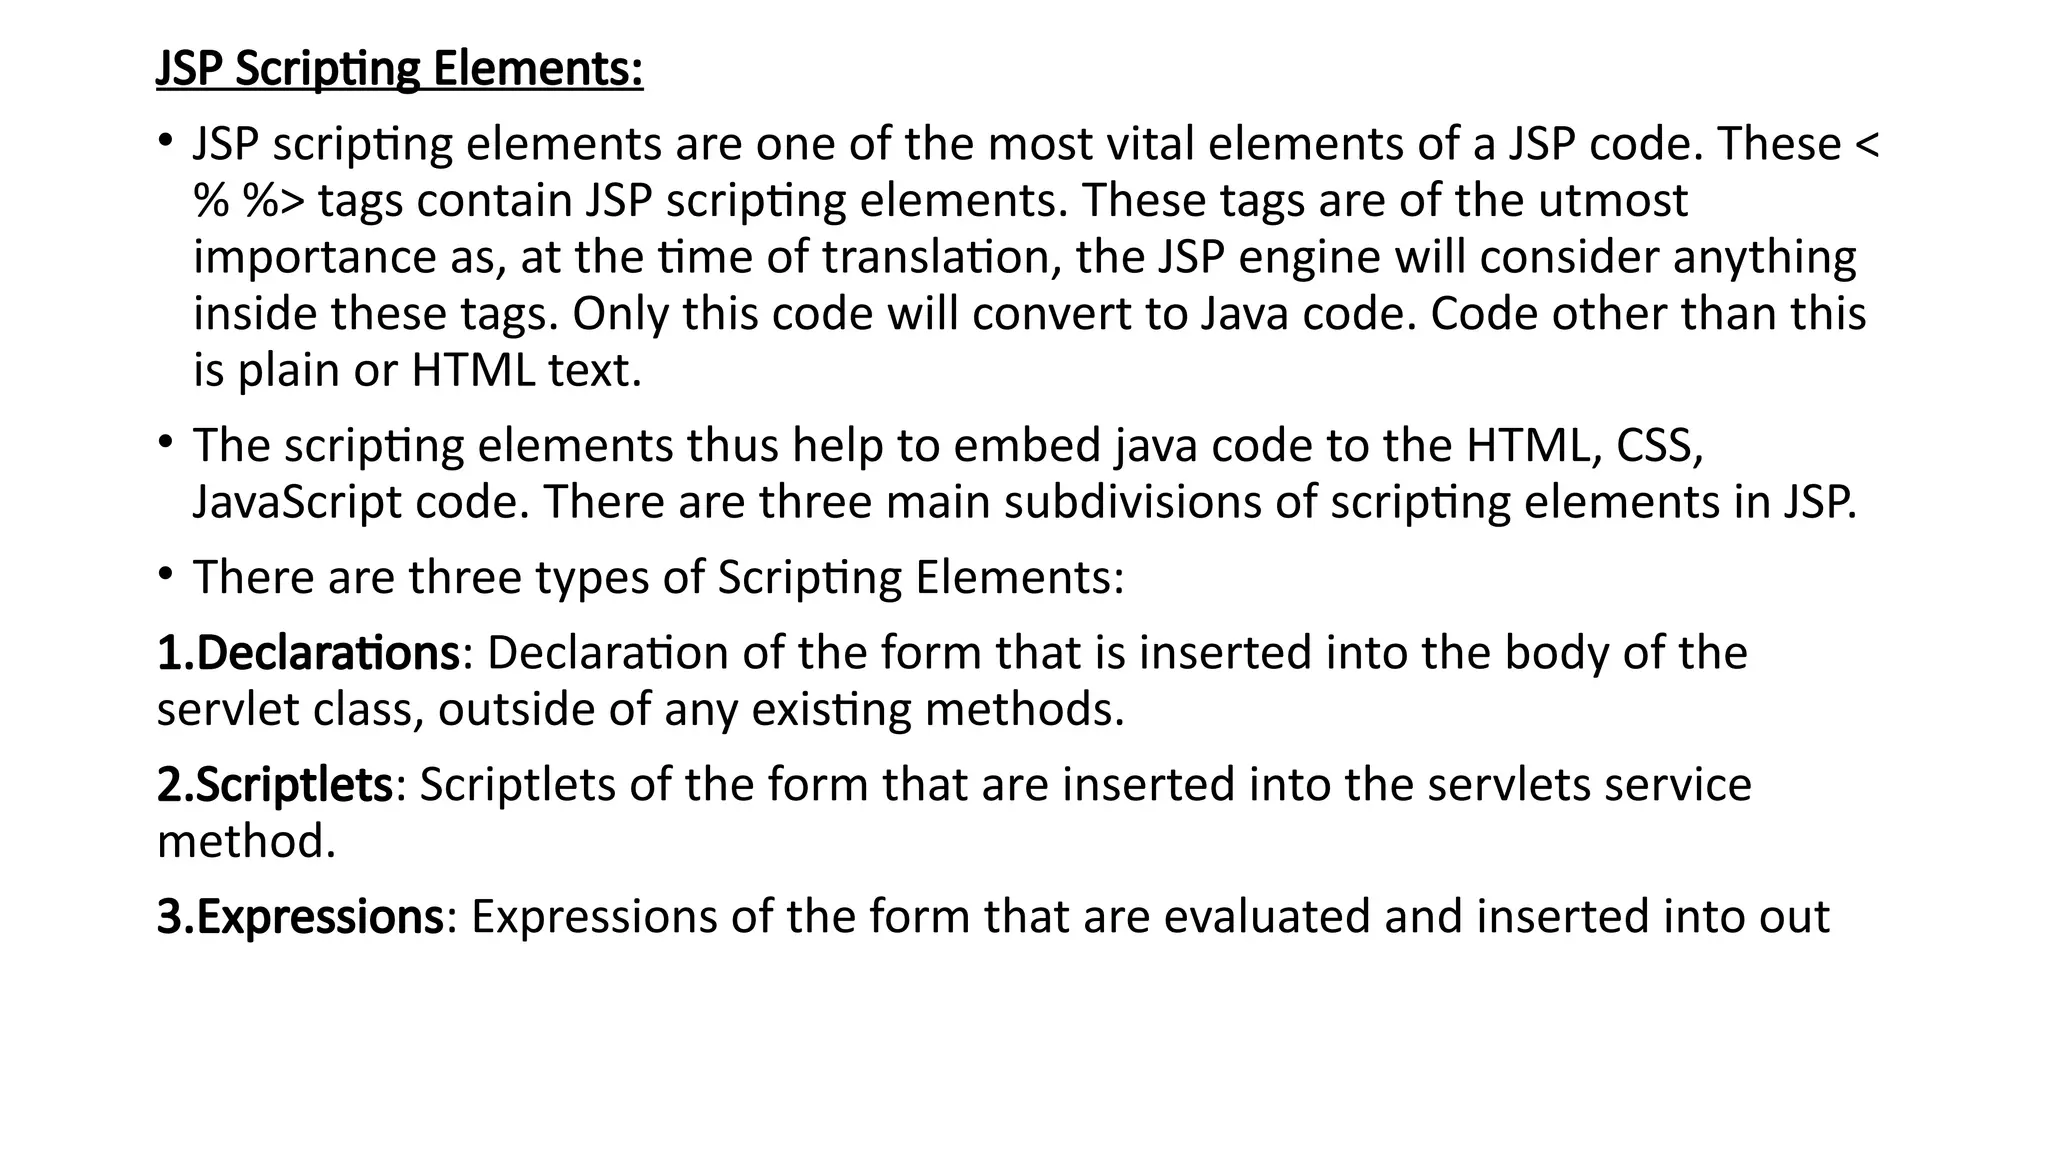
1.Declarations
• The JSPdeclaration tag is used to declare fields and methods.
• The JSP declaration is surrounded by the sign . For example, if you want to
declare a variable x, you can use JSP declaration as follows:
• The final semicolon is very important.
• The difference between a variable using declaration and a variable is
declared using Scriptlet is that a variable declare using declaration tag is
accessible by all the methods while a variable declared using Scriptlet is only
accessible to the method _jspservice of the generated servlet from JSP page.
• The syntax of the declaration tag is as follows:
17.
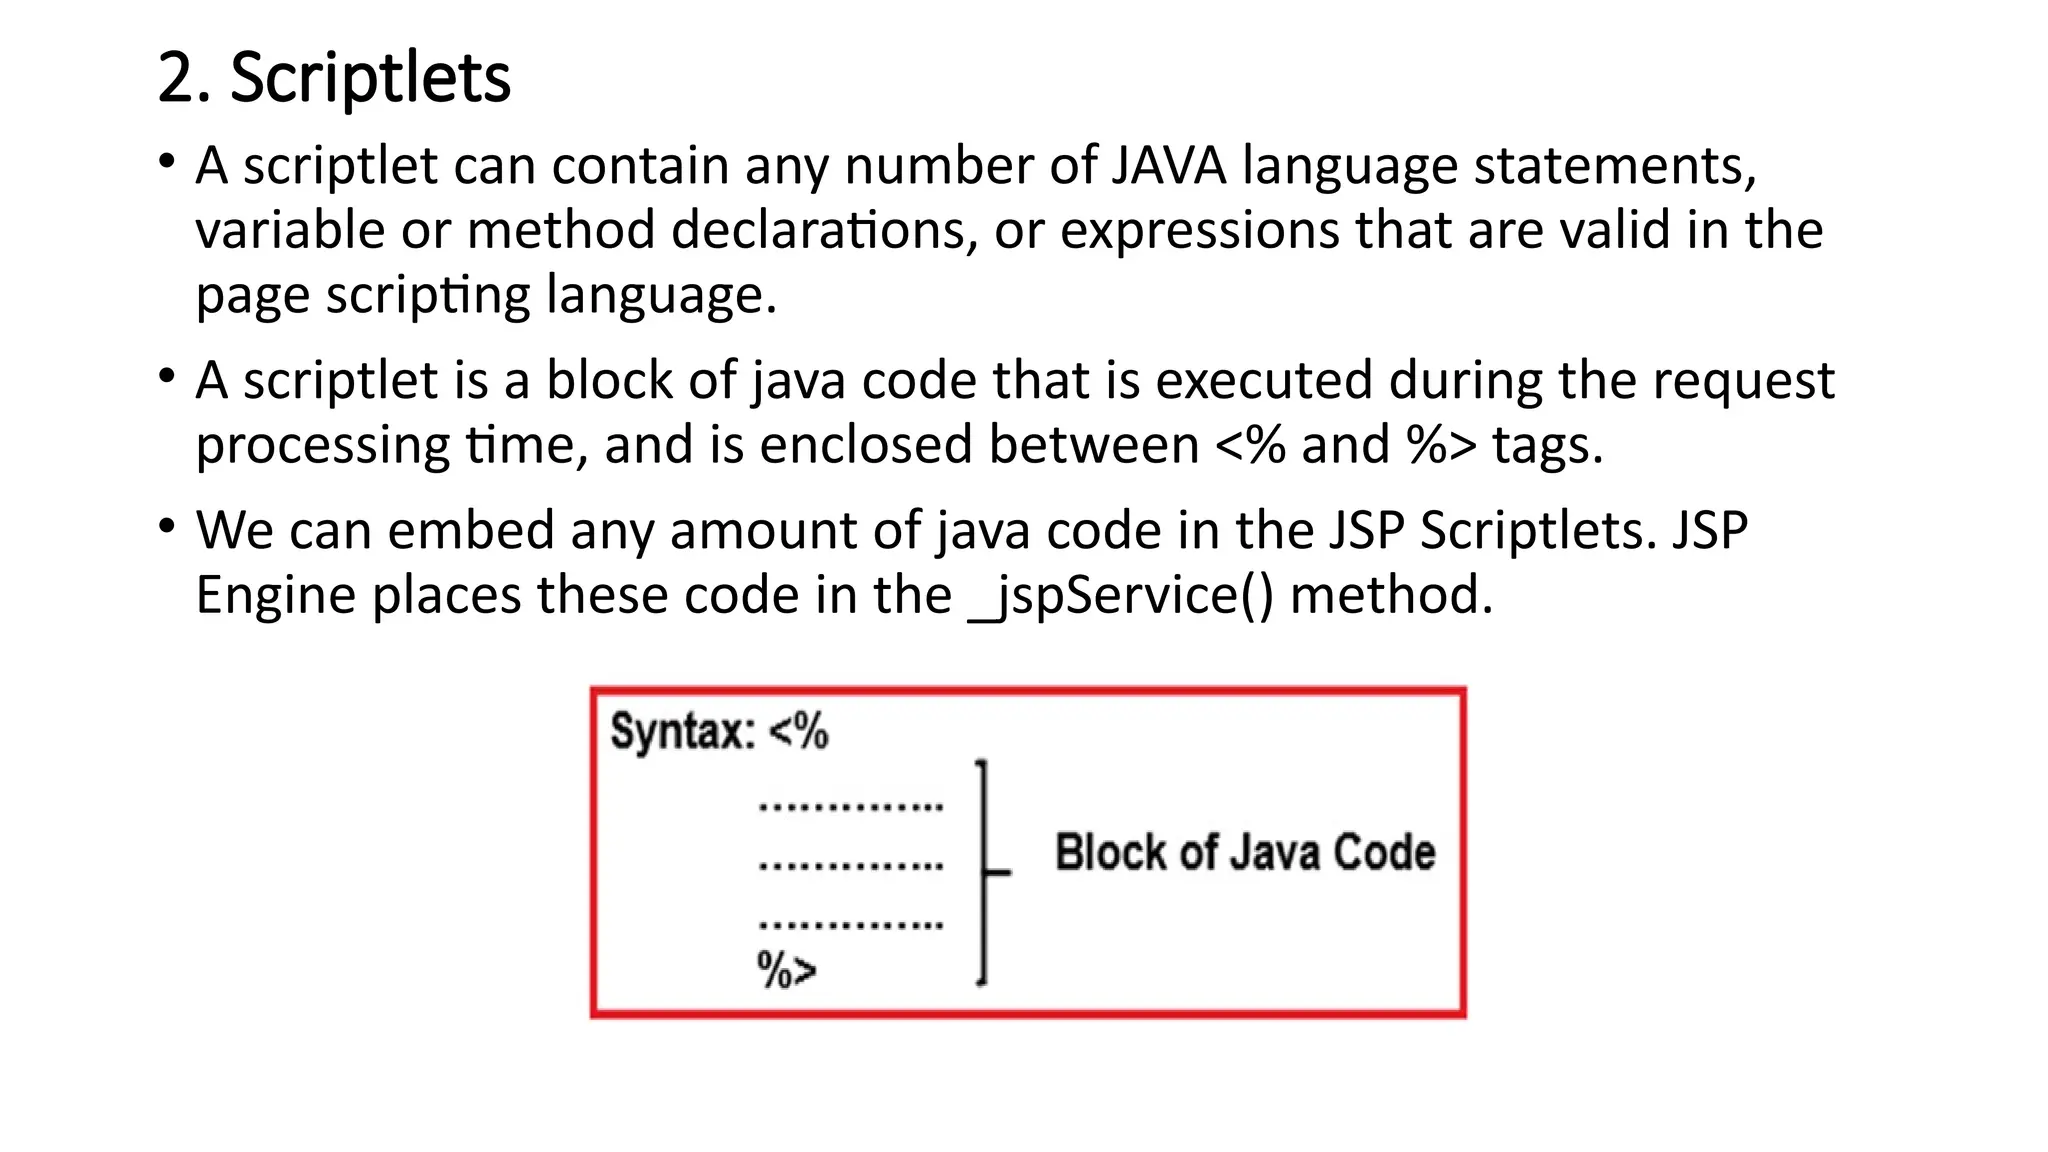
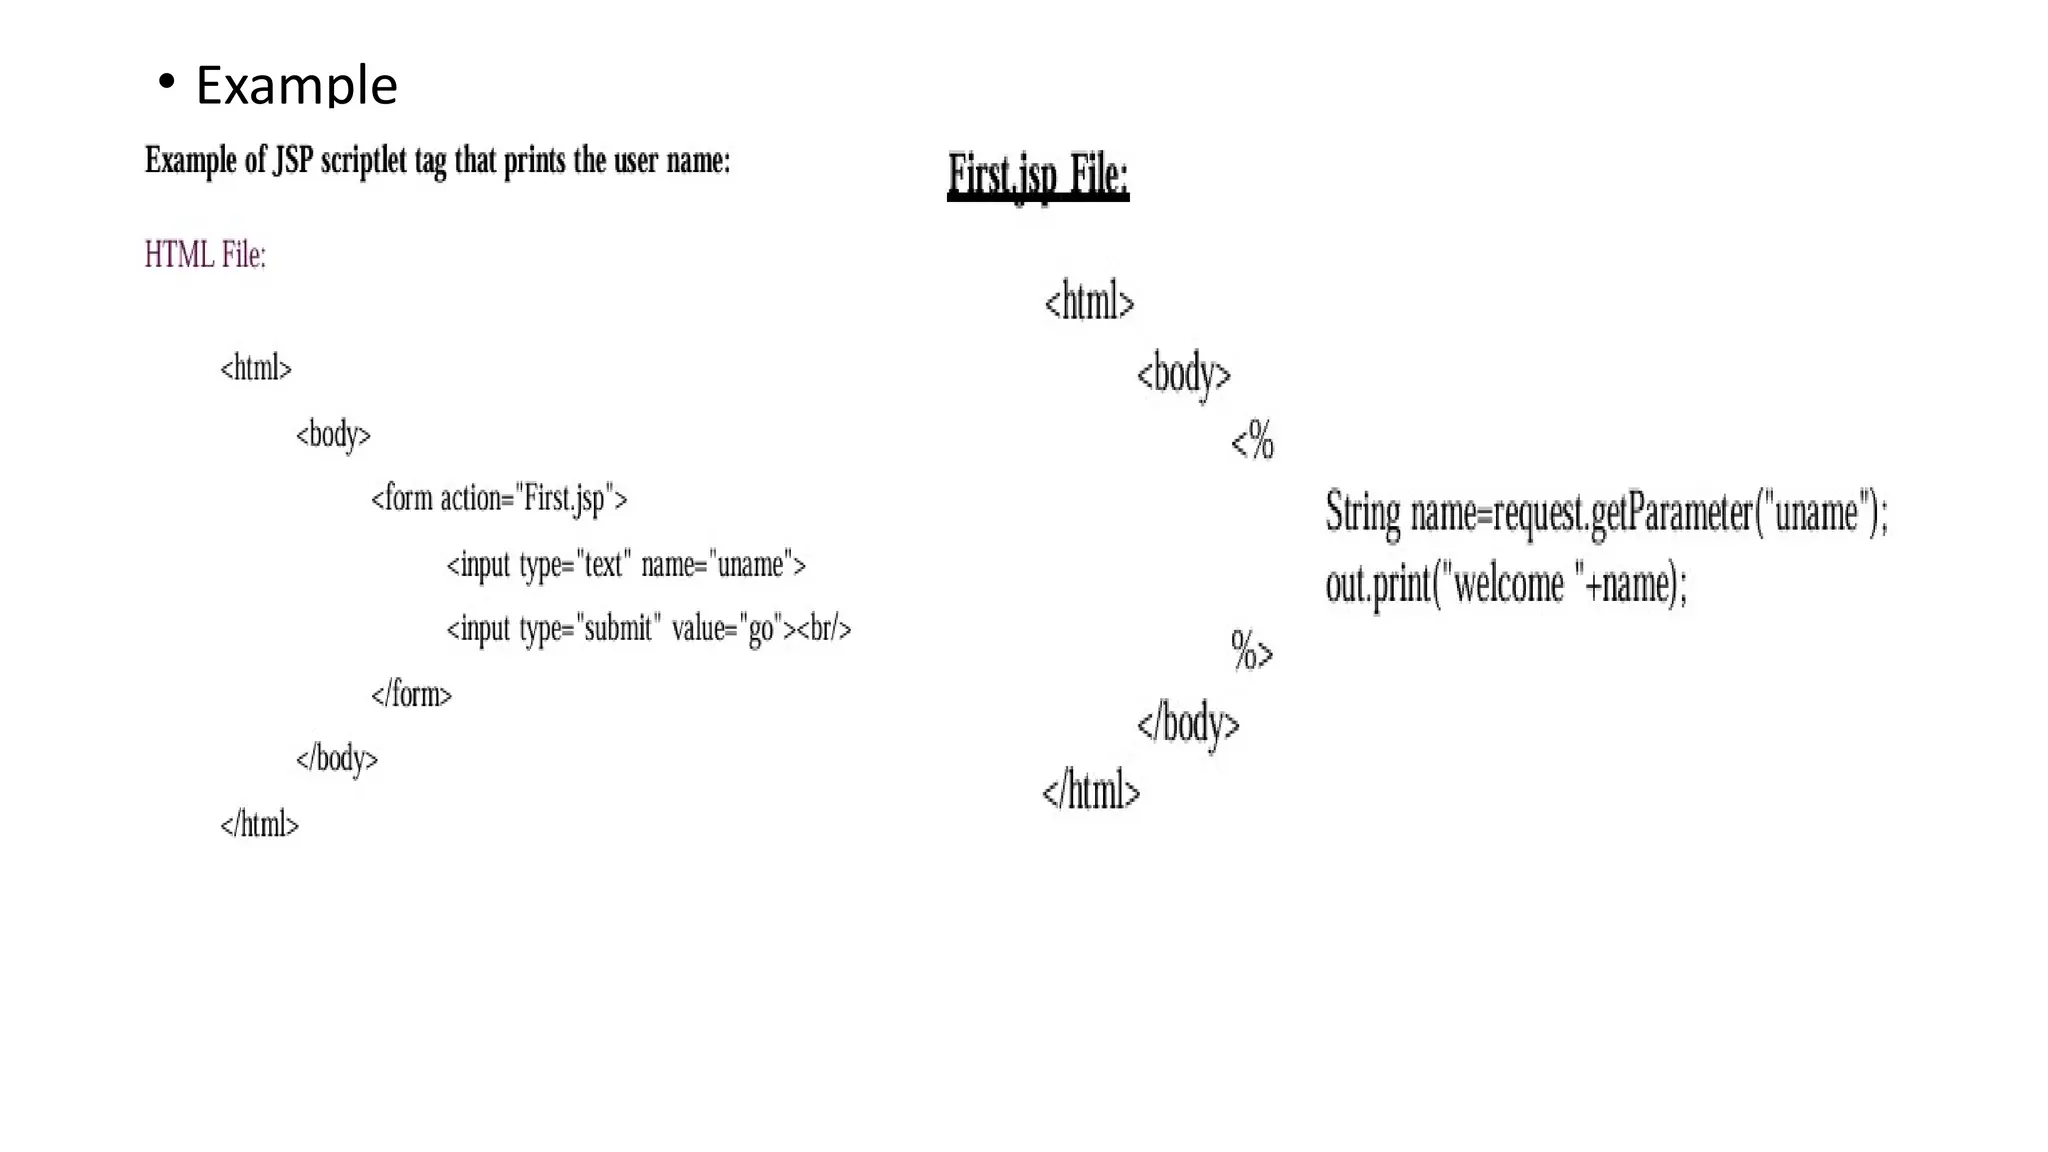
2. Scriptlets
• Ascriptlet can contain any number of JAVA language statements,
variable or method declarations, or expressions that are valid in the
page scripting language.
• A scriptlet is a block of java code that is executed during the request
processing time, and is enclosed between <% and %> tags.
• We can embed any amount of java code in the JSP Scriptlets. JSP
Engine places these code in the _jspService() method.
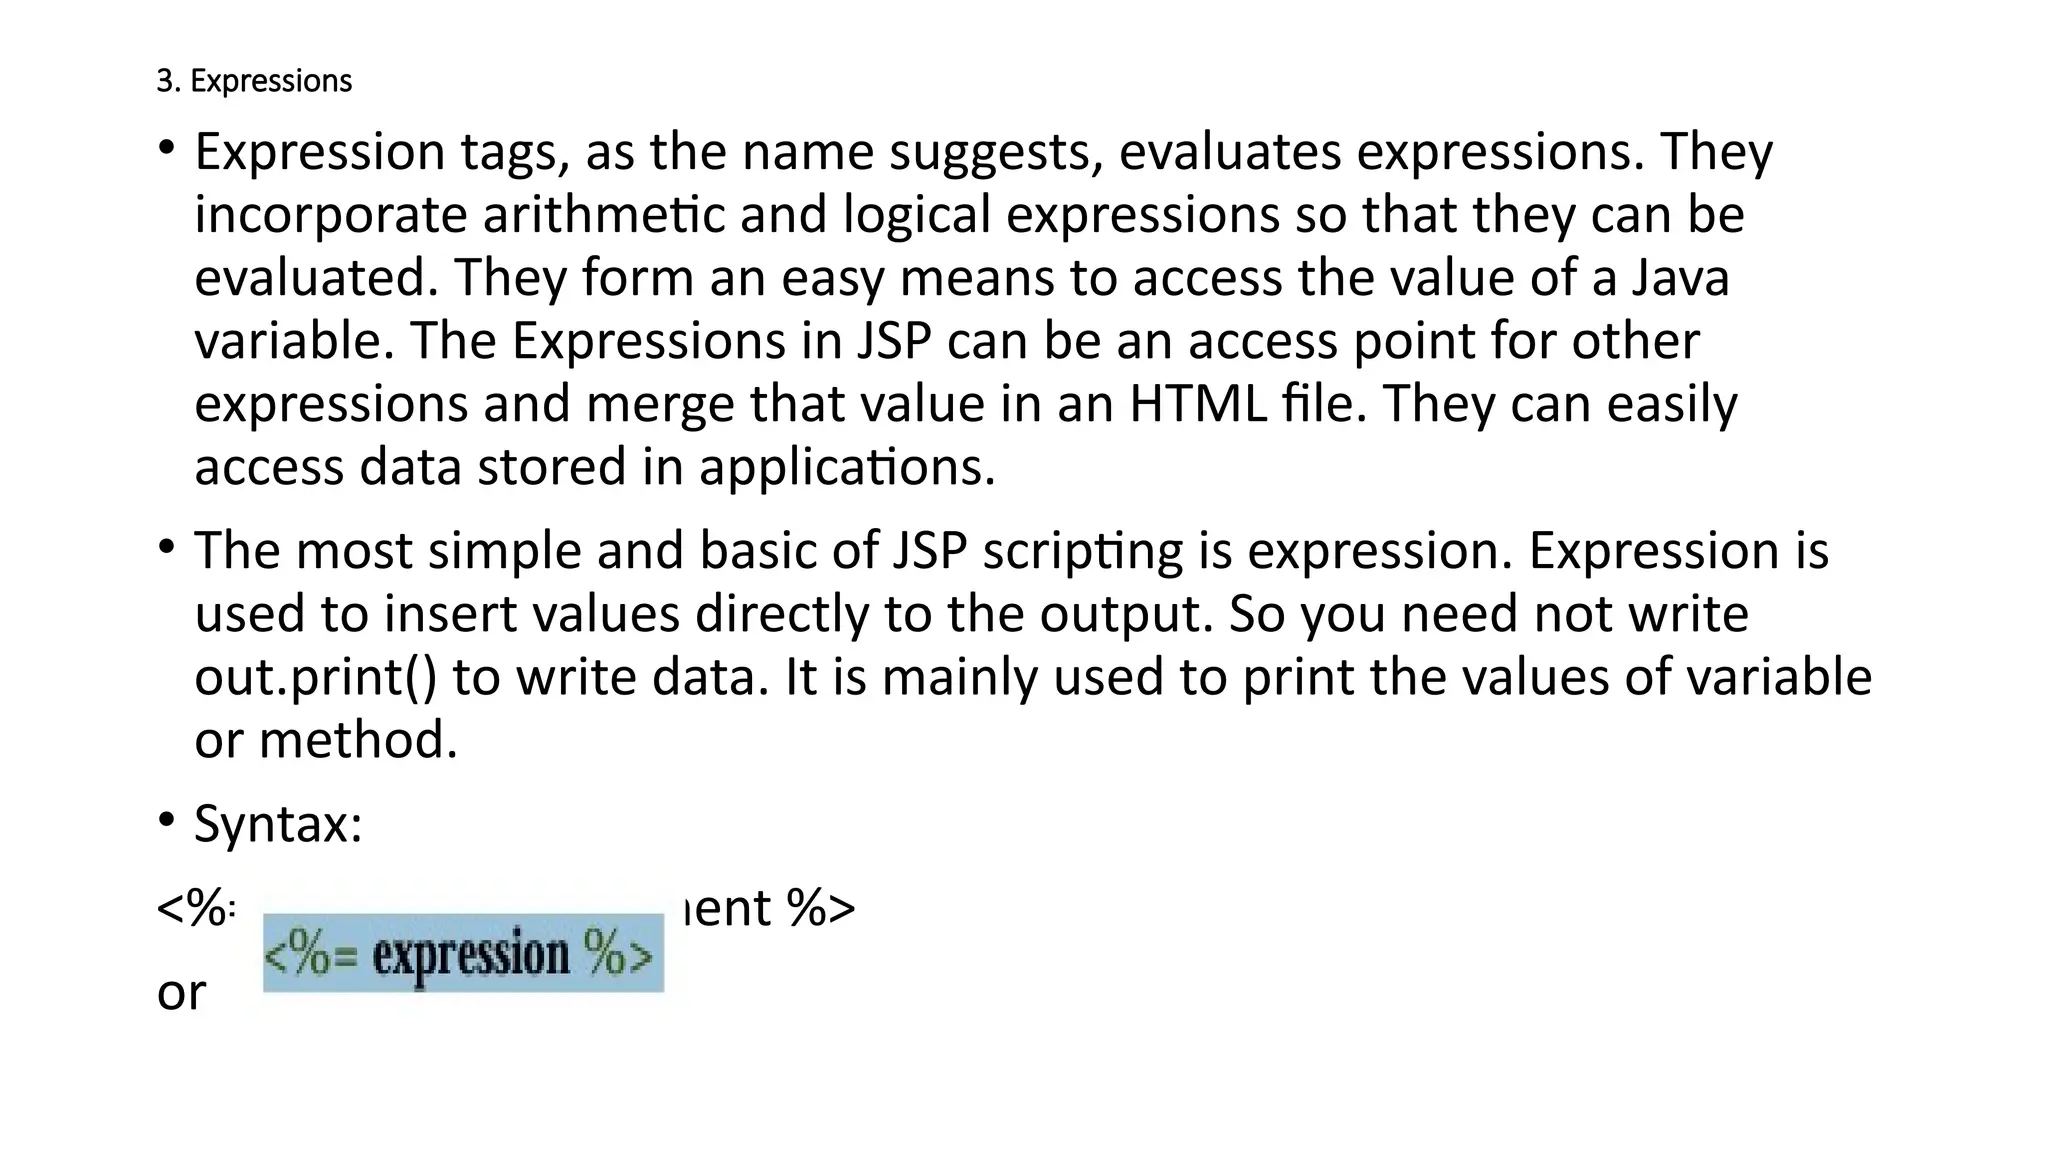
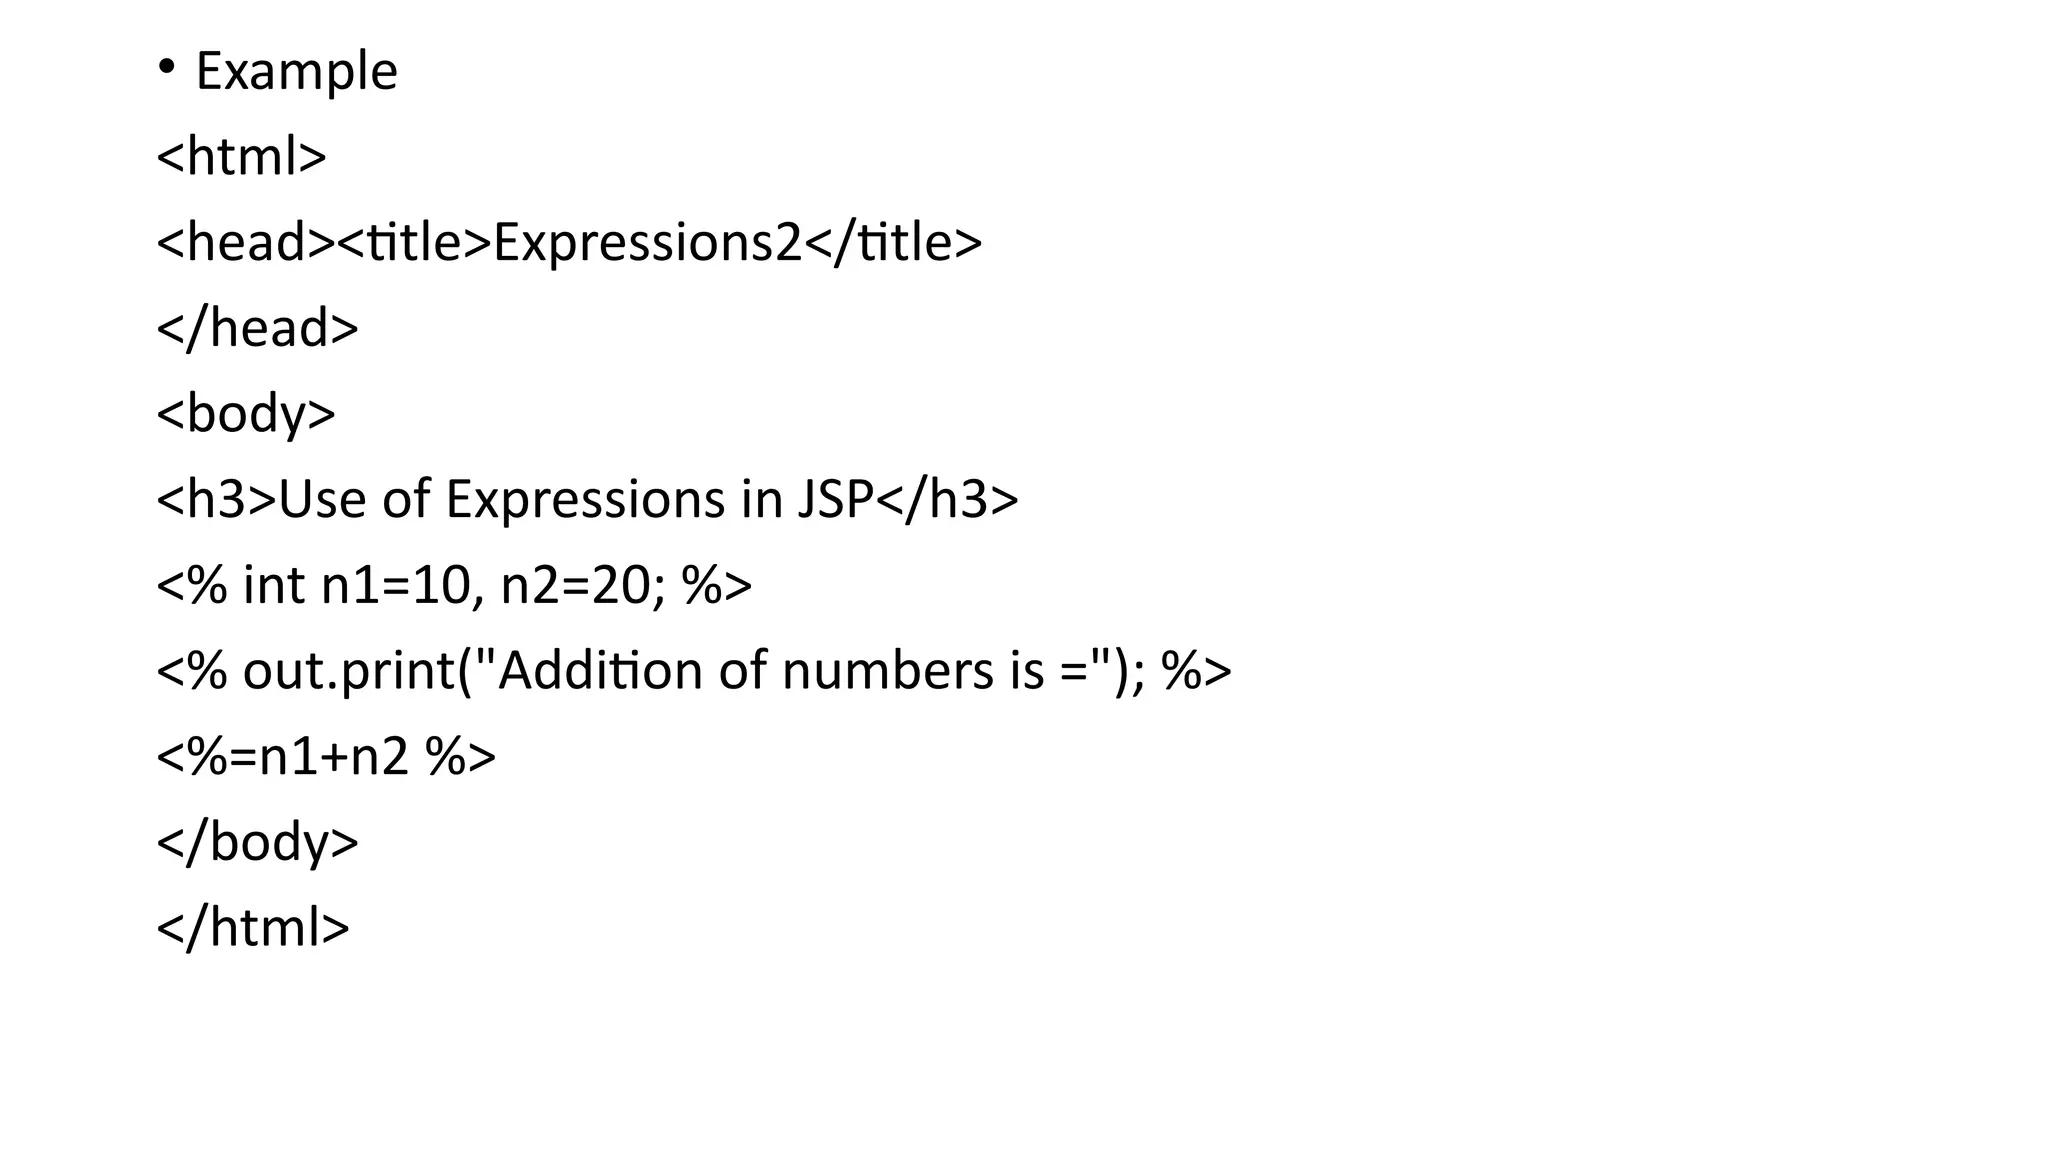
3. Expressions
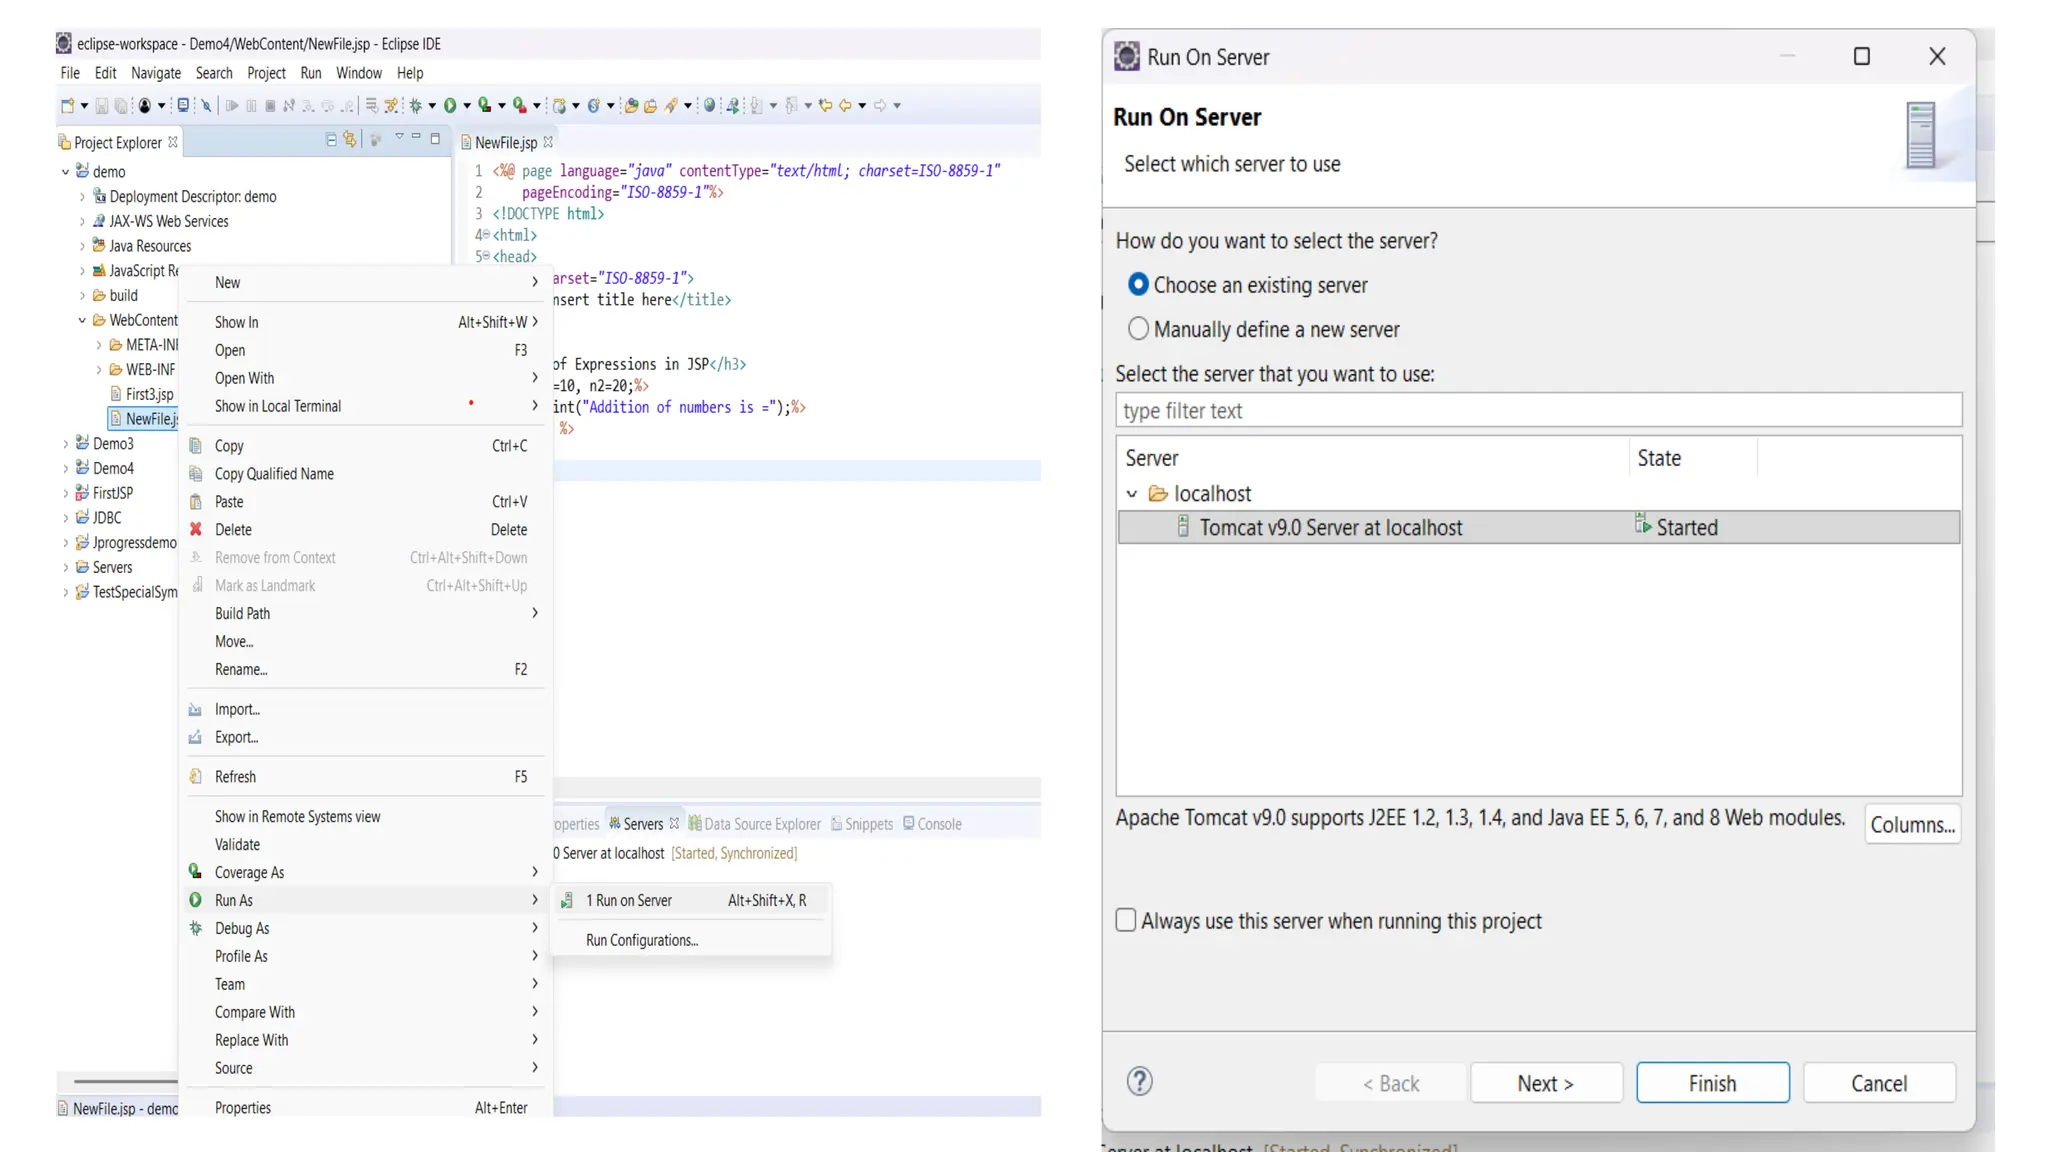
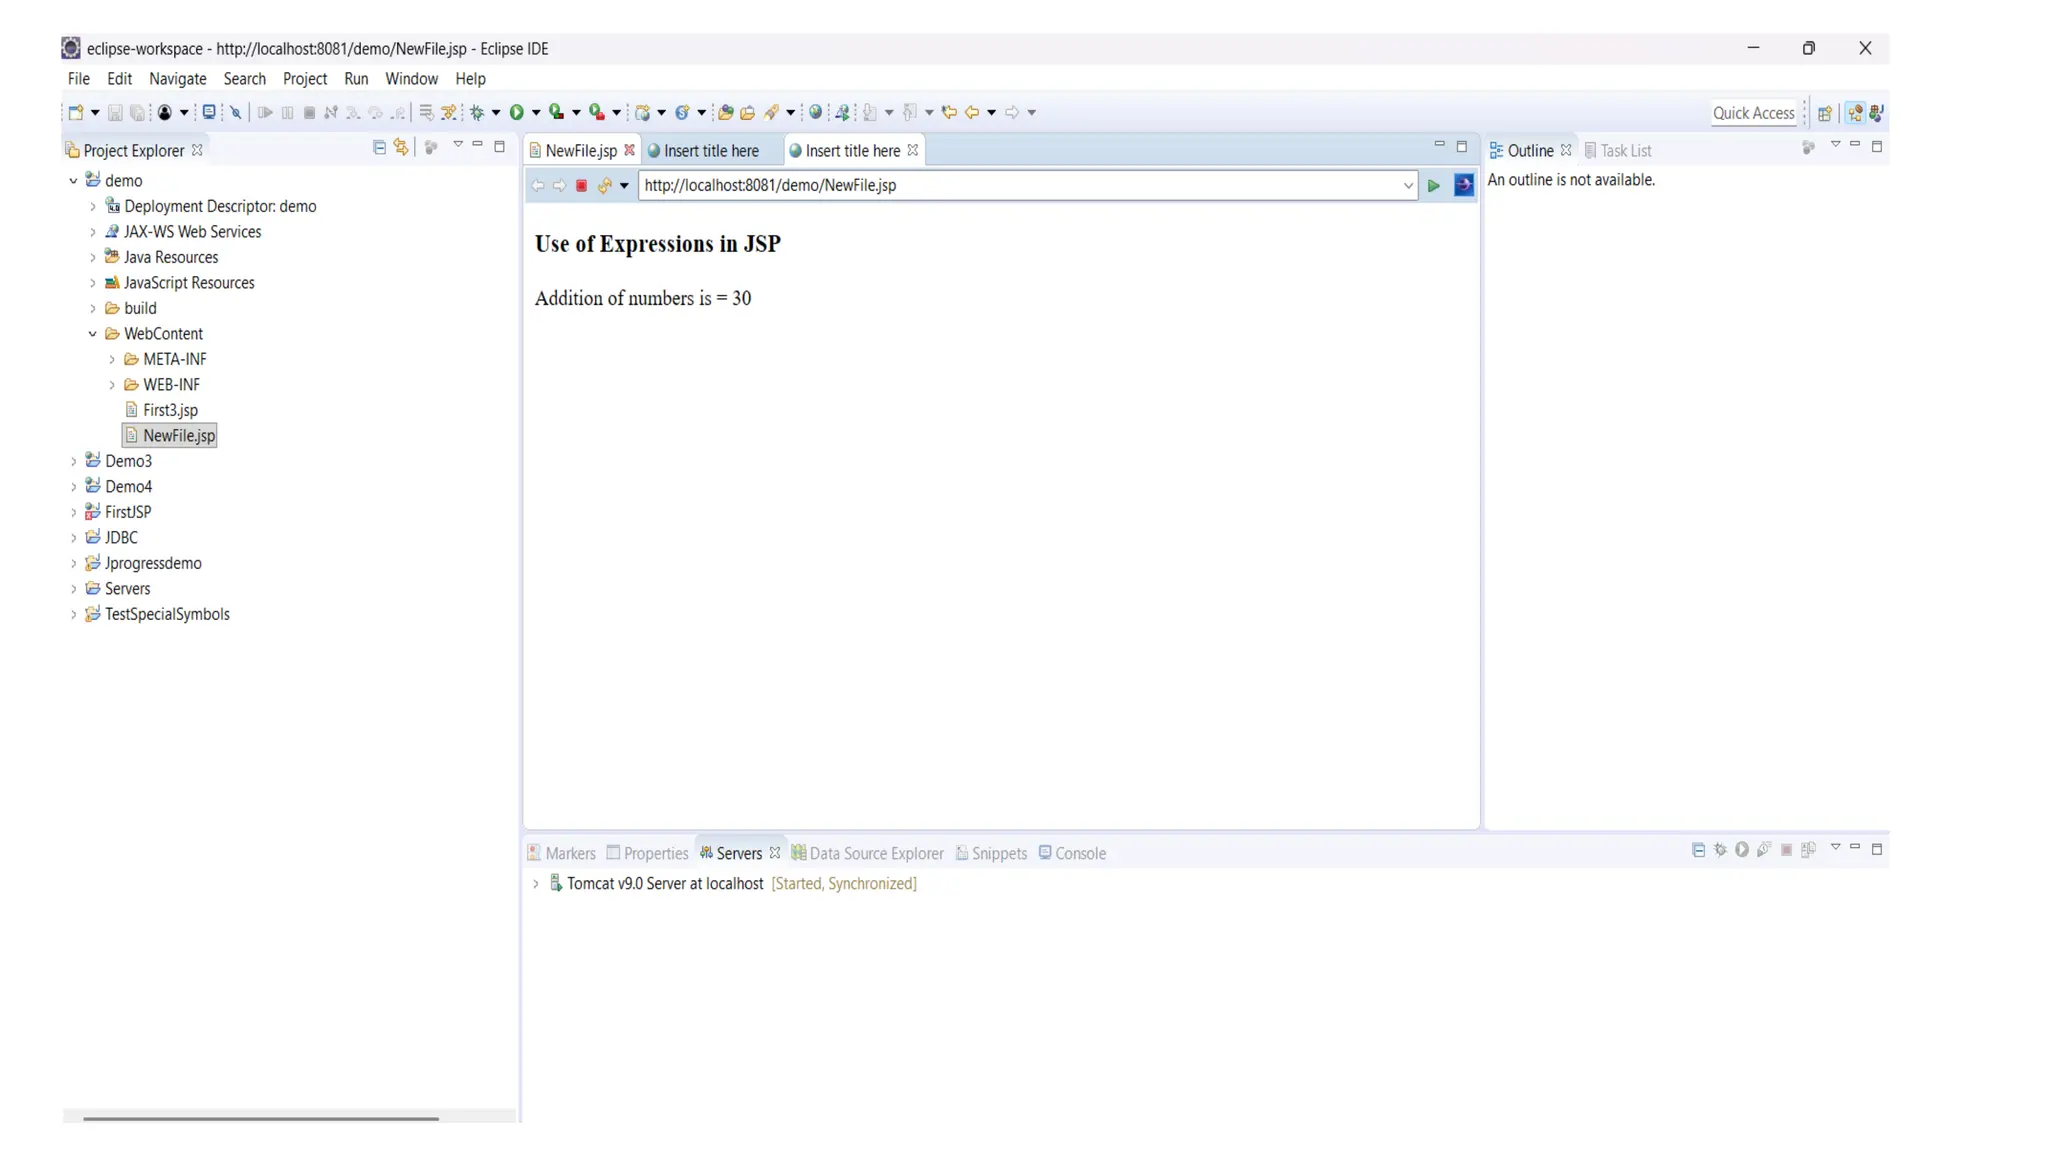
• Expressiontags, as the name suggests, evaluates expressions. They
incorporate arithmetic and logical expressions so that they can be
evaluated. They form an easy means to access the value of a Java
variable. The Expressions in JSP can be an access point for other
expressions and merge that value in an HTML file. They can easily
access data stored in applications.
• The most simple and basic of JSP scripting is expression. Expression is
used to insert values directly to the output. So you need not write
out.print() to write data. It is mainly used to print the values of variable
or method.
• Syntax:
<%=expression/statement %>
or
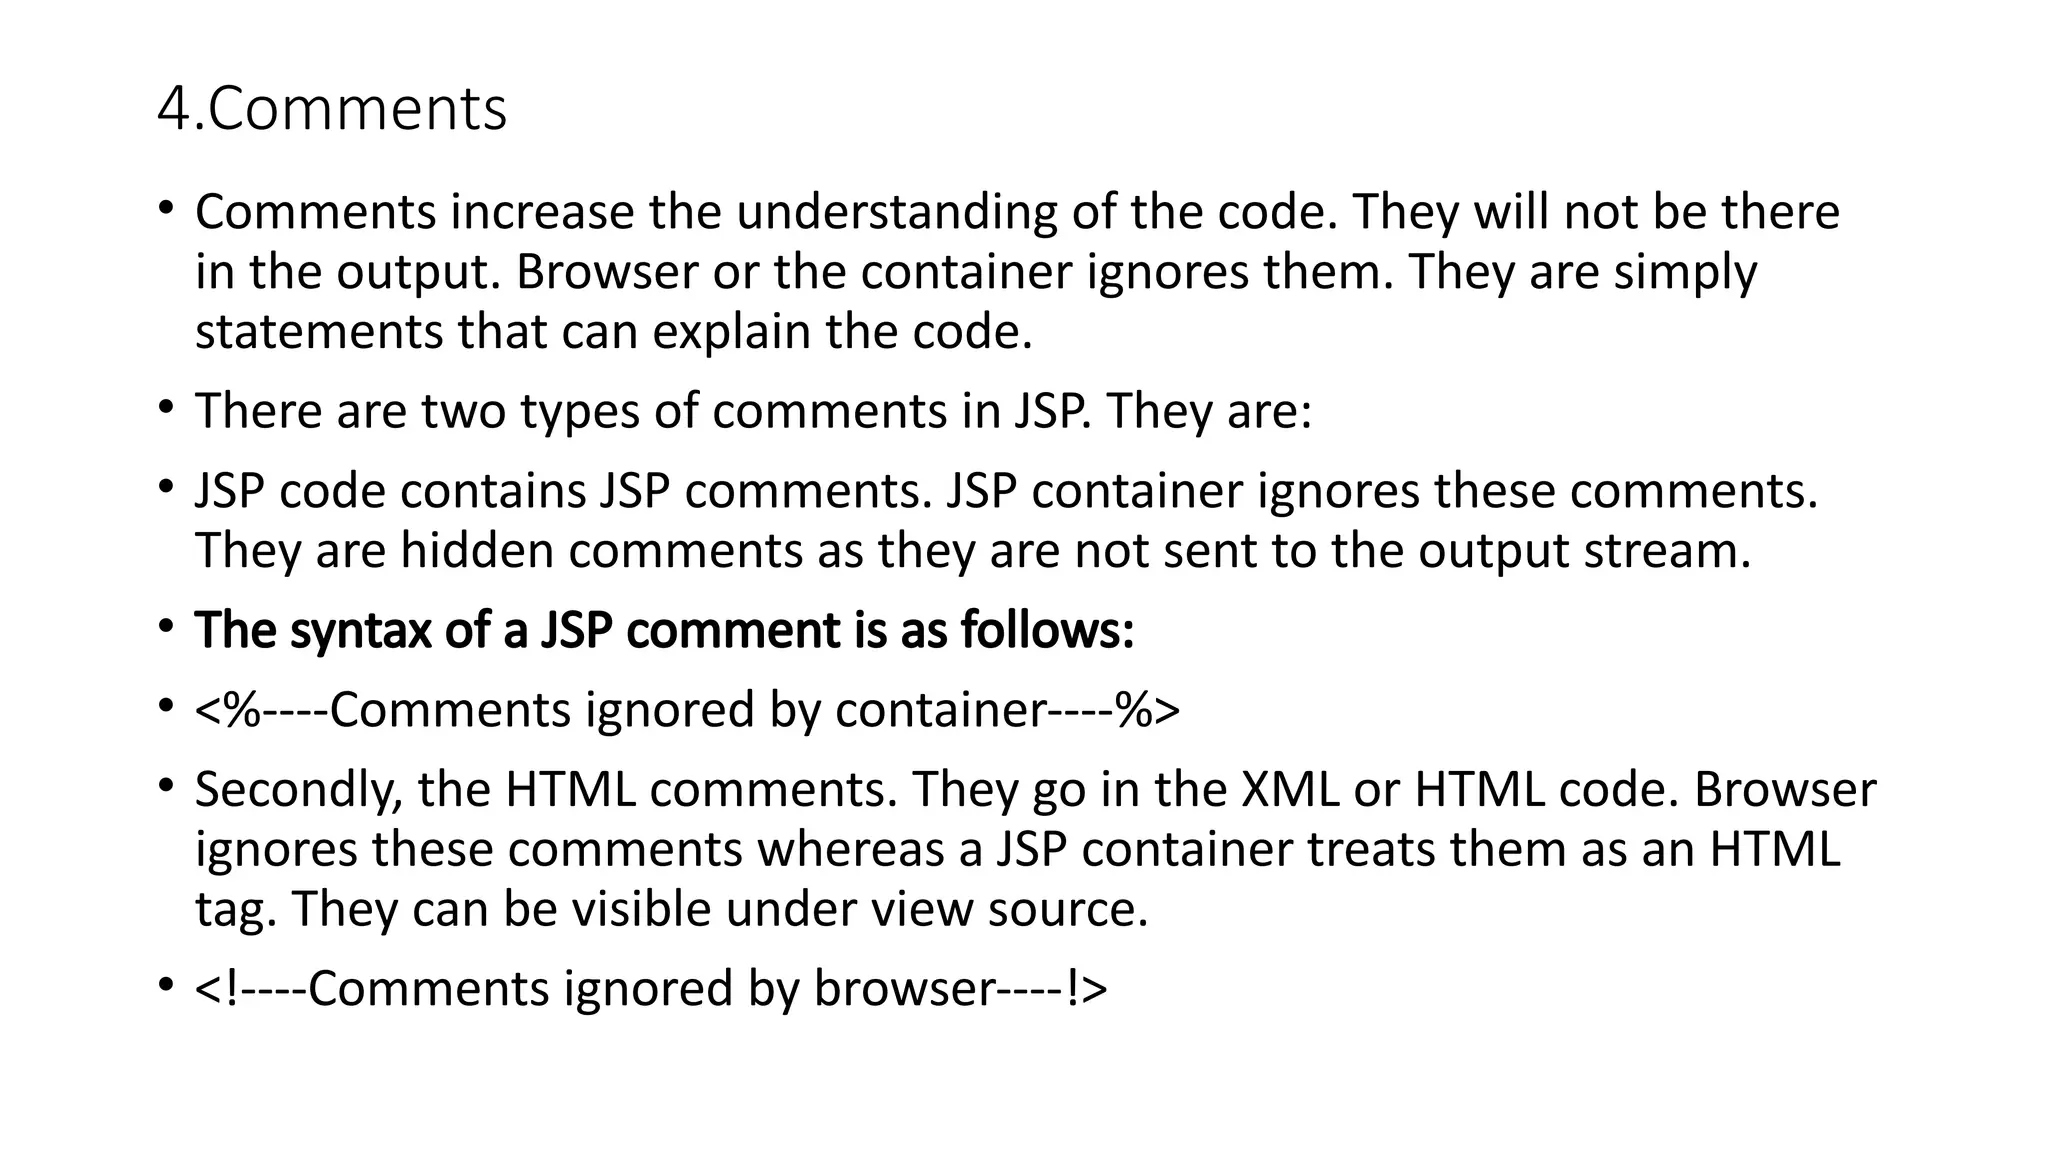
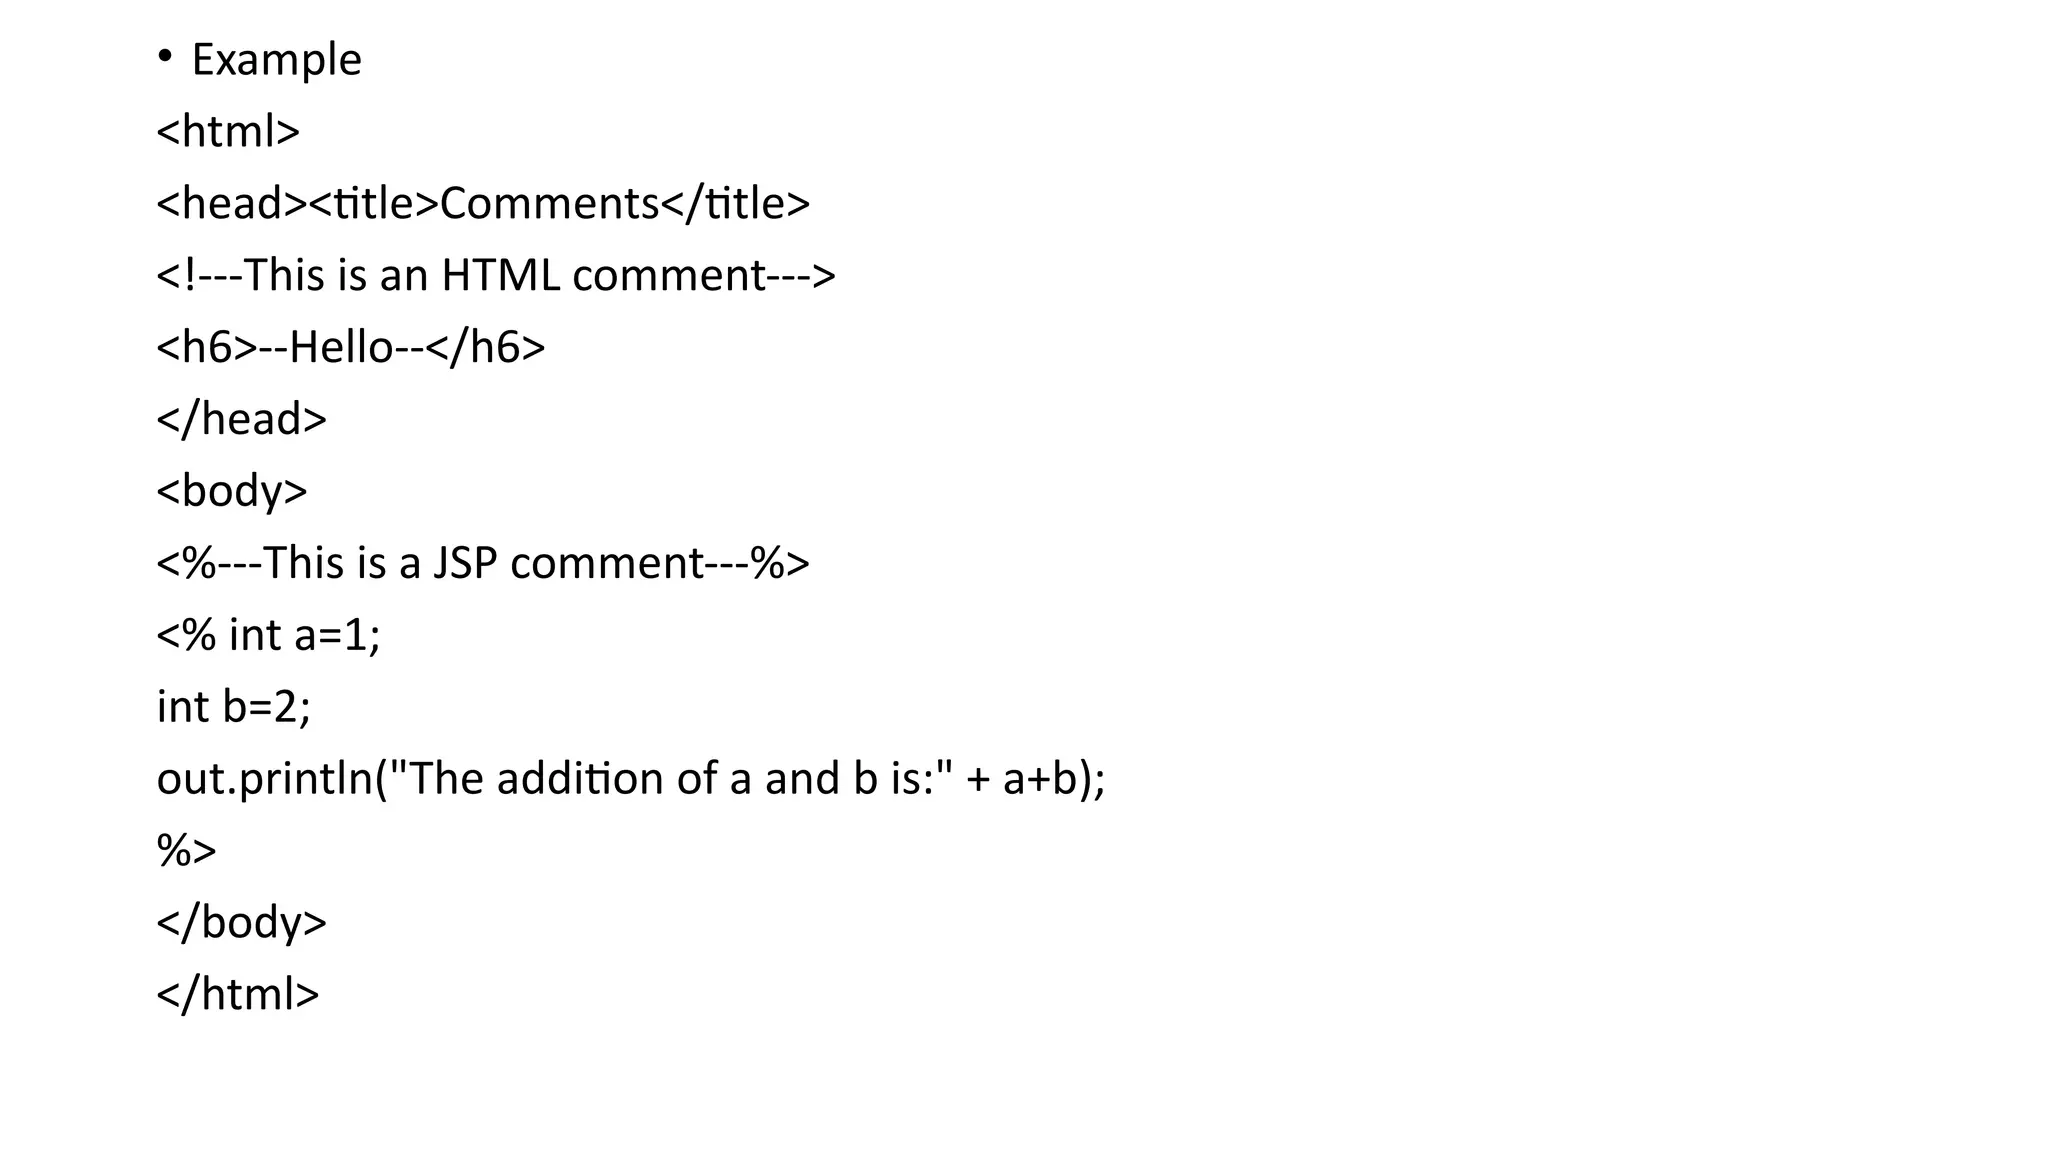
4.Comments
• Comments increasethe understanding of the code. They will not be there
in the output. Browser or the container ignores them. They are simply
statements that can explain the code.
• There are two types of comments in JSP. They are:
• JSP code contains JSP comments. JSP container ignores these comments.
They are hidden comments as they are not sent to the output stream.
• The syntax of a JSP comment is as follows:
• <%----Comments ignored by container----%>
• Secondly, the HTML comments. They go in the XML or HTML code. Browser
ignores these comments whereas a JSP container treats them as an HTML
tag. They can be visible under view source.
• <!----Comments ignored by browser----!>
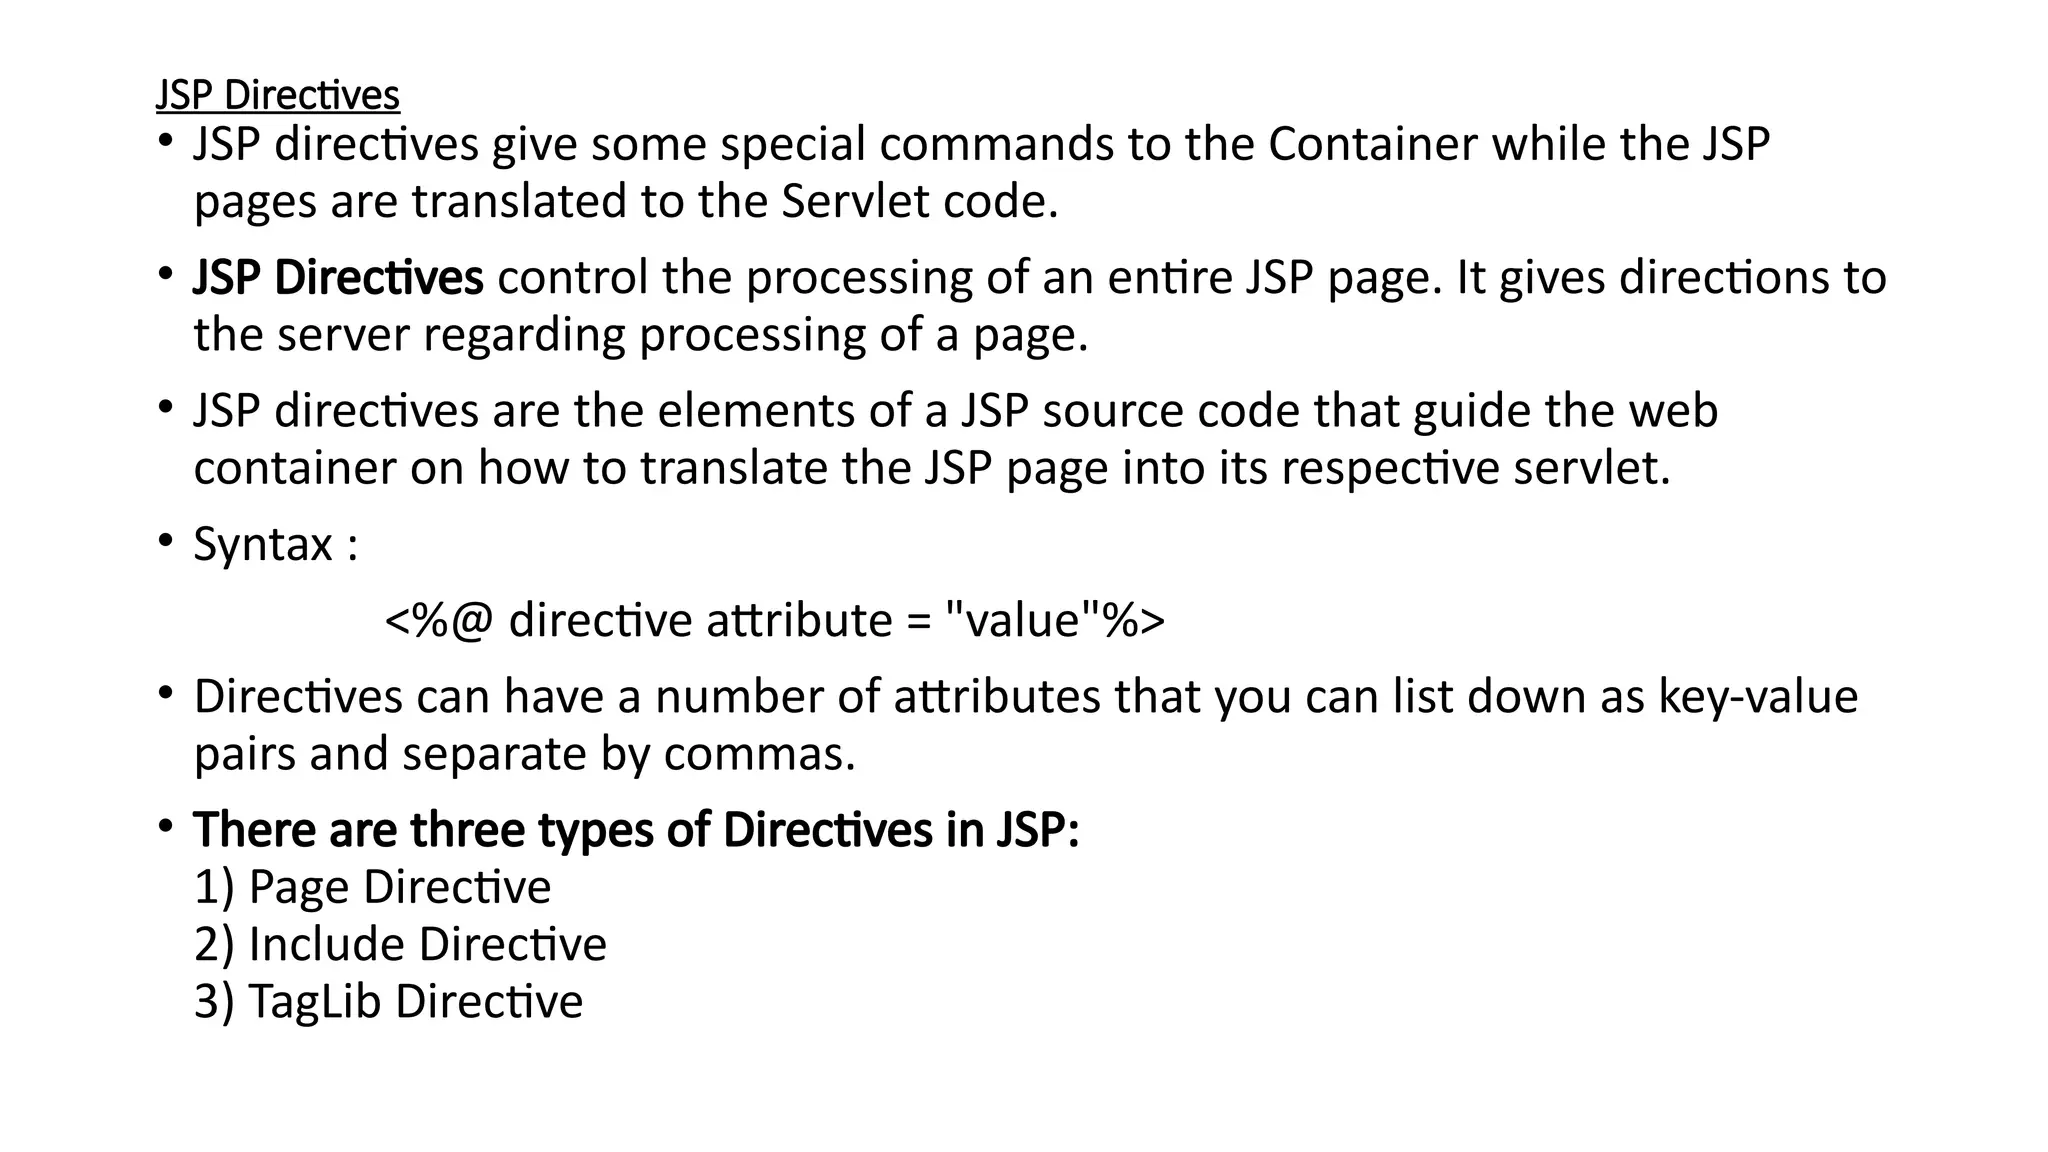
JSP Directives
• JSPdirectives give some special commands to the Container while the JSP
pages are translated to the Servlet code.
• JSP Directives control the processing of an entire JSP page. It gives directions to
the server regarding processing of a page.
• JSP directives are the elements of a JSP source code that guide the web
container on how to translate the JSP page into its respective servlet.
• Syntax :
<%@ directive attribute = "value"%>
• Directives can have a number of attributes that you can list down as key-value
pairs and separate by commas.
• There are three types of Directives in JSP:
1) Page Directive
2) Include Directive
3) TagLib Directive
32.
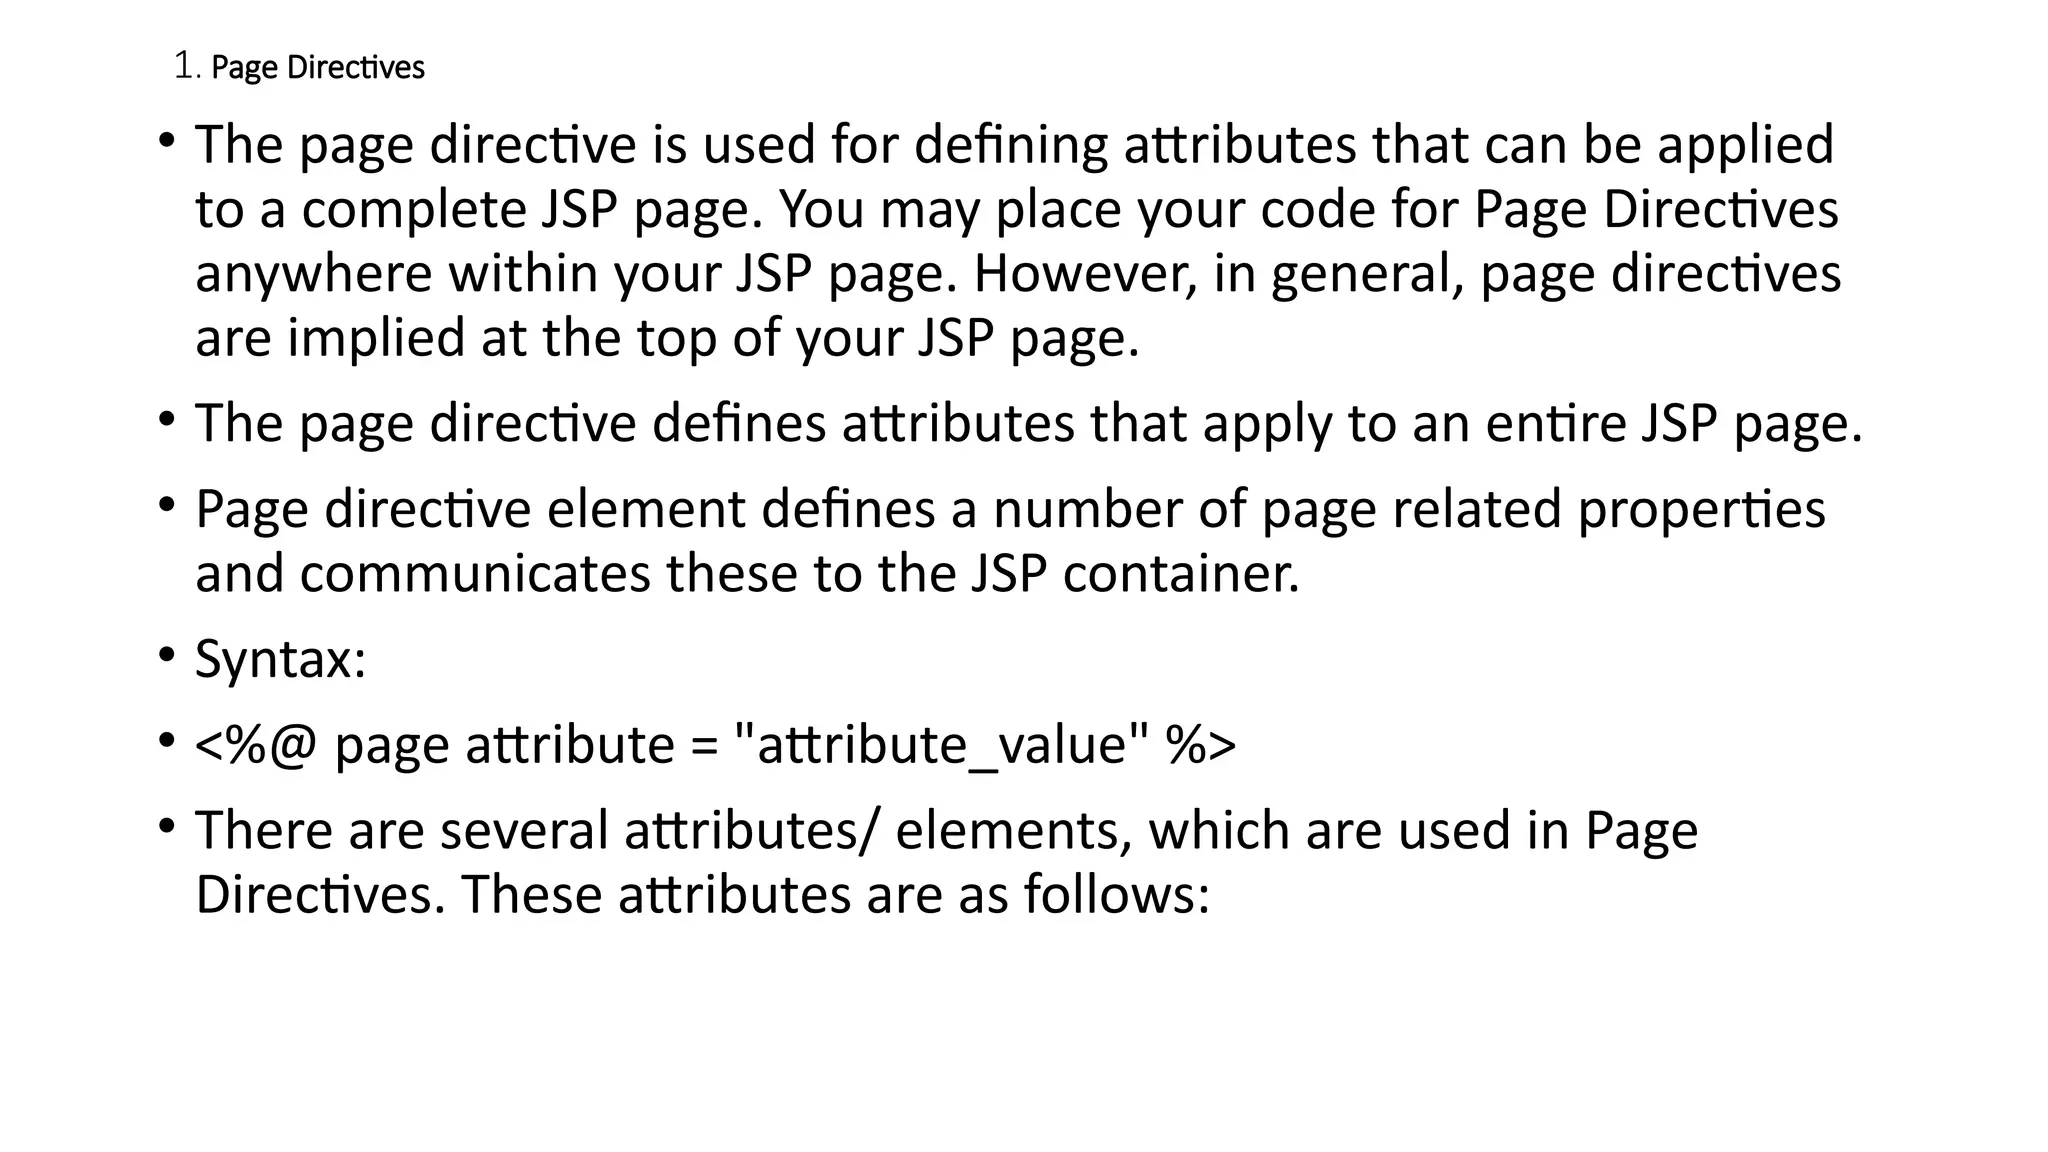
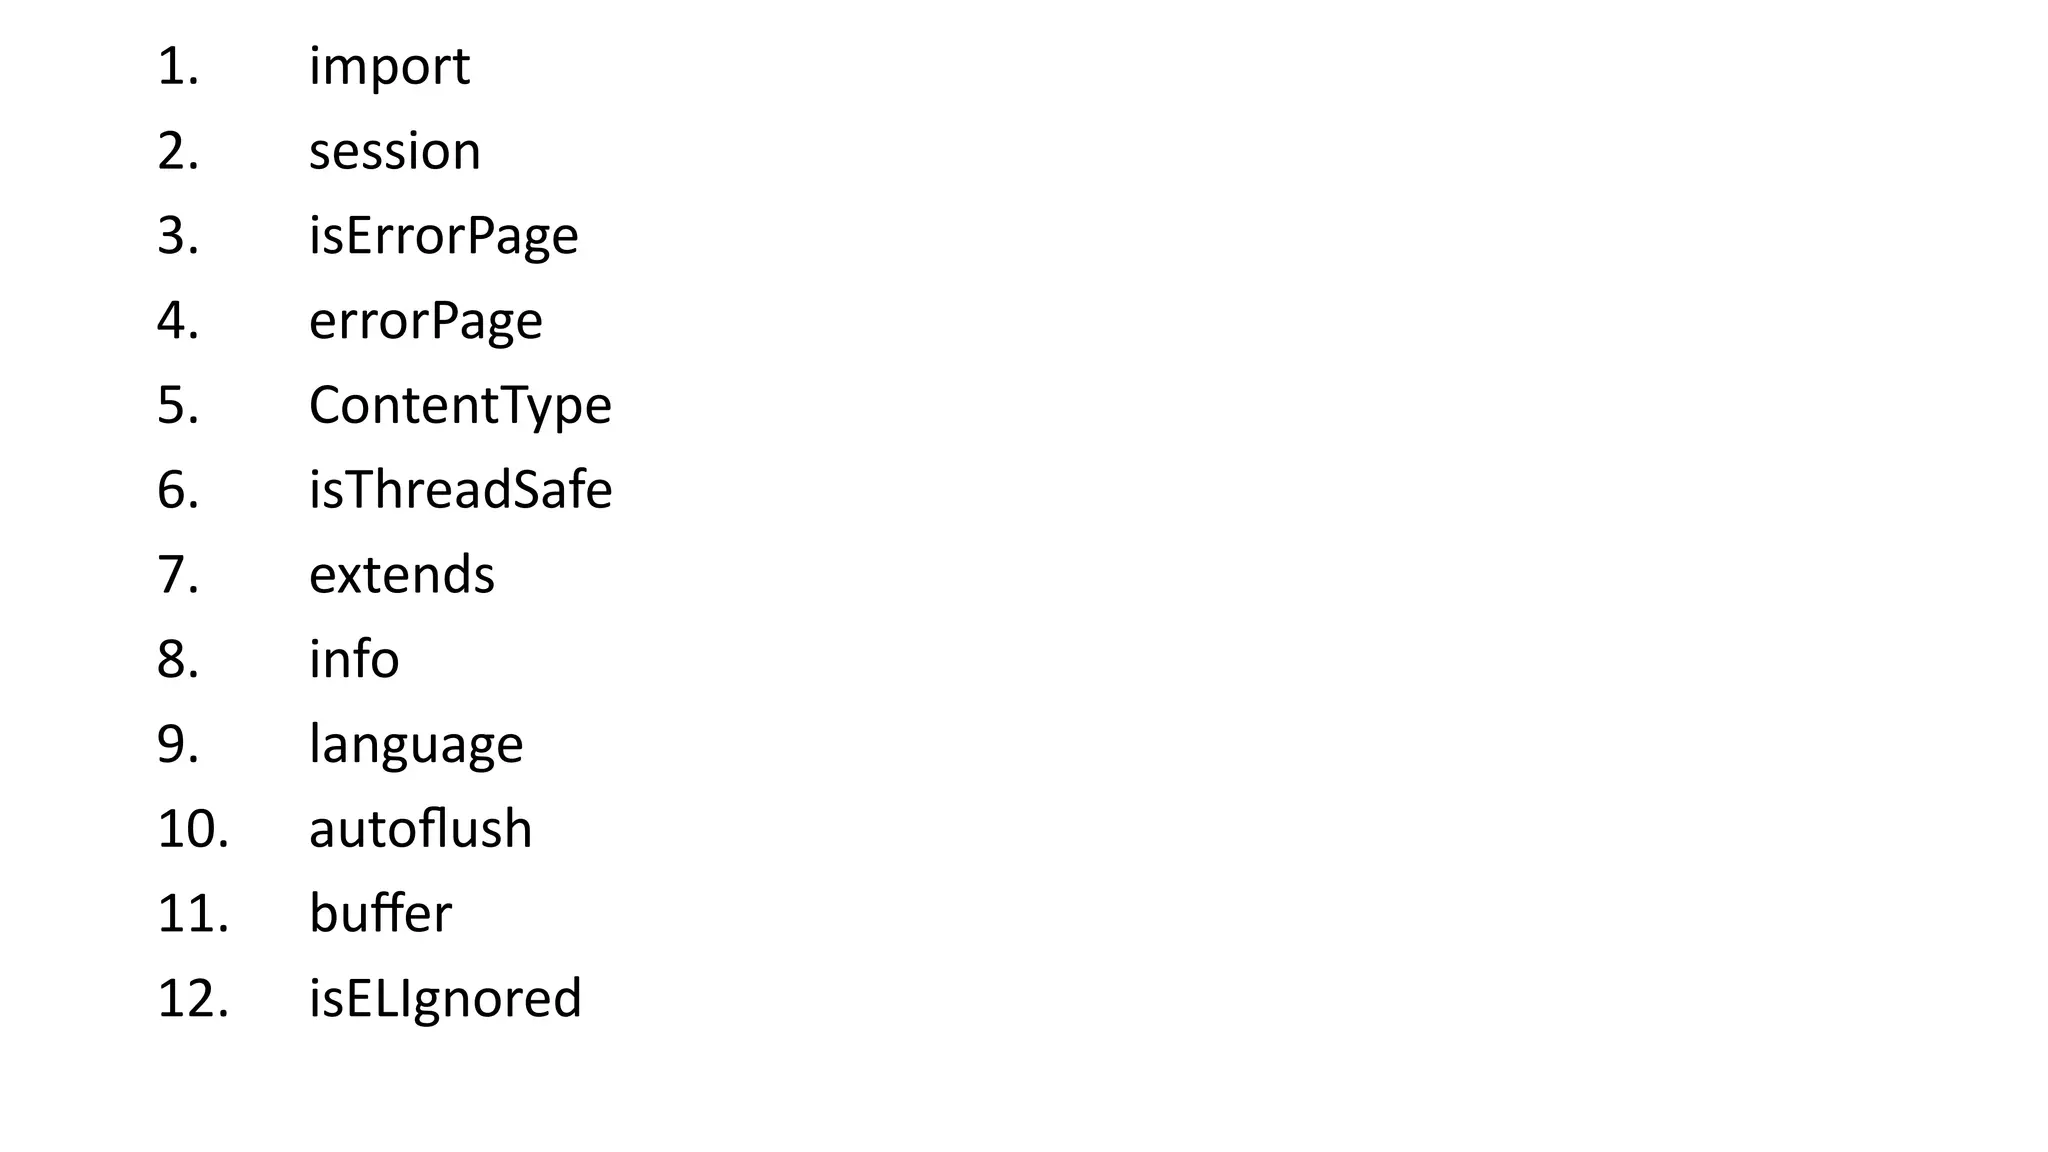
1. Page Directives
•The page directive is used for defining attributes that can be applied
to a complete JSP page. You may place your code for Page Directives
anywhere within your JSP page. However, in general, page directives
are implied at the top of your JSP page.
• The page directive defines attributes that apply to an entire JSP page.
• Page directive element defines a number of page related properties
and communicates these to the JSP container.
• Syntax:
• <%@ page attribute = "attribute_value" %>
• There are several attributes/ elements, which are used in Page
Directives. These attributes are as follows:
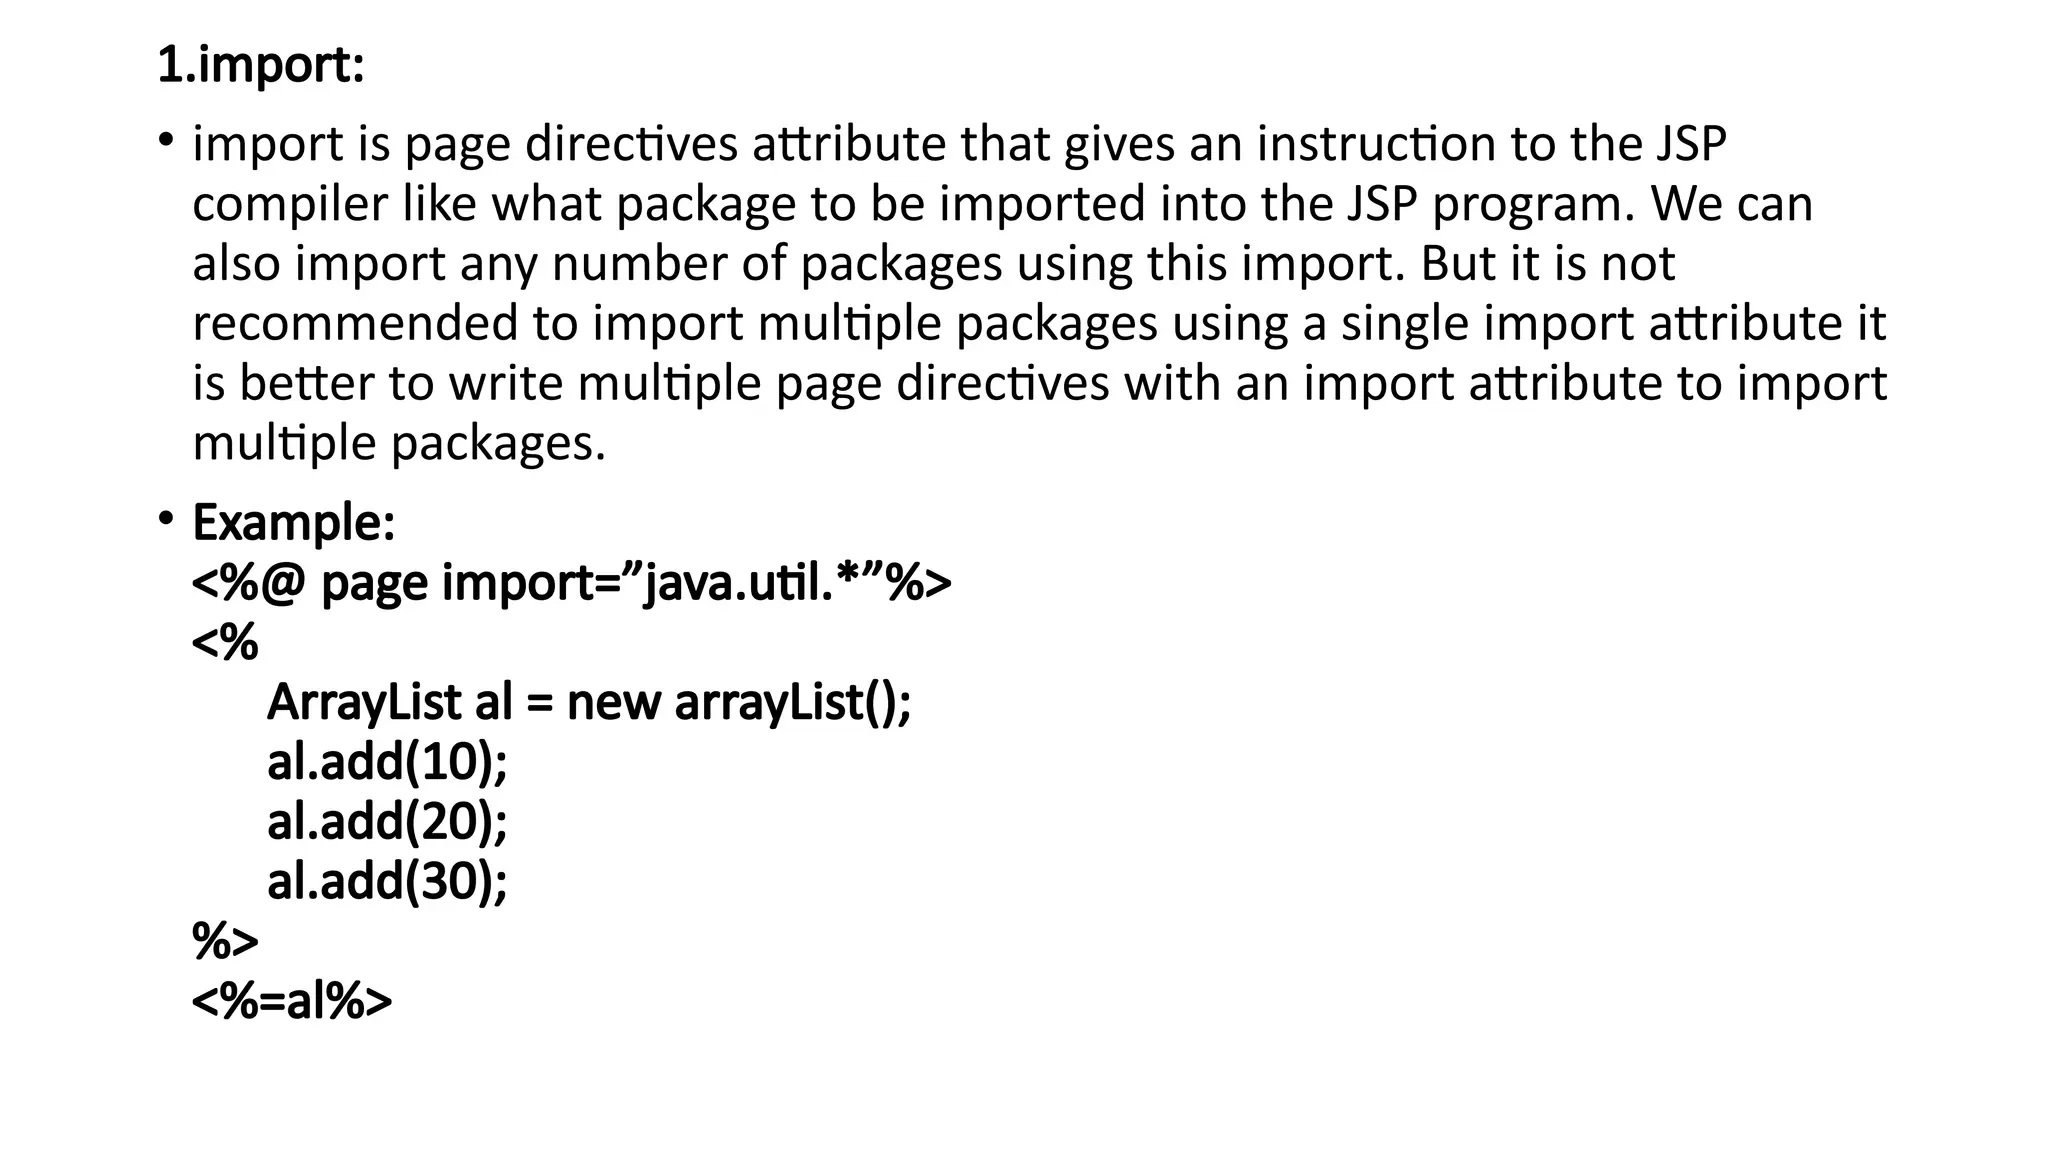
1.import:
• import ispage directives attribute that gives an instruction to the JSP
compiler like what package to be imported into the JSP program. We can
also import any number of packages using this import. But it is not
recommended to import multiple packages using a single import attribute it
is better to write multiple page directives with an import attribute to import
multiple packages.
• Example:
<%@ page import=”java.util.*”%>
<%
ArrayList al = new arrayList();
al.add(10);
al.add(20);
al.add(30);
%>
<%=al%>
35.
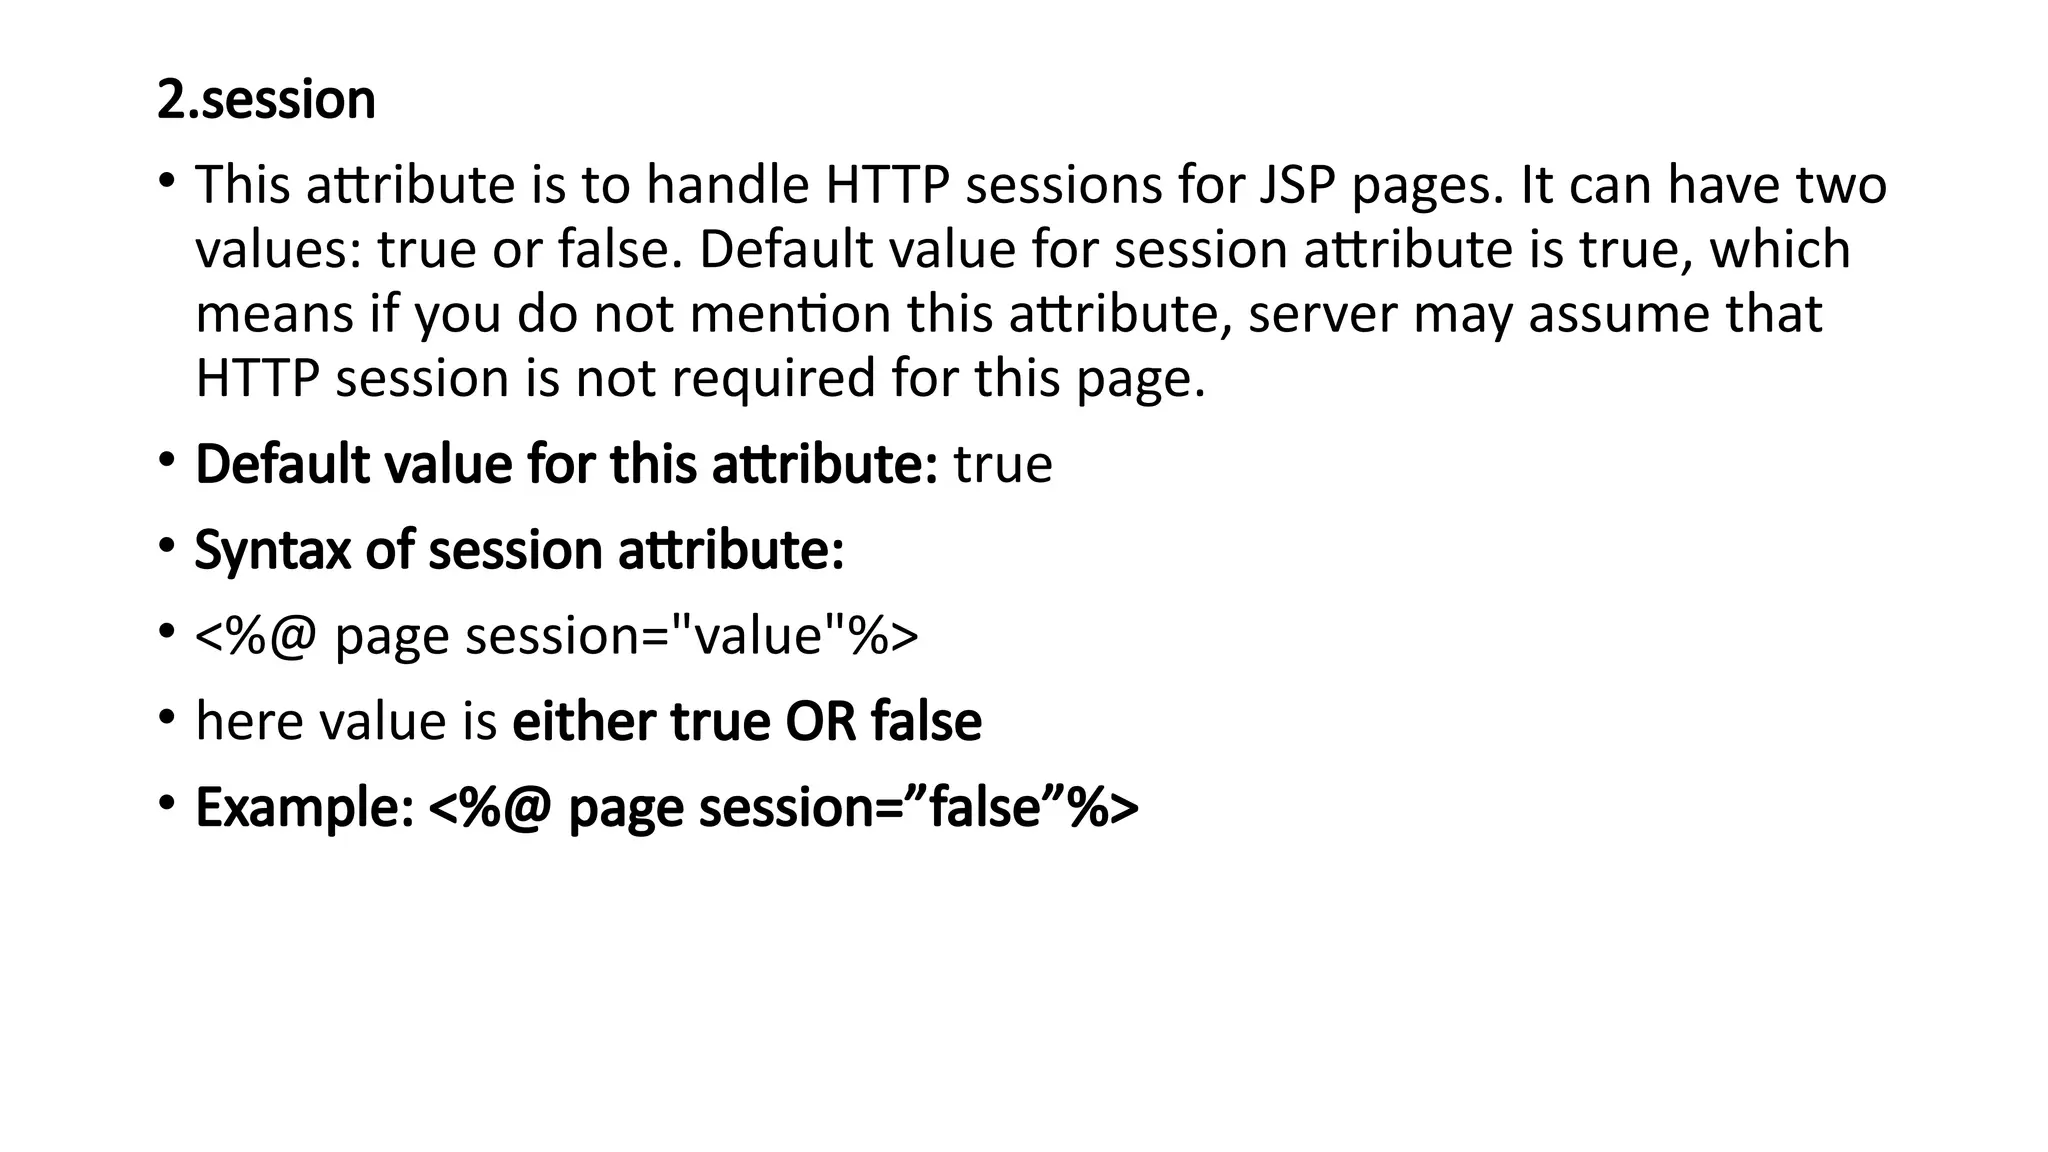
2.session
• This attributeis to handle HTTP sessions for JSP pages. It can have two
values: true or false. Default value for session attribute is true, which
means if you do not mention this attribute, server may assume that
HTTP session is not required for this page.
• Default value for this attribute: true
• Syntax of session attribute:
• <%@ page session="value"%>
• here value is either true OR false
• Example: <%@ page session=”false”%>
36.
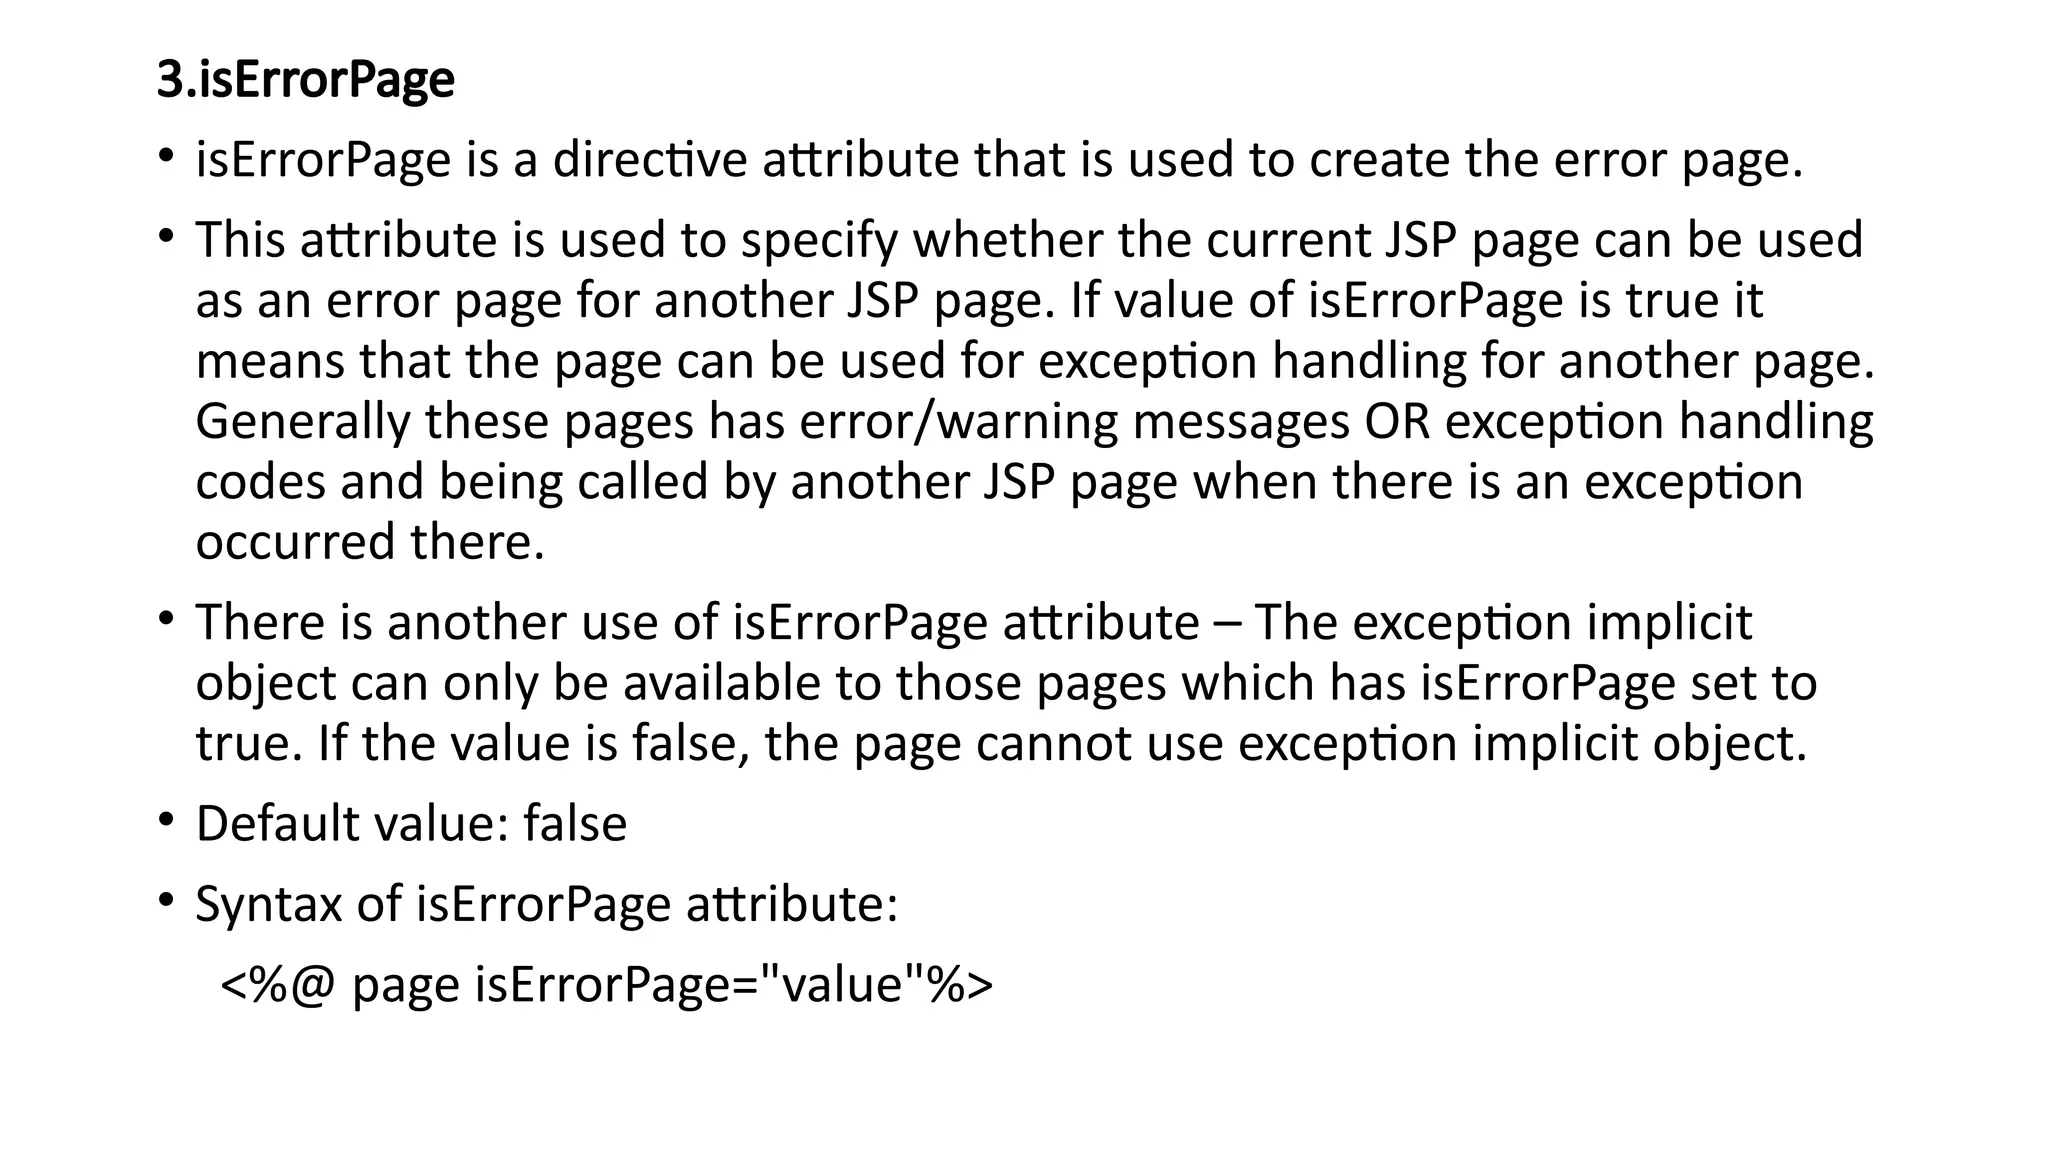
3.isErrorPage
• isErrorPage isa directive attribute that is used to create the error page.
• This attribute is used to specify whether the current JSP page can be used
as an error page for another JSP page. If value of isErrorPage is true it
means that the page can be used for exception handling for another page.
Generally these pages has error/warning messages OR exception handling
codes and being called by another JSP page when there is an exception
occurred there.
• There is another use of isErrorPage attribute – The exception implicit
object can only be available to those pages which has isErrorPage set to
true. If the value is false, the page cannot use exception implicit object.
• Default value: false
• Syntax of isErrorPage attribute:
<%@ page isErrorPage="value"%>
37.
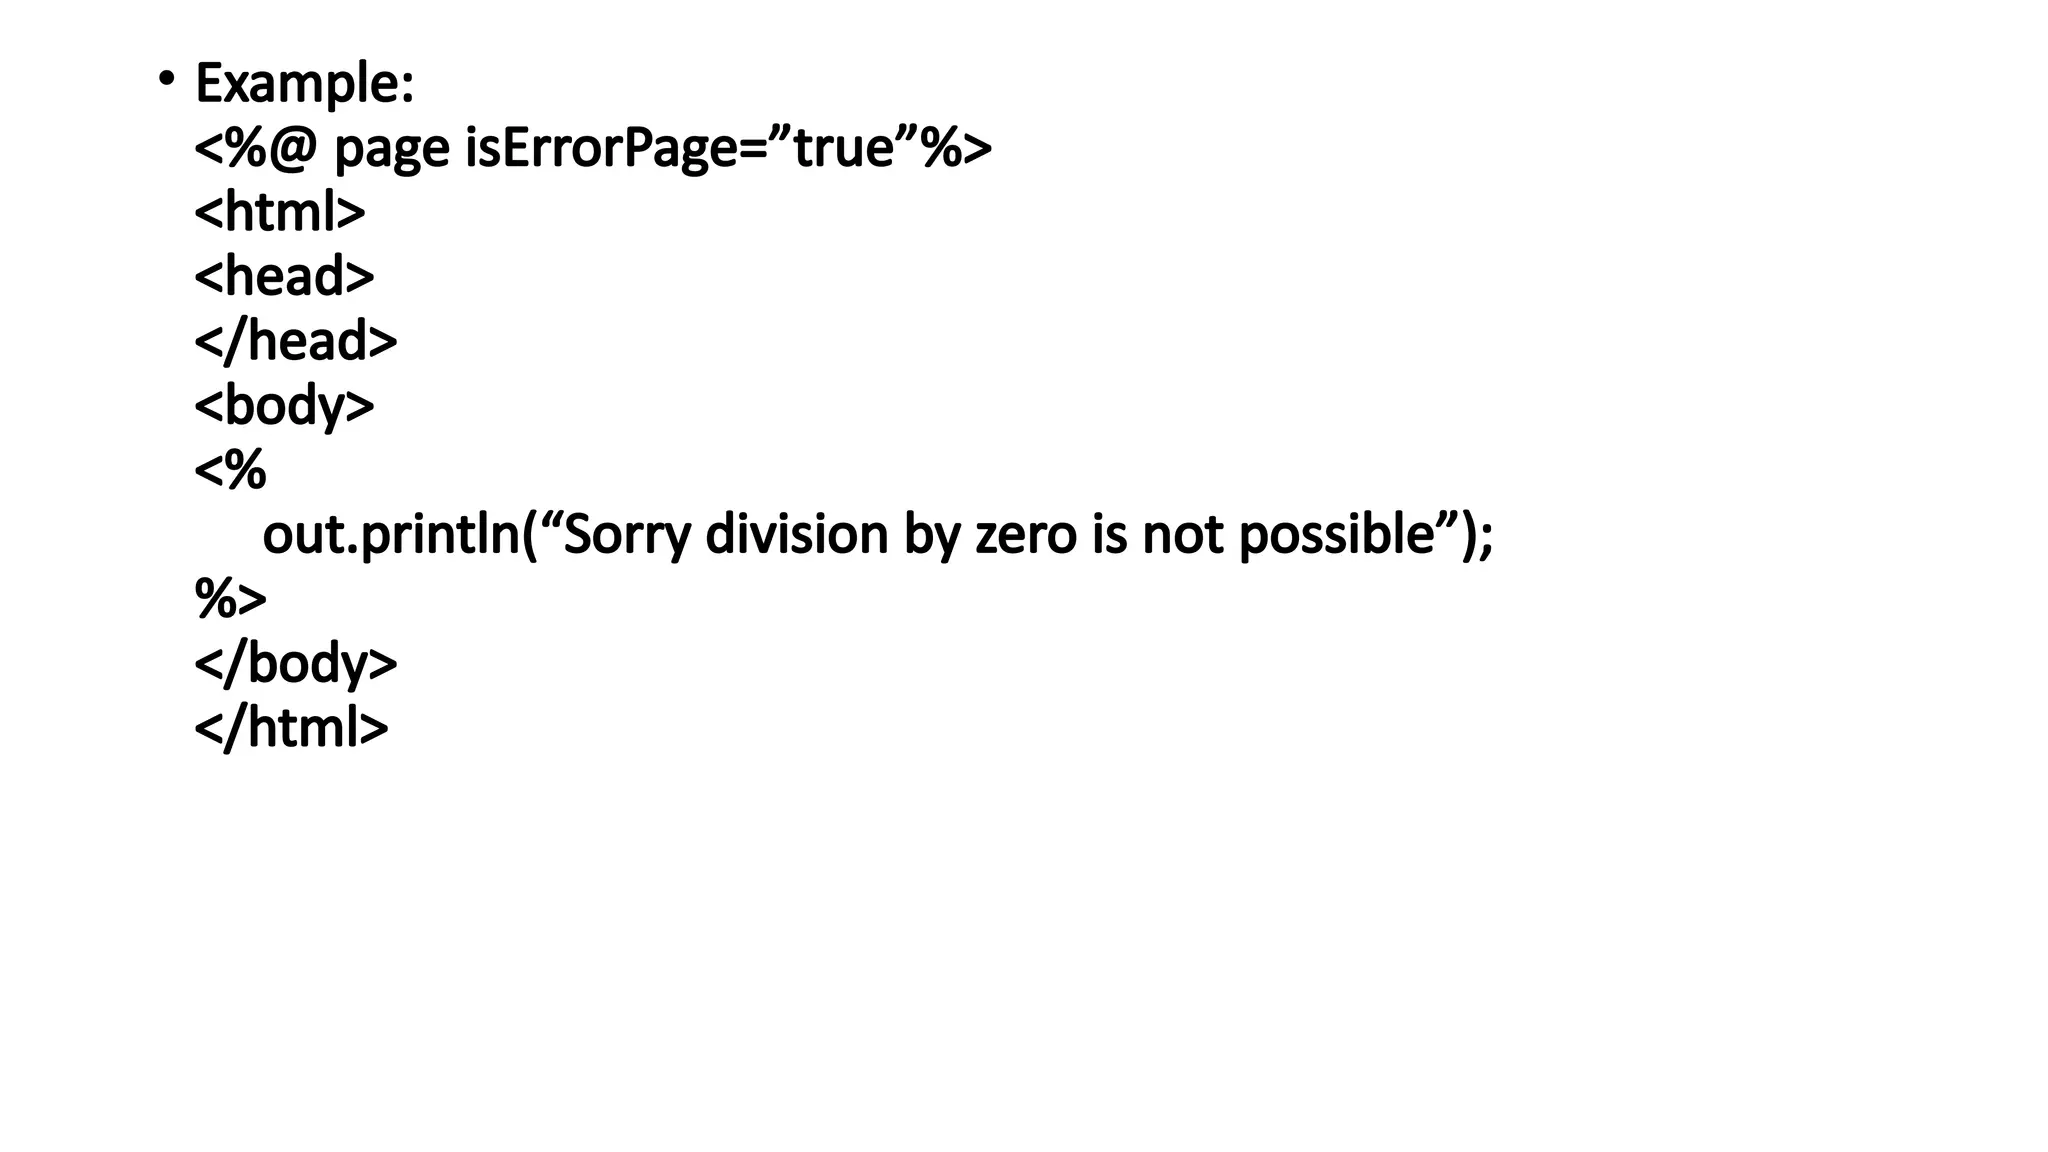
• Example:
<%@ pageisErrorPage=”true”%>
<html>
<head>
</head>
<body>
<%
out.println(“Sorry division by zero is not possible”);
%>
</body>
</html>
38.
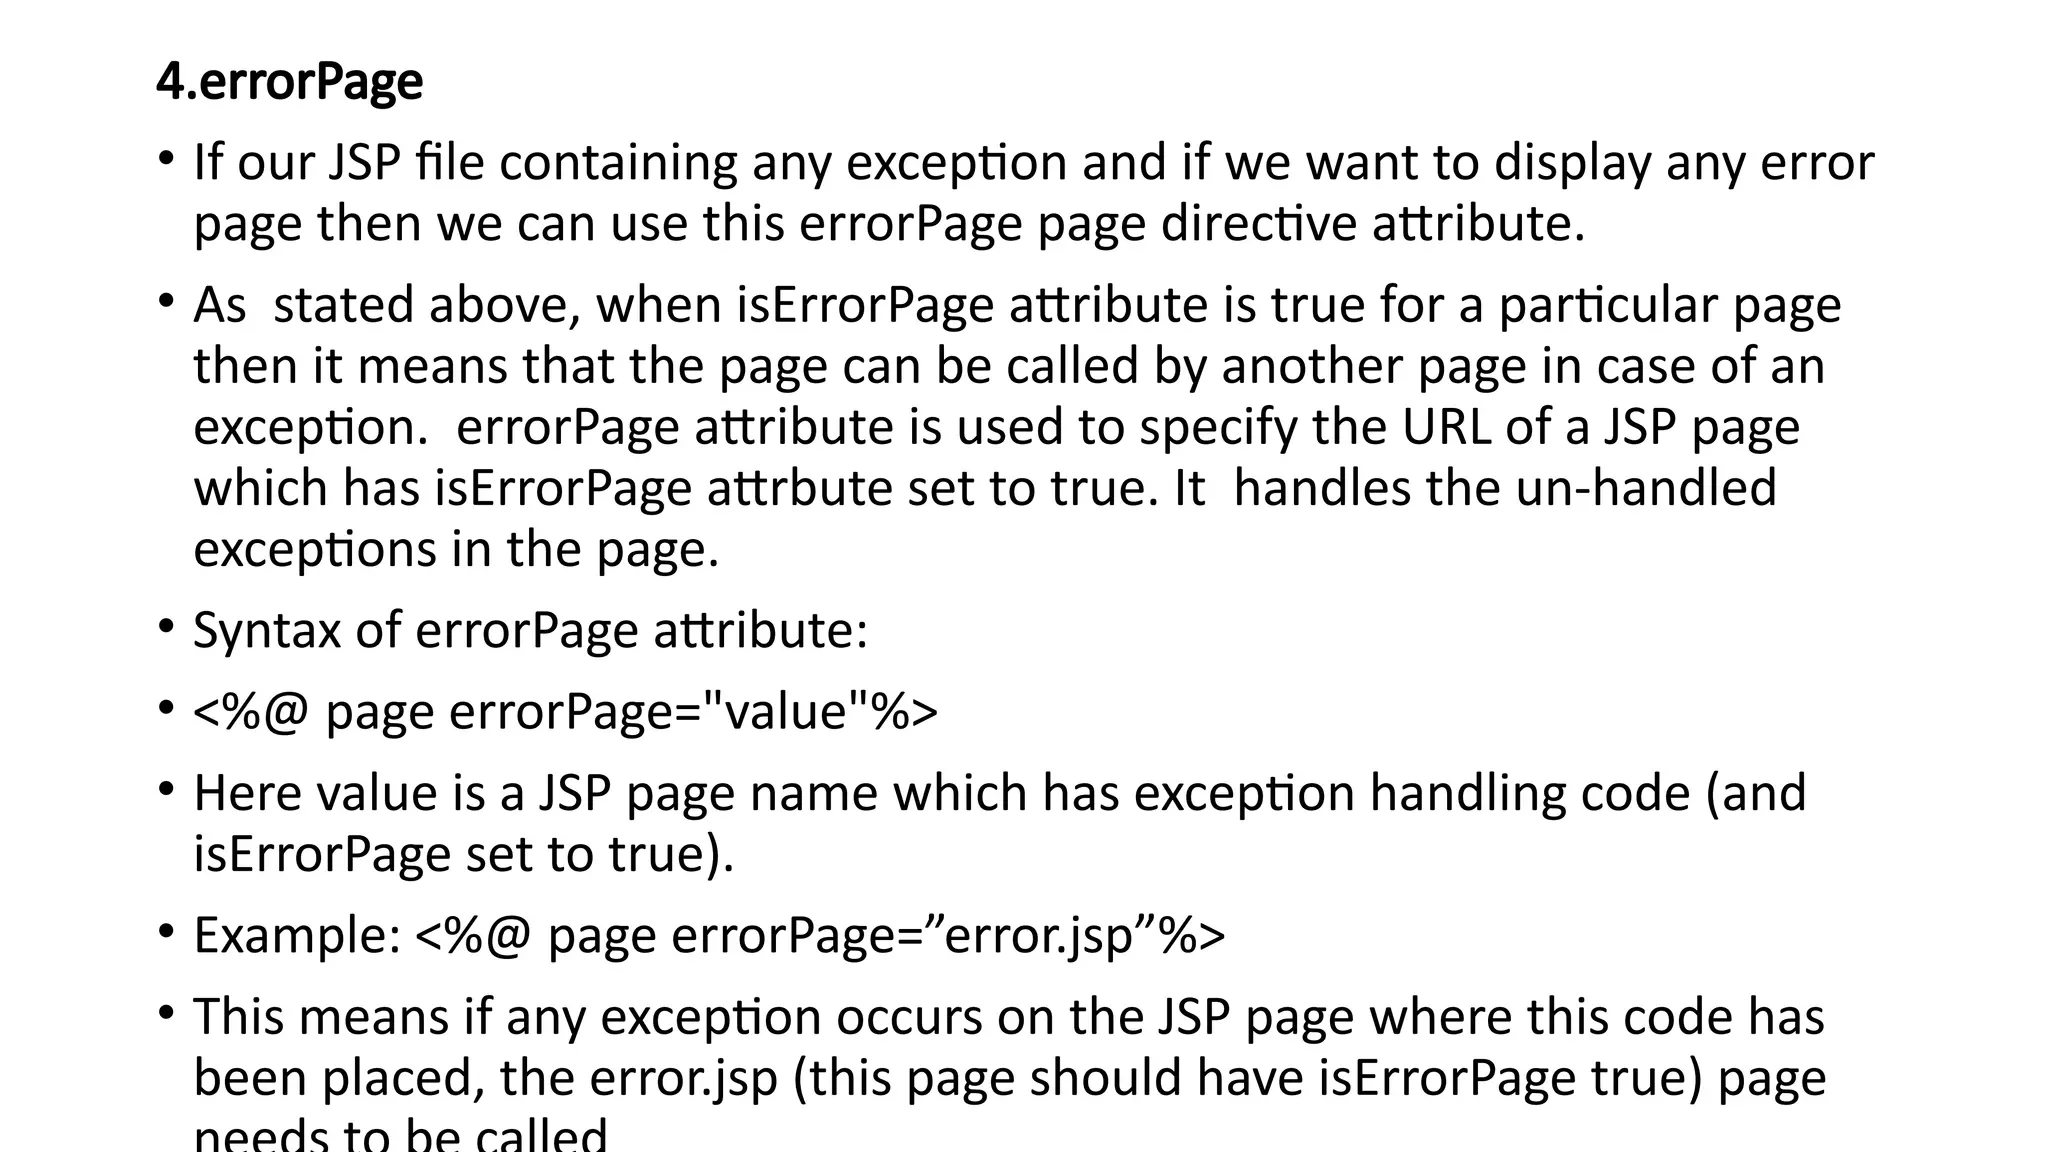
4.errorPage
• If ourJSP file containing any exception and if we want to display any error
page then we can use this errorPage page directive attribute.
• As stated above, when isErrorPage attribute is true for a particular page
then it means that the page can be called by another page in case of an
exception. errorPage attribute is used to specify the URL of a JSP page
which has isErrorPage attrbute set to true. It handles the un-handled
exceptions in the page.
• Syntax of errorPage attribute:
• <%@ page errorPage="value"%>
• Here value is a JSP page name which has exception handling code (and
isErrorPage set to true).
• Example: <%@ page errorPage=”error.jsp”%>
• This means if any exception occurs on the JSP page where this code has
been placed, the error.jsp (this page should have isErrorPage true) page
39.
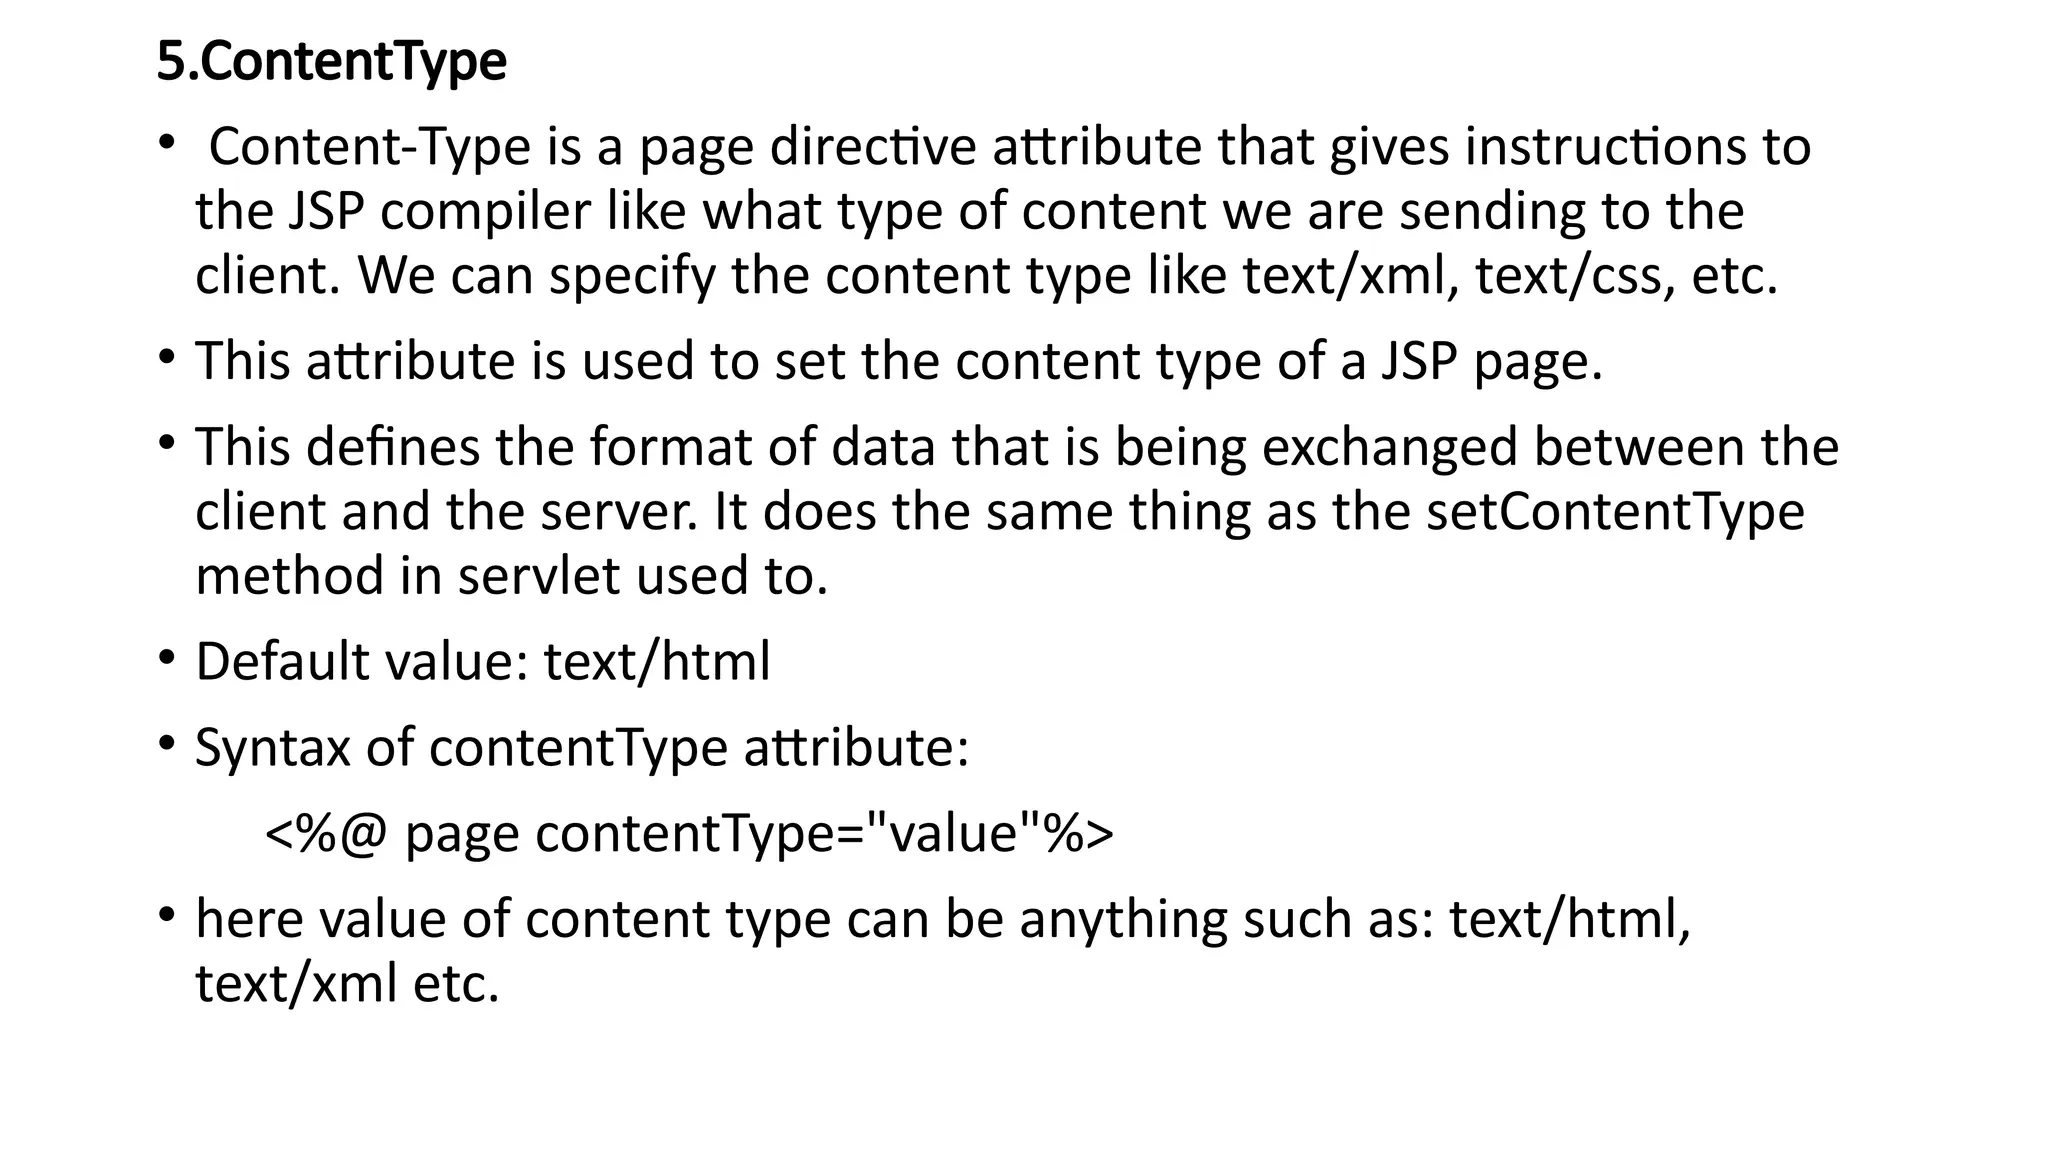
5.ContentType
• Content-Type isa page directive attribute that gives instructions to
the JSP compiler like what type of content we are sending to the
client. We can specify the content type like text/xml, text/css, etc.
• This attribute is used to set the content type of a JSP page.
• This defines the format of data that is being exchanged between the
client and the server. It does the same thing as the setContentType
method in servlet used to.
• Default value: text/html
• Syntax of contentType attribute:
<%@ page contentType="value"%>
• here value of content type can be anything such as: text/html,
text/xml etc.
40.
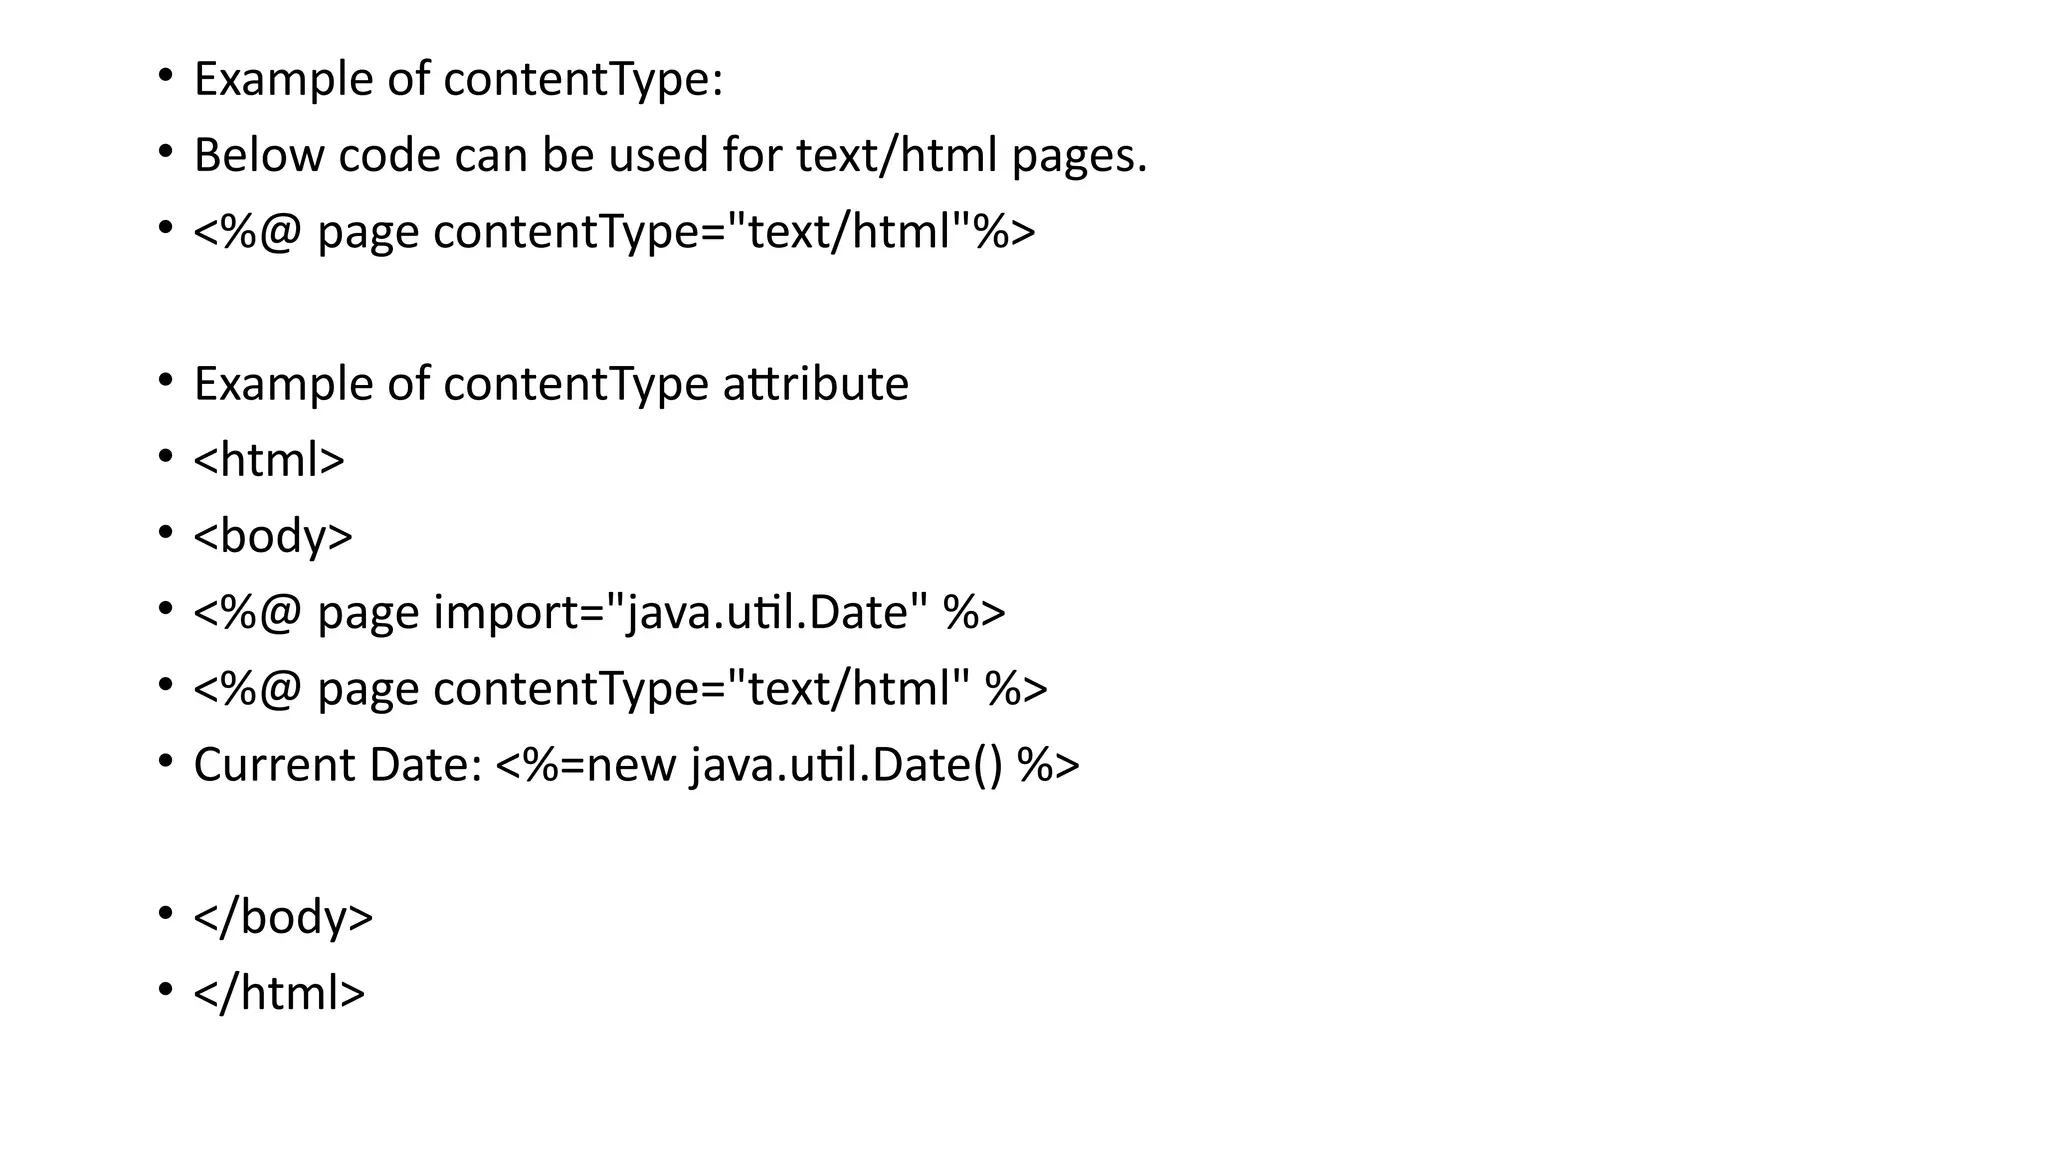
• Example ofcontentType:
• Below code can be used for text/html pages.
• <%@ page contentType="text/html"%>
• Example of contentType attribute
• <html>
• <body>
• <%@ page import="java.util.Date" %>
• <%@ page contentType="text/html" %>
• Current Date: <%=new java.util.Date() %>
• </body>
• </html>
41.
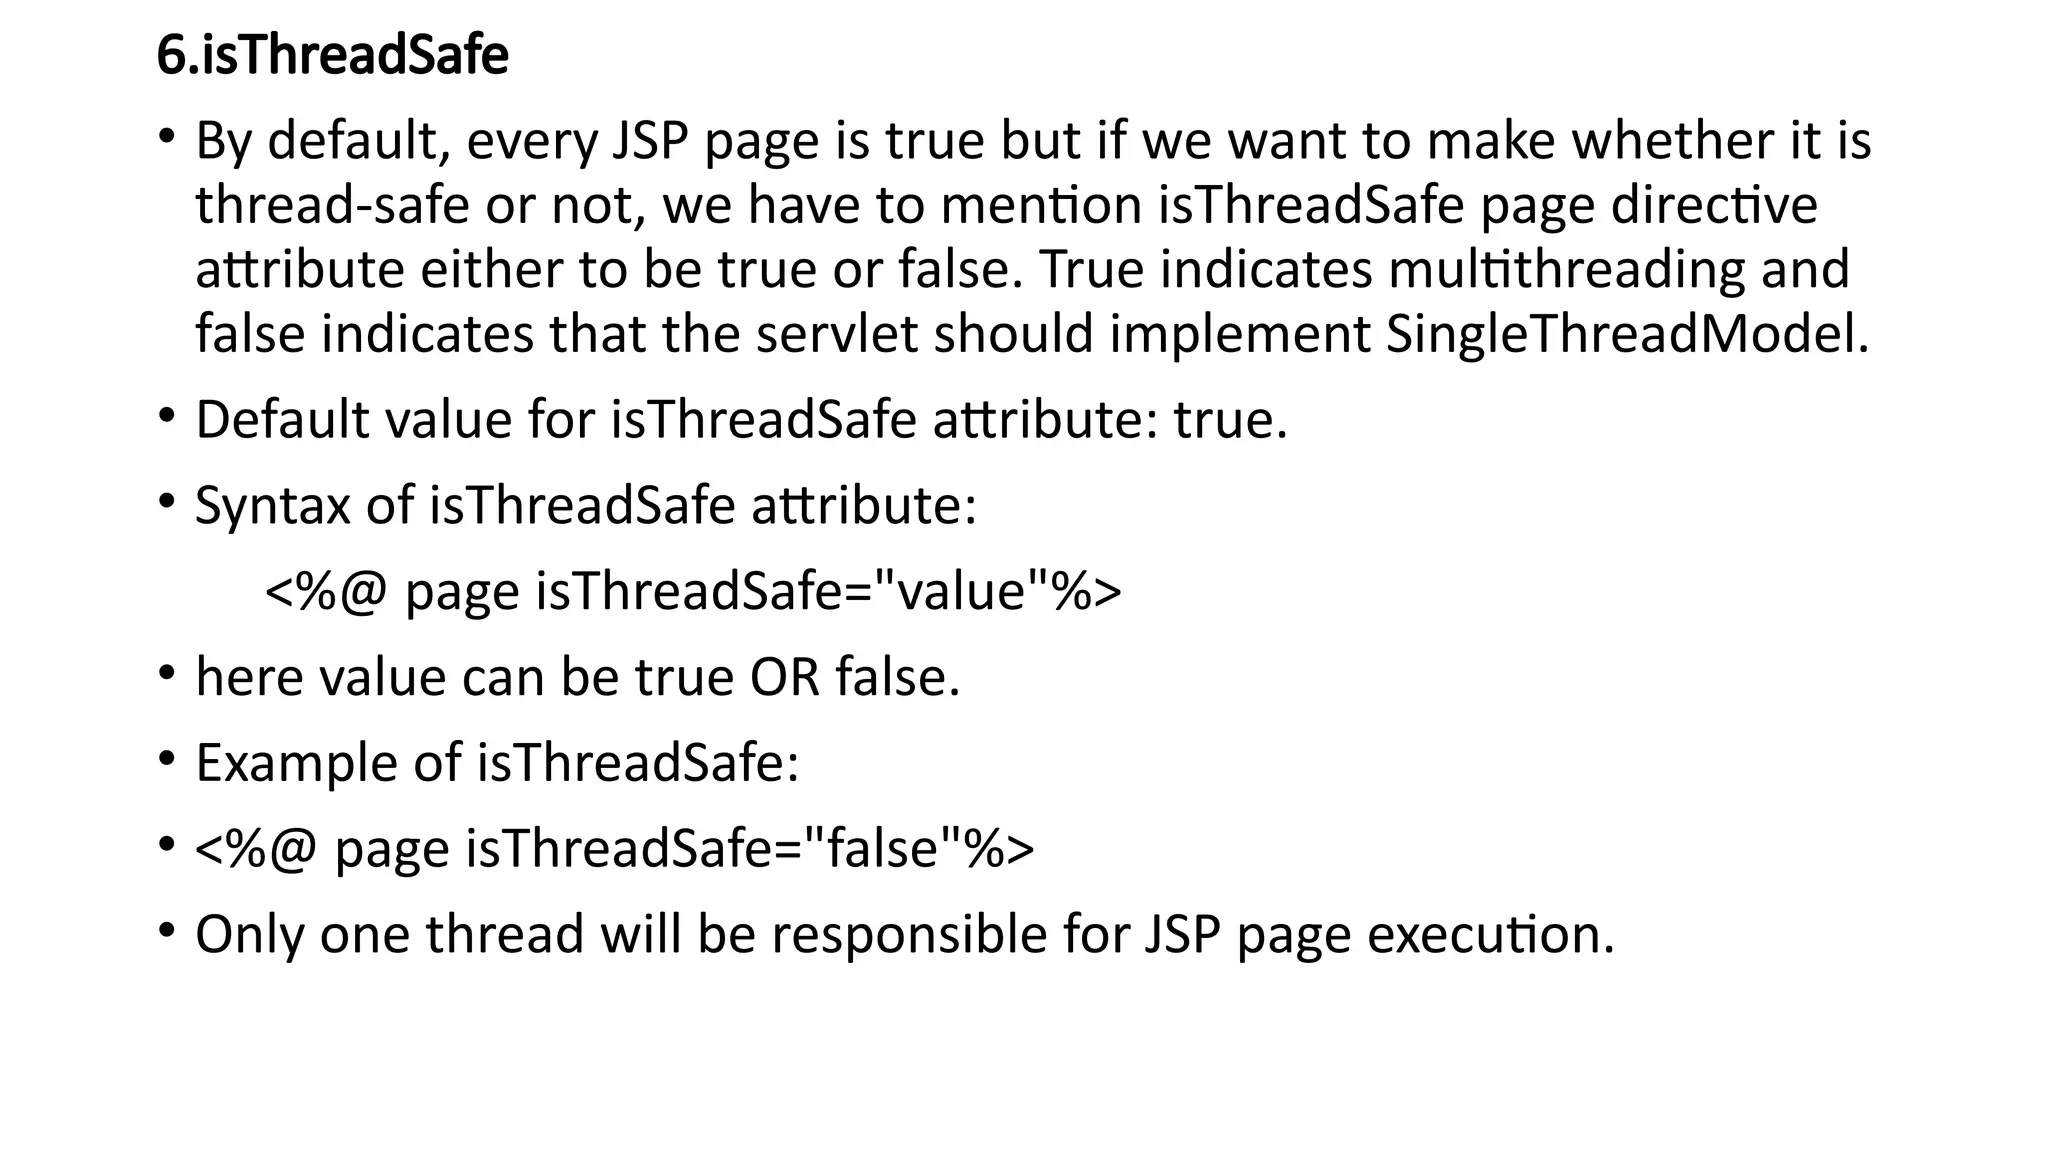
6.isThreadSafe
• By default,every JSP page is true but if we want to make whether it is
thread-safe or not, we have to mention isThreadSafe page directive
attribute either to be true or false. True indicates multithreading and
false indicates that the servlet should implement SingleThreadModel.
• Default value for isThreadSafe attribute: true.
• Syntax of isThreadSafe attribute:
<%@ page isThreadSafe="value"%>
• here value can be true OR false.
• Example of isThreadSafe:
• <%@ page isThreadSafe="false"%>
• Only one thread will be responsible for JSP page execution.
42.
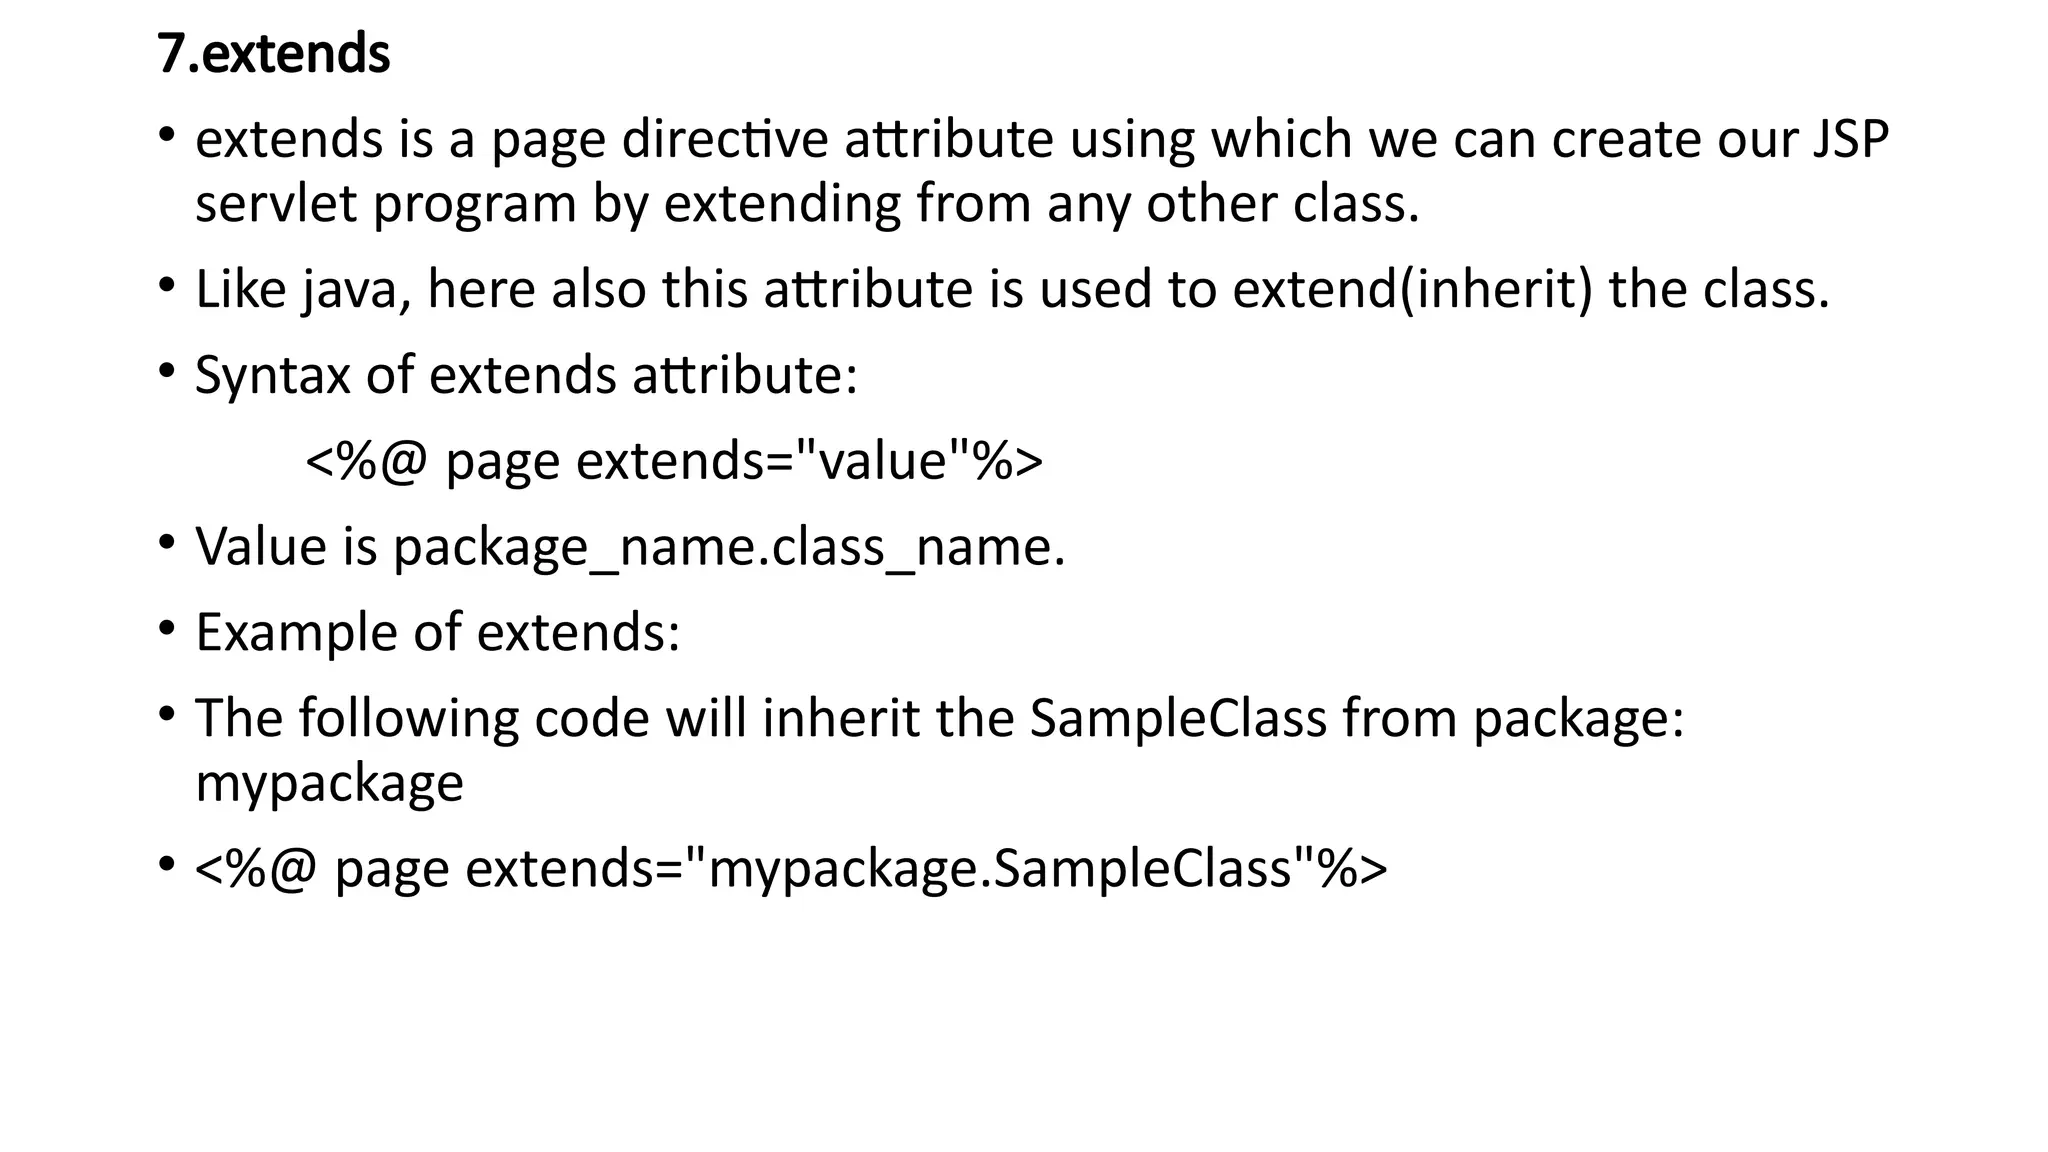
7.extends
• extends isa page directive attribute using which we can create our JSP
servlet program by extending from any other class.
• Like java, here also this attribute is used to extend(inherit) the class.
• Syntax of extends attribute:
<%@ page extends="value"%>
• Value is package_name.class_name.
• Example of extends:
• The following code will inherit the SampleClass from package:
mypackage
• <%@ page extends="mypackage.SampleClass"%>
43.
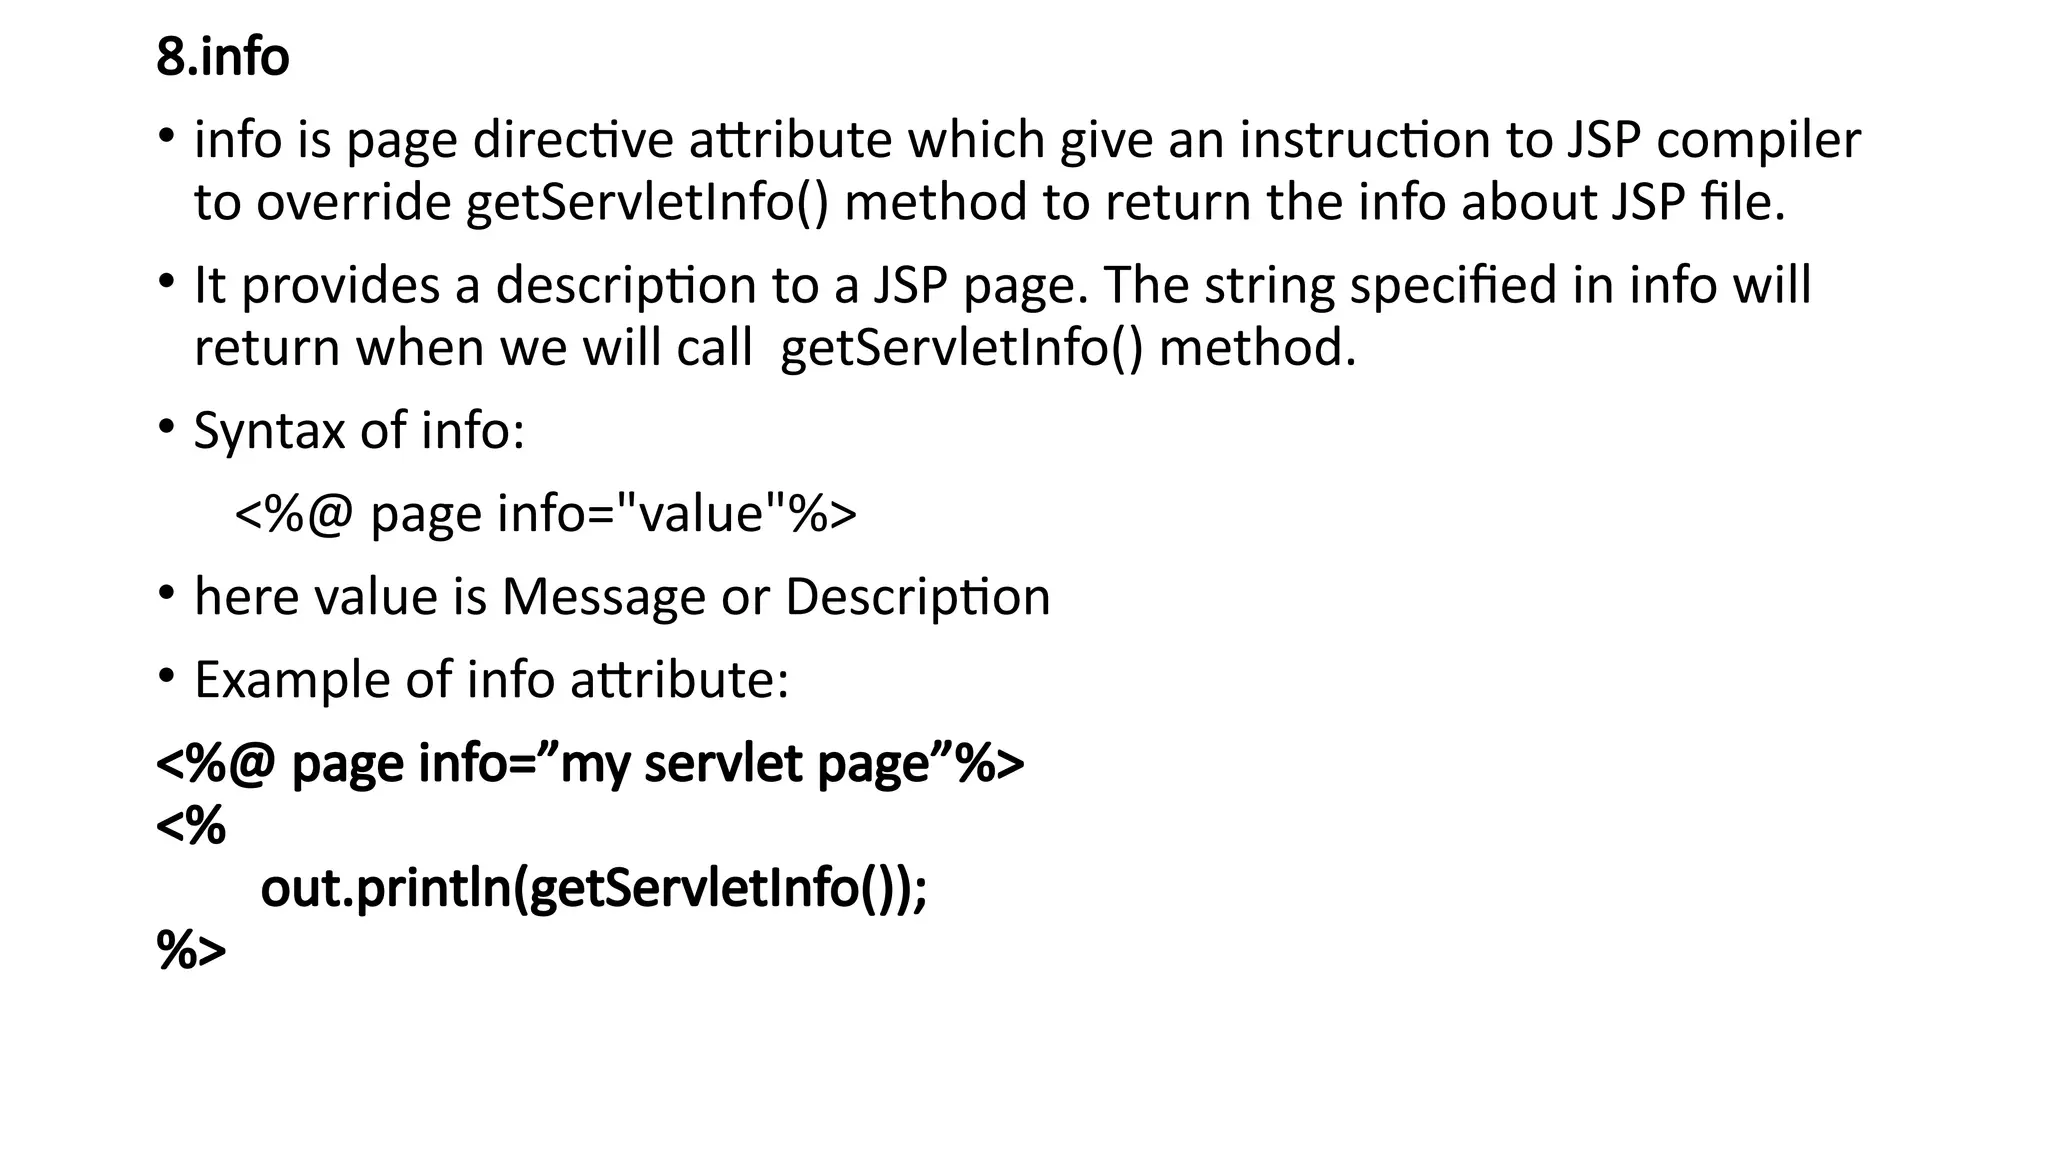
8.info
• info ispage directive attribute which give an instruction to JSP compiler
to override getServletInfo() method to return the info about JSP file.
• It provides a description to a JSP page. The string specified in info will
return when we will call getServletInfo() method.
• Syntax of info:
<%@ page info="value"%>
• here value is Message or Description
• Example of info attribute:
<%@ page info=”my servlet page”%>
<%
out.println(getServletInfo());
%>
44.
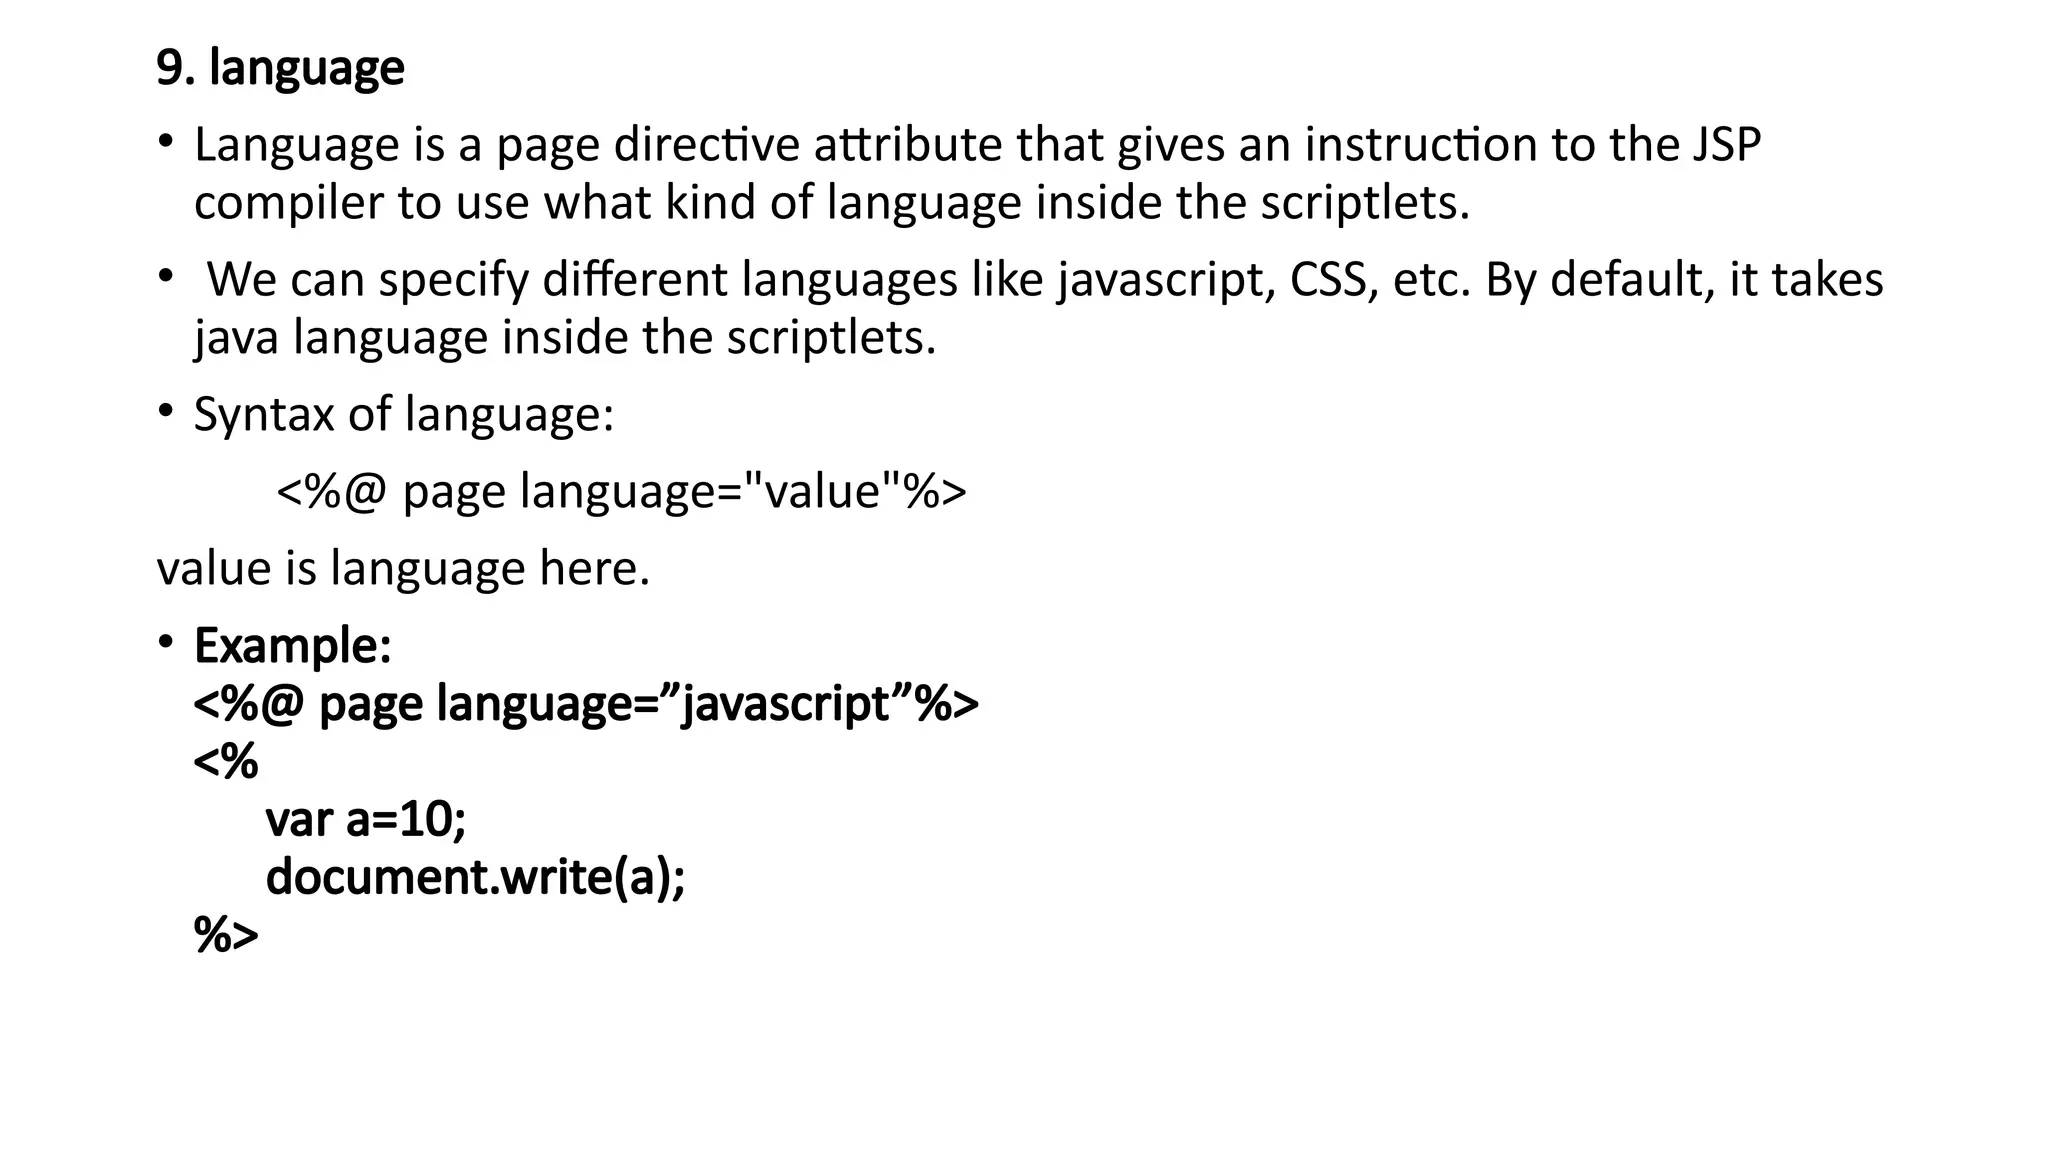
9. language
• Languageis a page directive attribute that gives an instruction to the JSP
compiler to use what kind of language inside the scriptlets.
• We can specify different languages like javascript, CSS, etc. By default, it takes
java language inside the scriptlets.
• Syntax of language:
<%@ page language="value"%>
value is language here.
• Example:
<%@ page language=”javascript”%>
<%
var a=10;
document.write(a);
%>
45.
10.autoflush
• By defaultauto flush is true but if we want to control flushing on our own
requirement we have to use this autoflush page directive.
• The autoFlush attribute controls the behavior of the servlet output buffer. It
monitors the buffer output and specifies whether the filled buffer output should be
flushed automatically or an exception should be raised to indicate buffer overflow
• If it is true it means the buffer should be flushed whenever it is full. false will throw
an exception when buffer overflows.
• Default value: True
• Syntax of autoFlush:
<%@ page autoFlush="value"%>
• value can be true or false.
• Example :
<%@ page autoFlush=”false”%>
<%
out.flush();
%>
46.
11. buffer
• bufferis page directive attribute which give an instruction to JSP compiler what
is the buffer size can be taken by out implicit variable of JspWriter (by default
8KB).
• This attribute is used to specify the buffer size. If you specify this to none
during coding then the output would directly written to Response object by
JSPWriter. And, if you specify a buffer size then the output first written to
buffer then it will be available for response object.
• Syntax of buffer attribute:
<%@ page buffer="value"%>
value is size in kb or none.
Example of buffer:
No buffer for this page:
<%@ page buffer="none"%>
5 kb buffer size for the page, which has below code:
<%@ page buffer="5kb"%>
47.
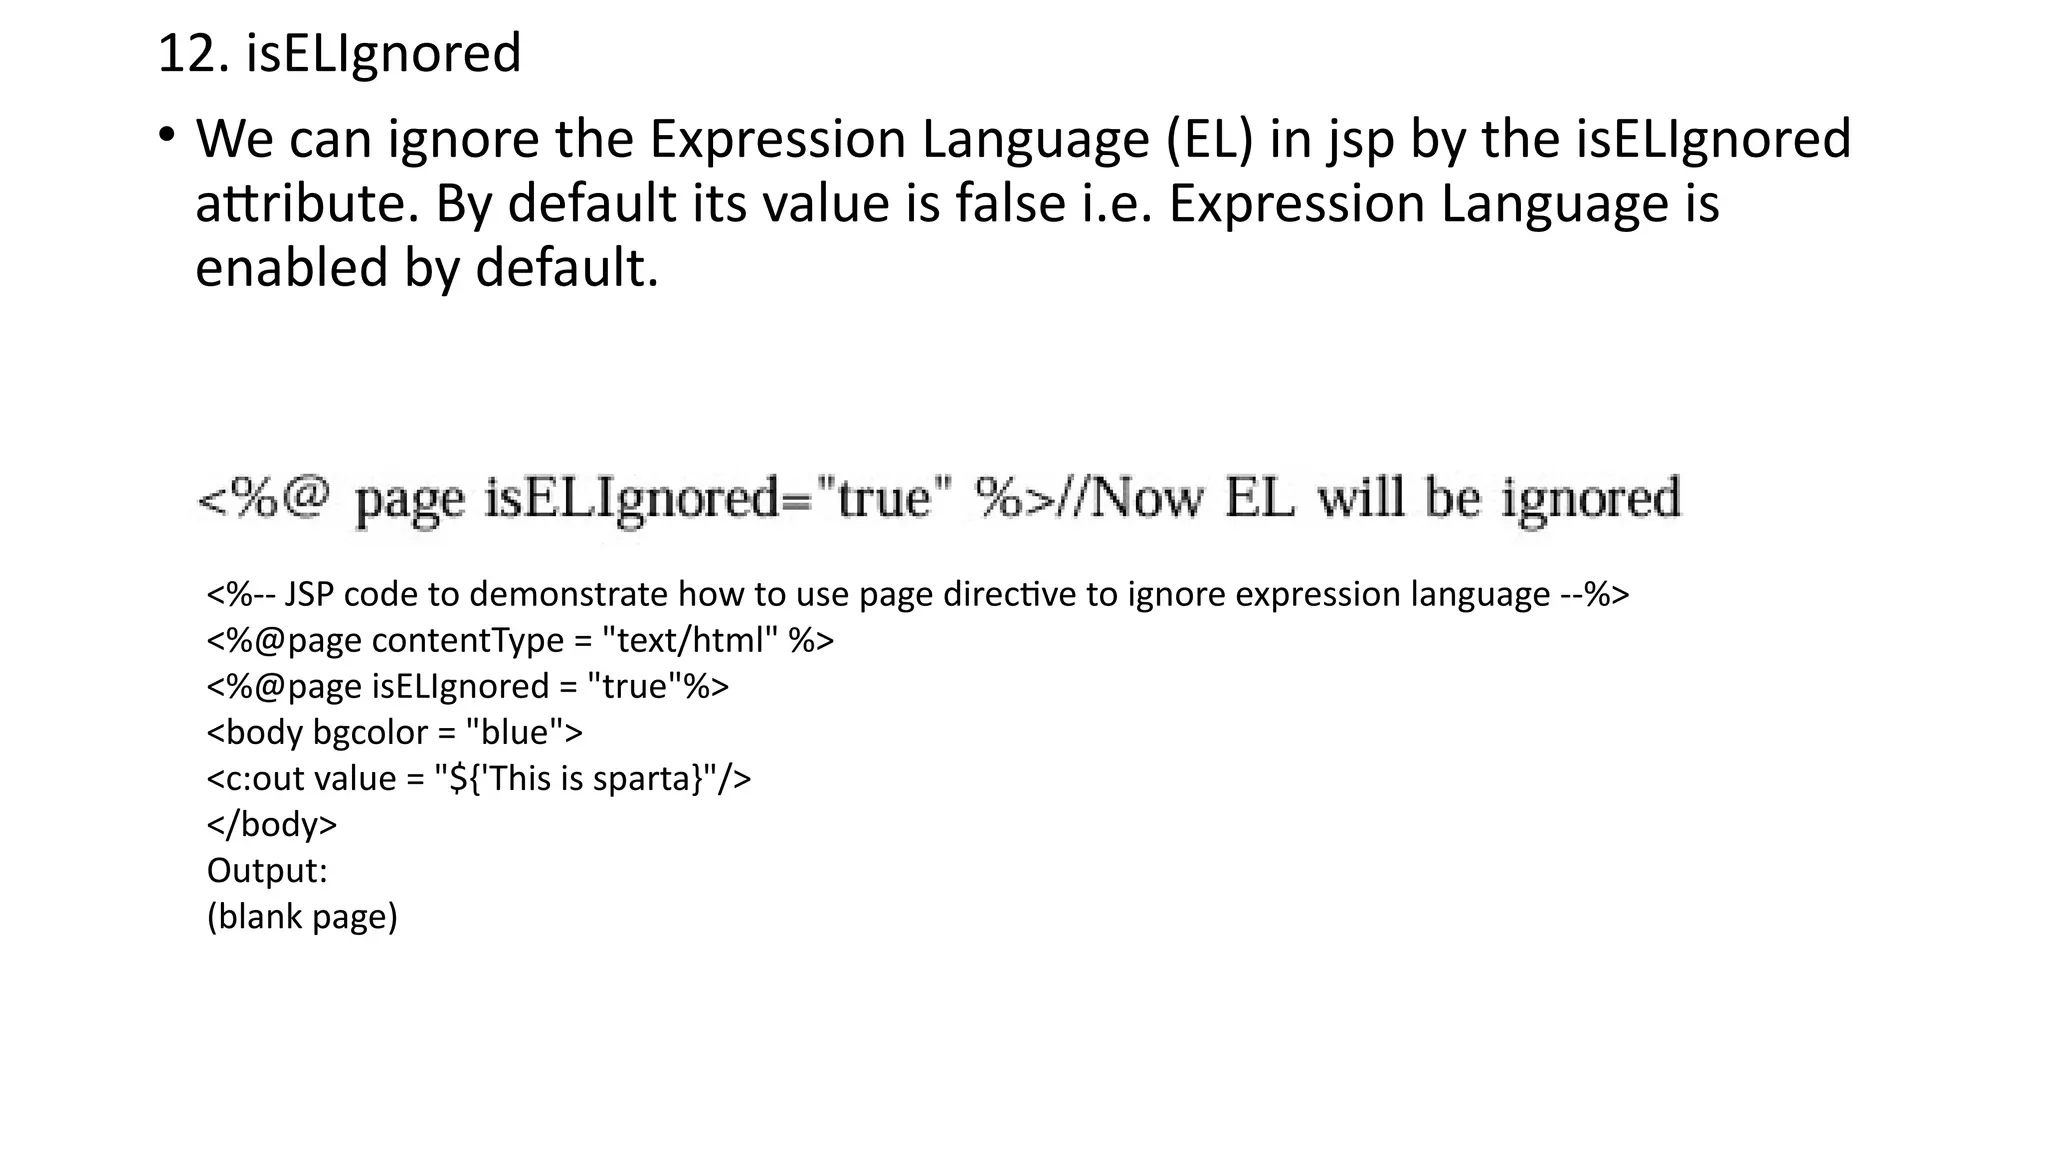
12. isELIgnored
• Wecan ignore the Expression Language (EL) in jsp by the isELIgnored
attribute. By default its value is false i.e. Expression Language is
enabled by default.
<%-- JSP code to demonstrate how to use page directive to ignore expression language --%>
<%@page contentType = "text/html" %>
<%@page isELIgnored = "true"%>
<body bgcolor = "blue">
<c:out value = "${'This is sparta}"/>
</body>
Output:
(blank page)
48.
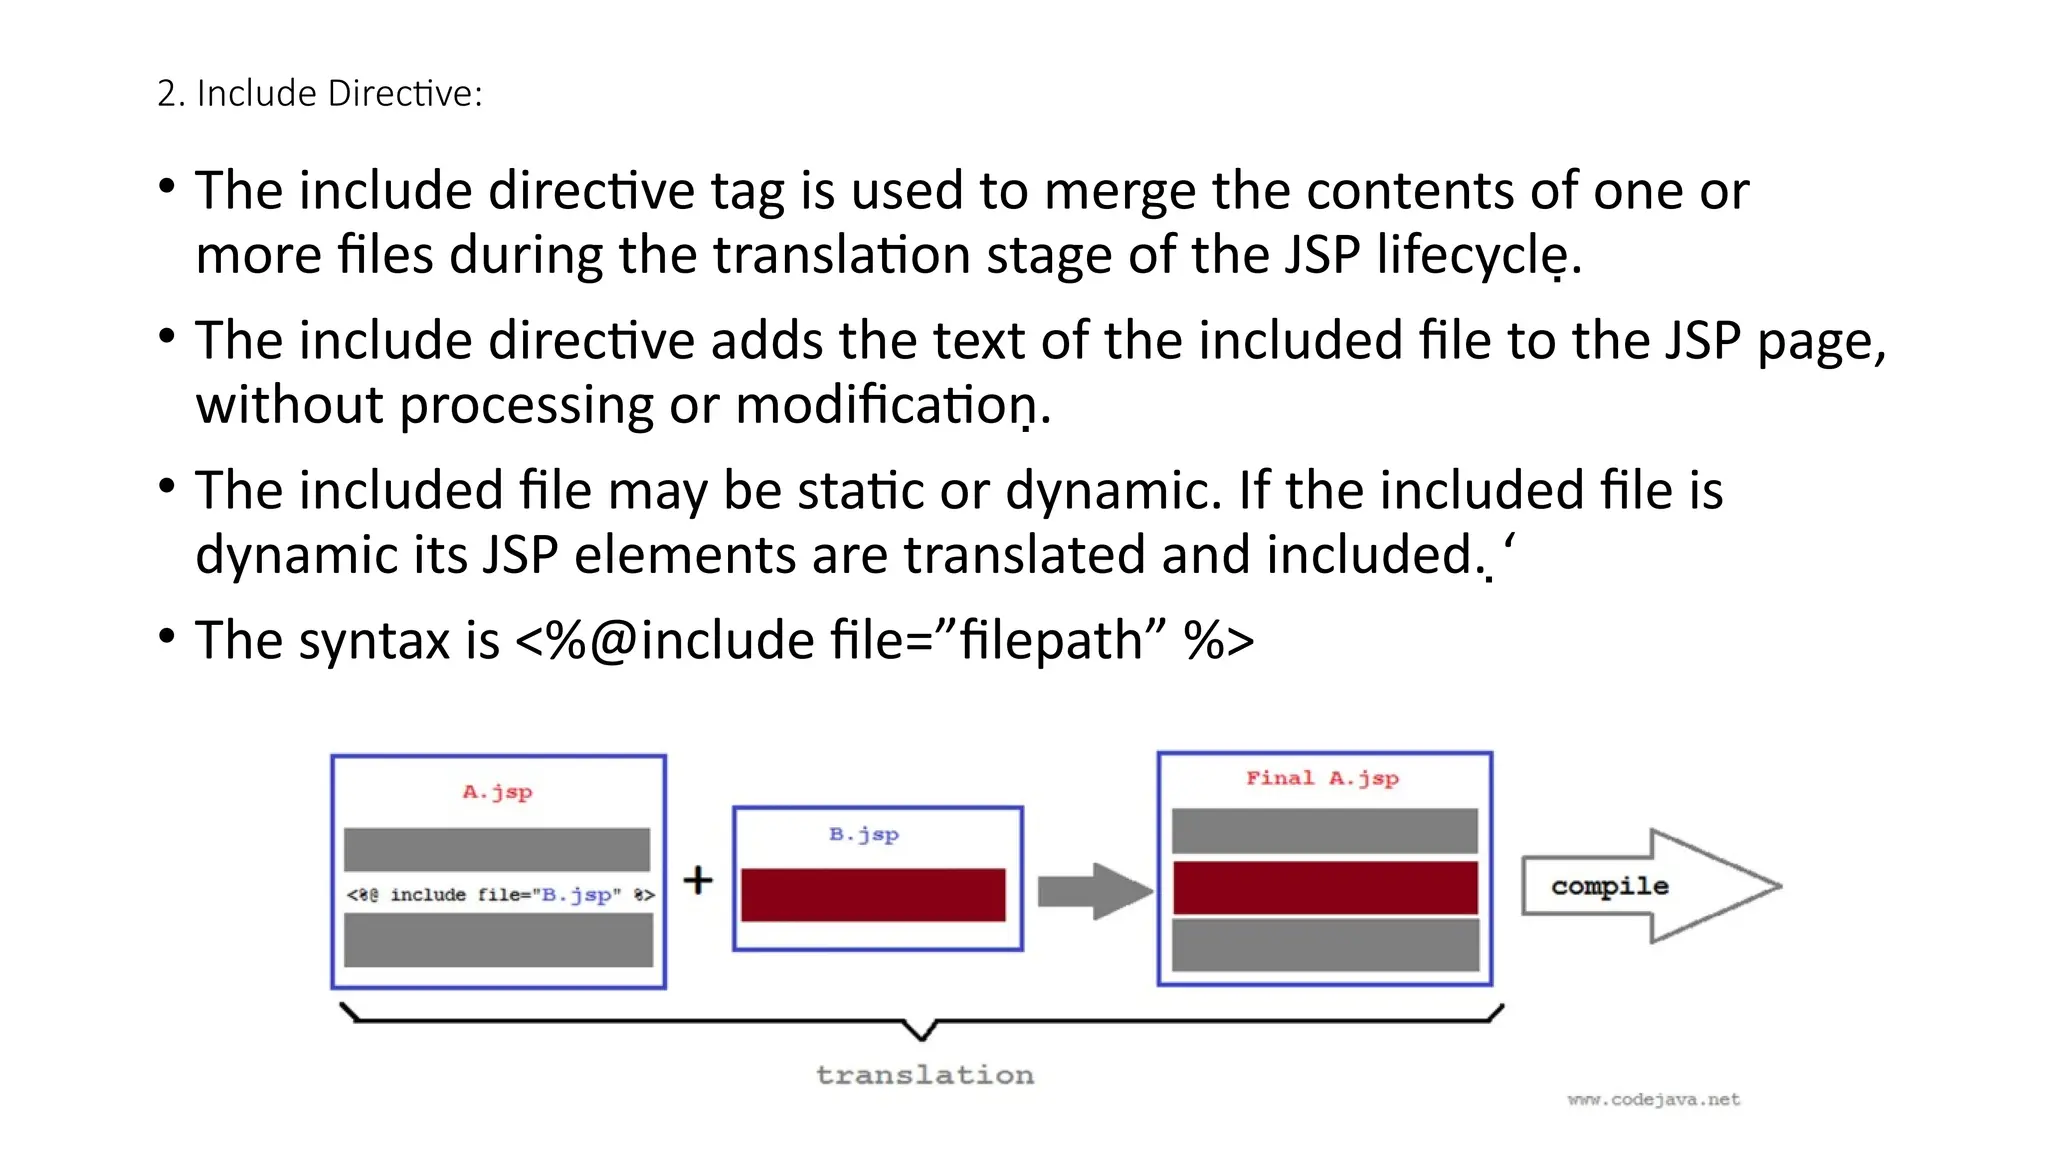
2. Include Directive:
•The include directive tag is used to merge the contents of one or
more files during the translation stage of the JSP lifecycle.
• The include directive adds the text of the included file to the JSP page,
without processing or modification.
• The included file may be static or dynamic. If the included file is
dynamic its JSP elements are translated and included. ‘
• The syntax is <%@include file=”filepath” %>
49.
• Example: index.jsp
•<html>
• <head>
• <title>Home Page</title>
• </head>
• <body>
• <%@include file="header.html" %>
• <hr/>
• <h2>This is main content</h2>
• <hr/>
• <%@include file="footer.html" %>
• Today is: <%= java.util.Calendar.getInstance().getTime() %>
• </body>
• </html>
• header. html -> <h1>This is header</h1>
• footer.html -> <h5>This is footer</h5>
50.
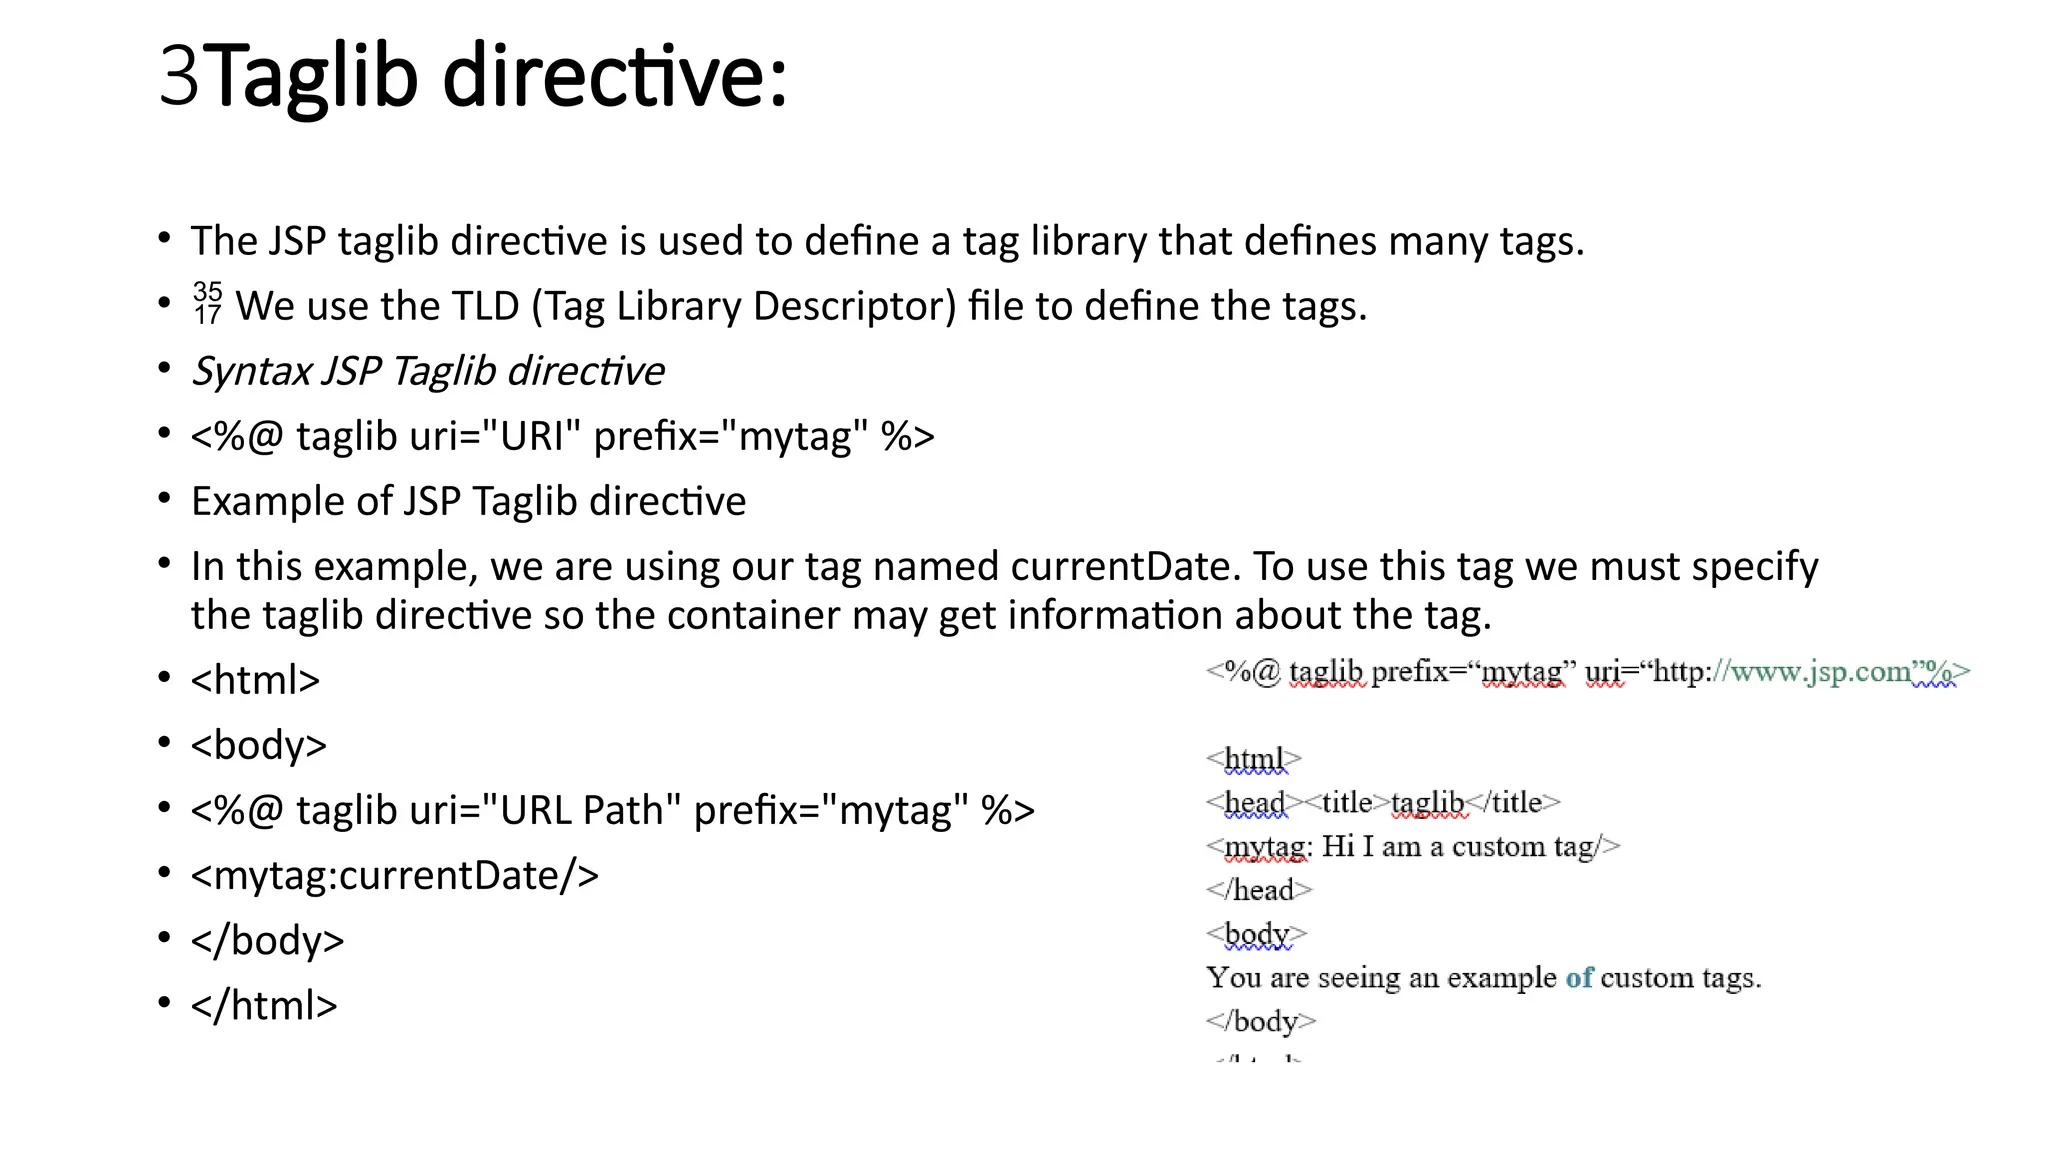
3Taglib directive:
• TheJSP taglib directive is used to define a tag library that defines many tags.
• We use the TLD (Tag Library Descriptor) file to define the tags.
• Syntax JSP Taglib directive
• <%@ taglib uri="URI" prefix="mytag" %>
• Example of JSP Taglib directive
• In this example, we are using our tag named currentDate. To use this tag we must specify
the taglib directive so the container may get information about the tag.
• <html>
• <body>
• <%@ taglib uri="URL Path" prefix="mytag" %>
• <mytag:currentDate/>
• </body>
• </html>
51.
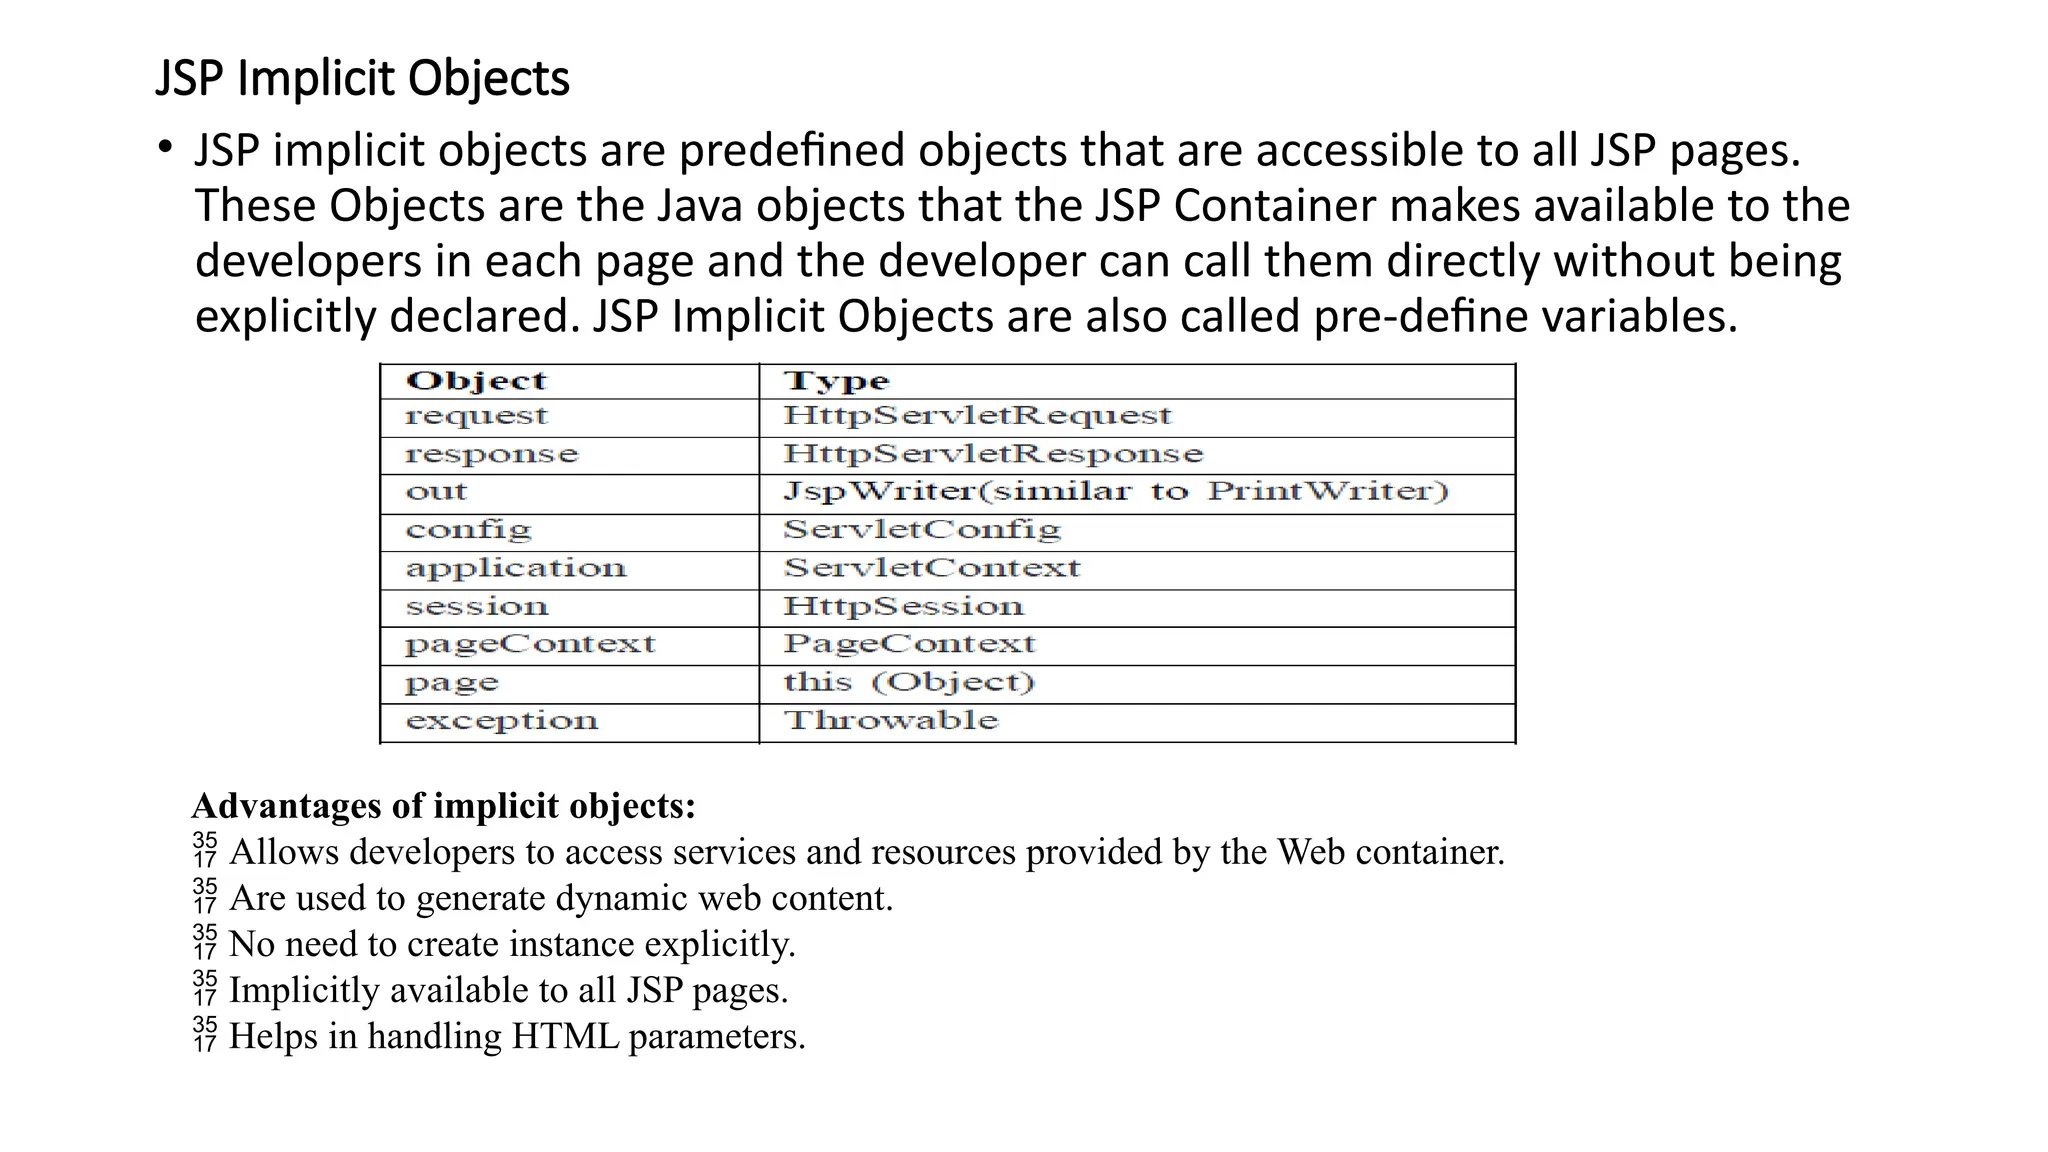
JSP Implicit Objects
•JSP implicit objects are predefined objects that are accessible to all JSP pages.
These Objects are the Java objects that the JSP Container makes available to the
developers in each page and the developer can call them directly without being
explicitly declared. JSP Implicit Objects are also called pre-define variables.
Advantages of implicit objects:
Allows developers to access services and resources provided by the Web container.
Are used to generate dynamic web content.
No need to create instance explicitly.
Implicitly available to all JSP pages.
Helps in handling HTML parameters.
52.
1. The requestObject
• The request object is an instance of a
javax.servlet.http.HttpServletRequest object. Each time a client
requests a page the JSP engine creates a new object to represent that
request.
• The request object provides methods to get the HTTP header
information including form data, cookies, HTTP methods etc.
• request object is passed as parameter to _jspService() method when
a client request is made.
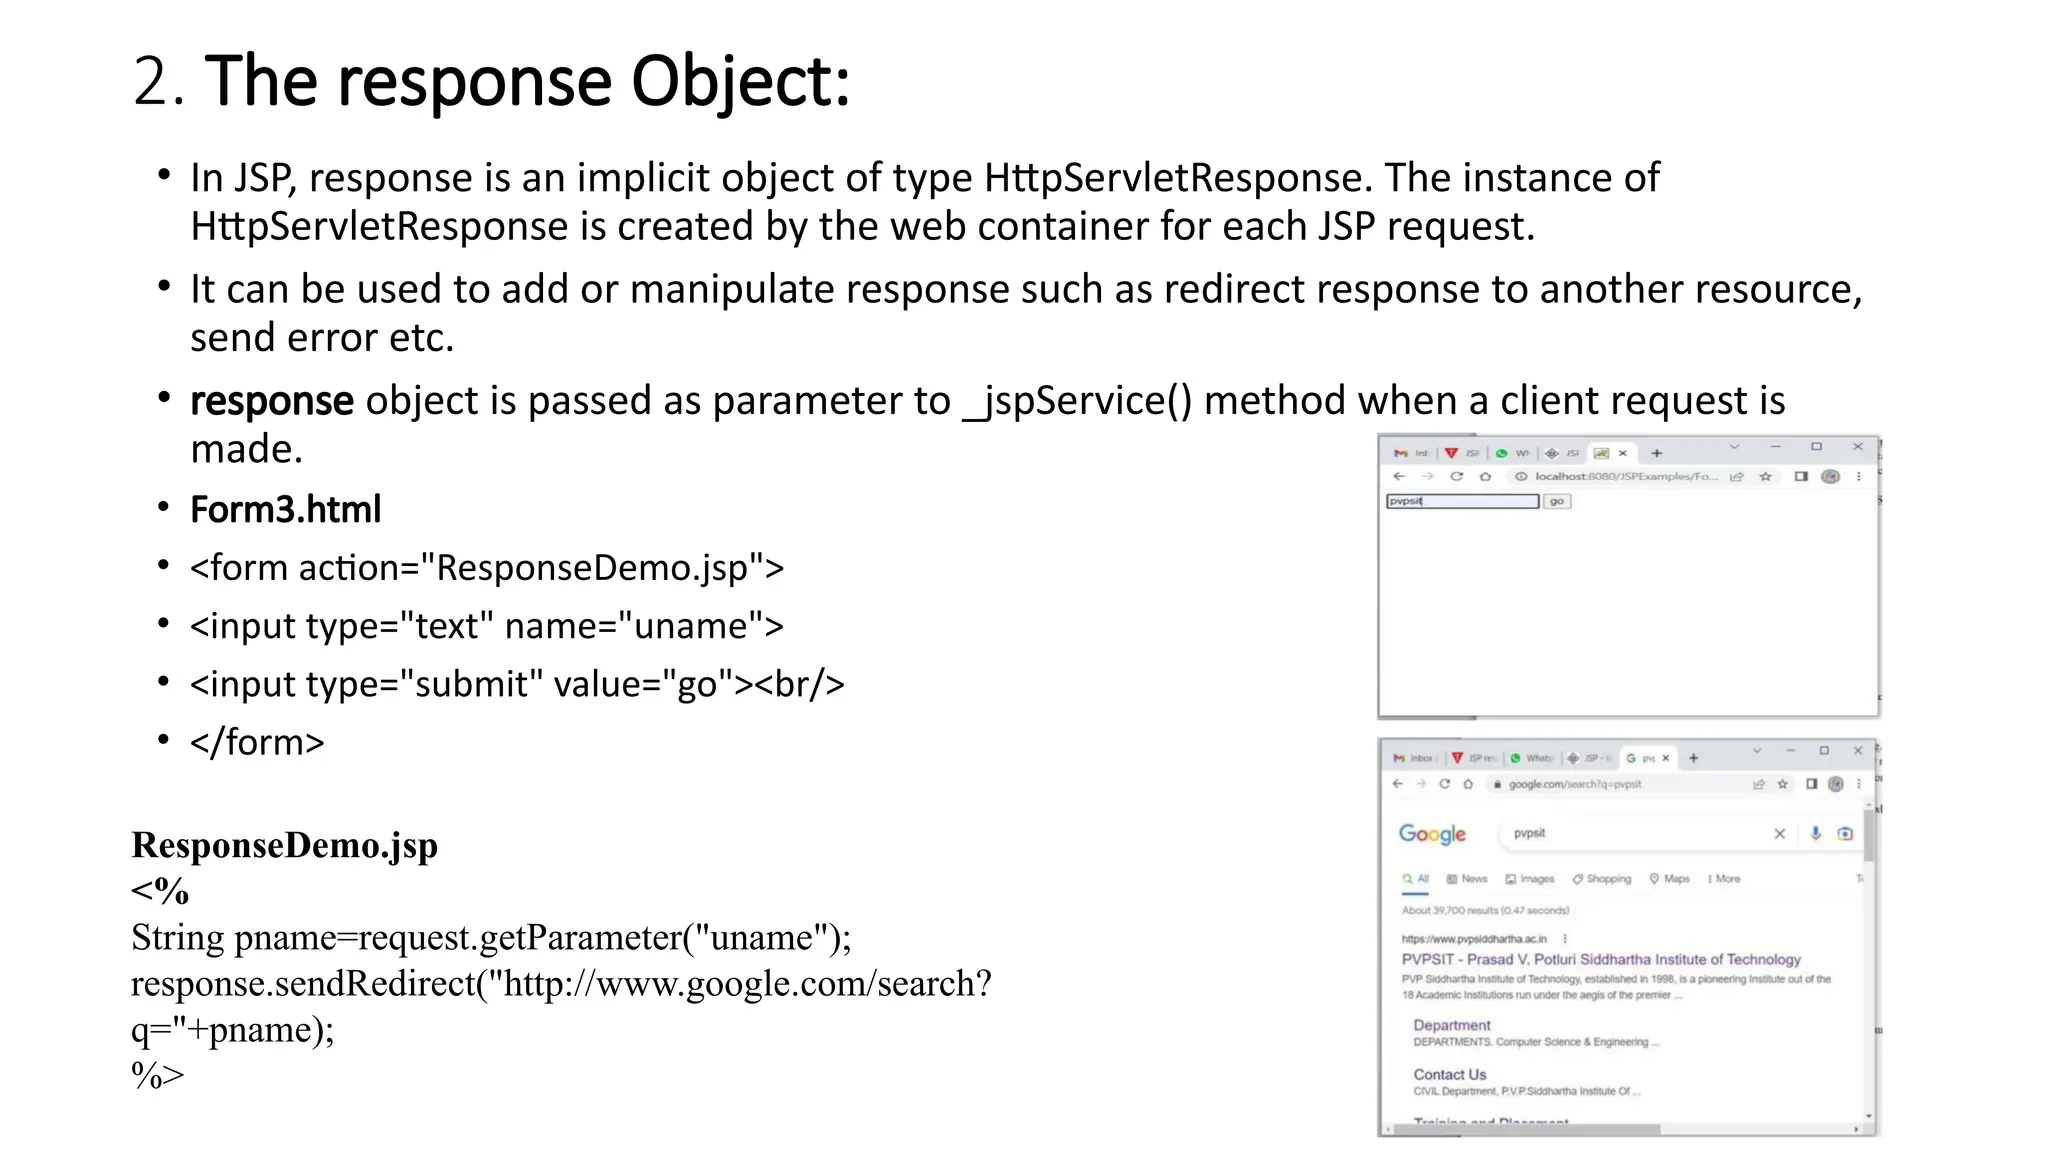
2. The responseObject:
• In JSP, response is an implicit object of type HttpServletResponse. The instance of
HttpServletResponse is created by the web container for each JSP request.
• It can be used to add or manipulate response such as redirect response to another resource,
send error etc.
• response object is passed as parameter to _jspService() method when a client request is
made.
• Form3.html
• <form action="ResponseDemo.jsp">
• <input type="text" name="uname">
• <input type="submit" value="go"><br/>
• </form>
ResponseDemo.jsp
<%
String pname=request.getParameter("uname");
response.sendRedirect("http://www.google.com/search?
q="+pname);
%>
55.
3. The outobject:
• The out implicit object is an instance of a javax.servlet.jsp.JspWriter
object and is used to send content in a response.
• The JspWriter object contains most of the same methods as the
java.io.PrintWriter class.
• Methods:
• out.print(dataType dt) - Print a data type value
• out.println(dataType dt) - Print a data type value then terminate the
line with new line character
56.
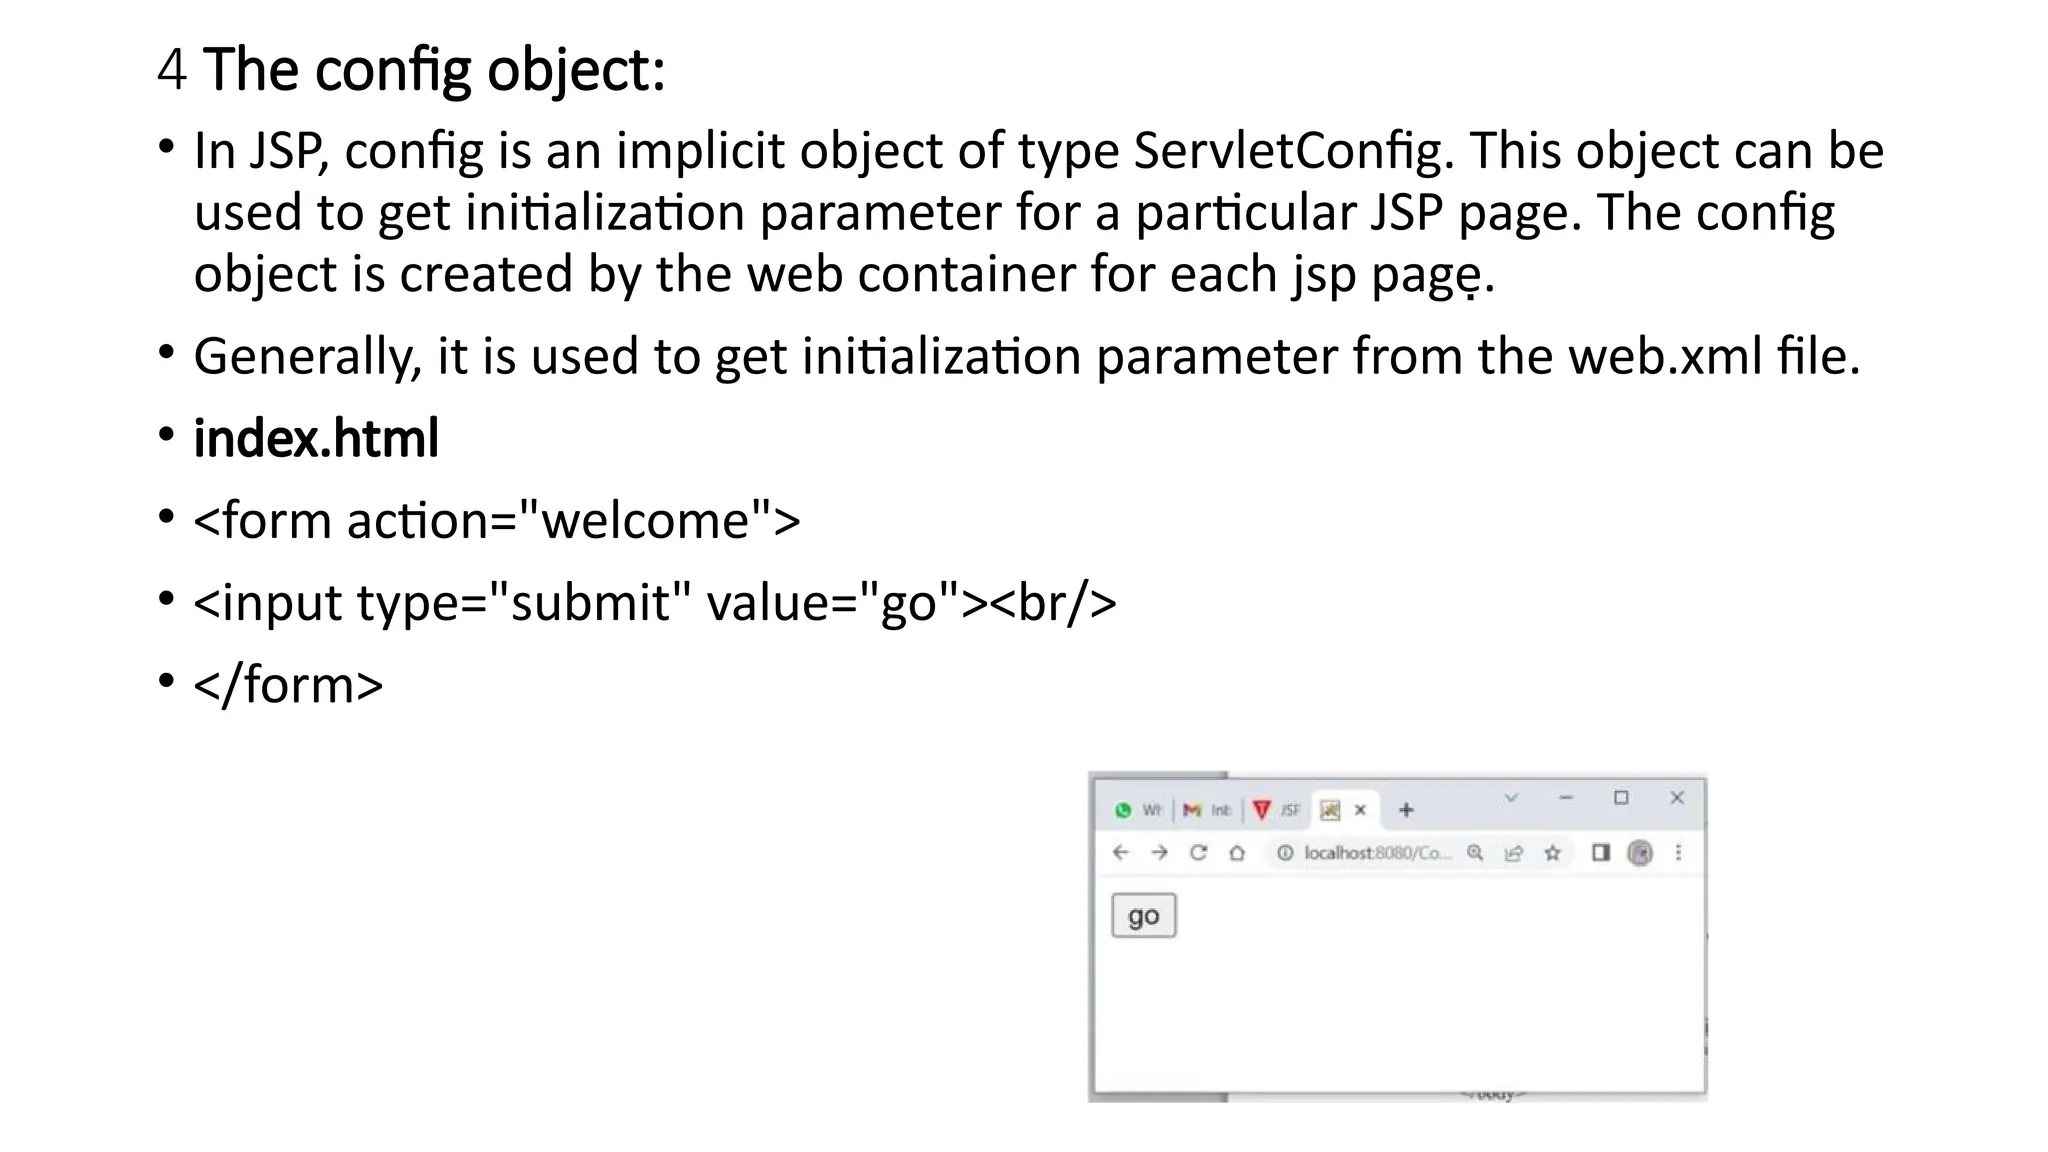
4 The configobject:
• In JSP, config is an implicit object of type ServletConfig. This object can be
used to get initialization parameter for a particular JSP page. The config
object is created by the web container for each jsp page.
• Generally, it is used to get initialization parameter from the web.xml file.
• index.html
• <form action="welcome">
• <input type="submit" value="go"><br/>
• </form>
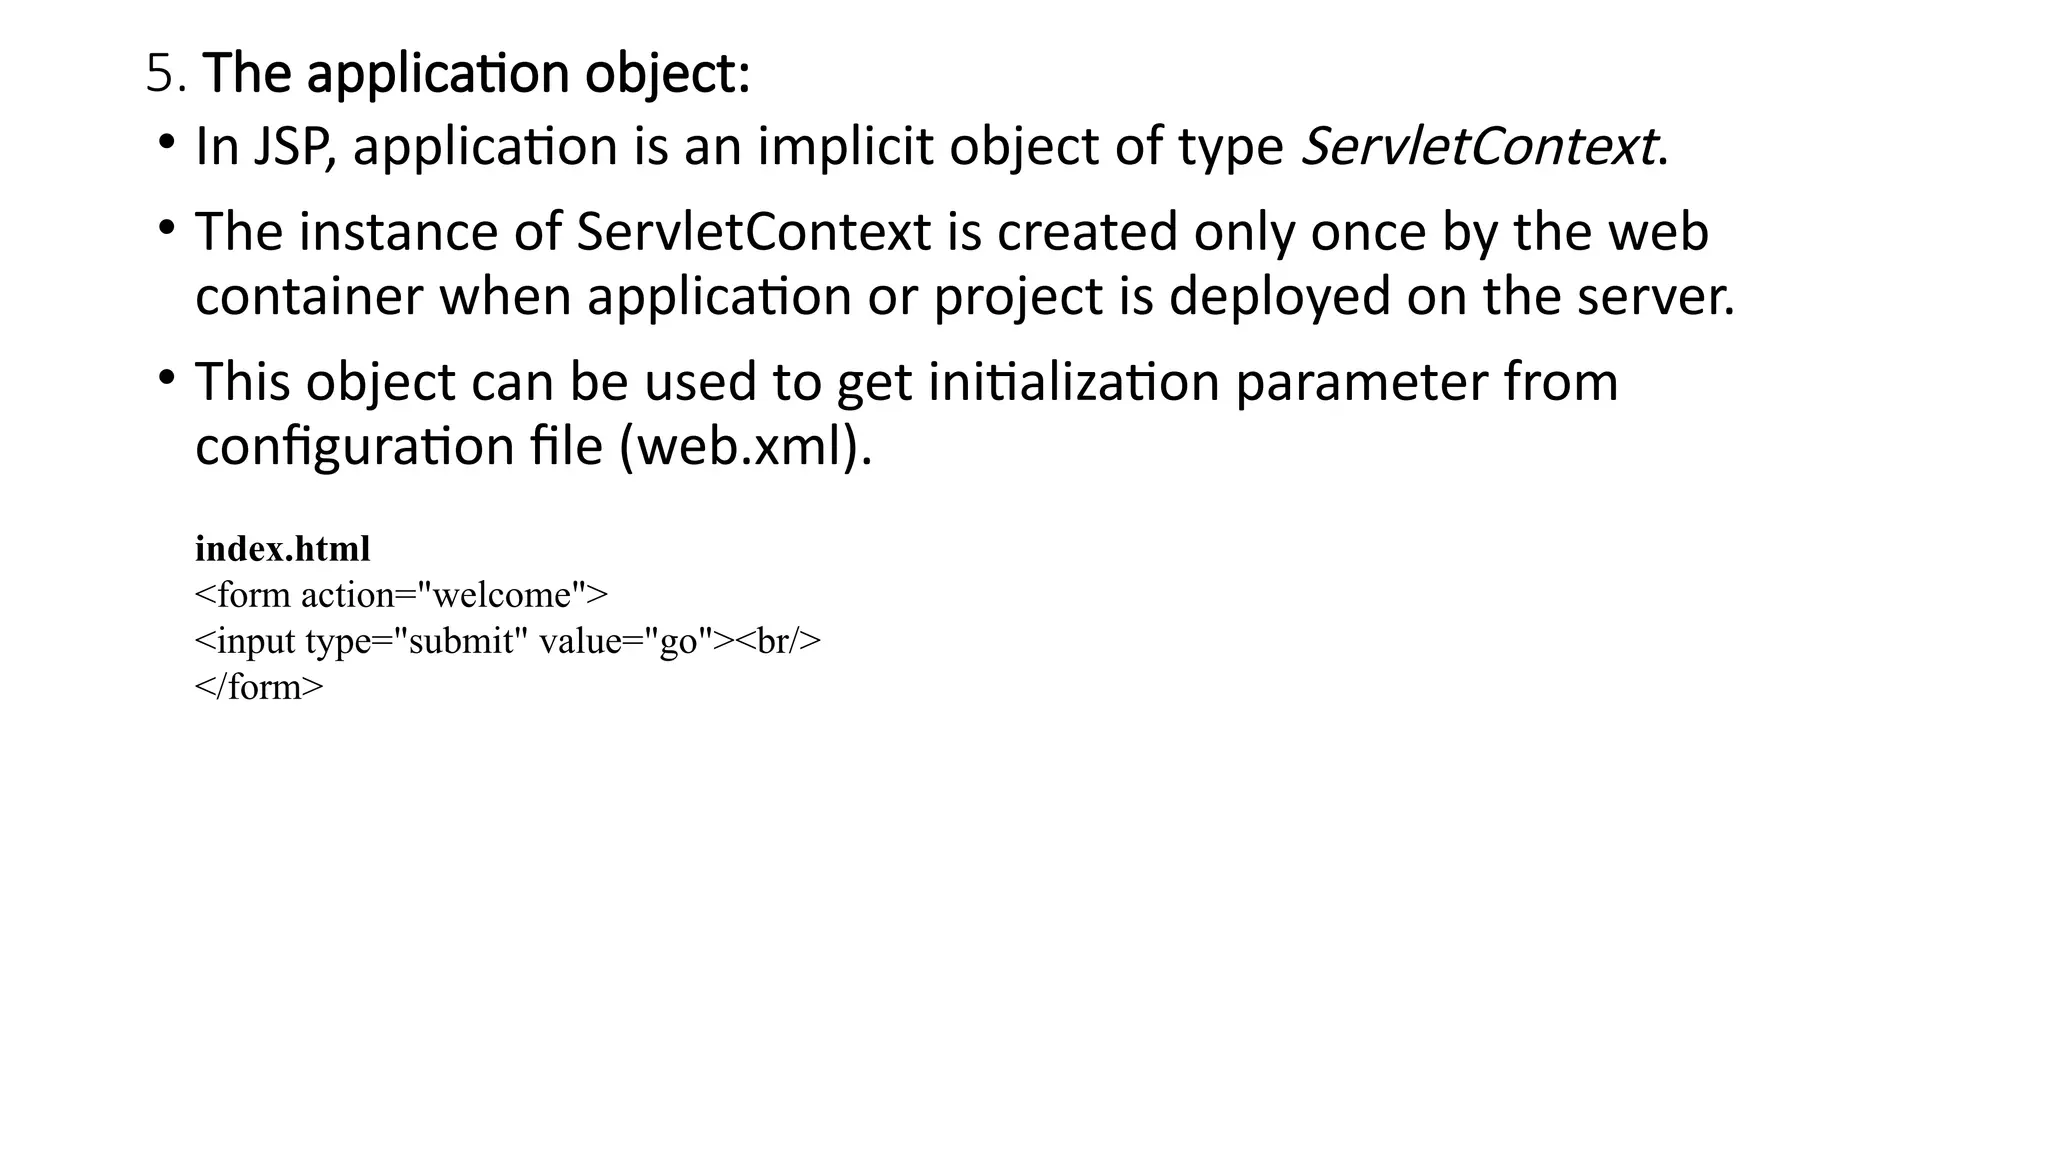
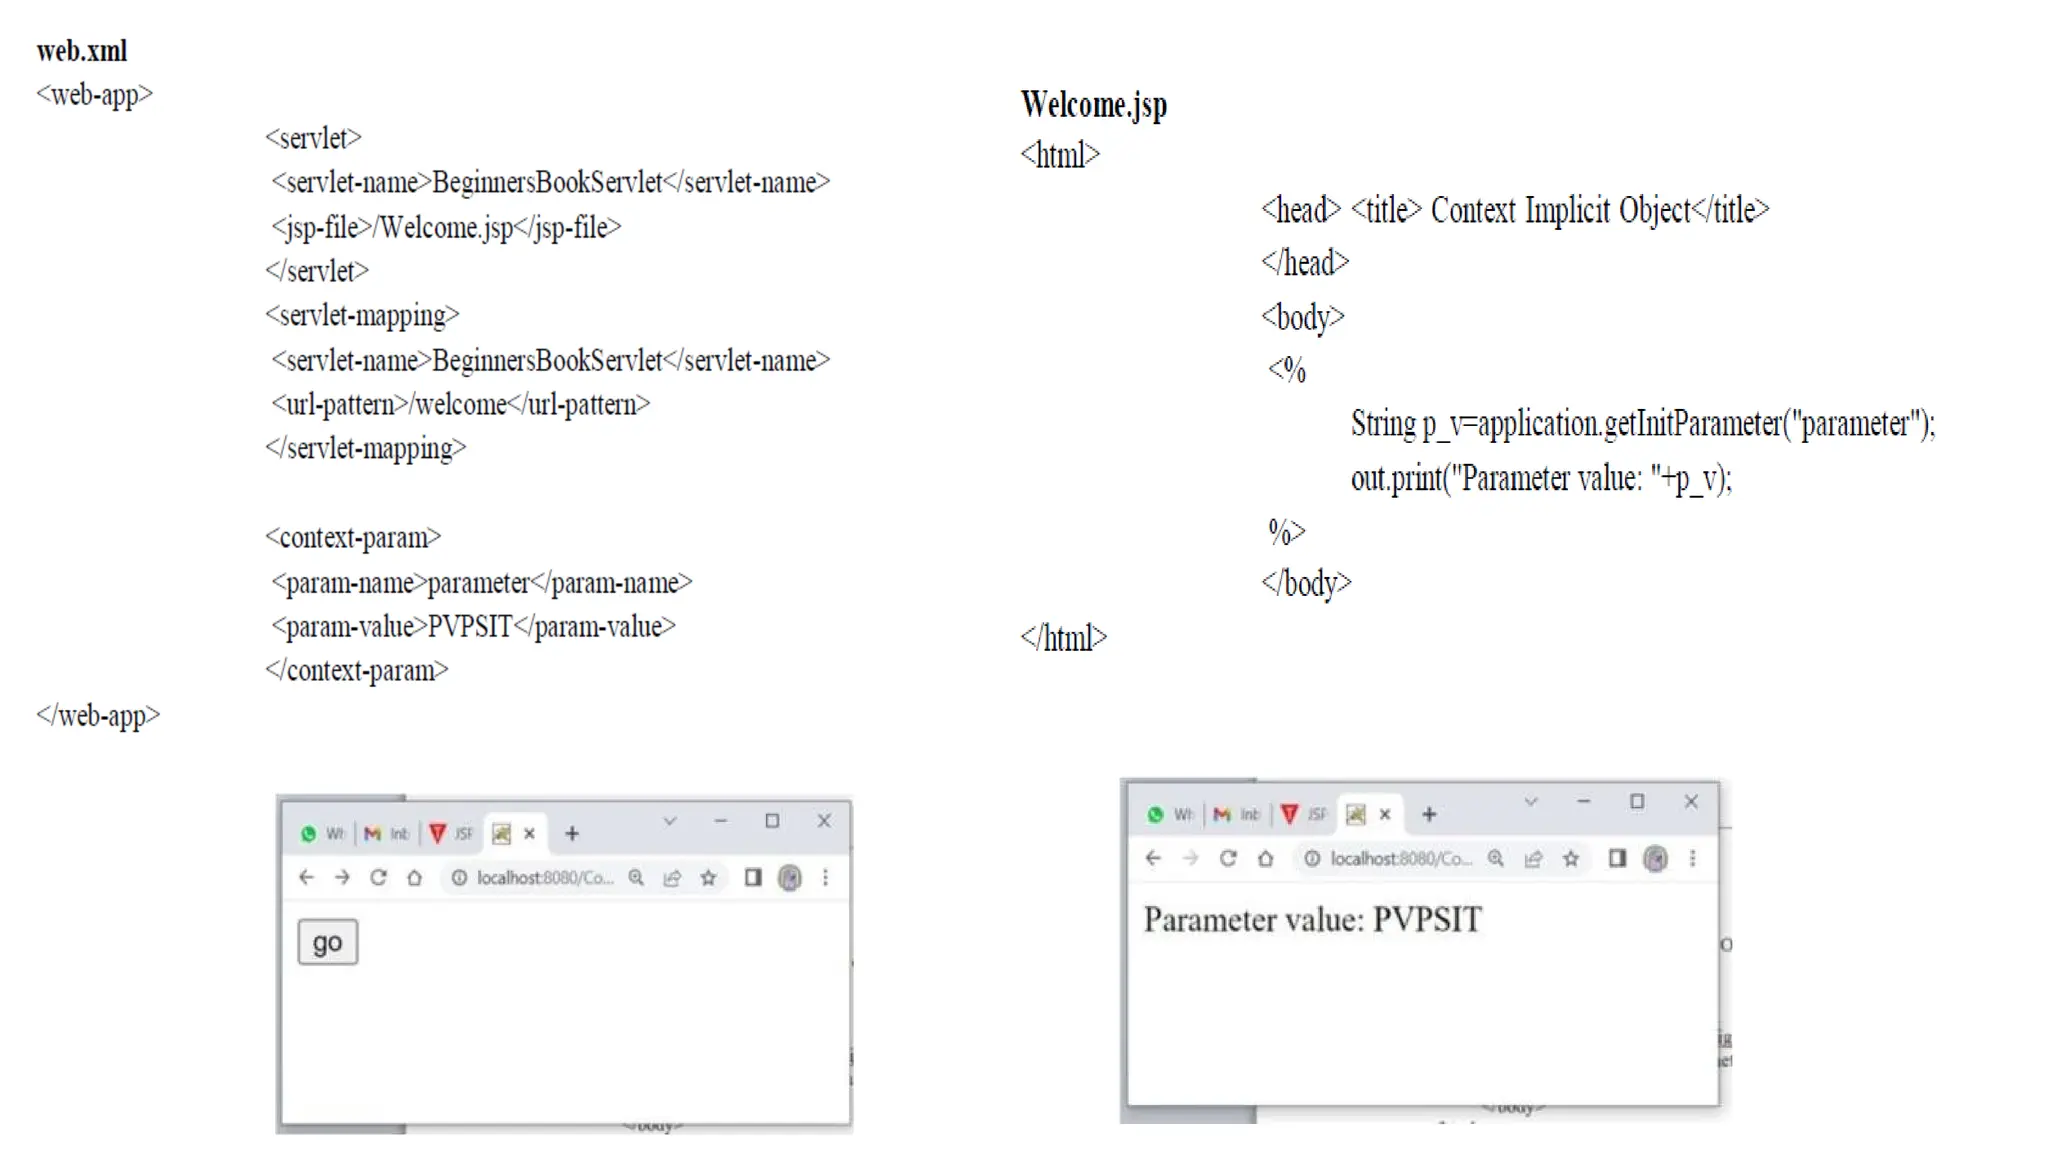
5. The applicationobject:
• In JSP, application is an implicit object of type ServletContext.
• The instance of ServletContext is created only once by the web
container when application or project is deployed on the server.
• This object can be used to get initialization parameter from
configuration file (web.xml).
index.html
<form action="welcome">
<input type="submit" value="go"><br/>
</form>
60.
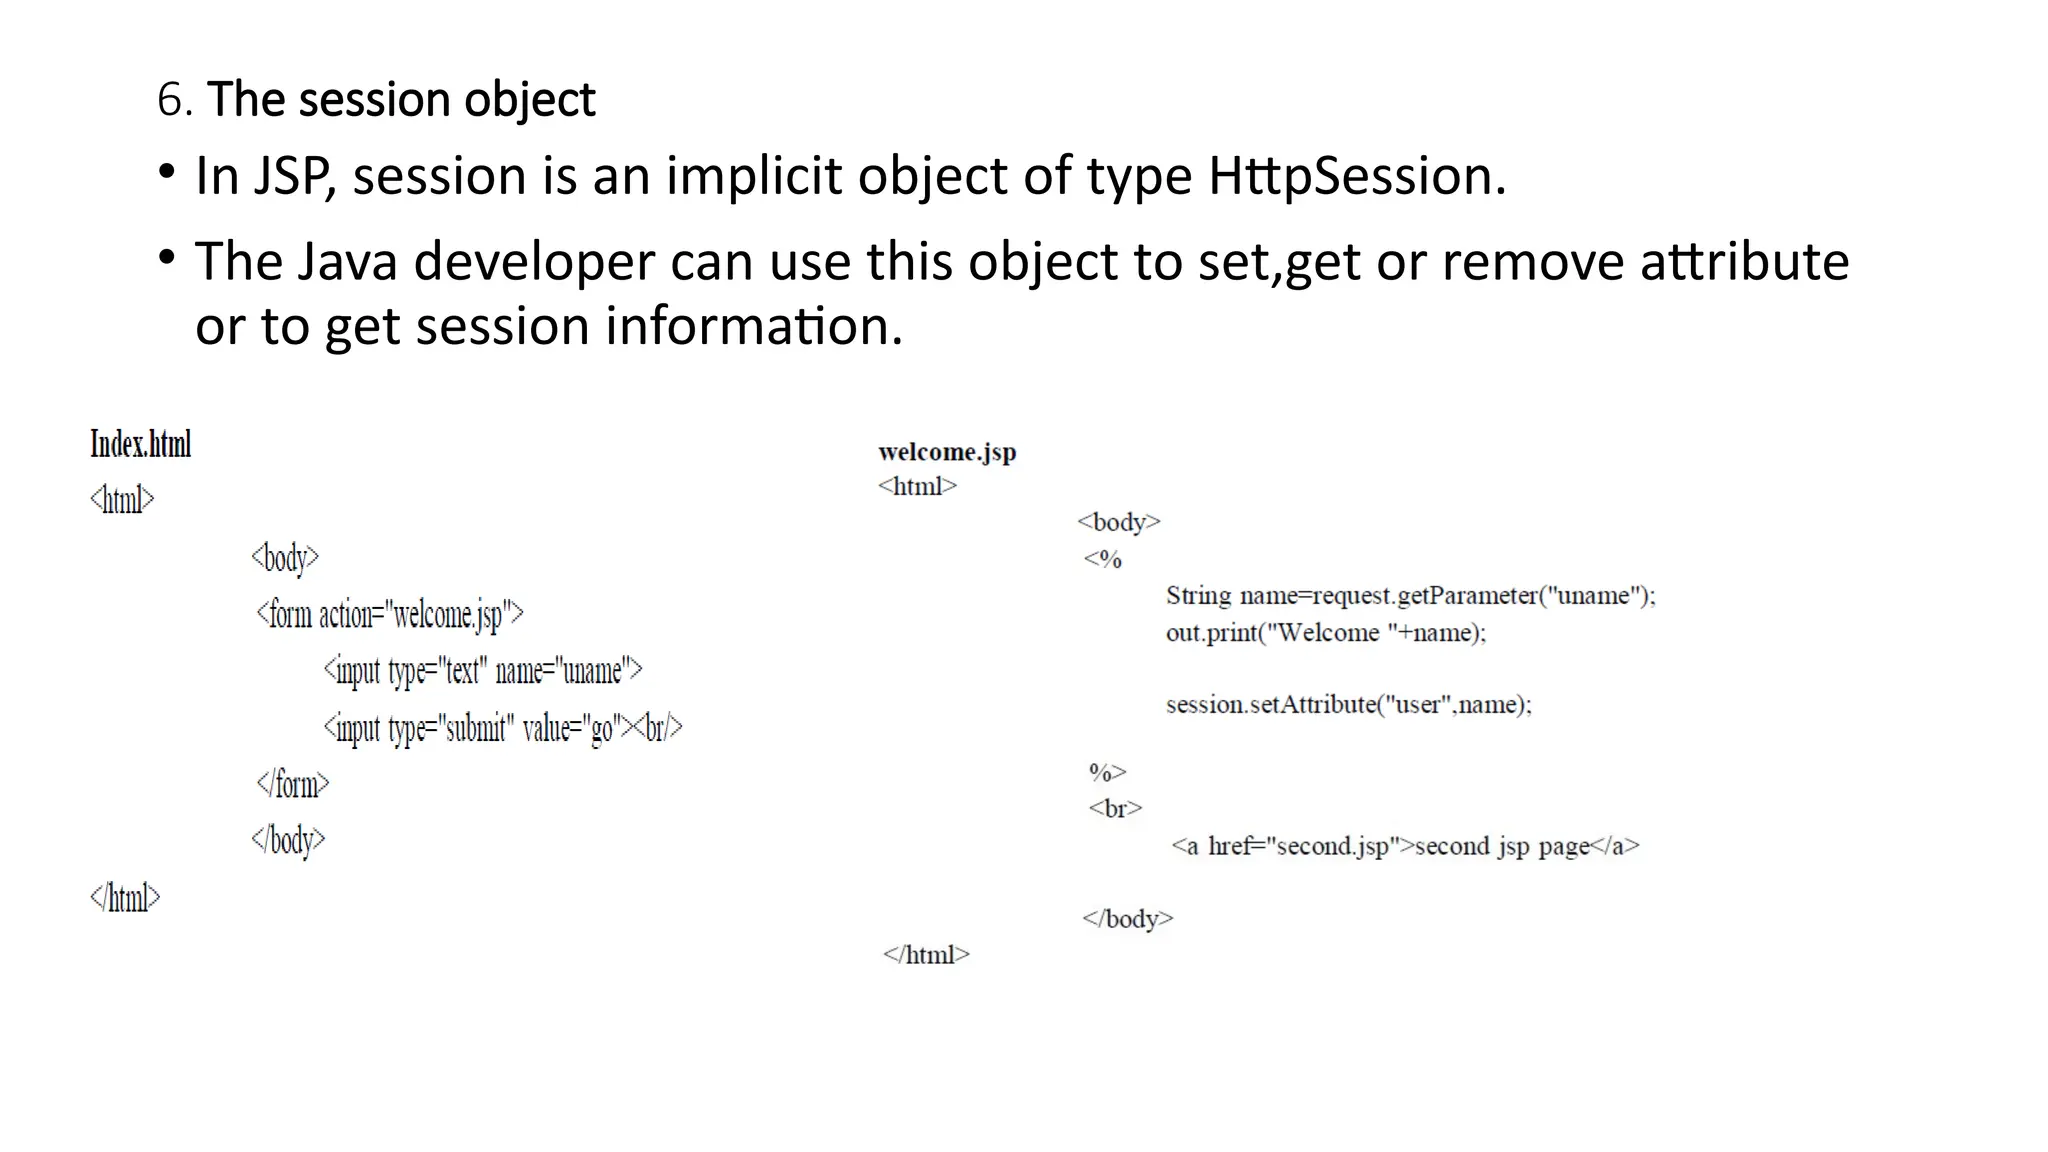
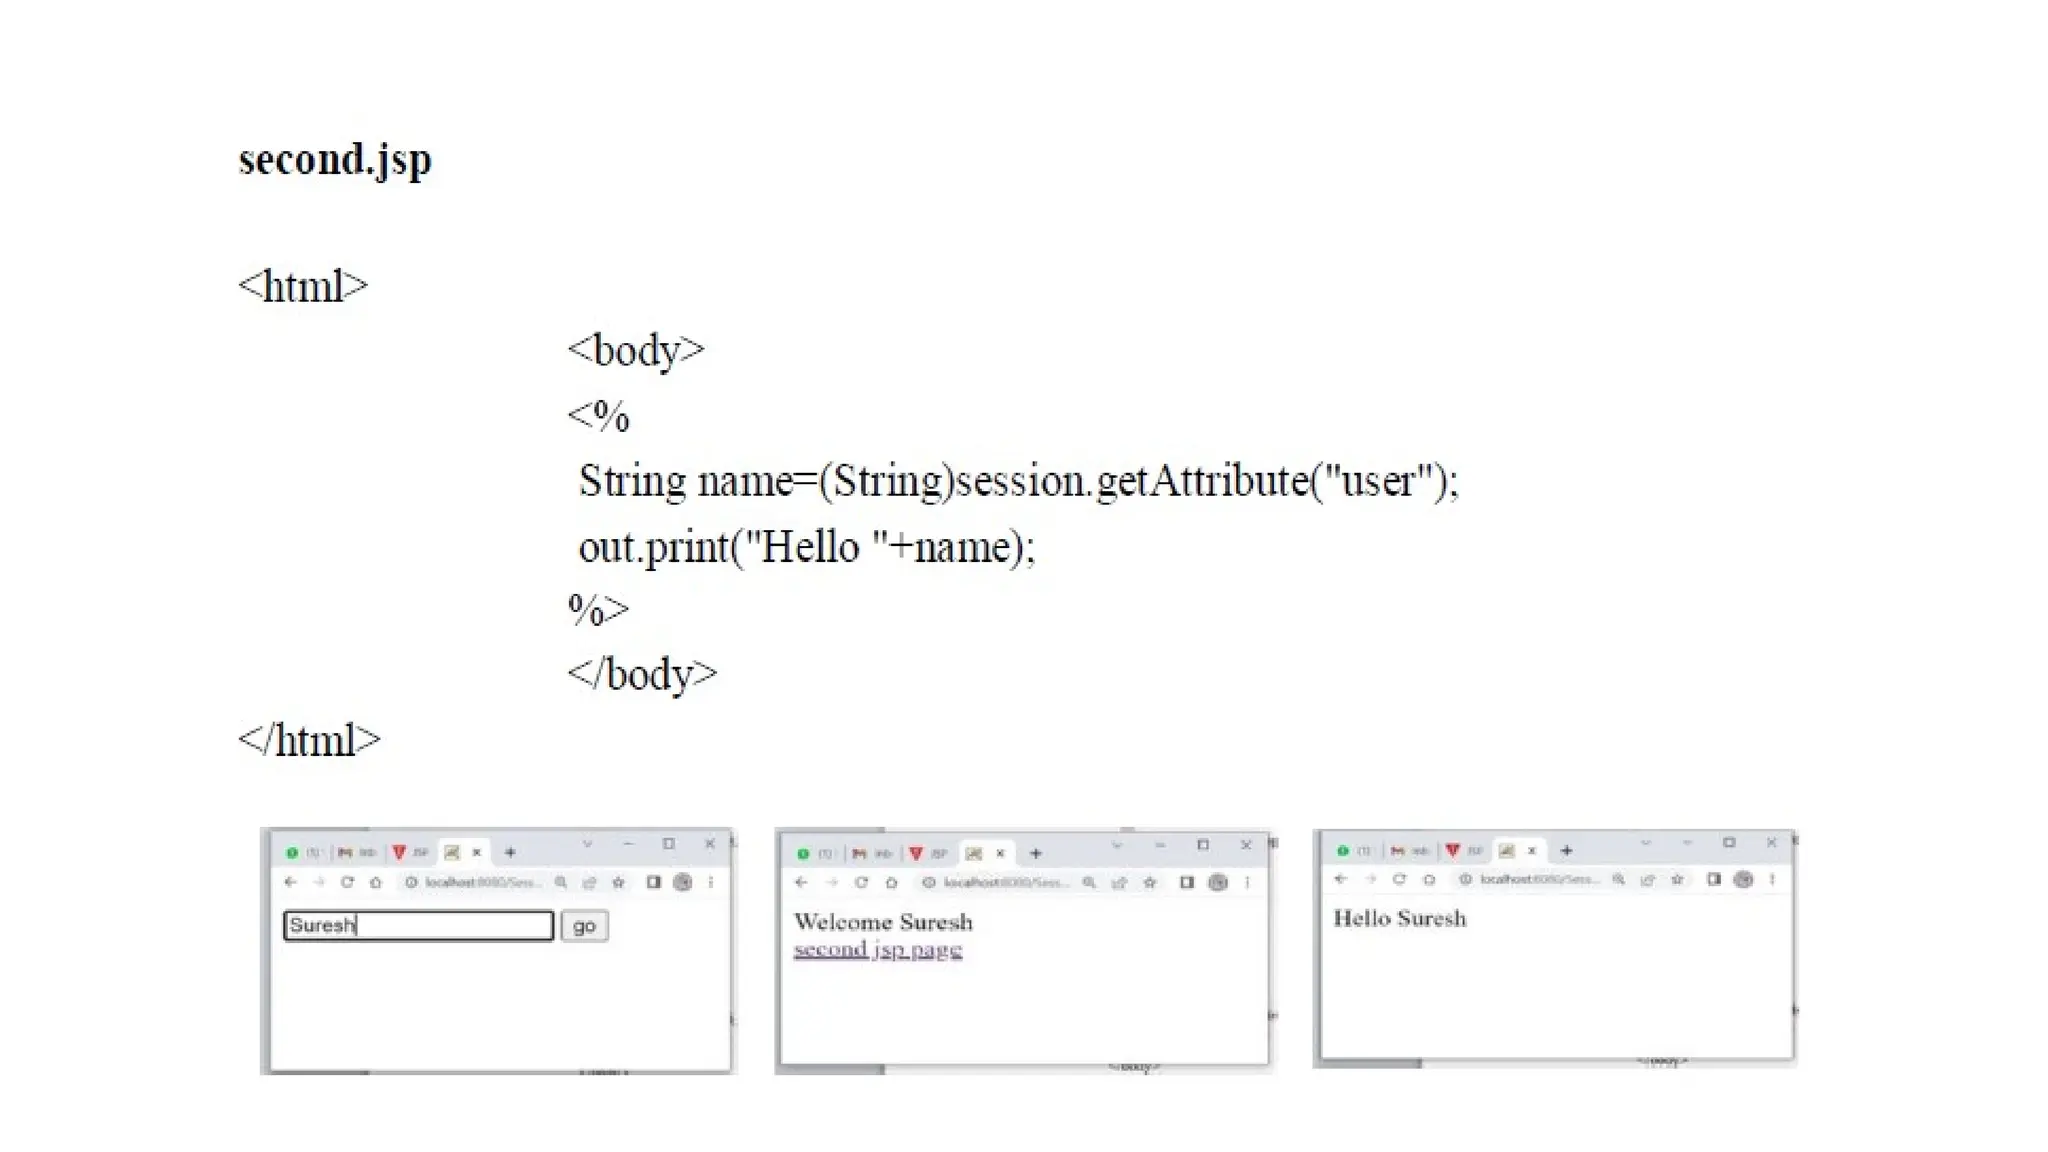
6. The sessionobject
• In JSP, session is an implicit object of type HttpSession.
• The Java developer can use this object to set,get or remove attribute
or to get session information.
62.
7.PageContext
• It isthe implicit object from javax.servlet.jsp.PageContext implementation where PageContext is an abstract
implementation. This object has the capability to get, set and remove attributes that fall under 4 scopes–page, request,
session and application scopes.
• This object has references to other implicit objects. It contains information of directives, buffer information, error page
URL. It holds reference to request and response as well. This can support over 40 methods that are inherited from
ContextClass. It is even used to get info of a complete JSP page.
• Syntax: pageContext.methodName(“parameter”);
• Some useful methods used with pageContext:
a. Object getAttribute (String AttributeName, int Scope): This method finds/gets the attribute from the suggested scope
• Object obj1 = pageContext.getAttribute(“name”, PageContext.SESSION_CONTEXT);
• Object obj2 = pageContext.getAttribute(“address”, PageContext. REQUEST_CONTEXT);
• Object obj3= pageContext.getAttribute(“number”, PageContext. PAGE_CONT EXT);
• Object obj4 = pageContext.getAttribute(“data”, PageContext. APPLICATION_CONTEXT);
• b. void setAttribute(String AttributeName, Object AttributeValue, int Scope): This method will set the attribute in the
scope along with its value.
• Object obj1 = pageContext.setAttribute(“name”, “Kajal”, PageContext.SESSION_CONTEXT);
• c. void removeAttribute(String AttributeName, int Scope):This method will remove the attribute mentioned from referred
scope.
Object obj1 = pageContext.removeAttribute(“name”, PageContext.SESSION_CONTEXT);
• d. Object findAttribute (String AttributeName): This method will find the attribute in all the four scopes and when found
none, return null value. The difference between get and find is that scope is defined in the get method.
63.
8. page
• Thisimplicit object comes under java.lang.Object class. Its work is to provide reference to the servlet
class generated. Type casting is thus required to access this object as shown below.
• <% (HttpServlet)page.log(“message”); %>
• We use this rarely. Instead, we use it as:
• Syntax:
Object page=this;
<% this.log(“message”); %>
• For Example:
• <html>
• <head><title>Object page</title>
• </head>
• <body>
• <%
• this.log("message");
• %>
• </body>
• </html>
64.
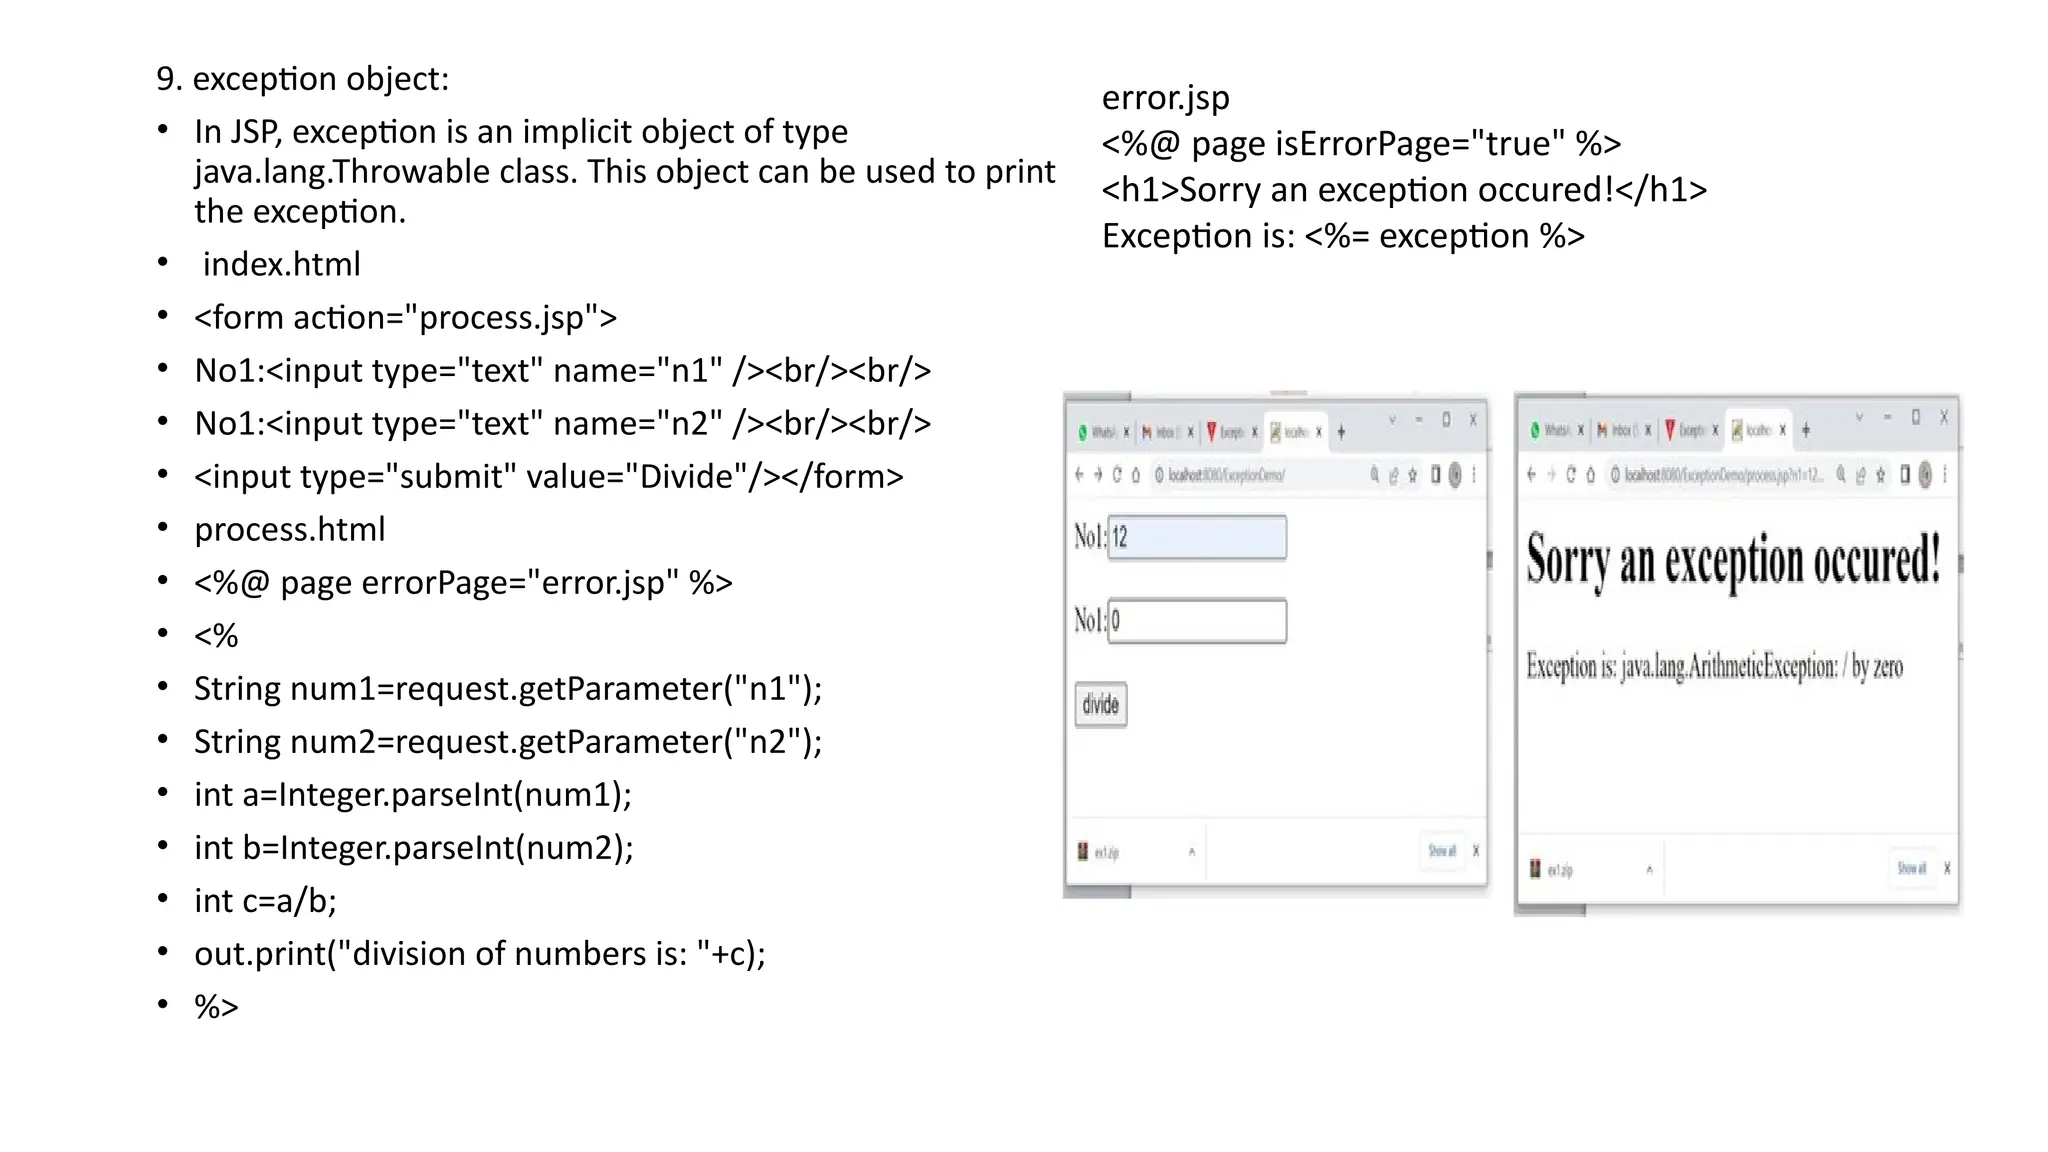
9. exception object:
•In JSP, exception is an implicit object of type
java.lang.Throwable class. This object can be used to print
the exception.
• index.html
• <form action="process.jsp">
• No1:<input type="text" name="n1" /><br/><br/>
• No1:<input type="text" name="n2" /><br/><br/>
• <input type="submit" value="Divide"/></form>
• process.html
• <%@ page errorPage="error.jsp" %>
• <%
• String num1=request.getParameter("n1");
• String num2=request.getParameter("n2");
• int a=Integer.parseInt(num1);
• int b=Integer.parseInt(num2);
• int c=a/b;
• out.print("division of numbers is: "+c);
• %>
error.jsp
<%@ page isErrorPage="true" %>
<h1>Sorry an exception occured!</h1>
Exception is: <%= exception %>
65.
JSP: Actions
JSP Actionsare one of the three important elements of a JSP page. They
perform some specific tasks and are predefined. They provide
functionalities like-
• Dynamic insertion of a file
• Controlling behavior of the servlet engine
• Forwarding a user to another page
• Controlling flow between pages
• XML format is used to define JSP Actions. What makes them different
from directives is that each time a page is visited, if it contains actions
then those actions get re-evaluated.
• Common Syntax:
<jsp:action_name attribute=”value”/>
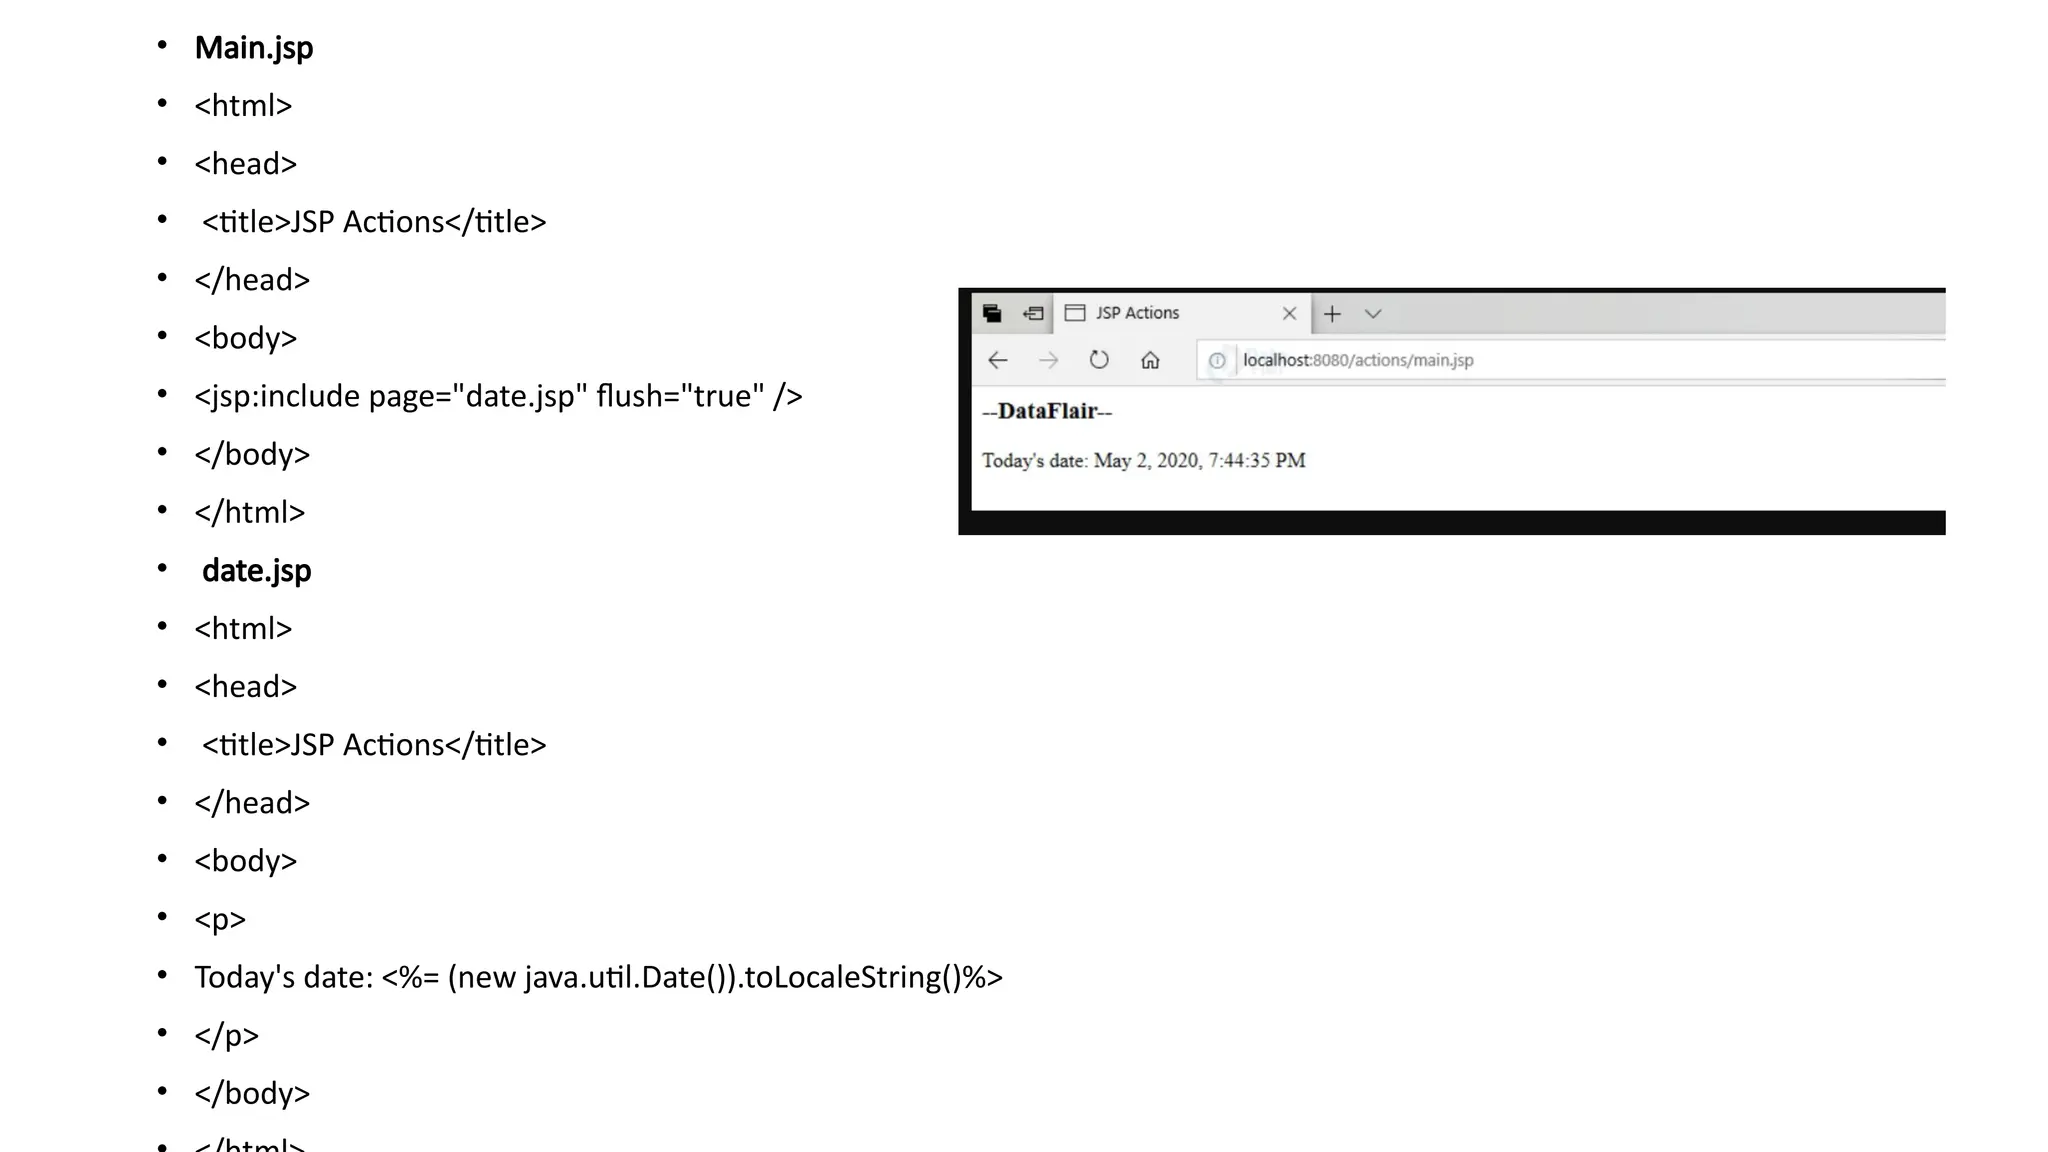
1. <java:include>
• Thisaction will include the required resources like html, servlets and
JSP.
This jsp:include action is different from jsp directive. Include directive
includes resources at the time of translation, whereas include action
includes resources dynamically at request time. Action directives work
well for static pages, whereas later works better for dynamic pages.
There are two attributes under include:
• Page: its value is the url of the required resource.
• Flush: it checks that the buffer of the resource is flushed before it is
included.
• Syntax:
<jsp:include page="page URL" flush="true/false">
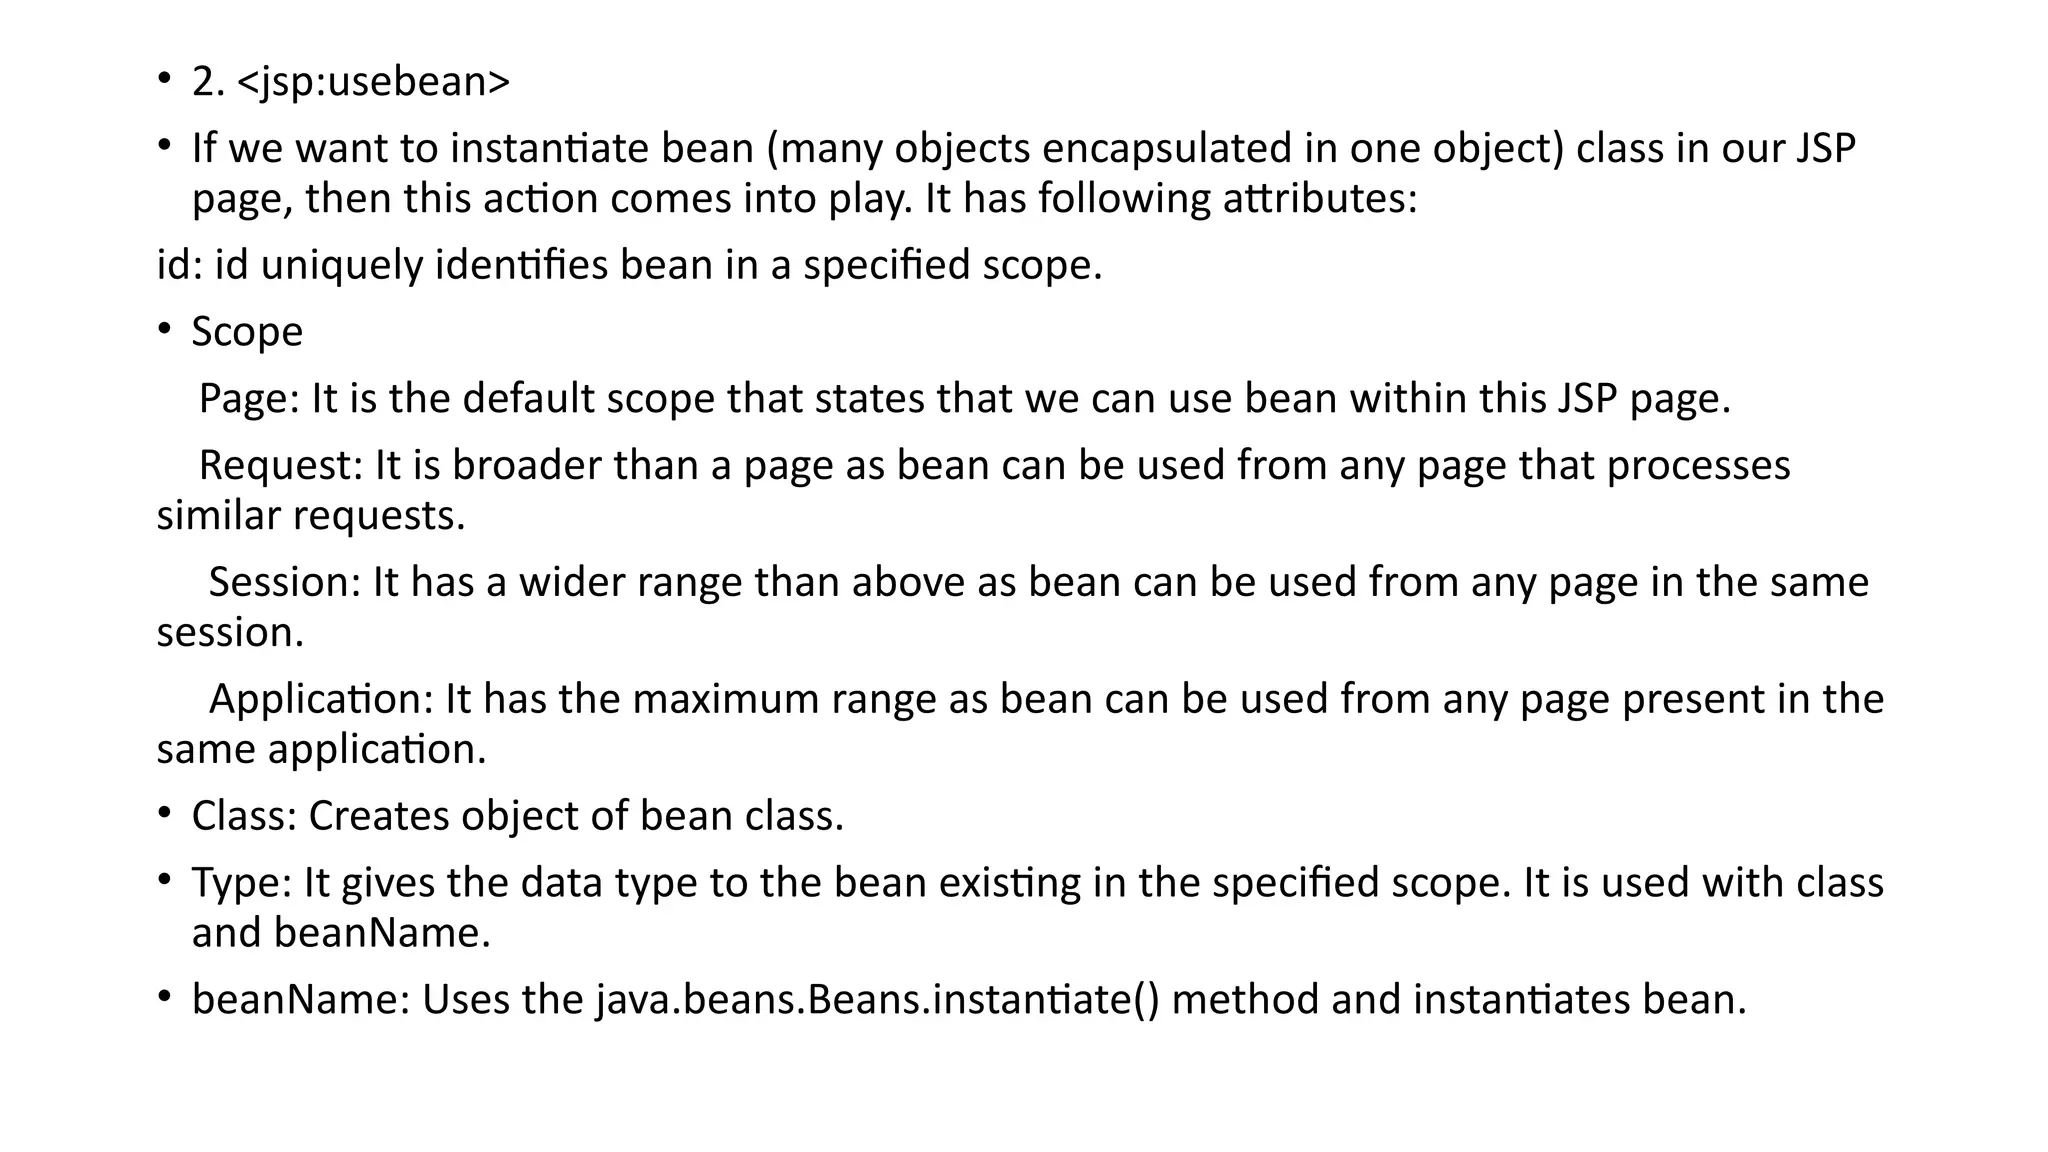
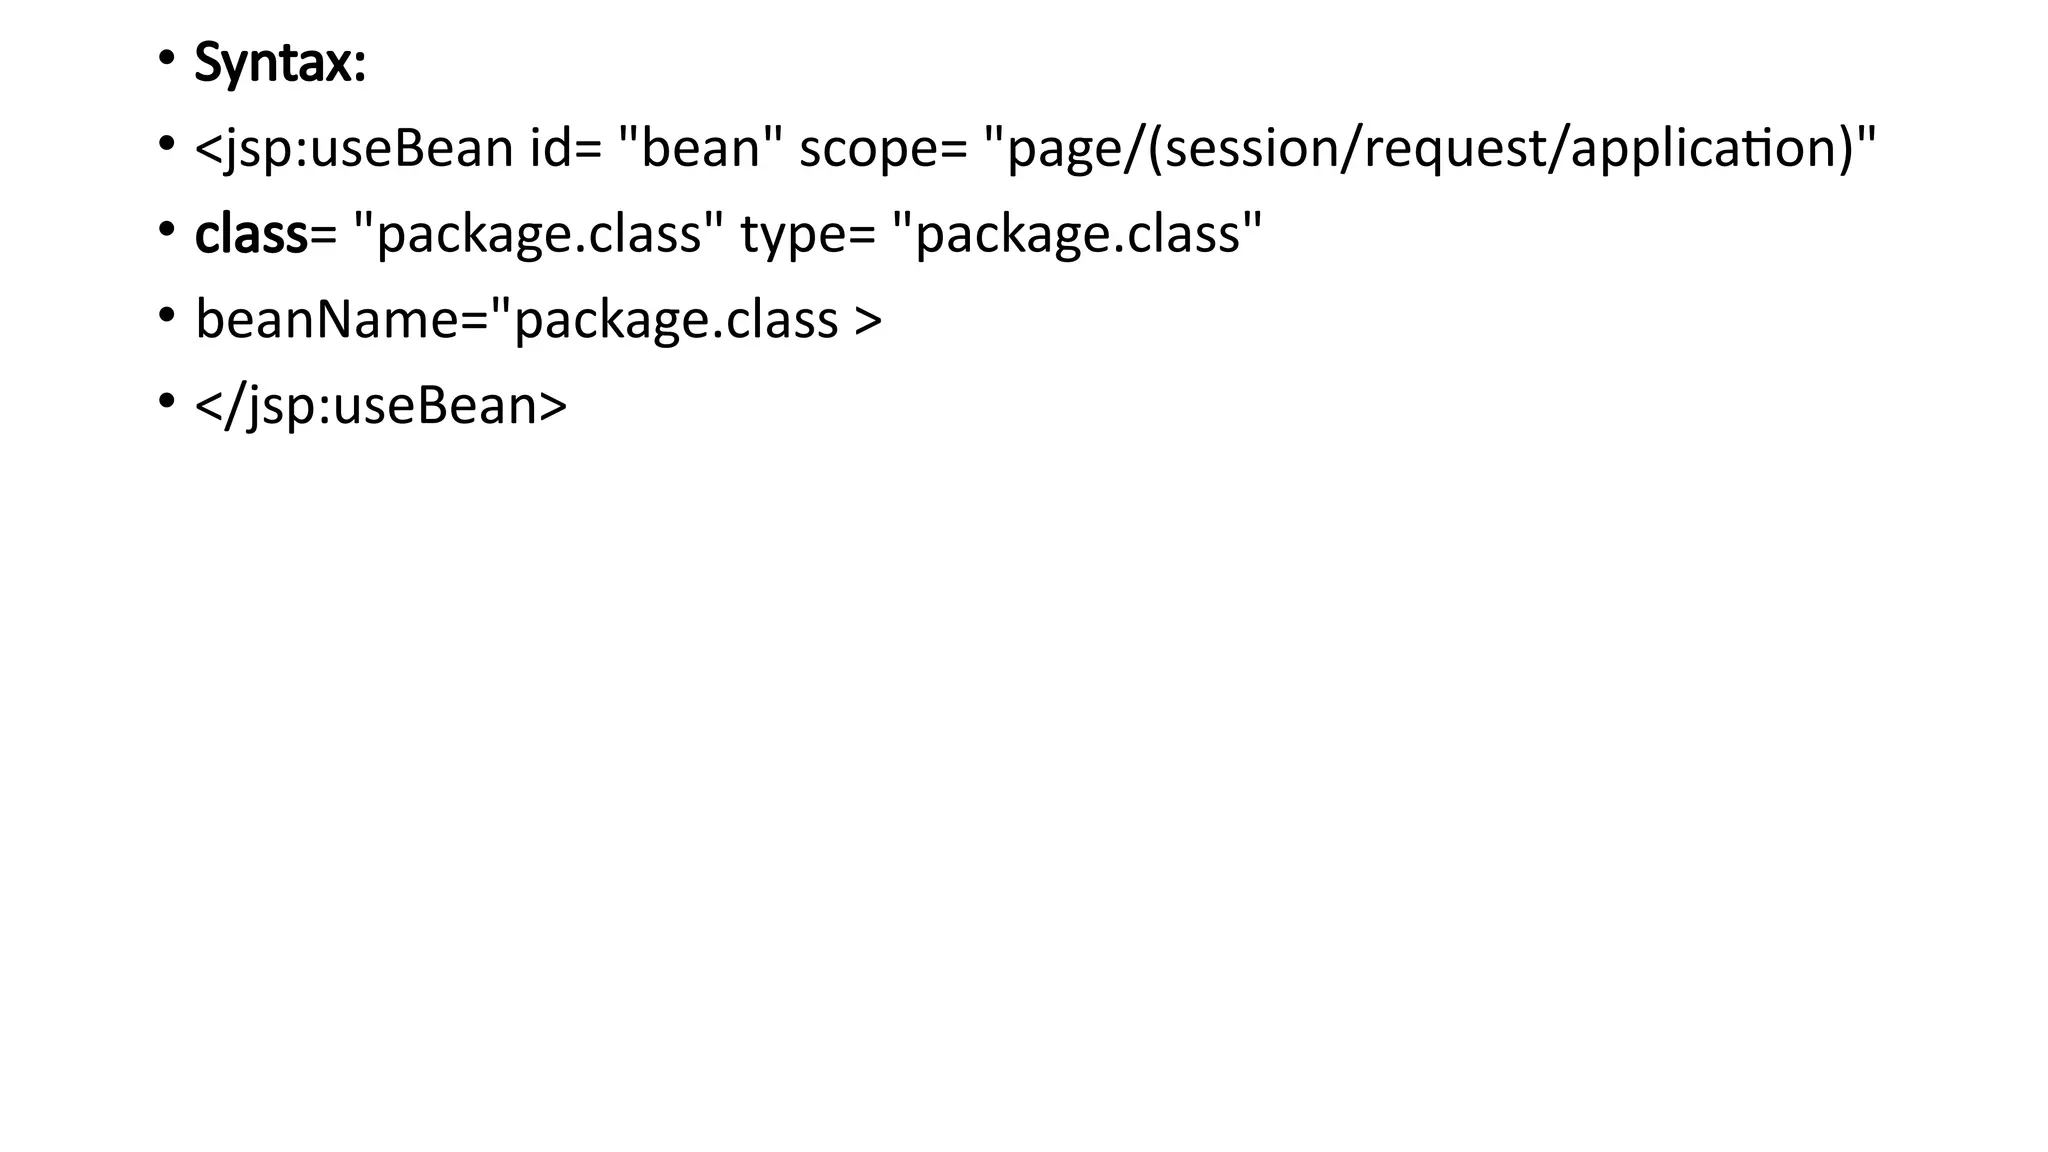
• 2. <jsp:usebean>
•If we want to instantiate bean (many objects encapsulated in one object) class in our JSP
page, then this action comes into play. It has following attributes:
id: id uniquely identifies bean in a specified scope.
• Scope
Page: It is the default scope that states that we can use bean within this JSP page.
Request: It is broader than a page as bean can be used from any page that processes
similar requests.
Session: It has a wider range than above as bean can be used from any page in the same
session.
Application: It has the maximum range as bean can be used from any page present in the
same application.
• Class: Creates object of bean class.
• Type: It gives the data type to the bean existing in the specified scope. It is used with class
and beanName.
• beanName: Uses the java.beans.Beans.instantiate() method and instantiates bean.
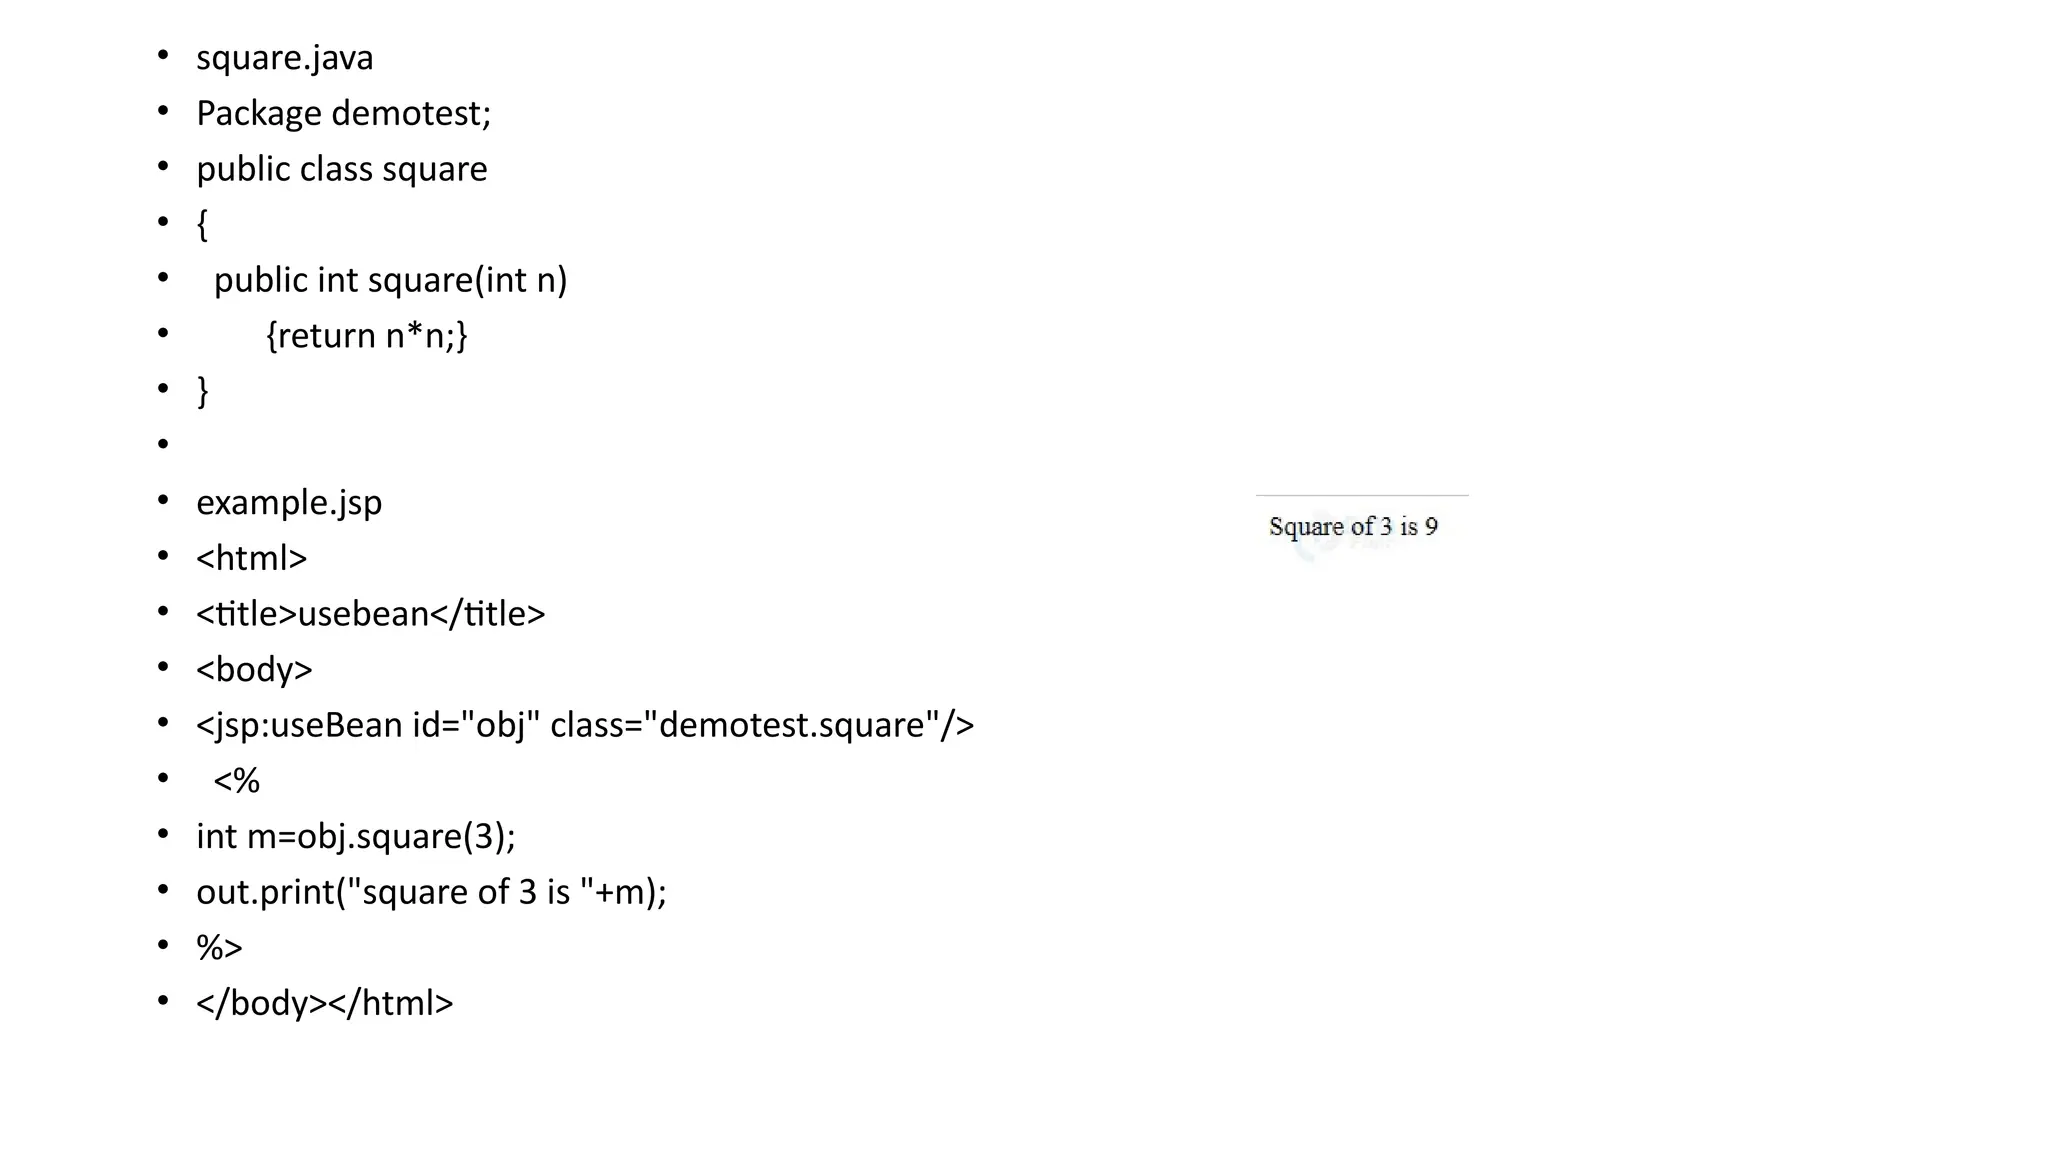
• square.java
• Packagedemotest;
• public class square
• {
• public int square(int n)
• {return n*n;}
• }
•
• example.jsp
• <html>
• <title>usebean</title>
• <body>
• <jsp:useBean id="obj" class="demotest.square"/>
• <%
• int m=obj.square(3);
• out.print("square of 3 is "+m);
• %>
• </body></html>
72.
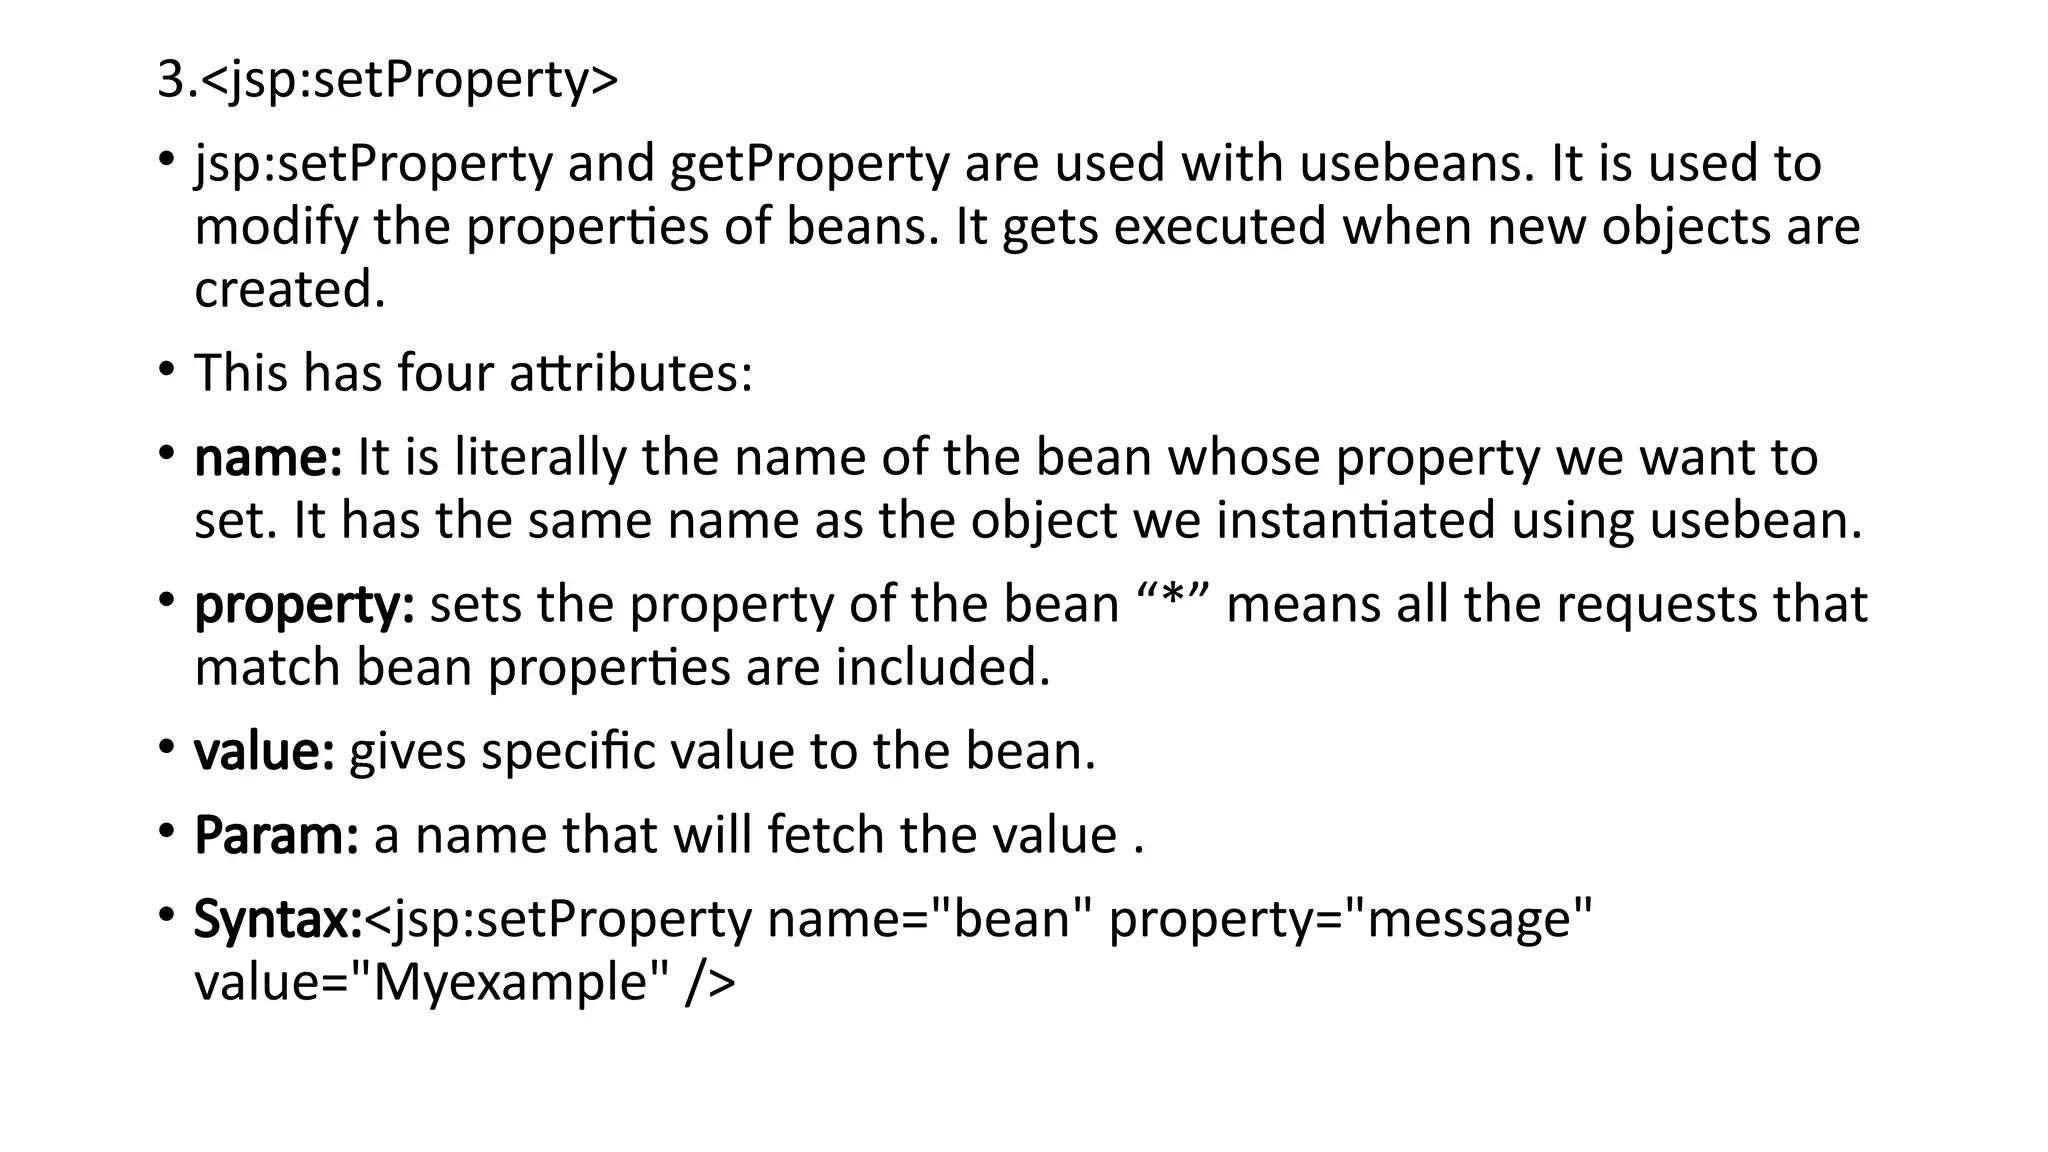
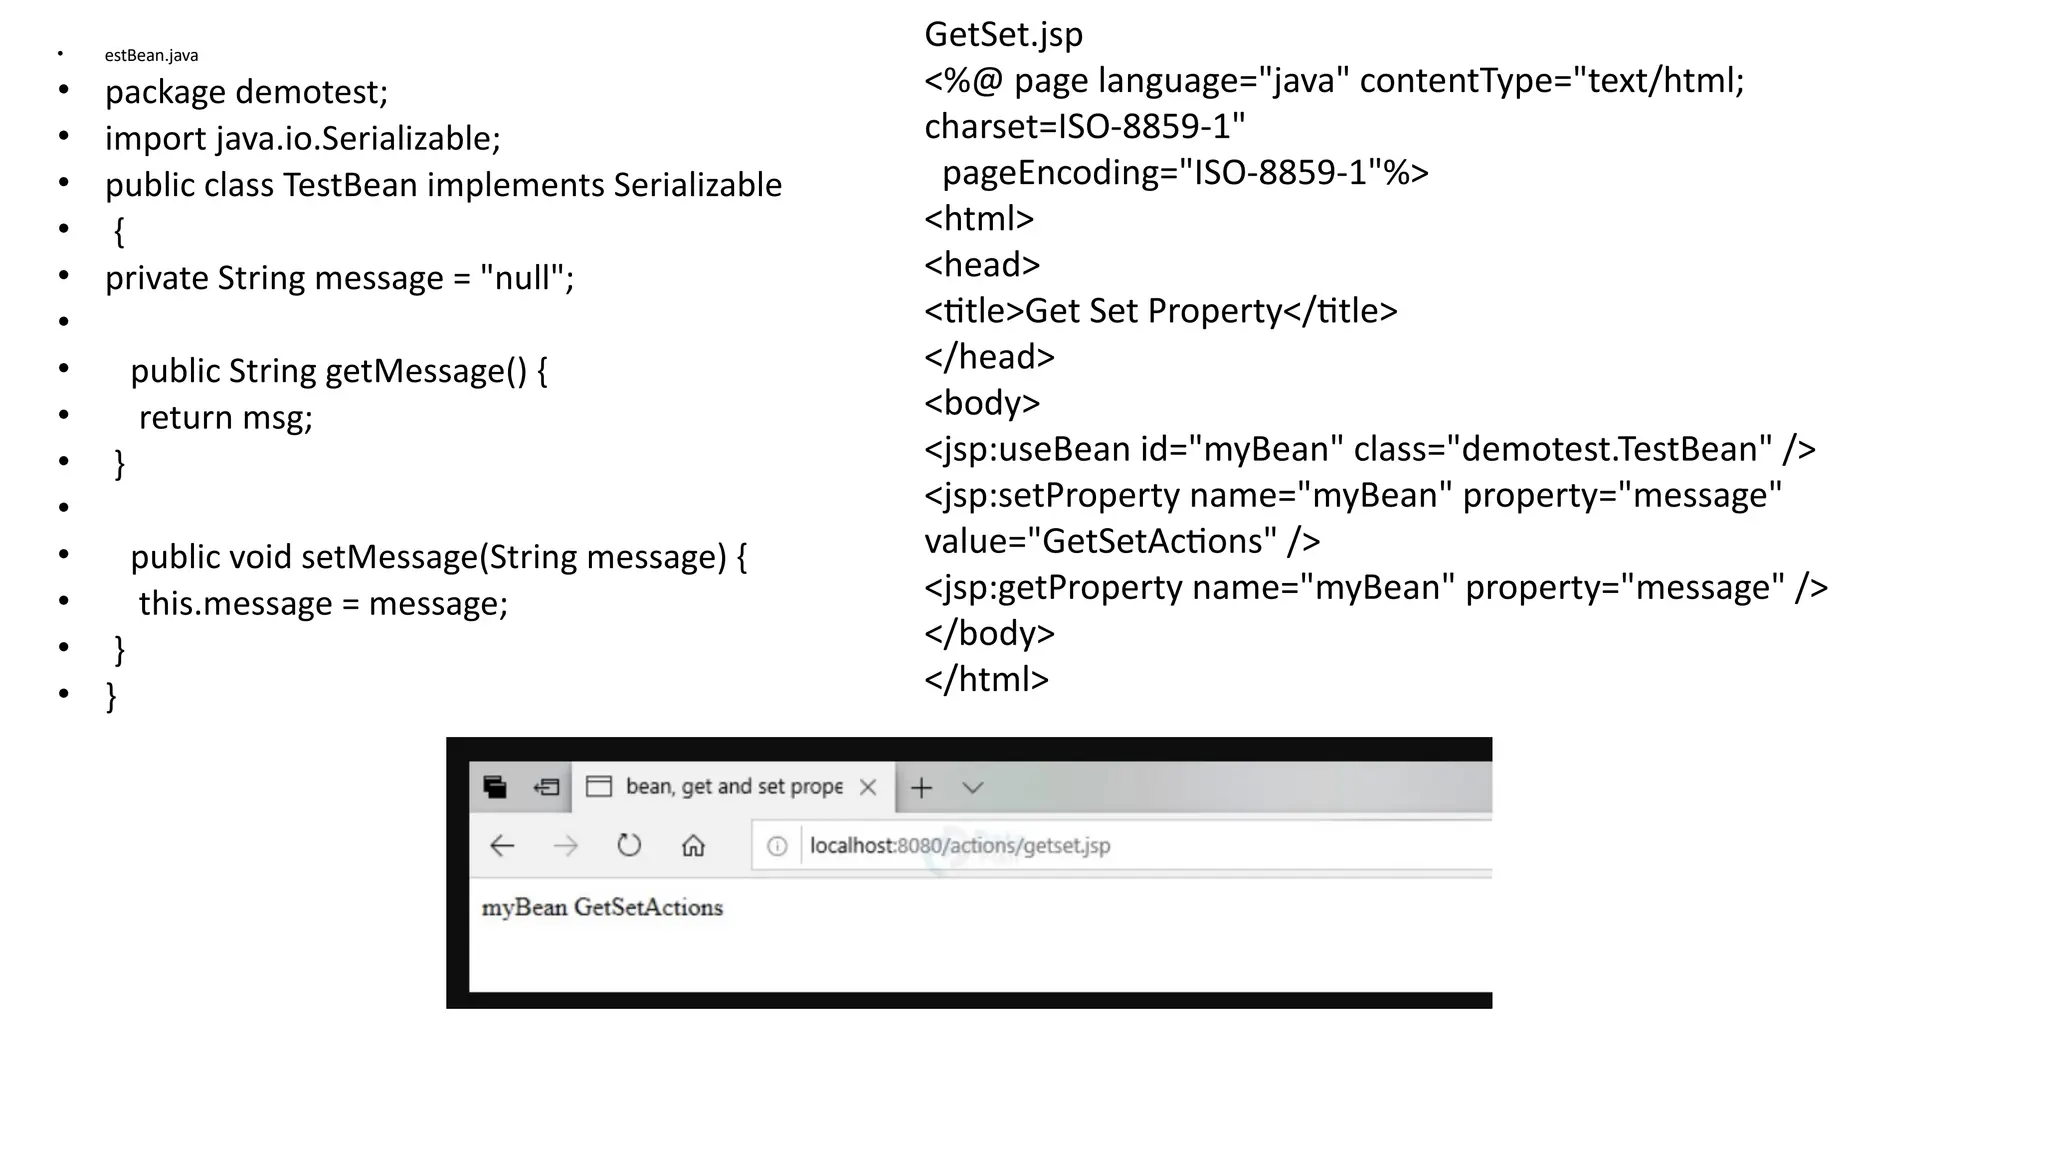
3.<jsp:setProperty>
• jsp:setProperty andgetProperty are used with usebeans. It is used to
modify the properties of beans. It gets executed when new objects are
created.
• This has four attributes:
• name: It is literally the name of the bean whose property we want to
set. It has the same name as the object we instantiated using usebean.
• property: sets the property of the bean “*” means all the requests that
match bean properties are included.
• value: gives specific value to the bean.
• Param: a name that will fetch the value .
• Syntax:<jsp:setProperty name="bean" property="message"
value="Myexample" />
73.
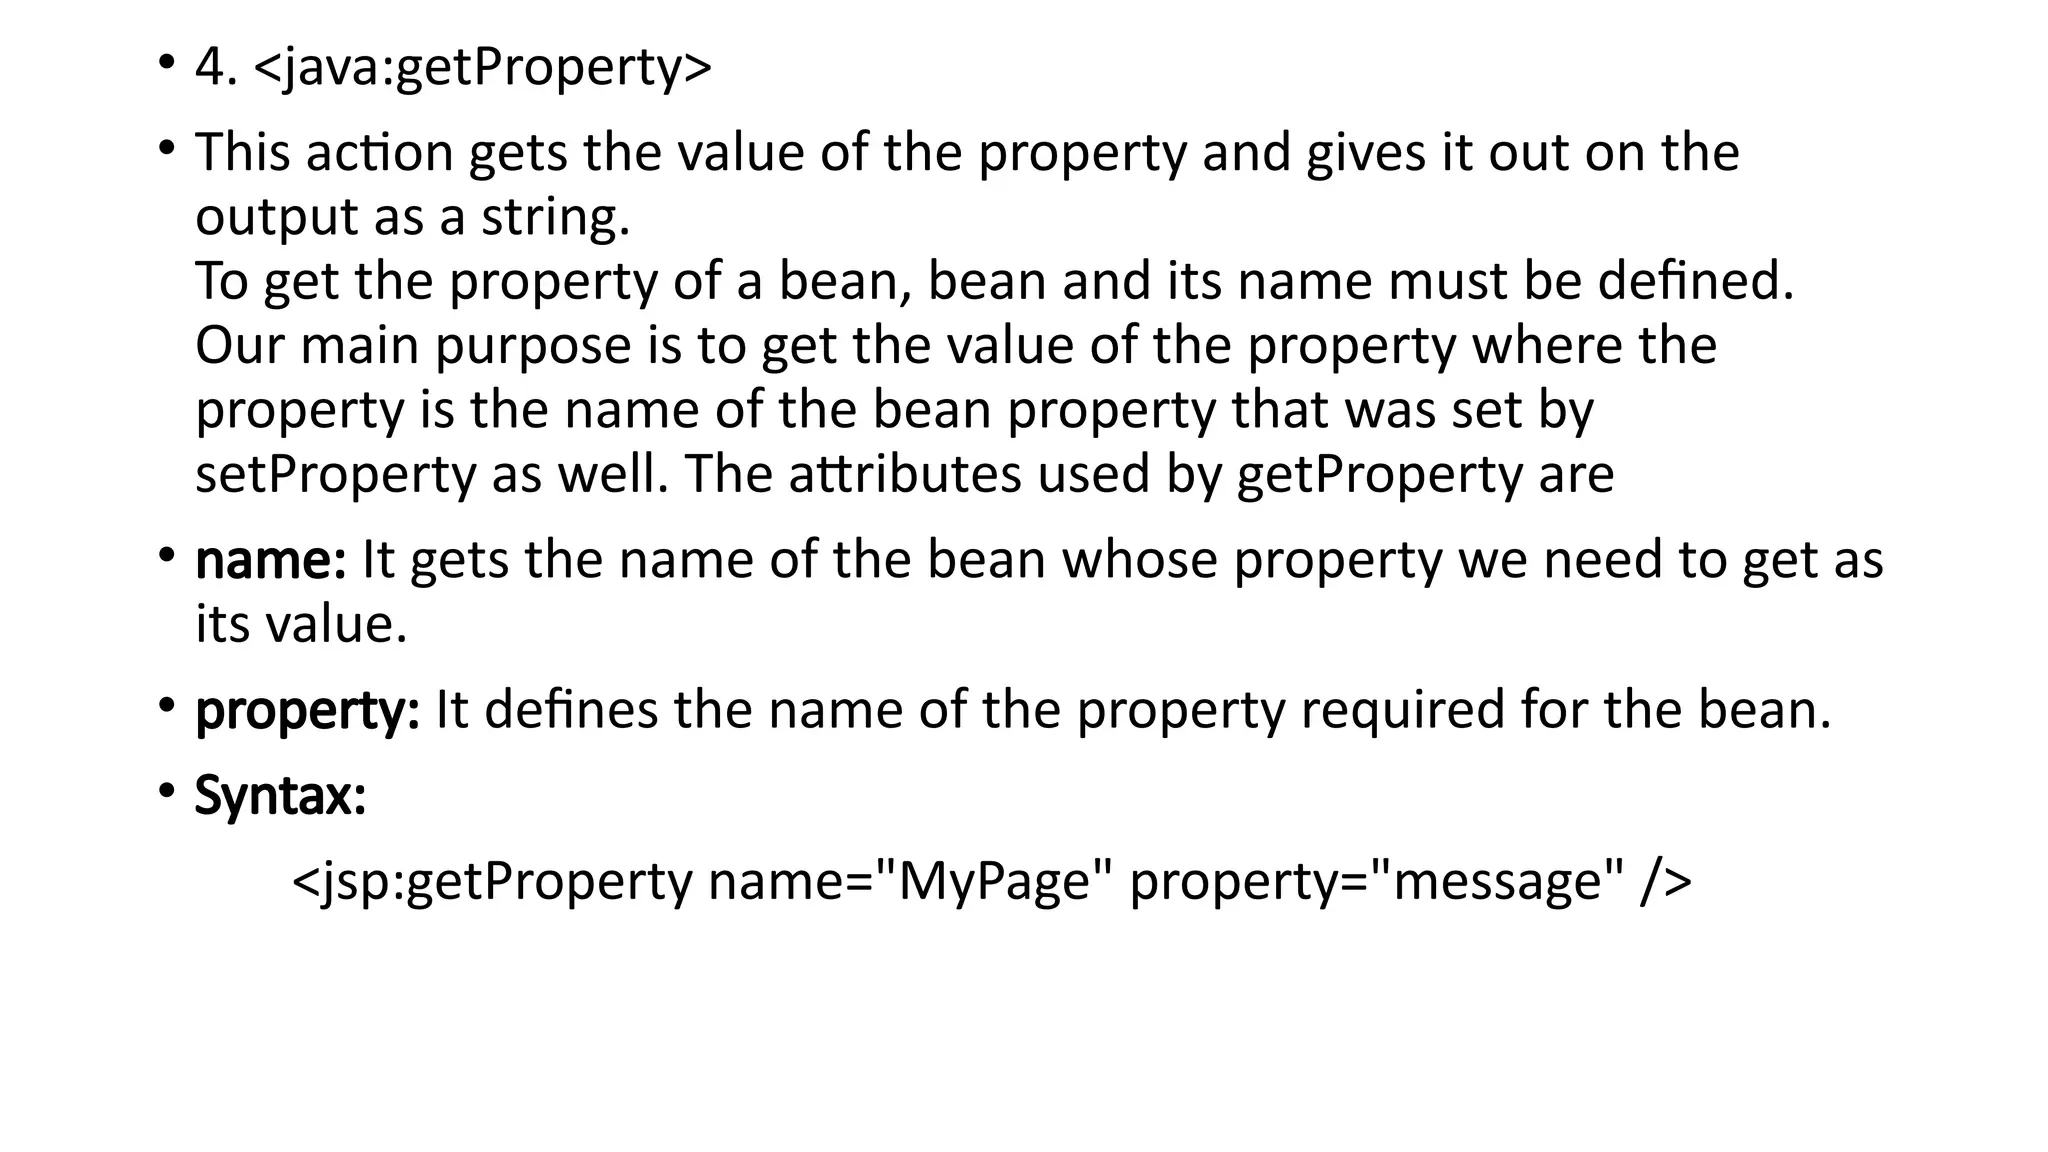
• 4. <java:getProperty>
•This action gets the value of the property and gives it out on the
output as a string.
To get the property of a bean, bean and its name must be defined.
Our main purpose is to get the value of the property where the
property is the name of the bean property that was set by
setProperty as well. The attributes used by getProperty are
• name: It gets the name of the bean whose property we need to get as
its value.
• property: It defines the name of the property required for the bean.
• Syntax:
<jsp:getProperty name="MyPage" property="message" />
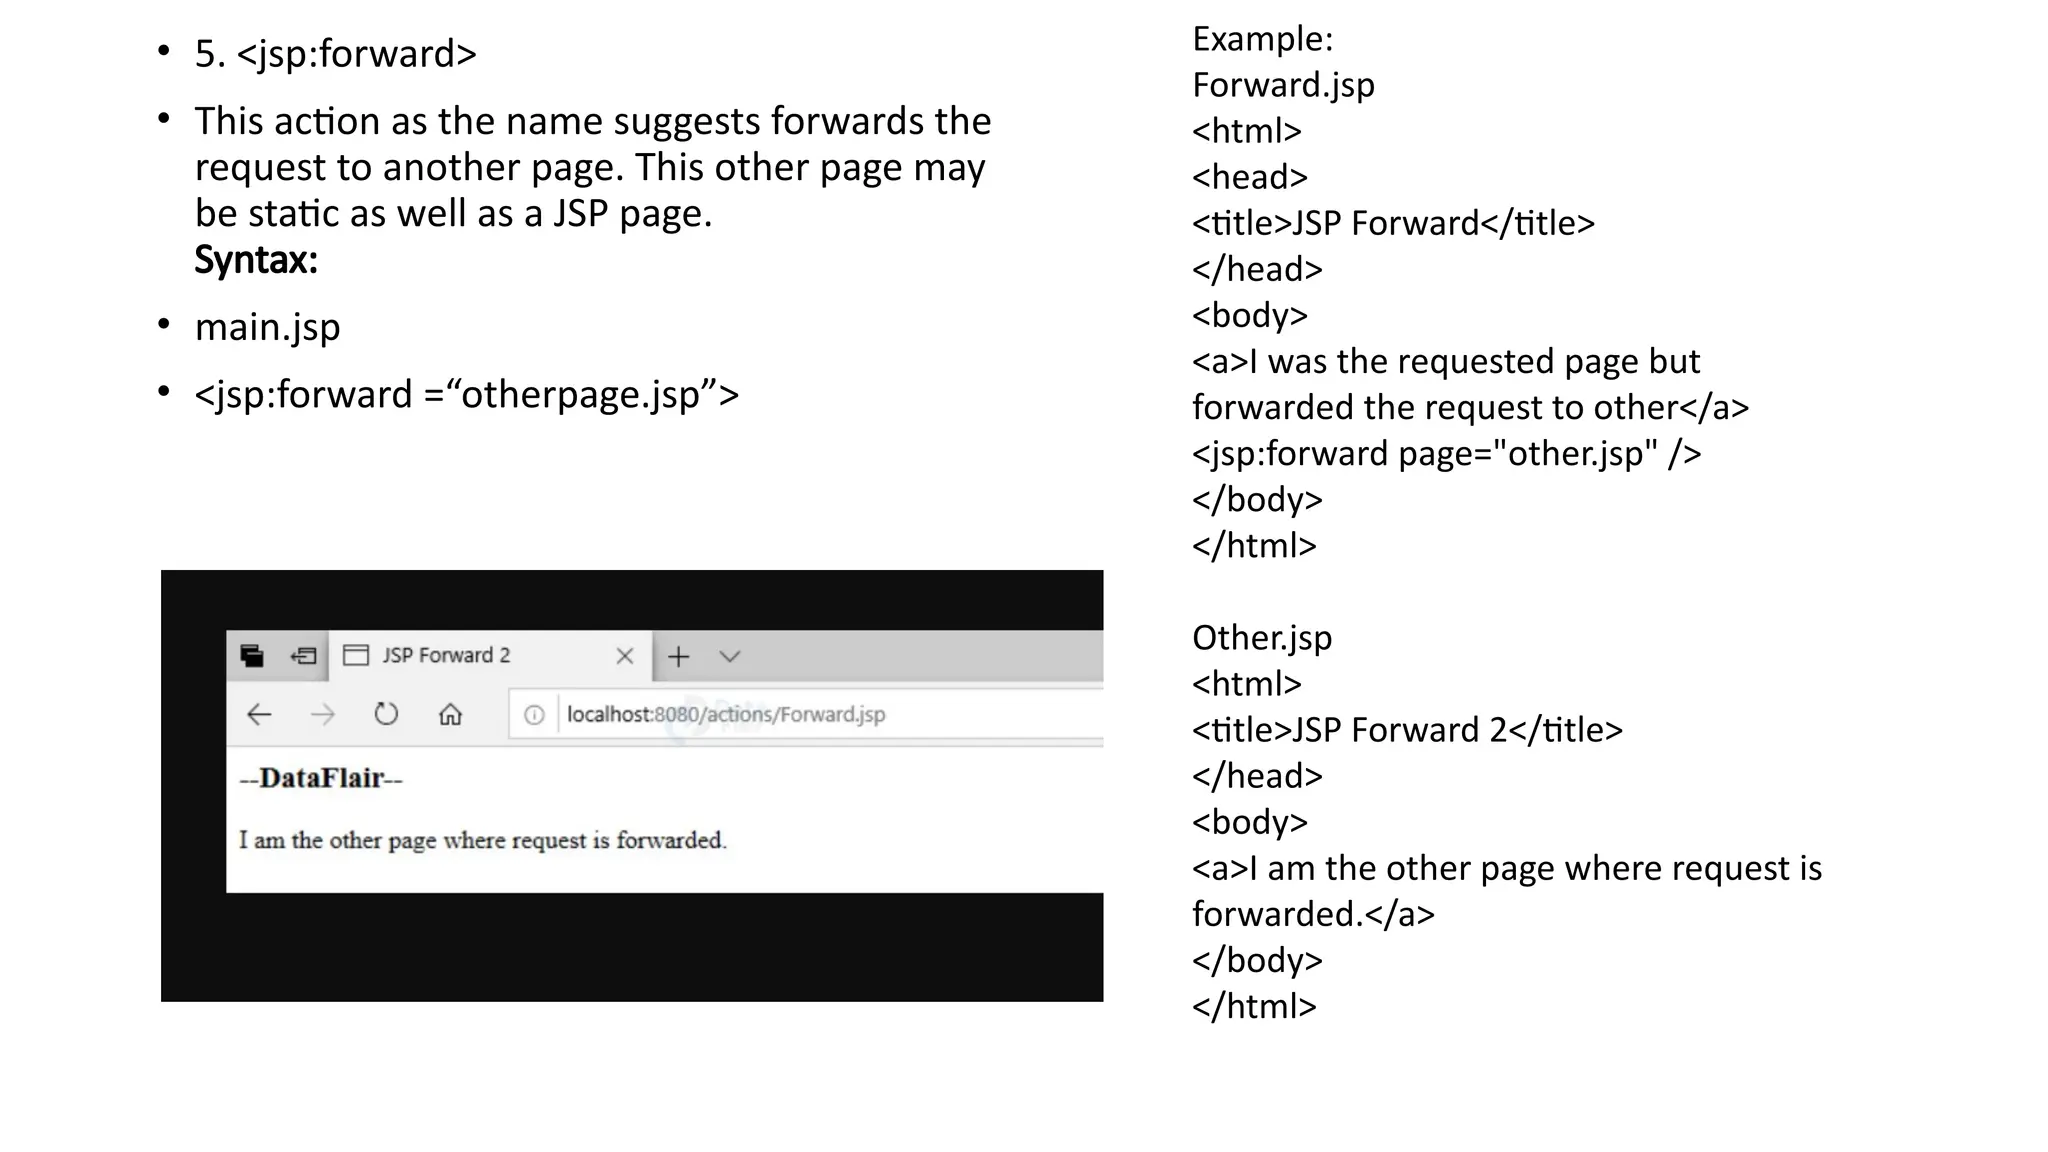
• 5. <jsp:forward>
•This action as the name suggests forwards the
request to another page. This other page may
be static as well as a JSP page.
Syntax:
• main.jsp
• <jsp:forward =“otherpage.jsp”>
Example:
Forward.jsp
<html>
<head>
<title>JSP Forward</title>
</head>
<body>
<a>I was the requested page but
forwarded the request to other</a>
<jsp:forward page="other.jsp" />
</body>
</html>
Other.jsp
<html>
<title>JSP Forward 2</title>
</head>
<body>
<a>I am the other page where request is
forwarded.</a>
</body>
</html>
76.
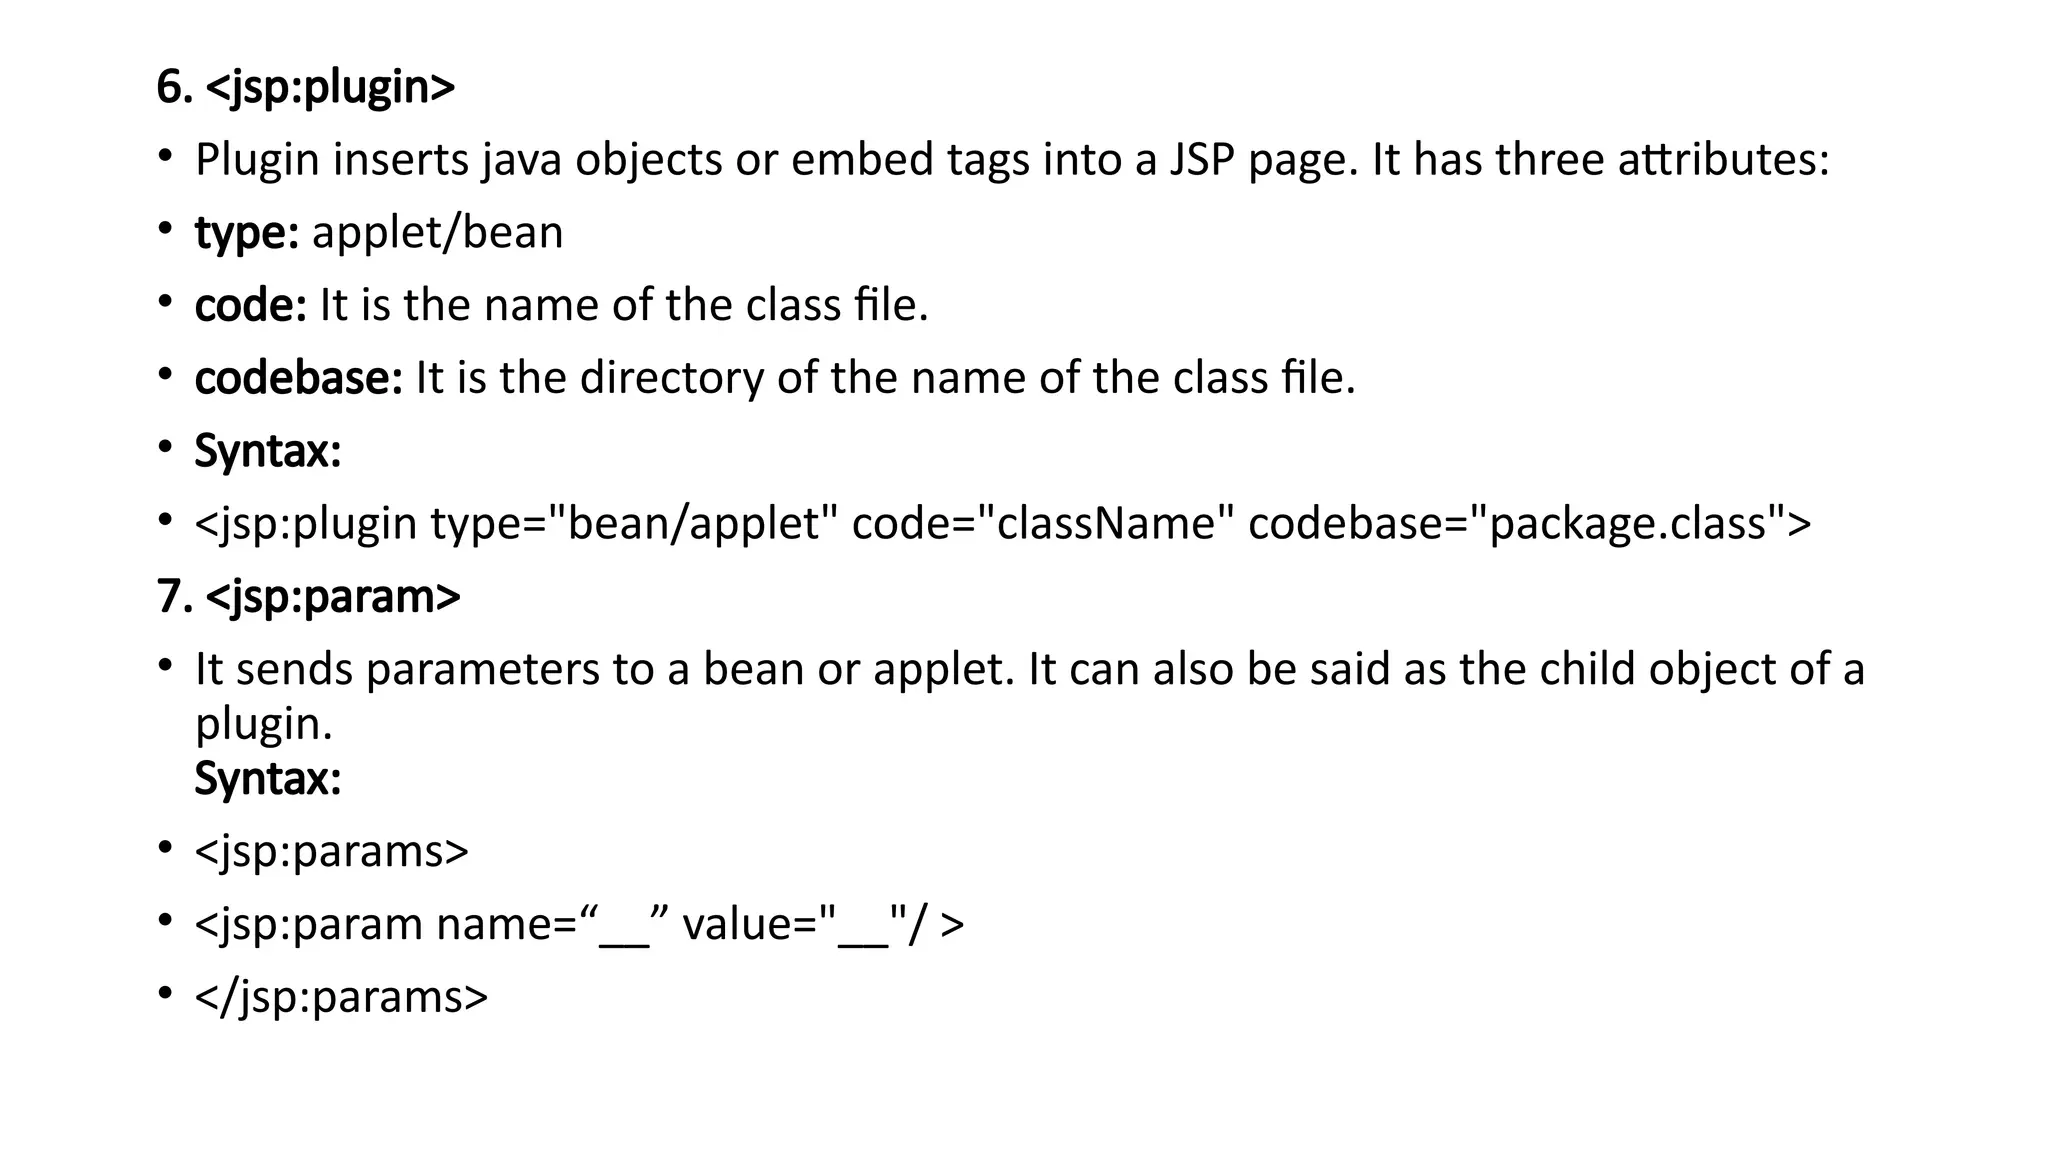
6. <jsp:plugin>
• Plugininserts java objects or embed tags into a JSP page. It has three attributes:
• type: applet/bean
• code: It is the name of the class file.
• codebase: It is the directory of the name of the class file.
• Syntax:
• <jsp:plugin type="bean/applet" code="className" codebase="package.class">
7. <jsp:param>
• It sends parameters to a bean or applet. It can also be said as the child object of a
plugin.
Syntax:
• <jsp:params>
• <jsp:param name=“__” value="__"/ >
• </jsp:params>
77.
• First.jsp
• <html>
•<head>
• <title>Plugin Param </title>
• </head>
• <body>
• <jsp:plugin type="bean" code="colour.class"
codebase="demotest.colour">
• <jsp:params>
• <jsp:param name="id" value="5" />
• <jsp:param name="nameofcolour" value="red" />
• </jsp:params>
• </jsp:plugin>
• </body>
• </html>
•
Colour.java
package demotest;
import java.io.Serializable;
public class Colour implements Serializable {
public String getName () {
return name;
}
public void setName (String name) {
this.name = name;
}
public int getId() {
return id;
}
public void setId (int id) {
this.id = id;
} //getters and setters
private String name = "null";
private int id = 0;
}
78.
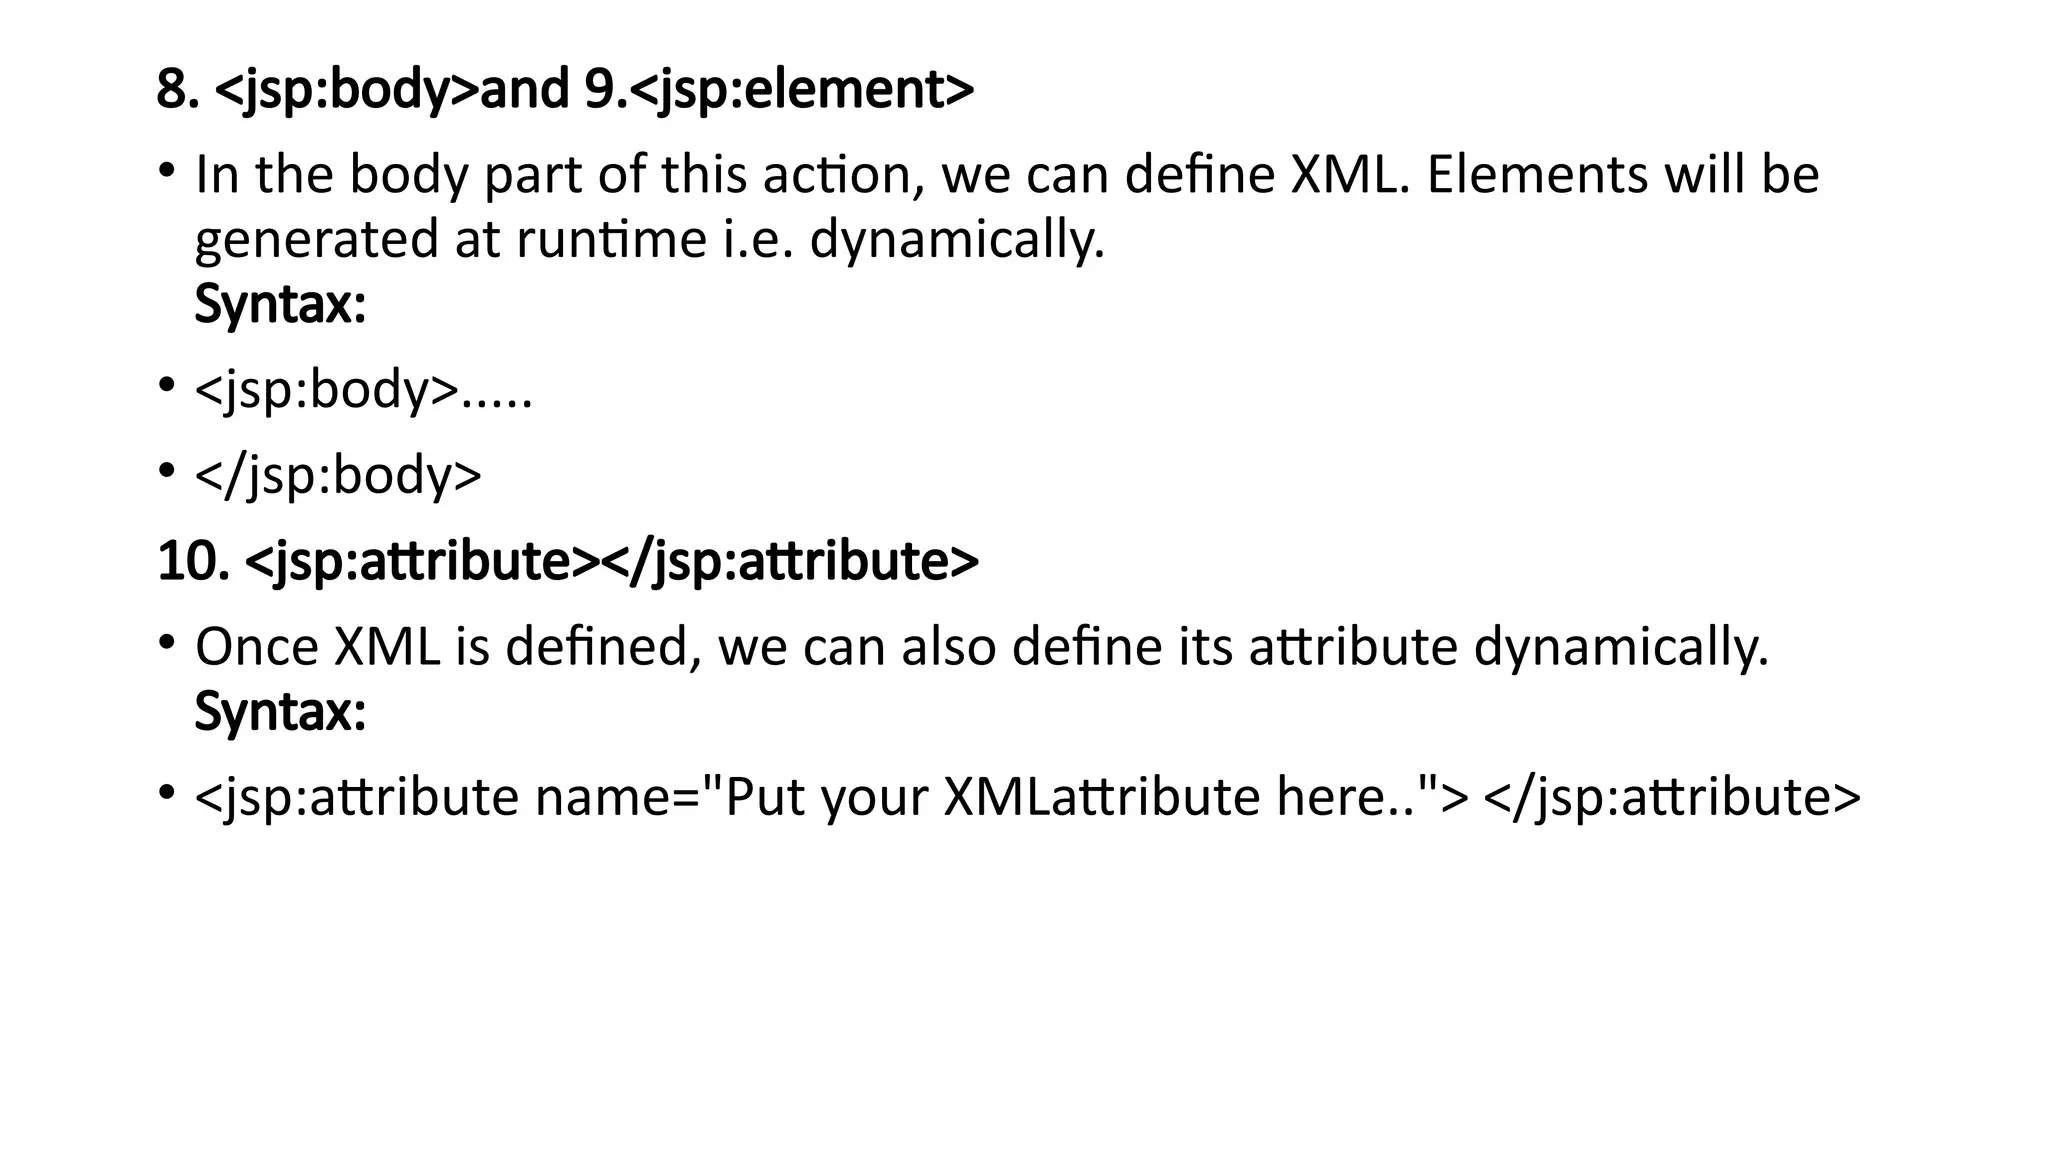
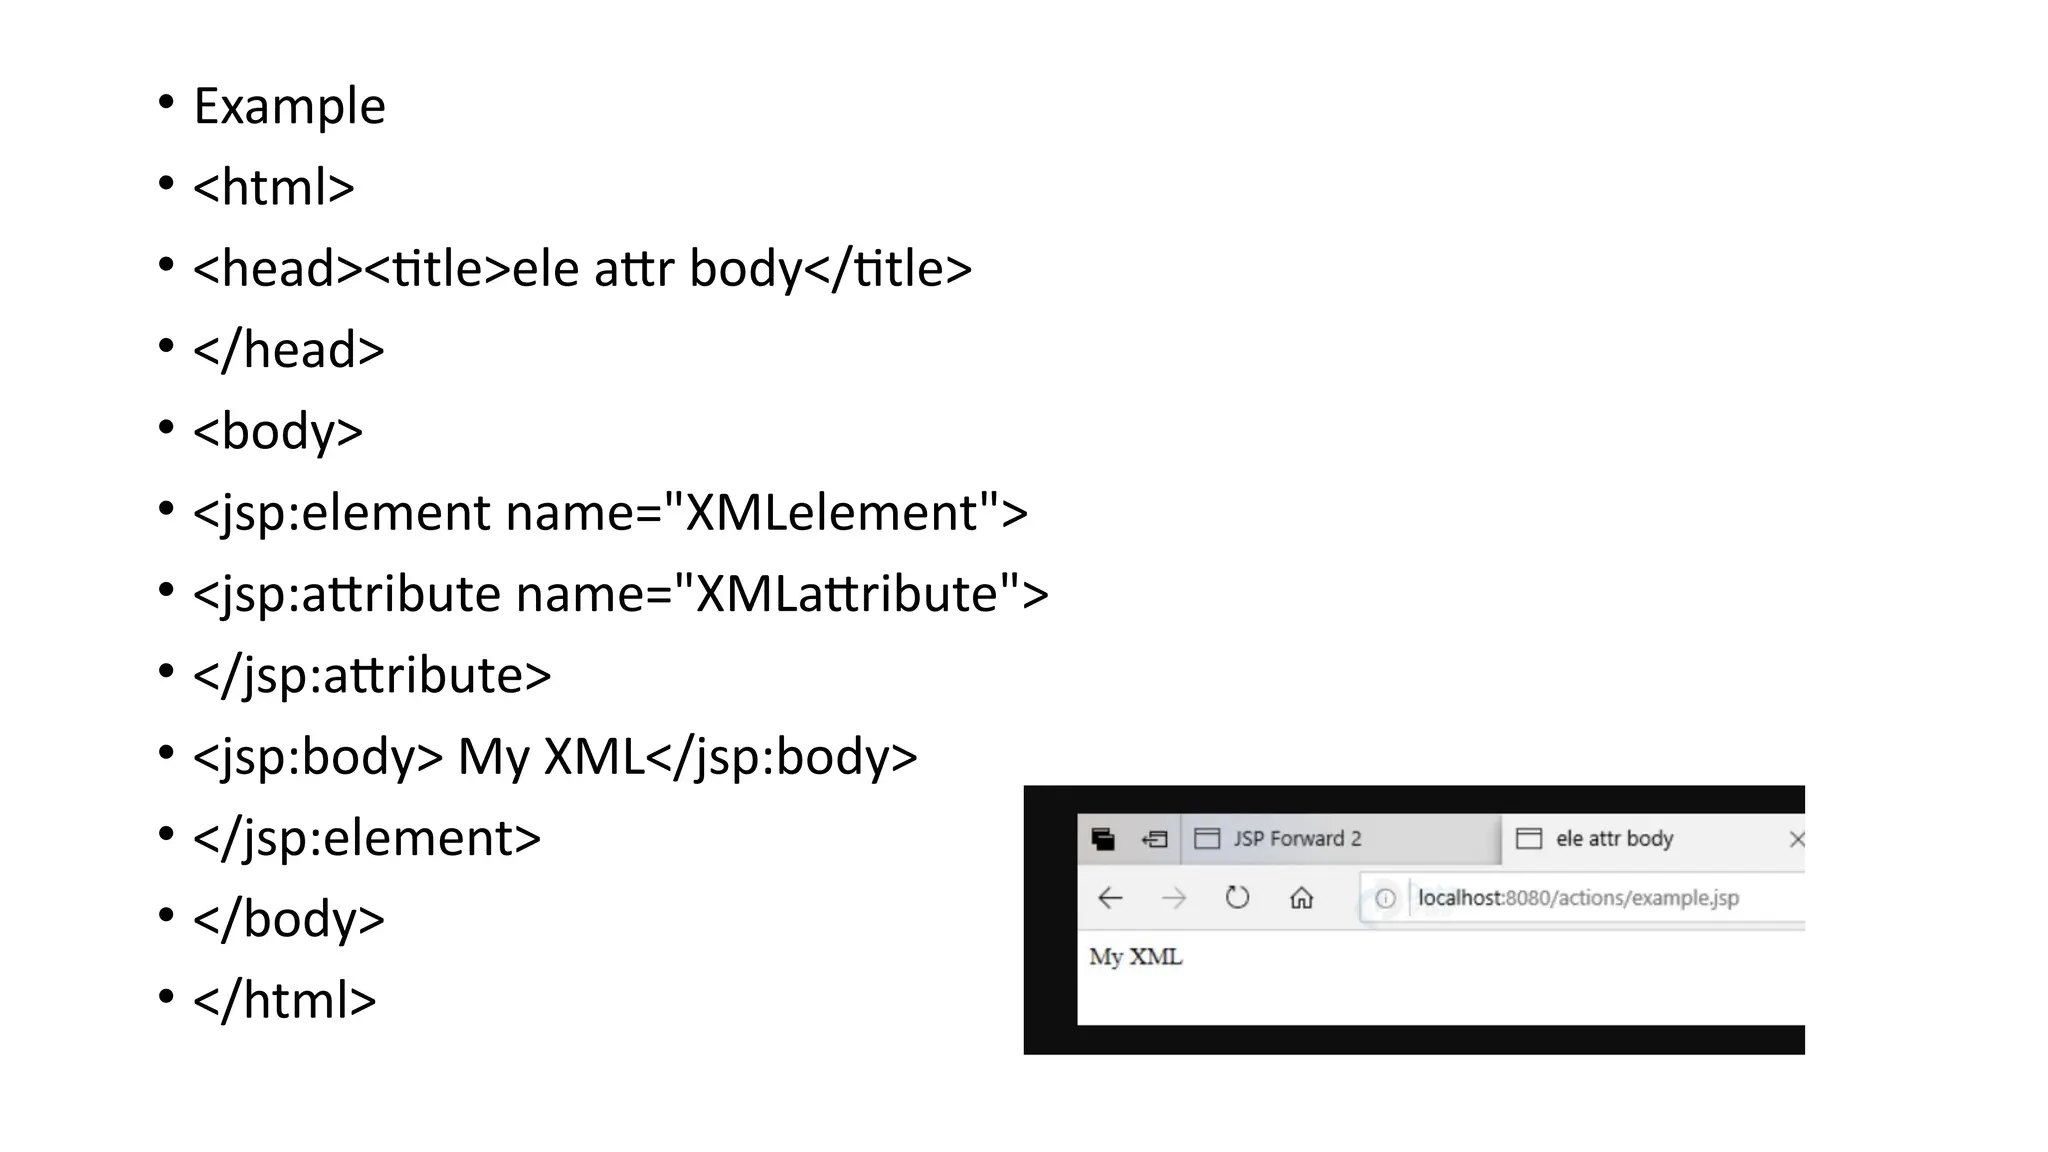
8. <jsp:body>and 9.<jsp:element>
•In the body part of this action, we can define XML. Elements will be
generated at runtime i.e. dynamically.
Syntax:
• <jsp:body>.....
• </jsp:body>
10. <jsp:attribute></jsp:attribute>
• Once XML is defined, we can also define its attribute dynamically.
Syntax:
• <jsp:attribute name="Put your XMLattribute here.."> </jsp:attribute>
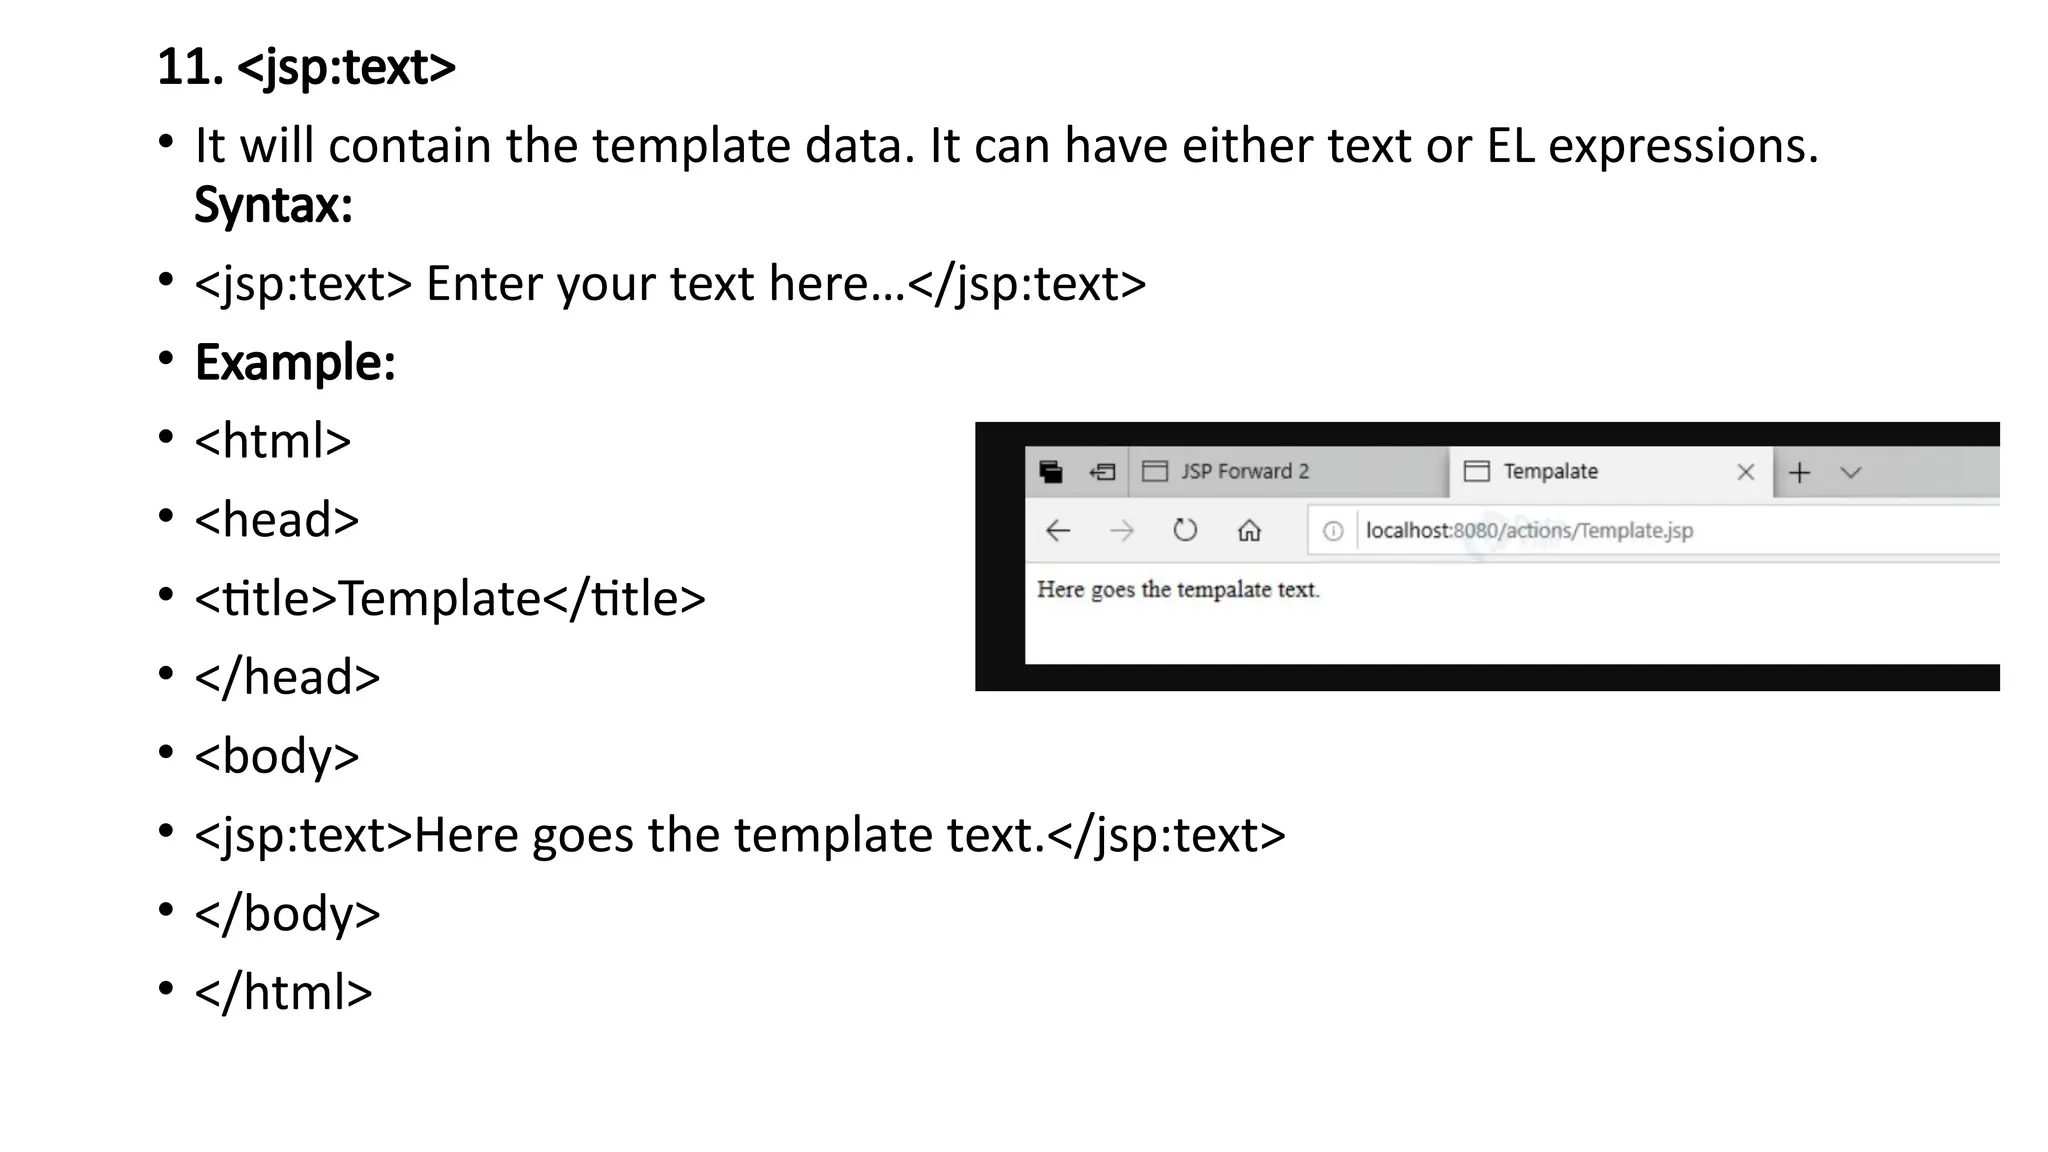
11. <jsp:text>
• Itwill contain the template data. It can have either text or EL expressions.
Syntax:
• <jsp:text> Enter your text here…</jsp:text>
• Example:
• <html>
• <head>
• <title>Template</title>
• </head>
• <body>
• <jsp:text>Here goes the template text.</jsp:text>
• </body>
• </html>
81.
12. <jsp:output>
• JSPoutput contains two attributes i.e doctype-root-element that will possess the root
element of the generated XML and doctype-system that shows doctype that will be
generated in output.
Syntax:
• <jsp:output doctype-root-element="__" doctype-system="__">
• Example:
• <html>
• <head>
• <title>Output Actions</title>
• </head>
• <body>
• <jsp:output doctype-root-element="XML"
doctype-system="http://www.myxml.com/loose.dtd"/>
• </body>
• </html>
82.
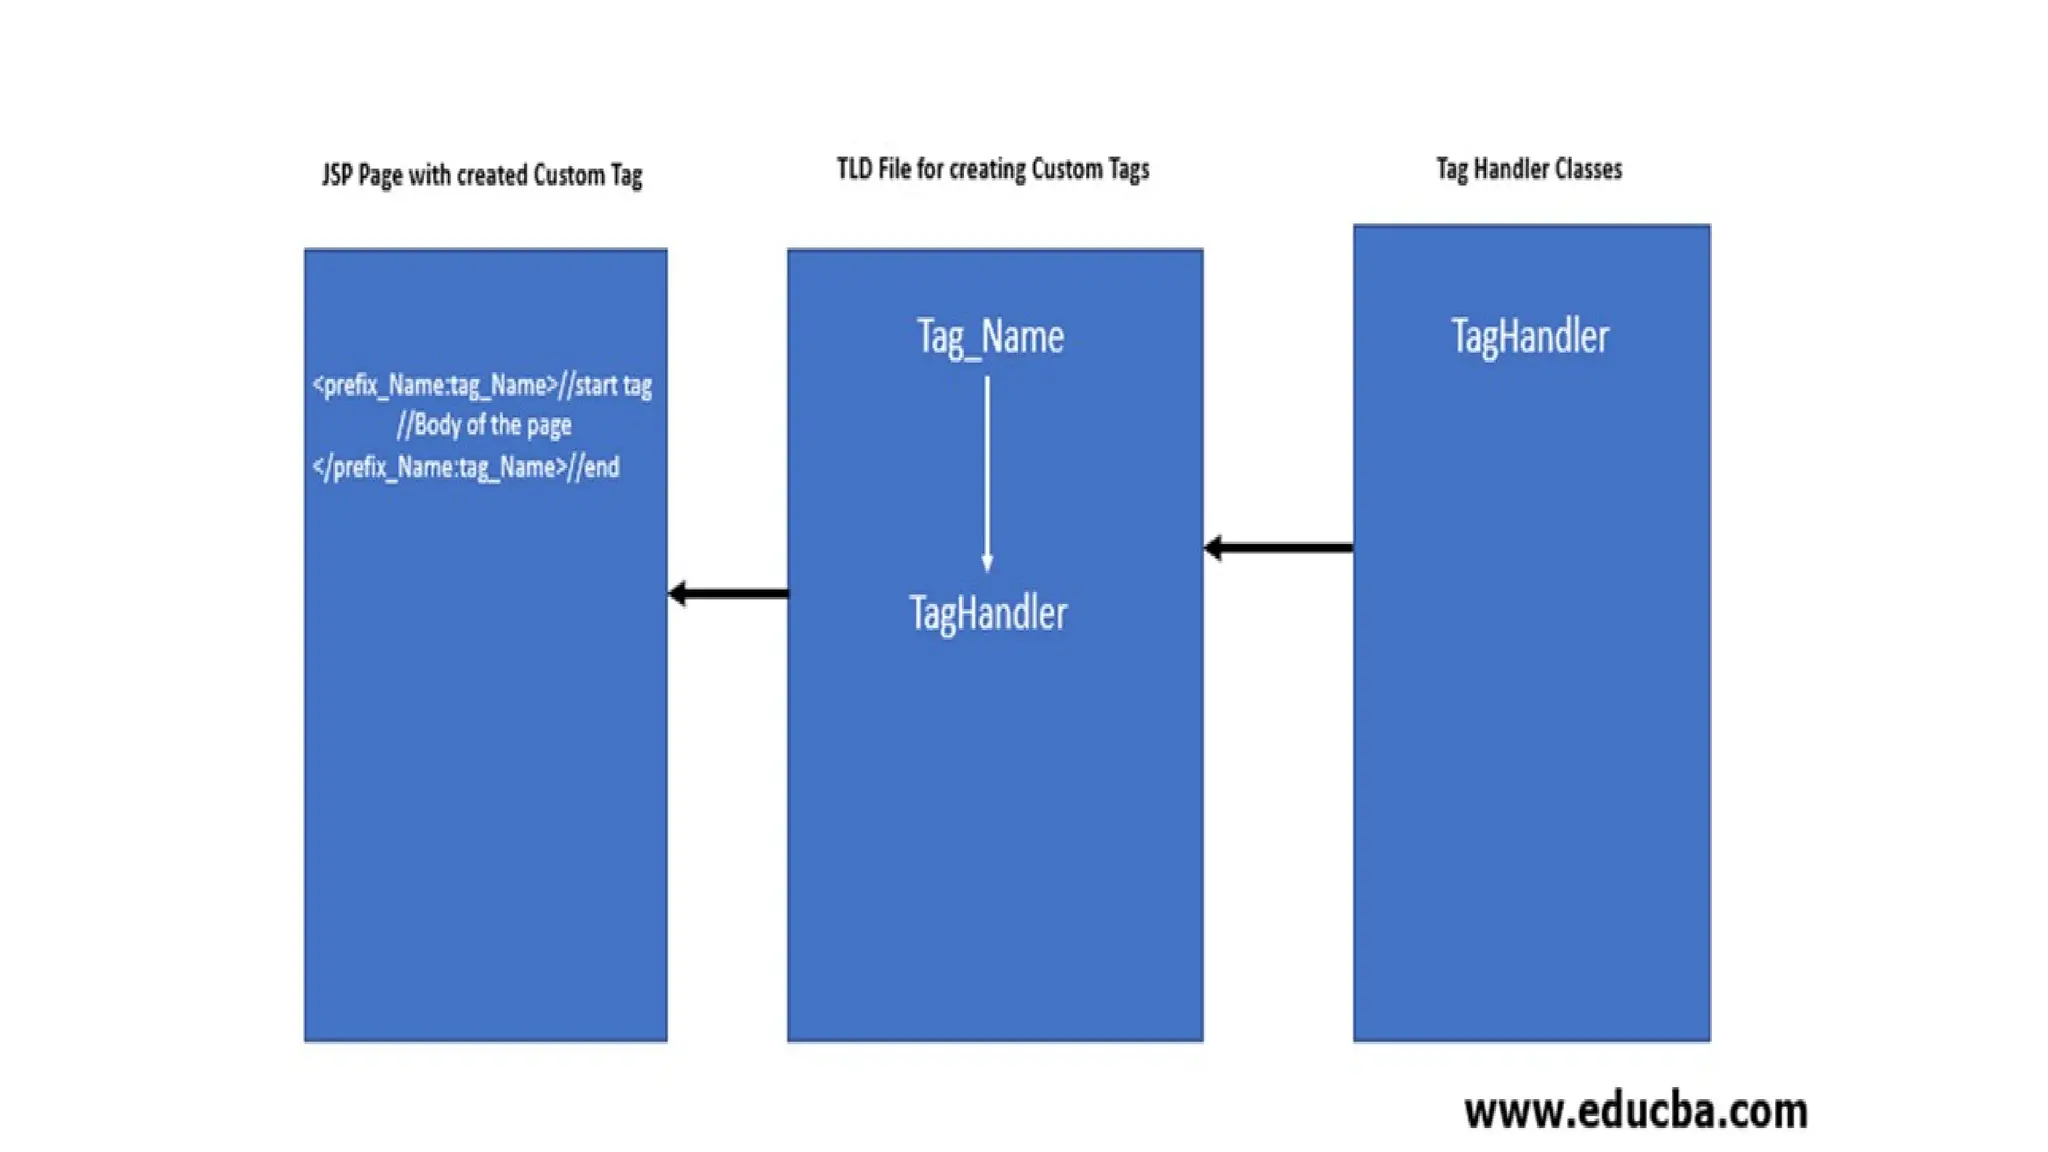
Custom-Tag
• User-defined tagsare known as custom tags.
• To create a custom tag we need three things:
1) Tag handler class: In this class we specify what our custom tag will do when it is
used in a JSP page.
2) TLD file: Tag descriptor file where we will specify our tag name, tag handler class
and tag attributes.
3) JSP page: A JSP page where we will be using our custom tag.
Why Use Custom Tags?
• Custom tags offer several benefits that can enhance the development process of
JSP-based web applications:
• Code Reusability: Encapsulate common functionalities into reusable tags.
• Separation of Concerns: Separate business logic from presentation logic.
• Simplified JSP Code: Reduce complexity and improve readability of JSP pages.
• Maintainability: Easier to maintain and update functionalities encapsulated in
custom tags.
84.
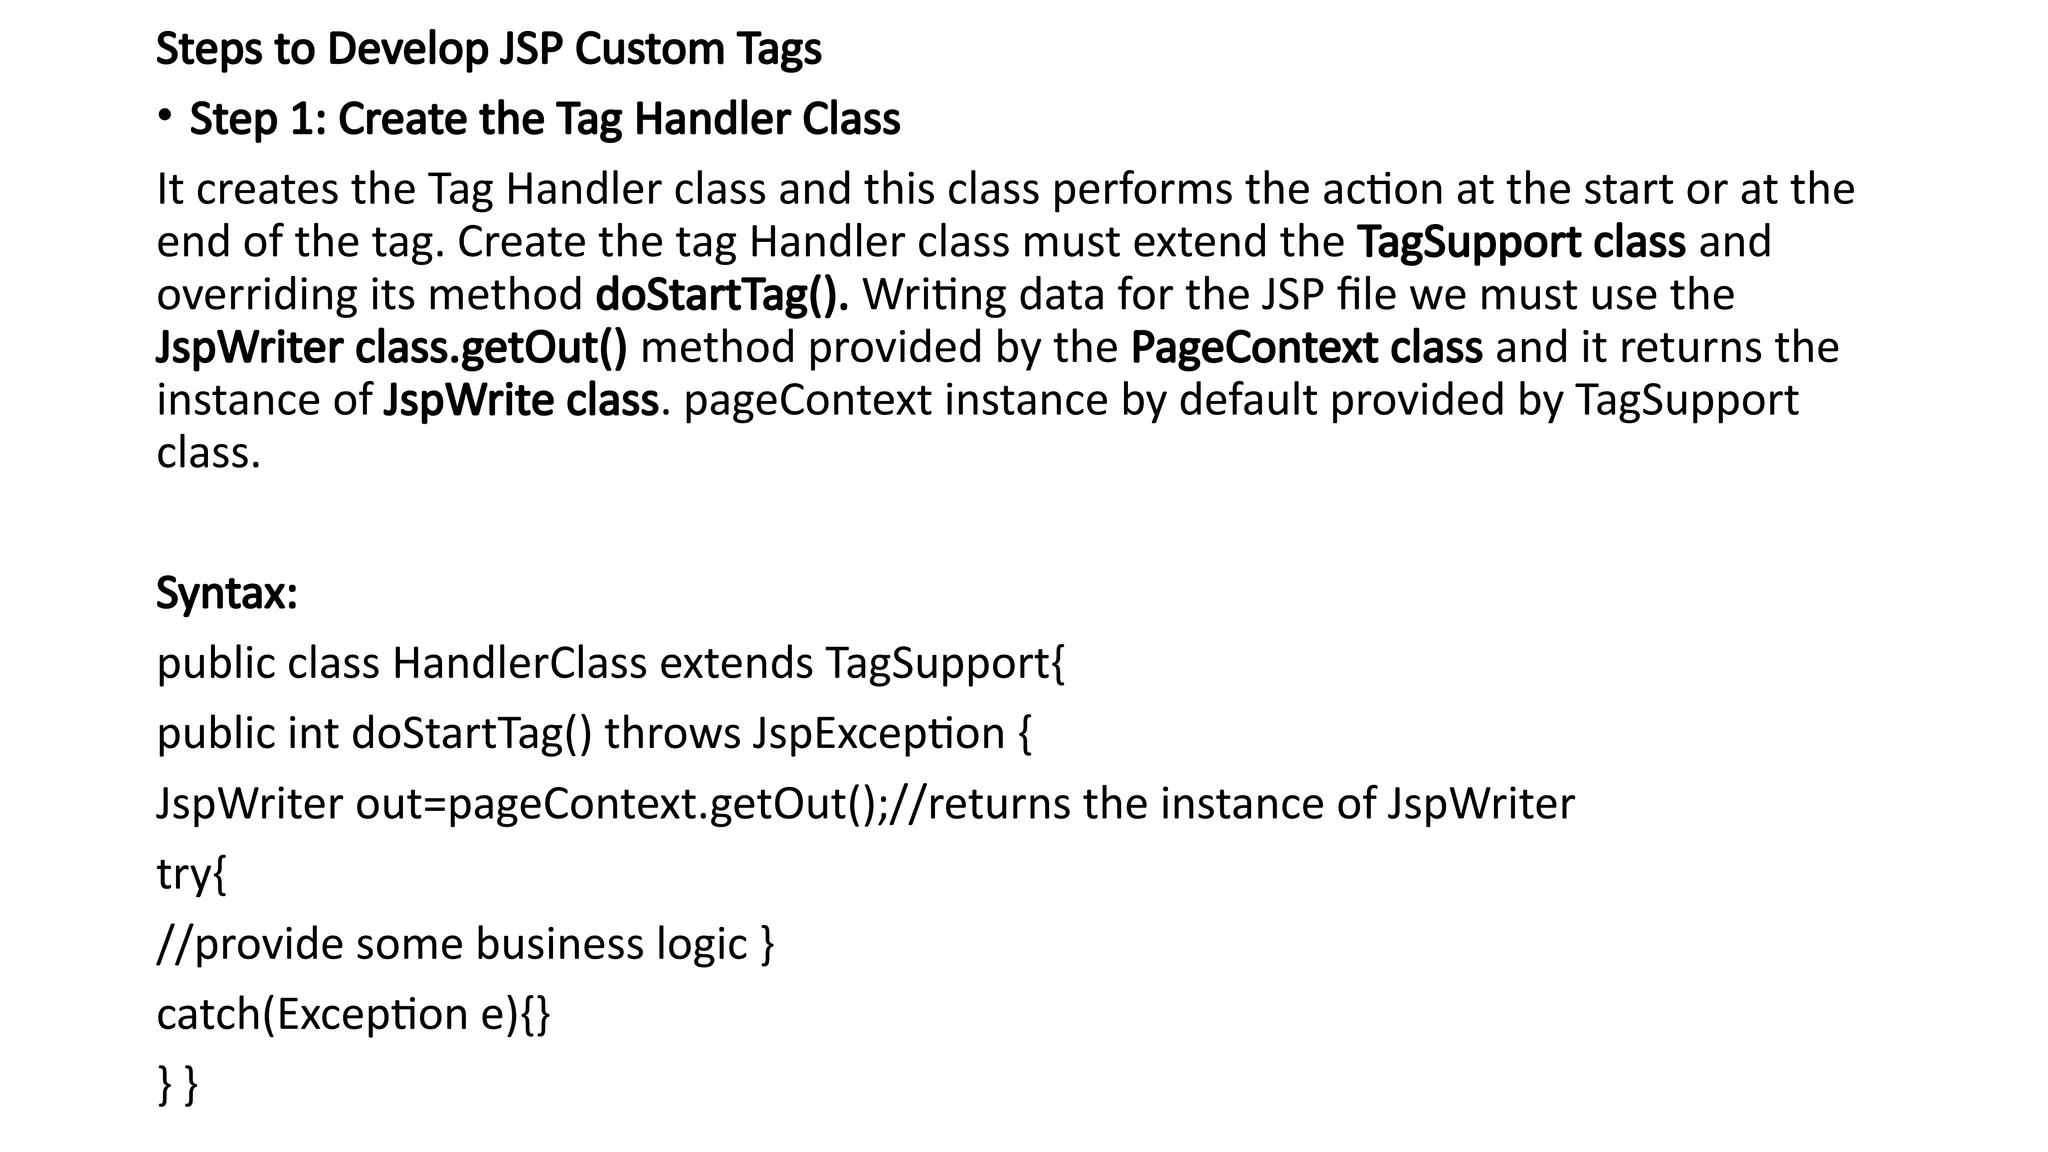
Steps to DevelopJSP Custom Tags
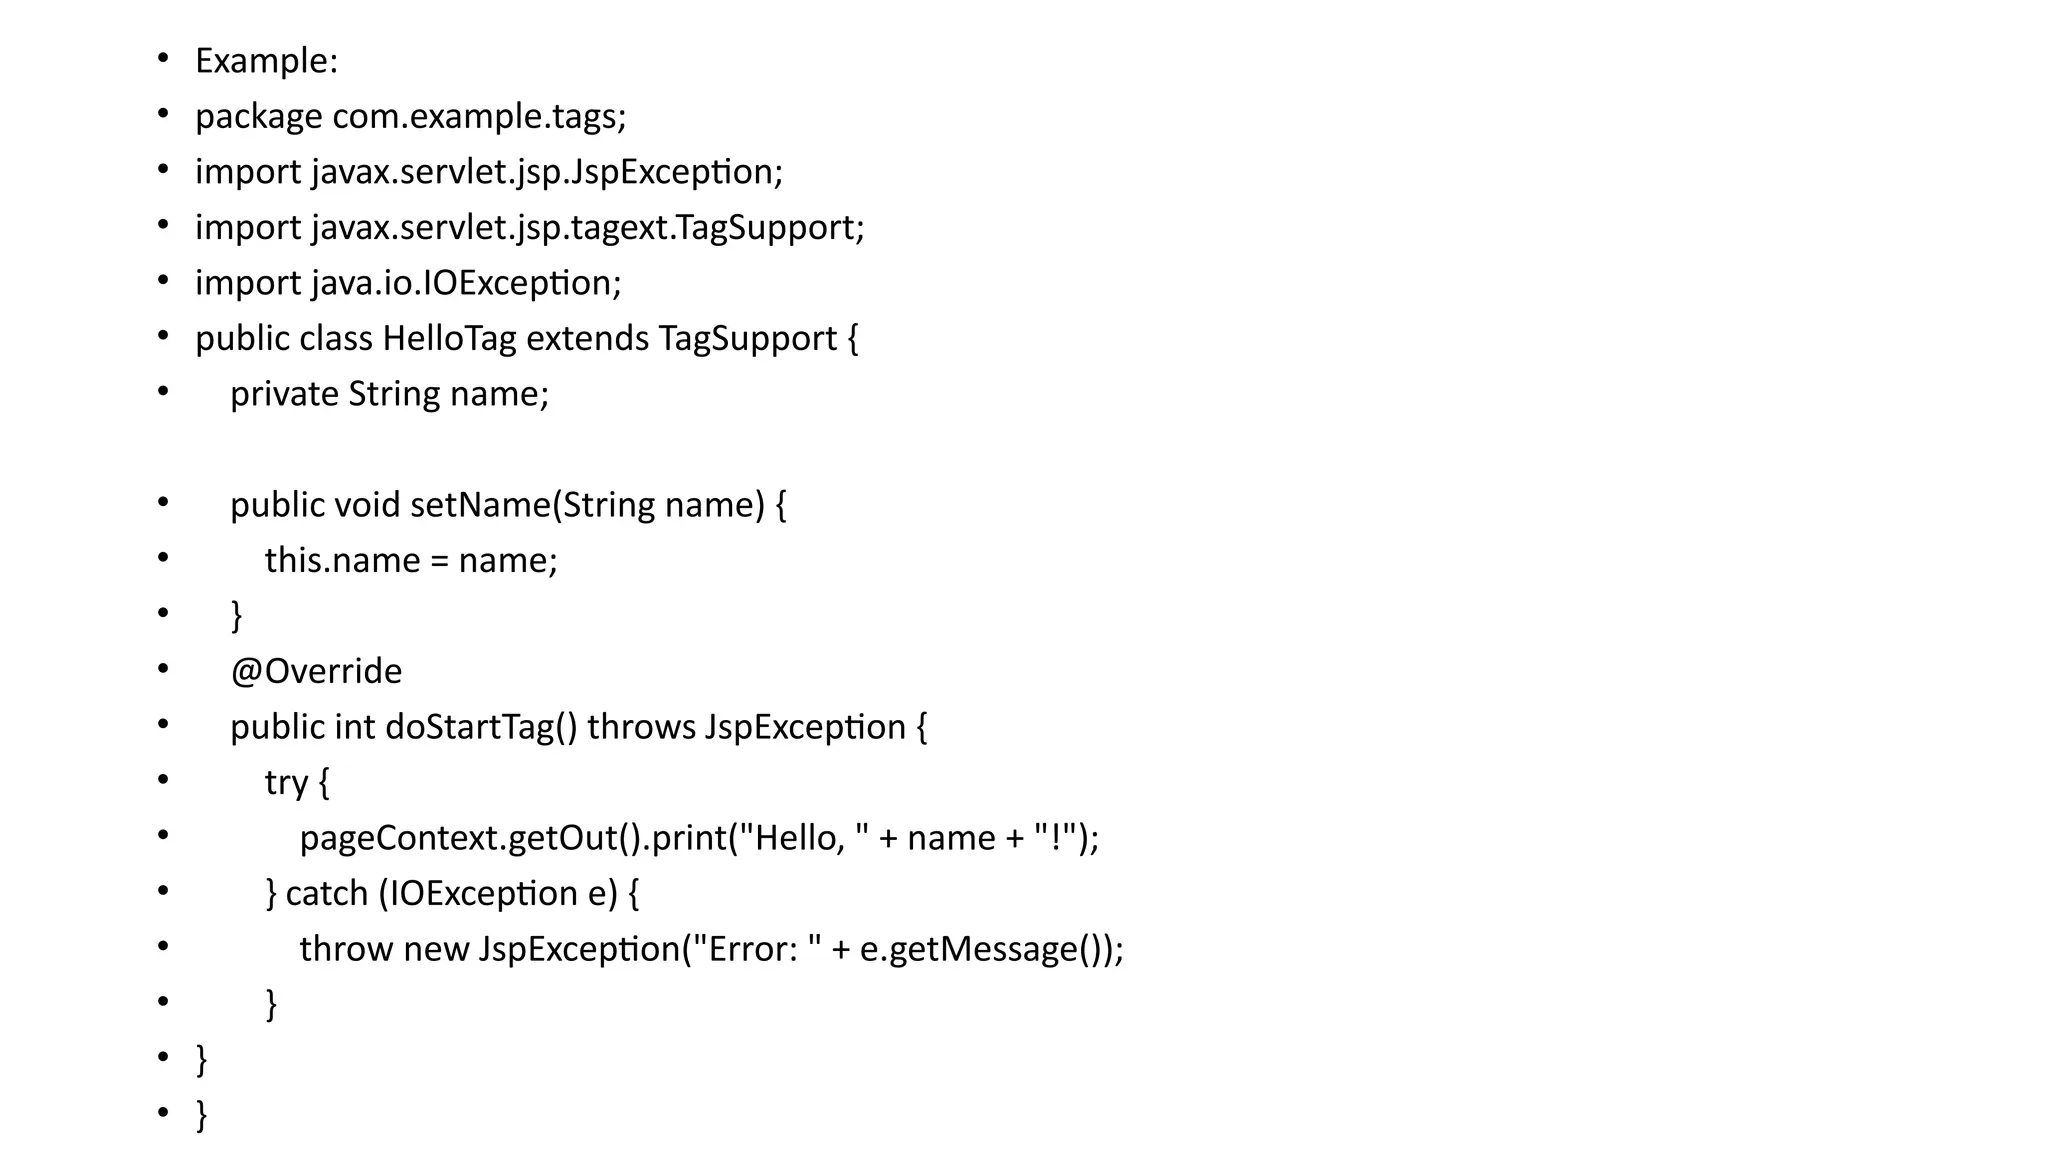
• Step 1: Create the Tag Handler Class
It creates the Tag Handler class and this class performs the action at the start or at the
end of the tag. Create the tag Handler class must extend the TagSupport class and
overriding its method doStartTag(). Writing data for the JSP file we must use the
JspWriter class.getOut() method provided by the PageContext class and it returns the
instance of JspWrite class. pageContext instance by default provided by TagSupport
class.
Syntax:
public class HandlerClass extends TagSupport{
public int doStartTag() throws JspException {
JspWriter out=pageContext.getOut();//returns the instance of JspWriter
try{
//provide some business logic }
catch(Exception e){}
} }
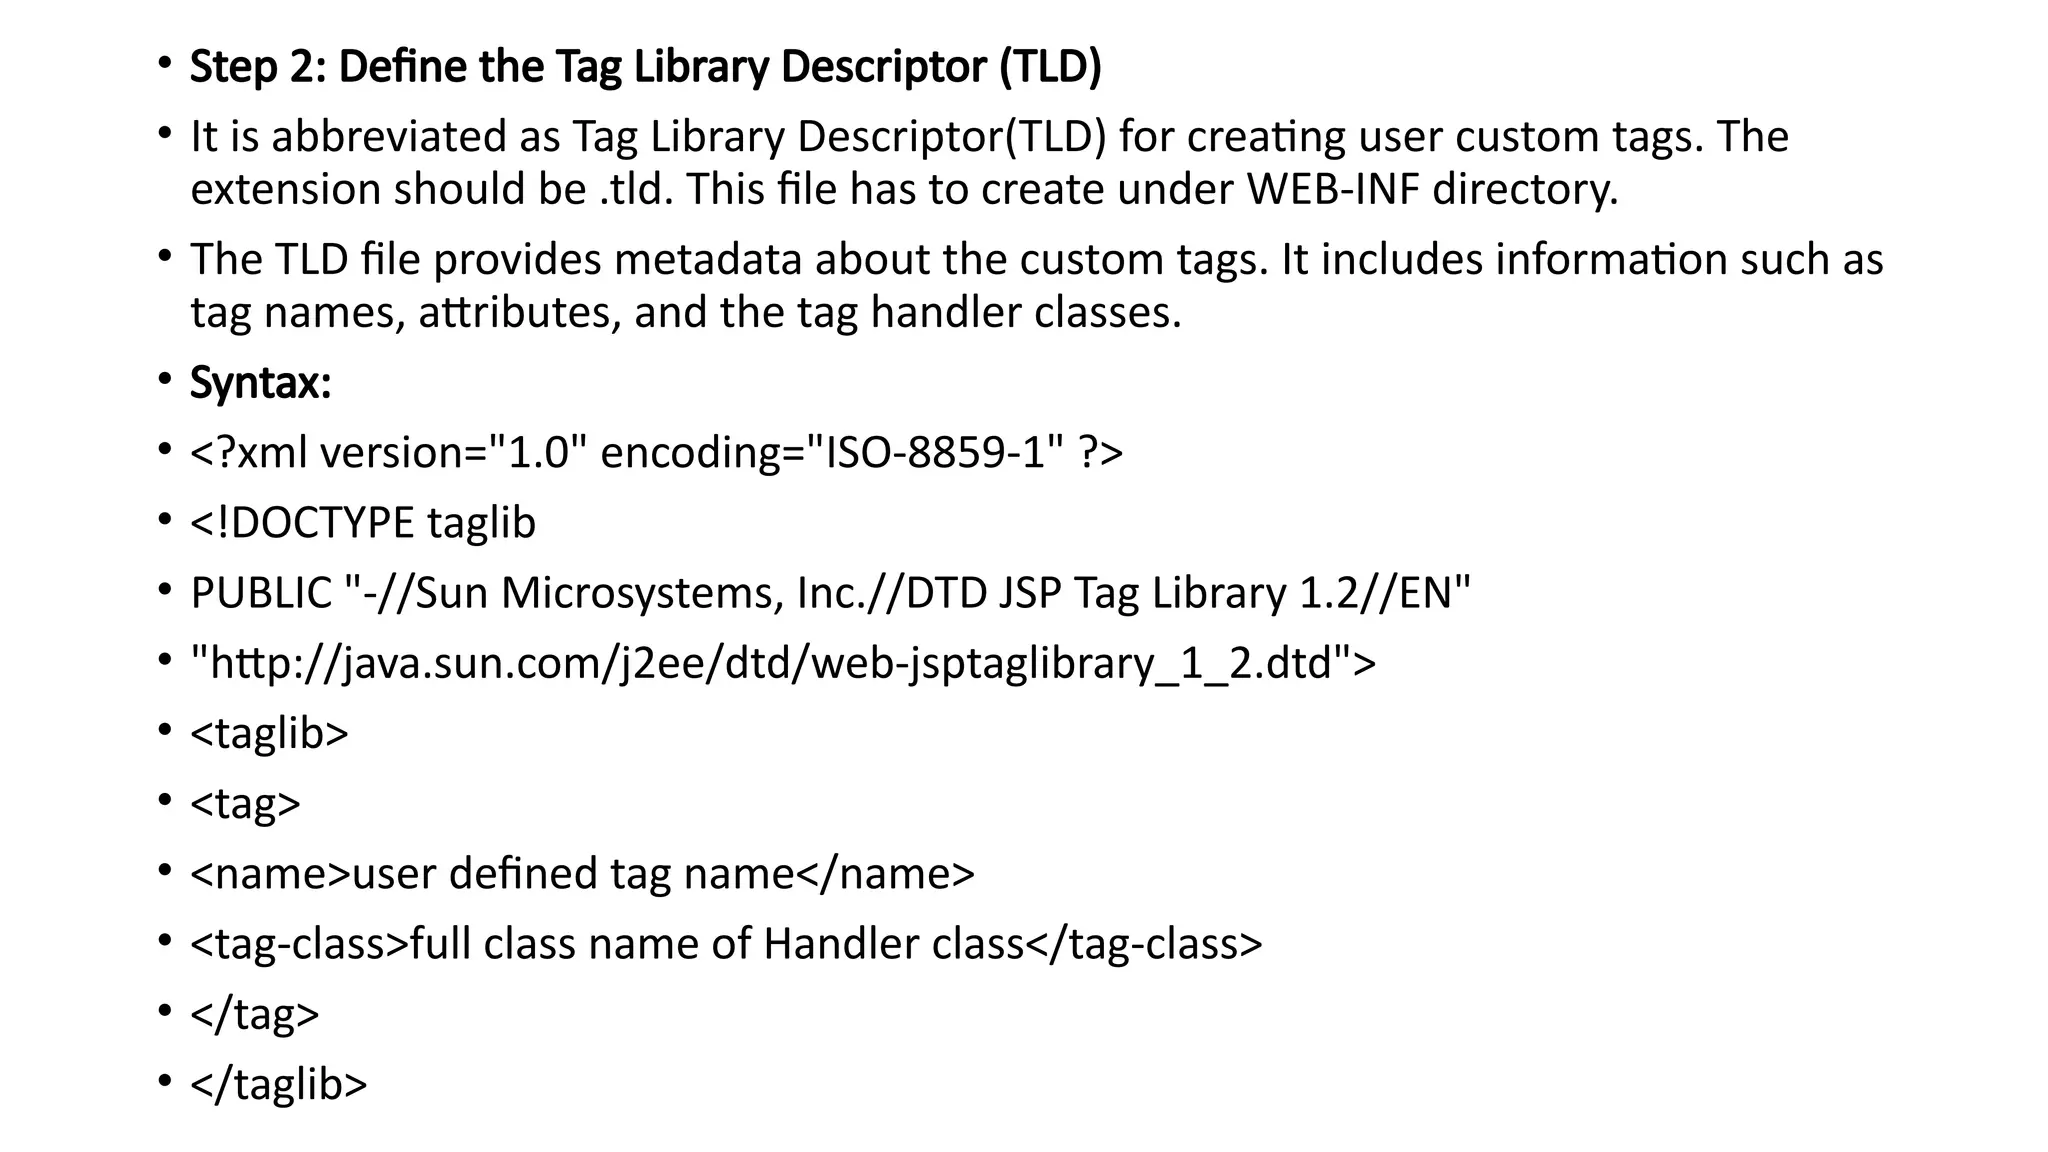
• Step 2:Define the Tag Library Descriptor (TLD)
• It is abbreviated as Tag Library Descriptor(TLD) for creating user custom tags. The
extension should be .tld. This file has to create under WEB-INF directory.
• The TLD file provides metadata about the custom tags. It includes information such as
tag names, attributes, and the tag handler classes.
• Syntax:
• <?xml version="1.0" encoding="ISO-8859-1" ?>
• <!DOCTYPE taglib
• PUBLIC "-//Sun Microsystems, Inc.//DTD JSP Tag Library 1.2//EN"
• "http://java.sun.com/j2ee/dtd/web-jsptaglibrary_1_2.dtd">
• <taglib>
• <tag>
• <name>user defined tag name</name>
• <tag-class>full class name of Handler class</tag-class>
• </tag>
• </taglib>
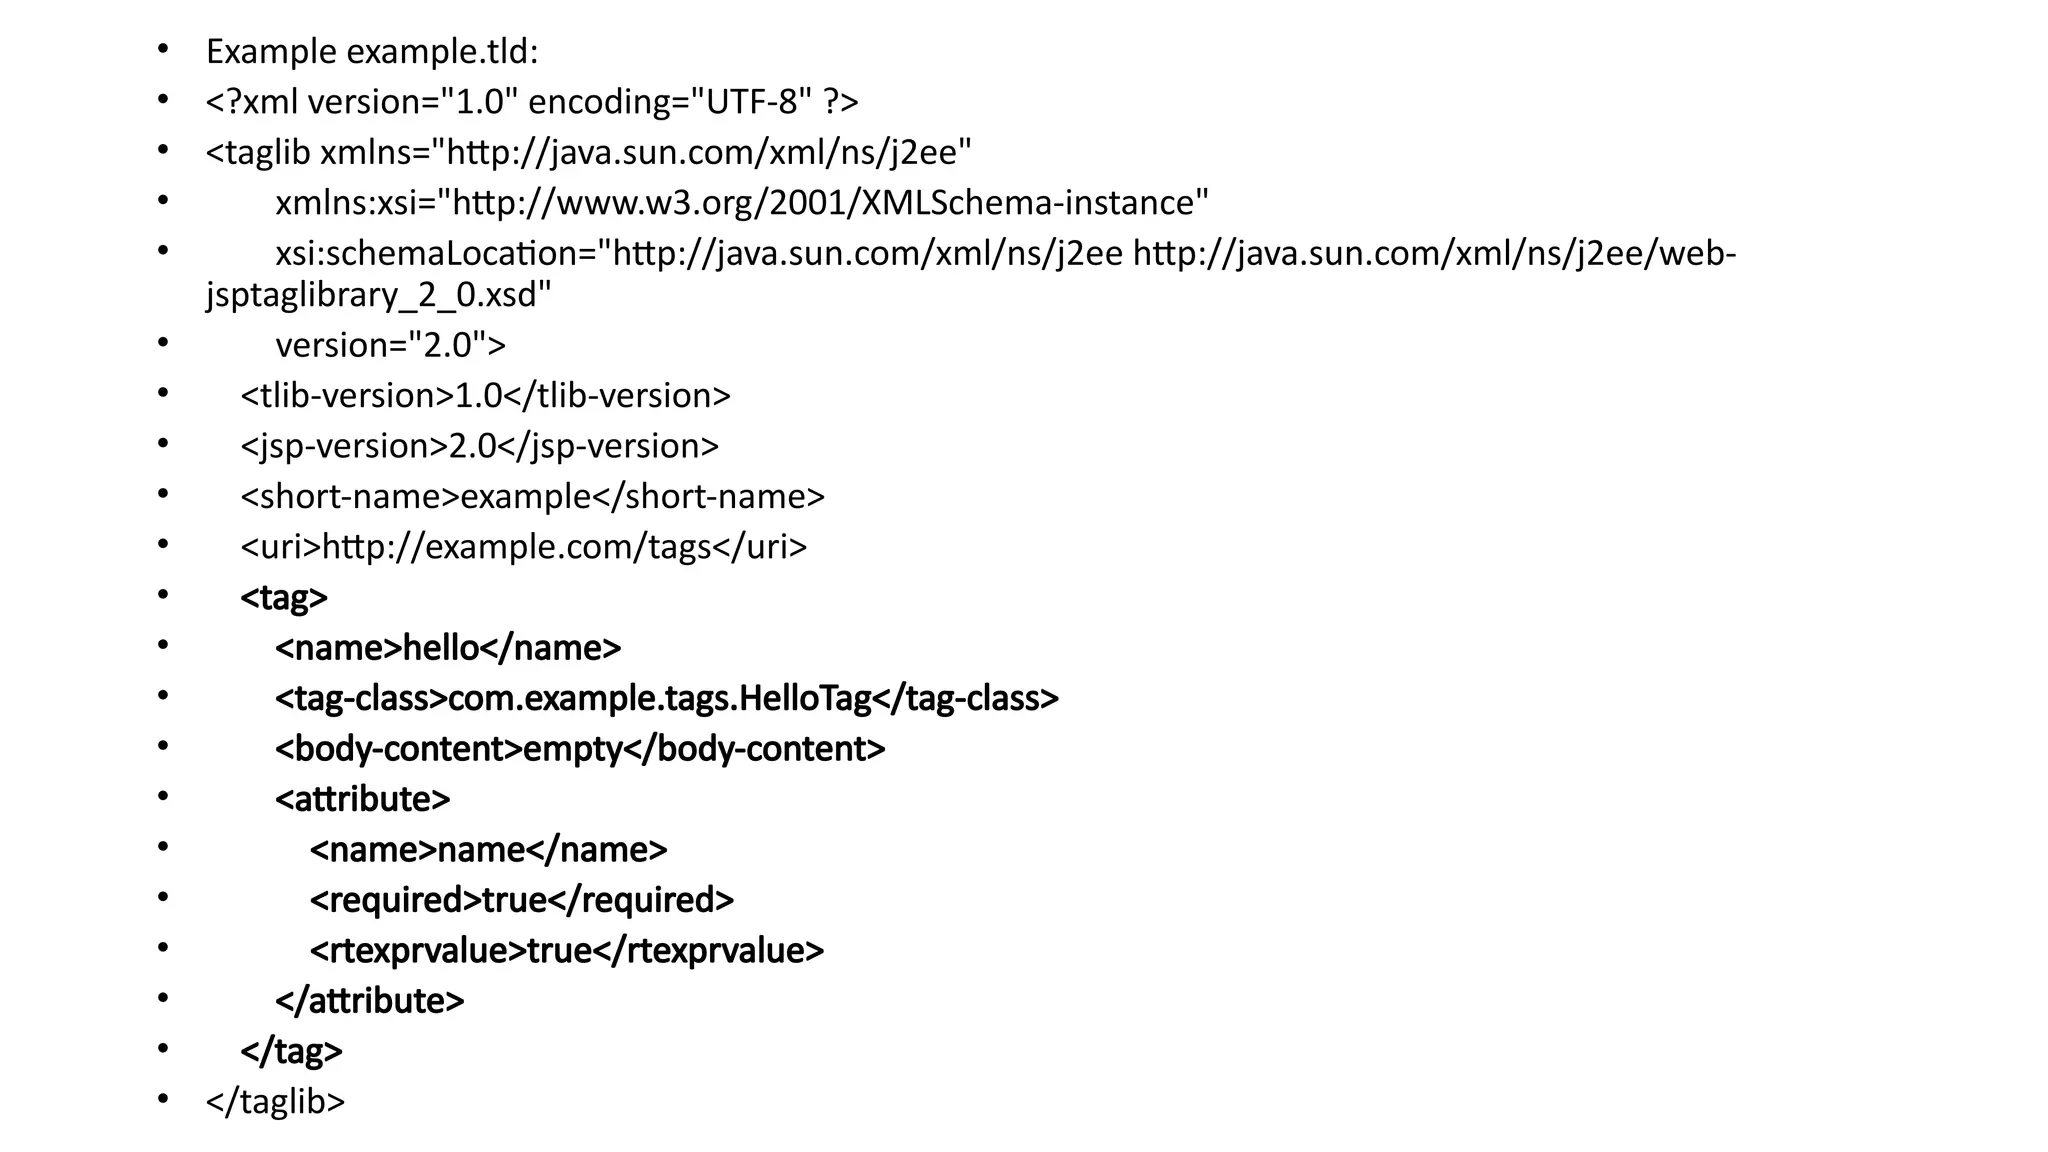
• Step 3:Use the Custom Tag in JSP
• To use the custom tag in a JSP page, you need to include the TLD file and use the tag with its
specified prefix.
• This is JSP page used for writing our created custom tags within the .jsp file
Syntax:
• <%@ tagliburi="WEB-INF/" prefix="prefix for our custom tag" %>
• <prefix_Tag:custom_Tag></prefix_Tag:custom_Tag>
Example index.jsp:
<%@ taglib uri="http://example.com/tags" prefix="ex" %>
<html>
<head>
<title>Custom Tag Example</title>
</head>
<body>
<ex:hello name="World" />
</body>
</html>
89.
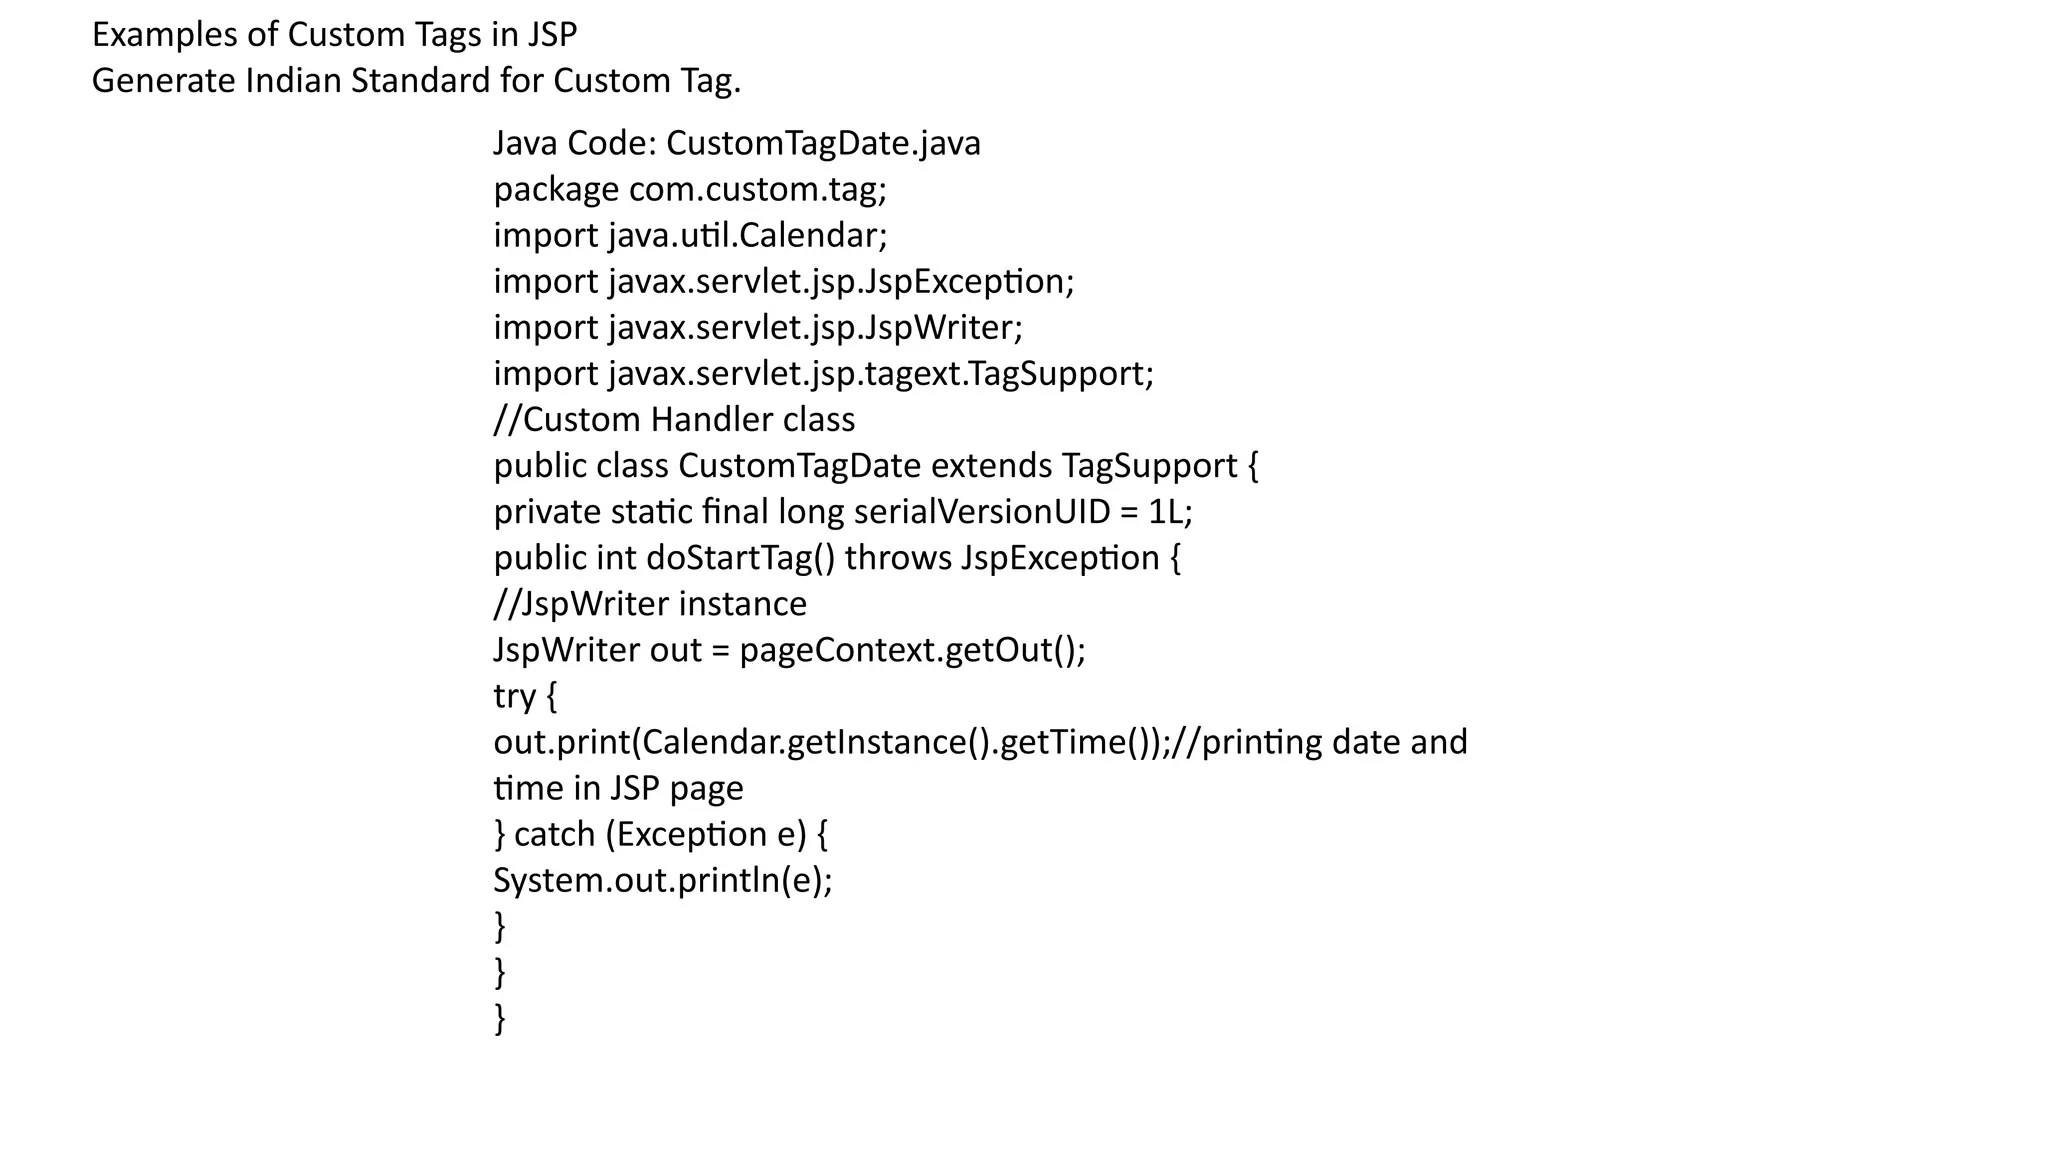
Examples of CustomTags in JSP
Generate Indian Standard for Custom Tag.
Java Code: CustomTagDate.java
package com.custom.tag;
import java.util.Calendar;
import javax.servlet.jsp.JspException;
import javax.servlet.jsp.JspWriter;
import javax.servlet.jsp.tagext.TagSupport;
//Custom Handler class
public class CustomTagDate extends TagSupport {
private static final long serialVersionUID = 1L;
public int doStartTag() throws JspException {
//JspWriter instance
JspWriter out = pageContext.getOut();
try {
out.print(Calendar.getInstance().getTime());//printing date and
time in JSP page
} catch (Exception e) {
System.out.println(e);
}
}
}
90.
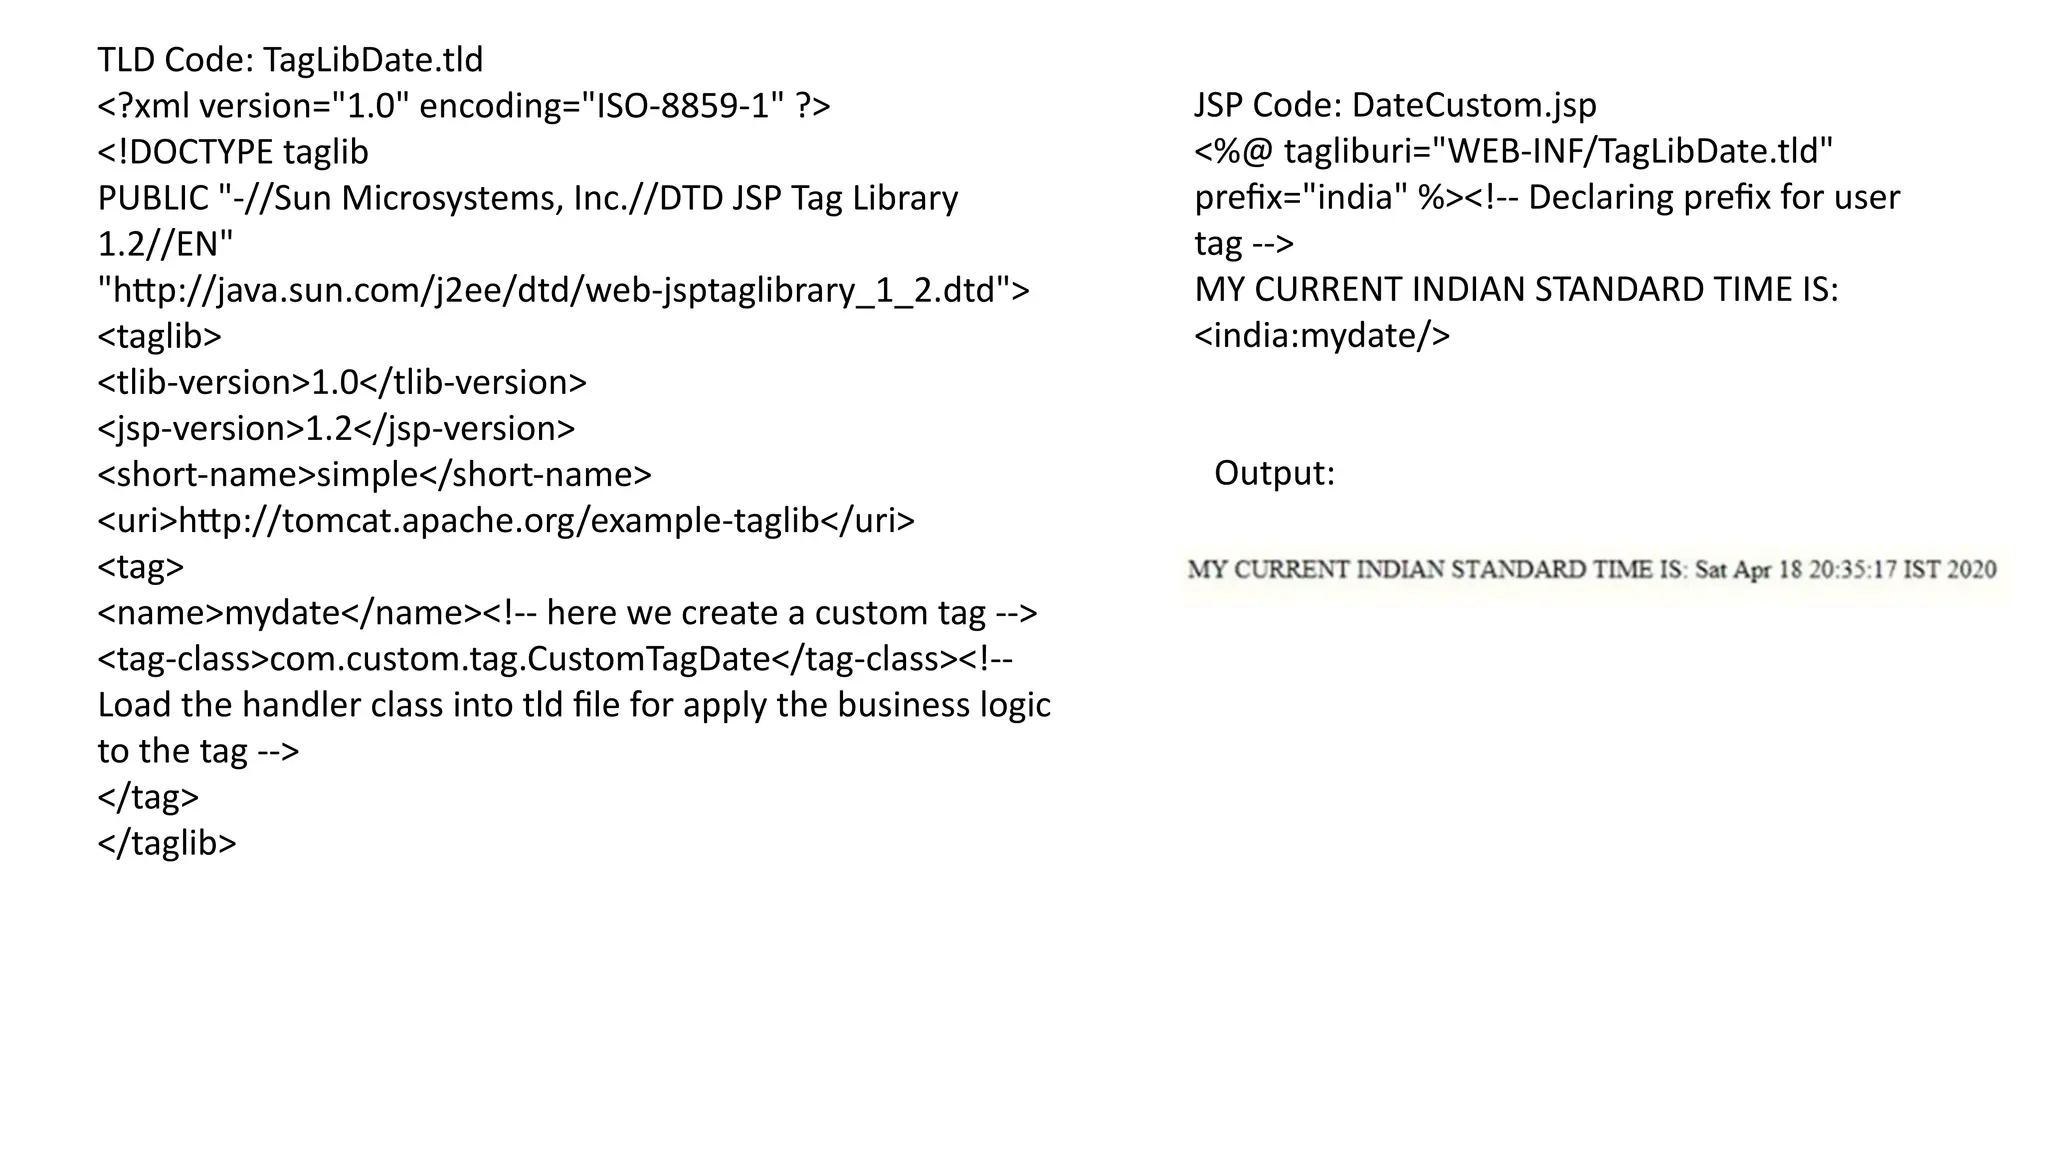
TLD Code: TagLibDate.tld
<?xmlversion="1.0" encoding="ISO-8859-1" ?>
<!DOCTYPE taglib
PUBLIC "-//Sun Microsystems, Inc.//DTD JSP Tag Library
1.2//EN"
"http://java.sun.com/j2ee/dtd/web-jsptaglibrary_1_2.dtd">
<taglib>
<tlib-version>1.0</tlib-version>
<jsp-version>1.2</jsp-version>
<short-name>simple</short-name>
<uri>http://tomcat.apache.org/example-taglib</uri>
<tag>
<name>mydate</name><!-- here we create a custom tag -->
<tag-class>com.custom.tag.CustomTagDate</tag-class><!--
Load the handler class into tld file for apply the business logic
to the tag -->
</tag>
</taglib>
JSP Code: DateCustom.jsp
<%@ tagliburi="WEB-INF/TagLibDate.tld"
prefix="india" %><!-- Declaring prefix for user
tag -->
MY CURRENT INDIAN STANDARD TIME IS:
<india:mydate/>
Output:
91.
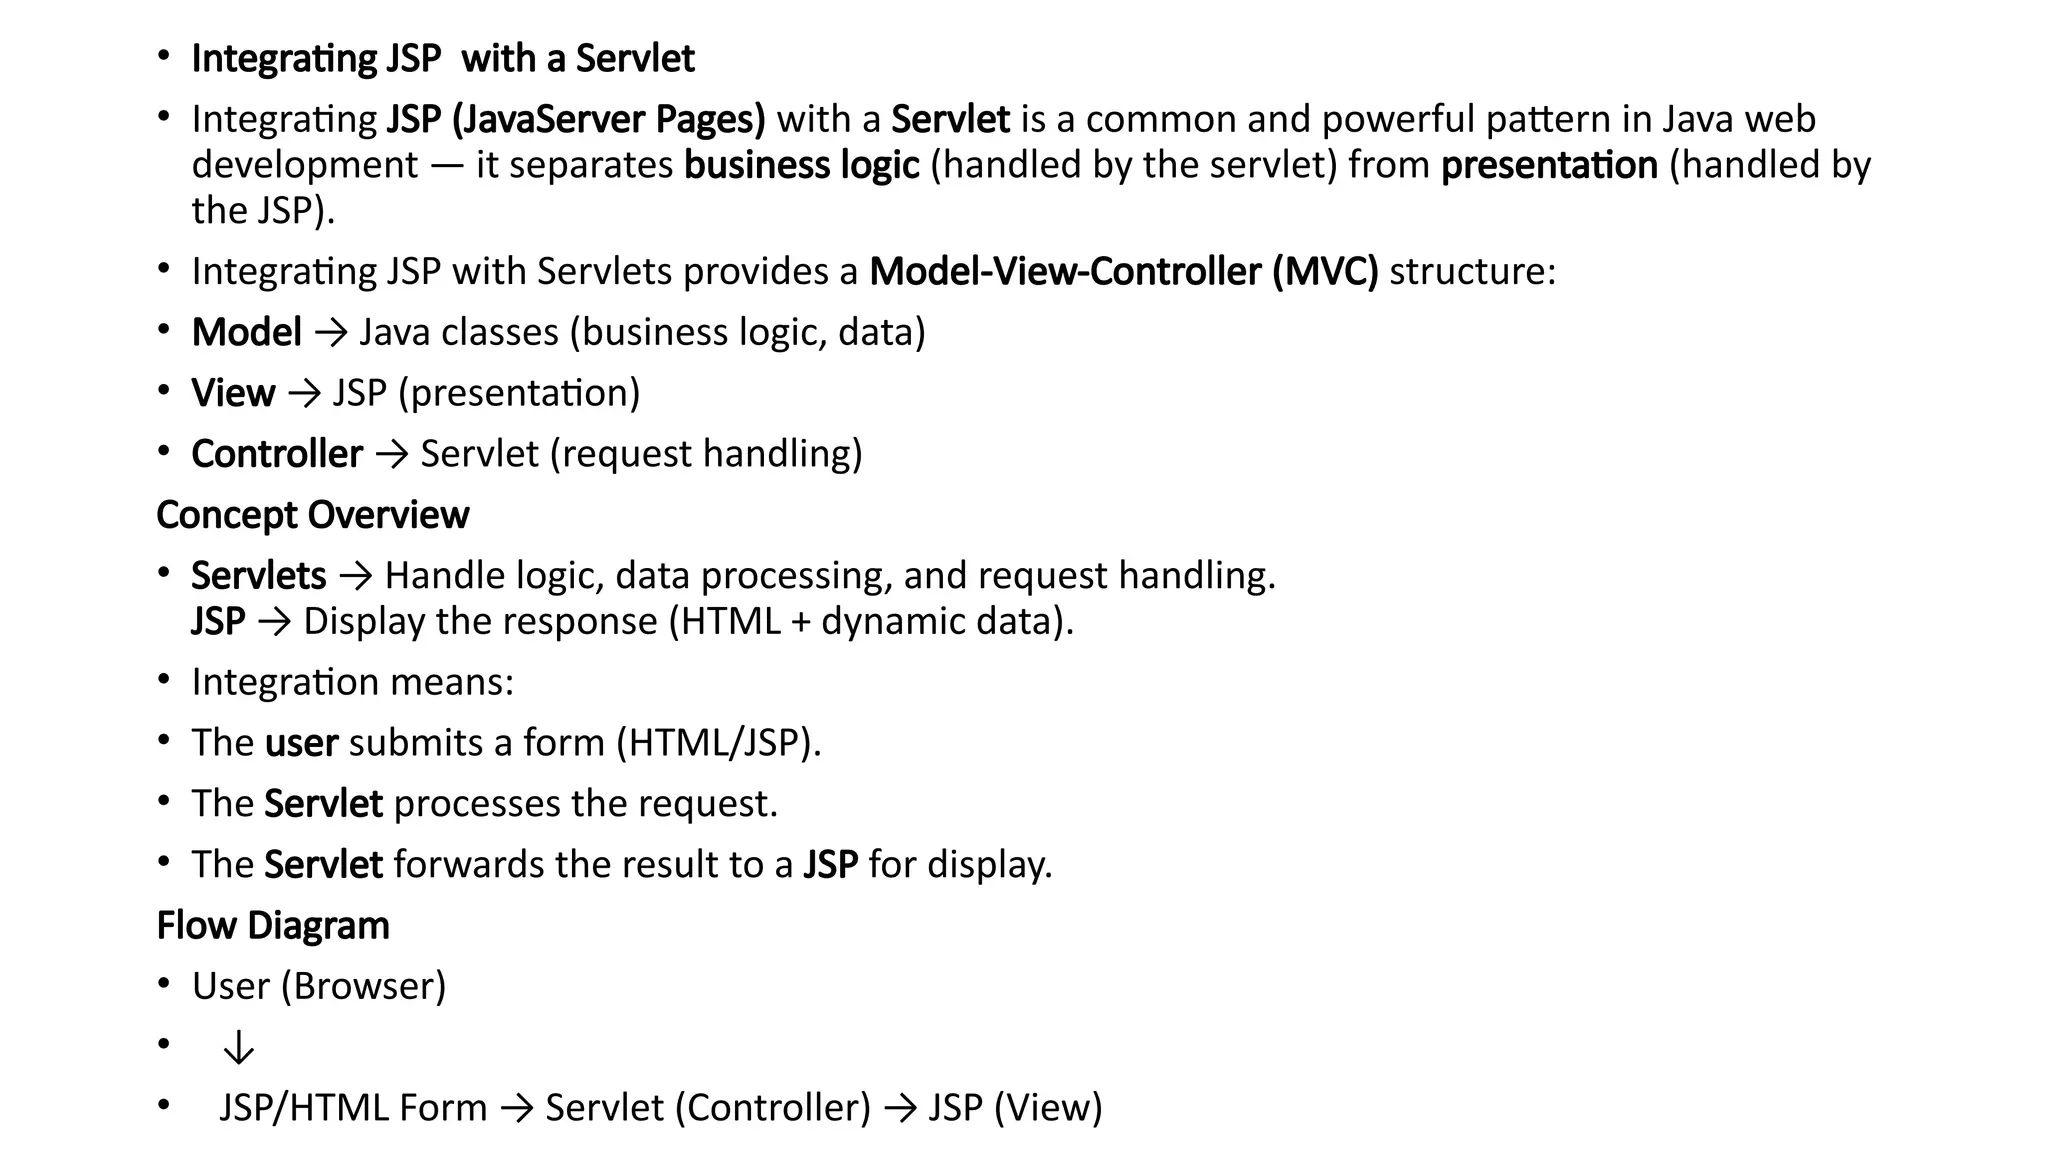
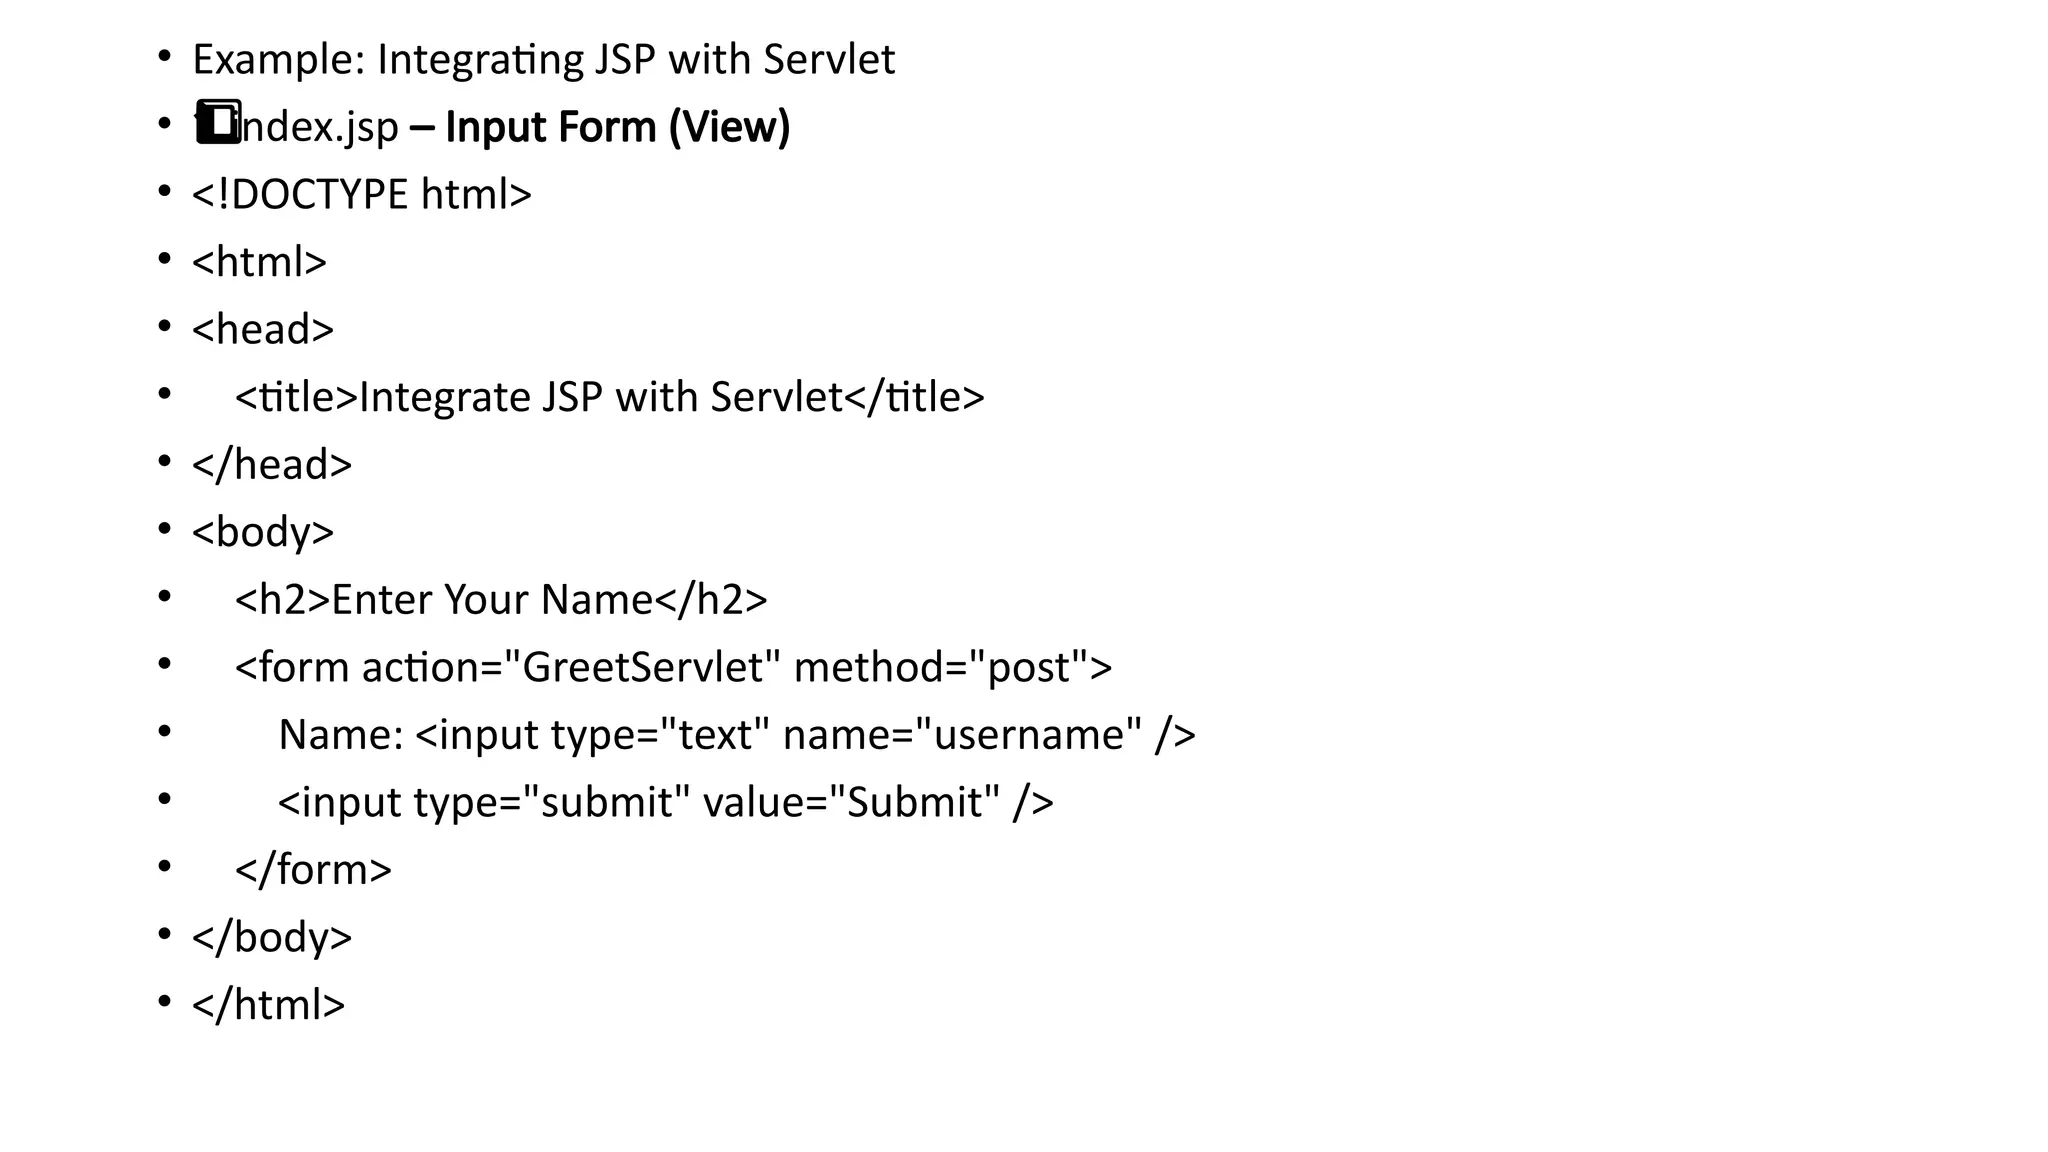
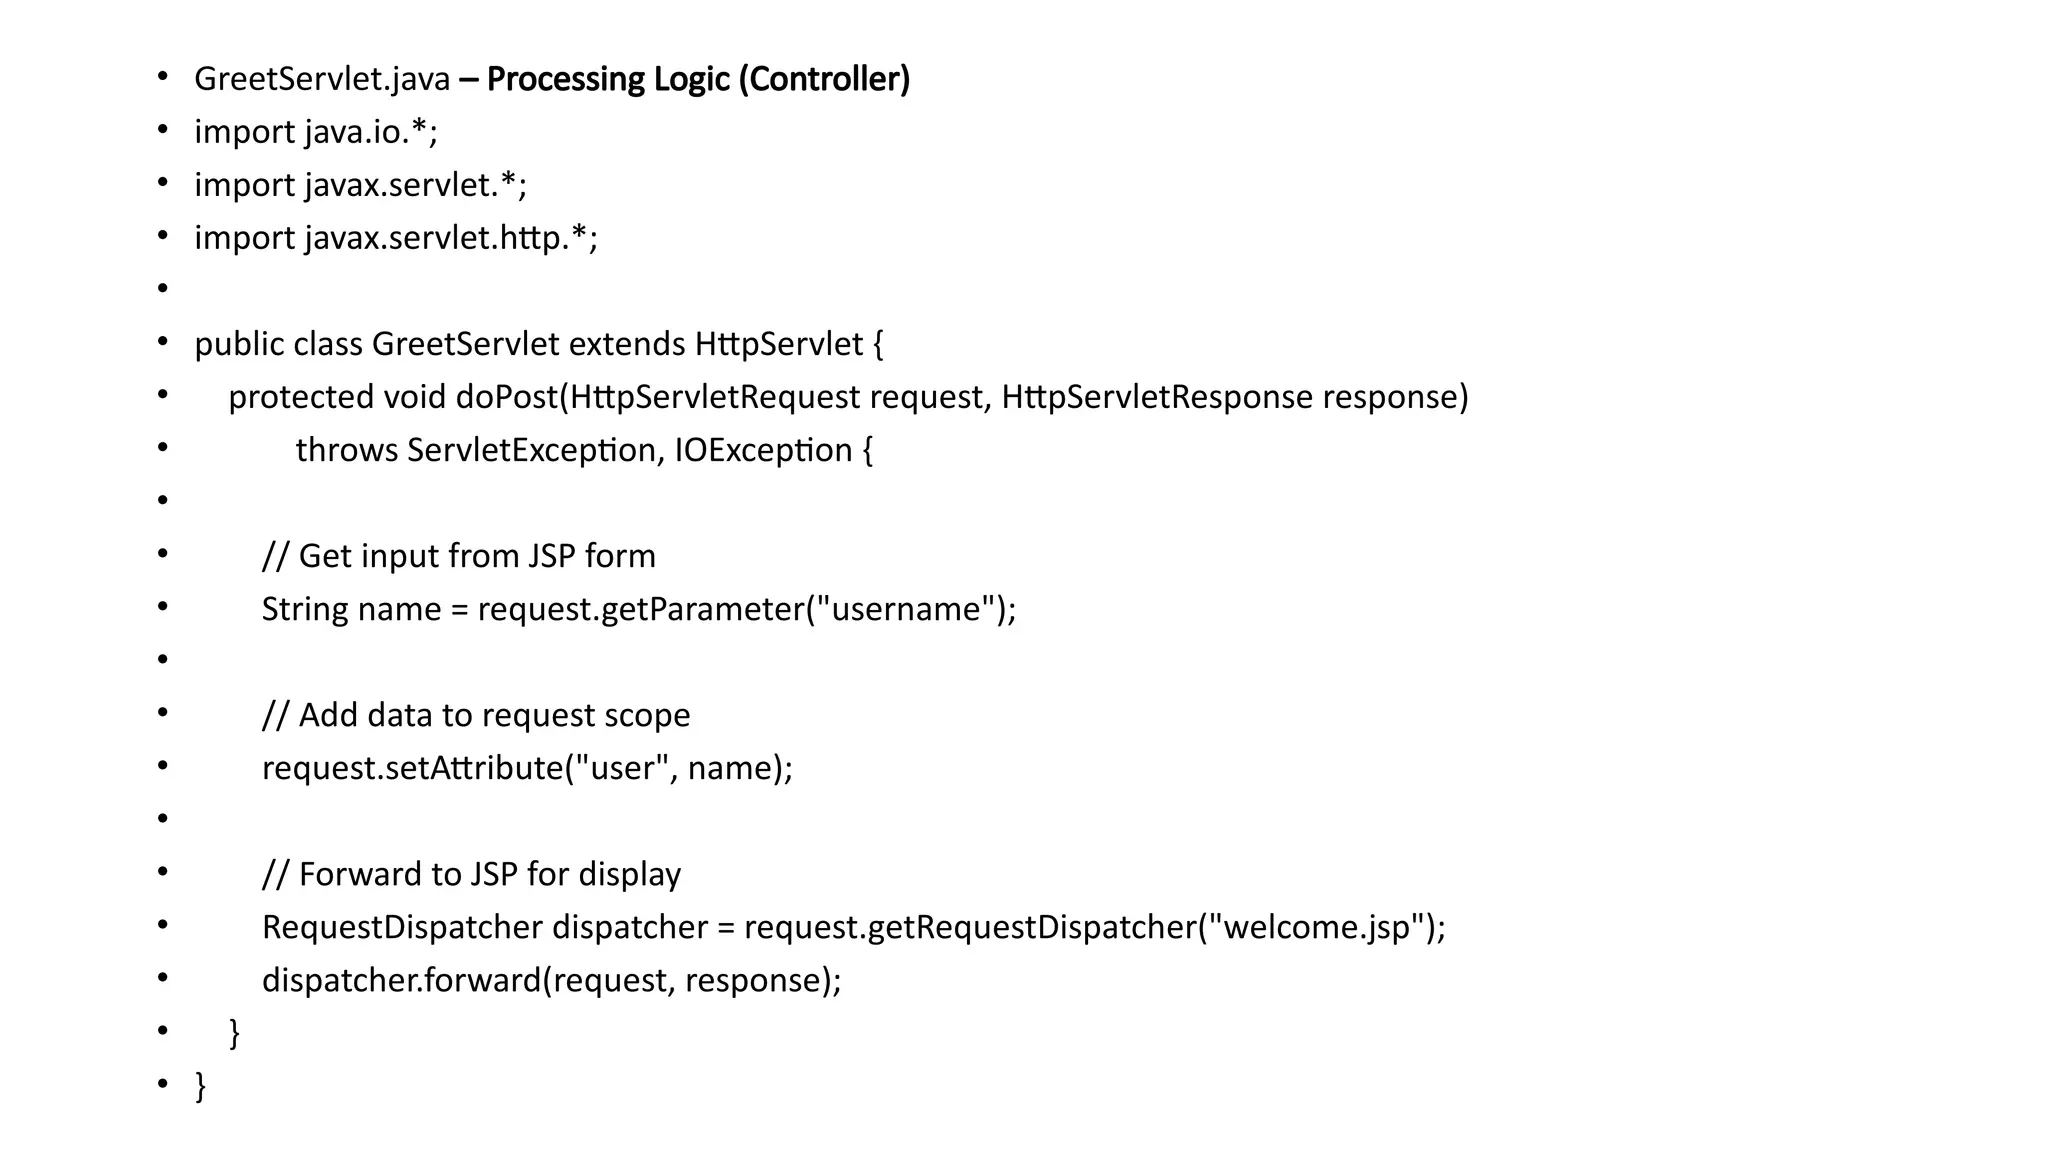
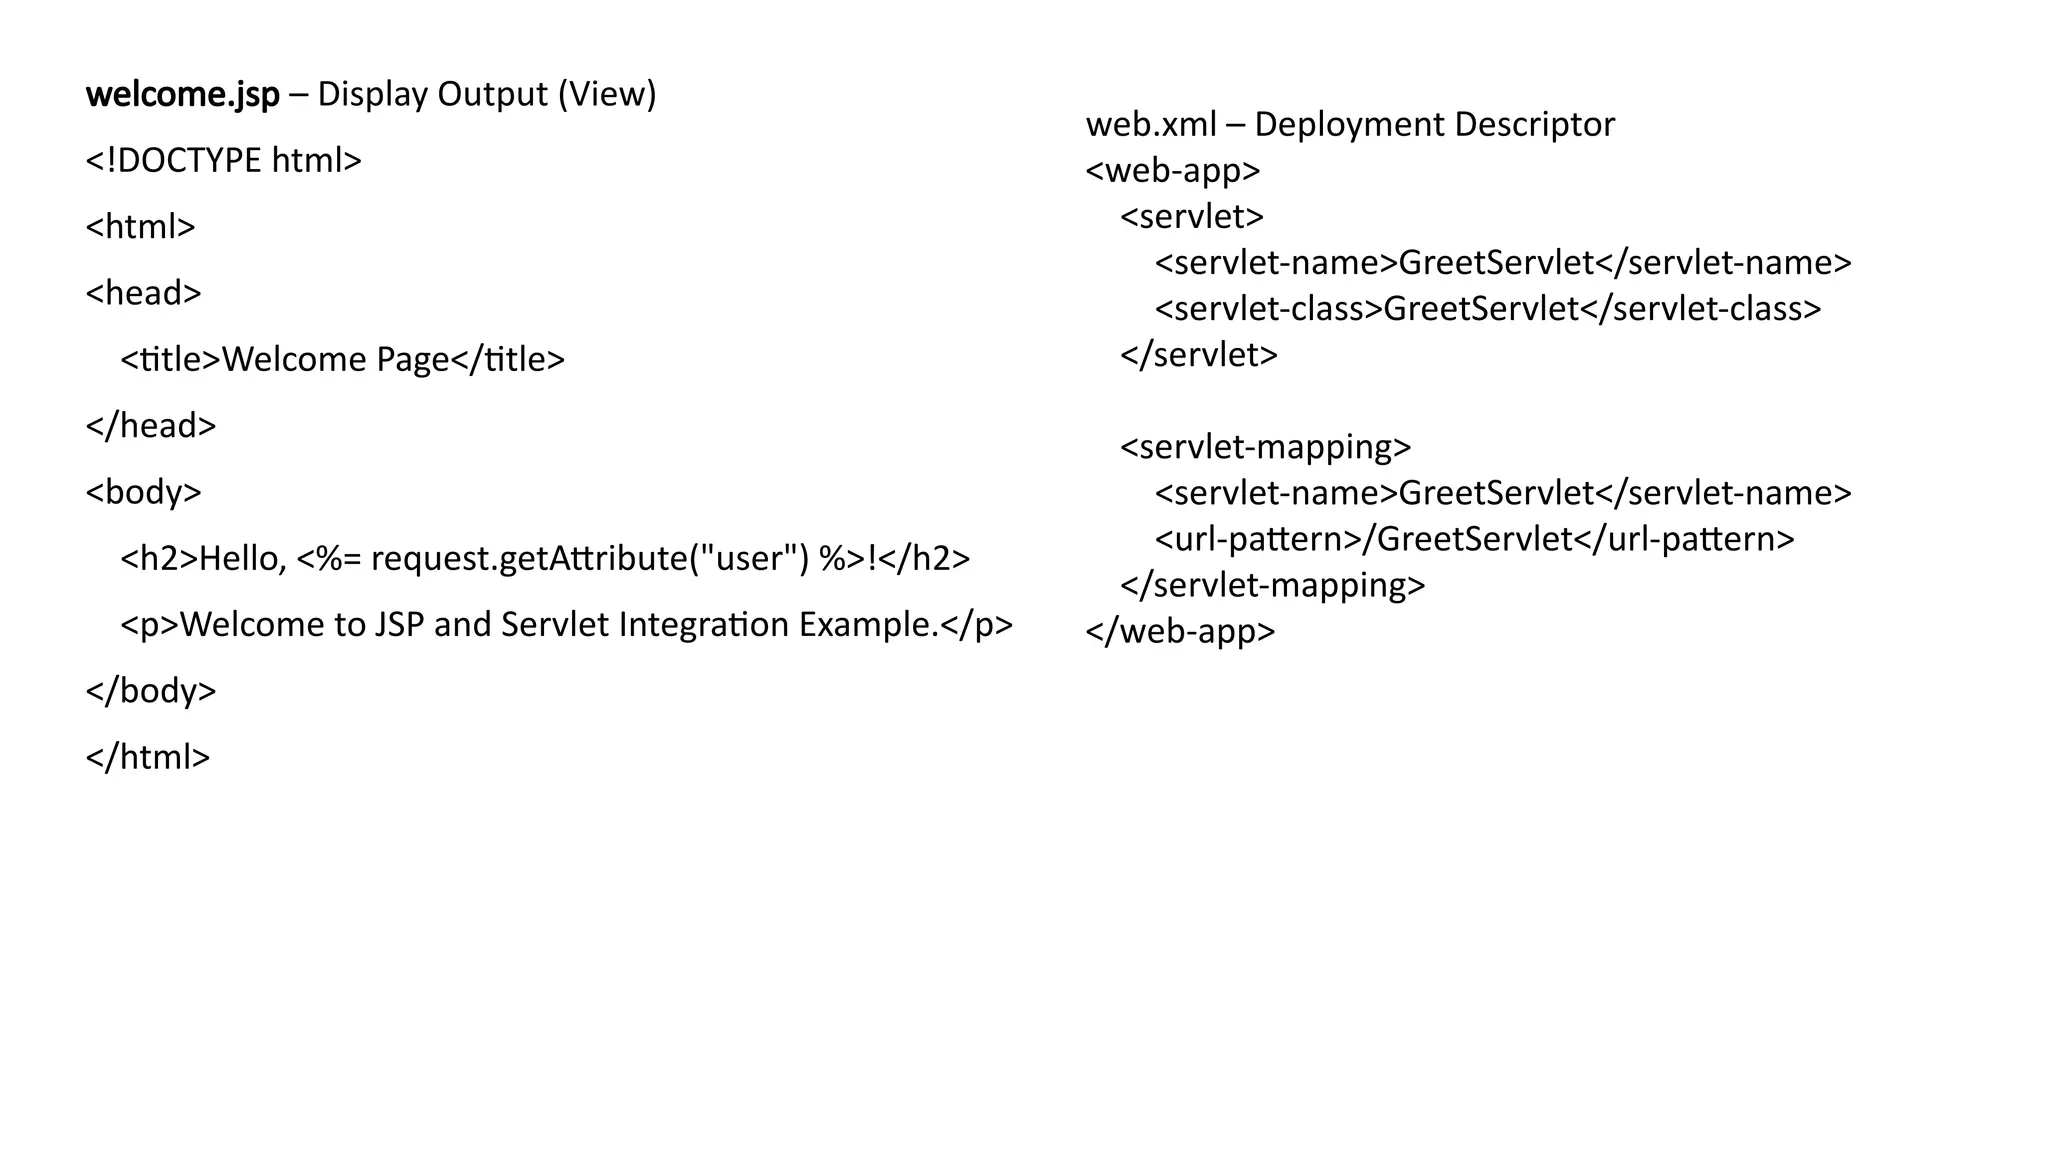
• Integrating JSPwith a Servlet
• Integrating JSP (JavaServer Pages) with a Servlet is a common and powerful pattern in Java web
development — it separates business logic (handled by the servlet) from presentation (handled by
the JSP).
• Integrating JSP with Servlets provides a Model-View-Controller (MVC) structure:
• Model → Java classes (business logic, data)
• View → JSP (presentation)
• Controller → Servlet (request handling)
Concept Overview
• Servlets → Handle logic, data processing, and request handling.
JSP → Display the response (HTML + dynamic data).
• Integration means:
• The user submits a form (HTML/JSP).
• The Servlet processes the request.
• The Servlet forwards the result to a JSP for display.
Flow Diagram
• User (Browser)
• ↓
• JSP/HTML Form → Servlet (Controller) → JSP (View)