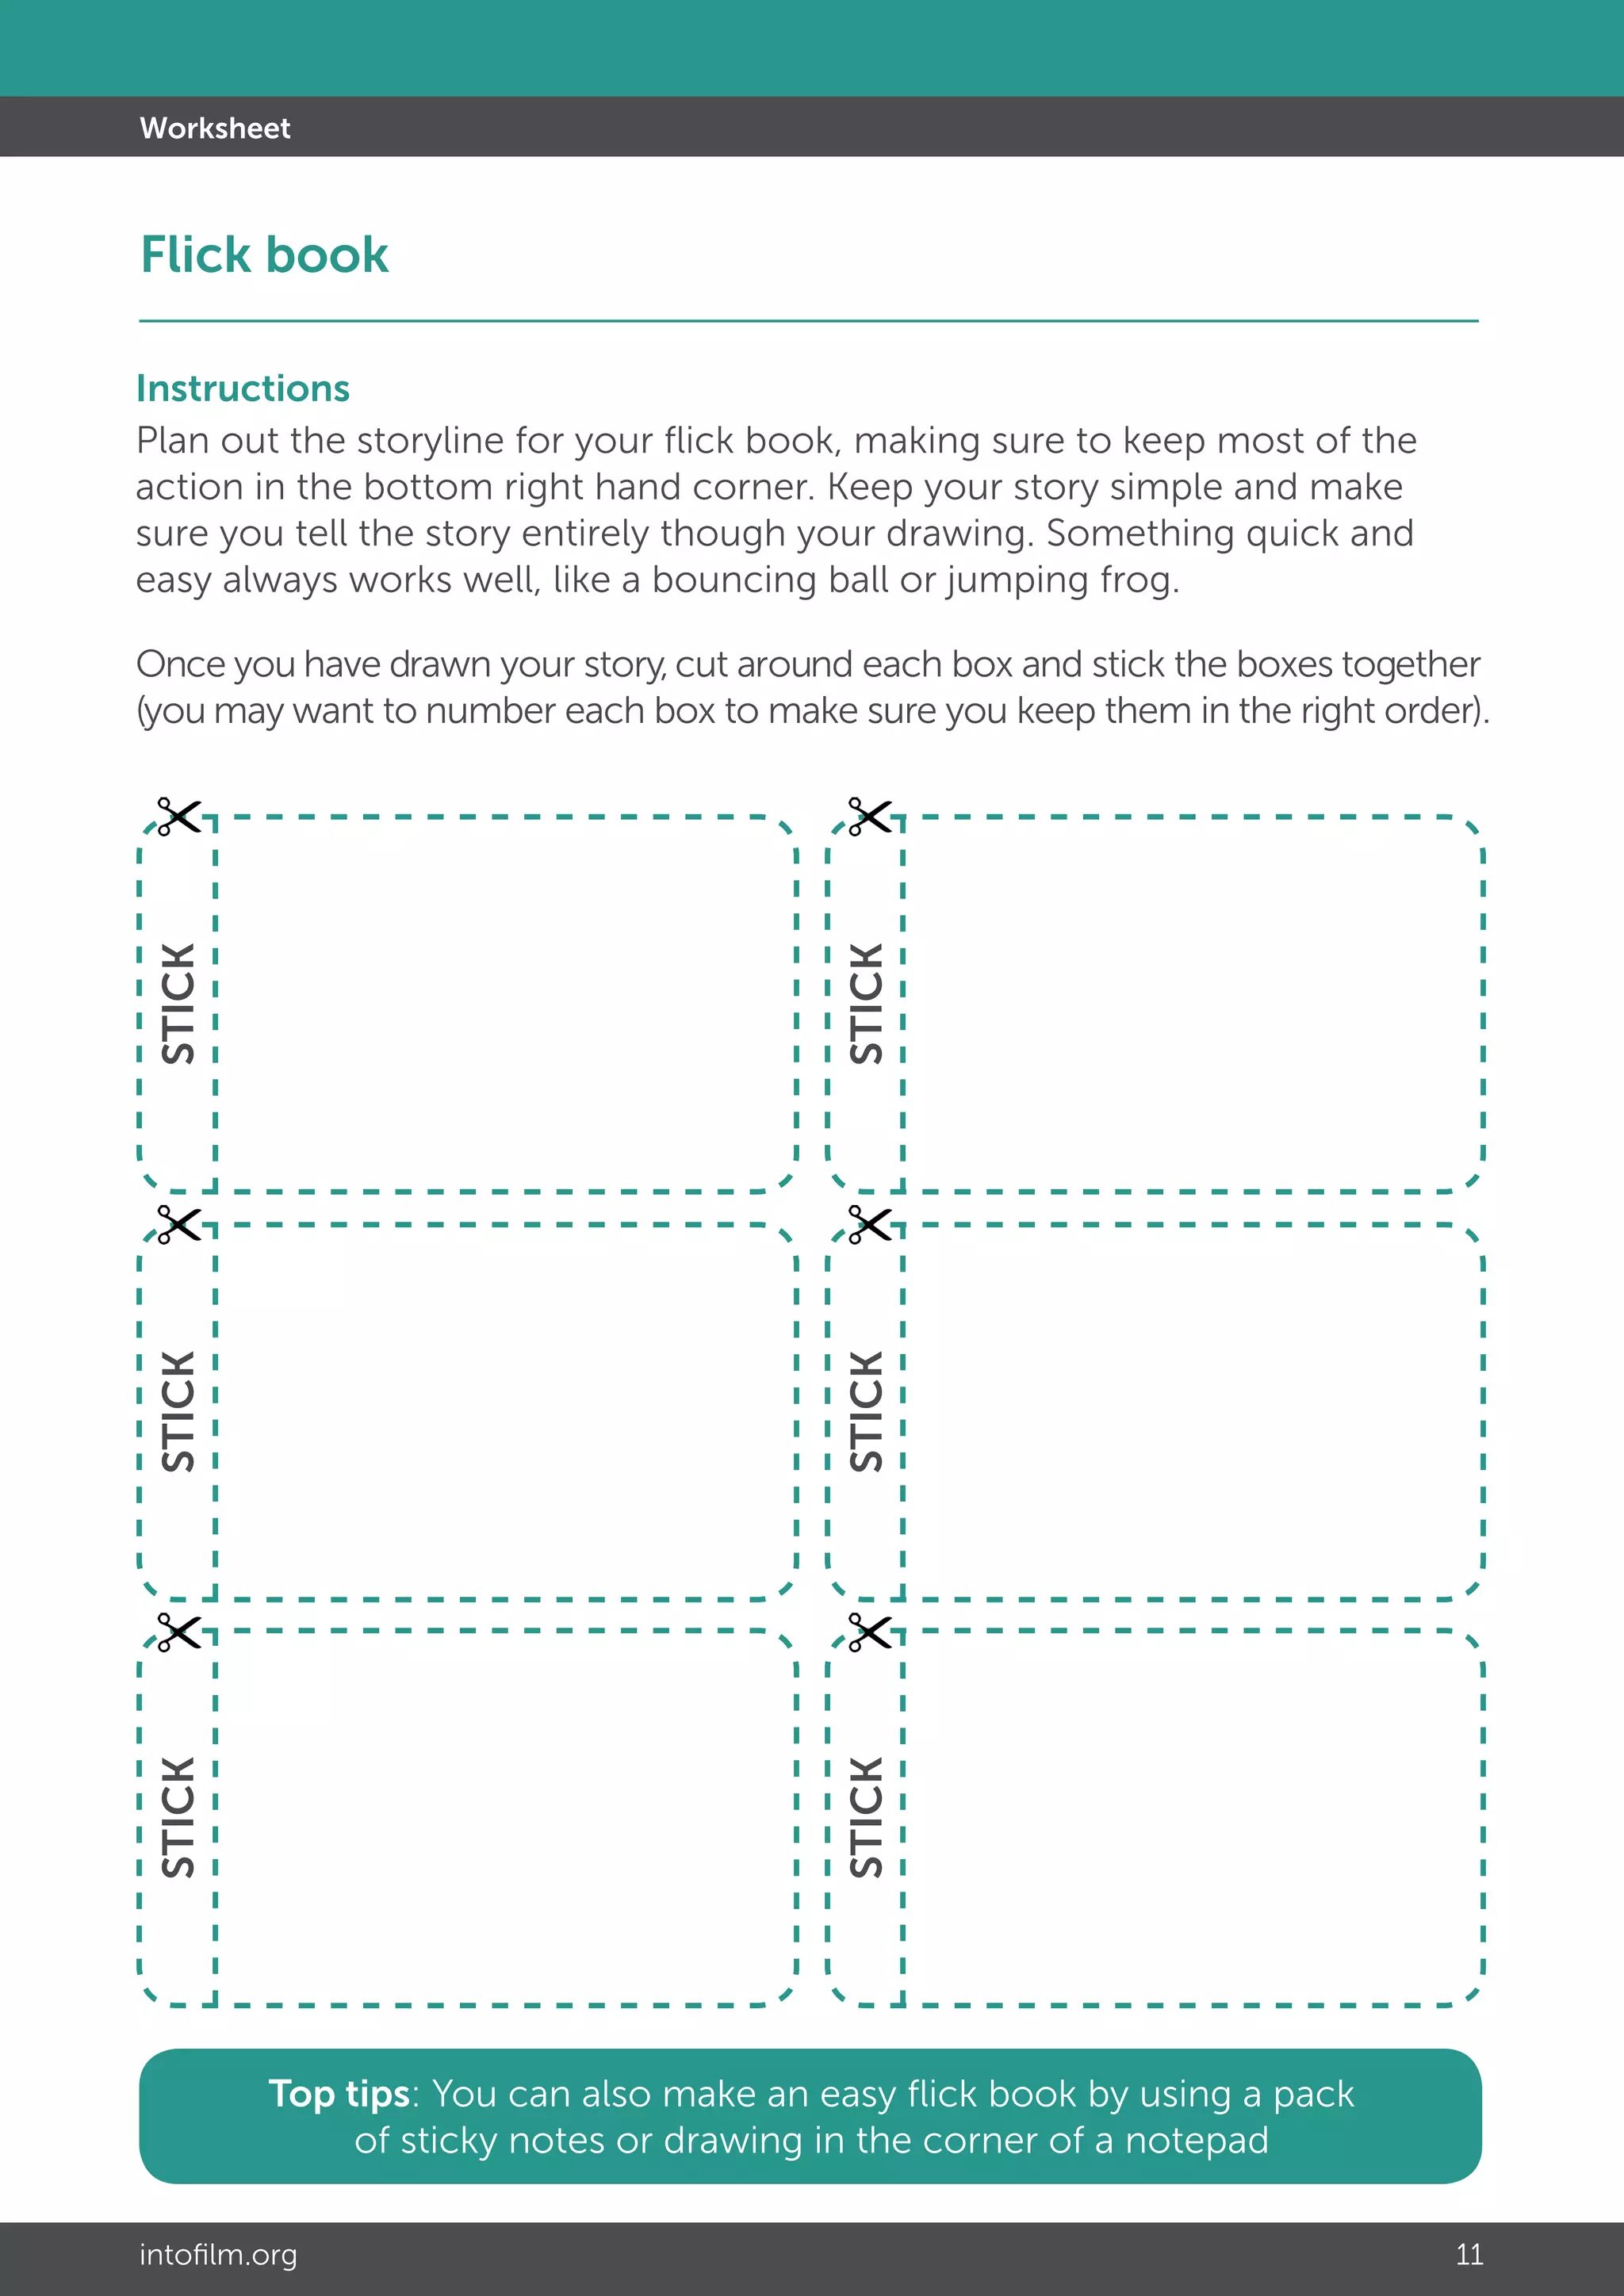
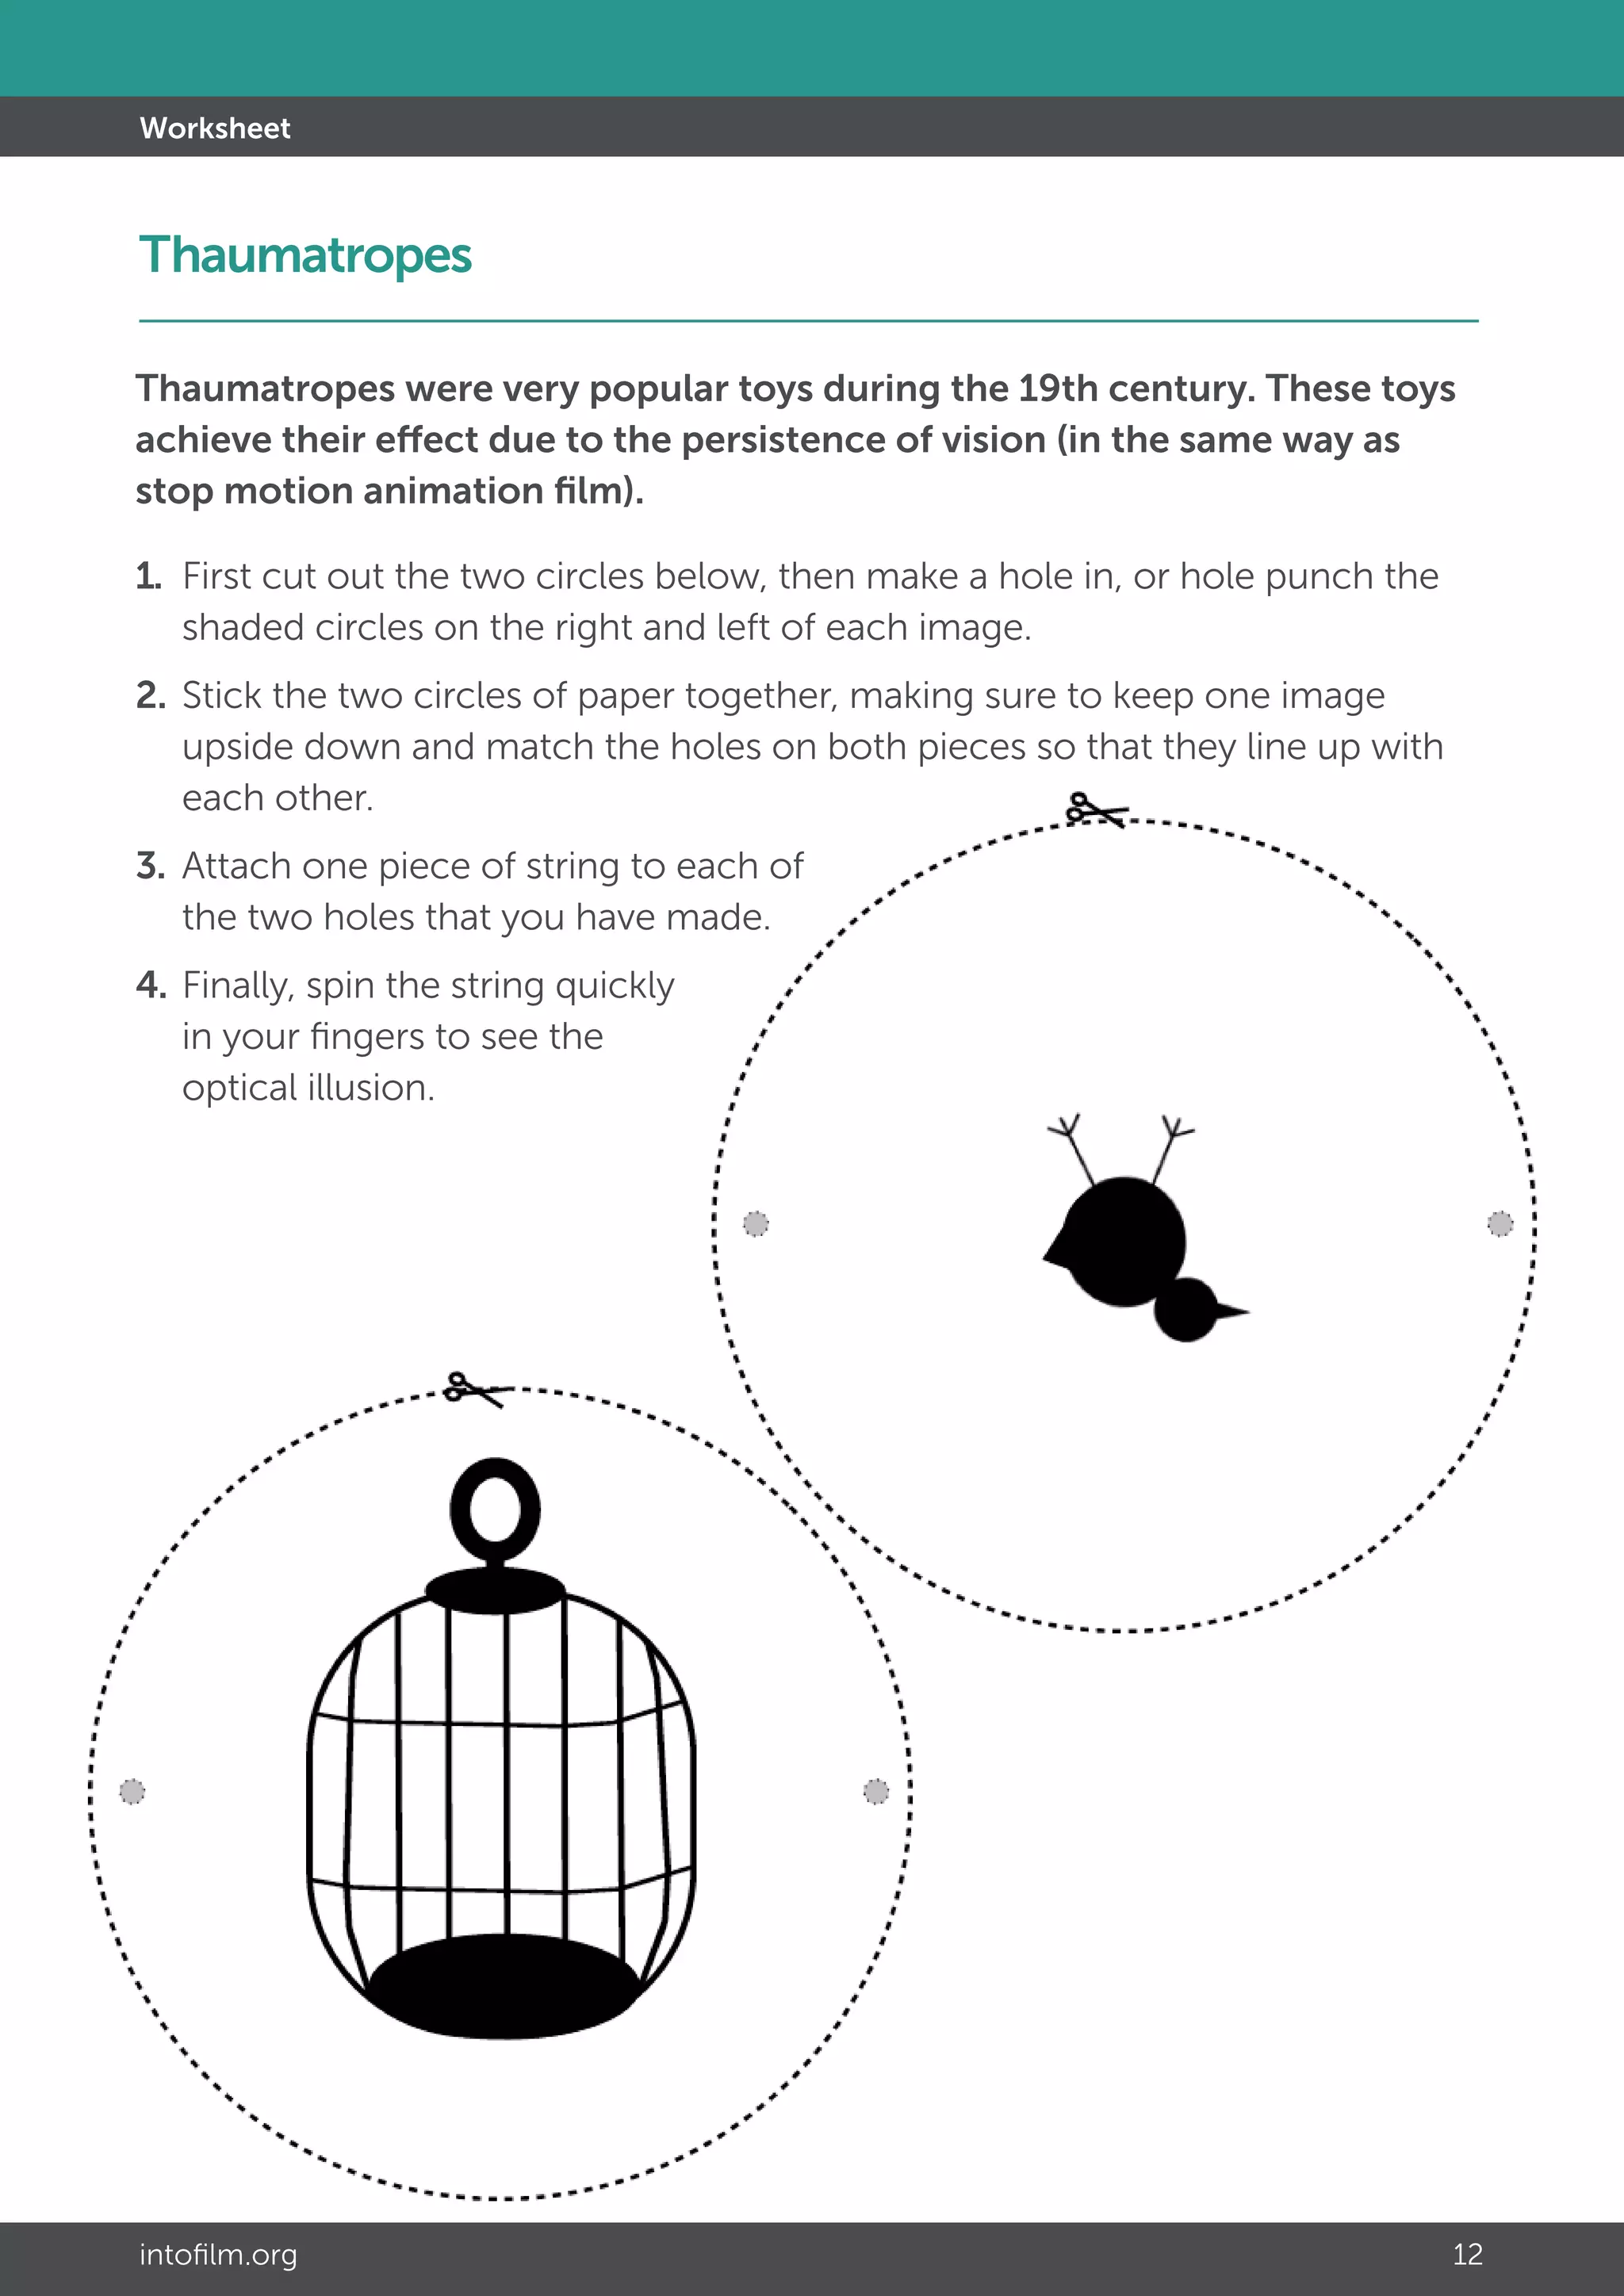
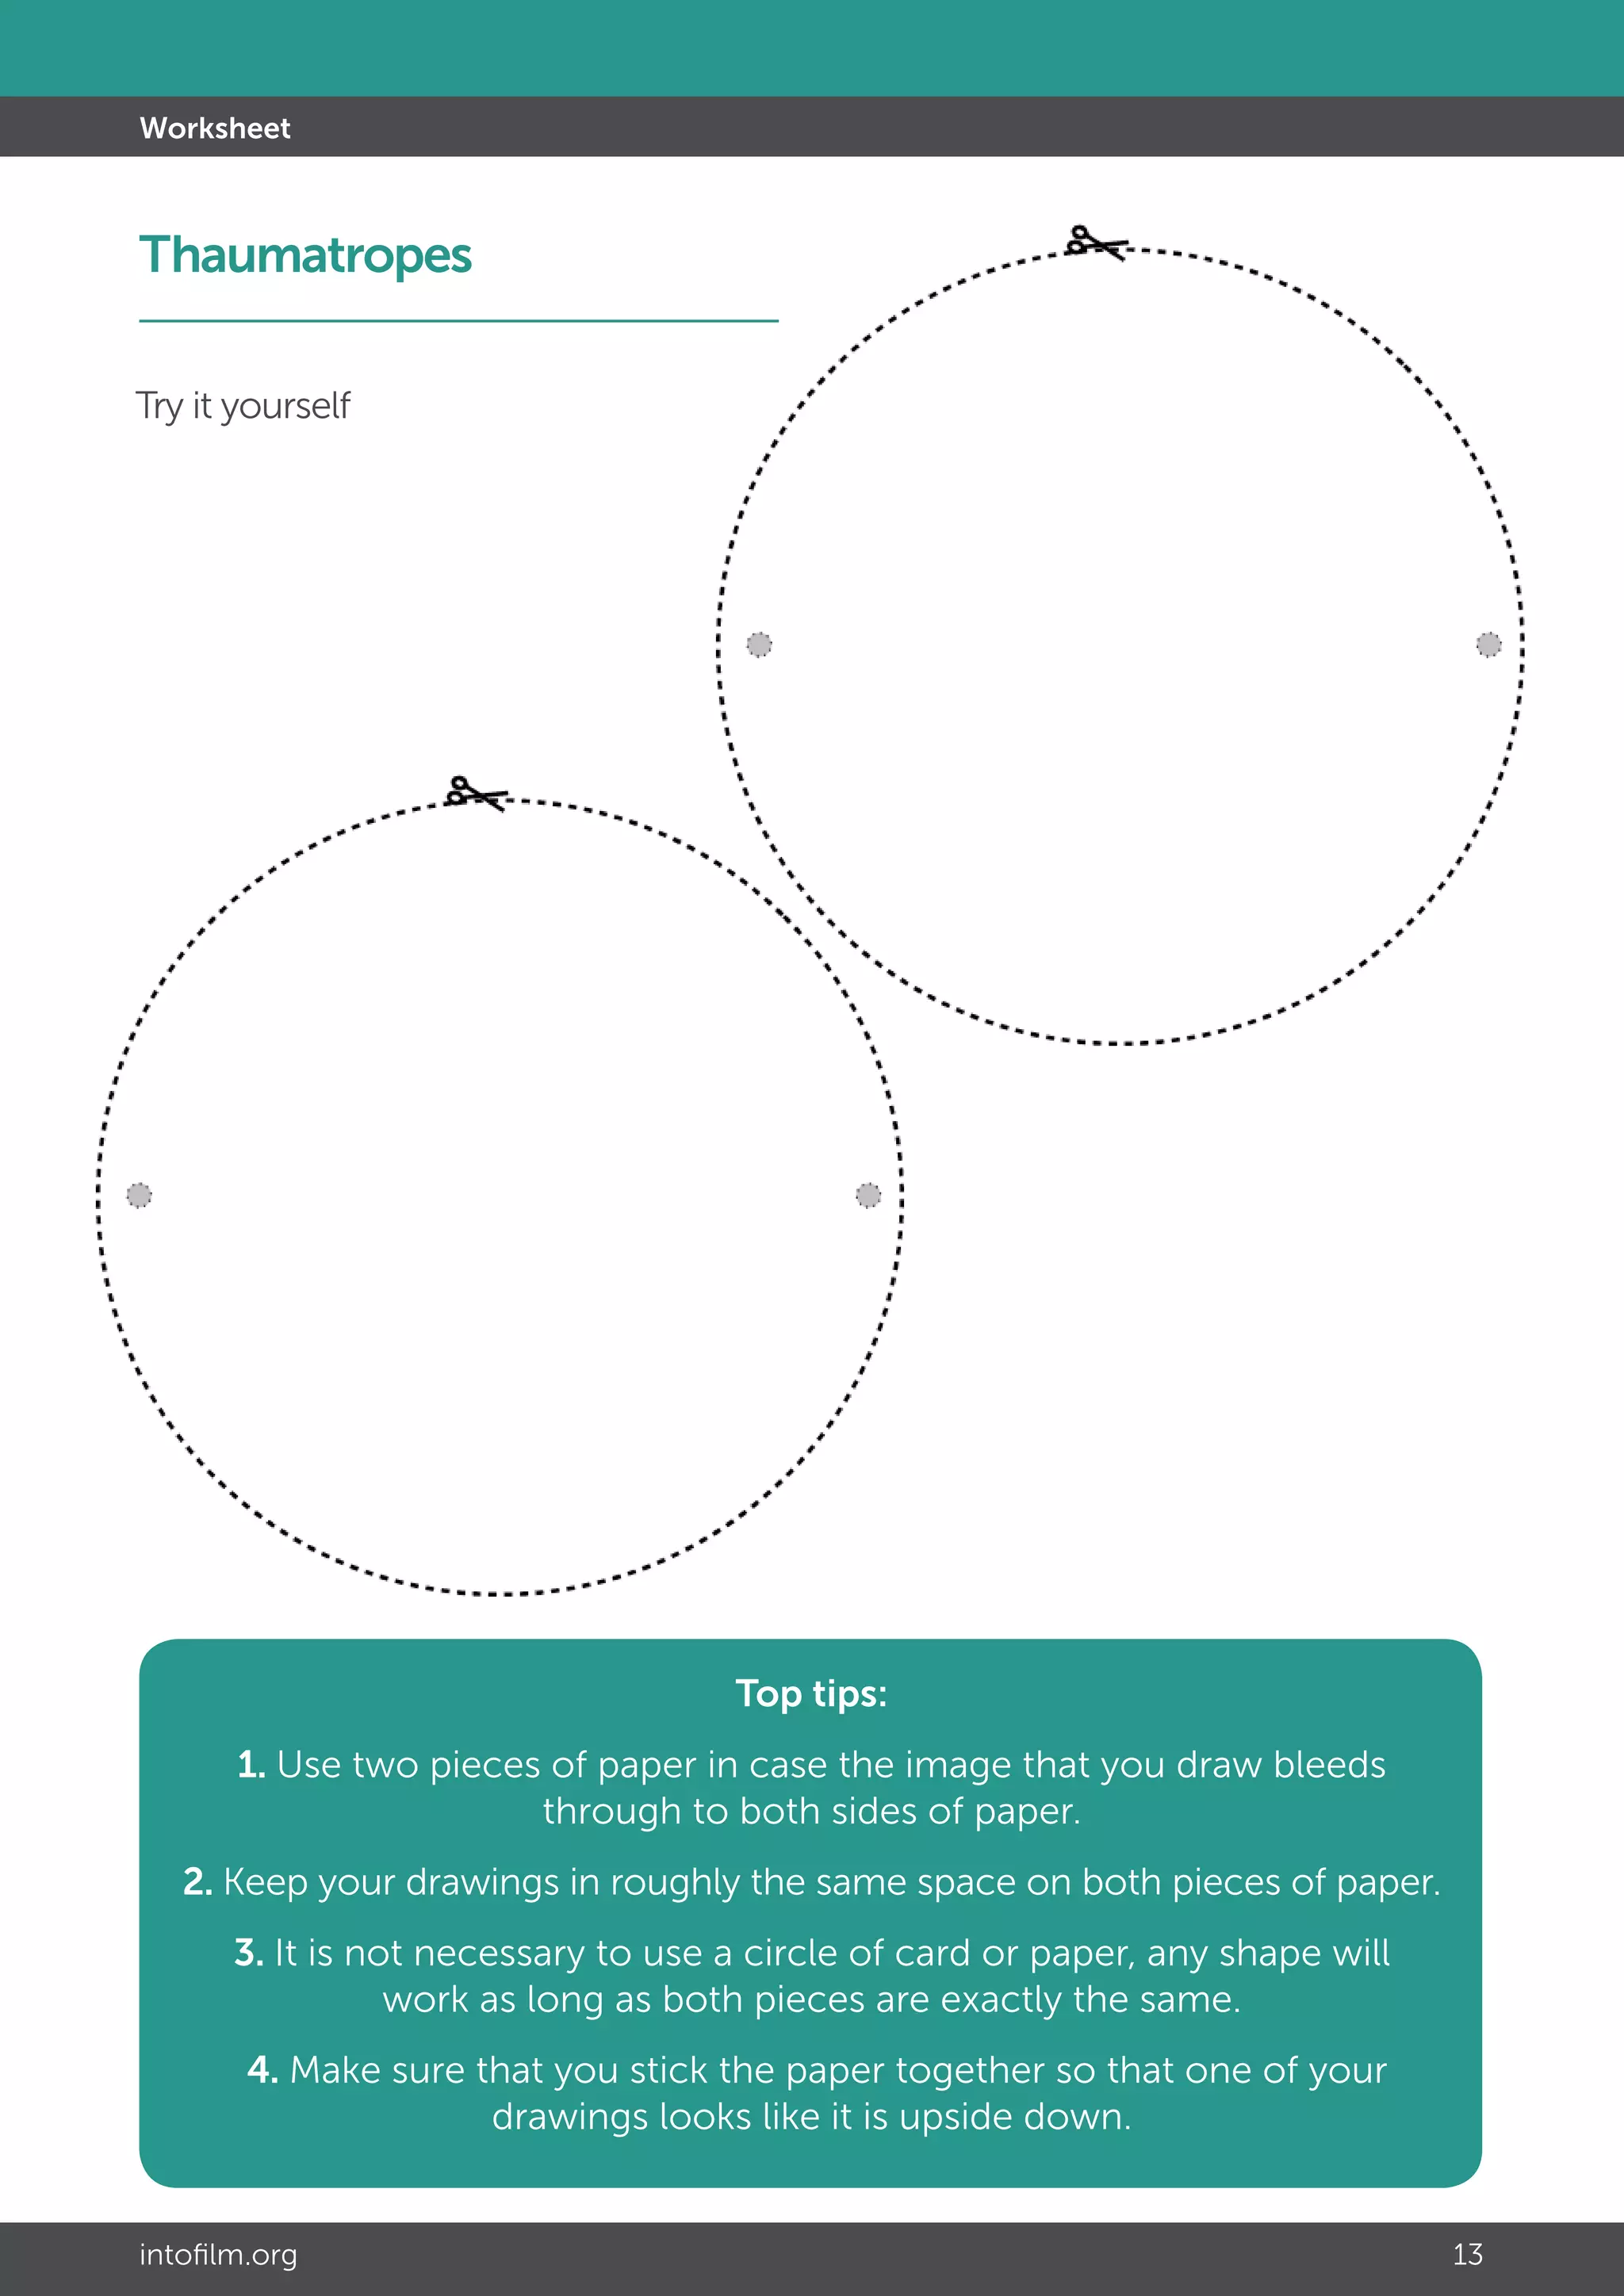
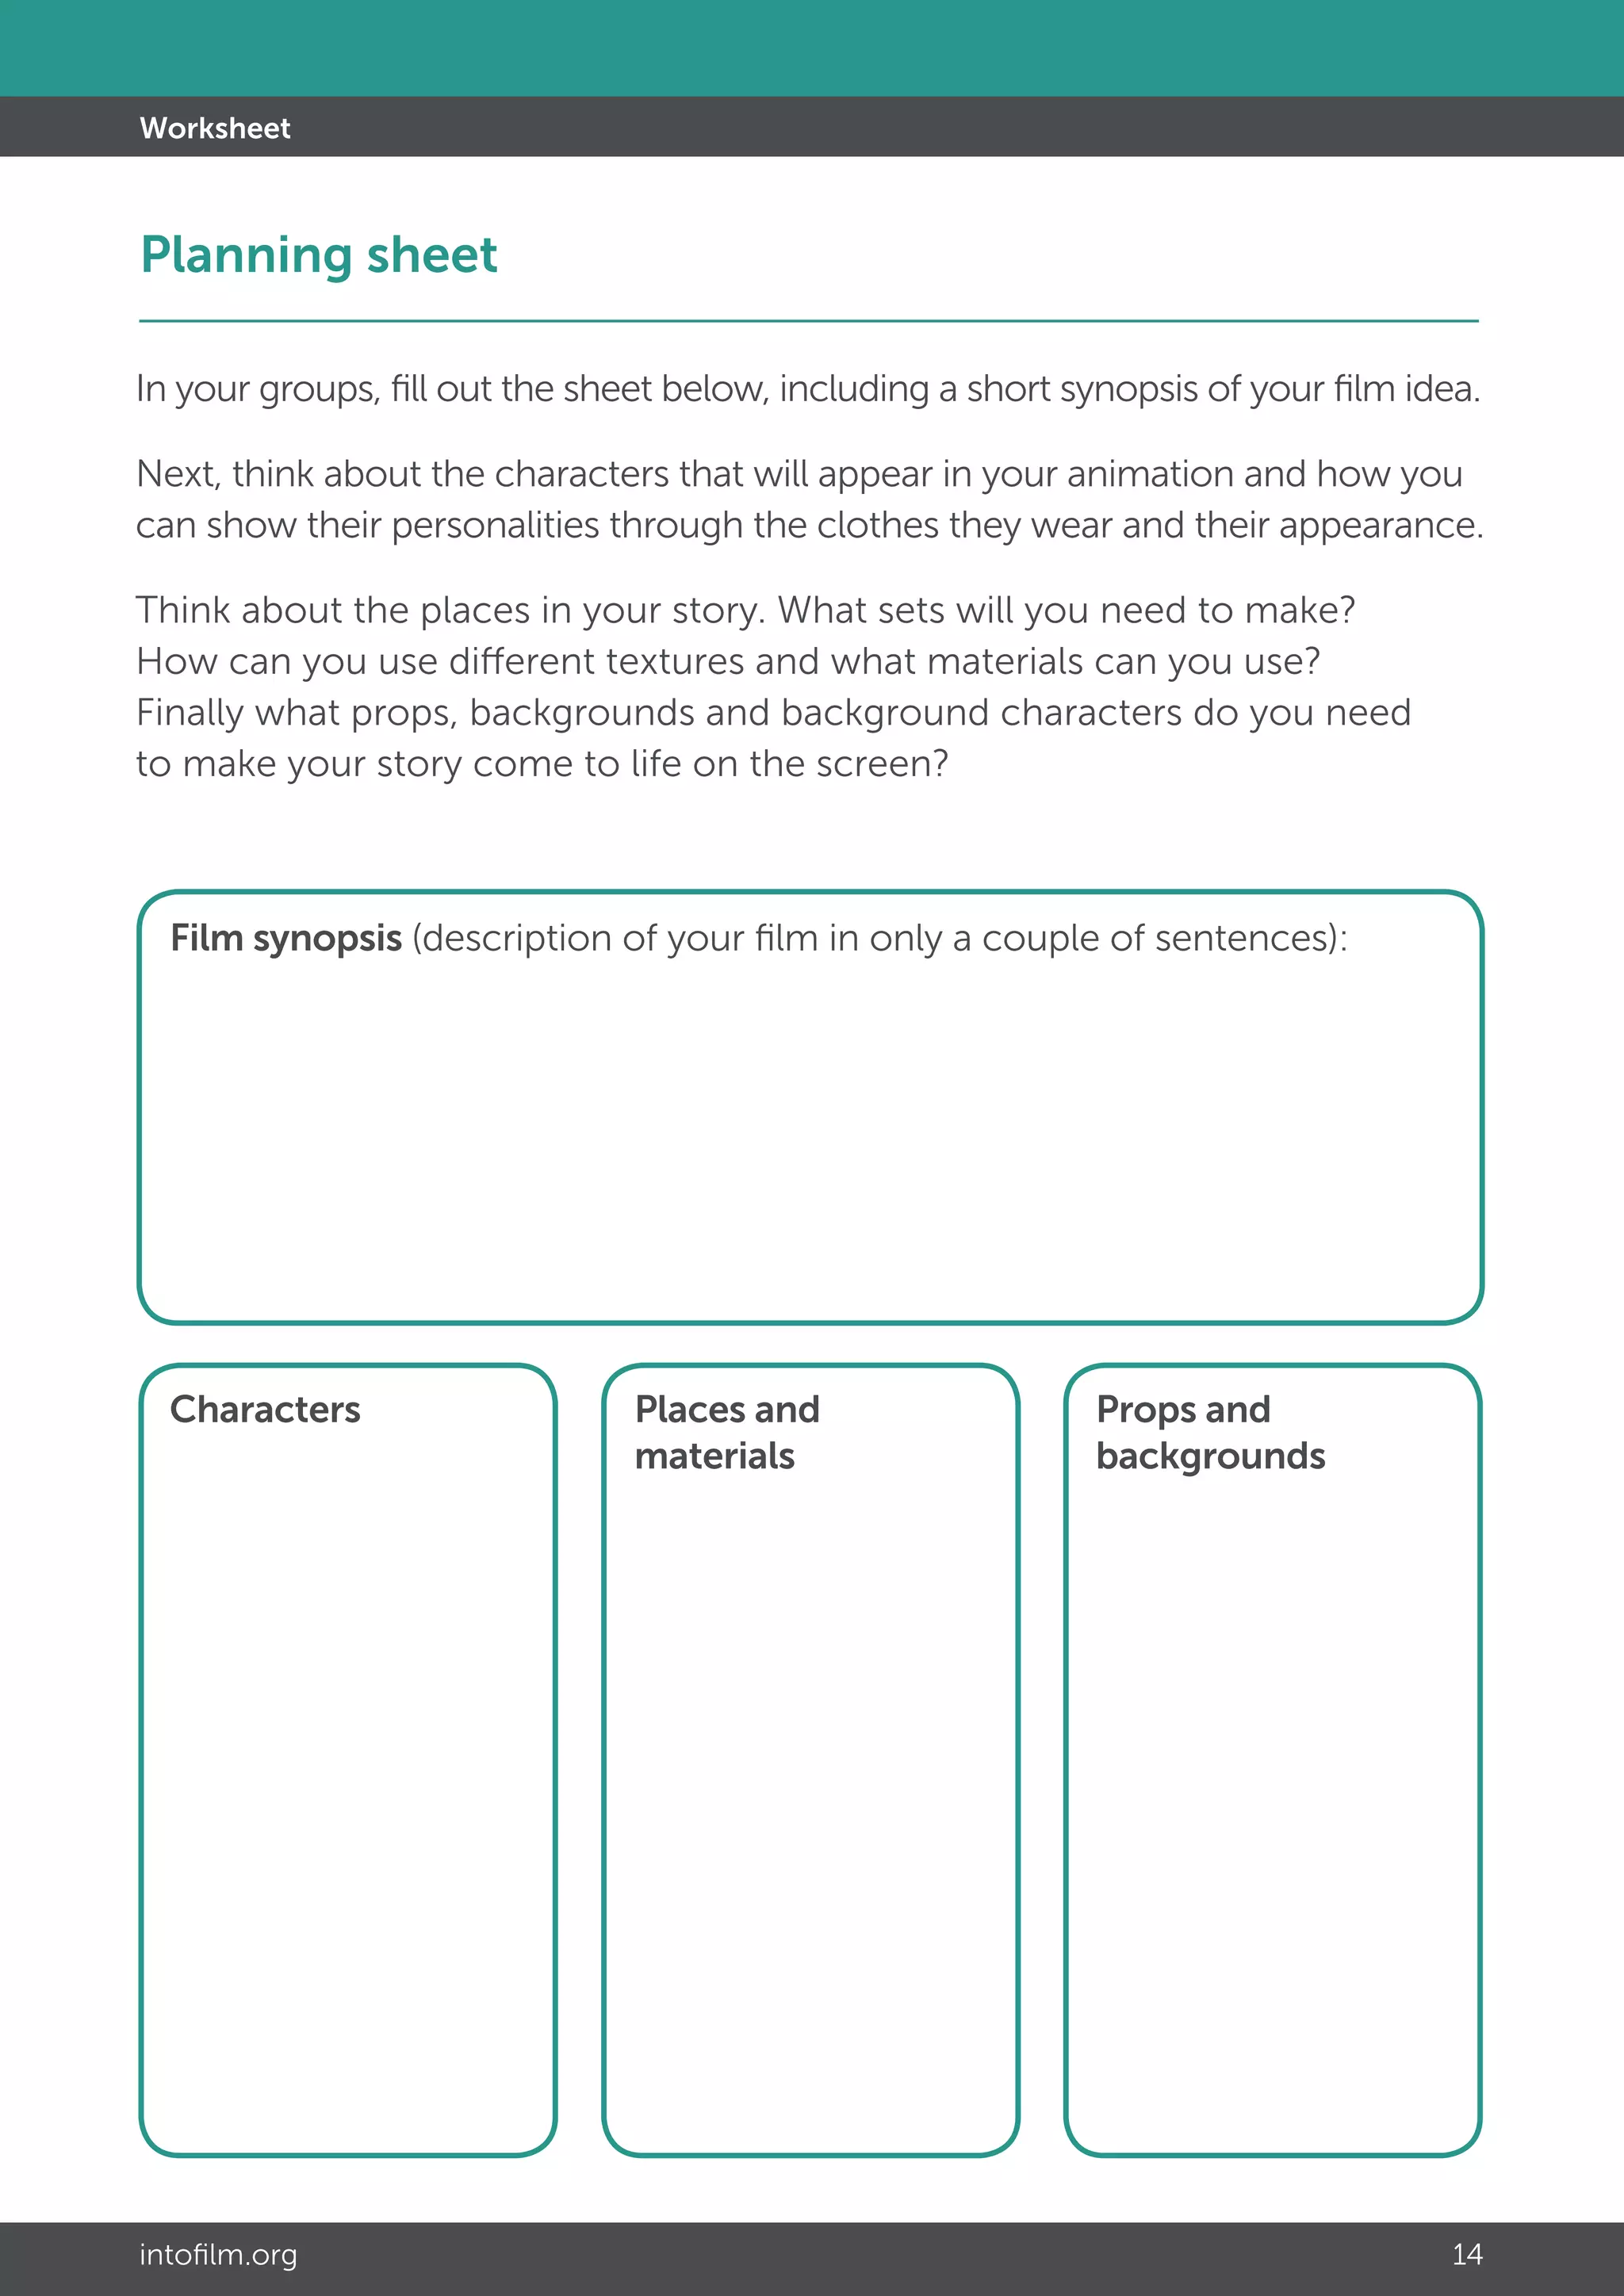
This document provides an introduction to stop motion animation. It discusses early animation techniques like thaumatropes, mutoscopes, flick books, and zoetropes that used optical illusions to create the impression of movement. It then outlines the basic steps for creating a stop motion animation, including coming up with a story, breaking it into scenes, designing characters, sets, and props, and experimenting with different materials and mediums. Examples of stop motion films are referenced throughout to illustrate different techniques.
1. Animation comes from the Latin word "anima" meaning soul, life, or spirit. It makes inanimate objects appear alive by displaying a series of images in quick sequence.
2. Pixar Animation Studios is known for computer animated films like Toy Story and Finding Nemo. Pixar perfected photorealistic rendering and was acquired by Disney in 2006.
3. Toy Story 3 was highly profitable, earning over $1 billion worldwide and becoming one of the highest grossing animated films ever made. Pixar has also won the most Academy Awards for Best Animated Feature.
Tap into the World of Comics Primary School versionS. Hendy
The document provides strategies for using comics in the classroom. It outlines several online comic creators that allow students to make their own comic strips, including ToonDoo, Read Write Think, and Myths and Legends. The comic making process offers opportunities to develop literacy, design, computer, creativity, problem solving, and storytelling skills. Comics can be used to deliver content, develop characters, explore sequencing, and teach internet safety. They engage students and help develop a variety of skills.
1. The production log details the creator's 13-week process of conceptualizing, researching, planning, designing, and creating a 5-page comic book.
2. Initial weeks focused on inspiration research and settling on a post-apocalyptic style. Later weeks involved weapon and character design, landscape illustrations, and a pitch.
3. The final weeks were spent creating planning materials and the 5-page comic, which had a shortened page count due to time constraints but achieved the desired art style.
Animated film has evolved from early techniques like frame-to-frame animation and stop motion photography. Frame-to-frame animation involved taking many photos over a few seconds to create the illusion of movement, while stop motion uses photography to make small changes between positions of objects. These early techniques aimed to bring drawings and inanimate objects to life. The document also discusses the 1964 Spanish cartoon "Telerín family" as an example of how animated films have changed over time in their shapes, colors, and purpose of announcing children's bedtimes.
Unit 4 group presentation late to the party with ant and beeChelseaPentecost
The summary is as follows:
1. Ant and Bee are late to a party in the forest and take a shortcut by flying down from their windowsill, but get blown into a drain by rain and end up lost in the sewers.
2. In the sewers, they meet Glug who agrees to help them get out. However, Ant's reckless decision causes Bee to get separated from them in the rushing sewer water.
3. Distraught, Ant and Glug emerge from the sewers alone into a dark, lifeless forest. But Bee turns up having survived, and their reunion brings the forest back to life just in time for the party.
This document discusses how the student's media product uses, develops, and challenges conventions of real horror films. The opening title sequence includes elements like: a mysterious title ("The Unseen") that hints at the plot; a run-down shed setting that lacks context; props like candles, spiders, and fake blood used in ritualistic clips; and a genre-typical montage style without dialogue. Inspiration was drawn from films like [REC] 2, House of 1000 Corpses, Arachnophobia, and Paranormal Activity regarding atmosphere, lighting, incorporation of fears/rituals. The goal was to look low-budget and "homemade" while still setting up genre expectations for the audience.
The document outlines Matthew-Burniston's initial plans for a final major project involving creating titles and posters for an original British crime drama TV series from the 1950s-1960s. Pros and cons are discussed for different concepts, including an animated title sequence exploring both 2D and 3D animation. Mood boards are presented analyzing titles and posters from other shows to help inspire the final product. An informal proposal provides more details on the planned crime drama concept, the types of products that will be created, and the intended audience. Discounted ideas involving James Bond and Doctor Who are explained.
The student was placed in a group to develop a film idea. They decided on a haunted orphanage with mysteriously disappearing children called "Orphanage," but later changed the name to "Abandoned." The group created audience profiles and discussed ideas for an opening title sequence that included burning a dollhouse and children's pictures. They plan to create an abstract, non-narrative title sequence using various shots to intrigue viewers. While their storyboard is unfinished, the group has begun collecting props and scouting filming locations.
Mise-en-scene refers to everything within the frame of a shot that can be used to enhance the audience's understanding, including costumes, makeup, setting, props, and lighting. It aims to create a realistic feeling and help viewers comprehend the emotions and roles of characters. Key elements of mise-en-scene are costumes, which convey a character's identity; makeup, which can set the time period and distinguish characters; setting, which provides context for understanding roles; and props and lighting, which further immerse the audience in the story and its themes. Together, these components allow filmmakers to interact with and express meaning to audiences visually as well as verbally.
This document provides contextual information and research for an animation project. It discusses why the creator chose animation as the medium, influences from horror films, planned scenes and characters. It also provides research on animation artists and theorists such as Ian Hubert, Chuck Jones, Hayao Miyazaki, and Paul Wells. Key points of animation theory are summarized, such as principles of movement, realism, narrative vs. experimental forms, the role of dialogue vs. music, and unity of style vs. multiple styles.
This document provides contextual information and research for an animation project. It discusses why the creator chose animation as the medium, influences from horror films, planned scenes and characters. It also provides research on animation artists and theorists such as Ian Hubert, Chuck Jones, Hayao Miyazaki, and Paul Wells. Key points of animation theory are summarized, such as principles of movement, realism, narrative vs. experimental forms, the role of sound, and using mixed styles.
The document discusses several key elements that are commonly found in horror films, including settings, narrative structures, character archetypes, and technical elements. Typical horror film settings include run-down houses, ghost towns, and dark alleyways. The narratives often feature heroic protagonists trying to stop threats and leave room for sequels. Character types include final girls, sex appeal victims, irritating characters, and unlikely heroes. Technical elements that build suspense include camera angles, sound design, editing, and lighting. Common themes in horror include good vs evil, the supernatural, madness, and revenge.
In his workshop, an artisan creature meticulously prepares his magnum opus against the sands of time. Absorbed in his sparkling artistic work, the motivated maker chooses components for his project. Soon, proud of his life's work, the indefatigable creator will finish his creation.
- The target audience is mainly young people aged 16-19, with a roughly even split between male and female viewers.
- Most of the audience prefers an animation length of 2-5 minutes.
- Viewers want the whole animation to be of good quality rather than just parts of it.
- There was a variety of preferences for character materials, but felt dolls may not be the most popular choice.
- The majority of viewers expressed interest in a "how it was made" video accompanying the animation.
- The gender of the lead characters does not seem to matter to most of the audience.
The document discusses how the opening sequence of the film "Crazy Love" uses and develops conventions of romantic comedy (rom-com) films. It establishes characters and contexts through a "boy meets girl" narrative where the protagonist is seen carrying flowers, seemingly for a date. Shots focus on couples to show the character noticing them. The titles are in a clear, white font moving across the screen in an enthusiastic way to set the lighthearted tone. Continuity editing uses matching shots from different angles, and the soundtrack provides a cheerful song without dialogue. The sequence aims to be conventional for the rom-com genre through its visuals and audio.
The document discusses several key elements that are commonly used in horror and thriller films to set the atmosphere and engage audiences, including iconic settings, character archetypes, visual styles, audio techniques, and common themes. Settings such as run-down houses or isolated places help set the mood, while character tropes include protagonists, victims, and antagonists. Elements like dark colors, lighting, weapons and masks are frequently used for visuals, and diegetic and non-diegetic sounds build suspense. Common themes revolve around good vs. evil, the supernatural, madness, and revenge.
This document provides photography tips in different categories such as photography, portraiture, gear, organization, and general tips. Some key tips include shooting early and late to get good lighting, shooting with a friend to get feedback, establishing a connection with portrait subjects, choosing backgrounds that provide contrast for portraits, packing backup gear like extra batteries and memory cards, and dressing in layers for changing weather conditions during photo shoots. The tips aim to improve photographers' skills, maximize photo opportunities, and prepare photographers for successful photo sessions.
The interviews and research analyzed common features that attract audiences to film marketing. Both interviewees said that posters and trailers providing character and plot information increased interest. One noted bold, colorful advertising standing out. Research showed audiences build relationships with films through familiar characters and actors. Effective marketing leaves some mystery while giving audiences a sense of the film. To appeal to this audience, the assistant will create colorful posters introducing characters to generate interest in the film's mystery.
The documents provide information about clay animation techniques. Clay animation, also known as claymation, involves using malleable clay or plasticine to create characters and scenes. Each frame is created by slightly adjusting the positions of the clay figures and taking a photograph. When the frames are played rapidly in sequence, it creates the illusion of smooth motion. The documents discuss the types of clay to use, building armatures, techniques for shooting frames, lighting, backgrounds, and the history of notable clay animators such as Art Clokey, Will Vinton, and Nick Park.
This document provides information about a digital storybooks and clay animation workshop occurring on October 30th, 2009. It outlines the agenda, describes what claymation is, explains why doing an animation project is beneficial for students, and provides detailed steps for creating a clay animation, including designing characters and backgrounds, taking photos, and editing the project into an animation. Students are assigned to groups by subject area and instructed to create a claymation storyboard and short movie demonstrating a concept from their given subject.
Teaching with Contrived and Dramatized ExperiencesAladin Awa
Contrived experiences are edited copies of reality used as substitutes for real things in the classroom. They are designed to simulate real-life situations. Examples include models, mock-ups, specimens, simulations, and games. Dramatized experiences range from plays and pageants to tableaus, pantomimes, puppets, and role-playing. They are used to vividly portray ideas about life. There are five types of puppets: hand puppets, shadow puppets, finger-glove puppets, marionettes, and rod puppets. Role-playing involves students spontaneously acting out assigned roles in described situations. Both contrived and dramatized experiences motivate students and help them learn.
This document provides instructions for making different types of puppets out of various materials for educational purposes. It includes directions for making finger puppets out of cardboard, hand puppets from paper bags, sock puppets from old socks, and stick puppets from popsicle sticks. The puppets are to be decorated and used to retell stories, myths and legends in mini puppet shows. Emphasis is placed on using recycled materials and working collaboratively in groups.
The document provides ideas for using photos to enhance literacy skills and student achievement. It discusses the importance of visual literacy and gives examples of how to analyze photos using questioning techniques. A variety of digital tools and activities are presented that use photos to develop literacy, such as sequencing photos, storytelling, and questioning activities.
This document provides an introduction and overview for students taking an AS level film studies course. It outlines some of the key concepts and approaches that will be covered over the course of the year, including examining films from different eras and movements, investigating reasons for changes in film over time, and analyzing films from both entertainment and sociopolitical perspectives. It encourages students to engage with films on an academic level by learning fundamental techniques for reading and analyzing films, such as considering elements of mise-en-scène, camerawork, and how films use codes and signals to communicate with audiences. Several film excerpts are referenced as examples to illustrate these concepts.
This document provides an induction booklet for students taking an AS level in Film Studies. It introduces some key concepts that will be covered in the course, including reading films through their use of film language, codes and signals. It explains some fundamental techniques used in film like camera shots and movements, mise-en-scene, lighting, sound, and editing. Several film extracts are referenced as examples to analyze how these techniques are used to convey meaning and achieve effects. The booklet aims to prepare students to study films in an academic manner by familiarizing them with analytical approaches to reading and interpreting film texts.
The document provides research on target audiences and existing products for animated short films about romance. It analyzes target audiences such as ages 16-30 who enjoy romance genres across genders. It also summarizes several existing successful animated short films such as "Here's the Plan", "Kitbull", and "Dug Days" that focus on themes of love, friendship and emotional bonding between characters. Key aspects that may be included from the research are the exploration of love and relationships.
The document provides research on creating effective film trailers, posters, and magazines. It discusses several theories for trailers, including following genre conventions, using mystery, and disrupting equilibrium. For posters, it recommends striking images, style matching the film, and lasting appeal. Magazine tips include compelling covers, benefits for readers, and sparking curiosity without clutter.
The document provides tips for staging Sims photos for sequential storytelling, including maintaining a consistent fourth wall by keeping characters on the same side of the screen between shots, using close-ups for intimacy over full-body shots, and re-establishing the scene after large camera angle changes to avoid disorienting the viewer. It also discusses techniques like following the rule of thirds for composition, using silhouettes and contrast to guide the eye, and having characters' eye lines follow the subject of conversation.
1. The document provides instructions for a series of art lessons focusing on self-portraits, portraits using grids, and combining photos of oneself with animal images.
2. Artists mentioned include Chuck Close, who uses a grid method for portraits, and Cindy Sherman, who creates self-portraits using disguises.
3. Students are directed to take photos of themselves, combine them with animal photos to create hybrid images, and use those hybrids to create painted self-portraits using grids and tonal layers.
The document contains evaluations from a student of various digital graphic narrative exercises they completed. For a house image using basic shapes, the student liked the simplistic style but would improve centering the roof. For an image of a bear using mirroring shapes, the student liked the minimalist style but would draw the eyes. For an image made of layered shapes, the student liked the detail and perspective but would make the shapes more precise.
Claymation Instructions for the ClassroomSandra Hines
The document provides instructions for creating a claymation animation project. It outlines the 7 key steps: 1) developing a story concept, 2) creating a storyboard, 3) designing a background, 4) designing characters, 5) taking photos, 6) importing photos into animation software to add effects, and 7) sharing the finished animation. Tips are provided for each step, such as using simple storyboards for younger students and ensuring characters are the proper size. Examples of both good and bad characters and backgrounds are displayed.
Stop Motion Animation Education Presentation in Grey White Collage Photograph...CarlaMaeMaozo
Stop motion animation is a filmmaking technique that makes objects appear to move by taking multiple sequential photographs of small incremental changes to the objects' position between each photo. The animator moves the objects slightly between photos which are then compiled together in a video to create the illusion of movement as the objects change position from frame to frame. Common objects used in stop motion include clay, paper, and found objects.
The document provides information on creating a trailer, film posters, and magazines for a horror film project. It discusses several theories for an effective trailer, including following genre conventions, creating mystery through an "enigma code", and using a non-linear narrative structure. For the poster, it recommends including attention-grabbing images, icons, and appeal to fans and non-fans. For the magazine, it suggests using a striking cover photo, limited fonts, and offering exclusive content to entice readers.
The document provides details for semester 2 sketchbook assignments for students. It outlines that students must complete 5 assignments by March 1st for quarter 3 and 5 different assignments by May 10th for quarter 4. It then describes 10 specific sketchbook assignment options for students to choose from that involve drawing sounds, shading techniques, landscapes, characters, and more. The assignments are meant to help students look more closely at subjects, use their imagination, and explore ideas and techniques.
This document outlines steps for a school project where students will create alien sculptures using found materials. They will first learn about the artist Yinka Shonibare and how he represents cultural identity. Students will then design their alien, create a model, and build an armature before fully constructing their sculpture. The document provides guidance on construction techniques and safety. It also introduces the artist Dilomprizulike as additional inspiration for representing cultural issues.
Students will create their own comic strips by writing stories and speech bubbles on templates provided. They will practice writing skills and storytelling as they draw pictures to illustrate short narratives about aliens, scientists, and hatchlings. Key steps include brainstorming stories, using speech and thought bubbles to tell the stories, and presenting the comic strips to the class.
The document provides three potential ideas for an adventure story or game. Idea 1 involves a man who travels to the future and discovers the world has ended. Idea 2 is about a Viking mercenary in 920 AD who realizes he wants a better life than just fighting for money. Idea 3 centers around a simulation where people compete for money, with the person behind the simulation doing it for fun. Research on existing adventure games like The Legend of Zelda: The Minish Cap and Super Mario Bros is also presented, focusing on gameplay elements and graphics that could inform the ideas.
Similar to Introduction to-stop-motion-animation-resource-intofilm (20)
Heart Touching Romantic Love Shayari In English with ImagesShort Good Quotes
Explore our beautiful collection of Romantic Love Shayari in English to express your love. These heartfelt shayaris are perfect for sharing with your loved one. Get the best words to show your love and care.
This tutorial offers a step-by-step guide on how to effectively use Pinterest. It covers the basics such as account creation and navigation, as well as advanced techniques including creating eye-catching pins and optimizing your profile. The tutorial also explores collaboration and networking on the platform. With visual illustrations and clear instructions, this tutorial will equip you with the skills to navigate Pinterest confidently and achieve your goals.
Fashionista Chic Couture Maze & Coloring Adventures is a coloring and activity book filled with many maze games and coloring activities designed to delight and engage young fashion enthusiasts. Each page offers a unique blend of fashion-themed mazes and stylish illustrations to color, inspiring creativity and problem-solving skills in children.
This document announces the winners of the 2024 Youth Poster Contest organized by MATFORCE. It lists the grand prize and age category winners for grades K-6, 7-12, and individual age groups from 5 years old to 18 years old.
1. An Introduction to
Stop Motion Animation
Our resources are designed to be used with selected film
titles, which are available free for clubs at www.intofilm.org
See, think, make.
Imagine
intofilm.org
Into Film is a trading name of Film Nation UK. Registered Charity number 1154030.
2. An Introduction to Stop Motion Animation
intofilm.org 2
Our resources are designed to be used with selected film titles, which are available free for clubs at www.intofilm.org
Activity pack
Early animation
How it works
Animation creates the impression of movement through an optical illusion referred to as the “Persistence of Vision.”
The eye retains an image for a split second after it has actually been shown. Animation works by presenting slightly
different images in quick succession, with the persistence of vision filling in the gap between each image and allowing
for the illusion of motion.
In the 19th century, this phenomenon was made use of in many children’s toys that some students may still be
familiar with.
Thaumatropes
Popularised by John A. Paris in 1824, thaumatropes work by presenting two separate images on the front and back of a
piece of card with string attached to each side. When the card is spun quickly using the string the two images are shown
in quick succession, giving the illusion of one image. Use the Thaumatrope worksheets on pages 11 to 12 to help the
class to understand how thaumatropes work and have a go at making their own.
Mutoscopes
Mutoscopes were manufactured between 1895 and 1909. To achieve the illusion of movement, a series of slightly
altered images were mounted onto a circular core (a bit like a filofax) and then turned quickly using a handle or crank.
Mutoscopes were coin operated, the viewer would put in their money and then turn a crank to see the animation.
Flick books
Flick books were invented in the latter half of the 19th century and it is thought that the first flick book was created by
John Barnes Linnett in 1868. Flick books use the persistence of vision in a similar way to mutoscopes to fool the eye into
perceiving motion. Flick books are essentially a collection of slightly altered images bound at one end to allow the user
to flick through the images by hand, viewing the images in quick succession and creating the illusion of movement.
Use the Flick book template on page 10 to help the class create their own flick books.
Zoetropes
Zoetropes were also invented in the 19th century and use the persistence of vision to fool
the eye into perceiving motion. A zoetrope is a cylindrical drum with slits cut into the sides.
On the inside of the drum are a series of slightly different images so when the drum is rotated
the viewer looks through the slits to see the animated movement. The invention of the
zoetrope is credited to William George Horner in 1884, although a variety of zoetropes that
use a similar principle are thought to have been created in China at around 100 BC.
3. intofilm.org 3
Our resources are designed to be used with selected film titles, which are available free for clubs at www.intofilm.org
Story
Before you start any animation, you will need to come up with a story that you want to bring to life. This could be as
simple as a character or two coming into the frame and doing something visual, like jumping in the air, or simply two
characters having a conversation.
Keep it simple
The more characters you have, the more time it takes to create your animation and the more complicated the story
becomes, so use no more than four characters to begin with. Remember, you also have to make sets and backgrounds
for each scene in the film, so it is good to limit your story to four different scenes maximum if you only have a short
amount of time. Give students clear guidelines and set tight limits on what the film needs to include. By limiting them to
four characters and four scenes, you are also asking them to think about how they can convey the story concisely and
in a visual way.
Keep it familiar
Animations can take a long time to make (just like anything worth doing), so it is important that the class do not spend
all day deciding on the storyline. You could base the animation on something simple that the class have been studying
recently, or take your inspiration from a film they have recently seen. By giving the class a starting point such as lyrics
from a song, a topic, a prop to include or a suggested title you can reign them in and focus the story, while still asking
them to think creatively about their film and visual storytelling.
Split it into scenes
Once you have your basic narrative in place you, will need to break it up into different scenes. This helps the class
to start visualising their film and gives you an opportunity to start listing the set, props and background models to be
made for each scene. If you are making an animation with the whole class you might want to split them into groups
with each one being responsible for a different element of model making. For example, one group could design the
main characters while another group could make the buildings needed and a third group could craft the props, trees or
outside spaces.
Pitch it
A great way of allowing the class to decide democratically on what their film is going to be about is to ask them to pitch
their ideas to each other and then to vote on the best film idea. If you are making an animation with the whole class
then divide them into groups and ask each group to present their best idea. Students generally respond well to this,
and it is great practice for pitching their film ideas in the future.
4. intofilm.org 4
Our resources are designed to be used with selected film titles, which are available free for clubs at www.intofilm.org
Characters, sets and props
The star of your animation could be anything from models made out of clay/dough and paper cut-outs, to toys, food
and cutlery or real people. All you need to do is adjust their position between frames to create the illusion that they are
moving. Explain to the students how they are going to be filming their models so they can try to visualise the best way
to make them. If you are going to be filming with the camera resting on the table, then the characters will need to be
able to stand up unaided or be stuck against a wall. If you film using a tripod with the camera pointed downwards, then
the characters will need to be flat onto the surface. Also, it is a good idea to decide on a scale for your animation early on.
You can make your models as large or small as you like, but characters, props and backgrounds need to be to the same
scale. It is a good idea to show the students the area you will be animating in first, they can then decide on the scale of
their models.
Modelling clay
A quick tip for creating modelling clay characters is to keep them strong and simple – you do not want pieces falling off
as you are adjusting their limbs. Younger students may try to shape their characters flat onto the table - this is fine for
light weight paper cut-outs but will make clay characters too flimsy. Start them off with blocks or round balls rather than
thin strips and encourage them to build models with a flat round base. Thin legs can be a weak area that might see your
characters topple over.
Example film: Binn Bunny Goes Green http://bit.ly/BinnBunny
Paper cut-outs
You could also create characters out of paper or card. Paper figures might be easily broken by the time the whole class
has animated with them, so try to use thin card or reinforce coloured paper with card. Ask the students to draw their
characters with long arms and legs, these can then be cut out and reattached at the joints with adhesive putty or split
pins ready to animate. Remember when using adhesive putty; less is more, you don’t want to be able to see the putty
past joints as you move your character, so be quite strict with the amount you give out. Unlike claymation, anything
you make using paper cut-outs will be in 2D. If you have time, you could make profile and front-on versions of the
main characters and models to add depth to your animation. A good cheat is to put detail on both sides of your model,
so that one model can be used for the front and back of a character. To give the illusion that a character is turning to the
side, simply swap your front-facing character for the side profile.
Example film: Can You Teach a Worm to Tango http://bit.ly/WormTango
5. intofilm.org 5
Our resources are designed to be used with selected film titles, which are available free for clubs at www.intofilm.org
Activity pack An Introduction to Stop Motion Animation
Silhouettes
Using a lightbox can create a very dramatic and filmic aesthetic for your animation. Lightboxes can be bought cheaply
but it may be worth checking with the school art department as they may already have one or two. For a bold and
eerie animation, use black card to create silhouetted characters, backgrounds and sets. Any details, character features
and definition should be cut out so that the light can shine through the card. Cut out windows and cut around doors
(leaving the hinge attached) and have your characters move through houses by moving them behind the card. Coloured
acetate and thin tissue paper can also be used to add a little colour to your animation.
Example film: Ominous Shadows http://bit.ly/1r94a2i
Mixed media
Ask the students to be creative and experiment with different mediums, colours and textures. Newspaper, corrugated
cardboard, reflective paper, sandpaper and tissue paper can be used to create different textures and patterns. Crumpled,
coloured tissue paper can be used for water and fire effects in particular. They could also experiment with different
textures by adding sand to paint before painting the backgrounds.
Example film: High Above the Sky http://bit.ly/HighAbove
6. intofilm.org 6
Our resources are designed to be used with selected film titles, which are available free for clubs at www.intofilm.org
Equipment
Cameras
You can capture frames with a video camera, stills camera, tablet or mobile phone and then transfer the images onto
a computer to edit. You could also try stop-motion software, capturing the frames directly into a timeline. The most
important thing to remember is to keep the camera still and in the same position. A good idea is to sticky tack your
camera down to the table so it does not move, or alternatively you could mark its position with tape. When using sticky
tack, be careful to ensure that the frame is straight, as this may affect the film when you put it all together.
Tripod
If you are using a tripod, mark where the legs are placed with duct or masking tape, so that if the tripod is knocked you
can line it up to the original position. This is where using animation software such as iStopmotion can be really helpful
as it keeps your last image up on the screen whilst also showing you the live feed image from your camera, allowing you
to match up the images. This process is called ‘onion skinning’. Tripods are particularly useful when using a light box to
animate. Ensure your tripod can be tilted 180 degrees as this will allow you to shoot from above onto a flat surface.
The bare bones
A tripod and camera are not always necessary – for example, you could use the the inbuilt camera on your laptop
with free software like iMovie or Windows Movie Maker. Or you could simply take images with your phone or camera
and feed them into the software with a USB lead. The most important thing is that you are able to get a clear, straight
photograph of each movement of your set, work with what you have in the classroom already. The students will learn a
lot from the process of animating so to begin with, the equipment used is less important.
Top tip
You might not have enough animation kits and models for everyone to animate at once, so it is best to rotate the
groups. While some groups are using the backgrounds, models and animation kits, the others can be coming up with
dialogue for the film, finishing off their model making, recording sound effects and voiceovers or creating promotional
posters for the finished film’s ‘theatrical release’. Use the Film poster template on page 16 to give students an idea of
how they can structure their poster.
7. intofilm.org 7
Our resources are designed to be used with selected film titles, which are available free for clubs at www.intofilm.org
Animating
Now that you have your set, props, characters and equipment in place it is time to start animating. At this stage it may
be a good idea to split the class up into small groups of four or five with each group taking a turn to animate. This will
make things easier to manage, will ensure everyone has the opportunity to animate and will help prevent students from
becoming restless with the process. It could also be an idea to split the sessions into Pre-production and Production
days if you have the time to do so. If you have the space, equipment and staff available you can also set up multiple
animating stations and animate scenes simultaneously.
On your marks
Ask the students to put all models and scenery in place
for the first scene to begin. It is a good idea to take four
or five establishing frames at the beginning of every new
scene, this will slow down the action and allow the
viewer to take in the new surroundings.
Get set
To give an impression of movement, carefully adjust your
props and characters’ positions by a tiny amount. Once
everyone in the group is happy then take a photograph.
Take care that the group do not change anything that is
meant to stay still.
It is worth taking two photographs every time you move
your character or object as this will help to ensure the
movements are smooth.
Go
A rule of thumb is that 12 adjustments, each one captured twice on camera, will add up to about one second of film.
Remember to make only small adjustments each time, the bigger the movements between the frames, the faster the
action and jerkier the animation.
In the frame
A good tip for helping younger pupils to keep their fingers out of shot when capturing each frame is to mark a line
of the floor with gaffer tape and ask everyone to stand behind this line while one member of the group captures the
frame. Ask the group to give a signal to the student taking the photo each time, this can be “Action” or simply “Ready”.
The student capturing the frame can then respond, letting the group know they are ready to put the new frame in place.
Younger pupils respond especially well to this as it encourages a team dynamic and helps them to take responsibility for
their own work.
8. intofilm.org 8
Our resources are designed to be used with selected film titles, which are available free for clubs at www.intofilm.org
Software and editing
There are two very basic and easy to use animation software packages that you can use to make your films. iStopmotion
can be downloaded onto macs and iPads and allows you to import images directly on to a timeline, and export the
footage as a QuickTime file to edit in iMovie. If you have PCs in school, you can download Windows Movie Maker for
free and use this to edit your finished footage. These both come with easy to follow instructions. You might need to play
back your animation and check that the movements you have made are smooth and not jerky.
Slow down and repeat it
Once you have exported your footage to your editing software, it is now possible to slow down the action, simply by
adjusting the speed settings. It is likely that some parts of the animation will have to be slowed down but you may also
want to encourage students to think about looping and reusing some of their footage. For example, a short scene
where two characters are talking to each other can be looped to fit a longer conversation or reused with different
voiceovers. Similarly you can also reverse some of your footage to create a bigger impact, if you have footage of your
character looking away from the camera, this can be copied then reversed so that the character looks away from and
then back to the camera.
The process verses the product
Most computers, tablets and phones will have some kind
of editing software that the class can use, however if you
don’t have the time to make edits to your final film don’t
worry. The beauty of animation is that a lot of the editing
is achieved ‘in-camera’, this means that the way you set
up the shots and the amount of movement between
frames can often determine how smooth the finished
film is. Animation is about teamwork, creativity and visual
storytelling and students will gain a lot through the process
of making an animation, even if the finished product is not
polished or edited to industry standard.
Adding sound
Adding voiceovers, sound effects and music will have a dramatic effect on your animation. Voice overs can help to
move the action along and reiterate the storyline for the audience. Adding atmospheric music and sound effects can
help to punctuate the action, infer an emotion or feeling to the audience and add humour. If you are using iMovie to
edit your films, this program comes with a bank of royalty-free music and sound effects that you can add to your film.
If not, then there are many royalty-free music websites that you can use to download music and sound effects.
9. intofilm.org 9
Our resources are designed to be used with selected film titles, which are available free for clubs at www.intofilm.org
Free Software
Some great free software and apps:
Stick man: drawn animation
http://www.stykz.net/
Stop motion animation
http://www.culturestreet.org.uk/activities/stopframeanimator/
Sound effects
www.freesound.org
Royalty free music
http://www.freesfx.co.uk
10. intofilm.org 10
Worksheet
Event
Year
The Magic
Lantern
Walt Disney creates the
first sound and colour
animated feature film,
Snow White and the
Seven Dwarves
1650 1868 1895-1909
John A Paris
popularises the
thaumotrope
William George
Horner invents
the zoetrope
Gertie the Dinosaur,
an early example
of drawn animation,
is released.
Early animation timeline
Instructions
Fill in the missing information on the timeline below.
Use the internet to search for the missing events and years.
11. intofilm.org 11
Top tips: You can also make an easy flick book by using a pack
of sticky notes or drawing in the corner of a notepad
STICKSTICKSTICK
STICKSTICKSTICK
Worksheet
Flick book
Instructions
Plan out the storyline for your flick book, making sure to keep most of the
action in the bottom right hand corner. Keep your story simple and make
sure you tell the story entirely though your drawing. Something quick and
easy always works well, like a bouncing ball or jumping frog.
Once you have drawn your story,cut around each box and stick the boxes together
(you may want to number each box to make sure you keep them in the right order).
12. intofilm.org 12
Worksheet
Thaumatropes were very popular toys during the 19th century. These toys
achieve their effect due to the persistence of vision (in the same way as
stop motion animation film).
1. First cut out the two circles below, then make a hole in, or hole punch the
shaded circles on the right and left of each image.
2. Stick the two circles of paper together, making sure to keep one image
upside down and match the holes on both pieces so that they line up with
each other.
3. Attach one piece of string to each of
the two holes that you have made.
4. Finally, spin the string quickly
in your fingers to see the
optical illusion.
Thaumatropes
13. intofilm.org 13
Worksheet
Top tips:
1. Use two pieces of paper in case the image that you draw bleeds
through to both sides of paper.
2. Keep your drawings in roughly the same space on both pieces of paper.
3. It is not necessary to use a circle of card or paper, any shape will
work as long as both pieces are exactly the same.
4. Make sure that you stick the paper together so that one of your
drawings looks like it is upside down.
Try it yourself
Thaumatropes
14. intofilm.org 14
Worksheet
In your groups, fill out the sheet below, including a short synopsis of your film idea.
Next, think about the characters that will appear in your animation and how you
can show their personalities through the clothes they wear and their appearance.
Think about the places in your story. What sets will you need to make?
How can you use different textures and what materials can you use?
Finally what props, backgrounds and background characters do you need
to make your story come to life on the screen?
Film synopsis (description of your film in only a couple of sentences):
Characters Places and
materials
Props and
backgrounds
Planning sheet
16. intofilm.org 16
Worksheet
1. Cut out the pieces of the figure below and join them together on the places
marked “x” with sticky tack or split pins.
2. Decorate the character by drawing features and clothing on them.
3. Extension activity: Try to make your own character using the same dimensions.
Character dimensions
17. intofilm.org 17
A film poster will usually have one photograph or still image from
the film as a background image for the entire poster
Often the lead cast members are credited above the title
The date the film is out in cinemas
“Sometimes a quote from a review or a star rating is included”,
Person, Company
At the bottom you will find credits for:
The studio name, producer, script writer, lead actors, “Film title”, music composer, costume design,
editor, production design, cinematographer, executive producer, producer, story writer, screen
writer and director...
in that order
THE FILM TITLE WILL BE
BOLD AND NOTICEABLE