Instruction Manual | C-More C3 Riflescopes | Optics Trade
•
0 likes•400 views

This document provides instructions for operating and maintaining a C3 Competition Rifle Scope. It describes the major components of the scope, provides guidance on installation, bore sighting, live fire sighting, and adjusting the reticle focus, magnification, windage, elevation, and illumination settings. It also details procedures for resetting the adjustment knobs to zero and includes a limited lifetime warranty.

Recommended
Recommended
More Related Content
What's hot
What's hot (20)
Viewers also liked
Viewers also liked (20)
Similar to Instruction Manual | C-More C3 Riflescopes | Optics Trade
Similar to Instruction Manual | C-More C3 Riflescopes | Optics Trade (20)
More from Optics-Trade
More from Optics-Trade (20)
Recently uploaded
Recently uploaded (20)
Instruction Manual | C-More C3 Riflescopes | Optics Trade
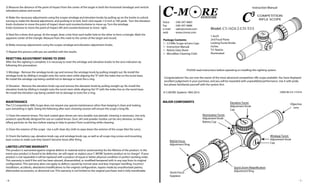
- 1. Voice - 540-347-4683 Fax - 540-347-4684 e-mail - sales@cmore.com web - www.cmore.com © C-MORE Systems 1993-2014 CMS-IB-C3-111014 Instruction Manual C3 COMPETITION RIFLE SCOPE Reticle Focus Adjustment Ring Quick Focus Eyepiece Quick Zoom Magnification Adjustment Ring Windage Turret Adjustment Knob Cap Objective Lens Elevation Turret Adjustment Knob Cap Illumination Turret Adjustment Knob Battery Cap MAJOR COMPONENTS Congratulations! You are now the owner of the most advanced competition rifle scope available. You have displayed excellent judgement in your purchase, and you will be rewarded with unparalleled performance. Use it with pride, but please familiarize yourself with the system first. PLEASE read instructions before operating or installing this sighting system. Model: C3-1624-2-LTI-TJ1I 1-6x24 2nd Focal Plane Locking Turret Knobs Inches TJ1 Reticle Illuminated Package Contents: 1 - C3 Rifle Scope w/Lens Caps 1 - Instruction Manual 1 - Reticle Data Sheet 1 - Microfiber Cleaning Cloth MAINTENANCE The C3 Competition Rifle Scope does not require any special maintenance other than keeping it clean and making sure everything is tight. Doing the following after each shooting session will ensure the scope a long life. 1) Clean the exterior lenses. The hard coated glass lenses are very durable, but periodic cleaning is necessary. Use only products specifically designed for use on coated lenses. Dust, dirt and powder residue can be very abrasive, so blow offany particles on the lens before wiping to help to protect from scratching while cleaning. 2) Clean the exterior of the scope. Use a soft clean dry cloth to wipe down the exterior of the scope (Not the Lens). 3) Check the battery cap, elevation knob cap, and windage knob cap, as well as all scope ring screws and mounting base screws to make sure they haven’t become loose after firing. LIMITED LIFETIME WARRANTY This product is warranted against original defects in material and/or workmanship for the lifetime of the product. In the event your product is found to be defective, we will repair or replace your C-MORE Systems product at no charge*. If your product is not repairable it will be replaced with a product of equal or better physical condition in perfect working order. This warranty is void if the unit has been abused, disassembled, or modified/tampered with in any way from its original configuration. This warranty does not apply to defects caused by normal wear and tear, improper handling, incorrect installation, accidents, alterations/modifications to the original configuration, repairs made by unauthorized parties, aftermarket accessories, or abnormal use. This warranty is not limited to the original purchaser and is fully transferable. RESETTING ADJUSTMENT KNOBS TO ZERO After live fire sighting is complete, it is necessay to reset the windage and elevation knobs to the zero indicators by following this proceedure: 1) Windage - Remove the windage knob cap and remove the windage knob by pulling straight out. Re-install the windage knob by slliding it straight onto the turret stem while aligning the“0”with the index line on the turret base. Re-install the windage cap being carefull not to damage or twist the o-ring. 2) Elevation - Remove the elevation knob cap and remove the elevation knob by pulling straight up. Re-install the elevation knob by slliding it straight onto the turret stem while aligning the“0”with the index line on the turret base. Re-install the elevation cap being carefull not to damage or twist the o-ring. 3) Measure the distance of the point of impact from the center of the target in both the horizontal (windage) and verticle (elevation) planes and record. 4) Make the necessary adjustments using the scopes windage and elevation knobs by pulling up on the knobs to unlock, turning to make the desired adjustment, and pushing in to lock. Each click equals 1/2 inch @ 100 yards. Turn the elevation knob clockwise to move the point of impact down and counterclockwise to move up. Turn the windage knob clockwise to move the point of impact left and counterclockwise to move right. 5) Next fire a three shot group. At the target, draw a line from each bullet hole to the other to form a triangle. Mark the apparent center of the triangle. Measure from this mark to the center of the target and record. 6) Make necessay adjustments using the scopes windage and elevation adjustment knobs. 7) Repeat this process until you are satisfied with the results. - 1 -- 4 -
- 2. BORE SIGHTING Bore sighting the riflescope will save time and frustration at the range. There are different types of bore sighters available on the market; follow the manufacturers directions when using. On many rifles, bore sighting can be accom- plished by aligning the scopes crosshairs with the bore. Follow the instructions below to visually bore sight the scope. 1) Remove the bolt from the rifle. On AR type rifles remove the bolt and carrier. (It’s helpfull to separate the lower receiver from the upper receiver) 2) Place a 4”diameter bullseye at a distance of 100 yards. 3) Remove the elevation turret cap using a tool or coin. 4) Remove the elevation turret knob by pulling straight up on the knob. Adjustments to elevation will be performed with the the turret knob removed. This proceedure is not necessary with windage adjustments. 5) Place the firearm in a solid rest with the elevation turret knob level. 6) Looking through the bore, visually center the bore with the target. 7) Without disturbing the rifle, look through the scope to check the crosshair location. 8) Make elevation adjustments to vertically align the crosshairs with the bullseye using the elevation adjustment post (elevation turret knob removed). Note: clockwise rotation of the post will move the reticle upwards in relation to the fixed target (This is opposite of bullet impact) 9) Make windage adjustments by pulling out on the windage adjustment knob to unlock it, then turn to make adjustments to align the crosshairs with the bullseye horizontally. Push in on the knob to lock. The windage cap and turret knob are not removed. 10) Check to make sure the target is centered in the bore and that the reticle is aligned with the target without disturbing the rifle. 11) Carefully replace the elevation adjustment knob aligning the index number“16”graduation with the elevation index mark on the turret base. The zero setting and zero stop will be indexed after live fire sighting. LIVE FIRE SIGHTING When performing the final sight in proceedure below, use the exact ammunition you plan to use for your specific end use. 1) Start at a zero distance of 100 yards. 2) From a solid rest with proper shooting technique, fire one shot at the target. MOUNTING continued 6) Remove the elevation turret cap using a coin or tool. Use a level on the firearms scope rail/base and on top of the scopes elevation turret knob (with cap removed) to level the scope in the horizontal perpendicular axis. 7) Carefully tighten the scope ring screws while checking level. Torque the scope ring screws according to the manufacturers specifications. - 3 -CMS-IB-C3-111014 SCOPE CONTROLS WARNING! Never look directly into the sun through a rifle scope! Severe permanent damage to your eyesight can result! Reticle Focus Adjustment To focus the reticle, hold the scope 3 to 4 inches from your eye for correct eye relief, then quickly look through the scope while looking at a white wall or clear sky and note if the reticle appears sharp and in focus. Turn the reticle focus adjustment ring left and right noting the sharpness of the reticle. Look away from the scope to give you eyes time to re-focus. If you stare at the reticle too long, your eyes will try to adjust to an out of focus reticle. Repeat procedure until reticle image is sharp and focused as soon as you see it. Magnification Adjustment Use the quick zoom magnification adjustment ring to change the magnification to the desired power. Windage and Elevation Adjustment The C3 Competition Rifle Scope features lockable target knobs for quick adjustment without the use of any tools. Simply pull out the elevation or windage adjustment knob to unlock, make the desired adjustment, and push the knob back in to lock. The elevation and windage target knobs can be re-zeroed after sight in has been completed. Illumination Adjustment For fast target acquisition, the C3 provides an illuminated center dot with 11 intensity settings. An off position between each intesity position allows the illumination to be turned off or on quickly with out any extra rotating. Battery Installation and Replacement To install or replace the battery, remove the battery cap from the illumnation adjustment turret using a tool or coin. Remove the used battery and/or install a new CR2032 battery with the positive (+) side facing up, then replace the battery cap. MOUNTING The C3 1-6x24 scope requires 30mm rings for mounting to your rifle. Consult high quality ring and base manufacturers for their suggested mounting solution for your rifle. If you are unsure or uncomfortable with these scope monting procedures, consult a qualified gunsmith. STOP!! Make sure your firearm is unloaded and the magazine and ammunition has been removed before proceeding! 1) Secure the rifle in a rifle vise or other suitable fixture. 2) Mount the bottom halves of scope rings onto the rifles scope rail/base. Place scope onto the scope rings and perform an initial check for eye relief. If necessary make adjustments to scope ring placement on the rail/base. Using a piece of masking tape, temporarily mark the scope to note its position on the rings for final tightening. If desired, the scope rings may be lapped. 3) Using pure alcohol or a suitable solvent, degrease the inside of the scope rings. 4) Adjust the scope to the highest magnification and place it on to the rings aligning it with the previously noted eye relief mark. Install the top halves of the scope rings so that the scope can still be rotated and can move forward and aft. 5) While in a proper shooting position, carefully look through the scope to check for eye relief. Proper eye relief is obtained with the scope in the most forward position while still maintaining a clear image and a full field of view of the reticle. Temporarily mark this position. - 2 -