guía para ubicar parlantes (Speaker placement)
•
0 likes•2,612 views

The document provides guidance on speaker placement techniques to achieve optimal sound quality. It outlines 4 methods for determining initial speaker positioning: 1) "Audio Arithmetic" which uses mathematical relationships between speaker and room boundaries, 2) "Voicing the Room" where the listener moves around speaking to find natural balance points, 3) "Changing Places" where the listener moves the speakers to their ear's position, and 4) guidelines for placing dipole speakers using a "Rule of Thirds". Precise measurement, marking, and testing of incremental position changes are recommended to refine placement. The goal is a setup that produces the best musical results.

Recommended
More Related Content
Similar to guía para ubicar parlantes (Speaker placement)
Similar to guía para ubicar parlantes (Speaker placement) (20)
More from roger gustavo saravia aramayo
More from roger gustavo saravia aramayo (20)
Recently uploaded
Recently uploaded (20)
guía para ubicar parlantes (Speaker placement)
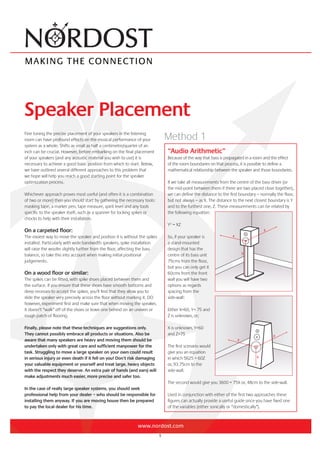
- 1. www.nordost.com Fine tuning the precise placement of your speakers in the listening room can have profound effects on the musical performance of your system as a whole. Shifts as small as half a centimetre/quarter of an inch can be crucial. However, before embarking on the final placement of your speakers (and any acoustic material you wish to use) it is necessary to achieve a good basic position from which to start. Below, we have outlined several different approaches to this problem that we hope will help you reach a good starting point for the speaker optimization process. Whichever approach proves most useful (and often it is a combination of two or more) then you should start by gathering the necessary tools: masking tape, a marker pen, tape measure, spirit level and any tools specific to the speaker itself, such as a spanner for locking spikes or chocks to help with their installation. On a carpeted floor: The easiest way to move the speaker and position it is without the spikes installed. Particularly with wide bandwidth speakers, spike installation will raise the woofer slightly further from the floor, affecting the bass balance, so take this into account when making initial positional judgements. On a wood floor or similar: The spikes can be fitted, with spike shoes placed between them and the surface. If you ensure that these shoes have smooth bottoms and deep recesses to accept the spikes, you’ll find that they allow you to slide the speaker very precisely across the floor without marking it. DO however, experiment first and make sure that when moving the speaker, it doesn’t “walk” off of the shoes or leave one behind on an uneven or rough patch of flooring. Finally, please note that these techniques are suggestions only. They cannot possibly embrace all products or situations. Also be aware that many speakers are heavy and moving them should be undertaken only with great care and sufficient manpower for the task. Struggling to move a large speaker on your own could result in serious injury or even death if it fell on you! Don’t risk damaging your valuable equipment or yourself and treat large, heavy objects with the respect they deserve. An extra pair of hands (and ears) will make adjustments much easier, more precise and safer too. In the case of really large speaker systems, you should seek professional help from your dealer – who should be responsible for installing them anyway. If you are moving house then be prepared to pay the local dealer for his time. Speaker Placement Method 1 “Audio Arithmetic” Because of the way that bass is propagated in a room and the effect of the room boundaries on that process, it is possible to define a mathematical relationship between the speaker and those boundaries. If we take all measurements from the centre of the bass driver (or the mid-point between them if there are two placed close together), we can define the distance to the first boundary – normally the floor, but not always – as X. The distance to the next closest boundary is Y and to the furthest one, Z. These measurements can be related by the following equation: Y2 = XZ So, if your speaker is a stand-mounted design that has the centre of its bass unit 75cms from the floor, but you can only get it 60cms from the front wall you will have two options as regards spacing from the side-wall: Either X=60, Y= 75 and Z is unknown, or; X is unknown, Y=60 and Z=75 The first scenario would give you an equation in which 5625 = 60Z or, 93.75cm to the side-wall. The second would give you 3600 = 75X or, 48cm to the side-wall. Used in conjunction with either of the first two approaches these figures can actually provide a useful guide once you have fixed one of the variables (either sonically or “domestically”). 1
- 2. www.nordost.com Method 2 “Voicing The Room” This is loosely based on a technique first developed and popularized by Wilson Audio. You will need to start by clearing the space where the speakers will stand. Then, starting with your back against the front wall (the wall that will be behind the speakers) and roughly one fifth of the way across it, move slowly down the room, speaking in a loud but even voice as you do so. At first your voice will sound chesty and thick, but as you advance into the room it will become more natural in balance. Once it sounds correct, mark the floor with a strip of masking tape parallel to the front wall. Now continue your advance until it starts to sound hollow and diffuse. Again, mark the boundary where your voice starts to lose its natural balance. You will probably now have two strips of tape, between 15 and 45cms apart. Next, starting on the side-wall, between the two pieces of tape you’ve already laid, move across the room, again speaking until your voice achieves its most natural balance, marking this point and the subsequent point where it loses it again. This should leave you with a rectangular space marked out on the floor. Repeat the process for the other side of the room where the second speaker will stand. Now place the speakers centrally, a third of the way back into the rectangles you’ve defined. Along the inner edge of each speaker run a long strip of masking tape and mark it off in ± half-inch increments from the front baffle. Then, using a piece of appropriate music (I often use the Analogue Productions disc of This One’s For Blanton, with its extended acoustic bass passages) adjust the speaker forwards and back until you achieve the best bass balance. Of course, you can also use the low frequency tones on the Nordost System Tuning and Set-Up Disc, but remember, this is about bass energy and timing as well as linearity. You need the low frequencies to be musically communicative. Once you have a good position, mark it and then continue. The taped increments mean that you can always return to a better place. Once you have the fore and aft positioning for both speakers, place a strip of tape across the front of the speaker, mark it up and repeat the process laterally, the two tape axes allowing you to move the speakers on a predictable and repeatable “grid”. Above all, don’t be afraid to move on to another position; you can always go back. Once you have the best, most musically integrated and communicative placement, you are ready to start looking at toe-in using the LEDR tests. Method 3 “Changing Places” A surprisingly effective way of achieving an initial placement for speakers involves quite literally changing places with them. Put the speakers side by side at the listening position and play some music. Then, on your knees so that your ear approximates the height of your listening position, move around the area where each speaker will be placed, until you find the point that delivers the best musical results. Mark that point and once again, follow the grid procedure laid out above – obviously moving the speakers into their correct places and restoring yourself to the more comfortable perch of your listening seat. 2
- 3. www.nordost.com Method 4 “Di-Poles and The Rule Of Thirds” Di-pole speakers such as the majority of electrostatics and planar- magnetics drive the room very differently from more conventional, box loudspeakers. This is due to their unimpeded rear output, which can cause severe comb-filtering cancellation with the forward low-frequency output once it is reflected from the wall behind the speakers. As a result they generally benefit from more room behind them than box speakers do. One popular approach suggests a simple formula where both the speakers and listening seat are placed at the one-third intervals down the room. The speakers can then be adjusted laterally and with toe-in for soundstage width, depth and focus. Undoubtedly effective in sonic terms, the domestic impact of such placing in a shared space often rules it out, but in a dedicated listening room it is an ideal starting point with most panel speakers – and not a few boxes. If the Rule Of Thirds proves impractical (and it often does) then a more reasonable alternative can often be arrived at using the following formulae: Distance from front baffle to rear wall = height of ceiling x 0.618 Distance from tweeter or centre of panel = width of room divided by 18. Multiply the result by 5 So, in a room with an 8’ ceiling and 13’ width: 96” x 0.618 = 59.3” to the rear wall 156” / 18 = 8.666 x 5 = 43.3” to the side wall Nordost Corporation 200 Homer Avenue Ashland MA 01721 USA Tel: +1 508 881 1116 Fax: +1 508 881 6444 Email: info@nordost.com Website: www.nordost.com Whilst the information contained here can be used in its own right, it is primarily intended to achieve an initial position that can then be refined by using the tracks contained on the Nordost System Tuning and Set-Up Disc. This carefully considered set of “audio tools” will enable you to optimize your speaker set-up and system condition and should be part of every audiophile’s armory. If you don’t already own a copy, you can obtain one from any Nordost dealer or by contacting Nordost direct. Finally, once you’ve achieved initial placement of your speakers, level them precisely. Yes, small movements will disturb their level and you’ll need to repeat the operation again, but having them level to start with will make the effects of each shift in position much easier to hear. Speaker placement is all about precision and repeatability – so be precise in what you do, and be prepared to repeat the steps as often as necessary. 3
- 4. PRINCIPLES AND TECHNIQUES OF SPEAKER PLACEMENT 4
- 5. 2 | P a g e With most good quality music systems the room becomes the limiting factor in sonic performance. There have been many articles and theories presented on speaker-room interface and also about the damping of critical room resonances. Constructing speakers with room interface in mind can result in speakers that only work in one type of room, or in one position in a room. Efforts to damp out room resonances to get a flat amplitude response are usually costly and can result in a lifeless sound. The solution presented here is aimed at limiting the interference of the room, with speaker placement and listening position, through the application of psychoacoustics and physics. This method can give superb results through experimentation without the use of special room treatment. However, it may be possible to get even better results with carefully used room treatment. The way we locate sonic events in space is by the brain measuring the time delay of the sound between the two ears. If there is no delay the sound emanates from directly in front of us, if it reaches the right ear first it is to the right, etc. The brain determines location in the first 800µs of the transient because this is the maximum time delay possible due to the distance between the left and right ear. It is after this initial recognition of location that the perception of tonality starts. This has been proven in scientific studies and is believed to be a critical part of our survival historically. In other words, we first locate the source of a sound, a potential danger for example, and then try to identify what made the sound. So, the first step to getting a good stereo soundstage is to eliminate early reflections of the leading transient as much as possible. In practice, to have the sound from the speakers arrive at your ears before any reflections. This prevents any confusion as to where the sound is coming from. A psychoacoustic phenomenon called the Haas effect, states that the brain prioritizes the first sound wave to avoid confusion. Which is the same as saying the brain ignores reflections if they are not too loud. Also, if the speakers measure flat under anechoic conditions, the brain will register flat response when it hears the first transient without reflections. So, even if tests from the listening position indicate severe deviations in frequency response due to reflections, the brain will ignore this and perceive flat response. To illustrate a set-up using these principles, let’s imagine a well-proportioned room that is dedicated to listening. The ideal location for the speakers is at the two center points 5
- 6. 3 | P a g e of an ellipsoid touching the walls of the room. The best listening position is 1 to 3 ft. from the rear wall. Make sure your system is wired in correct phase! The advantage of this placement is that it allows the maximum possible speaker separation for the widest desirable soundstage, and it places the speakers away from all walls to maximize reflection delay. In this position the sound from the speakers reaches the ears before any reflections coming from the sidewalls, resulting in a better soundstage and an unaltered perception of the speakers’ tonal balance. Here is the basic formula to calculate reflection delay. The distance from the speaker directly to the ear should be at least 5 ft. less than the distance from the speaker, to a reflective surface, to the ear. For example, speaker to ear = 6 ft. Speaker to wall = 5 ft., and wall to ear = 8 ft. for a total distance of 13 ft. calculating 13 ft for reflection – 6 ft from source = 7 ft., so this will work. The technical reason for the 5ft. difference is that if the secondary sound arrives at least 5 milliseconds or later after the primary sound, the brain recognizes it is not the source. It requires sound 5 milliseconds to travel 5 ft. There are two reasons for sitting close to the rear wall. First, at the room boundaries (walls) the sound pressure is high and the velocity is low. Sitting in the maximum pressure area gives the best perception of deep bass. Secondly, the reflections are shorter than the circumference of the head, so the brain cannot measure the time delay between the ears, and therefore cannot localize the source of sound. When the brain cannot localize reflections it ignores them. Here is a simple example of the brain ignoring unwanted or unessential information. Imagine being in a noisy public place and conversing with the person next to you. Even though a recording made where you are standing would sound like random noise, you can isolate the conversation. If you hear your name spoken several feet away, you can change your focus, and “listen in” on the other conversation. Our brains do this 6
- 7. 4 | P a g e automatically all the time, for example, to filter out a distracting natural resonance of a room to facilitate speech, or to identify potential dangers. So, in this listening position your brain will “listen in” to the primary source and ignore the reflections. To sum up, it is usually best to locate the listening position so the first information to arrive at the ears is from the speaker. The secondary reflections should arrive much later and at a much lower volume. Place the listening chair near the rear wall, because the distance (1 to 3 ft.) creates too short a time delay for the brain to locate the source of the reflection. Finally, it places you at the room boundary where the perception of bass is greatest. Let’s expand on the information regarding bass reinforcement. This is a method we call room mapping. The underlying principle of this technique uses principles of wave phenomenon. Since it is uncommon to have a dedicated listening room, and one of ideal proportions at that, here is how to locate the speakers according to room dimensions. Accurately measure the room and draw a simple floor plan. Divide the room into quarters. At even points in the room, bass frequencies are reinforced. Referring to the above example, the cross points 2A and 2C are the ideal starting position for speaker placement. Place the listening chair at B less than 3 feet from the wall. If you want to set the speakers on the short wall in a more traditional arrangement, you can get good results for bass reinforcement by placing the listening chair against the wall at line 2 and placing the speakers at B1 and B3. The next best speaker location would be A1 and A3 or C1 and C3. You can also place the listening chair at 2B and the speakers at A1 and A3 or C1 and C3. Or place the chair at 2A and the speakers at C1 and C3. The disadvantage of these locations is narrow speaker placement and increased side wall reflection. The final arrangement is usually determined by room size and furniture layout. However, by placing the speakers and chair at an even division point of the room, you will get natural bass reinforcement. A B C 1 2 3 7
- 8. 5 | P a g e 4 5 D E A method of tuning the bass and mid-bass is by using the same principle to cancel, rather than reinforce, low frequencies. To do this you move the speakers toward odd divisions of the room. This illustration is another drawing of the above room divided into odd increments. The cross points are the locations with the least bass reinforcement. It’s important to remember is that the room can be divided into far more than just quarters or thirds. At even divisions the bass is reinforced and at odd divisions the bass is canceled. By overlaying these grids you can see that small movements can have a large effect on the sound. A B C 1 2 3 4 5 D E 8
- 9. 6 | P a g e For tuning, the general tendency is for sideways movements to effect the mid-bass and forward and backward movements to affect lower bass. After determining the general placement for deep bass with the above room mapping technique, the next step is to determine the distance between speakers. Using a recording with strong center information, a vocal or mono recording works well, listen to the center-fill with the speakers pointed slightly behind the listeners head. Move them apart about 6 inches and listen again. Continue this until the center image thins out and becomes diffuse. At this point the separation is too great. Move them back to the location where you get the widest possible soundstage without losing center-fill energy. In blind listening tests the preferred angle of separation, with listener at the apex, turned out to be 72°. The next step is to adjust left to right balance. If the system components are adjusted for equal output from both channels, and the center image is not centered, it could be that one speaker is closer than the other. Compensate for this by moving one speaker slightly forward or backward. An excellent source for this procedure is a mono recording. If an instrument that should be centered sounds slightly to the right, the right speaker should be pushed back or the left moved forward. Often 1 inch movements are audible. It is also possible to get this very close before listening by measuring with a tape measure from the tweeter on each speaker to a fixed position on the listening chair. The final step is to focus the soundstage. The basic technique involves rotating one speaker to change the dispersion pattern. This is easier to do with two people. Start with the speakers aimed slightly behind the listener’s head again listening to music with Balance Soundstage Focus 9
- 10. 7 | P a g e prominent center fill. While the listener listens for focus, (sometimes it helps to close your eyes) the other person rotates one speaker on the inside front spike. The listener signals to indicate the best speaker location. Listen for the size of the instrument and the energy. Usually a smaller energetic image indicates the best location. When this is done neither speaker has to be readjusted to “look” like the other. The reason the toe- in may not be symmetrical is that rooms are not symmetrical therefore reflections that affect dispersion are not symmetrical. Dispersion also varies according to speaker and crossover design. For example, Sonics speakers are designed so that off-axis response is similar to on-axis response. This will reduce side wall reflection problems and toe-in will not be as critical as in speakers with radically different on and off-axis response. Here is a summary of the set-up steps: 1. Place the speakers for best bass performance. Front to back movements for deep bass and side-to-side for mid bass. 2. Separate speakers to optimize soundstage width. 3. Move one speaker to adjust left to right balance. 4. Adjust speaker toe-in for image focus. Here are some additional suggestions: 1. Because adjustments are interactive, the way to extract more performance from your system is to go through the set-up procedure again for “fine tuning”. 2. When you are seated so that your head is close to a wall, some light damping material, (e.g. a small rug or heavy towel) directly behind your head may improve the sound. Also, at some point between the wall and 3 ft away, if you move your head forward and backward, you can hear changes in the apparent energy. This is a result of the slow wave velocity close to the room boundary. As you get a little farther from the wall the system will sound a little more “lively” but bass impact will drop. You can adjust your position to balance this out. 3. When fine-tuning for tonal balance the initial toe-in of the speakers affects the sound quite a bit. Listen to the difference between having the speaker pointed directly at your ear or straight ahead with no toe-in. You can adjust for a bright or dull room to some degree this way. Typically speakers pointed directly at the listener will sound more extended due to on-axis response having less roll-off of the highs. When speakers are pointed straight ahead the off-axis response will result in more energy reflecting off the side-walls and imaging will be more diffuse. 10
- 11. 8 | P a g e SONICS 1516 Fifth St. Berkeley, CA 94710. Phone (510)559-2050 FAX (510)559-1855 www.immediasound.com 4 5 D E We hope that this information helps you maximize your speaker set-up and also gives you a better understanding of stereo sound. The best way to understand this information is to listen and experiment. Use the charts below to keep notes on your listening room. Allen Perkins copyright 1996 revised 2009 A B C 1 2 3 11
- 12. Active nodes are the main concern when placing speakers in a rectangular room. A node, or the frequency where speakers and parallel walls interact, is proportional to the speaker to the wall distance. The three most importance nodes, in order of importance, are proportional to the distance between the speaker and: 1. The side wall nearest the speaker 2. The rear wall 3. The side wall across from the speaker A secondary factor is the speaker-to-speaker time constant. When you use this method to set your room up, the speakers are placed so the three nodes progress or differ from one another in Golden Ratio. This eliminates any unison or near unison resonance in the nodes. Speaker placement, simply stated. The distance from the center of the woofer face to the side walls is: Room Width times .276 (RW x .276). The distance from the center of the woofer face to the wall behind the speaker is: Room Width times .447 (RW x .447). This is all you need to know to place speakers in a symmetrical, rectangular room! (Diagram A) 1. The distance from the center of the woofer face to the side walls is: Room Width times .276 (RW x .276). 2. The distance from the center of the woofer face to the wall behind the speaker is: Room Width times .447 (RW x .447). This is all you need to know to place speakers in a symmetrical, rectangular room. Don't look at diagrams B, C, D, and E until you have your speakers in position, because it will make your head explode! SETTING-UP SPEAKERS IN A RECTANGULAR ROOM By George Cardas Diagram A Very precise speaker placement can open up a whole new dimension in listening, so I will outline the system that is becoming the standard of the industry. This standardized listening room is a Golden Cuboid and is the model of math used in the system. This method will work with any panel or box speaker, in any reasonably sized rectangular room. You may find that you have already positioned your speakers this way by ear. 12
- 13. For those who must know more… Placing speakers in this manner will set all the nodes in Golden progression. Final focusing can be done from the near field position (Diagram B) The importance of symmetrical speaker placement in a small room cannot be over emphasized. Once the speakers are set as close to perfect as possible, you must angle them slightly toward the listening position. This can be done by ear and usually a 1/4 to 1/2 inch tweak will do. Box speakers generally require a bit more toe-in than planear speakers. You will be able to hear a center focused voice clarify when the sweet spot is hit. Golden Cuboid Listening Room The Golden Cuboid listening room (Diagram C) is 10' x 16' x 26' (Read 10.000 x 16.18033989... x 26.18033989... It's dimensions differ in a Golden Ratio or Fibonacci sequence (5- 8-13-21-34...). The three major room nodes progress or differ in Golden Ratio and thus null rather than add or beat. The math used to create the dimensions of the Golden Cuboid listening room can also be applied to speaker placement, speaker box size, or for that matter, the conductors in your audio cable. Doing so will make the node progression an irrational or Golden progression. In the near field position the speakers and the listener's head are the points of an equilateral triangle. Near field listening gives the perfect stereo field. It is frequently used in the recording studio to position the microphones and the voice in the mix. The near field listening position is determined by the "center to center" distance of the speakers and the distance to the listener's head. It does not refer to the room in any way. The Golden Cuboid listening room is 10' x 16' x 26' (Read 10.000 x 16.18033989... x 26.18033989... It's dimensions differ in a Golden Ratio or Fibonacci sequence (5-8-13-21-34...). The three major room nodes progress or differ in Golden Ratio and thus null rather than add or beat. The math used to create the dimensions of the Golden Cuboid listening room can also be applied to speaker placement, speaker box size, or for that matter, the conductors in your audio cable. Diagram B Diagram C 13
- 14. In the case of our listening room, the relationship of potential nodes or energy storage units can be expressed as a ratio (Diagram D), or a Fibonacci progression (Diagram E) Diagram D Distance/Ratio Distance Ratio Numerical Percentage Speaker to side wall: RW x .618 5 .276 Speaker to rear wall: RW x 1 8 .447 Speaker to opposite wall: RW x 1.618 13 .724 Speaker to speaker: RW x 1 8 .447 The Golden Ratio room set-up can be seen as a Golden Progression. The Golden Ratio room set-up can be seen as a Fibonacci sequence. Diagram E Golden Ratio can be derived from an exponential progression known as the Fibonacci sequence or summation numbers: 1, 1, 2, 3, 5, 8, 13, 21, 34, 55, 89… etc. The farther you go, the closer the distance between the numbers approaches the ratio that can never be reached: 1.618033988… to infinity, to 1. The Golden listening room is 10' x 16' x 26'. This can be reduced to 5 x 8 x 13. 14
- 15. If you are forced to place your speakers on the long side of a symmetrical, rectangular room, create a Golden rectangle in each rear corner. Your speakers can then be placed anywhere along a line extending from the outside rear corner through the inside front corner (Diagram F). If you have the misfortune to have a square listening room, as above, create Golden Rectangles in the rear corners of the room. Your speakers can then be placed along lines extending from the outside rear corners through the inside front corners (Diagram G). Diagram F Diagram G Golden Rectangles, 1.618 from the side walls x 1 from the rear wall, create diagonal lines for speaker placement in a horizontal room. Golden Rectangles, 1.618 (side wall) x 1 (rear wall) on one side and 1 (side wall) x 1.618 (rear wall) create diagonal lines for speaker placement in a square room. 15
- 16. The Golden Cuboid (Diagram H) is the best "rectangular" shape for a listening room. If, however, you have full architectural freedom, a Golden Trapagon (Diagram I) is by far the favored shape. A Golden Trapagon has a Golden rectangle for the front wall behind the speakers, and the room progresses to a larger (by Golden Ratio in area) Golden rectangle back wall behind the listener. For example, if the wall behind the speakers is 10 feet x 16 feet, the room would then be 26 feet long and the wall behind the listener would be 13 feet x 21 feet. Ideally, the rear portion of this room would vent into an attic space filled with fiberglass insulation. The trick to a Golden Trapagon shaped room is it eliminates the problem of parallel walls and the slap and sharp nodes associated with them. The "sound" of this room is a decaying hologram of the original, not a slap. This decay is exponential, or higher, at all frequencies. The relationship between the height and the width of the room, at any point, is Golden Ratio. The cross-section area at the rear of the room is 1.618 times the cross- section of the front. In the example above, the ceiling height would be 12.72 feet. The ratio of front height or width, to rear height or width, is 1.272 to 1. 1.272 is the square root of 1.618 or Golden Ratio. The progression of size at the ends of the room is a area relationship. The sound confronts the entire surface of the end walls at the same time, rather than progressively as with height and width. It is like tuning a guitar to a major chord, the side walls become the strings and the end walls are the bridge and tailpiece. Cardas Audio, Ltd. 480 Eleventh Street, South East Bandon, Oregon 97411 Voice: 541-347-2484 Fax: 541-347-2301 http:/www.cardas.com Diagram H Diagram I 16
- 17. 17
- 18. 18
- 19. 19
- 20. 20
- 21. 21
- 22. 22
- 23. 23
- 24. 24
- 25. 25
- 26. 26
- 27. 27
- 28. 28
- 29. 29
- 30. 30
- 31. 31
- 32. 32
- 33. 33
- 34. 34
- 35. 35
- 36. 36
- 37. 37
- 38. 38
- 39. 39
- 40. 40
- 41. 41
- 42. 42
- 43. 43
- 44. 44
- 45. 45
- 46. 46
- 47. 47
- 48. 48
- 49. 49
- 50. 50
- 51. 51
- 52. 52
- 53. 53
- 54. 54
- 55. 55
- 56. 56