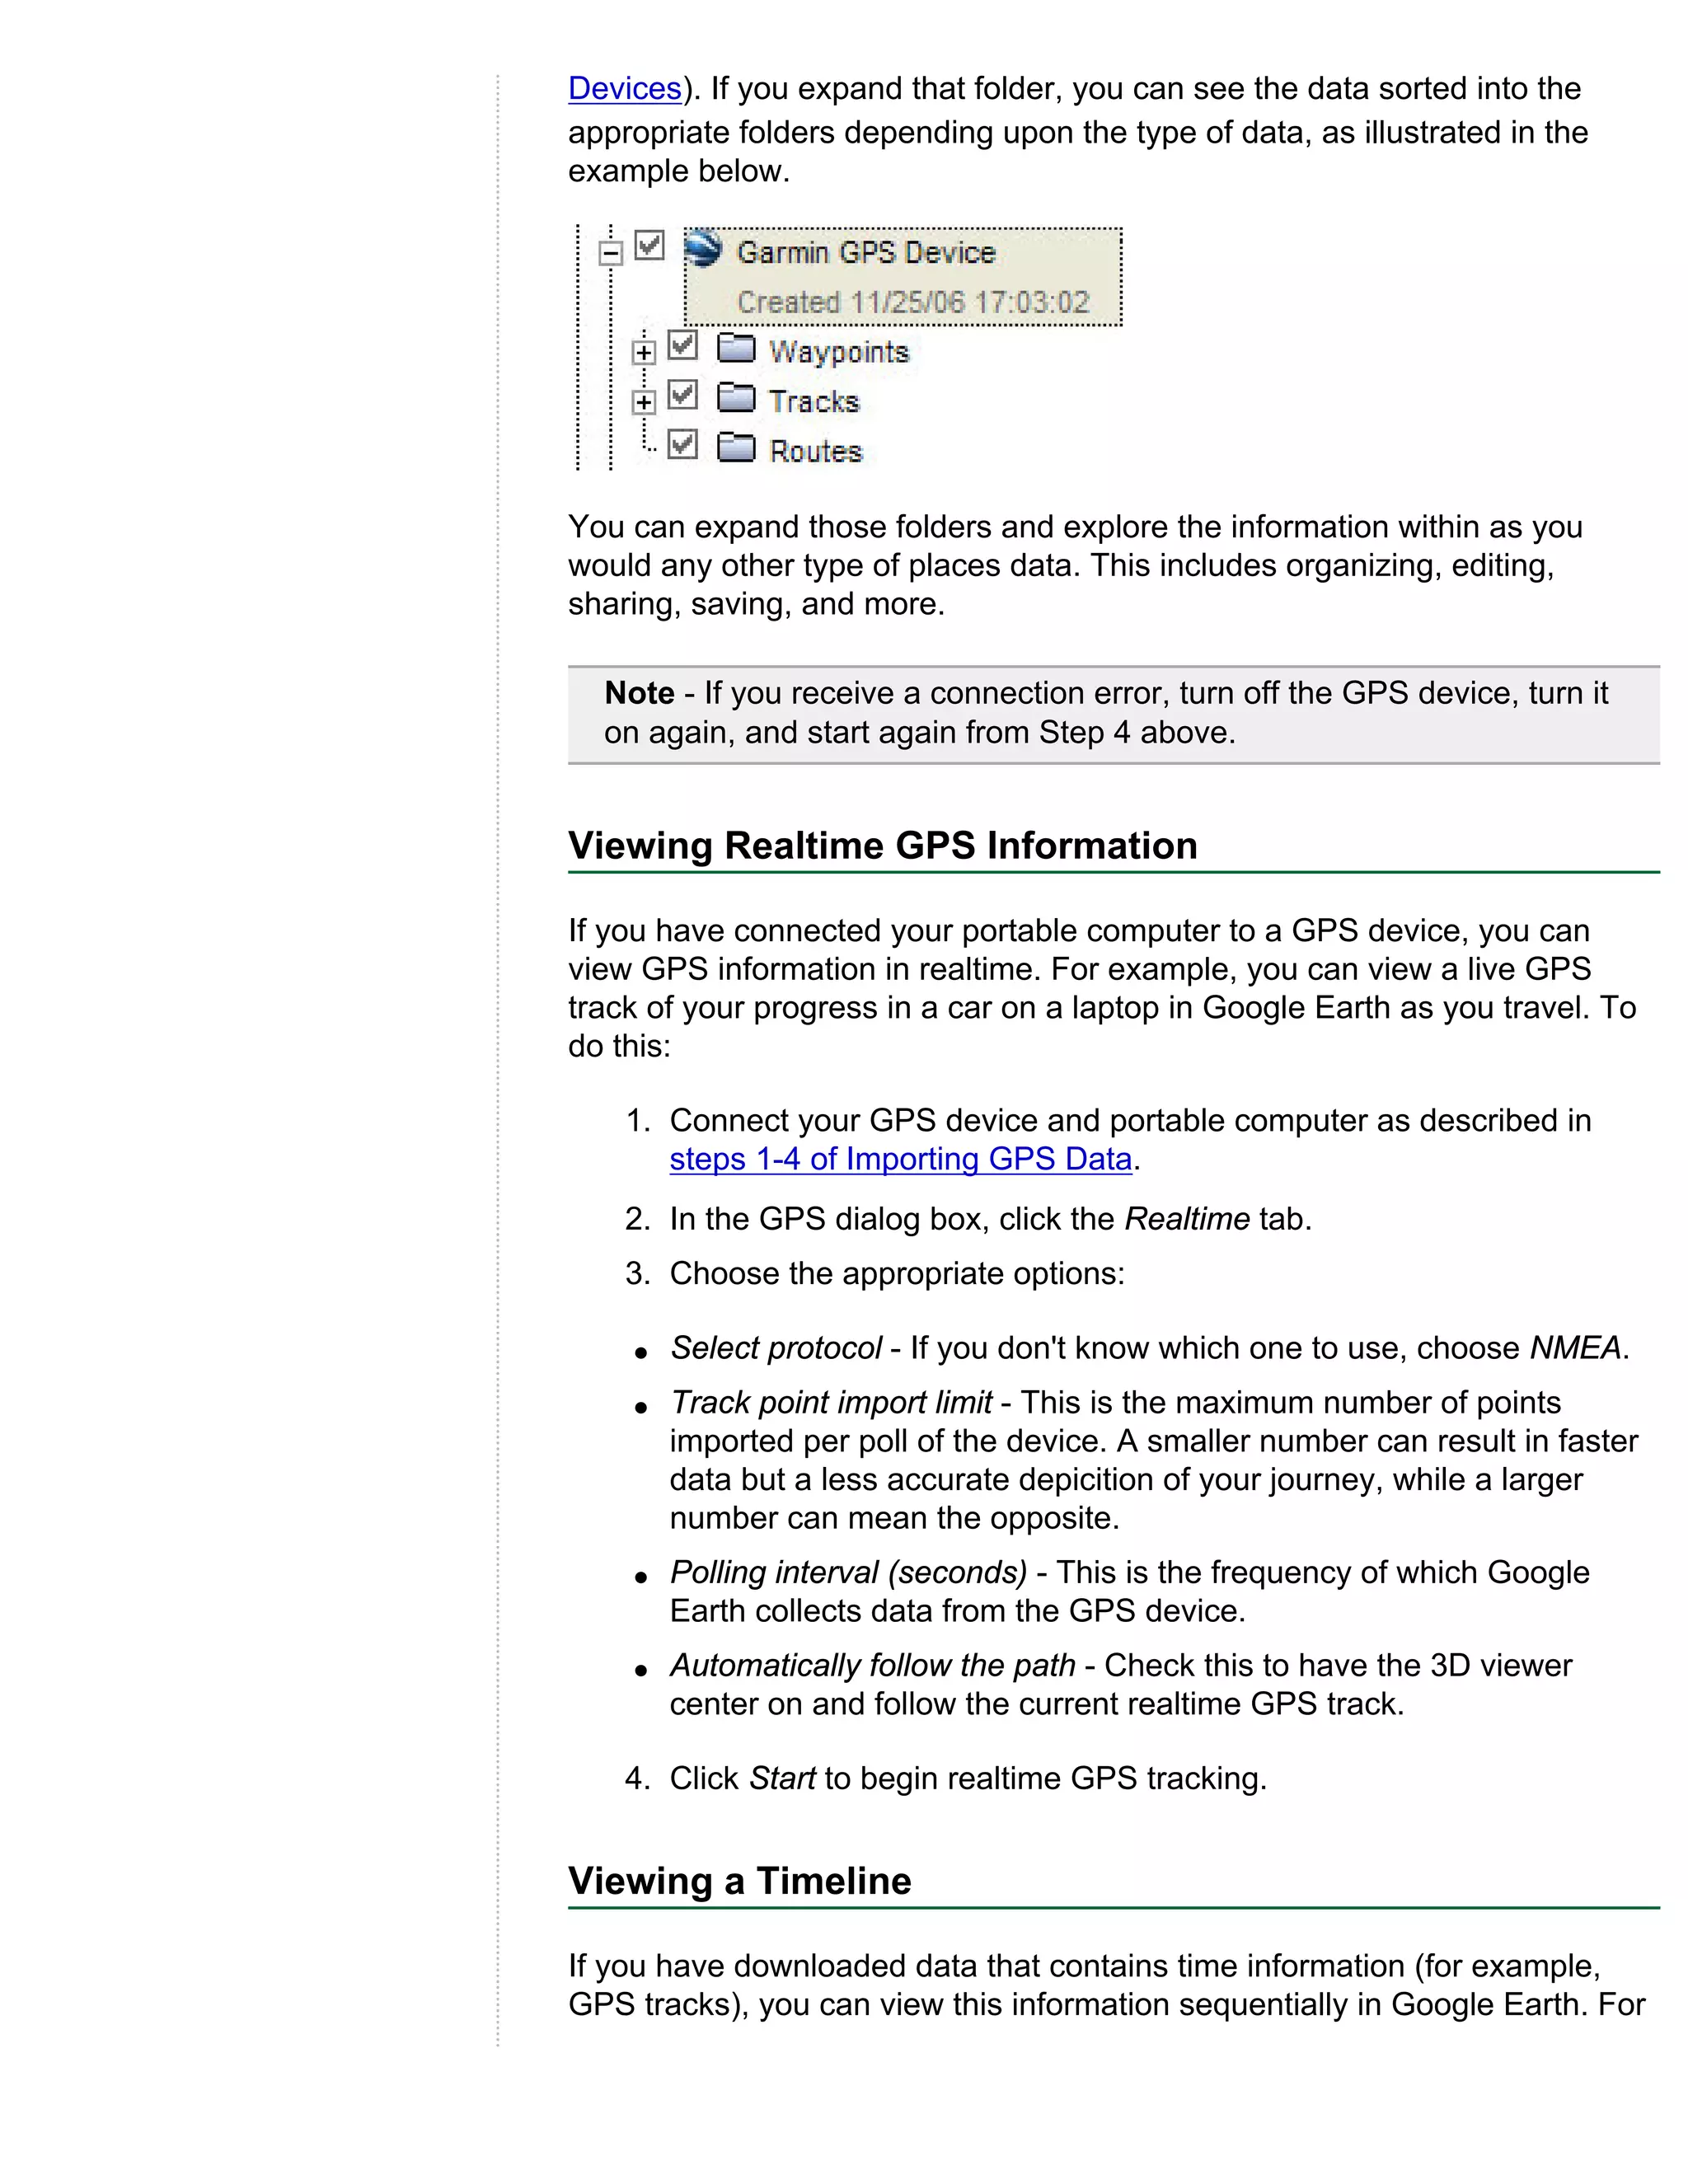
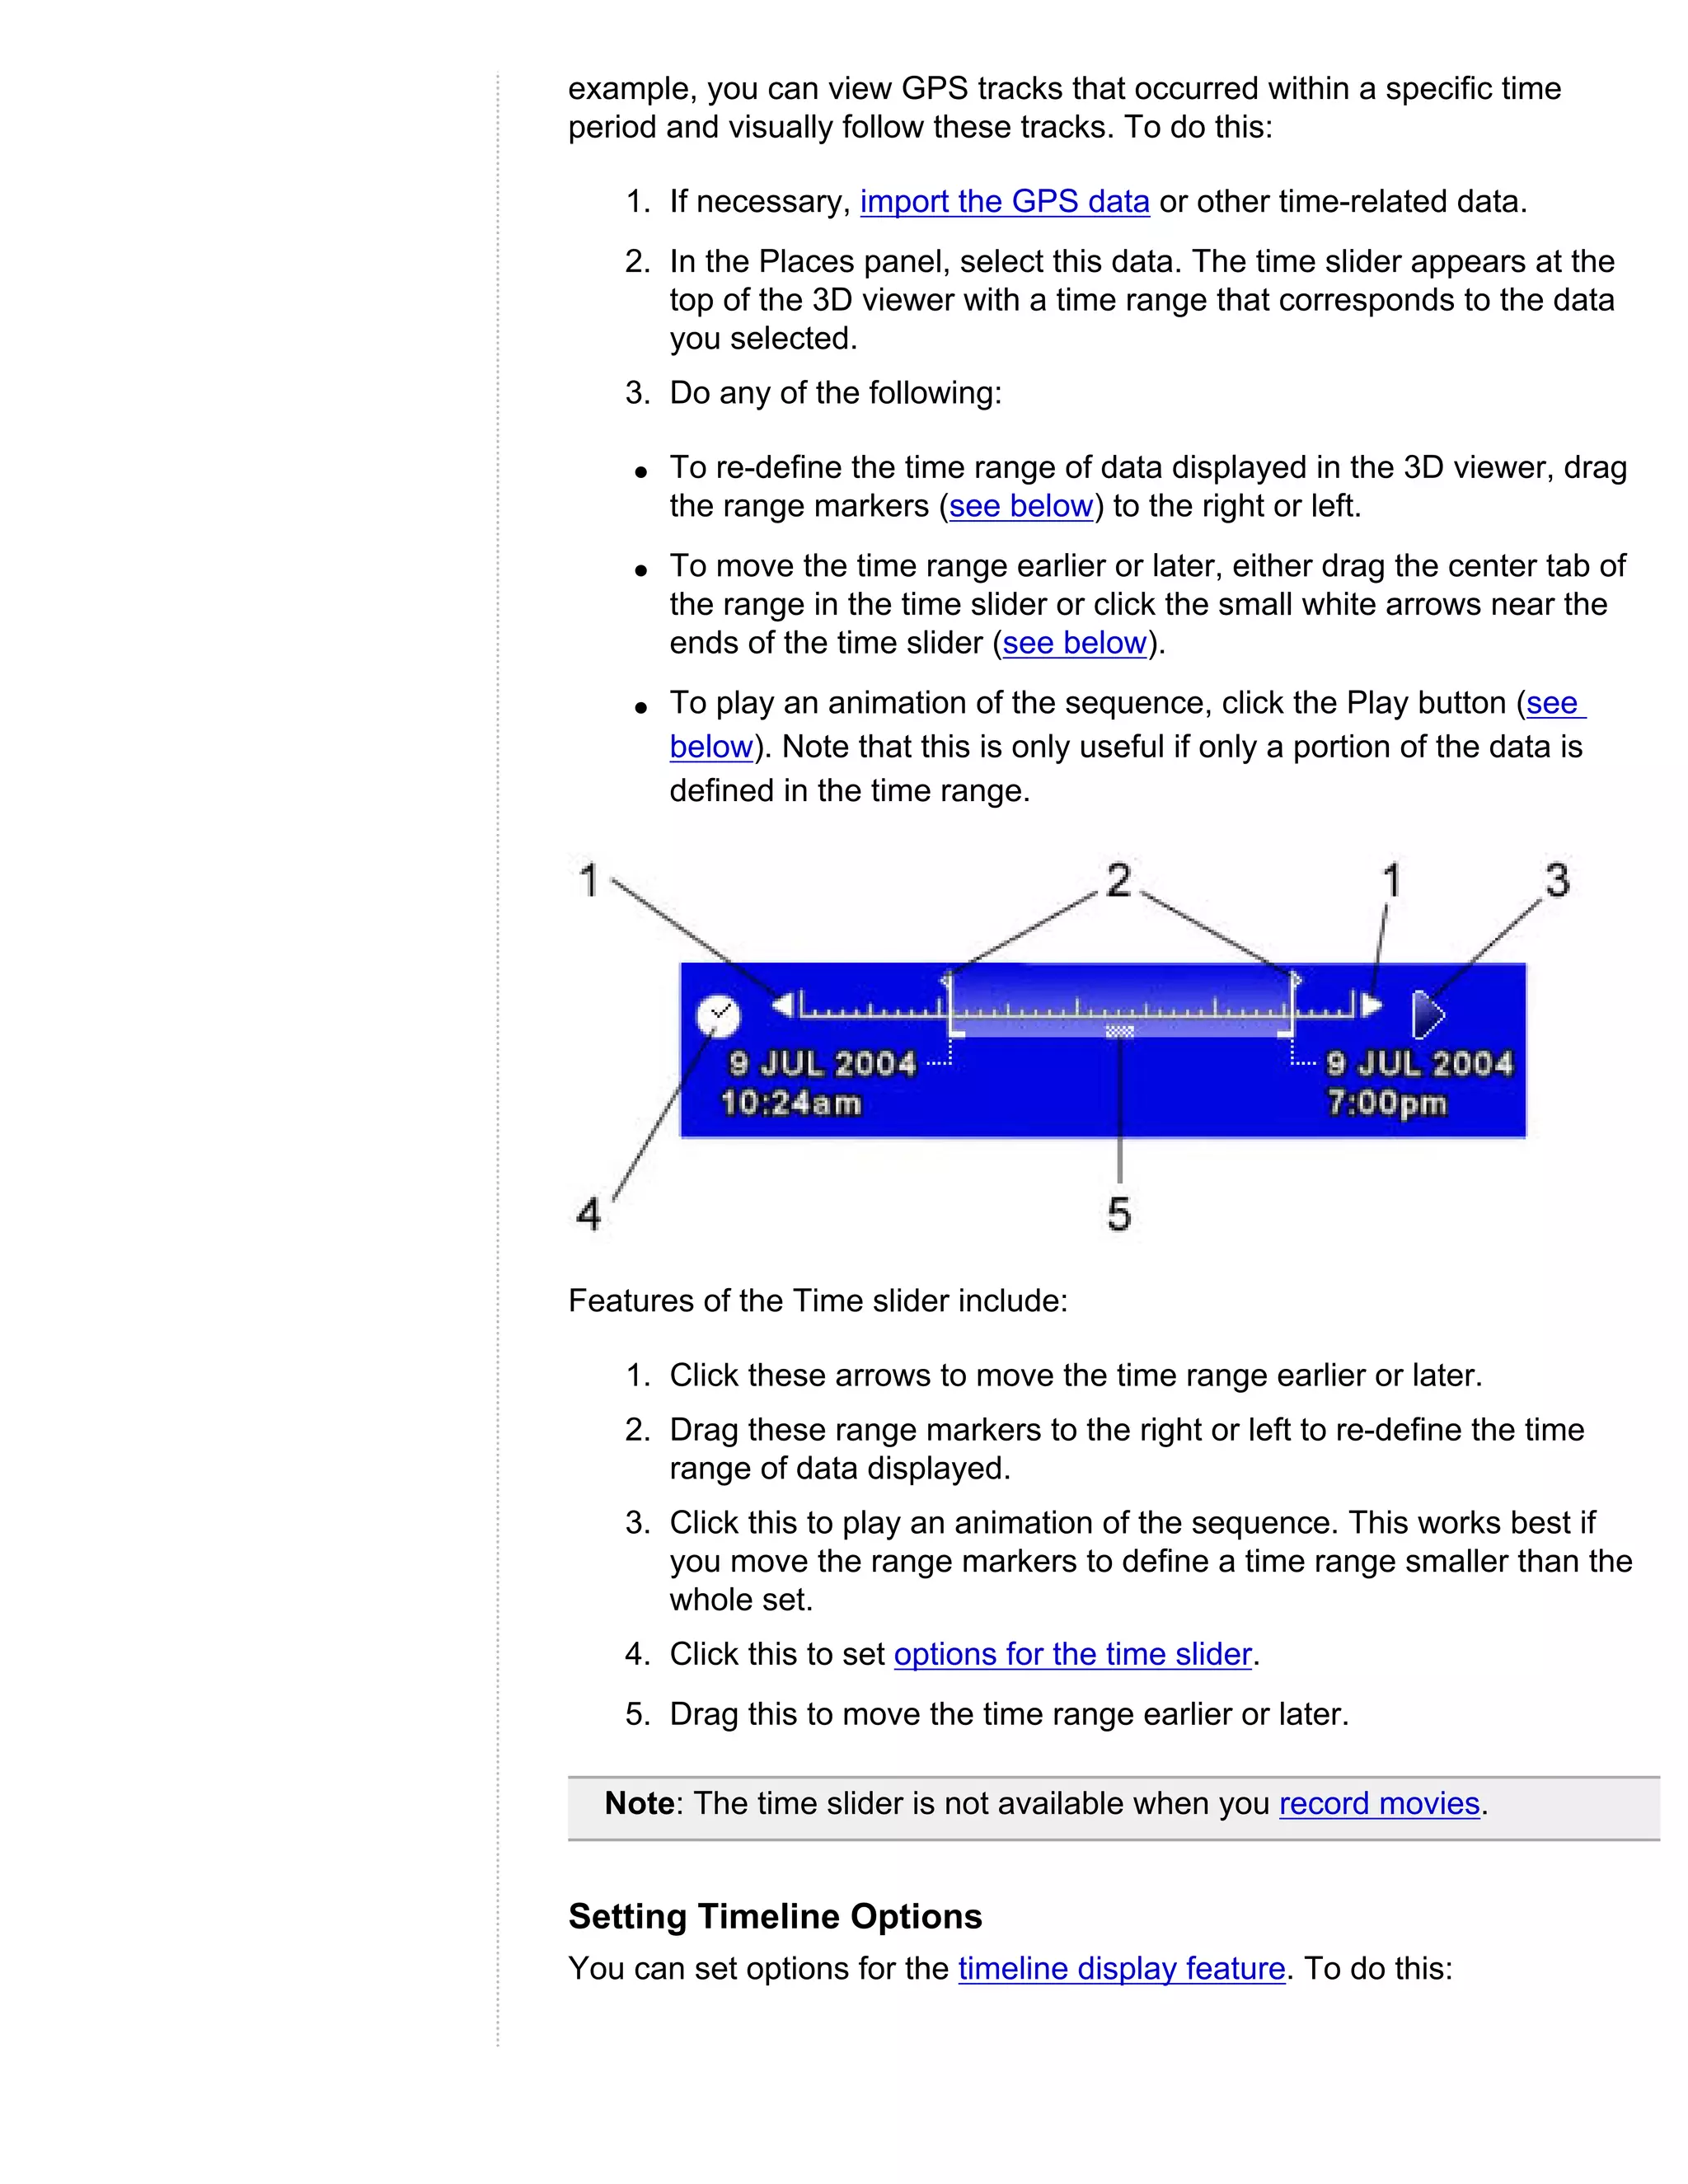
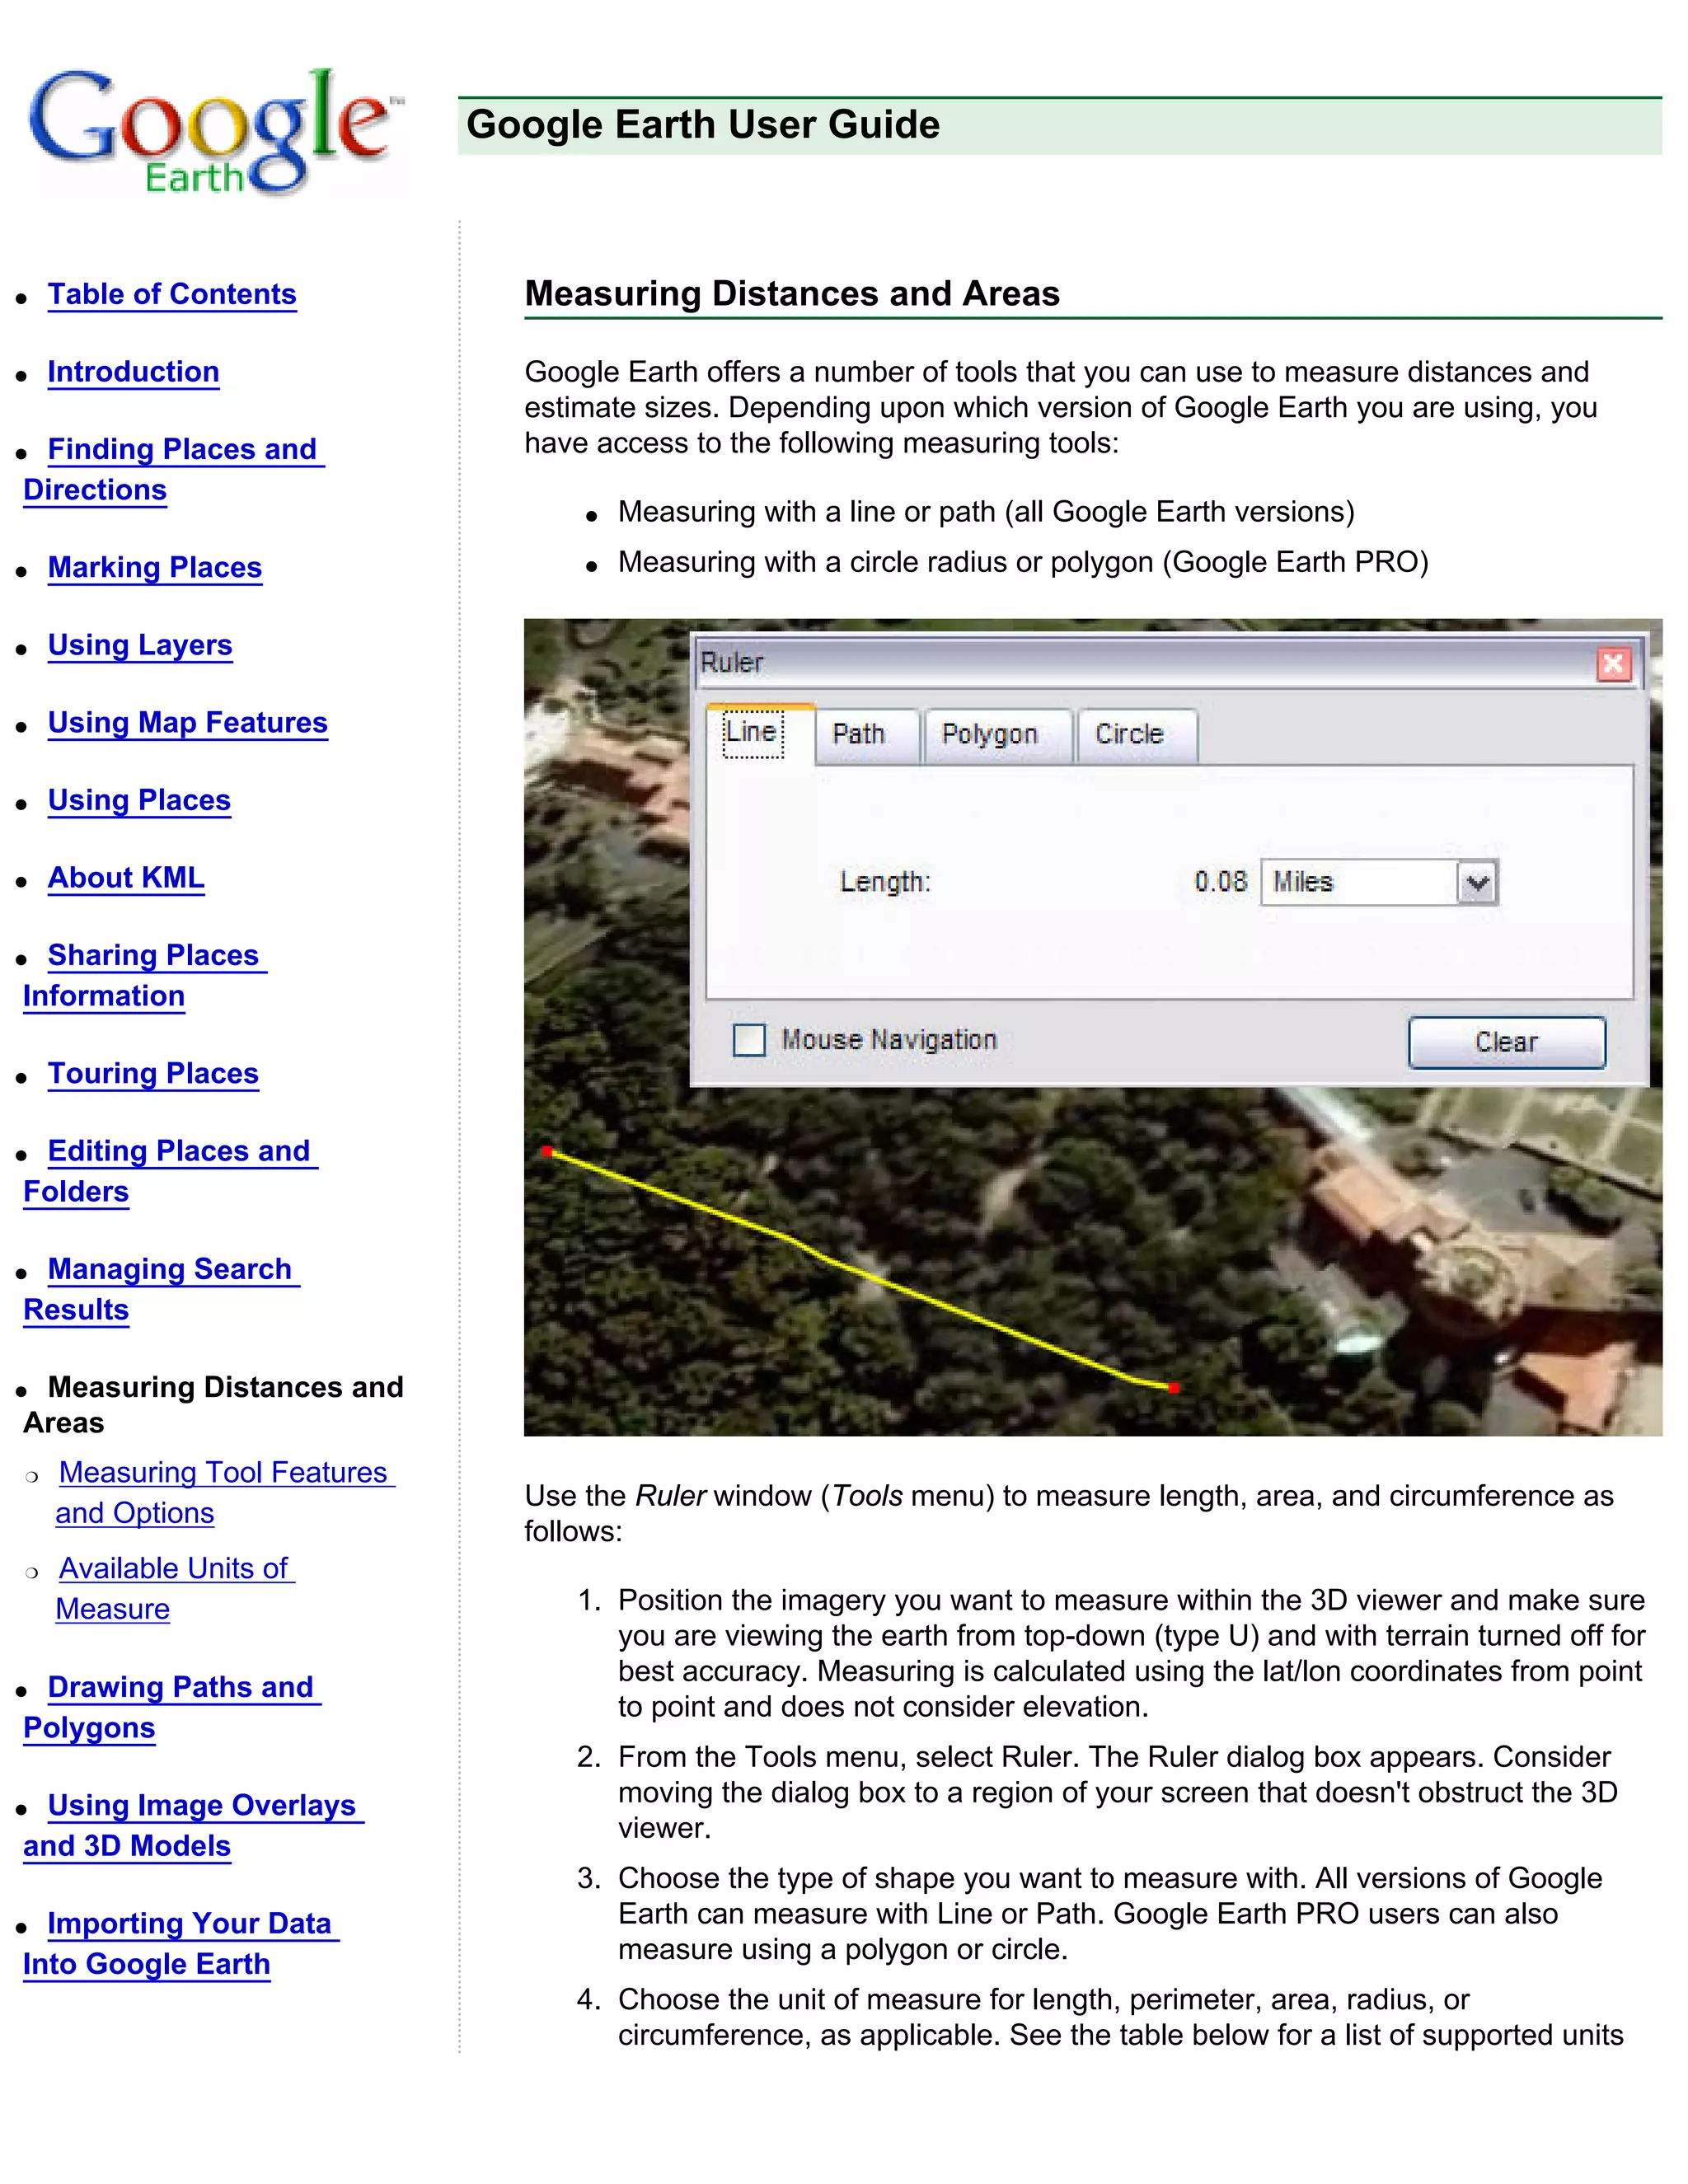
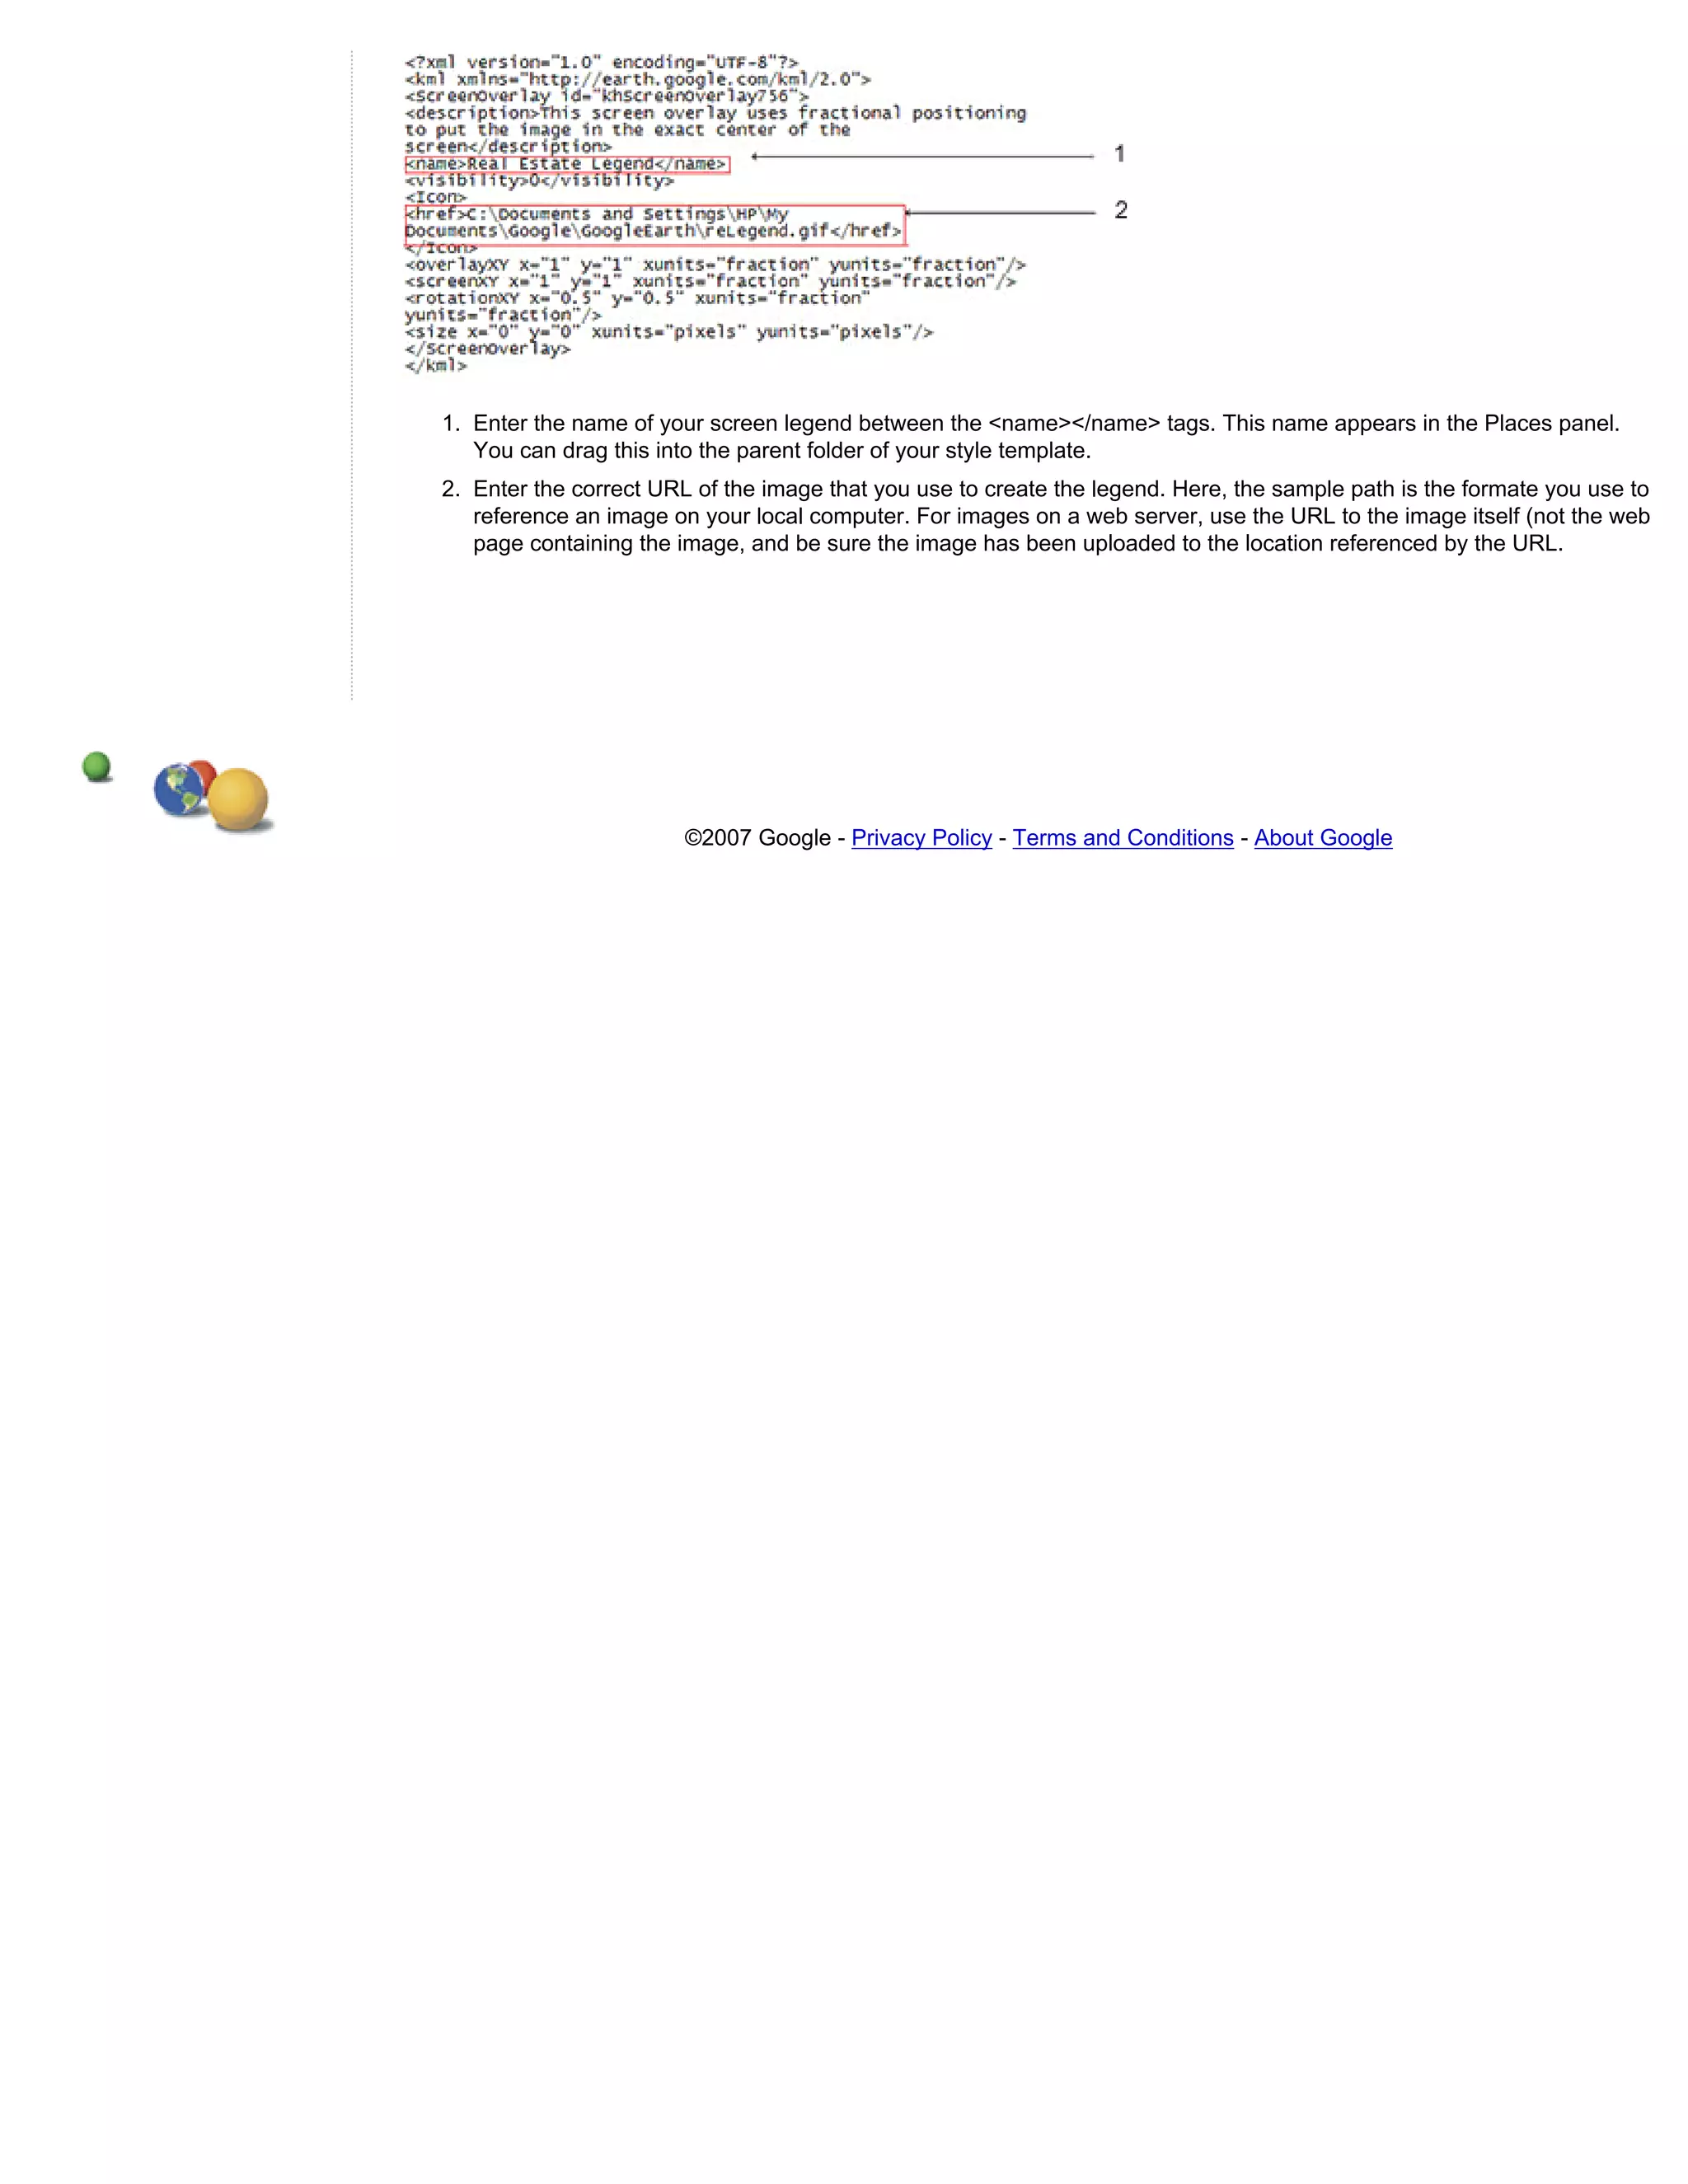
Google Earth is a free program that allows users to view Earth from space. It contains satellite imagery, maps, and tools to create placemarks and measure distances. This document provides an overview of how to get started with Google Earth, navigate around the globe, search for locations, add placemarks, and use layers and additional features. It also lists some educational resources for using Google Earth in the classroom.
Speaking notes for a Google Earth tour and demonstration. I wanted to show my colleagues how GE can be helpful in civil, environmental, and related projects on a daily basis.
This document provides instructions for mapping a local community using Google Earth. It explains how to download and use Google Earth to view satellite images, add placemarks and annotations to record information, and share the annotated maps through saving as a KML file or posting online. Directions are given on zooming and panning the map, creating folders to organize placemarks, and adding different types of annotations like placemarks, paths and polygons.
This document discusses how to build a mapping application similar to Google Maps. It provides background on the history of web mapping and how Google Maps works. The key aspects of Google Maps' performance are its tile caching system. The document recommends building your own mapping application by understanding the map stack architecture, which includes components like a tile cache, map server, and geospatial data. Rather than using Google Maps, building your own application allows more control over the map display and data.
Google Earth is a virtual globe program that displays satellite images of Earth allowing users to view locations from above. It supports 3D models and GIS data. Users can search locations, enter coordinates, view places in 23 languages. Features include Street View, a flight simulator, and sky viewing mode to see stars. It requires basic system specifications and is available in free, Plus, and Pro versions with different export and data options.
Geody is a search engine that allows users to find locations on Earth, the Moon, Mars, Venus, Mercury, and in space. Users can search for a place by name or coordinates and results are linked to tools like Google Earth, NASA WorldWind, and Google Maps. The database also contains information on places near the location searched, and users can contribute by uploading their own photos. Geody provides additional features like a world time zone converter, streaming images of places worldwide, and information on sunrise/sunset times for any location. It also works as a sidebar for exploration in Google Earth and NASA WorldWind.
This presentation introduces Google Earth, an interactive mapping application that allows users to visually explore the globe. It summarizes that Google Earth displays roads, buildings and geographic features, and that users can search locations by address, name or coordinates to fly to new places. The document also outlines that Google Earth is used by teachers, scientists, students and others to easily show locations, and describes some of its key features like Street View, historical imagery of places and the ability to add one's own placemarks.
Google's satellite earth program provides an aerial map view of the earth from space. Users can zoom in on satellite images to see detailed aerial views from above. This program allows people to view locations from above and observe physical features and structures on the ground.
Unlocking Productivity: Leveraging the Potential of Copilot in Microsoft 365, a presentation by Christoforos Vlachos, Senior Solutions Manager – Modern Workplace, Uni Systems
In the rapidly evolving landscape of technologies, XML continues to play a vital role in structuring, storing, and transporting data across diverse systems. The recent advancements in artificial intelligence (AI) present new methodologies for enhancing XML development workflows, introducing efficiency, automation, and intelligent capabilities. This presentation will outline the scope and perspective of utilizing AI in XML development. The potential benefits and the possible pitfalls will be highlighted, providing a balanced view of the subject.
We will explore the capabilities of AI in understanding XML markup languages and autonomously creating structured XML content. Additionally, we will examine the capacity of AI to enrich plain text with appropriate XML markup. Practical examples and methodological guidelines will be provided to elucidate how AI can be effectively prompted to interpret and generate accurate XML markup.
Further emphasis will be placed on the role of AI in developing XSLT, or schemas such as XSD and Schematron. We will address the techniques and strategies adopted to create prompts for generating code, explaining code, or refactoring the code, and the results achieved.
The discussion will extend to how AI can be used to transform XML content. In particular, the focus will be on the use of AI XPath extension functions in XSLT, Schematron, Schematron Quick Fixes, or for XML content refactoring.
The presentation aims to deliver a comprehensive overview of AI usage in XML development, providing attendees with the necessary knowledge to make informed decisions. Whether you’re at the early stages of adopting AI or considering integrating it in advanced XML development, this presentation will cover all levels of expertise.
By highlighting the potential advantages and challenges of integrating AI with XML development tools and languages, the presentation seeks to inspire thoughtful conversation around the future of XML development. We’ll not only delve into the technical aspects of AI-powered XML development but also discuss practical implications and possible future directions.
Dr. Sean Tan, Head of Data Science, Changi Airport Group
Discover how Changi Airport Group (CAG) leverages graph technologies and generative AI to revolutionize their search capabilities. This session delves into the unique search needs of CAG’s diverse passengers and customers, showcasing how graph data structures enhance the accuracy and relevance of AI-generated search results, mitigating the risk of “hallucinations” and improving the overall customer journey.
Communications Mining Series - Zero to Hero - Session 1DianaGray10
This session provides introduction to UiPath Communication Mining, importance and platform overview. You will acquire a good understand of the phases in Communication Mining as we go over the platform with you. Topics covered:
• Communication Mining Overview
• Why is it important?
• How can it help today’s business and the benefits
• Phases in Communication Mining
• Demo on Platform overview
• Q/A
Maruthi Prithivirajan, Head of ASEAN & IN Solution Architecture, Neo4j
Get an inside look at the latest Neo4j innovations that enable relationship-driven intelligence at scale. Learn more about the newest cloud integrations and product enhancements that make Neo4j an essential choice for developers building apps with interconnected data and generative AI.
GraphSummit Singapore | The Art of the Possible with Graph - Q2 2024Neo4j
Neha Bajwa, Vice President of Product Marketing, Neo4j
Join us as we explore breakthrough innovations enabled by interconnected data and AI. Discover firsthand how organizations use relationships in data to uncover contextual insights and solve our most pressing challenges – from optimizing supply chains, detecting fraud, and improving customer experiences to accelerating drug discoveries.
Why You Should Replace Windows 11 with Nitrux Linux 3.5.0 for enhanced perfor...SOFTTECHHUB
The choice of an operating system plays a pivotal role in shaping our computing experience. For decades, Microsoft's Windows has dominated the market, offering a familiar and widely adopted platform for personal and professional use. However, as technological advancements continue to push the boundaries of innovation, alternative operating systems have emerged, challenging the status quo and offering users a fresh perspective on computing.
One such alternative that has garnered significant attention and acclaim is Nitrux Linux 3.5.0, a sleek, powerful, and user-friendly Linux distribution that promises to redefine the way we interact with our devices. With its focus on performance, security, and customization, Nitrux Linux presents a compelling case for those seeking to break free from the constraints of proprietary software and embrace the freedom and flexibility of open-source computing.
UiPath Test Automation using UiPath Test Suite series, part 5DianaGray10
Welcome to UiPath Test Automation using UiPath Test Suite series part 5. In this session, we will cover CI/CD with devops.
Topics covered:
CI/CD with in UiPath
End-to-end overview of CI/CD pipeline with Azure devops
Speaker:
Lyndsey Byblow, Test Suite Sales Engineer @ UiPath, Inc.
In his public lecture, Christian Timmerer provides insights into the fascinating history of video streaming, starting from its humble beginnings before YouTube to the groundbreaking technologies that now dominate platforms like Netflix and ORF ON. Timmerer also presents provocative contributions of his own that have significantly influenced the industry. He concludes by looking at future challenges and invites the audience to join in a discussion.
Programming Foundation Models with DSPy - Meetup SlidesZilliz
Prompting language models is hard, while programming language models is easy. In this talk, I will discuss the state-of-the-art framework DSPy for programming foundation models with its powerful optimizers and runtime constraint system.
Full-RAG: A modern architecture for hyper-personalizationZilliz
Mike Del Balso, CEO & Co-Founder at Tecton, presents "Full RAG," a novel approach to AI recommendation systems, aiming to push beyond the limitations of traditional models through a deep integration of contextual insights and real-time data, leveraging the Retrieval-Augmented Generation architecture. This talk will outline Full RAG's potential to significantly enhance personalization, address engineering challenges such as data management and model training, and introduce data enrichment with reranking as a key solution. Attendees will gain crucial insights into the importance of hyperpersonalization in AI, the capabilities of Full RAG for advanced personalization, and strategies for managing complex data integrations for deploying cutting-edge AI solutions.
Goodbye Windows 11: Make Way for Nitrux Linux 3.5.0!SOFTTECHHUB
As the digital landscape continually evolves, operating systems play a critical role in shaping user experiences and productivity. The launch of Nitrux Linux 3.5.0 marks a significant milestone, offering a robust alternative to traditional systems such as Windows 11. This article delves into the essence of Nitrux Linux 3.5.0, exploring its unique features, advantages, and how it stands as a compelling choice for both casual users and tech enthusiasts.
GraphSummit Singapore | The Future of Agility: Supercharging Digital Transfor...Neo4j
Leonard Jayamohan, Partner & Generative AI Lead, Deloitte
This keynote will reveal how Deloitte leverages Neo4j’s graph power for groundbreaking digital twin solutions, achieving a staggering 100x performance boost. Discover the essential role knowledge graphs play in successful generative AI implementations. Plus, get an exclusive look at an innovative Neo4j + Generative AI solution Deloitte is developing in-house.
“An Outlook of the Ongoing and Future Relationship between Blockchain Technologies and Process-aware Information Systems.” Invited talk at the joint workshop on Blockchain for Information Systems (BC4IS) and Blockchain for Trusted Data Sharing (B4TDS), co-located with with the 36th International Conference on Advanced Information Systems Engineering (CAiSE), 3 June 2024, Limassol, Cyprus.
2024 State of Marketing Report – by HubspotMarius Sescu
https://www.hubspot.com/state-of-marketing
· Scaling relationships and proving ROI
· Social media is the place for search, sales, and service
· Authentic influencer partnerships fuel brand growth
· The strongest connections happen via call, click, chat, and camera.
· Time saved with AI leads to more creative work
· Seeking: A single source of truth
· TLDR; Get on social, try AI, and align your systems.
· More human marketing, powered by robots
ChatGPT is a revolutionary addition to the world since its introduction in 2022. A big shift in the sector of information gathering and processing happened because of this chatbot. What is the story of ChatGPT? How is the bot responding to prompts and generating contents? Swipe through these slides prepared by Expeed Software, a web development company regarding the development and technical intricacies of ChatGPT!
Product Design Trends in 2024 | Teenage EngineeringsPixeldarts
The realm of product design is a constantly changing environment where technology and style intersect. Every year introduces fresh challenges and exciting trends that mold the future of this captivating art form. In this piece, we delve into the significant trends set to influence the look and functionality of product design in the year 2024.
How Race, Age and Gender Shape Attitudes Towards Mental HealthThinkNow
Mental health has been in the news quite a bit lately. Dozens of U.S. states are currently suing Meta for contributing to the youth mental health crisis by inserting addictive features into their products, while the U.S. Surgeon General is touring the nation to bring awareness to the growing epidemic of loneliness and isolation. The country has endured periods of low national morale, such as in the 1970s when high inflation and the energy crisis worsened public sentiment following the Vietnam War. The current mood, however, feels different. Gallup recently reported that national mental health is at an all-time low, with few bright spots to lift spirits.
To better understand how Americans are feeling and their attitudes towards mental health in general, ThinkNow conducted a nationally representative quantitative survey of 1,500 respondents and found some interesting differences among ethnic, age and gender groups.
Technology
For example, 52% agree that technology and social media have a negative impact on mental health, but when broken out by race, 61% of Whites felt technology had a negative effect, and only 48% of Hispanics thought it did.
While technology has helped us keep in touch with friends and family in faraway places, it appears to have degraded our ability to connect in person. Staying connected online is a double-edged sword since the same news feed that brings us pictures of the grandkids and fluffy kittens also feeds us news about the wars in Israel and Ukraine, the dysfunction in Washington, the latest mass shooting and the climate crisis.
Hispanics may have a built-in defense against the isolation technology breeds, owing to their large, multigenerational households, strong social support systems, and tendency to use social media to stay connected with relatives abroad.
Age and Gender
When asked how individuals rate their mental health, men rate it higher than women by 11 percentage points, and Baby Boomers rank it highest at 83%, saying it’s good or excellent vs. 57% of Gen Z saying the same.
Gen Z spends the most amount of time on social media, so the notion that social media negatively affects mental health appears to be correlated. Unfortunately, Gen Z is also the generation that’s least comfortable discussing mental health concerns with healthcare professionals. Only 40% of them state they’re comfortable discussing their issues with a professional compared to 60% of Millennials and 65% of Boomers.
Race Affects Attitudes
As seen in previous research conducted by ThinkNow, Asian Americans lag other groups when it comes to awareness of mental health issues. Twenty-four percent of Asian Americans believe that having a mental health issue is a sign of weakness compared to the 16% average for all groups. Asians are also considerably less likely to be aware of mental health services in their communities (42% vs. 55%) and most likely to seek out information on social media (51% vs. 35%).
AI Trends in Creative Operations 2024 by Artwork Flow.pdfmarketingartwork
Creative operations teams expect increased AI use in 2024. Currently, over half of tasks are not AI-enabled, but this is expected to decrease in the coming year. ChatGPT is the most popular AI tool currently. Business leaders are more actively exploring AI benefits than individual contributors. Most respondents do not believe AI will impact workforce size in 2024. However, some inhibitions still exist around AI accuracy and lack of understanding. Creatives primarily want to use AI to save time on mundane tasks and boost productivity.
Organizational culture includes values, norms, systems, symbols, language, assumptions, beliefs, and habits that influence employee behaviors and how people interpret those behaviors. It is important because culture can help or hinder a company's success. Some key aspects of Netflix's culture that help it achieve results include hiring smartly so every position has stars, focusing on attitude over just aptitude, and having a strict policy against peacocks, whiners, and jerks.
PEPSICO Presentation to CAGNY Conference Feb 2024Neil Kimberley
PepsiCo provided a safe harbor statement noting that any forward-looking statements are based on currently available information and are subject to risks and uncertainties. It also provided information on non-GAAP measures and directing readers to its website for disclosure and reconciliation. The document then discussed PepsiCo's business overview, including that it is a global beverage and convenient food company with iconic brands, $91 billion in net revenue in 2023, and nearly $14 billion in core operating profit. It operates through a divisional structure with a focus on local consumers.
Content Methodology: A Best Practices Report (Webinar)contently
This document provides an overview of content methodology best practices. It defines content methodology as establishing objectives, KPIs, and a culture of continuous learning and iteration. An effective methodology focuses on connecting with audiences, creating optimal content, and optimizing processes. It also discusses why a methodology is needed due to the competitive landscape, proliferation of channels, and opportunities for improvement. Components of an effective methodology include defining objectives and KPIs, audience analysis, identifying opportunities, and evaluating resources. The document concludes with recommendations around creating a content plan, testing and optimizing content over 90 days.
How to Prepare For a Successful Job Search for 2024Albert Qian
The document provides guidance on preparing a job search for 2024. It discusses the state of the job market, focusing on growth in AI and healthcare but also continued layoffs. It recommends figuring out what you want to do by researching interests and skills, then conducting informational interviews. The job search should involve building a personal brand on LinkedIn, actively applying to jobs, tailoring resumes and interviews, maintaining job hunting as a habit, and continuing self-improvement. Once hired, the document advises setting new goals and keeping skills and networking active in case of future opportunities.
A report by thenetworkone and Kurio.
The contributing experts and agencies are (in an alphabetical order): Sylwia Rytel, Social Media Supervisor, 180heartbeats + JUNG v MATT (PL), Sharlene Jenner, Vice President - Director of Engagement Strategy, Abelson Taylor (USA), Alex Casanovas, Digital Director, Atrevia (ES), Dora Beilin, Senior Social Strategist, Barrett Hoffher (USA), Min Seo, Campaign Director, Brand New Agency (KR), Deshé M. Gully, Associate Strategist, Day One Agency (USA), Francesca Trevisan, Strategist, Different (IT), Trevor Crossman, CX and Digital Transformation Director; Olivia Hussey, Strategic Planner; Simi Srinarula, Social Media Manager, The Hallway (AUS), James Hebbert, Managing Director, Hylink (CN / UK), Mundy Álvarez, Planning Director; Pedro Rojas, Social Media Manager; Pancho González, CCO, Inbrax (CH), Oana Oprea, Head of Digital Planning, Jam Session Agency (RO), Amy Bottrill, Social Account Director, Launch (UK), Gaby Arriaga, Founder, Leonardo1452 (MX), Shantesh S Row, Creative Director, Liwa (UAE), Rajesh Mehta, Chief Strategy Officer; Dhruv Gaur, Digital Planning Lead; Leonie Mergulhao, Account Supervisor - Social Media & PR, Medulla (IN), Aurelija Plioplytė, Head of Digital & Social, Not Perfect (LI), Daiana Khaidargaliyeva, Account Manager, Osaka Labs (UK / USA), Stefanie Söhnchen, Vice President Digital, PIABO Communications (DE), Elisabeth Winiartati, Managing Consultant, Head of Global Integrated Communications; Lydia Aprina, Account Manager, Integrated Marketing and Communications; Nita Prabowo, Account Manager, Integrated Marketing and Communications; Okhi, Web Developer, PNTR Group (ID), Kei Obusan, Insights Director; Daffi Ranandi, Insights Manager, Radarr (SG), Gautam Reghunath, Co-founder & CEO, Talented (IN), Donagh Humphreys, Head of Social and Digital Innovation, THINKHOUSE (IRE), Sarah Yim, Strategy Director, Zulu Alpha Kilo (CA).
Trends In Paid Search: Navigating The Digital Landscape In 2024Search Engine Journal
The search marketing landscape is evolving rapidly with new technologies, and professionals, like you, rely on innovative paid search strategies to meet changing demands.
It’s important that you’re ready to implement new strategies in 2024.
Check this out and learn the top trends in paid search advertising that are expected to gain traction, so you can drive higher ROI more efficiently in 2024.
You’ll learn:
- The latest trends in AI and automation, and what this means for an evolving paid search ecosystem.
- New developments in privacy and data regulation.
- Emerging ad formats that are expected to make an impact next year.
Watch Sreekant Lanka from iQuanti and Irina Klein from OneMain Financial as they dive into the future of paid search and explore the trends, strategies, and technologies that will shape the search marketing landscape.
If you’re looking to assess your paid search strategy and design an industry-aligned plan for 2024, then this webinar is for you.
5 Public speaking tips from TED - Visualized summarySpeakerHub
From their humble beginnings in 1984, TED has grown into the world’s most powerful amplifier for speakers and thought-leaders to share their ideas. They have over 2,400 filmed talks (not including the 30,000+ TEDx videos) freely available online, and have hosted over 17,500 events around the world.
With over one billion views in a year, it’s no wonder that so many speakers are looking to TED for ideas on how to share their message more effectively.
The article “5 Public-Speaking Tips TED Gives Its Speakers”, by Carmine Gallo for Forbes, gives speakers five practical ways to connect with their audience, and effectively share their ideas on stage.
Whether you are gearing up to get on a TED stage yourself, or just want to master the skills that so many of their speakers possess, these tips and quotes from Chris Anderson, the TED Talks Curator, will encourage you to make the most impactful impression on your audience.
See the full article and more summaries like this on SpeakerHub here: https://speakerhub.com/blog/5-presentation-tips-ted-gives-its-speakers
See the original article on Forbes here:
http://www.forbes.com/forbes/welcome/?toURL=http://www.forbes.com/sites/carminegallo/2016/05/06/5-public-speaking-tips-ted-gives-its-speakers/&refURL=&referrer=#5c07a8221d9b
ChatGPT and the Future of Work - Clark Boyd Clark Boyd
Everyone is in agreement that ChatGPT (and other generative AI tools) will shape the future of work. Yet there is little consensus on exactly how, when, and to what extent this technology will change our world.
Businesses that extract maximum value from ChatGPT will use it as a collaborative tool for everything from brainstorming to technical maintenance.
For individuals, now is the time to pinpoint the skills the future professional will need to thrive in the AI age.
Check out this presentation to understand what ChatGPT is, how it will shape the future of work, and how you can prepare to take advantage.
The document provides career advice for getting into the tech field, including:
- Doing projects and internships in college to build a portfolio.
- Learning about different roles and technologies through industry research.
- Contributing to open source projects to build experience and network.
- Developing a personal brand through a website and social media presence.
- Networking through events, communities, and finding a mentor.
- Practicing interviews through mock interviews and whiteboarding coding questions.
Google's Just Not That Into You: Understanding Core Updates & Search IntentLily Ray
1. Core updates from Google periodically change how its algorithms assess and rank websites and pages. This can impact rankings through shifts in user intent, site quality issues being caught up to, world events influencing queries, and overhauls to search like the E-A-T framework.
2. There are many possible user intents beyond just transactional, navigational and informational. Identifying intent shifts is important during core updates. Sites may need to optimize for new intents through different content types and sections.
3. Responding effectively to core updates requires analyzing "before and after" data to understand changes, identifying new intents or page types, and ensuring content matches appropriate intents across video, images, knowledge graphs and more.
A brief introduction to DataScience with explaining of the concepts, algorithms, machine learning, supervised and unsupervised learning, clustering, statistics, data preprocessing, real-world applications etc.
It's part of a Data Science Corner Campaign where I will be discussing the fundamentals of DataScience, AIML, Statistics etc.
Time Management & Productivity - Best PracticesVit Horky
Here's my presentation on by proven best practices how to manage your work time effectively and how to improve your productivity. It includes practical tips and how to use tools such as Slack, Google Apps, Hubspot, Google Calendar, Gmail and others.
The six step guide to practical project managementMindGenius
The six step guide to practical project management
If you think managing projects is too difficult, think again.
We’ve stripped back project management processes to the
basics – to make it quicker and easier, without sacrificing
the vital ingredients for success.
“If you’re looking for some real-world guidance, then The Six Step Guide to Practical Project Management will help.”
Dr Andrew Makar, Tactical Project Management
Beginners Guide to TikTok for Search - Rachel Pearson - We are Tilt __ Bright...
Google earth user guide
1. Google Earth User Guide
q Table of Contents Introduction
q Introduction This user guide describes Google Earth Version 4 and later.
r Getting to Know Google
Welcome to Google Earth! Once you download and install Google Earth, your
Earth
computer becomes a window to anywhere on the planet, allowing you to view high-
r Five Cool, Easy Things resolution aerial and satellite imagery, elevation terrain, road and street labels,
You Can Do in Google business listings, and more. See Five Cool, Easy Things You Can Do in Google
Earth Earth.
r New Features in Version
4.0
r Installing Google Earth
Use the following topics to For other topics in this documentation,
r System Requirements
learn Google Earth basics - see the table of contents (left) or check
r Changing Languages navigating the globe, out these important topics:
r Additional Support searching, printing, and
r Selecting a Server more: q Making movies with Google
Earth
r Deactivating Google q Getting to know
Earth Plus, Pro or EC q Using layers
Google Earth
r Navigating in Google q Using places
Earth q New features in
Version 4.0 q Managing search results
s Using a Mouse
q Navigating in Google q Measuring distances and areas
s Using the
Navigation Controls
Earth q Drawing paths and polygons
s Tilting and Viewing q Finding places and q Using image overlays
Hilly Terrain directions
q Using GPS devices with Google
s Resetting the q Marking places on
Default View Earth
the earth
s Setting the Start
Location q Showing or hiding
points of interest
qFinding Places and
q Tilting and viewing
Directions
hilly terrain
q Marking Places
q Sight seeing
q Using Layers
Getting to Know Google Earth
q Using Map Features
The following diagram describes some of the features available in the main window of Google Earth:
q Using Places
q About KML
q Sharing Places
Information
q Touring Places
qEditing Places and
Folders
2. qManaging Search
Results
qMeasuring Distances
and Areas
qDrawing Paths and
Polygons
qUsing Image Overlays
and 3D Models
q Importing Your Data
Into Google Earth
q Using Style Templates
qUsing GPS Devices with
Google Earth
qMaking Movies with
Google Earth
q Keyboard Controls
q 3D Viewer Options
1. Search panel - Use this to find places and directions and manage search results. Google Earth EC
may display additonal tabs here.
2. Overview map - Use this for an additional perspective of the Earth.
3. Hide/Show sidebar - Click this to conceal or the display the side bar (Search, Places and Layers
panels).
4. Placemark - Click this to add a placemark for a location.
5. Polygon - Click this to add a polygon.
6. Path - Click this to add a path (line or lines).
7. Image Overlay - Click this to add an image overlay on the Earth.
8. Measure - Click this to measure a distance or area size.
9. Email - Click this to email a view or image.
10. Print - Click this to print the current view of the Earth.
11. Show in Google Maps - Click this to show the current view in Google Maps in your web browser
12. Navigation controls - Use these to tilt, zoom and move around your viewpoint (see below).
13. Layers panel - Use this to display points of interest.
14. Places panel - Use this to locate, save, organize and revisit placemarks.
3. 15. 3D Viewer - View the globe and its terrain in this window.
16. Status bar - View coordinate, elevation and imagery streaming status here.
Five Cool, Easy Things You Can Do in Google Earth
Want to jump in and start having fun with Google Earth? Try any of the the following:
1. View an image of your home, school or any place on Earth - Click Fly To. Enter the location in the
input box and click the Search button. In the search results (Places panel), double click the location.
Google Earth flies you to this location.
Search button
2. Go on a tour of the world - In the Places panel, check the Sightseeing folder and click the Play Tour
button:
3. Get driving directions from one place to another and fly (follow) the route - See Getting Directions
and Touring the Route.
4. View other cool locations and features created by other Google Earth users - In the Layers panel,
check Community Showcase. Interesting placemarks and other features appear in the 3D viewer.
Double click these points of interest to view and explore. See Using Points of Interest (POIs) for more
information.
5. View 3D terrain of a place - This is more fun with hilly or mountainous terrain, such as the Grand
Canyon. Go to a location (see number 1 above). When the view shows the location, use the tilt slider to
tilt the terrain. See Using the Navigational Controls and Tilting and Viewing Hilly Terrain for more
information.
Tilt slider
View samples of other things you can see and do in Google Earth.
New Features in Version 4.1
This version of Google Earth has a number of exciting new features, including:
q Support for many new language versions
q Default view shows your location
q Ability to deactivate Plus and Pro versions
q Support for Microsoft Vista
q Display current view in Google Maps
q Improved rendering performance
q Start up tips
q MSI installer for enterprises
Installing Google Earth
For information about installing Google Earth, visit the Google Earth Support Center.
System Requirements
To use Google Earth on a Windows PC, you must have at least the following:
q Operating System: Windows 2000, Windows XP, Windows Vista
q CPU: 500Mhz, Pentium 3
q System Memory (RAM): 128MB RAM
q Hard Disk: 400MB free space
4. q Network Speed: 128 Kbits/sec
q Graphics Card: 3D-capable with 16MB of VRAM
q Screen: 1024x768, "16-bit High Color" screen
q For better performance, see Recommended Configuration.
To use Google Earth on a Mac, you must have at least the following:
q Operating System: Mac OS X 10.4 or later
q CPU: G3 500Mhz
q System Memory (RAM): 256MB RAM
q Hard Disk: 400MB free space
q Network Speed: 128 Kbits/sec
q Graphics Card: 3D-capable with 16MB of VRAM
q Screen: 1024x768, "Thousands of Colors"
q For better performance, see Recommended Configuration
To use Google Earth on a Linux computer, you must have at least the following:
q Kernel 2.4 or later
q glibc 2.3.2 w/ NPTL or later
q XFree86-4.0 or x.org R6.7 or later
q CPU: 500Mhz, Pentium 3
q System Memory (RAM): 128MB RAM
q Hard Disk: 400MB free space
q Network Speed: 128 Kbits/sec
q Graphics Card: 3D-capable with 16MB of VRAM
q Screen: 1024x768, "16-bit High Color" screen
Note that Google Earth may work on other configurations not explicitly listed here. The recommended
configuration for Linux computers:
q Kernel 2.6 or later
q glibc 2.3.5 w/ NPTL or later
q x.org R6.7 or later
Google Earth has been tested on the following GNU/Linux distributions, but certainly works on others:
q Ubuntu 5.10
q Suse 10.1
q Fedora Core 5
q Linspire 5.1
q Gentoo 2006.0
q Debian 3.1
q Red Hat 9
Please make sure your system has properly-configured OpenGL drivers. If Google Earth appears to be slow
and unresponsive, it is likely that your system needs different video drivers.
Changing Languages
You can change the language displayed in Google Earth. To do this:
1. Click Tools > Options (Mac: Google Earth > Preferences). Click the General tab.
2. Under Language settings, choose the appropriate language of your choice. System Default
corresponds to the language used by the operating system of your computer.
5. At this time, Google Earth supports the following languages:
q English
q French
q German
q Italian
q Japanese
q Spanish
Additional Support
In addition to this user guide, Google offers a number of resources that can help you use and enjoy Google
Earth. These include:
q Tutorials: These provide hands-on lessons using the Google Earth.
q FAQs: View a list answers to frequently asked questions (FAQs) about Google Earth.
q Google Earth Help Center: Use the Help Center at any time to find additional information.
q Troubleshooting: View information that specifically pertains to troubleshooting issues with Google
Earth.
q Google Earth Community: Learn from other Google Earth users by asking questions and sharing
answers on the Google Earth Community forums.
q Using Google Earth: This blog describes how you can use some of the interesting features of Google
Earth.
Selecting a Server
Note: This section is relevant to Google Earth Pro and EC users.
When you first start Google Earth EC, the Select Server dialog box appears. This enables you to chose the
appropriate server settings. Settings in this dialog box include:
q Server: Choose or enter the address for the appropriate server. For more information, contact your
administrator.
q Port: The appropriate port for this server. For more information, contact your administrator.
q Always login to this server: Check this to automatically login in this server when you start Google Earth.
Subsequently, this dialog box does not appear. To make it appear again when you start Google Earth,
click File > Disable auto-login.
q Enable secure login: Check this if your work environment requires a secure login to this server. For
more information, contact your administrator.
To add a database (server) that you can log into in Google Earth EC, click File > Add Database. To log out of
a server in Google Earth Pro or EC, choose File > Server Log Out. To log in to a server, choose File > Server
Login and choose the settings described above.
Tip - When you add another database (click File > Add Database), Google Earth logs into new database
and maintains a connection to the existing database. Using this method, you can view data from up to eight
databases simultaneously.
Deactivating Google Earth Plus, Pro or EC
If you have Google Earth Plus, Pro or EC installed, you can deactivate this software. When you deactivate
Google Earth Plus, the free version of the product replaces Google Earth Plus. When you deactivate Google
Earth Pro or EC, the the license is removed so you can use the Pro or EC license on another computer.
To deactivate Google Earth Plus, Pro or EC, click Help > Deactivate Google Earth Plus/Pro/EC license.
6. Tip: When the Google Earth Pro/EC login and password appear, write these down so you can use them
later to activate the software on this or another computer.
Navigating in Google Earth
Tip: Follow a tutorial on this subject: Navigating on the Earth
In Google Earth, you see the Earth and its terrain in the 3D viewer. You can navigate through this 3D view of
the globe in several ways:
q Using a mouse
q Using the navigation controls
You can also manipulate your view of the earth by tilting the terrain for perspectives other than a top-down
view. Finally, you can reset the default view for a north-up, top-down view wherever you are.
Using a Mouse
To get started navigating with your mouse, simply position the cursor in the middle of the 3D viewer (image of
the earth), click one of the buttons (right or left), move the mouse and note what happens in the viewer.
Depending upon which mouse button you press, the cursor changes shape to indicate a change in behavior.
By moving the mouse while pressing one of the buttons, you can:
q Drag the view in any direction
q Zoom in or out
q Tilt the view (requires middle button or scroll wheel)
q Rotate the view (requires middle button or scroll wheel)
The following list describes all the actions you can accomplish using the mouse.
q Move the view in any direction (north, south, east, or west) - To move the view, position the mouse
cursor on the viewer and press the LEFT/main mouse button. Notice that the cursor icon changes from
an open hand to a closed hand . Pull the viewer as if the hand cursor is like a hand on an actual
globe, and you want to drag a new part of the earth into view.
You can drag in any direction to reveal new parts of the globe, and you can even drag in circular
motions.
q Drift continuously across the earth - If you want to drift continuously in any direction, hold the left/
main mouse button down. Then, briefly move the mouse and release the button, as if you are
"throwing" the scene. Click once in the 3D viewer to stop motion.
q Zoom in - There are a number of ways to zoom in with the mouse.
r You can double-click anywhere in the 3D viewer to zoom in to that point. Single-click to stop, or
double-click to zoom in more.
r If your mouse has a scroll wheel, use it to zoom in by scrolling towards you. Use the ALT (alt/
option on the Mac) key in combination with the scroll wheel to zoom in by smaller increments. More
settings.
r You can also position the cursor on the screen and press the RIGHT mouse button (CTRL click on
7. the Mac). Once the cursor changes to a double arrow, move the mouse backward or pull toward
you, releasing the button when you reach the desired elevation.
If you want to zoom continuously in, hold the button down and briefly pull the mouse down and
release the button, as if you are "throwing" the scene. Click once in the viewer to stop the motion.
r On some Macintosh laptops, you can drag two fingers across the trackpad to zoom in and out.
q Zoom out - There are a number of ways to zoom out with the mouse.
r Using the RIGHT mouse button (CTRL click on the Mac), double-click anywhere in the 3D viewer
to zoom out from that point. The viewer will zoom out by a certain amount. Single-click to stop, or
right double-click (CTRL click on the Mac) to zoom out more.
r If your mouse has a scroll wheel, you can use the scroll wheel to zoom out by scrolling away from
you (forward motion). Use the ALT (alt/option on the Mac) key in combination with the scroll wheel
to zoom out by smaller increments. More settings.
r You can also position the mouse cursor on the screen and press the RIGHT mouse button (CTRL
click on the Mac). Once the cursor changes to a double arrow, move the mouse forward or push
away from you, releasing the button when you reach the desired elevation. If you want to zoom
continuously out, hold the right button (CTRL click on the Mac) down and briefly push the mouse
forward and release the button, as if you are "throwing" the scene. Click once in the viewer to stop
motion.
q Tilt the view - If your mouse has a either middle button or a depressible scroll wheel, you can tilt the
view by depressing the button and moving the mouse forward or backward. If your mouse has a scroll
wheel, you can tilt the view by pressing the SHIFT key and scrolling DOWN to tilt the earth to "top
down" view, or scrolling UP to tilt the earth for horizon view. See Tilting and Viewing Hilly Terrain for
more information.
q Rotate the view - If your mouse has either a middle button or a depressible scroll wheel, you rotate the
view to the left by clicking on the middle button and moving the mouse to the left. To rotate the view
right, click on the middle button and move the mouse to the right. You can also use the CTRL ( on
the Mac) key in combination with the scroll wheel to rotate the view. Press CTRL ( on the Mac) and
scroll UP to rotate clockwise, CTRL ( on the Mac) + scroll DOWN to rotate counter-clockwise. See
Tilting and Viewing Hilly Terrain for more information.
q Mouse Wheel - See above. To change these settings, click Tools > Options > Navigation > Navigation
Mode > Mouse Wheel Settings (on the Mac: Google Earth > Preferences > Navigation > Navigation
Mode > Mouse Wheel Settings). Move the slider to set how fast or slow your viewpoint of the earth
zooms in or out. Check Invert Mouse Wheel Zoom Direction to reverse the direction of zooming when
you use the mouse wheel.
q Pan and Zoom navigation - This mode is on by default when you start Google Earth. You can return
to this mode from other modes by doing one of the following:
r Type Ctrl ( on the Mac) +T. When this mode is activated, the cursor changes to a hand
symbol.
r (Windows and Linux) Tools > Options > Navigation > Navigation Mode > Pan and Zoom . (Mac)
Google Earth > Preferences > Navigation > Navigation Mode > Pan and Zoom. If you use a
joystick or other non-mouse controller, you can also change how perspective moves in the 3D
viewer under Non-mouse controller settings. Note that these options are not available (greyed
out) until you connect a non-mouse controller to your computer and check Enable Controller.
Choose User-Based to move your particular vantage point or Earth Based to move the globe.
Check Reverse Controls to reverse the actions of the joystick.
q GForce navigation (advanced) - To change to this navigation mode, do one of the following:
r Type Ctrl ( on the Mac) + G to change when window focus is in the 3D viewer
r (Windows and Linux) Tools > Options > Navigation > Navigation Mode > Flight Control. (Mac)
Google Earth > Preferences > Navigation > Navigation Mode > Flight Control.
This mode is in effect when the navigation cursor changes to an airplane. In addition, the effects of
G-Force mode are most noticeable the closer you are to the terrain, and become less exaggerated
the higher your eye elevation. The behavior of this navigation mode simulates that of a joystick,
where the direction your mouse moves indicates specific joystick moves. If you are familiar with
using a joystick, you'll be able to use this mode easily.
To pan left or right, or to tilt the horizon left or right, left-click and move the mouse right/left of
center. To tilt to top-down view, left-click and move the mouse forward (away from you). To tilt to
8. horizon view, left click and move the mouse back (toward you). To accelerate, right-click (CTRL
click on the Mac) and move the mouse forward. To decelerate, right-click (CTRL click on the Mac)
and move the mouse backward.
The response in the 3D viewer to your mouse movements is related to the vigorousness of your
mouse movements, so you can test this mode out slowly using movements.
To return to standard trackball navigation mode, type Ctrl ( on the Mac) + T. To stop motion in
the viewer at any time, press the spacebar.
q Click-and-Zoom navigation - To change to this navigation mode, choose:
r (Windows and Linux) Tools > Options > Navigation > Navigation Mode > Click-and-Zoom
r (Mac) Google Earth > Preferences > Navigation > Navigation Mode > Click-and-Zoom
When the 3D viewer enters this navigation mode, the cursor changes to a cross-hair mark. Here,
navigation with the mouse is limited: left-click to zoom in a set distance, and right-click (CTRL click on
the Mac) to zoom out a set distance. Use the navigation controls to pan and rotate. Return to the
standard trackball mode by typing Ctrl ( on the Mac) +T.
Using the Navigation Controls
To view and use the navigation controls, move the cursor over right corner of the 3D viewer. After you start
Google Earth and move the cursor over this area, the navigation controls fade from sight when you move the
cursor elsewhere. To view these controls again, simply move the cursor over the right corner of the 3D viewer.
To hide or show the compass icon in the 3D viewer, click View > Compass. See also Showing or Hiding Items
in the 3D Viewer.
The Google Earth navigation controls offer the same type of navigation action that you can achieve with
mouse navigation. In addition, you can use the controls to tilt the view (perhaps for a perspective on terrain) or
to rotate the viewer around the center. The following diagram shows the controls and explains their functions.
1. Use the tilt slider to tilt the terrain toward a horizon view. Move the slider to the left for a top-down view
or to the right for a horizon view. Double click the icons at the end of the slider to reset the tilt all the
way to a top-down view or to a horizon view.
2. Use the joystick to move the center point of the view down, up, right or left. Click the center, hold the
mouse button, and move in any direction.
3. Click the direction arrows to move the view in the direction you wish.
4. Click the north up button to reset the view so that north is at the top of the screen.
5. Use the zoom slider to zoom in or out (+ to zoom in, - to zoom out). Double click the icons at the end of
the slider to reset the zoom all the in or out.
6. Click and drag the navigation ring to rotate the view.
You can also use the keyboard to control navigation, see 3D Viewer Navigation in Keyboard Controls for more
information.
9. Tilting and Viewing Hilly Terrain
When you first start Google Earth, the default view of the earth is a "top-down" view, which looks like the view
straight down out of an airplane window when you are sufficiently zoomed in.
q Tilt the terrain from 0 - 90 degrees - You can use the mouse or the navigation controls to tilt the view
in order to see a different perspective of the area you're exploring. You can tilt to a maximum of 90
degrees, which provides a view of the object as well as the horizon, in some cases.
q Turn on terrain - Using the tilt feature is particularly interesting when you are looking at a part of the
earth where the terrain is hilly, so be sure to also have the terrain check box selected in the Layers
panel when tilting the view.
q Rotate the view for a new perspective - Once you have tilted the view so that you are looking at a
particular object, such as a hill, you can also rotate around that object. When you do this, the object
remains in the center of the view, but you look at it from different perspectives (i.e., north, south, east,
west) as you rotate around it.
q Use the middle mouse button (if available) for seamless movement - If your mouse has a middle
button or a depressible scroll wheel, you can depress the button to both tilt and rotate the view.
Movements up or down tilt the view, and movements left or right rotate the view. See Using a Mouse
for more information.
The following figures show a comparison view of Mount Shasta in California with and without tilt enabled.
Top down view Tilted view
You can adjust the appearance of the terrain if you would like the elevation to appear more pronounced. To do
this, click Tools > Options > 3D View from the Tools menu (for the Mac, choose Google Earth > Preferences >
3D View) and change the Elevation Exaggeration figure. You can set it to any value from 1 to 3, including
decimal points. A common setting is 1.5, which achieves an obvious yet natural elevation appearance. See
Viewing Preferences for more information.
Resetting the Default View
After tilting and rotating the 3D view in Google Earth, you can always quickly reset to the default north-up and
top-down view by clicking on the appropriate buttons in the navigation controls.
q Click the North-up button to reset the view so that north is at the top of the viewer.
q Click the Reset Tilt button to reset tilt to the default "top-down" view.
q (Windows and Linux only) Click in the 3D viewer and type r on the keyboard to reset the view (see
Keyboard Controls for more).
Note: To quickly return to a known, familiar spot if you get lost, click on the default placemark in the My
Places folder. This returns you to the center of your country (or a country that speaks your language). You
can also edit the location and name for that Default placemark if you want to. See Editing Places and
Folders for more information.
11. Google Earth User Guide
Version 4.1 - For Windows, Mac OS X, and Linux
Google Earth - Google Earth Plus - Google Earth Pro - Google EC
Table of Contents
Introduction Measuring Distances and
Areas
q Getting to Know Google
Earth q Measuring Tool
q Five Cool, Easy Things Features and Options
You Can Do in Google q Available Units of
Earth Measure
q New Features in Drawing Paths and Polygons
Version 4.1
q Installing Google Earth Using Image Overlays and 3D
Models
q System Requirements
q Changing Languages q About Overlays
q Additional Support q Overlay
Requirements
q Selecting a Server
q Overlay Features
q Deactivating Google
Earth Plus, Pro or EC r Terrain
Integration
q Navigating in Google
Earth r Creating an
Image Overlay
r Using a Mouse
q Opening and Viewing
r Using the
Overlays
Navigation Controls
r Opening
r Tilting and Viewing
Overlays Emailed
Hilly Terrain
to You
r Resetting the
r Opening
Default View
Overlays on a
r Setting the Start Web Server
Location
12. r Posting Image
Finding Places and Directions Overlays to a
Web Server
q Finding Addresses and
Locations q Placing WMS Image
Overlays
r About Search
Terms q Placing Google
SketchUp 3D Models
q Searching for Listings
Importing Your Data Into
r Search Methods
Google Earth
q Getting and Printing
Directions q Importing Vector
Data
r Getting Directions
r Printing Directions r Using Third Party
Vector Data
q Touring and Saving Using Generic Text
Directions Files
r Touring the Route r Required
r Saving Directions Location Fields
Using Addresses
q Showing and Hiding
Points of Interest q Using Geographic
Coordinates
q Sightseeing
q Viewing a Location in r Optional and
Google Maps Descriptive
Fields
Marking Places Viewing Vector Data
Fields
q Creating a New
q Modifying Vector
Placemark
Data Display
q Saving a Point of
q Importing Imagery
Interest
r Opening GIS
q Sharing a Placemark
Imagery
q Saving Search Results
r Saving GIS
q Saving Images Imagery
q Printing A Note About
Projections and
13. Using Layers Datums
q What is a Map
q Layers Versus Places
Projection?
q Using Points of Interest
q What Is a Datum?
(POIs)
r Locating POIs in Using Style Templates
Your Viewing Area
q Applying a Style
r Saving or Copying Template
POIs to My Places
r Mapping Color
r Viewing Layer Sub- Styles
Categories
r Using a Single
r Tuning Display of
Color
POIs
r Using Random
Using Map Features Colors
r Setting Colors
q Roads
Based on Field
q Terrain Values
q Borders r Mapping Icons to
q Viewing 3D Buildings Point Data
q Viewing Google r Setting Icons
SketchUp 3D Models Based on Fields
r Mapping Height
Using Places
Values
q Organizing Places Data r Height Values for
Text Fields
r Creating Folders
r Height Values for
r Reordering
Numeric Fields
Placemarks or
Folders r Using Style
Settings to
r Renaming a
Modify Point
Placemark or Folder
Display
r Removing a
r Using Buckets for
Placemark or Folder
Field Data
q Saving Places Data
r Choosing Field
14. q Opening Saved Types for Style
Placemarks Mapping
q Deleting Places Data q Customizing the
q Showing and Hiding Value Ranges for
Places Data Numeric Data
q A Style Template
About KML Example
q KML Specification and r Saving the
Tutorial Sample File
q Setting KML Error r Importing the File
Options r Creating Style
Template Name
Sharing Places Information
and Color
Settings
r Emailing an
r Modifying the
Image
Style Template
r Emailing Places for Icon Settings
Data
r Removing
r Troubleshooting Duplicate Folders
Email Issues
r Adding Height
q Sharing Data Over a Values
Network
r Creating a Map
r Saving Data to a Legend
Server
Using GPS Devices with
r Opening Data from
Google Earth
a Network Server
r About Network q Supported Devices
Links q Required Connectors
r Creating a Network q About GPS Points
Link
q Importing GPS Data
Touring Places q Viewing Realtime
GPS Information
q Setting Which Items Are
Toured q Viewing a Timeline
q Setting Touring r Setting Timeline
15. Behavior Options
Editing Places and Folders Making Movies with Google
Earth
q Repositioning
Placemarks q Movie Quality Levels
r Dragging the q Tips for Recording
Placemark Movies
r Locking a r Update Your
Placemark to the Movie Player
Center of the View r Update Your
r Entering Advanced Graphics Card
Coordinates Driver
r Setting the View r Increase Your
Memory Cache
r Applying a New
View r Increase the
Detail Area of the
r Returning to the
3D Viewer
Default, Top-Down
View r Adjust the
Touring Speed
q Writing Descriptions
r Adjust the
q Changing Labels
Elevation
q Setting Icons for Places Exaggeration
and Folders
r Showing or
r Using Custom Icons Hiding Items in
r Setting Line Color the 3D Viewer.
and Width r Preview Your
Setting Altitude Tour Setup
Before Recording
r Altitude Settings
r Set Up Your
r Drawing Lines with
System for
Skirting
Maximum
q Modifying Folder Efficiency
Settings
q Steps for Recording
r Modifying Settings Movies
for a Single Item
r When You Are
18. Google Earth User Guide
q Table of Contents Finding Places and Directions
q Introduction Note - Not all language versions of Google Earth support all the features described
on this page. Learn more here.
qFinding Places and
Directions
You can use the Google Earth Search panel to find places on the globe in the following
r Finding Addresses and ways:
Locations
q Fly to or search for addresses and locations
sAbout Search Terms
Searching for Listings q Getting and printing directions
s Search Methods q Touring and saving directions
Getting and Printing q Showing and hiding points of interest
Directions q Sight seeing
s Getting Directions
This section covers basic search techniques using Google Earth. For more information
s Printing Directions on searches, see Managing Search Results.
Touring and Saving
Directions
Finding Addresses and Locations
s Touring the Route
sSaving Directions Tip - Follow a tutorial on this subject: Searching for Locations and Businesses
Showing and Hiding
Points of Interest You can search for specific locations using the Fly To tab in Google Earth. To do this,
enter the location in the input box and click on the Search button.
r Sightseeing
r Viewing a Location in
Google Maps
q Marking Places
q Using Layers
q Using Map Features
q Using Places
q About KML
q Sharing Places
Information
q Touring Places
Search button
q Editing Places and
Each tab of the Search panel displays an example of a search term (see above).
19. Folders Google Earth recognizes the following types of search terms, which you can enter with
or without commas.
qManaging Search
Results Format Example
City, State Buffalo, NY
qMeasuring Distances City Country London England
and Areas Number Street City State 1600 Pennsylvania Ave
Washington DC
qDrawing Paths and Zipcode or Postal Code 90210
Polygons Latitude, Longitude in decimal format 37.7, -122.2
qUsing Image Overlays Note that such coodinates must
and 3D Models appear in this order (latitude,
longitute).
q Importing Your Data
Latitude, Longitude in DMS format 37 25'19.07"N, 122 05'06.24"W
Into Google Earth
or
q Using Style Templates 37 25 19.07 N, 122 05 06.24 W
qUsing GPS Devices with Note that format 37d25'19.07"N,
Google Earth 122d05'06.24"W does not work
with Google Earth. Such
qMaking Movies with coodinates must appear in this
Google Earth order (latitude, longitute).
q Keyboard Controls Note: Currently, street-level searching is limited to certain countries. Learn more
here.
q 3D Viewer Options
The most recent search terms are saved in the search entry history (indicated by the
small black triangle on the right of the search input).
See Managing Search Results for more information.
About Search Terms
Certain search terms are not currently recognized as locations in the Fly To tab. These
include:
q Minor city names in many countries
q State or province names alone
q Search terms that are not a recognizable location search are treated as a
business listing search over the current view. For more information on how
listing searches work, see Searching for Listings.
Tip: If you want to find a particular street in a city, you can enter the name of the
street alone, and the search engine will display the top 10 matches for that street
entry. For example, if you want to find Sunset Boulevard in Hollywood, CA, you can
enter the phrase Sunset Blvd Hollywood CA in the search field and the beginning of
Sunset Boulevard will be displayed in the 3D viewer, along with the top 10 results for
streets that contain the string Sunset in their name.
20. Searching for Listings
You can search for directory listings using the Find Businesses tab in Google Earth. To
do this, enter your search term in the What input box and click on the Search button.
The top 10 matching results are displayed in the current view. To target your search
over a specific city, enter the name and state of the city in the Where input box. This
returns the first 10 results from the center of that city outwards, searching web page
information in that region.
Search Methods
You can use a number of search methods, including:
q Exact names (for example "Cost Plus World Market") - If you know the exact
name of the listing you want, try entering that name within quotation marks to
limit the number of results to those that match the entire string. This is the most
specific type of entry, so if you receive unexpected results, you might be
matching a web page entry for that exact term. Try removing the quotation
marks for broader results or using one of the other methods described here.
Partial name (i.e., Disneyland) - If you know part of the name (one word or
more) in the listing you are searching for, you can use that. This type of search
typically returns a greater number of matches than an exact name search. For
example, if you search for Disneyland in Anaheim, CA, you will see results for
Disneyland Hotel and other similar listings. If you have more than one word in
your partial search, enter them with quotations to return only results that contain
both of those terms in the order you have entered them (i.e., "Greenwood
Publishing")
q Keyword (i.e., colleges, salon) - A keyword search returns business listings
whose type matches the keyword search, even if the keyword itself is not in the
title of the business. For example, the keyword salon can return results for
Supercuts or Hair By Jodi and other businesses that are classified as a salon.
When you use the Find Businesses feature, you are using Google Maps search to
search a combination of Yellow Page listings along with web page information for that
region. For example, you might search Shell Oil and see a result for an investment
company with holdings in Shell Oil Co. and whose web site also references the term
Shell Oil.
Your search terms for both What and Where are saved in the entry history (indicated by
the small black triangle on the right of the search input). When you log out of Google
Earth, the last 10 search entries are saved for the next session. This location search
history is independent of the location search history for the Fly To search panel.
A Find Businesses search starts in a radius either from the center of the current view,
or from the center of the location indicated in the Where input box. So, if you want to
search for a movie theater close to a restaurant where you are having dinner, try
entering the address of the restaurant in the Where input box when searching the term
movie theater.
See Finding Addresses and Locations for example location searches and Managing
Search Results for details on results.
Getting and Printing Directions
21. You can get and print directions to and from any placemark in the 3D viewer, or any
place listed in the search results or available in the Places panel.
Getting Directions
Directions are available for a place or listing in the following ways:
q Right-click (CTRL click on the Mac) on an icon or listing result - In the pop-
up menu, select either Directions from here or Directions to here. When you do
this, the Search panel automatically transfers the information to the Directions
tab. The route and turn-by-turn directions appear in the search listings window.
Search button
q To Here/From Here - To do this, click once on any search result listing or
placemark to view the information balloon in the 3D viewer. Click To Here or
From Here. Location information appears in the appropriate field (From or To) in
the Directions tab. Repeat this action for either the starting location or the final
destination and click the Search button. The route and turn-by-turn directions
appear in the Search panel.
q Enter start and ending points in the Directions tab. You can manually enter
valid location searches in each input box. After clicking the Search button, the
route and turn-by-turn directions appear in the search listing window below the
search input.
The direction route is mapped in the the 3D view with a line indicating the route. See
Getting and Printing Directions and Saving Directions for more information on how you
can use the results of your directions search.
Note - Direction are not always available for locations that are far from roads.
Printing Directions
1. Make sure that the driving directions you created are selected in the Directions
tab.
2. Click File > Print. The Print dialog box appears.
3. Choose Driving Directions and click Print. Another Print dialog box appears.
4. Choose the appropriate printing options and click Print. Google Earth prints
driving directions that include images of intersections that require turns.
You can remove the directions from the 3D viewer by clearing the check box next to
your directions summary, or by clearing the search results entirely. See Managing
Search Results for more details.
Touring and Saving Directions
Once you have a route displayed in the 3D viewer, you can use the tour feature to "fly"
the route in the 3D viewer, and you can save the directions to your My Places folder for
later reference.
Touring the Route
22. Select the Route item at the end of the directions listing. Click the Play Tour button:
The 3D viewer automatically starts the tour from the departure point, oriented in the
correct direction as if you were flying over the route you have marked. The tour follows
the route, stops at the end, and zooms out to encompass the entire route in the 3D
viewer. See Touring Places for more information.
Note - You can also display driving directions in an animated time sequence. To
learn more, see Viewing a Timeline.
Saving Directions
When you get driving directions between two points, those directions are listed beneath
the Search button in a folder that is expanded to show all the turning points along the
route. You can save those directions to your My Places folder as follows:
1. Scroll up on the results listing until you see the top folder that contains
your directions. The folder is labeled with the To and From search words you
entered.
2. Collapse the folder by clicking on the minus icon. This helps provide a less
cluttered appearance in your My Places listing, but is not necessary.
3. Right-click (CTRL click on the Mac) on the folder and select Save to My
Places from the pop-up menu. The folder is moved from the search listing
window to your My Places folder. Because its appearance is collapsed before
you save it, it also appears collapsed in your My Places folder. If you wish, you
can save only individual route points to your My Places folder instead of the
entire route.
23. Once you save the directions to your My Places folder, you can edit the folder and its
placemarks in the same way you would any place data. See Editing Places and Folders
for more information.
Showing and Hiding Points of Interest
The Layers panel holds an extensive list of points of interest (POIs) that you can turn
on to display in the 3D viewer wherever you are. This listing includes:
q Businesses, such as banks, restaurants and gas stations
q Restaurants of a variety of styles
q Parks and recreation areas
q Airports, hospitals, and schools
q Postal, city, and school boundaries
Turn on a POI by checking it in the Layers panel. Turn off a POI by clearing the check
box.
Note - To view all available POIs or layers, at the top of the Layers panel, beside
View, be sure to choose All Layers.
You can interact with points of interest in the following ways:
q Find Directions to or from the POIs - See Getting and Printing Directions
q Search the web for information on the POI - Click on the icon, and in the info
balloon, click on the link that says Google Search. The web window appears
below the 3D viewer or in a new browser window with the Google search results
for that POI.
q Save the POI to your My Places folder
q Right-click (CTRL click on the Mac) on the POI icon and select Save to My
Places from the pop-up menu. See Using Places for more information.
Tip: You can deselect a parent POI category and thereby hide data for that category,
including sub-categories. This is faster than turning off multiple sub-categories one-
by-one.
For more information on points of interest and layers, see Using Layers.
Sightseeing
If you are using Google Earth for the first time, this feature is a great introduction. A
Sightseeing folder inside the My Places folder contains a number of points of interest
already marked on the earth for you to explore. To view them, expand the folder and
double-click on one of the entries. The 3D viewer flies to that location.
24. Tip - If you are upgrading to Google Earth from a previous version, you can access
the Sightseeing folder by opening the default_myplaces.kml file located in the
Google Earth installation folder, as follows:
1. Click File > Open. A dialog box appears. Use the dialog box to navigate to the
folder where Google Earth is installed. If you installed Google Earth using the
default method, look in Program Files > Google > Google Earth for the
application.
2. Select the default_myplaces.kml file and click Open. A second My Places folder
appears in the Temporary Places folder.
3. Expand this second My Places folder to view the Sightseeing folder within. If you
wish, you can drag the sightseeing items to your original My Places folder if you
want them to appear the next time you start Google Earth. Or, simply right-click
(CTRL click on the Mac) on any place you want to save and select Save to My
Places from the pop-up menu.
You can also tour places in the Sightseeing folder as you would any placemark. See
Touring Places.
Viewing a Location in Google Maps
To display the current view in Google Maps in your web browser, do one of the
following:
q Click in the toolbar
q Click Ctrl + Alt + M ( + Option + M on the Mac)
26. Google Earth User Guide
q Table of Contents Marking Places
q Introduction When you first start Google Earth, the Places panel contains an empty My
Places folder to hold places that you want to save. (If you are upgrading
qFinding Places and from a previous version of Google Earth, Google Earth imports your saved
Directions places.) Every item located in the My Places folder is saved for subsequent
Google Earth sessions. Items located in the Places panel but not saved in
the My Places folder are located in the Temporary Places folder and are
q Marking Places
unavailable in the next Google Earth session if you do not move or save
r Creating a New them to your My Places folder.
Placemark
You can use the Places panel to save and organize places that you visit,
r Saving a Point of Interest
address or listing searches, natural features, and more.
r Sharing a Placemark
This section covers the basic ways to add a placemark to the My Places
r Saving Search Results folder:
r Saving Images
q Create a new placemark
r Printing
q Add a point of interest
q Using Layers q Add search results
q Saving an image
q Using Map Features
q Printing imagery from the 3D viewer
q Using Places
For more information on other things you can do with placemarks, see Using
q About KML Places.
q Sharing Places Tip: If Google Earth takes a long time to load, you might have more
Information places saved than your computer can reasonably handle. Try moving
some of the places you don't regularly visit to a folder and saving that
q Touring Places folder to your computer. See Saving and Sharing Places.
qEditing Places and
Folders Creating a New Placemark
qManaging Search Tip - Follow a tutorial on this subject: Marking Locations
Results
Follow these instructions to add a new placemark to any spot in the viewer.
qMeasuring Distances
and Areas 1. Position the viewer to contain the spot you want to placemark.
Consider zooming into the best viewing level for the desired location.
Choose any one of the following methods:
27. qDrawing Paths and
Polygons r Select Placemark from the Add Menu.
r Click the Pushpin icon on the toolbar menu at the the top of
qUsing Image Overlays the screen
and 3D Models
q Importing Your Data The New Placemarkdialog box appears and a New Placemarkicon is
Into Google Earth centered in the viewer inside a flashing yellow square. Position the
placemark. To do this, position the cursor on the placemark until the
cursor changes to a pointing finger and drag it to the desired location.
q Using Style Templates
The cursor changes to a finger pointing icon to indicate that you can
move the placemark.
qUsing GPS Devices with
Google Earth
qMaking Movies with
Google Earth
q Keyboard Controls
q 3D Viewer Options
You can also lock the placemark position or set advanced coordinates for
its position. Set the following properties for the new placemark:
r Name for the placemark
r Description, including HTML text (see Writing Descriptions)
r Style, Color - Choose a color, scale (size) and opacity for
the placemark icon
r View - Choose a position for the placemark. For explanation
of terms in this tab, mouse over each field.
r Altitude - Choose the height of the placemark as it appears
over terrain with a numeric value or the slider. Choose
Extend to ground to show the placemark attached to a line
anchored to the ground.
r (Icon) - Click the icon for the placemark (top right corner of
the dialog box) to choose an alternate icon.
2. Click OK to apply the information you entered in the placemark
dialog box.
Your placemark appears in the 3D viewer and as an entry in the selected
folder. Once you save this placemark, you can always change its position
and properties. See Editing Places and Folders for more information.
Saving a Point of Interest
You can save any point of interest (POI) displayed in the 3D viewer to the
28. My Places folder by right-clicking (CTRL clicking on the Mac) on the
placemark in the viewer and selecting Save to My Places from the pop-up
menu.
You can also use the copy feature as follows:
1. Right-click (CTRL click on the Mac) on a POI and select Copy from
the pop-up menu.
2. Open the My Places folder to display the destination folder for the
POI.
3. Position your cursor over the desired folder or sub-folder.
4. Right-click (CTRL click on the Mac) and select Paste from the pop-up
menu. The POI appears in the location you selected.
See Showing and Hiding Points of Interest for more information on viewing
points of interest in the 3D viewer.
You can also move a saved POI to any folder in your Places panel. See
Organizing Places for more information.
Sharing a Placemark
After you have created a placemark, you can easily share it with others on
the Google Earth Community BBS website. To do this, right click (CTRL
click on the Mac) on the placemark and choose Share/Post. The Google
Earth Community posting wizard appears in a browser window at the bottom
of your screen. Follow the instructions on this web page to post information
about this placemark on the Google Earth BBS.
Note - You can also share information that appears in Google Earth via
KML files.
Saving Search Results
After you perform a search, a listing results panel also appears below the
Search button. Each search term you enter is the title for the folder
containing the top 10 results within it. You can collapse a particular search
folder by clicking on the minus icon next to the search term. While you are
logged in, you can revisit your search results just by double-clicking on an
item in the search list. You can clear search results from the listing by
clicking on the Clear button (X).
Once you log out of Google Earth, your search terms are cleared. However,
you can save search results for future Google Earth sessions in the
following ways:
q Drag and drop a search result item from the search results panel to
29. any folder within the Places panel. Release the item to place it in the
new location.
q Right-click (CTRL click on the Mac) on a search result in either the
listing or the 3D viewer and select Save to My Places from the pop-
up menu.
q Use the copy feature by right-clicking (CTRL clicking on the Mac) on
a result listing in either the viewer or the Search panel and selecting
Copy from the pop-up menu. From there, right-click (CTRL click on
the Mac) on a folder in the Places panels where you want to save the
search result and select Paste from the pop-up menu to paste the
search result in your new location.
Tip: You can also save the contents of the entire search result to the
Places panel by selecting the folder containing your search results and
dragging it to the desired location.
Once a search result is saved, you can change its title, location, and
description. See Editing Placemark or Folder for information.
Saving Images
Note - This feature is available to users of the Google Earth Pro and
Google Earth EC products. Visit http://earth.google.com/products.html for
more information.
Use File > Save > Save Image to save the current view as an image file to
your computer's hard drive. When you save an image, a Save dialog box
appears and you can locate a folder on your computer to save the image to,
just as you would for any document you might save. The image is saved
with all visible placemarks, borders, or other Layer information visible in the
3D viewer.
You can save images in the following resolutions:
q Screen capture only (lower resolution)
q 1000 pixels per inch (PPI)
Google Earth PRO/EC users can save images in the following resolutions:
q 1400 PPI
q 2400 PPI
q 4800 PPI
Printing
Use the Print... command under the File menu to print the current view. You
31. Google Earth User Guide
q Table of Contents Using Layers
q Introduction The Layers feature in Google Earth provides a variety of data points of
geographic interest that you can select to display over your viewing area.
qFinding Places and This includes points of interest (POIs) as well as map, road, terrain, and
Directions even building data. The full list of layers is available in the Layers panel:
q Marking Places
q Using Layers
r Layers Versus Places
r Using Points of Interest
(POIs)
s Locating POIs in Your
Viewing Area
s Saving or Copying POIs
to My Places
s Viewing Layer Sub-
Categories
s Tuning Display of POIs
q Using Map Features
Note: In the View field, you can choose to display all available layers (All
Layers), key layers (Core) or just those that are currently displayed (Now
q Using Places Enabled).
q About KML You can use the layer data feature of Google Earth to:
q Sharing Places q Display and save points of interest
Information
q Display map features such as borders, roads, and terrain
q Touring Places q Display 3D Buildings
qEditing Places and Tip: You can display or hide country, state or province borders by
Folders checking or unchecking Borders in the Layers panel.
qManaging Search
Results Layers Versus Places
32. qMeasuring Distances Layers content is created by Google or its content partners. Google
and Areas publishes the content you see in the Layers panel.
qDrawing Paths and Information which appears the Places panel, however, can be created by
Polygons anyone using Google Earth or KML. Learn more about sharing places data.
qUsing Image Overlays Using Points of Interest (POIs)
and 3D Models
This section contains tips on using points of interest not covered in Showing
q Importing Your Data and Hiding Points of Interest:
Into Google Earth
q Locating POIs in your viewing area
q Using Style Templates
q Saving or copying POIs to My Places
qUsing GPS Devices with q Viewing Layer subcategories
Google Earth
q Tuning the display of POIs
qMaking Movies with
Google Earth Locating POIs in Your Viewing Area
Follow these steps to find a particular point of interest in your viewing region.
q Keyboard Controls
1. Adjust the 3D viewer to encompass the area you want to investigate.
q 3D Viewer Options If you are interested in finding all the schools in a particular city, then
adjust the viewer so that you can view the entire city. You can do this
by zooming out or by expanding the size of the viewer itself (use the
maximize window control or drag the size of the window using the
mouse).
2. Double-click on the Layers folder to expand it. You can also expand
folders within the Layers folder to view certain sub-categories of
POIs.
3. Select one or more points of interest in the list. If there is a point of
interest or business of the selected type in the viewing area, that icon
appears in the viewer. Certain selections - such as a geographical
feature like a lake - do not always produce an icon, but will instead
display a label near the corresponding area.
Saving or Copying POIs to My Places
Once you locate a POI that you want to save for future Google Earth
sessions, you can right click (CTRL click on the Mac) on it and select Save
to My Places from the pop-up menu. Alternatively, right-click (CTRL click on
the Mac) and select Copy from the pop-up; then paste it over a target folder
in the Places panel.
Viewing Layer Sub-Categories
Some points of interest act as a folder that contain categories of data. These
are indicated by a plus icon which you can click to view the sub-categories
35. Google Earth User Guide
q Table of Contents Using Map Features
q Introduction This section covers how to set and use the map controls, which include
roads, terrain, borders. buildings, and models. Topics include:
qFinding Places and
Directions q Roads
q Terrain
q Marking Places
q Borders
q Using Layers q Viewing 3D Buildings
q Viewing Google SketchUp 3D Models
q Using Map Features
r Roads
Roads
r Terrain
r Borders The road layer displays road map information for the viewing area, including
major highways, county roads, and streets. This option is available in the
r Viewing 3D Buildings Layers folder. In the Layers folder, you can expand the Roads folder and
r Viewing Google control the display for U.S., Canadian, and many international roads.
SketchUp 3D Models
While road information for a given view is always available, it only displays in
the viewer when a logical distance is reached. For example, if you are
q Using Places looking at a very large region, such as the southern area of a state, you see
only major highways. When you zoom in to a more confined region, you see
q About KML labels for those highways, as well as smaller highways and roads. The figure
below shows only the major highways for the states in view.
q Sharing Places
Information
q Touring Places
qEditing Places and
Folders
qManaging Search
Results
qMeasuring Distances
and Areas
qDrawing Paths and
Tip: If you cannot see the label for a highway or a road, zoom in or
Polygons
reposition the viewer until the label appears. Typically, you need to zoom
36. in to see the label.
qUsing Image Overlays
and 3D Models
Terrain
q Importing Your Data
Into Google Earth The terrain layer shows 3D elevation data for the viewing region. Elevation
data is limited to natural geographic features, like mountains and canyons,
q Using Style Templates and does not apply to buildings. Turn this feature on to get an even clearer
image of your favorite ski resort or canyon trail. You can turn terrain on by
qUsing GPS Devices with selecting on the Terrain item in the Layers folder.
Google Earth
You can also adjust the appearance of the terrain if you would like the
elevation to appear more pronounced in your views. To do this, do the
qMaking Movies with
following:
Google Earth
Windows and Linux: Tools > Options > 3D View. Modify the Elevation
q Keyboard Controls Exaggeration value.
q 3D Viewer Options Mac: Google Earth > Preferences > 3D View. Modify the Elevation
Exaggeration value.
The default value is set to 1, but you can set it to any value from 1 to 3,
including decimal points. A common setting is 1.5, which achieves an
obvious yet natural elevation appearance.
Tip: Because terrain data is additional information, more time is needed to
download this information to Google Earth. If you are not interested in
viewing terrain data, turn this layer off for faster streaming from the server
to the viewer.
Borders
You can turn on border information by checking the Borders folder in the
Layers tab. The Border check box turns on all possible borders, while you
can expand the Borders folder to control display of the many kinds of
borders, such as:
q Coastlines
q International boundaries
q State and province boundaries
q Countries and capitals
q State and province names
q USA county boundaries
When turned on, border information for a given view is always available.
However, as with road data, it is displayed in the viewer when a logical
distance is reached. For example, if you are looking at a very large region,
37. you see only major boundaries. When you zoom in to a more confined
region, you might see state or county labels depending upon your viewing
elevation.
Viewing 3D Buildings
Some geographic areas in Google Earth database display simple 3D
buildings. To view these:
1. Turn on the 3D building layer by selecting the 3D Buildings folder
check box in the Layers tab.
2. Position the viewer within a reasonable viewing altitude over a major
city such as San Francisco. Some 3D buildings start to appear from
an eye-elevation of 10,000 to 12,000 feet. Check the eye-elevation
meter on the lower right of the 3D viewer to determine your current
viewing height. The 3D buildings appear as light grey objects over the
imagery of the city.
3. As you zoom in, more details will appear until you can see the entire
shape of a building.
4. Use the tilt and rotate navigation tools to get the best view of the
buildings.
38. Viewing Google SketchUp 3D Models
Tip: Some Google SketchUp models do not appear correctly in Google
Earth until you turn off the 3D buildings layer. For more information, see
Viewing 3D Buildings.
You can easily view Google SketchUp 3D models in Google Earth. To do this:
1. Visit http://sketchup.google.com/3dwarehouse/
2. Search for a model that interests you and click it.
3. Click Download to Google Earth. Note that this option may not be
available for all models.
4. As you zoom in, more details will appear until you can see the entire
shape of the model.
5. Use the tilt and rotate navigation tools to get the best view of the
model.
For additional information, see Using Google SketchUp with Google Earth.
40. Google Earth User Guide
q Table of Contents Using Places
q Introduction Once you are familiar with the basics of marking places on the Earth, you
can refer to this section to learn all the features available to you in the
qFinding Places and Places panel. This section includes the following topics:
Directions
q Organizing Places Data
q Marking Places q Saving Places Data
q Opening Saved Placemarks
q Using Layers
q Deleting Places Data
q Using Map Features q Showing and Hiding Places Data
q Using Places
r Organizing Places Data Organizing Places Data
s Creating Folders You can organize your saved data in the Places panel in a way similar to
how you would organize files and folders on your computer's hard drive.
s Reordering This section covers the following:
Placemarks or
Folders q Creating Folders
s Renaming a q Reordering Placemarks or Folders
Placemark or q Renaming a Placemark or Folder
Folder
q Removing a Placemark or Folder
s Removing a
Placemark or
Creating Folders
Folder
You can create folders and move other folders, placemarks, or shapes to
r Saving Places Data them. To create a folder:
r Opening Saved
1. Right-click on a folder in the Places panel.
Placemarks
2. Select Add > Folder from the pop-up menu. The folder you right-
r Deleting Places Data clicked on is automatically set as the container for the new folder.
r Showing and Hiding
Places Data Once the New Folder dialog box appears, you can set the following fields:
q Name
q About KML
q Description - Enter a description for the folder. For example, you
q Sharing Places might enter text that gives a general description of all the placemarks
in the folder. The first few words of the description appear below the
Information
folder in the Places panel. When you double-click the folder, the
41. q Touring Places description appears in a balloon in the 3D viewer. In addition, you
can use a number of HTML tags to format your description and
qEditing Places and include images, including <b></b>, <br>, <img src="...">, and <a
href="...">. See Writing Descriptions.
Folders
q Style/Color - Once you have other icons within the new folder (or its
qManaging Search subfolders) the Style/Color tab is available. You can use this feature
Results to apply label and icon styles universally across all items within the
folder. See Editing Places and Folders for more information.
qMeasuring Distances q View - See Setting the View for details. Once you set a view for a
and Areas folder, double-clicking on the folder repositions the 3D viewer to the
position you have chosen. Setting a view for a folder is useful when
qDrawing Paths and you want to create a viewing angle to encompass all the items
Polygons contained by the folder. For example, you might have a collection of
placemarks in a specific region of the city, each with an independent
qUsing Image Overlays viewing angle. You can place them all in a folder and set a viewing
angle for the folder in order to display all of the placemarks from a
and 3D Models
consistent viewing angle, if desired.
q Importing Your Data
Into Google Earth Reordering Placemarks or Folders
You can reposition a placemark or folder in three ways:
q Using Style Templates
q Drag it to a new position in a list of items.
qUsing GPS Devices with q Drag and drop it over a folder.
Google Earth q Right-click (CTRL click on the Mac) the item and select Cut from the
pop-up menu, followed by right-clicking on the new position or folder
qMaking Movies with and selecting Paste from the pop-up menu.
Google Earth
In this way, you can put placemarks inside newly created folders, or you can
q Keyboard Controls move an entire folder and its contents into another folder to create groups of
folders.
q 3D Viewer Options
Note: If you move a folder so that it is inside the Temporary Places main
folder, you must save that data if you want it to be available the next time
you start Google Earth. If you exit Google Earth without saving the folder,
a dialog box prompts you to save the information to your My Places
folder. See Saving Places Data for details.
Renaming a Placemark or Folder
To quickly rename an item, right-click (CTRL click on the Mac) on it and
select Rename from the pop-up menu. You can enter the new name directly
in the name field. You can also:
q Choose Rename from the Edit menu if the item is selected in the list
q (Windows and Linux only) Select the item and press F2 on the
keyboard
42. Removing a Placemark or Folder
To delete an item, right-click (CTRL click on the Mac) the entry and select
Delete from the pop-up menu, or select Delete from the Edit menu when the
item is selected in the Places panel. A confirmation dialog box asks if you
want to delete the placemark or folder. If you delete a folder, you also delete
all its contents, including other folders and icons. Click Yes to confirm the
deletion.
Saving Places Data
You can save placemarks, shapes, and entire folders (and their contents) to
your computer's hard drive. The placemark file or folder is saved as a single
file in KMZ format, which you can open at any time in Google Earth. You
might want to do this for the following reasons:
q You want to share the saved data with other Google Earth
users. You can email any placemark, shape, or folder to another
Google Earth user from within Google Earth, but you can also email
any KMZ file located on your computer to a Google Earth user. In
addition, you can post a KMZ file to the Google Earth BBS where
other Google Earth users can view the information, or you can serve
the file on your own web server or from any network location. See
Sharing Places Information for details.
q You have so many places in your My Places folder that Google
Earth startup is slow. Each time you start Google Earth, all the
places data is processed during startup, even if it is not turned on in
the 3D viewer. Holding a large amount of data in the My Places
folder can impact the performance of Google Earth, depending upon
your computer. By saving folders to your hard drive, you can improve
Google Earth performance by then deleting the data from your My
Places folder once they are saved to disk. You can always open the
data you save at any time.
Save individual placemarks, shapes, or entire folders by right-clicking (CTRL
click on the Mac) the item and selecting Save As... from the pop-up menu.
Use the File dialog box to save the placemark or folder to your computer.
Enter the name for the new file, and click Save in the dialog box. The
placemark or the folder is saved to that location with an extension of .kmz.
Important: Placemarks created with Google Earth version 3.0 or higher
cannot be viewed in older Google Earth software. As an alternative, you
can send an image file. See Saving Images for details.
Opening Saved Placemarks
You can use the following methods to open placemarks and folders saved to
43. the file system on your computer's hard drive.
q From the File menu, select Open. Navigate to the folder on your
computer that contains the KMZ or KML data you want to open in
Google Earth. Select the file and click the Open button. The folder or
placemark appears beneath the Temporary Places folder and the 3D
viewer flies to the view set for the folder or placemark (if any).
q Locate the file you want to open. Once you have located the file on
your computer, you can simply drag and drop the KMZ file over the
Places panel or 3D viewer. The 3D viewer load the file and flies to
the view set for the folder or placemark (if any).
Tip: When you use the drag-and-drop method of opening a placemark or
folder, you can drop the item over a specific folder in the Places panel. If
the My Places folder is closed and you want to drop it there, just hold the
item over the My Places folder until the folder opens up and you can
place the item within subfolders or in the list. Items dropped in the My
Places folder appear the next time you start Google Earth. Otherwise,
you can drop the item in the Temporary Places folder. Items opened this
way appear only for the current session of Google Earth unless you save
them.
Deleting Places Data
There are a number of ways you can remove data from the Places panel:
q Delete - Right-click (CTRL click on the Mac) a placemark, folder, or
other item in the Places panel and select Delete from the pop-up
menu. You can also delete items in the 3D viewer by right-clicking
(CTRL click on the Mac) on the icon and selecting Delete from the
pop-up menu. This deletes the item from the Places panel. If the item
is located in your Temporary Places folder, it does not appear the
next time you use Google Earth. If you have previously saved the
item, you can always open the saved data at any time. Otherwise,
the item is permanently removed.
q Delete Key - With the item selected in the Places panel, press the
Delete key. A dialog box asks to confirm the deletion. Click OK to
remove the item from the Places panel.
r Delete Contents - Right-click (CTRL click on the Mac) a folder
and select Delete Contents from the pop-up menu. Click Yes on
the confirmation dialog box to proceed with deleting the
contents. All folder contents are removed, including any
subfolders and contained items.
r Cut Contents (Ctrl-X) - Right-click (CTRL click on the Mac) an
item in the Places panel and select Cut from the pop-up menu,
or right-click on a placemark in the 3D viewer and select Cut
there. The item is removed from the listing or view, but copied to
the clipboard, so that you can later paste it to a different location.
45. Google Earth User Guide
q Table of Contents About KML
q Introduction KML, or Keyhole Markup Language, is an XML grammar and file format for
modeling and storing geographic features such as points, lines, images,
qFinding Places and polygons, and models for display in Google Earth and Google Maps. You
Directions can use KML to share places and information with other users of Google
Earth and Google Maps. Likewise, you can find KML files on the Google
q Marking Places Earth Community site that describe interesting features and places.
q Using Layers A KML file is processed by Google Earth and Google Maps in a similar way
that HTML and XML files are processed by web browsers. Like HTML, KML
q Using Map Features has a tag-based structure with names and attributes used for specific
display purposes. Thus, Google Earth and Google Maps act as browsers of
KML files. Learn more here.
q Using Places
Google Maps can only display certain features of KML. For more
q About KML
information, see this Google Maps Help topic.
r KML Specification and
Tutorial
Note - A KMZ file is a compressed version of a KML file.
r Setting KML Error Options
q Sharing Places KML Specification and Tutorial
Information
You can learn more about using KML by reading the specification. At this
time, this document is in English only:
q Touring Places
http://earth.google.com/kml/
qEditing Places and
Folders
Also, you can try a hands-on approach to learning KML by following the
KML tutorial. At this time, this document is in English only:
qManaging Search
Results http://earth.google.com/kml/kml_tut.html
qMeasuring Distances
Note - You can display KML data in a time sequence. To learn more, see
and Areas Viewing a Timeline.
qDrawing Paths and
Polygons Setting KML Error Options
qUsing Image Overlays You can set how Google Earth reacts when it encounters erroneous KML.
and 3D Models To do this: