Download to read offline


![Gigaset C250 / englisch / A31008-C250-J101-176-19 / guidance.fm / 20.06.2003
Operating the telephone, menu guidance
Operating the telephone, menu guidance
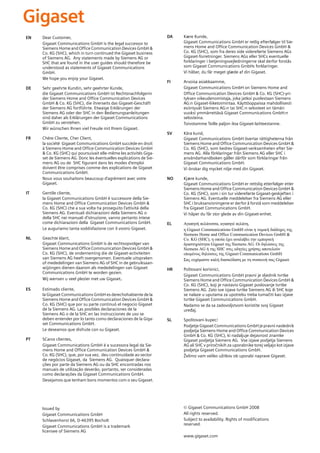
Keys
Talk/Handsfree key
The Talk/Handsfree key d is a rocker key with two functions. You press the top half of
the key to initiate a call. When you press the bottom half you initiate a call and the
handsfree function activates automatically.
Rocker key:
Top half of the key = Talk key
Bottom half of the key = Handsfree key
Display keys
The display keys are the horizontal rocker keys just below the display. Depending on
the particular operating situation, their function changes according to whether you
press the left or right side of the key. The current function is shown in the display directly
above the key to which it relates.
Example
Û
u vMENU
Display keys
The various functions are explained below:
Display icon
[__________]
•
[________]
INT
[_______]
OK
[______________]
MENU
¼
[_______]
Û
12
Meaning when key is pressed
Last number redial key: Open the list of the last 10 numbers you dialled.
INT key: Open the list of handsets when in idle status.
OK key: Confirm menu function or confirm an input and store.
Menu key: Open the main menu when in idle status
Open a status-dependent menu while making a call.
Scroll up/down.
Move cursor left/right.
Access to wake-up function.
Delete key: Delete input from right to left one character at a time.](https://image.slidesharecdn.com/gigasetc280userguide-140204080223-phpapp02/85/Gigaset-c280-user-guide-15-320.jpg)

![Gigaset C250 / englisch / A31008-C250-J101-176-19 / TimeCalendar.fm / 20.06.2003
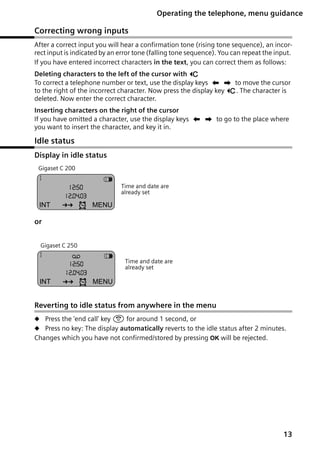
Date and Time
Date and Time
Setting the date and the time
Correct date and time settings are essential if you want to know exactly when calls/messages (C 250) were received.
[_______________]
MENU
Open the menu.
[__________] [_____________________________________________________________]
Calender/Clock
[_________]
OK
Select the menu item and confirm.
[__________] [_____________________________________________________________]
Date/Time
[_________]
OK
Select the menu item and confirm.
Enter the date:
[_______]
OK
Enter the day/month/year and confirm.
Example: For 20.05.2003, enter
2QQ5QI.
Enter the time:
[_______]
OK
Enter hours/minutes and confirm.
Example: For 9.35, enter QOI5.
Only when the 12-hour display is selected:
[__________] [_________]
OK
Select a.m. or p.m. and confirm.
Long press (back to idle status).
¼ appears on the bottom line of the display.
Changing the time mode
You can choose between the 12 hour and the 24 hour display (factory setting) for the
time (a.m. = 1st half of the day; p.m. = 2nd half of the day).
[_______________]
MENU
Open the menu.
[__________] [_____________________________________________________________]
Calender/Clock
[_________]
OK
Select the menu item and confirm.
[__________] [_____________________________________________________________]
Time Mode
[_________]
OK
Select the menu item and confirm.
either ...
[__________] [_____________________________________________________________]
24 hour
[_________]
OK
Select the menu item and confirm (‰ = On).
or ...
[_____________________________________________________________] [__________]
12 hour
OK
Confirm (‰ = On).
Long press (back to idle status).
15](https://image.slidesharecdn.com/gigasetc280userguide-140204080223-phpapp02/85/Gigaset-c280-user-guide-18-320.jpg)
![Gigaset C250 / englisch / A31008-C250-J101-176-19 / TimeCalendar.fm / 20.06.2003
Date and Time
Setting the alarm clock
You can use your handset as an alarm clock.
Precondition: You have set the date and time (page 15) .
Activating/deactivating the alarm clock and setting the wake-up time
either ...
Activate the alarm clock:
[_____]
¼
Press the display key.
[_____________________________________________________________] [__________]
Alarm Clock
OK
Confirm (‰ = On).
Set the wake-up time:
Enter hours/minutes and confirm.
Example: For 7.15, enter QM15. The top
line of the screen displays the alarm clock icon ¼.
[_______]
OK
When the 12-hour display is selected:
[__________] [_____________________________________________________________]
am
[_________ ]
OK
or ...
Select a.m. or p.m. and confirm (‰ = On), e.g. am.
Deactivate the alarm clock:
[_____]
¼
Press the display key.
[_____________________________________________________________] [__________]
Alarm Clock
OK
Confirm (‰ disappears).
Long press (back to idle status).
N A wake-up call only sounds when the handset is in the idle status and
i
16
the room monitor function is not activated.
N To find out how to set the wake-up volume and melody, turn to
page 89.
N When you deactivate the alarm clock the ¼ icon will only go out if
there is no active appointment.](https://image.slidesharecdn.com/gigasetc280userguide-140204080223-phpapp02/85/Gigaset-c280-user-guide-19-320.jpg)
![Gigaset C250 / englisch / A31008-C250-J101-176-19 / TimeCalendar.fm / 20.06.2003
Date and Time
Cancelling a wake-up call
A wake-up call sounds on the handset with its selected ringer melody, and Alarm Clock
appears in the display. Press any key to cancel the wake-up call. The alarm clock is still
switched on.
Setting an appointment
You can use your handset to remind yourself of an appointment. You do this by setting
the time of the appointment.
Activating/deactivating the appointment function
[_______________]
MENU
Open the menu.
[__________] [_____________________________________________________________]
Calender/Clock
[_________]
OK
Select the menu item and confirm.
[_____________________________________________________________] [__________]
Set Appointment
OK
Confirm (‰ = On).
[________]
OK
Confirm again if an appointment is activated.
Enter the date:
Enter the day/month and confirm.
Example: For 20.05. enter 2QQ5.
[_______]
OK
Enter the time:
Enter hours/minutes and confirm.
Example: For 9:05 enter QOQ5.
[_______]
OK
Name the appointment:
Enter a name (up to 16 characters) and confirm (for
inputting text see page 107). Delete an existing
appointment.
[_______]
OK
Long press (back to idle status).
The top line displays the alarm clock icon ¼.
N If you do not give the appointment a name, its date and time will
appear in the display when it is due.
N To find out how to set the wake-up volume and melody, turn to
i
page 89.
N If you are using the 12 hour clock, select a.m. or p.m. with s and
press OK to confirm.
N The handset will only display an appointment when it is in the idle
status. An appointment is not displayed when the room monitor is
active or while a phone call is in progress.
17](https://image.slidesharecdn.com/gigasetc280userguide-140204080223-phpapp02/85/Gigaset-c280-user-guide-20-320.jpg)
![Gigaset C250 / englisch / A31008-C250-J101-176-19 / TimeCalendar.fm / 20.06.2003
Date and Time
Deactivating an appointment call
An appointment call sounds with its selected ringer melody (page 89).
[_______]
OK
Press the display key. The alarm clock icon ¼ disappears when the alarm clock is not activated.
Cancelling an appointment
[______________]
MENU
Open the menu.
[__________] [_____________________________________________________________]
Calender/Clock
[_________ ]
OK
Select the menu item and confirm.
[_____________________________________________________________] [__________]
Set Appointment
OK
Confirm (‰ disappears).
Viewing an appointment you have not kept
If the handset reminds you of an appointment but you do not keep it, a message appears
in the display together with the name of the appointment. If you did not name the
appointment, its date and time are displayed. Press any key to cancel the message.
18](https://image.slidesharecdn.com/gigasetc280userguide-140204080223-phpapp02/85/Gigaset-c280-user-guide-21-320.jpg)


![Gigaset C250 / englisch / A31008-C250-J101-176-19 / telephony.fm / 20.06.2003
Making calls
Handsfree
Activating/deactivating handsfree
Activate while dialling:
Enter the telephone number and press the top half of
the key.
Activate during a call:
Press the bottom half of the key.
Deactivate handsfree:
Press the top half of the key.
As soon as you terminate the handsfree mode you switch to 'earpiece mode' and continue the call on the handset.
N If you wish to place the handset in the base during a call you must
i
press the bottom half of the d key and hold it down while you
position the handset in the base.
N You should inform your caller that you intend to use the handsfree
function before you activate it.
Adjusting the volume while in handsfree mode
A call is in progress and handsfree is activated.
Press the bottom half of the key again.
[________] [________]
Decrease or increase the volume.
[________]
OK
Now press the display key to store the setting.
21](https://image.slidesharecdn.com/gigasetc280userguide-140204080223-phpapp02/85/Gigaset-c280-user-guide-24-320.jpg)
![Gigaset C250 / englisch / A31008-C250-J101-176-19 / telephony.fm / 20.06.2003
Making calls
Activating/deactivating open listening (call screening at the base)
(C 250 only)
You can activate the built-in base loudspeaker to allow other people in the room to hear
what your external caller is saying.
Precondition: A call in is progress.
Press the display key to open the menu.
[______________]
MENU
either ...
Activate open listening:
[__________] [_____________________________________________________________]
Open Listening On
[_________ ]
OK
or ...
Select the menu item and confirm.
Deactivate open listening:
[_____________________________________________________________] [__________]
Open Listening Off
OK
Confirm.
Long press (back to idle status).
N You should inform your caller that you intend to use the open listen-
i
ing function before you activate it.
N You can adjust the volume on the base with the ð and ñ keys
(page 96).
Handset muting
You can mute your handset during external calls, e.g. if you wish to talk confidentially
to another person in the room. The external caller cannot hear your conversation during
this time (hold melody). You do not hear your caller either.
[_______]
INT
Open list of handsets. The call is 'held' (wait melody).
Cancel muting:
[______________]
MENU
[__________] [_____________________________________________________________]
******Back******
[_________ ]
OK
22
Press the display key to open the menu.
Select and confirm, or press the end call key a.](https://image.slidesharecdn.com/gigasetc280userguide-140204080223-phpapp02/85/Gigaset-c280-user-guide-25-320.jpg)
![Gigaset C250 / englisch / A31008-C250-J101-1-7619 / Directories.fm / 20.06.2003
Using the directory and other lists
Using the directory and other lists
Directory and speed dial list
You can store up to 100 numbers in the directory and the speed dial list (depending on
the size of individual entries).
The directory makes dialling easier for you. You open the directory with the h key. You
can mark any directory entry as 'VIP'.
The speed dial list is a special directory in which you can store particularly important
numbers such as private telephone numbers and prefixes of network providers (socalled 'call-by-call numbers'). You open the speed dial list with the C key.
You create the directory and speed dial list for your individual handset. You can send the
lists/individual entries to the other handsets if you want them to be available at other
handsets as well (page 28).
The speed dial list is operated in just the same way as the directory, except for the way
in which entries are stored.
N The EATONI predictive text helps you input names (page 108, this
feature is deactivated when you purchase your phone).
N Please refer to the Character Set Chart (page 107) to see how to
i
enter text correctly.
N You can enter up to 32 digits for a number and up to 16 letters for a
name.
N Turn to page 19 for instructions on how to insert a dialling pause.
Storing a telephone number in the directory
Open the directory.
[_______________]
MENU
Press the display key to open the menu.
[_____________________________________________________________] [__________]
New Entry
OK
Confirm.
[_______]
OK
Enter the number and confirm.
[______________]
MENU
Enter the name and press the display key.
[_____________________________________________________________] [__________]
Save Entry
OK
Confirm. The entry is stored.
Long press (back to idle status).
i
If your phone is connected to a PABX you may have to enter the access
code (outside line code) as the first digit of your directory entry (refer to
the operating instructions of your PABX).
23](https://image.slidesharecdn.com/gigasetc280userguide-140204080223-phpapp02/85/Gigaset-c280-user-guide-26-320.jpg)
![Gigaset C250 / englisch / A31008-C250-J101-1-7619 / Directories.fm / 20.06.2003
Using the directory and other lists
Storing a telephone number in the speed dial list
You can assign a digit (0, 2–9) to up to nine entries on your speed dial list. When you
press and hold one of these digits, e.g. '3', and press the top half of the d key you are
immediately connected to the telephone number that is assigned '3'.
Open the speed dial list.
[______________]
MENU
Press the display key to open the menu.
[_____________________________________________________________] [__________]
New Entry
OK
Confirm.
[_______]
OK
Enter the number and confirm.
[______________ ]
MENU
Enter the name and press the display key.
[_____________________________________________________________] [__________]
Save Entry
OK
Confirm. The entry is stored.
[______________]
MENU
Press the display key to open the menu.
[__________] [_____________________________________________________________]
Shortcut
[_________ ]
OK
Select the menu item and confirm.
[__________] [_____________________________________________________________]
Shortcut: 2
[_________ ]
OK
Select the digit and confirm.
Long press (back to idle status).
i
Speed dial digits cannot be assigned more than once at a time.
Dialling with the directory/speed dial list
or
either ...
Open the directory or speed dial list
Scroll to the entry:
Select entry.
Press the key. The number is dialled.
or ...
Enter the first letter:
Enter the first letter of the name you require.
Press the key. The number is dialled.
24](https://image.slidesharecdn.com/gigasetc280userguide-140204080223-phpapp02/85/Gigaset-c280-user-guide-27-320.jpg)
![Gigaset C250 / englisch / A31008-C250-J101-1-7619 / Directories.fm / 20.06.2003
Using the directory and other lists
Editing an entry in the directory/speed dial list
Open the directory or speed dial list.
or
[__________] [______________]
MENU
Select the entry and press the display key.
[__________] [_____________________________________________________________]
Edit Entry
[_________]
OK
Select the menu item and confirm.
Change the number and confirm.
[_______]
OK
Edit the name.
[_______________]
MENU
Press the display key to open the menu.
[_____________________________________________________________] [__________]
Save Entry
OK
Confirm. The entry is stored.
Long press (back to idle status).
Copying and editing a directory entry
So that you do not have to enter a similar entry twice, you can create a copy and then
edit that entry.
Open the directory.
[__________] [______________]
MENU
Select the entry and press the display key.
[__________] [_____________________________________________________________]
Copy and Edit
[_________]
OK
Select the menu item and confirm.
either ...
Change the number and confirm.
[_______]
OK
or ...
Edit the name and confirm.
[_______]
OK
[_______________]
MENU
Press the display key to open the menu.
[_____________________________________________________________] [__________]
Save Entry
OK
Confirm. The entry is stored.
... then
[________]
OK
If you only edit the name, you will see a message telling you that the number already exists. Press the display key to confirm the prompt.
Long press (back to idle status).
i
The 'VIP' setting and the voice patterns (C 250 only) are not copied.
25](https://image.slidesharecdn.com/gigasetc280userguide-140204080223-phpapp02/85/Gigaset-c280-user-guide-28-320.jpg)
![Gigaset C250 / englisch / A31008-C250-J101-1-7619 / Directories.fm / 20.06.2003
Using the directory and other lists
Marking a directory entry as VIP
You can mark directory entries of callers who are particularly important to you as 'VIP'
(Very Important Person). You can also assign a particular melody to VIP numbers. You
can then tell who is calling you from the ringer melody. The VIP melody sounds after the
first ring tone.
Precondition: Calling Line Identification is activated (page 20).
Open the directory.
[_________] [______________ ]
MENU
[__________] [_____________________________________________________________]
VIP Entry
[_________ ]
OK
[_________] [_________]
OK
Select the entry and press the display key.
Select the menu item and confirm (‰ = On).
You hear the current melody. Select a melody (1–10)
(page 89) and confirm. The number ends with 'VIP'.
Long press (back to idle status).
Deleting a single entry or directory/speed dial list
or
[_________] [______________ ]
MENU
either ...
[__________] [_____________________________________________________________]
Delete Entry
[_________ ]
OK
or ...
Open the directory or speed dial list.
Select the entry and press the display key.
Delete a single entry:
Select the menu item and confirm.
Delete the entire directory/speed dial list:
[__________] [_____________________________________________________________]
Delete List
[_________ ]
OK
Select the menu item and confirm.
[_______]
OK
Press the display key to confirm the prompt.
... then
Long press (back to idle status).
26](https://image.slidesharecdn.com/gigasetc280userguide-140204080223-phpapp02/85/Gigaset-c280-user-guide-29-320.jpg)
![Gigaset C250 / englisch / A31008-C250-J101-1-7619 / Directories.fm / 20.06.2003
Using the directory and other lists
Adding a displayed telephone number to the directory
When a telephone number appears in the display (CLIP) you can add it to your directory.
This can be done while dialling from the last number redial list, from the calls list/
answering machine list (C 250 only) or during a call.
[_______________]
MENU
Press the display key to open the menu.
[__________] [_____________________________________________________________]
Copy to Directory
[_________]
OK
Select the menu item and confirm.
[________]
OK
Confirm the telephone number.
Enter a name if required.
[_______________]
MENU
Press the display key to open the menu.
[_____________________________________________________________] [__________]
Save Entry
OK
Confirm. The entry is stored.
Long press (back to idle status).
If you have CNIP (page 20) as well as CLIP, then the name that goes with
the telephone number will also be displayed (up to 16 characters long).
i
Picking a phone number from the directory/speed dial list
If you are prompted to enter an external telephone number while you are operating
your telephone, you can use the directory to do this.
Precondition: The input field for external telephone numbers is displayed.
or
[__________] [_________]
OK
Open the directory or speed dial list.
Select the entry and confirm.
The telephone number is added to the entry field.
27](https://image.slidesharecdn.com/gigasetc280userguide-140204080223-phpapp02/85/Gigaset-c280-user-guide-30-320.jpg)
![Gigaset C250 / englisch / A31008-C250-J101-1-7619 / Directories.fm / 20.06.2003
Using the directory and other lists
Sending a single entry or complete list to a handset
You can send single entries or the complete list to another handset that is registered on
the same base. This saves you the need to make double entries. VIP settings and speed
dial (shortcut) digits are not sent.
or
[_________] [______________ ]
MENU
either ...
[__________] [_____________________________________________________________]
Send Entry
[_________ ]
OK
or ...
[__________] [_____________________________________________________________]
Send List
[_________ ]
OK
Open the directory or speed dial list.
Select the entry and press the display key.
Send a single entry:
Select the menu item and confirm.
Send complete list:
Select the menu item and confirm.
... then
[__________] [_____________________________________________________________]
INT 2
[_________ ]
OK
Select the handset to which you wish to send the
entry or list and confirm, e.g. handset 2. Your selections are sent to that handset.
Long press (back to idle status).
After an entry has been sent you are asked if you want to send another entry. If you confirm with the display key OK you can select more entries to send; once you have finishing sending, press the 'end call' key a.
The successful transfer of data is confirmed with a message and with the confirmation
tone at the receiving handset. Existing entries in the receiving handset are retained.
Entries with identical numbers or names are not overwritten. The number of entries that
are stored in the receiving handset may therefore differ from the number of entries that
you have sent to it.
The transfer is cancelled if the phone rings and you take the call or if the memory of the
receiving handset is full. The last entry to be transferred appears in the display.
28](https://image.slidesharecdn.com/gigasetc280userguide-140204080223-phpapp02/85/Gigaset-c280-user-guide-31-320.jpg)

![Gigaset C250 / englisch / A31008-C250-J101-1-7619 / Directories.fm / 20.06.2003
Using the directory and other lists
Recording a voice pattern for an existing entry (C 250 only)
Record your voice pattern in quiet surroundings..
Step 1: Open the directory with voice-activated
dialling:
Press the directory key twice.
[_______]
OK
Confirm.
[__________] [_____________________________________________________________]
User 2
[_________ ]
OK
Select and confirm, e.g. User 2.
Step 2: Select entry for voice-activated dialling:
Select an entry which has no recorded voice pattern.
Step 3: Begin recording:
[______________]
MENU
Press the display key to open the menu.
[_____________________________________________________________] [__________]
Record Word
OK
Confirm. The name appears in the display.
[_______]
OK
Confirm the display prompt. The loudspeaker activates. You hear the ready tone (a short tone). Now
speak the name. After the second prompt in the display you hear the ready tone again. Speak the name
again. Your recording is stored automatically.
Long press (back to idle status).
i
30
To change the user name, select the user as described on page page 67.](https://image.slidesharecdn.com/gigasetc280userguide-140204080223-phpapp02/85/Gigaset-c280-user-guide-33-320.jpg)
![Gigaset C250 / englisch / A31008-C250-J101-1-7619 / Directories.fm / 20.06.2003
Using the directory and other lists
Recording a voice pattern for a new entry (C 250 only)
Press the directory key twice.
[________]
OK
Confirm.
[__________] [_____________________________________________________________]
User 2
[_________]
OK
Select and confirm, e.g. User 2.
[_______________]
MENU
Press the display key to open the menu.
[_____________________________________________________________] [__________]
New Entry
OK
Confirm.
[_______]
OK
Enter the number and confirm.
[_______]
OK
Enter name and confirm (for text input see
page 107).
To record the voice pattern, continue as described in the previous section in 'Step 3:
Begin recording'.
N If your two recordings are too different from each other, you will be
i
prompted to repeat them.
N A message tells you if your speech pattern is too much like another
user's. Clear this message by pressing a, return to the start of the
recording procedure and repeat the recording.
Using voice-activated dialling (C 250 only)
Press the top half of the key and hold.
The display prompts you to speak. After you hear the ready tone, speak the name,
e.g. Anna. If the name matches the recorded voice pattern, it is repeated. The telephone number is dialled.
31](https://image.slidesharecdn.com/gigasetc280userguide-140204080223-phpapp02/85/Gigaset-c280-user-guide-34-320.jpg)
![Gigaset C250 / englisch / A31008-C250-J101-1-7619 / Directories.fm / 20.06.2003
Using the directory and other lists
Phone announces the caller's name (C 250 only)
When you receive an external call, you hear the ringer and the telephone announces the
caller's name.
Preconditions: Calling Line Identification is active (page 20) and you have recorded a
voice pattern for the incoming number (page 30).
Activating/deactivating the name announcement
[______________]
MENU
Press the display key to open the menu.
[__________] [_____________________________________________________________]
Base Settings
[_________ ]
OK
Select the menu item and confirm.
[__________] [_____________________________________________________________]
Additional Features
[_________ ]
OK
Select the menu item and confirm.
[__________] [_____________________________________________________________]
Name Announcement
[_________ ]
OK
Select the menu item and confirm (‰ = On).
Playing or deleting voice patterns (C 250 only)
You can play a particular user's voice pattern for an entry, or you can delete it. This does
not affect the voice patterns of the other users.
Open the directory with voice-activated dialling and select the entry (see Step 1 and
Step 2, page 30). Now:
Press the display key to open the menu.
[______________]
MENU
either ...
Play the voice pattern:
[__________] [_____________________________________________________________]
Play Recording
[_________ ]
OK
or ...
Select the menu item and confirm. The loudspeaker
activates.
Delete the voice pattern:
[__________] [_____________________________________________________________]
Delete Word
[_________ ]
OK
Select the menu item and confirm. The ‰ after the
entry disappears.
Long press (back to idle status).
i
32
Deleting a voice pattern for an entry does not affect its number or name
– they are retained. The voice patterns of other users for the same entry
are also unaffected.](https://image.slidesharecdn.com/gigasetc280userguide-140204080223-phpapp02/85/Gigaset-c280-user-guide-35-320.jpg)
![Gigaset C250 / englisch / A31008-C250-J101-1-7619 / Directories.fm / 20.06.2003
Using the directory and other lists
Viewing and editing an entry (C 250 only)
Open the directory with voice-activated dialling, and select an entry (checked ‰)
(see Step 1 and Step 2, page 30). You can now view and edit the name and number of
the entry in the same way as you would in the directory without voice-activated dialling
(page 25).
Deleting a single voice-activated dialling entry or the complete list
(C 250 only)
Open the directory with voice-activated dialling and select the entry (see Step 1 and
Step 2 page 30). You can now delete a single entry or the complete directory with voiceactivated dialling as described for the directory without voice-activated dialling
(page 26).
Last number redial list
The last number redial list contains the ten last dialled numbers. If names have been
stored for these numbers in the directory, then both the names and the numbers will be
displayed. You can use the last number redial list to redial the telephone numbers.
Dialling telephone numbers from the last number redial list
[__________]
•
Open the last number redial list.
Select an entry and press the top half of the key.
The telephone number is dialled.
N To add or change the telephone number, press MENU and confirm
i
Use Number with OK.
N To add a telephone number from the last number redial list to the
directory (page 27), press MENU,
Copy to Directory OK.
Deleting a single telephone number or the entire last number redial list
[__________]
•
Open the last number redial list.
[__________] [______________]
MENU
Select an entry and open the menu.
either ...
Delete a single telephone number:
[__________] [_____________________________________________________________]
Delete Entry
[_________]
OK
Select the menu item and confirm.
If there still entries on the list, press the key and hold
(back to idle status).
or ...
[__________] [_____________________________________________________________]
Delete List
[_________]
OK+
Delete the entire last number redial list:
Select the menu item and confirm.
33](https://image.slidesharecdn.com/gigasetc280userguide-140204080223-phpapp02/85/Gigaset-c280-user-guide-36-320.jpg)
![Gigaset C250 / englisch / A31008-C250-J101-1-7619 / Directories.fm / 20.06.2003
Using the directory and other lists
Opening lists with the Message key
You can use the Message key f to open the following lists:
1. Text message list (if several mailboxes are set up, they will all be listed),
2. Answering machine list (C 250 only),
3. Messages in the network mailbox (if your network provider supports this function
and the network mailbox is configured for fast access, page 72),
4. Calls list.
As soon as a new entry (a text message, a message on the built-in answering machine
(C 250 only) and/or a call) arrives in one or more of the lists, the f key flashes and you
hear an advisory tone. If you now press the flashing f key but you do not open any of
the lists but instead close the menu, the f key continues to flash.
If you press the flashing f key and open one of the lists, when you close the list the
key will stop flashing even if one of the other lists still contains new entries. If there is
at least one new entry, you can set the f key 'flashing' again, i.e. reactivate it. This will
let others, e.g. members of your family/your office colleagues, know that they have
received new messages.
The following lists are displayed when you press f:
N If only one list has new entries, the first new entry on that list is displayed; if the
entries are in a personal mailbox (page 51), then the appropriate list is displayed.
N If several lists have new entries, those lists are offered for your selection.
N If there are no new messages in any of the lists, then all the lists are offered for your
selection.
N If calls are stored in the network mailbox, you will see a message if the correct setting has been made (refer to the network mailbox operating instructions).
Setting the Message key to 'flashing'/deactivating the Message key
Precondition: There is still one new entry in one of the lists.
Open the calls list.
[__________] [_____________________________________________________________]
Set MWI-LED
[_________ ]
OK
Select the menu item and confirm.
Long press (back to idle status).
The key only flashes until it is pressed again and a list or list entry is opened.
34](https://image.slidesharecdn.com/gigasetc280userguide-140204080223-phpapp02/85/Gigaset-c280-user-guide-37-320.jpg)
![Gigaset C250 / englisch / A31008-C250-J101-1-7619 / Directories.fm / 20.06.2003
Using the directory and other lists
Calls list and answering machine list (C 250 only)
The numbers of the last 30 calls are saved in the calls list. The oldest entry is deleted
when the calls list is full and new entries are added.
Precondition: The caller's number has been identified (page 20).
Depending on the setting, either all calls or only missed calls (default) are stored ('Set
calls list', page 35).
Depending on this setting, several calls from the same number are entered in the calls
list as follows:
N More than once when All Calls is set,
N Once and only the last missed call when Missed Calls is set.
Here is an example of how the calls list (Calls List: ) appears in the display:
Number of new entries in the list
Calls List: 01+05
Number of old, read entries in the list
You can use the answering machine list to listen to the messages that are on the
answering machine on the Gigaset C 250 . The date and time of arrival and caller's
number of each message is displayed provided they are identified.
Once you have listened to them, the new messages are added after the old messages in
the answering machine list.
Here is an example of how the answering machine list (Answering Mach.: ) appears in
the display:
Answering Mach.: 01+05
Number of new entries/messages in the list
Number of old, played entries/messages in the list
Setting the calls list
Open the calls list.
[__________] [_____________________________________________________________]
Calls List: 01+02
[_________]
OK
Select the menu item and confirm.
[_______________]
MENU
Press the display key to open the menu.
[__________] [_____________________________________________________________]
Calls List Settings
[_________]
OK
Select the menu item and confirm. The current selection is checked ‰.
either ...
[_____________________________________________________________] [__________]
Missed Calls
OK
or ...
[__________] [_____________________________________________________________]
All Calls
[_________]
OK
Only calls which you could not take:
Confirm.
All calls:
Select the menu item and confirm.
Long press (back to idle status).
35](https://image.slidesharecdn.com/gigasetc280userguide-140204080223-phpapp02/85/Gigaset-c280-user-guide-38-320.jpg)
![Gigaset C250 / englisch / A31008-C250-J101-1-7619 / Directories.fm / 20.06.2003
Using the directory and other lists
Opening the calls list/answering machine list (C 250 only)
New calls (calls list) and new messages (answering machine) are indicated by the f
key flashing and by an advisory tone.
Open the calls list.
either ...
Open the calls list:
[__________] [_____________________________________________________________]
Calls List: 01+02
[_________ ]
OK
Select the menu item and confirm.
The entry received last is displayed.
Select entry.
or ...
Open the answering machine list:
[__________] [_____________________________________________________________]
Answering Mach.: 01+02
[_________ ]
OK
Select the menu item and confirm. The entry of the
first new message to arrive is displayed. The loudspeaker activates. Message playback begins.
Scroll to the next or previous message. The entry of
the message appears in the display. Message playback begins.
i
To delete an entry or a message , press
MENU, Delete Entry OK .
Calling back a caller
Precondition: The caller's number has been identified (page 20).
Open the calls list/answering machine list (C 250 only) and select an entry. Now:
Press the Talk key once (calls list) or twice (answering
machine list, C 250only).
The telephone number is entered in the last number redial list.
36](https://image.slidesharecdn.com/gigasetc280userguide-140204080223-phpapp02/85/Gigaset-c280-user-guide-39-320.jpg)
![Gigaset C250 / englisch / A31008-C250-J101-1-7619 / Directories.fm / 20.06.2003
Using the directory and other lists
Viewing an entry in the calls list/answering machine list (C 250 only),
adding a number to the directory
You can view the time when a call arrived and add the caller's number to your directory.
Precondition: Calling Line Identification is activated.
Open the calls list/answering machine list and select an entry. Now:
[_______________]
MENU
either ...
Press the display key to open the menu.
Copy telephone number to the directory:
[__________] [_____________________________________________________________]
Copy to Directory
[_________]
OK
Select the menu item and confirm.
[________]
OK
Confirm the number.
[______________]
MENU
[_____________________________________________________________] [__________]
Save Entry
OK
or ...
[__________] [_____________________________________________________________]
Date and Time
[_________]
OK
or ...
[__________] [_____________________________________________________________]
Status
[_________]
OK
Enter name and open the menu.
Confirm. The entry is stored.
View the date and time of arrival:
Select the menu item and confirm.
View information whether new or old:
Select the menu item and confirm.
... then
Long press (back to idle status).
37](https://image.slidesharecdn.com/gigasetc280userguide-140204080223-phpapp02/85/Gigaset-c280-user-guide-40-320.jpg)
![Gigaset C250 / englisch / A31008-C250-J101-1-7619 / Directories.fm / 20.06.2003
Using the directory and other lists
The entry's status is displayed like this:
V
2
1234567890
First (new) call/First (new) message of a total
of two (new) calls/messages
New
OK
The following status messages are used:
New call
The call is new in the list.
Old call
The call is old in the list.
Calls received
The call was taken
(All Calls setting only, page 35).
Answer Machine
C 250 only: The answering machine answered the call but the
caller did not leave a message (All Calls setting only, page 35).
New Msg.
C 250 only: The message is new in the list.
Old Msg.
C 250 only: The message is old in the list, it has already been
played.
i
Gigaset C 250: When picking a telephone number from the answering
machine list, message playback is interrupted when you press MENU.
Playback will resume when the telephone number has been stored in the
directory.
Deleting the calls list
Open the calls list (page 36). Now:
[______________]
MENU
Press the display key to open the menu.
[__________] [_____________________________________________________________]
Delete List
[_________ ]
OK
Select the menu item and confirm. Caution: All old
and new entries will be deleted.
Long press (back to idle status).
Deleting old messages from the answering machine list is explained on page 63.
Deleting a single entry from the calls list
Open the calls list and select an entry (page 36). Now:
[______________]
MENU
Press the display key to open the menu.
[_____________________________________________________________] [__________]
Delete Entry
OK
Confirm.
Long press (back to idle status).
38](https://image.slidesharecdn.com/gigasetc280userguide-140204080223-phpapp02/85/Gigaset-c280-user-guide-41-320.jpg)

![Gigaset C250 / englisch / A31008-C250-J101-176-19 / sms_neutral_theresa.fm / 20.06.2003
SMS (Text Messages)
Before you can send and receive text messages
N Calling Line Identification (page 20) must be enabled for your phone line. Check
with your telephone network provider to make sure that this service is activated on
your phone line. You may have to apply for it to your network provider.
N To receive text messages you must be registered with your service provider.
Ask your service provider,
N what charges are billed for sending and receiving a text message,
N which mobile phone operators you can send text messages to and which mobile
phone operators you can receive text messages from,
N which functions your SMS service offers,
N how you are registered with SMS centres which your phone may already be precon-
figured for – automatically by sending a message or by a special registration procedure.
Sending and receiving text messages
To send and receive a text message, you must enter the call numbers of the SMS centre
of your service provider. These numbers may be preconfigured at the factory.
Activating and deactivating the send message and receive message
functions
The text message 'send' and 'receive' functions are already activated when you purchase
your phone.
[_______________]
MENU
Press the display key to open the menu.
Initiate the setting.
either ...
[________ ]
OK
or ...
[________ ]
OK
Deactivate 'send/receive SMS':
Enter and confirm.
Activate 'send/receive SMS':
Enter and confirm.
The settings which you have made for sending and receiving text messages (e.g. the call
numbers of the SMS centres, personal mailboxes etc.) and the entries in the incoming
and draft message lists are saved when you switch off your phone. They are reactivated
automatically when you switch on your phone again.
When you switch off you cannot send or receive any text messages with your phone.
The first ring tone is signalled again (page 91).
40](https://image.slidesharecdn.com/gigasetc280userguide-140204080223-phpapp02/85/Gigaset-c280-user-guide-43-320.jpg)
![Gigaset C250 / englisch / A31008-C250-J101-176-19 / sms_neutral_theresa.fm / 20.06.2003
SMS (Text Messages)
Entering the numbers of an SMS centre, changing the send centre
You can enter and change the call numbers of an SMS centre. A previously stored SMS
centre number is changed by being overwritten.
You should find out about the services and special functions offered by your service provider before you make a new application and/or before you delete pre-configured call
numbers.
If your service provider supports the sending of text messages to email addresses you
can also enter a number for the 'SMS to email' service. You will then be prompted to use
this number when sending a text message to an email address.
[_______________ ]
MENU
Press the display key to open the menu.
[_____________________________________________________________] [__________]
SMS
OK
Confirm.
[__________] [_____________________________________________________________]
Settings
[_________]
OK
Select the menu item and confirm.
[_____________________________________________________________] [__________]
Service Centres
OK
Confirm.
[__________] [_____________________________________________________________]
SMS Centre No. 3
[_________]
OK
Select and confirm, e.g. SMS Centre No. 3.
3
SMS Centre No. 3
t s
U
OK
Activate SMS centre as the send centre:
[_____________________________________________________________] [__________]
Active Send Service Centre
OK
If required, confirm to temporarily activate SMS
Centre No. 3 as the send centre for your registration
with the service provider (‰ = On). The previously
selected send service centre is automatically deactivated.
Enter the number of the SMS centre:
[__________] [_____________________________________________________________]
SMS
[_________]
OK
Select the menu item and confirm.
Enter the number and confirm.
[________]
OK
Enter the number of the email service:
[__________] [_____________________________________________________________]
E-mail
[_________]
OK
[________]
OK
Select the menu item and confirm.
Enter the number and confirm.
Long press (back to idle status).
i
Ask your service provider for details of how you should enter service numbers if you wish to use personal mailboxes (assuming your service provider supports this function).
41](https://image.slidesharecdn.com/gigasetc280userguide-140204080223-phpapp02/85/Gigaset-c280-user-guide-44-320.jpg)

![Gigaset C250 / englisch / A31008-C250-J101-176-19 / sms_neutral_theresa.fm / 20.06.2003
SMS (Text Messages)
You write a text message like this:
[_______________ ]
MENU
Press the display key to open the menu.
[_____________________________________________________________] [__________]
SMS
OK
Confirm.
[__________] [_____________________________________________________________]
SMS 1
[_________]
OK
If more than one mailbox is activated (page 51),
select a mailbox and confirm, e.g. SMS 1.
If required, enter the mailbox PIN and confirm.
[_______]
OK
[_____________________________________________________________] [__________]
Write Message
OK
Confirm. The input field opens.
Input your text (for text input see page 107).
2
with
Û
tomorrow
U
The number indicates the message you are in (with linked messages). Example: You are in the second message.
Text of the message
u v MENU
Predictive text
The EATONI predictive text feature helps you write your message (page 108, default is
On). You can deactivate EATONI at any time by selecting MENU, s Predictive Text
OK.
N Please refer to the Character Set Chart (page 107) to see how to
enter text correctly.
i
N Use 1 to insert a space, and P to toggle between upper case,
lower case and digits (page 107).
N You can find out how to correct text on page 13.
N If you receive a text message that is incomplete (e.g. because your
phone's memory is full), you will see a message.
Saving text messages
Precondition: You have written a text message (page 42) and the input field is open.
[_______________ ]
MENU
Press the display key to open the menu.
[__________] [_____________________________________________________________]
Save Text
[_________]
OK
Confirm. You can send your text message later
(see page 44).
The message is stored in the draft message list. It can be retrieved and sent at a later
time (page 45).
43](https://image.slidesharecdn.com/gigasetc280userguide-140204080223-phpapp02/85/Gigaset-c280-user-guide-46-320.jpg)
![Gigaset C250 / englisch / A31008-C250-J101-176-19 / sms_neutral_theresa.fm / 20.06.2003
SMS (Text Messages)
Sending a text message without saving it
Precondition: You have written a text message (page 42) and the input field is open.
[_______________]
MENU
Press the display key to open the menu.
[_____________________________________________________________] [__________]
Send Text
OK
Confirm.
[_____________________________________________________________] [__________]
SMS
OK
Confirm.
either ...
Enter the recipient's number (with prefix).
or ...
Select a number from the directory:
Open the directory.
[_________] [_________]
OK
Select the entry and confirm. The number appears in
the display.
... then
[_______]
OK
Confirm. The message is sent.
N The recipient's number must always include the area code (prefix),
i
even if you are in that area.
N When you send a text message to a specific SMS mailbox, you must
put the mailbox ID at the end of the phone number (page 51).
Sending a text message to an email address
If your service provider supports the 'SMS to email' service, then you can also send your
text messages to email addresses. Ask your service provider what format you must enter
the email address in so that he can deliver your message as an email.
To send a text message to an email address, proceed as follows (example).
Enter the recipient's email address at the beginning of your text message. Separate the
email address from the text of the message by a space or a colon (this depends on the
provider).
If the predictive text feature is off, enter the '@' character using the hash key R
(press x2), the colon using the Q key (press x8) and the space with 1 (press once).
If predictive text is on, enter '@' by giving the hash key R 1 long and 1 short press.
You can temporarily save with MENU, s Save Text OK .
44](https://image.slidesharecdn.com/gigasetc280userguide-140204080223-phpapp02/85/Gigaset-c280-user-guide-47-320.jpg)
![Gigaset C250 / englisch / A31008-C250-J101-176-19 / sms_neutral_theresa.fm / 20.06.2003
SMS (Text Messages)
You must send the text message to the number of the email service (page 44).
Enter the email address:
Enter the full email address and end it with a space
or a colon.
Enter the text of the message:
Enter the text. The text is always displayed on one
line.
1
U
p.mai@ort.de Hello
Û
u v MENU
email address, space,
SMS text (example).
Send a text message to the email service:
[_______________ ]
MENU
Press the display key to open the menu.
[_____________________________________________________________] [__________]
Send Text
OK
Confirm.
[__________] [_____________________________________________________________]
E-mail
[_________]
OK
Select the menu item and confirm.
Enter the number of the email service and confirm:
If the number of the send centre's email service is
entered (page 40), then this number is offered.
[_______]
OK
Opening the draft message list
The draft message list shows you:
N Text messages which you saved before you sent them (page 42),
N Text messages you could not send because, for example, you were interrupted by an
incoming call while you were writing the message.
These messages are stored until you delete them.
[_______________ ]
MENU
Press the display key to open the menu.
[_____________________________________________________________] [__________]
SMS
OK
Confirm.
[__________] [_____________________________________________________________]
SMS 2
[_________]
OK
If necessary, select and confirm, e.g. SMS 2.
If required, enter the mailbox PIN and confirm
(see page 51).
[_______]
OK
[__________] [_____________________________________________________________]
Outgoing
[_________]
OK
i
Select the menu item and confirm.
When the memory is full, you are prompted to delete messages.
45](https://image.slidesharecdn.com/gigasetc280userguide-140204080223-phpapp02/85/Gigaset-c280-user-guide-48-320.jpg)
![Gigaset C250 / englisch / A31008-C250-J101-176-19 / sms_neutral_theresa.fm / 20.06.2003
SMS (Text Messages)
Reading and deleting text messages in the draft message list
Precondition: You have opened the draft message list (page 45). If more than one mailbox is activated, then you have opened the draft message list for a mailbox.
[_________] [__________________]
MENU
either ...
[_____________________________________________________________] [__________]
Read SMS
OK
or ...
[__________] [_____________________________________________________________]
Delete Entry
[_________ ]
OK
Select SMS and press the display key.
Read SMS:
Confirm. Use s to view the continuation of the text
message in the display.
Delete SMS:
Select the menu item and confirm. The text message
is deleted.
Long press (back to idle status).
Deleting the entire draft message list
This function deletes all the messages in the draft message list.
Precondition: You have opened the draft message list (page 45).
[_______________]
MENU
Press the display key to open the menu.
[__________] [_____________________________________________________________]
Delete List
[_________ ]
OK
Select the menu item and confirm. The text message
is deleted.
[_______]
OK
Press the display key to confirm the prompt.
Long press (back to idle status).
Sending or editing text messages in the draft message list
Precondition: You have opened a text message in the draft message list to read
(page 46).
[_______________]
MENU
either ...
[_____________________________________________________________] [__________]
Write Message
OK
or ...
[__________] [_____________________________________________________________]
Use text
[_________ ]
OK
Press the display key to open the menu.
Write and send a new text message :
Confirm. A blank input field is opened (page 42).
Edit and send a stored text message:
Select the menu item and confirm. The input field is
opened with the contents of the stored text message.
You can now send the message as described on page 44.
46](https://image.slidesharecdn.com/gigasetc280userguide-140204080223-phpapp02/85/Gigaset-c280-user-guide-49-320.jpg)
![Gigaset C250 / englisch / A31008-C250-J101-176-19 / sms_neutral_theresa.fm / 20.06.2003
SMS (Text Messages)
Receiving text messages, incoming message list
New text messages are indicated by the message New messages, by the f key flashing on all handsets and by an advisory tone.
In the incoming message list the new (unread) messages are before the old messages.
New and old messages are sorted according to their time of arrival: oldest new message,
... , newest message, oldest old message, ..., newest old message.
Linked messages are stored as one message (assuming your service provider supports
text message linking). If an incoming linked message is too long or has not transferred
completely, it will be split into individual messages and stored in the incoming message
list.
You can view the date and time (as transmitted by the message centre) of every message.
Opening the incoming message list
The incoming message list shows you:
N All received messages,
N Messages that could not be sent despite several attempts. These messages are all
stored with an error status (page 56).
The message list is displayed for example as follows:
SMS: 01+05
Number of new entries in the list
Number of old, read entries in the list
Name of the general or personal mailbox
Opening with the message key
Precondition: There is at least one new message in the list.
Press the message key.
[__________] [_____________________________________________________________]
SMS: 01+05
[_________]
OK
If necessary, select a mailbox and confirm. The
incoming message list is opened and the first new
message is displayed.
The display tells you if the message memory is full. Press OK to confirm and delete messages you no longer require from the incoming and draft message list.
Opening with the menu
[_______________ ]
MENU
Press the display key to open the menu.
[_____________________________________________________________] [__________]
SMS
OK
Confirm.
[__________] [_____________________________________________________________]
SMS 2
[_________]
OK
If more than one mailbox is activated (page 51),
select a mailbox and confirm, e.g. SMS 2.
[_______]
OK
[__________] [_____________________________________________________________]
Incoming 01+05
[_________]
OK
If required, enter the mailbox PIN and confirm.
Select the menu item and confirm.
47](https://image.slidesharecdn.com/gigasetc280userguide-140204080223-phpapp02/85/Gigaset-c280-user-guide-50-320.jpg)
![Gigaset C250 / englisch / A31008-C250-J101-176-19 / sms_neutral_theresa.fm / 20.06.2003
SMS (Text Messages)
Viewing the date and time of an incoming text message
You can view the date and time of an incoming text message.
Precondition: You have opened the incoming message list (page 47).
[_________] [__________________]
MENU
Select SMS and press the display key.
[__________] [_____________________________________________________________]
Date and Time
[_________ ]
OK
Select the menu item and confirm. The date and
time of the incoming message are displayed.
Long press (back to idle status).
Reading and deleting text messages in the incoming message list
Precondition: You have opened the incoming message list (page 47).
[_________] [__________________]
MENU
either ...
[_____________________________________________________________] [__________]
Read SMS
OK
or ...
[__________] [_____________________________________________________________]
Delete Entry
[_________ ]
OK
Select SMS and press the display key.
Read SMS:
Confirm. Use s to view the continuation of the
text message in the display.
Delete an individual SMS:
Select the menu item and confirm. The next SMS is
now displayed.
Long press (back to idle status).
A new message which you have read acquires the status Old.
Deleting the entire incoming message list
This function deletes all new and old text messages in the incoming message list.
Precondition: You have opened the incoming message list (page 47).
[_______________]
MENU
Press the display key to open the menu.
[__________] [_____________________________________________________________]
Delete List
[_________ ]
OK
Select the menu item and confirm.
[_______]
OK
Press the display key to confirm the prompt.
Long press (back to idle status).
48](https://image.slidesharecdn.com/gigasetc280userguide-140204080223-phpapp02/85/Gigaset-c280-user-guide-51-320.jpg)
![Gigaset C250 / englisch / A31008-C250-J101-176-19 / sms_neutral_theresa.fm / 20.06.2003
SMS (Text Messages)
Replying to or forwarding text messages
While you read a text message you can use the following functions:
[_______________ ]
MENU
either ...
[_____________________________________________________________] [__________]
Reply
OK
or ...
[__________] [_____________________________________________________________]
Answer: Yes
[_________]
OK
or ...
[__________] [_____________________________________________________________]
Answer: No
[_________]
OK
or ...
[__________] [_____________________________________________________________]
Use text
[_________]
OK
Press the display key to open the menu.
Reply to an incoming message:
Confirm. You can reply to the message immediately
in the input field.
Answer 'Yes':
Select the menu item and confirm.
Answer 'No':
Select the menu item and confirm.
Edit the incoming message and return it:
Select the menu item and confirm.
Edit text as required.
... then
[_______________]
MENU
Press the display key to open the menu.
[_____________________________________________________________] [__________]
Send
OK
Confirm and then send the message as described on
page 44.
or ...
[__________] [_____________________________________________________________]
Save Text
[_________]
OK
Select the menu item and confirm.
To forward a text message, open the menu with MENU and select Send. Now send the
message as described on page 44.
49](https://image.slidesharecdn.com/gigasetc280userguide-140204080223-phpapp02/85/Gigaset-c280-user-guide-52-320.jpg)
![Gigaset C250 / englisch / A31008-C250-J101-176-19 / sms_neutral_theresa.fm / 20.06.2003
SMS (Text Messages)
Adding the telephone number of a text message to the directory
You can add the telephone number to your directory.
Precondition: You have opened the incoming message list and selected a message.
[_______________]
MENU
Press the display key to open the menu.
[__________] [_____________________________________________________________]
Copy to Directory
[_________ ]
OK
Select the menu item and confirm.
[_______]
OK
Confirm the telephone number.
Enter a name (up to 16 characters) (for inputting text
see page 107).
[_______________]
MENU
Press the display key to open the menu.
[_____________________________________________________________] [__________]
Save Entry
OK
Confirm.
Long press (back to idle status).
i
The number of the text message recipient must be stored in the directory
together with its area code (prefix) so that it can also be used for sending
text messages.
Marking text messages as 'new'
If you wish to put an 'old' text message (one which you have already read) back to the
top of the incoming message list, you must first mark it as 'new'. The f key on the
handset will now flash. This will let others, e.g. members of your family, know that they
have received a message.
Precondition: You have opened the incoming message list and selected an old message.
[_______________]
MENU
Press the display key to open the menu.
[__________] [_____________________________________________________________]
Mark as New
[_________ ]
OK
Select the menu item and confirm.
Long press (back to idle status).
50](https://image.slidesharecdn.com/gigasetc280userguide-140204080223-phpapp02/85/Gigaset-c280-user-guide-53-320.jpg)

![Gigaset C250 / englisch / A31008-C250-J101-176-19 / sms_neutral_theresa.fm / 20.06.2003
SMS (Text Messages)
[_______________]
MENU
Press the display key to open the menu.
[_____________________________________________________________] [__________]
SMS
OK
Confirm.
[__________] [_____________________________________________________________]
Settings
[_________ ]
OK
Select the menu item and confirm.
[__________] [_____________________________________________________________]
SMS Mailboxes
[_________ ]
OK
Select the menu item and confirm. Activated mailboxes are checked ‰.
[__________] [_____________________________________________________________]
SMS 2
[_________ ]
OK
Select and confirm, e.g. SMS 2.
Activate/deactivate the mailbox:
[_____________________________________________________________] [__________]
Activate SMS Mailbox
OK
Confirm to activate or deactivate the mailbox
(‰ = On).
U
SMS 2
t s
‰
OK
Confirm.
[_______]
OK
Assign an ID to a mailbox:
[__________] [_____________________________________________________________]
Box-ID:
[_________ ]
OK
Select the menu item and confirm.
[_________] [_________]
OK
Select a number from the available ID's and confirm.
Press the 'end call' key briefly to return to the previous menu level.
Activate/deactivate PIN protection for a mailbox:
[__________] [_____________________________________________________________]
SMS PIN Protection
[_________ ]
OK
Select the menu item and confirm (‰ = On).
[_______]
OK
Enter PIN and confirm.
[_______]
OK
Re-enter PIN and confirm.
Long press (back to idle status).
i
If you operate a number of devices (bases) with SMS functionality on a
single phone line, then each SMS mailbox ID may only occur once. In this
case you must also change the preset ID of the general mailbox.
To find out how to change the PIN, turn to page 53. If you have forgotten your PIN, you
can reset it by restoring the factory settings of the base. This will delete all messages
from all mailboxes.
When you deactivate a mailbox, messages sent to that box will be lost. The messages
stored for that box are deleted.
If you deactivate the PIN protection, the PIN is reset to 0000.
52](https://image.slidesharecdn.com/gigasetc280userguide-140204080223-phpapp02/85/Gigaset-c280-user-guide-55-320.jpg)
![Gigaset C250 / englisch / A31008-C250-J101-176-19 / sms_neutral_theresa.fm / 20.06.2003
SMS (Text Messages)
Sending a text message to a personal mailbox
To send a text message to your personal mailbox, the sender must know your ID and
enter it after your number. Send your SMS contact a text message. He or she will automatically receive your SMS number with your current ID and can then store it in their
directory.
N The message will not be delivered if the sender has used an invalid
ID or the mailbox has been deactivated.
i
N The message will go to your general mailbox if the sender has not
entered the ID.
Changing the ID, name and PIN of a mailbox
[_______________ ]
MENU
Press the display key to open the menu.
[_____________________________________________________________] [__________]
SMS
OK
Confirm.
[__________] [_____________________________________________________________]
Settings
[_________]
OK
Select the menu item and confirm.
[__________] [_____________________________________________________________]
SMS Mailboxes
[_________]
OK
Select the menu item and confirm. All activated mailboxes are checked ‰.
[__________] [_____________________________________________________________]
SMS 2
[_________]
OK
Select and confirm, e.g. SMS 2.
If required, enter the mailbox PIN and confirm.
[_______]
OK
Change mailbox ID:
[_____________________________________________________________] [__________]
Box-ID:
OK
Select the menu item and confirm.
[__________] [_________]
OK
Select a number from the available ID's and confirm.
Press the 'end call' key briefly to return to the previous menu level.
Change the name of the mailbox:
[__________] [_____________________________________________________________]
Change Name
[_________]
OK
Select the menu item and confirm.
Enter the new name and confirm.
[_______]
OK
Change mailbox PIN:
[__________] [_____________________________________________________________]
Change SMS PIN
[_________]
OK
Select the menu item and confirm.
[_______]
OK
Enter new PIN and confirm.
[_______]
OK
Re-enter new PIN and confirm.
Long press (back to idle status).
i
The general mailbox cannot be PIN protected.
53](https://image.slidesharecdn.com/gigasetc280userguide-140204080223-phpapp02/85/Gigaset-c280-user-guide-56-320.jpg)
![Gigaset C250 / englisch / A31008-C250-J101-176-19 / sms_neutral_theresa.fm / 20.06.2003
SMS (Text Messages)
Deactivating PIN protection
Precondition: PIN protection is activated.
[_______________]
MENU
Press the display key to open the menu.
[_____________________________________________________________] [__________]
SMS
OK
Confirm.
[__________] [_____________________________________________________________]
Settings
[_________ ]
OK
Select the menu item and confirm.
[__________] [_____________________________________________________________]
SMS Mailboxes
[_________ ]
OK
Select the menu item and confirm.
All activated mailboxes are checked ‰.
[__________] [_____________________________________________________________]
SMS 2
[_________ ]
OK
Select and confirm, e.g. SMS 2.
[_______]
OK
[__________] [_____________________________________________________________]
SMS PIN Protection
[_________ ]
OK
Enter the mailbox PIN and confirm.
Select the menu item and confirm (‰ disappears).
Long press (back to idle status).
54](https://image.slidesharecdn.com/gigasetc280userguide-140204080223-phpapp02/85/Gigaset-c280-user-guide-57-320.jpg)
![Gigaset C250 / englisch / A31008-C250-J101-176-19 / sms_neutral_theresa.fm / 20.06.2003
SMS (Text Messages)
SMS notification
You are expecting an important call but you have to go out. You can have a notification
sent to any device with SMS functionality, e.g. your mobile phone, by SMS. You must
first store the destination number in your phone which is at home (the default is Off).
Precondition: The caller's number was identified when a call was missed (CLI).
Storing the notify number
[_______________ ]
MENU
Press the display key to open the menu.
[_____________________________________________________________] [__________]
SMS
OK
Confirm.
[__________] [_____________________________________________________________]
Settings
[_________]
OK
Select the menu item and confirm.
[__________] [_____________________________________________________________]
Notify Number
[_________]
OK
Select the menu item and confirm.
Enter the number (e.g. of your mobile phone) and
confirm. The entry is stored.
[_______]
OK
Long press (back to idle status).
Setting the notify type
You can select which calls will be notified:
N Missed calls from the calls list and/or
N Messages from the answering machine (C 250 only)
[_______________ ]
MENU
Press the display key to open the menu.
[_____________________________________________________________] [__________]
SMS
OK
Confirm.
[__________] [_____________________________________________________________]
Settings
[_________]
OK
Select the menu item and confirm.
[__________] [_____________________________________________________________]
Notify Type
[_________]
OK
Select the menu item and confirm.
either ...
Messages from the answering machine:
[_____________________________________________________________] [__________]
Ans.M Message
OK
or ...
Confirm.
Missed calls only:
[__________] [_____________________________________________________________]
Missed Calls
[_________]
OK
Select the menu item and confirm.
Long press (back to idle status).
i
If Greek or Russian is set as the display language on your handset, you will
be notified in English.
55](https://image.slidesharecdn.com/gigasetc280userguide-140204080223-phpapp02/85/Gigaset-c280-user-guide-58-320.jpg)


![Gigaset C250 / englisch / A31008-C250-J101-176-19 / answering_m.fm / 20.06.2003
Using the answering machine in the C 250 Base
Operating the answering machine from the handset
The handset's loudspeaker activates automatically if you receive an acoustic prompt or
message while operating the answering machine from the handset. Press the top half
of the d key to deactivate handsfree mode.
Activating/deactivating the answering machine
[_______________]
MENU
Press the display key to open the menu.
[__________] [_____________________________________________________________]
Voice Mail
[_________]
OK
Select the menu item and confirm.
[__________] [_____________________________________________________________]
Answer Machine
[_________]
OK
Select the menu item and confirm (‰ = On).
When you have activated the answering machine, the remaining memory time is
announced and × appears in the display. The ö key on the base lights up. If the
memory is full and one announcement is present (page 59), then the answering
machine switches automatically to that announcement. If there is no announcement, it
switches itself off. Delete old messages in this case. The answering machine automatically returns to the original announce mode when the old messages have been
deleted.
Recording a personal announcement/announce only
[_______________]
MENU
Press the display key to open the menu.
[__________] [_____________________________________________________________]
Voice Mail
[_________]
OK
Select the menu item and confirm.
[__________] [_____________________________________________________________]
Announcements
[_________]
OK
Select the menu item and confirm.
either ...
[_____________________________________________________________] [__________]
Record Announcement
OK
or ...
[__________] [_____________________________________________________________]
Record Announce Only
[_________]
OK
... then
Record personal announcement:
Confirm.
Record announce only:
Select the menu item and confirm.
The display prompts you to start recording:
[________]
OK
Confirm. You hear the ready tone (a short tone).
Now record your announcement.
[________]
OK
Confirm. The recorded announcement is repeated
for you to check.
59](https://image.slidesharecdn.com/gigasetc280userguide-140204080223-phpapp02/85/Gigaset-c280-user-guide-62-320.jpg)
![Gigaset C250 / englisch / A31008-C250-J101-176-19 / answering_m.fm / 20.06.2003
Using the answering machine in the C 250 Base
N Recording ends automatically when the max. recording time of
i
170 seconds is exceeded or there was a break in speaking or more
than 2 seconds.
N While recording, you may cancel the announcement by pressing a
and then record again using the display key OK.
N If you cancel while recording:
– in the Answer and Record mode, the pre-recorded announcement
will be used again,
– in the Announce Only mode the answering machine is
deactivated.
Listening to announcements
[______________]
MENU
Press the display key to open the menu.
[__________] [_____________________________________________________________]
Voice Mail
[_________ ]
OK
Select the menu item and confirm.
[__________] [_____________________________________________________________]
Announcements
[_________ ]
OK
Select the menu item and confirm.
either ...
[__________] [_____________________________________________________________]
Play Announcement
[_________ ]
OK
or ...
[__________] [_____________________________________________________________]
Play Announce Only
[_________ ]
OK
Play personal announcement:
Select the menu item and confirm.
Play announce only:
Select the menu item and confirm.
Deleting announcements
[______________]
MENU
Press the display key to open the menu.
[__________] [_____________________________________________________________]
Voice Mail
[_________ ]
OK
Select the menu item and confirm.
[__________] [_____________________________________________________________]
Announcements
[_________ ]
OK
Select the menu item and confirm.
[__________] [_____________________________________________________________]
Delete Announcement
[_________ ]
OK
Select the menu item and confirm.
[_______]
OK
Press the display key to confirm the prompt.
or ...
[__________] [_____________________________________________________________]
Delete Announce Only
[_________ ]
OK
Select the menu item and confirm.
[_______]
OK
Press the display key to confirm the prompt.
60](https://image.slidesharecdn.com/gigasetc280userguide-140204080223-phpapp02/85/Gigaset-c280-user-guide-63-320.jpg)
![Gigaset C250 / englisch / A31008-C250-J101-176-19 / answering_m.fm / 20.06.2003
Using the answering machine in the C 250 Base
Select announcement mode
You can choose between the Answer and Record mode and the Announce Only
mode (if you have recorded the announce only, page 59). For definitions of the terms
see page 58.
There is one pre-recorded announcement stored in your phone for the Answer and
Record mode. This announcement is used if you have not yet recorded a personal
announcement or if a personal announcement has been deleted.
[_______________]
MENU
Press the display key to open the menu.
[__________] [_____________________________________________________________]
Voice Mail
[_________]
OK
Select the menu item and confirm.
[__________] [_____________________________________________________________]
Announcements
[_________]
OK
Select the menu item and confirm.
[__________] [_____________________________________________________________]
Set Answer Mode
[_________]
OK
Select the menu item and confirm.
either ...
[_____________________________________________________________] [__________]
Answer and Record
OK
or ...
[__________] [_____________________________________________________________]
Announce Only
[_________]
OK
With record message:
Confirm (‰ = On).
No record message:
Select the menu item and confirm (‰ = On). Your
selected announcement is saved even after the
answering machine is deactivated.
How the answering machine responds to the deletion of announcements
N Answer and Record mode The answering machine remains activated after the
personal announcement is deleted. The pre-recorded announcement is used.
N Announce Only mode The answering machine deactivates after the Announce
Only is deleted.
61](https://image.slidesharecdn.com/gigasetc280userguide-140204080223-phpapp02/85/Gigaset-c280-user-guide-64-320.jpg)
![Gigaset C250 / englisch / A31008-C250-J101-176-19 / answering_m.fm / 20.06.2003
Using the answering machine in the C 250 Base
Playing messages
The date and time of arrival of each message is logged (provided this function is set,
page 15). If Calling Line Identification is activated, then the caller's number or name is
displayed.
New messages that have not yet been played are indicated by a message in the display,
by the ö key flashing on the base and the f key flashing on the handset.
Pressing f starts the playback with the first new message. If there are no new messages, the old messages are played back. After the last new message, the old ones are
played back. You now hear the end tone.
Once they have been played, new messages are added to the list after the old ones.
If you want to listen again to messages you have already played, you must select the
answering machine list.
Open calls list/answering machine list.
[__________] [_____________________________________________________________]
Answering Mach.: 01+02
[_________ ]
OK
Select the menu item and confirm. The playback
starts.
The loudspeaker activates.
Stop and skip forward/back during playback
either ...
1. Using the keypad:
Stop playback:
[______________]
MENU
Stop playback:
[_____________________________________________________________] [__________]
Continue
OK
Confirm to continue.
Skip forward and back:
[_________ ]
To the start of the current message.
2 x [________]
To the previous message.
[_________ ]
To the next message.
2 x [________]
To the next message but one.
or ...
2. Using voice prompts (page 66):
Press the top half of the key and hold.
The loudspeaker activates. You hear the ready tone (a short tone). Now speak the command Back or Forward (page 66).
i
62
The answering machine reverts to idle status if playback is interrupted for
more than a minute.](https://image.slidesharecdn.com/gigasetc280userguide-140204080223-phpapp02/85/Gigaset-c280-user-guide-65-320.jpg)
![Gigaset C250 / englisch / A31008-C250-J101-176-19 / answering_m.fm / 20.06.2003
Using the answering machine in the C 250 Base
Marking a message as "new" during playback
If you wish to put an "old" message which you have already listened to back to the beginning of the list, you must mark it as "new"; the ö key on the base and thef key on
the handset will now flash. During playback:
[_______________]
MENU
Press the display key to open the menu.
[__________] [_____________________________________________________________]
Mark as New
[_________]
OK
Select the menu item and confirm.
Adding the telephone number of a message to the directory
You can add a telephone number to the directory. During playback:
[_______________]
MENU
Press the display key to open the menu.
[__________] [_____________________________________________________________]
Copy to Directory
[_________]
OK
Select the menu item and confirm.
Enter name (for text input see page 107).
[_______________]
MENU
Press the display key to open the menu.
[_____________________________________________________________] [__________]
Save Text
OK
Confirm. The entry is stored.
Deleting messages
You can delete old messages either all together or individually.
Deleting all old messages
During playback or pause:
[_______________]
MENU
Press the display key to open the menu.
[__________] [_____________________________________________________________]
Delete all
[_________]
OK
Select the menu item and confirm.
[________]
OK
Press the display key to confirm the prompt.
i
A new message must be played for 3 seconds before it acquires 'old' status and can be deleted.
Deleting individual old messages
While playing back the message to be deleted:
either ...
[________]
Û
or ...
1. Using the keypad:
Press the display key.
2. Using voice prompts (page 66):
Press the top half of the key and hold.
The loudspeaker activates. You hear the ready tone (a short tone). Now speak the command Delete. You will hear the ready tone again when prompted to repeat the command. Repeat Delete.
63](https://image.slidesharecdn.com/gigasetc280userguide-140204080223-phpapp02/85/Gigaset-c280-user-guide-66-320.jpg)
![Gigaset C250 / englisch / A31008-C250-J101-176-19 / answering_m.fm / 20.06.2003
Using the answering machine in the C 250 Base
Recording memos
Memos are played back and deleted in the same way as messages. New memos are indicated by the ö key (on the base) and the f key (on the handset) flashing. You can
record a number of memos.
[______________]
MENU
Press the display key to open the menu.
[__________] [_____________________________________________________________]
Voice Mail
[_________ ]
OK
Select the menu item and confirm.
[__________] [_____________________________________________________________]
Record Memo
[_________ ]
OK
Select the menu item and confirm.
[_______]
OK
Confirm the display prompt. The loudspeaker activates. You hear the ready tone (a short tone). Now
record your memo.
[_______]
OK
Confirm. The recording is stored.
If you press the a key while recording the memo, recording is cancelled and the
memo will not be stored.
Adding a telephone number from the answering machine list to the
directory
Open calls list/answering machine list.
[__________] [_____________________________________________________________]
Answering Mach.: 01+02
[_________ ]
OK
Select the menu item and confirm.
Select entry.
[______________]
MENU
Press the display key to open the menu.
[__________] [_____________________________________________________________]
Copy to Directory
[_________ ]
OK
Select the menu item and confirm.
Enter name (for text input see page 107).
[______________]
MENU
Press the display key to open the menu.
[_____________________________________________________________] [__________]
Save Text
OK
Confirm. The entry is stored.
Long press (back to idle status).
Picking up a call from the answering machine
You can take a call while the answering machine is recording it.
Press the Talk/Handsfree key.
Recording stops and you can speak to the caller. If 2 seconds of the call have already
been recorded when you pick it up, the call will be displayed as a new message. The
ö and f keys flash when the call is finished.
64](https://image.slidesharecdn.com/gigasetc280userguide-140204080223-phpapp02/85/Gigaset-c280-user-guide-67-320.jpg)
![Gigaset C250 / englisch / A31008-C250-J101-176-19 / answering_m.fm / 20.06.2003
Using the answering machine in the C 250 Base
Activating/deactivating Two-Way Recording
You can record an external call with the answering machine. The recording time
depends on the selected recording quality (page 70) and the amount of available memory.
Precondition: You are conducting an external call.
Press the display key to open the menu.
[_______________]
MENU
either ...
Activate two way record:
[__________] [_____________________________________________________________]
Two Way Record
[_________]
OK
or ...
Select the menu item and confirm (‰ = On).
Deactivate two way record:
[_____________________________________________________________] [__________]
Stop Recording
OK
Confirm.
Two way recording is indicated by an advisory text and is added to the message list as a
new message.
i
Tell the other party that the call is being recorded.
65](https://image.slidesharecdn.com/gigasetc280userguide-140204080223-phpapp02/85/Gigaset-c280-user-guide-68-320.jpg)
![Gigaset C250 / englisch / A31008-C250-J101-176-19 / answering_m.fm / 20.06.2003
Using the answering machine in the C 250 Base
Operating the answering machine with voice prompts
You can use voice commands to control message playback. Four users (user 1 to 4) can
store their pronunciation of the commands Delete, Forward and Back for voice recognition. For the recording, the user must speak all three voice patterns in the above
order.
Recording voice commands
Record your voice pattern in quiet surroundings.
[______________]
MENU
Press the display key to open the menu.
[__________] [_____________________________________________________________]
Voice Mail
[_________ ]
OK
Select the menu item and confirm.
[__________] [_____________________________________________________________]
Voice Prompts
[_________ ]
OK
Select the menu item and confirm.
[_____________________________________________________________] [__________]
Record Word
OK
Confirm.
[_______]
OK
Confirm the message in the display.
[__________] [_____________________________________________________________]
User 2
[_________ ]
OK
Select and confirm, e.g. User 2.
[_______]
OK
Confirm the message in the display.
The loudspeaker activates. You will hear the ready tone (a short tone) when prompted
to speak the first command. Now speak the command Delete. You will hear the ready
tone again when prompted to repeat the command. Repeat Delete.
The loudspeaker activates. You hear the ready tone (a short tone): Speak now. You will
hear the ready tone again when prompted to repeat the command. Repeat Delete.
You are now prompted to speak the second command Forward . Proceed exactly as you
did for the Delete command. Finally, speak the third command Back.
[_______]
OK
i
66
Confirm. The recording is stored.
No further voice patterns can be recorded when the memory is full.](https://image.slidesharecdn.com/gigasetc280userguide-140204080223-phpapp02/85/Gigaset-c280-user-guide-69-320.jpg)
![Gigaset C250 / englisch / A31008-C250-J101-176-19 / answering_m.fm / 20.06.2003
Using the answering machine in the C 250 Base
Changing the user name
[_______________]
MENU
Press the display key to open the menu.
[__________] [_____________________________________________________________]
Voice Mail
[_________]
OK
Select the menu item and confirm.
[__________] [_____________________________________________________________]
Voice Prompts
[_________]
OK
Select the menu item and confirm.
[__________] [_____________________________________________________________]
User List Complete
[_________]
OK
Select the menu item and confirm.
[__________] [_____________________________________________________________]
User 2
[_________]
OK
Select and confirm, e.g. User 2.
[_____________________________________________________________] [__________]
Change User Name
OK
Confirm.
Enter the user name and confirm.
[_______]
OK
Long press (back to idle status).
Activating/deactivating voice prompts
Precondition: You have recorded voice commands.
[_______________]
MENU
Press the display key to open the menu.
[__________] [_____________________________________________________________]
Voice Mail
[_________]
OK
Select the menu item and confirm.
[__________] [_____________________________________________________________]
Voice Prompts
[_________]
OK
Select the menu item and confirm.
[__________] [_____________________________________________________________]
Voice Control
[_________]
OK
Select the menu item and confirm (‰ = On).
Operating the answering machine while you are away from home
(remote operation)
You can check and activate your answering machine from any other telephone (hotel,
pay phone etc.).
Precondition:
1. You have previously changed the preset system PIN (0000) at home (page 94).
2. The phone from which you are calling has tone dialling (DTMF), i.e. you hear different tones when you press the keys. Alternatively you can use a code transmitter
(available from your mobile phone retailer).
i
You will find a quick guide to the remote operation of your answering
machine on page 107.
67](https://image.slidesharecdn.com/gigasetc280userguide-140204080223-phpapp02/85/Gigaset-c280-user-guide-70-320.jpg)

![Gigaset C250 / englisch / A31008-C250-J101-176-19 / answering_m.fm / 20.06.2003
Setting the Answering Machine of the C 250 Base
Setting the Answering Machine of the C 250
Base
The answering machine has already been preset at the factory. However you can make
individual settings using the handset.
Ring delay and charge saving function for remote operation
You can set when you want the answering machine to activate. The options are: immediately, after 10 sec., after 20 sec. (the default setting) or after 30 sec. Instead of a fixed
ring delay you can also select the charge saving setting Auto.
In this setting the answering machine activates automatically:
N after 10 seconds if there are new messages;
N after 20 seconds if there are no new messages.
After around 15 seconds in remote operation you will know that there are no new messages (otherwise the answering machine would have already activated). There will be
no call charges if you hang up now.
i
Please remember:
N Only ringer melodies 1-3 are the same as the call tones during a call.
N With all ringer tones the first ringer tone is suppressed. You can cancel the suppression of the first ringer tone (page 91).
[_______________]
MENU
Press the display key to open the menu.
[__________] [_____________________________________________________________]
Voice Mail
[_________]
OK
Select the menu item and confirm.
[__________] [_____________________________________________________________]
Ring Delay
[_________]
OK
Select the menu item and confirm.
[__________] [_________]
OK
Select Auto, 10 sec, 20 sec, 30 sec or Immediately
and confirm.
69](https://image.slidesharecdn.com/gigasetc280userguide-140204080223-phpapp02/85/Gigaset-c280-user-guide-72-320.jpg)
![Gigaset C250 / englisch / A31008-C250-J101-176-19 / answering_m.fm / 20.06.2003
Setting the Answering Machine of the C 250 Base
Setting the recording time and recording quality
You can set the maximum length of a message and its recording quality. The recording
quality determines the total recording time of your answering machine.
The total recording time is up to 9 minutes in the High Quality setting and up to
15 minutes in the Long Play setting.
[______________]
MENU
Press the display key to open the menu.
[__________] [_____________________________________________________________]
Voice Mail
[_________ ]
OK
Select the menu item and confirm.
[__________] [_____________________________________________________________]
Records
[_________ ]
OK
Select the menu item and confirm.
[__________] [_____________________________________________________________]
Message Length
[_________ ]
OK
Confirm.
either ...
Select recording time (30 sec, 60 sec, 120 sec or
Maximum) and confirm.
[_________] [_________]
OK
or ...
[__________] [_____________________________________________________________]
Record Quality
[_________ ]
OK
Select the menu item and confirm.
[_________] [_________]
OK
Select Long Play or High Quality and confirm.
Activating/deactivating call screening
While a message is recording, you can monitor the call on the loudspeaker of any handset or on the loudspeaker in the base (default).
[______________]
MENU
Press the display key to open the menu.
[__________] [_____________________________________________________________]
Voice Mail
[_________ ]
OK
Select the menu item and confirm.
[__________] [_____________________________________________________________]
Call Screening
[_________ ]
OK
Select the menu item and confirm.
either ...
Activate the loudspeaker in the handset:
[_____________________________________________________________] [__________]
Handset
OK
or ...
Activate the loudspeaker in the base:
[__________] [_____________________________________________________________]
Base
[_________ ]
OK
i
70
Confirm (‰ = On).
Select the menu item and confirm (‰ = On).
N You can switch off the Call Screening function on the handset during
the call using the 'end call' key a.](https://image.slidesharecdn.com/gigasetc280userguide-140204080223-phpapp02/85/Gigaset-c280-user-guide-73-320.jpg)
![Gigaset C250 / englisch / A31008-C250-J101-176-19 / answering_m.fm / 20.06.2003
Setting the Answering Machine of the C 250 Base
Resetting fast access on the answering machine
The (built-in) answering machine is preconfigured for fast access at the factory. However if you have set the network mailbox for fast access (see page 72) you can reset this
setting.
[_______________]
MENU
Press the display key to open the menu.
[__________] [_____________________________________________________________]
Voice Mail
[_________]
OK
Select the menu item and confirm.
[_____________________________________________________________] [__________]
Set Key 1
OK
Confirm.
[__________] [_____________________________________________________________]
Answer Machine
[_________]
OK
Select the menu item and confirm.
Long press (back to idle status).
If you now long press the 1 key you will be connected directly to the answering
machine.
i
The setting for fast access applies to all registered handsets.
71](https://image.slidesharecdn.com/gigasetc280userguide-140204080223-phpapp02/85/Gigaset-c280-user-guide-74-320.jpg)
![Gigaset C250 / englisch / A31008-C250-J101-176-19 / SAG_ T-netbox.fm / 20.06.2003
Using the network mailbox
Using the network mailbox
The 'T-NetBox' network mailbox is the answering machine in your network provider's
network ('T-Net'). You cannot use the network mailbox unless you have applied to your
network provider.
Configuring the network mailbox for fast access
When fast access is configured, by pressing and holding the 1 key you can either
select the network mailbox or the built-in answering machine (Gigaset C 250) directly.
With the Gigaset C 200 the network mailbox is preconfigured for fast access. You just
need to enter the number of the network mailbox.
With the Gigaset C 250 the (built-in) answering machine is preconfigured for fast
access. You can configure the network mailbox instead. Ask your network provider
about this.
Entering the network mailbox number and configuring the network mailbox for
fast access
[______________]
MENU
Press the display key to open the menu.
[__________] [_____________________________________________________________]
Voice Mail
[_________ ]
OK
Select the menu item and confirm.
[_____________________________________________________________] [__________]
Set Key 1
OK
Confirm.
[_____________________________________________________________] [__________]
Network Mailbox
OK
Confirm.
[______________ ]
MENU
[_____________________________________________________________] [__________]
Save Text
OK
Enter the telephone number of the mailbox and
press the display key.
Confirm. The entry is stored.
Long press (back to idle status).
This setting is now valid for all registered handsets. To find out how to reset fast access
on the Gigaset C 250 to the answering machine, refer to page 71.
Calling the network mailbox
Press 1 and hold. This connects you directly to the network mailbox.
If you now press the d key, you can 'open listen' to the announcements of the network
mailbox and operate the network mailbox easily and conveniently.
Viewing a message from the network mailbox
When a message arrives for you, you get a call from the network mailbox. If you have
requested Calling Line Identification, the display shows the number. If you accept the
call, the new messages are played back. If you do not accept the call, the number of the
network mailbox will be stored in the list of missed calls and the message key flashes
(page 34).
72](https://image.slidesharecdn.com/gigasetc280userguide-140204080223-phpapp02/85/Gigaset-c280-user-guide-75-320.jpg)

![Gigaset C250 / englisch / A31008-C250-J101-176-19 / registration.fm / 20.06.2003
Registering and de-registering handsets
Manual registration: Gigaset C 2 on Gigaset C 200 or C 250
You must initiate handset registration on the handset and on the base.
1. On the handset
[______________]
MENU
Press the display key to open the menu.
[__________] [_____________________________________________________________]
Handset Settings
[_________ ]
OK
Select the menu item and confirm.
[__________] [_____________________________________________________________]
Register Handset
[_________ ]
OK
Select the menu item and confirm.
[__________] [_____________________________________________________________]
Base 2
[_________ ]
OK
Select base (1–4) and confirm, e.g. Base 2.
[_______]
OK
Enter the system PIN of the base (the default is 0000)
and confirm.
Base 2 flashes in the display when the system PIN has been entered.
2. On the base
Press the Registration/Paging key on the base
(page 58) until you hear a signal tone (C 250 only)
(approx. 3 seconds). Registration is initiated.
The base search is cancelled after 60 seconds. If registration has not completed inside
this time, repeat the process.
When registration is successful, the handset is automatically assigned the lowest unassigned number, as described in the chapter 'Automatic Registration' (page 73).
74](https://image.slidesharecdn.com/gigasetc280userguide-140204080223-phpapp02/85/Gigaset-c280-user-guide-77-320.jpg)
![Gigaset C250 / englisch / A31008-C250-J101-176-19 / registration.fm / 20.06.2003
Registering and de-registering handsets
Manual registration:
Gigaset 1000 to 4000 and other handsets with GAP functionality
This section describes how to connect handsets belonging to the Gigaset families, handsets A 2, C 1, S 1 or handsets of other devices with GAP functionality to your C 200/C
250 .
1. On the handset
Start to register the handset as described in its operating instructions.
2. On the base
Press the Registration/Paging key on the base
(page 58) until you hear a signal tone (C 250 only)
(approx. 3 seconds). Registration is initiated.
The next unassigned internal number (1-6) is automatically assigned to the handset as
it is registered. If all the numbers have been assigned, number 6 is overwritten provided
the handset is in idle status.
De-registering handsets
You can de-register any registered handset from any registered C 2 handset.
[________]
INT
Open list of handsets.
[__________] [______________]
MENU
Select the handset you wish to de-register (your own
handset is checked ‰) and press the display key.
[__________] [_____________________________________________________________]
De-register Handset
[_________]
OK
Select the menu item and confirm.
Enter the current system PIN (the default setting is
0000) and confirm.
[_______]
OK
Press the display key to confirm the prompt.
[________]
OK
Paging a handset
If you have mislaid your handset you can 'page' it with the help of the base. The Registration/Paging key is on the base to the right of the handset shell (page 58).
Press the Registration/Paging key on the base for 1
second. All handsets will ring together ('Paging').
End paging:
Press the Registration/Paging key on the base again
for 1 second or press the top half of the c key.
i
N Paging ends automatically after 30 seconds.
N The paging call can be heard even when the ringer is switched off.
75](https://image.slidesharecdn.com/gigasetc280userguide-140204080223-phpapp02/85/Gigaset-c280-user-guide-78-320.jpg)
![Gigaset C250 / englisch / A31008-C250-J101-176-19 / registration.fm / 20.06.2003
Registering and de-registering handsets
Changing the base
The following settings may be made if your handset is registered with more than one
base:
N Set to one specific base, e.g. the base at home or the base at the office.
N Set to the base with the best reception (Best Base). This setting will automatically
select whichever base has the best reception.
[______________]
MENU
Press the display key to open the menu.
[__________] [_____________________________________________________________]
Handset Settings
[_________ ]
OK
Select the menu item and confirm.
[__________] [_____________________________________________________________]
Select Base
[_________ ]
OK
Select the menu item and confirm.
[_________] [_________]
OK
Select one of the registered bases or Best Base and
confirm.
76](https://image.slidesharecdn.com/gigasetc280userguide-140204080223-phpapp02/85/Gigaset-c280-user-guide-79-320.jpg)
![Gigaset C250 / englisch / A31008-C250-J101-176-19 / registration.fm / 20.06.2003
Using several handsets
Using several handsets
Internal calls, ending a call
Internal calls are calls with other handsets that are registered with the same base. These
calls are free.
Calling a specific handset or all handsets simultaneously.
Select handset (your own is checked ‰).
[________]
INT
either ...
Call a specific handset:
Select the handset and press the Talk/Handsfree key.
or ...
Call all handsets (group call'):
Press the star key. All handsets are called.
... then
End the call:
Press the end call key.
N To call a specific handset, you can also enter the handset number after
you open the list, e.g. INT 2.
i
N If you receive a call during an internal call or group call, the group call
is not interrupted.
Changing the name of a handset
The names 'INT 1', 'INT 2' etc. are assigned automatically. However you can change
these names, e.g. to 'Anna' etc. (10 characters maximum). The changed name is displayed in the list of every handset.
[________]
INT
Open list of handsets.
[__________] [______________]
MENU
Select the handset and press the display key.
[__________] [_____________________________________________________________]
Change Handset Name
[_________]
OK
Select the menu item and confirm.
Delete the old name using Û.
[_______]
OK
Enter the name and confirm.
Press the end call key.
77](https://image.slidesharecdn.com/gigasetc280userguide-140204080223-phpapp02/85/Gigaset-c280-user-guide-80-320.jpg)
![Gigaset C250 / englisch / A31008-C250-J101-176-19 / registration.fm / 20.06.2003
Using several handsets
Changing a handset's internal number
A handset is automatically assigned the lowest unassigned number when it is registered (page 73). You can change the internal number of all registered handsets
(1–6).
[_______]
INT
Open list of handsets.
[______________]
MENU
Press the display key to open the menu.
[_____________________________________________________________] [__________]
Edit Handset Number
OK
Confirm.
Select a handset.
[_______]
OK
The current number flashes. Enter the new internal
number (1–6) and confirm. The handset's old
number is overwritten.
Press the 'end call' key.
i
You will hear the error tone if you assign an internal number twice (a falling tone sequence). Repeat the process with an unused number.
Transferring a call to another handset
You can transfer (connect) an external call to another handset..
[_______]
INT
Open list of handsets.
The external caller hears the wait melody.
Select one specific handset or Calling all handsets
and press the top half of the key. When the internal
user answers, announce the external call.
Press the 'end call' key. The external call is transferred
to the other handset.
i
78
Instead of announcing the call you can also press the 'end call' key a
immediately. If the internal user does not answer or is busy, the call will
come back to you automatically (Recall appears in the display).](https://image.slidesharecdn.com/gigasetc280userguide-140204080223-phpapp02/85/Gigaset-c280-user-guide-81-320.jpg)
![Gigaset C250 / englisch / A31008-C250-J101-176-19 / registration.fm / 20.06.2003
Using several handsets
Internal consultation calls
You can call an internal user (e.g. to consult with him) while speaking with an external
caller. You are automatically reconnected to the external user when you end this internal call.
Open list of handsets.
The external caller hears the wait melody.
[________]
INT
Select handset and press the top half of the key.
End consultation call:
[_______________]
MENU
Press the display key to open the menu.
[_____________________________________________________________] [__________]
Back
OK
Confirm. You are reconnected to the external caller.
Accepting/rejecting call waiting during an internal call
If you get an external call while conducting an internal call, you will hear the call waiting tone (short tone). The caller's number or name will appear in the display if Calling
Line Identification is enabled.
either ...
Cancel internal call, accept external call:
[_______________]
MENU
Press the display key to open the menu.
[_____________________________________________________________] [__________]
Accept Call Waiting
OK
Select the menu item and confirm. The internal call
is ended. You are connected to the external caller.
or ...
Reject external call:
[__________] [_____________________________________________________________]
Reject Call Waiting
[_________]
OK
i
Select the menu item and confirm. The call waiting
tone is deactivated. You are still connected to the
internal caller.
If you reject the call waiting tone on your handset, it can still be heard on
other registered handsets.
79](https://image.slidesharecdn.com/gigasetc280userguide-140204080223-phpapp02/85/Gigaset-c280-user-guide-82-320.jpg)
![Gigaset C250 / englisch / A31008-C250-J101-176-19 / registration.fm / 20.06.2003
Using several handsets
Listening in to an external call
You are conducting an external call. An internal party can listen in to this call and can
speak as well. A signal tone indicates 'listening in' to all call parties.
Precondition: The Listening in function is activated (default is Off).
Activating/deactivating 'internal listening in'
[______________]
MENU
Press the display key to open the menu.
[__________] [_____________________________________________________________]
Base Settings
[_________ ]
OK
Select the menu item and confirm.
[__________] [_____________________________________________________________]
Additional Features
[_________ ]
OK
Select the menu item and confirm.
[__________] [_____________________________________________________________]
Listening in
[_________ ]
OK
Select and confirm to activate or deactivate listening
in (‰ = On).
Enter the system PIN (page 94) and confirm.
[_______]
OK
Long press (back to idle status).
Internal listening in
On your handset you see Line in use. You wish to listen in to this external call.
Press the Talk/Handsfree key. You can now listen in to
the call. All parties hear a signal tone.
End listening in:
Press the end call key (signal tone).
i
80
If the first internal party presses the 'end call' key a, a signal tone
sounds. The handset that is 'listening in' is still connected to the external
party however.](https://image.slidesharecdn.com/gigasetc280userguide-140204080223-phpapp02/85/Gigaset-c280-user-guide-83-320.jpg)
![Gigaset C250 / englisch / A31008-C250-J101-176-19 / registration.fm / 20.06.2003
Using several handsets
Call Director (calling a specific handset) (C 250 only)
You can set your phone so that an external caller is put through direct to a specific handset. You must activate the Call Director for this. When he has dialled your number, the
caller is asked to select the number of the person he wishes to speak to, or he hears your
personal Call Director announcement. He now has 5 seconds to dial the internal number
of the required handset.
Precondition: The Call Director has been activated.
i
If the dialled party does not take the call, the answering machine will
accept it provided it is switched on. If the ring delay of the answering
machine is set to Immediately (page 69), then the call director
announcement will not be played.
Activating/deactivating the Call Director (C 250 only)
[_______________]
MENU
Press the display key to open the menu.
[__________] [_____________________________________________________________]
Base Settings
[_________]
OK
Select the menu item and confirm.
[__________] [_____________________________________________________________]
Call Director
[_________]
OK
Select the menu item and confirm.
[_____________________________________________________________] [__________]
Call Director Activation
OK
Confirm to activate or deactivate the Call Director (‰
= On).
Long press (back to idle status).
81](https://image.slidesharecdn.com/gigasetc280userguide-140204080223-phpapp02/85/Gigaset-c280-user-guide-84-320.jpg)
![Gigaset C250 / englisch / A31008-C250-J101-176-19 / registration.fm / 20.06.2003
Using several handsets
Recording a Call Director announcement (C 250 only)
Here is a typical Call Director announcement: 'To speak to Mr. Jones press 1, to speak to
the secretary press 2. If you do not want to speak to anyone in particular, press the
>star< key'.
[______________]
MENU
Press the display key to open the menu.
[__________] [_____________________________________________________________]
Base Settings
[_________ ]
OK
Select the menu item and confirm.
[__________] [_____________________________________________________________]
Call Director
[_________ ]
OK
Select the menu item and confirm.
[__________] [_____________________________________________________________]
Record Announcement
[_________ ]
OK
Select the menu item and confirm. The display
prompts you to start recording.
[_______]
OK
Confirm. You hear the ready tone (a short tone).
Now record your announcement.
[_______]
OK
Confirm. The recorded announcement is repeated
for you to check.
i
N If you press the 'end call' key a while recording your announce-
ment, the recording will not be saved.
N Recording ends when the max. recording time of 170 seconds is
exceeded or there was a break in speech of more than 2 seconds.
Playing/deleting a Call Director announcement (C 250 only)
[______________]
MENU
Press the display key to open the menu.
[__________] [_____________________________________________________________]
Base Settings
[_________ ]
OK
Select the menu item and confirm.
[__________] [_____________________________________________________________]
Call Director
[_________ ]
OK
Select the menu item and confirm.
Activate the loudspeaker if necessary.
either ...
[__________] [_____________________________________________________________]
Play Announcement
[_________ ]
OK
or ...
Play the announcement:
Select the menu item and confirm.
Delete the announcement:
[__________] [_____________________________________________________________]
Delete Announcement
[_________ ]
OK
Select the menu item and confirm.
[_______]
OK
Press the display key to confirm the prompt.
Long press (back to idle status).
82](https://image.slidesharecdn.com/gigasetc280userguide-140204080223-phpapp02/85/Gigaset-c280-user-guide-85-320.jpg)

![Gigaset C250 / englisch / A31008-C250-J101-176-19 / registration.fm / 20.06.2003
Using several handsets
Activating the room monitor function and entering the 'call to' number for
the first time
[______________]
MENU
Press the display key to open the menu.
[__________] [_____________________________________________________________]
Additional Features
[_________ ]
OK
Select the menu item and confirm.
[_____________________________________________________________] [__________]
Room Monitor
OK
Confirm.
either ...
Enter an internal number as the 'call to' number:
[__________] [_____________________________________________________________]
Call Internal
[_________ ]
OK
Select the menu item and confirm.
[_________] [_________]
OK
Select the handset and confirm.
or ...
Enter an external number as the 'call to' number:
[__________] [_____________________________________________________________]
Call External
[_________ ]
OK
Select the menu item and confirm.
Enter the number and confirm.
[_______]
OK
If the room monitor is activated, you go straight to the room monitor setting when you
press the display key MENU (open menu).
N You can pick the external number from the directory. Instead of key-
i
ing in the number, press the h key, use s to select an entry and
confirm your choice with OK.
N If you enter an external number as the 'call to' number, only the last
4 digits will appear in the input panel.
Setting the room monitor's sensitivity
[______________]
MENU
Press the display key to open the menu.
[__________] [_____________________________________________________________]
Additional Features
[_________ ]
OK
Select the menu item and confirm.
[_____________________________________________________________] [__________]
Room Monitor
OK
Confirm.
[__________] [_____________________________________________________________]
Level
[_________ ]
OK
If necessary, select and confirm.
[_________] [_________]
OK
Select Low or High and confirm. The setting is
checked ‰.
84](https://image.slidesharecdn.com/gigasetc280userguide-140204080223-phpapp02/85/Gigaset-c280-user-guide-87-320.jpg)
![Gigaset C250 / englisch / A31008-C250-J101-176-19 / registration.fm / 20.06.2003
Using several handsets
Deactivating the room monitor
The room monitor function must be deactivated on the handset that is in the baby's
room.
[_______________]
MENU
Press the display key to open the menu.
[______________________________________________] [__________] OK
Room Monitor off
Confirm.
Deactivating the room monitor remotely
You can deactivate the room monitor remotely. Take the call from the room monitor and
press O R. The room monitor function will deactivate around 90 seconds after the
call ends. The room monitor will make no further calls. The other room monitor functions on the handset (e.g. no ringer) will remain activated until you press MENU and OK
on the handset that is in the baby's room.
Setting the Walk and Talk mode
The Walk and Talk function allows two C 2 handsets to communicate with each other no
matter how far they are from the base.
Example: You go on holiday and take two handsets with Walk and Talk functionality
with you. Set the Walk and Talk function on both handsets. You can now communicate
using the handsets.
Precondition:
N Both handsets have been registered to the same base or
N Both handsets are registered to different bases and both are set to Best Base
(page 76) or
N One of the handsets is not registered to any base and the registered handset is set
to Best Base or
N Neither handset is registered to a base.
i
In Walk and Talk mode
N The maximum range between handsets is 300 metres outdoors,
N The handsets cannot be reached by incoming calls,
N Handset operating times are severely curtailed.
85](https://image.slidesharecdn.com/gigasetc280userguide-140204080223-phpapp02/85/Gigaset-c280-user-guide-88-320.jpg)
![Gigaset C250 / englisch / A31008-C250-J101-176-19 / registration.fm / 20.06.2003
Using several handsets
Activating/deactivating the Walk and Talk mode
Activate the Walk and Talk mode:
[______________]
MENU
Press the display key to open the menu.
[__________] [_____________________________________________________________]
Additional Features
[_________ ]
OK
Select the menu item and confirm.
[__________] [_____________________________________________________________]
Walk and Talk
[_________ ]
OK
Select the menu item and confirm.
Deactivate the Walk and Talk mode:
[______________]
MENU
Press the display key to open the menu.
[_____________________________________________________________] [__________]
Walk and Talk Off
OK
Confirm.
When you press the top half of the d key after you activate the Walk and Talk mode,
the call will go to all handsets which are in that mode. The connection is made with the
first handset to answer the Walk and Talk call.
N Ring and advisory tones are set in exactly the same way as if your
handsets at home were in range of the base (page 88 and page 90).
i
N 'Activate/deactivate ringer' (page 90) and 'Activate/deactivate keypad
lock' (page 11) are available in the Walk and Talk mode.
N The Walk and Talk mode is retained even when you switch your hand-
set off and back on.
86](https://image.slidesharecdn.com/gigasetc280userguide-140204080223-phpapp02/85/Gigaset-c280-user-guide-89-320.jpg)
![Gigaset C250 / englisch / A31008-C250-J101-1-7619 / settings_bs_hs.fm / 20.06.2003
Handset settings
Handset settings
Your handset is preset. You can change the settings to suit your requirements.
Changing the display language
You can view the display texts in different languages.
[_______________]
MENU
Press the display key to open the menu.
[__________] [_____________________________________________________________]
Handset Settings
[_________]
OK
Select the menu item and confirm.
[__________] [_____________________________________________________________]
Language
[_________]
OK
Select the menu item and confirm. The current language is checked ‰ (the default setting is German).
[__________] [_________]
OK
Select a language and confirm.
Long press (back to idle status).
N If you set the wrong language in error, press MENU M 2. Now
i
select the correct language with s and press OK to confirm your
choice.
N When you change the display language the character set can change
too, e.g. for Russian.
Activate/deactivate Auto Answer
If you have activated this function, when you get a call you can simply lift the handset
out of its base or the charger without having to press the Talk/Directory key c
(the default setting is On).
[_______________]
MENU
Press the display key to open the menu.
[__________] [_____________________________________________________________]
Handset Settings
[_________]
OK
Select the menu item and confirm.
[_____________________________________________________________] [__________]
Auto Answer
OK
Confirm to deactivate or activate the function
(‰ = On).
Long press (back to idle status).
87](https://image.slidesharecdn.com/gigasetc280userguide-140204080223-phpapp02/85/Gigaset-c280-user-guide-90-320.jpg)
![Gigaset C250 / englisch / A31008-C250-J101-1-7619 / settings_bs_hs.fm / 20.06.2003
Handset settings
Adjusting the loudspeaker volume
You can adjust the earpiece volume on three levels (1–3) and the handsfree volume on
five levels (1–5) – you can even do this while an external call is in progress.
[______________]
MENU
Press the display key to open the menu.
[__________] [_____________________________________________________________]
Audio Settings
[_________ ]
OK
Select the menu item and confirm.
[_____________________________________________________________] [__________]
Earpiece Volume
OK
Confirm. You hear the current setting.
[_________] [_________]
OK
Select the earpiece volume and confirm.
[__________] [_____________________________________________________________]
Handsfree Volume
[_________ ]
OK
Select the menu item and confirm.
[_________] [_________]
OK
Select the handsfree volume and confirm.
Long press (back to idle status).
88](https://image.slidesharecdn.com/gigasetc280userguide-140204080223-phpapp02/85/Gigaset-c280-user-guide-91-320.jpg)
![Gigaset C250 / englisch / A31008-C250-J101-1-7619 / settings_bs_hs.fm / 20.06.2003
Handset settings
Changing the ringer tone
You can set the ringer volume individually for an internal or external call, for a wake-up
call or for an appointment. A range of options are available:
N Six volume levels:
– Five volume levels (1–5; e.g. volume level 2 = ˆ),
– 'Crescendo' call (6; the volume increases with each ring = ‰).
N Ten melodies (1-10; melodies 1–3 are the 'classical ringer tones').
Changing the ringer melody
[_______________]
MENU
Press the display key to open the menu.
[__________] [_____________________________________________________________]
Audio Settings
[_________]
OK
Select the menu item and confirm.
[__________] [_____________________________________________________________]
Ringer Melody
[_________]
OK
Select the menu item and confirm.
either ...
[_____________________________________________________________] [__________]
External Calls
OK
or ...
[__________] [_____________________________________________________________]
Internal Calls
[_________]
OK
or ...
[__________] [_____________________________________________________________]
Appointment
[_________]
OK
or ...
[__________] [_____________________________________________________________]
Alarm Clock
[_________]
OK
For external calls:
Confirm.
For internal calls:
Select the menu item and confirm.
For an appointment (page 17):
Select the menu item and confirm.
For a preset wake-up call (page 16):
Select the menu item and confirm.
... then
[_____________________________________________________________] [__________]
Melody 1
OK
Confirm melody, e.g. Melody 1 (‰ = On).
Long press (back to idle status).
You can also set all ringers the same. The current setting will be automatically used for
external calls. To do this, select All Ringer Tones and confirm twice with OK.
89](https://image.slidesharecdn.com/gigasetc280userguide-140204080223-phpapp02/85/Gigaset-c280-user-guide-92-320.jpg)
![Gigaset C250 / englisch / A31008-C250-J101-1-7619 / settings_bs_hs.fm / 20.06.2003
Handset settings
Adjusting the ringer volume
[______________]
MENU
Press the display key to open the menu.
[__________] [_____________________________________________________________]
Audio Settings
[_________ ]
OK
Select the menu item and confirm.
[__________] [_____________________________________________________________]
Ringer Volume
[_________ ]
OK
Select the menu item and confirm.
[_________] [_________]
OK
You hear the current volume. Select volume and confirm.
Long press (back to idle status).
Activating/deactivating the ringer
All handsets ring when there is an incoming call. You can cancel the ringer on your
handset before you answer a call or when the handset is in idle status; the ringer can be
cancelled permanently or just for the current call.
Cancelling the ringer permanently:
Press the star key and hold until the ringer cannot be
heard any longer. The ringer is now permanently
cancelled. The Ú icon appears in the display.
Re-activating the ringer:
Press the star key and hold.
To cancel the ringer in the idle status, press the key and hold until the Ú icon appears.
The ringer cannot be re-activated while an external call is in progress.
i
90
To cancel the ringer for the current call, press the display key MENU
and then Silent.](https://image.slidesharecdn.com/gigasetc280userguide-140204080223-phpapp02/85/Gigaset-c280-user-guide-93-320.jpg)
![Gigaset C250 / englisch / A31008-C250-J101-1-7619 / settings_bs_hs.fm / 20.06.2003
Handset settings
First ring muting off/on
The first ring is muted so that you are not disturbed by an incoming text message. You
can change this setting so you can hear the first ring too.
[_______________]
MENU
Press the display key to open the menu.
Press keys.
either ...
You want to hear the first ring:
Press the key.
or ...
You do not want to hear the first ring:
Press the key.
[________]
OK
i
Confirm.
If you accept a call on the first ring and if this ring has signalled a text message, then the message will be lost.
91](https://image.slidesharecdn.com/gigasetc280userguide-140204080223-phpapp02/85/Gigaset-c280-user-guide-94-320.jpg)
![Gigaset C250 / englisch / A31008-C250-J101-1-7619 / settings_bs_hs.fm / 20.06.2003
Handset settings
Activating/deactivating advisory tones
Your handset uses 'advisory tones' to tell you about different activities and statuses. The
following advisory tones can be activated and deactivated individually (the default setting is On).
N Key click: Every key press is confirmed
N Acknowledge tones:
– Confirmation tone (rising tone sequence): at the end of an input/setting, when
the handset is placed in the base and when a new text message or a new entry
arrives in the calls list/answering machine list (C 250 only)
– Error tone (a falling tone sequence): with incorrect inputs
– End of menu tone: when scrolling at the end of a menu
N Battery tone: The batteries must be charged.
[______________]
MENU
Press the display key to open the menu.
[__________] [_____________________________________________________________]
Audio Settings
[_________ ]
OK
Select the menu item and confirm.
[__________] [_____________________________________________________________]
Advisory Tones
[_________ ]
OK
Select the menu item and confirm.
either ...
[_____________________________________________________________] [__________]
Key Tones
OK
or ...
Activate/cancel key click:
Confirm (‰ = On).
Activate/cancel battery warning tone:
[__________] [_____________________________________________________________]
Battery Low
[_________ ]
OK
Select the menu item and confirm.
[__________] [_____________________________________________________________]
On
[_________ ]
OK
Select condition (Off, On, During Call) and confirm,
e.g. On (checked ‰).
Press the 'end call' key briefly to return to the previous menu level.
or ...
[__________] [_____________________________________________________________]
Confirmation Tone
[_________ ]
OK
Activate/cancel confirmation tones:
Select the menu item and confirm (‰ = On).
... then
Long press (back to idle status).
92](https://image.slidesharecdn.com/gigasetc280userguide-140204080223-phpapp02/85/Gigaset-c280-user-guide-95-320.jpg)
![Gigaset C250 / englisch / A31008-C250-J101-1-7619 / settings_bs_hs.fm / 20.06.2003
Handset settings
Restoring the handset factory settings
You can reset individual settings and changes you have made. Entries in the directory,
the calls list and the speed dial list and the handset's registration on the base will be
retained. Press a to cancel the reset.
[_______________]
MENU
Press the display key to open the menu.
[__________] [_____________________________________________________________]
Handset Settings
[_________]
OK
Select the menu item and confirm.
[__________] [_____________________________________________________________]
Reset Handset
[_________]
OK
Select the menu item and confirm.
[________]
OK
Press the display key to confirm the prompt.
Long press (back to idle status).
Factory settings of the handset
Base selection
Earpiece volume
Handsfree volume
Ringer volume
Ringer melody
Auto answer
Battery tone/Key click/Confirmation tone
Display language
Alarm clock/appointment
Best Base
1
3
5
1
activated
activated
country specific
deactivated
Appointment name
Last number redial list
Room monitor/room monitor sensitivity
deleted
empty
deactivated/high
page 76
page 88
page 88
page 89
page 89
page 87
page 92
page 87
page 16/
page 17
page 17
page 33
page 85/
page 84
93](https://image.slidesharecdn.com/gigasetc280userguide-140204080223-phpapp02/85/Gigaset-c280-user-guide-96-320.jpg)
![Gigaset C250 / englisch / A31008-C250-J101-1-7619 / settings_bs_hs.fm / 20.06.2003
Setting the base
Setting the base
All the settings for the base are made with a registered C 2 handset.
Protecting the telephone from unauthorised access
You can protect your telephone from unauthorised access by saving system settings for
the base with a system PIN which only you know. The system PIN must now be entered
for handset registration/de-registration, restoring factory settings or internal listening
in, for example.
Changing the System PIN
You can change the base's 4-digit system PIN (default setting 0000) to a 4-digit PIN
which is known only to you. This also allows you to remotely operate the answering
machine from the Gigaset C 250 (page 67).
[______________]
MENU
Press the display key to open the menu.
[__________] [_____________________________________________________________]
Base Settings
[_________ ]
OK
Select the menu item and confirm.
[__________] [_____________________________________________________________]
System PIN
[_________ ]
OK
Select the menu item and confirm.
[_______]
OK
Enter the current system PIN and confirm. For security reasons the input is shown as four asterisks
(****).
Enter the new system PIN and confirm.
[_______]
OK
Repeat the new system PIN and confirm.
[_______]
OK
Long press (back to idle status).
94](https://image.slidesharecdn.com/gigasetc280userguide-140204080223-phpapp02/85/Gigaset-c280-user-guide-97-320.jpg)
![Gigaset C250 / englisch / A31008-C250-J101-1-7619 / settings_bs_hs.fm / 20.06.2003
Setting the base
Changing the loudspeaker volume of the base (C 250 only)
The loudspeaker volume is the volume that the built-in base loudspeaker uses for message playback and call screening. There are 5 volume levels for you to choose from. The
volume is set either on the base or with the handset.
Setting on the base:
During message playback, press ñ (for louder) or ð (for softer) on the base.
Setting with the handset
[_______________]
MENU
Press the display key to open the menu.
[__________] [_____________________________________________________________]
Base Settings
[_________]
OK
Select the menu item and confirm.
[_____________________________________________________________] [__________]
Audio Settings
OK
Confirm.
[__________] [_____________________________________________________________]
Loudspeaker Volume
[_________]
OK
Select the menu item and confirm. The current loudspeaker volume sounds.
[__________] [_________]
OK
Select desired volume (1-5) and confirm.
Long press (back to idle status).
95](https://image.slidesharecdn.com/gigasetc280userguide-140204080223-phpapp02/85/Gigaset-c280-user-guide-98-320.jpg)
![Gigaset C250 / englisch / A31008-C250-J101-1-7619 / settings_bs_hs.fm / 20.06.2003
Setting the base
Changing the ringer volume and the ringer melody (C 250 only)
As with the handset, you can choose between different ringer volumes and ringer melodies for the base (see page 89). You can also cancel the base ringer.
Adjusting the ringer volume on the base:
While an incoming call is ringing, press ñ (for louder) or ð (for softer) on the base .
Setting the ringer volume and melody from the handset:
[______________]
MENU
Press the display key to open the menu.
[__________] [_____________________________________________________________]
Base Settings
[_________ ]
OK
Select the menu item and confirm.
[_____________________________________________________________] [__________]
Audio Settings
OK
Confirm.
either ...
Adjust the ringer volume:
[__________] [_____________________________________________________________]
Ringer Volume
[_________ ]
OK
Select the menu item and confirm. You hear the current volume.
[_________] [_________]
OK
Select desired volume (0–6) and confirm.
'0' cancels the ringer.
or ...
Changing the ringer melody:
[__________] [_____________________________________________________________]
Ringer Melody
[_________ ]
OK
Select the menu item and confirm. You hear the current melody.
[__________] [_____________________________________________________________]
Melody 1
[_________ ]
OK
Select melody (1–10) and confirm, e.g. Melody 1.
... then
Long press (back to idle status).
Activating/cancelling the key click on the base: (C 250 only)
[______________]
MENU
Press the display key to open the menu.
[__________] [_____________________________________________________________]
Base Settings
[_________ ]
OK
Select the menu item and confirm.
[_____________________________________________________________] [__________]
Audio Settings
OK
Confirm.
[__________] [_____________________________________________________________]
Key Tones
[_________ ]
OK
Select the menu item and confirm (‰ = On).
Long press (back to idle status).
96](https://image.slidesharecdn.com/gigasetc280userguide-140204080223-phpapp02/85/Gigaset-c280-user-guide-99-320.jpg)
![Gigaset C250 / englisch / A31008-C250-J101-1-7619 / settings_bs_hs.fm / 20.06.2003
Setting the base
Repeater support
With a repeater you can increase the range and reception strength of your base; the
repeater must be registered. To use the repeater you must first activate the repeater
mode. This will cancel any calls that are in progress.
[_______________]
MENU
Press the display key to open the menu.
[__________] [_____________________________________________________________]
Base Settings
[_________]
OK
Select the menu item and confirm.
[__________] [_____________________________________________________________]
Additional Features
[_________]
OK
Select the menu item and confirm.
[__________] [_____________________________________________________________]
Repeater Mode
[_________]
OK
Select the menu item and confirm (‰ = On).
Press the display key to confirm the prompt.
[________]
OK
Long press (back to idle status).
Restoring the base factory settings
Resetting does not affect the system PIN and handsets are still registered.
[_______________]
MENU
Press the display key to open the menu.
[__________] [_____________________________________________________________]
Base Settings
[_________]
OK
Select the menu item and confirm.
[__________] [_____________________________________________________________]
Base Reset
[_________]
OK
Select the menu item and confirm.
[_______]
OK
[________]
OK
Enter the system PIN (the factory setting is 0000)
and confirm.
Press the display key to confirm the prompt.
97](https://image.slidesharecdn.com/gigasetc280userguide-140204080223-phpapp02/85/Gigaset-c280-user-guide-100-320.jpg)

![Gigaset C250 / englisch / A31008-C250-J101-1-7619 / pabx.fm / 20.06.2003
Connecting the base to a PABX
Connecting the base to a PABX
The following settings are only needed when your PABX requires them, please refer to
the operating instructions for your PABX.
i
You cannot send or receive text messages on PABX's that do not support
Calling Line Identification.
Dialling modes and recall
The current setting is indicated by ‰.
Step 1: Changing the dialling mode
The following dialling modes can be set:
N Tone dialling (DTMF),
N Dial pulsing (DP),
N DTMF earth (country-specific).
[_______________]
MENU
Press the display key to open the menu.
[__________] [_____________________________________________________________]
Base Settings
[_________]
OK
Select the menu item and confirm.
[__________] [_____________________________________________________________]
Additional Features
[_________]
OK
Select the menu item and confirm.
[_____________________________________________________________] [__________]
Dialling Mode
OK
Confirm.
[__________] [_________]
OK
Select the dialling mode and confirm.
Long press (back to idle status).
Step 2: Setting the recall
[_______________]
MENU
Press the display key to open the menu.
[__________] [_____________________________________________________________]
Base Settings
[_________]
OK
Select the menu item and confirm.
[__________] [_____________________________________________________________]
Additional Features
[_________]
OK
Select the menu item and confirm.
[__________] [_____________________________________________________________]
Recall
[_________]
OK
Select the menu item and confirm.
[__________] [_________]
OK
Select recall and confirm.
Long press (back to idle status).
99](https://image.slidesharecdn.com/gigasetc280userguide-140204080223-phpapp02/85/Gigaset-c280-user-guide-102-320.jpg)
![Gigaset C250 / englisch / A31008-C250-J101-1-7619 / pabx.fm / 20.06.2003
Connecting the base to a PABX
Setting pauses
Changing the pause after line seizure
You can set the length of the pause that is inserted between pressing the top half of the
c key and the transmission of the telephone number (the default setting is 3 seconds).
[______________]
MENU
Press the display key to open the menu.
Press keys.
[_______]
OK
Enter a number for the length of the pause
(1 = 1 sec.; 2 = 3 sec.; 3 = 7 sec.; 4 = 2.5 sec.)
and confirm.
Change pause after Recall key
You can change the length of the pause if your PABX requires this (refer to the operating
instructions for your PABX; the default setting is 800 ms).
[______________]
MENU
Press the display key to open the menu.
Press keys.
[_______]
OK
Enter a number for the length of the pause
(1 = 800 ms; 2 = 1600 ms; 3 = 3200 ms) and confirm.
Changing the dialling pause
[______________]
MENU
Press the display key to open the menu.
Press keys.
[_______]
OK
Enter a number for the length of the pause
(1 = 1 sec.; 2 = 2 sec.; 3 = 3 sec.; 4 = 6 sec.) and confirm.
Switching temporarily to tone dialling (DTMF)
If your PABX still operates with dial pulsing (DP) but tone dialling (DTMF) is required for
a particular call (e.g. to check your network mailbox), you must switch to tone dialling
during the call.
Precondition: A call is in progress.
[______________]
MENU
Press the display key to open the menu.
[__________] [_____________________________________________________________]
Tone dialing
[_________ ]
OK
Select the menu item and confirm. Tone dialling is
now activated for this call.
100](https://image.slidesharecdn.com/gigasetc280userguide-140204080223-phpapp02/85/Gigaset-c280-user-guide-103-320.jpg)


![Gigaset C250 / englisch / A31008-C250-J101-1-7619 / appendix.fm / 20.06.2003
Appendix
Activating/deactivating predictive text
Predictive text is activated and deactivated according to specific functions. Even if you
have deactivated EATONI when entering a name in the telephone for instance, it is still
available for writing text messages.
Precondition: You are in a text input field (text message, name in the directory or speed
dial list).
[_______________]
MENU
[__________] [_____________________________________________________________]
Predictive Text
[_________]
OK
Press the display key to open the menu.
Select the menu item and confirm (‰ = On).
Press the 'end call' key briefly to return to the text
area. Now enter your text.
109](https://image.slidesharecdn.com/gigasetc280userguide-140204080223-phpapp02/85/Gigaset-c280-user-guide-112-320.jpg)


![Gigaset C250 / englisch / A31008-C250-J101-1-7619 / menuetree.fm / 20.06.2003
Menu Tree
Menu Tree
Instead of scrolling to locate a menu function, you can select a menu function faster by
opening the menu and keying in the digit combination ('shortcut').
Example: MENU 5 4 4 for 'set ringer melody for the alarm clock'.
Main menu
With the telephone in the idle status, press MENU (open menu):
1
SMS
or ...
1
SMS
You have activated an SMS mailbox (general or private without PIN)
1-1 Write Message
1-2 Incoming
00+00
1-3 Outgoing
You have activated an SMS mailbox with a PIN or 2-4 mailboxes
1-1 SMS
1-1-1 Write Message
1-1-2 Incoming
00+00
1-1-3 Outgoing
1-2 SMS 1
to 1- SMS 2
4
SMS 3
1-6-1
Service Centres
1-6-1-1 SMS Centre No. 1
1-6-1-… [to]
1-6-1-5 SMS Centre No. 5
SMS Mailboxes
1-6-2-1
1-6-2-2
1-6-2-3
1-6-2-4
SMS
SMS 1
SMS 2
SMS 3
1-6-3
1-6-4
Settings
Write Message
1-6-2
1-6
1-2-1
to
1-4-4
1-2-2
to
1-4-2
1-2-3
to
1-4-3
Notify Number
Notify Type
1-6-4-1
Ans.M Message
(C 250 only)
Missed Calls
Incoming
00+00
Outgoing
1-6-4-2
112](https://image.slidesharecdn.com/gigasetc280userguide-140204080223-phpapp02/85/Gigaset-c280-user-guide-115-320.jpg)
![Gigaset C250 / englisch / A31008-C250-J101-1-7619 / menuetree.fm / 20.06.2003
Menu Tree
3
Additional
Features
3-1
Room Monitor
5
Calender/
Clock
Audio Settings
Call Internal
3-1-2
3-1-3
Call External
Level
4-4-1
4-4-2
24 hour
12 hour
5-4-1
External Calls
5-4-1-1
5-4-1-...
5-4-1-0
Melody 1
[to]
Melody 10
Internal Calls
5-4-2-1
5-4-2-...
5-4-2-0
Melody 1
[to]
Melody 10
5-4-3
Appointment
5-4-3-1
5-4-3-...
5-4-3-0
Melody 1
[to]
Melody 10
5-4-4
Alarm Clock
5-4-4-1
5-4-4-...
5-4-4-0
Melody 1
[to]
Melody 10
5-4-5
Set Appointment
Alarm Clock
Date/Time
Time Mode
Low
High
All Ringer Tones 5-4-5-1
5-4-5-...
5-4-5-0
Melody 1
[to]
Melody 10
5-5-1
5-5-2
Key Tones
Battery Low
5-5-3
Confirmation
Tone
Walk and Talk
4-1
3-1-3-1
3-1-3-2
5-4-2
3-2
4
3-1-1
4-2
4-3
4-4
5-1
5-2
5-3
5-4
5-5
Earpiece Volume
Handsfree Volume
Ringer Volume
Ringer Melody
Advisory Tones
5-5-2-1
5-5-2-2
5-5-2-3
Off
On
During Call
113](https://image.slidesharecdn.com/gigasetc280userguide-140204080223-phpapp02/85/Gigaset-c280-user-guide-116-320.jpg)
![Gigaset C250 / englisch / A31008-C250-J101-1-7619 / menuetree.fm / 20.06.2003
Menu Tree
7
Handset Set- 7-1
tings
7-2
7-3
Auto Answer
Select Base
(List)
7-5
Base Settings
(List)
(List)
7-4
8
Language
Register Handset
Reset Handset
8-1
Audio Settings
(C 250 only)
8-2
8-3
8-4
System PIN
Base Reset
Additional Features
8-1-1
Loudspeaker
VolumeVolume
8-1-2
8-1-3
8-1-4
Ringer Volume
Ringer Melody
Key Tones
8-4-1
Dialling Mode
8-4-3
8-4-6
8-4-7
8-5
Preselection
Recall
Repeater Mode
Listening in
Name
Announcement
8-5-1
Preselect
Number
With Preselect
Without Preselect
8-5-2
8-5-3
8-6
Call Director
(C 250 only)
8-6-1
8-6-2
8-6-3
8-6-4
114
Call Director
Activation
Record
Announcement
Play Announcement
Delete
Announcement
Tone
8-4-1-2
8-4-1-3
8-4-2
8-4-1-1
Pulse
Tone-Earth
8-4-2-1
8-4-2-...
8-4-2-8
80 ms
[to]
800 ms](https://image.slidesharecdn.com/gigasetc280userguide-140204080223-phpapp02/85/Gigaset-c280-user-guide-117-320.jpg)
![Gigaset C250 / englisch / A31008-C250-J101-1-7619 / menuetree.fm / 20.06.2003
Menu Tree
9
Voice Mail
9-1
Set Key 1
9-1-1
9-1-2
C 250 only:
9-2
9-3
9-4
9-5
Answer Machine
Call Screening
9-3-1
9-3-2
Record Memo
Announce9-5-1
ments
9-5-2
9-5-3
9-5-4
9-5-5
9-5-6
9-5-7
Network Mailbox
Answer
Machine
Handset
Base
Record
Announcement
Play Announcement
Delete
Announcement
Record
Announce Only
Play Announce
Only
Delete
Announce Only
Set Answer
Mode
9-5-7-1
9-5-7-2
Answer and
Record
Announce Only
9-6
Records
9-6-1
9-6-2
Message Length
Record Quality 9-6-2-1
9-6-2-2
9-7
Ring Delay
9-7-1
9-7-2
9-7-3
9-7-4
9-7-5
Immediately
10 sec
20 sec
30 sec
Auto
9-8
Voice Prompts
9-8-1
Record Word
(List)
9-8-2
9-8-3
Voice Control
User List Complete
9-8-3-1
User 1
9-8-3-...
9-8-3-4
[to]
User 4
Long Play
High Quality
115](https://image.slidesharecdn.com/gigasetc280userguide-140204080223-phpapp02/85/Gigaset-c280-user-guide-118-320.jpg)
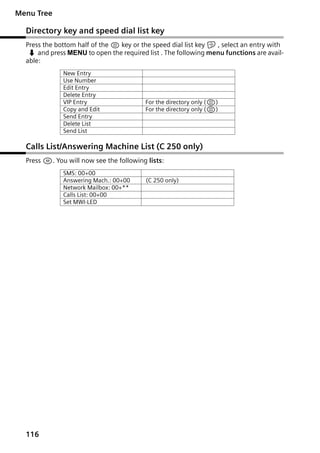


The document explains that Gigaset Communications GmbH is the legal successor to Siemens Home and Office Communication Devices GmbH & Co. KG (SHC), which continued the Gigaset business of Siemens AG. Any statements made by Siemens AG or SHC in user guides should be understood as statements made by Gigaset Communications GmbH. It wishes customers enjoyment of their Gigaset product.


