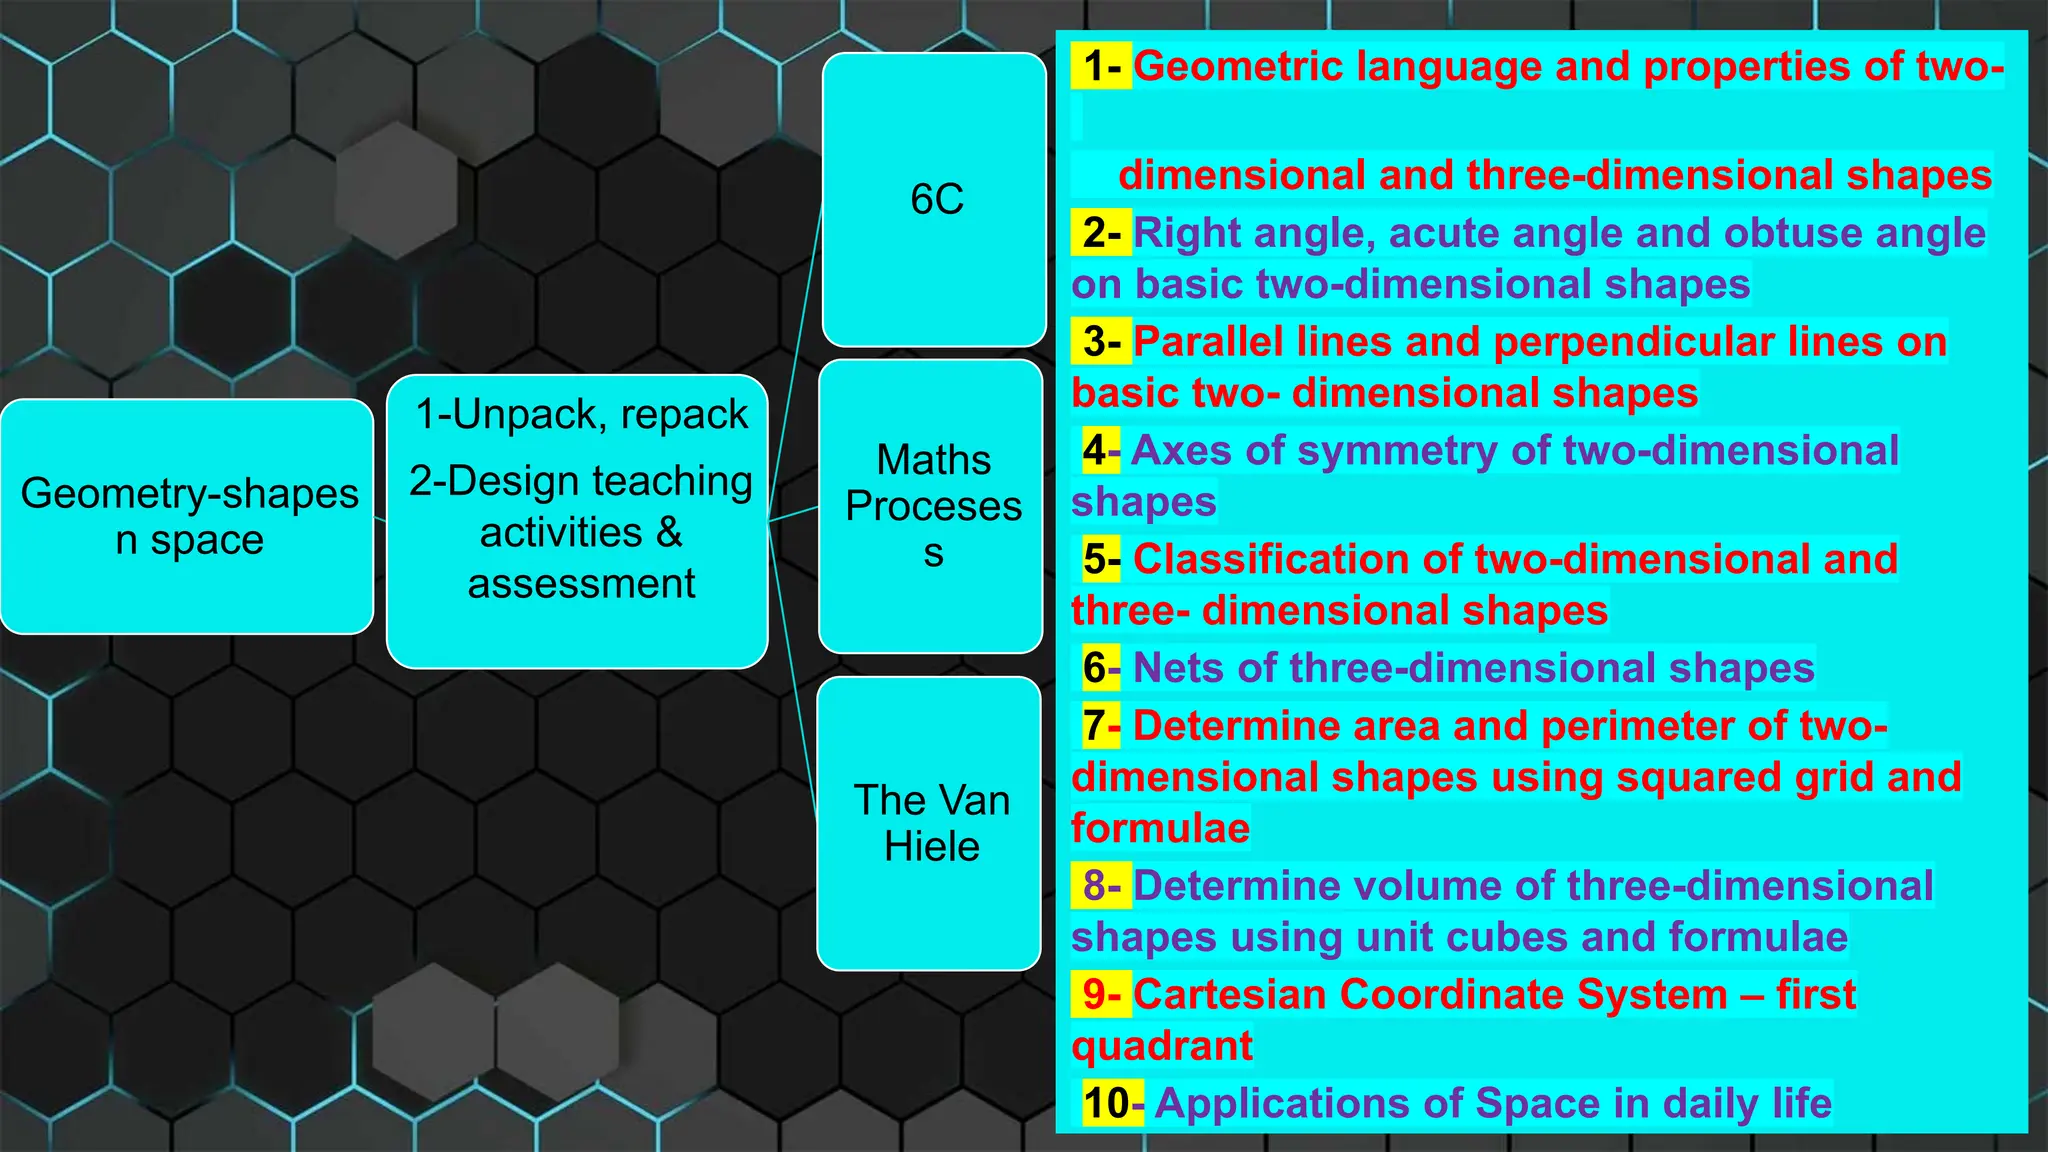
Geometry-shapes
n space
1-Unpack, repack
2-Designteaching
activities &
assessment
6C
Maths
Proceses
s
The Van
Hiele
1- Geometric language and properties of two-
dimensional and three-dimensional shapes
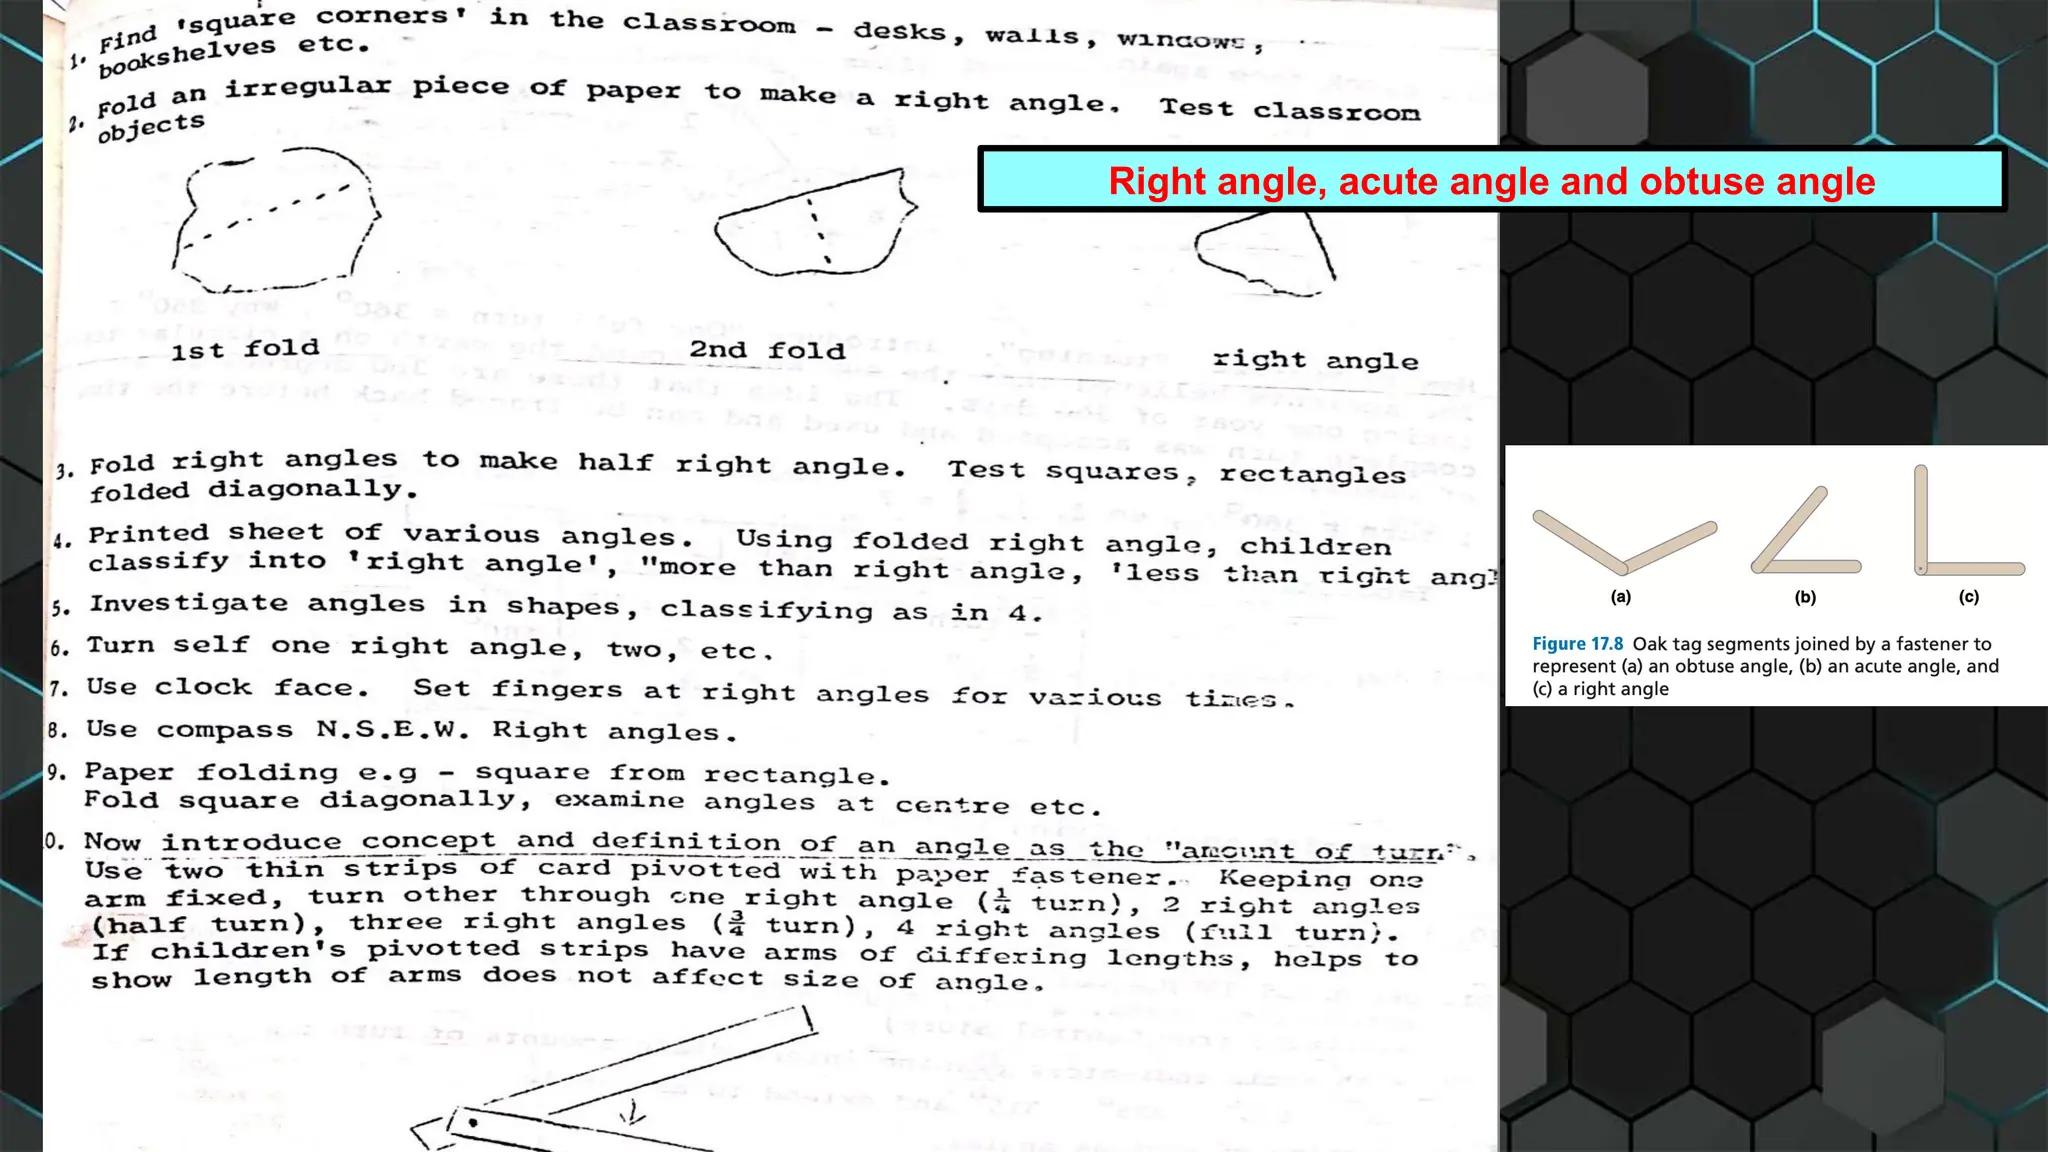
2- Right angle, acute angle and obtuse angle
on basic two-dimensional shapes
3- Parallel lines and perpendicular lines on
basic two- dimensional shapes
4- Axes of symmetry of two-dimensional
shapes
5- Classification of two-dimensional and
three- dimensional shapes
6- Nets of three-dimensional shapes
7- Determine area and perimeter of two-
dimensional shapes using squared grid and
formulae
8- Determine volume of three-dimensional
shapes using unit cubes and formulae
9- Cartesian Coordinate System – first
quadrant
10- Applications of Space in daily life
2.
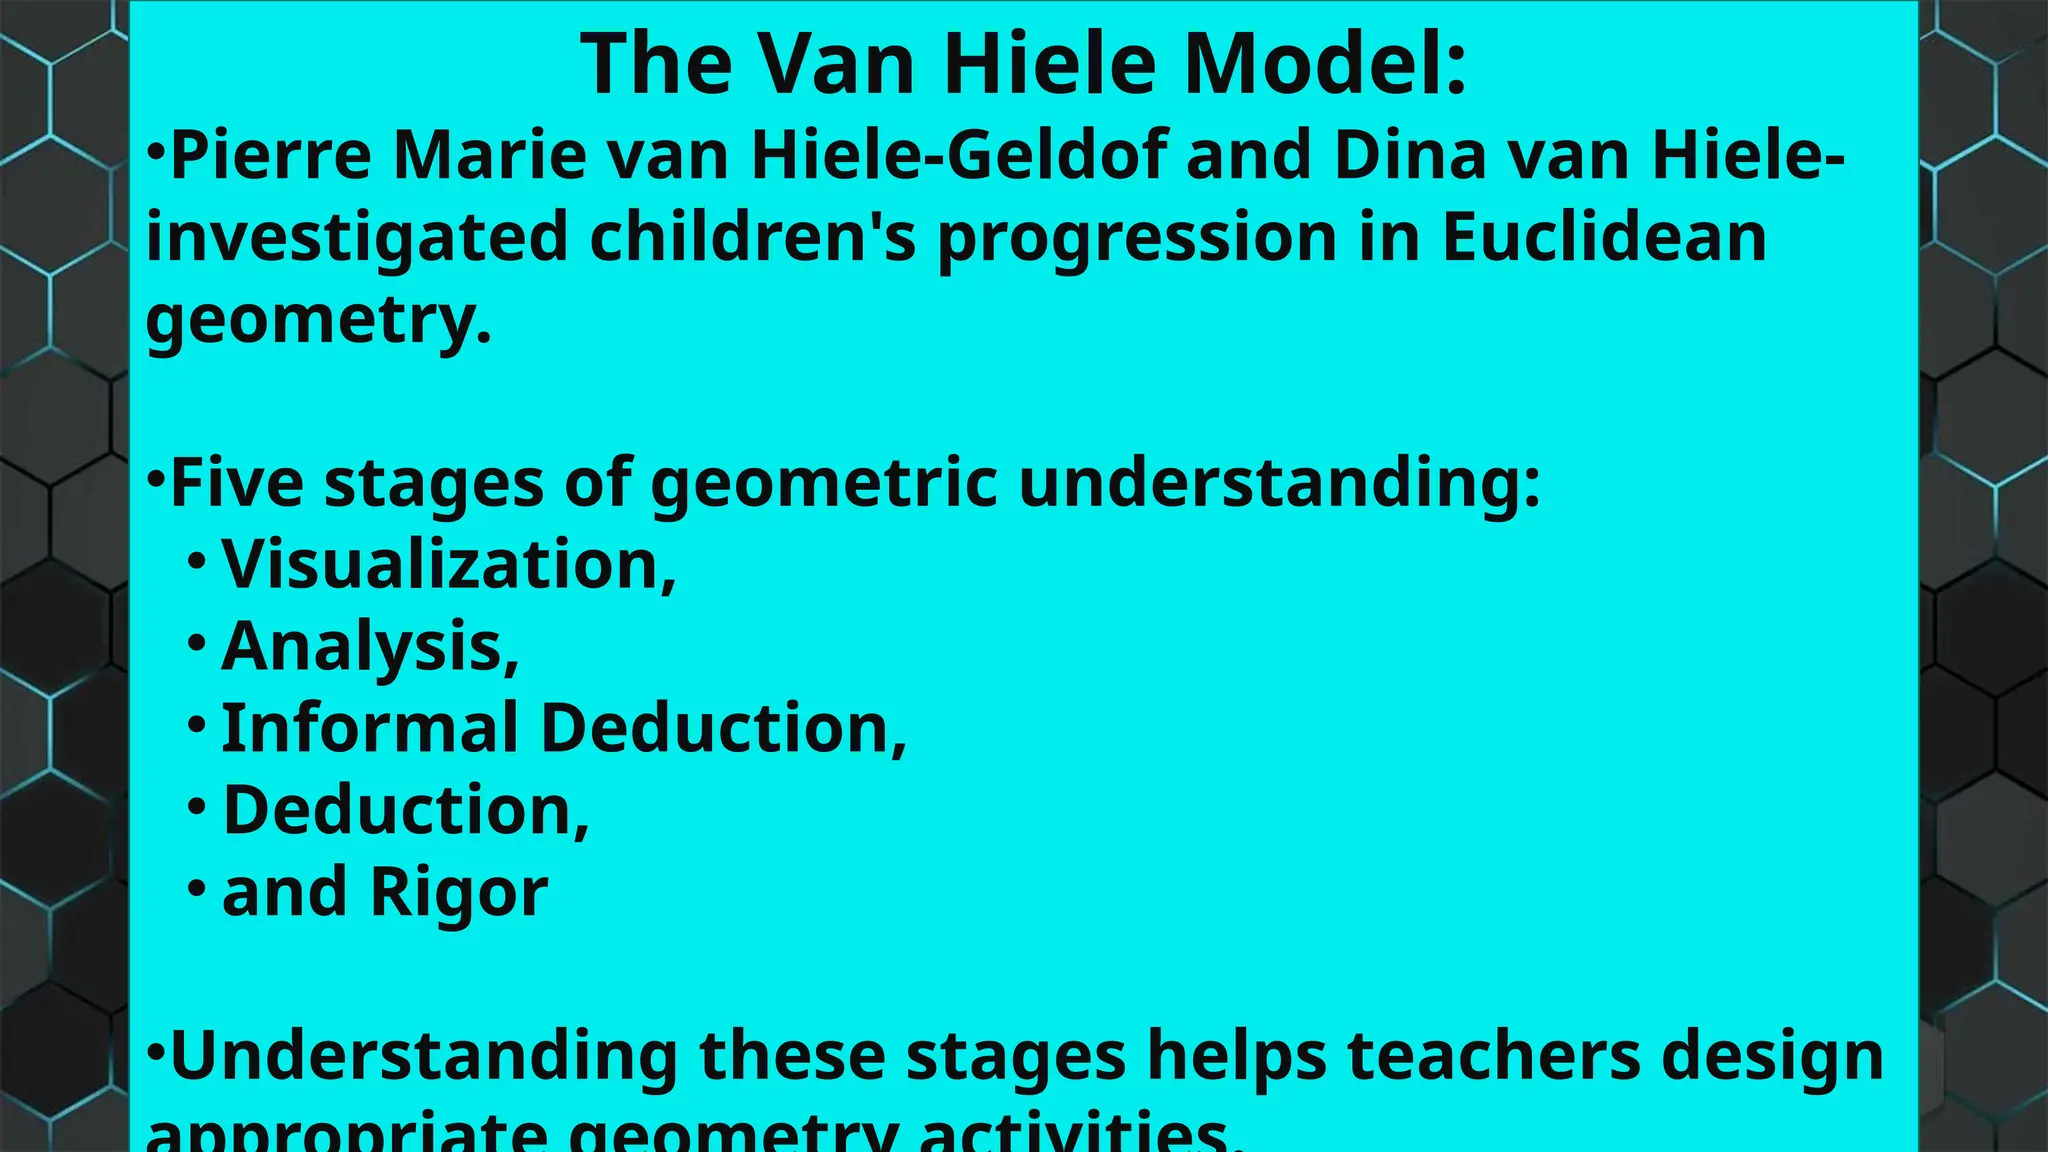
The Van HieleModel:
•Pierre Marie van Hiele-Geldof and Dina van Hiele-
investigated children's progression in Euclidean
geometry.
•Five stages of geometric understanding:
• Visualization,
• Analysis,
• Informal Deduction,
• Deduction,
• and Rigor
•Understanding these stages helps teachers design
3.
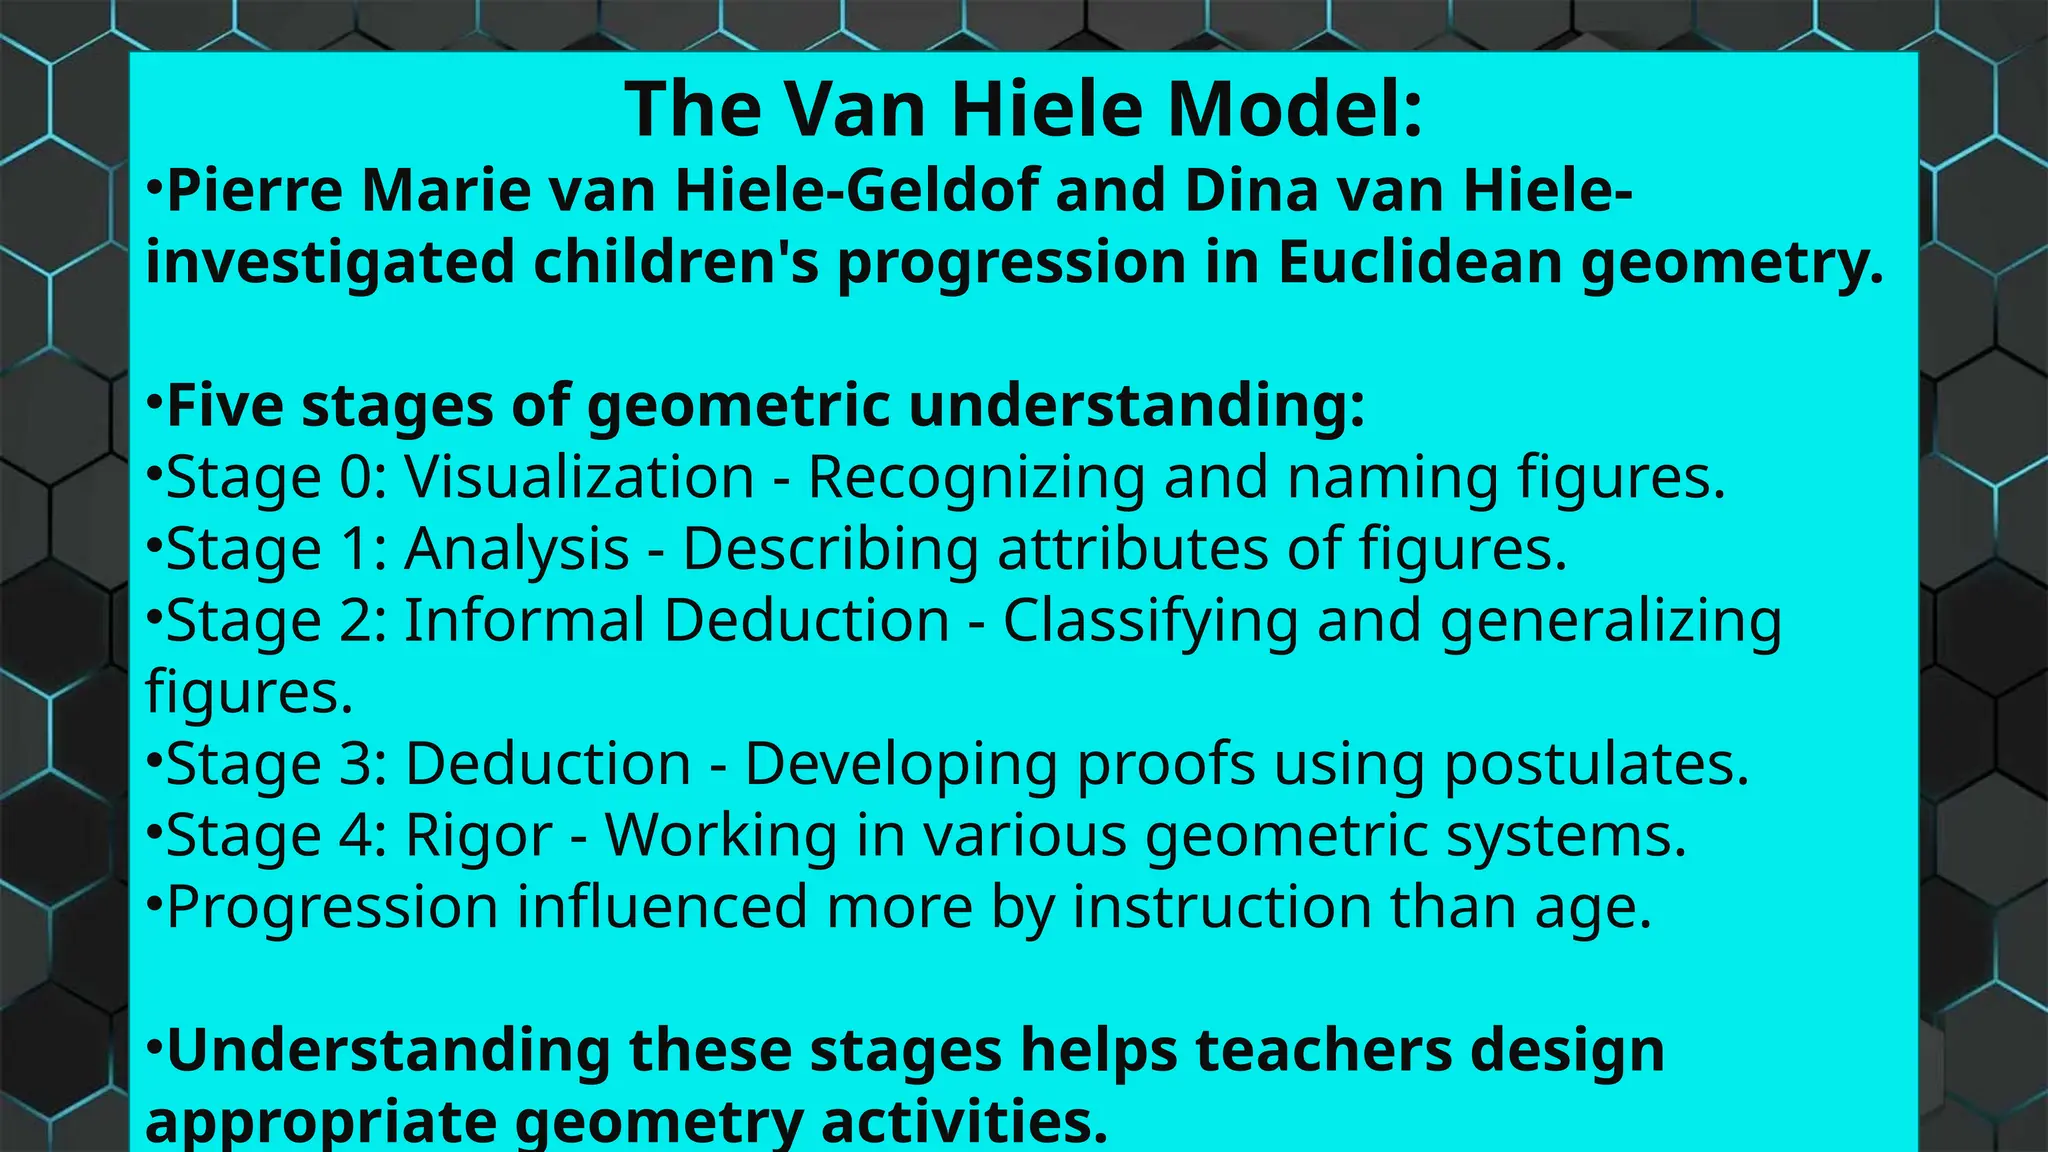
The Van HieleModel:
•Pierre Marie van Hiele-Geldof and Dina van Hiele-
investigated children's progression in Euclidean geometry.
•Five stages of geometric understanding:
•Stage 0: Visualization - Recognizing and naming figures.
•Stage 1: Analysis - Describing attributes of figures.
•Stage 2: Informal Deduction - Classifying and generalizing
figures.
•Stage 3: Deduction - Developing proofs using postulates.
•Stage 4: Rigor - Working in various geometric systems.
•Progression influenced more by instruction than age.
•Understanding these stages helps teachers design
appropriate geometry activities.
4.
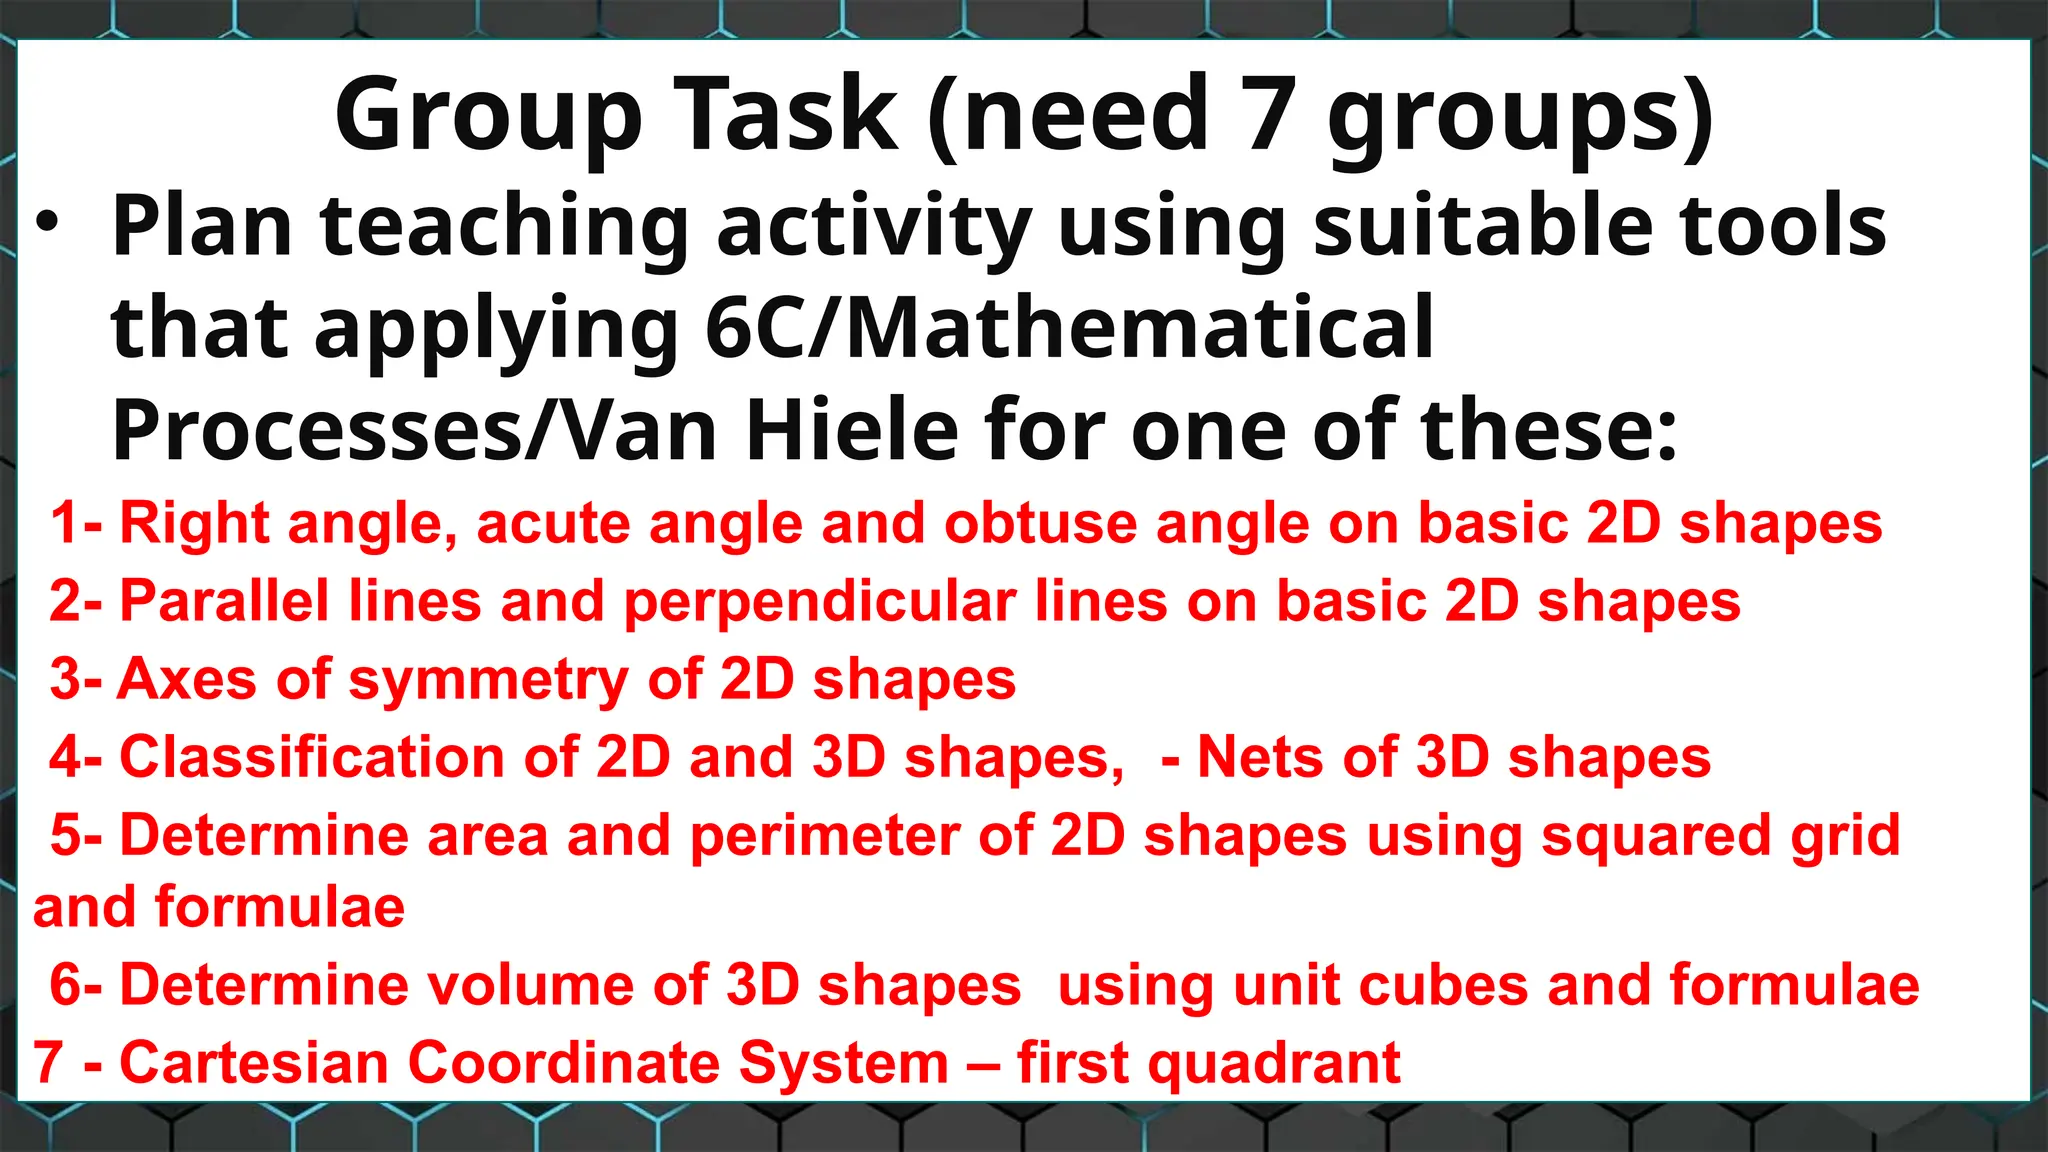
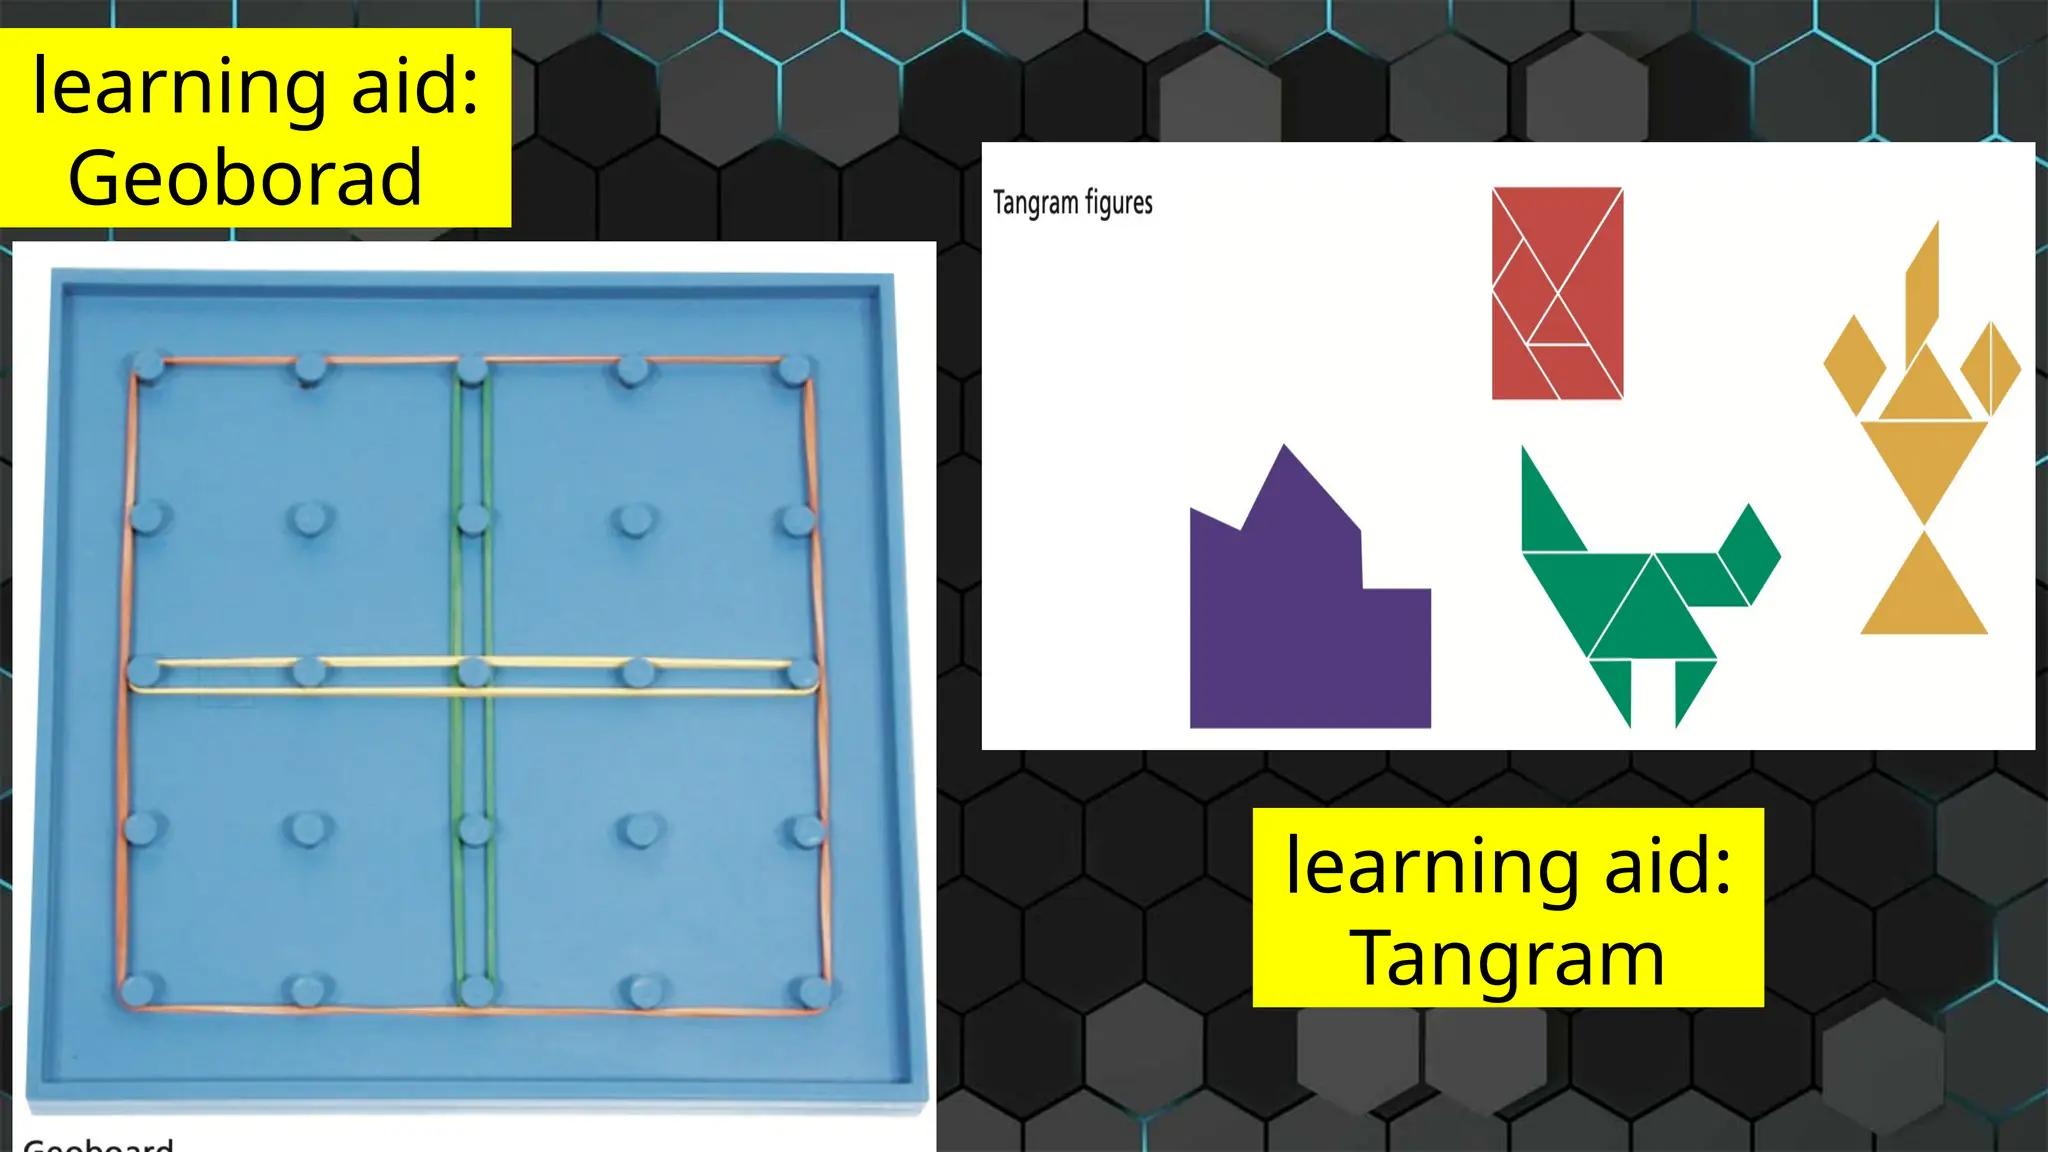
Group Task (need7 groups)
• Plan teaching activity using suitable tools
that applying 6C/Mathematical
Processes/Van Hiele for one of these:
1- Right angle, acute angle and obtuse angle on basic 2D shapes
2- Parallel lines and perpendicular lines on basic 2D shapes
3- Axes of symmetry of 2D shapes
4- Classification of 2D and 3D shapes, - Nets of 3D shapes
5- Determine area and perimeter of 2D shapes using squared grid
and formulae
6- Determine volume of 3D shapes using unit cubes and formulae
7 - Cartesian Coordinate System – first quadrant
5.
Group Task (need7 groups)
• Plan teaching activity (applying
6C/Mathematical Processes/Van Hiele)
• Create the suitable tool
• Demonstrate the teaching activity to your classmate
(record)
• Get feedback and suggest improvement (if needed)
6.
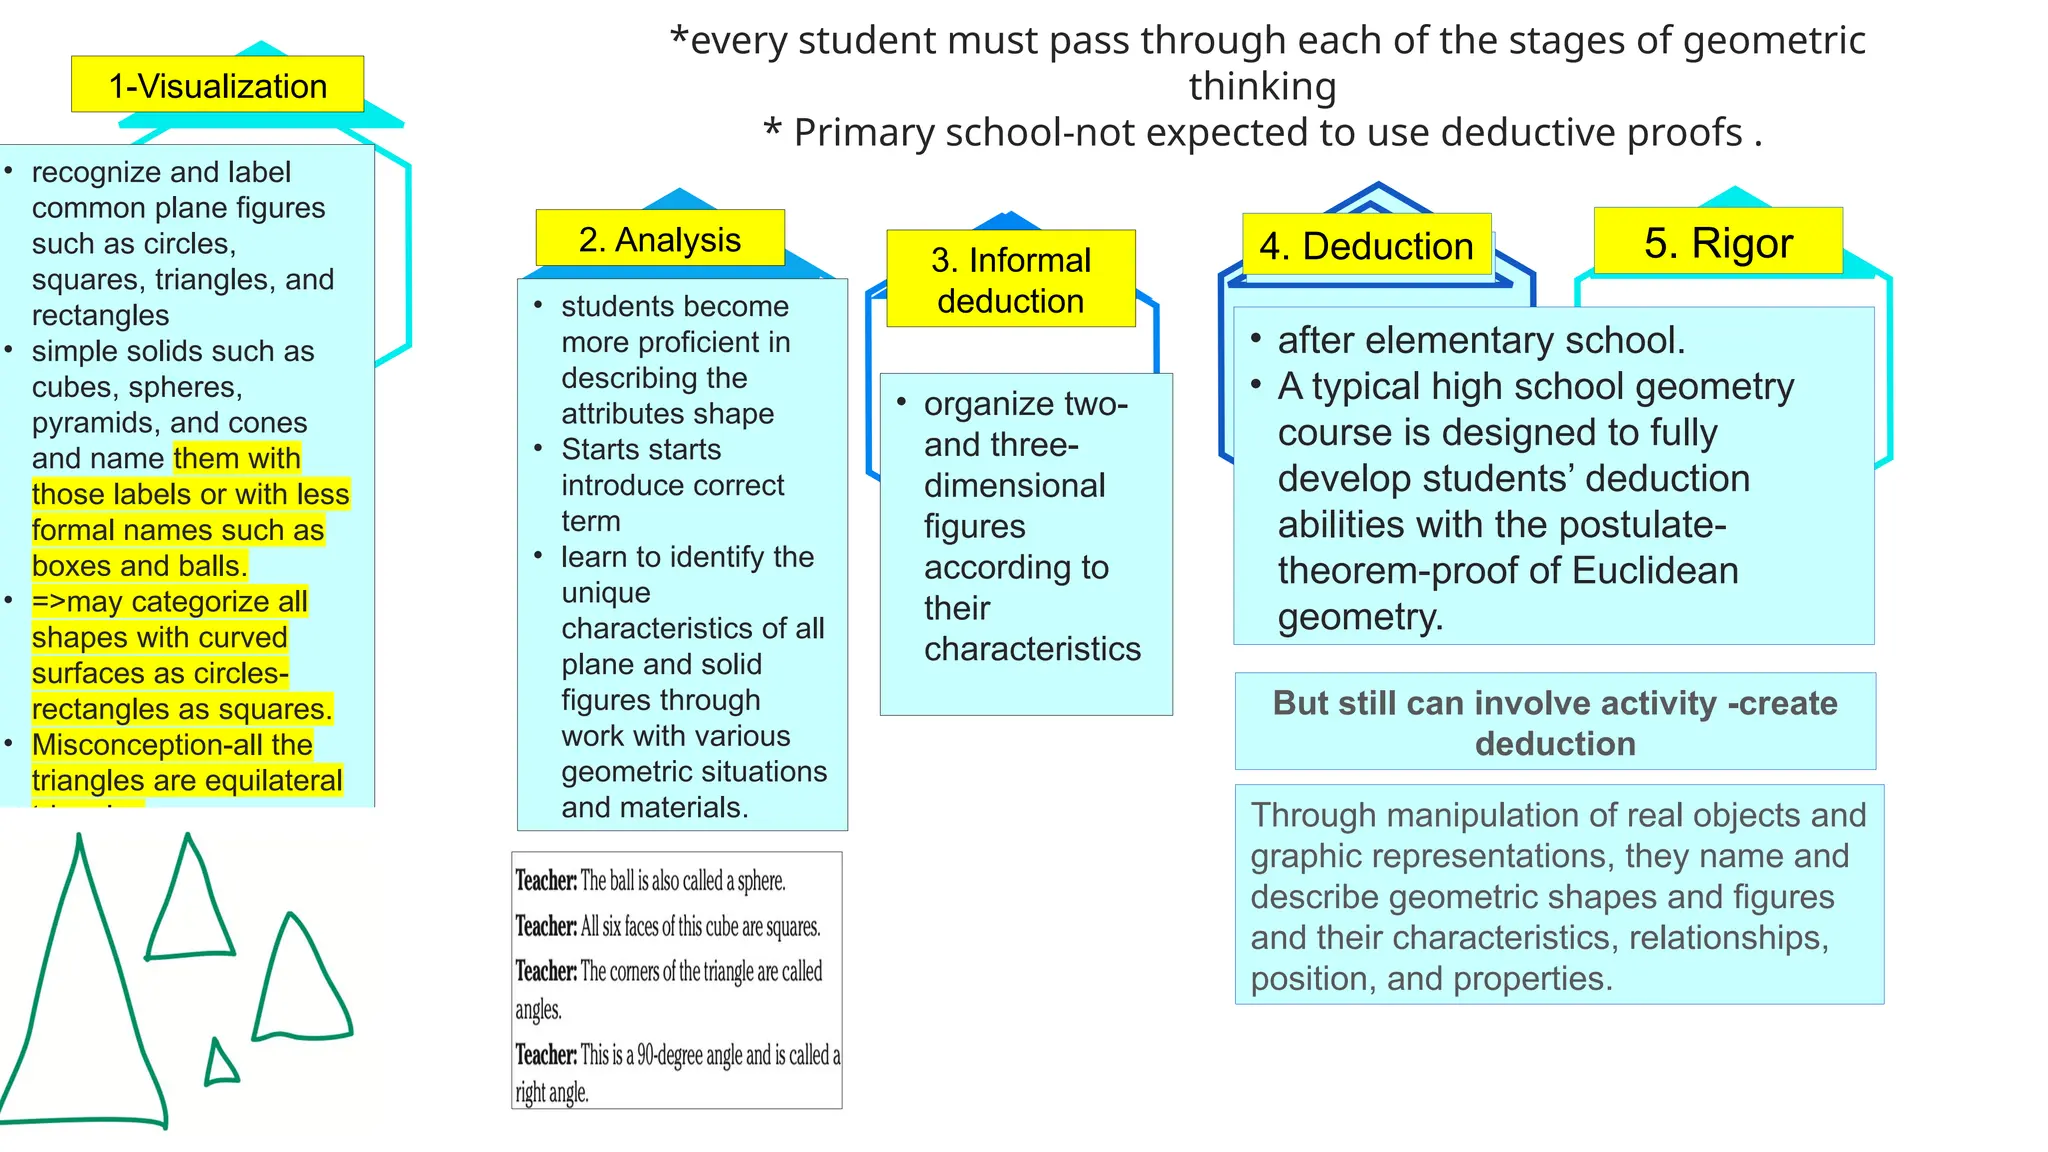
*every student mustpass through each of the stages of geometric
thinking
* Primary school-not expected to use deductive proofs .
1-Visualization
• recognize and label
common plane figures
such as circles,
squares, triangles, and
rectangles
• simple solids such as
cubes, spheres,
pyramids, and cones
and name them with
those labels or with less
formal names such as
boxes and balls.
• =>may categorize all
shapes with curved
surfaces as circles-
rectangles as squares.
• Misconception-all the
triangles are equilateral
triangles
Add Text
Get a modern
PowerPoint
Presentation that
is beautifully
designed.
Add Text
• organize two-
and three-
dimensional
figures
according to
their
characteristics
Add Text
• students become
more proficient in
describing the
attributes shape
• Starts starts
introduce correct
term
• learn to identify the
unique
characteristics of all
plane and solid
figures through
work with various
geometric situations
and materials.
Add Text
• after elementary school.
• A typical high school geometry
course is designed to fully
develop students’ deduction
abilities with the postulate-
theorem-proof of Euclidean
geometry.
Through manipulation of real objects and
graphic representations, they name and
describe geometric shapes and figures
and their characteristics, relationships,
position, and properties.
But still can involve activity -create
deduction
2. Analysis
3. Informal
deduction
4. Deduction 5. Rigor
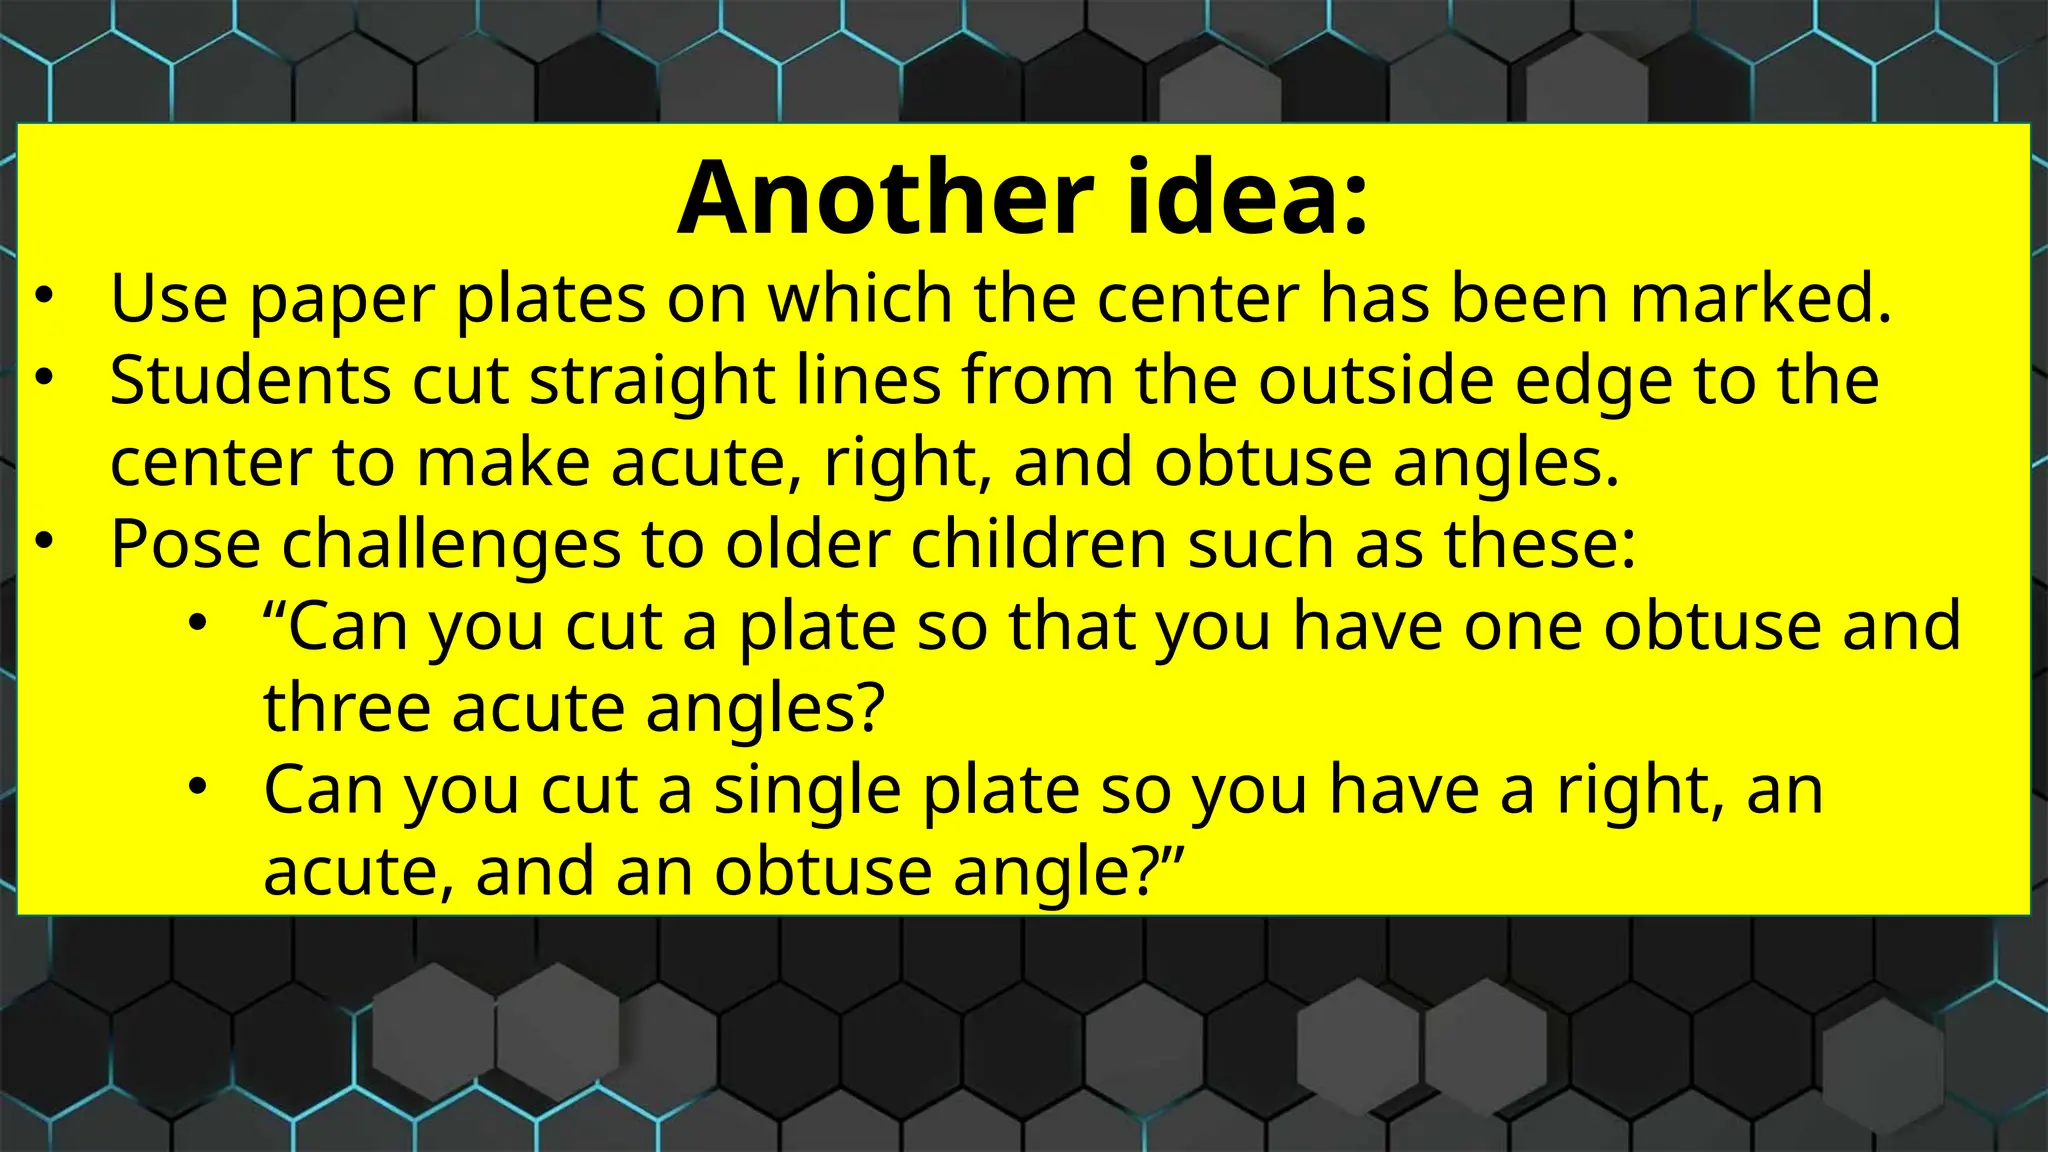
Another idea:
• Usepaper plates on which the center has been marked.
• Students cut straight lines from the outside edge to the
center to make acute, right, and obtuse angles.
• Pose challenges to older children such as these:
• “Can you cut a plate so that you have one obtuse and
three acute angles?
• Can you cut a single plate so you have a right, an
acute, and an obtuse angle?”
11.
Symmetry
• each sideof the symmetry line is a mirror image of the other. Every example of line symmetry produces
mirror images that can be “folded” along the symmetry line onto one another.
Misconception-
if a figure is divided into two congruent parts by a line, then the line must be a symmetry line.
Help them- they should have many experiences examining figures such as a rectangle with a diagonal, in
which the line divides the rectangle into two congruent parts, but the diagonal is not a symmetry line. In
this case the diagonal fails the fold test.
14.
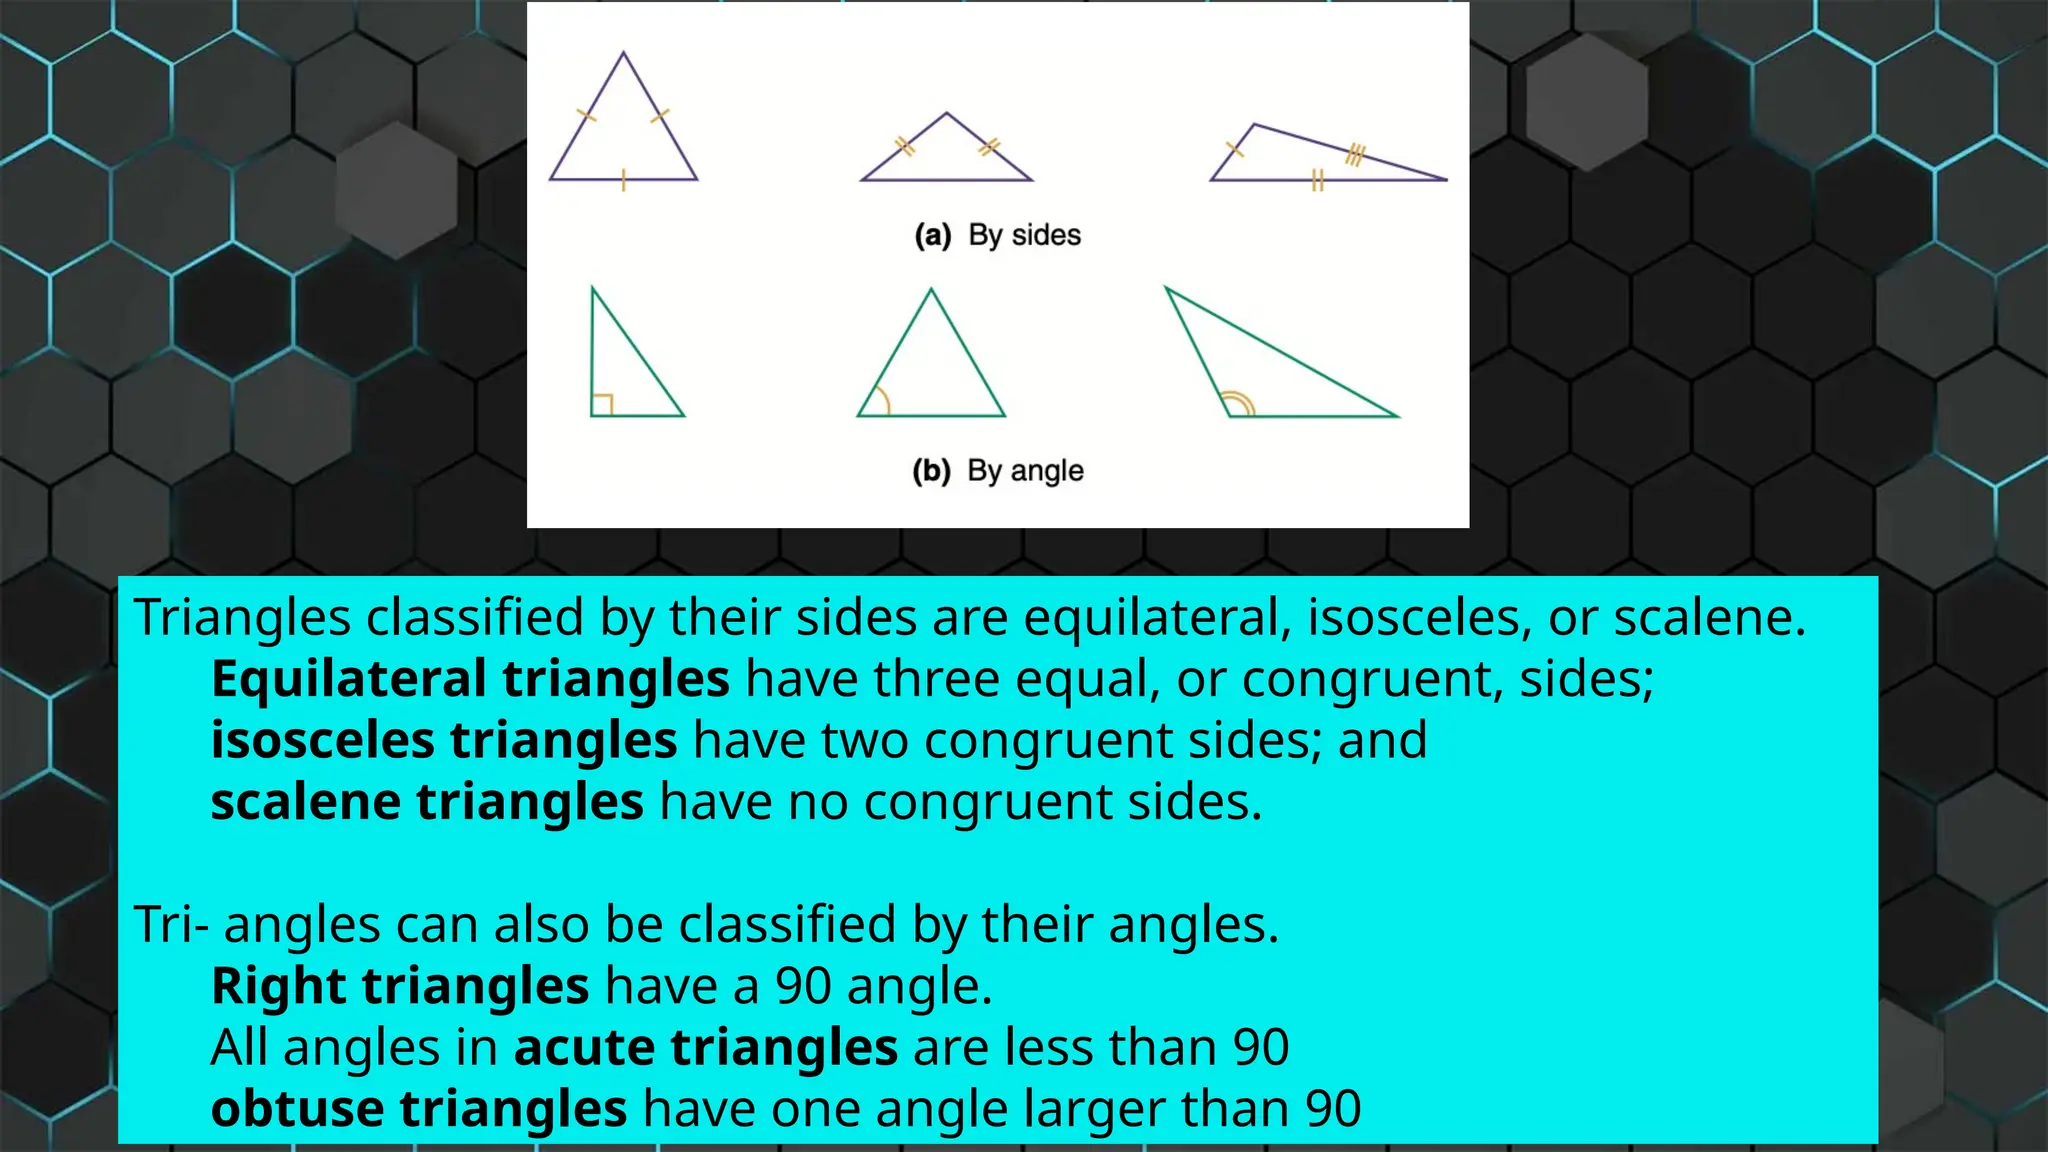
Triangles classified bytheir sides are equilateral, isosceles, or scalene.
Equilateral triangles have three equal, or congruent, sides;
isosceles triangles have two congruent sides; and
scalene triangles have no congruent sides.
Tri- angles can also be classified by their angles.
Right triangles have a 90 angle.
All angles in acute triangles are less than 90
obtuse triangles have one angle larger than 90
16.
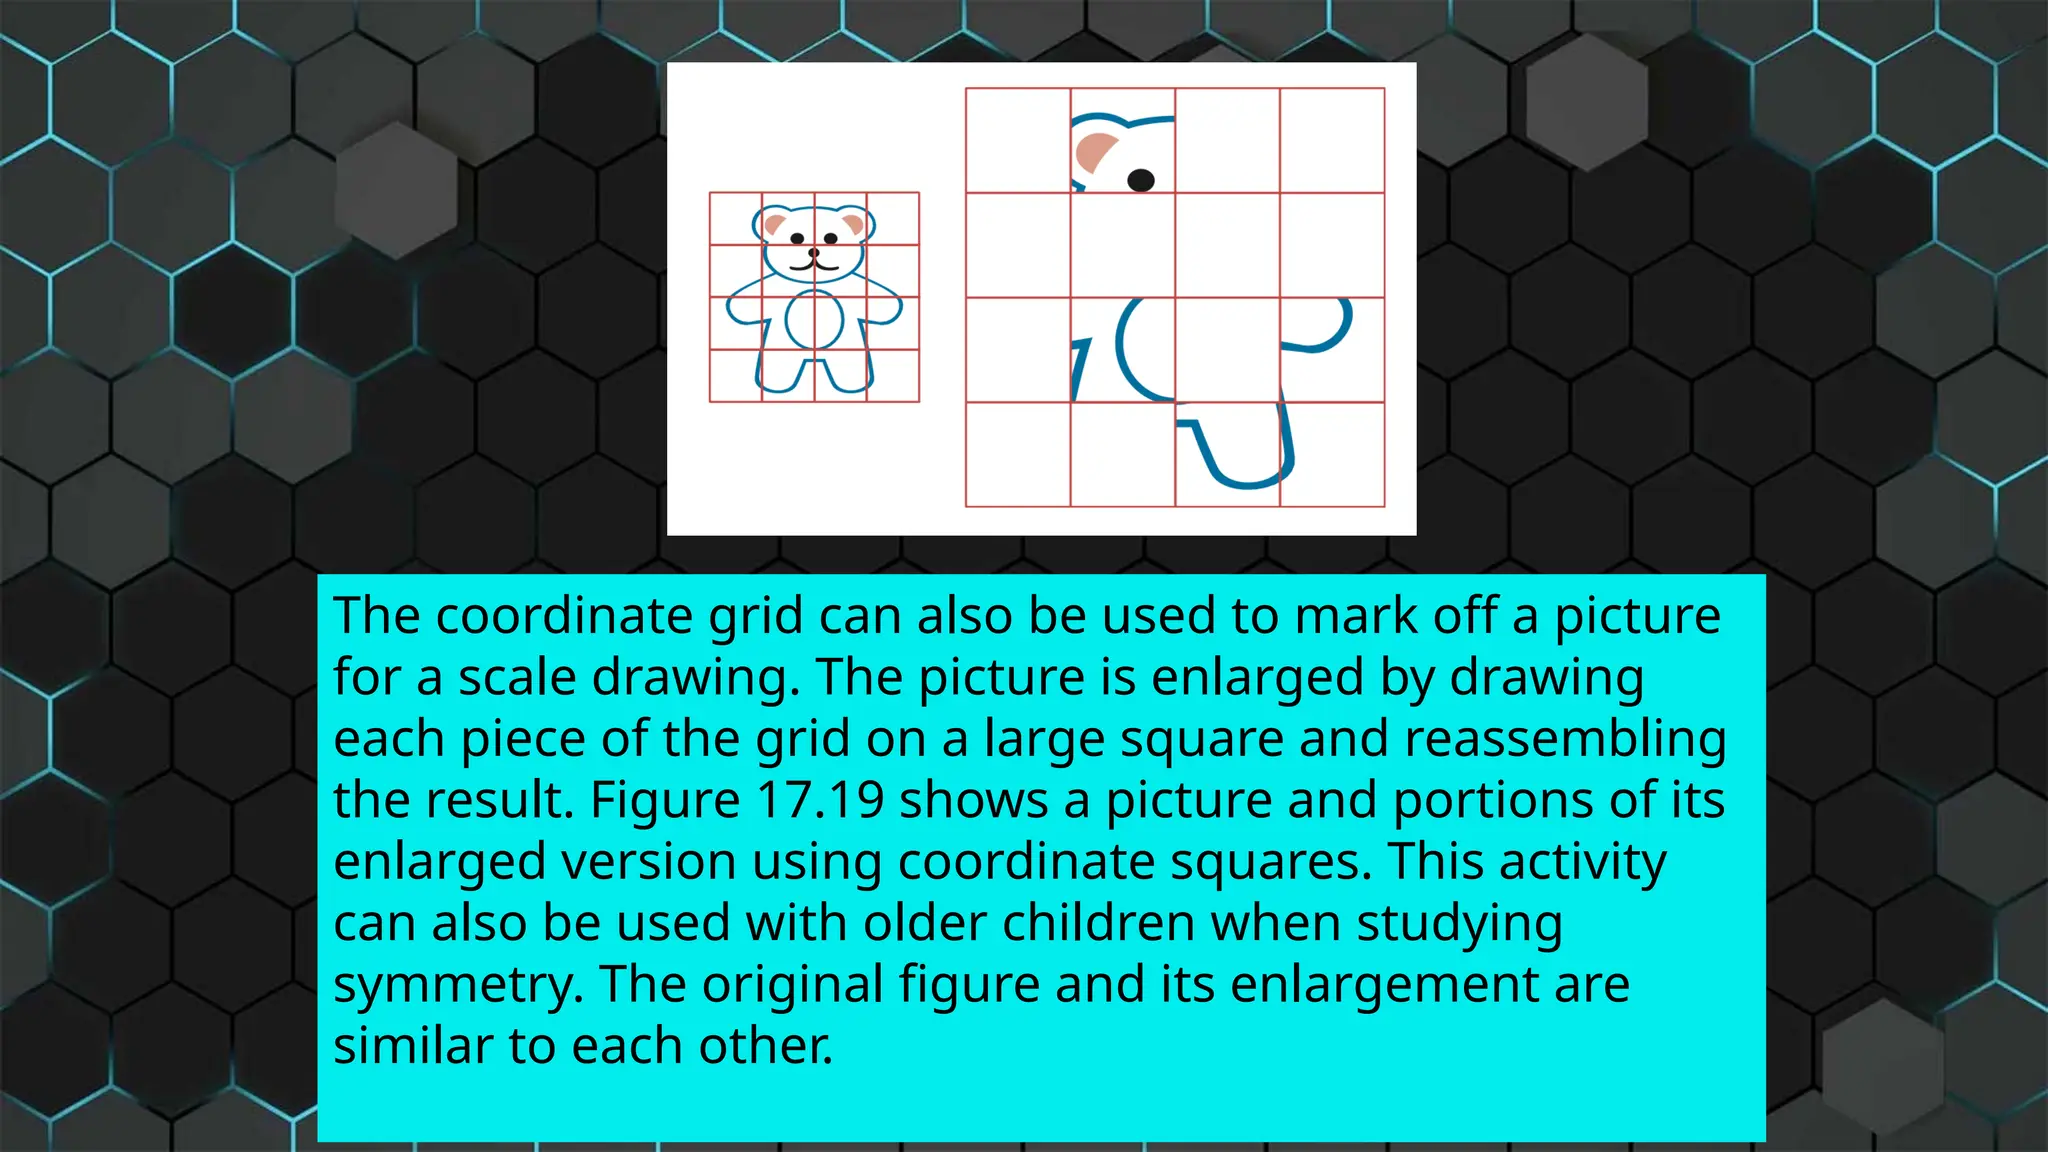
The coordinate gridcan also be used to mark off a picture
for a scale drawing. The picture is enlarged by drawing
each piece of the grid on a large square and reassembling
the result. Figure 17.19 shows a picture and portions of its
enlarged version using coordinate squares. This activity
can also be used with older children when studying
symmetry. The original figure and its enlargement are
similar to each other.
23.
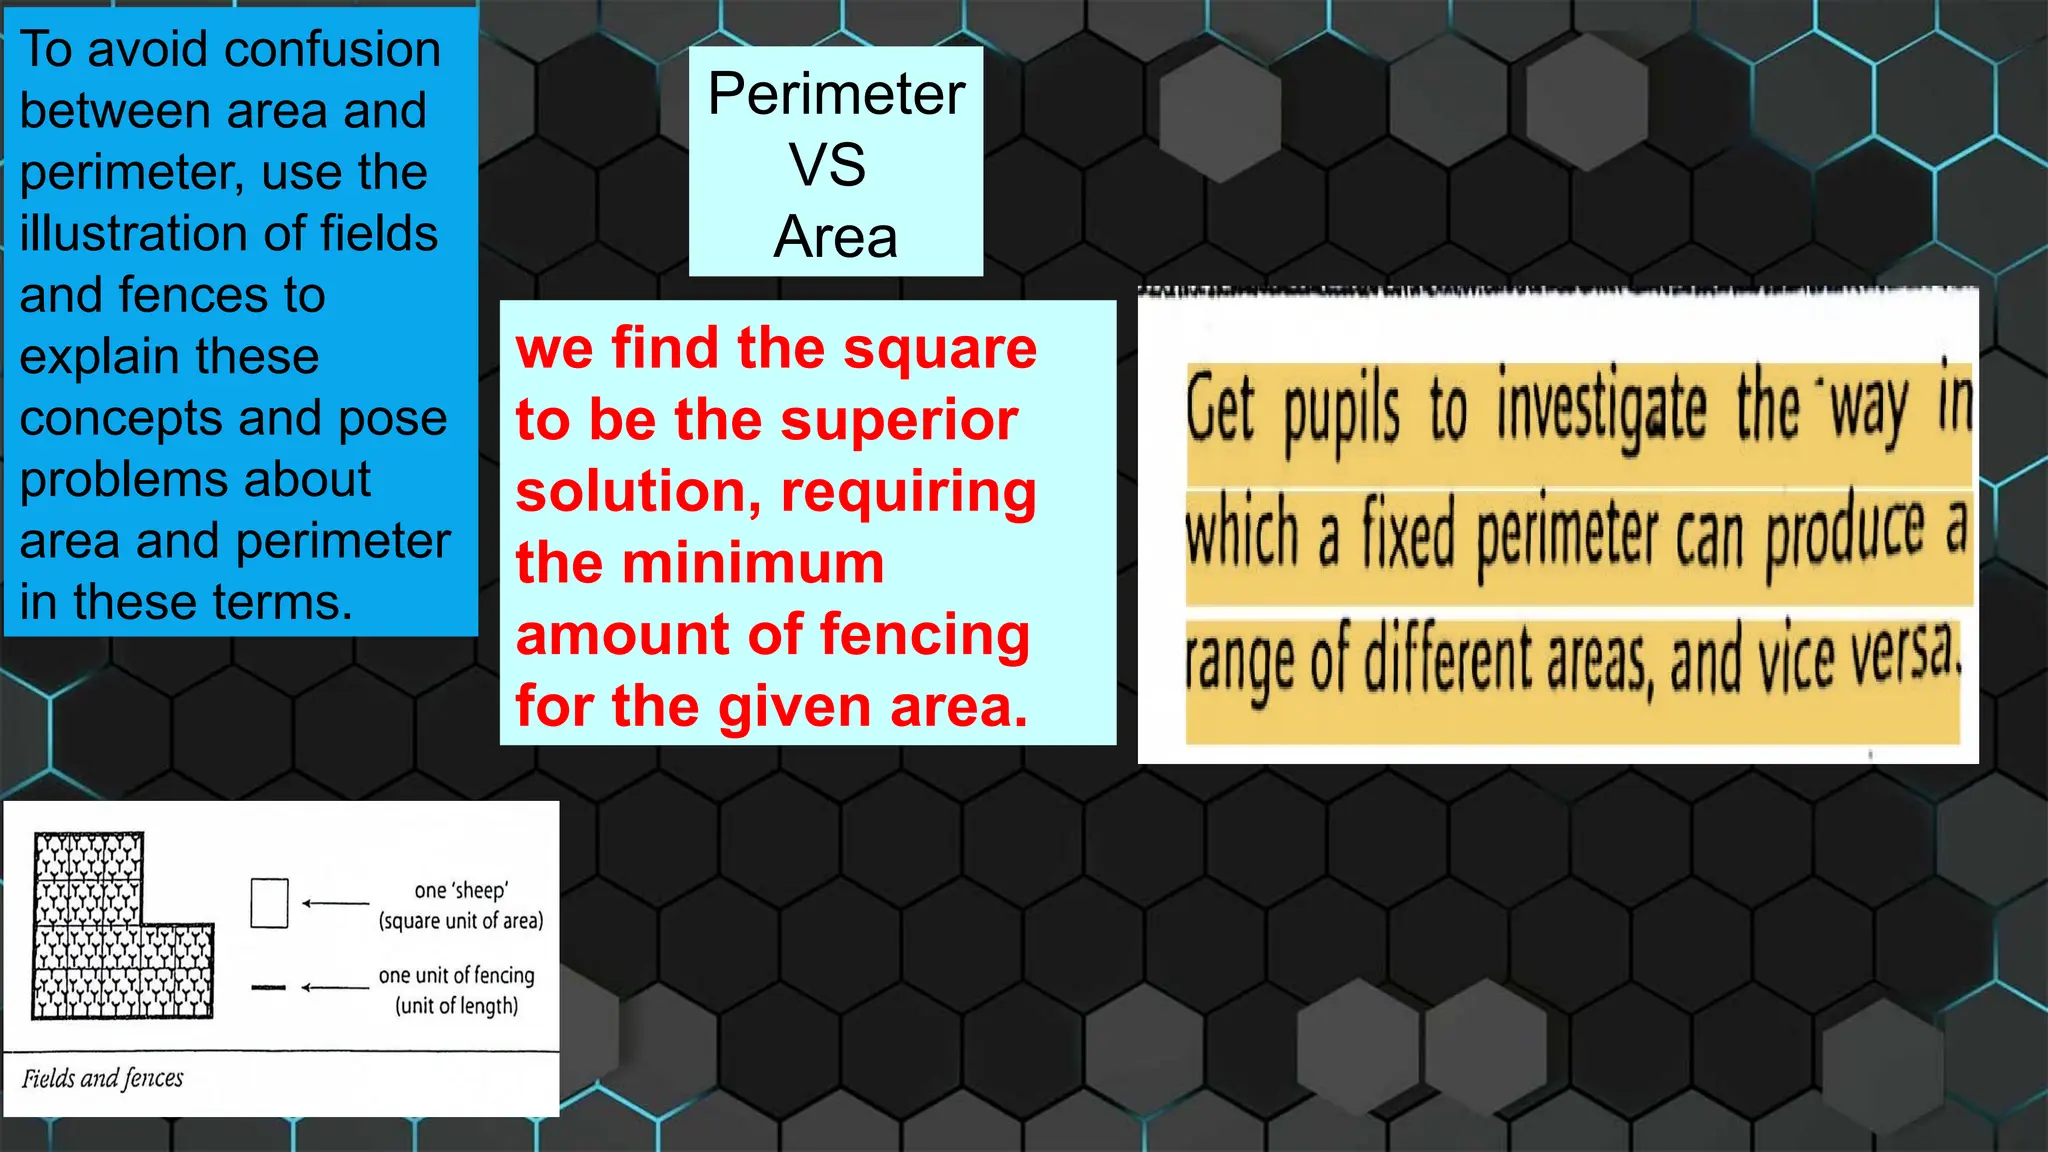
To avoid confusion
betweenarea and
perimeter, use the
illustration of fields
and fences to
explain these
concepts and pose
problems about
area and perimeter
in these terms.
Perimeter
VS
Area
we find the square
to be the superior
solution, requiring
the minimum
amount of fencing
for the given area.
24.
find the
superior
solution,
requiring
the
minimum
amount of
fencingfor
the Max
area.
• The first
challenge is to
find as many
different fields as
possible that can
be enclosed
within a given
amount of
fencing.
• The second challenge si the reverse
problem: keep the area fixed and find the
different perimeters. - what amounts of
fencing would be required to enclose
differently shaped fields all with the same
area?