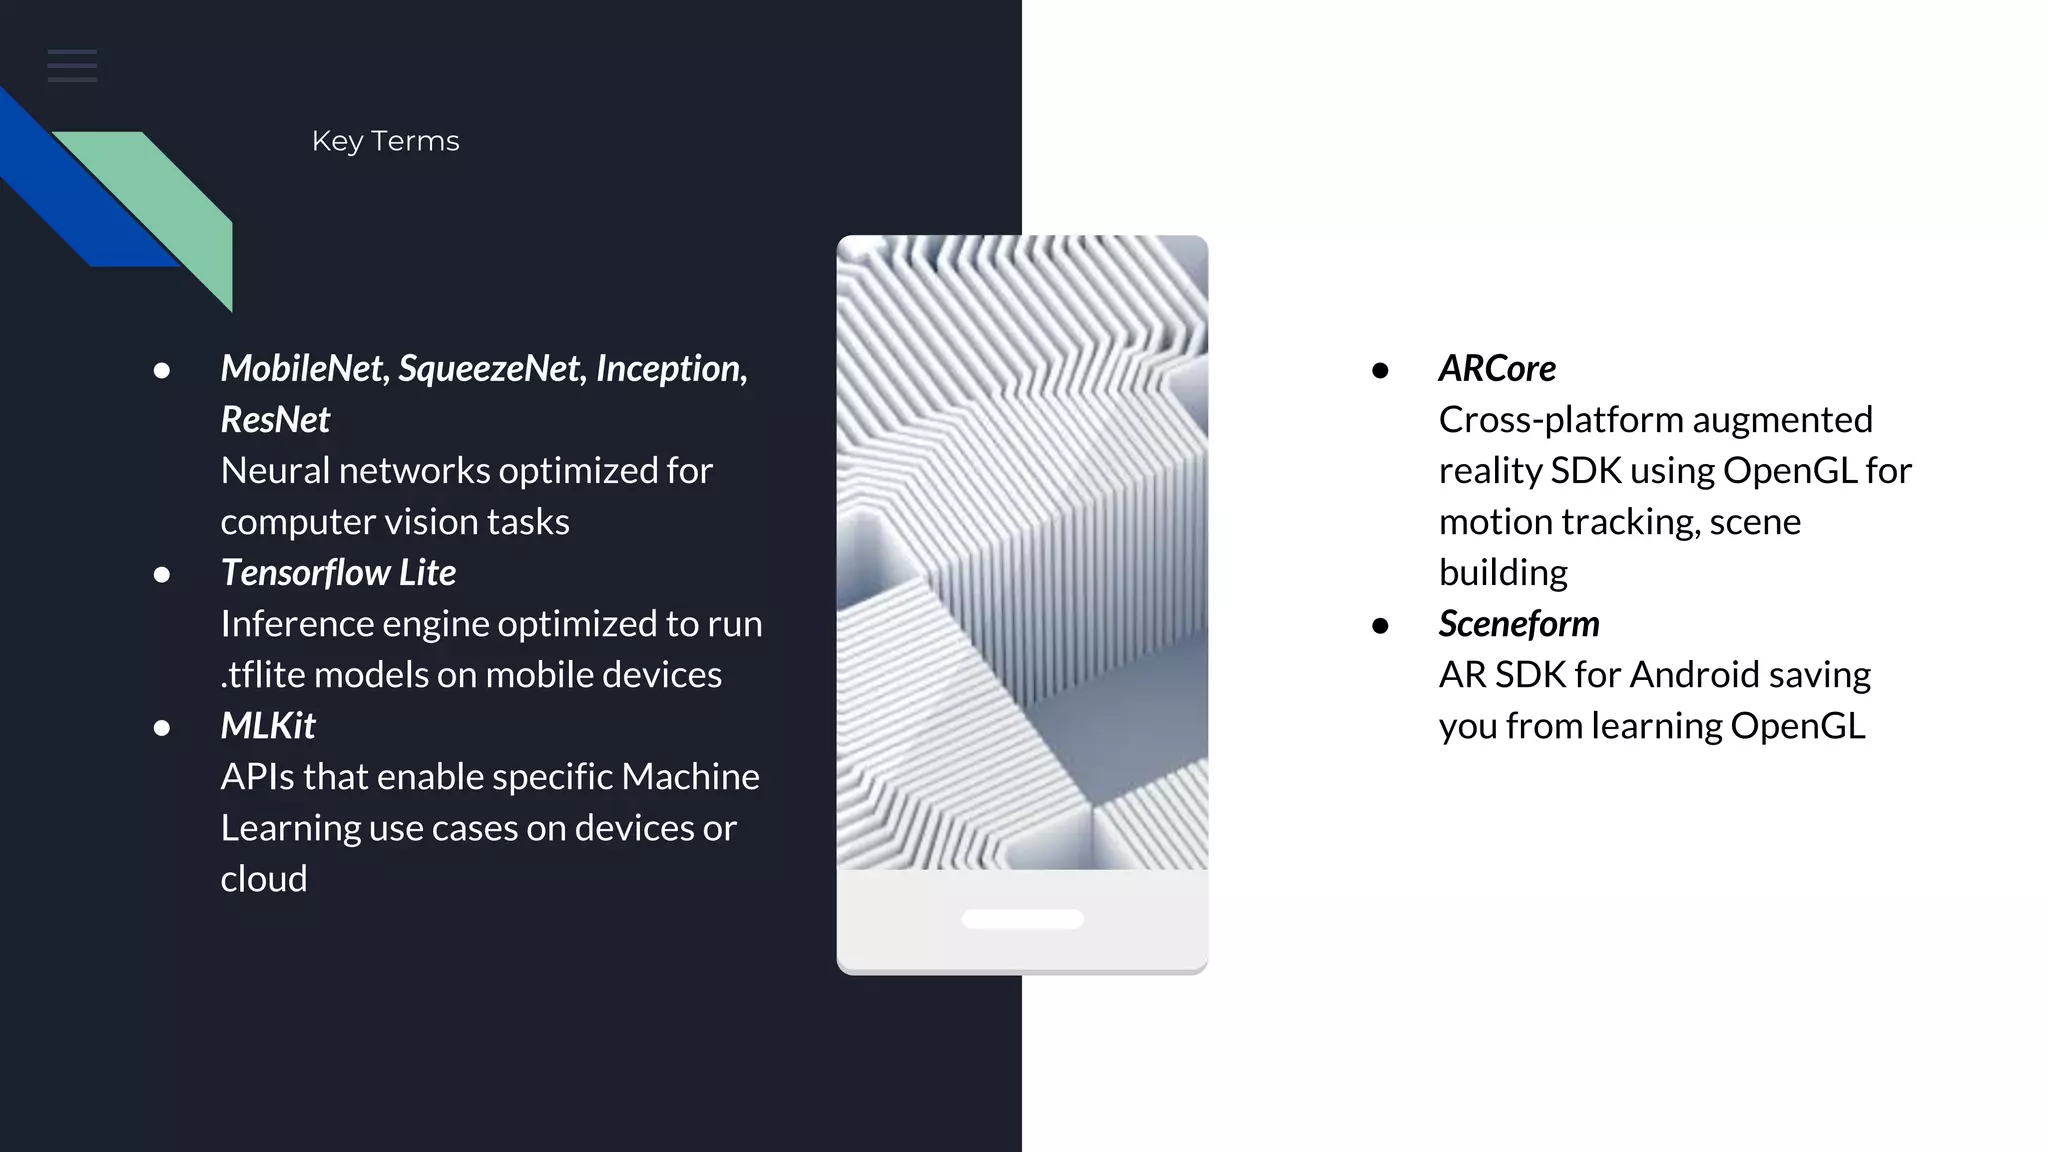
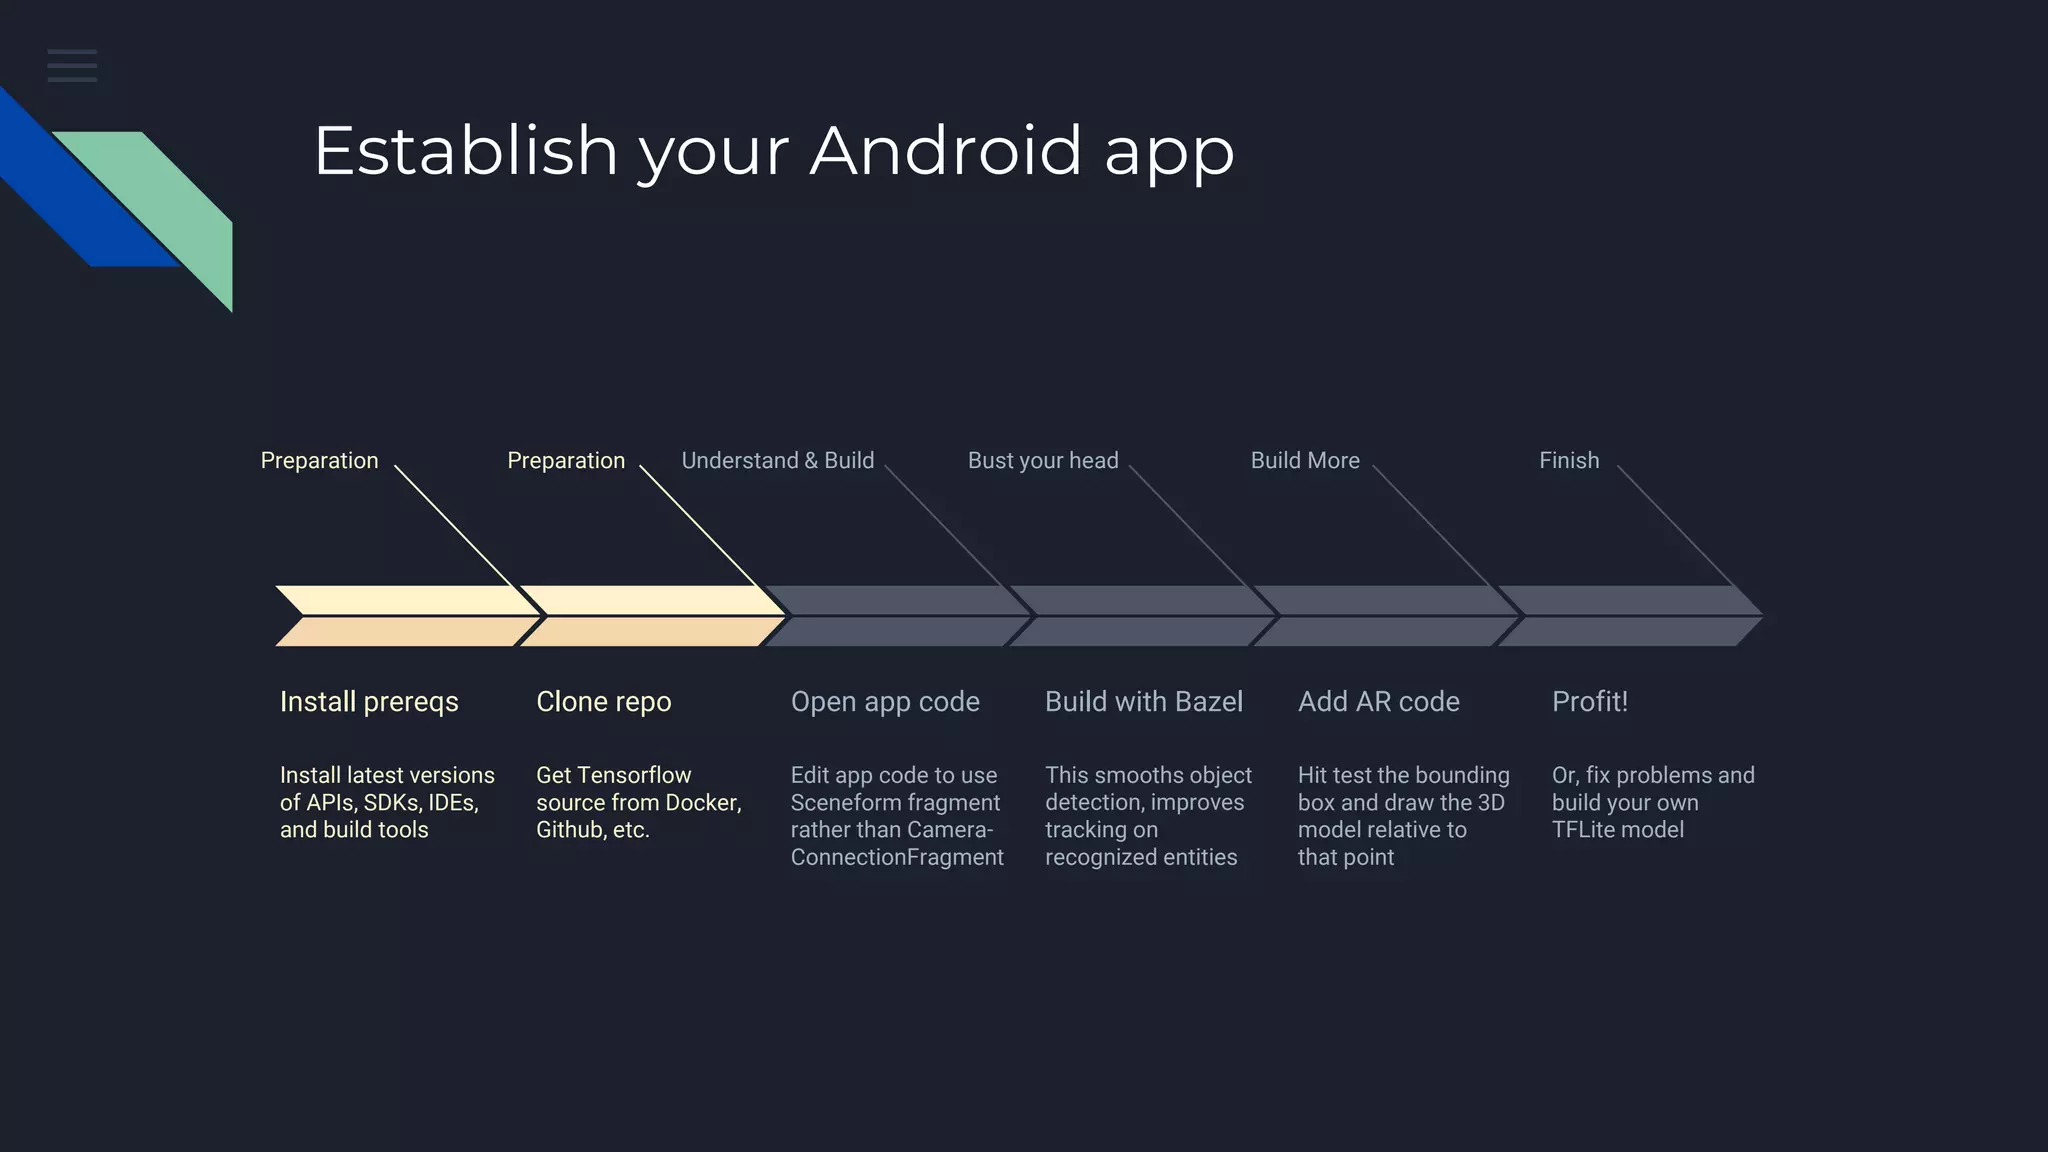
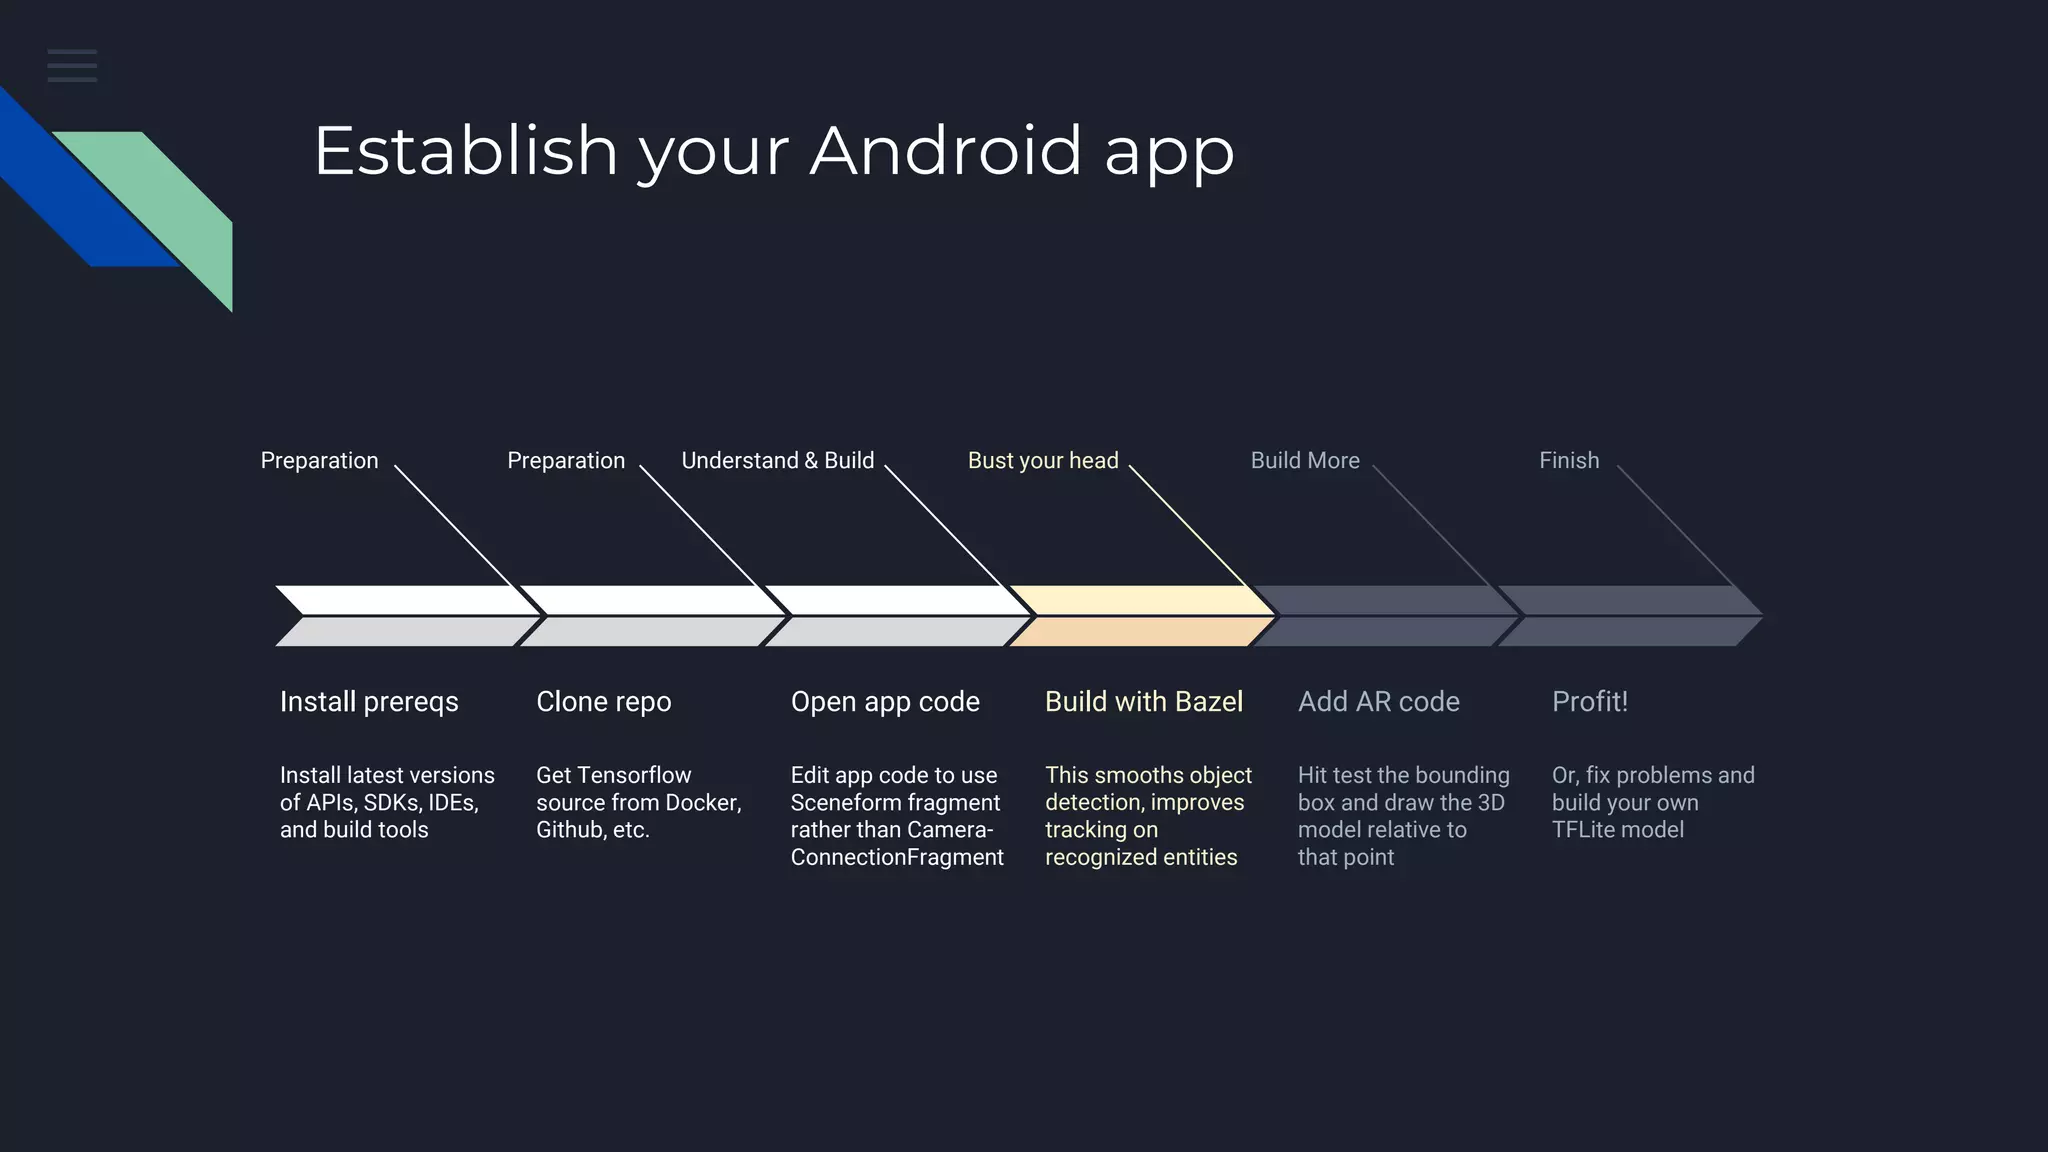
Fusing AI with AR
By Stephen Wylie
Windy City DevFest - Chicago
Feb. 1, 2019
About Me
● Google Developer Expert in Machine Learning
● Fix old arcade machines & computers, and pinballs of all eras
● Love fancy men’s clothing & vintage TV game shows
● Lots of patents in this area
AI + AR: Does anyone do this themselves?
Yes, of course! But with help…
Vehicle Recognition & Auto Loans
● Blippar - AR/VR company
● Capital One - AR feature of
Auto Navigator
● USAA - Loans & insurance
APIs & Frameworks Are Your Friends!
Retail
● Burberry - Customize items,
detect counterfeits
● Cup Noodles - Turn cups into
musical instruments
Sports
● Homecourt- Practice
basketball, get coaching
● MLB - ID players, show stats
Key Terms
● MobileNet, SqueezeNet, Inception,
ResNet
Neural networks optimized for
computer vision tasks
● Tensorflow Lite
Inference engine optimized to run
.tflite models on mobile devices
● MLKit
APIs that enable specific Machine
Learning use cases on devices or
cloud
● ARCore
Cross-platform augmented
reality SDK using OpenGL for
motion tracking, scene
building
● Sceneform
AR SDK for Android saving
you from learning OpenGL
Establish your Android app
Preparation
Install prereqs
Install latest versions
of APIs, SDKs, IDEs,
and build tools
Preparation
Clone repo
Get Tensorflow
source from Docker,
Github, etc.
Understand & Build
Open app code
Edit app code to use
Sceneform fragment
rather than Camera-
ConnectionFragment
Bust your head
Build with Bazel
This smooths object
detection, improves
tracking on
recognized entities
Build More
Add AR code
Hit test the bounding
box and draw the 3D
model relative to
that point
Finish
Profit!
Or, fix problems and
build your own
TFLite model
Install Prerequisites
● Latest:
● Java JDK 10 (not 11, not 8)
● Building in Windows? You’ll need ~5GB worth of:
○ Visual C++ Build Tools - visualcppbuildtools_full.exe
■ Windows 10 SDK 10.0.10240
■ .NET Framework SDK
○ A real shell like MSYS2
● Pick your poison! Download Tensorflow source from
GitHub or Docker
- Android Studio
- Android API level
- Android NDK
- Gradle
- Bazel
Establish your Android app
Preparation
Install prereqs
Install latest versions
of APIs, SDKs, IDEs,
and build tools
Preparation
Clone repo
Get Tensorflow
source from Docker,
Github, etc.
Understand & Build
Open app code
Edit app code to use
Sceneform fragment
rather than Camera-
ConnectionFragment
Bust your head
Build with Bazel
This smooths object
detection, improves
tracking on
recognized entities
Build More
Add AR code
Hit test the bounding
box and draw the 3D
model relative to
that point
Finish
Profit!
Or, fix problems and
build your own
TFLite model
Start Modifying Code
Code root: tensorflow/tensorflow/lite/examples/android/app
● Consider copying to a different folder
● Add Sceneform dependencies to Gradle build
● Update Gradle build to latest Tools, API >= 26
● Add AR permissions to Android Manifest
● Make new Layout incorporating ArFragment
● Use this Layout in your CameraActivity
○ Or make it a separate class
○ Update Manifest with new Activity
○ Ensure DetectorActivity extends it
Gradle downloads ML model assets
Establish your Android app
Preparation
Install prereqs
Install latest versions
of APIs, SDKs, IDEs,
and build tools
Preparation
Clone repo
Get Tensorflow
source from Docker,
Github, etc.
Understand & Build
Open app code
Edit app code to use
Sceneform fragment
rather than Camera-
ConnectionFragment
Bust your head
Build with Bazel
This smooths object
detection, improves
tracking on
recognized entities
Build More
Add AR code
Hit test the bounding
box and draw the 3D
model relative to
that point
Finish
Profit!
Or, fix problems and
build your own
TFLite model
Build with Bazel
● Define androidsdk and androidndk path in WORKSPACE
● Omit API level & build tools version
● cd to tensorflow/
● Run bazel build
//tensorflow/lite/examples/android:tflite_demo
● Funky Windows business in “Windows Kits” directory
● Pray hard!
What
Success
Looks
Like
Establish your Android app
Preparation
Install prereqs
Install latest versions
of APIs, SDKs, IDEs,
and build tools
Preparation
Clone repo
Get Tensorflow
source from Docker,
Github, etc.
Understand & Build
Open app code
Edit app code to use
Sceneform fragment
rather than Camera-
ConnectionFragment
Bust your head
Build with Bazel
This smooths object
detection, improves
tracking on
recognized entities
Build More
Add AR code
Hit test the bounding
box and draw the 3D
model relative to
that point
Finish
Profit!
Or, fix problems and
build your own
TFLite model
Add Augmented Reality Code
● Can’t use Bazel anymore
○ Incorporate object detection model into src/main/jniLibs
○ Set parameter for CPU architecture in Gradle
● Sceneform Plugin or Gradle Instruction
○ Sceneform codelab calls for 1.4; Android Studio plugin is 1.6
○ Best to just use Gradle instructions to create SFB assets
● Add augmented reality code to MultiBoxTracker
Establish your Android app
Preparation
Install prereqs
Install latest versions
of APIs, SDKs, IDEs,
and build tools
Preparation
Clone repo
Get Tensorflow
source from Docker,
Github, etc.
Understand & Build
Open app code
Edit app code to use
Sceneform fragment
rather than Camera-
ConnectionFragment
Bust your head
Build with Bazel
This smooths object
detection, improves
tracking on
recognized entities
Build More
Add AR code
Hit test the bounding
box and draw the 3D
model relative to
that point
Finish
Profit!
Or, fix problems and
build your own
TFLite model
Pitfalls of AI + AR: Battery life
“Turn your phone into an incendiary device!
Run AI & AR at the same time.”
Throttling AI is key.
Pitfalls of AI + AR: Depth & size of object
Projecting 3D object in AR requires good understanding of 3D space:
● Size of object, in pixels,
proportional to the camera
● Size of object, in real life,
to position 3D object correctly
● Positioning 3D object visible
to user without maneuvering
● Improvement: Correlate bounding box with hit detection
Pitfalls of AI + AR: Sensor drift
Object out of the viewport?
● AR relies on point clouds, hardware sensors
● Hardware sensors likely to drift with lots of motion
● Objects anchored to world space likely to wander off
Solution?
● Ensure scene has good contrast, enough corners to see every frame
● Attach objects to anchors
● Scan enough of the scene ahead of time before drawing AR
Pitfalls of AI + AR: Tracking multiple objects
● Object detections could be missed, false, or switch IDs
● Discover correlations between objects moving on camera
○ Pairwise dependencies
○ Uniform or non-uniform hypergraph
● Multiple object tracking is easier with the tensorflowlite_demo library
● No library? Gotta code it yourself!
Mitigating This
● Consumption issues? Minimize anchors as you instantiate objects
● Take the time to set up NDK and/or libraries
Thank You
@SWebCEO
goshtastic.blogspot.com
github.com/mrcity/mlworkshop
Slideshare: StephenWylie3

Fusing Artificial Intelligence with Augmented Reality on Android - 1 Feb. 2019

  • 1.
    Fusing AI withAR By Stephen Wylie Windy City DevFest - Chicago Feb. 1, 2019
  • 2.
    About Me ● GoogleDeveloper Expert in Machine Learning ● Fix old arcade machines & computers, and pinballs of all eras ● Love fancy men’s clothing & vintage TV game shows ● Lots of patents in this area
  • 3.
    AI + AR:Does anyone do this themselves? Yes, of course! But with help… Vehicle Recognition & Auto Loans ● Blippar - AR/VR company ● Capital One - AR feature of Auto Navigator ● USAA - Loans & insurance APIs & Frameworks Are Your Friends! Retail ● Burberry - Customize items, detect counterfeits ● Cup Noodles - Turn cups into musical instruments Sports ● Homecourt- Practice basketball, get coaching ● MLB - ID players, show stats
  • 4.
    Key Terms ● MobileNet,SqueezeNet, Inception, ResNet Neural networks optimized for computer vision tasks ● Tensorflow Lite Inference engine optimized to run .tflite models on mobile devices ● MLKit APIs that enable specific Machine Learning use cases on devices or cloud ● ARCore Cross-platform augmented reality SDK using OpenGL for motion tracking, scene building ● Sceneform AR SDK for Android saving you from learning OpenGL
  • 5.
    Establish your Androidapp Preparation Install prereqs Install latest versions of APIs, SDKs, IDEs, and build tools Preparation Clone repo Get Tensorflow source from Docker, Github, etc. Understand & Build Open app code Edit app code to use Sceneform fragment rather than Camera- ConnectionFragment Bust your head Build with Bazel This smooths object detection, improves tracking on recognized entities Build More Add AR code Hit test the bounding box and draw the 3D model relative to that point Finish Profit! Or, fix problems and build your own TFLite model
  • 6.
    Install Prerequisites ● Latest: ●Java JDK 10 (not 11, not 8) ● Building in Windows? You’ll need ~5GB worth of: ○ Visual C++ Build Tools - visualcppbuildtools_full.exe ■ Windows 10 SDK 10.0.10240 ■ .NET Framework SDK ○ A real shell like MSYS2 ● Pick your poison! Download Tensorflow source from GitHub or Docker - Android Studio - Android API level - Android NDK - Gradle - Bazel
  • 7.
    Establish your Androidapp Preparation Install prereqs Install latest versions of APIs, SDKs, IDEs, and build tools Preparation Clone repo Get Tensorflow source from Docker, Github, etc. Understand & Build Open app code Edit app code to use Sceneform fragment rather than Camera- ConnectionFragment Bust your head Build with Bazel This smooths object detection, improves tracking on recognized entities Build More Add AR code Hit test the bounding box and draw the 3D model relative to that point Finish Profit! Or, fix problems and build your own TFLite model
  • 8.
    Start Modifying Code Coderoot: tensorflow/tensorflow/lite/examples/android/app ● Consider copying to a different folder ● Add Sceneform dependencies to Gradle build ● Update Gradle build to latest Tools, API >= 26 ● Add AR permissions to Android Manifest ● Make new Layout incorporating ArFragment ● Use this Layout in your CameraActivity ○ Or make it a separate class ○ Update Manifest with new Activity ○ Ensure DetectorActivity extends it Gradle downloads ML model assets
  • 9.
    Establish your Androidapp Preparation Install prereqs Install latest versions of APIs, SDKs, IDEs, and build tools Preparation Clone repo Get Tensorflow source from Docker, Github, etc. Understand & Build Open app code Edit app code to use Sceneform fragment rather than Camera- ConnectionFragment Bust your head Build with Bazel This smooths object detection, improves tracking on recognized entities Build More Add AR code Hit test the bounding box and draw the 3D model relative to that point Finish Profit! Or, fix problems and build your own TFLite model
  • 10.
    Build with Bazel ●Define androidsdk and androidndk path in WORKSPACE ● Omit API level & build tools version ● cd to tensorflow/ ● Run bazel build //tensorflow/lite/examples/android:tflite_demo ● Funky Windows business in “Windows Kits” directory ● Pray hard!
  • 11.
  • 12.
    Establish your Androidapp Preparation Install prereqs Install latest versions of APIs, SDKs, IDEs, and build tools Preparation Clone repo Get Tensorflow source from Docker, Github, etc. Understand & Build Open app code Edit app code to use Sceneform fragment rather than Camera- ConnectionFragment Bust your head Build with Bazel This smooths object detection, improves tracking on recognized entities Build More Add AR code Hit test the bounding box and draw the 3D model relative to that point Finish Profit! Or, fix problems and build your own TFLite model
  • 13.
    Add Augmented RealityCode ● Can’t use Bazel anymore ○ Incorporate object detection model into src/main/jniLibs ○ Set parameter for CPU architecture in Gradle ● Sceneform Plugin or Gradle Instruction ○ Sceneform codelab calls for 1.4; Android Studio plugin is 1.6 ○ Best to just use Gradle instructions to create SFB assets ● Add augmented reality code to MultiBoxTracker
  • 14.
    Establish your Androidapp Preparation Install prereqs Install latest versions of APIs, SDKs, IDEs, and build tools Preparation Clone repo Get Tensorflow source from Docker, Github, etc. Understand & Build Open app code Edit app code to use Sceneform fragment rather than Camera- ConnectionFragment Bust your head Build with Bazel This smooths object detection, improves tracking on recognized entities Build More Add AR code Hit test the bounding box and draw the 3D model relative to that point Finish Profit! Or, fix problems and build your own TFLite model
  • 15.
    Pitfalls of AI+ AR: Battery life “Turn your phone into an incendiary device! Run AI & AR at the same time.” Throttling AI is key.
  • 16.
    Pitfalls of AI+ AR: Depth & size of object Projecting 3D object in AR requires good understanding of 3D space: ● Size of object, in pixels, proportional to the camera ● Size of object, in real life, to position 3D object correctly ● Positioning 3D object visible to user without maneuvering ● Improvement: Correlate bounding box with hit detection
  • 17.
    Pitfalls of AI+ AR: Sensor drift Object out of the viewport? ● AR relies on point clouds, hardware sensors ● Hardware sensors likely to drift with lots of motion ● Objects anchored to world space likely to wander off Solution? ● Ensure scene has good contrast, enough corners to see every frame ● Attach objects to anchors ● Scan enough of the scene ahead of time before drawing AR
  • 18.
    Pitfalls of AI+ AR: Tracking multiple objects ● Object detections could be missed, false, or switch IDs ● Discover correlations between objects moving on camera ○ Pairwise dependencies ○ Uniform or non-uniform hypergraph ● Multiple object tracking is easier with the tensorflowlite_demo library ● No library? Gotta code it yourself! Mitigating This ● Consumption issues? Minimize anchors as you instantiate objects ● Take the time to set up NDK and/or libraries
  • 19.

Editor's Notes

  • #17 Imagine recognizing a chair with your app. A normal-sized chair might be detected and you might understand it’s about 3 feet tall and 2 feet wide. This is useful to know when you’re sizing the billboard But then how far away from the camera is the chair? You’ll need to know that in order to find out where to place the billboard in space. Now imagine if your camera picks up on a tiny chair in a dollhouse. Your original billboard would be far too big to display with the chair if it were correctly placed above the chair. But, more likely, it would be placed way beyond the chair, and then the billboard would only appear correctly if you hold your phone at a specific angle. To capture the tiny dollhouse chair correctly, we need to consider our options: