This document provides instructions and examples for formatting a document in FrameMaker. It discusses headings, examples, notes, terms and definitions, tables of contents, equations, text blocks, frames, and conditions. Examples are given for each element to demonstrate proper formatting. The goal is to create a document that can be converted to PDF and HTML formats while maintaining formatting.
![Abstract
Software Information:
Operating System:
Author Information:
<Logo & Company_Name>,
Copyright © 1999 by <Company_Nmae>.
Generic Document
FrameMaker Style Files/Template
Version 1.1
6th February 1999
[This are the FrameMaker V5.5x style files/template for a generic
document for Windows NT4/98. FM can read/write Word files and
can be exported in RTF, PDF, or HTML format with little loss of
formatting. As a true DTP program, it is the best tool for the cre-
ation of long, complex documents.]
This document describes...
<XYZ Application Vx.y>
Windows NT <4/SP5 W98>
Greg Turnbull, Office, Tel, Email,
[Drive:DirectoryFilename]
<Group>-<Name>, Zürich.](https://image.slidesharecdn.com/d052aec8-61bc-4f4e-853d-cb710b3addc1-150806172519-lva1-app6892/75/FrameMaker-StyleFile-Template-1-2048.jpg)


![Preface
xiv XYZ Document
Terms and Conventions
The following terms and conventions are used throughout this document:
Change History
The first version of this document (V1.0) was created and released in April ‘94.
Version 1.1 was last updated by G. Turnbull in Feb. ‘99 for generic terminology.
Term/Convention Meaning in this Document
<Return> A three– to six-character abbreviation enclosed in angled
brackets indicates that you should press a particular key.
Unless otherwise stated, use the <Return> key to end all key-
board entries.
<Ctrl/Y> This combination indicates that you should hold down the key
marked <Ctrl>, and simultaneously press the key marked <Y>.
KEYWORDS Keywords, such as command names, always appear in upper-
case letters and are spelled out in full.
Ellipses... Ellipses indicate that the preceding item may be repeated, for
example:
$COPY input_file,... output_file
[Square Brackets] Square brackets enclose optional parts of a command, for
example:
$TYPE filename.ext [/qualifiers]
User Input In detailed command examples, user input is shown in bold-
face, and system responses in normal type. For example:
$copy
_From: oldfilename.ext
_To: newfilename.ext
File Specifications Full file specifications are indicated as follows:
device:[dir.subdir,...]filename.ext](https://image.slidesharecdn.com/d052aec8-61bc-4f4e-853d-cb710b3addc1-150806172519-lva1-app6892/75/FrameMaker-StyleFile-Template-14-2048.jpg)
![XYZ Document 1-1
1 Introduction
This is the Generic Document Style File/Template for FrameMaker V5.5.x on
Windows NT (and will also work under Unix & Mac). It is intended for docu-
ments for Windows NT4. Note: FM files can be transferred to another platform
either directly (via file transfer - FTP), or in MIF (Maker Interchange Format).
This style file was last updated by Greg Turnbull, in Feb. ‘99 (for terminology).
General settings: Paper Size is A4 (Landscape or Portrait), Custom 1” Margins,
Double-Sided Pages with 0.5” binding gutter (see Master Pages for details). Note
that FrameMaker V5.1.x can read Word, RTF, and other file formats as direct
input. Graphics should either be internal, or platform-independent, e.g., TIFF or
EPS in anchored frames (or GIF files for HTML conversion). FM V5.5 can read/
write Word ‘97 & RTF documents, as well as export files to PDF/HTML formats.
FrameMaker V5.x files can be saved (printed) as PostScript (PS) files with Hyper-
Text info for ‘distillation’ to Adobe PDF (Portable Document Format) files for
use in Lotus Notes with Acrobat Reader, or for use on the World-Wide Web
(WWW) in Netscape/IE. NB: FM V5.5 allows direct creation of PDF files (Save
as), and Acrobat V4 allows for drag & drop PDF creation from any application.
In FM V5.1.x, use WebWorks Publisher V3.5x or V4 for conversion (via a Map-
ping file) to HTML/GIF format for use in Netscape/IE or Front Page ‘98 - see
Chapters 5 and 6 for details. NB: FM V5.5 includes a (limited) function to map
FM styles into HTML tags, and automatically create Cascading Style Sheets.
1.1 Headings
Use this Chapter Template to create all the chapters of a book. Put each chapter in
a separate file to maintain the correct page numbering (note that subdividing a
large chapter into several files may need literal starting page numbers). For Land-
scape pages, use the special Landscape Chapter Template, not the Rotate Page
command. Use the Preface Template to create a Preface for your document – if
required. Do not use the Chapter Template to create appendices.
1.1.1 Level2 Heading
Use the Appendix Template to create all the appendices (except the Glossary &
Bibliography), and list all the files, in the correct order, in a Master Book to gen-
erate the Table of Contents (ToC/LoF/LoT/[LoE]) and Index (optional) – make
sure that the “Generate HyperText Links” options are set to On; then use the for-
mats from the ToC/Index templates (see Chapter 2 for details). Note that some
components of the Master Book need their page numbers specially defined (e.g.,
Appendix A: restart from 1; suffix A–).](https://image.slidesharecdn.com/d052aec8-61bc-4f4e-853d-cb710b3addc1-150806172519-lva1-app6892/75/FrameMaker-StyleFile-Template-15-2048.jpg)
![Examples
1-2 XYZ Document
1.1.1.1 Level3 Heading
Create Bibliographies and Glossaries as special appendices using the templates
provided. (Note that Glossary lists and Bibliography items can be indicated via
Cross-References).
Subheading Text
This is normal Body Text (Times New Roman: 11pt, plain, spelling: US English;
although may map to plain Times in HTML). Create headings with Head x styles
(Apdx HeadX for appendices); for unnumbered headings, use the Subheading
style. In Webworks Publisher V3.5, each Head1 will cause the creation of a new
HTML file.
1.1.1.1.1 Level4 Heading
Note that the Appendix Template uses Apdx HeadX instead of Head x styles for
proper section numbering, Flow B not A, which must be included in a generated
ToC (& HTML mapping file), and separate files for proper page numbering. NB:
Heading fonts have been changed from Helvetica (not standard on PCs) to Arial.
(Heading fonts are sans-serif, and body text fonts are serif for ease of reading.)
1.1.1.1.1.1 Level5 Heading
Use character styles from the f [Character] Catalog for bold, emphasis, change
bars, strikethrough, underlining, etc. Note that there is no HTML equivalent of
some of these styles. Do not use the menu bar icons to do this, or these effects will
be lost in HTML (unless manually mapped). Use (unruled) tables or term/defini-
tion lists for tabbed/indented text if you want to convert files to HTML. (Avoid
‘soft’ carriage returns to indicate line breaks in body text for HTML.)
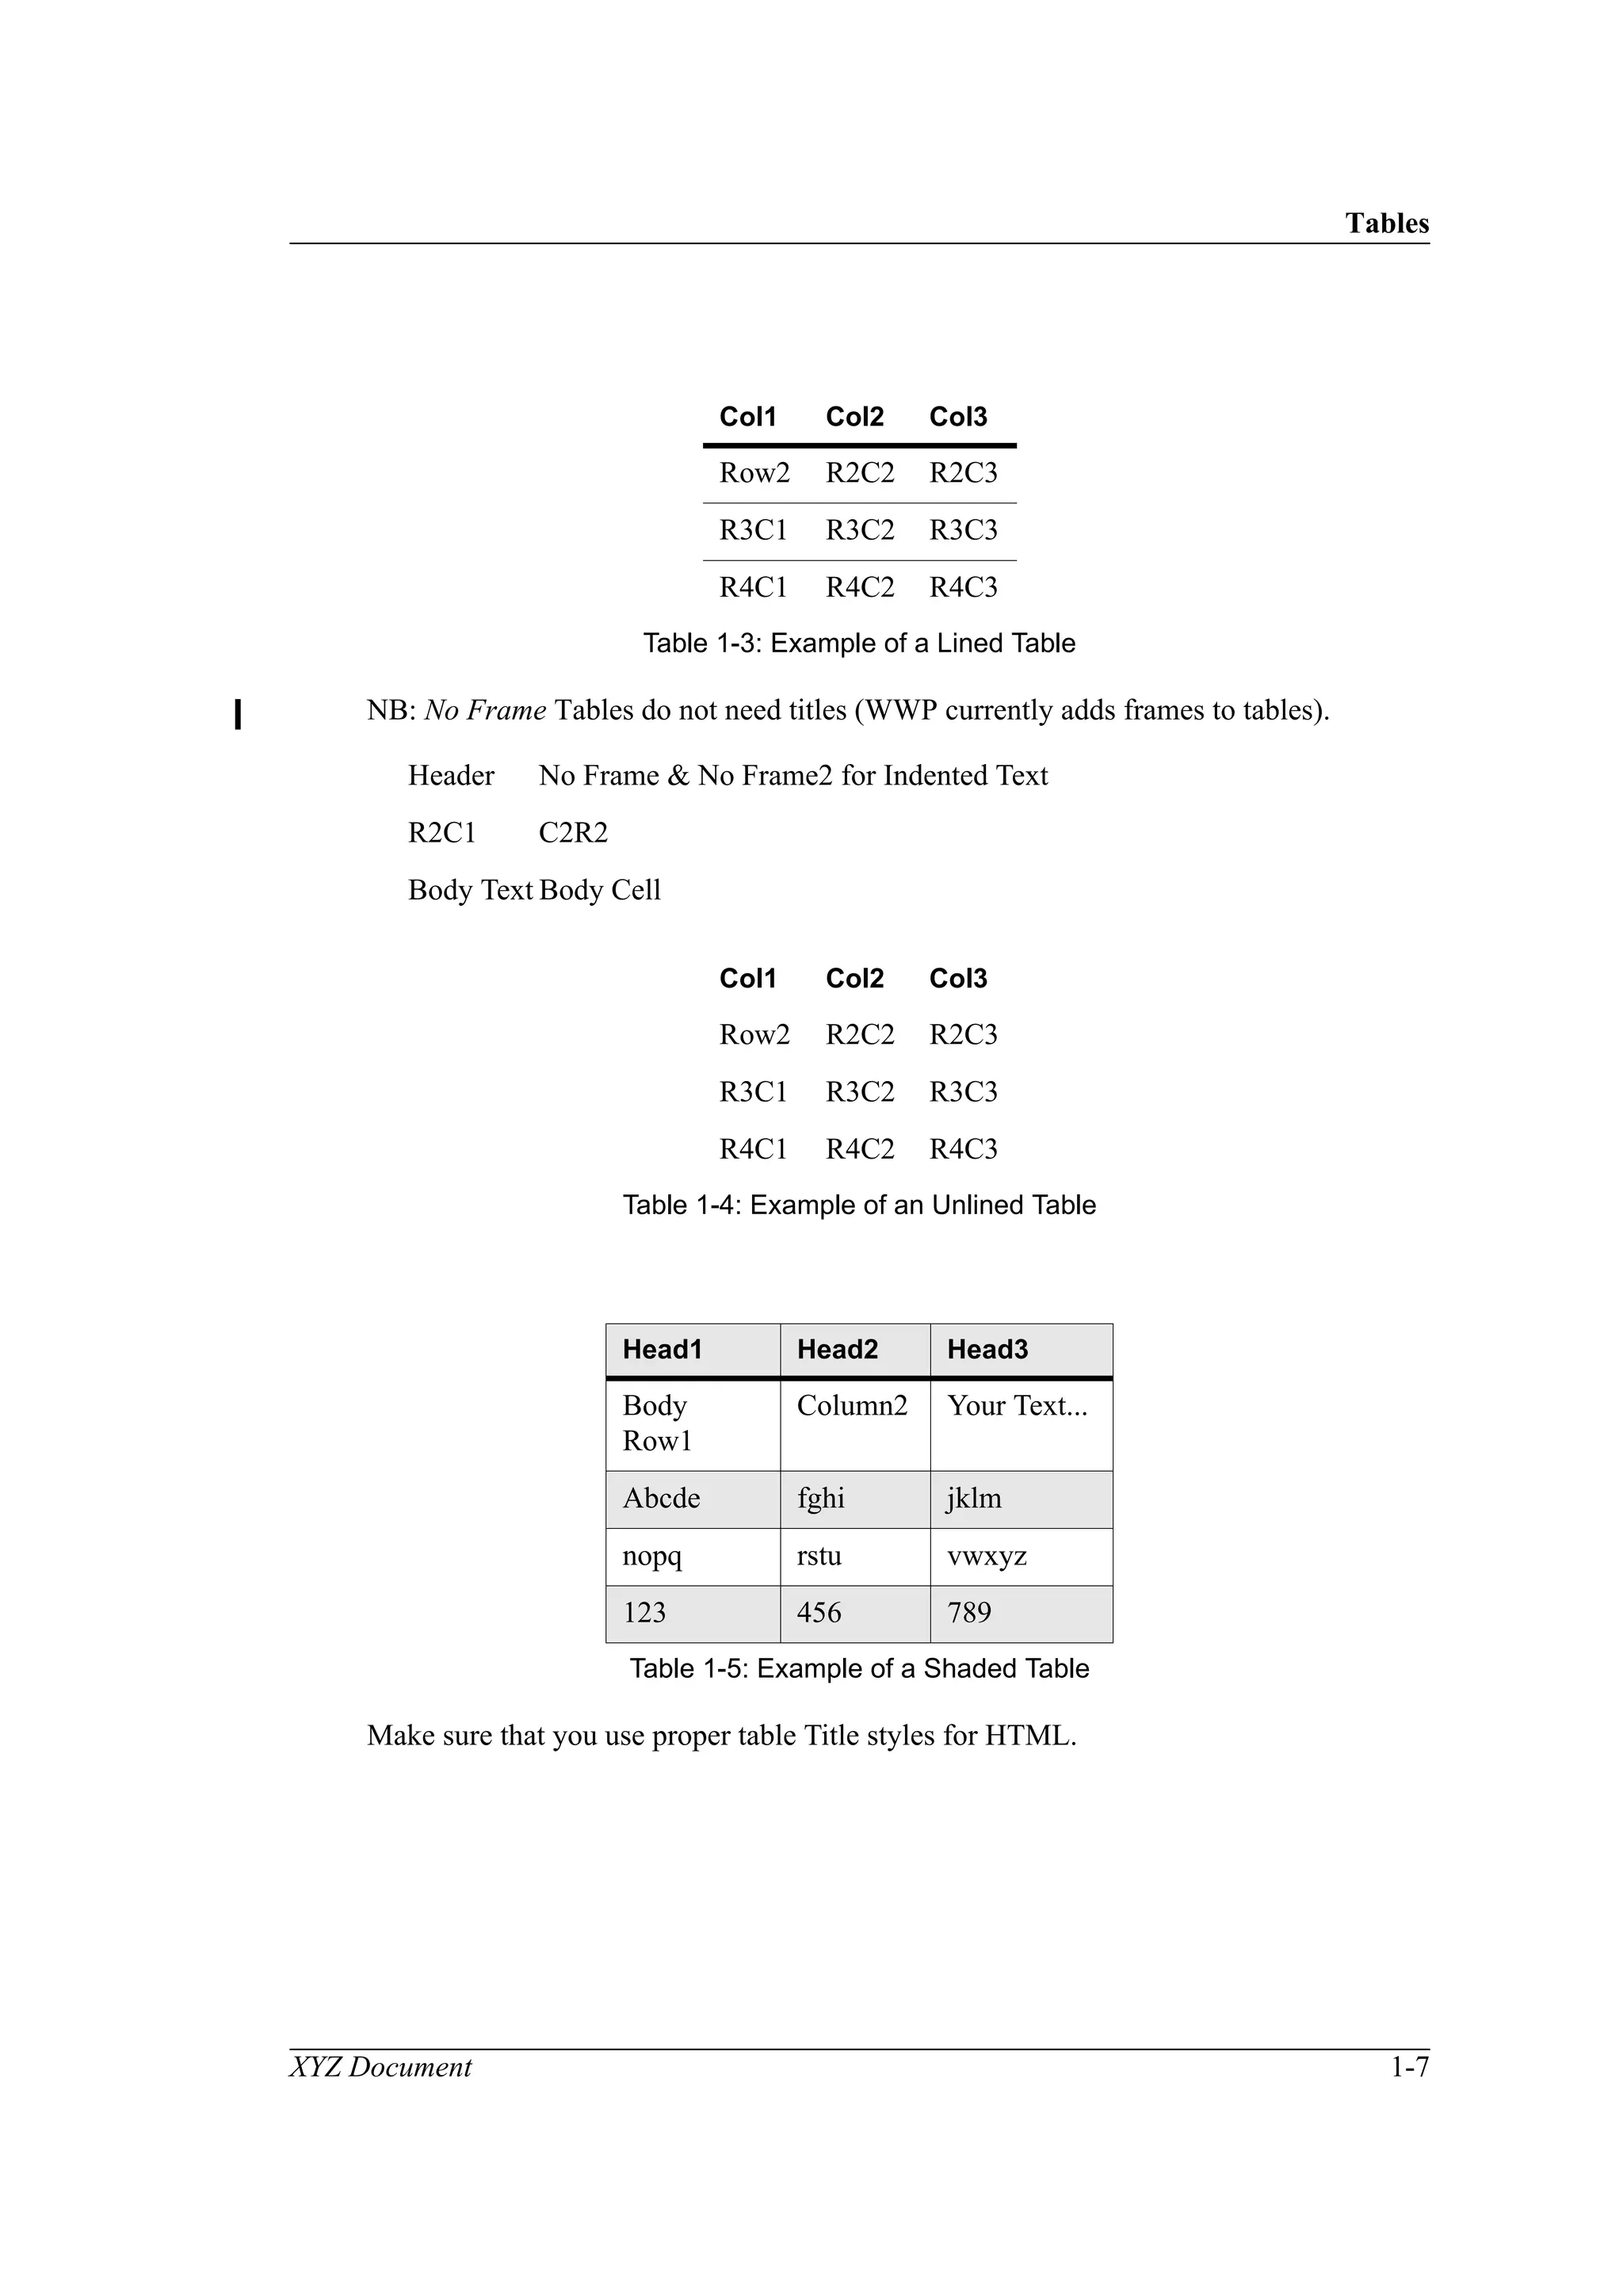
1.2 Examples
Enter examples, computer interaction for instance, as follows:
This is an Example paragraph (Courier 9pt, plain, indented,
unhyphenated, no spell check, etc.). This is an example para.
This is a Code paragraph (Courier 8pt, plain, unhyphenated, no indent, no
spell check, 80 chars/line, etc.). This is a Computer Code example:
12345678901234567890123456789012345678901234567890123456789012345678901234567890
(Note that these styles have the language attribute set to None to bypass spell
checking.) In HTML, code will be converted to Preformatted text so that soft or
hard carriage returns MUST be added to indicate line breaks (otherwise the line
will not wrap at the screen margin). Do NOT use Tabs, Hard Spaces, etc. for
indentation; use normal spaces instead, and switch off “Smart Spaces” in the For-
mat..Document..Text Options menu to allow multiple blank spaces.](https://image.slidesharecdn.com/d052aec8-61bc-4f4e-853d-cb710b3addc1-150806172519-lva1-app6892/75/FrameMaker-StyleFile-Template-16-2048.jpg)
![Textblocks and Frames
1-4 XYZ Document
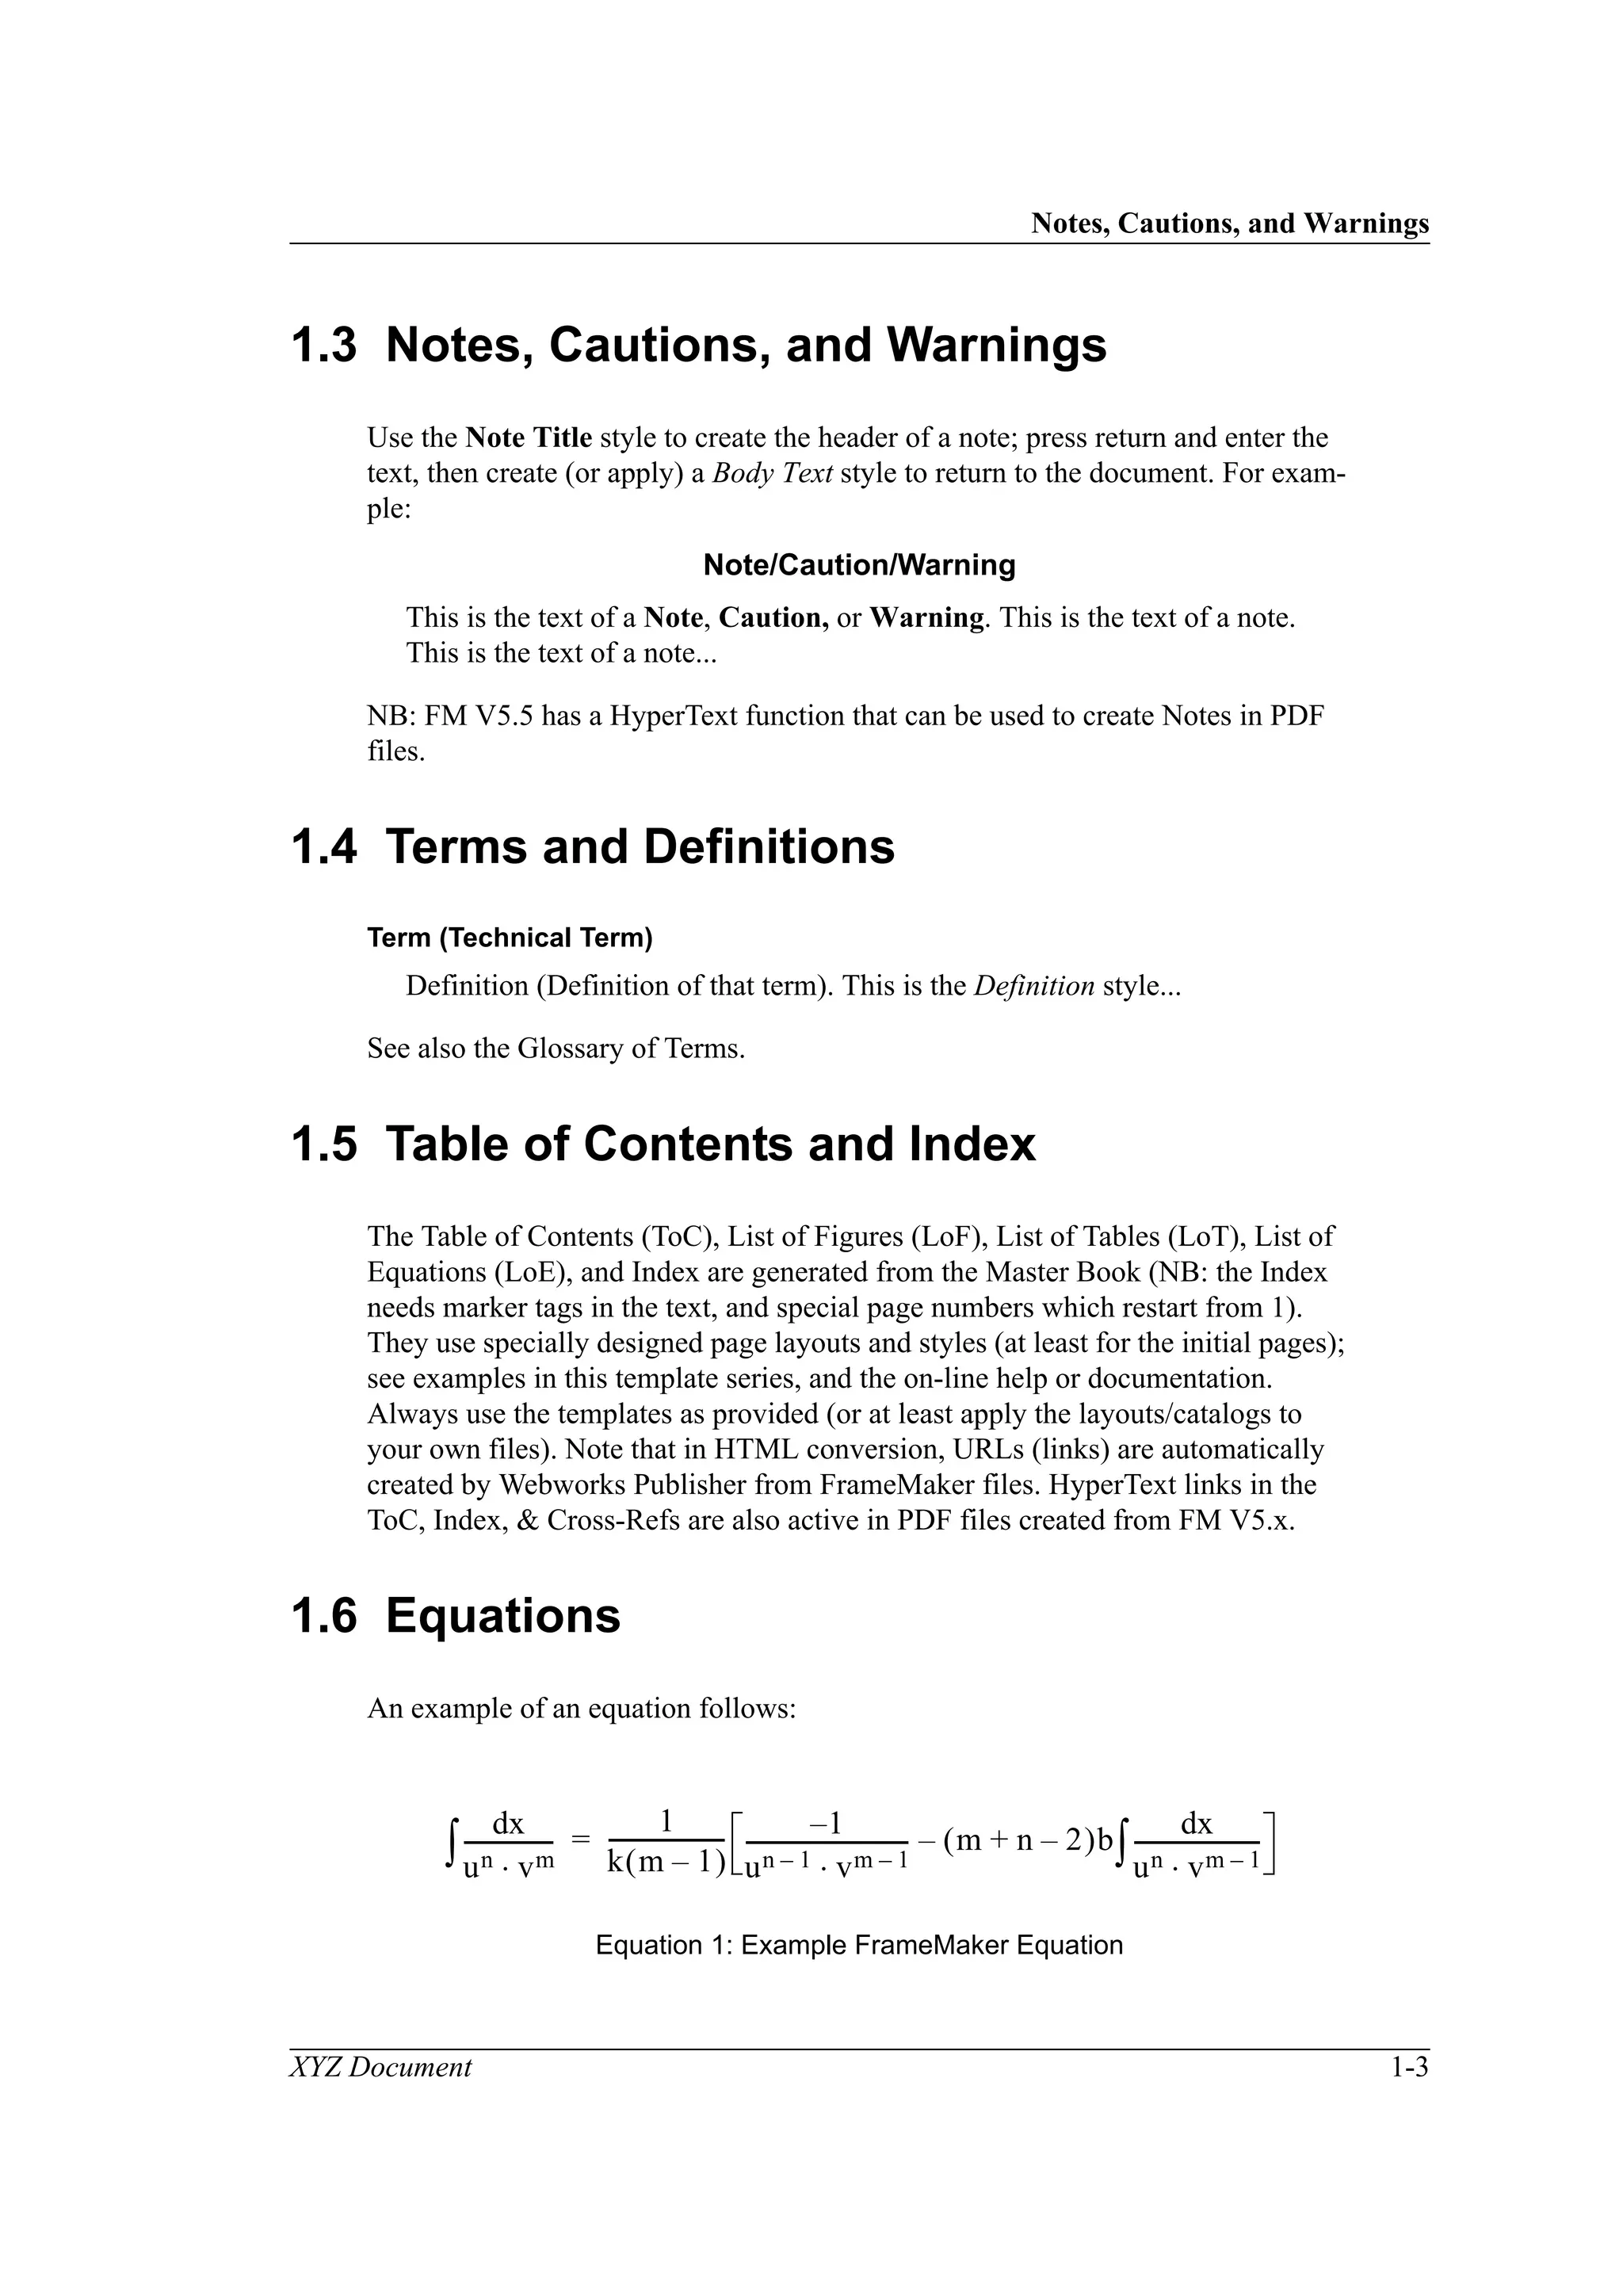
Always use an Anchored Frame on its own line for Equations (see also Figures
below). In HTML you can convert equations either to HTML or GIF graphics.
1.7 Textblocks and Frames
Frames can either be anchored or floating on a page (use only anchored frames for
HTML). Refer to the Master (and Reference) Pages for layout details, and see
examples above and below.
1.8 Conditions
Conditions can be created and applied to portions of the text. When a condition is
set, only general portions of text and those marked with the condition will be dis-
played. Watch out for cross-refs to sections which are inside a condition; try to
keep the Cross-Ref marker out of the condition area. Conditions can be applied to
all chapters of a book via Import Formats in the Master Book. Conditions may be
needed for HTML versions of graphics (75 dpi instead of 150 or 300) which are
converted to GIF format via Webworks Publisher. Note that you can set global
conditions from within WWP.
1.9 Footnotes
This is an example of Footnote1
. See also the FrameMaker Documentation. In
HTML, footnotes (even from Tables) will appear at the end of the file (no matter
how large).
1.10 Cross-References
This is an example of a full internal cross-reference: Chapter 1, “Introduction”,
on page 1-1; other (shorter) formats can also be used. Watch out for unresolved
cross-refs when files are moved, deleted, or renamed. Note that all cross-refs can
be automatically updated from the Master Book file. Cross-refs can also be used
for Bibliography entries (e.g., see Chapter 1 of [1]), and page numbers: see page 1-
1 (not recommended for HTML). In HTML, internal cross-refs will be converted
1. This is the text of the Footnote.
75 DPI](https://image.slidesharecdn.com/d052aec8-61bc-4f4e-853d-cb710b3addc1-150806172519-lva1-app6892/75/FrameMaker-StyleFile-Template-18-2048.jpg)
![Markers
XYZ Document 1-9
1.15 Markers
Markers are used to insert special items in the text, such as:
• Index Entries:
– Main Index Entry:Subindex Entry
– Index Entry<$startrange>
– Index Entry<$endrange>
– Index Entry<$nopage> (used for See, See Also entries)
• HyperText Links:
– newlink yourlinkname
– gotolink yourlinkname
– External URL for WWP: Netscape; format: [Marker Type 13: <URL>]
Link_Text [Marker Type 14: <Blank>]
• Non-printing Comments & Conditions (for selective printing or HTML);
Definition of Cross-References, etc.](https://image.slidesharecdn.com/d052aec8-61bc-4f4e-853d-cb710b3addc1-150806172519-lva1-app6892/75/FrameMaker-StyleFile-Template-23-2048.jpg)
![XYZ Document 2-1
2 Creating a New Book
This chapter describes how to create a ‘Master’ series of files for a new document
using the Newdoc templates for FrameMaker V5.5.x (on Mac, PC, NT, or Unix).
Note that both USA and UK dictionaries should be installed. Files from other sys-
tems should be opened and resaved (if necessary) to remove any font problems
prior to regenerating the book.
2.1 Plan the Layout and Names of the New Book
The process of creating and setting up a new book from FrameMaker templates is
complicated, and difficult to change later, so it is highly recommended that you
plan the organization and naming of your book carefully in advance. (Frame-
Maker’s own special template for a Pagination Sheet can help with this process.)
A typical organization for a full document is as follows:
Newdoc (Choose a short meaningful name for the Book):
• Cover (includes trademarks, acknowledgments, etc.)
• Newdoc.TOC1 (Table of Contents)
• [Newdoc.LOF/LOT/LOE]1 (Optional Lists of Figures/Tables/Equations)
• Preface (if required)
• Chap1 (Introduction/Overview)
• Chap2
• ChapN (last chapter)
• ApdxA (optional)
• ApdxN (last of the optional appendices)
• [Glossary] (Optional appendices)
• [Bibliog]
• Newdoc.IDX1 (Index - sometimes optional)
You should avoid spaces and other special characters in filenames if you want to
maintain Unix compatibility. Keep filenames short for PC/Windows use. Exten-
sions, if required, could be .fm or .fm5 which should then be associated with the
FrameMaker application.
1. These are generated files whose names are based on the book name and which cannot be changed.](https://image.slidesharecdn.com/d052aec8-61bc-4f4e-853d-cb710b3addc1-150806172519-lva1-app6892/75/FrameMaker-StyleFile-Template-25-2048.jpg)
![Creating a New Book File
2-2 XYZ Document
Note: the simplest way to create a new document set is just to copy all the files,
change the folder &/or book name, and accept the filenames inside; adding or
removing files as required. This means that no ToC/Index swapping is required (or
should be done). Note that you might want to change the variable Document Title
(XYZ Document) in one file and import this into all the other files via the master
book (careful: no undo).
2.2 Creating a New Book File
Create a folder with a meaningful name for your new document.
Copy all the Newdoc templates from the appropriate file server or web page into
the new folder. (Contact the author if the files are unavailable.)
If necessary, rename the Book Template (Newdoc1) to the name defined in your
plan. (Note: do not rename the generated files just yet.)
Open the new Book file and use the Rearrange Files command to delete the old,
automatically generated lists (indicated by a + symbol at the end).
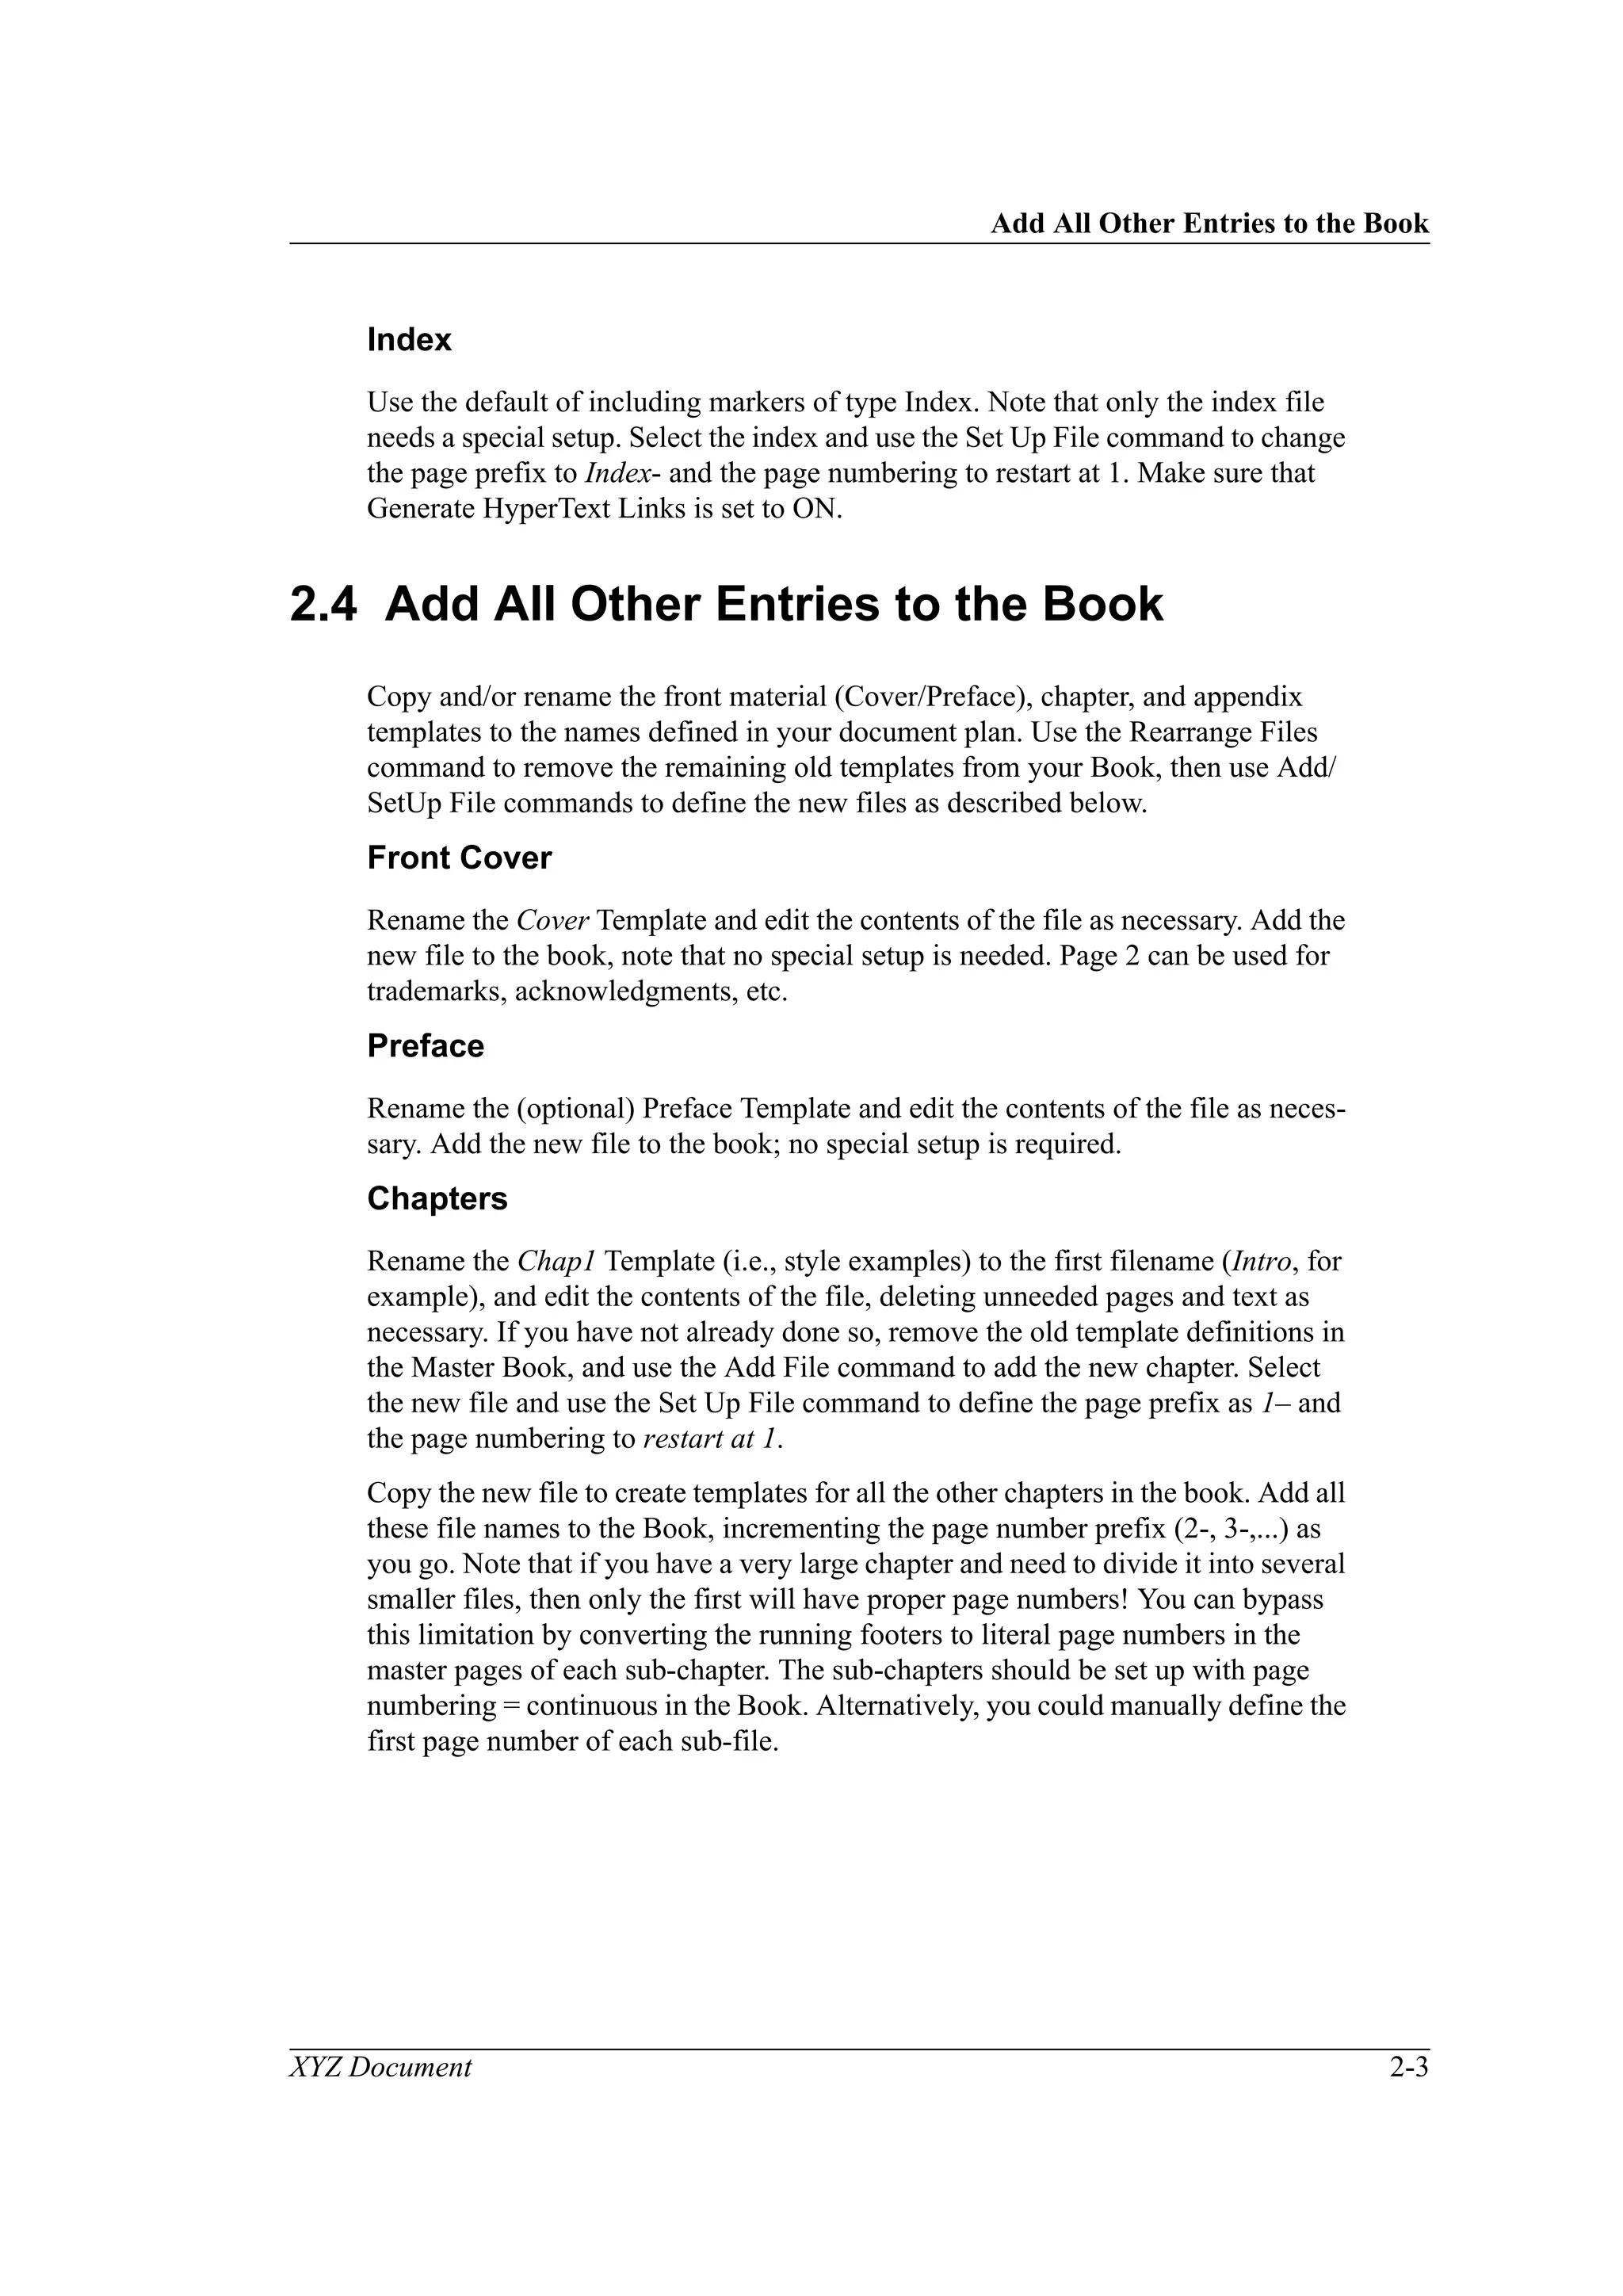
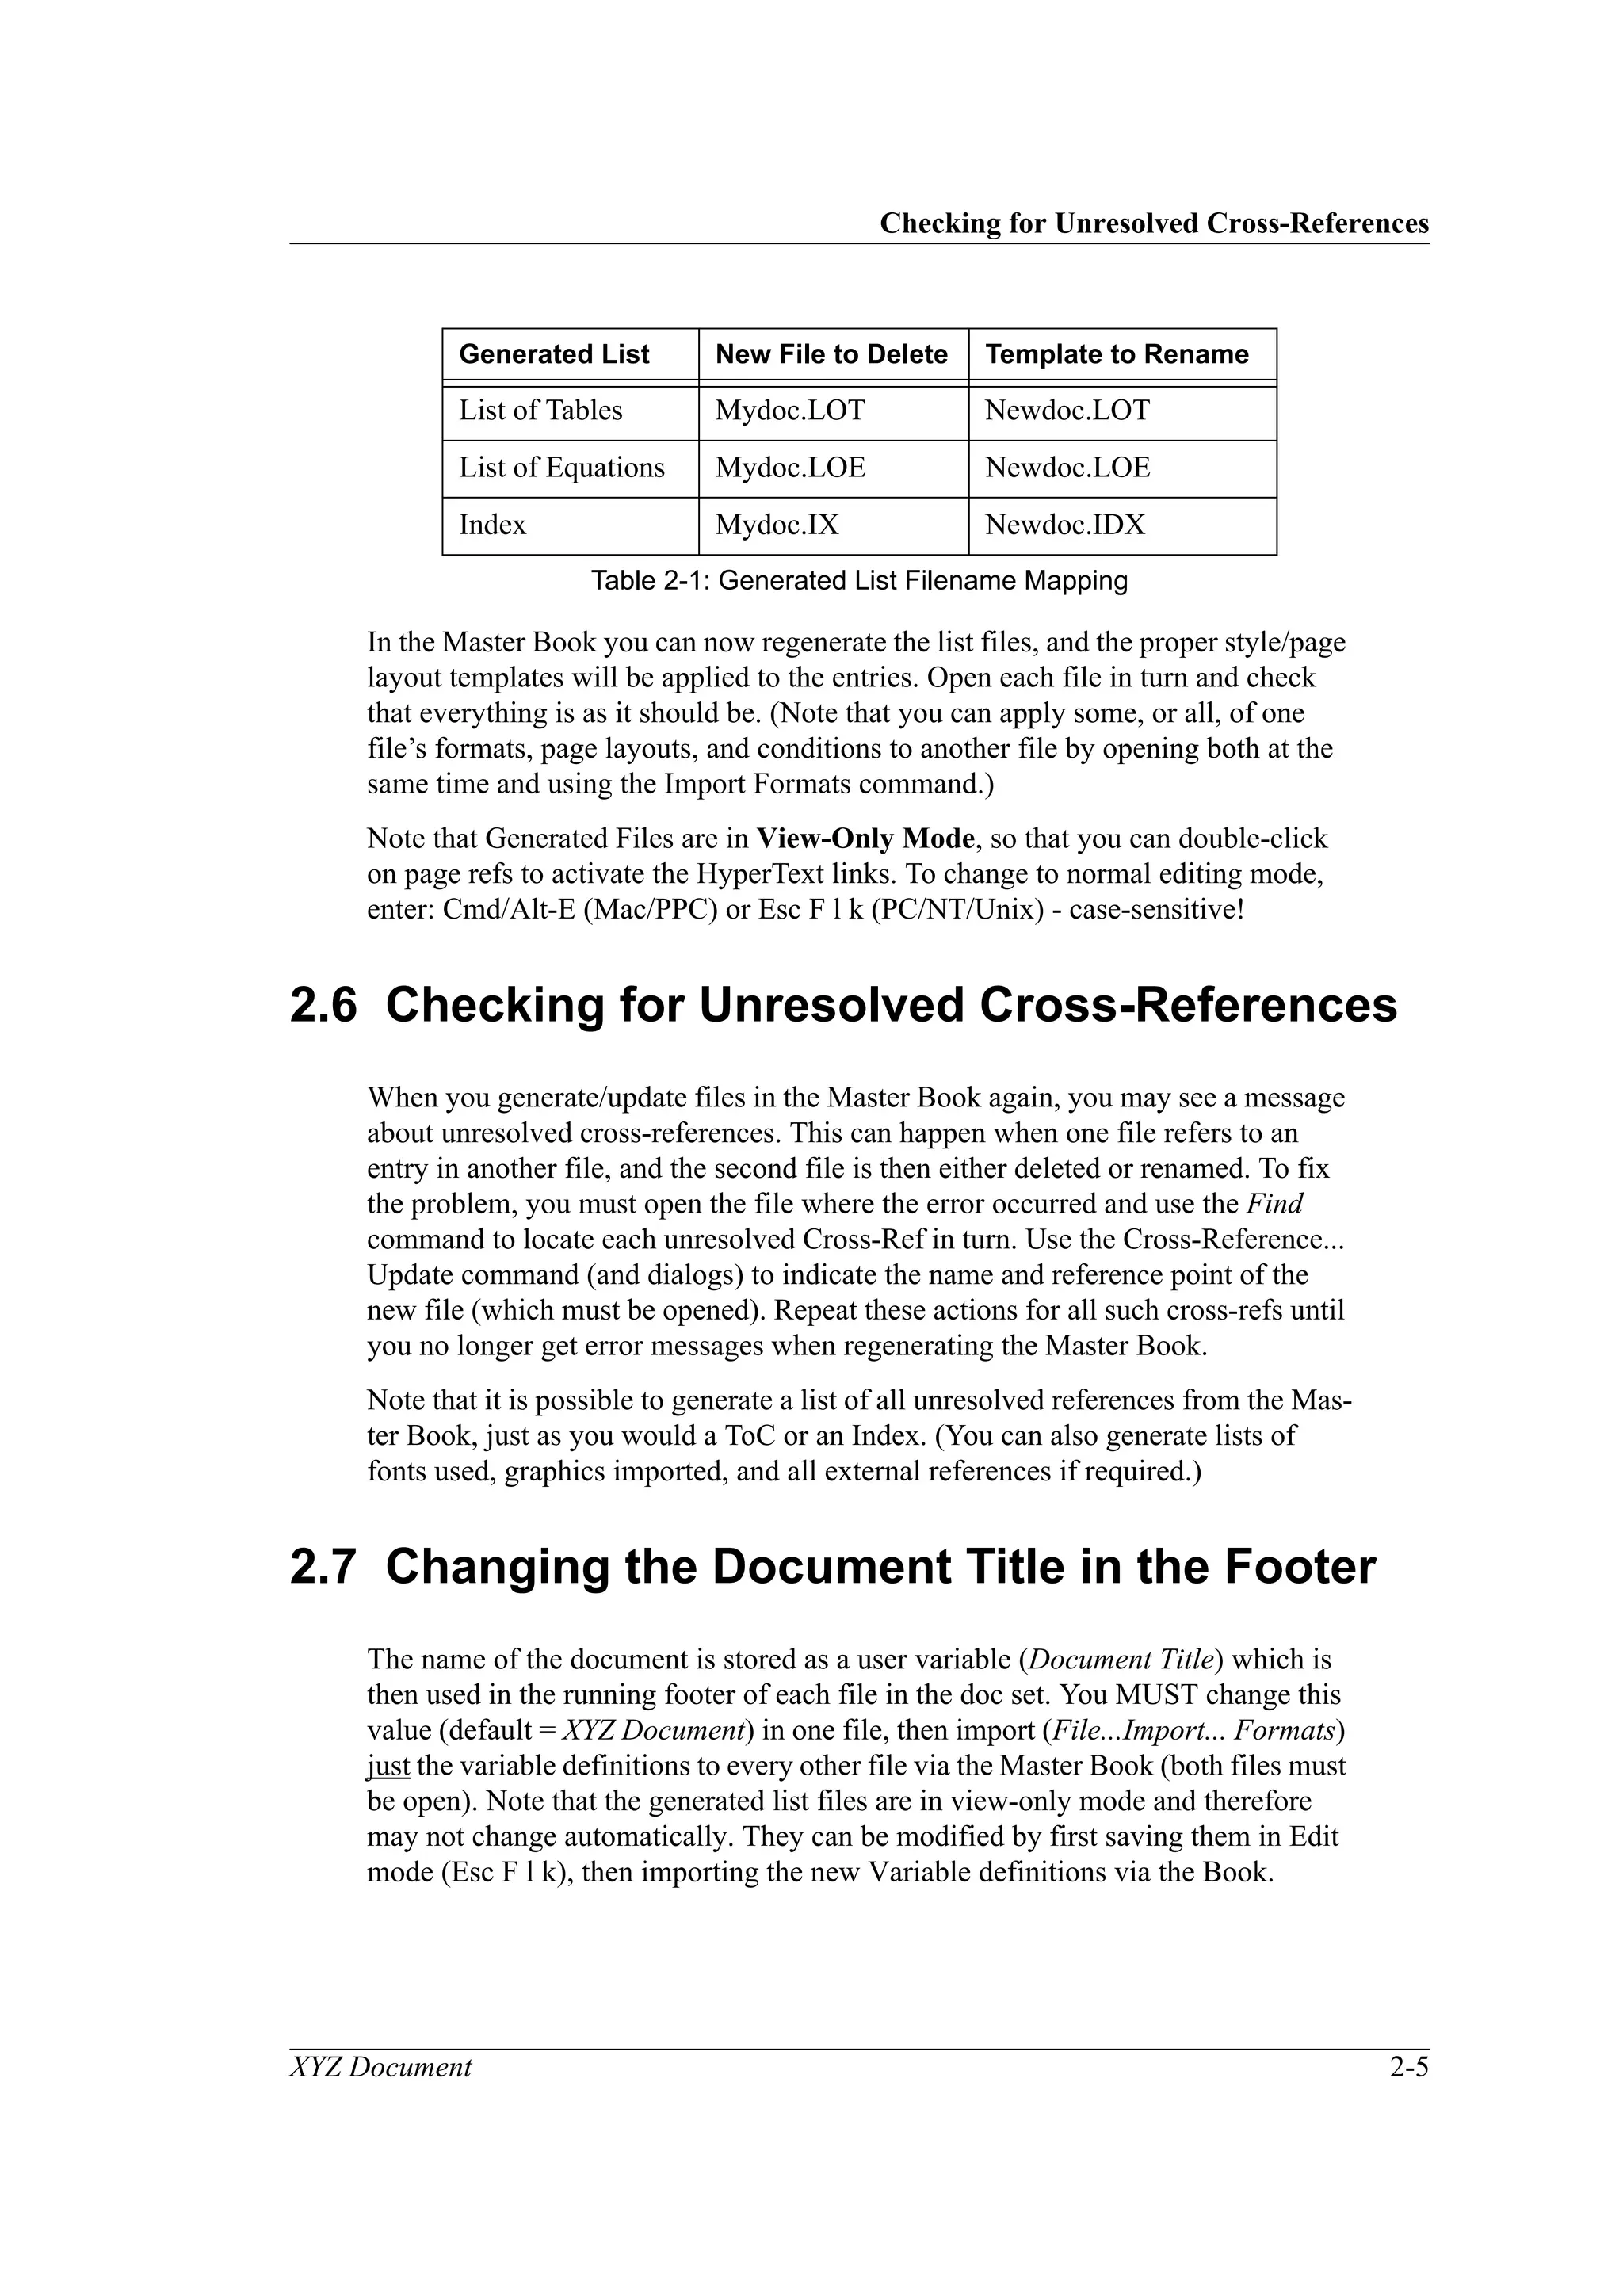
2.3 Adding Generated Files to the New Book
Use the Add File command to include new generated list files in the correct order:
Table of Contents, List of Figures, List of Tables, [Equations], & Index:
Table of Contents
Include the following paragraph types: Appendix, Apdx Head 1–5, Chapter, Head
1–5, Preface, and Index Title. Make sure that Generate HyperText Links is set to
ON. Note that no special page prefix or numbering is required.
List of Figures
Include the following paragraph types: Figure Title and Figure Apdx Title. Note
that no special page prefix or numbering is required.
List of Tables
Include the following paragraph types: Table Title and Table Apdx Title.
Note that no special page prefix or numbering is required.
[List of Equations]
Optional: include the following paragraph types: Equation (no special Apdx style).
Note that no special page prefix or numbering is required. (This file is based on a
List of Figures and is not normally present in FM V5.)
1. Note that we recommend keeping the names as they are.](https://image.slidesharecdn.com/d052aec8-61bc-4f4e-853d-cb710b3addc1-150806172519-lva1-app6892/75/FrameMaker-StyleFile-Template-26-2048.jpg)

![File Transfer
3-2 XYZ Document
• Filters (MML1
, Word, RTF, MIF WordPerfect; also uses Claris XTND)
• Help (On-Line Help)
• Modules (Interfaces, Internal Code, & Plug-Ins - not many as yet)
• Templates (Book, Outline, Report, Business, Special, Personal - add your
own here, e.g., customized templates)
• Others (Personal Dictionary, On-Line Docs, Fonts, Samples, Tutorial, and
WebWorks Lite Converter for HTML?)
FrameMaker Menus:
• Check Preferences (auto backup/save, interface type, leave cross-platform
set to Mac, etc.) – O/S-specific!
• Utilities (Document Report = word count; 3rd party: e.g., Cumulus (uses
graphics Db plug-in for extra menu option; HTML, not many others...)
3.4 File Transfer
FrameMaker V5.5 (binary) source files are directly interchangeable from one sys-
tem to another, but watch for filename and special character differences (espe-
cially with Book files). Also, some fonts may not be available, or may be called
something else, on other systems. If problems occur, export to MIF (Maker Inter-
change Format) files, which like EPS are ASCII self-contained files, and mail/
copy. Use FTP, NFS/share, or Anarchie via TCP/IP for Unix file transfer. For
graphics, use EPS or TIFF format (PICT is Mac-specific and won’t print on a PC).
If you still have problems with graphics, you can also try setting the Save Frame-
Image option to On in the File...Preferences.
3.5 File Import/Export
Import: Word (Mac/PC), RTF (Microsoft), WordPerfect, ASCII Text (direct to
table if tab-delimited), or via Claris Translators/MacLink Pro (not always a reli-
able method). For graphics use EPS/TIFF via cut/paste or direct file import. Watch
out for picture size for HTML export (GIF format).
Export: MIF (Maker Interchange Format) or RTF for use with MS-Word or
DECwrite (via Pathworks file transfer to VAX), otherwise only export option is
[Encapsulated] PostScript via print menu (see below) – used for Acrobat PDF
files (see Chapter 5 for details).
1. Maker Markup Language](https://image.slidesharecdn.com/d052aec8-61bc-4f4e-853d-cb710b3addc1-150806172519-lva1-app6892/75/FrameMaker-StyleFile-Template-32-2048.jpg)
![HTML Files
4-4 XYZ Document
Avoid the use of cross-references to literal page numbers, as these have no mean-
ing in HTML (even though they will work).
Do not use graphical text, e.g., on Master Pages, as this will be lost.
Make sure you always use Character Styles to apply bold, italics, etc., to text,
otherwise such changes may be lost in HTML (unless specifically mapped in
WWP).
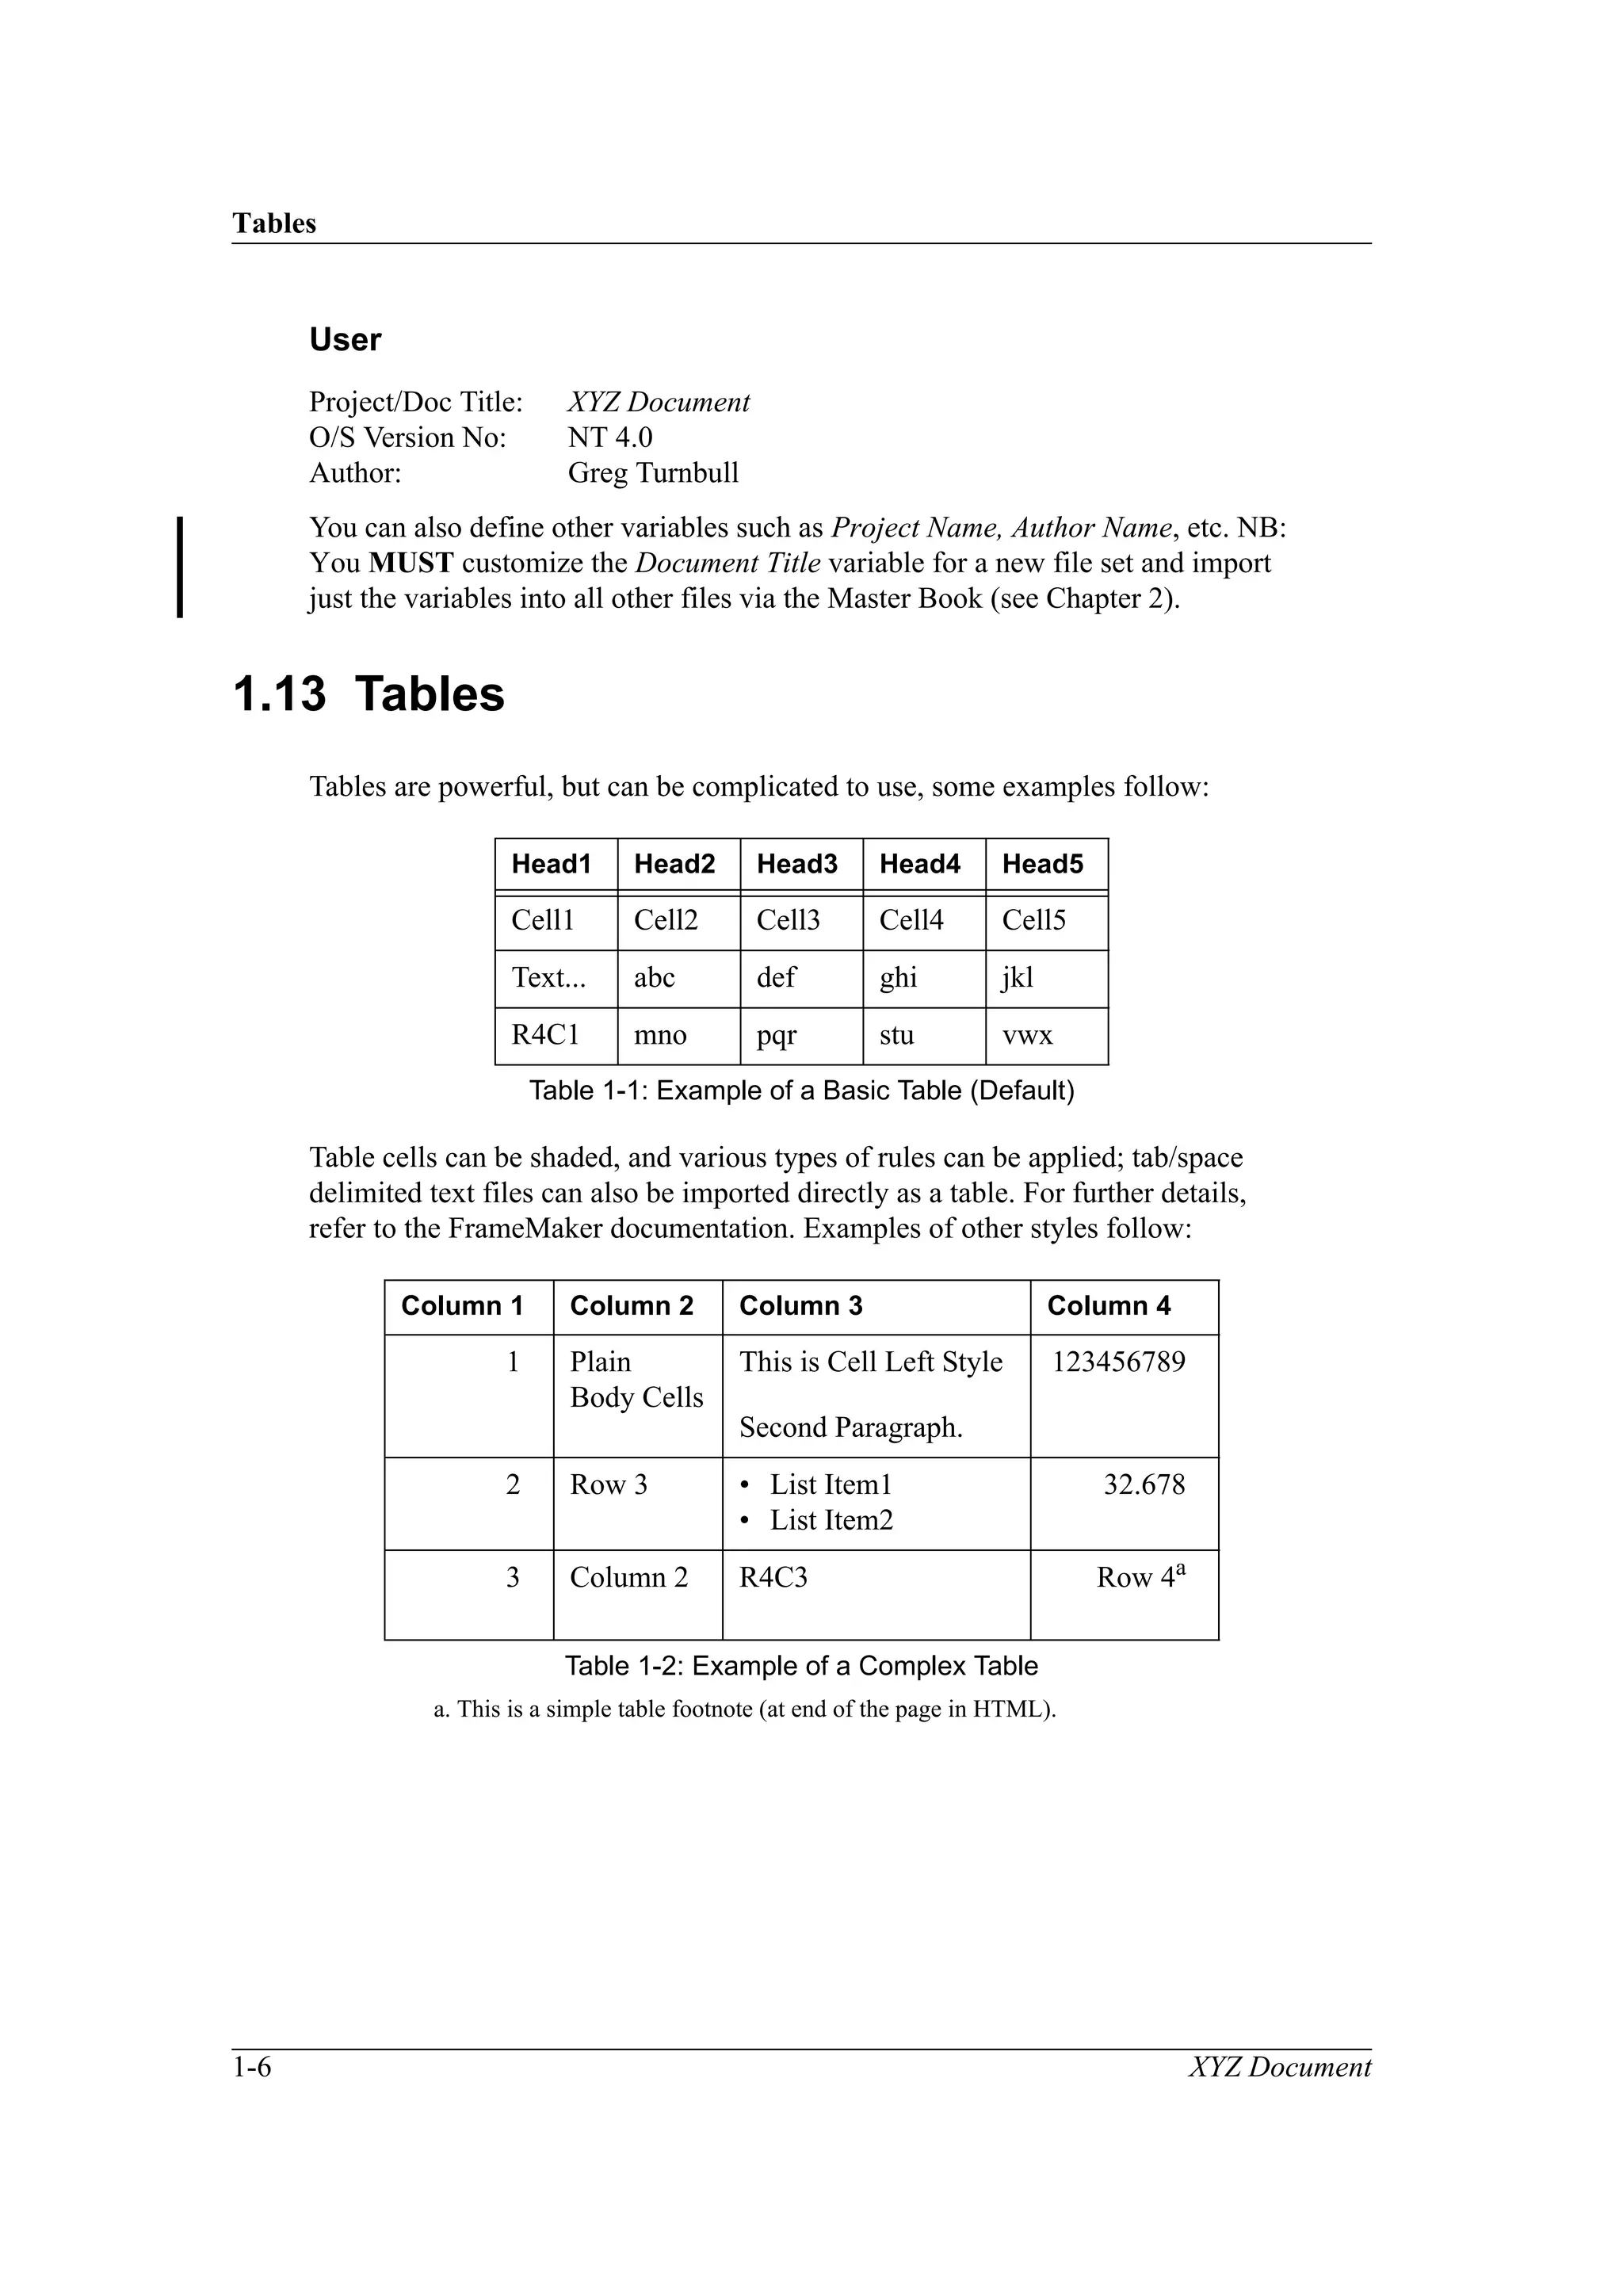
Make sure that Table Titles are separate paragraphs, i.e., not part of the table
itself, otherwise they will be lost. (Remove the automatic title (below) in the table
styles and apply the Table Title style to a separate text string.) It is also be best to
have the table anchor in its own paragraph.
Equations will be converted to graphics, but may not appear exactly the same as
in your document. Remember that they too should be in anchored frames on new
lines.
Tables with custom ruling, or no rules at all, will be converted to standard HTML
tables. Cell shading and autonumbering will be lost; joined cells may become
split. Table Footnotes appear at the end of the HTML page (even if very long).
Multi-column pages (such as the Index) will be converted to a single column.
As Level1 Headings will create new HTML files, try to always have some intro-
ductory text between the Chapter/Appendix Title and the first L1 Head. Note that
new files can be created (by modifying the WWP mapping) for Level2 Heads for
very large sections.
Always use the standard paragraph styles; custom styles will not be mapped and
will therefore lose their formatting. Contact the author if you require new styles/
templates or special web mapping. See also Chapter 6.
Note: Landscape pages become portrait again, so the text may look wrong.
External URLs in WWP1 are added via Type 13/14 Marker tags, for example:
[Marker Type 13: <URL>] Link_Text [Marker Type 14: <Blank>]
Avoid the use of ‘soft’ carriage returns in Body text, as browser windows can be
any size, and may therefore make your text look strange. The exceptions are Code
and Example styles which become Preformatted HTML and therefore MUST
have hard &/or soft returns (<Ctrl><Enter>) to indicate line breaks!
Similarly, avoid the use of tabbed or indented text, as this will not display prop-
erly in Netscape; consider using tables (e.g., No Frame or No Frame 2) without
rules/borders, or term/definition lists instead.
If you have many figures, consider using linked GIF files to speed up the process
of conversion to HTML. You may need to use Conditions here. See also Chapter 6
on switching off WWP graphic conversion.
1. HTML Transit uses Type 25 Markers.](https://image.slidesharecdn.com/d052aec8-61bc-4f4e-853d-cb710b3addc1-150806172519-lva1-app6892/75/FrameMaker-StyleFile-Template-40-2048.jpg)
![XYZ Document 5-1
5 WebWorks Publisher Tutorial
This chapter describes how to convert FrameMaker V5.5x documents into HTML/
GIF format (for use in Netscape/IE or FrontPage ‘98) via WebWorks Publisher
V3.5x (under NT or Unix). HTML has the advantage over PDF files, in that it is
smaller, and therefore quicker to view, and is in ASCII format, which means that it
is easier to search and index. The disadvantage of the current version of HTML is
that it is limited in controlling page layout - this may improve with the use of Cas-
cading Style Sheets (CSS). It is possible that you may need to provide both for-
mats: HTML for display, searching, etc., and PDF for down-loading, printing, etc.
WWP V3.5x uses FM V5.5x to convert docs to HTML format (via MIF), and uses
Netscape to display the results. It automatically handles internal or linked graphics
(converting them to GIF format if necessary), equations, cross-refs, variables,
HyperText links, Table of Contents, Lists of Figures/Tables, Indexes, tables, file
division, conditions, external URLs, and so on. It is a very powerful tool, provid-
ing that you use the FM style files properly, and unmodified. Note that HTML has
some limitations which mean that some FM formatting (such as indents or tabbed
text) cannot be converted; refer to Chapter 5 for information on how to optimize
your document for WWP. Note that for good quality graphics, you should set up
and select a Seiko Color Printer Driver in the Printer Control Panel.
WWP uses a mapping file (NEWDOC.WDT) to define the appearance of HTML tags
in Netscape, and also which FM styles are converted to which HTML tags. WWP
handles both paragraph- and character-based styles (although it ignores everything
on the master pages). Note that it is good practice to apply character styles (bold,
italics, underline, etc.) via the character menu, rather than directly via the icon bar.
(Note: you could do things this way, but would then have to check that all such
attributes were properly mapped in WWP.)
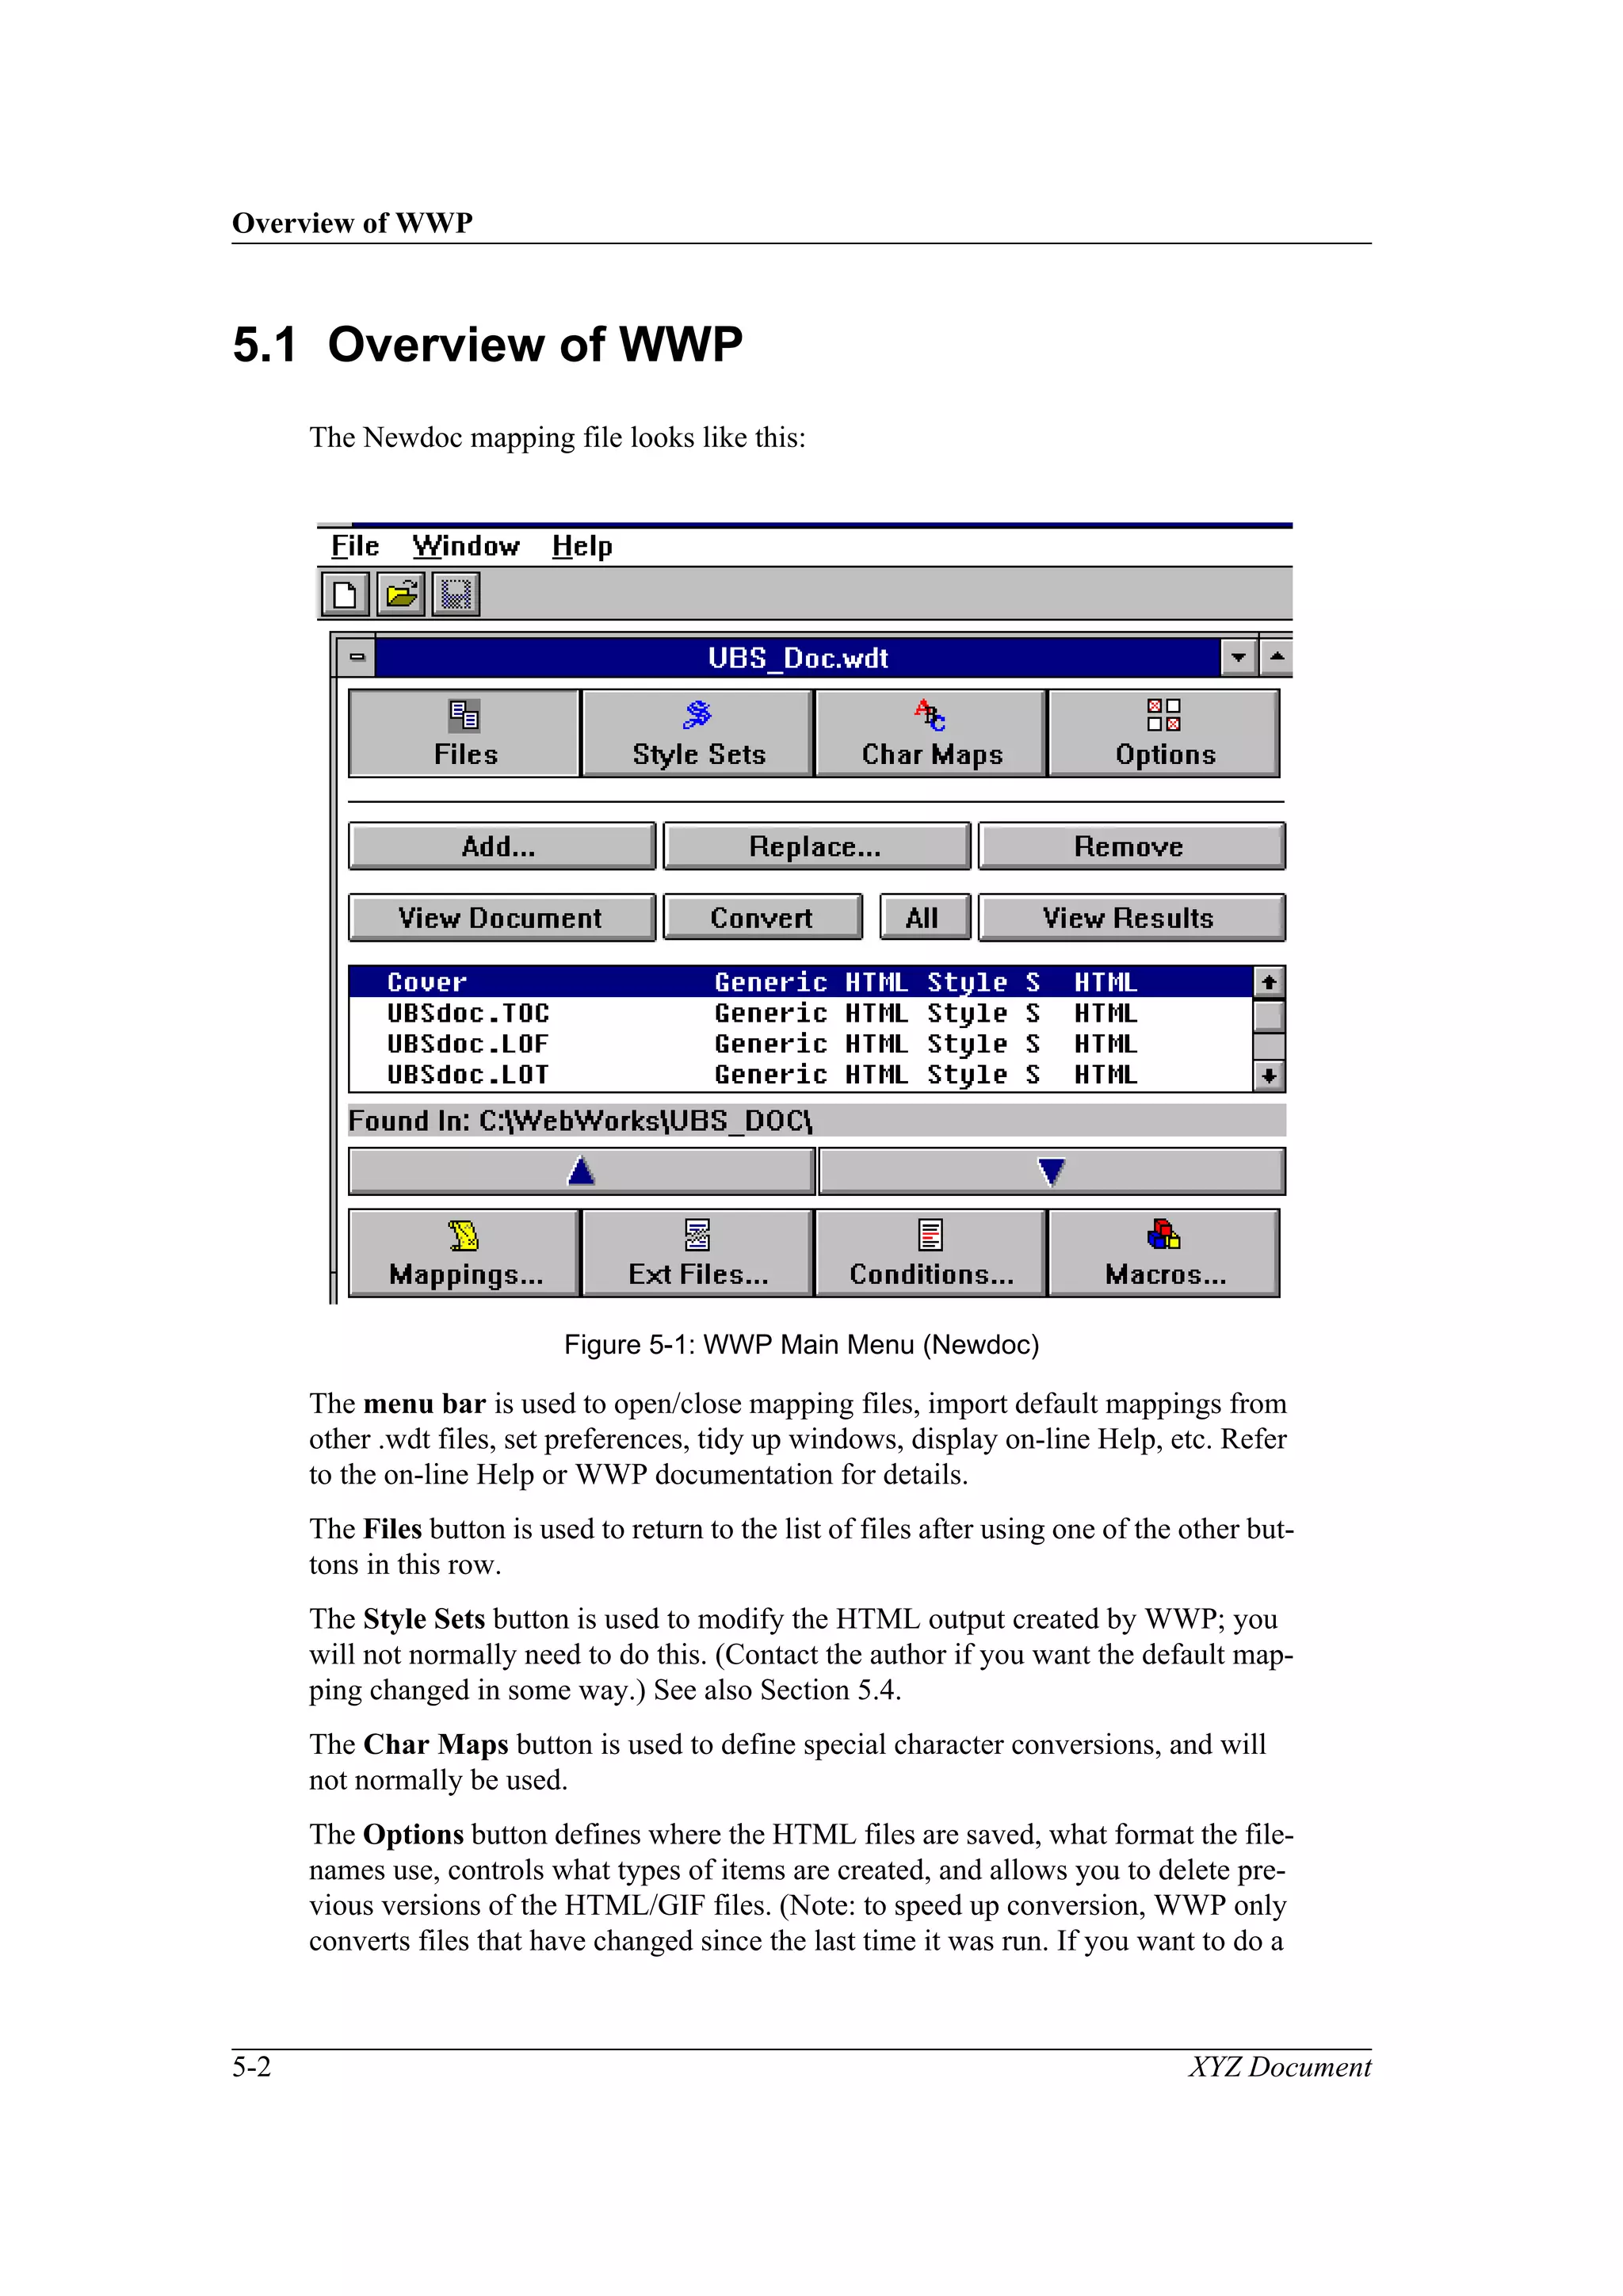
Headers and footers are not converted by WWP, instead it adds automatic naviga-
tion features (prev/next, first/last), and allows you to customize the footer of each
HTML page (via user macros). In this quick tutorial you will learn how mapping
works, how to convert FM files to HTML for use in Netscape, customize the user
macros, and how to map customized styles.
Remember that if you add or change any of the default character or paragraph
styles, you should check that the WWP mapping file will convert them properly.
[NB: WWP V4/2000 supports on-line HTML Help files (via the MS HTML Help
Workshop V1.x).]](https://image.slidesharecdn.com/d052aec8-61bc-4f4e-853d-cb710b3addc1-150806172519-lva1-app6892/75/FrameMaker-StyleFile-Template-43-2048.jpg)
![An Example Conversion
5-4 XYZ Document
The Conditions button is used to set any defined FM condition on a global level.
This is useful if, for example, you have conditions defined to select graphics for
either the world-wide web/screen (72 dpi) or printing (150-300 dpi).
The Macros button is used to define items such as background color and reply
Email address. Note that other macros are defined via the Mappings button, as
described in Section 5.3.
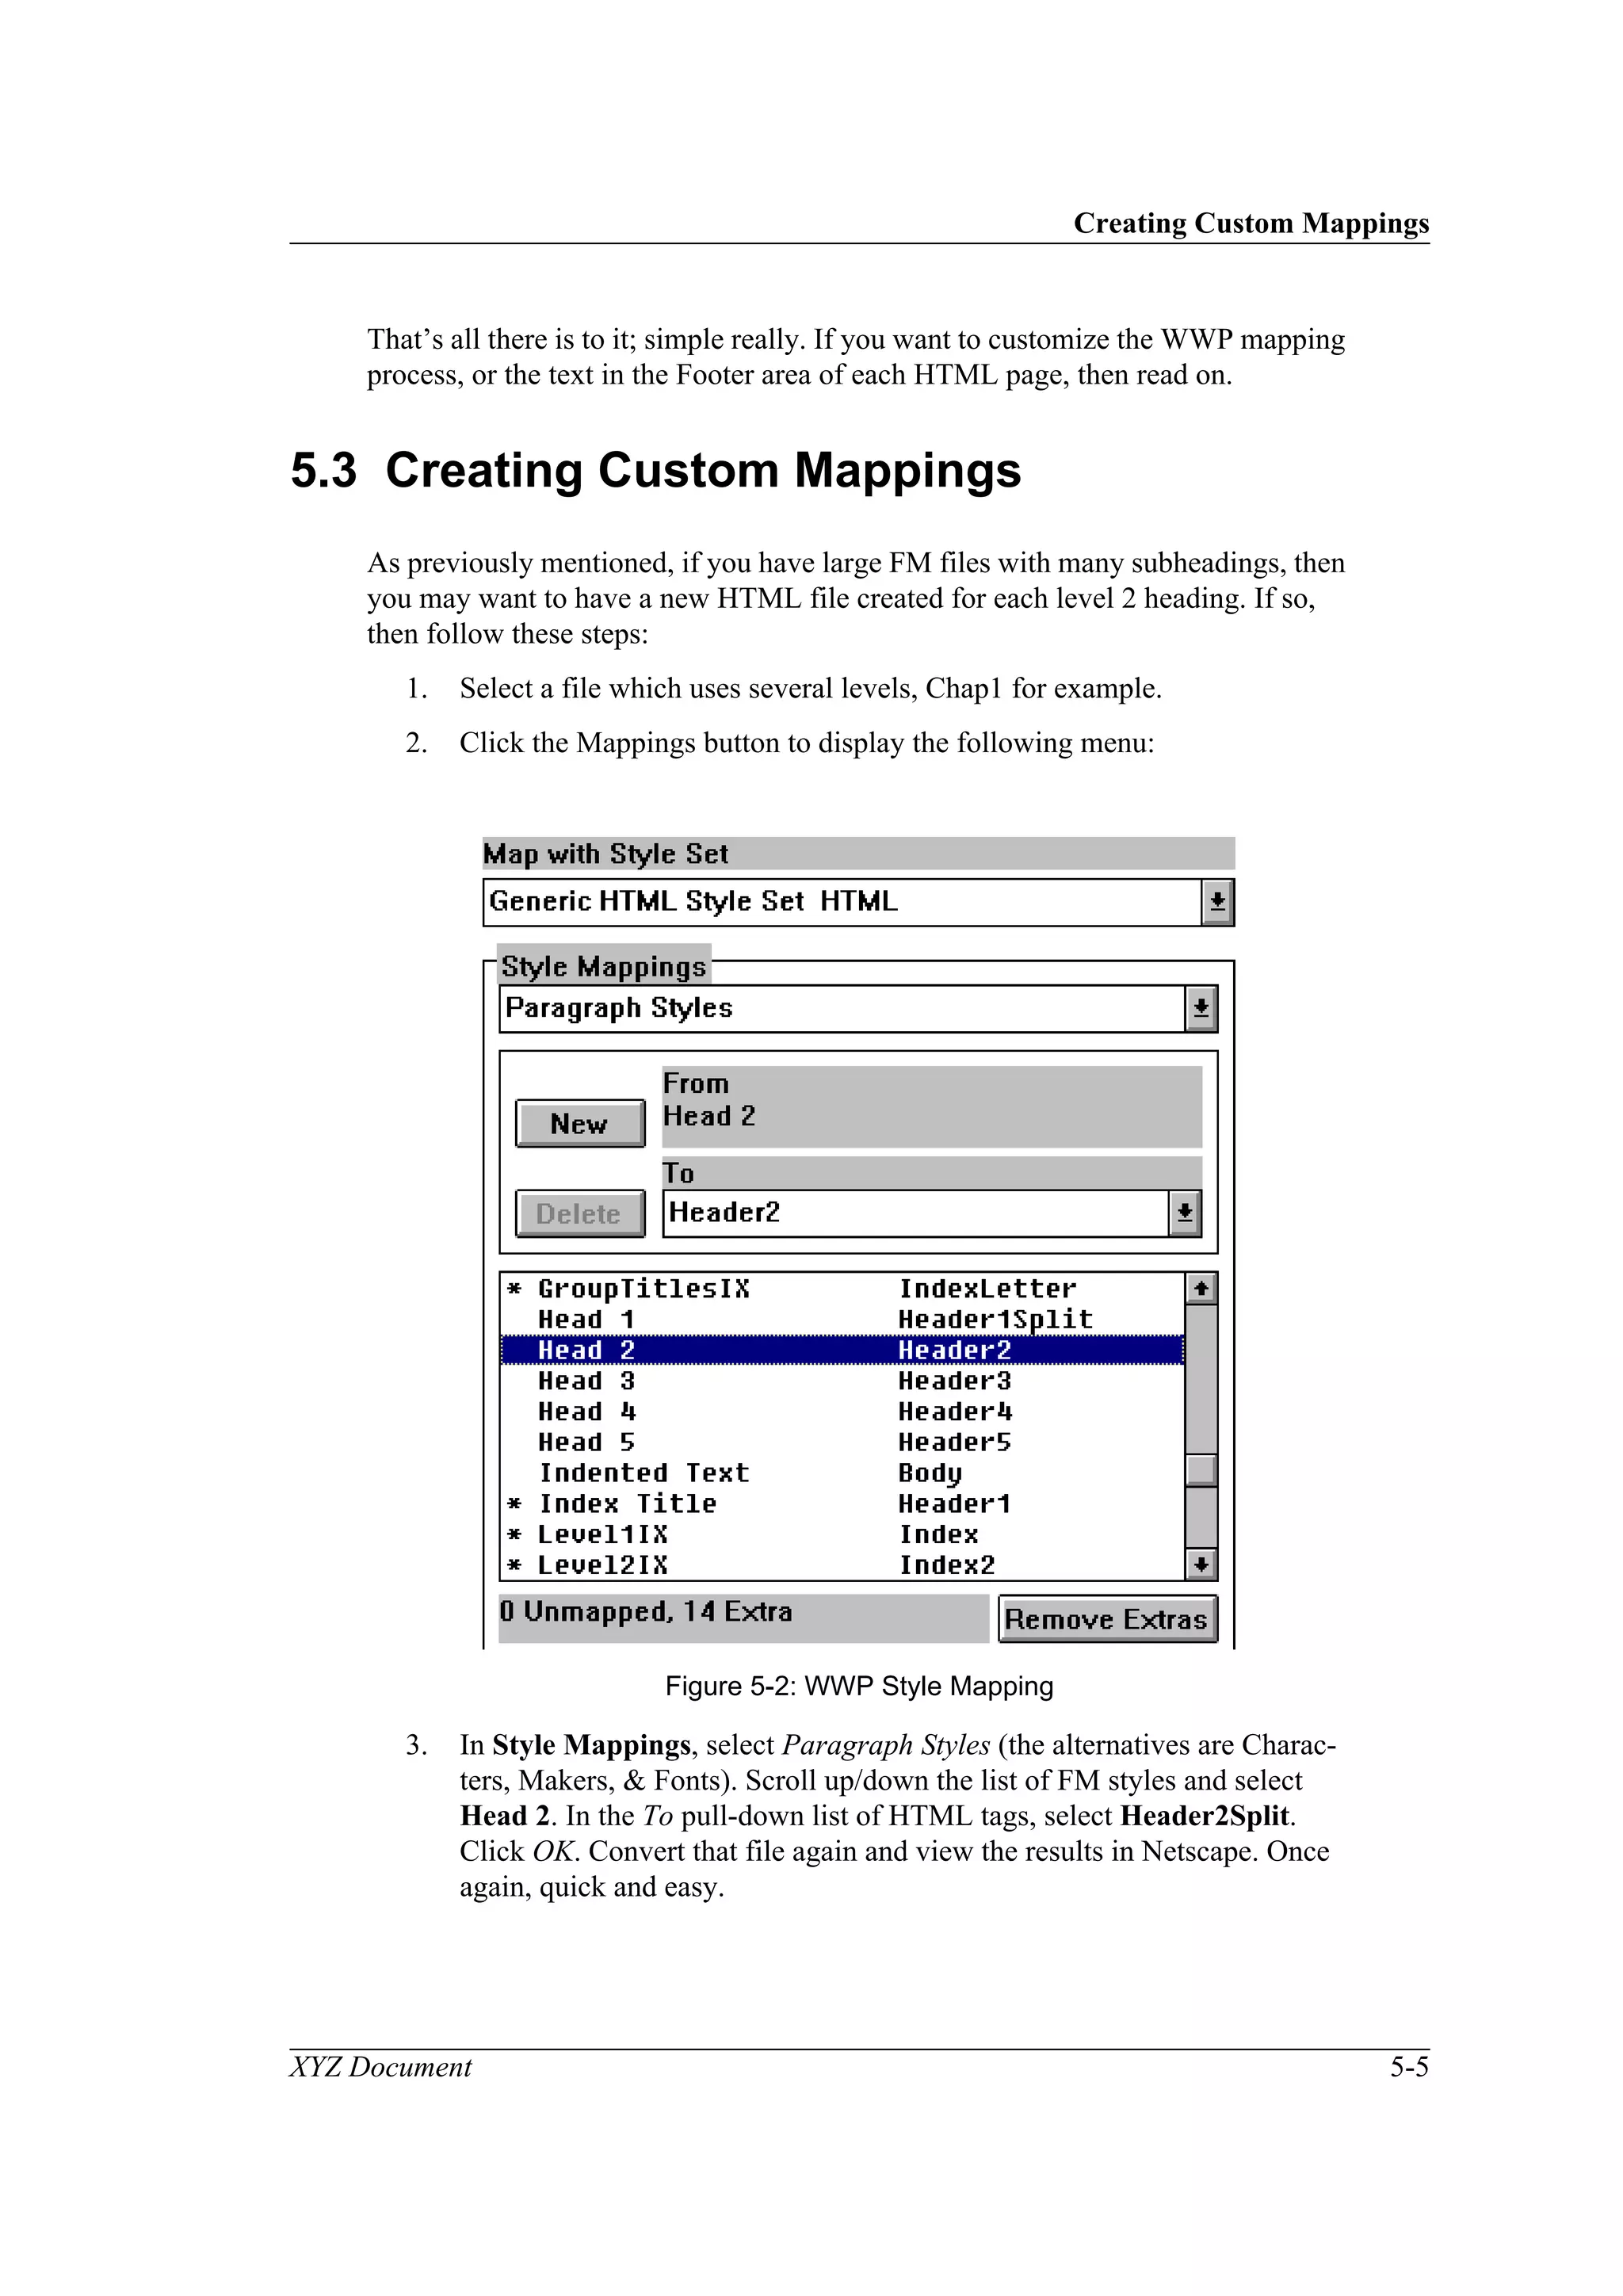
5.2 An Example Conversion
This section leads you through the steps required to convert a generic document,
i.e., one which uses unmodified char/para styles, and takes into account the guide-
lines for creating FM documents intended for HTML:
1. Download or Copy the WWP mapping file Newdoc.wdt to a new filename
and location which refers to your document.
2. Open the new mapping file in WWP and delete the existing FM files (if
any) with the Remove button.
3. Locate the correct output directory with the Browse button in Options.
(Make sure that all 3 generated output types, and DOS 8.3 format filena-
mes, are selected.)
4. Add the master book of your FM document to the list of files (all the files
listed in the master book will be displayed).
5. [If you want a customized running footer, then see Section 5.4.]
6. If you are sure that there are no new or modified styles in your document,
click All and WWP will convert your files into HTML, with linked GIFs
as appropriate. (Note that if you have large files, or lots or equations or
graphics, then this process may take some time.)
7. Start Netscape, select the first file (usually Cover), & View Results.
8. Use the Navigation buttons in the HTML headers and footers, as well as
the Table of Contents and Index (if available) to move through your docu-
ment. Check that the conversion looks OK. If you have used FM features
(such as tabbed or indented text) which do not map to HTML, consider
changing these to (unruled) tables or term/definition lists.
9. Save your mapping file from the File menu.
10. You can now view the first file (cover.htm) in Netscape. Alternatively, if
you are using FrontPage ‘98, or only have HTML files, then you can
import the files directly into a new web (FTP, WCRM, or Web Publisher).
Link the first file (cover.htm) into any other web which needs to refer to
this document.](https://image.slidesharecdn.com/d052aec8-61bc-4f4e-853d-cb710b3addc1-150806172519-lva1-app6892/75/FrameMaker-StyleFile-Template-46-2048.jpg)

![XYZ Document Bibliography-1
Appendix C Bibliography
This is an example of a Bibliography (list of associated documents). It was created
from the AppendixA Template file; however, it uses different headers and footers,
and so should be considered as a separate template in its own right.
Use a separate file for each appendix to maintain the page numbering, and list
them all (in the correct order: appendixes, glossary, & then bibliography) in the
Master Book (edit the setup of each file to define the correct page prefixes and set
the page numbering to restart at 1).
[1] Guide to Using DECwrite V2.x, V2.1, December 1994, G. Turnbull.
[2] Document Title, Version Number, Print Date, Author, Etc.
[3] And so on...
Usage
To create the first item of a bibliographic list, use the Bibliog List First style, then
press return for the second, and subsequent, list items (which use the Bibliog List
Item style).
You can then refer to list items in the text using either the Bibliog Short or Long
cross-reference formats (and selecting the appropriate Bibliog List Item in this
file). Note that both files have to be open at the same time.
For example: for basic details refer to [2], for further information see [1] Guide to
Using DECwrite V2.x, V2.1, December 1994, G. Turnbull.
N.B.: Full document references should be shown in italics.](https://image.slidesharecdn.com/d052aec8-61bc-4f4e-853d-cb710b3addc1-150806172519-lva1-app6892/75/FrameMaker-StyleFile-Template-55-2048.jpg)