This document provides information about a book titled "Microsoft® SQL ServerTM 2005 Programming For Dummies®" including details about the publisher, copyright information, and table of contents. The document discusses that the book was published by Wiley Publishing to provide guidance on SQL Server 2005 programming and covers topics such as retrieving and manipulating data, creating databases and database objects, programming security, and more advanced programming techniques.


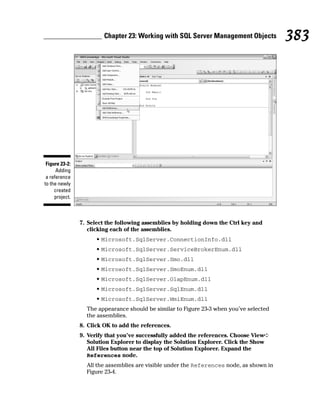
![A regular identifier for a table name might be like this:
MyMessages
The identifier begins with a letter and all the subsequent characters are let-
ters, so it meets the criteria for a regular identifier.
You must use regular identifiers for the names of variables and of stored pro-
cedure parameters.
A delimited identifier need not follow the rules for regular identifiers.
However, the identifier must be enclosed in paired double quotes:
“My Messages”
or paired square brackets:
[My Messages]
I suggest you avoid using delimited identifiers, if at all possible. The longer
the code you write, the easier it becomes to incorrectly pair delimiters some-
where in the code with unpredictable error messages, which can be difficult
to track down.
The following sample Transact-SQL, Identifiers.sql, shows the differ-
ences in how you have to write names with no spaces and names that include
a space character. The first command creates a new database named
Chapter02.
CREATE DATABASE Chapter02
USE Chapter02
CREATE TABLE MyMessages
(MessageNumber Int Primary Key,
Message varchar(500))
CREATE TABLE [My Messages]
([Message Number] Int Primary Key,
Message varchar(500))
SELECT *
FROM [My Messages]
SELECT *
FROM My Messages
22 Part I: Getting Started Using the SQL Server 2005 Development Environment](https://image.slidesharecdn.com/for-220822032846-82be8eed/85/For-Dummies-Microsoft-SQL-Server-2005-Programming-For-Dummies-Apr-2007-pdf-41-320.jpg)
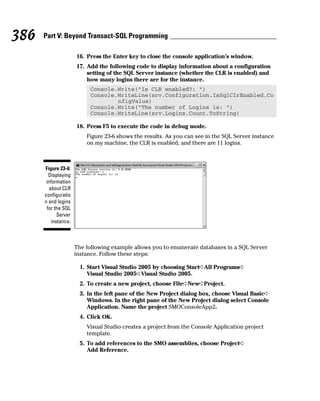
![The USE statement ensures that the subsequent statements run in the cor-
rect database. When I create the table MyMessages, there is no space charac-
ter in the table’s name, so I don’t have to use delimiters. However, if I call a
table My Messages (with a space character), I have to delimit the table name
to avoid an error message. Similarly, when I name a column Message
Number (with a space character), I need to delimit that name too.
When I retrieve data from the My Messages (with a space) table, I must
delimit the table name if I want the SELECT statement to run correctly. If you
omit the delimiters, as in the second select statement, you see the following
error message:
Msg 208, Level 16, State 1, Line 1
Invalid object name ‘My’.
There are no delimiters in the statement. However, because the name has a
space character, the name needs to be delimited to be a legal name. So you
can rewrite the query as
SELECT *
FROM [My Messages]
or
SELECT *
FROM “My Messages”
23
Chapter 2: Understanding Database Fundamentals
Other naming conventions
The company you work for might have its own
naming conventions. SQL Server naming con-
ventionsshouldworkwithoutproblemswithmost
company naming conventions. If you’re starting
from scratch, you might want to apply conven-
tions that help to remind you or your colleagues
whateachdatabaseobjectis,suchaspreceding
atablenamewithtblsothat theMyMessages
tableisnamedtblMyMessages. Similarly, you
might prefix a view with vw so that a view of
employees might be named vwEmployees.](https://image.slidesharecdn.com/for-220822032846-82be8eed/85/For-Dummies-Microsoft-SQL-Server-2005-Programming-For-Dummies-Apr-2007-pdf-42-320.jpg)


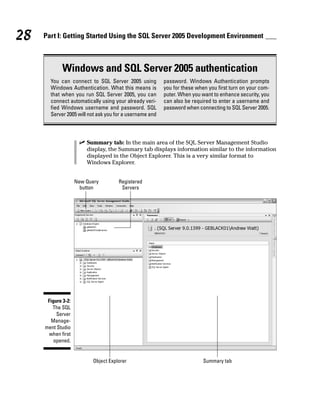


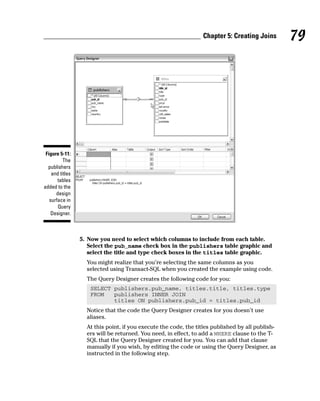
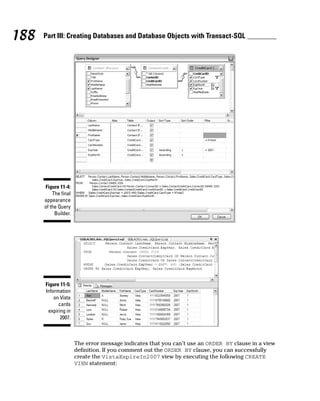
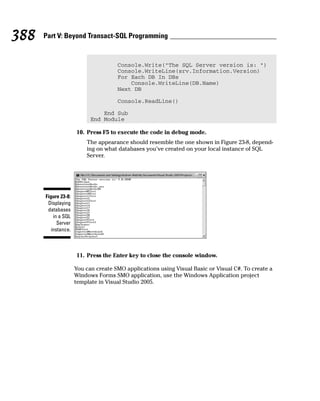
![11. To explore the database objects, navigate to the column names by
expanding the nodes (the + signs) in the following order: Databases➪
[database name]➪Tables➪[table name]. Explore the table objects as
desired.
For example, for the pubs database, follow this path to explore the columns
in the Publishers table: Databases➪Pubs➪Tables➪dbo.publishers folder➪
Columns. You should see an appearance similar to Figure 4-5. You might need
to scroll up or down in the Object Explorer to see all the information shown
in Figure 4-5.
In the example in the next section, the aim is to retrieve the name and coun-
try of the publishers in the pubs database. Before you can do this retrieval,
you need to inspect the information about columns in the dbo.publishers
table to determine the names of the relevant columns.
This technique is also useful when you come to insert, update, or delete
information from SQL Server 2005 databases. In that case, you often need to
know the data type of the data in the columns you work with.
Figure 4-5:
Displaying
information
about the
columns
of the
Publishers
table in
the pubs
database.
51
Chapter 4: Retrieving Data Using the SELECT Statement](https://image.slidesharecdn.com/for-220822032846-82be8eed/85/For-Dummies-Microsoft-SQL-Server-2005-Programming-For-Dummies-Apr-2007-pdf-70-320.jpg)
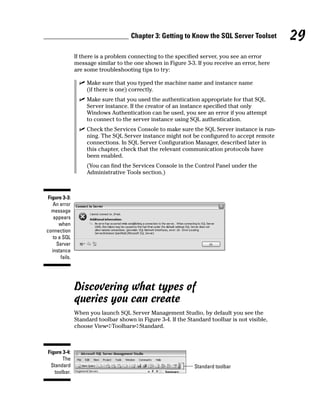
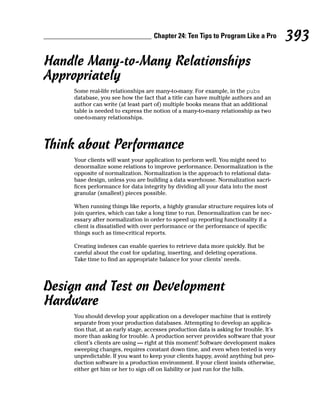
![Introducing the SELECT Statement
The SELECT statement is the Transact-SQL statement that retrieves, or
selects, data from a SQL Server database.
The following summarizes the forms that the SELECT statement can take:
SELECT [ALL | DISTINCT]
[TOP expression]
[<select_list>]
[FROM <table_source>]
[WHERE <search_condition>]
[GROUP BY group_by_expression]
[HAVING search_condition]
[ORDER BY order_by_expression]
The paired square brackets ([ ]) contain optional clauses. As you can see in
the preceding partial definition, almost everything, apart from the SELECT
statement itself, is optional. This illustrates how flexible the SELECT state-
ment can be. It also shows you that you need to think carefully about how you
use the SELECT statement because you have so many options available to
you. Table 4-1 describes the function of each part of the SELECT statement.
Table 4-1 SELECT Statement Clauses
Clause What It Does
FROM Specifies one or more tables to read data from.
WHERE Applies one or more filters rows accessed, retrieving only wanted
rows (or removing unwanted rows).
ORDER BY Resorts rows into a specific order.
GROUP BY Summarizes (or aggregates) rows into fewer rows, based on
some aggregate, such as a SUM function to add rows together for
duplicated values.
HAVING Works similar to the WHERE clause, applying a filtering mecha-
nism to rows. The HAVING clause applies to aggregated rows
returned from the GROUP BY clause. The WHERE clause applies
to rows returned from SELECT and FROM clauses.
In the remainder of the chapter, I explain in detail how to use the FROM, WHERE,
ORDER BY, GROUP BY, HAVING and WITH clauses, in tandem with the SELECT
statement.
52 Part II: Retrieving Data Using Transact-SQL](https://image.slidesharecdn.com/for-220822032846-82be8eed/85/For-Dummies-Microsoft-SQL-Server-2005-Programming-For-Dummies-Apr-2007-pdf-71-320.jpg)


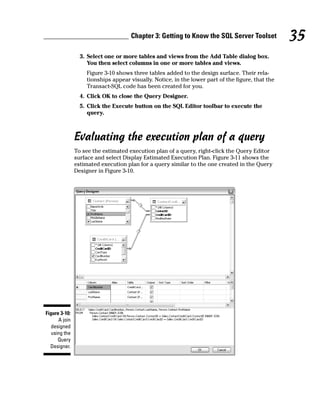
![Table 4-5 Wildcards
Wildcard What It Matches
% A string of zero or more characters
_ A single character
[] One of the characters inside the square brackets — characters
inside the square brackets are a character class
* [^] Any character not inside the square brackets
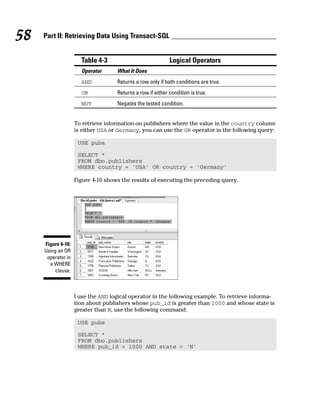
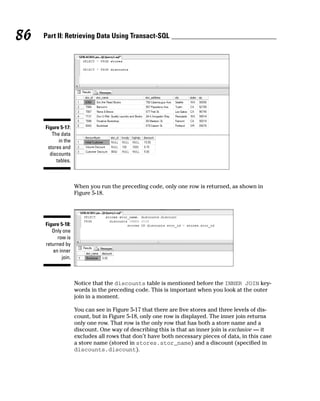
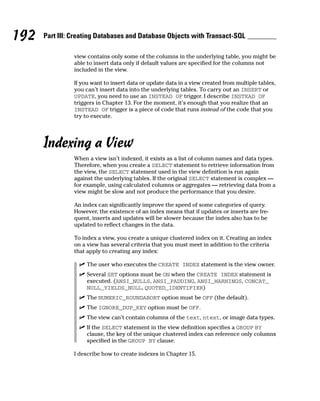
The following query matches publishers where the city begins with B. The
LIKE keyword is used, and B% means B followed by zero or more other char-
acters. In other words, words that begin with B.
USE pubs
SELECT *
FROM dbo.publishers
WHERE city LIKE ‘B%’
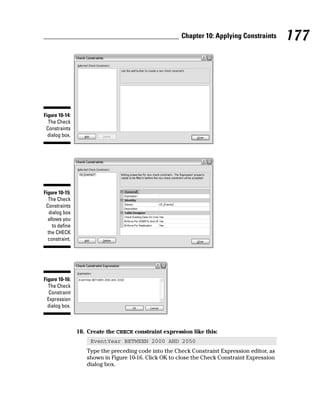
Figure 4-15 shows the results of executing the preceding query.
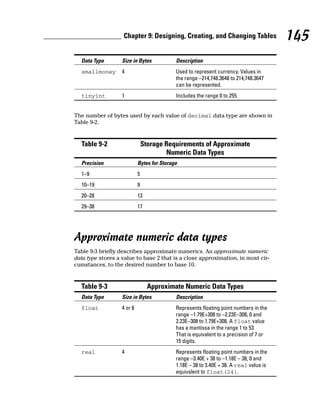
The following query finds publishers where the state begins with M or N.
USE pubs
SELECT *
FROM dbo.publishers
WHERE state LIKE ‘[MN]%’
Figure 4-16 shows the results of executing the preceding query.
Figure 4-15:
Using
the LIKE
keyword to
find cities
that begin
with B.
63
Chapter 4: Retrieving Data Using the SELECT Statement](https://image.slidesharecdn.com/for-220822032846-82be8eed/85/For-Dummies-Microsoft-SQL-Server-2005-Programming-For-Dummies-Apr-2007-pdf-82-320.jpg)


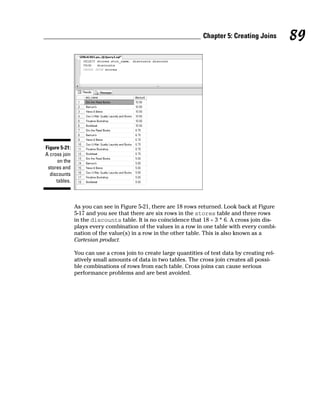


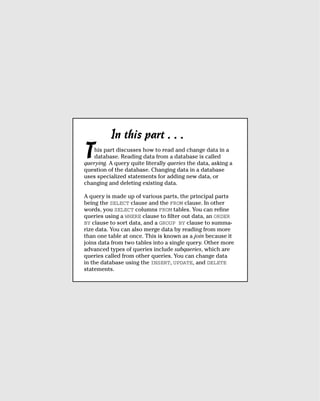
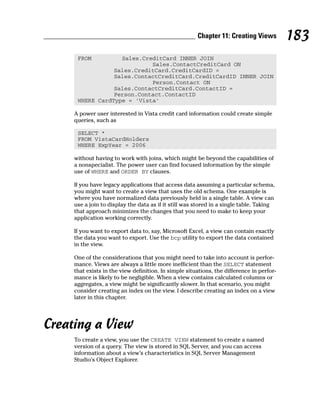
![Utilizing subqueries in multiple table joins can make the overall join query
easier to write and easier to decipher when a problem is encountered. How-
ever, execution performance may not necessarily be a benefit.
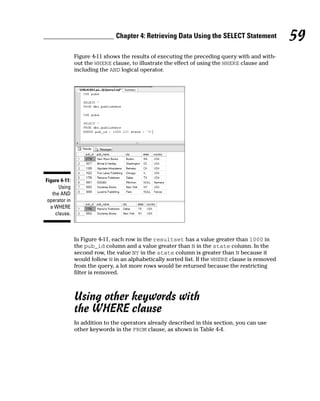
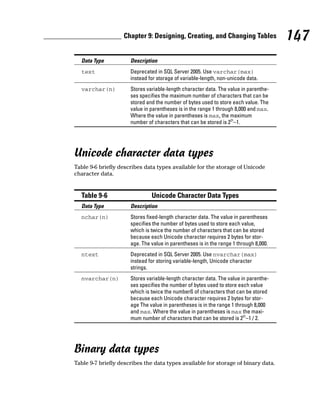
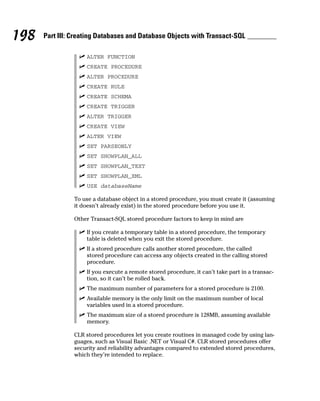
This example uses the Northwind database. Suppose you want to find out
which items were ordered on the last day that an order was placed. If you
know the date of the last order, you can put that date into the query as a lit-
eral value. If you don’t know when the last order was placed, you can find it
simply by using the MAX() function with the order date, assuming that the
Northwind database is the current database.
SELECT Max(OrderDate) FROM Orders
Figure 6-1 shows the result of executing the preceding statement.
After you find the most recent date that has an order, you can edit the date
into the query:
SELECT DISTINCT [Order Details].ProductID,
Orders.OrderDate
FROM Orders
JOIN [Order Details]
ON Orders.OrderID = [Order Details].OrderID
WHERE Orders.OrderDate = ‘1998-05-06’
ORDER BY ProductID
Notice that the name of the Order Details table has a space in it, so you
must delimit the table name when you use it in the query. You should see
that 27 rows are returned, indicating that 27 products were ordered on the
date of the most recent order.
In practice, it isn’t convenient to hand-edit code before running it. You saw
earlier that the MAX() function allows you to find the most recent order date.
Using a subquery, you can find the date of the most recent order and use that
value in the WHERE clause of the SELECT statement:
Figure 6-1:
Finding the
date of the
most recent
order in the
Orders table.
92 Part II: Retrieving Data Using Transact-SQL](https://image.slidesharecdn.com/for-220822032846-82be8eed/85/For-Dummies-Microsoft-SQL-Server-2005-Programming-For-Dummies-Apr-2007-pdf-111-320.jpg)
![SELECT DISTINCT [Order Details].ProductID,
Orders.OrderDate
FROM Orders
JOIN [Order Details]
ON Orders.OrderID = [Order Details].OrderID
WHERE Orders.OrderDate = (SELECT MAX(OrderDate) FROM
Orders)
ORDER BY Orders.OrderDate
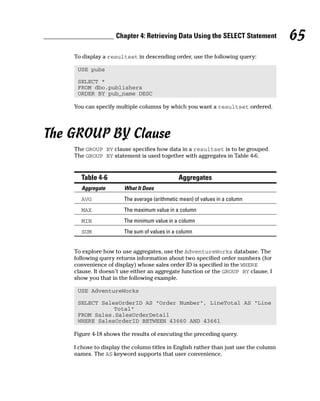
When you execute the preceding code, you get the same results as you see
when you hand code the date in the WHERE clause. Figure 6-2 shows part of
the results.
Suppose you want to identify the products ordered in the last seven days.
Modify the query as follows. Now, the subquery is used in an expression
inside the SELECT statement.
SELECT DISTINCT [Order Details].ProductID,
Orders.OrderDate
FROM Orders
JOIN [Order Details]
ON Orders.OrderID = [Order Details].OrderID
WHERE Orders.OrderDate > ((SELECT MAX(OrderDate) FROM
Orders) - 7)
ORDER BY [Order Details].ProductID
Notice the nested parentheses in the WHERE clause. The outer parentheses
ensure that the expression
(SELECT MAX(OrderDate) FROM Orders) – 7
Figure 6-2:
Using a
nested
subquery to
find the
most recent
order date.
93
Chapter 6: Creating Advanced Queries](https://image.slidesharecdn.com/for-220822032846-82be8eed/85/For-Dummies-Microsoft-SQL-Server-2005-Programming-For-Dummies-Apr-2007-pdf-112-320.jpg)


![CONVERT(datatype, expression)
You can specify a maximum length for the data type and specify a style for an
output date (if applicable) using the following form:
CONVERT(datatype [length], expression [, style])
If you don’t specify a value for length, the CONVERT() function assumes a
length of 30 characters.
As an example, try to output the contact ID for a contact using the following
code:
USE AdventureWorks_New
SELECT ‘The first contact has a contact ID of ‘ +
ContactID
FROM Person.Contact
WHERE ContactID = 1
When you execute the code, SQL Server attempts to automatically convert the
literal string in the first line of the code to the int data type. Not surprisingly,
that attempted data-type conversion fails. The error message displayed is
Msg 245, Level 16, State 1, Line 3
Conversion failed when converting the varchar value ‘The
first contact has a contact ID of ‘ to data
type int.
Notice that the failed automatic data type conversion is trying to do some-
thing appropriate — convert a string to an integer. To get the code to do what
you want, you need to convert the int data type of the ContactID column
to a varchar data type. To do that using the CAST() function, use the fol-
lowing code:
SELECT ‘The first contact has a contact ID of ‘ +
CAST(ContactID AS varchar(30) )
FROM Person.Contact
WHERE ContactID = 1
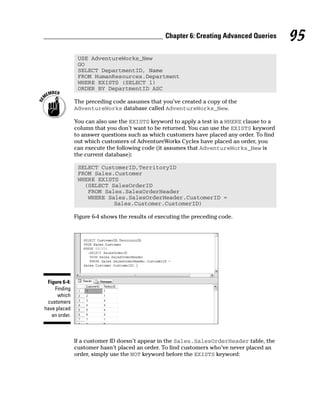
Figure 6-5 shows the results of executing the preceding code.
To achieve the same using the CONVERT() function, execute the following
code:
SELECT ‘The first contact has a contact ID of ‘ +
CONVERT(varchar(30), ContactID)
FROM Person.Contact
WHERE ContactID = 1
97
Chapter 6: Creating Advanced Queries](https://image.slidesharecdn.com/for-220822032846-82be8eed/85/For-Dummies-Microsoft-SQL-Server-2005-Programming-For-Dummies-Apr-2007-pdf-116-320.jpg)


![Figure 6-7 shows the results of executing the preceding SELECT statements.
The full list of style codes is shown in SQL Server Books Online (http://
msdn2.microsoft.com/en-us/library/ms130214.aspx).
Working with Common Table Expressions
A new feature in SQL Server 2005 is support for common table expressions. A
common table expression is a temporary result set that is used for some pur-
pose and is written as a WITH clause. To write a common table expression,
use this general form of syntax:
WITH expression_name [(column_names)]
AS
(common_table_expression_definition)
The preceding statement is then followed by, for example, a SELECT state-
ment that selects data from the temporary result set created using the WITH
statement.
The following code shows a simple use of a common table expression. The
code assumes that the AdventureWorks database is the current database.
WITH DirReps(ManagerID, DirectReports) AS
(
SELECT ManagerID, COUNT(*)
FROM HumanResources.Employee AS e
Figure 6-7:
European-
style
formatting
for a date
with and
without
time data.
100 Part II: Retrieving Data Using Transact-SQL](https://image.slidesharecdn.com/for-220822032846-82be8eed/85/For-Dummies-Microsoft-SQL-Server-2005-Programming-For-Dummies-Apr-2007-pdf-119-320.jpg)


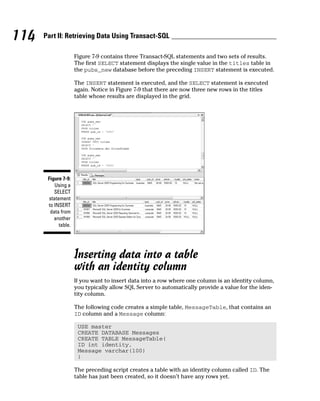
![Adding Data Using INSERT
You use the INSERT statement to put new data into a table. Specifically, the
INSERT statement adds a row to a table.
The INSERT statement takes the following general form:
INSERT [<columnName> [, <columnName2>]
VALUES (<value> [, <value2>])
When you insert data into a table, you need to match data types for the
columns in the tables that you want to insert data into. In other words, you
can’t try to add a string into an integer data type because the string can’t be
converted to a number. You can, however, add a number into a string because
a number can be interpreted as a sequence of alphanumeric characters.
You can review column information in the Object Explorer by expanding the
Databases node, then expanding the node for the database of interest (in this
case, the pubs_new database, which is a copy of the pubs database), expand
the Tables node, and then expand the node(s) for the individual tables that
you want to add data to.
Writing a basic INSERT statement
The INSERT statements I show you next add a listing for this book to the
pubs database. You need to add data to the authors, publishers,
titleauthor, and titles tables. You can’t add data first to the titles table
because its pub_id column is a column key. If you try it, you see the follow-
ing error message:
Msg 547, Level 16, State 0, Line 2
The INSERT statement conflicted with the FOREIGN KEY
constraint “FK__titles__pub_id__07020F21”. The conflict
occurred in database “pubs_new”, table
“dbo.publishers”, column ‘pub_id’.
The statement has been terminated.
This error happens because there is no value in the pub_id column in the
publishers database. You can’t specify a row that contains a column that is
a foreign key if the relevant primary key hasn’t been defined. See Chapter 5
for explanations of primary and foreign keys.
To add information about Wiley Publishing to the publishers table, use this
code in SQL Server Management Studio query pane:
111
Chapter 7: Manipulating Data](https://image.slidesharecdn.com/for-220822032846-82be8eed/85/For-Dummies-Microsoft-SQL-Server-2005-Programming-For-Dummies-Apr-2007-pdf-130-320.jpg)

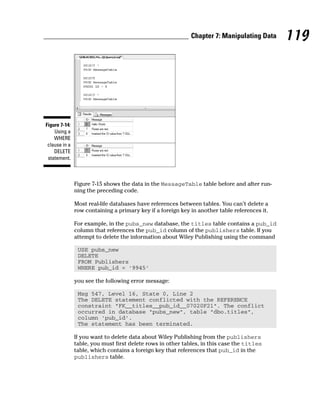
![Inserting data from another table
There is a form of the INSERT statement that allows you to load data in bulk
from another table. The command takes the general form:
INSERT [<columnList>]
INTO <sometable>
SELECT <some_columns>
FROM <another_table>
The values to insert are retrieved from another table using a SELECT state-
ment. Again, the column list for the INSERT statement is optional. If it is omit-
ted, then the SELECT statement must match the sequence of column names
and data types for all columns in the INSERT targeted table.
The following example shows how to add multiple rows from a table in
another database:
USE pubs_new
INSERT INTO titles
SELECT *
FROM TitleData.dbo.TitlesToAdd
Figure 7-8:
Retrieving
information
on the
newly
added title
using an
inner join.
113
Chapter 7: Manipulating Data
SQL Server identity columns
A SQL Server identify column is a specialized
sequence counter, sometimes known as an
auto counter. These types of columns are typi-
cally used to contain surrogate keys. It’s called
a surrogate key because it replaces the primary
key on a table. One of the reasons for using sur-
rogate keys is for better performance because
integer surrogate keys perform better than
strings. Another reason repeats an example
mentioned earlier in this book. What happens
when you have two customers with the same
name? You have to be able to tell them apart.
One solution is a surrogate key.](https://image.slidesharecdn.com/for-220822032846-82be8eed/85/For-Dummies-Microsoft-SQL-Server-2005-Programming-For-Dummies-Apr-2007-pdf-132-320.jpg)


![Changing Data Using UPDATE
An UPDATE statement allows you to change existing data. To execute an
UPDATE statement, you need update permissions on the table. If the UPDATE
statement contains a WHERE clause, you also need select permissions on the
table.
The UPDATE statement takes the following general form:
UPDATE <tableName>
SET <columnName> = <value> , [<columnName2> = <value2>]
[FROM <sourceTableName>]
[WHERE <condition>]
If you’ve been running all the examples in this chapter, there is only a single
row in the MessageTable table with the message Roses are red. To
change the message so it reads Roses are very red., execute the follow-
ing code.
UPDATE MessageTable
SET Message = ‘Roses are very red.’
WHERE ID = ‘7’
Figure 7-16 shows the data before and after running the preceding code.
You can update multiple columns at once. For example, take a look at the title
highlighted in Figure 7-17. To begin with, the type of this book is set to busi-
ness, and the year-to-date sales are NULL. The following UPDATE statement
changes two column values:
Figure 7-15:
Using the
WHERE
clause to
delete a set
of rows.
120 Part II: Retrieving Data Using Transact-SQL](https://image.slidesharecdn.com/for-220822032846-82be8eed/85/For-Dummies-Microsoft-SQL-Server-2005-Programming-For-Dummies-Apr-2007-pdf-139-320.jpg)


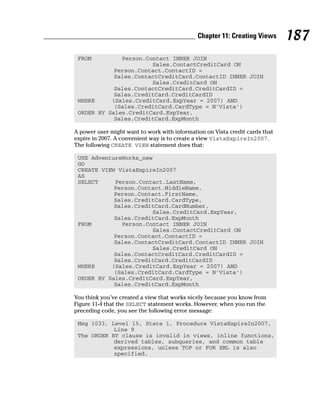
![Table 8-2 Optional Arguments for CREATE DATABASE
Argument What It Specifies
ON The location of the files that will be used to
create the database.
PRIMARY The location of the primary file(s).
LOG ON The location of the database log files.
COLLATE The default collation for the database.
FOR ATTACH Use existing files to create the database.
FOR ATTACH_REBUILD_LOG Use existing files to create the database and
rebuild any missing logs.
NAME A logical name for the database files
FILENAME The physical name (the drive location) for
the database files.
SIZE The initial size of the file. If absent, the size
of the new database is the size of the model
database for that SQL Server instance.
MAXSIZE The maximum size to which the database
files are allowed to grow.
UNLIMITED The file can grow until the hard drive is full
or until a 2TB limit is reached for log files or
16TB limit is reached for database files.
Every database you create in SQL Server 2005 has a primary (database) file
and a transaction log file.
If you simply create a database without specifying any of the options
described in Table 8-2, then default characteristics, names and, locations are
supplied. To view the default size in MB of a database, execute the following
code:
USE master
CREATE DATABASE SimpleTest
SELECT name, size, size*1.0/128 AS [Size in MBs]
FROM sys.master_files
WHERE name = N’SimpleTest’;
Figure 8-2 shows the results on one SQL Server 2005 instance. Depending on
the size of the data model database in the SQL Server instance where you
create a new database, the default size might vary from that shown. Any new
137
Chapter 8: Designing, Creating, and Altering Database Objects](https://image.slidesharecdn.com/for-220822032846-82be8eed/85/For-Dummies-Microsoft-SQL-Server-2005-Programming-For-Dummies-Apr-2007-pdf-156-320.jpg)


![Msg 547, Level 16, State 0, Line 1
The INSERT statement conflicted with the FOREIGN KEY
constraint “FK_Titles_Publishers”. The conflict
occurred in database “Chapter9Test2”, table
“dbo.Publishers”, column ‘PublisherID’.
The statement has been terminated.
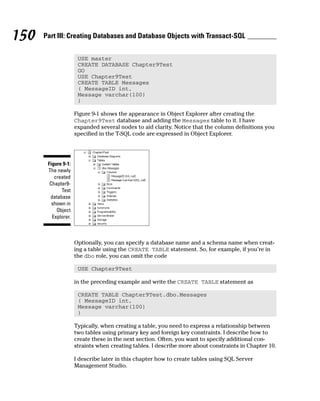
The ALTER TABLE Statement
So far in this chapter, you have seen tables created with the called CREATE
TABLE statement. You have also seen creation of tables in the SQL Server
Management Studio. Altering a table in SQL Server Management Studio is just
as easy as creating a new one. To alter a table in the Management Studio, you
simply right-click the table name in the Object Explorer and then select the
Modify option.
The ALTER TABLE statement allows you to change tables from the command
line, as a new query in the query window, or even using a tool such as SQLCMD
(which is described briefly in Chapter 3).
What specifically does the ALTER TABLE statement let you do?
⻬ Change default column settings.
⻬ Set a new identity column or alter an existing identity column.
⻬ Add one or more new columns.
⻬ Define, add, and drop constraints for a column or the entire table, or
both (see Chapter 10).
Speaking of changing constraints, the ALTER TABLE statement also allows
you to add and change primary and foreign key settings. From a metadata
perspective, referential integrity keys are in fact constraints. The very basic
syntax for the ALTER TABLE statement is of one of the following forms:
⻬ You can change an existing column:
ALTER TABLE <table_name>
(
ALTER COLUMN <column name>
<default or identity settings>
)
⻬ You can add one or more columns where the [, ... ] means that
one or more new columns can be added in the same ALTER TABLE
statement:
161
Chapter 9: Designing, Creating, and Changing Tables](https://image.slidesharecdn.com/for-220822032846-82be8eed/85/For-Dummies-Microsoft-SQL-Server-2005-Programming-For-Dummies-Apr-2007-pdf-180-320.jpg)
![ALTER TABLE <table_name>
(
ADD <column name> <optional constraint>
[, ... ]
)
⻬ You can drop an existing column:
ALTER TABLE <table_name>
(
DROP COLUMN <column name>
)
⻬ You can drop a constraint from an existing column without dropping the
column itself:
ALTER TABLE <table_name>
(
DROP CONSTRAINT <constraint name>
)
⻬ One of the most important things is that you can change a data type,
default values, NULL settings, and again-identity columns. Obviously, if a
column contains values, such as strings, you will not be allowed to
change the column to a numeric data type unless all string values are
numbers:
ALTER TABLE <table_name>
(
<column name> <data type>
DEFAULT <value>
NULL
NOT NULL
IDENTITY ...
)
⻬ And lastly, you can change referential integrity:
ALTER TABLE <table_name>
(
<column name> <data type> PRIMARY KEY
<column name> <data type> UNIQUE
<column name> <data type> REFERENCES
<table name> <optional column list>
)
In short, you can change a great deal using the ALTER TABLE statement. You
see some use of the ALTER TABLE statement in Chapter 10. However, when
doing this kind of thing yourself, I strongly recommend creating and changing
tables using the GUI tools in the Management Studio. It’s there to make your
life easier.
162 Part III: Creating Databases and Database Objects with Transact-SQL](https://image.slidesharecdn.com/for-220822032846-82be8eed/85/For-Dummies-Microsoft-SQL-Server-2005-Programming-For-Dummies-Apr-2007-pdf-181-320.jpg)


![The body of a function consists of one of the following parts:
⻬ One or more Transact-SQL statements when the function is a Transact-
SQL function
⻬ A reference to a .NET assembly when the function is a CLR function
The following is a simple form of the syntax of the CREATE FUNCTION state-
ment to return a scalar value. Notice that this form of the syntax doesn’t take
any parameters:
CREATE FUNCTION [schemaName.]<function_name>
RETURNS <return_datatype>
AS
BEGIN
<Transact-SQL_statements>
RETURNS <scalar_datatype>
END
The following example creates a user-defined function that returns the aver-
age price of products in the dbo.Products table in the Northwind database.
The following instructions assume that you have the Northwind sample data-
base installed:
1. Create a new query in SQL Server Management Studio.
2. Execute the following command to ensure that you’re working with
the Northwind database:
USE Northwind
3. Create the user-defined function dbo.FindAveragePrice() by exe-
cuting the following code:
CREATE FUNCTION dbo.FindAveragePrice()
RETURNS money
WITH SCHEMABINDING
AS
BEGIN
RETURN (SELECT avg(UnitPrice) FROM dbo.Products)
END
4. Use the function to display the average price for products in the
table. Execute the following code. Notice that you use the dbo.
FindAveragePrice() function inline in a SELECT statement:
SELECT dbo.FindAveragePrice() AS “Average Price”
5. Display products with prices greater than the average price by using
the following code:
SELECT ProductName, UnitPrice
FROM dbo.Products
WHERE UnitPrice > dbo.FindAveragePrice()
ORDER BY UnitPrice
230 Part III: Creating Databases and Database Objects with Transact-SQL](https://image.slidesharecdn.com/for-220822032846-82be8eed/85/For-Dummies-Microsoft-SQL-Server-2005-Programming-For-Dummies-Apr-2007-pdf-249-320.jpg)

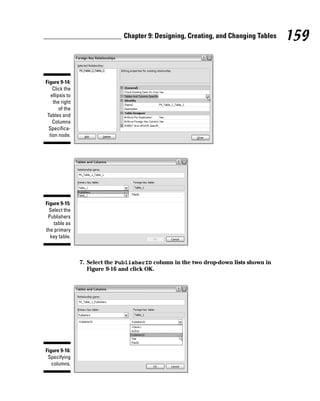
![Figure 14-2 displays the list of products, the average price, and the difference
from the average of each unit price.
To create a function that returns a table, use this form of the syntax of the
CREATE FUNCTION statement:
CREATE FUNCTION [schemaName.]<functionname>()
RETURNS TABLE
AS
RETURN (<statement(s)_to_define_table)
The following function retrieves customers for a specified country:
CREATE FUNCTION dbo.GetCustomersByCountry(@Country
nvarchar(15))
RETURNS TABLE
RETURN (
SELECT CompanyName, ContactName, City, Country
FROM dbo.Customers
WHERE Country = @Country
)
Notice that the dbo.GetCustomersByCountry() function takes a parame-
ter, @Country, which is an nvarchar(15). You select the data type of the
parameter based on the data type of the Country column in the Customers
table. Notice that the @Country parameter is used in the WHERE clause in the
SELECT statement that defines the table to be returned.
Figure 14-2:
Use two
functions to
display the
average
price and
the
difference
from the
average.
232 Part III: Creating Databases and Database Objects with Transact-SQL](https://image.slidesharecdn.com/for-220822032846-82be8eed/85/For-Dummies-Microsoft-SQL-Server-2005-Programming-For-Dummies-Apr-2007-pdf-251-320.jpg)
![You can use the table-valued function as you would an ordinary table. For
example, you can retrieve data from it by using a SELECT statement:
SELECT *
FROM dbo.GetCustomersByCountry(‘France’)
Notice that the literal value, France, is supplied as a parameter to the func-
tion in the preceding code. Figure 14-3 shows the results of executing the pre-
ceding statement.
Altering and Dropping Functions
To alter a user-defined function, use the ALTER FUNCTION statement. To
delete a user-defined function, use the DROP FUNCTION statement.
Altering a function has the advantages that permissions aren’t changed and
that any dependent stored procedures, functions, or triggers are unaffected.
If you delete a function and create it again, you have to grant any necessary
permissions and make any necessary alterations to dependent stored proce-
dures, functions, or triggers. To alter a scalar-valued function, use the ALTER
FUNCTION statement as follows.
ALTER FUNCTION [<schema_name>.]<function_name>
<parameter_name> [AS] <parameter_datatype>
RETURNS <return_datatype>
BEGIN
<Transact-SQL statement(s)>
RETURN <scalar_expression>
END
Figure 14-3:
Selecting
data from a
table-valued
function
with a
SELECT
statement.
233
Chapter 14: Creating Functions](https://image.slidesharecdn.com/for-220822032846-82be8eed/85/For-Dummies-Microsoft-SQL-Server-2005-Programming-For-Dummies-Apr-2007-pdf-252-320.jpg)
![To delete a function, use the DROP FUNCTION statement with the function
name:
DROP FUNCTION [<schema_name>.]<function_name>
Using System Functions
The built-in system functions in SQL Server 2005 provide a great range of
functionality that you can use in your Transact-SQL code. However, that func-
tionality, although very useful, is fixed. You cannot modify system functions,
for example, by using the ALTER FUNCTION statement. SQL Server system
functions are either deterministic or non-deterministic. A deterministic func-
tion always returns the same value when the function is called with the same
input values, whatever the other circumstances (for example, the state of the
database) at the time of the function call. For example, the command
SELECT Sum (1 + 1)
uses the Sum() function to add two integers. The command always returns
the same result and is, therefore, deterministic. However, the command
SELECT GetDate()
uses the GetDate() function to return the current date and time and then
returns a different time every time you run it (assuming that you don’t run it
twice in the same millisecond). Clearly, the date and time returned by
GetDate() doesn’t depend on database state. Therefore, the Sum() function
is deterministic, and the GetDate() function is non-deterministic.
SQL Server 2005 provides an extensive range of system functions that you
can use in your code. To explore the system functions available to you in any
particular database, follow these steps:
1. Start SQL Server Management Studio and open the Object Explorer if
it isn’t already visible by choosing View➪Object Explorer.
2. Expand the Databases node and then expand the Northwind node.
3. Expand the Programmability, Functions, and System Functions
nodes.
The appearance is similar to Figure 14-4.
234 Part III: Creating Databases and Database Objects with Transact-SQL](https://image.slidesharecdn.com/for-220822032846-82be8eed/85/For-Dummies-Microsoft-SQL-Server-2005-Programming-For-Dummies-Apr-2007-pdf-253-320.jpg)


![Table 14-6 (continued)
Function Description Syntax/Example
@@Procid() Returns the stored SELECT @@PROCID
procedure identifica-
tion number of the
current stored
procedure.
Sql_Variant_ Returns the values SELECT SQL_VARIANT_
Property() of the properties of PROPERTY
a Sql_variant ( expression ,
value. property )
Typeproperty() Returns the value of SELECT TYPEPROPERTY
a property of a data (type , property)
type.
The “other” functions (Object Explorer terminology) in Table 14-7 are sup-
ported in SQL Server 2005.
Table 14-7 “Other” Functions
Function Description Syntax/Example
App_Name() Returns the application name SELECT APP_NAME()
of the current session.
Cast() Explicitly converts an expres- SELECT (expression
sion from one data type to AS datatype)
another.
Coalesce() Returns the first not NULL SELECT COALESCE
expression in its arguments. (expression,
[, ... ])
Collation Returns the value of a SELECT COLLATION
Property() specified property of a PROPERTY(collation,
collation. property)
Columns_ Returns a varbinary bit SELECT COLUMNS_
Update() pattern, which indicates UPDATED()
which columns of a table or
view were inserted or
updated.
Convert() Explicitly converts an expres- SELECT CONVERT
sion from one data type (datatype,
to another. expression)
244 Part III: Creating Databases and Database Objects with Transact-SQL](https://image.slidesharecdn.com/for-220822032846-82be8eed/85/For-Dummies-Microsoft-SQL-Server-2005-Programming-For-Dummies-Apr-2007-pdf-263-320.jpg)


![Function Description Syntax/Example
Suser_Sid() Returns the security SELECT SUSER_SID
identification number for (login)
a specified login.
Suser_Sname() Returns the login name SELECT SUSER_SNAME
for a specified security (server_user_sid)
identification number.
User() Returns a user’s data- SELECT USER
basename.
User_Id() Returns a user’s identifi- SELECT USER_ID(user)
cation number.
User_Name() Returns a user’s SELECT USER(id)
username.
Table 14-10 lists which string functions are supported in SQL Server 2005.
Table 14-10 String Functions
Function Description Syntax/Example
Ascii() Returns the ASCII code SELECT ASCII
for the leftmost character (expression)
in an expression.
Char() Converts an integer SELECT ASCII
ASCII code to a (integer)
character.
Charindex() Returns the starting posi- SELECT CHARINDEX
tion of an expression in (expression1,
a string. expression2
[,start])
Difference() Returns the difference in SELECT DIFFERENCE
Soundex values of two (expression,
expressions as an integer. expression)
Left() Returns the leftmost speci- SELECT LEFT
fied number of characters (expression,
from an expression. integer)
Len() Returns the number of SELECT LEN
characters in a string. (expression)
249
Chapter 14: Creating Functions
(continued)](https://image.slidesharecdn.com/for-220822032846-82be8eed/85/For-Dummies-Microsoft-SQL-Server-2005-Programming-For-Dummies-Apr-2007-pdf-268-320.jpg)


![the world, it might need to be in use almost continuously. In that kind of situ-
ation where you cannot afford for the table to be unavailable, the ONLINE
option is likely the way to go.
You cannot create an index on columns of the following data types as
key columns:
⻬ ntext
⻬ text
⻬ image
⻬ varchar(max)
⻬ nvarchar(max)
⻬ varbinary(max)
You can use an xml data type as a key only in an XML index. I discuss XML
programming in Chapter 20.
The CREATE INDEX statement looks like the following:
CREATE [ UNIQUE ] [ CLUSTERED | NONCLUSTERED ] INDEX
<index_name>
ON <table_or_view> ( <column_list> )
[ INCLUDE ( <column_list>) ]
[ WITH ( <relational_index_options> ) ]
[ ON { partition_scheme_name ( column_name ) |
filegroup_name
| default
The CREATE INDEX statement supports several options, as described in
Table 15-1.
Table 15-1 Options Supported by CREATE INDEX
Option Description
PAD_INDEX Sets the percentage of free space in intermediate-level
pages during index creation.
FILLFACTOR Sets the percentage of free space in leaf-level pages
during index creation.
SORT_IN_TEMPDB Specifies whether intermediate search results generated
during index creation are stored in the tempdb database.
(continued)
261
Chapter 15: Creating Indexes](https://image.slidesharecdn.com/for-220822032846-82be8eed/85/For-Dummies-Microsoft-SQL-Server-2005-Programming-For-Dummies-Apr-2007-pdf-280-320.jpg)


![You can create indexes with included columns. An included column is a
column that is part of a nonclustered index and is not a key column. An
included column is created using the INCLUDE keyword in the CREATE
INDEX statement. The CREATE INDEX statement to create an index that has
an included column has this general form:
CREATE INDEX <index_name>
ON <table_name> (<column_list>)
INCLUDE (<included_column_name>)
When you consider creating an index with one or more included columns,
the following considerations apply:
⻬ You can define an included column on a nonclustered index for a table
or for an indexed view. You cannot define an included column in a
clustered index.
⻬ The text, ntext, and image data types are not allowed. An included
column can be of any other SQL Server 2005 data type.
⻬ If a computed column is deterministic, it can be an included column.
⻬ A column cannot be both a key column and an included column.
Altering an Index
To alter an index, use the ALTER INDEX statement. To execute the ALTER
INDEX statement, you must have at least ALTER permissions on the table or
view whose index is to be altered.
ALTER INDEX { <index_name> | ALL }
ON <table_name>
REBUILD
[ WITH ( <rebuild_index_options> ) ]
Figure 15-2:
Finding the
number of
bytes used
by key
columns.
264 Part III: Creating Databases and Database Objects with Transact-SQL](https://image.slidesharecdn.com/for-220822032846-82be8eed/85/For-Dummies-Microsoft-SQL-Server-2005-Programming-For-Dummies-Apr-2007-pdf-283-320.jpg)


![⻬ default_database_name The default database for the principal.
The data type is sysname.
⻬ default_language-name The default language for the principal.
The data type is sysname.
⻬ credential_id The ID of any credential associated with the
principal. The data type is int. If no credential is associated with the
principal, the value is NULL.
⻬ is_policy_checked Specifies whether the password policy is
checked. The data type is bit.
⻬ is_expiration_checked Specifies whether expiration of the
password is checked. The data type is bit.
⻬ password_hash A hash of the password for the SQL Server login.
I discuss users in more detail in Chapter 19.
Adding Logins
To add a login to a SQL Server 2005 instance, use the CREATE LOGIN
statement or use Object Explorer in SQL Server Management Studio.
The simplest form of the CREATE LOGIN statement supplies the login name
and a password:
CREATE LOGIN <login_name>
WITH PASSWORD = ‘somePassword’
For example, to create a login, Alan, with a password, execute the following
command:
CREATE LOGIN Alan
WITH PASSWORD = ‘abc123!”’
To specify that the login must change the password when first logging in, add
MUST CHANGE:
CREATE LOGIN Alan
WITH PASSWORD = ‘abc123!”’ MUST_CHANGE
To create a login from a Windows domain account, use this form:
CREATE LOGIN [DomainNameUserName]
FROM WINDOWS
288 Part IV: Programming SQL Server Security](https://image.slidesharecdn.com/for-220822032846-82be8eed/85/For-Dummies-Microsoft-SQL-Server-2005-Programming-For-Dummies-Apr-2007-pdf-307-320.jpg)

![6. Optionally, specify a default database and default language for the
login. Click OK to close the dialog box.
The Login – New dialog box contains a check box called User Must Change
Password at Next Login. Microsoft uses the word user in the name of this
check box, but they mean login, in my view. The term login refers to the
mixed-mode login through Windows, SQL Server, or both.
To alter a login, use the ALTER LOGIN statement or use the Properties dialog
box accessible from Object Explorer for an existing login. The ALTER LOGIN
statement can be used to change login properties, as shown in the following
syntax. For example, you can disable a login to prevent the person from log-
ging in to SQL Server:
ALTER LOGIN <login_name> DISABLE
And you can reenable that disabled login at a later date:
ALTER LOGIN <login_name> ENABLE
You can also change the login’s password and specify the new password
against the old password:
ALTER LOGIN WITH PASSWORD = ‘password’
[OLD PASSWORD = ‘oldpassword’]
You can even change the name of the login you are altering:
ALTER LOGIN WITH NAME = <login_name>
To delete a login, use the DROP LOGIN statement or right-click an existing
login in Object Explorer. Then select the Delete option in the context menu.
The DROP LOGIN statement has very simple syntax:
DROP LOGIN <login_name>
Understanding Schemas and Users
Schemas and users are both database-level principals. In SQL Server 2005,
there is a significant change from SQL Server 2000 — schemas and users are
no longer interchangeable. In SQL Server 2005, a schema is a namespace that
exists independently of the user who created it. A schema is, essentially, a
container for objects in a database.
290 Part IV: Programming SQL Server Security](https://image.slidesharecdn.com/for-220822032846-82be8eed/85/For-Dummies-Microsoft-SQL-Server-2005-Programming-For-Dummies-Apr-2007-pdf-309-320.jpg)


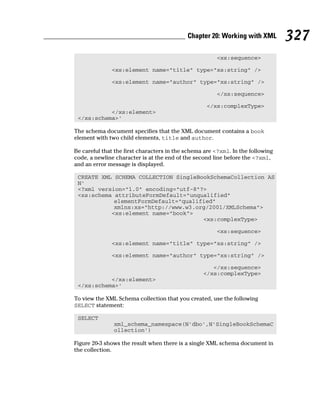
![The following error message is displayed. The Location indicates that a
publisher element is present and wasn’t expected, according to the
schema. The final line of the error message is an XPath (XML Path language)
location path, which specifies where the unexpected element occurs.
Msg 6923, Level 16, State 1, Line 1
XML Validation: Unexpected element(s): publisher.
Location: /*:book[1]/*:publisher[1]
If you remove the publisher element, the XML document inserts as
expected. However, you might want to accept XML documents that also
have a publisher element.
One approach is to add another XML schema collection, by executing the
following code:
CREATE XML SCHEMA COLLECTION SingleBookSchemaCollection2
AS
N’<?xml version=”1.0” encoding=”utf-16”?>
<xs:schema attributeFormDefault=”unqualified”
elementFormDefault=”qualified”
xmlns:xs=”http://www.w3.org/2001/XMLSchema”>
<xs:element name=”book”>
<xs:complexType>
<xs:sequence>
<xs:element name=”title” type=”xs:string” />
<xs:element name=”author” type=”xs:string” />
<xs:element name=”publisher”
type=”xs:string” minOccurs=”0” maxOccurs=”1” />
</xs:sequence>
</xs:complexType>
</xs:element>
</xs:schema>’
Notice in the xs:element element the minOccurs and maxOccurs attrib-
utes that define the minimum and maximum allowed occurrences of the
publisher element.
You then use the ALTER TABLE statement to alter the BookInfo column to
use the SingleBookSchemaCollection2 XML schema collection:
ALTER TABLE BooksTyped
ALTER COLUMN BookInfo xml(SingleBookSchemaCollection2)
329
Chapter 20: Working with XML](https://image.slidesharecdn.com/for-220822032846-82be8eed/85/For-Dummies-Microsoft-SQL-Server-2005-Programming-For-Dummies-Apr-2007-pdf-348-320.jpg)


![The following UPDATE statement shows how to add a publisher element
as last.
UPDATE Books
SET BookInfo.modify(‘insert <publisher>Wiley
Publishing</publisher>
as last
into (/book)[1]’)
Execute the following statement to show the modified rows in the Books
table.
SELECT *
FROM Books
Figure 20-6 shows the XML document returned for one row in the results.
To insert an ISBN element after the author element, use the following
command:
UPDATE Books
SET BookInfo.modify(‘insert <ISBN>Not yet known.</ISBN>
after (/book/author)[1]
‘)
Confirm the successful inserts using the following command:
SELECT *
FROM Books
Figure 20-7 shows the XML document with an ISBN element added.
Figure 20-6:
A publisher
element
added to
an XML
document.
333
Chapter 20: Working with XML](https://image.slidesharecdn.com/for-220822032846-82be8eed/85/For-Dummies-Microsoft-SQL-Server-2005-Programming-For-Dummies-Apr-2007-pdf-352-320.jpg)
![To delete the publisher element, use the following statement:
UPDATE Books
SET BookInfo.modify(‘delete /book/publisher’)
Confirm the successful deletion by executing the following code:
SELECT *
FROM Books
Click the XML document in the second row. Figure 20-8 shows that the
publisher element has been deleted.
To replace the value of the ISBN element for all rows in the Books table,
execute this statement:
UPDATE Books
SET BookInfo.modify(‘replace value of
(/book/ISBN/text())[1]
with “07645774227” ‘)
Execute the following statement to confirm that the data has changed:
SELECT *
FROM Books
Figure 20-8:
The
publisher
element
has been
deleted.
Figure 20-7:
An ISBN
element has
been added
after the
author
element.
334 Part V: Beyond Transact-SQL Programming](https://image.slidesharecdn.com/for-220822032846-82be8eed/85/For-Dummies-Microsoft-SQL-Server-2005-Programming-For-Dummies-Apr-2007-pdf-353-320.jpg)


![6. Click the DataSet option in the Add New Item dialog box. Name the
data set MessagesDataSet and click OK to close the Add New Item
dialog box.
A new item, MessagesDataSet.xsd, is added to Solution Explorer.
A design interface for you to design the data set is displayed in the
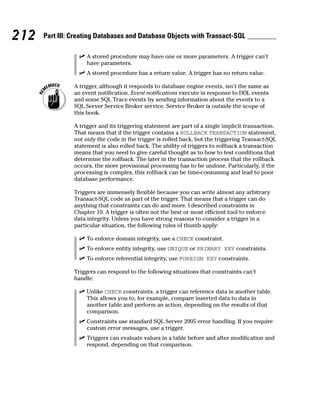
main part of the Visual Studio design surface.
7. In Server Explorer, expand the nodes for the Chapter22 database
and the Tables node. Hover the mouse pointer over the node for the
Messages table (as shown in Figure 22-25).
8. Drag the table to the design surface for the data set. On the data
set design surface, you should see a shape like the one shown in
Figure 22-26.
9. Click the tab labeled Form1.vb[Design] to return to the Windows
Form design surface.
10. Click the Windows Form, if necessary, to display the handles on the
outer edge of the form. Drag the handle on the right edge of the form
to the right.
Figure 22-26:
The data
set and the
data table
adapter on
the data
set design
surface.
Figure 22-25:
Mouse the
Messages
table prior
to dragging
it to the data
set design
surface.
367
Chapter 22: Using Visual Studio 2005](https://image.slidesharecdn.com/for-220822032846-82be8eed/85/For-Dummies-Microsoft-SQL-Server-2005-Programming-For-Dummies-Apr-2007-pdf-386-320.jpg)


![• Symbols •
* (asterisk) wildcard character, 54, 60, 63
[^] (caret inside square brackets) wildcard
character, 63
= (equality) comparison operator, 56
> (greater than) comparison operator, 56
>= (greater than or equal to) comparison
operator, 56
!= (inequality) comparison operator, 56
<> (inequality) comparison operator, 56
< (less than) comparison operator, 56
<= (less than or equal to) comparison
operator, 56
% (percent sign) wildcard character, 63
[ ] (square brackets)
SELECT statement, 52
wildcard characters, 63
_ (underscore) wildcard character, 63
• A •
Abs() function, 239
accessing system stored procedures, 194–195
Acos() function, 239
adding
logins, 288–290
users, 293–296
administration, 16
AdventureWorks database, 19, 43
AFTER trigger, 209–210, 213–220
aggregate functions, 236
aggregates, 65
aliases for table names, 76–77
ALLOW_PAGE_LOCKS option (CREATE INDEX
statement), 262
ALLOW_ROW_LOCKS option (CREATE INDEX
statement), 262
ALTER ASYMMETRIC KEY statement, 315
ALTER AUTHORIZATION statement, 293
ALTER DATABASE statement, 139
ALTER FUNCTION statement, 233
ALTER INDEX statement, 264–265
ALTER LOGIN statement, 290
ALTER MASTER KEY statement, 311–312
Alter() method, 378
ALTER PROCEDURE statement, 205
ALTER ROLE statement, 303
ALTER SERVICE MASTER KEY statement, 309
ALTER SETTINGS permissions, 346
ALTER TABLE statement, 161–162
ALTER USER statement, 292
alternatives to Transact-SQL (T-SQL), 24
Analysis Services Data Mining Expressions
(DMX query), 30
Analysis Services Multidimensional
Expressions (MDX) query, 30
Analysis Services XMLA query, 30
AND logical operator, 58–59
application roles, 303–304
App_Name() function, 244
approximate numeric data types, 20, 145–146
AS keyword, 65, 77
Ascii() function, 249
Asin() function, 239
assembly, 343, 348–350
assigning
permissions, 297–300
privileges, 298
roles, 302–303
associating users with logins, 295–296
asterisk (*) wildcard character, 54, 60, 63
asymmetric keys, 312–315
Atan() function, 240
Atn2() function, 240
AttachDatabase() method, 378
attributes, 128–129
authentication, 27–28, 289
auto counter, 113
AVG aggregate, 65
avg() function, 236, 253–254
• B •
BACKUP DATABASE permission, 298
BACKUP LOG permission, 298
BACKUP MASTER KEY statement, 311
BACKUP SERVICE MASTER KEY statement,
309–310
BEGIN TRANSACTION statement, 122
BETWEEN keyword, 60–61
bigint data type, 144
Index](https://image.slidesharecdn.com/for-220822032846-82be8eed/85/For-Dummies-Microsoft-SQL-Server-2005-Programming-For-Dummies-Apr-2007-pdf-418-320.jpg)
![binary data types, 20, 148
binary_checksum() function, 236
binary(n) data type, 148
bit data type, 144
Books Online, 10, 39–42, 100, 395–396
B-tree (binary tree), 257
budgeting time, 392
Business Intelligence Development Studio,
39, 351
Business Intelligence Web site, 397
business rules
constraints, 12, 163–178
CREATE RULE permission, 298
triggers, 11, 209–223
• C •
caret inside square brackets ([^]) wildcard
character, 63
cartesian product, 89
case sensitivity, 142
Cast() function, 96–100, 244
catalog views, 286, 313–314
causes of errors, 267–268
Ceiling() function, 240
Certificate object, 18
certificates, 312–314, 316–317
changing
default schema for a user, 292
ownership of a schema, 293
Channel 9 Web site, 398
Char() function, 249
character data types, 21, 146–147
Charindex() function, 249
char(n) data type, 146
CHECK constraint, 164, 173–178
checking installation status of SQLCMD
utility, 36
checksum() function, 236
checksum_agg() function, 236
CLOSE MASTER KEY statement, 312
CLR (Common Language Runtime). See
Common Language Runtime (CLR)
clustered index, 257–260
Coalesce() function, 244
Code Access Security, 344
Code Editor, 30
code templates, 31–33
Collation_Property() function, 244
Col_Length() function, 242
Col_Name() function, 242
column-level constraints, 179–180
ColumnProperty() function, 242
columns
creating, 149, 156
data types, 143
identity column, 113–116, 151–152
maximum number of bytes in key columns,
262–264
modifying, 161–162
naming, 142–143
Columns_Update() function, 244
combining comparison operators, 57–58
COMMIT TRANSACTION statement, 122
Common Language Runtime (CLR)
advantages of using, 342–343
Code Access Security, 344
configuring SQL Server 2005 for CLR,
345–347
defined, 341–342
enabling, 345–347
functions, 227–228
Microsoft Intermediate Language
(MSIL), 344
security, 344
stored procedures, 198
common table expressions, 100–104
CompareUrn() method, 378
comparison operators, 56–58
Compatibility Level object, 18
compatibility levels, 21
configuration functions, 237
configuring
network protocols, 37–38
security settings, 284–286
SQL Server 2005 for CLR, 345–347
connecting, 27–29, 285
@@Connections function, 251
constraints
CHECK, 164, 173–178
column-level, 179–180
DEFAULT, 164, 168–170
defined, 12, 163
deleting, 178–179
integrity of data, 163
NOT NULL, 163–168
PRIMARY KEY, 70–71, 164
REFERENCES, 164
table-level, 179–180
UNIQUE, 163–164, 170–173
CONTAINS keyword, 60–62
Containstable() function, 247
controlling transactions, 122
Convert() function, 96–100, 244
400 SQL Server 2005 Programming For Dummies](https://image.slidesharecdn.com/for-220822032846-82be8eed/85/For-Dummies-Microsoft-SQL-Server-2005-Programming-For-Dummies-Apr-2007-pdf-419-320.jpg)


![schemas
changing ownership of, 293
creating, 292–293
default schema, 292
defined, 290–291
deleting, 293
dropping, 293
separation from users, 290–291
XML schema collections, 326–330
Scope_Identity() function, 246
searching
SQL Server Books Online, 42
stored procedures, 195–197
second normal form, 134–135
security
catalog views, 286
Common Language Runtime (CLR), 344
configuring security settings, 284–286
encryption, 307–317
importance of, 10, 12–13
logins, 13
malicious code, 13
permissions, 297–302
privileges, 298, 302
SQL injection attacks, 13, 200, 207
SQL Server Surface Area Configuration tool,
284–286
stored procedures, 200, 207
suggested security measures, 284
users, 13
viewing information about, 286
views, 190–191
Windows Authentication, 28
security functions, 248–249, 304–305
SELECT permission, 298–300
SELECT statement
asterisk (*) wildcard, 54
forms of, 52
FROM clause, 52–55
GROUP BY clause, 52, 65–67
HAVING clause, 52, 67
joins, 73–89
optional clauses, 52
ORDER BY clause, 52, 64–65
square brackets ([ ]), 52
uses of, 10, 47
WHERE clause, 52, 55–64
selecting
servers, 106–107
templates, 32
sequence counter, 113
Server Explorer (Visual Studio 2005), 352–356
Server Management Objects (SMO). See SMO
(Server Management Objects)
Server object, 17, 375–381
server-level security catalog views, 286
@@Servername function, 237
SERVERPROPERTY() function, 31
Server_property() function, 246
servers
connecting to, 27–29
selecting, 106–107
service master key, 308–310
@@Servicename function, 237
services
managing, 37–38
SQL Server Agent service, 108–110
session key, 308
Sessionproperty() function, 246
Session_User function, 247, 304
SetDefaultInitFields() method, 381
SETUSER function, 305
severity of errors, 268
Sign() function, 241
Sin() function, 241
smalldatetime data type, 146
smallint data type, 144
smallmoney data type, 145
SMO (Server Management Objects)
Certificate object, 18
Compatibility Level object, 18
Database object, 17
Default object, 18
DefaultFileGroup object, 18
DefaultSchema object, 18
defined, 17–18
LogFile object, 18
Login object, 17
namespaces, 374
navigating, 51
object model, 374–375
Owner object, 18
Role object, 18
Schema object, 18
Server object, 17, 375–381
SMO applications, 381–388
SqlAssembly object, 18
SQL-DMO (SQL Server Distributed
Management Objects), 373
StoredProcedure object, 18
Table object, 17–19
Trigger object, 18
User object, 17
View object, 18
Visual Basic.NET, 373
Visual C#, 373
Solution Explorer (Visual Studio 2005),
362–364
412 SQL Server 2005 Programming For Dummies](https://image.slidesharecdn.com/for-220822032846-82be8eed/85/For-Dummies-Microsoft-SQL-Server-2005-Programming-For-Dummies-Apr-2007-pdf-431-320.jpg)
![SORT_IN_TEMPDB option (CREATE INDEX
statement), 261
Soundex() function, 250
Space() function, 251
sp_addmessage system stored
procedure, 272
sp_adduser system stored procedure, 294
sp_configure system stored
procedure, 345–346
specifying template parameter values, 33
sp_setapprole system stored
procedure, 304
SQL Editor toolbar, 33–34
SQL injection attacks, 13, 200, 207
SQL Management Object method of
transferring data, 107
SQL Server Agent service, 108–110
SQL Server Authentication, 27
SQL Server Books Online, 10, 39–42, 100,
395–396
SQL Server Configuration Manager, 37–38,
50, 108
SQL Server Developer Center Web site, 397
SQL Server Distributed Management Objects
(SQL-DMO), 373
SQL Server Management Studio
Code Editor, 30
Copy Database Wizard, 105–110
launching, 26–27
New Query button, 30
Object Explorer pane, 27–28, 50
Query Designer, 33–35, 77–83
Query Pane, 30
Registered Servers pane, 27–28
SQL Editor toolbar, 33–34
Standard toolbar, 29–30
starting, 26–27
Summary tab, 28
Template Explorer tool, 31–32
Transact-SQL (T-SQL), 12, 25–26
versions, 26
SQL Server Management Studio Express, 26
SQL Server Mobile query, 30
SQL Server Surface Area Configuration tool,
284–286, 346–347
SQL Server 2000, 9
SQL Server 2005
editions, 11, 394
installing, 2, 10, 15
SQL Server 2005 level encryption, 308–309
SQL Server 2005 TechCenter Web site, 397
SQL Server 2005 Web Site, 397
SqlAssembly object, 18
SQLCMD utility
checking installation status, 36
help, 37
launching, 36–37
starting, 36–37
Transact-SQL (T-SQL), 25
SQL-DMO (SQL Server Distributed
Management Objects), 373
SQL-SMO. See SMO (Server Management
Objects)
sql_variant data type, 148
Sql_Variant_Property() function, 244
Sqrt() function, 241
square brackets ([ ])
SELECT statement, 52
wildcard characters, 63
Square() function, 241
Standard edition, 11
starting
SQL Server Books Online, 40
SQL Server Configuration Manager, 37
SQL Server Management Studio, 26–27
SQLCMD utility, 36–37
STATISTICS_NORECOMPUTE option (CREATE
INDEX statement), 262
Stats_Date() function, 247
stdev() function, 236
stored procedures
Common Language Runtime, 198–199
CREATE PROCEDURE permission, 298
creating, 200–201
defined, 193
deleting, 204–205
differences from functions, 199, 228
differences from triggers, 211–212
dropping, 204–205
executing, 199, 202–204
extended, 199
filtering, 195–197
modifying, 204–206
naming, 203–204
parameters, 200, 206–207
permissions, 200
searching, 195–197
security, 200, 207
sp_addmessage, 272
sp_adduser, 294
sp_configure, 345–346
sp_setapprole, 304
system, 194–197
Transact-SQL (T-SQL), 197–198
user-defined, 194, 197–199
uses of, 193–194, 199–200
viewing, 194–195
413
Index](https://image.slidesharecdn.com/for-220822032846-82be8eed/85/For-Dummies-Microsoft-SQL-Server-2005-Programming-For-Dummies-Apr-2007-pdf-432-320.jpg)

![Visual C#, 343–344, 373
Visual Studio 2005
Business Intelligence Development Studio
(BIDS), 351
Database Diagram Designer, 351, 356–357
Database Explorer, 352
downloads, 351
installing, 351
projects, 363–372
Query Designer, 352, 356, 360–362
Server Explorer, 352–356
Solution Explorer, 362–364
Table Designer, 352, 356–360
uses for, 39, 351
variants, 26
versions, 352
View Designer, 352, 356
visual database tools, 351–352, 356–362
• W •
well-formed XML document, 322–323
WHERE clause
CREATE VIEW statement, 183
DELETE statement, 116–120
joins, 75–76
SELECT statement, 52, 55–64
UPDATE statement, 120–121
wildcard characters
* (asterisk), 54, 60, 63
[^] (caret inside square brackets), 63
escaping, 60
% (percent sign), 63
[ ] (square brackets), 63
_ (underscore), 63
Windows Authentication, 27–28
Windows Forms project, 364–372
Windows level encryption, 308
Workgroup edition, 11
• X •
XML
deleting, 334–335
FOR XML clause, 323, 336–340
indexes, 335–336
inserts, 333–334
queries, 330–332
typed XML, 323–326
untyped XML, 323–326
updates, 333–334
uses of, 322
well-formed XML document, 322–323
xml data type, 13, 15, 21, 149, 322
XML index, 259
XML schema collections, 326–330
XPath (XML Path language), 329
XQuery language, 323, 330–335
XSD schema document, 326–328
• Y •
Year() function, 239
416 SQL Server 2005 Programming For Dummies](https://image.slidesharecdn.com/for-220822032846-82be8eed/85/For-Dummies-Microsoft-SQL-Server-2005-Programming-For-Dummies-Apr-2007-pdf-435-320.jpg)