This document provides an overview and table of contents for a book titled "Excel Programming: Your visual blueprint for creating interactive spreadsheets". The book aims to teach readers how to use Visual Basic for Applications (VBA) to program Excel macros and automate tasks. It covers topics such as recording macros, using the Visual Basic Editor, programming basics in VBA, working with the Excel object model, using variables and arrays, adding control statements, debugging macros, working with other workbooks and files, and working with worksheets. The book uses a "visual blueprint" approach that incorporates text and screenshots into the page layout.


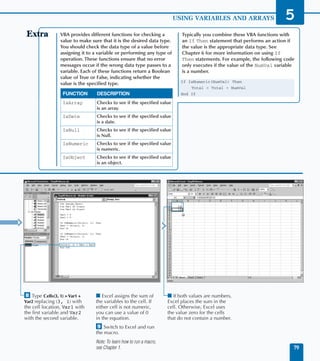
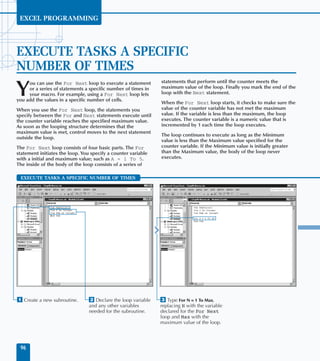
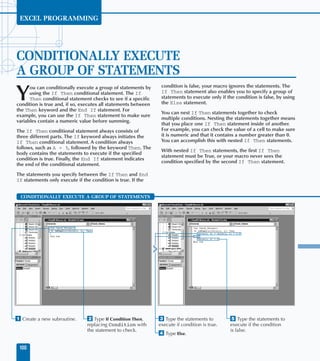
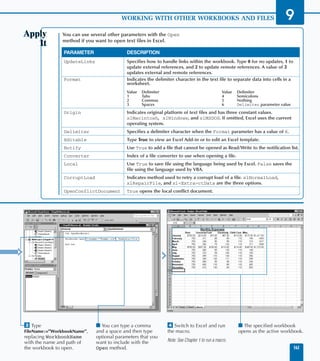
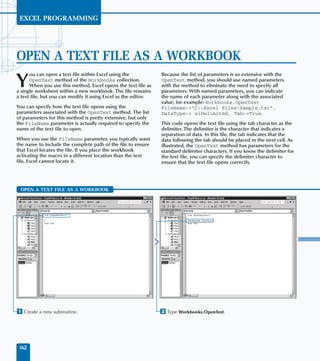
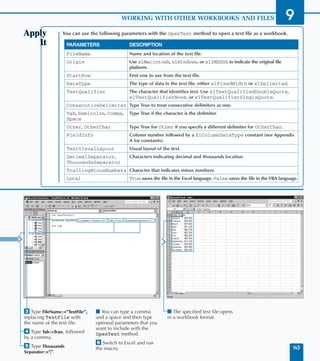
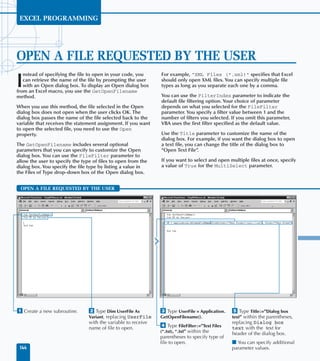
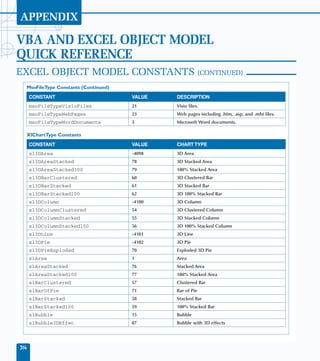
![USING THE VISUAL BASIC EDITOR 2
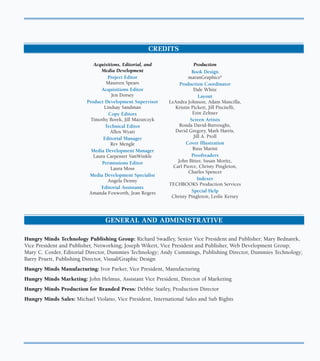
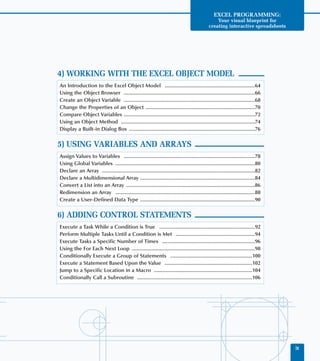
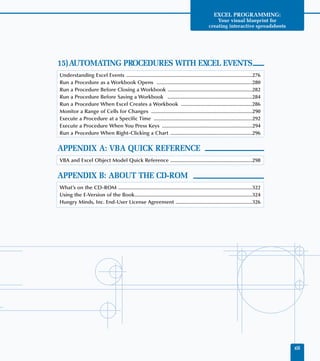
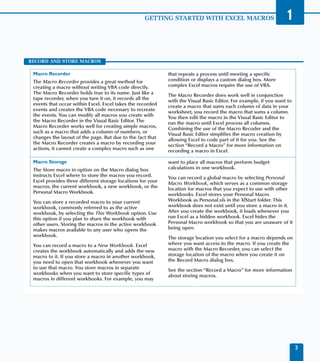
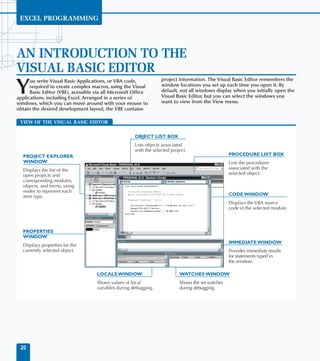
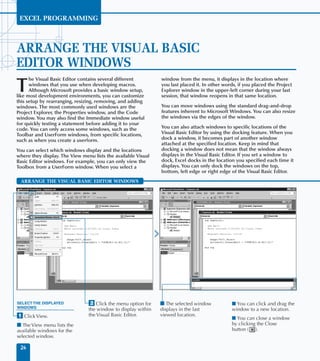
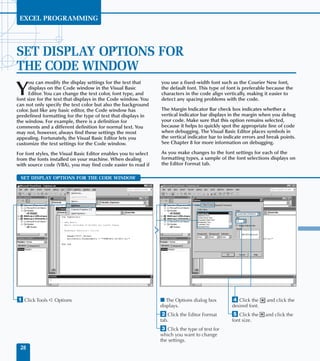
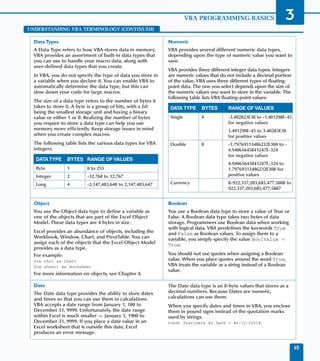
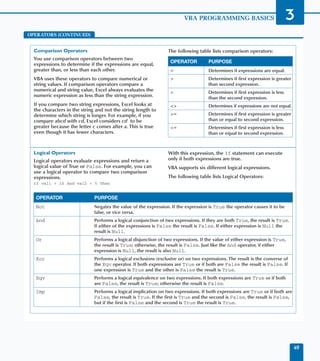
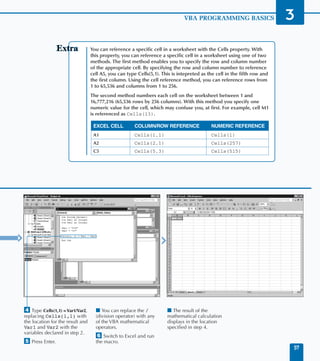
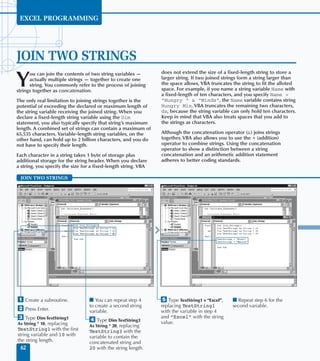
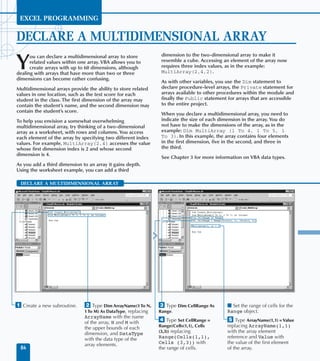
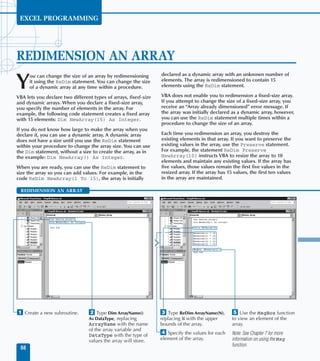
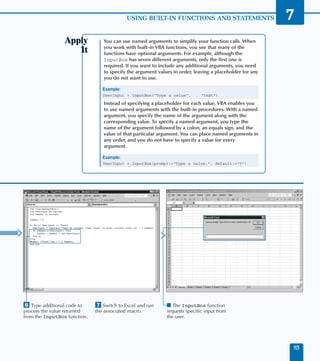
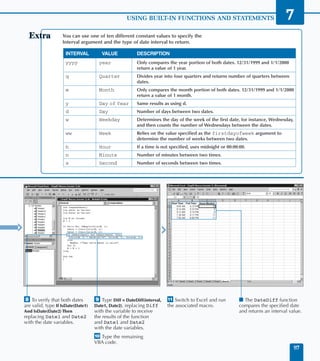
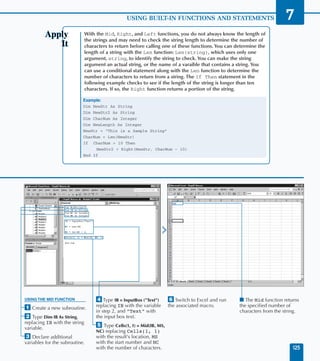
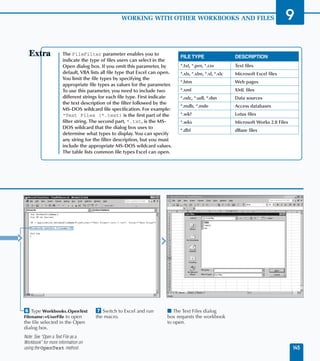
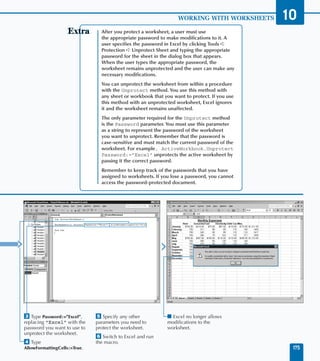
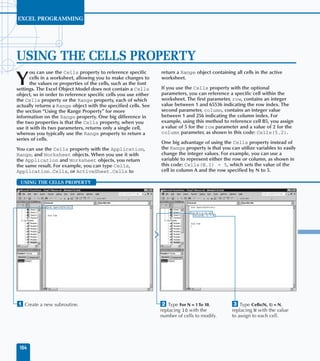
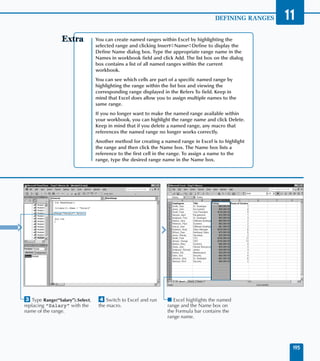
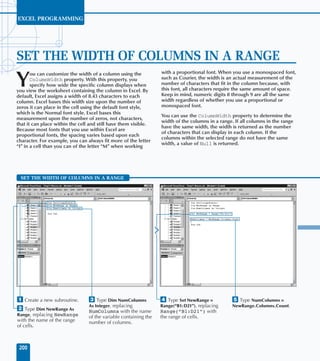
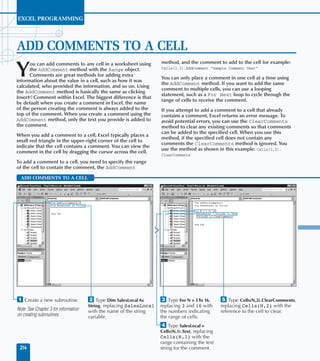
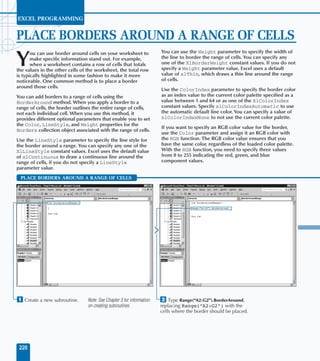
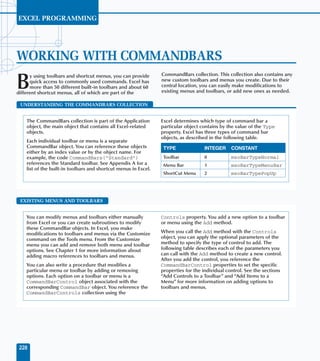
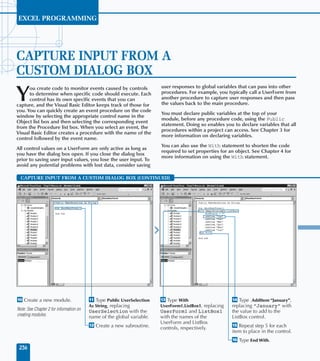
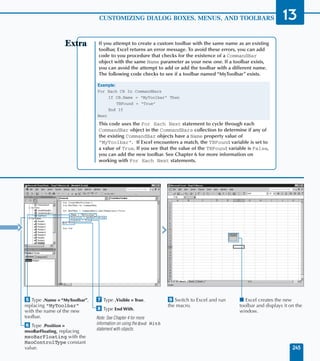
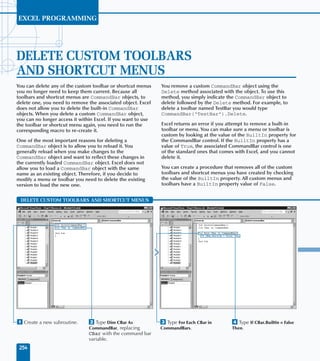
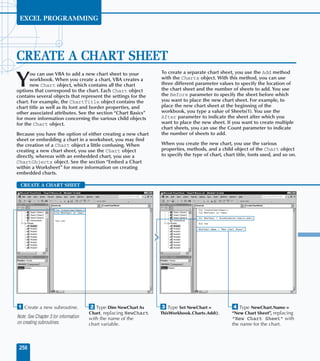
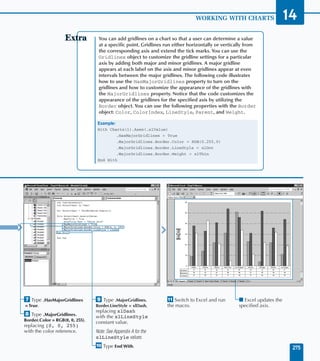
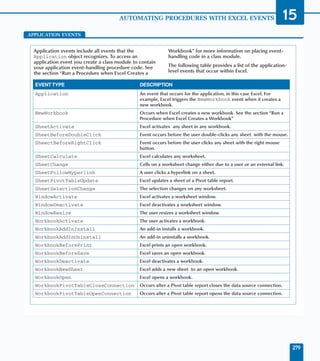
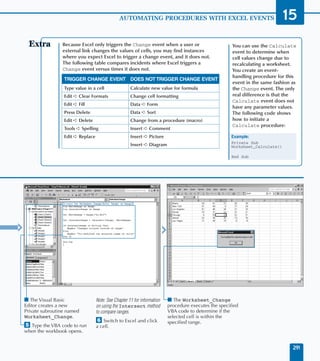
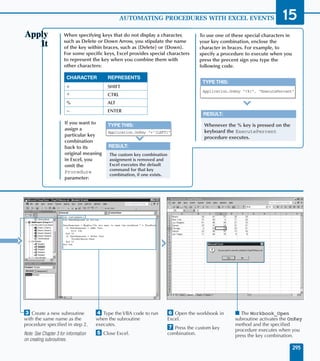
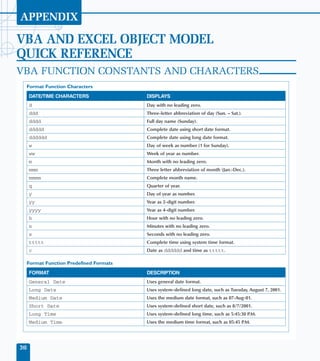
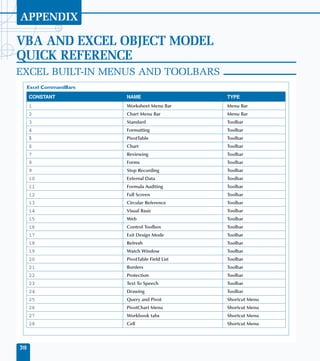
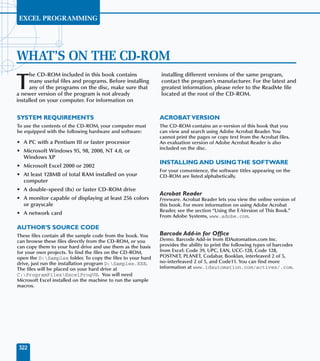
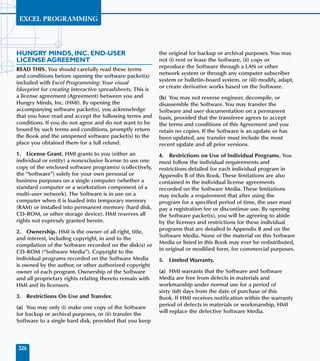
When you view the VBA code for your Example:
macro, you may notice that a single Private Sub add()
quote (‘) precedes several lines. Called ‘
comment lines, programmers use these ‘ add Macro
lines to provide information about the ‘ Macro recorded 5/19/2001 by
code such as what the code does, Jinjer Simon
when it was created, or even who ‘
coded it. When you use the Macro ‘ Keyboard Shortcut: Ctrl+d
Recorder to create a macro, by default ‘
Excel adds several comment lines. ActiveCell.FormulaR1C1 =
“=SUM(RC[-6]:RC[-1])”
These comment lines always indicate
the name of the macro, the creation End Sub
date, and the programmer. If the
programmer creates a keyboard
shortcut for the macro, the comments
contain this information as well.
Making modifications to the comment
lines does not affect the macro
execution. In fact, Excel ignores any
line of text or code preceded by a
single quote when the macro executes.
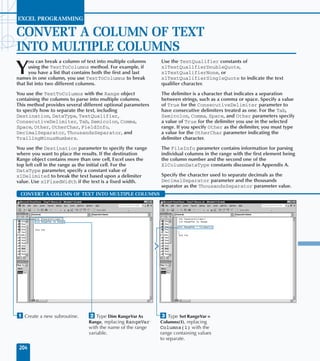
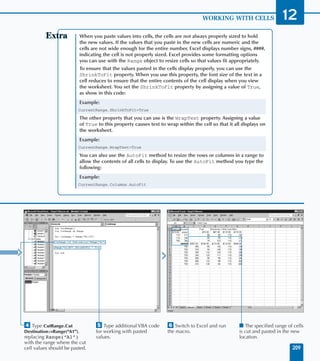
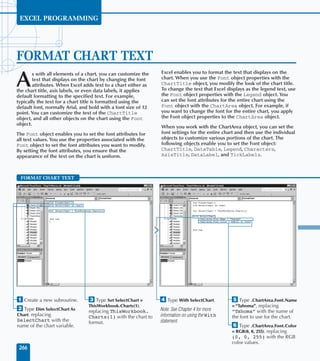
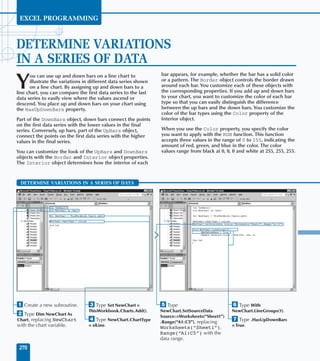
Format Currency
(Name)
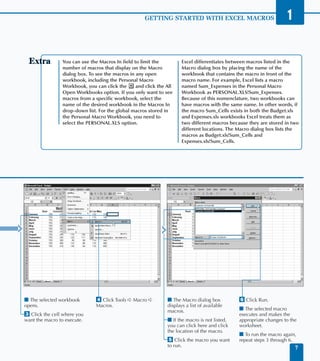
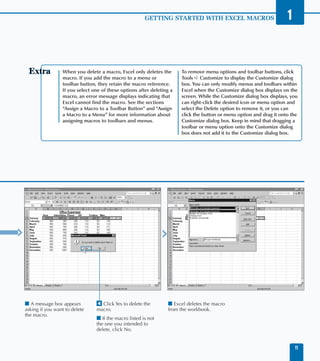
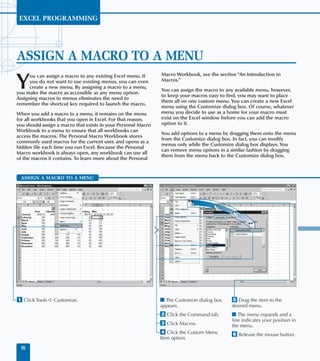
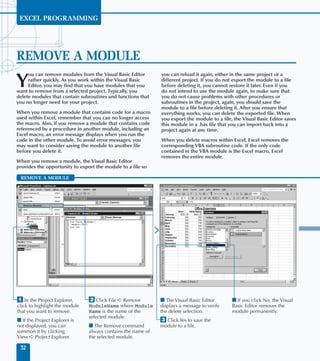
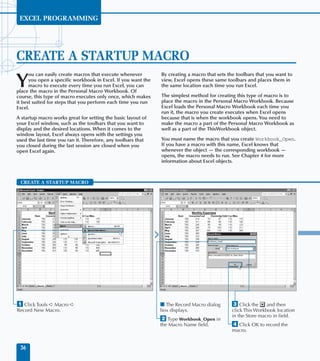
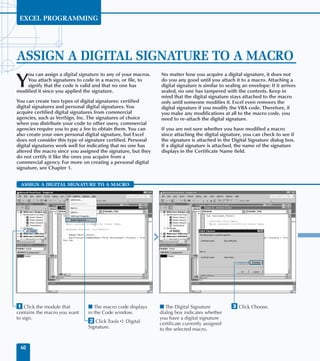
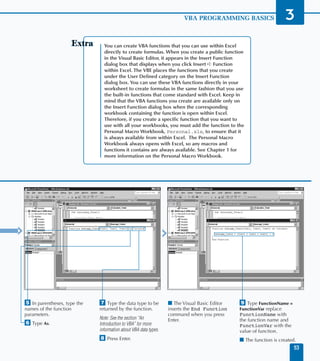
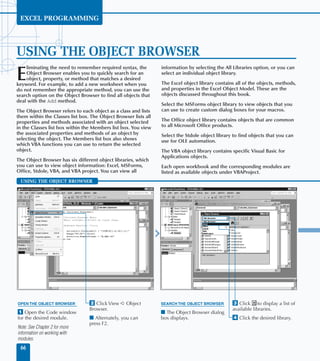
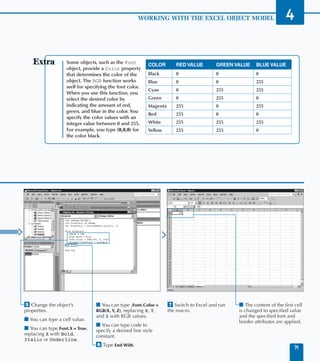
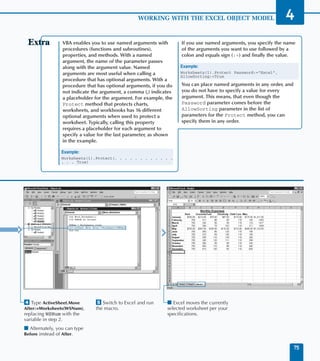
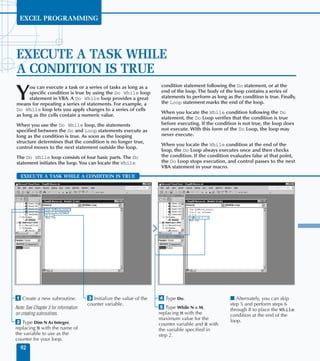
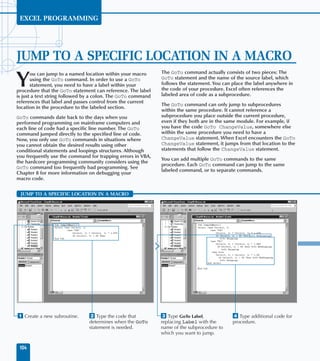
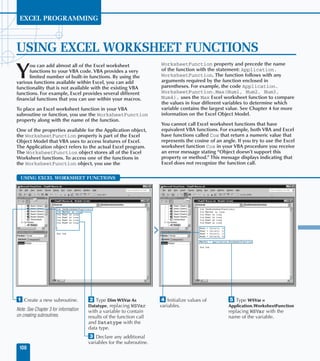
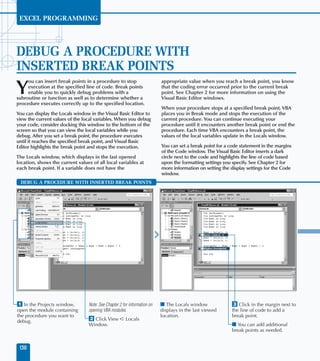
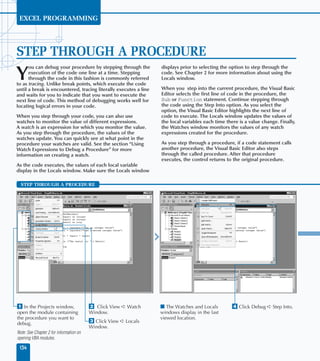
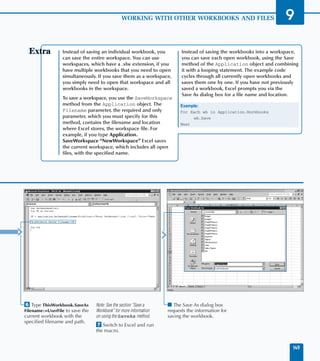
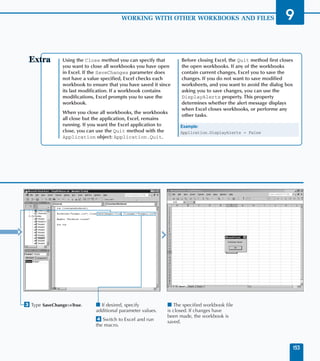
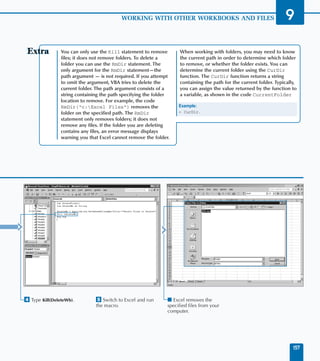
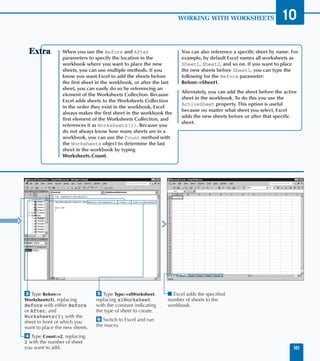
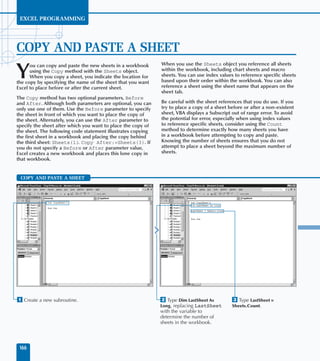
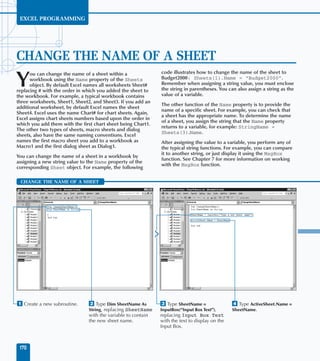
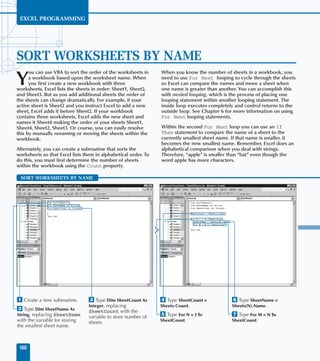
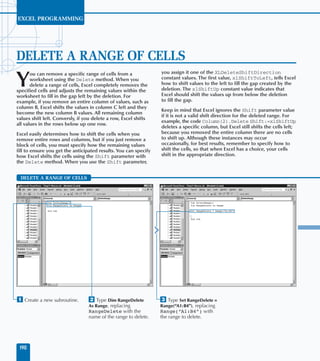
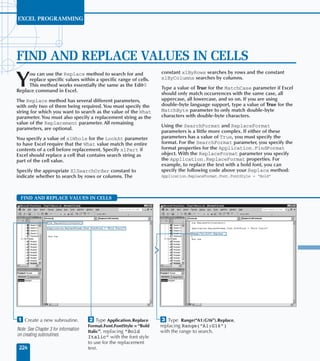
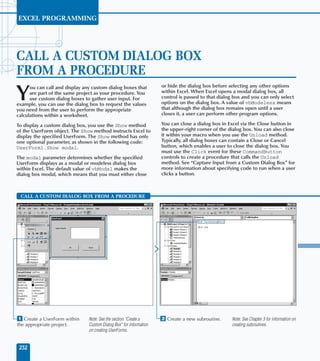
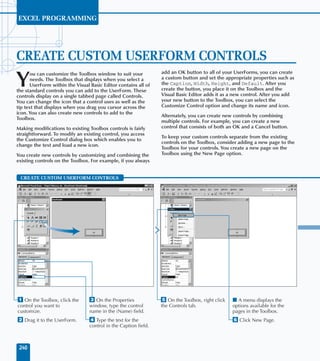
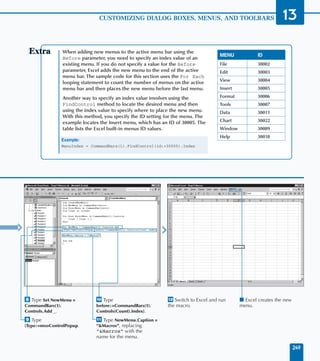
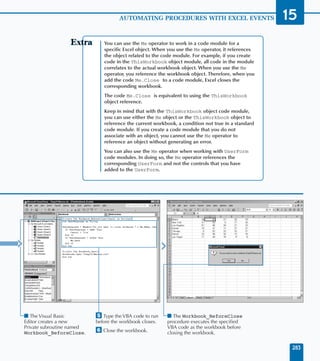
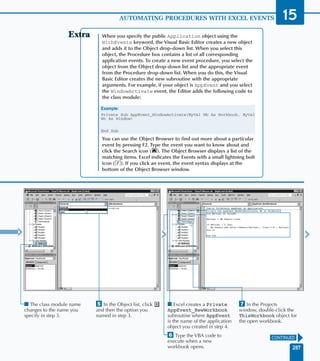
Á In the Project Explorer I You may need to insert a ‚ In the Macro dialog box, ± Close the Macro dialog
click the module that blank line. click the second-to-last macro. box.
contains the code for the
macro you want to update. ° Click the Paste button ( ). — Click Delete to remove I When you run the macro,
the macro. Excel executes the original
‡ Place the cursor between · Close the Visual Basic and copied code.
the last line of code and the Editor.
End Sub command.
43](https://image.slidesharecdn.com/excelvbaprogramming-100216172634-phpapp02/85/Excel-Vba-Programming-57-320.jpg)
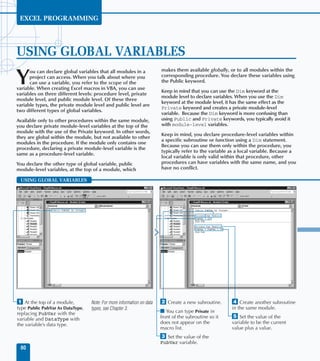
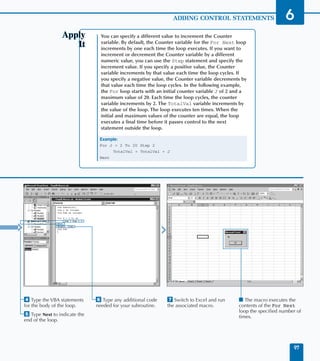
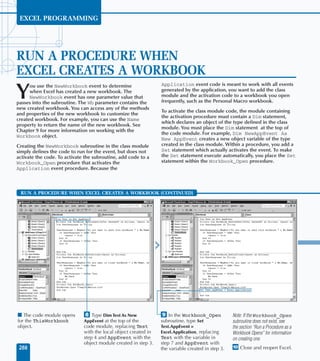
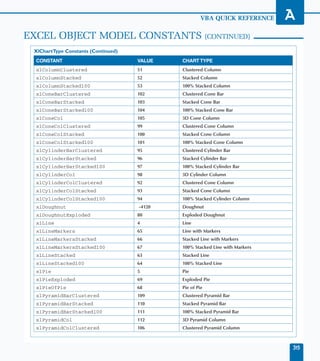
![VBA PROGRAMMING BASICS 3
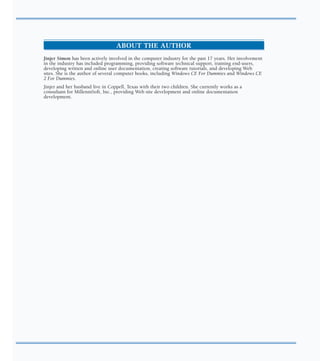
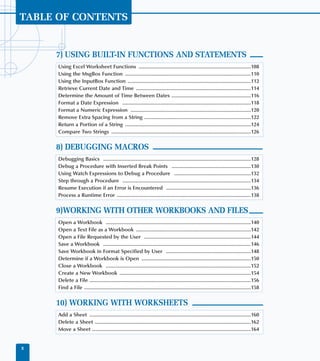
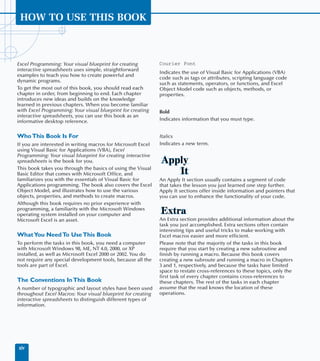
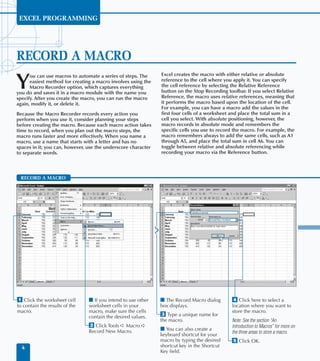
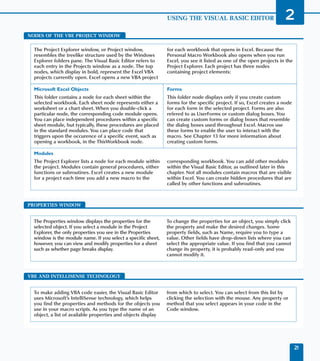
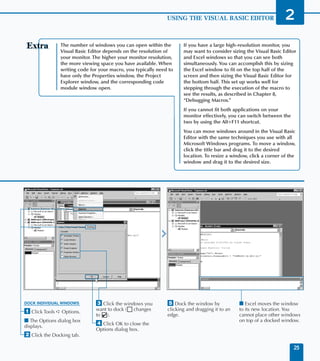
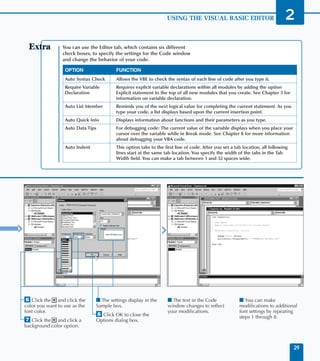
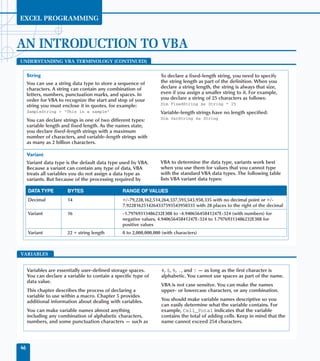
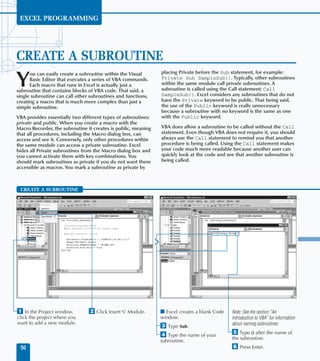
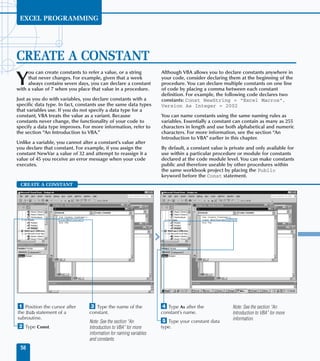
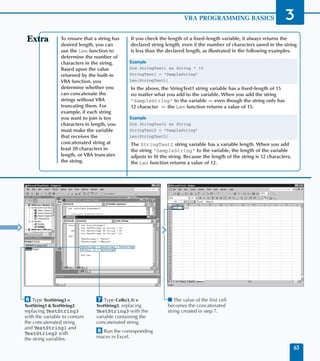
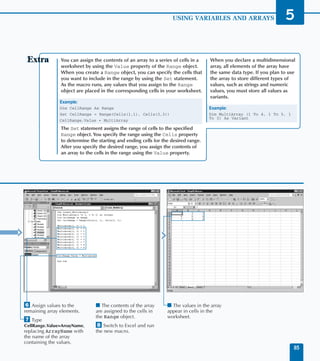
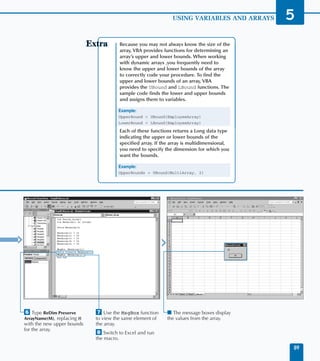
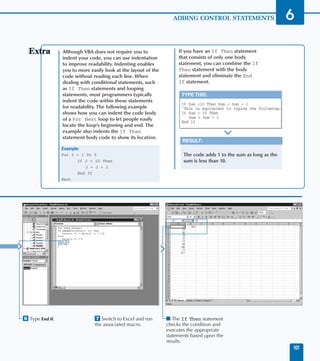
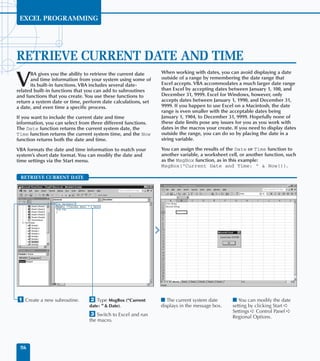
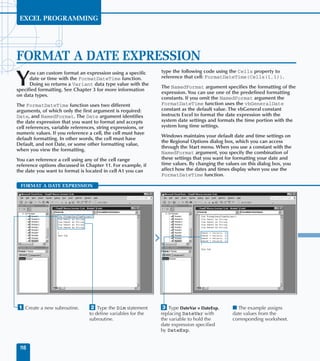
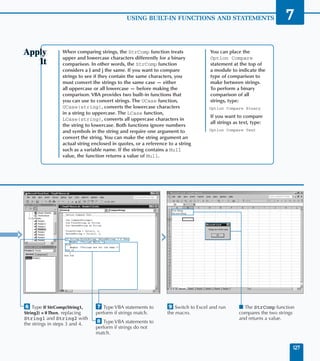
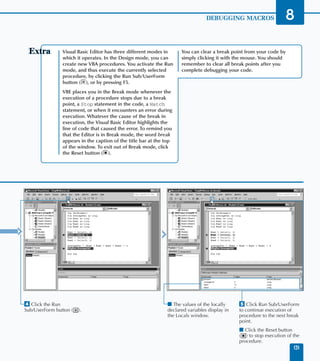
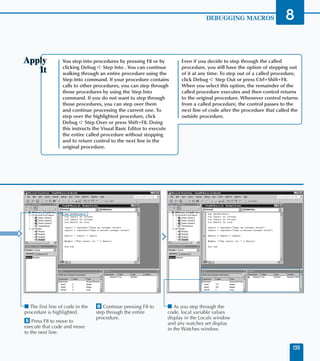
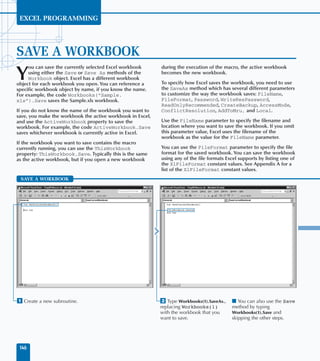
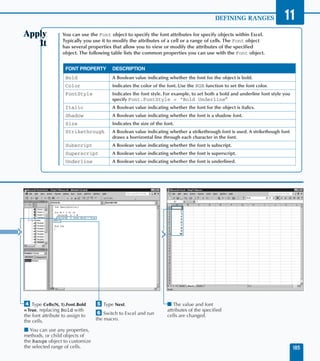
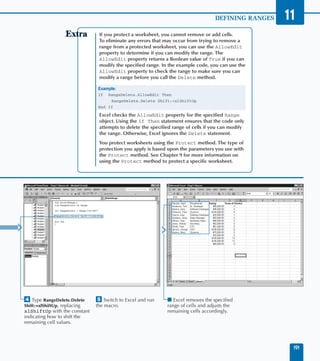
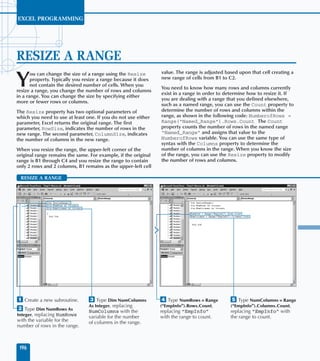
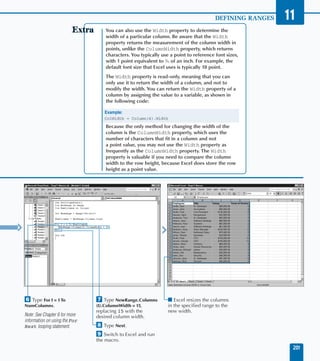
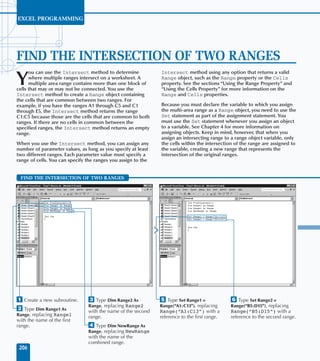
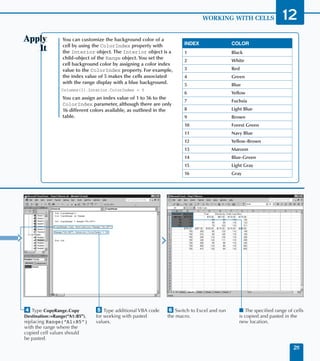
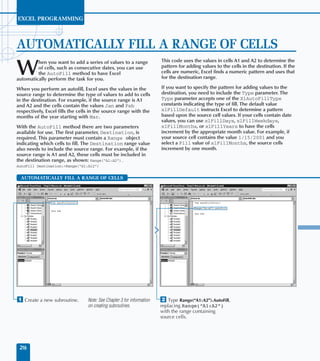
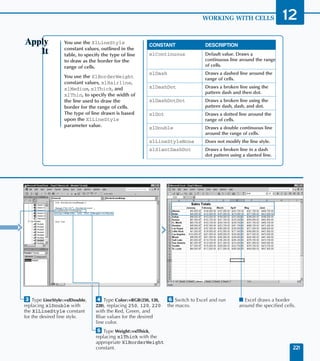
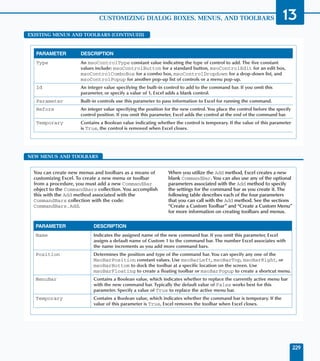
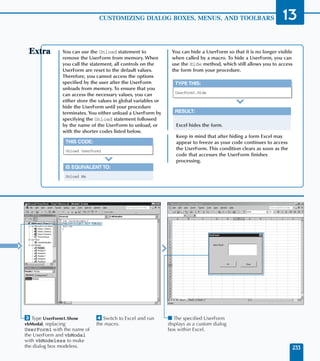
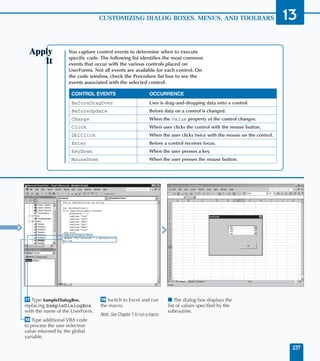
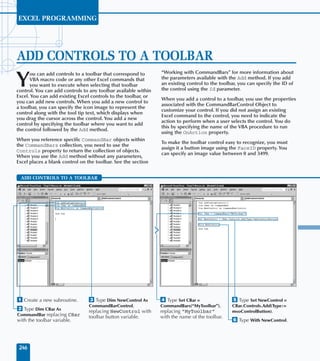
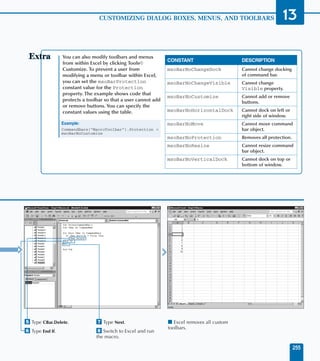
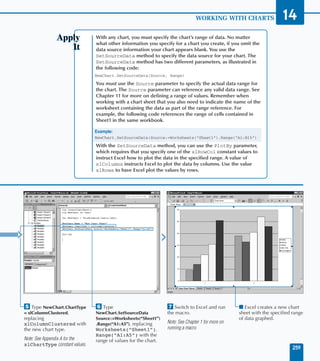
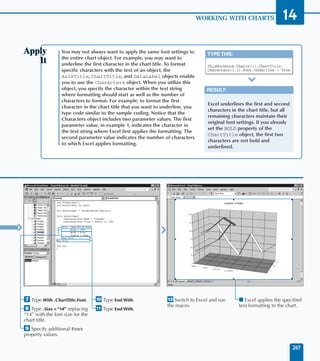
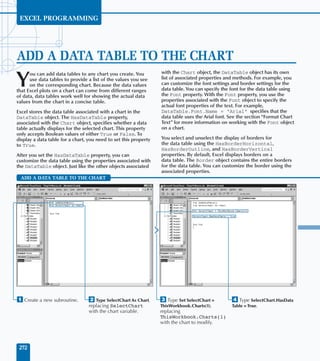
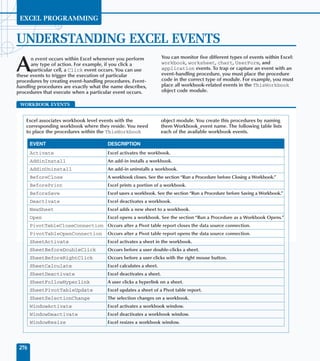
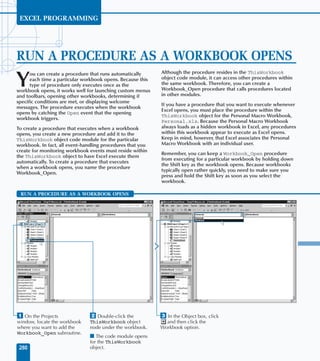
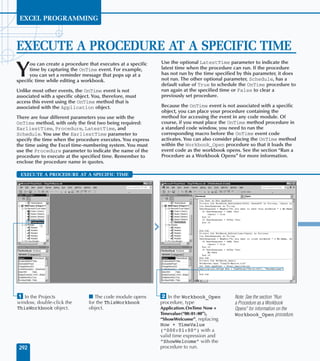
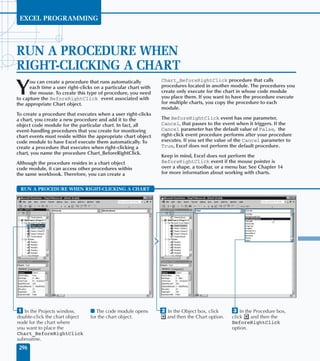
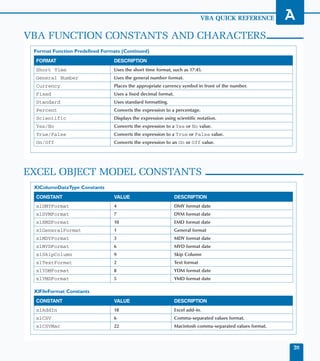
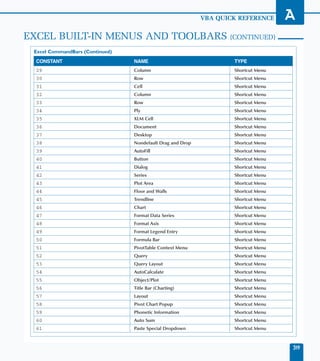
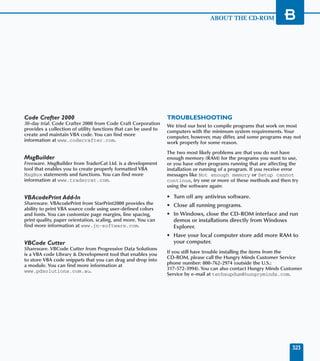
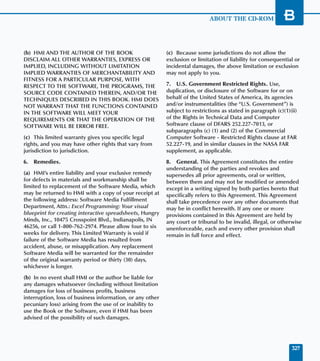
You can use comments for testing your code. If you
have a line of code that is not functioning properly,
you can comment it out and run your macro without
it. This process eliminates the need to delete the line
of code, and you can reactivate the commenting by
simply removing the apostrophe at the beginning of
the line. The following code comments the
Selection.NumberFormat statement out so that
the cell formatting remains unchanged when the
macro runs.
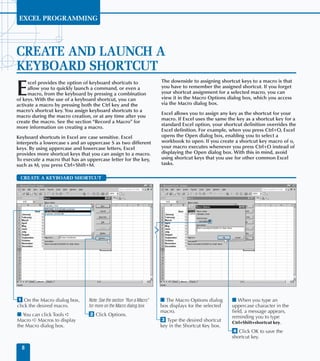
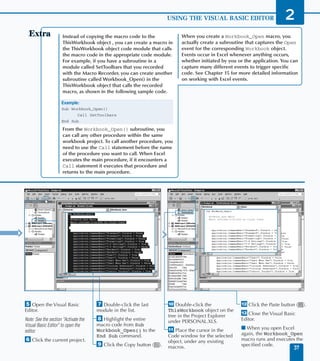
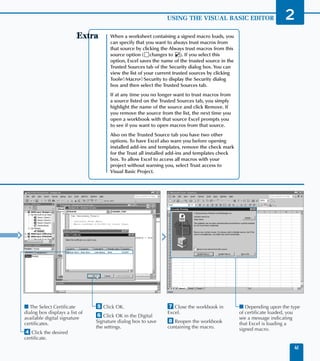
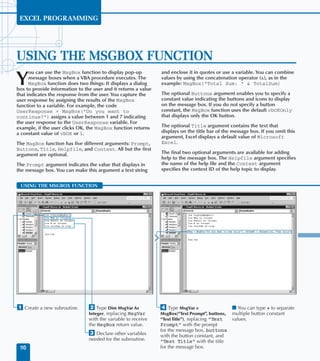
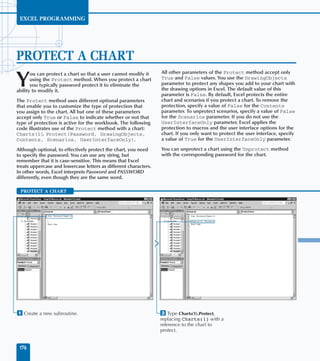
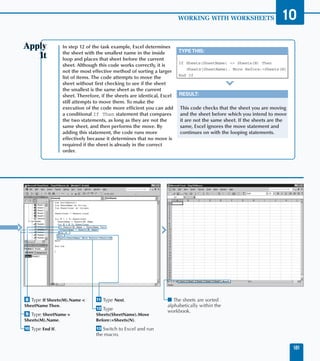
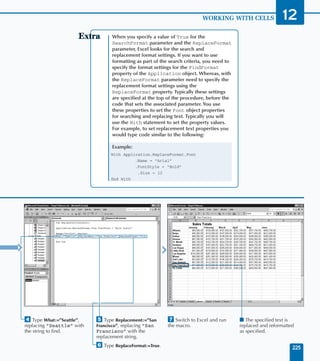
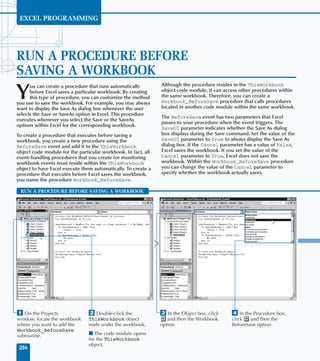
Example:
Sub Sum_Values
ActiveCell.FormulaR1C1 = “=SUM(RC[-6]:RC[-1])”
Range(“B3:H3”).Select
Range(“H3”).Activate
‘ Selection.NumberFormat = “$#,##0.00”
End Sub
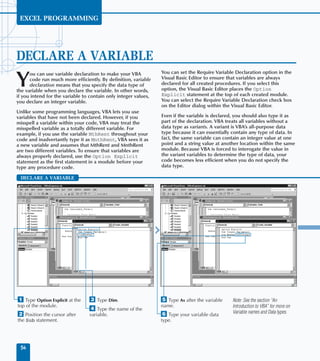
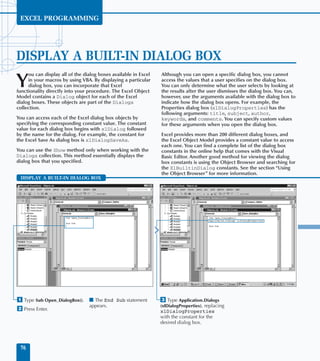
(Name) (Name)
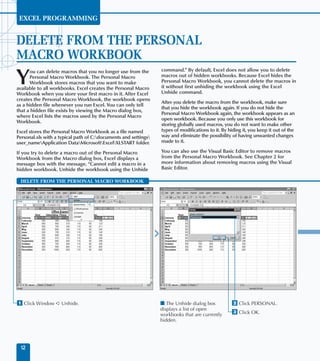
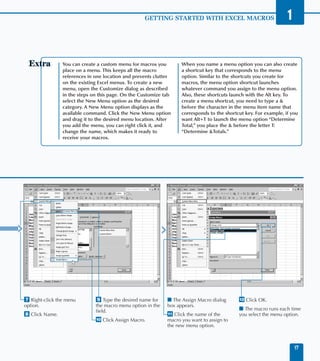
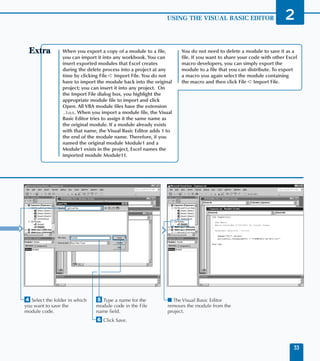
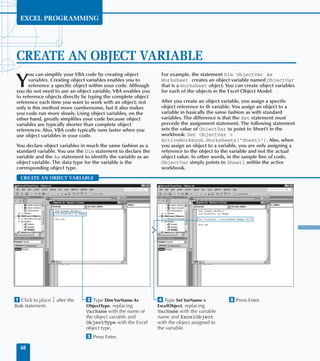
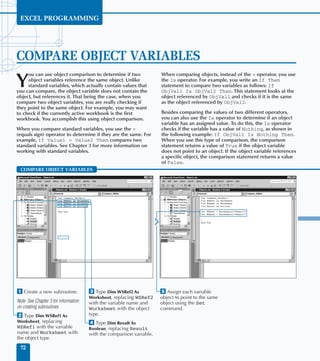
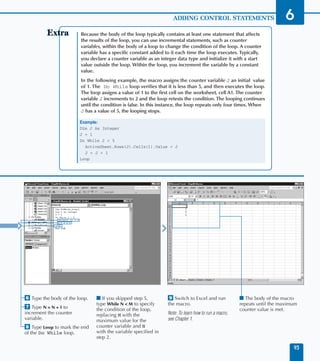
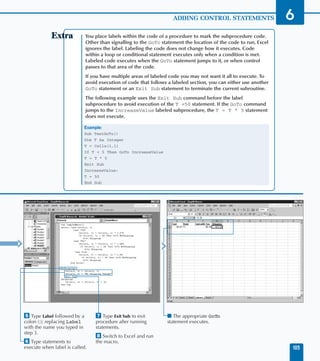
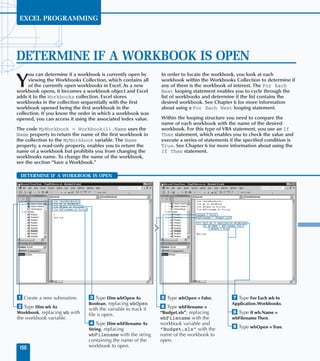
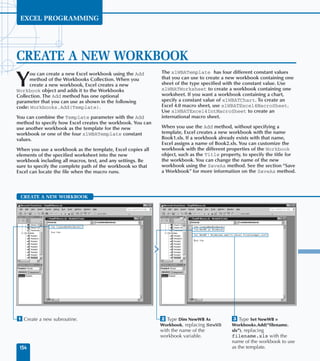
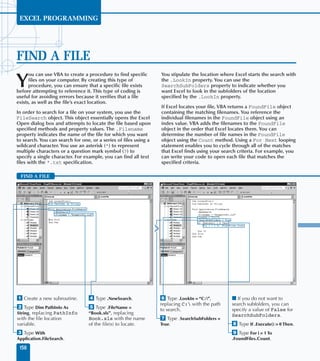
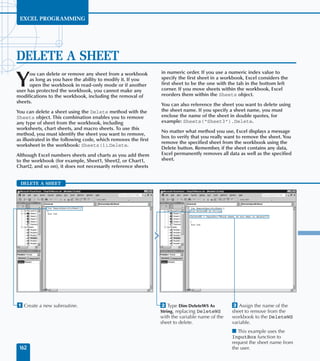
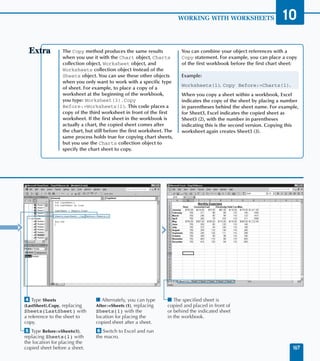
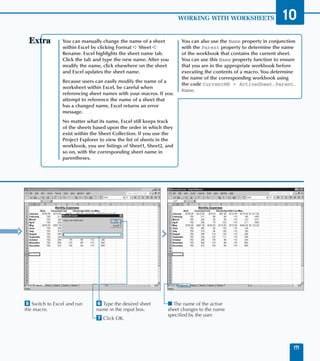
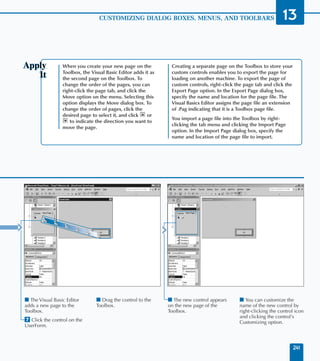
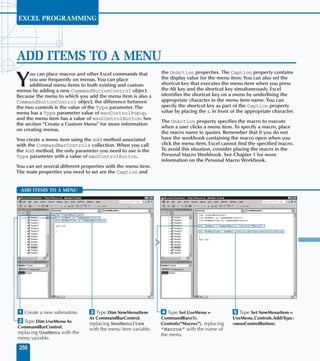
› Type an apostrophe (’) at ˇ Type comments Á Place the cursor at end of ° Type a description for the
the beginning of the line. describing the selected a variable declaration. selected variable.
procedure.
‡ Type an apostrophe (’). I When you run the selected
I Start each comment line procedure, VBA ignores the
with an apostrophe. comment lines.
61](https://image.slidesharecdn.com/excelvbaprogramming-100216172634-phpapp02/85/Excel-Vba-Programming-75-320.jpg)

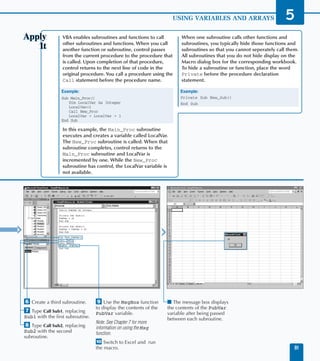

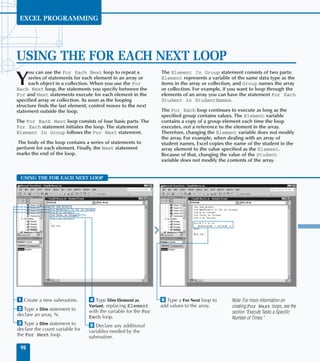

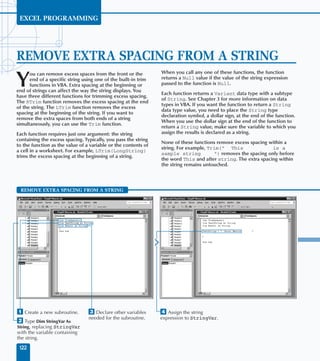


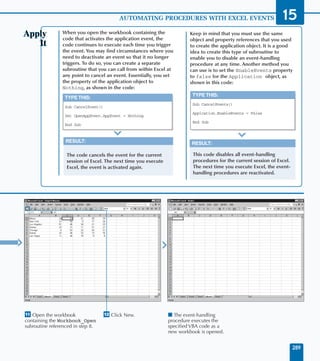
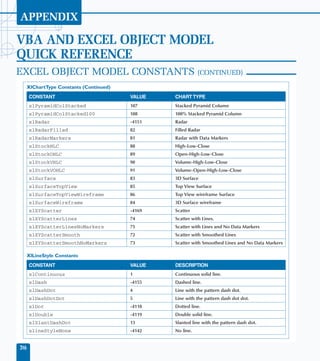
![DEFINING RANGES 11
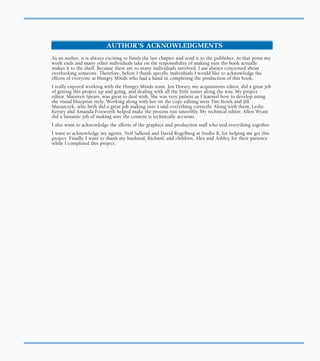
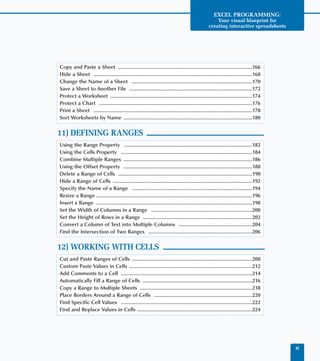
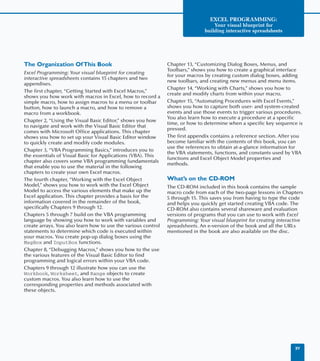
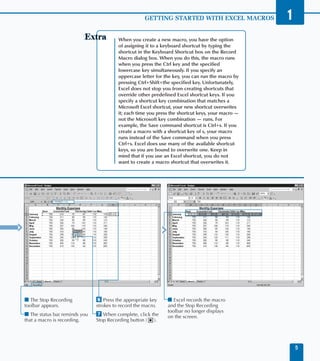
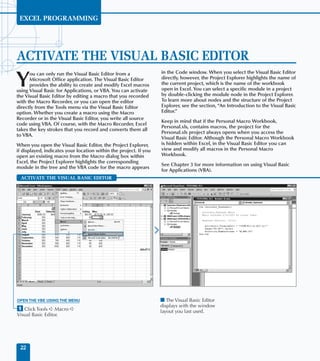
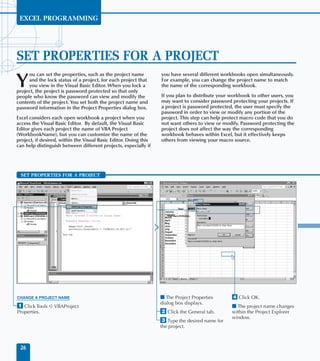
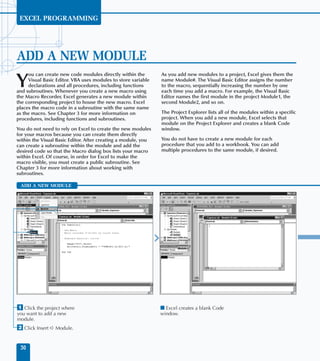
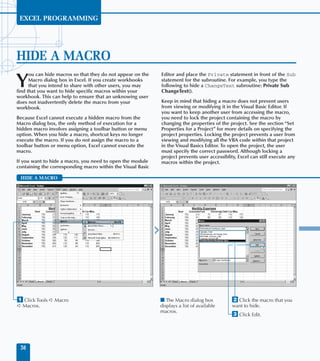
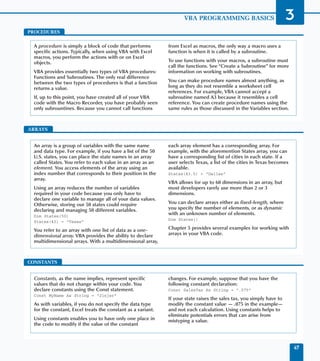
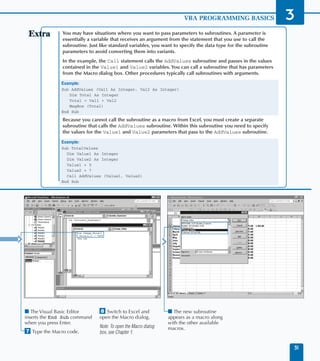
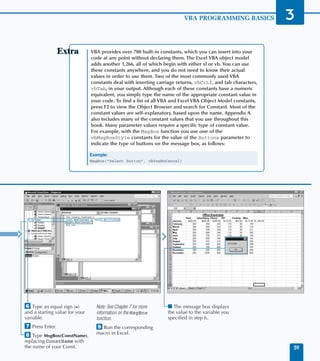
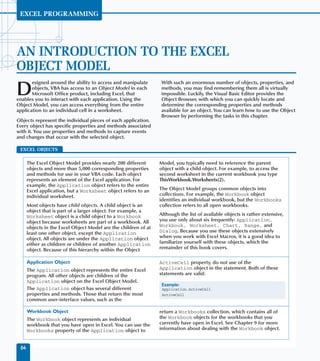
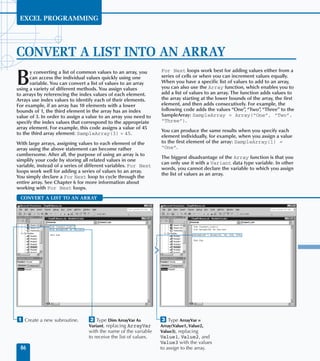
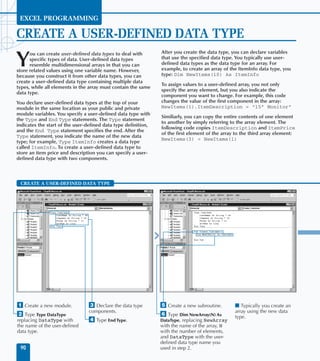
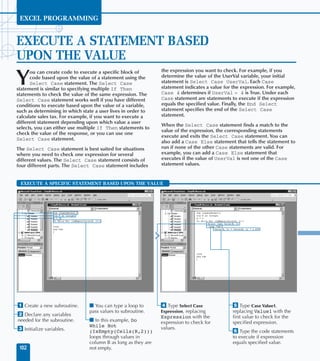
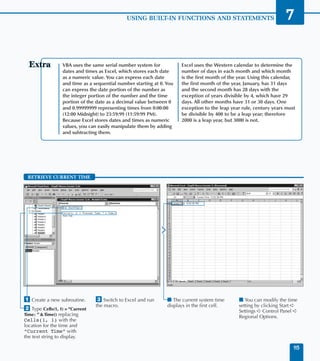
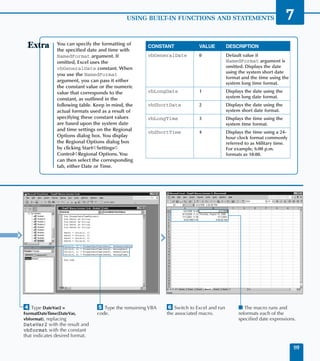
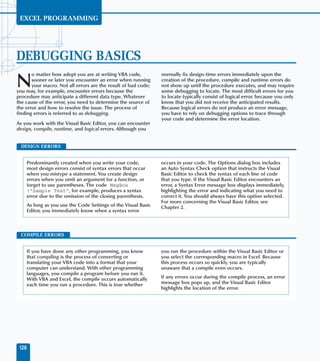
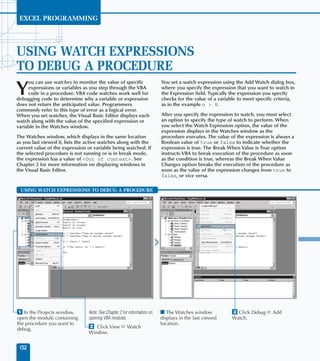
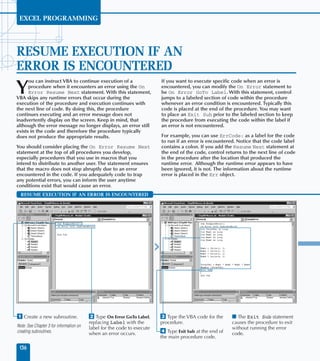
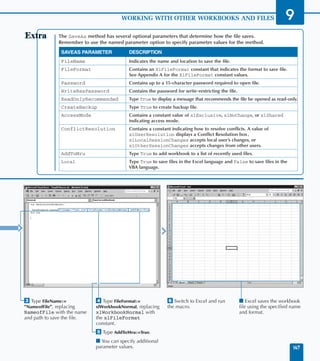
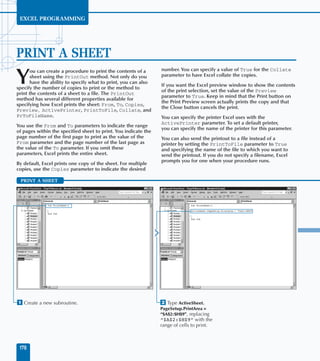
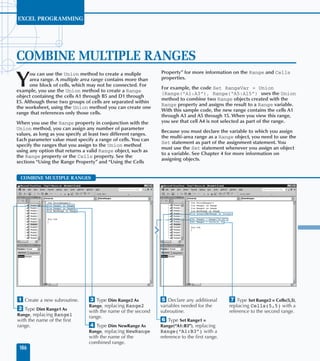
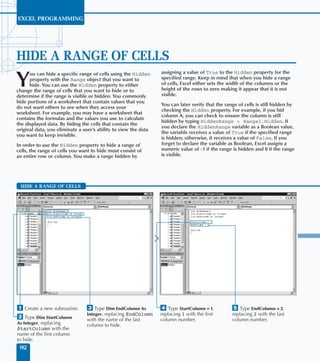
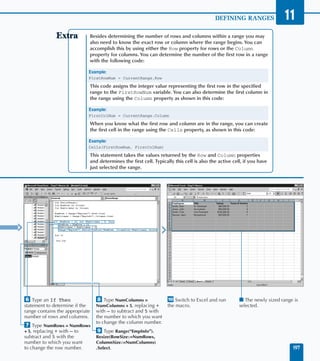
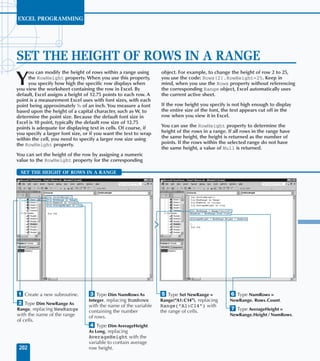
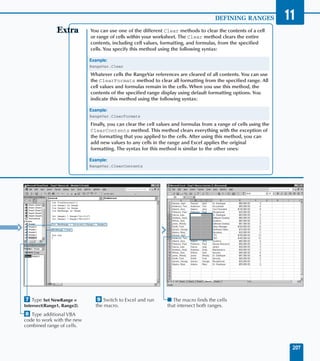
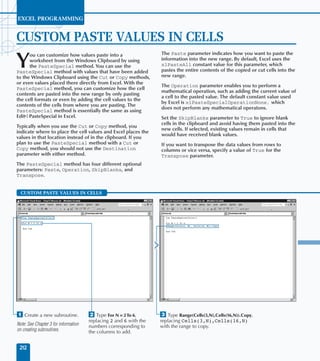
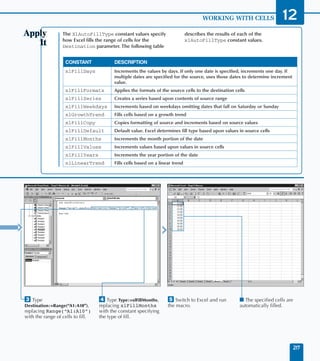
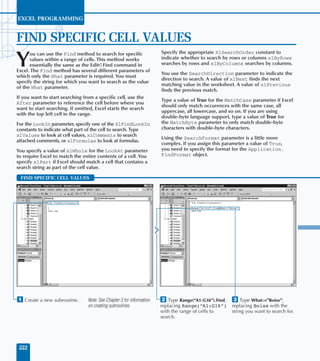
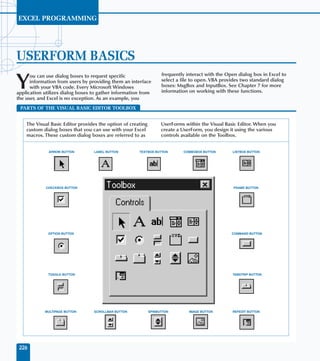
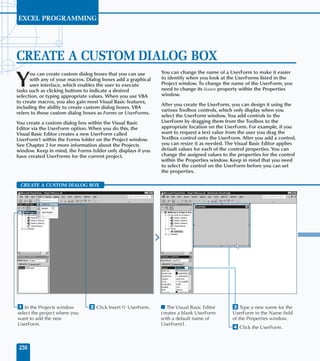
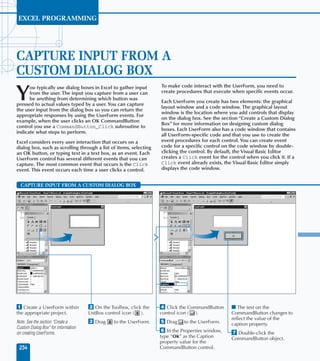
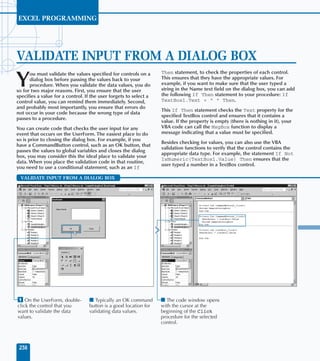
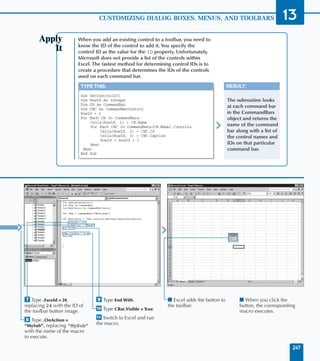
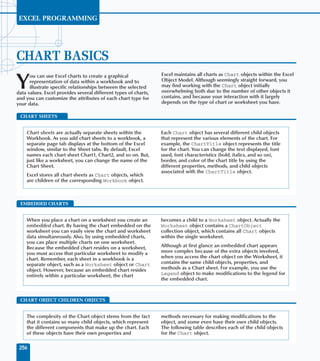
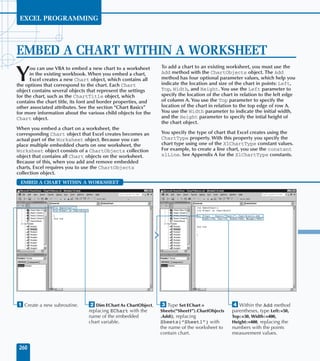
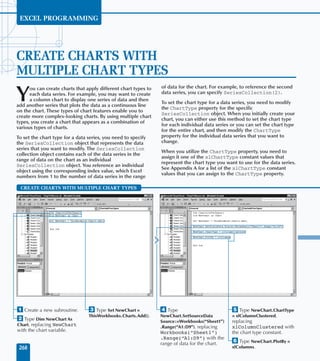
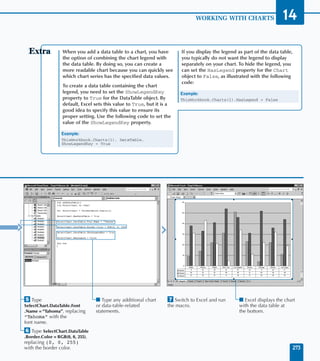
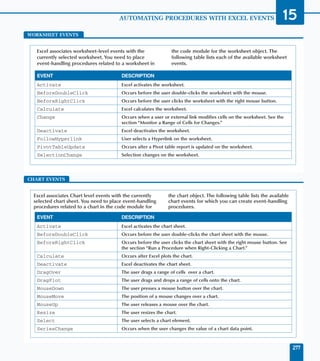
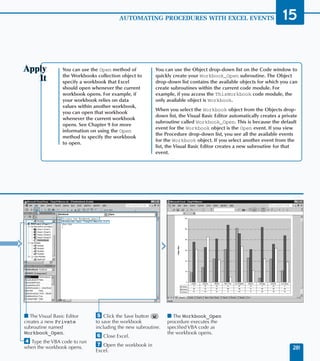
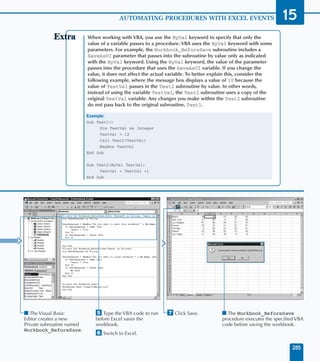
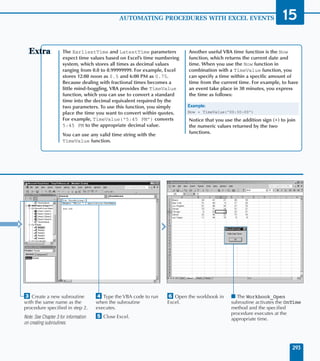
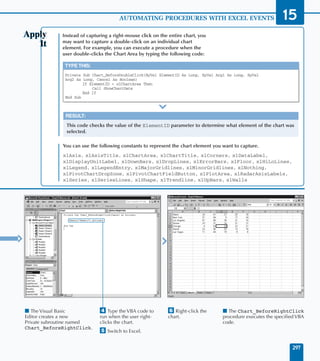
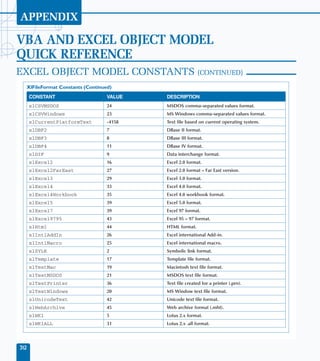
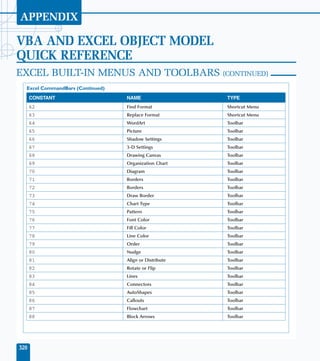
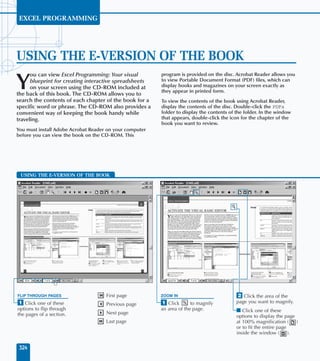
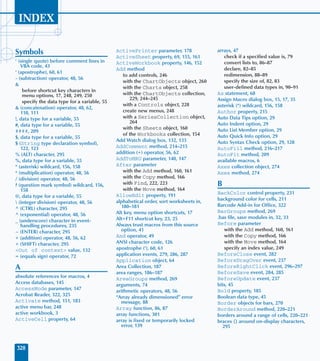
Excel provides the Parse method that you can use to
separate data values in one column into multiple columns.
The method works well when you have string data that is all
the same length, such as phone numbers. With the Parse
method, you specify how the strings in each cell should
break and Excel applies that format to each cell.
There are two optional parameters for the Parse method.
The first parameter, ParseLine, is a string containing left
and right brackets indicating where the cells should split.
For example, [xxxx] [xxxx] breaks each string so that the first
four characters are placed in the first column and the
second four characters are placed in the second column.
Any characters outside those characters are ignored and not
moved to a new column. If the string is “Alphabetical”,
with this ParseLine parameter, Excel places the first four
characters Alph in the first column and the second four
characters, abet in the second column. The remaining
characters in the string, ical, are ignored because they are
not specified as part of the ParseLine value.
The second parameter, Destination, specifies the range
where the parsed data is placed. If you specify a range of
more than one cell, Excel uses the upper left corner of the
range as the first cell.
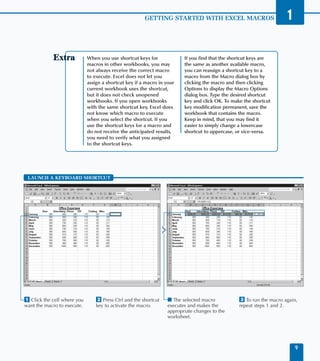
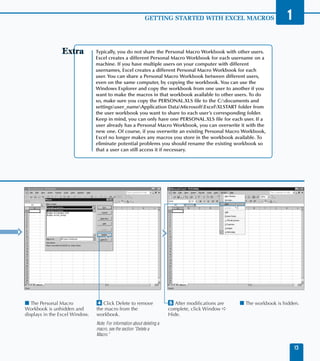
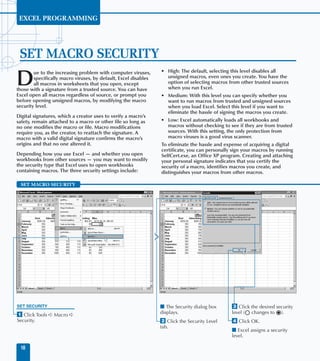
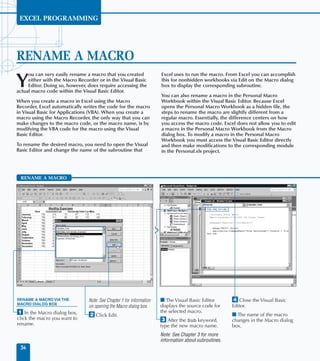
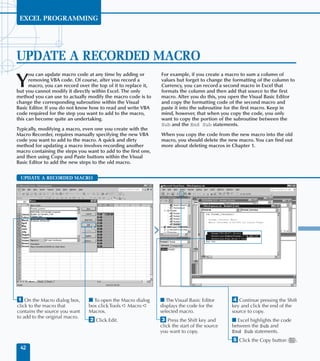
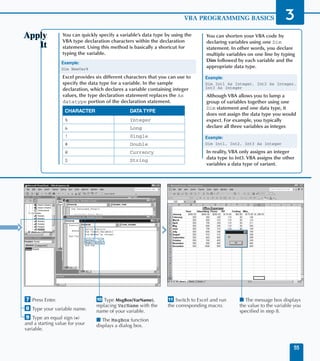
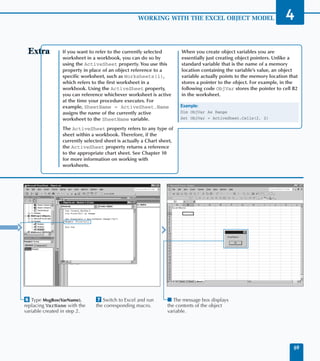
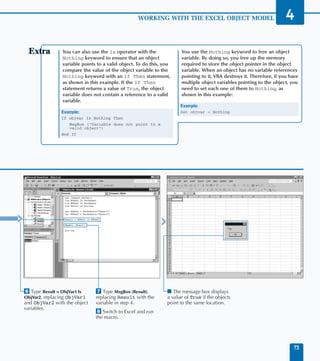
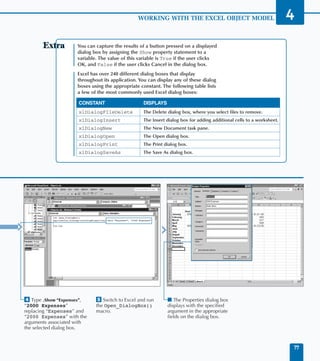
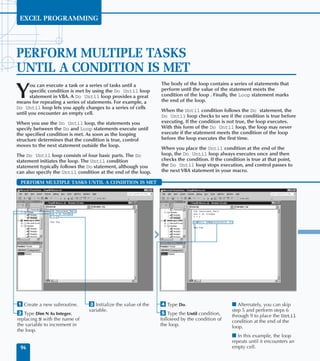
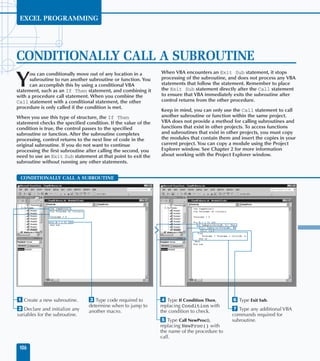
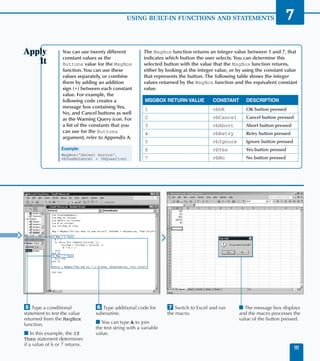
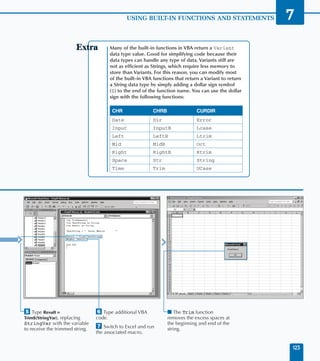
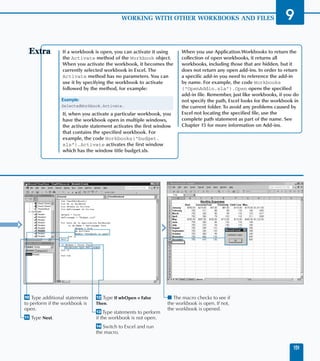
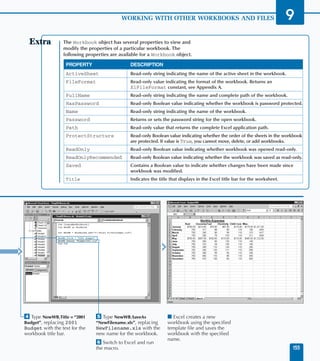
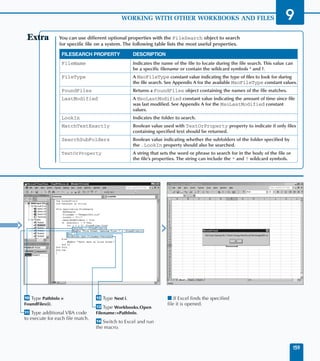
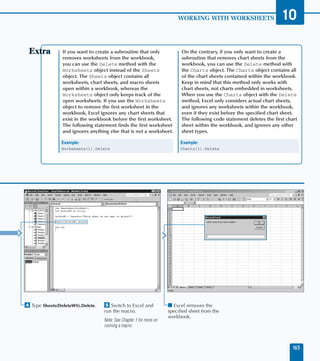
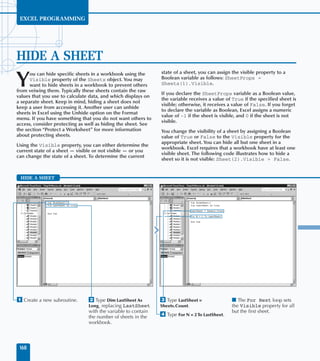
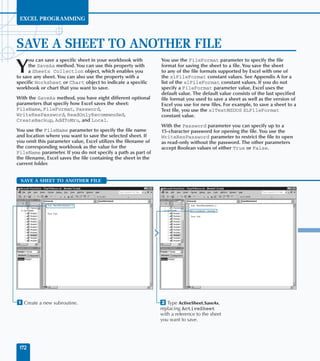
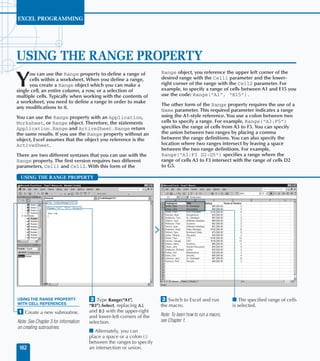
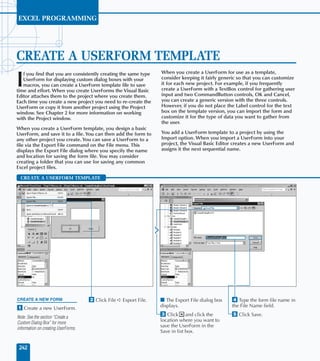
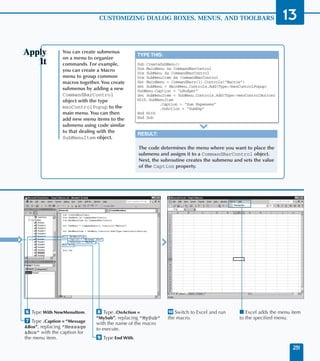
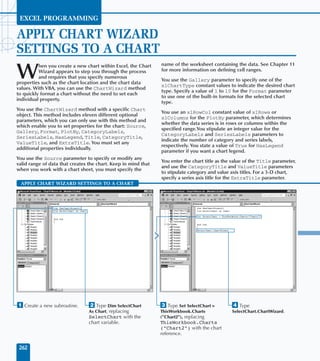
› Type Á Type ° Switch to Excel and run I Excel breaks the contents
RangeVar.TextToColumns. DataType:=xlDelimited. the macro. of the specified column into
two separate columns.
ˇ Type Destination ‡ Type Comma:=True.
:=Range(“B1”), replacing
Range(“B1”) with the
location to place the cells. 205](https://image.slidesharecdn.com/excelvbaprogramming-100216172634-phpapp02/85/Excel-Vba-Programming-219-320.jpg)


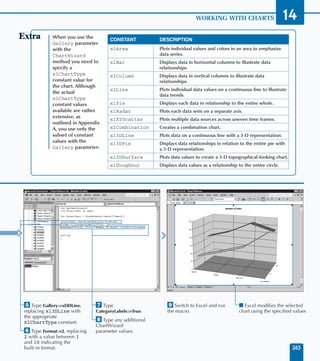

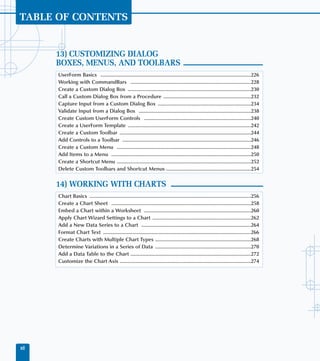
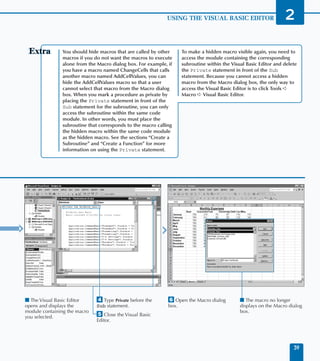
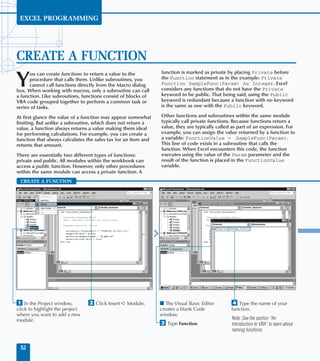
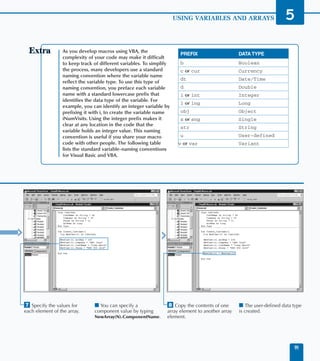
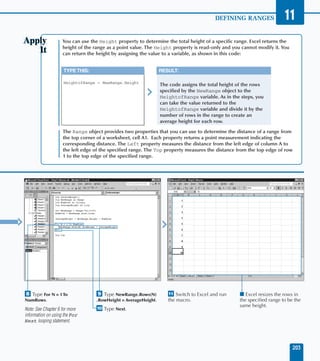
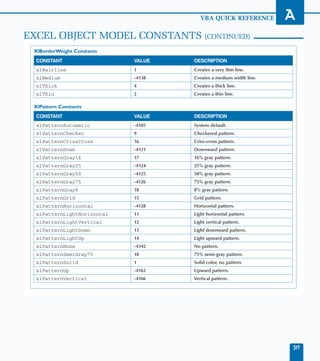
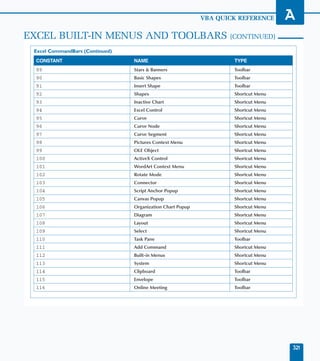
![APPENDIX
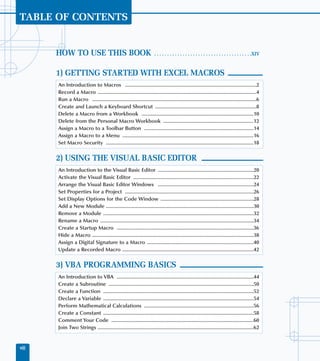
VBA AND EXCEL OBJECT MODEL
QUICK REFERENCE
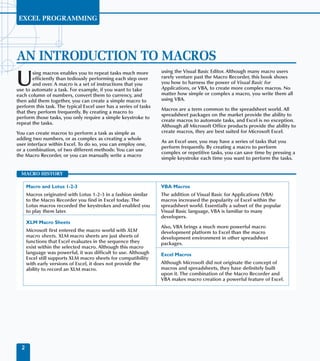
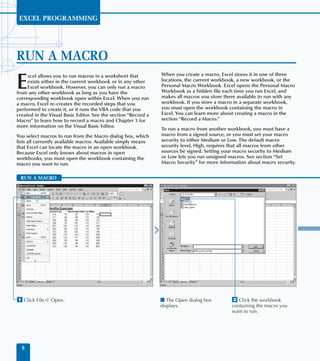
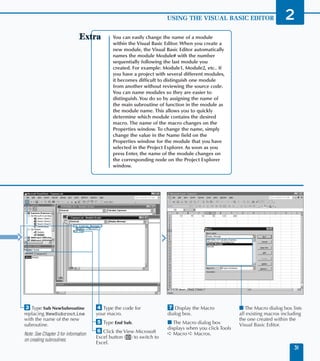
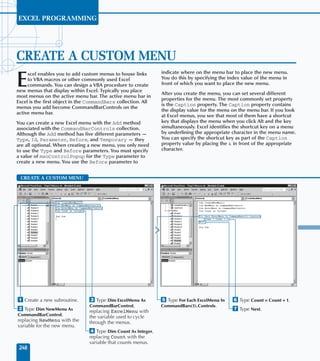
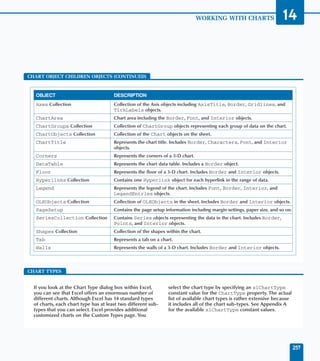
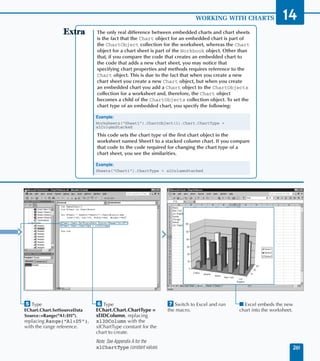
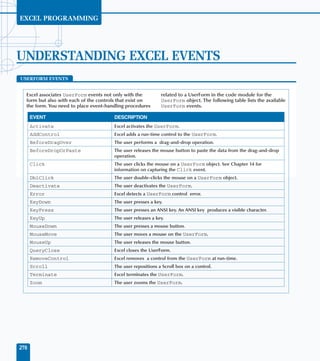
VBA STATEMENTS QUICK REFERENCE
Legend:
Plain courier text = required [] = optional | = or
Italics = user-defined . . . = list of items
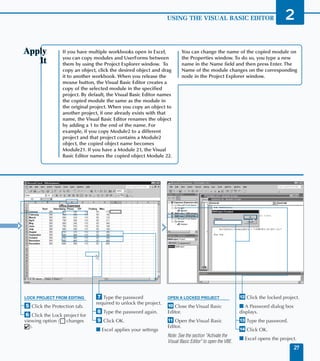
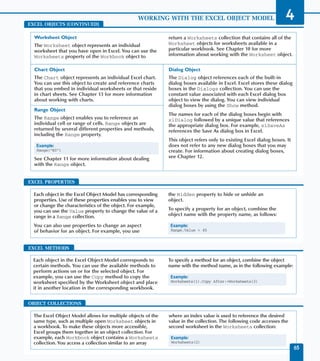
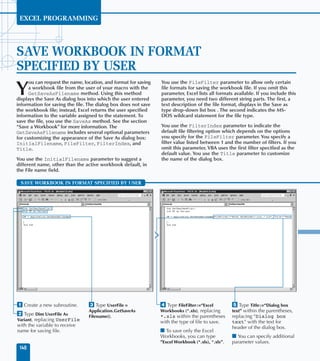
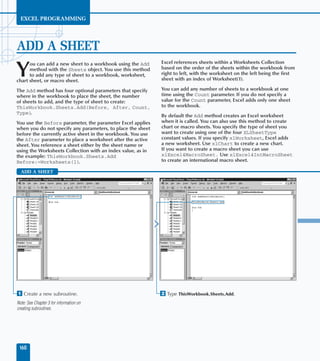
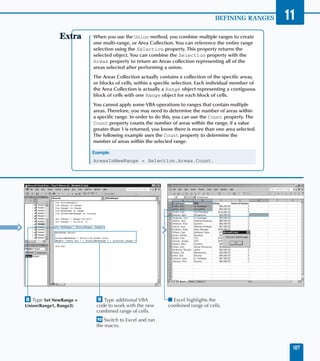
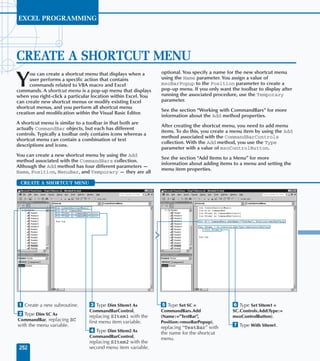
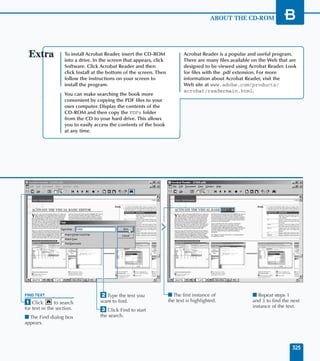
File and Folder Handling
STATEMENT DESCRIPTION
ChDir path Changes to the specified folder location.
ChDrive drive Changes to the specified drive.
Close [filenumber] Closes a file opened using the Open statement.
FileCopy source, destination Copies a file from the source to the specified destination.
Kill pathname Deletes files from a disk. Use wildcards * for multiple characters and ? for
single characters.
Lock [#]filenumber[, recordrange] Locks all or a portion of an open file to prevent access by other processes.
Open pathname For mode Opens the specified file to allow input/output operations.
[Access access] [lock] As
[#]filenumber [Len=reclength]
MkDir path Creates a new directory or folder.
Print #filenumber[, outputlist] Writes display-formatted data sequentially to a file.
Put [#]filenumber, [recnumber,] varname Writes data contained in a variable to a disk file.
Reset Closes all files opened using the Open statement.
RmDir path Removes the specified folder.
SetAttr pathname, attributes Sets the attribute information for the specified file.
Unlock [#]filenumber[, recordrange] Unlocks a file to allow access by other processes.
Width #filenumber, width Assigns the output line width for a file opened using the Open statement.
Write #filenumber[, outputlist] Writes data to a sequential text file.
Interaction
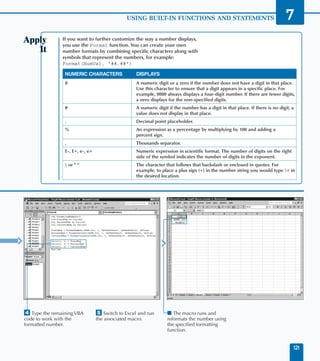
STATEMENT DESCRIPTION
AppActivate title[, wait] Activates an application window.
DeleteSetting appname, section[, key] Deletes a section or key setting from an application’s entry in
the Windows Registry.
SaveSetting appname, section, key, setting Saves an application entry in the application’s entry in the
Windows Registry.
SendKeys string[, wait] Sends one or more keystrokes to the active window as if they
were typed on the keyboard.
298](https://image.slidesharecdn.com/excelvbaprogramming-100216172634-phpapp02/85/Excel-Vba-Programming-312-320.jpg)
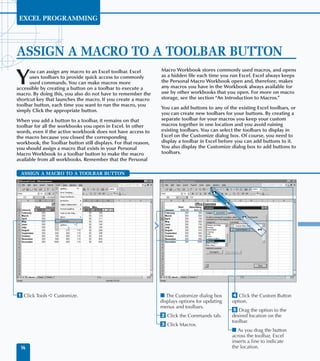
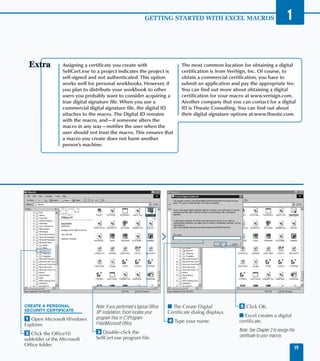
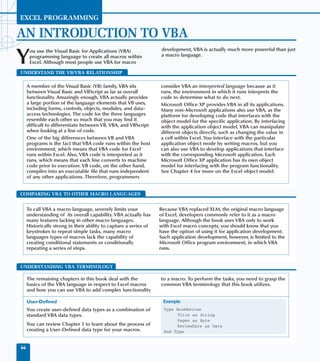
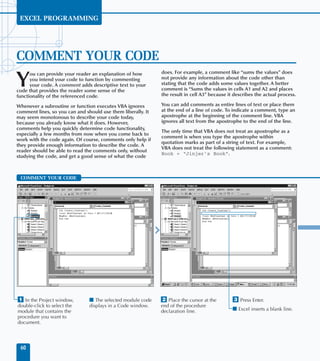
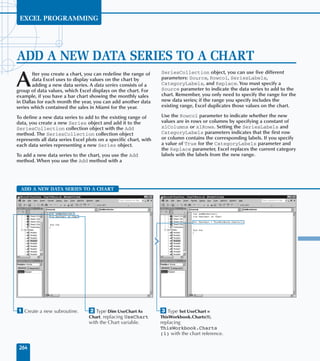
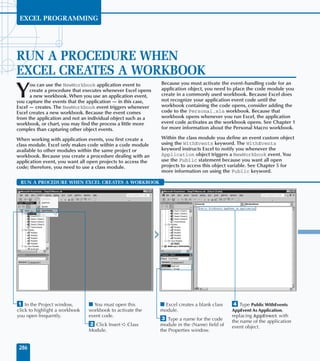
![VBA QUICK REFERENCE A
VBA STATEMENTS QUICK REFERENCE (CONTINUED)
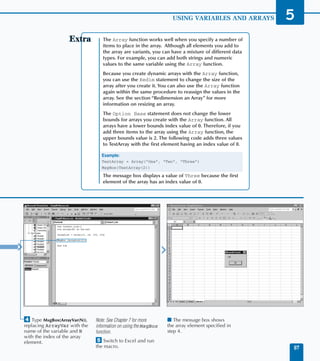
Program Flow
STATEMENT DESCRIPTION
[Public | Private] Declare Sub name Lib “libname” Declares a reference to an external DLL library
[Alias “aliasname”] [([arglist])] function.
Do [{While | Until} condition] Repeats a block of statements while or until a
[statements] condition is true. The condition is checked at the
Loop beginning of the loop.
Do Repeats a block of statements while or until a
[statements] condition is true. Because the condition is
Loop [{While | Until} condition] checked at the end of the loop, the block of
statements always executes at least once.
Exit Do | For | Function | Property | Sub Exits the specified Do Loop, For Next,
Function, Sub, or Property code.
For Each element In group Repeats a block of statements for each element
[statements] in an array or collection.
Next [element]
For counter = start To end [Step step] Repeats a section of code the specified number
[statements] of times.
Next [counter]
[Public | Private | Friend] [Static] Function name Defines a procedure that returns a value.
[(arglist)] [As type]
[statements]
[name = expression]
End Function
If condition Then Conditionally executes a block of statements
[statements] based upon the value of an expression.
[ElseIf condition-n Then
[elseifstatements] . . .
[Else
[elsestatements]]
End If
[Public | Private | Friend] [Static] Property Get name Declares the name and arguments procedure
[(arglist)] [As type]
[statements]
[name = expression]
End Property
[Public | Private | Friend] [Static] Property Let name Declares the name and arguments of a
([arglist,] value) procedure that assigns a value to a property.
[statements]
End Property
[Public | Private | Friend] [Static] Property Set name Declares the name and arguments of a
([arglist,] reference) procedure that sets a reference to an object.
[statements]
End Property
299](https://image.slidesharecdn.com/excelvbaprogramming-100216172634-phpapp02/85/Excel-Vba-Programming-313-320.jpg)
![APPENDIX
VBA AND EXCEL OBJECT MODEL
QUICK REFERENCE
VBA STATEMENTS QUICK REFERENCE (CONTINUED)
Program Flow (Continued)
STATEMENT DESCRIPTION
Select Case testexpression Executes one block out of a series of statement
[Case expressionlist-n blocks depending upon the value of an expression.
[statements-n]] . . .
[Case Else
[elsestatements]]
End Select
[Private | Public | Friend] [Static] Sub name [(arglist)] Declares the name, arguments, and code that
[statements] form a Sub procedure.
End Sub
While condition Executes a block of statements as long as the
[statements] specified condition is true.
Wend
With object Executes a block of statements on a single object
[statements] or on a user-defined data type.
End With
Variable Declaration
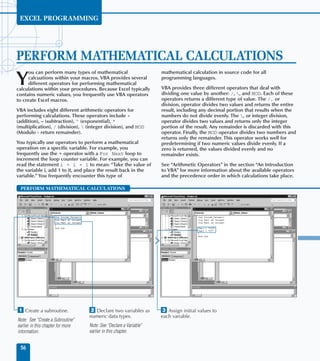
STATEMENT DESCRIPTION
[Public | Private] Const constname [As type] = expression Declares a constant value.
Dim [WithEvents] varname[([subscripts])] [As [New] type] Declares variables and allocates the appropriate
storage space.
Friend [WithEvents] varname[([subscripts])] [As [New] type] Declares a procedure or variable to only have
scope in the project where it is defined.
Option Compare {Binary | Text | Database} Specifies the default comparison method to use
when comparing strings.
Option Explicit Forces declaration of all variables within the
module.
Option Private Indicates that all code within the entire module is
Private. This option is used by default. You can
overwrite the effects of this option by declaring a
specific procedure Public.
Private [WithEvents] varname[([subscripts])] [As [New] type] Declares variables and procedures to only have
scope within the current module.
Public [WithEvents] varname[([subscripts])] [As [New] type] Declares variables and procedures to have scope
within the entire project.
300](https://image.slidesharecdn.com/excelvbaprogramming-100216172634-phpapp02/85/Excel-Vba-Programming-314-320.jpg)
![VBA QUICK REFERENCE A
VBA STATEMENTS QUICK REFERENCE (CONTINUED)
Variable Declaration (Continued)
STATEMENT DESCRIPTION
ReDim [Preserve] varname(subscripts) [As type] Changes the dimensions of a dynamic array.
[Private | Public] Type varname Defines a custom data type.
elementname [([subscripts])] As type
[elementname [([subscripts])] As type]
...
End Type
VBA FUNCTION QUICK REFERENCE
Legend:
Plain courier text = required . . . = list of items
Italics = user-defined | = or
[] = optional
Array Functions
FUNCTION DESCRIPTION RETURNS
Array(arg1,arg2, arg3, . . .) Creates a variant array containing the specified elements. Variant
LBound(arrayname[, dimension]) Returns the smallest subscript for the specified array. Long
UBound(arrayname[, dimension]) Returns the largest subscript for the specified array. Long
Data Type Conversion Functions
FUNCTION DESCRIPTION RETURNS
Asc(string) Returns the character code of the first letter in a string. Integer
CBool(expression) Converts an expression to Boolean data type Boolean
(True or False).
CByte(expression) Converts an expression to Byte data type. Byte
CCur(expression) Converts an expression to Currency data type. Currency
CDate(expression) Converts an expression to a Date data type. Date
CDbl(expression) Converts an expression to Double data type. Double
CDec(expression) Converts an expression to a decimal value. Variant
(Decimal)
Chr(charactercode) Converts the character code to the corresponding character. Variant
Chr(9) returns a tab, Chr(34) returns quotation marks, etc.
CInt(expression) Converts an expression to an Integer data type; rounding Integer
any fractional parts.
301](https://image.slidesharecdn.com/excelvbaprogramming-100216172634-phpapp02/85/Excel-Vba-Programming-315-320.jpg)
![APPENDIX
VBA AND EXCEL OBJECT MODEL
QUICK REFERENCE
VBA FUNCTION QUICK REFERENCE (CONTINUED)
Data Type Conversion Functions (Continued)
FUNCTION DESCRIPTION RETURNS
CLng(expression) Converts an expression to the Long data type. Long
CSng(expression) Converts an expression to the Single data type. Single
CStr(expression) Returns a string containing the specified expression. String
CVar(expression) Converts any data type to a Variant data type. All Variant
numeric values are treated as Double data types and
string expressions are treated as String data types.
Format(expression[, format[, Formats the expression using either predefined or Variant
firstdayofweek[, user-defined formats.
firstweekofyear]]])
FormatCurrency(Expression[, Formats the expression as a currency value using the Currency
NumDigitsAfterDecimal system-defined currency symbol.
[, IncludeLeadingDigit
[,UseParensForNegativeNumbers
[, GroupDigits]]]])
FormatDateTime(Date[, NamedFormat]) Formats an expression as a date and time. Date
FormatNumber (Expression Formats the expression as a number. Mixed
[, NumDigitsAfterDecimal
[, IncludeLeadingDigit
[, UseParensForNegativeNumbers
[, GroupDigits]]]])
FormatPercent (Expression Returns the expression formatted as a percentage with a String
[,NumDigitsAfterDecimal trailing % character.
[,IncludeLeadingDigit
[,UseParensForNegativeNumbers
[,GroupDigits]]]])
Hex(number) Converts a number to a hexadecimal value. Rounds String
numbers to nearest whole number before converting.
Oct(number) Converts a number to an octal value. Rounds numbers to Variant
nearest whole number before converting. (String)
Str(number) Converts a number to a string using the Variant . Variant
data type (String)
Val(string) Returns the numeric portion of a string formatted as a Mixed
number of the appropriate data type.
302](https://image.slidesharecdn.com/excelvbaprogramming-100216172634-phpapp02/85/Excel-Vba-Programming-316-320.jpg)
![VBA QUICK REFERENCE A
VBA FUNCTION QUICK REFERENCE (CONTINUED)
Date and Time Functions
FUNCTION DESCRIPTION RETURNS
Date Returns the current system date. Date
DateAdd(interval, number, date) Returns a date that is the specified interval of time from Date
the original date.
DateDiff(interval, date1, date2[, Determines the time interval between two dates. Long
firstdayofweek[,
firstweekofyear]])
DatePart(interval, date[, Returns the specified part of a date. Integer
firstdayofweek[,
firstweekofyear]])
DateSerial(year, month, day) Converts the specified date to a serial number. Date
DateValue(date) Converts a string to a date. Date
Day(date) Returns a whole number between 1 and 31 representing Integer
the day of the month.
Hour(time) Returns a whole number between 0 and 23 representing Integer
the hour of the day.
Minute(time) Returns a whole number between 0 and 59 representing Integer
the minute of the hour.
Month(date) Returns a whole number between 1 and 12 representing Integer
the month of the year.
Now Returns the current system date and time. Date
Second(time) Returns a whole number between 0 and 59 representing Integer
the second of the minute.
Time Returns the current system time. Date
Timer Indicates the number of seconds that have elapsed since Single
midnight
TimeSerial(hour, minute, second) Creates a time using the specified hour, minute, Date
and second values.
TimeValue(time) Converts a time to the serial number used to store time. Date
WeekDay(date, [firstdayofweek]) Returns a whole number representing the first day Integer
of the week.
Year(date) Returns a whole number representing the year portion Integer
of a date.
303](https://image.slidesharecdn.com/excelvbaprogramming-100216172634-phpapp02/85/Excel-Vba-Programming-317-320.jpg)
![APPENDIX
VBA AND EXCEL OBJECT MODEL
QUICK REFERENCE
VBA FUNCTION QUICK REFERENCE (CONTINUED)
File and Folder Handling Functions
FUNCTION DESCRIPTION RETURNS
CurDir(drive) Returns the current path. String
Dir[(pathname[, attributes])] Returns the name of the file, directory, or folder that String
matches the specified pattern.
EOF(filenumber) Returns -1 when the end of a file has been reached. Integer
FileAttr(filenumber, returntype) Indicates the file mode used for files opened with the Long
Open statement.
FileDateTime(pathname) Indicates the date and time when a file was last modified. Date
FileLen(pathname) Indicates the length of a file in bytes. Long
FreeFile(rangenumber) Returns the next file number available for use by the Integer
Open statement.
GetAttr(pathname) Returns a whole number representing the attributes Integer
of a file, directory, or folder.
Input (number, [#]filenumber) Returns a string containing the indicated number of String
characters from the specified file.
Loc(filenumber) Indicates the current read/write position in an open file. Long
LOF(filenumber) Returns the size in bytes of a file opened using the Long
Open statement.
Seek(filenumber) Specifies the current read/write position with a file Long
opened with the Open statement.
Financial Functions
FUNCTION DESCRIPTION RETURNS
DDB(cost, salvage, life, period[, factor]) Specifies the depreciation value for an Double
asset during a specific time frame.
FV(rate, nper, pmt[, pv[, type]]) Determines the future value of an annuity Double
based on periodic fixed payments.
IPmt(rate, per, nper, pv[, fv[, type]]) Determines the interest payment on an Double
annuity for a specific period of time.
IRR(values(), [, guess]) Determines the internal rate of returns for Double
a series of cash flows.
MIRR(values(), finance_rate, reinvest_rate) Returns the modified interest rate of Double
returns for a series of periodic cash flows.
304](https://image.slidesharecdn.com/excelvbaprogramming-100216172634-phpapp02/85/Excel-Vba-Programming-318-320.jpg)
![VBA QUICK REFERENCE A
VBA FUNCTION QUICK REFERENCE (CONTINUED)
Financial Functions (Continued)
FUNCTION DESCRIPTION RETURNS
NPer(rate, pmt, pv[, fv[, type]]) Returns the number of periods for Double
an annuity.
NPV(rate, values()) Returns the net present value of Double
an investment.
Pmt(rate, nper, pv[, fv[, type]]) Returns the payment amount for Double
an annuity based on fixed payments.
PPmt(rate, per, nper, pv[, fv[, type]]) Returns the principal payment amount Double
for an annuity.
PV(rate, nper, pmt[, fv[, type]]) Returns the present value of an annuity. Double
Rate(nper, pmt, pv[, fv[, type[, guess]]]) Returns the interest rate per period for Double
an annuity.
SLN(cost, salvage, life) Determines the straight-line depreciation Double
of an asset for a single period.
SYD(cost, salvage, life, period) Determines the sum-of-years’ digits Double
depreciation of an asset for a
specified period.
Information Functions
FUNCTION DESCRIPTION RETURNS
CVErr(errornumber) Returns a user-defined error number. Variant
Error[(errornumber)] Returns the error message for the specified error number. String
IsArray(varname) Indicates whether a variable contains an array. Boolean
IsDate(expression) Indicates whether an expression contains a date. Boolean
IsEmpty(expression) Indicates whether a variable has been initialized. Boolean
IsError(expression) Indicates whether an expression is an error value. Boolean
IsMissing(argname) Indicates whether an optional argument was passed to Boolean
a procedure.
IsNull(expression) Indicates whether an expression contains no valid data. Boolean
IsNumeric(expression) Indicates whether an expression is a number. Boolean
IsObject(identifier) Indicates whether a variable references an object. Boolean
TypeName(varname) Specifies the variable type. String
VarType(varname) Specifies the subtype of a variable. Integer
305](https://image.slidesharecdn.com/excelvbaprogramming-100216172634-phpapp02/85/Excel-Vba-Programming-319-320.jpg)
![APPENDIX
VBA AND EXCEL OBJECT MODEL
QUICK REFERENCE
VBA FUNCTION QUICK REFERENCE (CONTINUED)
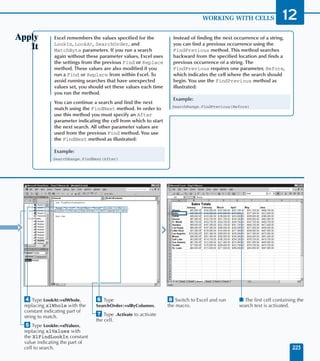
Interaction Functions
FUNCTION DESCRIPTION RETURNS
Choose(index, choice-1, Selects and returns a value from a list of arguments. Mixed
[choice-2, ...])
DoEvents() Yields execution so the operating system can process Integer
other events.
Iif(expr, truepart, falsepart) Evaluates the expression and returns either the Mixed
truepart or falsepart parameter value.
InputBox(prompt[, title] Displays a dialog box prompting the user for input. String
[, default] [, xpos]
[, ypos] [, helpfile,
context])
GetAllSettings(appname, section) Returns a list of key settings and their values from the Variant
Windows Registry.
GetObject([pathname][, class]) Returns a reference to an object provided by an Variant
ActiveX Component.
GetSetting(appname, section, Returns a key setting value from an application’s entry Variant
key[, default]) in the Windows registry.
MsgBox(prompt[, buttons] Displays a message box and returns a value representing Integer
[, title] [, helpfile, the button pressed by the user.
context])
Partition(number, start, stop, Indicates where a number occurs within a series of ranges. String
interval)
QBColor(color) Returns the RGB color code for the specified color. Long
Switch(expr-1, value-1[, expr-2, Evaluates a list of expressions and returns a value Variant
value-2 ...]) associated with the first True expression.
RGB(red, green, blue) Returns a number representing the RGB color value. Long
Mathematical Functions
FUNCTION DESCRIPTION RETURNS
Abs(number) Returns the absolute value of a number. Mixed
Atn(number) Returns the arctangent of a number. Double
Cos(number) Returns the cosine of an angle. Double
306](https://image.slidesharecdn.com/excelvbaprogramming-100216172634-phpapp02/85/Excel-Vba-Programming-320-320.jpg)
![VBA QUICK REFERENCE A
VBA FUNCTION QUICK REFERENCE (CONTINUED)
Mathematical Functions (Continued)
FUNCTION DESCRIPTION RETURNS
Exp(number) Returns the base of the natural logarithms raised to Double
a power.
Fix(number) Returns the integer portion of a number. With negative Integer
values, returns first negative value greater than or
equal to number.
Int(number) Returns the integer portion of a number. With negative Integer
values, returns the first negative number less than or
equal to the number.
Log(number) Returns the natural logarithm of a number. Double
Round(expression [, numdecimalplaces]) Rounds a number to the specified number of Mixed
decimal places.
Rnd[(number)] Returns a random number between 0 and 1. Single
Sgn(number) Returns 1 for a number greater than 0, 0 for a value of 0, Integer
and -1 number less than zero.
Sin(number) Specifies the sine of an angle. Double
Sqr(number) Specifies the square root of a number. Double
Tan(number) Specifies the tangent of an angle. Double
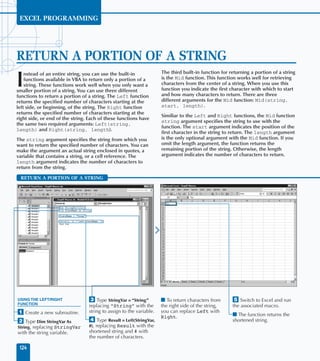
String Manipulation Functions
FUNCTION DESCRIPTION RETURNS
nStr([start, ]string1, Specifies the position of one string within another string. Long
string2[, compare])
InStrRev(stringcheck, Specifies the position of one string within another Long
stringmatch[, start[, starting at the end of the string.
compare]])
LCase(string) Converts a string to lowercase. String
Left(string, length) Returns the specified number of characters from the String
left side of a string.
Len(string | varname) Determines the number of characters in a string. Long
LTrim(string) Trims spaces from the left side of a string. String
Mid(string, start[, length]) Returns the specified number of characters from the String
center of a string.
Right(string, length) Returns the specified number of characters from the String
right side of a string.
RTrim(string) Trims spaces from the right side of a string. String
Space(number) Creates a string with the specified number of spaces. String
307](https://image.slidesharecdn.com/excelvbaprogramming-100216172634-phpapp02/85/Excel-Vba-Programming-321-320.jpg)
![APPENDIX
VBA AND EXCEL OBJECT MODEL
QUICK REFERENCE
VBA FUNCTION QUICK REFERENCE (CONTINUED)
String Manipulation Functions (Continued)
FUNCTION DESCRIPTION RETURNS
ISpc(n) Positions output when printing to a file. String
Str(number) Returns a string representation of a number. String
StrComp(string1, Returns a value indicating the result of a
string2[, compare]) string comparison. Integer
StrConv(string, conversion, LCID) Converts a string to the specified format. String
String(number, character) Creates a string by repeating a character String
the specified number of times.
Tab[(n)] Positions output when printing to a file. String
Trim(string) Trims spaces from left and right of a string. String
UCase(string) Converts a string to uppercase. String
VBA FUNCTION CONSTANTS AND CHARACTERS
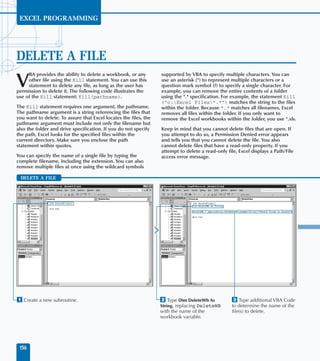
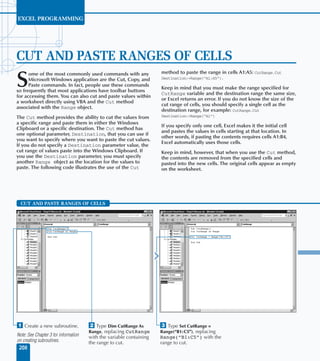
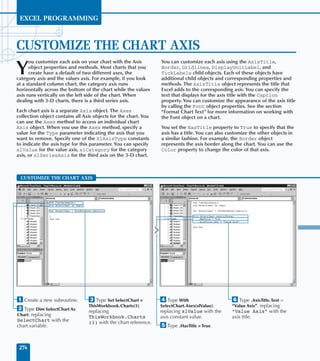
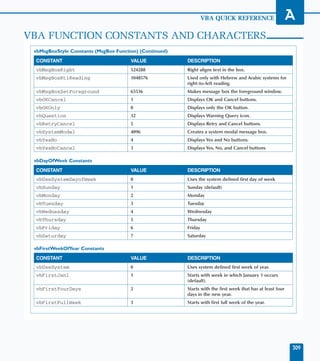
vbMsgBoxStyle Constants (MsgBox Function)
CONSTANT VALUE DESCRIPTION
vbAbortRetryIgnore 2 Displays Abort, Retry, and Ignore buttons.
vbApplicationModal 0 Creates application modal message box.
vbCritical 16 Displays Critical Message icon.
vbDefaultButton1 0 Makes first button default.
vbDefaultButton2 256 Makes second button default.
vbDefaultButton3 512 Makes third button default.
vbDefaultButton4 768 Makes fourth button default.
vbExclamation 48 Displays Warning Message icon.
vbInformation 64 Displays Information Message icon.
vbMsgBoxHelpButton 16384 Adds a Help button.
308](https://image.slidesharecdn.com/excelvbaprogramming-100216172634-phpapp02/85/Excel-Vba-Programming-322-320.jpg)


![LUXr 1-day workshop, Wed November 07, 2012 [San Francisco]](https://cdn.slidesharecdn.com/ss_thumbnails/1day-luxr20121107slideshare-121114152425-phpapp02-thumbnail.jpg?width=640&height=640&fit=bounds)


