This document provides tips for common pitfalls to avoid when installing tile floors yourself. It recommends ordering extra tile to account for breaks and ensuring all tiles are consistent in size and color before starting. The subfloor must be level and the proper backer or membrane chosen depending on the existing floor. When laying tiles, working from the center out and doing dry runs is best to minimize cuts. It's important to let the adhesive fully cure before grouting and sealing natural stone tiles, while ceramic tiles usually don't require sealing.
To tile a floor or wall:
1. Prepare a smooth surface by removing old tiles and filling any holes.
2. Affix horizontal and vertical batons as guides for tile placement.
3. Apply tile adhesive and carefully affix tiles using spacers for consistency. Cut tiles as needed.
This document provides instructions for digging post holes and pouring concrete foundations for a deck. It outlines digging holes to the proper depth and size, mixing concrete according to instructions, pouring and tamping concrete into the holes, placing concrete piers or posts, smoothing the surface, checking for levelness, and cleaning tools when finished. The project will take an experienced person 5-7 hours to complete for a 10' x 30' deck. Proper preparation of materials and tools, accurate hole digging, and correct concrete mixing and placement are emphasized.
How To Repair And Replace Broken Bathroom Ceramic TilesOttawa Tile
The document provides instructions for repairing broken ceramic bathroom tiles. It explains that damaged tiles should be repaired as soon as possible for safety and aesthetic reasons. The difficulty of the repair depends on the tile substrate and adhesive. For simple repairs, one should remove the grout around the damaged tile, remove the tile, clean the area, apply new adhesive and grout. More complex repairs require tools like drills and chisels and may require a professional. Proper preparation and allowing time for drying are essential for a seamless repair.
Flowcrete Presents 'Hubble Bubble Flooring Trouble' Halloween 2017Flowcrete Group Ltd
Hubble, bubble flooring trouble,
Fire burn and cauldron bubble.
Whether you’re a witch with a potion,
Or a vampire devoid of emotion.
Your coating can begin to break,
As heat and impacts make it flake.
So this Halloween, find the spell,
To avoid living in flooring hell.
Read our tips by the lair’s candlesticks,
And choose a floor of treats, not tricks.
The document discusses porcelain tiles, which are a type of ceramic tile made from thick clay fired at high temperatures. Porcelain tiles are dense, uniform, non-porous, and come in many styles. They are more durable and resistant to wear than standard ceramic tiles due to their composition and thickness. While porcelain tiles are more expensive initially than other flooring options, their longevity, low maintenance needs, and suitability for high-traffic areas make them a worthwhile investment.
1) The document is a site visit report submitted by Louise Fong for an integrated assignment on measurement, construction technology, and building materials.
2) It includes an introduction, sections on brick wall construction content and technical observations, objectives, and a conclusion.
3) The report describes the process of brick wall construction including planning, preparing mortar, laying bricks, cutting bricks as needed, and finishing work. It also lists the materials, equipment, and tools used.
This document provides instructions for applying grout during wall and floor tiling installations. It explains that grouting is an essential part of tiling that adds aesthetic appearance and allows for slight tile size deviations. The document outlines grout preparation steps like ensuring the adhesive is dry and joints are clear. It also details the necessary tools like grout floats and mixers and describes the grouting procedure which involves applying grout, cleaning excess from tiles, and allowing it to dry fully. Proper grout application and cleaning is emphasized for achieving uniform, smooth joints.
Acclimating new bath panels is essential to prevent bowing and ensure proper installation. Bath panels should be removed from packaging and placed flat in the installation room for at least 48 hours before installation to allow them to adjust to the room's humidity and temperature conditions. This acclimation process helps the panels become unified with the room's conditions to prevent warping and bowing caused by changes in humidity and temperature after installation.
Polariteiten - van Monoloog naar DialoogMindConsult
Presentatie over de inhoud, functie, betekenis en omgang met polariteiten, bewustwording van polarisatie, omvatting en overstijging van polariteiten - het geheel is meer dan de som der delen, individueel, in relatie en in de wereld
Satya Nadella is the Chief Executive Officer of Microsoft. Ammar Yaser Saleh Alsholi has successfully completed the requirements to be recognized as a Microsoft Certified Solutions Expert: Desktop Infrastructure. He achieved this certification on July 15, 2014 with certification number E884-1679.
Este documento contiene 19 secciones que tratan sobre diferentes aspectos de las redes de comunicación. Se definen conceptos como redes, tipos de redes según su alcance, topología y método de conexión. También se explican los protocolos de comunicación, niveles lógicos, dispositivos de red, medios de comunicación alámbricos e inalámbricos y redes telefónicas. Por último, se analizan las ventajas y desventajas de la comunicación digital y la representación numérica de señales digitales.
This document provides step-by-step instructions for tiling a floor from start to finish. It begins with safety precautions and preparation steps like measuring the space and selecting tiles. It then outlines the layout process including centering a "key tile" and dry-fitting tiles. Subsequent steps include applying adhesive, laying tiles from the key tile outward, cutting edge tiles, waiting 24 hours, filling edges, grouting, cleaning, and sealing. The overall process takes planning but results in an attractive and durable tiled floor.
A new kitchen floor deserves terracotta floor tiles which provide warmth and rustic charm with their uneven coloring. Proper preparation of the floor is important, such as leveling any slopes, before applying a thick adhesive suitable for terracotta's porous nature. The tiles are then laid using spacers and checked for level, cutting as needed with an angle grinder and safety gear. Once set, the tiles are sealed before grouting and a final protective sealing. Careful installation allows anyone to successfully lay terracotta floor tiles.
This document provides tips for replacing bathroom tiles, including removing old tiles, preparing the surface, applying new tile and grout. It discusses different tile types like ceramic, porcelain, glass and stone. For a single tile replacement, use tools to loosen grout and pry up the old tile. For many tiles, smash them up before removal. Thoroughly scrape and clean the surface before applying new tile with adhesive and grout. Larger replacement projects may require professional help.
Ceramic tiles provide a durable surface for floors, worktops, and other areas. When tiling, it is important to properly prepare the surface, set out the tiles, cut tiles as needed, grout, and finish edges. Tiles require precise laying and can be cut using different tools depending on the tile material. Spacers are used to establish grout lines and the surface must be completely level for the best results.
Mosaics have been around for thousands of years, dating back to around 2000 BC. Large mosaics are made by assembling small tiles or pieces of material to form a picture. The cost of mosaics can range widely, from $50 for a small piece to over $1000 for a large, professionally made mosaic. To finish a mosaic, the tiles are grouted together using a process that involves mixing grout, applying it between the tiles, smoothing it, and cleaning to reveal the final piece.
Ceramic tile installation involves several steps:
1) Preparing the subfloor to be structurally sound, smooth, flat and free of contaminants
2) Laying out the room using chalk lines for guidance
3) Applying thinset mortar to the subfloor using a notched trowel, then pressing tiles into the mortar
4) Allowing the thinset to set before grouting the following day
5) Grouting involves spreading grout over tiles using a float and cleaning excess grout from the tiles.
This document provides instructions for laying various types of floor tiles, including carpet, vinyl, and cork tiles. It discusses preparing the subfloor, calculating the number of tiles needed, cutting tiles to fit irregular spaces, dealing with doorways, and ensuring tiles are properly adhered. Specific tips are provided for issues like radiator pipes, laying tiles around sinks, and preventing tiles from misaligning at skirtings. Proper preparation of the subfloor and careful installation of each tile is emphasized to achieve the best results and performance from the new floor covering.
The kitchen is the one room in the house that can have several different types of tiles, in different applications, and they all will enhance your kitchen beautifully.
Here are a few tips for choosing the right application and type of tile for your kitchen.
Instructions on how to install faux stone panels and stone veneer panels. These are related to Faux Stone Depot's faux stacked stone panels and ledgestone only. DIY faux stone made easy.
This document provides instructions for laying a laminate floor, including:
1. Calculating the amount of underlay and laminate flooring needed based on room dimensions.
2. Preparing the sub-floor by ensuring it is dry, level, and adding a damp proof membrane if needed.
3. Conditioning the laminate flooring by leaving it in the room for 48 hours before installation.
4. Laying the flooring using the LOC (lock) system without adhesive, including staggering the joints, fitting around pipes, and installing the final row.
To sand a floor, clear all furniture from the room and protect doors and cupboards from wood dust. Remove any hazards from the floor and repair any wood panels before starting to sand. Load the floor sander with sandpaper and sand the floor in gradual passes from one side of the room to the other, sanding with the grain. Finish by sanding edges and corners, then apply several coats of varnish to seal and protect the floor. Allow adequate drying time between coats and before using the floor.
The document provides tips for waterproofing basements to prevent water damage. It advises homeowners to regularly inspect their basements for cracks or signs of moisture and ensure proper drainage around the home by cleaning gutters and installing drainage systems. Homeowners should also seal any visible cracks, use moisture-resistant materials in the basement, and consult a professional for waterproofing rather than attempting major projects without guidance, as improper installation can cause further issues. Regular maintenance of gutters and drainage is key to preventing water from pooling near the foundation.
Subway tiles have gained quite a following in the commercial arena of backsplashing and as a flooring material, in general. This has made them a primary choice to be implemented for efficient and stylish designs in the kitchen
Subway tiles have gained quite a following in the commercial arena of backsplashing and as a flooring material, in general. This has made them a primary choice to be implemented for efficient and stylish designs in the kitchen.
Plastering involves covering rough surfaces with a plaster mixture to create smooth surfaces. The document discusses the process of cement plastering, which is the most common type. It involves mixing cement, sand, lime and water then applying it in layers to walls and ceilings. Proper preparation, application technique and curing time are important for achieving durable, long-lasting plastering without defects like cracks or blistering. Safety precautions should also be followed when plastering at heights.
This document provides step-by-step instructions for stamping concrete to create decorative surfaces like brick, slate, or stone on patios, pool decks, and driveways. The 21 steps include: cleaning and preparing the concrete surface with acid, masking off areas, applying base and bond coats of cement mixture, embedding stamp mats in the wet top coat, using tools to refine the stamped pattern, applying colorant and sealer. Stamped concrete can transform plain concrete into an attractive surface with low maintenance.
Once your floor tiles are laid and set, it’s time to grout! Grout completes the look of your tiles and also gives strength to your tiles, preventing them from moving and cracking. Our guide makes grouting easy.
Floating Floors Installation and Warranty Information by AquaStepAquaStep
AquaStep provides installation and warranty information for floating floors, floating floorboards, laminate floors, timber floors, etc. For more information about our flooring service then visit us our website or call us @ 02 9683 1300.
Floating Floors Installation and Warranty Information by AquaStep
DIY Tile Floor Installation2
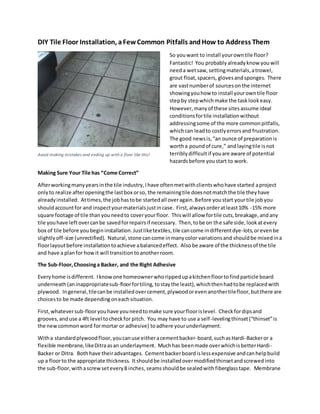
1. DIY Tile Floor Installation, aFewCommon Pitfalls andHow to Address Them
Avoid making mistakes and ending up with a floor like this!
So youwant to install yourowntile floor?
Fantastic! You probablyalreadyknow youwill
needa wetsaw,settingmaterials,atrowel,
grout float,spacers, glovesandsponges. There
are vastnumberof sourcesonthe internet
showingyouhow to install yourowntile floor
stepby stepwhichmake the tasklookeasy.
However,manyof these sitesassume ideal
conditionsfortile installationwithout
addressingsome of the more commonpitfalls,
whichcan leadto costlyerrorsand frustration.
The good newsis,“an ounce of preparationis
wortha poundof cure,” andlayingtile isnot
terriblydifficultif youare aware of potential
hazardsbefore youstart to work.
Making Sure Your Tile has “Come Correct”
Afterworkingmanyyearsinthe tile industry,Ihave oftenmetwithclientswhohave started aproject
onlyto realize afteropeningthe lastbox orso, the remainingtile doesnotmatchthe tile theyhave
alreadyinstalled. Attimes,the jobhastobe startedall overagain.Before you start yourtile job you
shouldaccountfor and inspectyourmaterialsjustincase. First,alwaysorderatleast10% -15% more
square footage of tile thanyouneedto coveryourfloor. Thiswill allow fortile cuts,breakage,andany
tile youhave leftovercanbe savedforrepairsif necessary. Then,tobe on the safe side,lookatevery
box of tile before you begininstallation. Justliketextiles,tile cancome indifferentdye-lots,orevenbe
slightlyoff-size (unrectified). Natural,stone cancome inmanycolor variationsand shouldbe mixedina
floorlayoutbefore installation toachieve abalancedeffect. Alsobe aware of the thicknessof the tile
and have a planfor howit will transitiontoanotherroom.
The Sub-Floor,Choosinga Backer, and the Right Adhesive
Everyhome isdifferent. Iknowone homeownerwhorippedupakitchenfloortofindparticle board
underneath(aninappropriatesub-floorfortiling,tostaythe least),whichthenhadtobe replacedwith
plywood. Ingeneral,tilecanbe installedovercement,plywoodorevenanothertilefloor,butthere are
choicesto be made dependingoneachsituation.
First,whateversub-flooryouhave youneedtomake sure yourfloorislevel. Checkfordipsand
grooves,anduse a 4ft level tocheckfor pitch. You may have to use a self-levelingthinset(“thinset”is
the newcommonword formortar or adhesive) toadhere yourunderlayment.
Witha standardplywoodfloor, youcanuse eitheracementbacker-board,suchasHardi-Backeror a
flexible membrane,likeDitraasan underlayment. Muchhas beenmade overwhichisbetterHardi-
Backer or Ditra. Bothhave theiradvantages. Cementbackerboardislessexpensive andcanhelpbuild
up a floorto the appropriate thickness. Itshouldbe installedovermodifiedthinsetandscrewedinto
the sub-floor,withascrewsetevery8 inches,seamsshouldbe sealedwith fiberglass tape. Membrane
2. ismore expensivethancementboardbutmucheasierto use. Simplyadhere the membrane tothe
plywoodusingmodifiedthinset. Itis importanttonote howeverwhenyouadhere yourtile to
membrane youmustuse unmodifiedthinset,whichwill cure properly.
If youhave a cementfloor,youshoulduse amembrane underlaymentbut youhave tocheckand make
sure your underlaymentwill adhere properly. Checkfor moisture absorption bythrowingafew drops
of wateronthe floor.If the watergetsabsorbedyouare goodto go, if it simplybeads,yourconcrete
has beentreatedandyouneedtostripwhateversubstance ispreventingthe waterfromabsorbing.
Concrete alsoneedstohave a rough surface for adhesive toadhere,soyoumayhave to score the
cementif itis smooth.
If you are tilingoveranoldtile flooryoumustmake sure the oldtile isstable (nolose pieces)andlevel.
You may have to use a grinderto level the floor.
Laying out Tile,Grout and Sealing
I have knownpeople tojustdive inandstart layingtile fromthe cornerof the room, onlytofindthey
have to cut lotsof oddpiecesonce theygetto the otherside. Alwayslaytile fromthe centerof a room.
Use a chalkline,runfromthe midpointof eachwall tomake a quadrant. Granted,not all rooms are
squaresor rectangles,buteveninaroom witha slantedwall youcanstill figure outacentral quadrant
point. Then,doa dry runlayingthe tilesfromthe centerandusingyourspacers (groutjointsare usually
between1/16”and 1/4” ) until youcan no longerfita full tile beforehittingthe wall. Use a dryeraser
to outline andmeasure forthe cutsof tile youwill needtomake to reachthe wall. If youneedtonotch
a tile a door frame youcan use a dryeraseras well.
Whenyouapplyyour adhesive toyourunderlaymentmake sure youcoverareascompletelyandevenly
withoutleavingandspaces,youwantacomplete bondbetweenthe floorandthe tile toprevent
movementandbreakage.
Wait at least24 hoursor more foryour adhesive tocure before grouting:itisall toocommonto be
impatient,butyoucaneasilyruinall yourhard workby groutingbefore the floorisproperlyset. Sanded
grout isbestfor floortiles. Donotadd too muchwater to yourgrout mix. Grout shouldbe the
consistencyof peanutbutter,justpliable enoughtoworkintoyourjoints. Once youhave completed
your job,waitat least3 days forthe groutto dry before doingacomplete scrubtoremove grouthaze.
Afterthe flooriscleanand dry youcan applyyoursealant.
It isalwaysadvisable toseal yourgroutand stone tile. However,youdonothave to seal porcelainor
ceramicfloors(granted,there may be some quite unusual exceptionsso alwayscheck withthe
manufacturer’s instructions).Unlike stone,whichisporous,porcelainandceramictile donotabsorb
sealanteasily,if atall,soif youattemptto seal youoftenendup witha tackycoating ontop of yourtile.