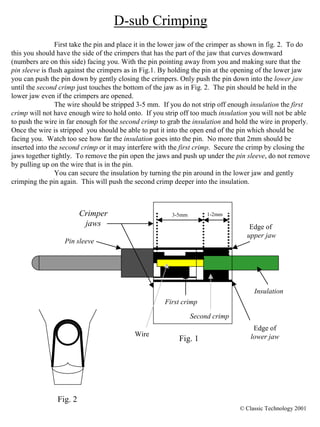
D-sub Crimping
                First take the pin and place it in the lower jaw of the crimper as shown in fig. 2. To do
this you should have the side of the crimpers that has the part of the jaw that curves downward
(numbers are on this side) facing you. With the pin pointing away from you and making sure that the
pin sleeve is flush against the crimpers as in Fig.1. By holding the pin at the opening of the lower jaw
you can push the pin down by gently closing the crimpers. Only push the pin down into the lower jaw
until the second crimp just touches the bottom of the jaw as in Fig. 2. The pin should be held in the
lower jaw even if the crimpers are opened.
                The wire should be stripped 3-5 mm. If you do not strip off enough insulation the first
crimp will not have enough wire to hold onto. If you strip off too much insulation you will not be able
to push the wire in far enough for the second crimp to grab the insulation and hold the wire in properly.
Once the wire is stripped you should be able to put it into the open end of the pin which should be
facing you. Watch too see how far the insulation goes into the pin. No more that 2mm should be
inserted into the second crimp or it may interfere with the first crimp. Secure the crimp by closing the
jaws together tightly. To remove the pin open the jaws and push up under the pin sleeve, do not remove
by pulling up on the wire that is in the pin.
                You can secure the insulation by turning the pin around in the lower jaw and gently
crimping the pin again. This will push the second crimp deeper into the insulation.


                         Crimper                        3-5mm        1-2mm
                          jaws                                                     Edge of
                                                                                  upper jaw
                  Pin sleeve


                                                                                     Insulation
                                                      First crimp

                                                                Second crimp
                                                                                     Edge of
                                           Wire                                     lower jaw
                                                           Fig. 1


                Fig. 2
                                                                                © Classic Technology 2001
Crimp pin


        Finished crimp pin


                                     This picture shows the pin in the
                                     lower jaw and flush against the
                                     crimper.


Crimp pin in lower jaw of crimpers


                                                  © Classic Technology 2001
Cross section of wire in D-sub pin


                          Cross section of lower jaw
 3D view of lower jaw


                               © Classic Technology 2001

Crimpers

  • 1.
    D-sub Crimping First take the pin and place it in the lower jaw of the crimper as shown in fig. 2. To do this you should have the side of the crimpers that has the part of the jaw that curves downward (numbers are on this side) facing you. With the pin pointing away from you and making sure that the pin sleeve is flush against the crimpers as in Fig.1. By holding the pin at the opening of the lower jaw you can push the pin down by gently closing the crimpers. Only push the pin down into the lower jaw until the second crimp just touches the bottom of the jaw as in Fig. 2. The pin should be held in the lower jaw even if the crimpers are opened. The wire should be stripped 3-5 mm. If you do not strip off enough insulation the first crimp will not have enough wire to hold onto. If you strip off too much insulation you will not be able to push the wire in far enough for the second crimp to grab the insulation and hold the wire in properly. Once the wire is stripped you should be able to put it into the open end of the pin which should be facing you. Watch too see how far the insulation goes into the pin. No more that 2mm should be inserted into the second crimp or it may interfere with the first crimp. Secure the crimp by closing the jaws together tightly. To remove the pin open the jaws and push up under the pin sleeve, do not remove by pulling up on the wire that is in the pin. You can secure the insulation by turning the pin around in the lower jaw and gently crimping the pin again. This will push the second crimp deeper into the insulation. Crimper 3-5mm 1-2mm jaws Edge of upper jaw Pin sleeve Insulation First crimp Second crimp Edge of Wire lower jaw Fig. 1 Fig. 2 © Classic Technology 2001
  • 2.
    Crimp pin Finished crimp pin This picture shows the pin in the lower jaw and flush against the crimper. Crimp pin in lower jaw of crimpers © Classic Technology 2001
  • 3.
    Cross section ofwire in D-sub pin Cross section of lower jaw 3D view of lower jaw © Classic Technology 2001