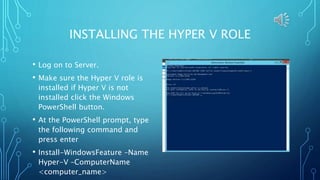
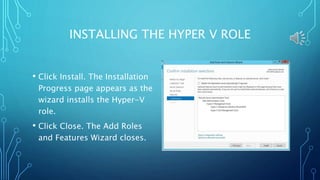
CREATING AND CONFIGURING
VIRTUAL NETWORKS
INSTALLING THE HYPER V ROLE
• Log on to Server.
• Make sure the Hyper V role is
installed if Hyper V is not
installed click the Windows
PowerShell button.
• At the PowerShell prompt, type
the following command and
press enter
• Install-WindowsFeature –Name
Hyper-V –ComputerName
<computer_name>
INSTALLING THE HYPER V ROLE
• The system installs the
Hyper-V role and prompts
you to restart the server.
INSTALLING THE HYPER V ROLE
• Log back on to the server.
• In the Server Manager
console, select Manage>Add
Roles and Features.
• The Add Roles and Features
Wizard appears. Displaying
the Before you begin page.
INSTALLING THE HYPER V ROLE
• Click next
• The Select Installation Type
page appears.
• Leave the Role-based or
feature-based installation
radio button selected and
click Next.
INSTALLING THE HYPER V ROLE
• The Select Installation Server
page appears.
• Click Next to accept the
default local server. The
Select Server Roles page
appears.
• Click Next. The Select
features page appears.
INSTALLING THE HYPER V ROLE
• Expand Remote Server
Administration Tools and Role
Administration Tools and select
the Hyper-V Management Tools
checkbox.
• Click Next. The Confirm
installation selections page
appears.
INSTALLING THE HYPER V ROLE
• Click Install. The Installation
Progress page appears as the
wizard installs the Hyper-V
role.
• Click Close. The Add Roles
and Features Wizard closes.
CREATING A VIRTUAL SWITCH
• Log on to Server which has
the Hyper-V role installed.
Open the Server Manager
console and select
Tools>Hyper-V Manager.
CREATING A VIRTUAL SWITCH
• In the left pane, select the
name of your server, and in
the right pane, click Virtual
Switch Manager.
• In the left pane, select New
virtual network switch.
CREATING A VIRTUAL SWITCH
In the Name text box, type in a
name for your internal switch and
click OK. The Virtual Switch
Manager dialog box closes.
Open the Virtual Switch Manager
dialog box and you should be
able to view your new Virtual
Switch.
CREATING A VIRTUAL NETWORK
• In the right pane of Hyper-V
Manager, click New>Virtual
Machine. The New Virtual
Machine Wizard appears,
displaying the Before You
Begin page
CREATING A VIRTUAL NETWORK
• Click Next. The Specify Name
and Location page appears.
• In the Name text box, type in
the name that you want to name
your machine and click Next.
The Assign Memory page
appears
• In the Startup memory text box,
type 128 or your desired
amount of memory and click
Next.
CREATING A VIRTUAL NETWORK
The Configure Networking page
appears.
In the Connection drop down list,
select Internal Switch and click
Next. The Connect Virtual Hard
Disk page appears.
Click Next. The Installation
Options page appears.
Click Next. The Completing the
New Virtual Machine Wizard page
appears.
CREATING A VIRTUAL NETWORK
• Click Finish. The wizard
creates the new virtual
machine and it appears in the
Hyper-V Manager console.
• To add additional virtual
machines repeat the steps.
THE END
TCI College of Technology
For Class CPN 250
Instructor Mr. Roy Lau
This presentation is brought to
you by Lakeisha York

Creating and Configuring

  • 1.
  • 2.
    INSTALLING THE HYPERV ROLE • Log on to Server. • Make sure the Hyper V role is installed if Hyper V is not installed click the Windows PowerShell button. • At the PowerShell prompt, type the following command and press enter • Install-WindowsFeature –Name Hyper-V –ComputerName <computer_name>
  • 3.
    INSTALLING THE HYPERV ROLE • The system installs the Hyper-V role and prompts you to restart the server.
  • 4.
    INSTALLING THE HYPERV ROLE • Log back on to the server. • In the Server Manager console, select Manage>Add Roles and Features. • The Add Roles and Features Wizard appears. Displaying the Before you begin page.
  • 5.
    INSTALLING THE HYPERV ROLE • Click next • The Select Installation Type page appears. • Leave the Role-based or feature-based installation radio button selected and click Next.
  • 6.
    INSTALLING THE HYPERV ROLE • The Select Installation Server page appears. • Click Next to accept the default local server. The Select Server Roles page appears. • Click Next. The Select features page appears.
  • 7.
    INSTALLING THE HYPERV ROLE • Expand Remote Server Administration Tools and Role Administration Tools and select the Hyper-V Management Tools checkbox. • Click Next. The Confirm installation selections page appears.
  • 8.
    INSTALLING THE HYPERV ROLE • Click Install. The Installation Progress page appears as the wizard installs the Hyper-V role. • Click Close. The Add Roles and Features Wizard closes.
  • 9.
    CREATING A VIRTUALSWITCH • Log on to Server which has the Hyper-V role installed. Open the Server Manager console and select Tools>Hyper-V Manager.
  • 10.
    CREATING A VIRTUALSWITCH • In the left pane, select the name of your server, and in the right pane, click Virtual Switch Manager. • In the left pane, select New virtual network switch.
  • 11.
    CREATING A VIRTUALSWITCH In the Name text box, type in a name for your internal switch and click OK. The Virtual Switch Manager dialog box closes. Open the Virtual Switch Manager dialog box and you should be able to view your new Virtual Switch.
  • 12.
    CREATING A VIRTUALNETWORK • In the right pane of Hyper-V Manager, click New>Virtual Machine. The New Virtual Machine Wizard appears, displaying the Before You Begin page
  • 13.
    CREATING A VIRTUALNETWORK • Click Next. The Specify Name and Location page appears. • In the Name text box, type in the name that you want to name your machine and click Next. The Assign Memory page appears • In the Startup memory text box, type 128 or your desired amount of memory and click Next.
  • 14.
    CREATING A VIRTUALNETWORK The Configure Networking page appears. In the Connection drop down list, select Internal Switch and click Next. The Connect Virtual Hard Disk page appears. Click Next. The Installation Options page appears. Click Next. The Completing the New Virtual Machine Wizard page appears.
  • 15.
    CREATING A VIRTUALNETWORK • Click Finish. The wizard creates the new virtual machine and it appears in the Hyper-V Manager console. • To add additional virtual machines repeat the steps.
  • 16.
    THE END TCI Collegeof Technology For Class CPN 250 Instructor Mr. Roy Lau This presentation is brought to you by Lakeisha York