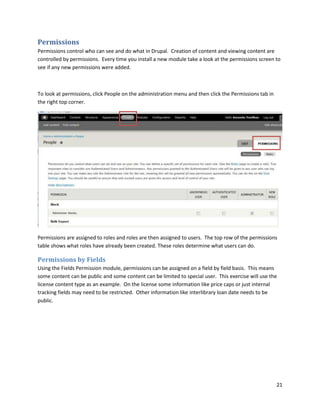
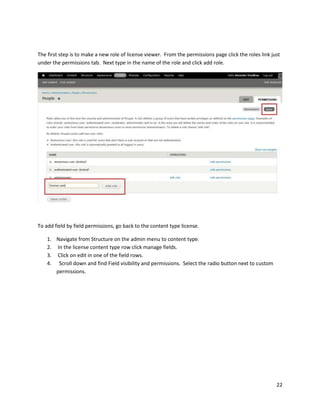
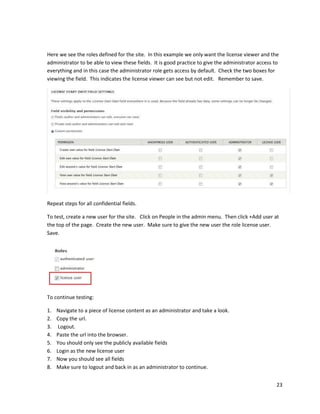
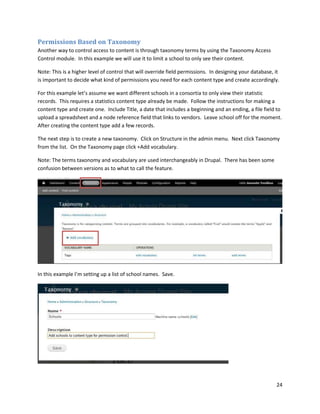
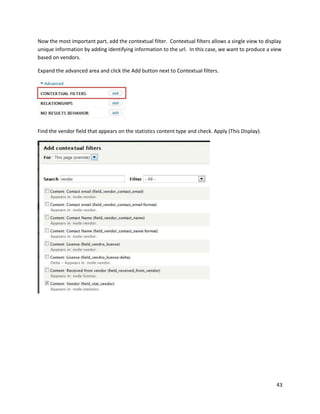
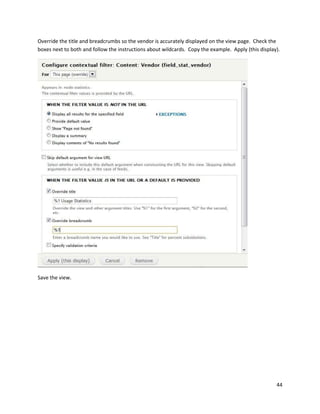
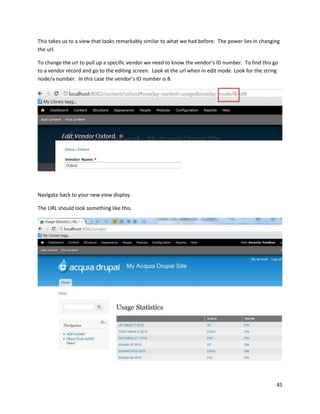
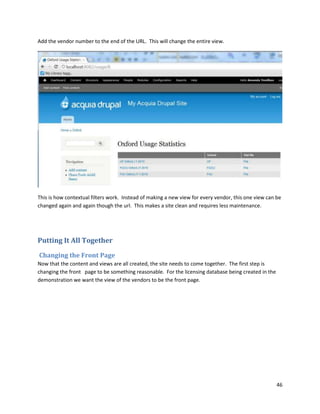
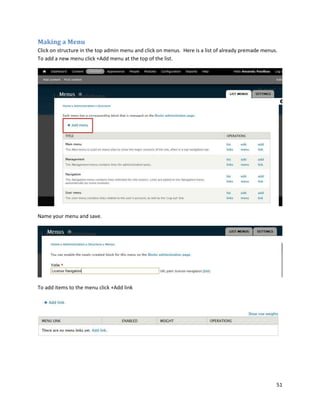
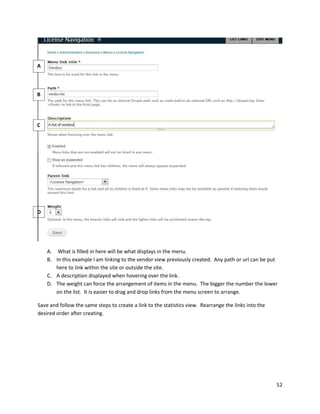
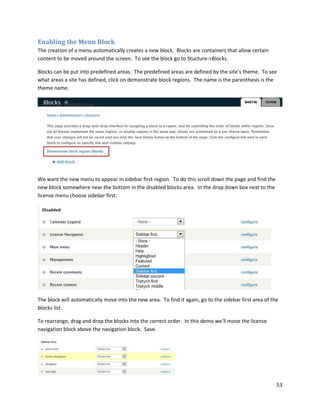
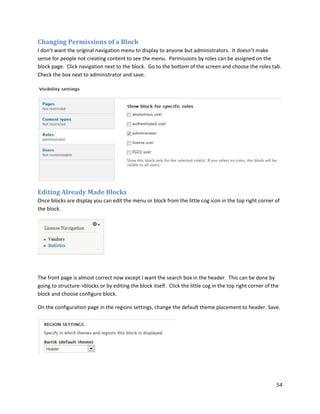
SlideShare a Scribd company logo
1 of 64
Creating a Licensing Database Using
Drupal 7 – NASIG 2012
By Amanda Yesilbas, Florida Center for Library Automation


Contents
About the Installation ................................................................................................................................... 3
Important Terms in Drupal ........................................................................................................................... 3
Getting Started.............................................................................................................................................. 5
   Creating and Approving Accounts ............................................................................................................ 5
       A note on account creation - Take a moment to check security .......................................................... 7
Turning on Modules ...................................................................................................................................... 8
Creating Basic Content ................................................................................................................................ 10
   Finding Already Created Content............................................................................................................ 12
   Editing Existing Content .......................................................................................................................... 13
Creating Custom Content Types ................................................................................................................. 13
       A special field ...................................................................................................................................... 17
   Field Groups ............................................................................................................................................ 18
Permissions ................................................................................................................................................. 21
   Permissions by Fields .............................................................................................................................. 21
   Permissions Based on Taxonomy ............................................................................................................ 24
       Assigning Taxonomy Permissions to a Role ........................................................................................ 27
Views ........................................................................................................................................................... 29
   Creating a list of Vendors ........................................................................................................................ 29
   Creating a Table View with Exposed Filters ............................................................................................ 32
   Rewriting Field Output ............................................................................................................................ 36
   Adding exposed filters ............................................................................................................................ 38
   Adding a Block or Other Iteration of a View ........................................................................................... 41
   Adding Contextual Filters (or how not to create the same view a million times) .................................. 41
Putting It All Together ................................................................................................................................. 46


                                                                                                                                                                  1
Changing the Front Page ......................................................................................................................... 46
   Making a Menu ....................................................................................................................................... 51
   Enabling the Menu Block ........................................................................................................................ 53
   Changing Permissions of a Block............................................................................................................. 54
   Editing Already Made Blocks................................................................................................................... 54
   Hiding the Login Box ............................................................................................................................... 55
Advanced Design......................................................................................................................................... 56
More Tutorials and Help ............................................................................................................................. 56
Appendix 1 .................................................................................................................................................. 57
Installation: ................................................................................................................................................. 57
Modules Added: .......................................................................................................................................... 57
Appendix 2 .................................................................................................................................................. 58
Downloading Aquia ..................................................................................................................................... 58
Installing New Modules .............................................................................................................................. 59


                                                                                                                                                                2
About the Installation
The demonstration is using the pre-packaged Aquia version of Drupal found at
http://www.acquia.com/downloads. This choice was made so participants would be familiar with the
Aquia look and feel, so they can easily use Acquia’s Dev Desktop software for easy experimentation and
practice after the session.

For more about the Dev Desktop tool, including installation, see the Getting Started Handout.


Important Terms in Drupal
Drupal has its own unique lingo that can be confusing to newcomers. Here is a list of terms which might
be helpful.

    1. Modules - http://drupal.org/glossary#module
        Software (usually PHP and CSS) that extends Drupal features and functionality.
        Drupal distinguishes between “core” and “contributed” modules.

         Core- http://drupal.org/glossary#core
        The files and modules included with the Drupal project download.

        Contrib - http://drupal.org/glossary#contrib
        Contributed. Modules or themes that are not part of the core Drupal product. Contributed
        modules and themes are available for separate download from the modulesand themes sections
        of Drupal.org downloads. These are separate from the Drupal “core”, although over time they
        can become part of it. Similar concepts exist in other software and are sometimes called
        “plugins”, “add-ons” or “extensions”.

    2. Node - http://drupal.org/glossary#node
        A piece of content in Drupal, typically corresponding to a single page on the site, that
        has a title, an optional body, and perhaps additional fields. Every node also belongs
        to a particular content type, and can additionally be classified using
        the taxonomy system. Examples of nodes are polls, stories, book pages and images.


    3. Fields- http://drupal.org/glossary#field
        Elements of data that can be attached to a node or other Drupal entities. Fields
        commonly contain text, image, or terms.

        In plain speak, this is an individual piece of data on a content type. Ex: The zip code
        on an address form.


                                                                                                      3
4. Content Type- http://drupal.org/glossary#content-type
    Every node belongs to a single “node type” or “content type”, which defines various
    default settings for nodes of that type, such as whether the node is published
    automatically and whether comments are permitted. Common "Content Types" that
    just about any website would have include: blog post and page. Content types can
    have different fields and modules can define their own content types. The core
    Drupal Book and Poll modules are two examples of modules that define content
    types.

    In plain speak, these are the forms you create to input a specific kind of information.
    In this demonstration we make a license and vendor content type. To add data into
    the database, we click the content type of the kind of information we want to add
    and are presented with a predefined form.

5. Blocks – http://drupal.org/glossary#block
    The boxes visible in the regions of a Drupal website. Most blocks (e.g., recent forum
    topics) are generated on-the-fly by various Drupal modules, but they can be created
    in the administer blocks area of a Drupal site. See the documentation for more
    information on blocks.

    Additional information: Blocks are one method to arrange content on a page. They
    can be dropped in predefined areas. Blocks is under structure.

6. Theme - http://drupal.org/glossary#theme
   A file or collection of files (PHP, INFO, CSS, JPG, GIF, PNG), which together
   determine the look and feel of a site. A theme contains elements such as the header,
   icons, block layout, etc. Drupal modules define themeable functions which can be
   overridden by the theme file. There are additional themes available in the themes
   section of downloads.

7. Taxonomy - http://drupal.org/glossary#taxonomy
   The science of classification. In Drupal, Taxonomy is a powerful core module that gives your sites
   use of “terms”, organizational keywords known in other systems as categories, tags, or
   metadata. In Drupal, these terms are gathered within “vocabularies.” TheTaxonomy
   module allows you to create, manage and apply those vocabularies.


8. Roles - http://drupal.org/glossary#roles
   Sets of permissions that can be applied to individual users. Users can belong to more than one
   role. Two roles, authenticated users (those users that sign up for an account)
   and anonymous users (those either without an account or not logged in), are supplied by default
   with Drupal installations. Drupal allows creating additional.


                                                                                                   4
Getting Started
The presentation will use a Drupal installation, with all relevant modules already installed, hosted by the
Florida Center for Library Automation (FCLA). The site can be found at http://drupal7demo.fcla.edu/.
This site will be available for use after the demonstration.

To practice on your own after the session see the getting started document for installing Dev Desktop
and modules.


Creating and Approving Accounts
All creators of content need and account. On the front page click Create Account beneath the login
form.


Fill in the appropriate information and submit. The presenter will give you the proper administrative
roles.


Administrators approve new users by clicking on the People link in the administration menu and then
clicking edit next to the user that needs to be approved.


                                                                                                          5
Change the user’s status to active and choose what roles the user should have. Make sure to save.


                                                                                                    6
A note on account creation - Take a moment to check security
Any new site will automatically be set up to allow users to create new accounts. This might not be
desirable. To check the settings and change accordingly click on the configure option in the
administration menu running across the browser. On the Configuration screen click on account settings.


                                                                                  This warning is because I’m using a
                                                                                  Dev desktop installation not
                                                                                  connected to the internet. Nothing
                                                                                  is actually broken


Look over all the settings on this page, but pay special attention to the registration section. Choose the
settings that match your institution’s needs. You may even consider hiding the login block. We’ll get to
how to do this later in the demonstration.


                                                                                                         7
Turning on Modules
Drupal gets it’s functionality through modules. Some modules are considered “core”, meaning they are
part of what comes with Drupal. An example of a core module is Taxonomy. Some are “Contrib”,
meaning they are modules created by the Drupal community. An example of a contrib module is Views.

Modules need to be enabled to use. For this demo the contributed modules have already been installed
and need enabling. For this demonstration we will enable the modules Chaos tools Suite, Date, Field
Group, References, Taxonomy Access Control, and Views.

Later we will enable Fusion Accelerator, Fusion and Panels in a discussion about arranging content.

To enable, click on the Modules item in the administration menu. This takes you to a list of all the
installed modules on the website.


                                                                                                       8
Scroll down the list and find the modules that need to be activated. Note that many of these modules
have multiple parts. Enable all parts of the module by checking the boxes. Remember to save at the
bottom of the screen.


The Date module has many parts.

Some modules require a extra step. After saving this warning appeared.


Click the Rebuild permissions link and follow the instructions to finalize the process.


                                                                                                       9
Now we will disable a module. Go to Modules from the administration menu at the top of the browser.
Scroll down on the module page and find Acquia Network Connector. Uncheck Acquia Site Profile
Information and save.


Then go back to the Module page and uncheck Acquia agent and save. This will make the advertisement
go away.


Creating Basic Content
To create a simple page using the Drupal defaults, click the add content link on the left navigation menu.
If you can’t find the left navigation menu make sure all overlays are closed and click the site logo, home
tab, or home breadcrumb.


                                                                                                       10
Choose create basic page.


The red star indicates a required field. The top part of the form is the content of the webpage.


The bottom part of the form gives options about publishing.


                                                                                                   11
Saving your content will take you to the completed webpage. That is all it takes to make a basic page in
Drupal.

Finding Already Created Content
Now navigate back to the home page. How do you find the content you just created? To see all the
content on the site click on the Content menu link from the administration menu. There you will see
your webpage.


Clicking on the title will take you to the page or clicking to edit will take you directly to editing.

New content can also be created from the content page.


                                                                                                         12
Editing Existing Content


If you are logged on and an authorized user, you will see the edit tab on a piece of content. Click the tab
to go to the edit screen.


Creating Custom Content Types
While useful, the existing content types in Drupal are limited. You will need to create custom content
types. This is the pen and paper portion of working in Drupal.

Consider what the data you want to track in Drupal. Break it into logical units. The better you define
these units the fewer headaches you will have. For the license database I need to track vendors,
licenses and statistics.

Next think about what kind of information is needed to describe each type of information.

Example:

Vendor –name, contact name, contact email, contact phone number, link to license, link to statistics,
login information, notes

Statistics – name, type of statistics, file, date


                                                                                                         13
License – file of titles, pdf, active dates, date sent to purchasing, date returned, acquisition terms,
cancellation terms, ILL terms (make as granular as possible ex. course reserve permissions) and
participants.

The type of information is your content type and the pieces of information on the content type are your
fields.


To create a new content type click structure from the admin menu and select content types.

Click +Add content type at the top of the content type page.


                                                                                                          14
The first screen sets the parameters of the content type. Here is where you name it and set up the
behavior. For the example I am making a vendor content type.


                                                             Added description


                                                                       Change the title field to vendor name


                 Read and choose settings for
                 content type


             Save and move on to adding
             fields.


                                                                                                     15
Fields are the information that is part of our content type. Here we add things like the vendor contact
name and email.


                                                                                                           E
                                B
    A                                           C                                    D


    A. This is the label. It will be what displays above the field when you create content.
    B. Be sure to name your field something unique and identifiable. A good practice is to preface the
       name with the content type name. This makes identification easier.

                                                                                                          16
C. There are many choices about what kind of information a field should store. Choose the type
       that best suits your needs. Ask yourself if you need a drop down list or a free text box? There
       are also many modules that expand the type. Some contributed field types are date, which adds
       a calendar pop-up, and node reference.
    D. Different kinds of fields have different widgets. For example: if you choose date you can have a
       pop-up calendar or box to type.
    E. Delete the body tag. This is not needed.

After setting your field up click save. This will bring you to more options that allow for further
customization of the field. These options change with the kind of field chosen

Fields can be dragged and dropped to be easily rearranged by clicking on the little cross icons on the left
side.

A special field
Node Reference is an interesting field that creates relationships across content types.


During creation you can choose the type of content type to reference.


                                                                                                         17
Now, when the license field is clicked on in a vendor record a list of real time licenses appear.


Field Groups
Too many fields can make a page unmanageable. A field group allows fields to be grouped together.
The groups can then be expanded or collapsed to make reading on a screen more manageable.

Adding a field group is almost exactly like adding a field. Go to manage fields on your content type and
add a field group. Save.


                                                                                                       18
Once you have created the field group, drag your fields under the field group. They will be indented if
they are properly placed under the group.


Use of field groups will collapse content into more manageable pages. This needs to be done twice.
Putting field groups on the Manage Fields Tab will change the edit screen. Adding Field Groups on the
Manage Display Tab will effect what the users see.


                                                                                                          19
Adding Field Sets to the manage display will give you a result similar to this. The page is better looking,
and the collapsed groups conserve space on a page.

Experiment with the Field Group settings. There are other interesting javascript affects besides
collapsing.


                                                                                                          20
Permissions
Permissions control who can see and do what in Drupal. Creation of content and viewing content are
controlled by permissions. Every time you install a new module take a look at the permissions screen to
see if any new permissions were added.


To look at permissions, click People on the administration menu and then click the Permissions tab in
the right top corner.


Permissions are assigned to roles and roles are then assigned to users. The top row of the permissions
table shows what roles have already been created. These roles determine what users can do.

Permissions by Fields
Using the Fields Permission module, permissions can be assigned on a field by field basis. This means
some content can be public and some content can be limited to special user. This exercise will use the
license content type as an example. On the license some information like price caps or just internal
tracking fields may need to be restricted. Other information like interlibrary loan date needs to be
public.


                                                                                                        21
The first step is to make a new role of license viewer. From the permissions page click the roles link just
under the permissions tab. Next type in the name of the role and click add role.


To add field by field permissions, go back to the content type license.

    1. Navigate from Structure on the admin menu to content type.
    2. In the license content type row click manage fields.
    3. Click on edit in one of the field rows.
    4. Scroll down and find Field visibility and permissions. Select the radio button next to custom
       permissions.


                                                                                                         22
Here we see the roles defined for the site. In this example we only want the license viewer and the
administrator to be able to view these fields. It is good practice to give the administrator access to
everything and in this case the administrator role gets access by default. Check the two boxes for
viewing the field. This indicates the license viewer can see but not edit. Remember to save.


Repeat steps for all confidential fields.

To test, create a new user for the site. Click on People in the admin menu. Then click +Add user at
the top of the page. Create the new user. Make sure to give the new user the role license user.
Save.


To continue testing:

1.   Navigate to a piece of license content as an administrator and take a look.
2.   Copy the url.
3.    Logout.
4.   Paste the url into the browser.
5.   You should only see the publicly available fields
6.   Login as the new license user
7.   Now you should see all fields
8.   Make sure to logout and back in as an administrator to continue.


                                                                                                     23
Permissions Based on Taxonomy
Another way to control access to content is through taxonomy terms by using the Taxonomy Access
Control module. In this example we will use it to limit a school to only see their content.

Note: This is a higher level of control that will override field permissions. In designing your database, it
is important to decide what kind of permissions you need for each content type and create accordingly.

For this example let’s assume we want different schools in a consortia to only view their statistic
records. This requires a statistics content type already be made. Follow the instructions for making a
content type and create one. Include Title, a date that includes a beginning and an ending, a file field to
upload a spreadsheet and a node reference field that links to vendors. Leave school off for the moment.
After creating the content type add a few records.

The next step is to create a new taxonomy. Click on Structure in the admin menu. Next click Taxonomy
from the list. On the Taxonomy page click +Add vocabulary.

Note: The terms taxonomy and vocabulary are used interchangeably in Drupal. There has been some
confusion between versions as to what to call the feature.


In this example I’m setting up a list of school names. Save.


                                                                                                          24
Next add terms. In this case, terms will be the names of schools. Click the add terms link next to the
vocabulary name. Type in the school name and save. Do this as many times as needed.


The Taxonomy needs to be added to the content type. This is the same as adding any field.

    1. Click Stucture -> content types
    2. Click manage fields next to the statistics content type.
    3. Add a new field as usual but select Term reference as the type of data to store.


    4. Save


                                                                                                         25
5. On the next screen choose the vocabulary Schools.


    6. Save the field.

Now add a school to the statistic pages you made earlier. Go to the piece of content. Click edit. Fill in
the new field from the school drop down list.

The next step is making a new role. Make a new role for one of the schools. People->permissions->role.


                                                                                                        26
Assigning Taxonomy Permissions to a Role
To assign the taxonomy permissions the new role click on Configuration in the Admin menu. Then click
on Taxonomy access control from the configuration screen.


Click enable access control next to your school role.


                                                                                                   27
Under the heading New, select the term, in this case the school, that the permission will be for. Under
    the column View click the radio button A. The A stands for allow. Click the Add button next to your
    school name. Scroll to the bottom of the screen and Save all.


A
                                 B
                                                 C

        A. Choose the term. In this case the school.
        B. Click add after choosing the term and setting the permissions.
        C. Selecting A will allow viewing access to anything tagged with FGCU.

    Now that you’ve allowed the new role to view the content you must disallow it from the other roles.
    This needs to be done for anonymous and authenticated user.

    On the Taxonomy Access Control screen click edit access rules next to the role anonymous.


    Choose the term, the school name. This time, click the radio button under the D for disallow. Click the
    Add button. Scroll down to the bottom of the page and Save All.


                                                                                                          28
Repeat this procedure for the authenticated roles.

To test:

    1.     Create a new user.
    2.     Assign the new user the school role.
    3.     Find a statistic page tagged with the school.
    4.     Logout and try to view page. The page should not appear.
    5.     Login as the school user and view page. It should appear.
    6.     Logout and log back in as an administrator.


Views
Views is the real power of Drupal. Technically views is a query builder with a point and click user
interface. This means you can call data from your pages to rearrange and display in dynamic lists. With
expansion modules the possibilities are endless. You can make calendars, galleries, slide shows, latest
news lists and on and on. Views could be a separate class unto itself.

This demonstration will cover a few basic uses of views that introduce some of the features.

Creating a list of Vendors
One of the most simple but widely used uses of view is creating a list of a specific content type. For this
database we need a list of all of our vendors.

To create a view click Structure in the admin menu. Then choose views from the structure page.

Once on the views page, you will see all the preloaded views that come with Drupal and the installed
modules. These can be good models when trying to figure out how to do something the first time. Click
enable to use one of these views in your site.


                                                                                                         29
To add a new view click +Add new view from the top of the page.


    Most of our work for this view will be done on the Add new view screen.


A


    B

                                                       C                          D
        A. Name the view
        B. This is what you want to make a list of. In this case we want content. Other options include
           user, commits, files, taxonomy terms and more.
        C. This field changes depending on what was chosen in the first drop down. In this case it lists all
           the content types. Choose vendor to create a list of vendors.
        D. The sort box also changes depending on the first two choices. We want an alphabetical list so
           choose title as the sort.


                                                                                                               30
The second part of the page defines a page that displays the view.


A


B

C

D


    A. Is inherited from the top but can be changed. This is the title that will display on the webpage.
    B. The URL to access the newly created page. This is created by the page title but can be changed.
    C. This is where you choose what kind of display your view will take. This is where you can change
       to output to make a calendar or table display. The second part defines what will be displayed in
       the format.
    D. The number of items to display before the list either ends or adds a pager.

Check to box to add a block. Mimic the page settings in the page. This can be used later.


Save & exit this view


                                                                                                      31
This takes you to the newly created view.


To find the url of the page again, go back to the view page. Structure->views. The url is displayed in the
views list.


Creating a Table View with Exposed Filters
Another useful view is one formatted as a table. This is a common way to display multiple fields. This
view will show a table of statistics records that displays title, school and uploaded file. There will also be
exposed filters at the top of the view to sort and limit the information displayed.


                                                                                                           32
Make a new view. Navigate Structure->Views->+Add new view

The first part of the form is filled out in a very similar way to the first view we made. The only difference
is we’ve chosen statistics as the type of content.


In this view the display format is table. Notice the “of fields” following the display format. This means
fields need to be selected.


Ignore the block check box and click continue & edit.


                                                                                                          33
This page shows the advance settings for a view. When you come back to an already created view this is
also the page you will see.


This view needs to have additional fields added to the display. The title field is already listed under fields
from the initial set up. We need to add school and file. Click the add button next to Fields.


This will bring up a list of all the fields in the database. This is why naming fields in content type in a
descriptive manner is important. Find the school field and check the box. Click Apply.


This will take you to a configuration screen. Take a moment to look at the different choices. Click Apply.

                                                                                                              34
A preview of your changes can be seen at the bottom of the screen. It should now look similar to this.


Next add the usage statistics file. Again click add next to Fields. You can use the search to find the field
if you know the name. Click the check box next to the field and click apply. Click apply again at the
configuration screen.


The preview should now look similar to this.


                                                                                                          35
Rewriting Field Output
The file name is very large and cumbersome. The output can be written to just display the word file. To
do this,click on the Stat file field.


This brings up the configuration screen. First change the formatter to url to file.


                                                                                                     36
Next open up the rewrite results collapsed area. Once opened, open the replacement pattern collapsed
area.

The replacement patterns show tokens of the field content. This allows you to manipulate how the
information is displayed. We are going to change the file into a link using html and the token.


A


B


    C


    A. Make sure to click the rewrite box. If this is not checked the rewrite will not take.
    B. Here is the html code to rewrite the field output. In place of a url in the href we place a token.
       Without the code a url would be displayed. With the code around the token the url is populating
       the code and displaying the hyper link “File”
    C. This shows the options of data to drop in a display. It will only show options from fields above
       this one. If you want to display extra data in an output make sure to put the field above it so the
       token will display.

Make sure to click apply.


                                                                                                       37
The preview should look something like this.


Adding exposed filters
This list could quickly become large and difficult to manage. Adding exposed filters allows the data to be
filtered on the fly. In this example a new exposed filter for school will be added. This will allow the user
to instantly get a list from the school they select.

Under filter criteria click add.


Find the school field and check the box. Apply.


On the configuration screen choose dropdown and apply.


                                                                                                         38
On the next screen, check the box expose filter. A new set of options will open up. Take the machine
field name out of the label to make it attractive. Apply.


                                                                                                       39
REMEMBER TO SAVE YOUR VIEW! The save is on the top of the screen instead of the usual bottom.
Updating is not saving.


Now take a look at the finished page and make sure it works.


                                                                                                40
Adding a Block or Other Iteration of a View
If you want to add a block of a view ofrmake another page of the view with slight changes this is easy to
do.

Navigate to the view. Structure->Views->edit button next to view.

Clicking the +Add button will bring up a list of display types. Choosing one will automatically populate
the new display with the view information.


Adding Contextual Filters (or how not to create the same view a million times)
If you want to put a link on each vendor page to a view of only that vendor’s statistics you have two
options. Make a new view for every vendor or use contextual filters in views. This was known as
arguments in previous versions of Drupal and is still called that in most discussions and help.


                                                                                                           41
We only need a slight variation on the usage statistic view previously made. We need to get rid of the
exposed filter and add a contextual filter. Navigate to the already created usage statistics view
Structure->views->edit usage statistics. Click the +Add button at the top of the view and choose page.


To delete the exposed filter click Content: School (exposed).


Before removing make sure to change the top drop down to “This page (override)”. If it is not changed
to override you will change the original view. Click remove at the bottom of the page.


Next add a unique path. This will be the url to this view.


                                                                                                         42
Now the most important part, add the contextual filter. Contextual filters allows a single view to display
unique information by adding identifying information to the url. In this case, we want to produce a view
based on vendors.

Expand the advanced area and click the Add button next to Contextual filters.


Find the vendor field that appears on the statistics content type and check. Apply (This Display).


                                                                                                       43
Override the title and breadcrumbs so the vendor is accurately displayed on the view page. Check the
boxes next to both and follow the instructions about wildcards. Copy the example. Apply (this display).


Save the view.


                                                                                                     44
This takes us to a view that looks remarkably similar to what we had before. The power lies in changing
the url.

To change the url to pull up a specific vendor we need to know the vendor’s ID number. To find this go
to a vendor record and go to the editing screen. Look at the url when in edit mode. Look for the string
node/a number. In this case the vendor’s ID number is 8.


Navigate back to your new view display.

The URL should look something like this.


                                                                                                      45
Add the vendor number to the end of the URL. This will change the entire view.


This is how contextual filters work. Instead of making a new view for every vendor, this one view can be
changed again and again though the url. This makes a site clean and requires less maintenance.


Putting It All Together

Changing the Front Page
Now that the content and views are all created, the site needs to come together. The first step is
changing the front page to be something reasonable. For the licensing database being created in the
demonstration we want the view of the vendors to be the front page.


                                                                                                      46
First step is to get the path of the view. Navigate to the views list to find it. Structure ->views. Find the
path next to the vendor view.


Next, click on Configuration in the admin menu across the top of the page. On the configuration screen
go to site information.


                                                                                                            47
In the first section of the site information screen, the title can be changed. Change it to License
Database.


The middle of the site information screen is where the front page is changed. Put in the path of the
vendor view.


Save configuration.

Now go to the front page and take a look. The default Acquia logo needs to be removed or changed to a
new logo.


                                                                                                       48
Click on appearance in the admin menu across the top of the screen. Click on the tab setting in the top
right corner.

By unchecking the box next to logo, the logo can be turned off. If the logo is to be replaced upload a
new image. For this demonstration the logo will be turned off.


Save configuration and return to home page.


                                                                                                         49
The front page looks better but the menu doesn’t make sense. We want to add a menu that navigates
to different pages. We also want to make the already existing menu viewable only to administrators.


Menus are only viewable when they are put into blocks or some other element. The first part is to make
a menu. The second part is to put it into a block for display.


                                                                                                   50
Making a Menu
Click on structure in the top admin menu and click on menus. Here is a list of already premade menus.
To add a new menu click +Add menu at the top of the list.


Name your menu and save.


To add items to the menu click +Add link


                                                                                                    51
A


B


C


D


    A. What is filled in here will be what displays in the menu.
    B. In this example I am linking to the vendor view previously created. Any path or url can be put
       here to link within the site or outside the site.
    C. A description displayed when hovering over the link.
    D. The weight can force the arrangement of items in the menu. The bigger the number the lower
       on the list. It is easier to drag and drop links from the menu screen to arrange.

Save and follow the same steps to create a link to the statistics view. Rearrange the links into the
desired order after creating.


                                                                                                       52
Enabling the Menu Block
The creation of a menu automatically creates a new block. Blocks are containers that allow certain
content to be moved around the screen. To see the block go to Stucture->Blocks.

Blocks can be put into predefined areas. The predefined areas are defined by the site’s theme. To see
what areas a site has defined, click on demonstrate block regions. The name is the parenthesis is the
theme name.


We want the new menu to appear in sidebar first region. To do this scroll down the page and find the
new block somewhere near the bottom in the disabled blocks area. In the drop down box next to the
license menu choose sidebar first.


The block will automatically move into the new area. To find it again, go to the sidebar first area of the
blocks list.

To rearrange, drag and drop the blocks into the correct order. In this demo we’ll move the license
navigation block above the navigation block. Save.


                                                                                                         53
Changing Permissions of a Block
I don’t want the original navigation menu to display to anyone but administrators. It doesn’t make
sense for people not creating content to see the menu. Permissions by roles can be assigned on the
block page. Click navigation next to the block. Go to the bottom of the screen and choose the roles tab.
Check the box next to administrator and save.


Editing Already Made Blocks
Once blocks are display you can edit the menu or block from the little cog icon in the top right corner of
the block.


The front page is almost correct now except I want the search box in the header. This can be done by
going to structure->blocks or by editing the block itself. Click the little cog in the top right corner of the
block and choose configure block.

On the configuration page in the regions settings, change the default theme placement to header. Save.


                                                                                                             54
The front page has come a long way.


Hiding the Login Box
For security reason you may not want the login box to ever display. You don’t want random hackers or
people trying to create accounts. The login box can be disabled from the blocks menu. Simply choose
none for the region and it will move into the disabled area.

To access your site without a login box add /user to the base url. This will take you to a login screen.


                                                                                                           55
Advanced Design
There are many ways to rearrange content on a Drupal site.

The module panels http://drupal.org/project/panels allows the users to create custom layouts through a
friendly drag and drop user interface. While simple to set up, this is a large and deep module.

Another way to change the look of a website is by downloading and installing a new theme. A list of
themes contributed by the community can be found at http://drupal.org/project/Themes . Some
themes have advance designs that let a user change colors or add some styling on the fly for a more
customized look.

If you are skilled at css or can manipulate php templates, you can “create” your own theme. This is
usually done by downloading a starter theme with good clean css markup like zen or fusion and
modifying the css and php files. The design options are limitless.


More Tutorials and Help
There are many sources of help in the form of tutorials or direct questions.

http://groups.drupal.org/ - Find a local group to participate in. These are your best sources for direct
help.

Drupal4Lib listserv - http://listserv.uic.edu/archives/drupal4lib.html a friendly and active listserv for
druapl questions. It specializes in library concerns.

For staying up to date with new modules, developments and tips and tricks there is
http://www.lullabot.com/. This company has a weekly newsletter and regular podcasts. They also
produce paid training materials and sessions. The Do It With Drupal conference they host is pricey but a
good learning opportunity.

Nodeone Learning Library - http://dev.nodeone.se/learning-library Free videos and training.

Drupal.org – The center of it all.

Google - If you Google any problem you have, you are sure to find and answer. The Drupal community
is vast and really into sharing information.


                                                                                                            56
Appendix 1

Drupal 7 Licensing Site Recipe

http://drupal7demo.fcla.edu/


Installation:
Aquia : http://www.acquia.com/downloads


Modules Added:
Views: http://drupal.org/project/views

Field Permissions: http://drupal.org/project/field_permissions

References: http://drupal.org/project/references

Field Group: http://drupal.org/project/field_group

Date: http://drupal.org/project/date

Taxonomy Access Control: http://drupal.org/project/taxonomy_access


Optional Modules for Display

Fusion Theme: http://drupal.org/project/fusion

Fusion Accelerator: http://drupal.org/project/fusion_accelerator

Panels: http://drupal.org/project/panels


Additional Resources:

DLF ERM Initiative http://old.diglib.org/pubs/dlf102/dlf102.htm


                                                                     57
Appendix 2

Getting Started

One way to easily start playing with and practicing with Drupal is to use a desktop installation. This
saves you the need to install Drupal on a server and allows for easier experimentation with modules and
themes.

The company Aquia provides a free and complete desktop Drupal installation. The advantage of using
Aquia’s software is it comes bundled with everything you need to get started, including the backend
database. It is a good one-click way for a beginning user to get started.


Downloading Aquia

The Dev Desktop installation can be found at http://www.acquia.com/downloads . At this time version
7 is the latest version of Drupal. Choose you operating system, download and install.


                                                                                                      58
During the installation process remember the user name and password entered into the installation
wizard. This is the user name and password for your new site.

Once you’ve installed the software go to the new site.


Installing New Modules

The power of Drupal comes from the community created modules that extend the functionality. The
basic functionality of some essential modules was incorporated into version 7 of Drupal, like CCK. One
exception is the module Views. This module is necessary for almost every Drupal installation. The
licensing database in the demonstration uses several modules that can be found on the site recipe card.

Modules require separate download and installation. This is easily done in the Dev Desktop. The first
step is to download the module. Links for all modules used in the presentation are provided on the site
recipe card. Since Views is so important, we’ll use this module as the example.


                                                                                                      59
Go to a modules project page on drupal.org.


Scroll to the bottom of the page and download the recommended release. The demonstration is using
Drupal 7.


                                                                                                60
To install the module in Drupal open your site from the Dev Desktop control panel. Login to the site
using the user name and password create during the installation. After logging in you will see the
Administration menu across the top of the browser. Click on Modules.


This brings you to the modules administration screen. This screen lists all the installed modules on your
site and indicates if they have been enabled. To install a module click the Install new module link
directly above the list.


                                                                                                       61
Choose the module you downloaded from the Drupal website, in this walk through Views, and then click
install.


The modules used in this demonstration.

Once a module is installed it needs to be enabled. From the installation finish screen or from the
administration menu, return to the module page.


                                                                                                     62
Scroll down the page and find the newly installed module. Click the checkboxes to enable.


If you look at the description you’ll see some required modules for views have not been enabled. These
also need to be enabled for views to work. Chaos tools is included in the Acquia installation. It is a
module that does not do anything on its own but is required to run many of the more powerful Drupal
modules.

Scroll up the page and find the Chaos Tools Suite. Enable all of the tools.


                                                                                                    63
Remember to save! The save button is at the bottom of the page.


Installing the rest of the modules for the demonstration follows the same steps.


Take some time to explore what modules are available. Chances are if you want to do something with
Drupal someone else has already created a module to do it. Some modules like reference and date
expand the core functionality of Drupal while others like views add completely new features.


                                                                                                     64

More Related Content

Similar to Creating a licensing database using drupal 7

Getting Started with Drupal
Getting Started with DrupalGetting Started with Drupal
Getting Started with DrupalRachel Vacek
 
One Man Band - Drupal Lightning Talks
One Man Band - Drupal Lightning TalksOne Man Band - Drupal Lightning Talks
One Man Band - Drupal Lightning TalksMark Jarrell
 
Beginner's guide to drupal
Beginner's guide to drupalBeginner's guide to drupal
Beginner's guide to drupalmayank.grd
 
Blisstering drupal module development ppt v1.2
Blisstering drupal module development ppt v1.2Blisstering drupal module development ppt v1.2
Blisstering drupal module development ppt v1.2Anil Sagar
 
SynapseIndia drupal presentation on drupal best practices
SynapseIndia drupal  presentation on drupal best practicesSynapseIndia drupal  presentation on drupal best practices
SynapseIndia drupal presentation on drupal best practicesSynapseindiappsdevelopment
 
Open Writing! Collaborative Authoring for CloudStack Documentation by Jessica...
Open Writing! Collaborative Authoring for CloudStack Documentation by Jessica...Open Writing! Collaborative Authoring for CloudStack Documentation by Jessica...
Open Writing! Collaborative Authoring for CloudStack Documentation by Jessica...buildacloud
 
Open writing-cloud-collab
Open writing-cloud-collabOpen writing-cloud-collab
Open writing-cloud-collabKaren Vuong
 
drupal theme developer in hyderabad
drupal theme developer in hyderabaddrupal theme developer in hyderabad
drupal theme developer in hyderabadphp2ranjan
 
Drupal is from Mars, Wordpress is from Venus: Finding your library's CMS soul...
Drupal is from Mars, Wordpress is from Venus: Finding your library's CMS soul...Drupal is from Mars, Wordpress is from Venus: Finding your library's CMS soul...
Drupal is from Mars, Wordpress is from Venus: Finding your library's CMS soul...sbclapp
 
Drupal distributions - how to build them
Drupal distributions - how to build themDrupal distributions - how to build them
Drupal distributions - how to build themDick Olsson
 
Drupal 7x Installation - Introduction to Drupal Concepts
Drupal 7x Installation - Introduction to Drupal ConceptsDrupal 7x Installation - Introduction to Drupal Concepts
Drupal 7x Installation - Introduction to Drupal ConceptsMicky Metts
 
Distribution Deli
Distribution DeliDistribution Deli
Distribution DeliWylbur
 
13th Sep - Drupal Global Training Day by TCS - Drupal core advanced overview
13th Sep - Drupal Global Training Day by TCS - Drupal core advanced overview13th Sep - Drupal Global Training Day by TCS - Drupal core advanced overview
13th Sep - Drupal Global Training Day by TCS - Drupal core advanced overviewDrupalMumbai
 
White Paper: Concepts and Benefits of Repository Management
White Paper: Concepts and Benefits of Repository ManagementWhite Paper: Concepts and Benefits of Repository Management
White Paper: Concepts and Benefits of Repository ManagementSonatype
 
Synapseindia drupal intro 0
Synapseindia drupal intro 0Synapseindia drupal intro 0
Synapseindia drupal intro 0saritasingh19866
 
Drupal module development
Drupal module developmentDrupal module development
Drupal module developmentRachit Gupta
 

Similar to Creating a licensing database using drupal 7 (20)

Getting Started with Drupal
Getting Started with DrupalGetting Started with Drupal
Getting Started with Drupal
 
Drupal - Introduction to Drupal Creating Modules
Drupal - Introduction to Drupal Creating ModulesDrupal - Introduction to Drupal Creating Modules
Drupal - Introduction to Drupal Creating Modules
 
One Man Band - Drupal Lightning Talks
One Man Band - Drupal Lightning TalksOne Man Band - Drupal Lightning Talks
One Man Band - Drupal Lightning Talks
 
Beginner's guide to drupal
Beginner's guide to drupalBeginner's guide to drupal
Beginner's guide to drupal
 
Blisstering drupal module development ppt v1.2
Blisstering drupal module development ppt v1.2Blisstering drupal module development ppt v1.2
Blisstering drupal module development ppt v1.2
 
SynapseIndia drupal presentation on drupal best practices
SynapseIndia drupal  presentation on drupal best practicesSynapseIndia drupal  presentation on drupal best practices
SynapseIndia drupal presentation on drupal best practices
 
Open Writing! Collaborative Authoring for CloudStack Documentation by Jessica...
Open Writing! Collaborative Authoring for CloudStack Documentation by Jessica...Open Writing! Collaborative Authoring for CloudStack Documentation by Jessica...
Open Writing! Collaborative Authoring for CloudStack Documentation by Jessica...
 
Open writing-cloud-collab
Open writing-cloud-collabOpen writing-cloud-collab
Open writing-cloud-collab
 
drupal theme developer in hyderabad
drupal theme developer in hyderabaddrupal theme developer in hyderabad
drupal theme developer in hyderabad
 
Drupal_cubet seminar
Drupal_cubet seminarDrupal_cubet seminar
Drupal_cubet seminar
 
Drupal is from Mars, Wordpress is from Venus: Finding your library's CMS soul...
Drupal is from Mars, Wordpress is from Venus: Finding your library's CMS soul...Drupal is from Mars, Wordpress is from Venus: Finding your library's CMS soul...
Drupal is from Mars, Wordpress is from Venus: Finding your library's CMS soul...
 
Drupal distributions - how to build them
Drupal distributions - how to build themDrupal distributions - how to build them
Drupal distributions - how to build them
 
The Drupal Way
The Drupal WayThe Drupal Way
The Drupal Way
 
Drupal 7x Installation - Introduction to Drupal Concepts
Drupal 7x Installation - Introduction to Drupal ConceptsDrupal 7x Installation - Introduction to Drupal Concepts
Drupal 7x Installation - Introduction to Drupal Concepts
 
Distribution Deli
Distribution DeliDistribution Deli
Distribution Deli
 
13th Sep - Drupal Global Training Day by TCS - Drupal core advanced overview
13th Sep - Drupal Global Training Day by TCS - Drupal core advanced overview13th Sep - Drupal Global Training Day by TCS - Drupal core advanced overview
13th Sep - Drupal Global Training Day by TCS - Drupal core advanced overview
 
White Paper: Concepts and Benefits of Repository Management
White Paper: Concepts and Benefits of Repository ManagementWhite Paper: Concepts and Benefits of Repository Management
White Paper: Concepts and Benefits of Repository Management
 
Synapseindia drupal intro 0
Synapseindia drupal intro 0Synapseindia drupal intro 0
Synapseindia drupal intro 0
 
Drupal module development
Drupal module developmentDrupal module development
Drupal module development
 
Drupal
DrupalDrupal
Drupal
 

Recently uploaded

Build your next Gen AI Breakthrough - April 2024
Build your next Gen AI Breakthrough - April 2024Build your next Gen AI Breakthrough - April 2024
Build your next Gen AI Breakthrough - April 2024Neo4j
 
Tech-Forward - Achieving Business Readiness For Copilot in Microsoft 365
Tech-Forward - Achieving Business Readiness For Copilot in Microsoft 365Tech-Forward - Achieving Business Readiness For Copilot in Microsoft 365
Tech-Forward - Achieving Business Readiness For Copilot in Microsoft 3652toLead Limited
 
Automating Business Process via MuleSoft Composer | Bangalore MuleSoft Meetup...
Automating Business Process via MuleSoft Composer | Bangalore MuleSoft Meetup...Automating Business Process via MuleSoft Composer | Bangalore MuleSoft Meetup...
Automating Business Process via MuleSoft Composer | Bangalore MuleSoft Meetup...shyamraj55
 
Transcript: New from BookNet Canada for 2024: BNC BiblioShare - Tech Forum 2024
Transcript: New from BookNet Canada for 2024: BNC BiblioShare - Tech Forum 2024Transcript: New from BookNet Canada for 2024: BNC BiblioShare - Tech Forum 2024
Transcript: New from BookNet Canada for 2024: BNC BiblioShare - Tech Forum 2024BookNet Canada
 
costume and set research powerpoint presentation
costume and set research powerpoint presentationcostume and set research powerpoint presentation
costume and set research powerpoint presentationphoebematthew05
 
AI as an Interface for Commercial Buildings
AI as an Interface for Commercial BuildingsAI as an Interface for Commercial Buildings
AI as an Interface for Commercial BuildingsMemoori
 
Bun (KitWorks Team Study 노별마루 발표 2024.4.22)
Bun (KitWorks Team Study 노별마루 발표 2024.4.22)Bun (KitWorks Team Study 노별마루 발표 2024.4.22)
Bun (KitWorks Team Study 노별마루 발표 2024.4.22)Wonjun Hwang
 
Enhancing Worker Digital Experience: A Hands-on Workshop for Partners
Enhancing Worker Digital Experience: A Hands-on Workshop for PartnersEnhancing Worker Digital Experience: A Hands-on Workshop for Partners
Enhancing Worker Digital Experience: A Hands-on Workshop for PartnersThousandEyes
 
SIEMENS: RAPUNZEL – A Tale About Knowledge Graph
SIEMENS: RAPUNZEL – A Tale About Knowledge GraphSIEMENS: RAPUNZEL – A Tale About Knowledge Graph
SIEMENS: RAPUNZEL – A Tale About Knowledge GraphNeo4j
 
Kotlin Multiplatform & Compose Multiplatform - Starter kit for pragmatics
Kotlin Multiplatform & Compose Multiplatform - Starter kit for pragmaticsKotlin Multiplatform & Compose Multiplatform - Starter kit for pragmatics
Kotlin Multiplatform & Compose Multiplatform - Starter kit for pragmaticscarlostorres15106
 
My INSURER PTE LTD - Insurtech Innovation Award 2024
My INSURER PTE LTD - Insurtech Innovation Award 2024My INSURER PTE LTD - Insurtech Innovation Award 2024
My INSURER PTE LTD - Insurtech Innovation Award 2024The Digital Insurer
 
Artificial intelligence in the post-deep learning era
Artificial intelligence in the post-deep learning eraArtificial intelligence in the post-deep learning era
Artificial intelligence in the post-deep learning eraDeakin University
 
New from BookNet Canada for 2024: BNC BiblioShare - Tech Forum 2024
New from BookNet Canada for 2024: BNC BiblioShare - Tech Forum 2024New from BookNet Canada for 2024: BNC BiblioShare - Tech Forum 2024
New from BookNet Canada for 2024: BNC BiblioShare - Tech Forum 2024BookNet Canada
 
Install Stable Diffusion in windows machine
Install Stable Diffusion in windows machineInstall Stable Diffusion in windows machine
Install Stable Diffusion in windows machinePadma Pradeep
 
Swan(sea) Song – personal research during my six years at Swansea ... and bey...
Swan(sea) Song – personal research during my six years at Swansea ... and bey...Swan(sea) Song – personal research during my six years at Swansea ... and bey...
Swan(sea) Song – personal research during my six years at Swansea ... and bey...Alan Dix
 
#StandardsGoals for 2024: What’s new for BISAC - Tech Forum 2024
#StandardsGoals for 2024: What’s new for BISAC - Tech Forum 2024#StandardsGoals for 2024: What’s new for BISAC - Tech Forum 2024
#StandardsGoals for 2024: What’s new for BISAC - Tech Forum 2024BookNet Canada
 
APIForce Zurich 5 April Automation LPDG
APIForce Zurich 5 April  Automation LPDGAPIForce Zurich 5 April  Automation LPDG
APIForce Zurich 5 April Automation LPDGMarianaLemus7
 
Understanding the Laravel MVC Architecture
Understanding the Laravel MVC ArchitectureUnderstanding the Laravel MVC Architecture
Understanding the Laravel MVC ArchitecturePixlogix Infotech
 
Connect Wave/ connectwave Pitch Deck Presentation
Connect Wave/ connectwave Pitch Deck PresentationConnect Wave/ connectwave Pitch Deck Presentation
Connect Wave/ connectwave Pitch Deck PresentationSlibray Presentation
 

Recently uploaded (20)

Build your next Gen AI Breakthrough - April 2024
Build your next Gen AI Breakthrough - April 2024Build your next Gen AI Breakthrough - April 2024
Build your next Gen AI Breakthrough - April 2024
 
Tech-Forward - Achieving Business Readiness For Copilot in Microsoft 365
Tech-Forward - Achieving Business Readiness For Copilot in Microsoft 365Tech-Forward - Achieving Business Readiness For Copilot in Microsoft 365
Tech-Forward - Achieving Business Readiness For Copilot in Microsoft 365
 
Automating Business Process via MuleSoft Composer | Bangalore MuleSoft Meetup...
Automating Business Process via MuleSoft Composer | Bangalore MuleSoft Meetup...Automating Business Process via MuleSoft Composer | Bangalore MuleSoft Meetup...
Automating Business Process via MuleSoft Composer | Bangalore MuleSoft Meetup...
 
Transcript: New from BookNet Canada for 2024: BNC BiblioShare - Tech Forum 2024
Transcript: New from BookNet Canada for 2024: BNC BiblioShare - Tech Forum 2024Transcript: New from BookNet Canada for 2024: BNC BiblioShare - Tech Forum 2024
Transcript: New from BookNet Canada for 2024: BNC BiblioShare - Tech Forum 2024
 
costume and set research powerpoint presentation
costume and set research powerpoint presentationcostume and set research powerpoint presentation
costume and set research powerpoint presentation
 
AI as an Interface for Commercial Buildings
AI as an Interface for Commercial BuildingsAI as an Interface for Commercial Buildings
AI as an Interface for Commercial Buildings
 
Bun (KitWorks Team Study 노별마루 발표 2024.4.22)
Bun (KitWorks Team Study 노별마루 발표 2024.4.22)Bun (KitWorks Team Study 노별마루 발표 2024.4.22)
Bun (KitWorks Team Study 노별마루 발표 2024.4.22)
 
Enhancing Worker Digital Experience: A Hands-on Workshop for Partners
Enhancing Worker Digital Experience: A Hands-on Workshop for PartnersEnhancing Worker Digital Experience: A Hands-on Workshop for Partners
Enhancing Worker Digital Experience: A Hands-on Workshop for Partners
 
SIEMENS: RAPUNZEL – A Tale About Knowledge Graph
SIEMENS: RAPUNZEL – A Tale About Knowledge GraphSIEMENS: RAPUNZEL – A Tale About Knowledge Graph
SIEMENS: RAPUNZEL – A Tale About Knowledge Graph
 
Kotlin Multiplatform & Compose Multiplatform - Starter kit for pragmatics
Kotlin Multiplatform & Compose Multiplatform - Starter kit for pragmaticsKotlin Multiplatform & Compose Multiplatform - Starter kit for pragmatics
Kotlin Multiplatform & Compose Multiplatform - Starter kit for pragmatics
 
My INSURER PTE LTD - Insurtech Innovation Award 2024
My INSURER PTE LTD - Insurtech Innovation Award 2024My INSURER PTE LTD - Insurtech Innovation Award 2024
My INSURER PTE LTD - Insurtech Innovation Award 2024
 
Artificial intelligence in the post-deep learning era
Artificial intelligence in the post-deep learning eraArtificial intelligence in the post-deep learning era
Artificial intelligence in the post-deep learning era
 
New from BookNet Canada for 2024: BNC BiblioShare - Tech Forum 2024
New from BookNet Canada for 2024: BNC BiblioShare - Tech Forum 2024New from BookNet Canada for 2024: BNC BiblioShare - Tech Forum 2024
New from BookNet Canada for 2024: BNC BiblioShare - Tech Forum 2024
 
Install Stable Diffusion in windows machine
Install Stable Diffusion in windows machineInstall Stable Diffusion in windows machine
Install Stable Diffusion in windows machine
 
Swan(sea) Song – personal research during my six years at Swansea ... and bey...
Swan(sea) Song – personal research during my six years at Swansea ... and bey...Swan(sea) Song – personal research during my six years at Swansea ... and bey...
Swan(sea) Song – personal research during my six years at Swansea ... and bey...
 
Vulnerability_Management_GRC_by Sohang Sengupta.pptx
Vulnerability_Management_GRC_by Sohang Sengupta.pptxVulnerability_Management_GRC_by Sohang Sengupta.pptx
Vulnerability_Management_GRC_by Sohang Sengupta.pptx
 
#StandardsGoals for 2024: What’s new for BISAC - Tech Forum 2024
#StandardsGoals for 2024: What’s new for BISAC - Tech Forum 2024#StandardsGoals for 2024: What’s new for BISAC - Tech Forum 2024
#StandardsGoals for 2024: What’s new for BISAC - Tech Forum 2024
 
APIForce Zurich 5 April Automation LPDG
APIForce Zurich 5 April  Automation LPDGAPIForce Zurich 5 April  Automation LPDG
APIForce Zurich 5 April Automation LPDG
 
Understanding the Laravel MVC Architecture
Understanding the Laravel MVC ArchitectureUnderstanding the Laravel MVC Architecture
Understanding the Laravel MVC Architecture
 
Connect Wave/ connectwave Pitch Deck Presentation
Connect Wave/ connectwave Pitch Deck PresentationConnect Wave/ connectwave Pitch Deck Presentation
Connect Wave/ connectwave Pitch Deck Presentation
 

Creating a licensing database using drupal 7

  • 1. Creating a Licensing Database Using Drupal 7 – NASIG 2012 By Amanda Yesilbas, Florida Center for Library Automation Contents About the Installation ................................................................................................................................... 3 Important Terms in Drupal ........................................................................................................................... 3 Getting Started.............................................................................................................................................. 5 Creating and Approving Accounts ............................................................................................................ 5 A note on account creation - Take a moment to check security .......................................................... 7 Turning on Modules ...................................................................................................................................... 8 Creating Basic Content ................................................................................................................................ 10 Finding Already Created Content............................................................................................................ 12 Editing Existing Content .......................................................................................................................... 13 Creating Custom Content Types ................................................................................................................. 13 A special field ...................................................................................................................................... 17 Field Groups ............................................................................................................................................ 18 Permissions ................................................................................................................................................. 21 Permissions by Fields .............................................................................................................................. 21 Permissions Based on Taxonomy ............................................................................................................ 24 Assigning Taxonomy Permissions to a Role ........................................................................................ 27 Views ........................................................................................................................................................... 29 Creating a list of Vendors ........................................................................................................................ 29 Creating a Table View with Exposed Filters ............................................................................................ 32 Rewriting Field Output ............................................................................................................................ 36 Adding exposed filters ............................................................................................................................ 38 Adding a Block or Other Iteration of a View ........................................................................................... 41 Adding Contextual Filters (or how not to create the same view a million times) .................................. 41 Putting It All Together ................................................................................................................................. 46 1
  • 2. Changing the Front Page ......................................................................................................................... 46 Making a Menu ....................................................................................................................................... 51 Enabling the Menu Block ........................................................................................................................ 53 Changing Permissions of a Block............................................................................................................. 54 Editing Already Made Blocks................................................................................................................... 54 Hiding the Login Box ............................................................................................................................... 55 Advanced Design......................................................................................................................................... 56 More Tutorials and Help ............................................................................................................................. 56 Appendix 1 .................................................................................................................................................. 57 Installation: ................................................................................................................................................. 57 Modules Added: .......................................................................................................................................... 57 Appendix 2 .................................................................................................................................................. 58 Downloading Aquia ..................................................................................................................................... 58 Installing New Modules .............................................................................................................................. 59 2
  • 3. About the Installation The demonstration is using the pre-packaged Aquia version of Drupal found at http://www.acquia.com/downloads. This choice was made so participants would be familiar with the Aquia look and feel, so they can easily use Acquia’s Dev Desktop software for easy experimentation and practice after the session. For more about the Dev Desktop tool, including installation, see the Getting Started Handout. Important Terms in Drupal Drupal has its own unique lingo that can be confusing to newcomers. Here is a list of terms which might be helpful. 1. Modules - http://drupal.org/glossary#module Software (usually PHP and CSS) that extends Drupal features and functionality. Drupal distinguishes between “core” and “contributed” modules. Core- http://drupal.org/glossary#core The files and modules included with the Drupal project download. Contrib - http://drupal.org/glossary#contrib Contributed. Modules or themes that are not part of the core Drupal product. Contributed modules and themes are available for separate download from the modulesand themes sections of Drupal.org downloads. These are separate from the Drupal “core”, although over time they can become part of it. Similar concepts exist in other software and are sometimes called “plugins”, “add-ons” or “extensions”. 2. Node - http://drupal.org/glossary#node A piece of content in Drupal, typically corresponding to a single page on the site, that has a title, an optional body, and perhaps additional fields. Every node also belongs to a particular content type, and can additionally be classified using the taxonomy system. Examples of nodes are polls, stories, book pages and images. 3. Fields- http://drupal.org/glossary#field Elements of data that can be attached to a node or other Drupal entities. Fields commonly contain text, image, or terms. In plain speak, this is an individual piece of data on a content type. Ex: The zip code on an address form. 3
  • 4. 4. Content Type- http://drupal.org/glossary#content-type Every node belongs to a single “node type” or “content type”, which defines various default settings for nodes of that type, such as whether the node is published automatically and whether comments are permitted. Common "Content Types" that just about any website would have include: blog post and page. Content types can have different fields and modules can define their own content types. The core Drupal Book and Poll modules are two examples of modules that define content types. In plain speak, these are the forms you create to input a specific kind of information. In this demonstration we make a license and vendor content type. To add data into the database, we click the content type of the kind of information we want to add and are presented with a predefined form. 5. Blocks – http://drupal.org/glossary#block The boxes visible in the regions of a Drupal website. Most blocks (e.g., recent forum topics) are generated on-the-fly by various Drupal modules, but they can be created in the administer blocks area of a Drupal site. See the documentation for more information on blocks. Additional information: Blocks are one method to arrange content on a page. They can be dropped in predefined areas. Blocks is under structure. 6. Theme - http://drupal.org/glossary#theme A file or collection of files (PHP, INFO, CSS, JPG, GIF, PNG), which together determine the look and feel of a site. A theme contains elements such as the header, icons, block layout, etc. Drupal modules define themeable functions which can be overridden by the theme file. There are additional themes available in the themes section of downloads. 7. Taxonomy - http://drupal.org/glossary#taxonomy The science of classification. In Drupal, Taxonomy is a powerful core module that gives your sites use of “terms”, organizational keywords known in other systems as categories, tags, or metadata. In Drupal, these terms are gathered within “vocabularies.” TheTaxonomy module allows you to create, manage and apply those vocabularies. 8. Roles - http://drupal.org/glossary#roles Sets of permissions that can be applied to individual users. Users can belong to more than one role. Two roles, authenticated users (those users that sign up for an account) and anonymous users (those either without an account or not logged in), are supplied by default with Drupal installations. Drupal allows creating additional. 4
  • 5. Getting Started The presentation will use a Drupal installation, with all relevant modules already installed, hosted by the Florida Center for Library Automation (FCLA). The site can be found at http://drupal7demo.fcla.edu/. This site will be available for use after the demonstration. To practice on your own after the session see the getting started document for installing Dev Desktop and modules. Creating and Approving Accounts All creators of content need and account. On the front page click Create Account beneath the login form. Fill in the appropriate information and submit. The presenter will give you the proper administrative roles. Administrators approve new users by clicking on the People link in the administration menu and then clicking edit next to the user that needs to be approved. 5
  • 6. Change the user’s status to active and choose what roles the user should have. Make sure to save. 6
  • 7. A note on account creation - Take a moment to check security Any new site will automatically be set up to allow users to create new accounts. This might not be desirable. To check the settings and change accordingly click on the configure option in the administration menu running across the browser. On the Configuration screen click on account settings. This warning is because I’m using a Dev desktop installation not connected to the internet. Nothing is actually broken Look over all the settings on this page, but pay special attention to the registration section. Choose the settings that match your institution’s needs. You may even consider hiding the login block. We’ll get to how to do this later in the demonstration. 7
  • 8. Turning on Modules Drupal gets it’s functionality through modules. Some modules are considered “core”, meaning they are part of what comes with Drupal. An example of a core module is Taxonomy. Some are “Contrib”, meaning they are modules created by the Drupal community. An example of a contrib module is Views. Modules need to be enabled to use. For this demo the contributed modules have already been installed and need enabling. For this demonstration we will enable the modules Chaos tools Suite, Date, Field Group, References, Taxonomy Access Control, and Views. Later we will enable Fusion Accelerator, Fusion and Panels in a discussion about arranging content. To enable, click on the Modules item in the administration menu. This takes you to a list of all the installed modules on the website. 8
  • 9. Scroll down the list and find the modules that need to be activated. Note that many of these modules have multiple parts. Enable all parts of the module by checking the boxes. Remember to save at the bottom of the screen. The Date module has many parts. Some modules require a extra step. After saving this warning appeared. Click the Rebuild permissions link and follow the instructions to finalize the process. 9
  • 10. Now we will disable a module. Go to Modules from the administration menu at the top of the browser. Scroll down on the module page and find Acquia Network Connector. Uncheck Acquia Site Profile Information and save. Then go back to the Module page and uncheck Acquia agent and save. This will make the advertisement go away. Creating Basic Content To create a simple page using the Drupal defaults, click the add content link on the left navigation menu. If you can’t find the left navigation menu make sure all overlays are closed and click the site logo, home tab, or home breadcrumb. 10
  • 11. Choose create basic page. The red star indicates a required field. The top part of the form is the content of the webpage. The bottom part of the form gives options about publishing. 11
  • 12. Saving your content will take you to the completed webpage. That is all it takes to make a basic page in Drupal. Finding Already Created Content Now navigate back to the home page. How do you find the content you just created? To see all the content on the site click on the Content menu link from the administration menu. There you will see your webpage. Clicking on the title will take you to the page or clicking to edit will take you directly to editing. New content can also be created from the content page. 12
  • 13. Editing Existing Content If you are logged on and an authorized user, you will see the edit tab on a piece of content. Click the tab to go to the edit screen. Creating Custom Content Types While useful, the existing content types in Drupal are limited. You will need to create custom content types. This is the pen and paper portion of working in Drupal. Consider what the data you want to track in Drupal. Break it into logical units. The better you define these units the fewer headaches you will have. For the license database I need to track vendors, licenses and statistics. Next think about what kind of information is needed to describe each type of information. Example: Vendor –name, contact name, contact email, contact phone number, link to license, link to statistics, login information, notes Statistics – name, type of statistics, file, date 13
  • 14. License – file of titles, pdf, active dates, date sent to purchasing, date returned, acquisition terms, cancellation terms, ILL terms (make as granular as possible ex. course reserve permissions) and participants. The type of information is your content type and the pieces of information on the content type are your fields. To create a new content type click structure from the admin menu and select content types. Click +Add content type at the top of the content type page. 14
  • 15. The first screen sets the parameters of the content type. Here is where you name it and set up the behavior. For the example I am making a vendor content type. Added description Change the title field to vendor name Read and choose settings for content type Save and move on to adding fields. 15
  • 16. Fields are the information that is part of our content type. Here we add things like the vendor contact name and email. E B A C D A. This is the label. It will be what displays above the field when you create content. B. Be sure to name your field something unique and identifiable. A good practice is to preface the name with the content type name. This makes identification easier. 16
  • 17. C. There are many choices about what kind of information a field should store. Choose the type that best suits your needs. Ask yourself if you need a drop down list or a free text box? There are also many modules that expand the type. Some contributed field types are date, which adds a calendar pop-up, and node reference. D. Different kinds of fields have different widgets. For example: if you choose date you can have a pop-up calendar or box to type. E. Delete the body tag. This is not needed. After setting your field up click save. This will bring you to more options that allow for further customization of the field. These options change with the kind of field chosen Fields can be dragged and dropped to be easily rearranged by clicking on the little cross icons on the left side. A special field Node Reference is an interesting field that creates relationships across content types. During creation you can choose the type of content type to reference. 17
  • 18. Now, when the license field is clicked on in a vendor record a list of real time licenses appear. Field Groups Too many fields can make a page unmanageable. A field group allows fields to be grouped together. The groups can then be expanded or collapsed to make reading on a screen more manageable. Adding a field group is almost exactly like adding a field. Go to manage fields on your content type and add a field group. Save. 18
  • 19. Once you have created the field group, drag your fields under the field group. They will be indented if they are properly placed under the group. Use of field groups will collapse content into more manageable pages. This needs to be done twice. Putting field groups on the Manage Fields Tab will change the edit screen. Adding Field Groups on the Manage Display Tab will effect what the users see. 19
  • 20. Adding Field Sets to the manage display will give you a result similar to this. The page is better looking, and the collapsed groups conserve space on a page. Experiment with the Field Group settings. There are other interesting javascript affects besides collapsing. 20
  • 21. Permissions Permissions control who can see and do what in Drupal. Creation of content and viewing content are controlled by permissions. Every time you install a new module take a look at the permissions screen to see if any new permissions were added. To look at permissions, click People on the administration menu and then click the Permissions tab in the right top corner. Permissions are assigned to roles and roles are then assigned to users. The top row of the permissions table shows what roles have already been created. These roles determine what users can do. Permissions by Fields Using the Fields Permission module, permissions can be assigned on a field by field basis. This means some content can be public and some content can be limited to special user. This exercise will use the license content type as an example. On the license some information like price caps or just internal tracking fields may need to be restricted. Other information like interlibrary loan date needs to be public. 21
  • 22. The first step is to make a new role of license viewer. From the permissions page click the roles link just under the permissions tab. Next type in the name of the role and click add role. To add field by field permissions, go back to the content type license. 1. Navigate from Structure on the admin menu to content type. 2. In the license content type row click manage fields. 3. Click on edit in one of the field rows. 4. Scroll down and find Field visibility and permissions. Select the radio button next to custom permissions. 22
  • 23. Here we see the roles defined for the site. In this example we only want the license viewer and the administrator to be able to view these fields. It is good practice to give the administrator access to everything and in this case the administrator role gets access by default. Check the two boxes for viewing the field. This indicates the license viewer can see but not edit. Remember to save. Repeat steps for all confidential fields. To test, create a new user for the site. Click on People in the admin menu. Then click +Add user at the top of the page. Create the new user. Make sure to give the new user the role license user. Save. To continue testing: 1. Navigate to a piece of license content as an administrator and take a look. 2. Copy the url. 3. Logout. 4. Paste the url into the browser. 5. You should only see the publicly available fields 6. Login as the new license user 7. Now you should see all fields 8. Make sure to logout and back in as an administrator to continue. 23
  • 24. Permissions Based on Taxonomy Another way to control access to content is through taxonomy terms by using the Taxonomy Access Control module. In this example we will use it to limit a school to only see their content. Note: This is a higher level of control that will override field permissions. In designing your database, it is important to decide what kind of permissions you need for each content type and create accordingly. For this example let’s assume we want different schools in a consortia to only view their statistic records. This requires a statistics content type already be made. Follow the instructions for making a content type and create one. Include Title, a date that includes a beginning and an ending, a file field to upload a spreadsheet and a node reference field that links to vendors. Leave school off for the moment. After creating the content type add a few records. The next step is to create a new taxonomy. Click on Structure in the admin menu. Next click Taxonomy from the list. On the Taxonomy page click +Add vocabulary. Note: The terms taxonomy and vocabulary are used interchangeably in Drupal. There has been some confusion between versions as to what to call the feature. In this example I’m setting up a list of school names. Save. 24
  • 25. Next add terms. In this case, terms will be the names of schools. Click the add terms link next to the vocabulary name. Type in the school name and save. Do this as many times as needed. The Taxonomy needs to be added to the content type. This is the same as adding any field. 1. Click Stucture -> content types 2. Click manage fields next to the statistics content type. 3. Add a new field as usual but select Term reference as the type of data to store. 4. Save 25
  • 26. 5. On the next screen choose the vocabulary Schools. 6. Save the field. Now add a school to the statistic pages you made earlier. Go to the piece of content. Click edit. Fill in the new field from the school drop down list. The next step is making a new role. Make a new role for one of the schools. People->permissions->role. 26
  • 27. Assigning Taxonomy Permissions to a Role To assign the taxonomy permissions the new role click on Configuration in the Admin menu. Then click on Taxonomy access control from the configuration screen. Click enable access control next to your school role. 27
  • 28. Under the heading New, select the term, in this case the school, that the permission will be for. Under the column View click the radio button A. The A stands for allow. Click the Add button next to your school name. Scroll to the bottom of the screen and Save all. A B C A. Choose the term. In this case the school. B. Click add after choosing the term and setting the permissions. C. Selecting A will allow viewing access to anything tagged with FGCU. Now that you’ve allowed the new role to view the content you must disallow it from the other roles. This needs to be done for anonymous and authenticated user. On the Taxonomy Access Control screen click edit access rules next to the role anonymous. Choose the term, the school name. This time, click the radio button under the D for disallow. Click the Add button. Scroll down to the bottom of the page and Save All. 28
  • 29. Repeat this procedure for the authenticated roles. To test: 1. Create a new user. 2. Assign the new user the school role. 3. Find a statistic page tagged with the school. 4. Logout and try to view page. The page should not appear. 5. Login as the school user and view page. It should appear. 6. Logout and log back in as an administrator. Views Views is the real power of Drupal. Technically views is a query builder with a point and click user interface. This means you can call data from your pages to rearrange and display in dynamic lists. With expansion modules the possibilities are endless. You can make calendars, galleries, slide shows, latest news lists and on and on. Views could be a separate class unto itself. This demonstration will cover a few basic uses of views that introduce some of the features. Creating a list of Vendors One of the most simple but widely used uses of view is creating a list of a specific content type. For this database we need a list of all of our vendors. To create a view click Structure in the admin menu. Then choose views from the structure page. Once on the views page, you will see all the preloaded views that come with Drupal and the installed modules. These can be good models when trying to figure out how to do something the first time. Click enable to use one of these views in your site. 29
  • 30. To add a new view click +Add new view from the top of the page. Most of our work for this view will be done on the Add new view screen. A B C D A. Name the view B. This is what you want to make a list of. In this case we want content. Other options include user, commits, files, taxonomy terms and more. C. This field changes depending on what was chosen in the first drop down. In this case it lists all the content types. Choose vendor to create a list of vendors. D. The sort box also changes depending on the first two choices. We want an alphabetical list so choose title as the sort. 30
  • 31. The second part of the page defines a page that displays the view. A B C D A. Is inherited from the top but can be changed. This is the title that will display on the webpage. B. The URL to access the newly created page. This is created by the page title but can be changed. C. This is where you choose what kind of display your view will take. This is where you can change to output to make a calendar or table display. The second part defines what will be displayed in the format. D. The number of items to display before the list either ends or adds a pager. Check to box to add a block. Mimic the page settings in the page. This can be used later. Save & exit this view 31
  • 32. This takes you to the newly created view. To find the url of the page again, go back to the view page. Structure->views. The url is displayed in the views list. Creating a Table View with Exposed Filters Another useful view is one formatted as a table. This is a common way to display multiple fields. This view will show a table of statistics records that displays title, school and uploaded file. There will also be exposed filters at the top of the view to sort and limit the information displayed. 32
  • 33. Make a new view. Navigate Structure->Views->+Add new view The first part of the form is filled out in a very similar way to the first view we made. The only difference is we’ve chosen statistics as the type of content. In this view the display format is table. Notice the “of fields” following the display format. This means fields need to be selected. Ignore the block check box and click continue & edit. 33
  • 34. This page shows the advance settings for a view. When you come back to an already created view this is also the page you will see. This view needs to have additional fields added to the display. The title field is already listed under fields from the initial set up. We need to add school and file. Click the add button next to Fields. This will bring up a list of all the fields in the database. This is why naming fields in content type in a descriptive manner is important. Find the school field and check the box. Click Apply. This will take you to a configuration screen. Take a moment to look at the different choices. Click Apply. 34
  • 35. A preview of your changes can be seen at the bottom of the screen. It should now look similar to this. Next add the usage statistics file. Again click add next to Fields. You can use the search to find the field if you know the name. Click the check box next to the field and click apply. Click apply again at the configuration screen. The preview should now look similar to this. 35
  • 36. Rewriting Field Output The file name is very large and cumbersome. The output can be written to just display the word file. To do this,click on the Stat file field. This brings up the configuration screen. First change the formatter to url to file. 36
  • 37. Next open up the rewrite results collapsed area. Once opened, open the replacement pattern collapsed area. The replacement patterns show tokens of the field content. This allows you to manipulate how the information is displayed. We are going to change the file into a link using html and the token. A B C A. Make sure to click the rewrite box. If this is not checked the rewrite will not take. B. Here is the html code to rewrite the field output. In place of a url in the href we place a token. Without the code a url would be displayed. With the code around the token the url is populating the code and displaying the hyper link “File” C. This shows the options of data to drop in a display. It will only show options from fields above this one. If you want to display extra data in an output make sure to put the field above it so the token will display. Make sure to click apply. 37
  • 38. The preview should look something like this. Adding exposed filters This list could quickly become large and difficult to manage. Adding exposed filters allows the data to be filtered on the fly. In this example a new exposed filter for school will be added. This will allow the user to instantly get a list from the school they select. Under filter criteria click add. Find the school field and check the box. Apply. On the configuration screen choose dropdown and apply. 38
  • 39. On the next screen, check the box expose filter. A new set of options will open up. Take the machine field name out of the label to make it attractive. Apply. 39
  • 40. REMEMBER TO SAVE YOUR VIEW! The save is on the top of the screen instead of the usual bottom. Updating is not saving. Now take a look at the finished page and make sure it works. 40
  • 41. Adding a Block or Other Iteration of a View If you want to add a block of a view ofrmake another page of the view with slight changes this is easy to do. Navigate to the view. Structure->Views->edit button next to view. Clicking the +Add button will bring up a list of display types. Choosing one will automatically populate the new display with the view information. Adding Contextual Filters (or how not to create the same view a million times) If you want to put a link on each vendor page to a view of only that vendor’s statistics you have two options. Make a new view for every vendor or use contextual filters in views. This was known as arguments in previous versions of Drupal and is still called that in most discussions and help. 41
  • 42. We only need a slight variation on the usage statistic view previously made. We need to get rid of the exposed filter and add a contextual filter. Navigate to the already created usage statistics view Structure->views->edit usage statistics. Click the +Add button at the top of the view and choose page. To delete the exposed filter click Content: School (exposed). Before removing make sure to change the top drop down to “This page (override)”. If it is not changed to override you will change the original view. Click remove at the bottom of the page. Next add a unique path. This will be the url to this view. 42
  • 43. Now the most important part, add the contextual filter. Contextual filters allows a single view to display unique information by adding identifying information to the url. In this case, we want to produce a view based on vendors. Expand the advanced area and click the Add button next to Contextual filters. Find the vendor field that appears on the statistics content type and check. Apply (This Display). 43
  • 44. Override the title and breadcrumbs so the vendor is accurately displayed on the view page. Check the boxes next to both and follow the instructions about wildcards. Copy the example. Apply (this display). Save the view. 44
  • 45. This takes us to a view that looks remarkably similar to what we had before. The power lies in changing the url. To change the url to pull up a specific vendor we need to know the vendor’s ID number. To find this go to a vendor record and go to the editing screen. Look at the url when in edit mode. Look for the string node/a number. In this case the vendor’s ID number is 8. Navigate back to your new view display. The URL should look something like this. 45
  • 46. Add the vendor number to the end of the URL. This will change the entire view. This is how contextual filters work. Instead of making a new view for every vendor, this one view can be changed again and again though the url. This makes a site clean and requires less maintenance. Putting It All Together Changing the Front Page Now that the content and views are all created, the site needs to come together. The first step is changing the front page to be something reasonable. For the licensing database being created in the demonstration we want the view of the vendors to be the front page. 46
  • 47. First step is to get the path of the view. Navigate to the views list to find it. Structure ->views. Find the path next to the vendor view. Next, click on Configuration in the admin menu across the top of the page. On the configuration screen go to site information. 47
  • 48. In the first section of the site information screen, the title can be changed. Change it to License Database. The middle of the site information screen is where the front page is changed. Put in the path of the vendor view. Save configuration. Now go to the front page and take a look. The default Acquia logo needs to be removed or changed to a new logo. 48
  • 49. Click on appearance in the admin menu across the top of the screen. Click on the tab setting in the top right corner. By unchecking the box next to logo, the logo can be turned off. If the logo is to be replaced upload a new image. For this demonstration the logo will be turned off. Save configuration and return to home page. 49
  • 50. The front page looks better but the menu doesn’t make sense. We want to add a menu that navigates to different pages. We also want to make the already existing menu viewable only to administrators. Menus are only viewable when they are put into blocks or some other element. The first part is to make a menu. The second part is to put it into a block for display. 50
  • 51. Making a Menu Click on structure in the top admin menu and click on menus. Here is a list of already premade menus. To add a new menu click +Add menu at the top of the list. Name your menu and save. To add items to the menu click +Add link 51
  • 52. A B C D A. What is filled in here will be what displays in the menu. B. In this example I am linking to the vendor view previously created. Any path or url can be put here to link within the site or outside the site. C. A description displayed when hovering over the link. D. The weight can force the arrangement of items in the menu. The bigger the number the lower on the list. It is easier to drag and drop links from the menu screen to arrange. Save and follow the same steps to create a link to the statistics view. Rearrange the links into the desired order after creating. 52
  • 53. Enabling the Menu Block The creation of a menu automatically creates a new block. Blocks are containers that allow certain content to be moved around the screen. To see the block go to Stucture->Blocks. Blocks can be put into predefined areas. The predefined areas are defined by the site’s theme. To see what areas a site has defined, click on demonstrate block regions. The name is the parenthesis is the theme name. We want the new menu to appear in sidebar first region. To do this scroll down the page and find the new block somewhere near the bottom in the disabled blocks area. In the drop down box next to the license menu choose sidebar first. The block will automatically move into the new area. To find it again, go to the sidebar first area of the blocks list. To rearrange, drag and drop the blocks into the correct order. In this demo we’ll move the license navigation block above the navigation block. Save. 53
  • 54. Changing Permissions of a Block I don’t want the original navigation menu to display to anyone but administrators. It doesn’t make sense for people not creating content to see the menu. Permissions by roles can be assigned on the block page. Click navigation next to the block. Go to the bottom of the screen and choose the roles tab. Check the box next to administrator and save. Editing Already Made Blocks Once blocks are display you can edit the menu or block from the little cog icon in the top right corner of the block. The front page is almost correct now except I want the search box in the header. This can be done by going to structure->blocks or by editing the block itself. Click the little cog in the top right corner of the block and choose configure block. On the configuration page in the regions settings, change the default theme placement to header. Save. 54
  • 55. The front page has come a long way. Hiding the Login Box For security reason you may not want the login box to ever display. You don’t want random hackers or people trying to create accounts. The login box can be disabled from the blocks menu. Simply choose none for the region and it will move into the disabled area. To access your site without a login box add /user to the base url. This will take you to a login screen. 55
  • 56. Advanced Design There are many ways to rearrange content on a Drupal site. The module panels http://drupal.org/project/panels allows the users to create custom layouts through a friendly drag and drop user interface. While simple to set up, this is a large and deep module. Another way to change the look of a website is by downloading and installing a new theme. A list of themes contributed by the community can be found at http://drupal.org/project/Themes . Some themes have advance designs that let a user change colors or add some styling on the fly for a more customized look. If you are skilled at css or can manipulate php templates, you can “create” your own theme. This is usually done by downloading a starter theme with good clean css markup like zen or fusion and modifying the css and php files. The design options are limitless. More Tutorials and Help There are many sources of help in the form of tutorials or direct questions. http://groups.drupal.org/ - Find a local group to participate in. These are your best sources for direct help. Drupal4Lib listserv - http://listserv.uic.edu/archives/drupal4lib.html a friendly and active listserv for druapl questions. It specializes in library concerns. For staying up to date with new modules, developments and tips and tricks there is http://www.lullabot.com/. This company has a weekly newsletter and regular podcasts. They also produce paid training materials and sessions. The Do It With Drupal conference they host is pricey but a good learning opportunity. Nodeone Learning Library - http://dev.nodeone.se/learning-library Free videos and training. Drupal.org – The center of it all. Google - If you Google any problem you have, you are sure to find and answer. The Drupal community is vast and really into sharing information. 56
  • 57. Appendix 1 Drupal 7 Licensing Site Recipe http://drupal7demo.fcla.edu/ Installation: Aquia : http://www.acquia.com/downloads Modules Added: Views: http://drupal.org/project/views Field Permissions: http://drupal.org/project/field_permissions References: http://drupal.org/project/references Field Group: http://drupal.org/project/field_group Date: http://drupal.org/project/date Taxonomy Access Control: http://drupal.org/project/taxonomy_access Optional Modules for Display Fusion Theme: http://drupal.org/project/fusion Fusion Accelerator: http://drupal.org/project/fusion_accelerator Panels: http://drupal.org/project/panels Additional Resources: DLF ERM Initiative http://old.diglib.org/pubs/dlf102/dlf102.htm 57
  • 58. Appendix 2 Getting Started One way to easily start playing with and practicing with Drupal is to use a desktop installation. This saves you the need to install Drupal on a server and allows for easier experimentation with modules and themes. The company Aquia provides a free and complete desktop Drupal installation. The advantage of using Aquia’s software is it comes bundled with everything you need to get started, including the backend database. It is a good one-click way for a beginning user to get started. Downloading Aquia The Dev Desktop installation can be found at http://www.acquia.com/downloads . At this time version 7 is the latest version of Drupal. Choose you operating system, download and install. 58
  • 59. During the installation process remember the user name and password entered into the installation wizard. This is the user name and password for your new site. Once you’ve installed the software go to the new site. Installing New Modules The power of Drupal comes from the community created modules that extend the functionality. The basic functionality of some essential modules was incorporated into version 7 of Drupal, like CCK. One exception is the module Views. This module is necessary for almost every Drupal installation. The licensing database in the demonstration uses several modules that can be found on the site recipe card. Modules require separate download and installation. This is easily done in the Dev Desktop. The first step is to download the module. Links for all modules used in the presentation are provided on the site recipe card. Since Views is so important, we’ll use this module as the example. 59
  • 60. Go to a modules project page on drupal.org. Scroll to the bottom of the page and download the recommended release. The demonstration is using Drupal 7. 60
  • 61. To install the module in Drupal open your site from the Dev Desktop control panel. Login to the site using the user name and password create during the installation. After logging in you will see the Administration menu across the top of the browser. Click on Modules. This brings you to the modules administration screen. This screen lists all the installed modules on your site and indicates if they have been enabled. To install a module click the Install new module link directly above the list. 61
  • 62. Choose the module you downloaded from the Drupal website, in this walk through Views, and then click install. The modules used in this demonstration. Once a module is installed it needs to be enabled. From the installation finish screen or from the administration menu, return to the module page. 62
  • 63. Scroll down the page and find the newly installed module. Click the checkboxes to enable. If you look at the description you’ll see some required modules for views have not been enabled. These also need to be enabled for views to work. Chaos tools is included in the Acquia installation. It is a module that does not do anything on its own but is required to run many of the more powerful Drupal modules. Scroll up the page and find the Chaos Tools Suite. Enable all of the tools. 63
  • 64. Remember to save! The save button is at the bottom of the page. Installing the rest of the modules for the demonstration follows the same steps. Take some time to explore what modules are available. Chances are if you want to do something with Drupal someone else has already created a module to do it. Some modules like reference and date expand the core functionality of Drupal while others like views add completely new features. 64