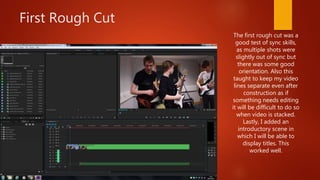
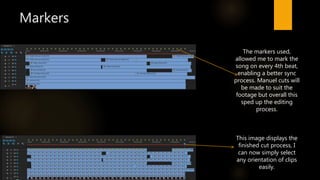
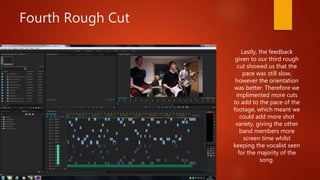
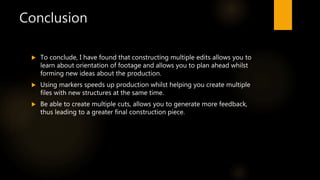
Introduction
 This document shall explain the process of production through editing
techniques and choices. I have had multiple attempts so far in order to
create a music video I am satisfied with.
 Sequence Markers are one technique that aided my editing process, and I
will explain their use.
 As well as markers, the orientation of the video clips needs to be analysed
because despite them being synced, they still need to be in a visually
appealing order to make the video more entertaining for the viewer.
 Enjoy!
Construction Folder
This folder highlights the
variety of files needed for
construction and the
amount of attempts
created in order to
produce a sequence that
I am happy with. One 15
second sequence may
work in one file so once
it does I can repeat it in
the next file alongside
another good sequence.
Through multiple rough
cuts I will be able to from
the perfect construction
of performance shots for
my music video.
First Rough Cut
The first rough cut was a
good test of sync skills,
as multiple shots were
slightly out of sync but
there was some good
orientation. Also this
taught to keep my video
lines separate even after
construction as if
something needs editing
it will be difficult to do so
when video is stacked.
Lastly, I added an
introductory scene in
which I will be able to
display titles. This
worked well.
Markers
This image displays the
finished cut process, I
can now simply select
any orientation of clips
easily.
The markers used,
allowed me to mark the
song on every 4th beat,
enabling a better sync
process. Manuel cuts will
be made to suit the
footage but overall this
sped up the editing
process.
Second Rough Cut
After receiving feedback
from our first rough cut,
we learned we needed to
shorten the length of our
shots. To do so we
added cuts between the
sequence markers we set
enabling faster paced
footage.
Third Rough Cut
Once we received
feedback on our second
rough cut, we learned we
needed more shots of
the vocalist as
conventionally he is the
lead and therefore needs
the most screen time. We
also attempted to cut
according to just the
sequence markers to test
the pace of that form of
edit.
Fourth Rough Cut
Lastly, the feedback
given to our third rough
cut showed us that the
pace was still slow,
however the orientation
was better. Therefore we
implimented more cuts
to add to the pace of the
footage, which meant we
could add more shot
variety, giving the other
band members more
screen time whilst
keeping the vocalist seen
for the majority of the
song.
Conclusion
 To conclude, I have found that constructing multiple edits allows you to
learn about orientation of footage and allows you to plan ahead whilst
forming new ideas about the production.
 Using markers speeds up production whilst helping you create multiple
files with new structures at the same time.
 Be able to create multiple cuts, allows you to generate more feedback,
thus leading to a greater final construction piece.

Construction & Editing Process

  • 1.
    Introduction  This documentshall explain the process of production through editing techniques and choices. I have had multiple attempts so far in order to create a music video I am satisfied with.  Sequence Markers are one technique that aided my editing process, and I will explain their use.  As well as markers, the orientation of the video clips needs to be analysed because despite them being synced, they still need to be in a visually appealing order to make the video more entertaining for the viewer.  Enjoy!
  • 2.
    Construction Folder This folderhighlights the variety of files needed for construction and the amount of attempts created in order to produce a sequence that I am happy with. One 15 second sequence may work in one file so once it does I can repeat it in the next file alongside another good sequence. Through multiple rough cuts I will be able to from the perfect construction of performance shots for my music video.
  • 3.
    First Rough Cut Thefirst rough cut was a good test of sync skills, as multiple shots were slightly out of sync but there was some good orientation. Also this taught to keep my video lines separate even after construction as if something needs editing it will be difficult to do so when video is stacked. Lastly, I added an introductory scene in which I will be able to display titles. This worked well.
  • 4.
    Markers This image displaysthe finished cut process, I can now simply select any orientation of clips easily. The markers used, allowed me to mark the song on every 4th beat, enabling a better sync process. Manuel cuts will be made to suit the footage but overall this sped up the editing process.
  • 5.
    Second Rough Cut Afterreceiving feedback from our first rough cut, we learned we needed to shorten the length of our shots. To do so we added cuts between the sequence markers we set enabling faster paced footage.
  • 6.
    Third Rough Cut Oncewe received feedback on our second rough cut, we learned we needed more shots of the vocalist as conventionally he is the lead and therefore needs the most screen time. We also attempted to cut according to just the sequence markers to test the pace of that form of edit.
  • 7.
    Fourth Rough Cut Lastly,the feedback given to our third rough cut showed us that the pace was still slow, however the orientation was better. Therefore we implimented more cuts to add to the pace of the footage, which meant we could add more shot variety, giving the other band members more screen time whilst keeping the vocalist seen for the majority of the song.
  • 8.
    Conclusion  To conclude,I have found that constructing multiple edits allows you to learn about orientation of footage and allows you to plan ahead whilst forming new ideas about the production.  Using markers speeds up production whilst helping you create multiple files with new structures at the same time.  Be able to create multiple cuts, allows you to generate more feedback, thus leading to a greater final construction piece.