Recommended
PDF
PDF
PDF
PDF
PDF
PDF
ODP
PPTX
PDF
PDF
PDF
PDF
PPT
Server2Go เว็บพกพาตัวจริง
PDF
Android Control Hardware and Arduino IoT ( 22 Aug 15 )
PDF
PDF
PDF
PDF
PDF
ODP
Ch01 administrators-tasks
PPTX
Learn docker in 90 minutes
PDF
PDF
Shipping Applications to Production in Containers with Docker
PDF
A Gentle Introduction To Docker And All Things Containers
PPTX
PPTX
PDF
Docker from A to Z, including Swarm and OCCS
PDF
Study: The Future of VR, AR and Self-Driving Cars
PDF
PDF
More Related Content
PDF
PDF
PDF
PDF
PDF
PDF
ODP
PPTX
What's hot
PDF
PDF
PDF
PDF
PPT
Server2Go เว็บพกพาตัวจริง
PDF
Android Control Hardware and Arduino IoT ( 22 Aug 15 )
PDF
PDF
Viewers also liked
PDF
PDF
PDF
ODP
Ch01 administrators-tasks
PPTX
Learn docker in 90 minutes
PDF
PDF
Shipping Applications to Production in Containers with Docker
PDF
A Gentle Introduction To Docker And All Things Containers
PPTX
PPTX
PDF
Docker from A to Z, including Swarm and OCCS
PDF
Study: The Future of VR, AR and Self-Driving Cars
PDF
Similar to Ch15 elastic hosts-svradmin
PDF
PDF
NETWORK SERVICEOPENSSH + NTP + SQUID
PDF
PPT
PPT
ODP
PAGES
PDF
Ubuntu office server-10.04-x64
ODP
Ch02 administrators-tasks
PDF
PDF
Set up rubytech fgs 2924 r กับ tacacs
PDF
PDF
PDF
PDF
PDF
เอกสารกันลืมของCirno(สำหรับผู้ใช้linuxทั่วไป)
PDF
PDF
PDF
PDF
Ch15 elastic hosts-svradmin 1. 2. First login
● ใช้ vncviewer
$ vncviewer $ELASTICHOSTSIP
● password: *******
● login: root
– no password
● ใช้ secureshell
$ ssh toor@$ELASTICHOSTSIP
● password: ********
3. initial setup
● set root password
# passwd root
● disabled 'toor' account
# passwd l toor
● create admin account
# useradd m G sudo s /bin/bash c “Admin” cj
# passwd cj
# aptget install sudo
4. initial setup (cont)
● setup hostname on local VM
$ sudo sh c “echo '216.157.xx.xx remote' >> /etc/hosts”
$ sudo sh c “echo '216.157.83.88 cheshire' >> /etc/hosts”
● ทดสอบ user ที่สร้างขึ้นโดยการ remote login
$ ssh user@remote
$ ssh cj@cheshire
– at remote vm
$ sudo aptget y update
● ถ้าใช้งานได้แสดงว่า setup ถูกต้อง
5. Setup secure shell key
● เพื่อให้การส่งคำาสั่งไปยัง remote server ทำาได้สะดวก
มากขึ้น และ ไม่จำาเป็ นต้องใช้ GUI (vncviewer)
● local – Linux VM ใช้ local:~$
● remote – Elastichost VM ใช้ remote:~$
local:~$
remote:~$
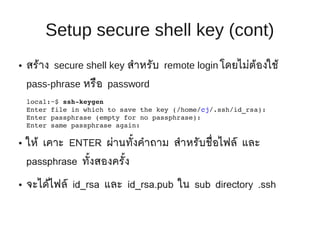
6. Setup secure shell key (cont)
● สร้าง secure shell key สำาหรับ remote login โดยไม่ต้องใช้
pass-phrase หรือ password
local:~$ sshkeygen
Enter file in which to save the key (/home/cj/.ssh/id_rsa):
Enter passphrase (empty for no passphrase):
Enter same passphrase again:
● ให้ เคาะ ENTER ผ่านทั้งคำาถาม สำาหรับชื่อไฟล์ และ
passphrase ทั้งสองครั้ง
● จะได้ไฟล์ id_rsa และ id_rsa.pub ใน sub directory .ssh
7. Setup secure shell key (cont)
● ส่ง key ไปเก็บไว้ที่ remote host
local:~$ sshcopyid user@remote
user@remote's password:
● มี message เตือนให้ตรวจสอบไฟล์ ~/.ssh/authorized_keys บน
remote host
● มันคือไฟล์เดียวกันกับ ~/.ssh/id_rsa.pub
● ลองเปรียบเทียบโดยการใช้คำาสั่ง
local:~$ ssh user@remote cat .ssh/authorized_keys
local:~$ cat .ssh/id_rsa.pub
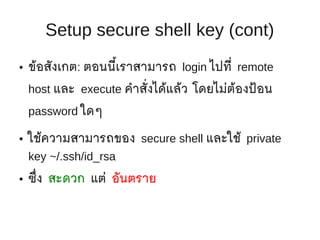
8. Setup secure shell key (cont)
● ข้อสังเกต: ตอนนี้เราสามารถ login ไปที่ remote
host และ execute คำาสั่งได้แล้ว โดยไม่ต้องป้ อน
password ใดๆ
● ใช้ความสามารถของ secure shell และใช้ private
key ~/.ssh/id_rsa
● ซึ่ง สะดวก แต่ อันตราย
9. Setup secure shell key (cont)
● สะดวก แต่ อันตราย
● ใครก็ตาม ซึ่งมีไฟล์ id_rsa ของเรา สามารถใช้สิทธิของเรา ใน
การทำางานใดๆ บนเครื่อง remote host ได้ โดยไม่จำาเป็ นจะ
ต้องรู้ password
● โดยเฉพาะถ้า กำาหนด sudo บางคำาสั่งแบบ NOPASSWD:
● วิธีการป้ องกัน: เพิ่ม passphrase ให้กับ key ของเรา
local:~$ sshkeygen p
10. Setup secure shell key (cont)
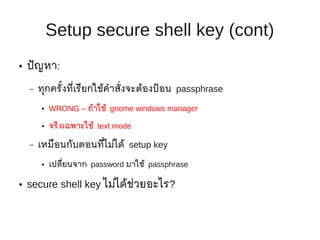
● ปั ญหา:
– ทุกครั้งที่เรียกใช้คำาสั่งจะต้องป้ อน passphrase
● WRONG – ถ้าใช้ gnome windows manager
● จริงเฉพาะใช้ text mode
– เหมือนกับตอนที่ไม่ได้ setup key
● เปลียนจาก password มาใช้ passphrase
่
● secure shell key ไม่ได้ช่วยอะไร?
11. Setup secure shell key (cont)
● ถ้าอยู่ใน GUI ให้ logout และ login ใหม่
● Gnome จะมี gnome-keyring-daemon และ seahorse Encryption
Key Manager คอยจัดการ key ให้
● Menu “System” ->”Preferences”->”Passwords and Encryption Keys”
● เลือก Tab “Personal Keys”
● สามารถ Export, Copy, Delete, Change Comment/Password ได้
12. keychain
● ถ้าใช้ terminal console และ remote login หรือ เครื่องที่
ใช้ในการจัดการ ไม่ได้ run gnome โดยตรง
● Notebook →Admin PC → Server
● GUI (gnome) → text terminal → text terminal
● สามารถใช้ keychain สำาหรับทำางานแบบเดียวกันกับ
Seahorse
13. keychain (cont)
● ติดตั้ง keychain
local:~$ sudo aptget install keychain sshaskpass
● เพิ่มลงไปใน .bashrc
if [ x /usr/bin/keychain ]; then
keychain id_rsa
[ z "$HOSTNAME" ] && HOSTNAME=`uname n`
[ f $HOME/.keychain/$HOSTNAMEsh ] &&
. $HOME/.keychain/$HOSTNAMEsh
fi
14. Setup secure shell key (cont)
● หลังจากใช้งาน keychain หรือ seahorse ก็จะทำาให้
สามารถ ป้ อน passphrase เพียงครั้งเดียว ก็จะใช้
secure shell key ในครั้งต่อๆไปได้
● การใช้ secure shell key ยังมีความสามารถอื่นๆ อีก
มาก เช่น ระบุว่าใช้ key นี้ run เฉพาะคำาสั่งนี้ โดย
ส่งมาจาก host นี้เท่านั้น
15. sync config using rsync
● เพื่อความสะดวกในการแก้ไข / backup config
– sync config จาก remote → local
– ใช้ rsync
– จะต้องมี rsync ทั้งที่ local และ remote
local:~$ sudo aptget install rsync
local:~$ ssh t remote sudo aptget install rsync
16. sync config (cont)
● First Sync
local:~$ sudo su
local:~# cd; mkdir REMOTE; cd REMOTE
local:~/REMOTE# rsync avuP root@remote:/etc/ etc
lsa:~$ sudo su
lsa:~# cd; mkdir cheshire; cd cheshire
lsa:~/cheshire# rsync avuP root@cheshire:/etc/ etc
17. sync config (cont)
● แก้ไขข้อมูล
● sync กลับ
local:~/REMOTE# rsync avuP etc root@remote:/
lsa:~/cheshire# rsync avuP etc root@cheshire:/
● จะมีเฉพาะไฟล์ที่ถูกแก้ไขเท่านั้น ที่ถูกส่งกลับไป
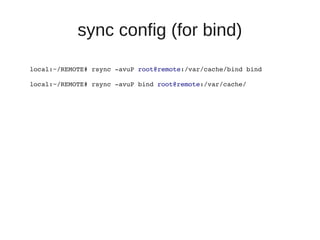
18. sync config (for bind)
local:~/REMOTE# rsync avuP root@remote:/var/cache/bind bind
local:~/REMOTE# rsync avuP bind root@remote:/var/cache/
19. sync config (deleted files)
● rsync --delete --delete-after
● อ่าน manual page ของ rsync สำาหรับ option
อื่นๆ
● เป็ นเครื่องมือที่มีประโยชน์มาก
20. sync config
● Note:
– ทุกครั้ง ก่อนที่จะแก้ไข config ที่ local copy
– ให้ sync config จาก remote server มาก่อนเสมอ
– แก้ไขแล้ว ค่อย sync กลับไป
● YOU HAVE BEEN WARNED
● การติดตั้ง/update package จะมีการแก้ไข config ที่ตัว server เพราะ
ฉะนั้น ให้ถือว่า ข้อมูลที่ server มีความทันสมัยกว่า เสมอ
● ยกเว้นกรณีที่ ทำาผิดพลาดบน server (เช่น ลบไฟล์ผิด)
21. Elastic VM Setup
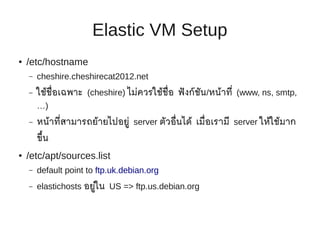
● /etc/hostname
– cheshire.cheshirecat2012.net
– ใช้ช่ อเฉพาะ (cheshire) ไม่ควรใช้ช่ อ ฟั งก์ชน/หน้าที่ (www, ns, smtp,
ื ื ั
…)
– หน้าที่สามารถย้ายไปอยู่ server ตัวอื่นได้ เมื่อเรามี server ให้ใช้มาก
ขึ้น
● /etc/apt/sources.list
– default point to ftp.uk.debian.org
– elastichosts อยู่ใน US => ftp.us.debian.org
22. VM Setup (cont)
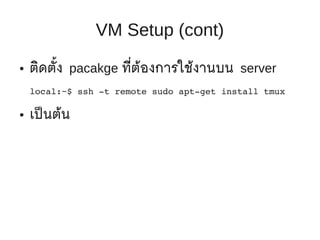
● ติดตั้ง pacakge ที่ต้องการใช้งานบน server
local:~$ ssh t remote sudo aptget install tmux
● เป็ นต้น


![keychain (cont)
● ติดตั้ง keychain
local:~$ sudo aptget install keychain sshaskpass
● เพิ่มลงไปใน .bashrc
if [ x /usr/bin/keychain ]; then
keychain id_rsa
[ z "$HOSTNAME" ] && HOSTNAME=`uname n`
[ f $HOME/.keychain/$HOSTNAMEsh ] &&
. $HOME/.keychain/$HOSTNAMEsh
fi](https://image.slidesharecdn.com/ch15-elastichosts-svradmin-130129213649-phpapp01/85/Ch15-elastic-hosts-svradmin-13-320.jpg)