Download to read offline
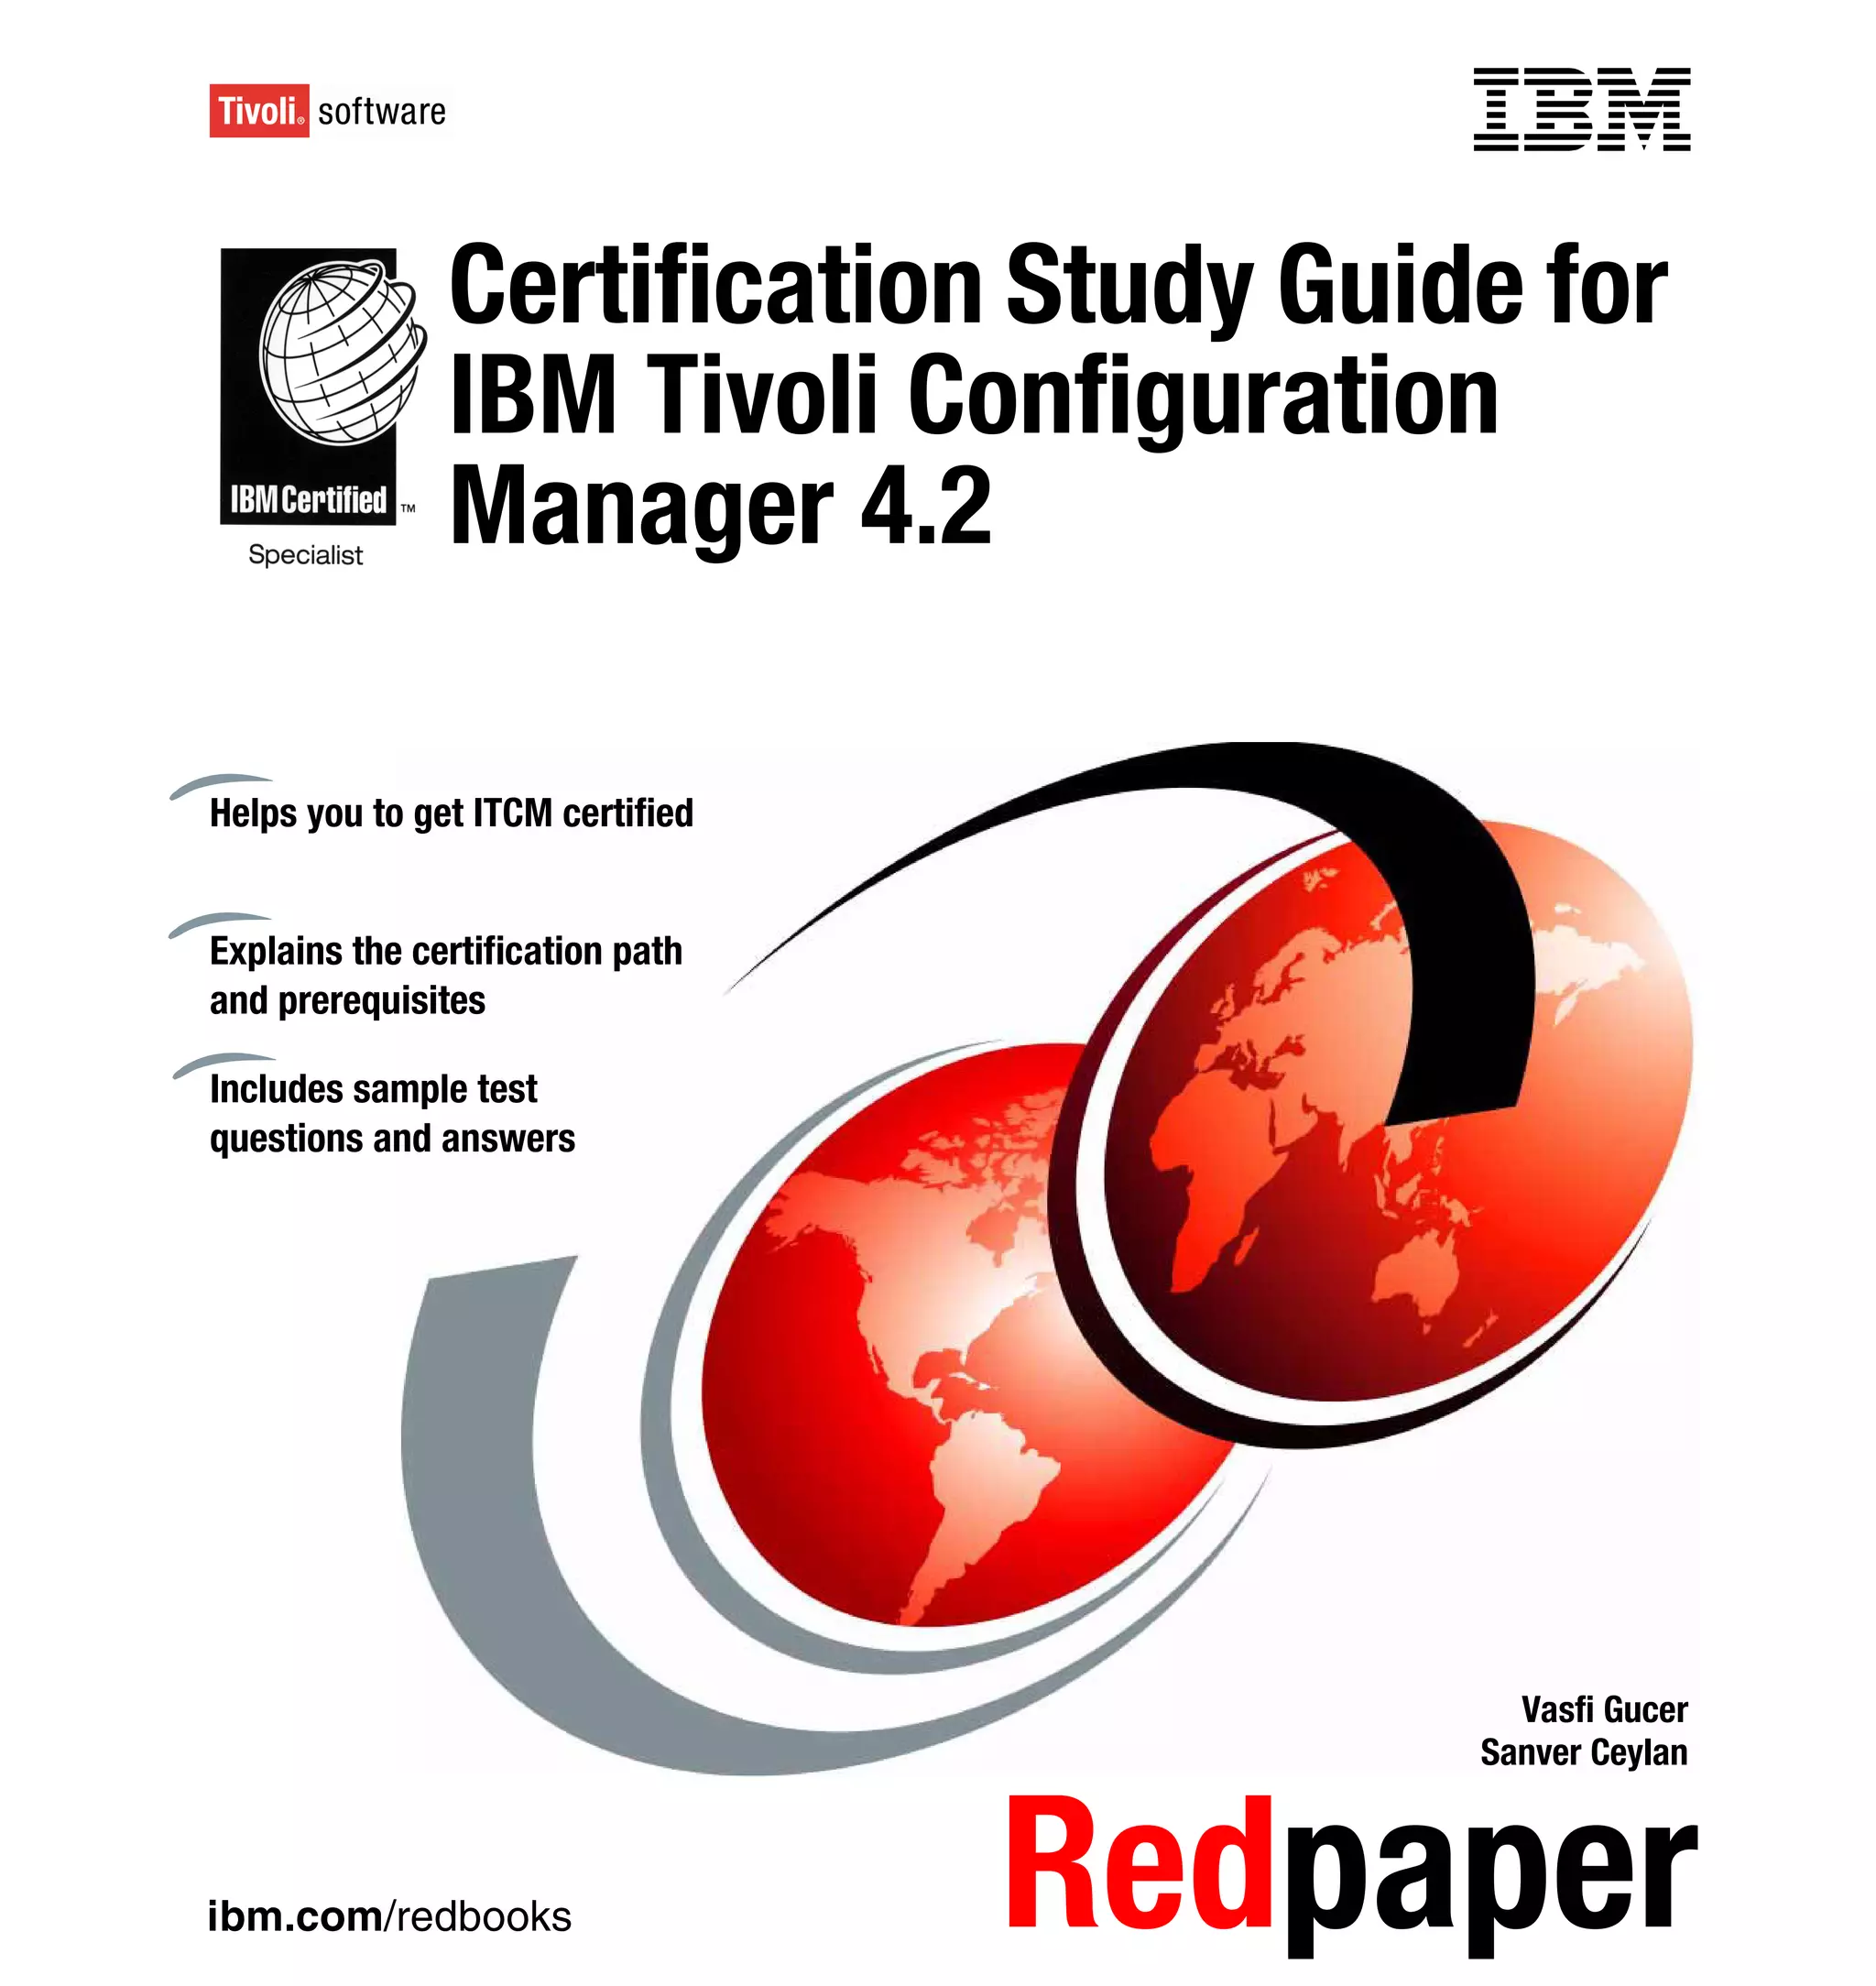


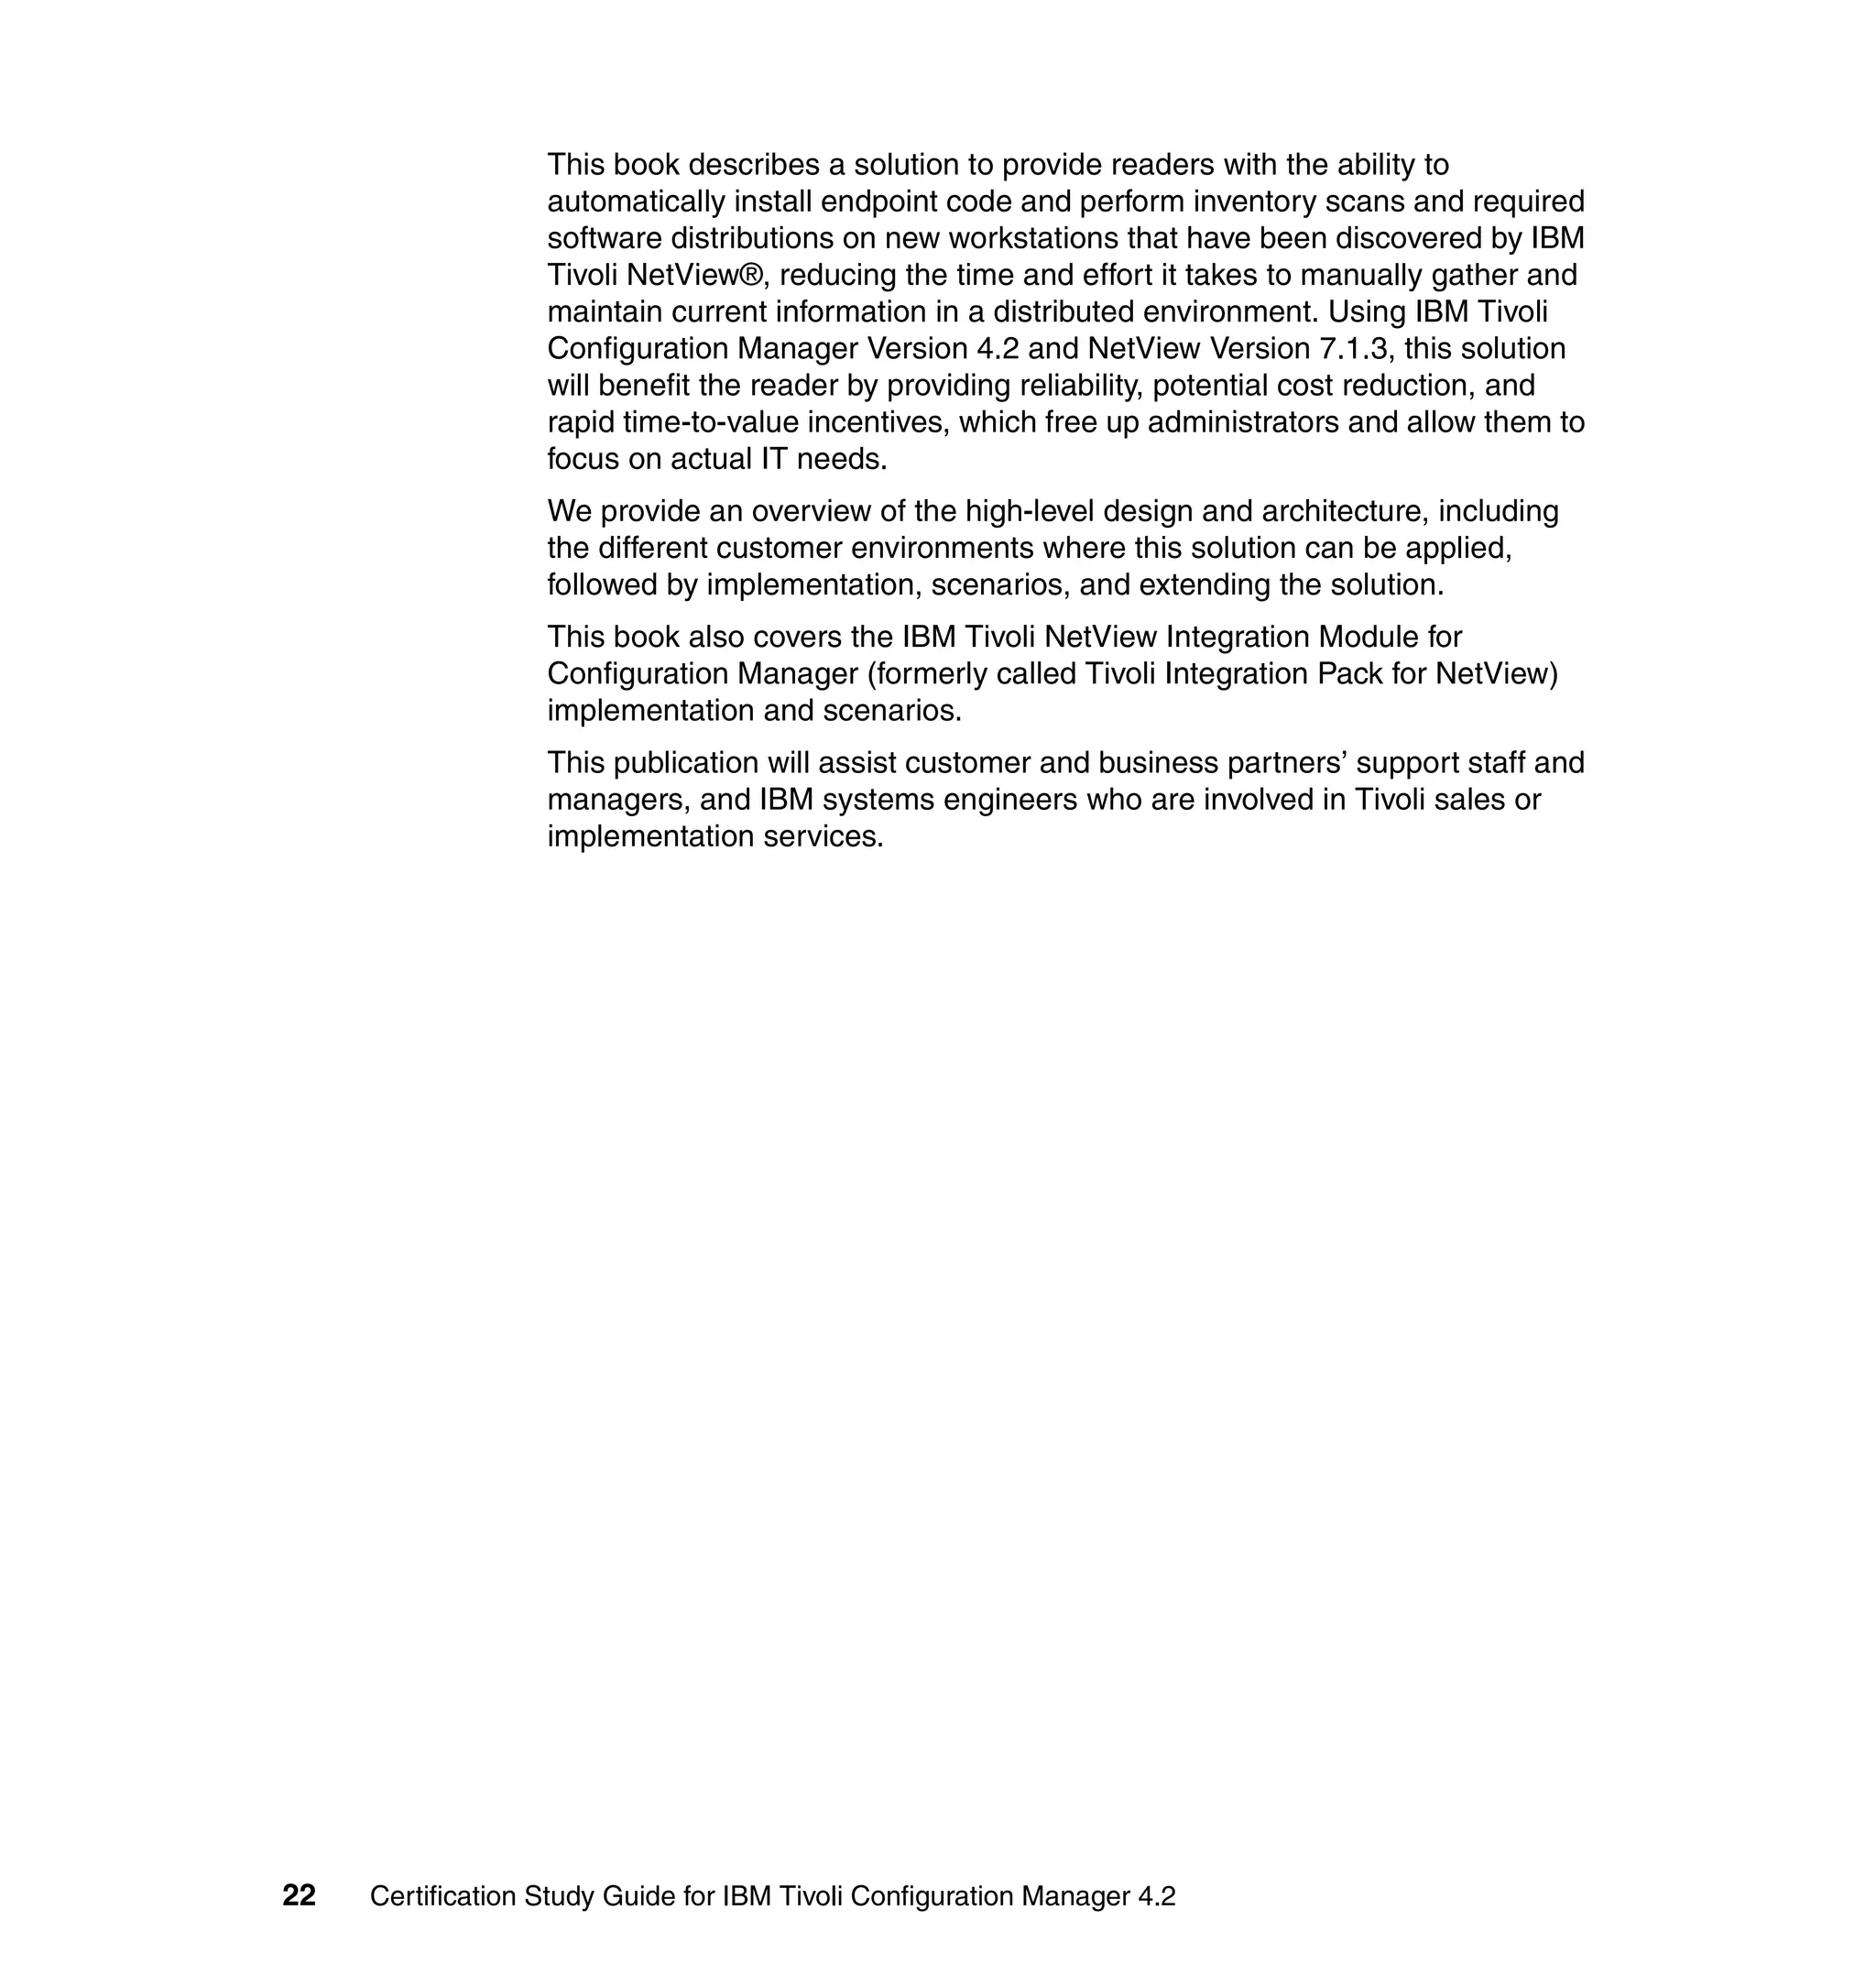
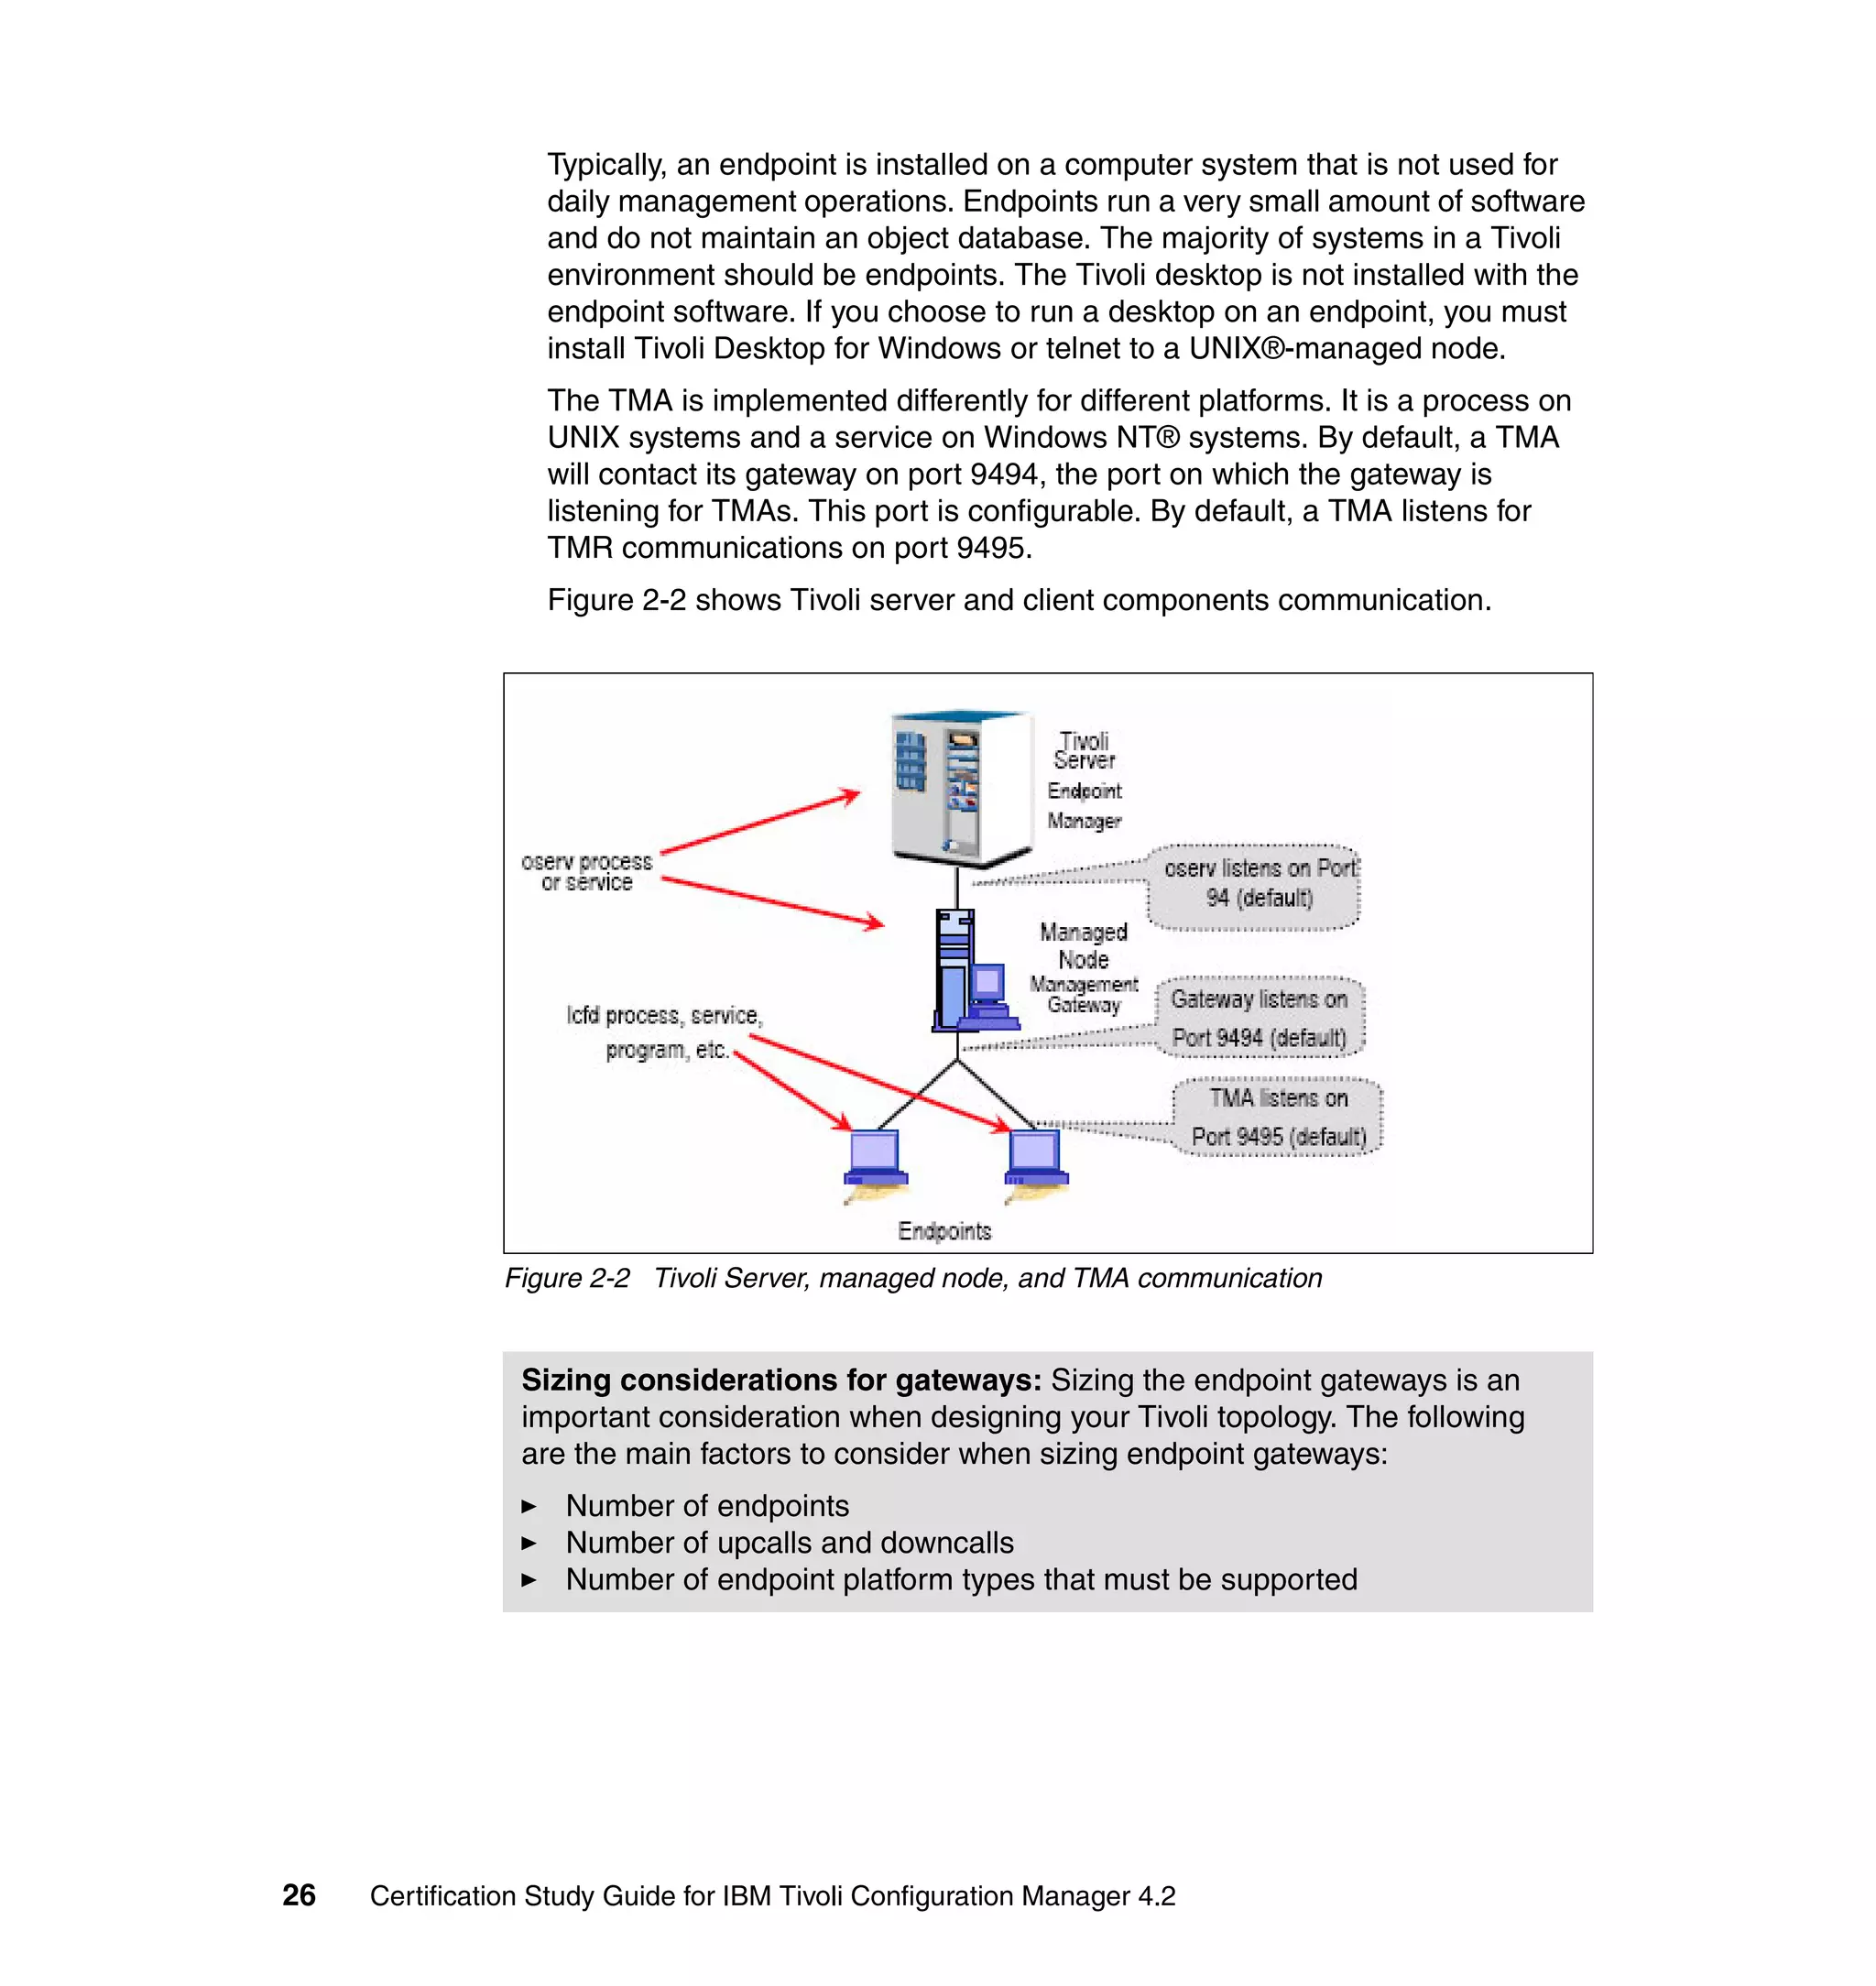

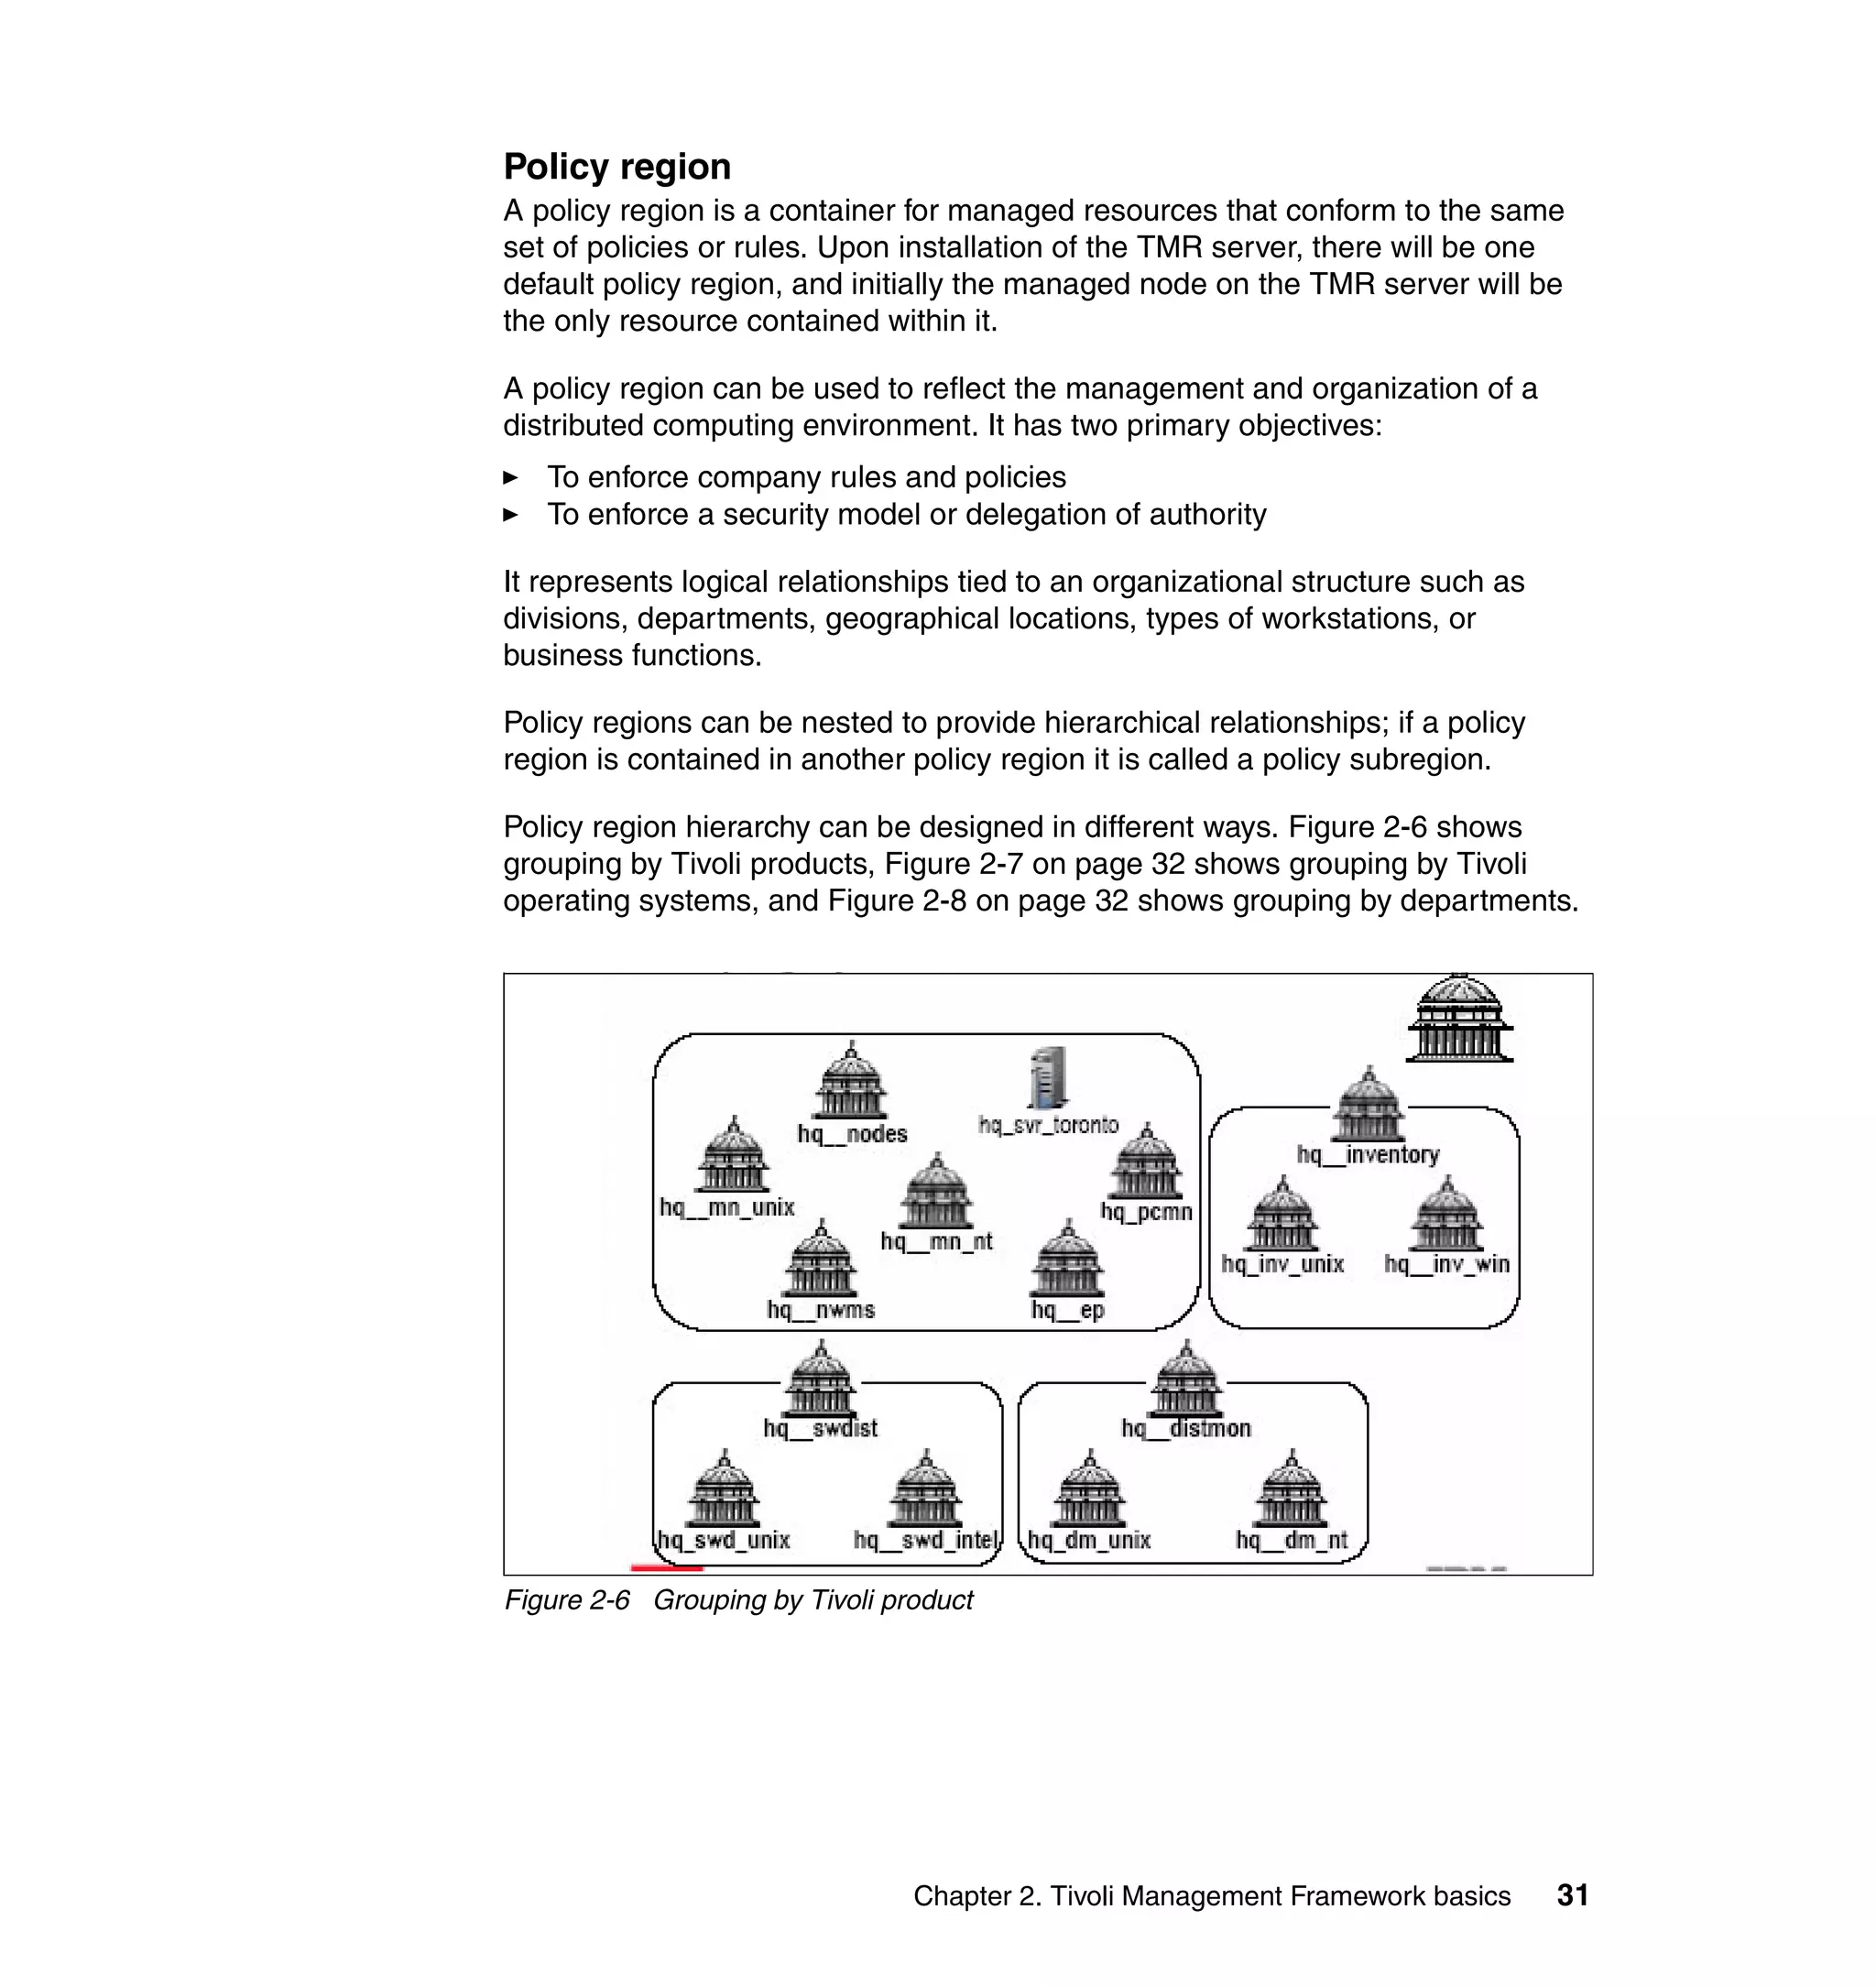
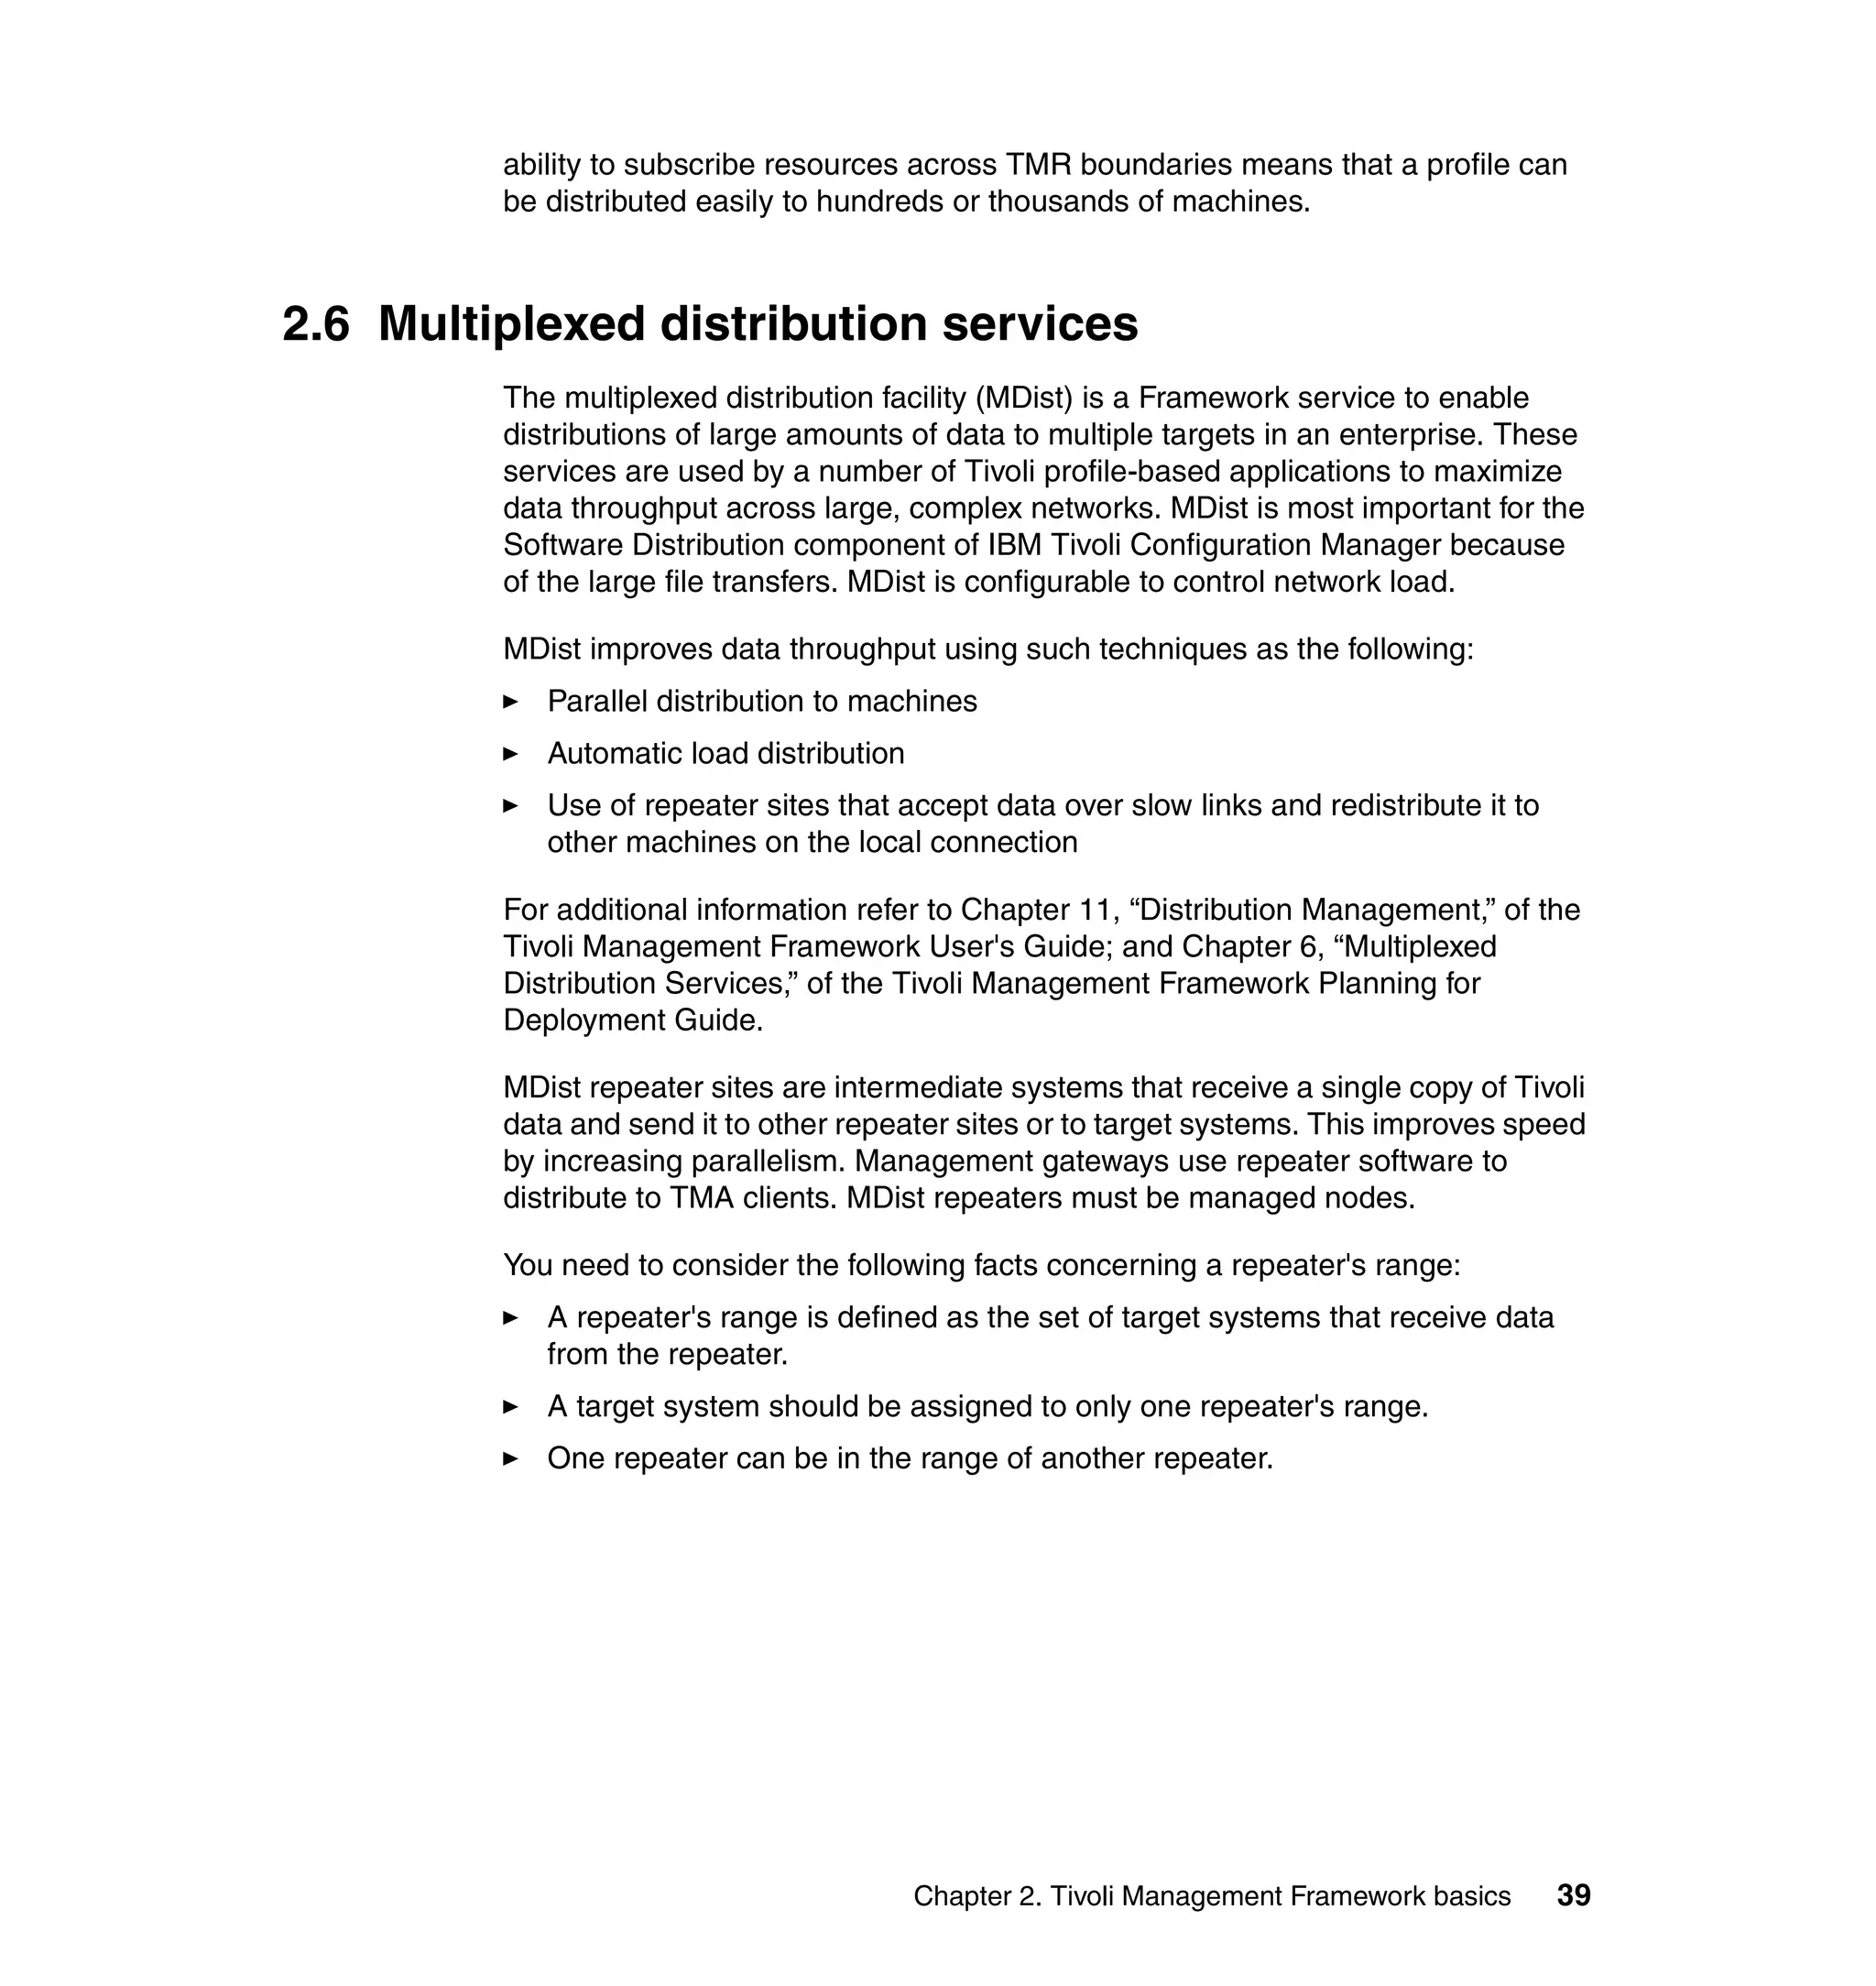
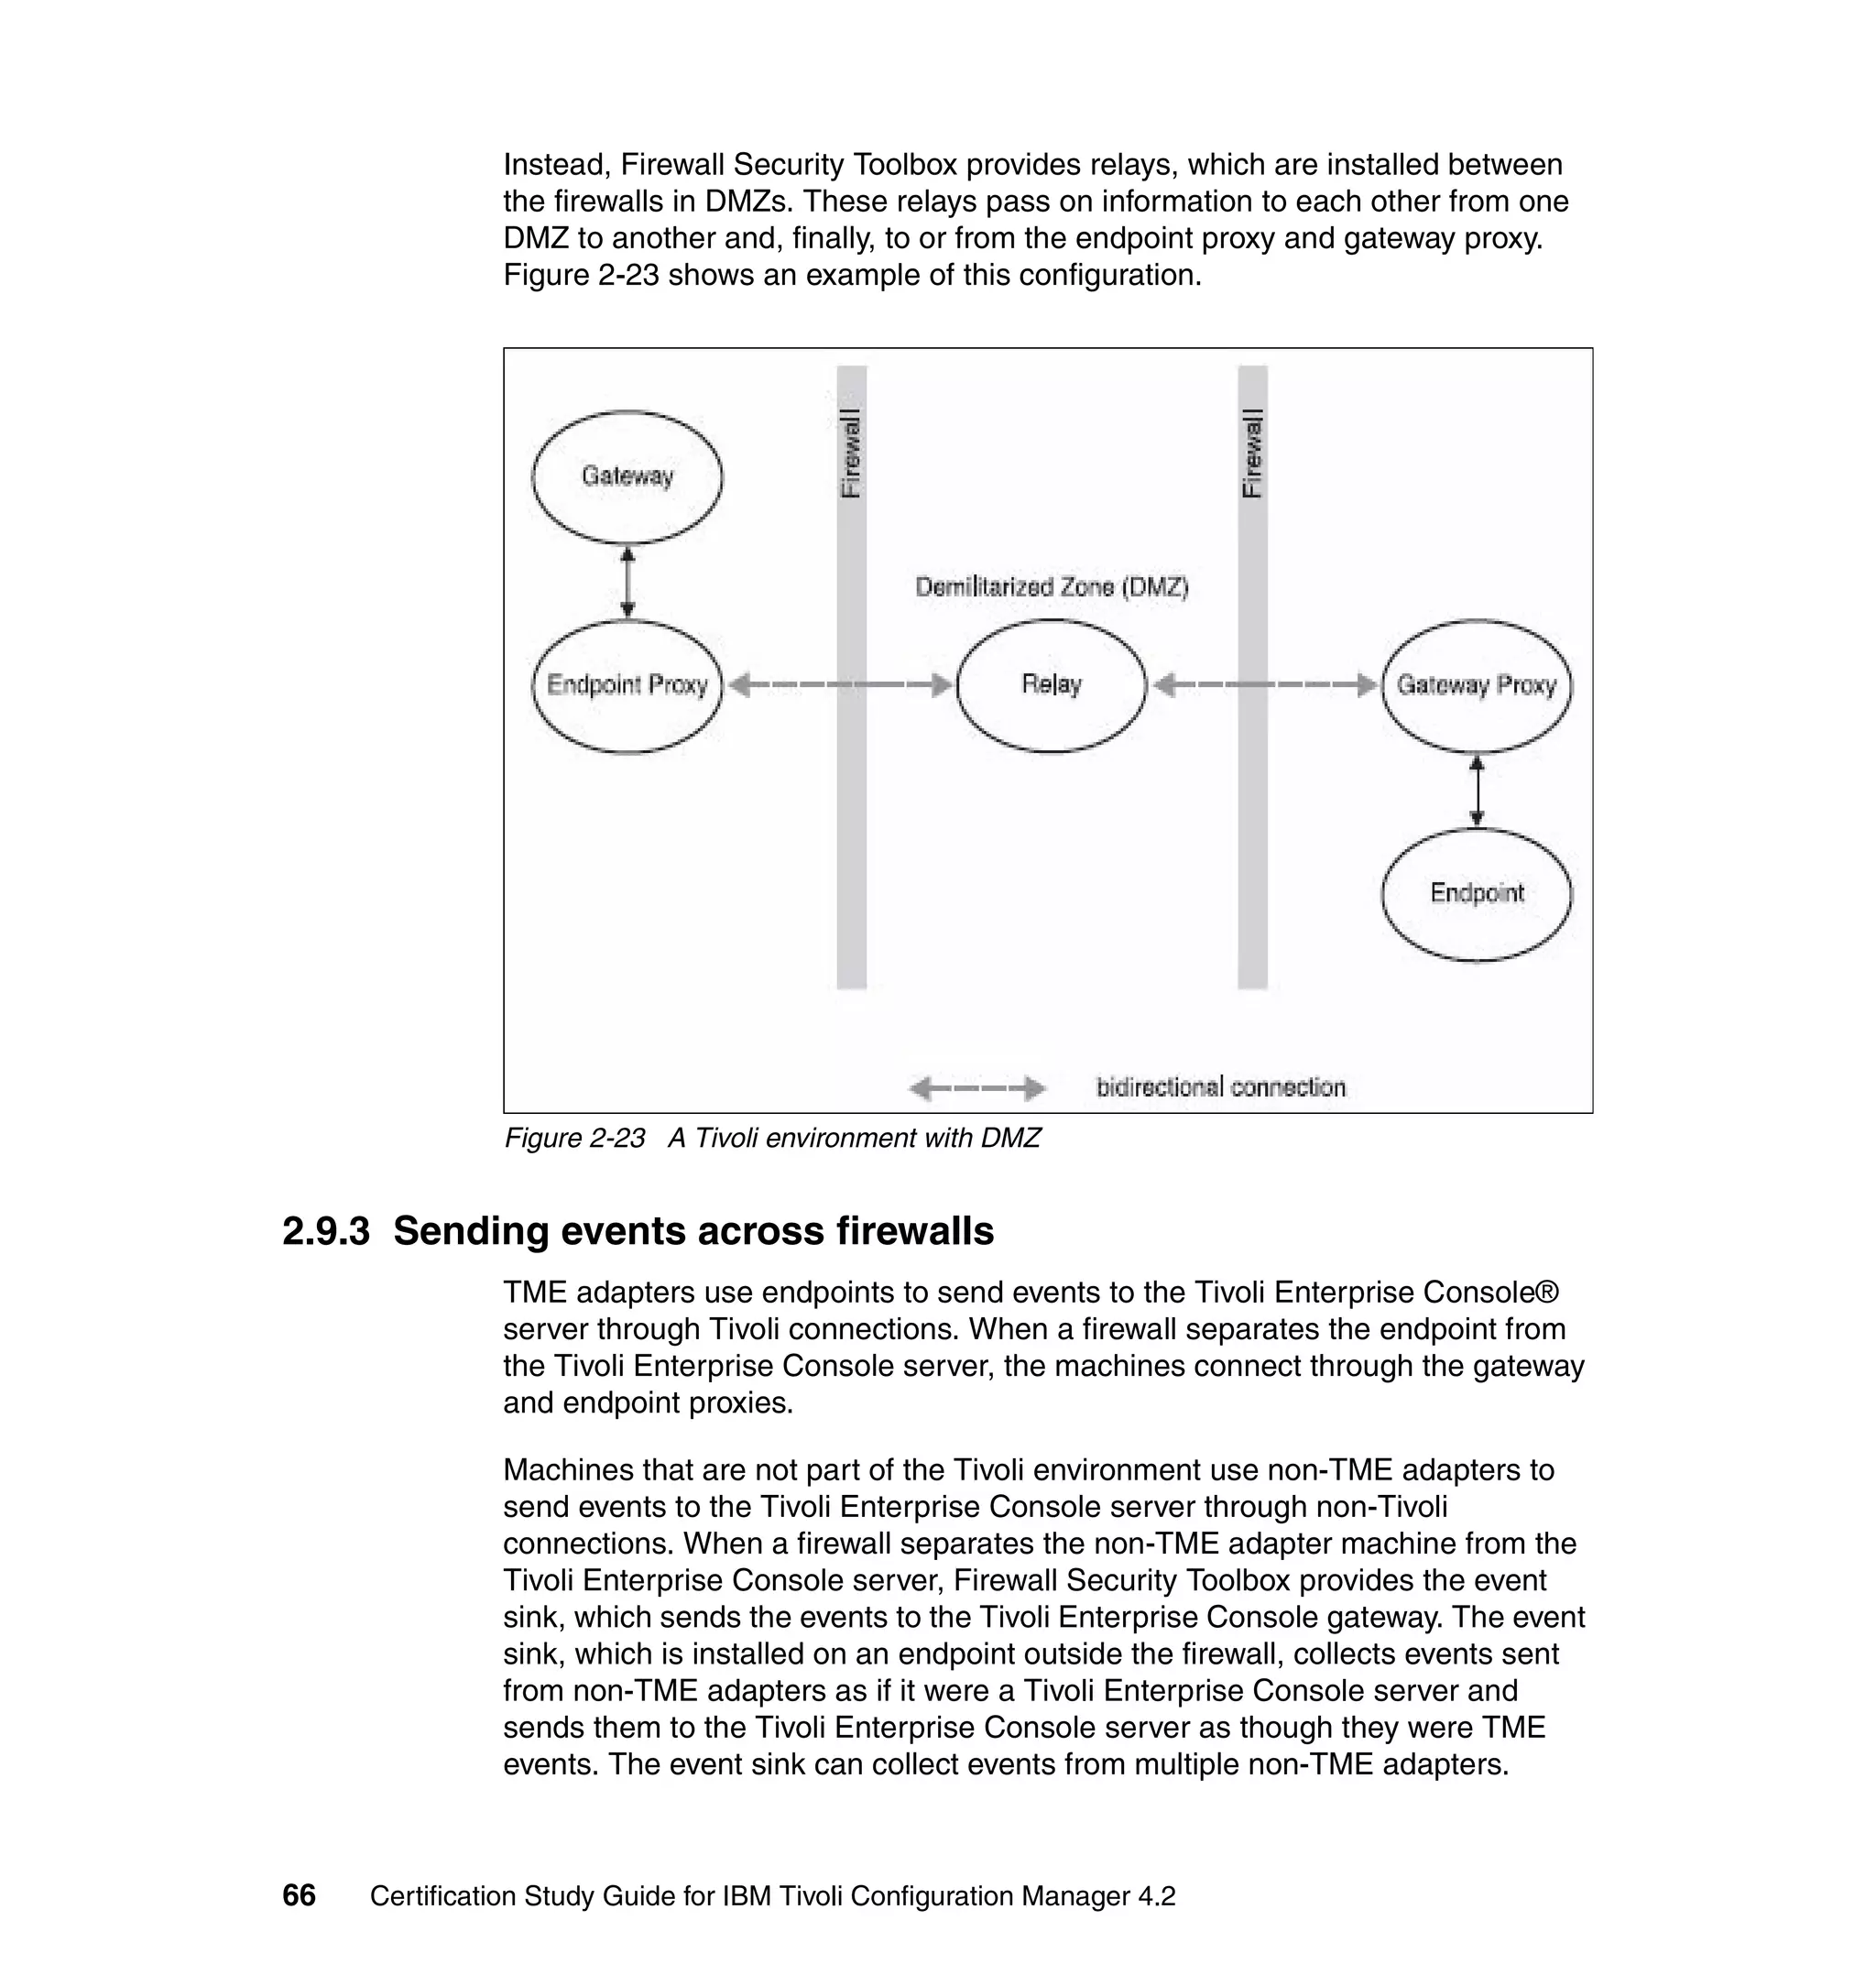
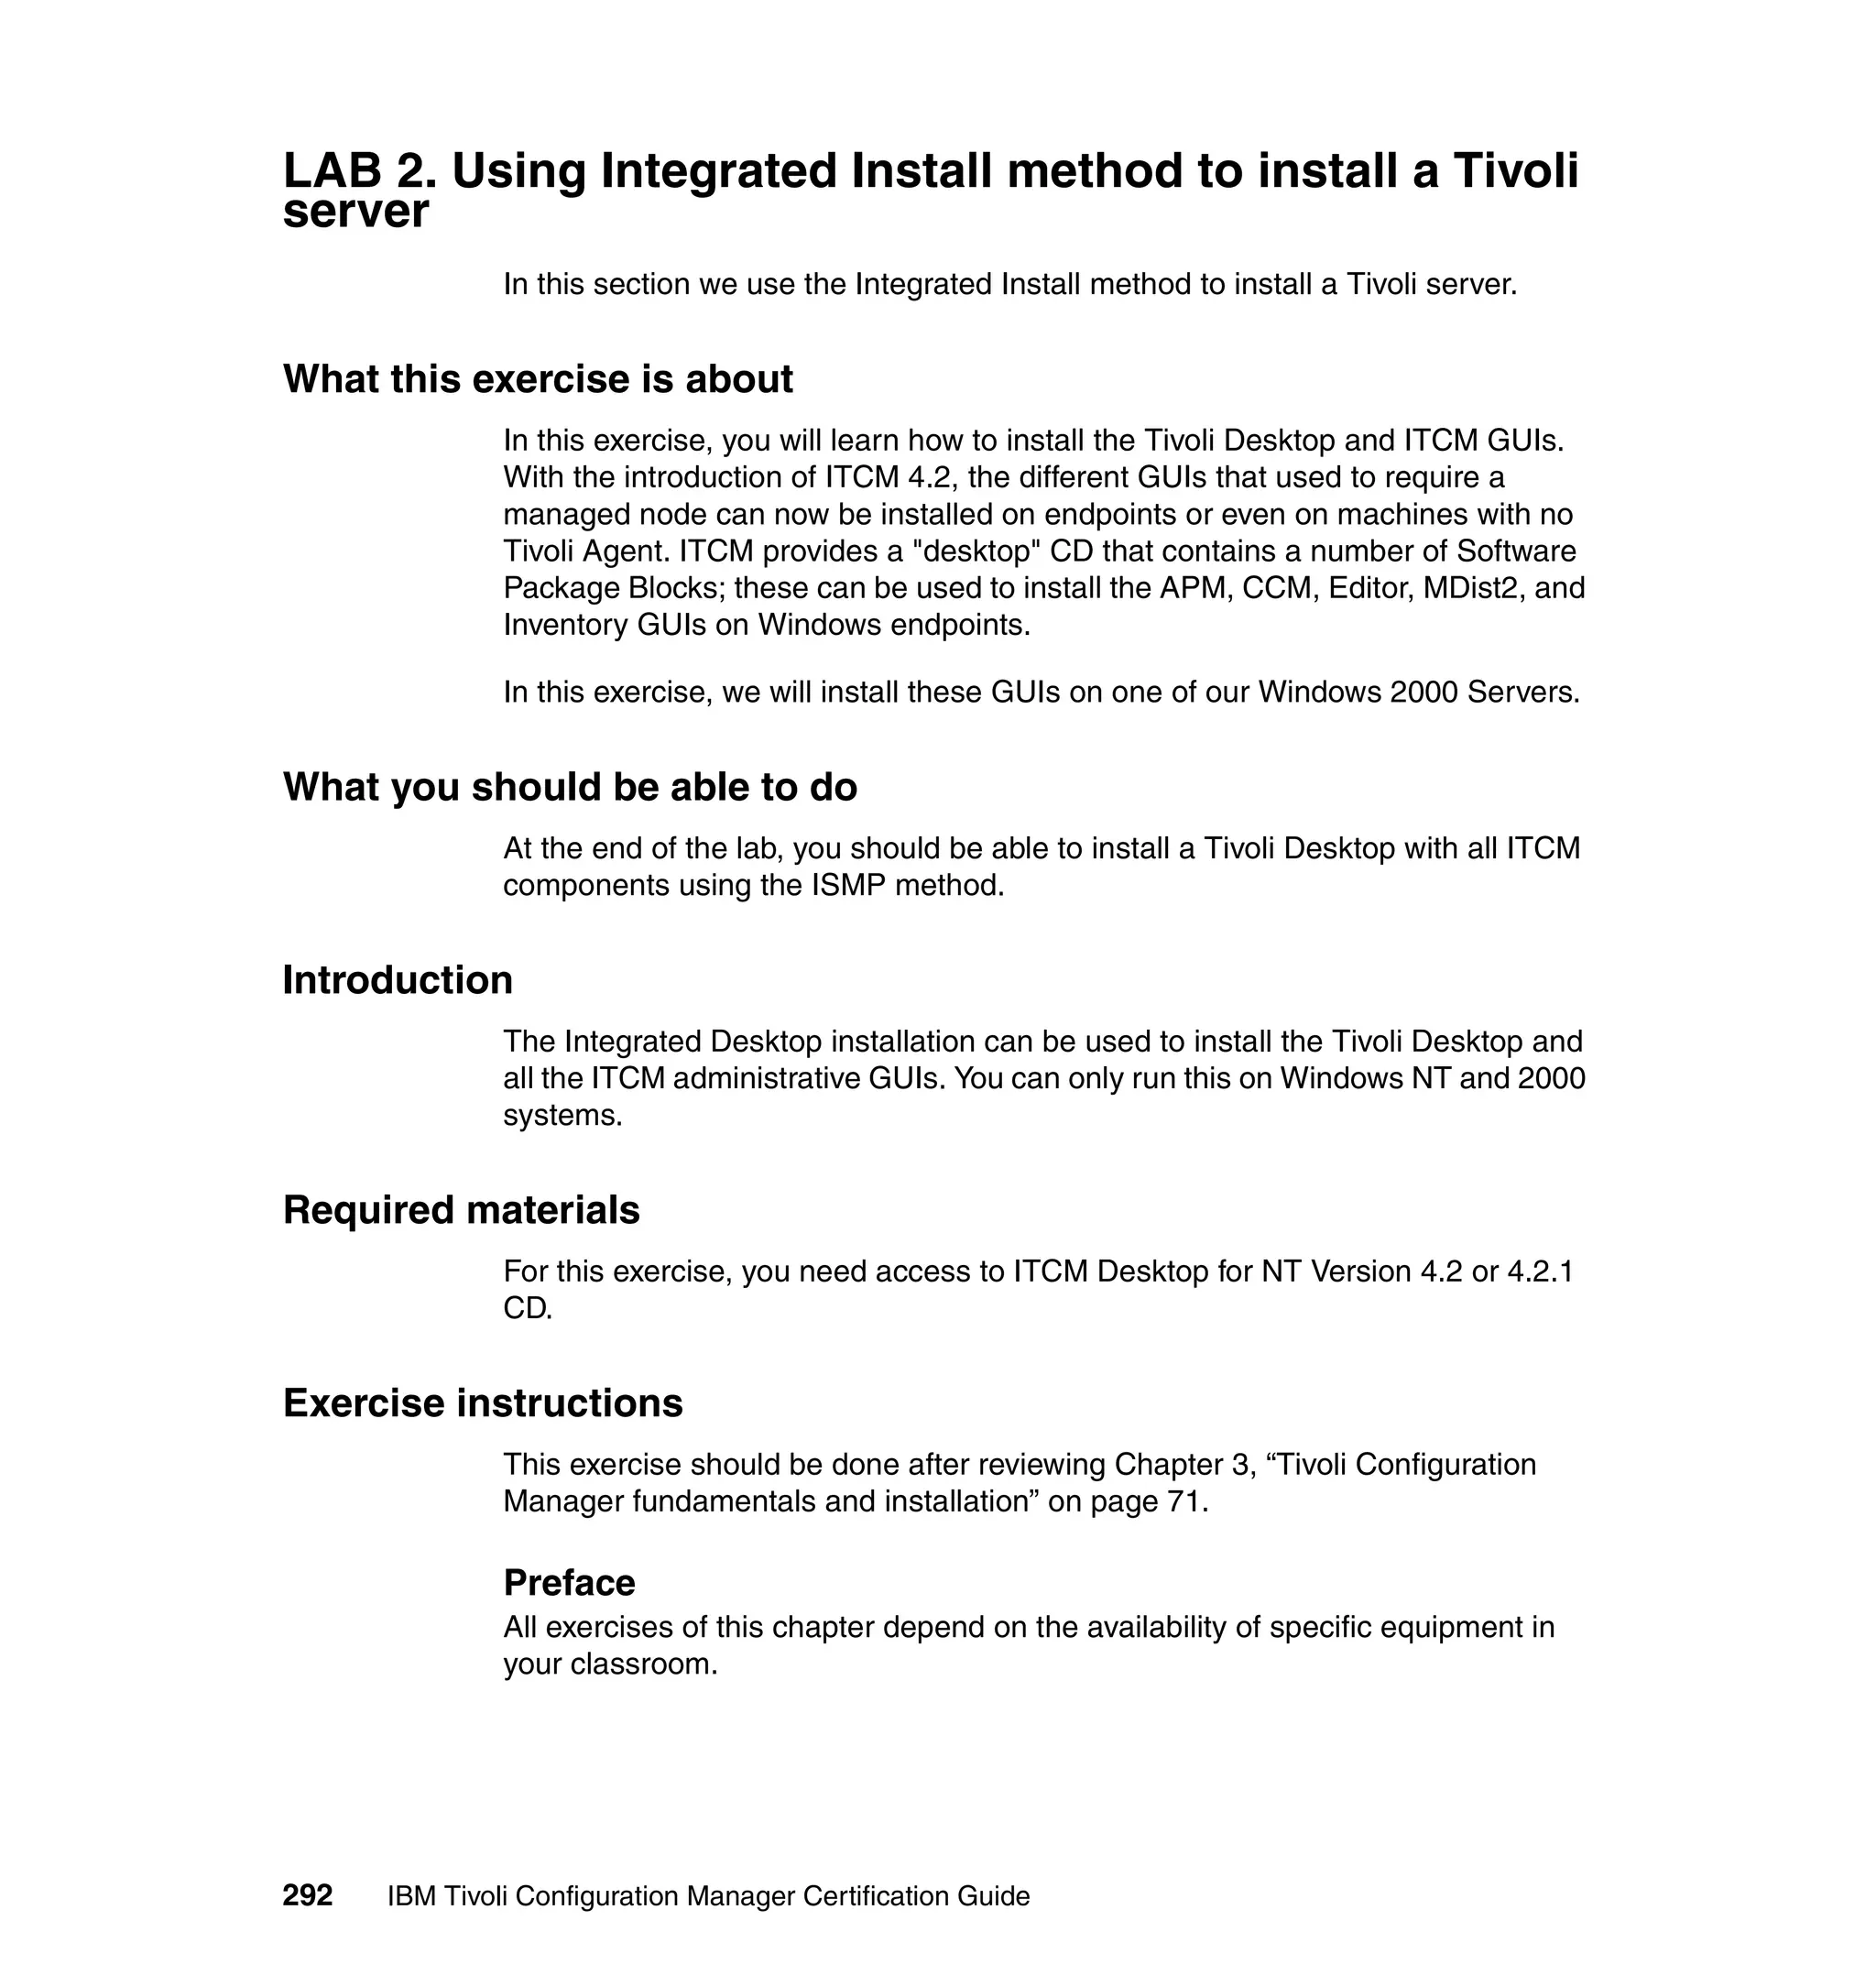
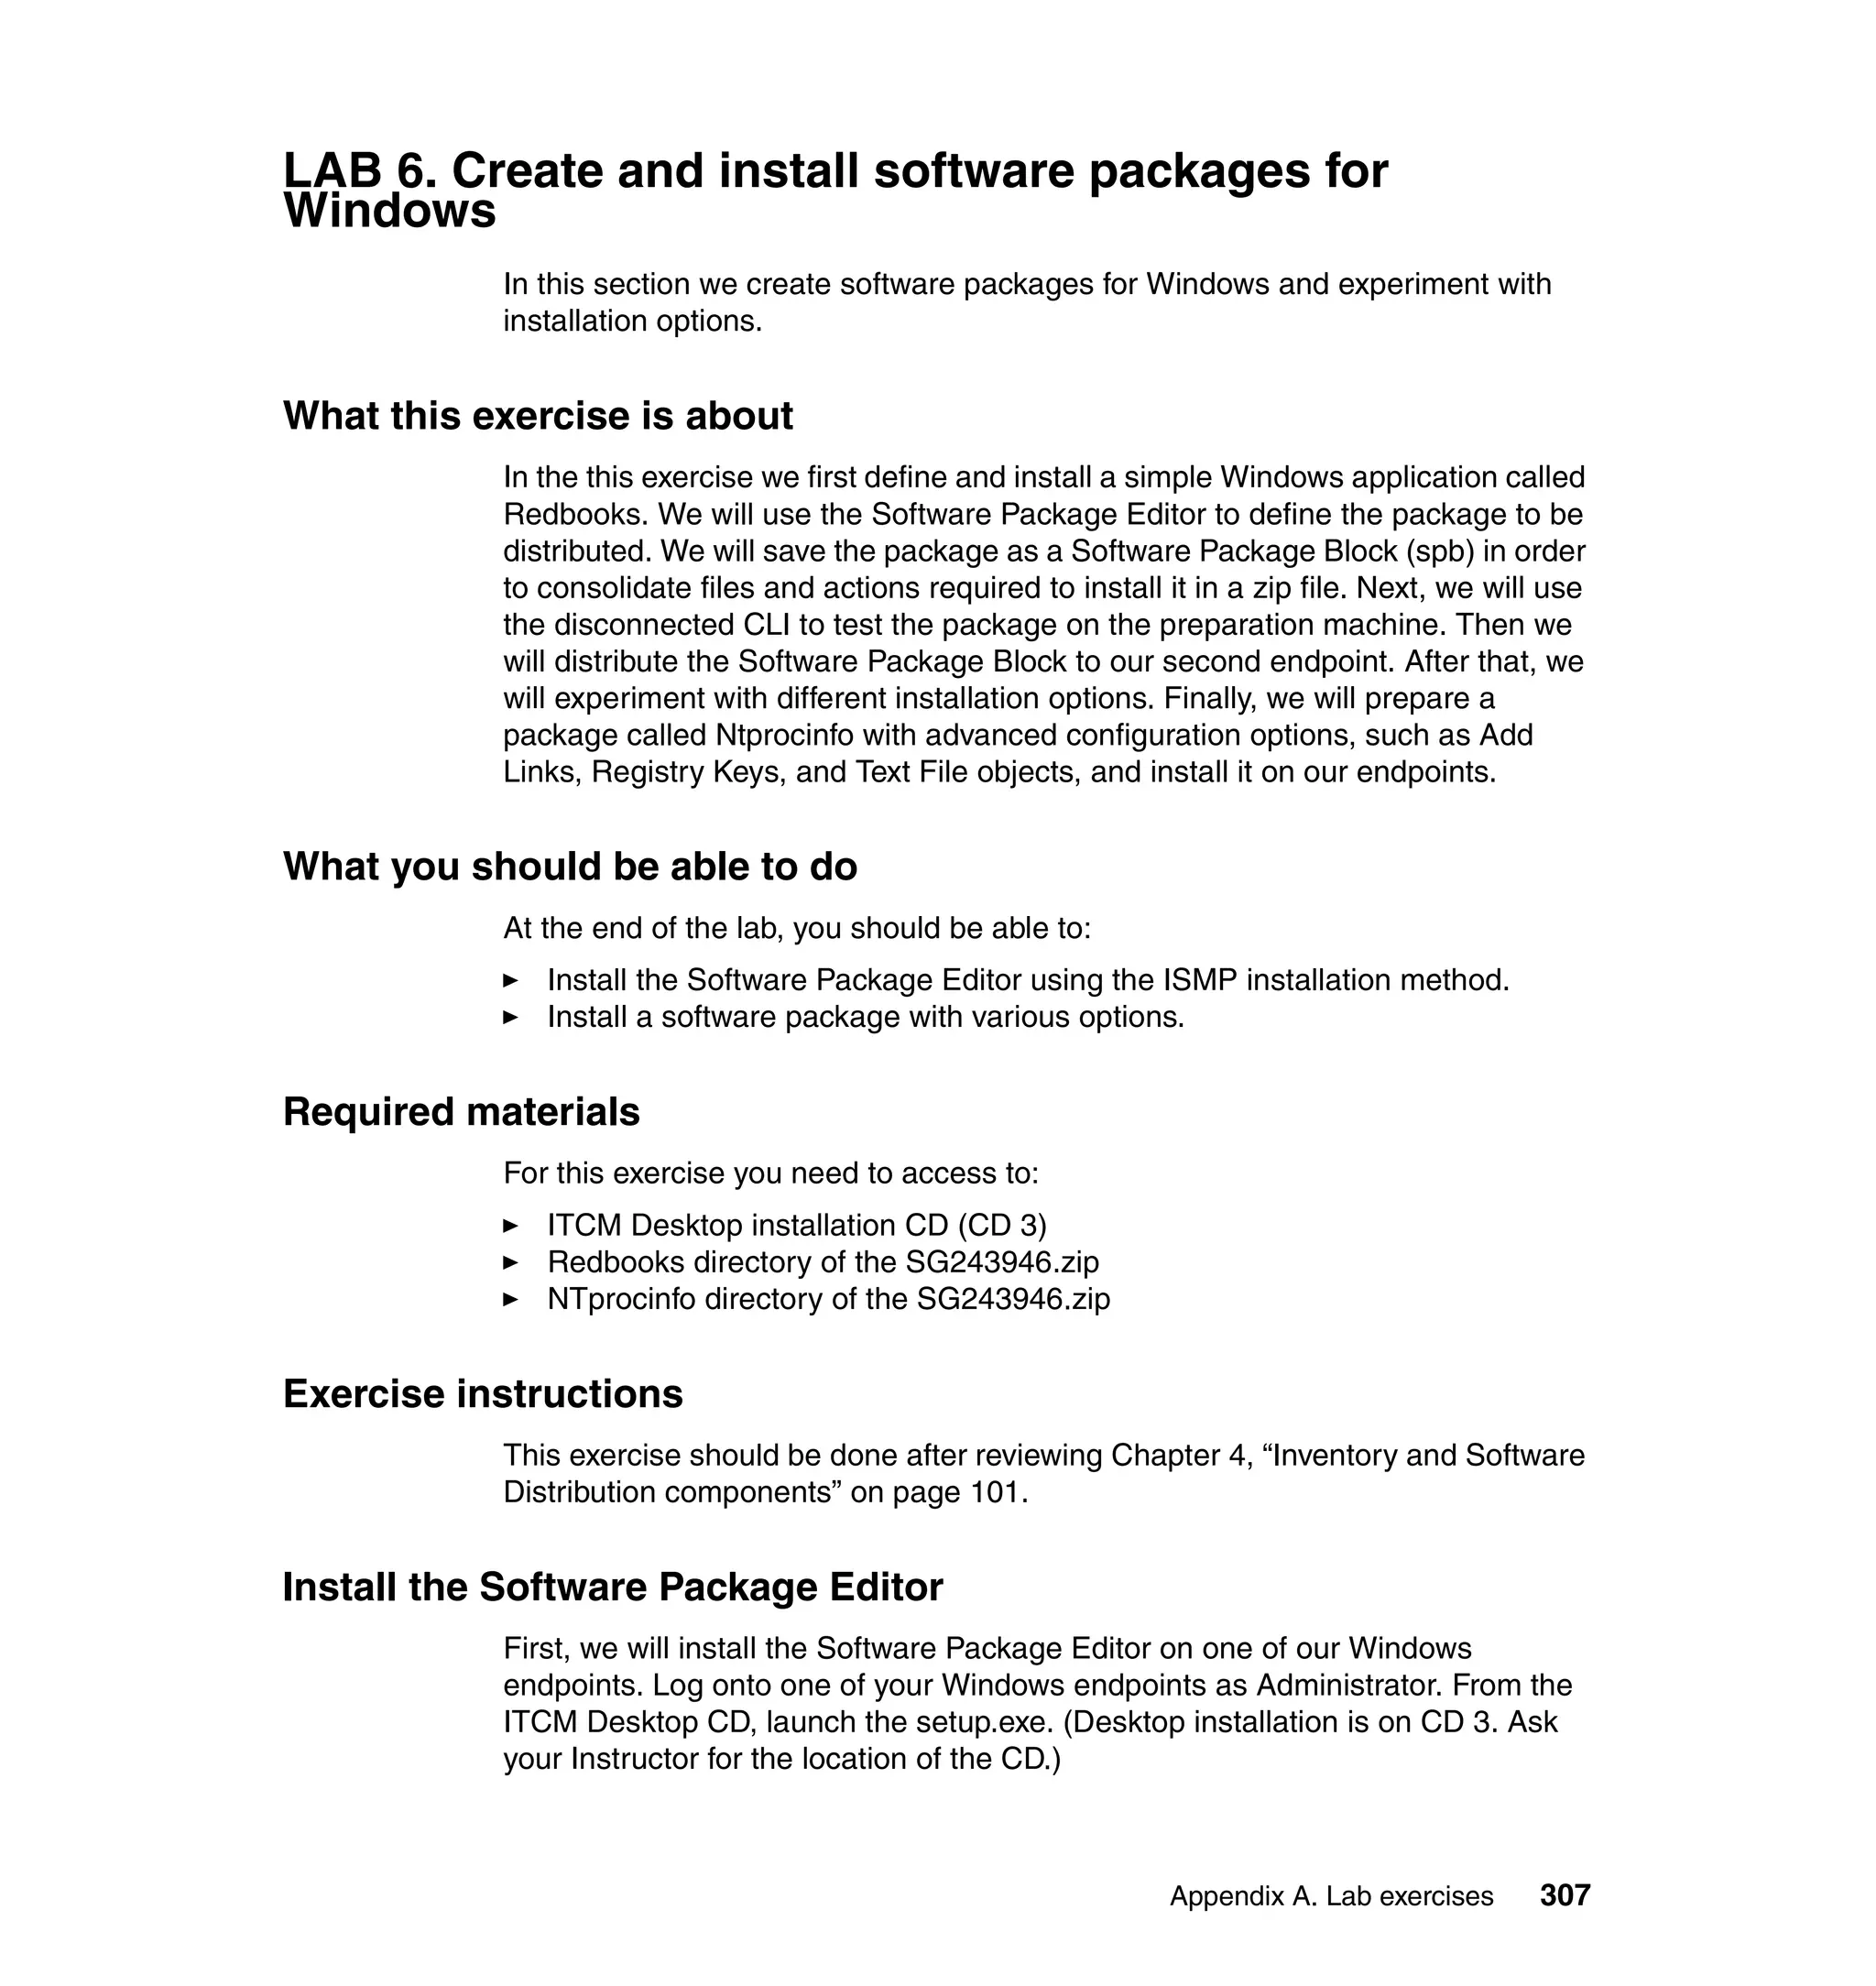
![Figure 2-13 MDist 2 components
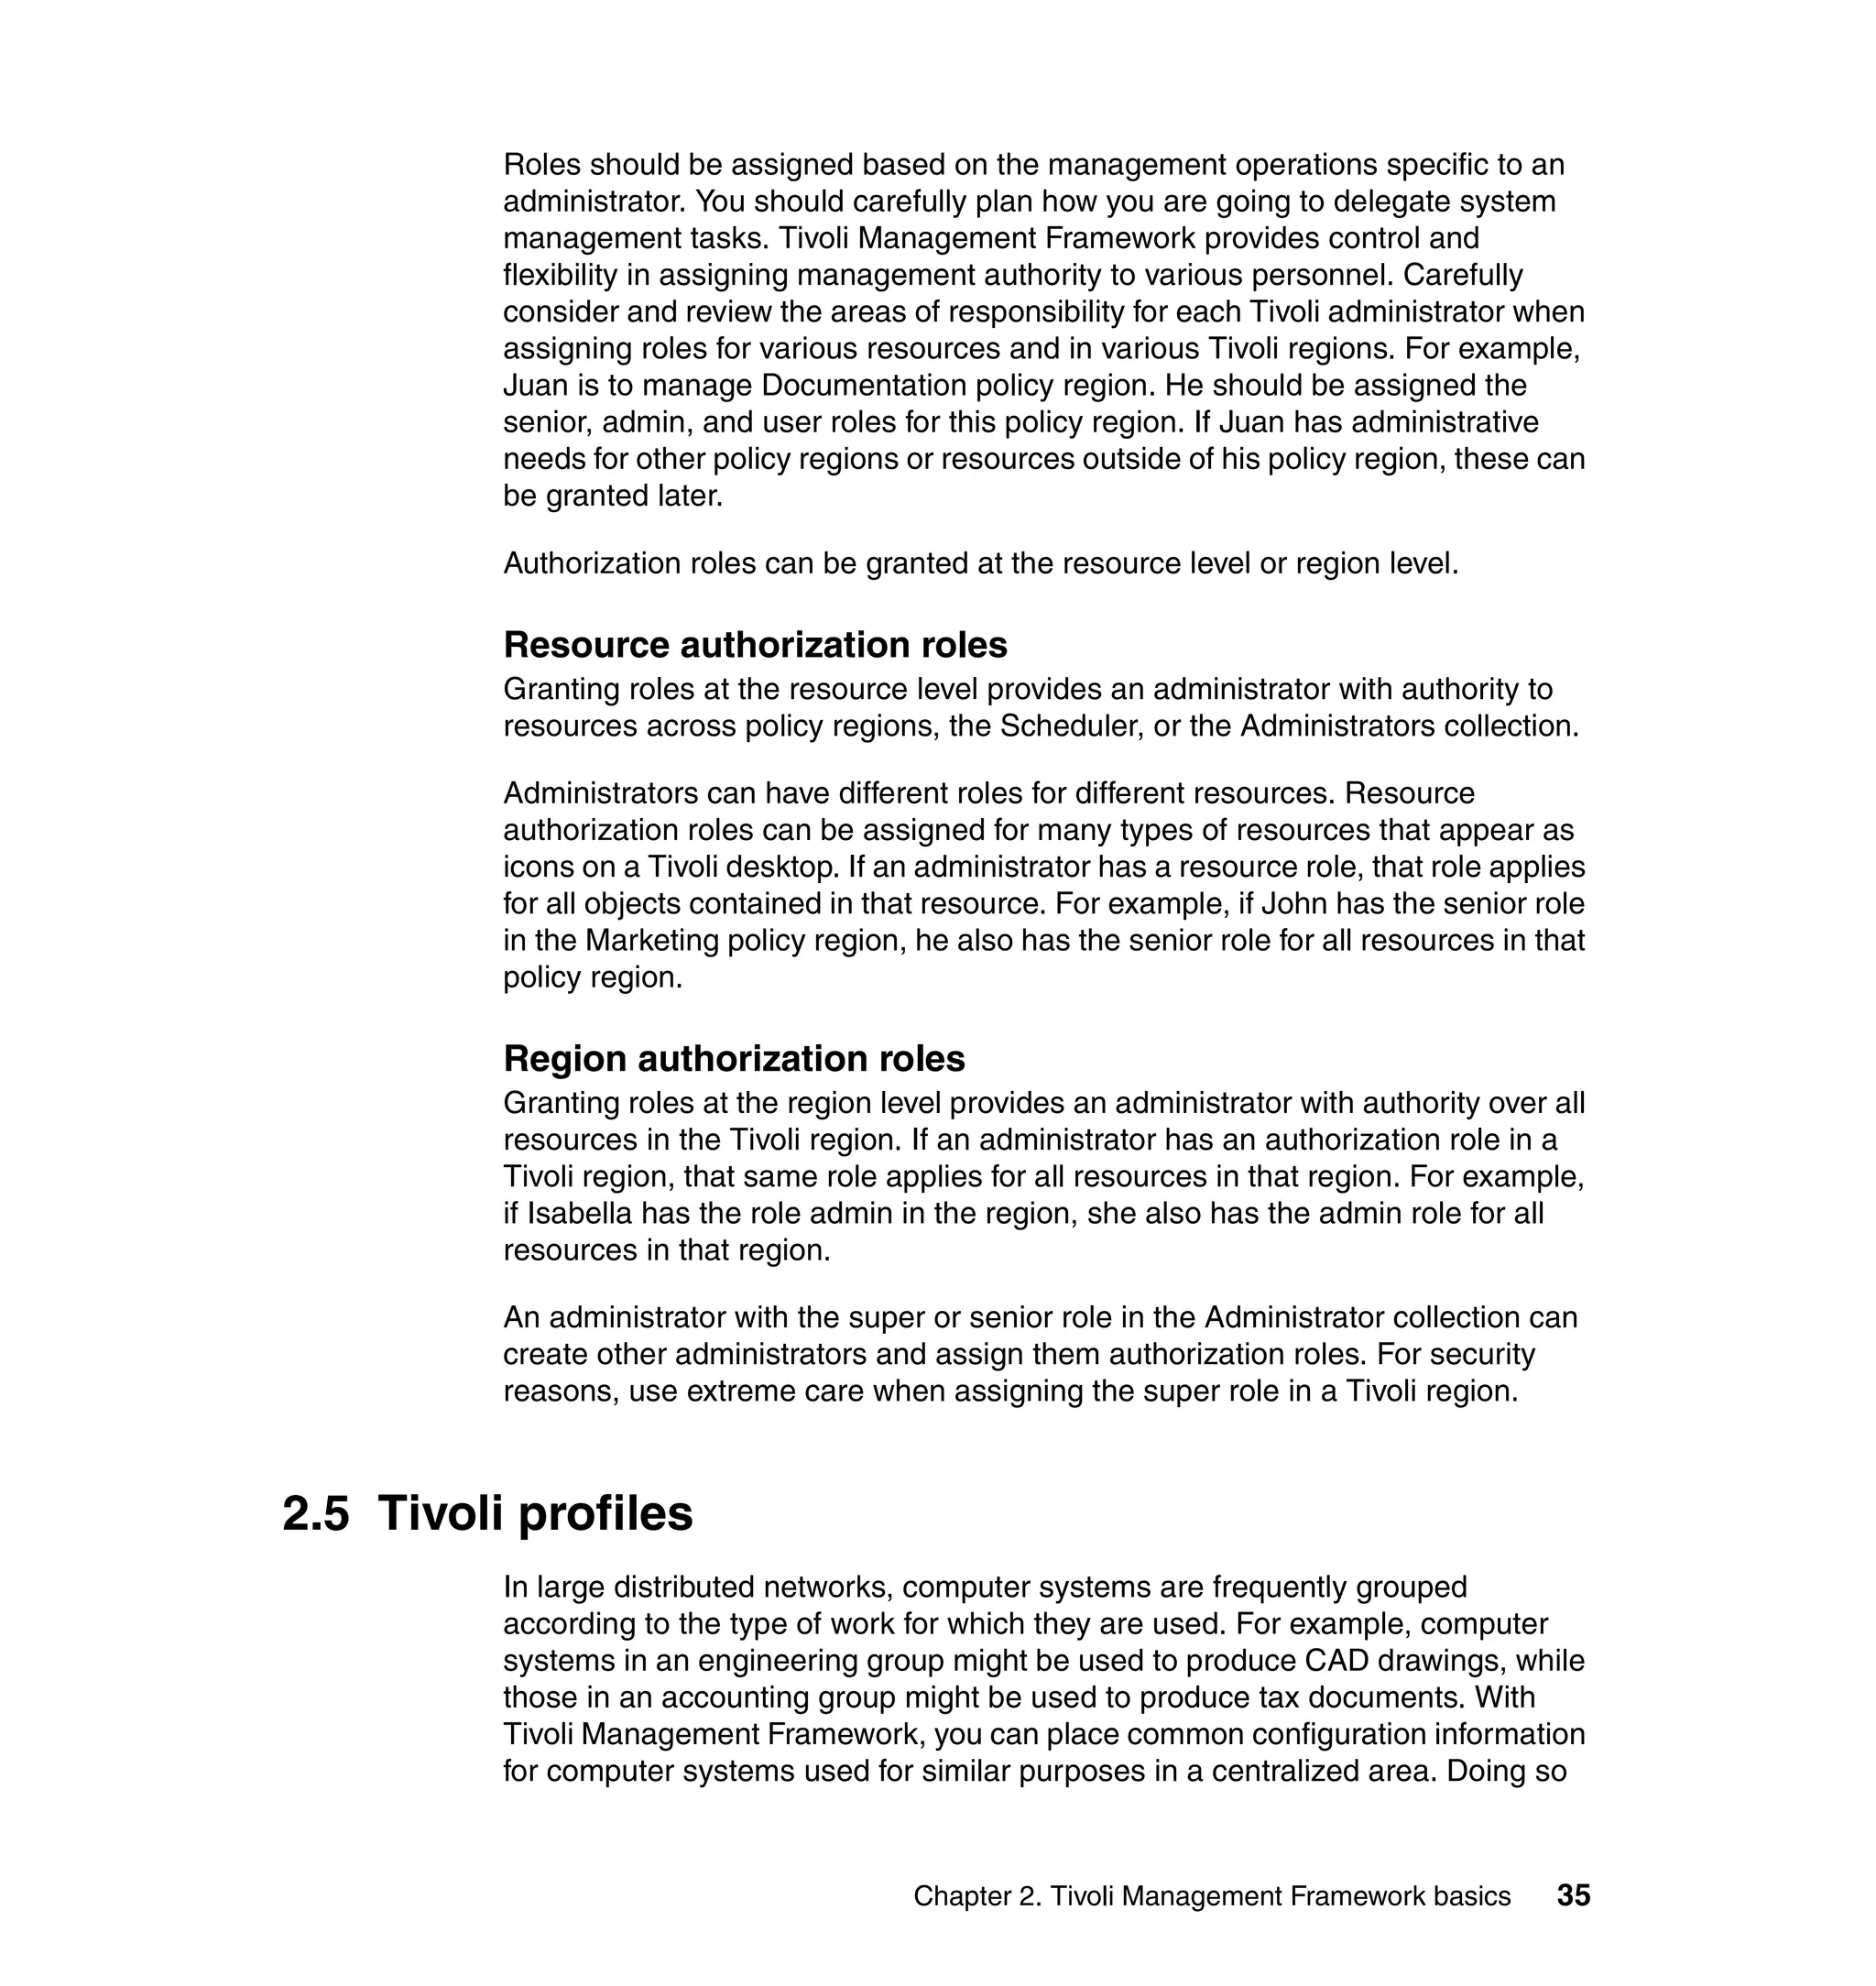
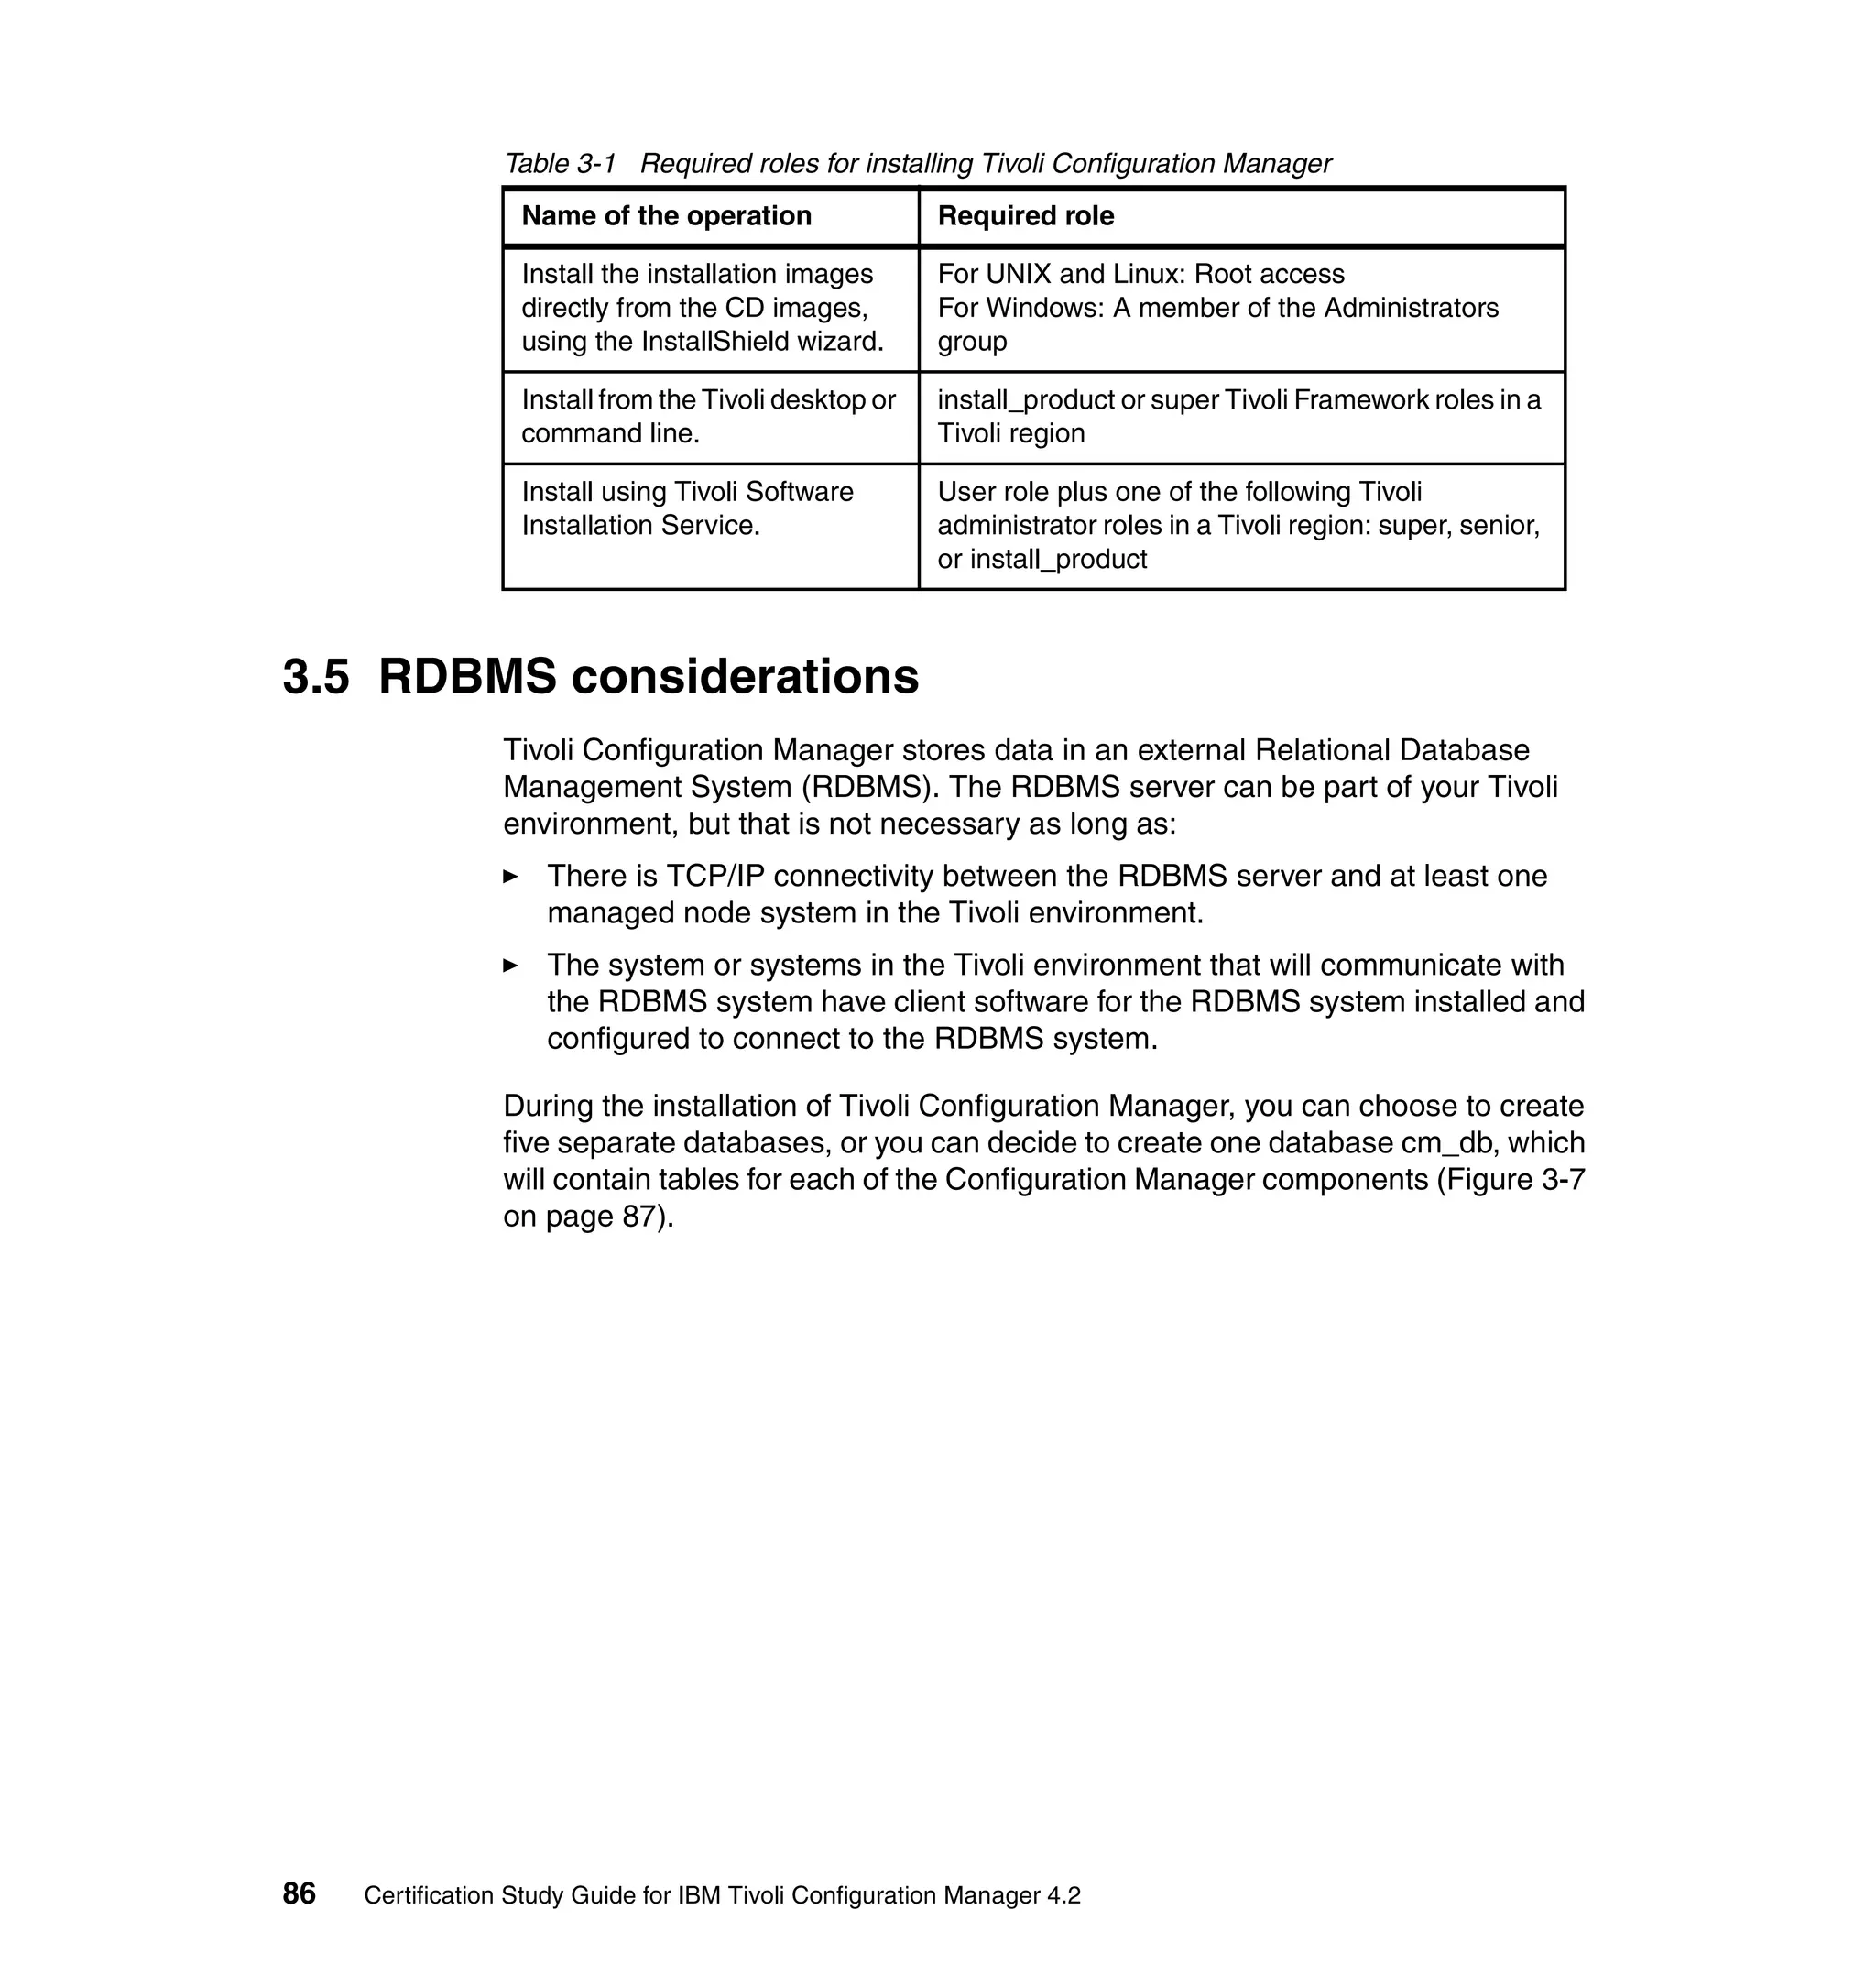
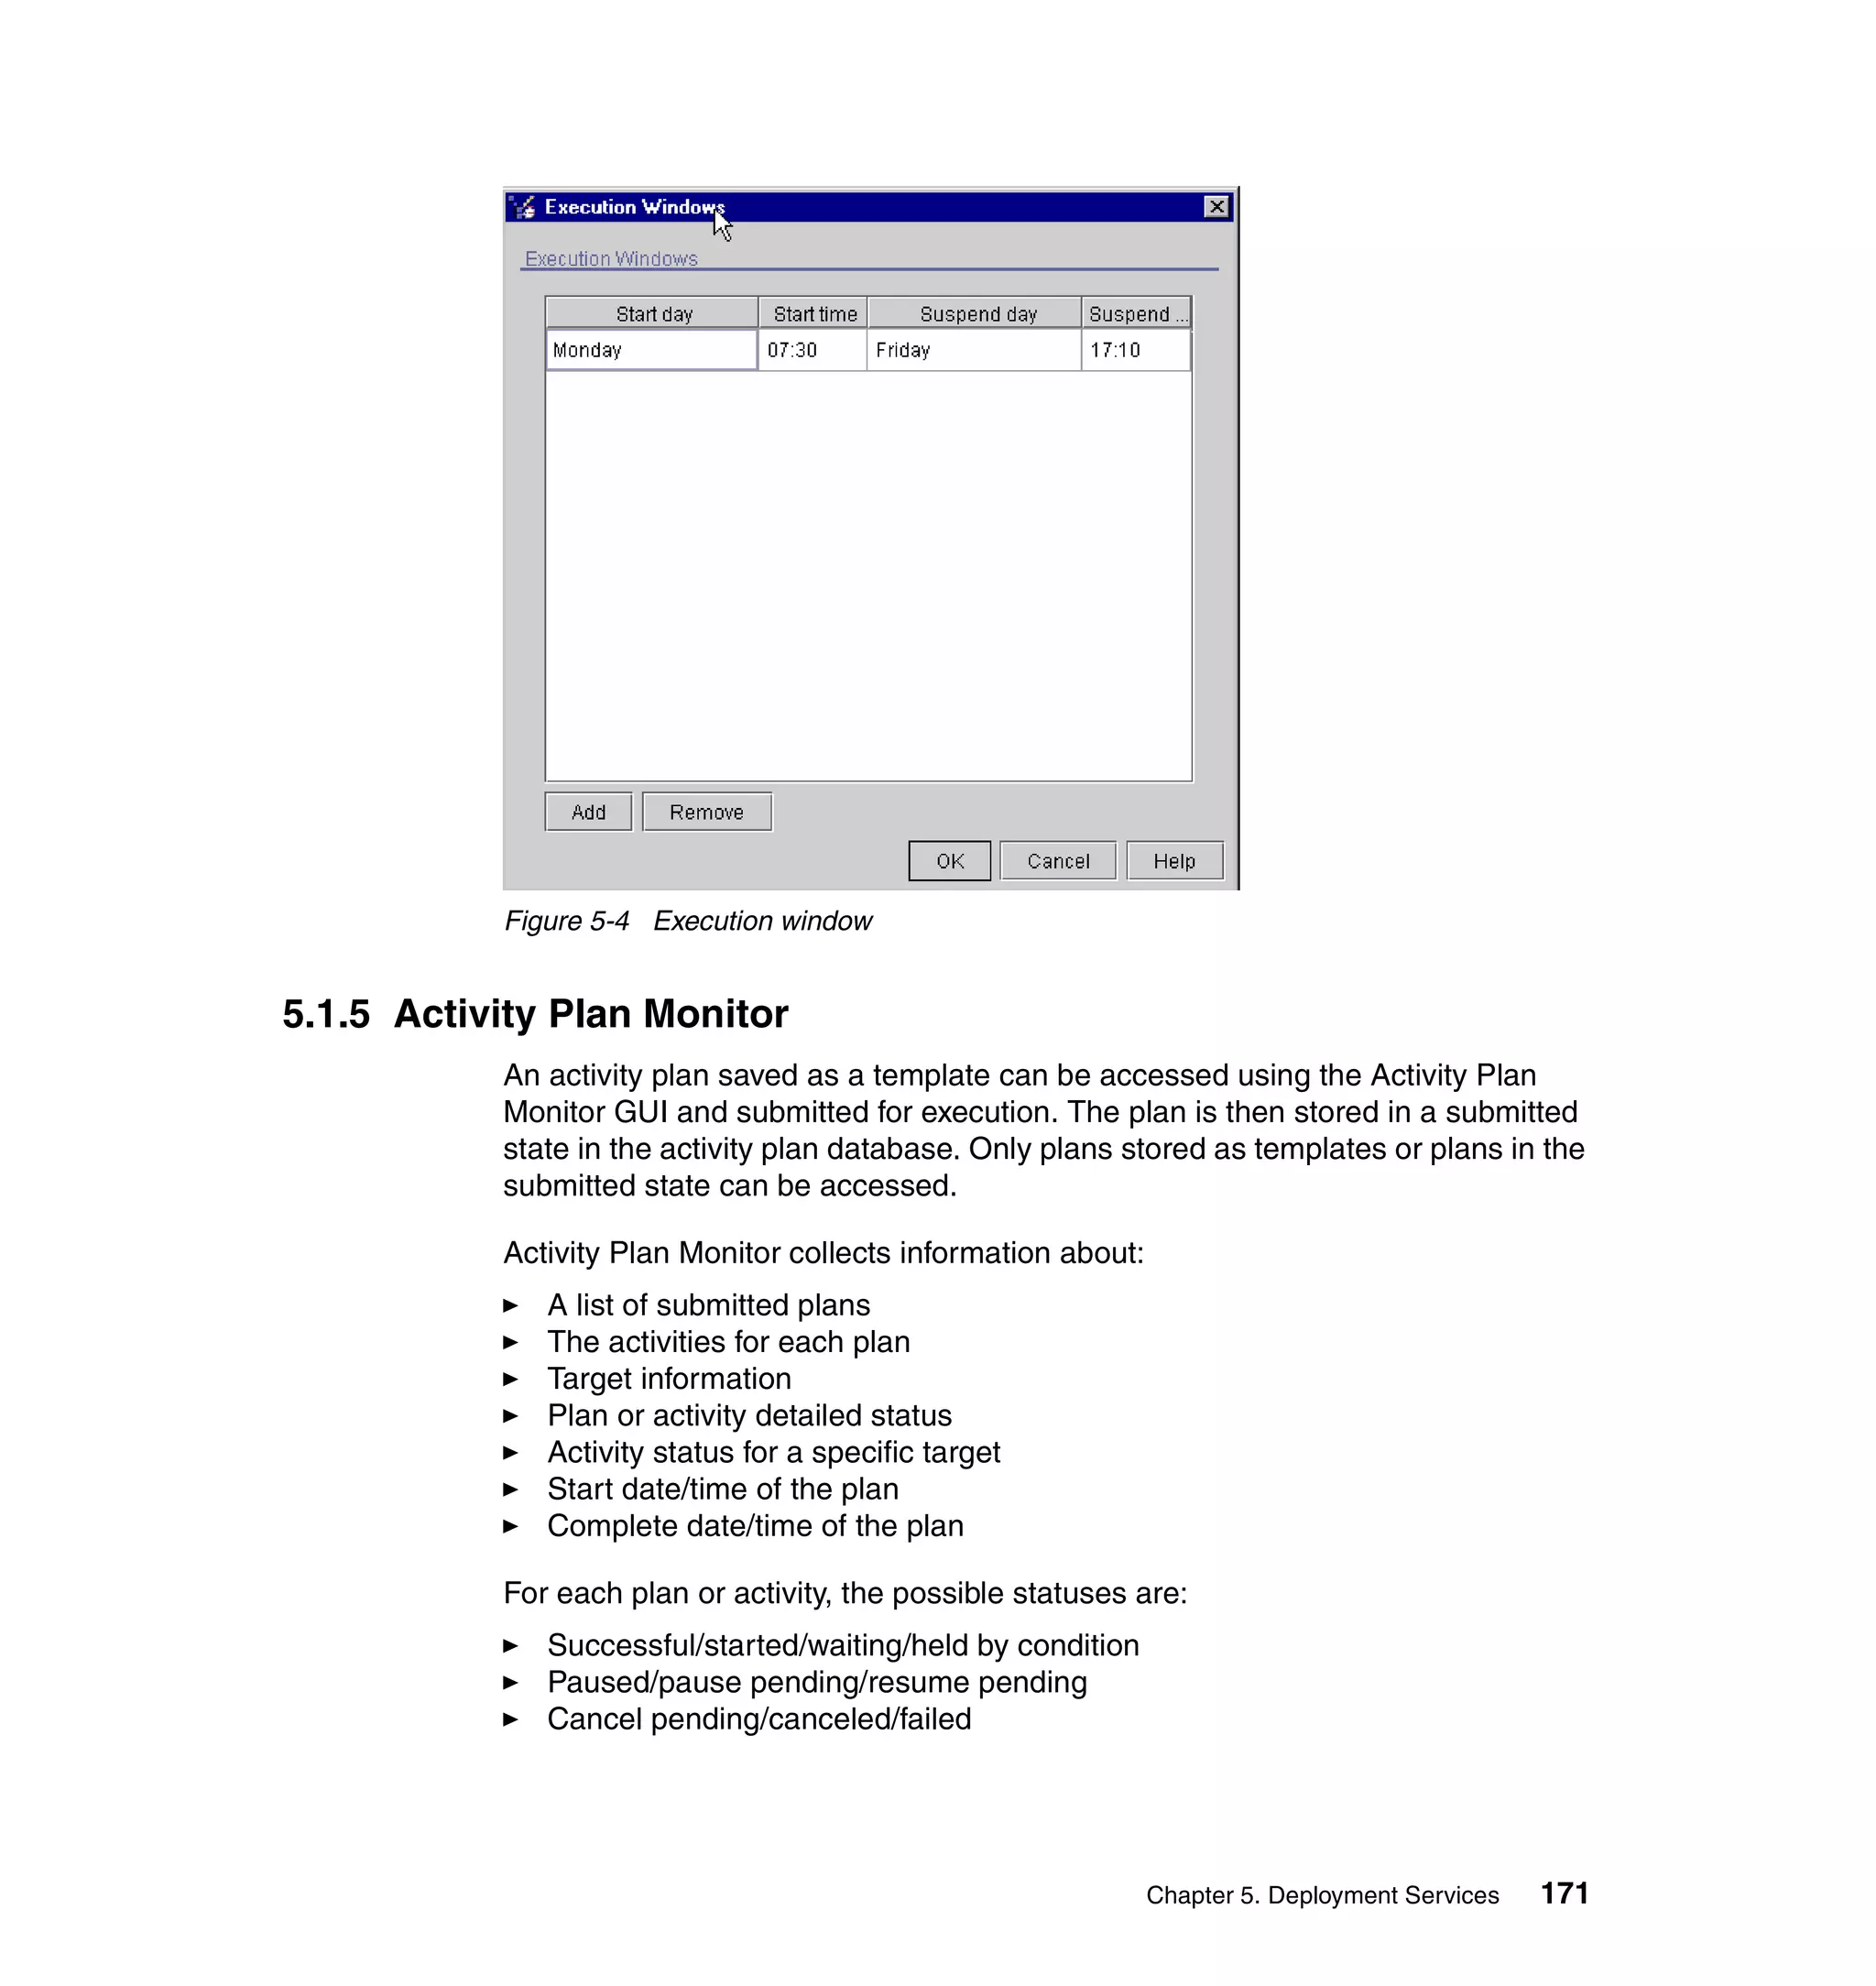
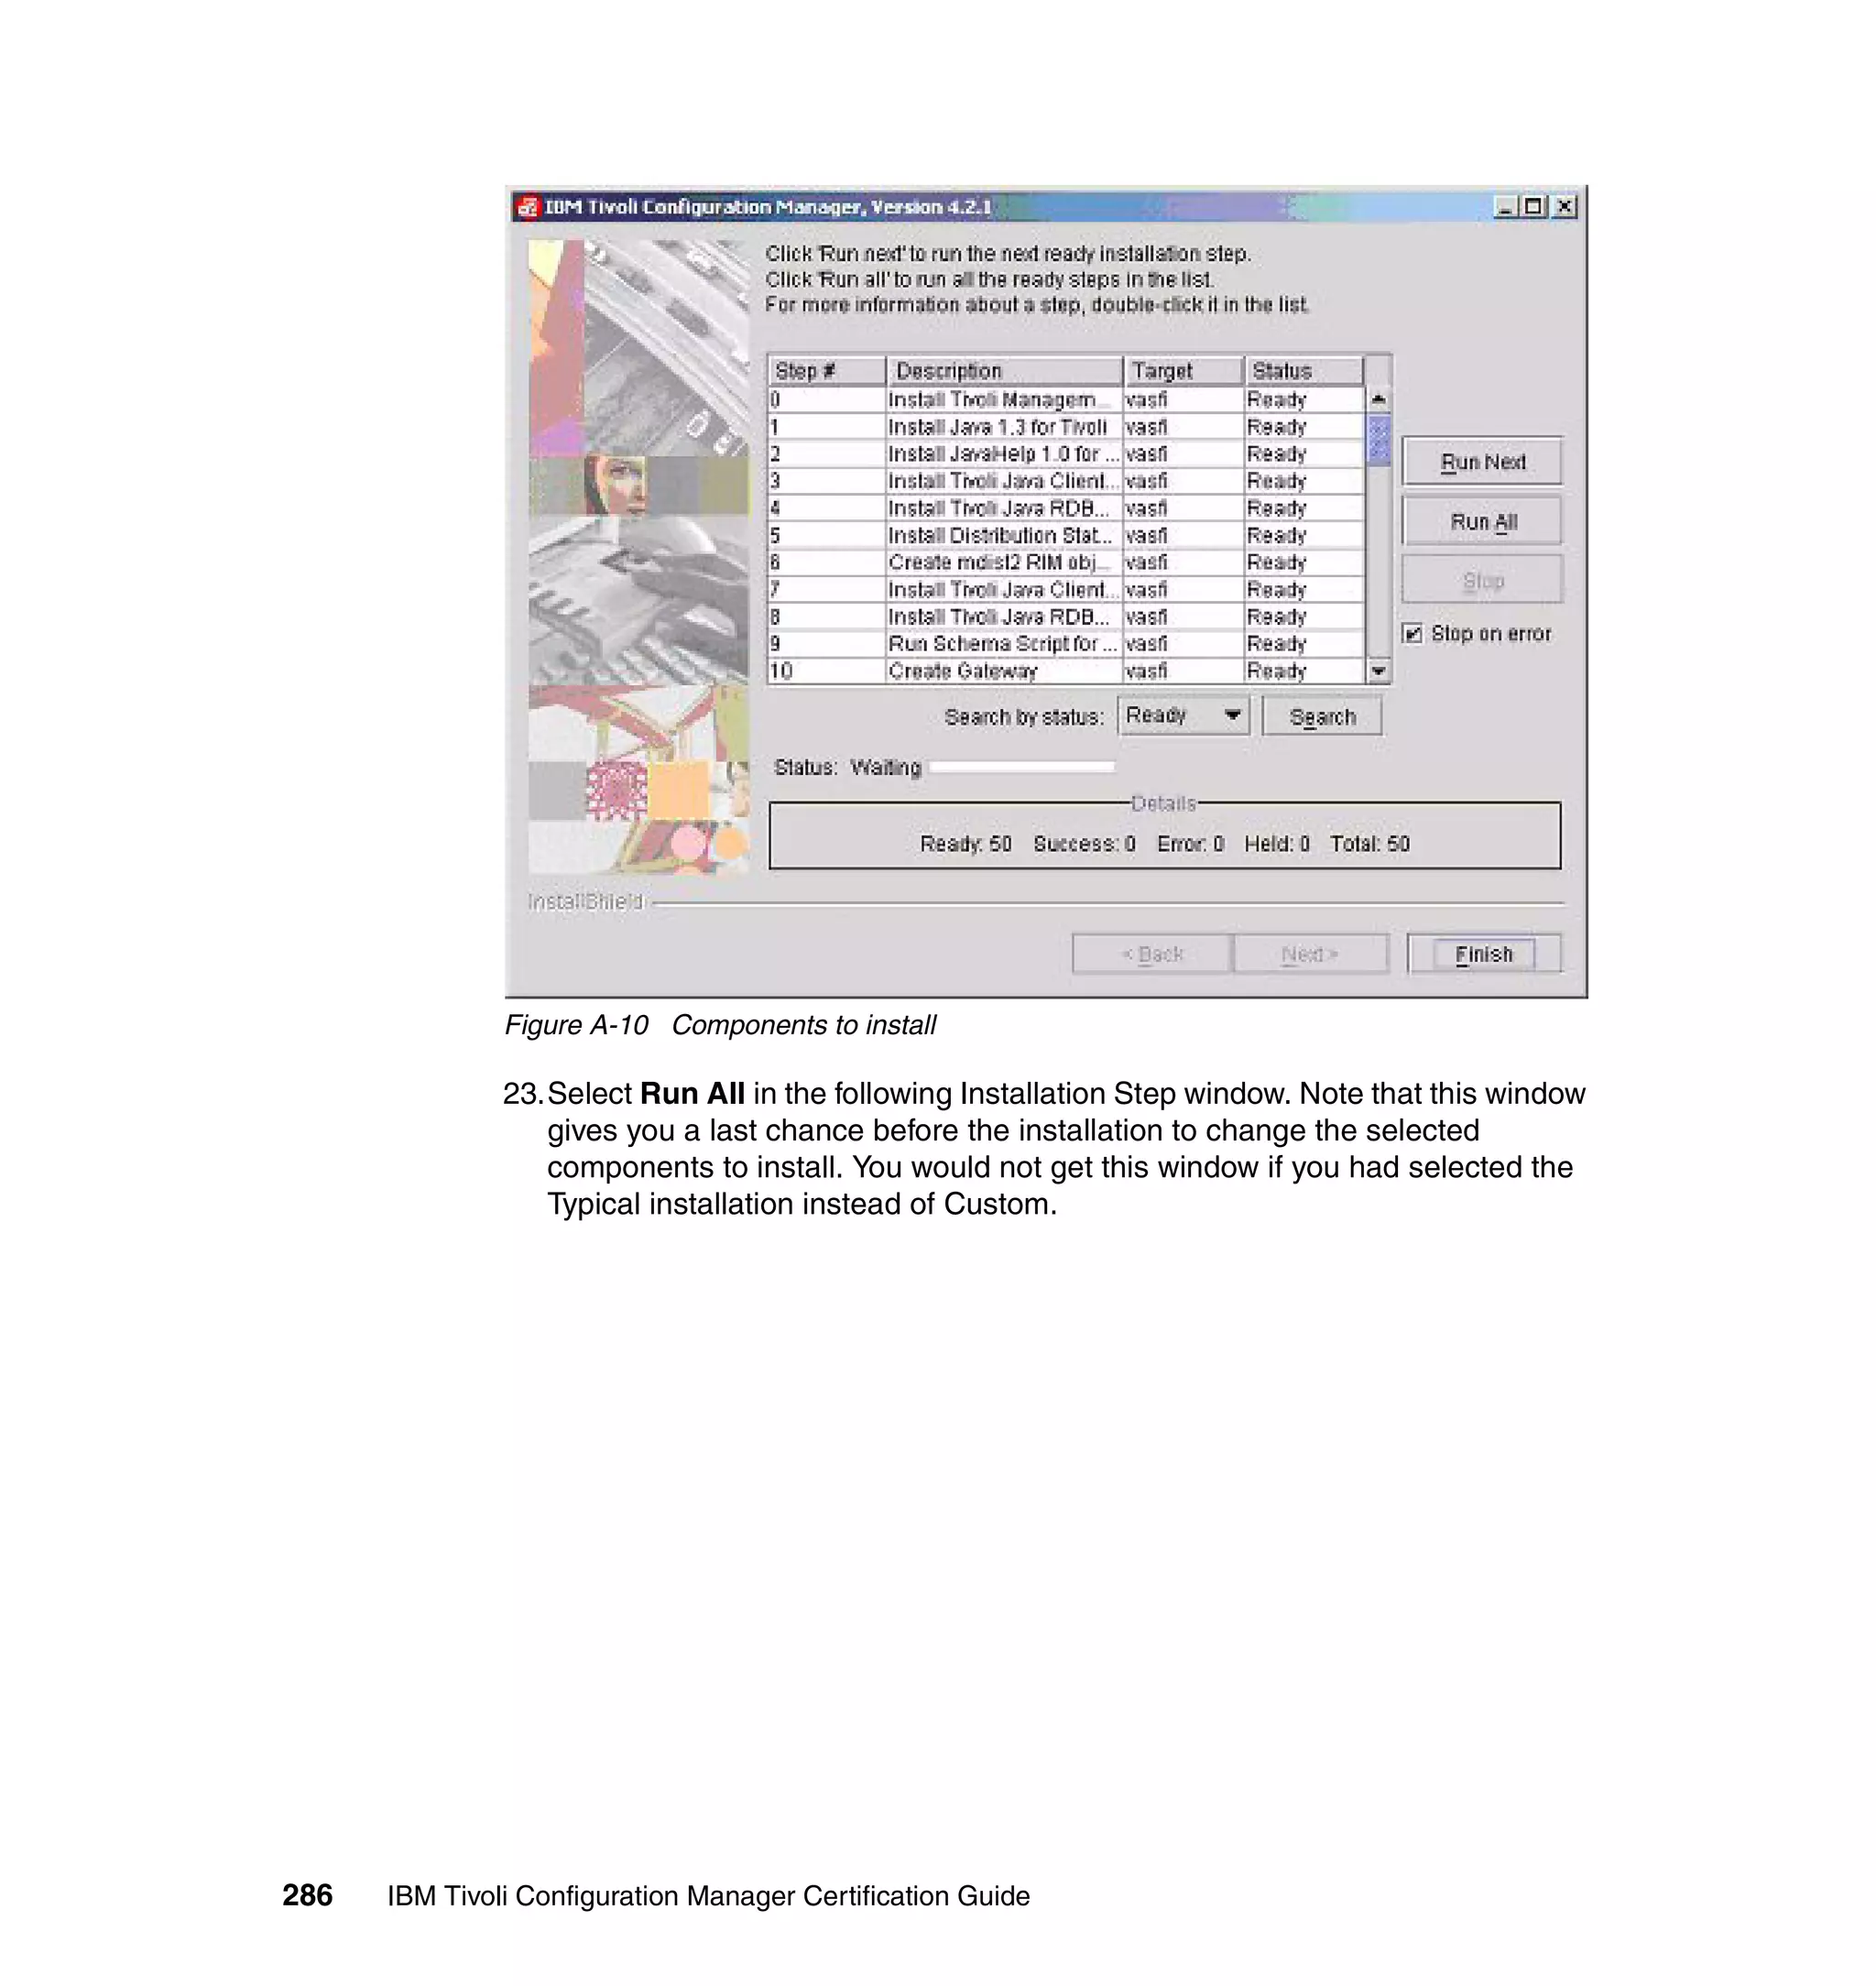
2.6.4 wmdist command
Configures repeaters and manages MDist 2 distributions. Here you can find
some important options of the wmdist command.
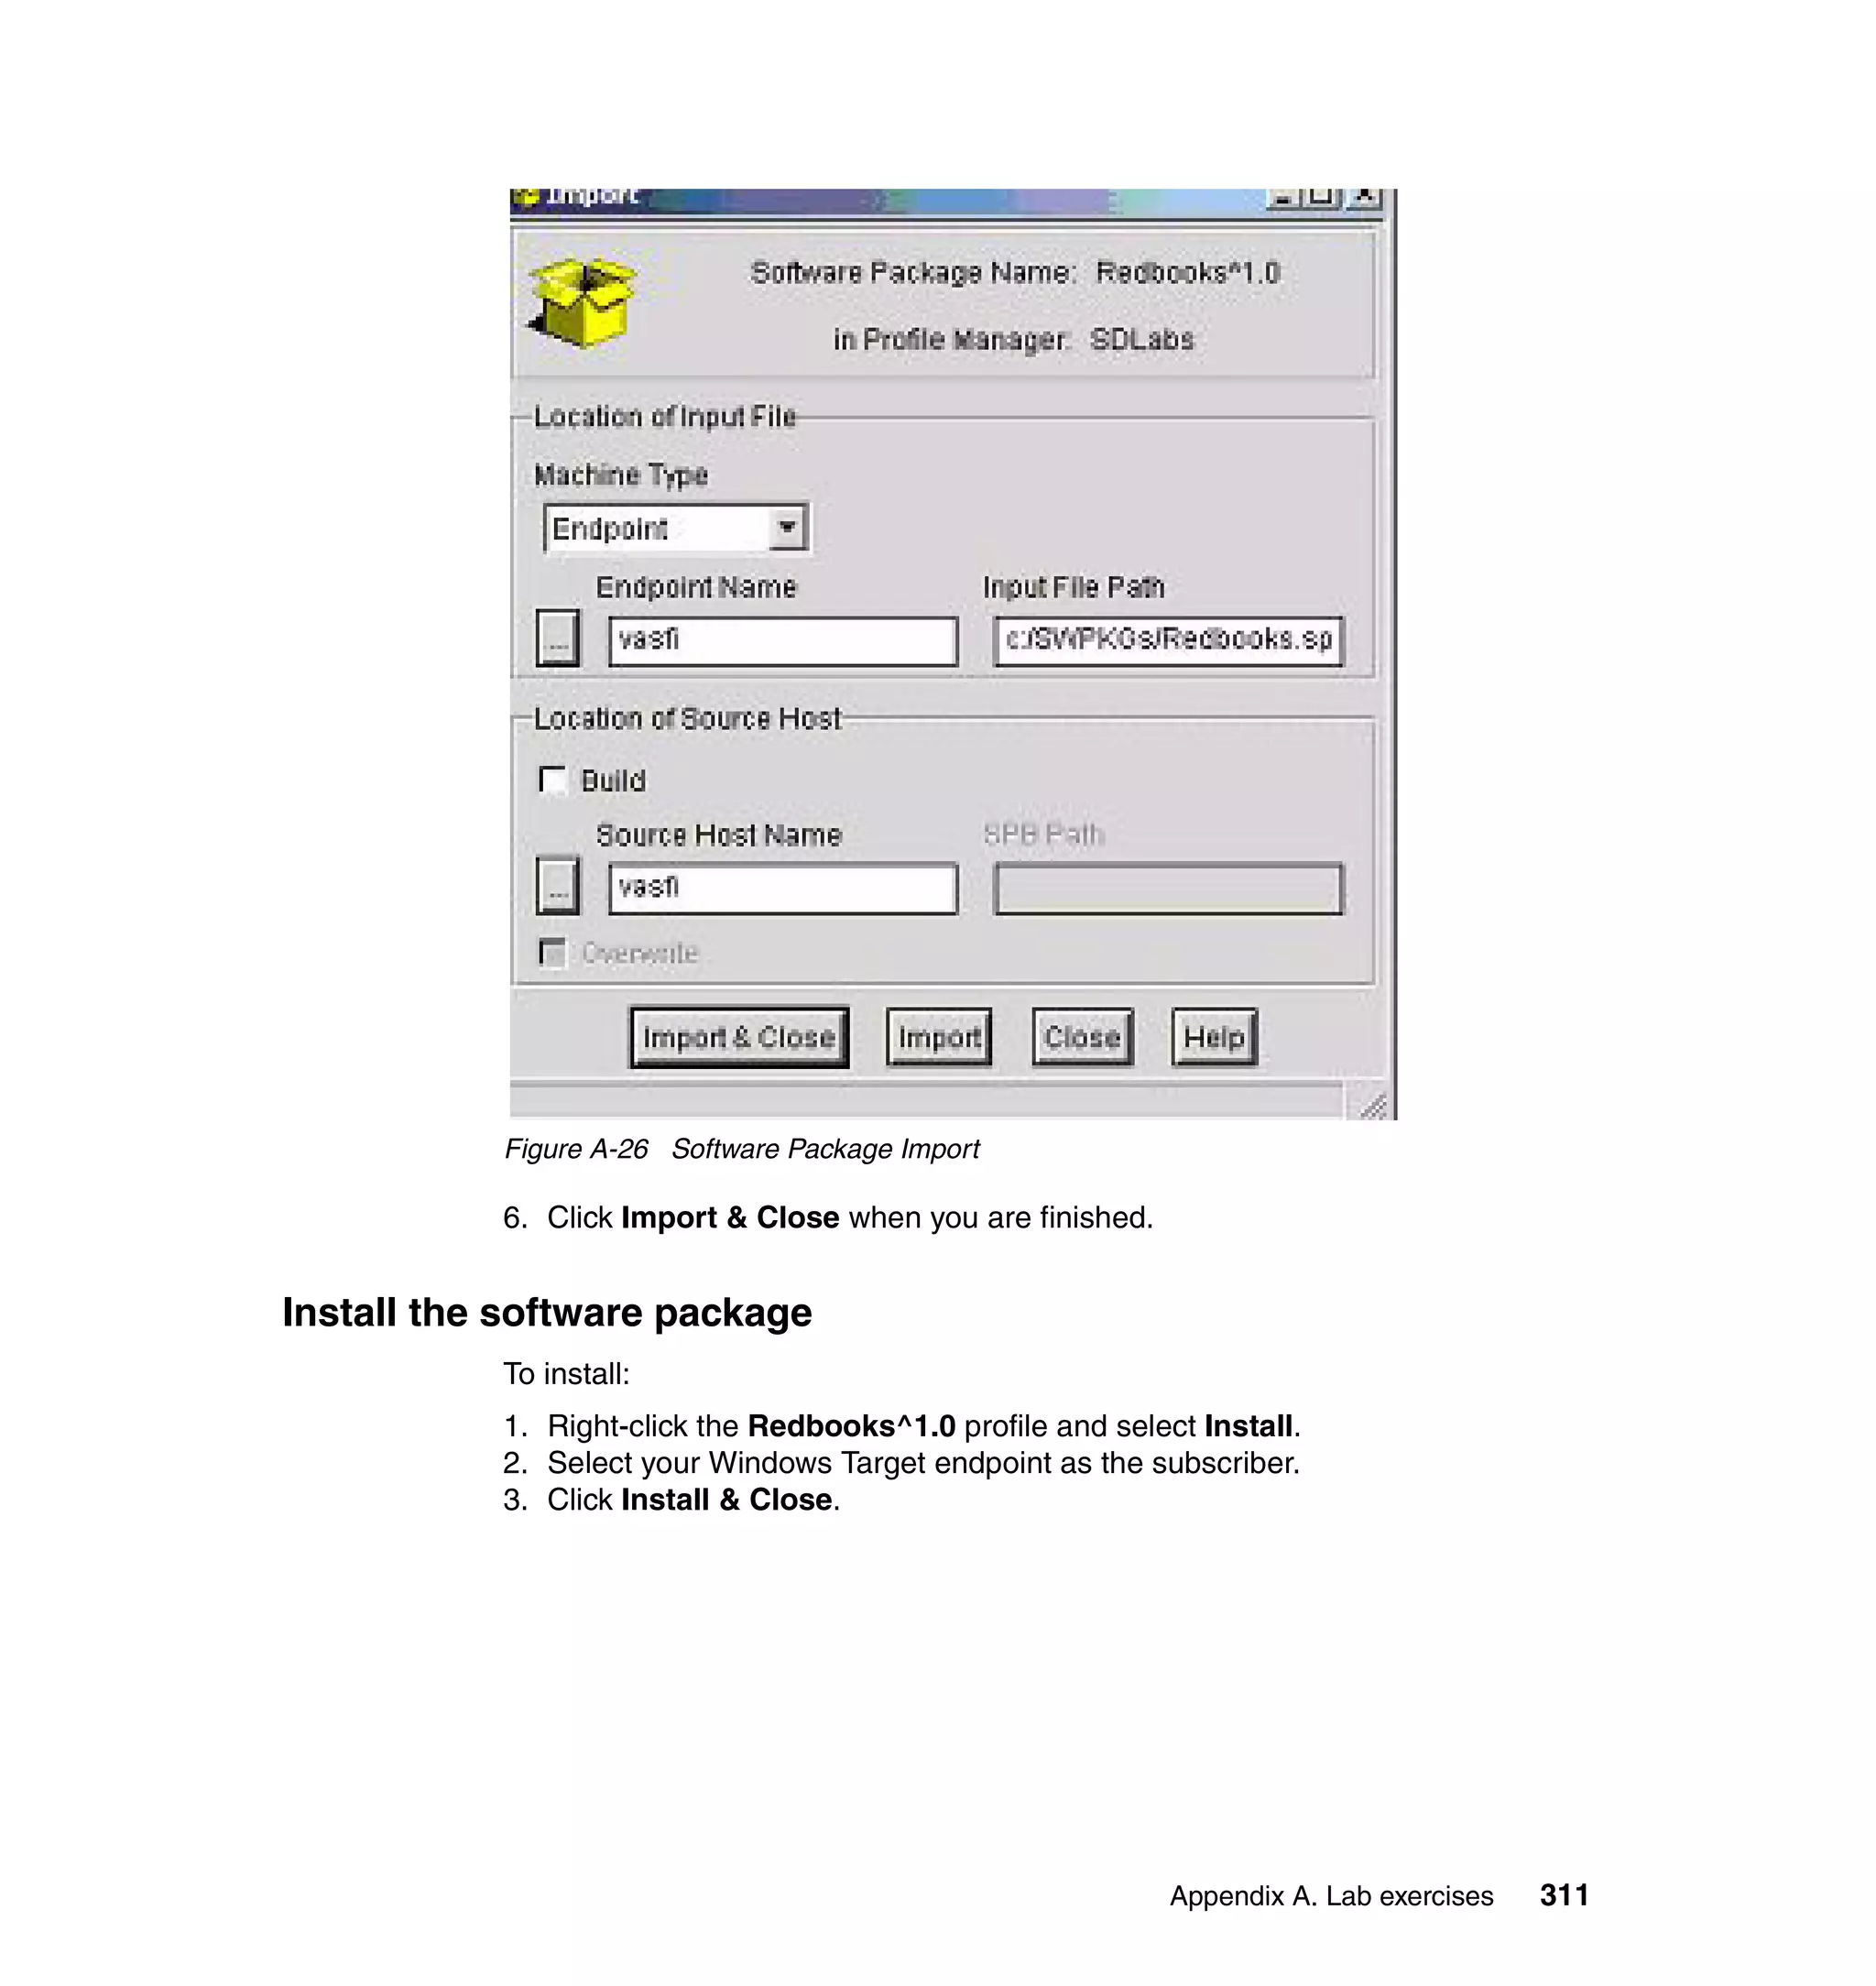
wmdist –I repeater_name wmdist –j depot_directory...
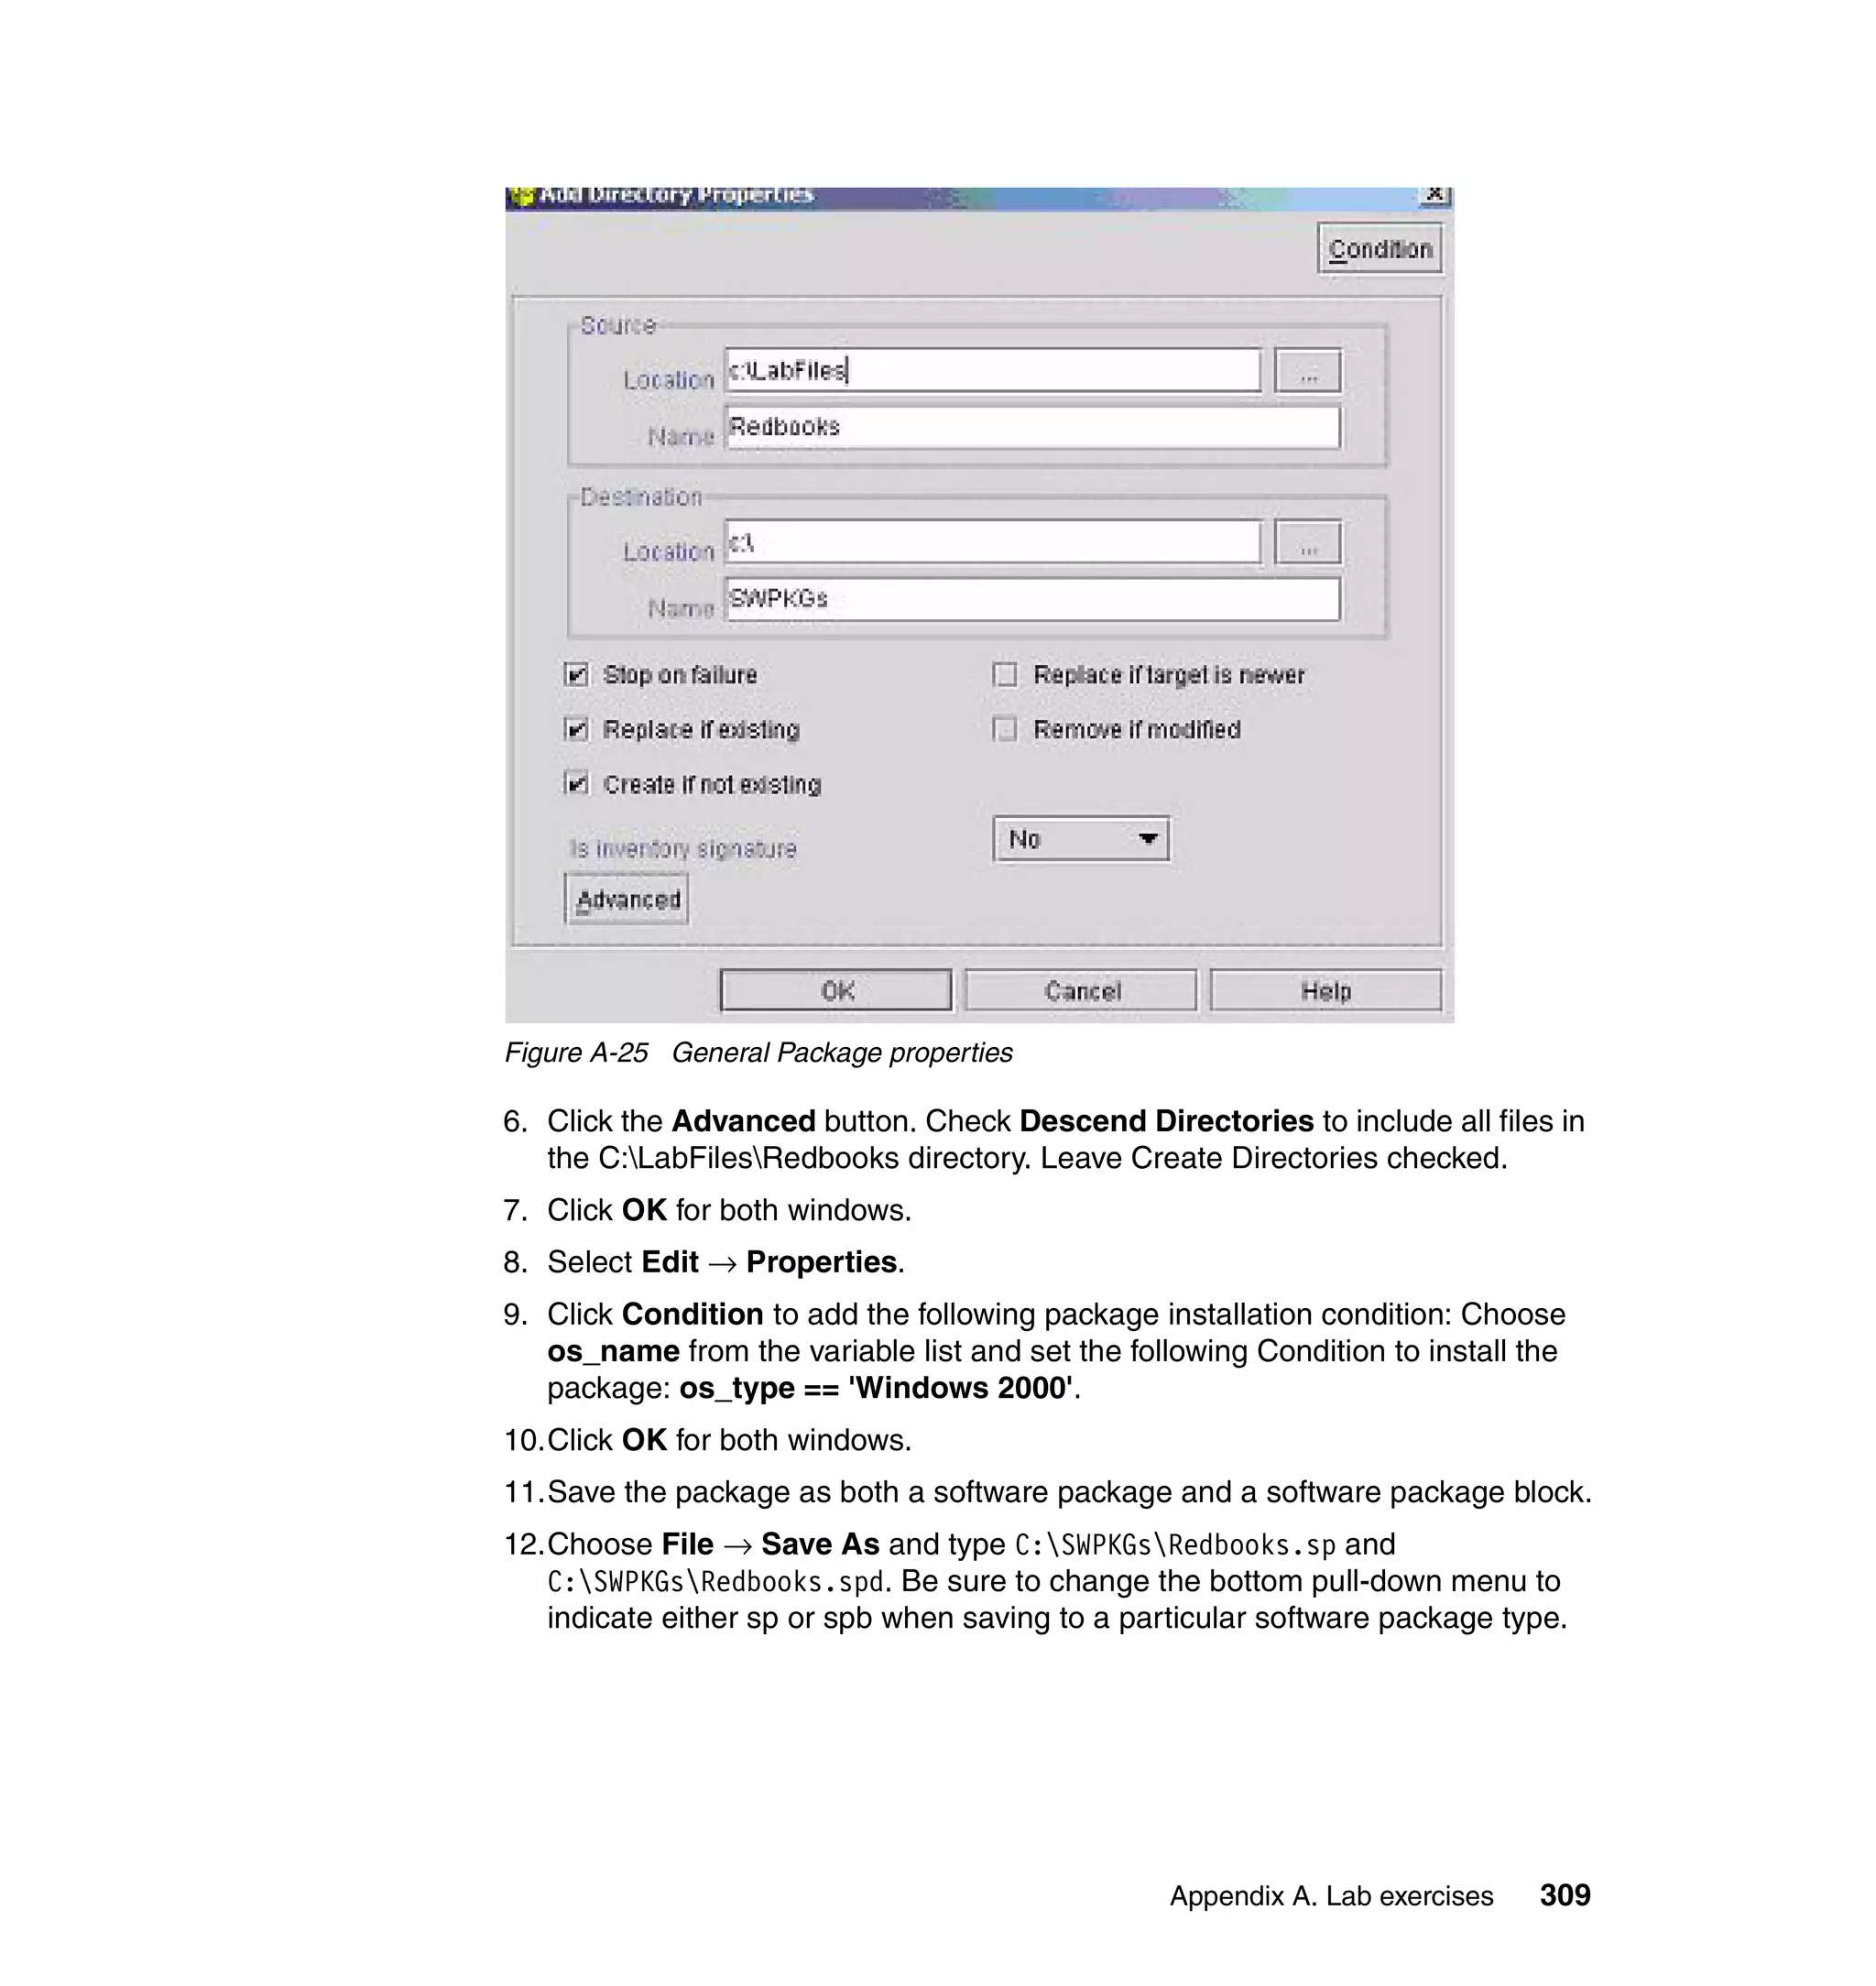
– I enables you to view detailed information about the distributions that the
repeater is currently processing, and obtains the ID for the distribution.
wmdist –k depot_directory...
– k removes one or more alternative depot directories.
wmdist –l [–a] [–idist_id] [–v]
This lists distribution status. The options are as follows:
–a returns active distributions only.
–i dist_id specifies the distribution ID. When no distribution ID is specified, the
command returns the status for all distributions.
–v returns all information about the status. If you do not specify the –v option,
the command returns only the keyword value information.
wmdist –m dist_id [–t ep_label] [–n node_type] [state...]
This lists the messages for a distribution.
Chapter 2. Tivoli Management Framework basics 43](https://image.slidesharecdn.com/certificationstudyguideforibmtivoliconfigurationmanager4-2redp3946-120522221807-phpapp01/75/Certification-study-guide-for-ibm-tivoli-configuration-manager-4-2-redp3946-61-2048.jpg)
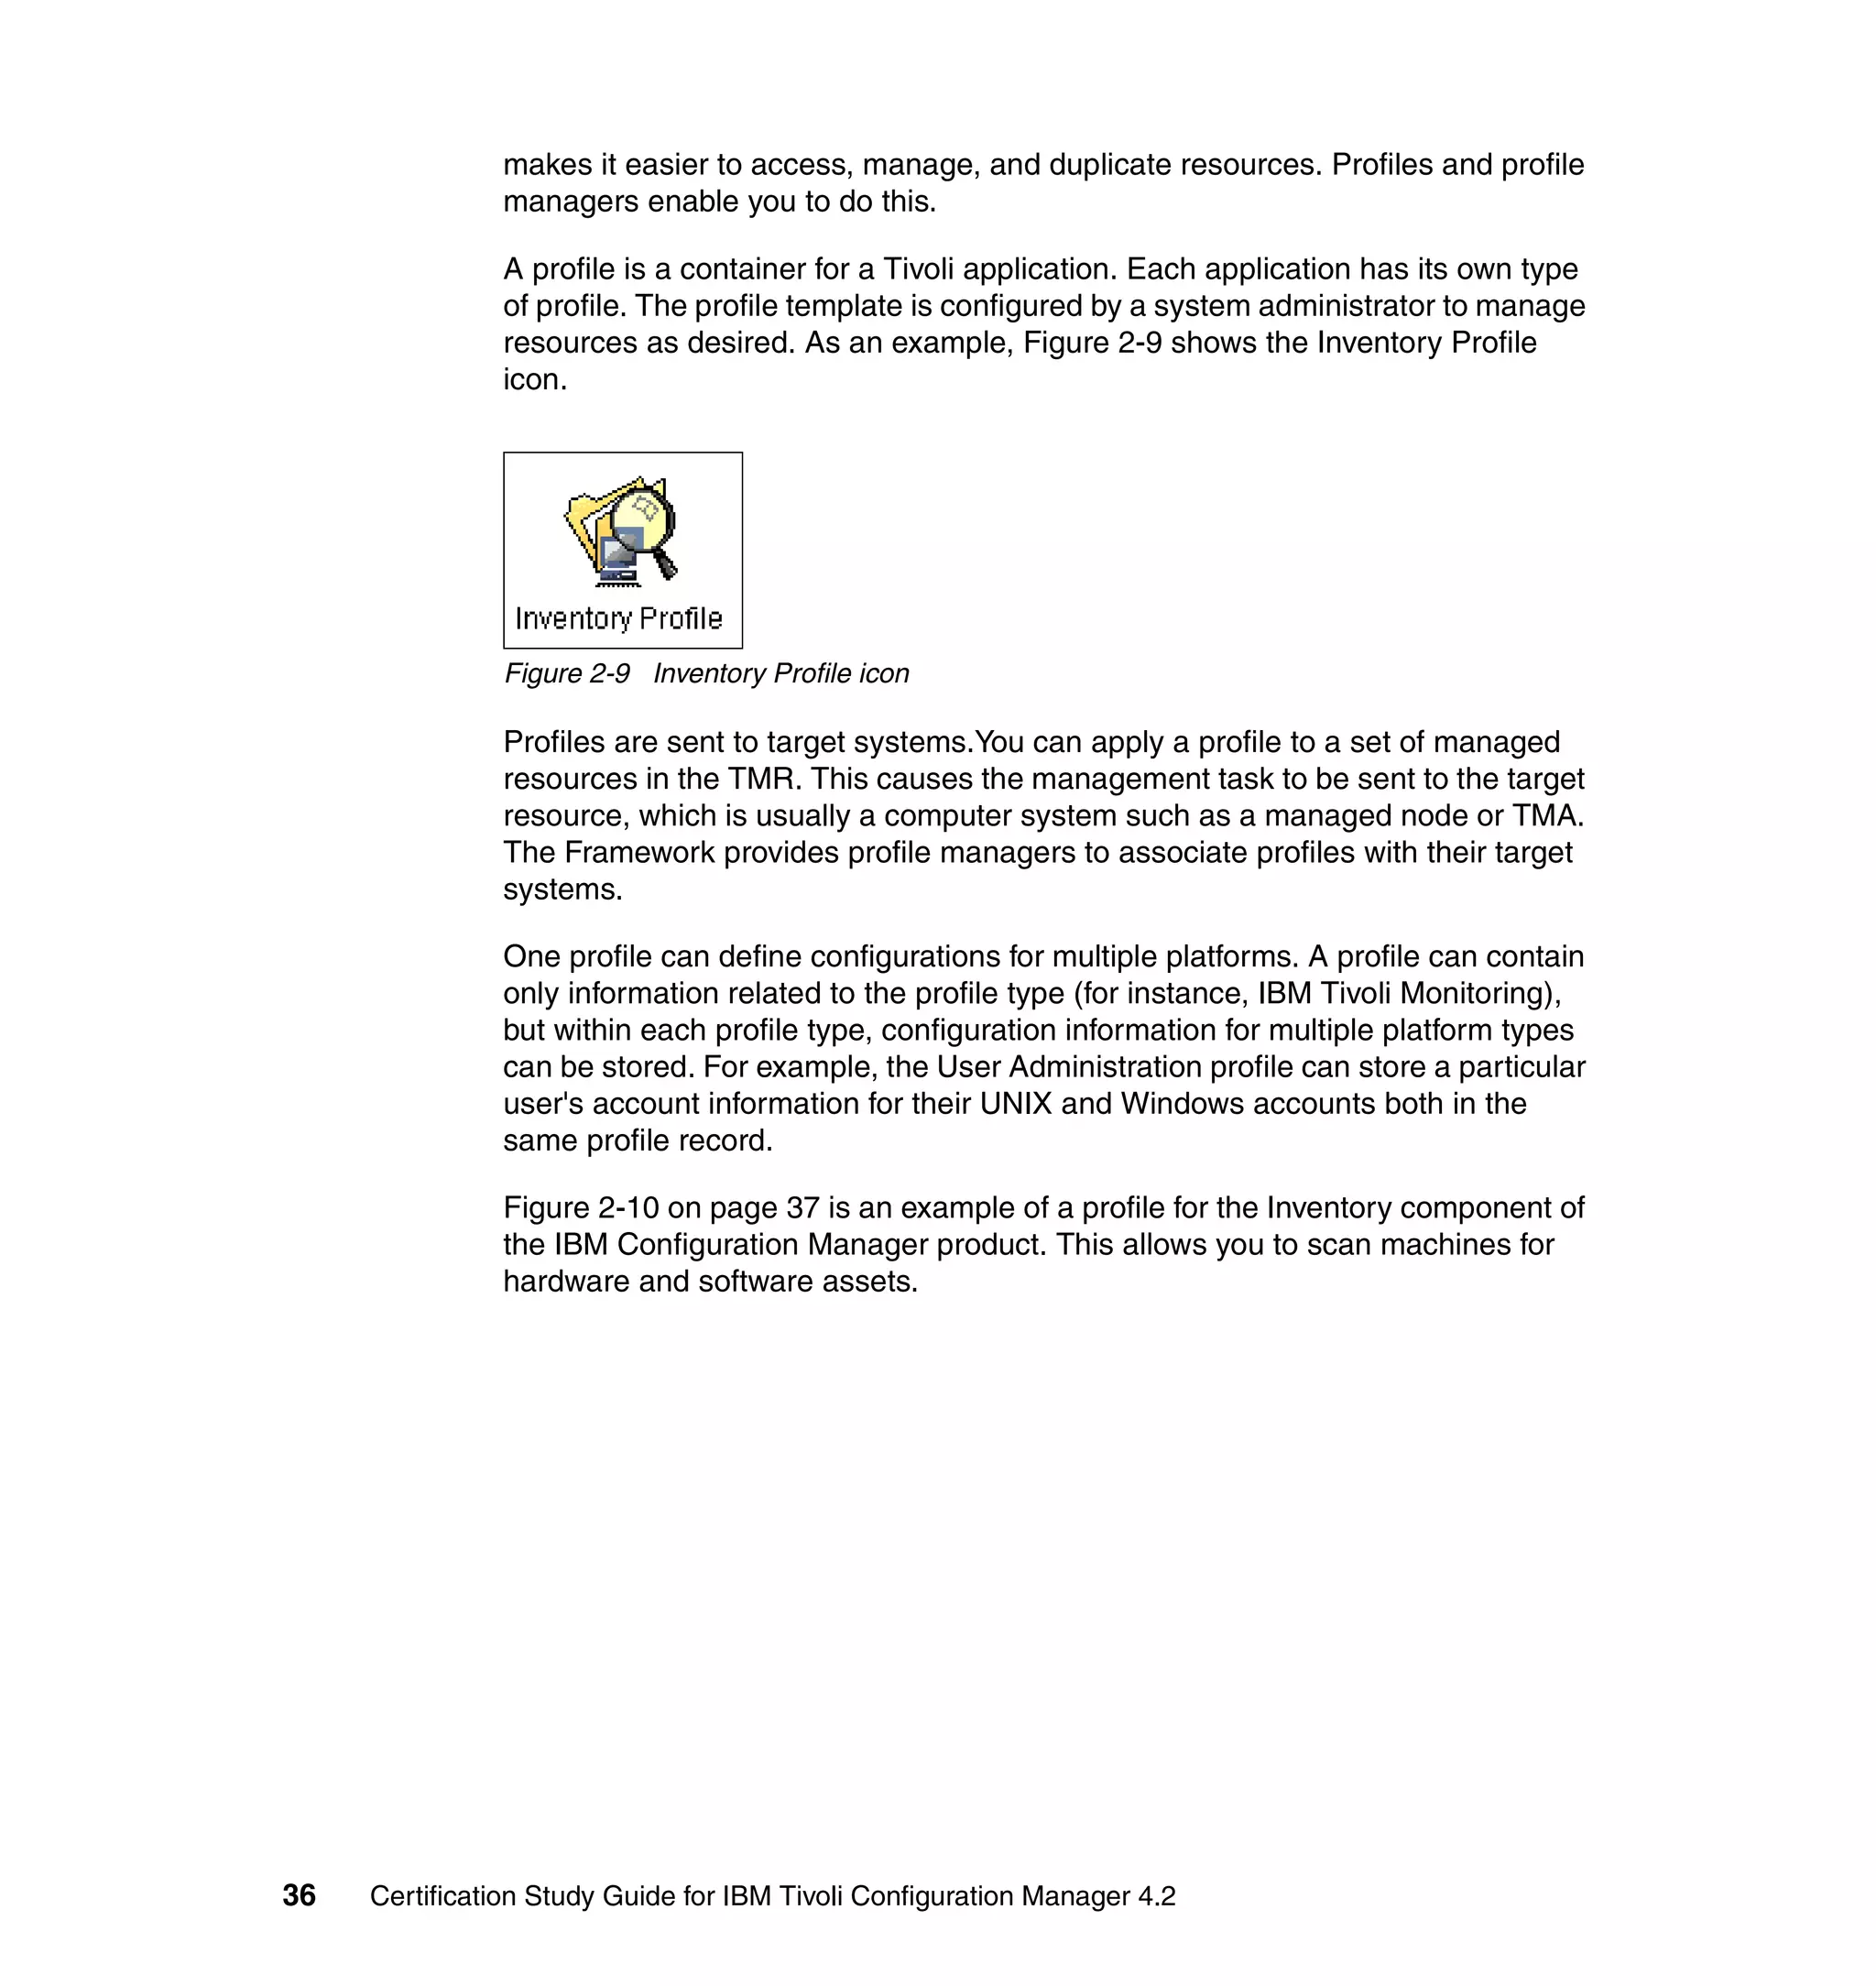
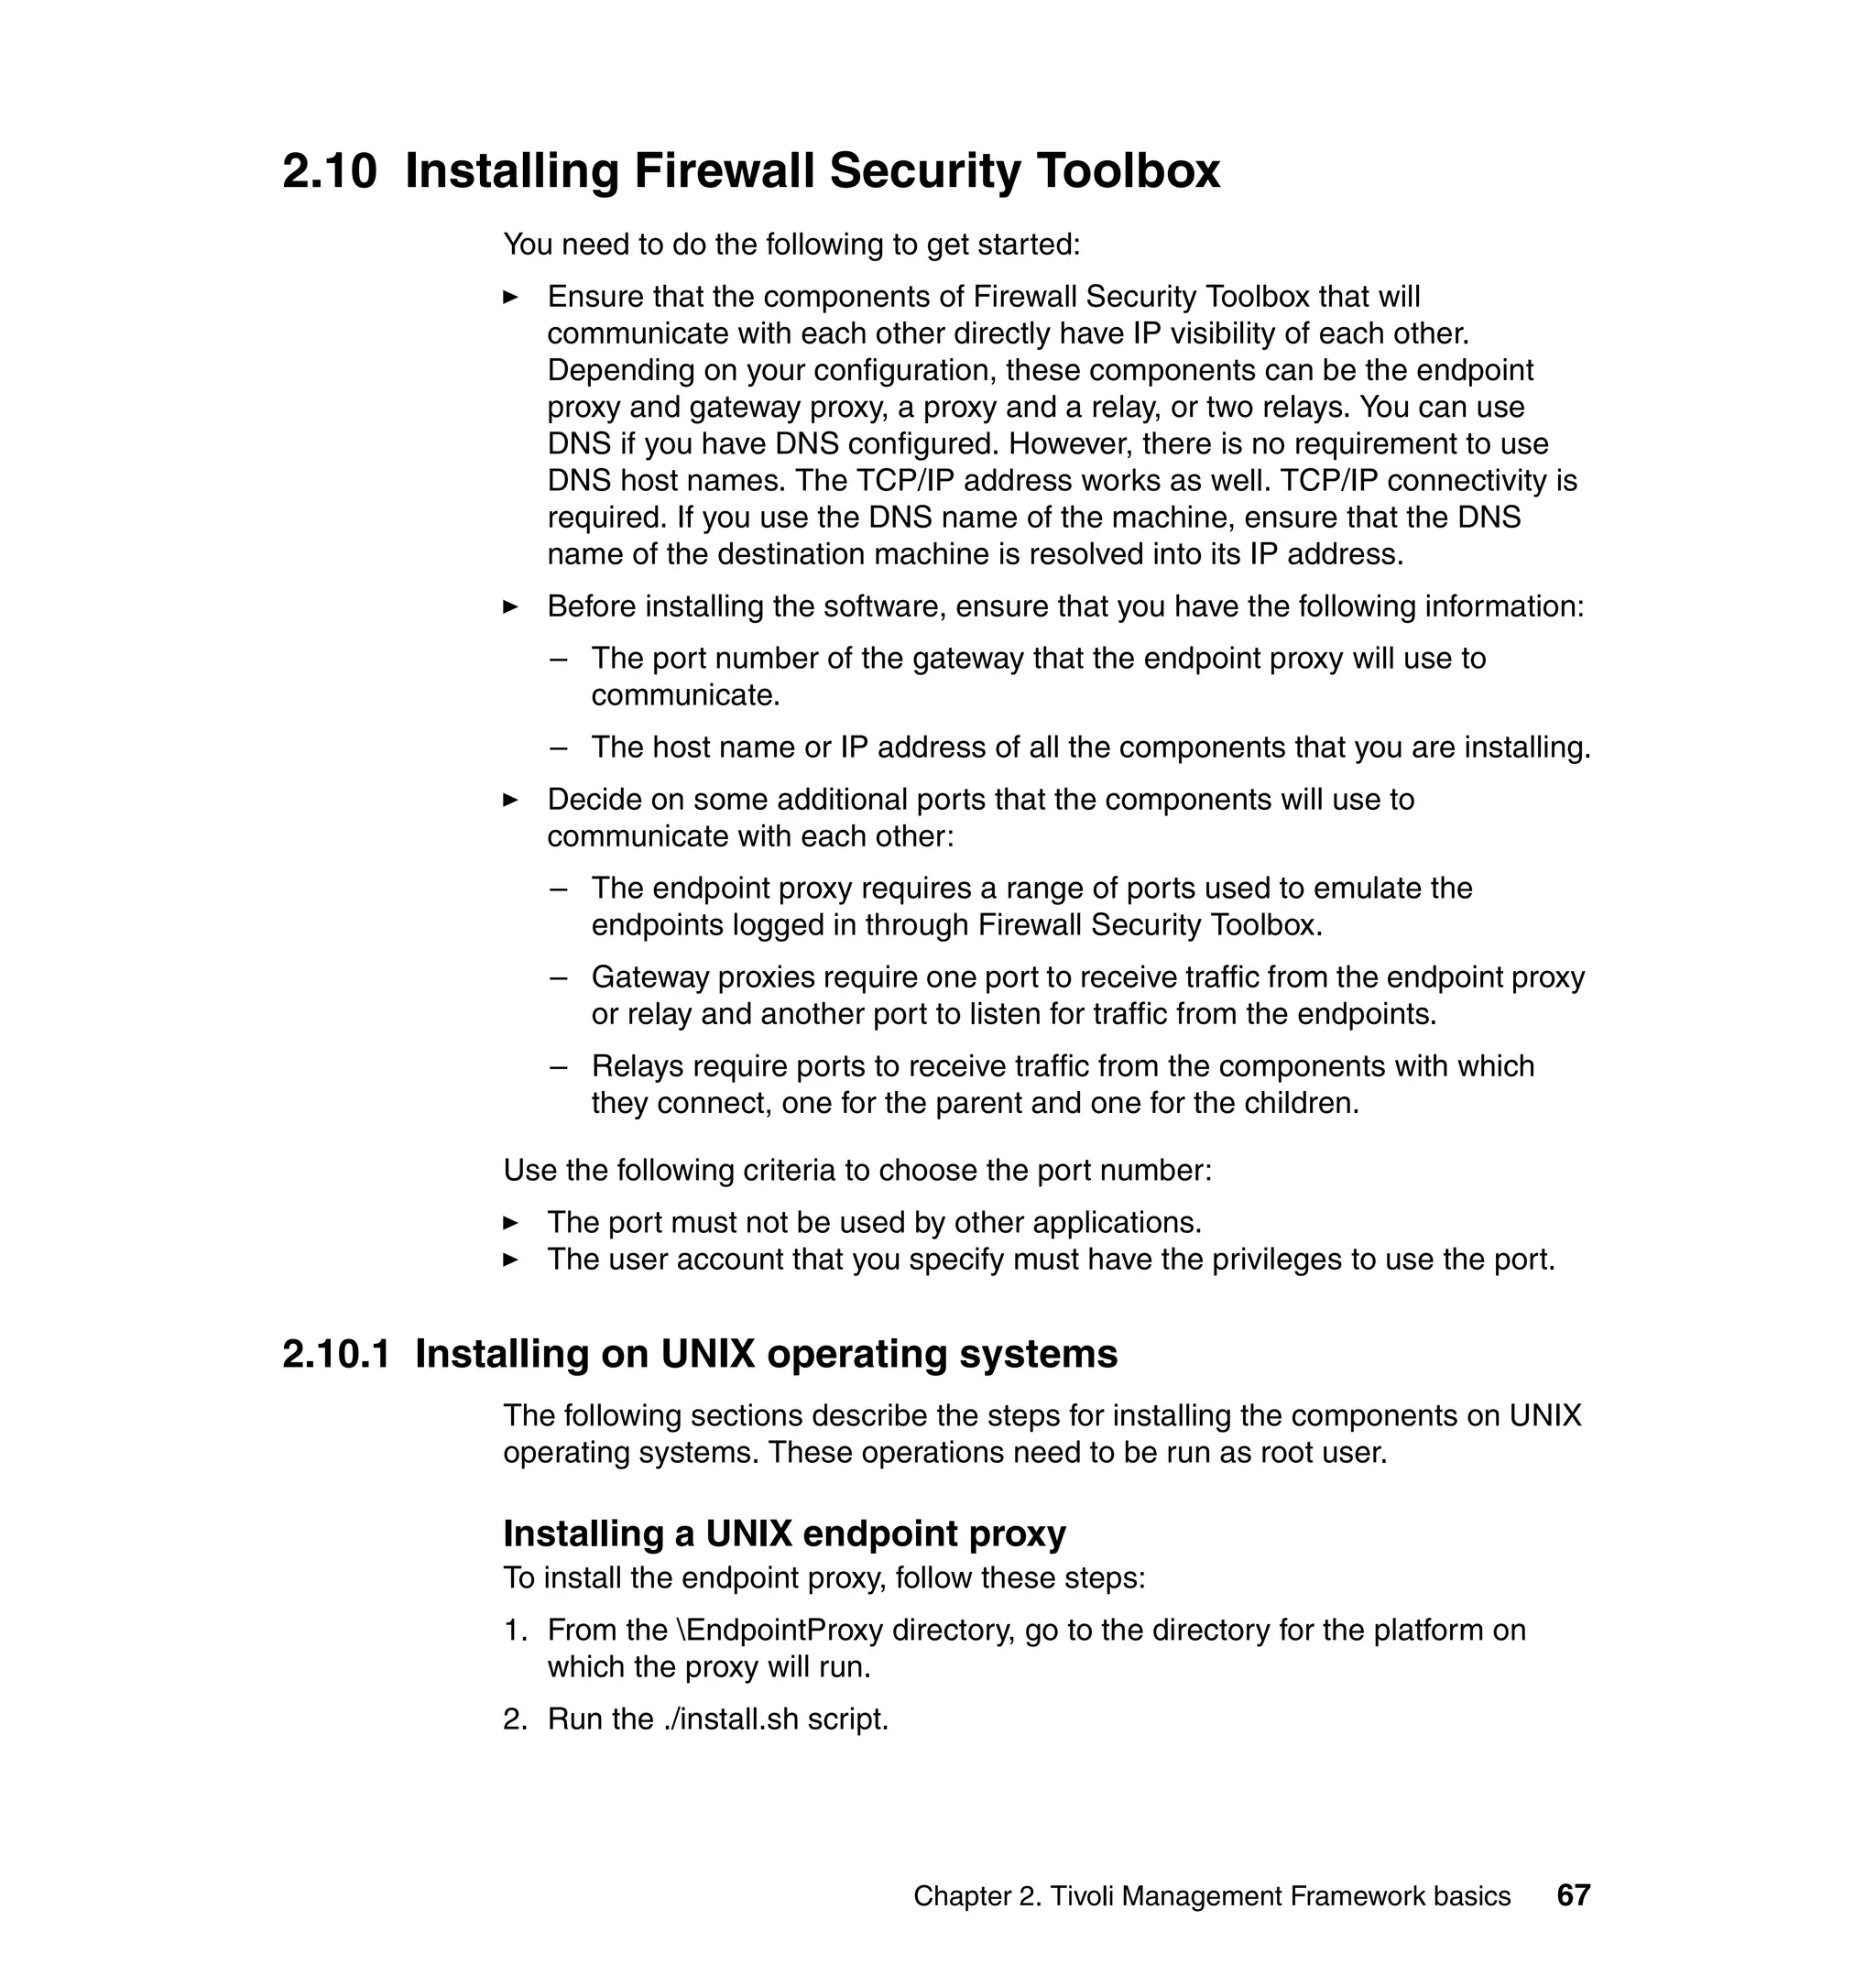
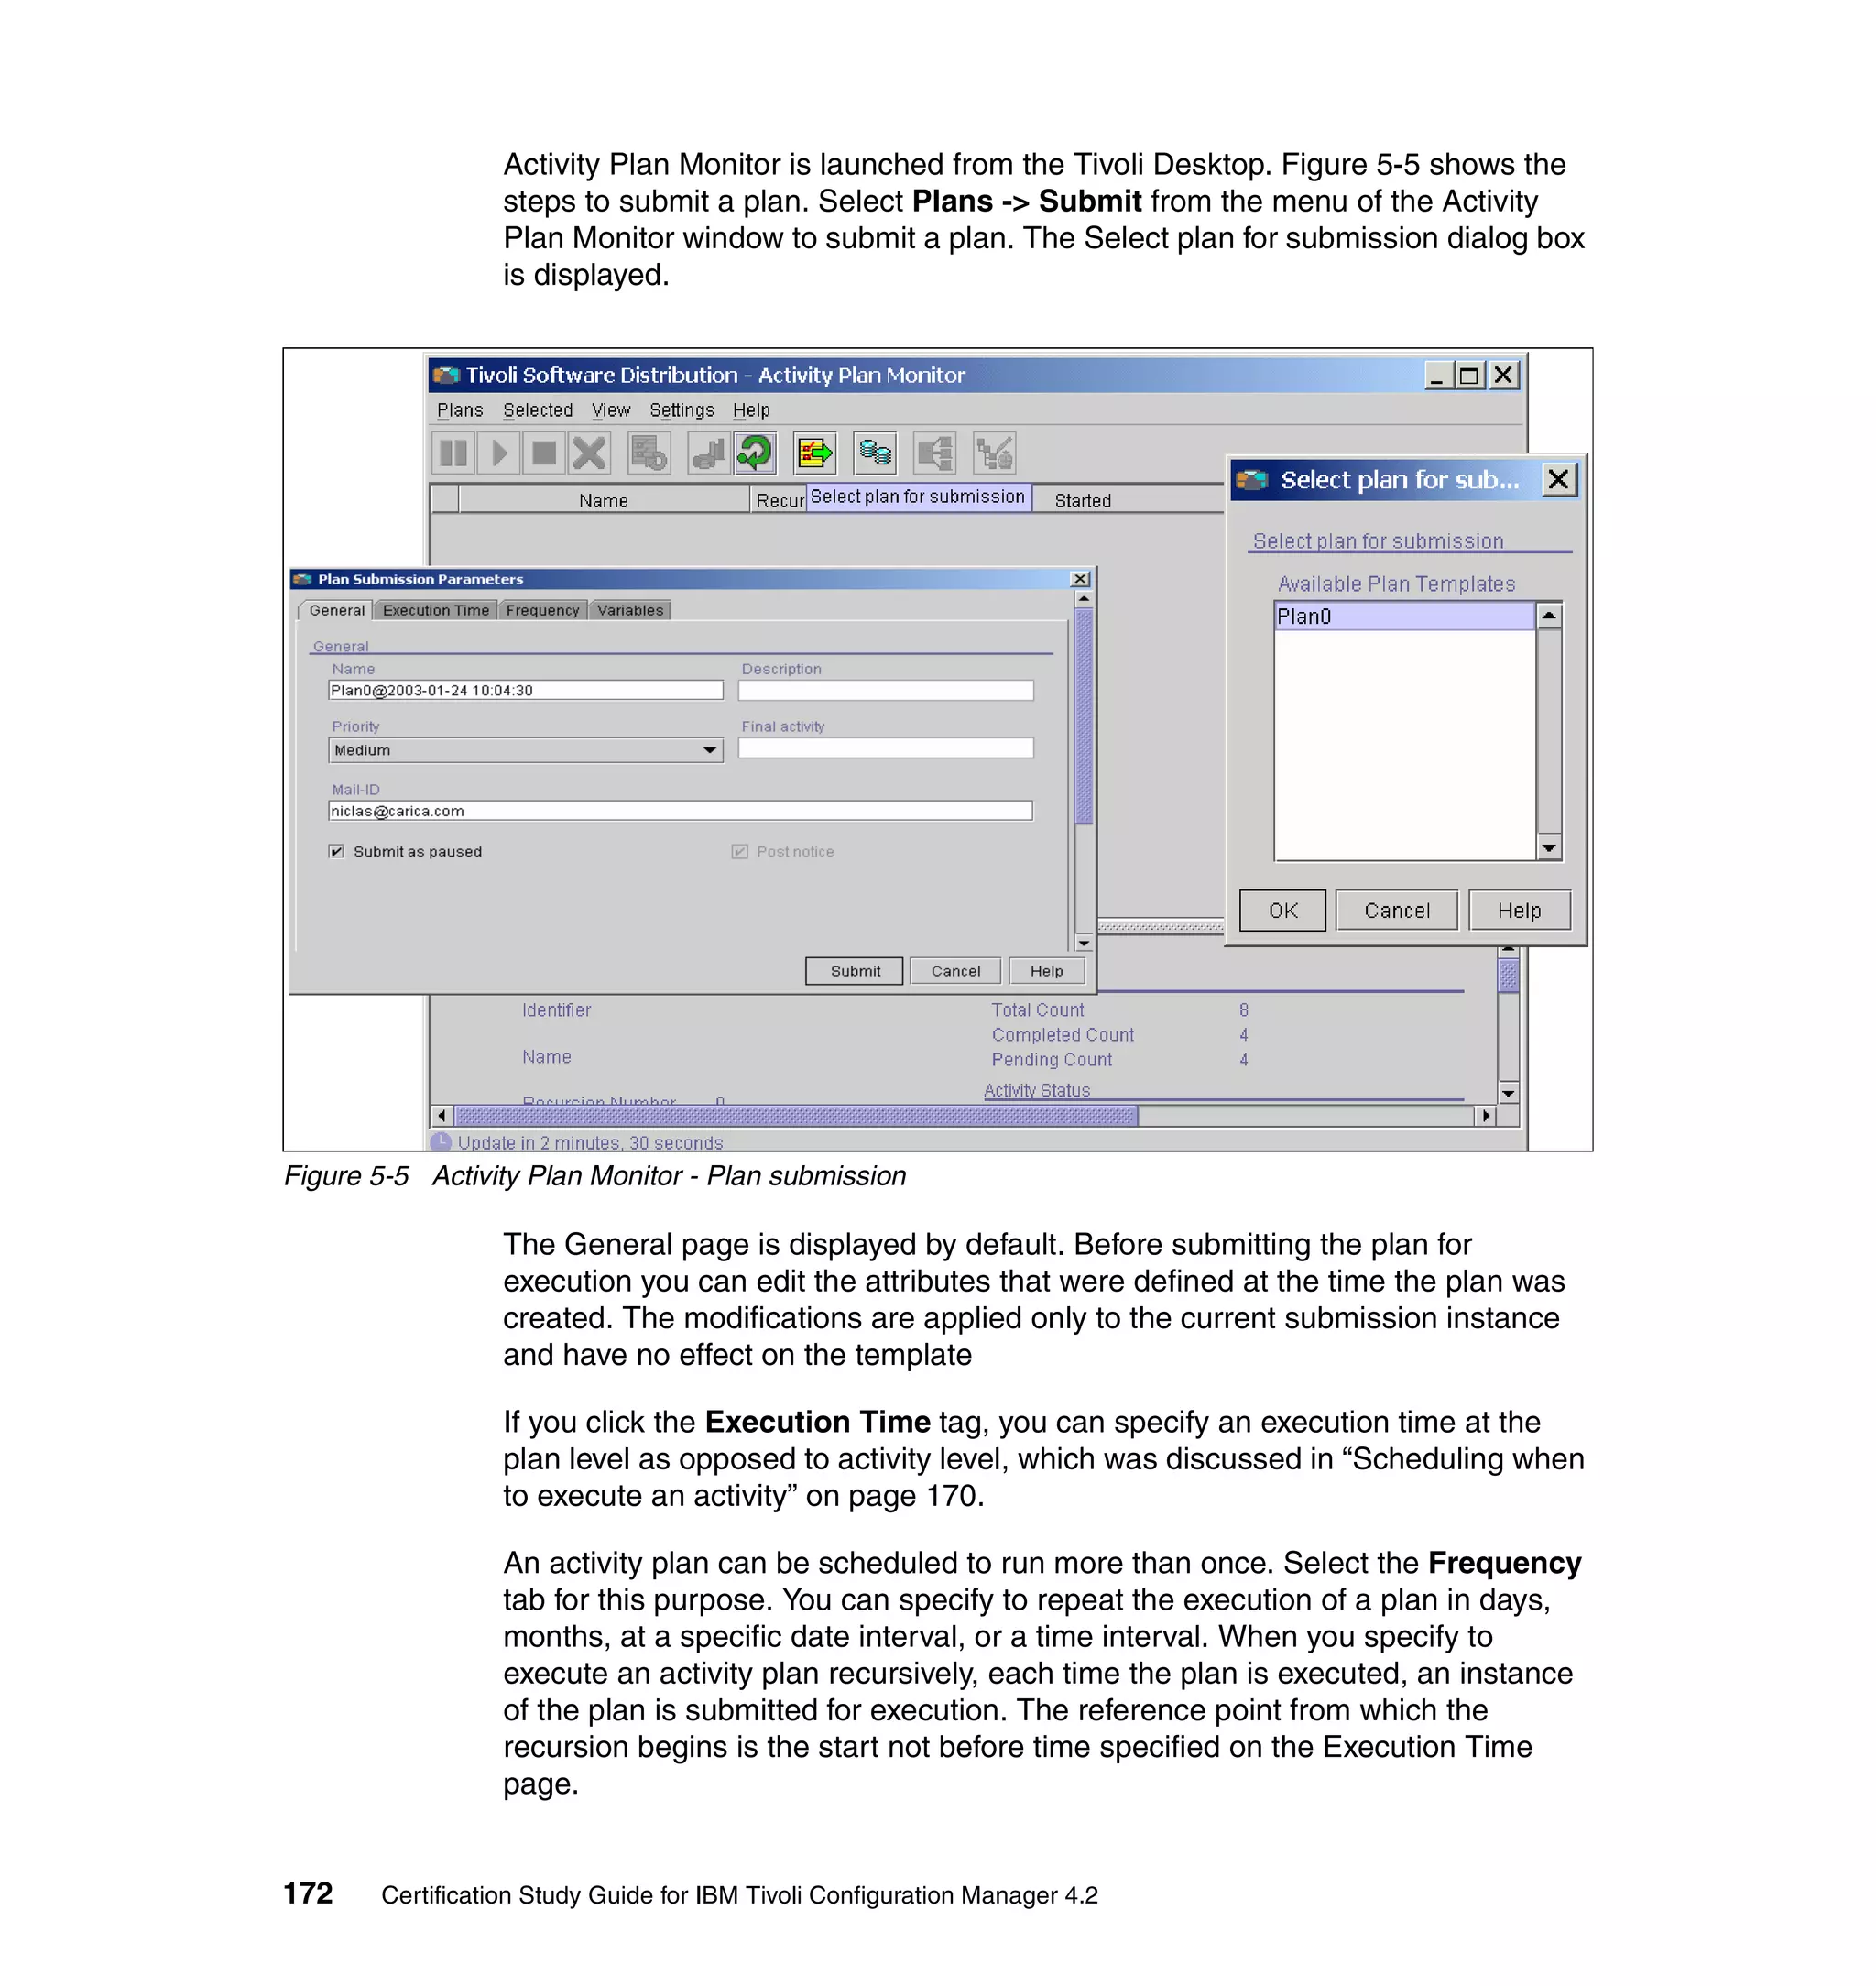
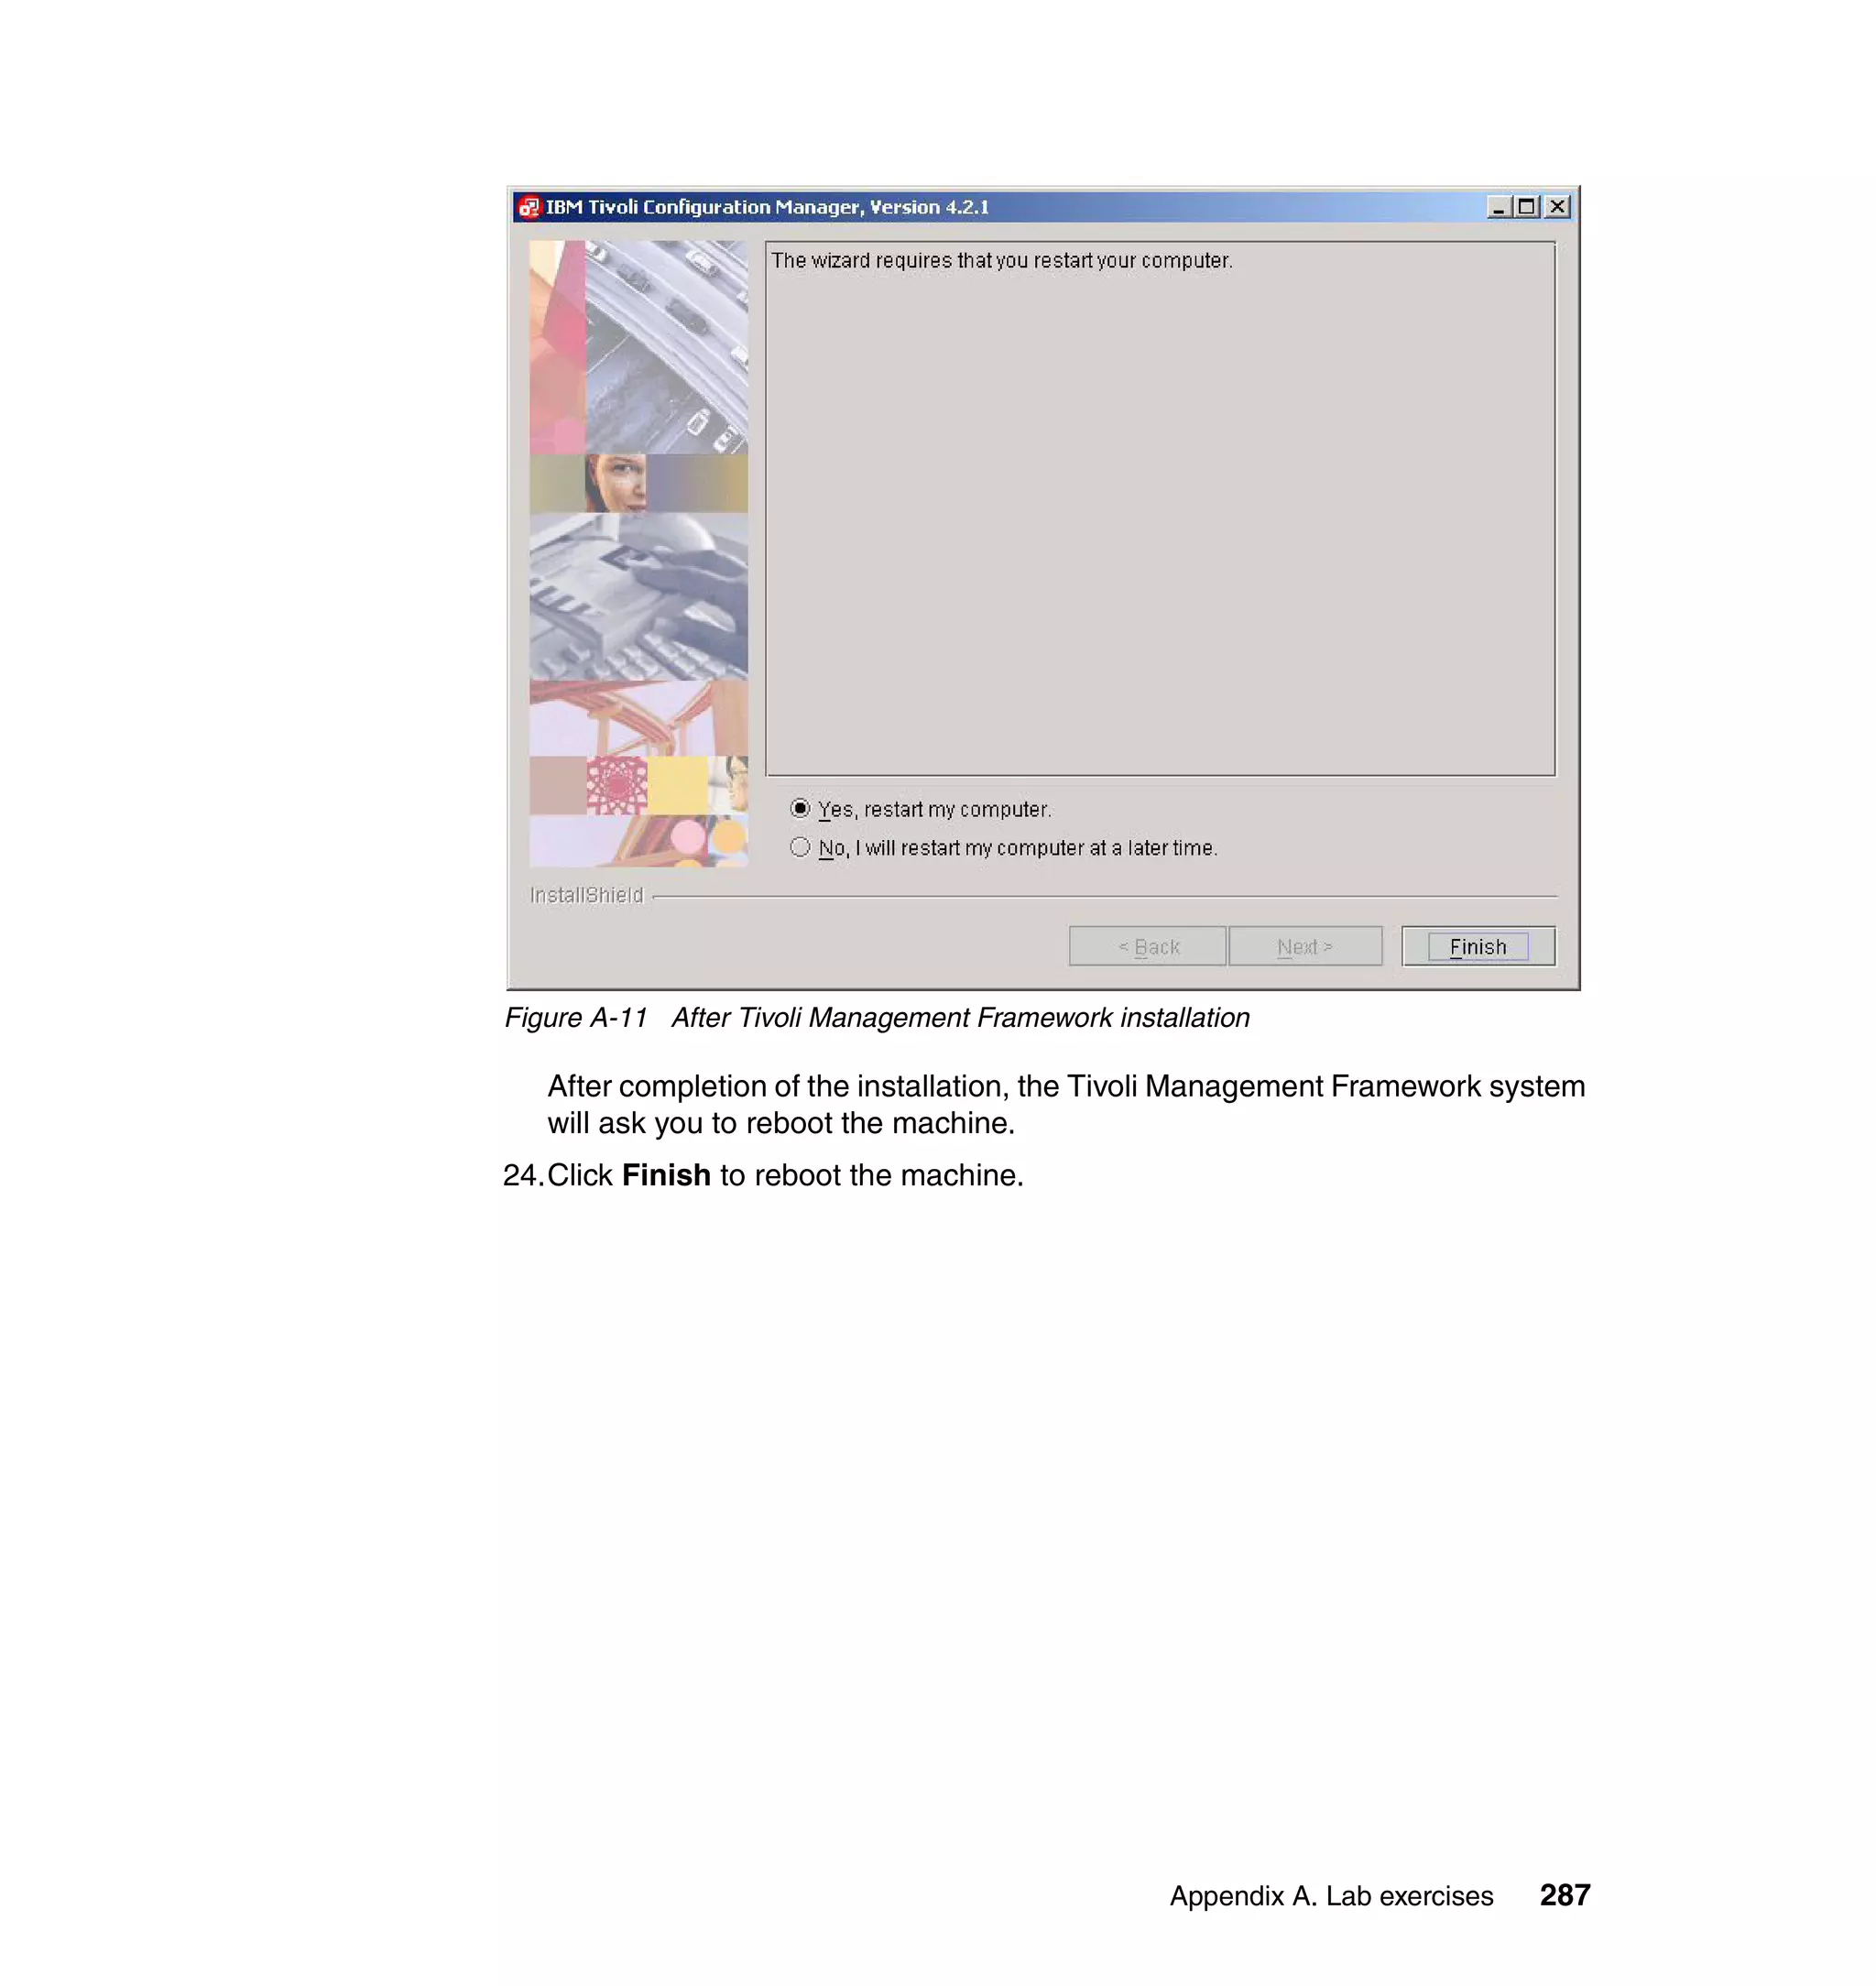
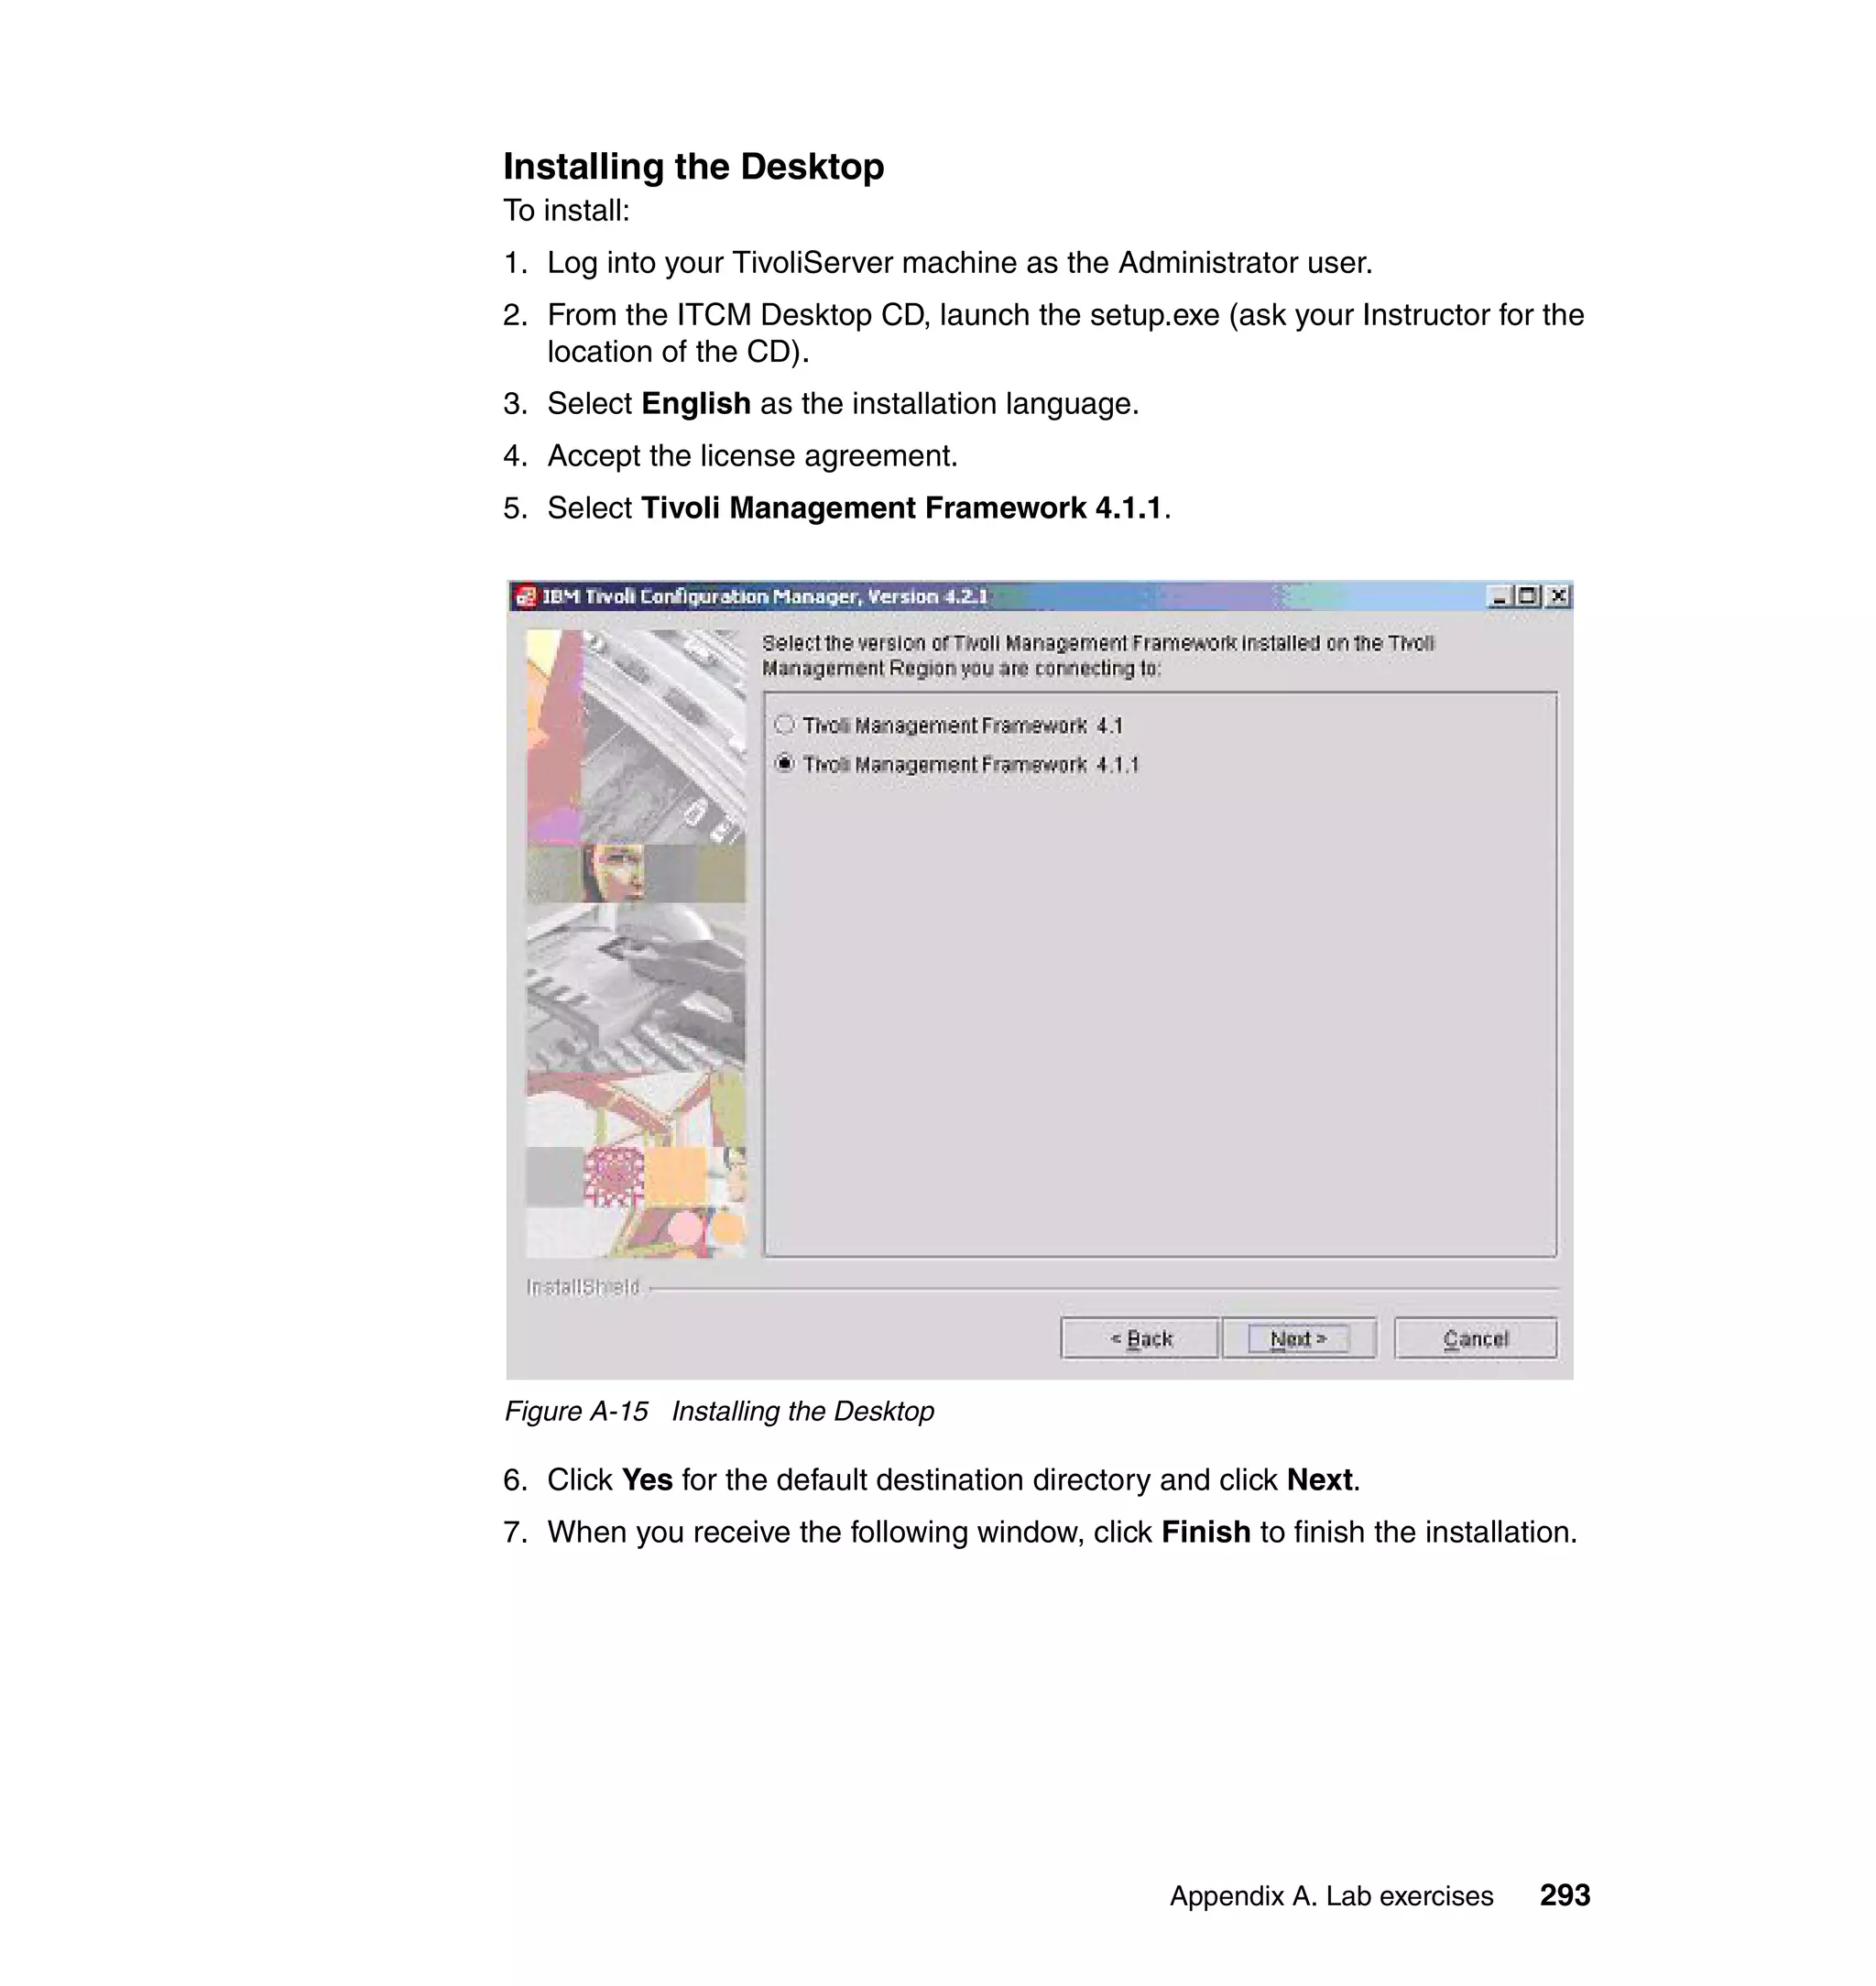
![wmdist –q dist_id
This displays the nodes associated with a given distribution in an indented format
that indicates the route. Each node displayed is suffixed with its state. You can
also determine the distribution path for an active distribution.
wmdist [–f] –r dist_id | endpoint_id [endpoint_id...]
This resumes a paused distribution specified by dist_id, or resumes one or more
paused distributions by target specified by endpoint_id.
wmdist –R [rim_object]
This allows the user to change the RIM object used by the distribution manager
to store status. The default value is mdist2. Issuing this command without a value
prints the current value.
wmdist –s repeater_name [–C noprompt| nostart| nostop] [keyword=value.]
This configures a repeater (specified by repeater_name) using one or more of
the following keywords and values. If a value is not specified, the existing options
for the specified repeater are displayed. When no keyword value pairs are listed,
the command returns the configurations currently in use.
wmdist –T [database_purge_interval]
This sets the interval (in seconds) when completed distributions are deleted by
the distribution manager from the RIM database. Setting this interval allows the
distribution manager to delete completed or irrelevant distributions from the
database after a distribution request is submitted. Although a purge interval is
defined, the completed distributions are not deleted unless the defined interval
has elapsed and a distribution request was submitted. Issuing this command
without a purge interval prints the current setting. Setting the purge interval to -1
disables database purges. The default value is -1.
For the complete wmdist command function please refer to the Tivoli
Management Framework Reference Guide.
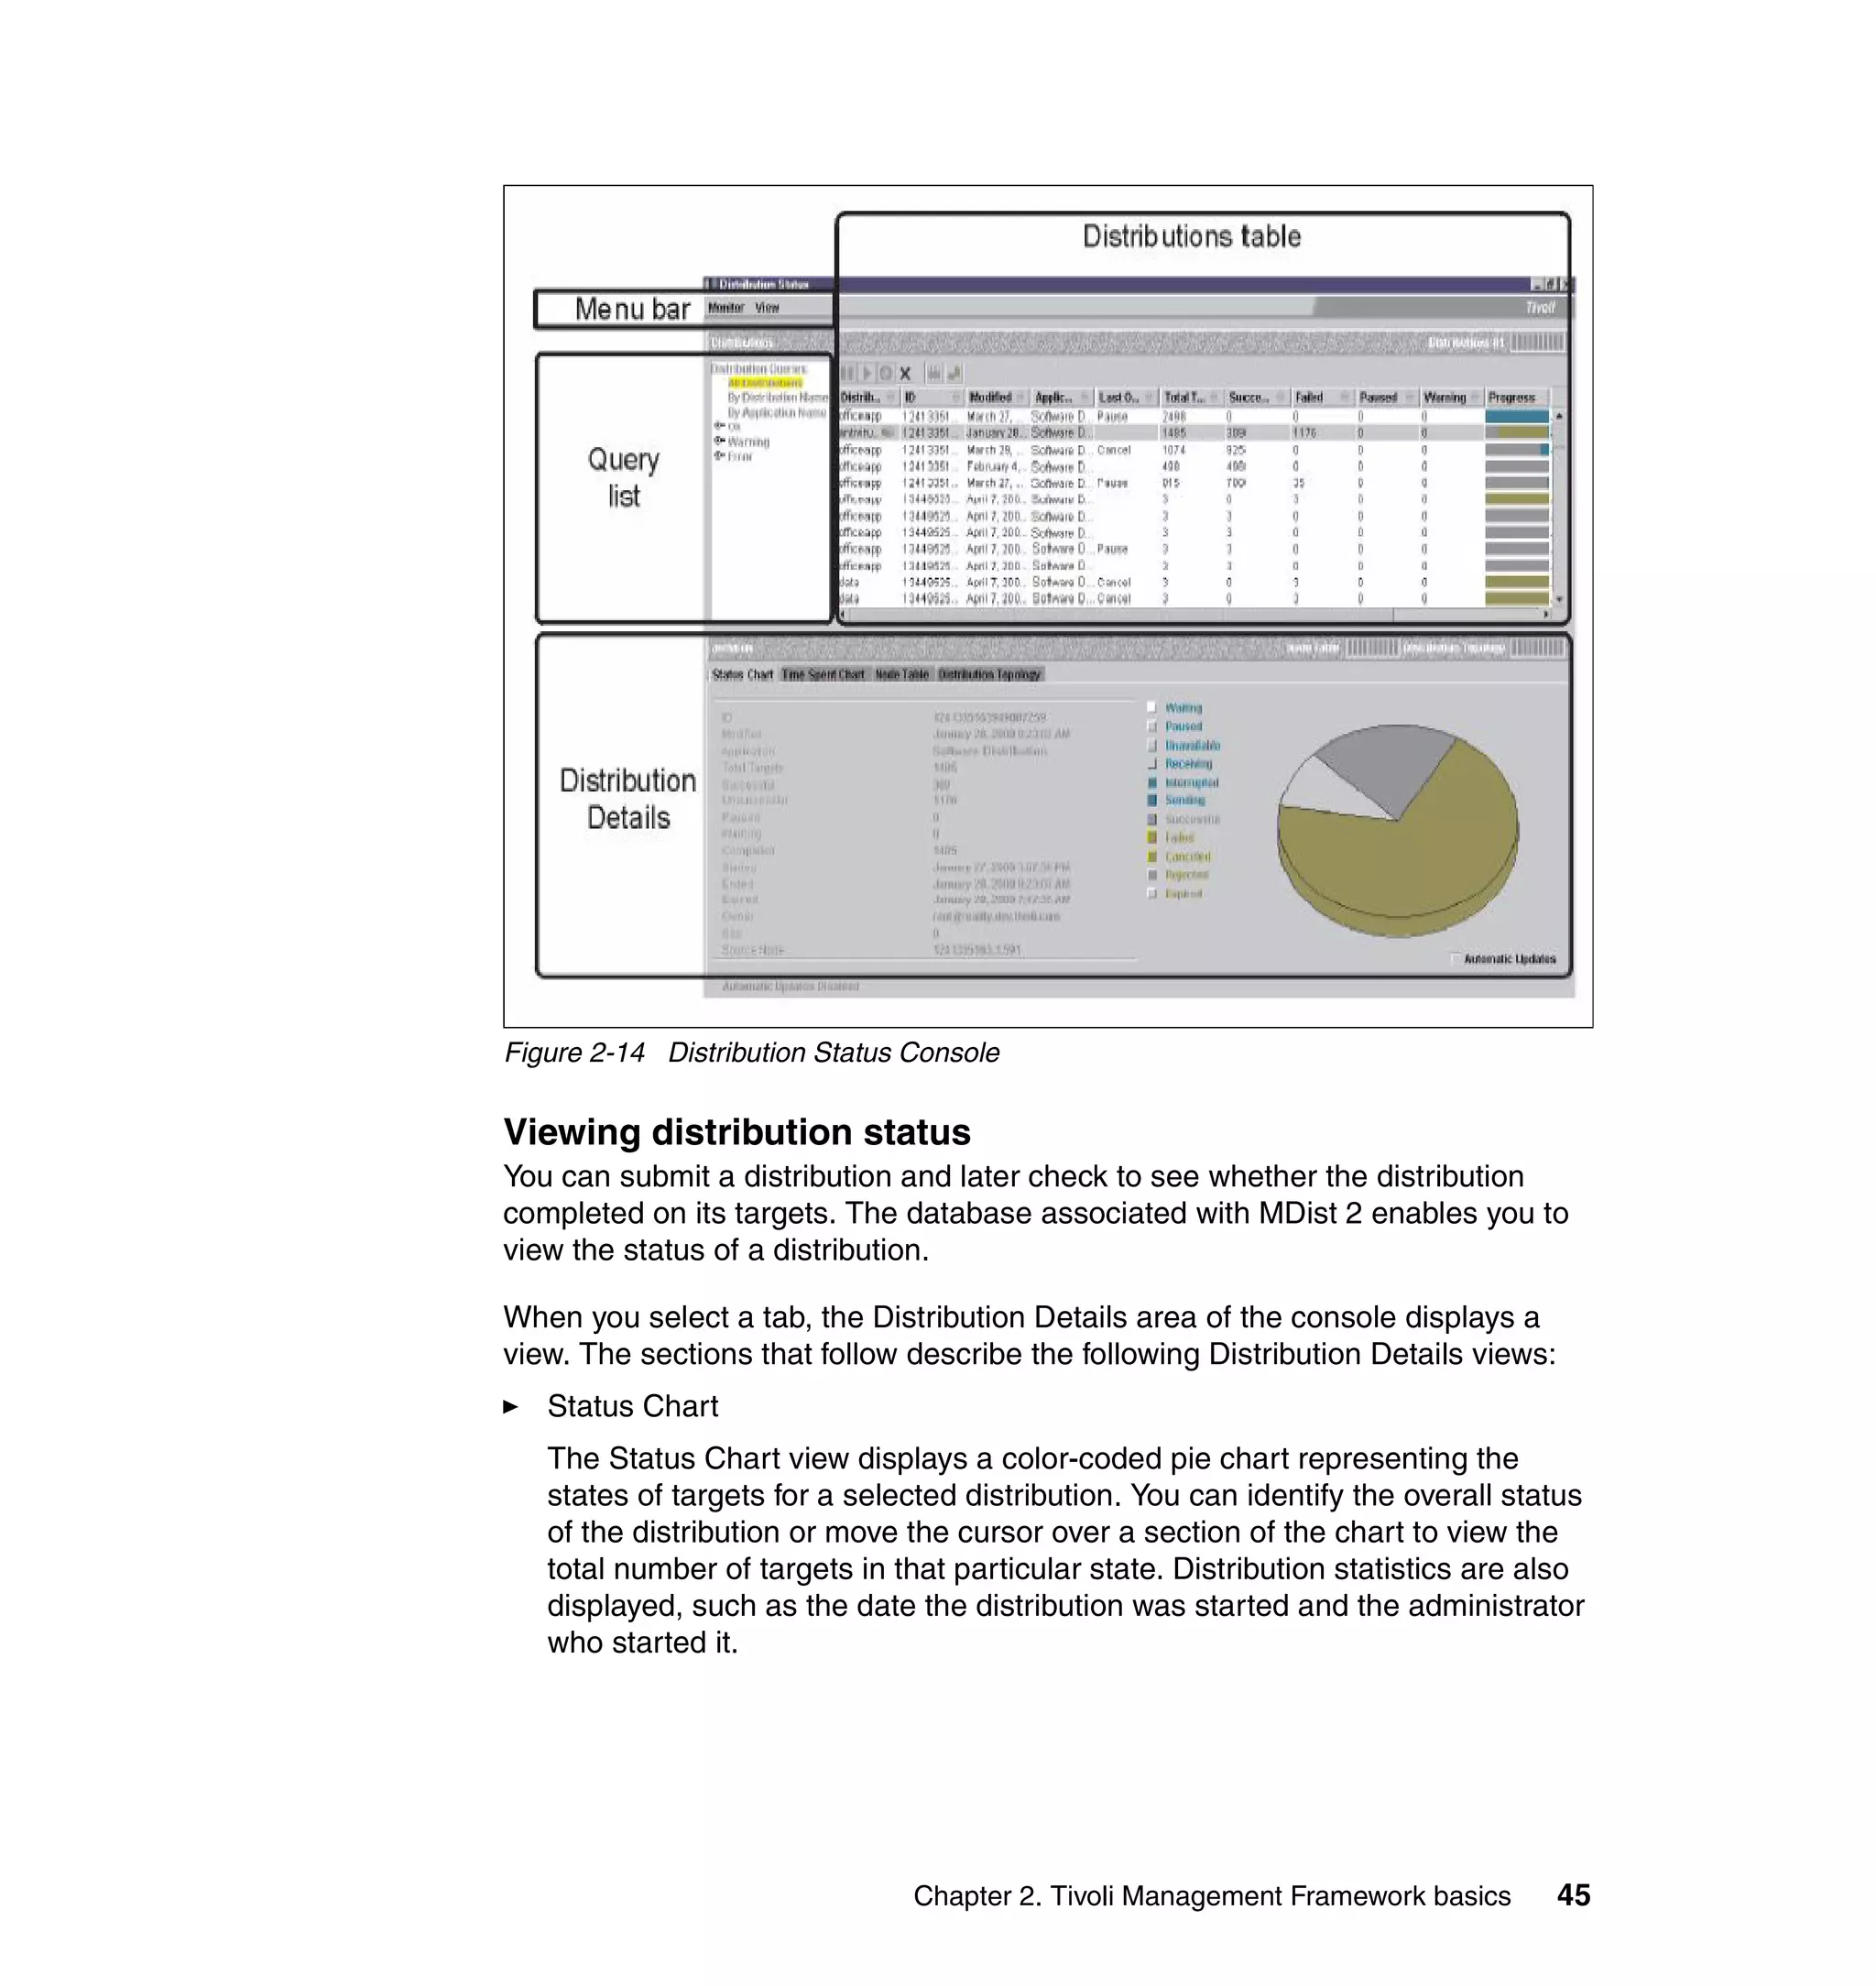
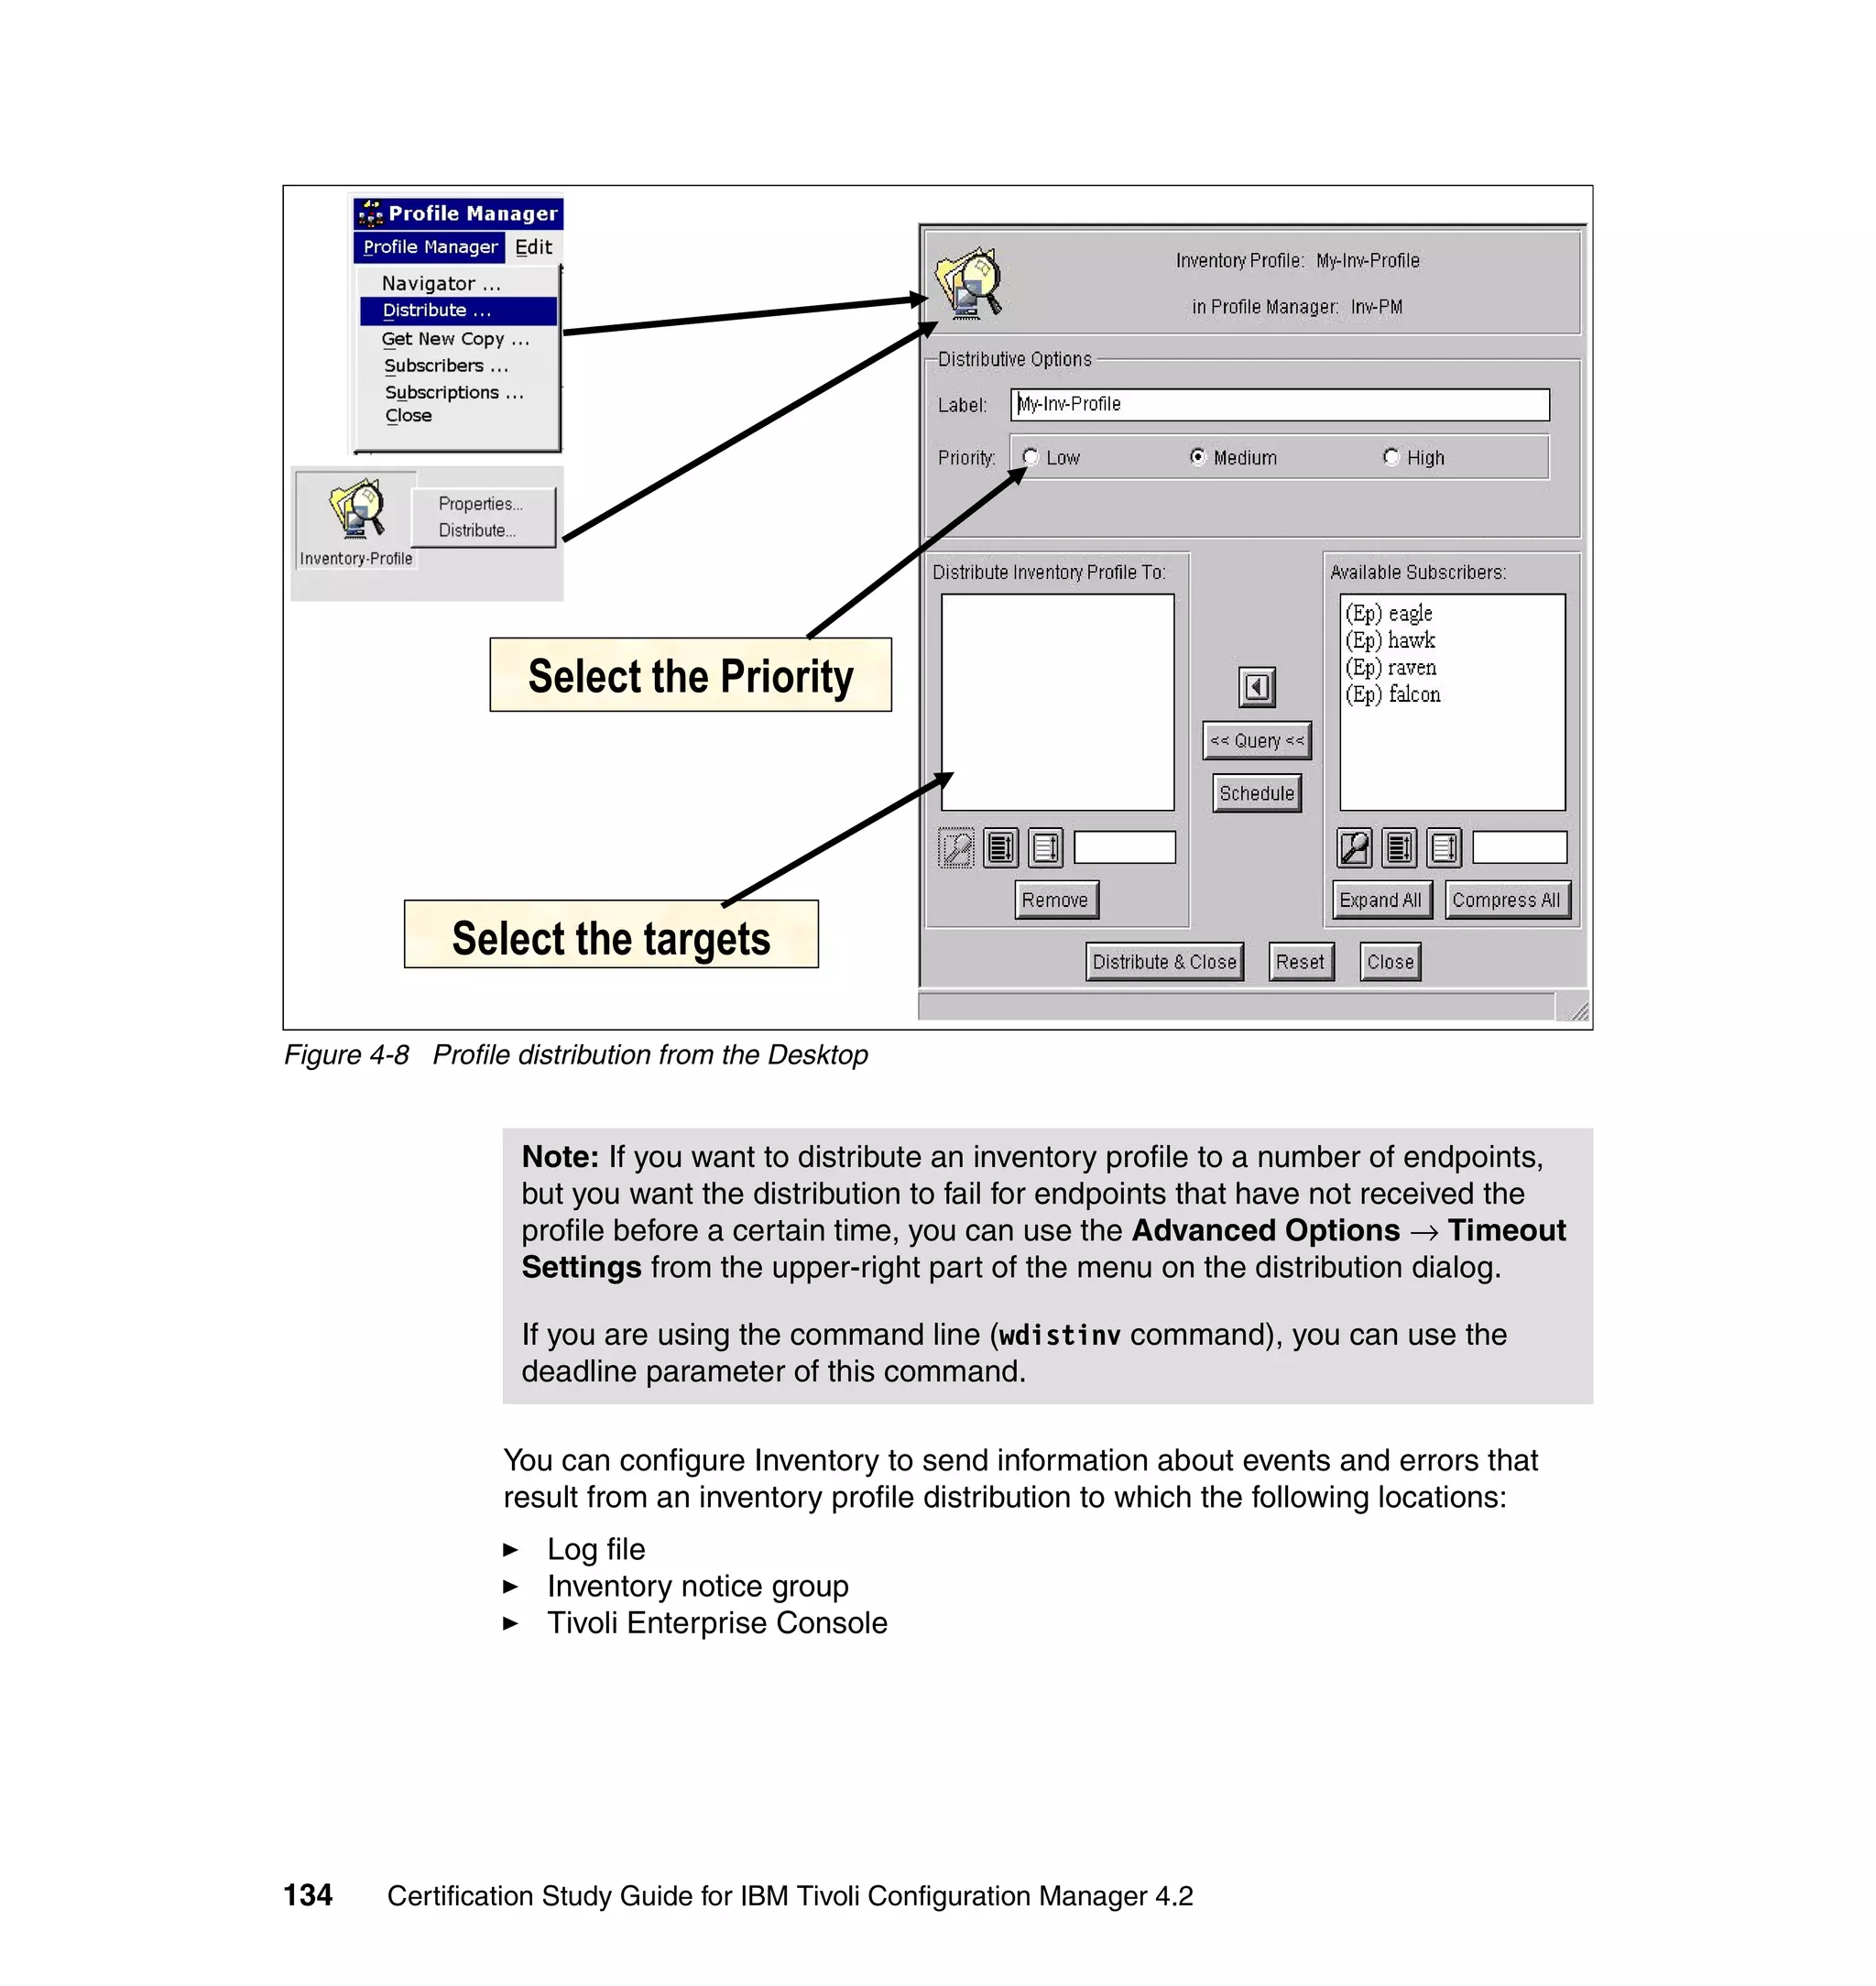
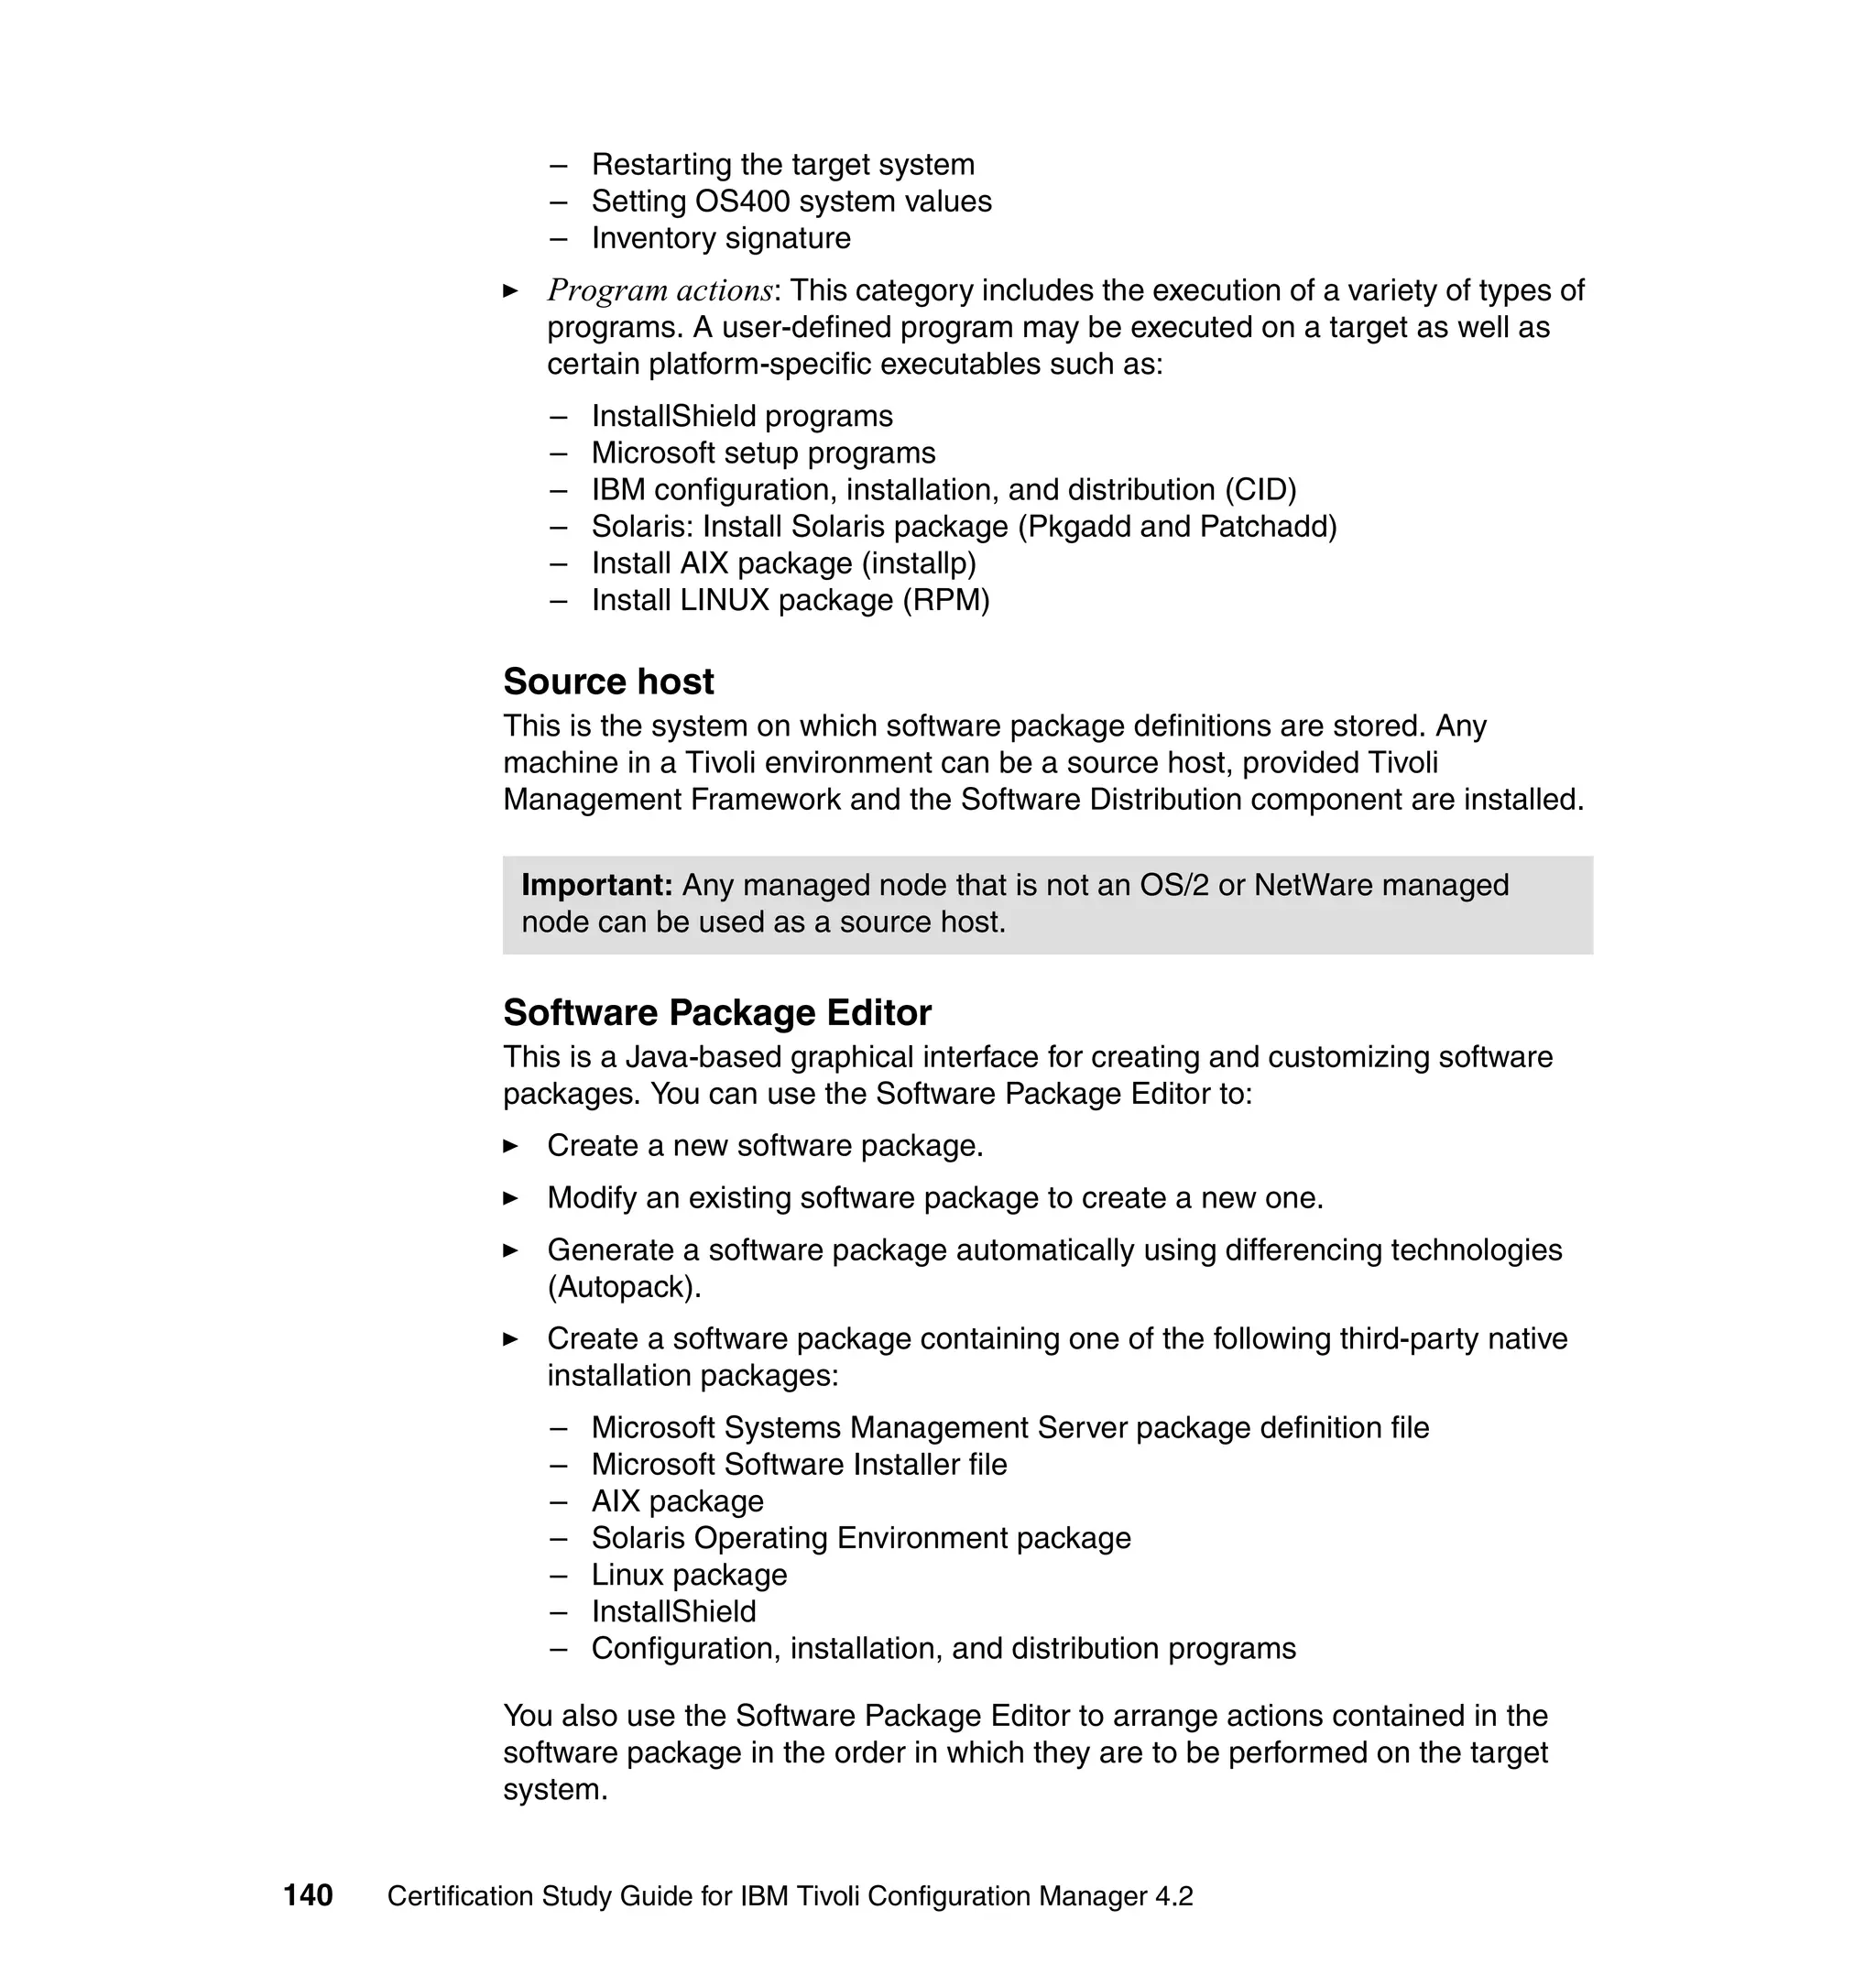
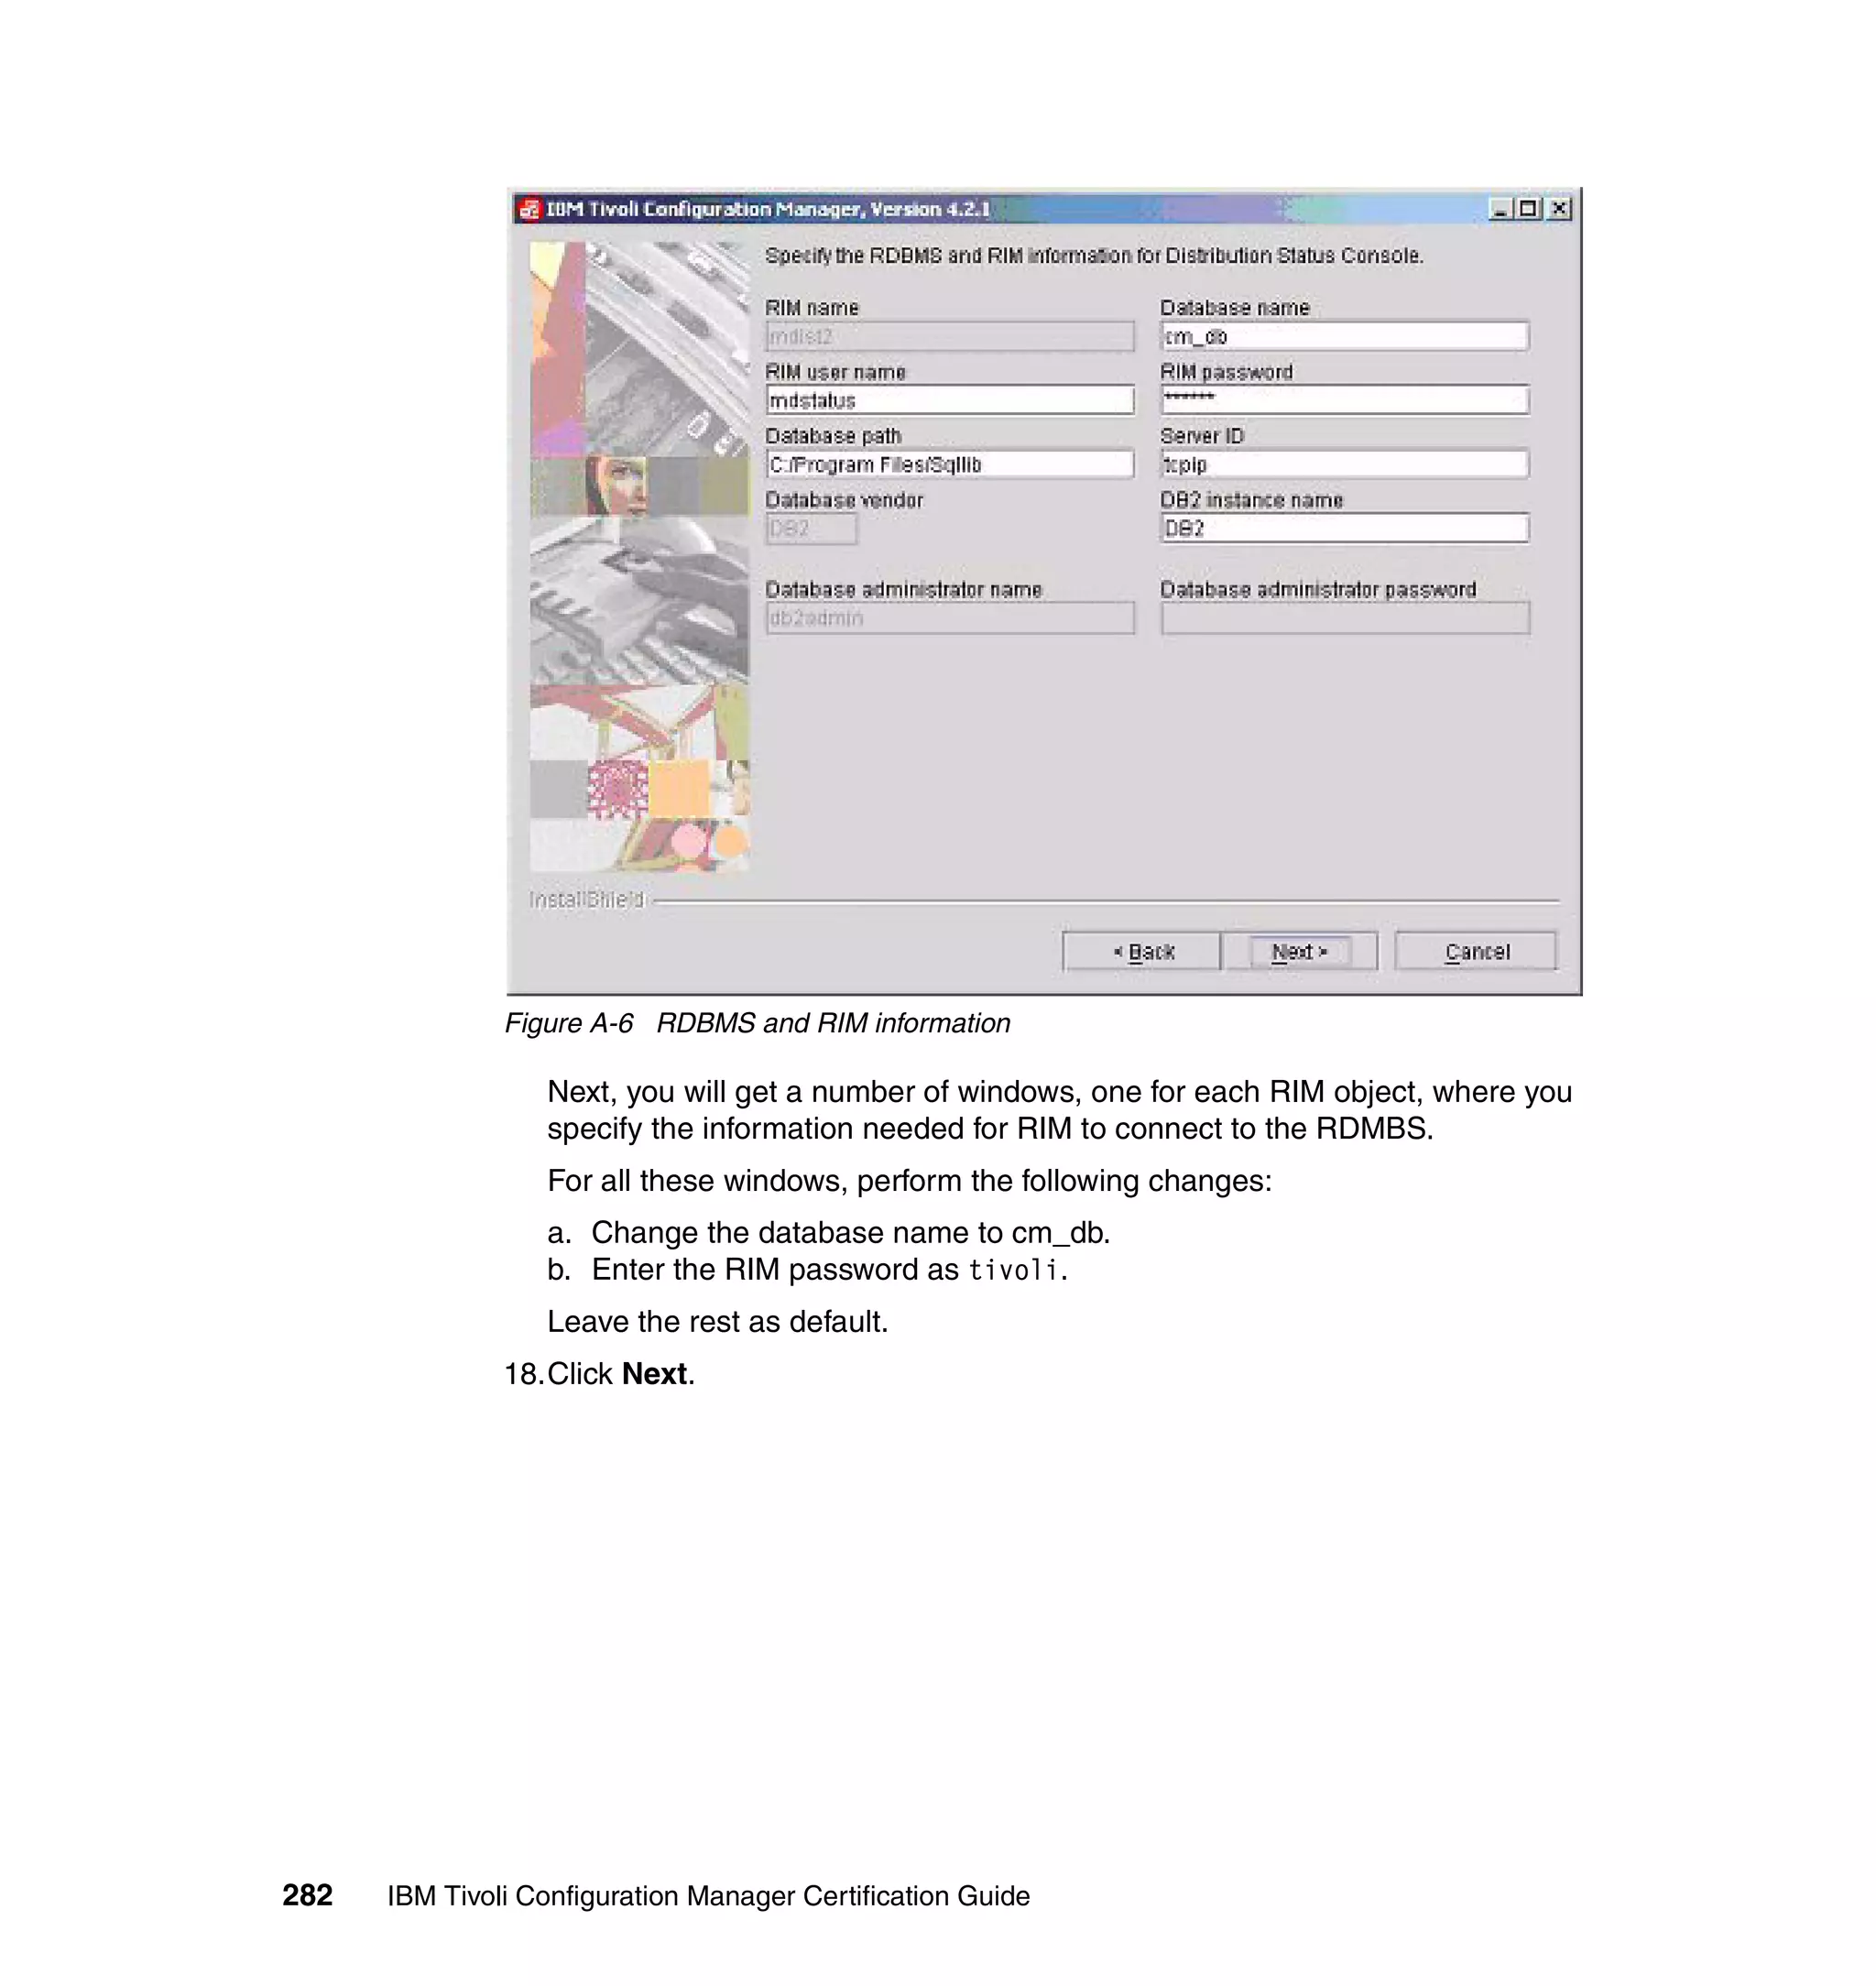
2.6.5 Using the Distribution Status console
The Distribution Status console, shown in Figure 2-14 on page 45, provides
administrators with real-time reporting and control of profile distributions.
Administrators can track the progress of a distribution, intervene (if necessary),
and analyze the details of a distribution. The console provides color-coded charts
and graphs to enable administrators to identify patterns and relationships in the
data. These views are helpful when identifying items of interest to be focused on,
such as unavailable targets, which prevent a distribution from completing
successfully.
44 Certification Study Guide for IBM Tivoli Configuration Manager 4.2](https://image.slidesharecdn.com/certificationstudyguideforibmtivoliconfigurationmanager4-2redp3946-120522221807-phpapp01/75/Certification-study-guide-for-ibm-tivoli-configuration-manager-4-2-redp3946-62-2048.jpg)


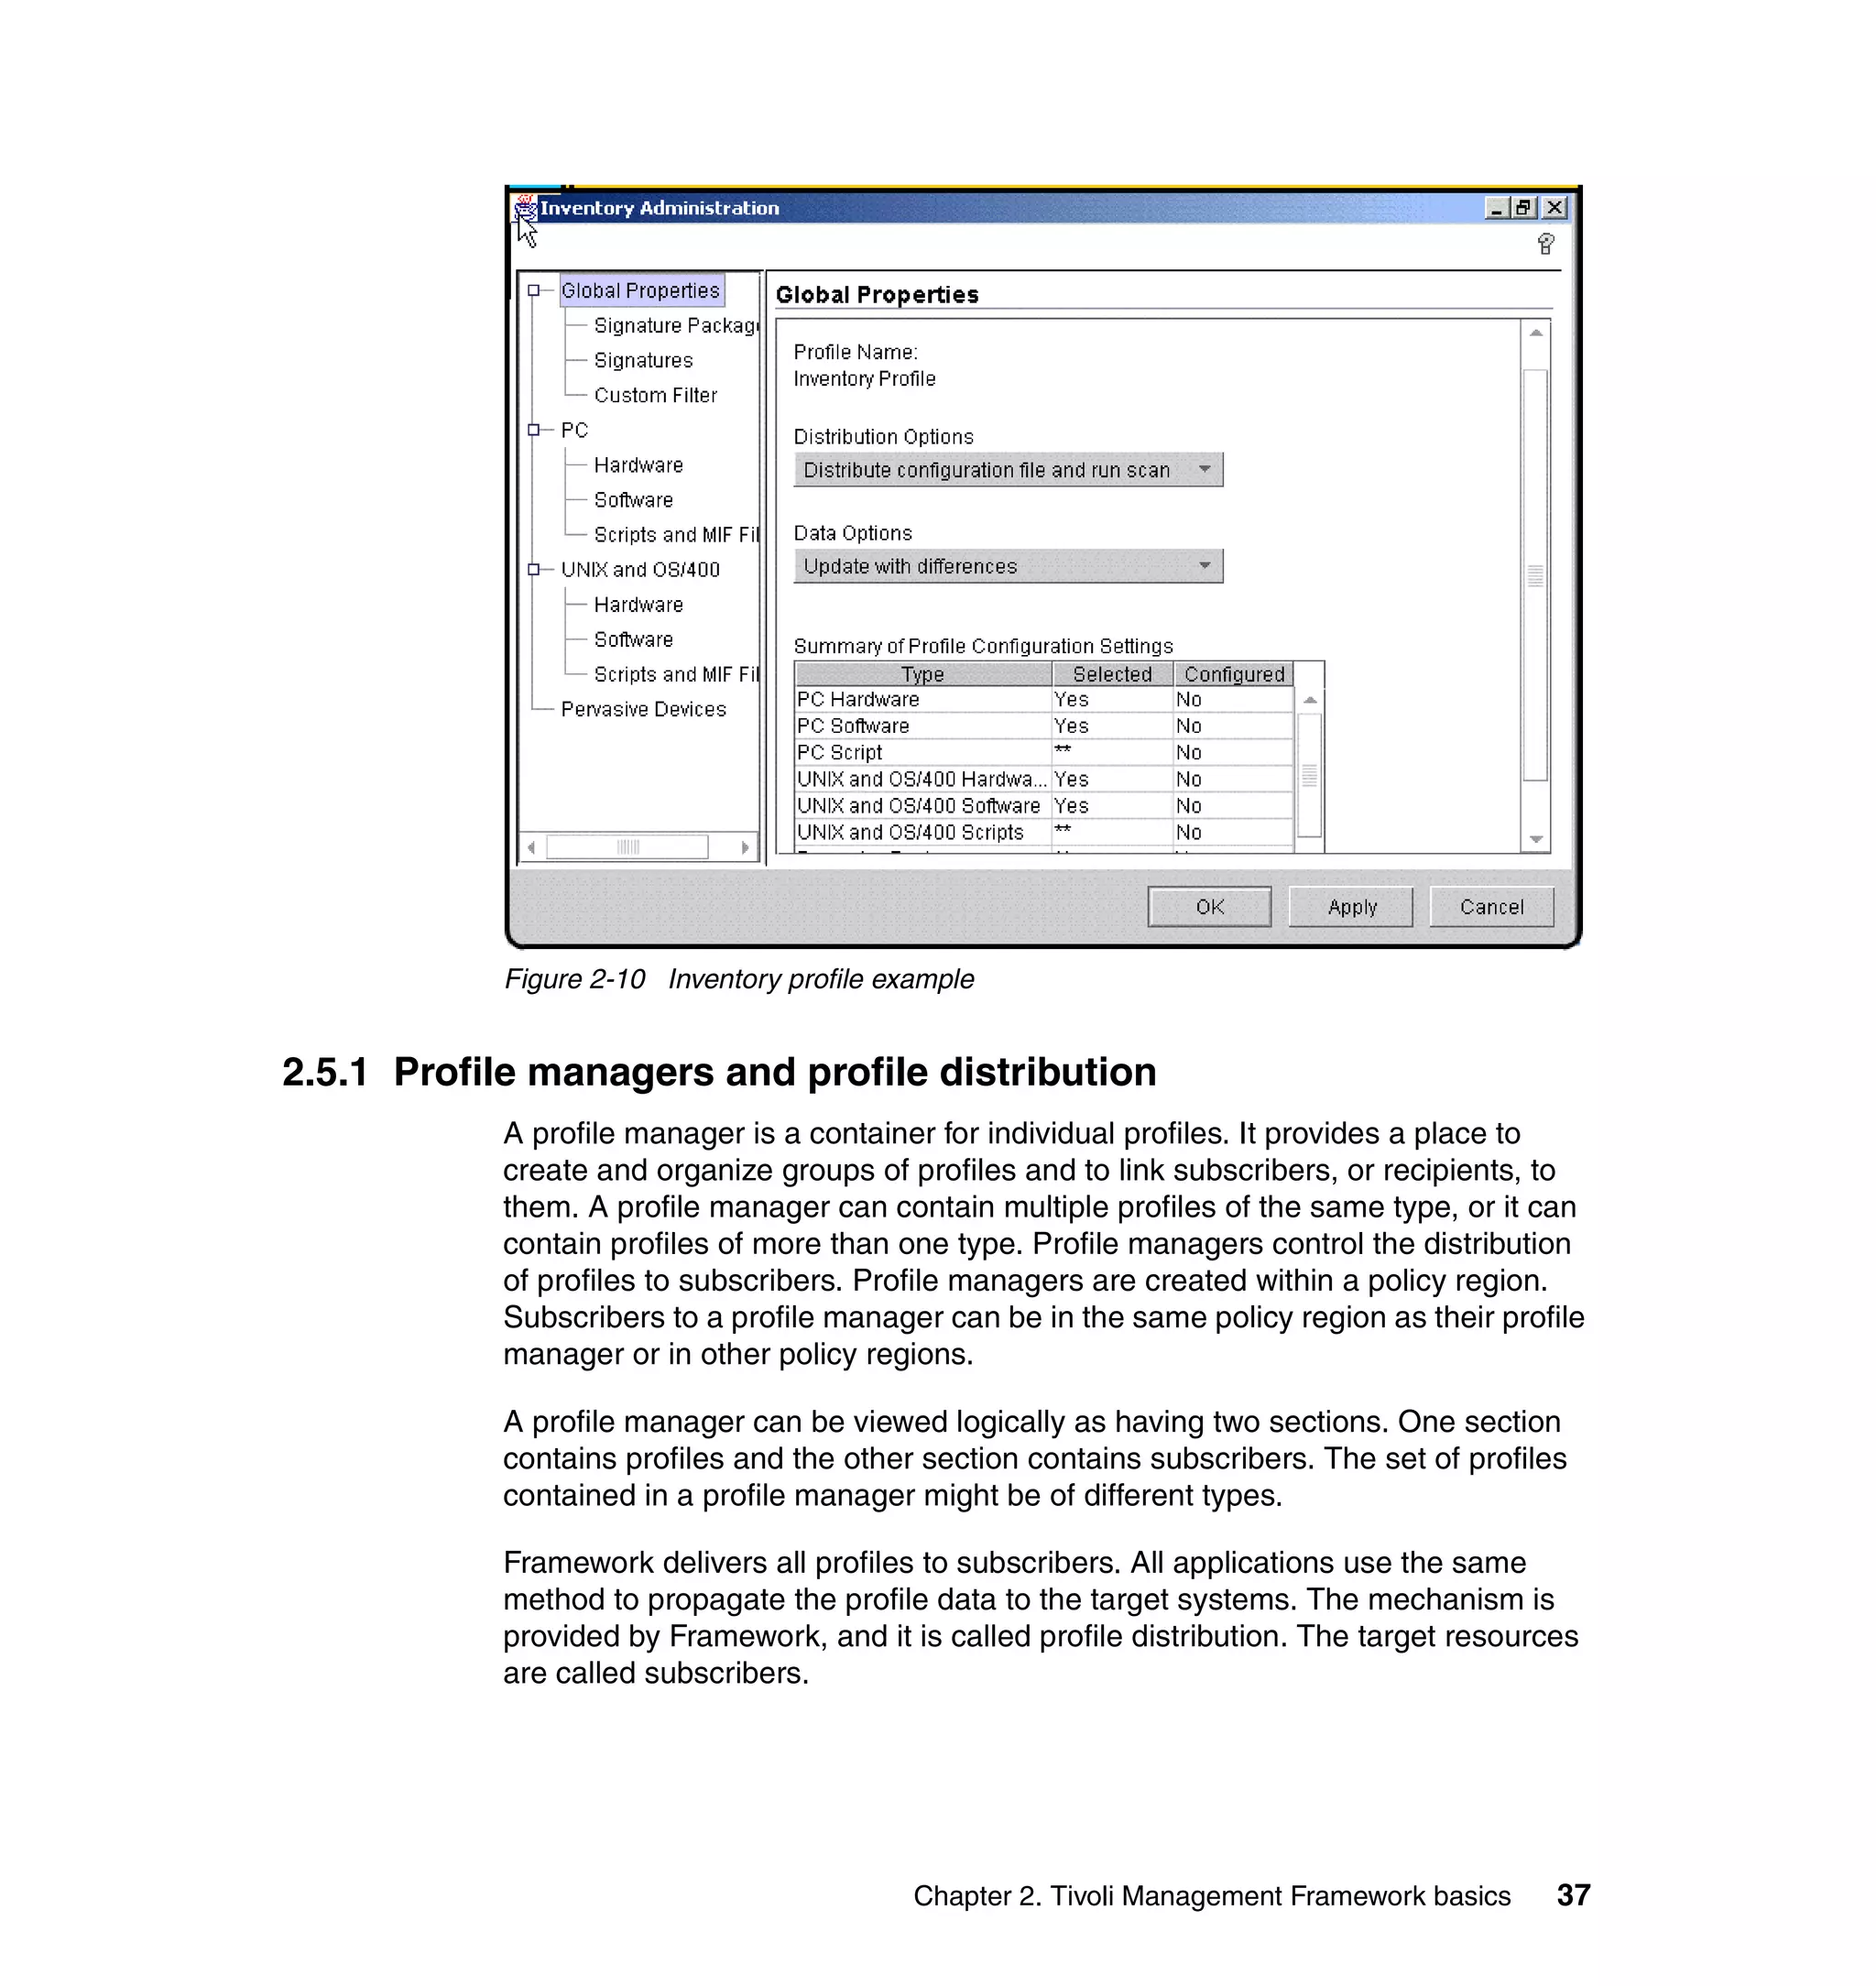
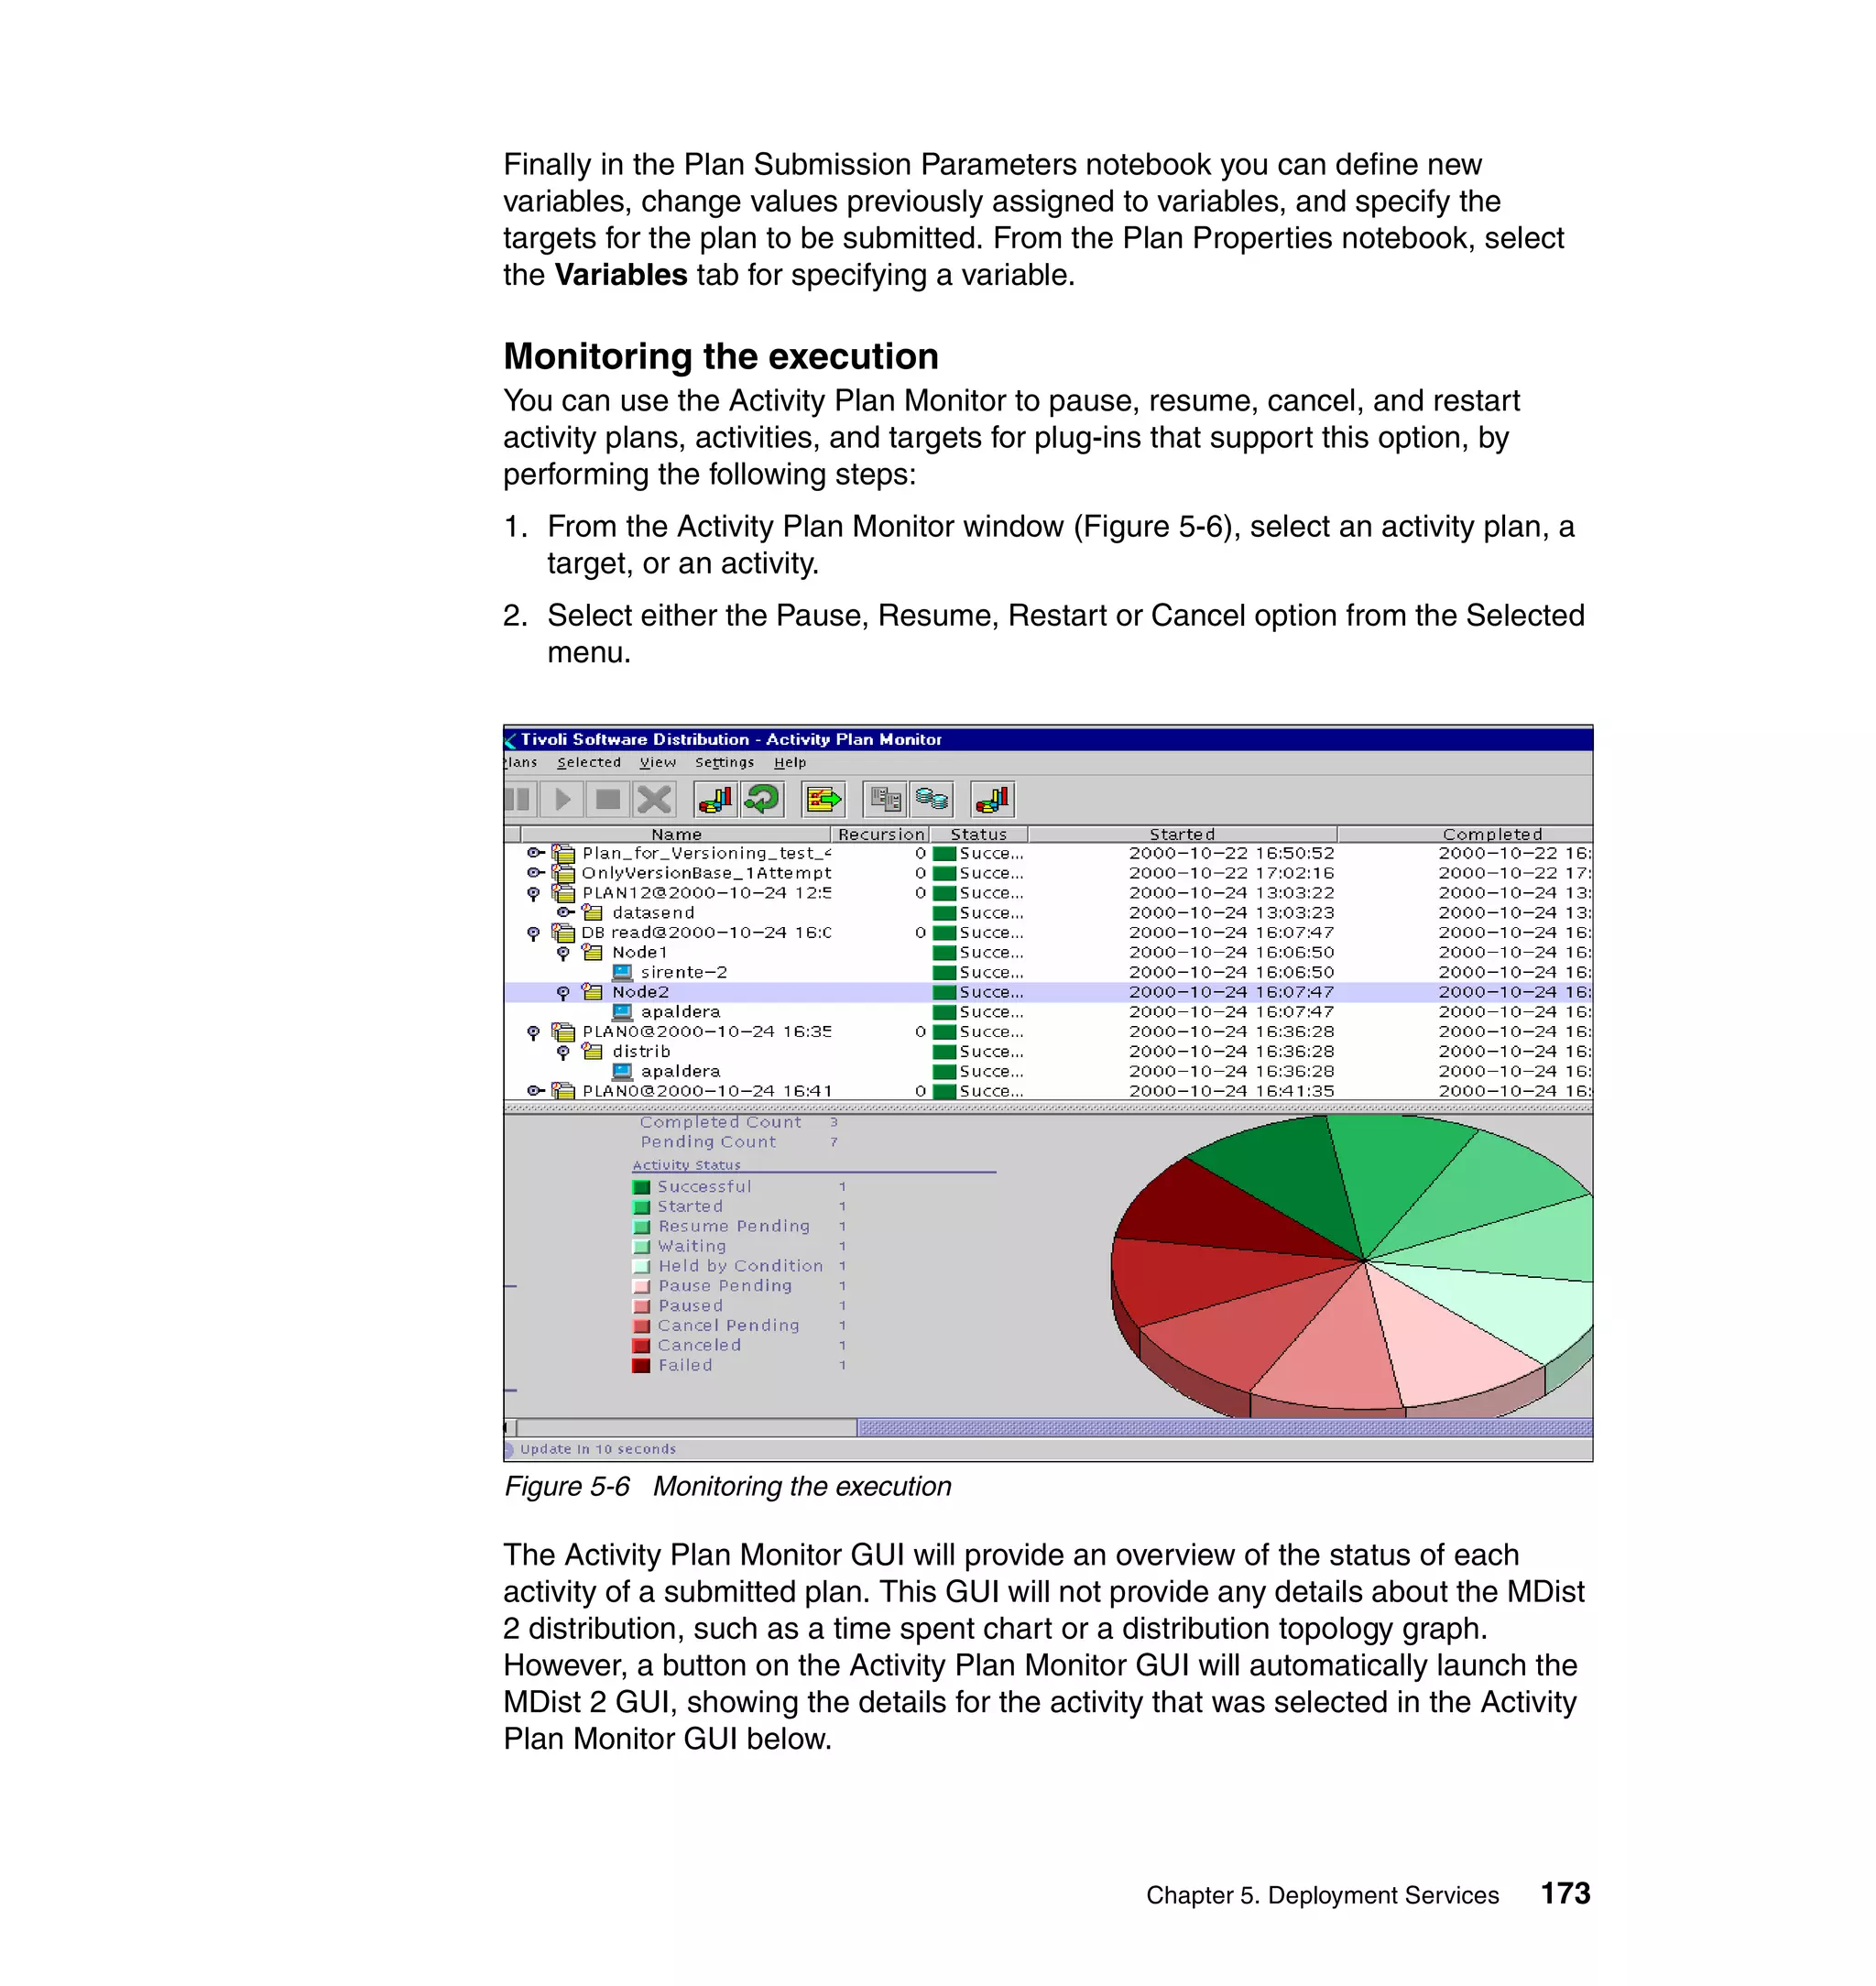
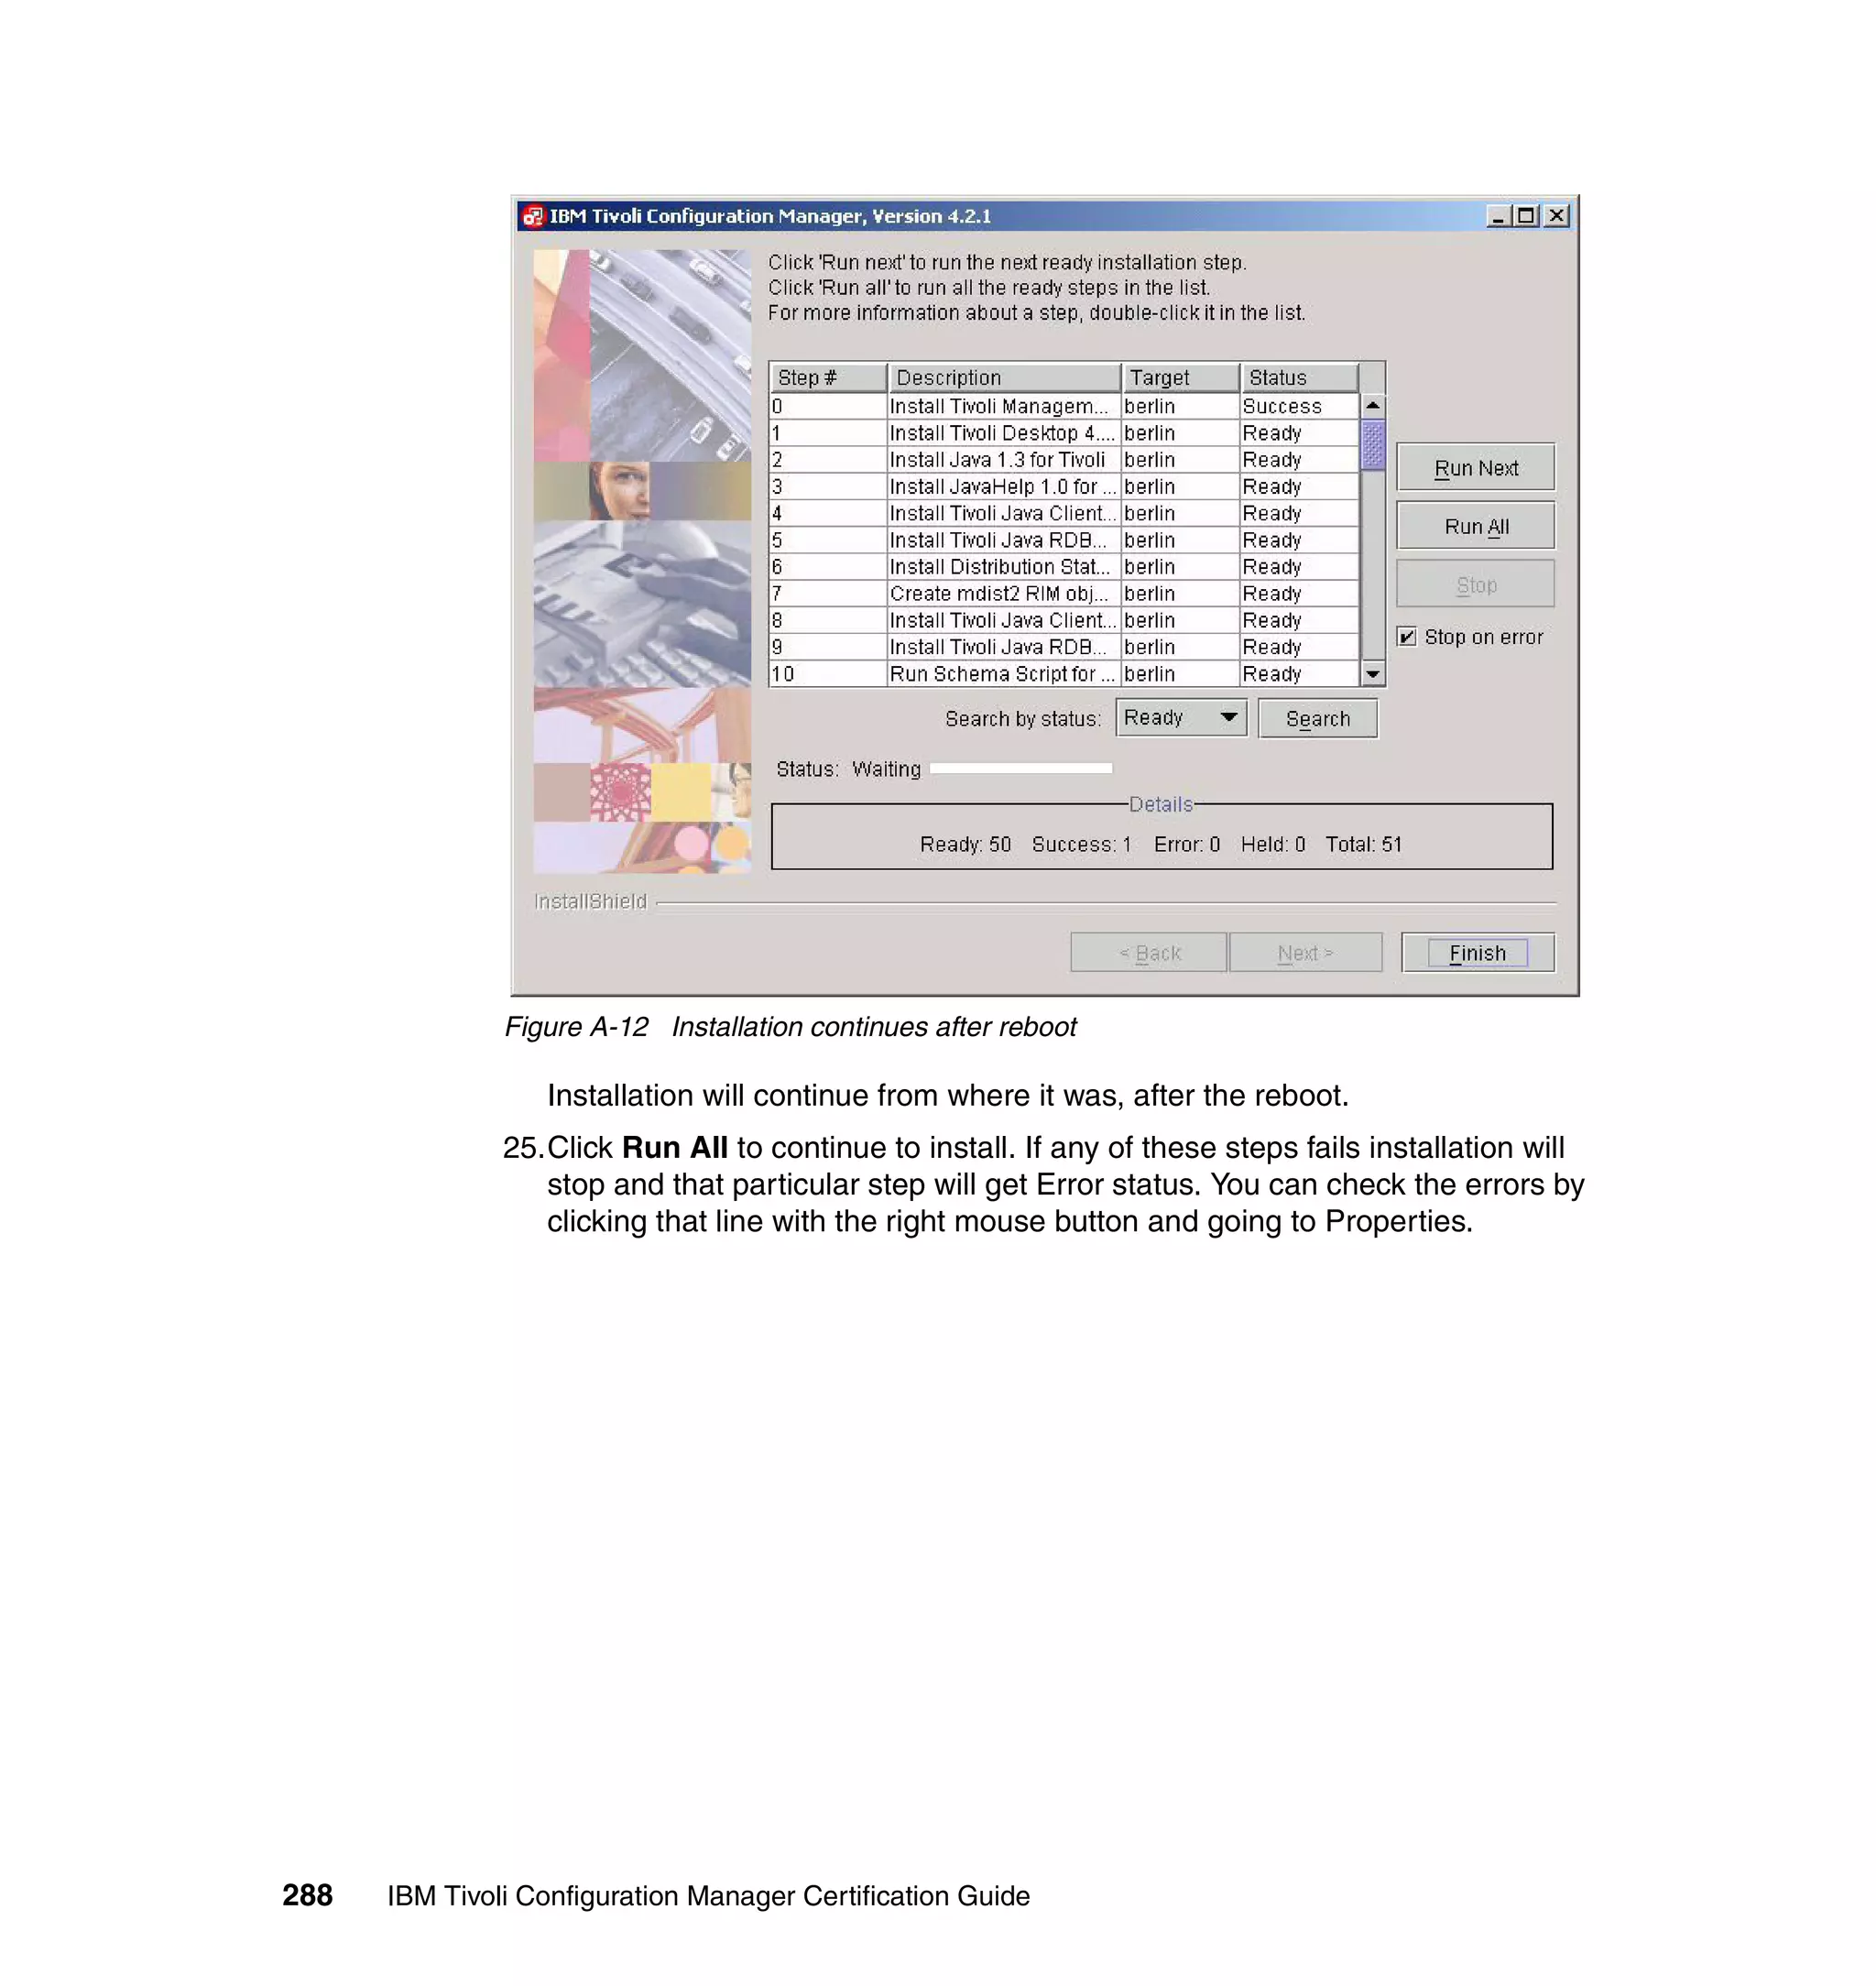
![3. Gateway port [default=9494]: Specify the TCP/IP port number of the gateway
on which it will listen for communication from the endpoint proxy as if it were
the endpoint. This is normally port 9494. Do not change this value unless the
gateway is known to be using a different listening port with the endpoint.
4. Endpoint proxy port: Specify the port number of the endpoint proxy machine
from which it listens for connections with the relay or gateway proxy.
Installing a UNIX gateway proxy
To install the gateway proxy, follow these steps:
1. From the GatewayProxy directory, go to the directory for the platform on
which the proxy will run.
2. Run the ./install.sh script.
3. Port to listen on for TMA traffic [default=9494]: Enter the port number on the
gateway proxy that represents the gateway to the endpoints. The default is
9494.
4. Gateway proxy port: Specify the port number that the gateway proxy uses to
listen for connections from the relay or endpoint proxy.
Installing a UNIX relay
To install the relay, follow these steps:
1. From the Relay directory, go to the directory for the platform on which the
relay will run.
2. Run the ./install.sh script.
Installing a UNIX event sink
To install the event sink, follow these steps:
1. From the EventSink directory, go to the directory for the platform on which
the proxy will run.
2. Run the ./install.sh script.
3. Listening Port [default=9444]: Enter the port number on the endpoint where
the event sink will receive events.
2.10.2 Installing on Windows operating systems
Firewall Security Toolbox provides a self-extracting EXE file to install each
component on Windows operating systems.
68 Certification Study Guide for IBM Tivoli Configuration Manager 4.2](https://image.slidesharecdn.com/certificationstudyguideforibmtivoliconfigurationmanager4-2redp3946-120522221807-phpapp01/75/Certification-study-guide-for-ibm-tivoli-configuration-manager-4-2-redp3946-86-2048.jpg)


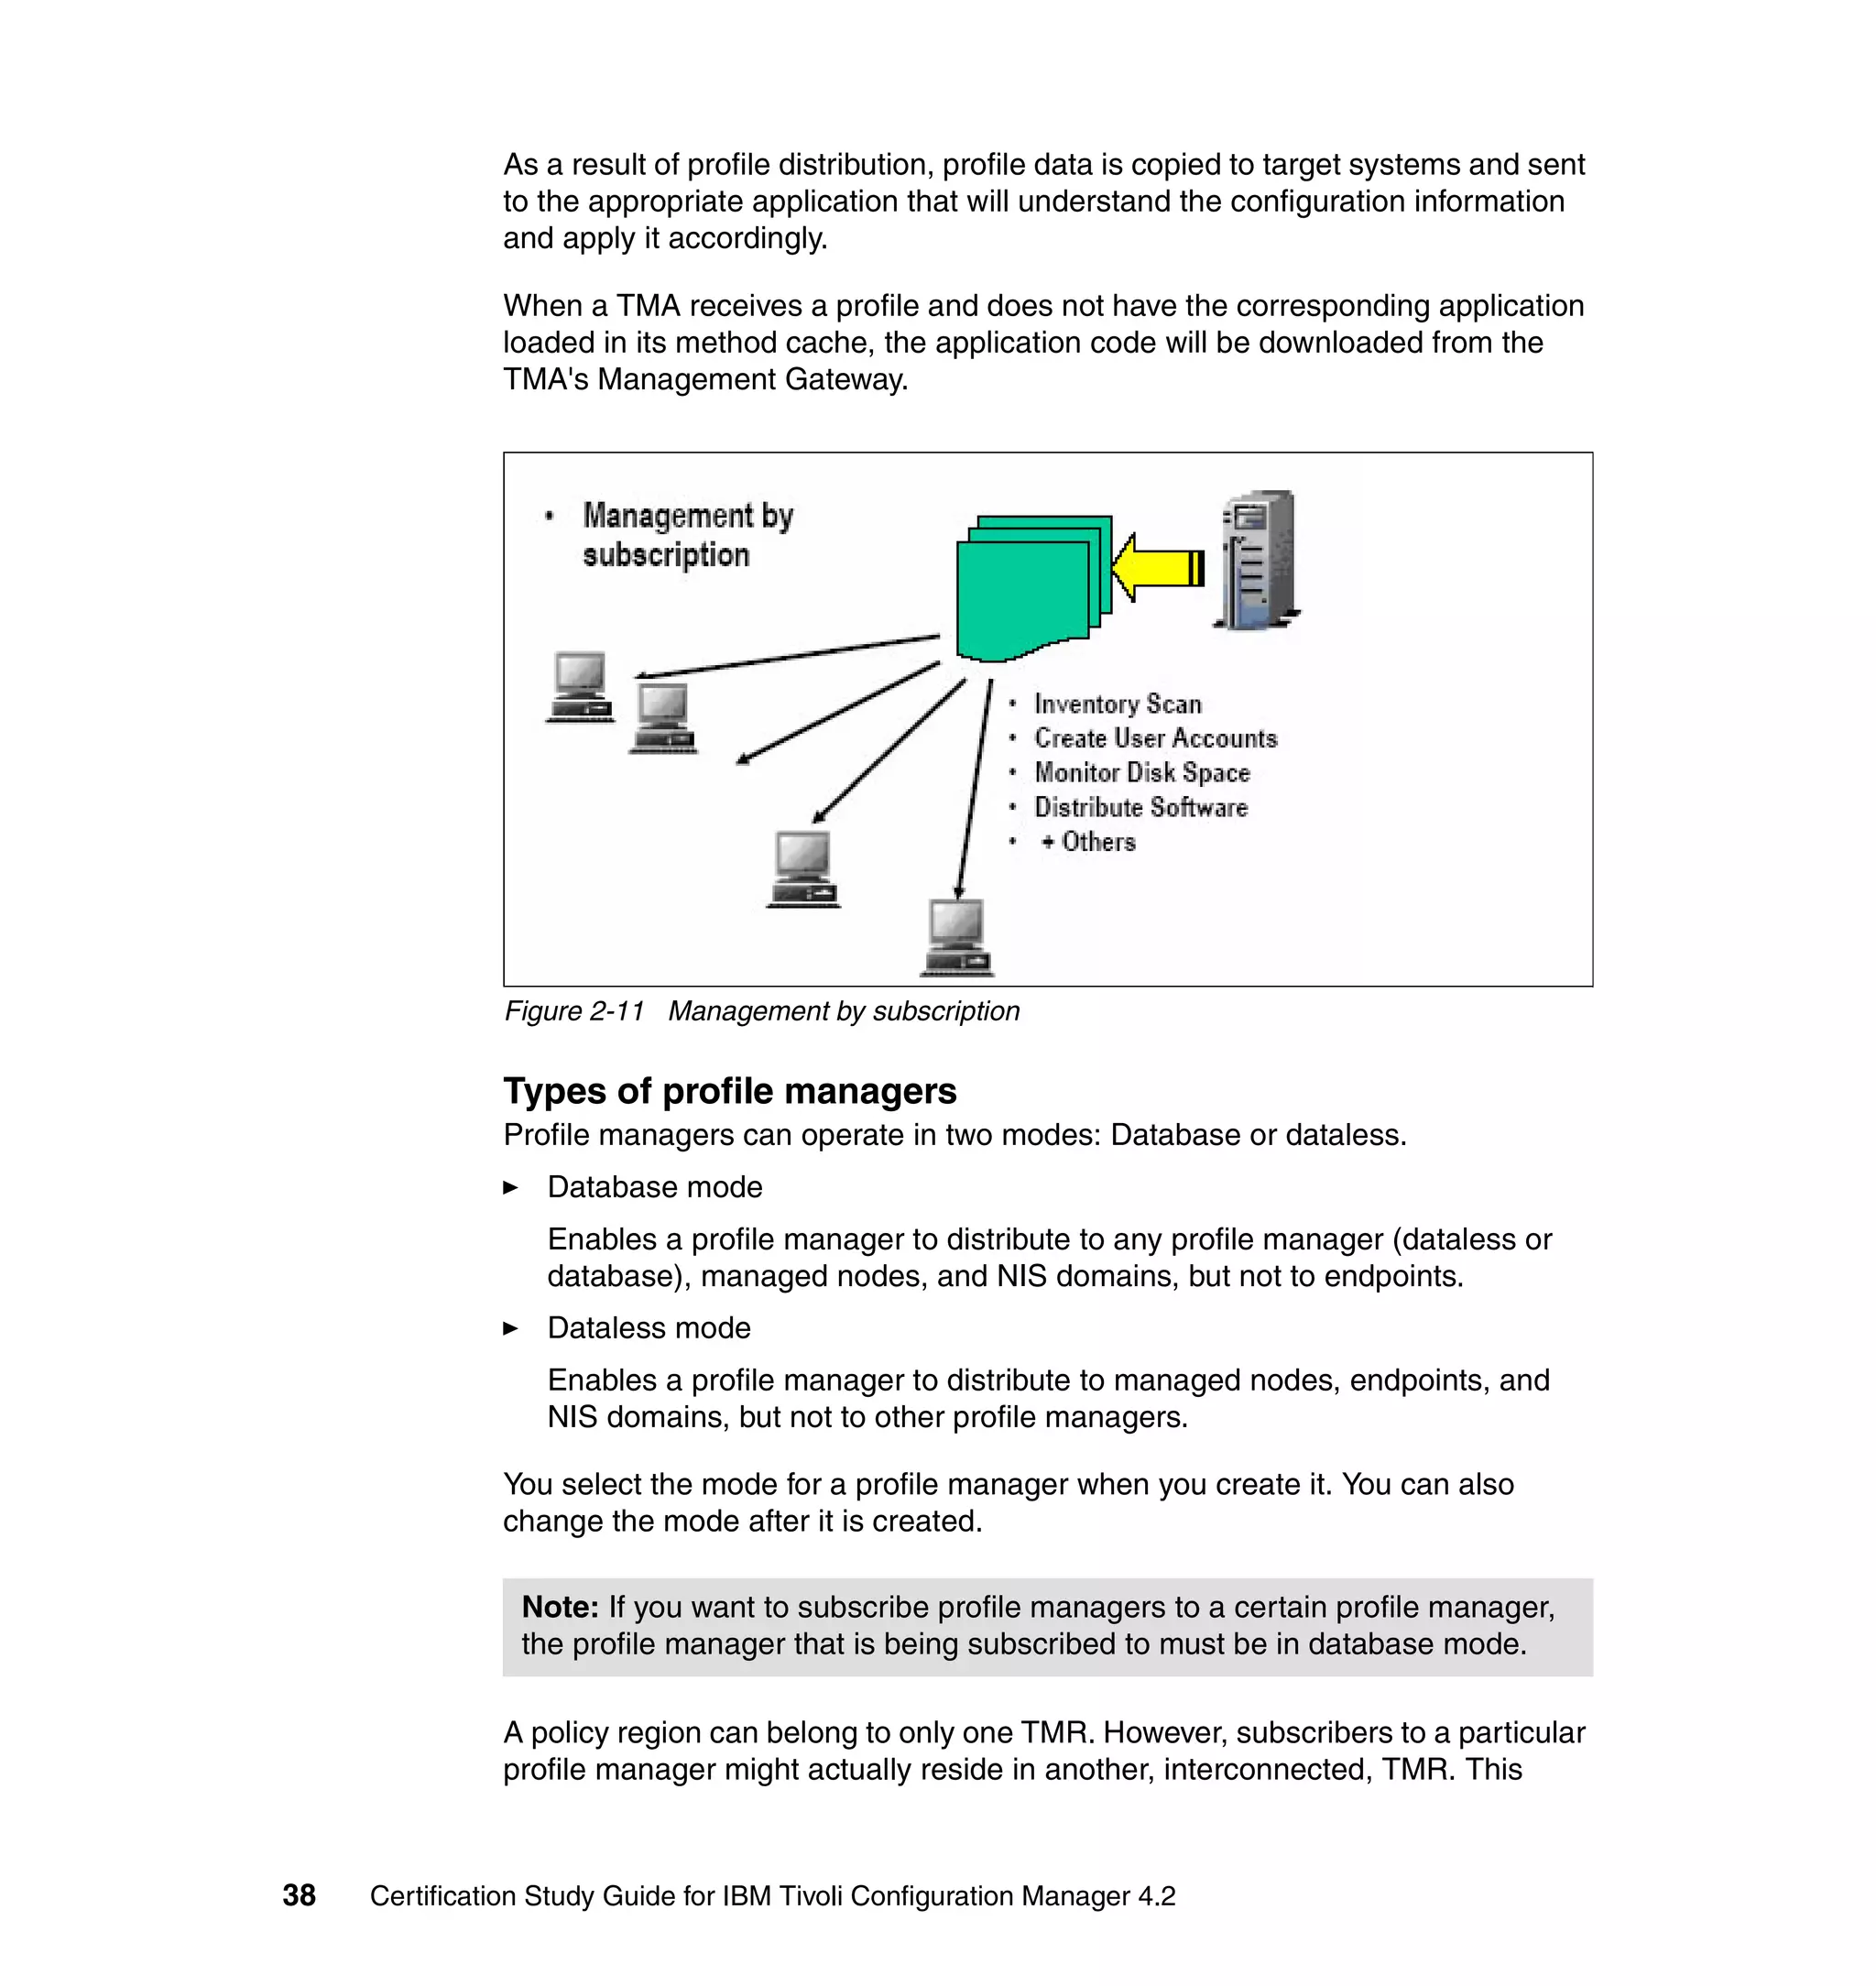
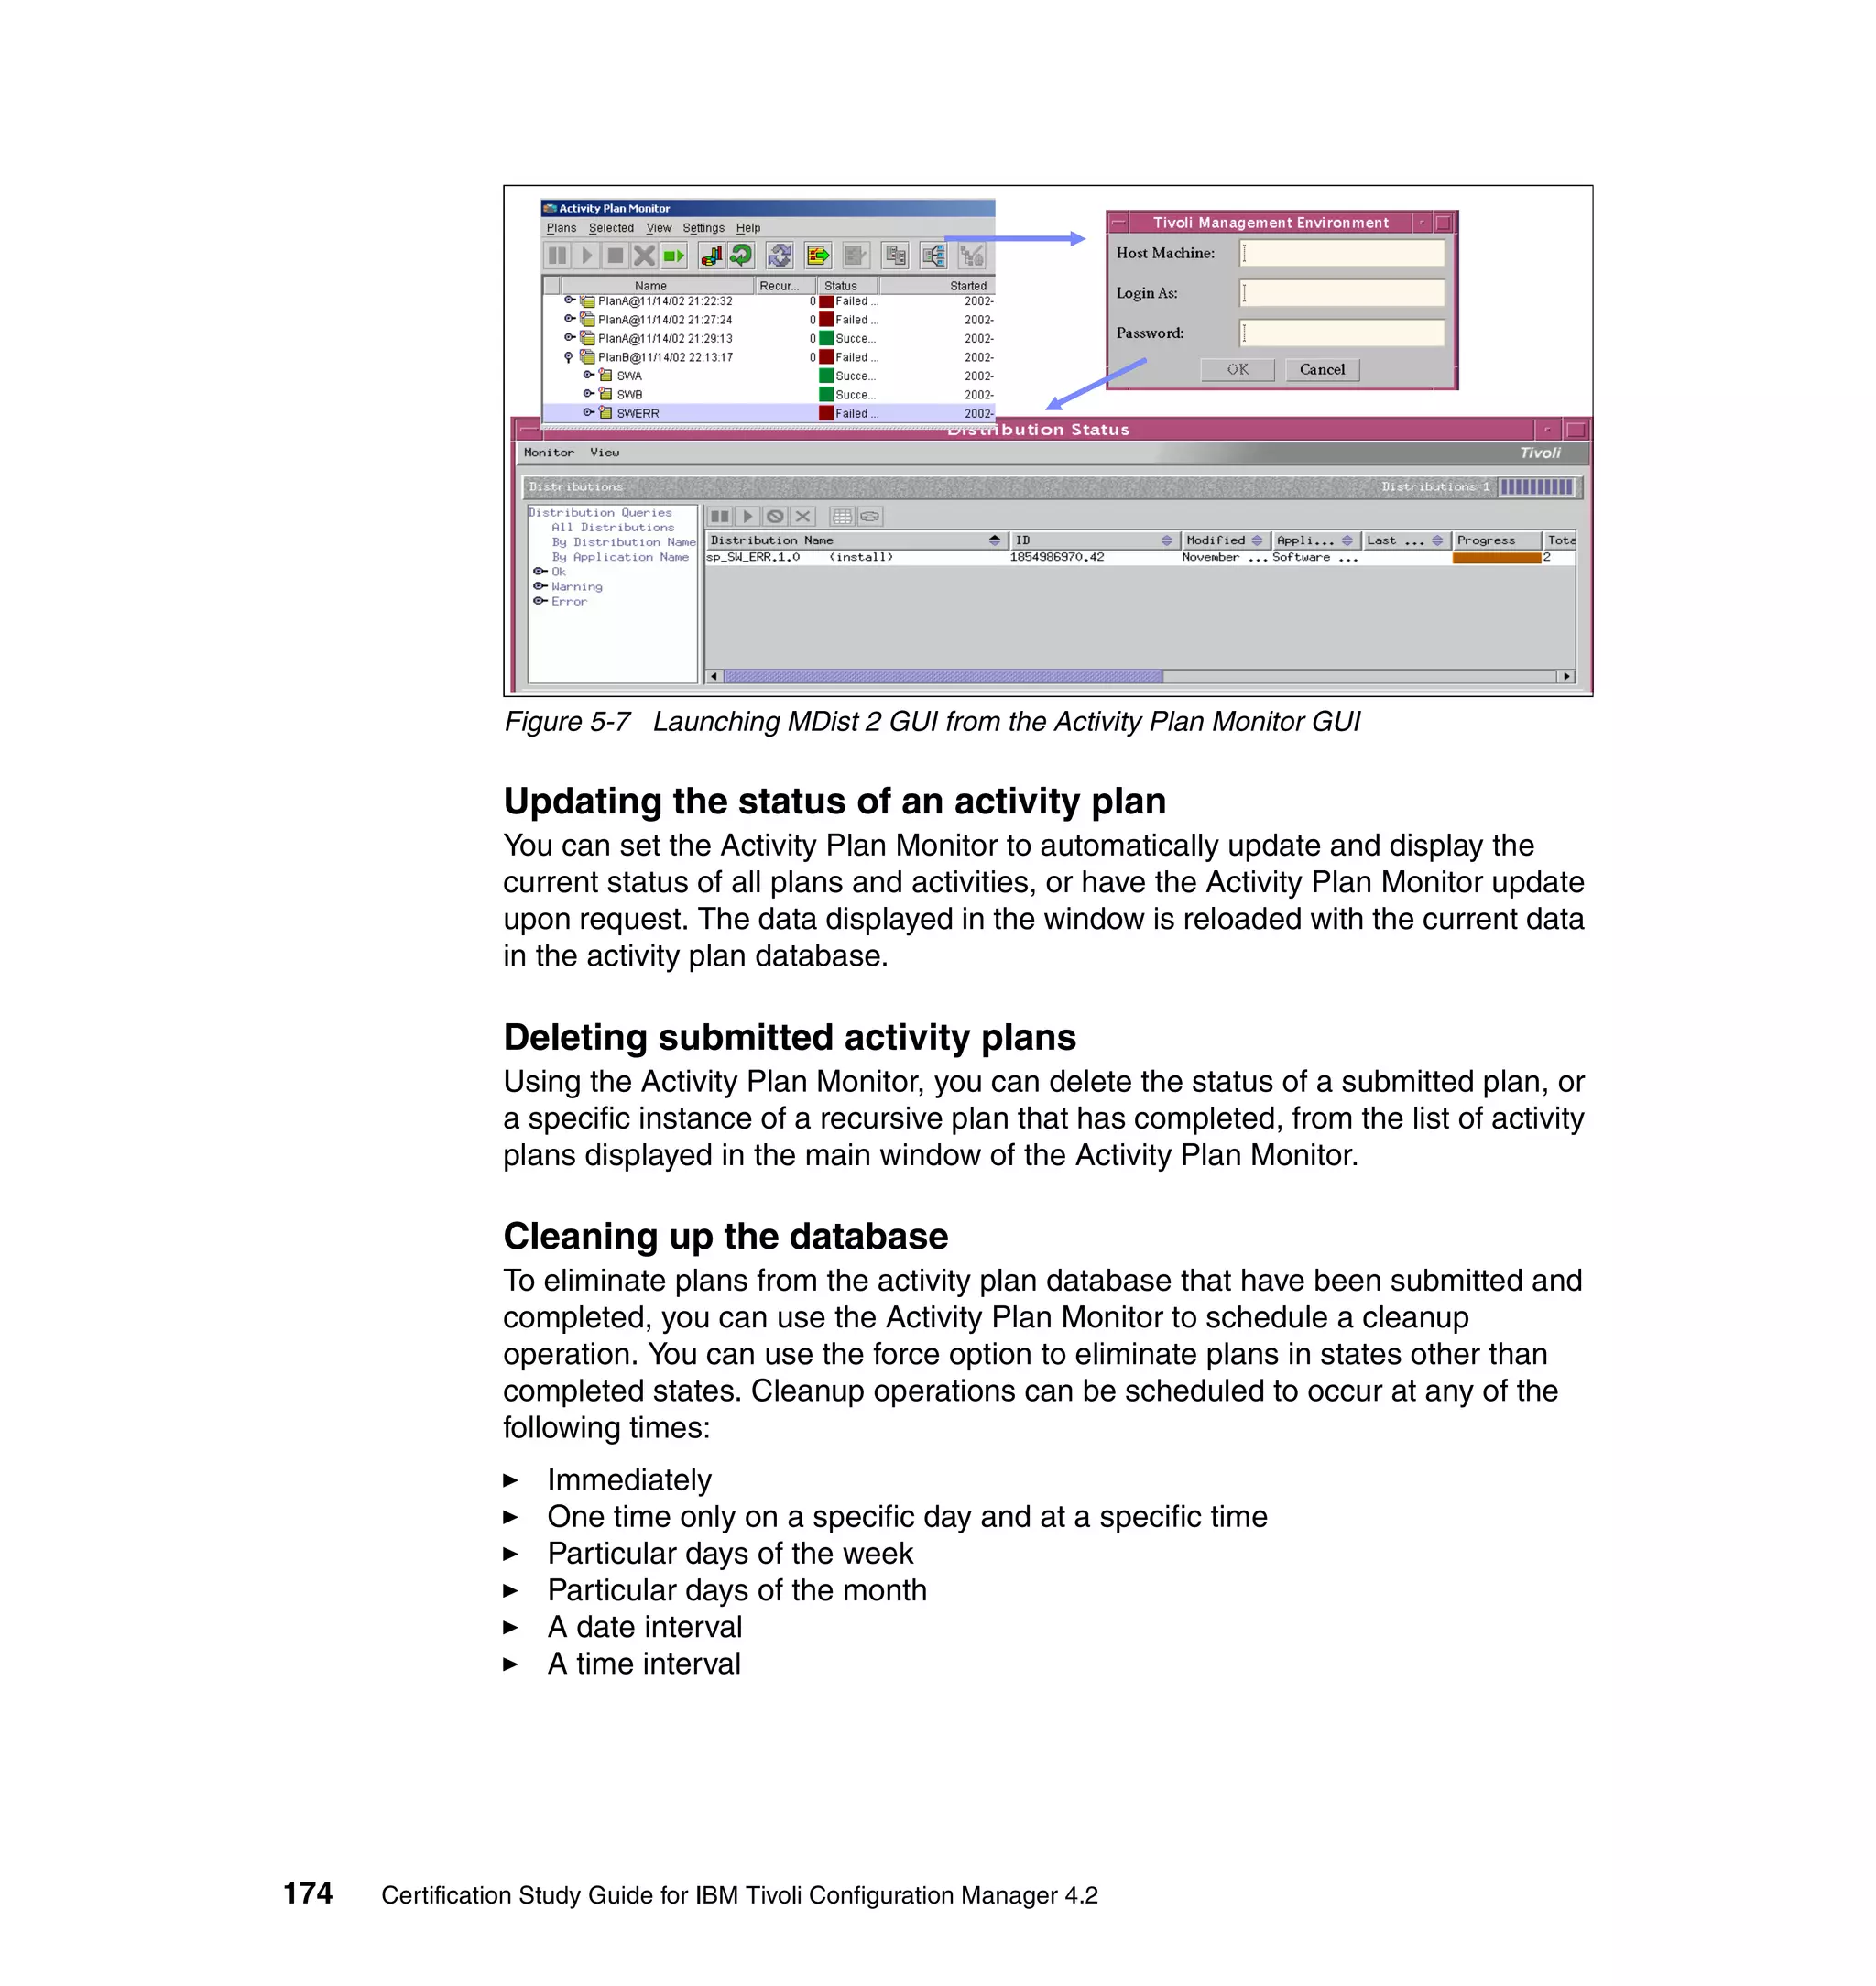
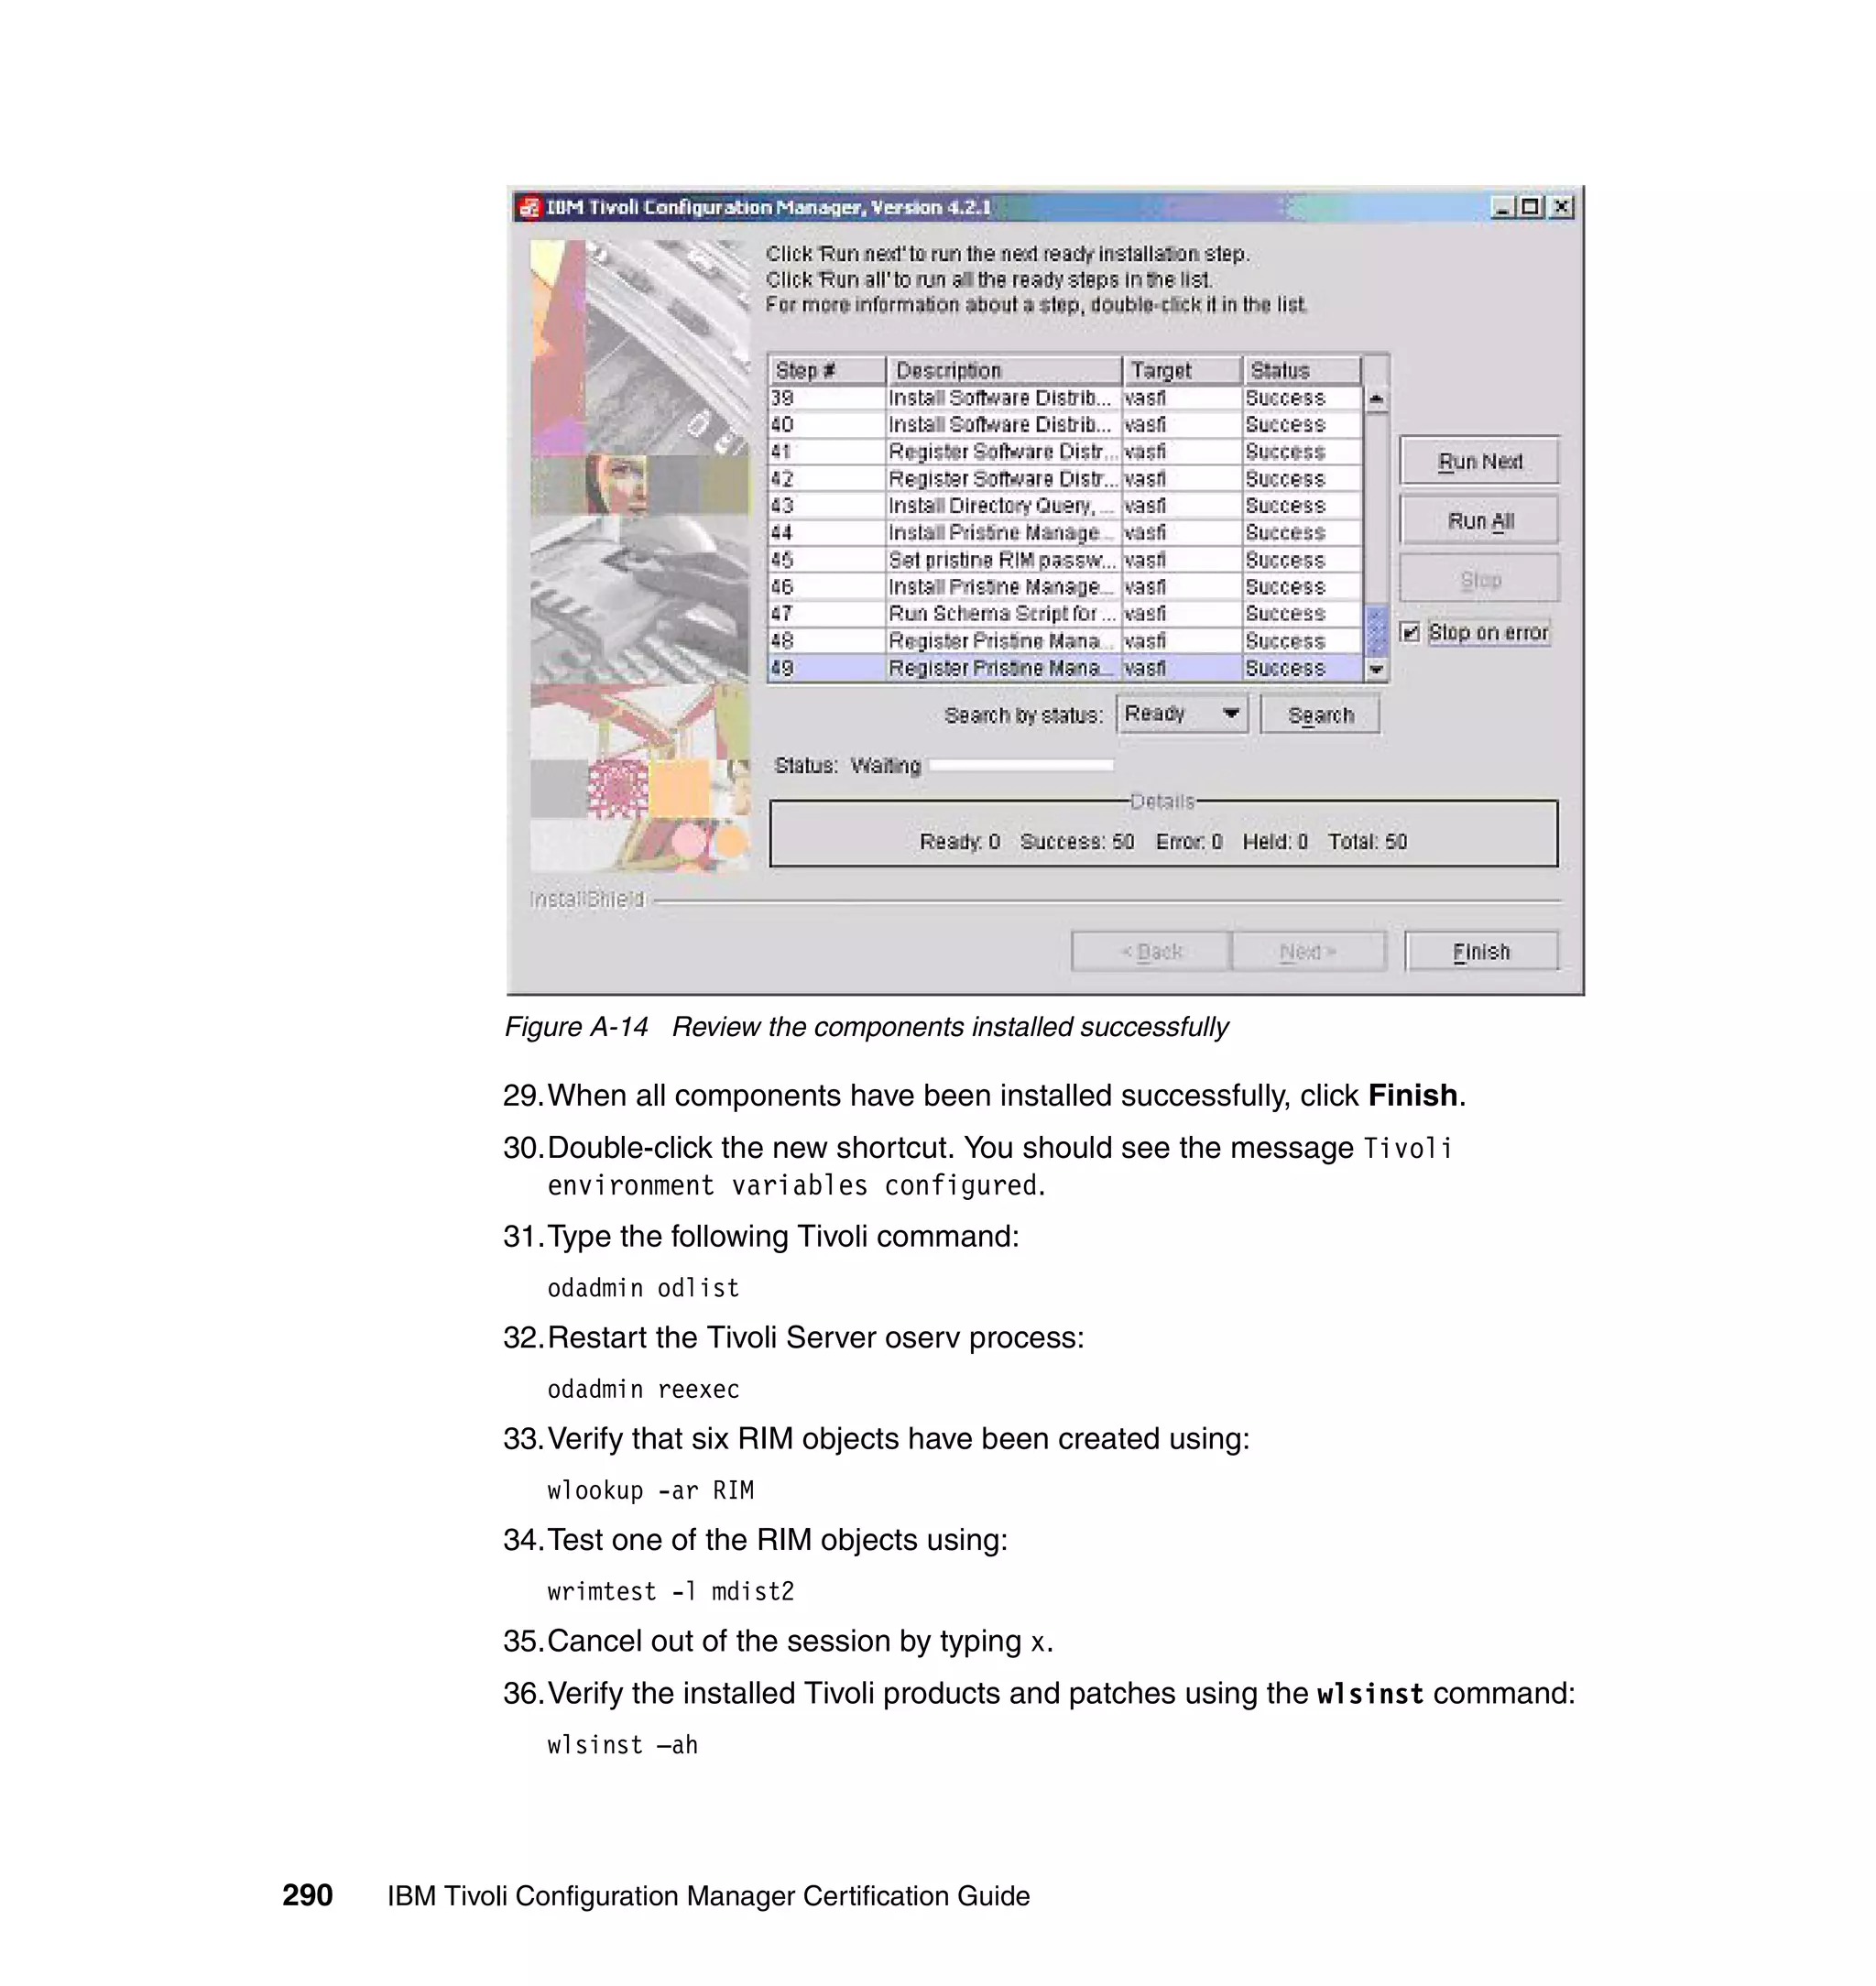
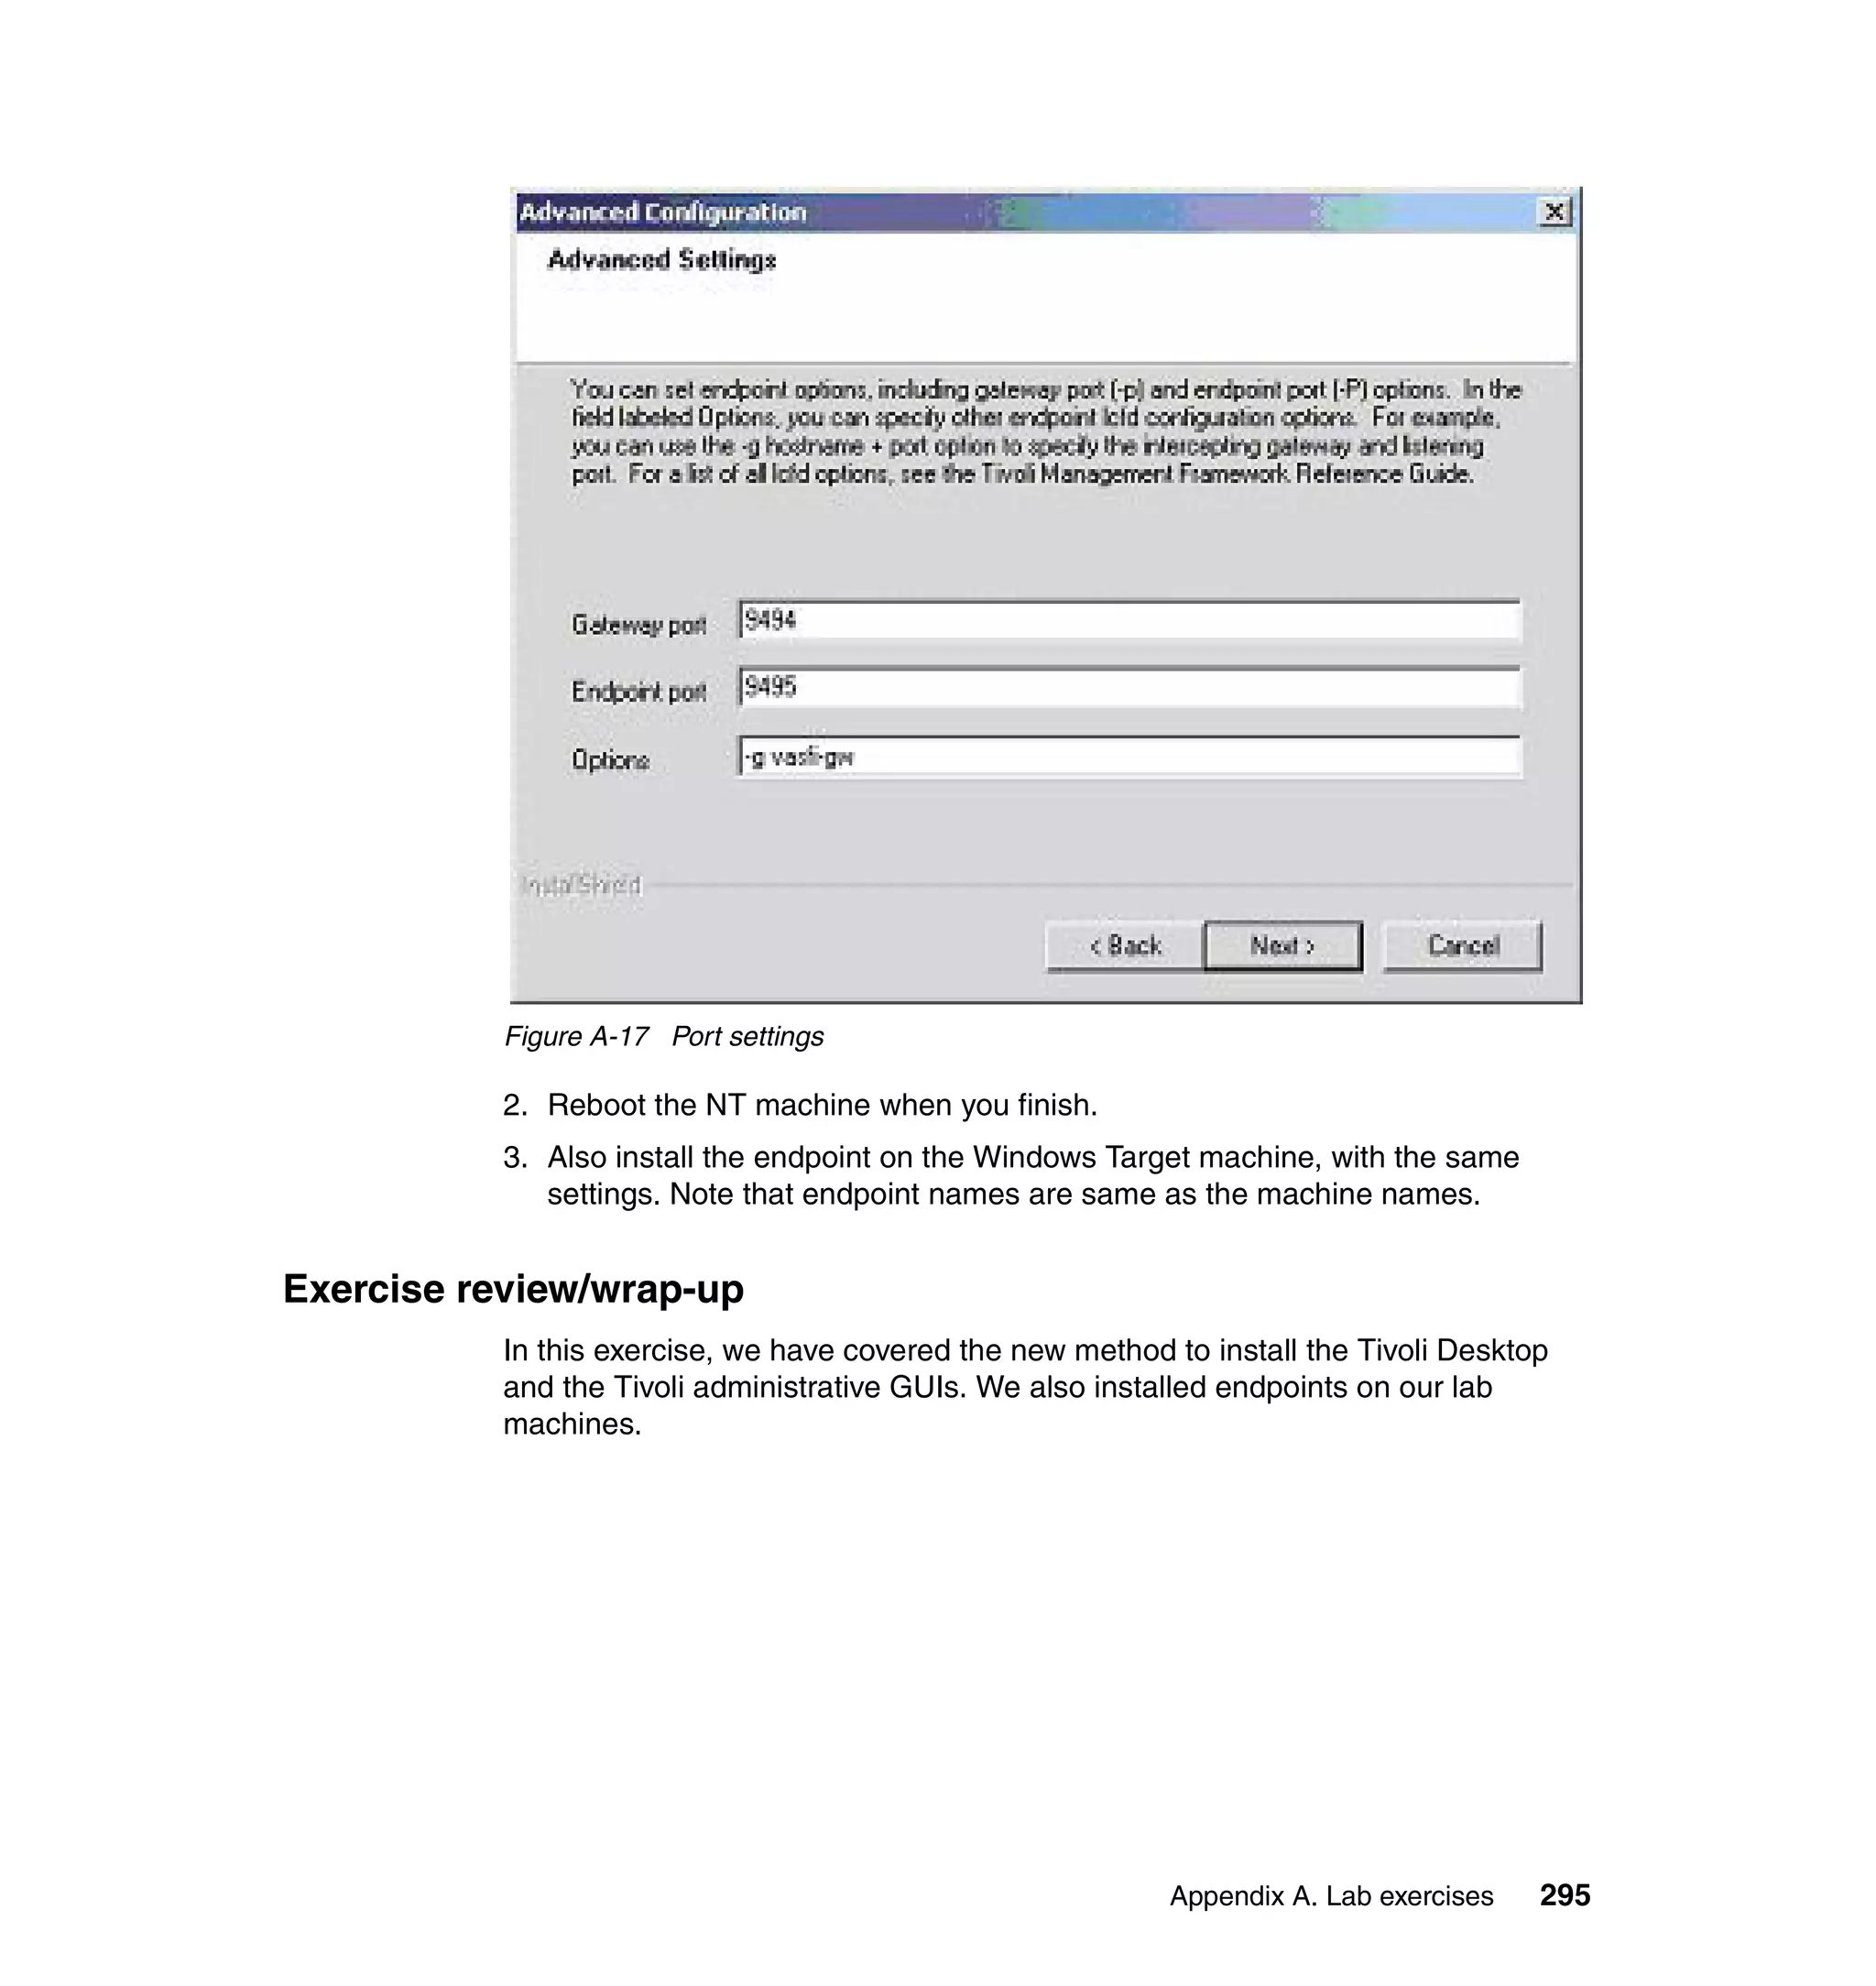
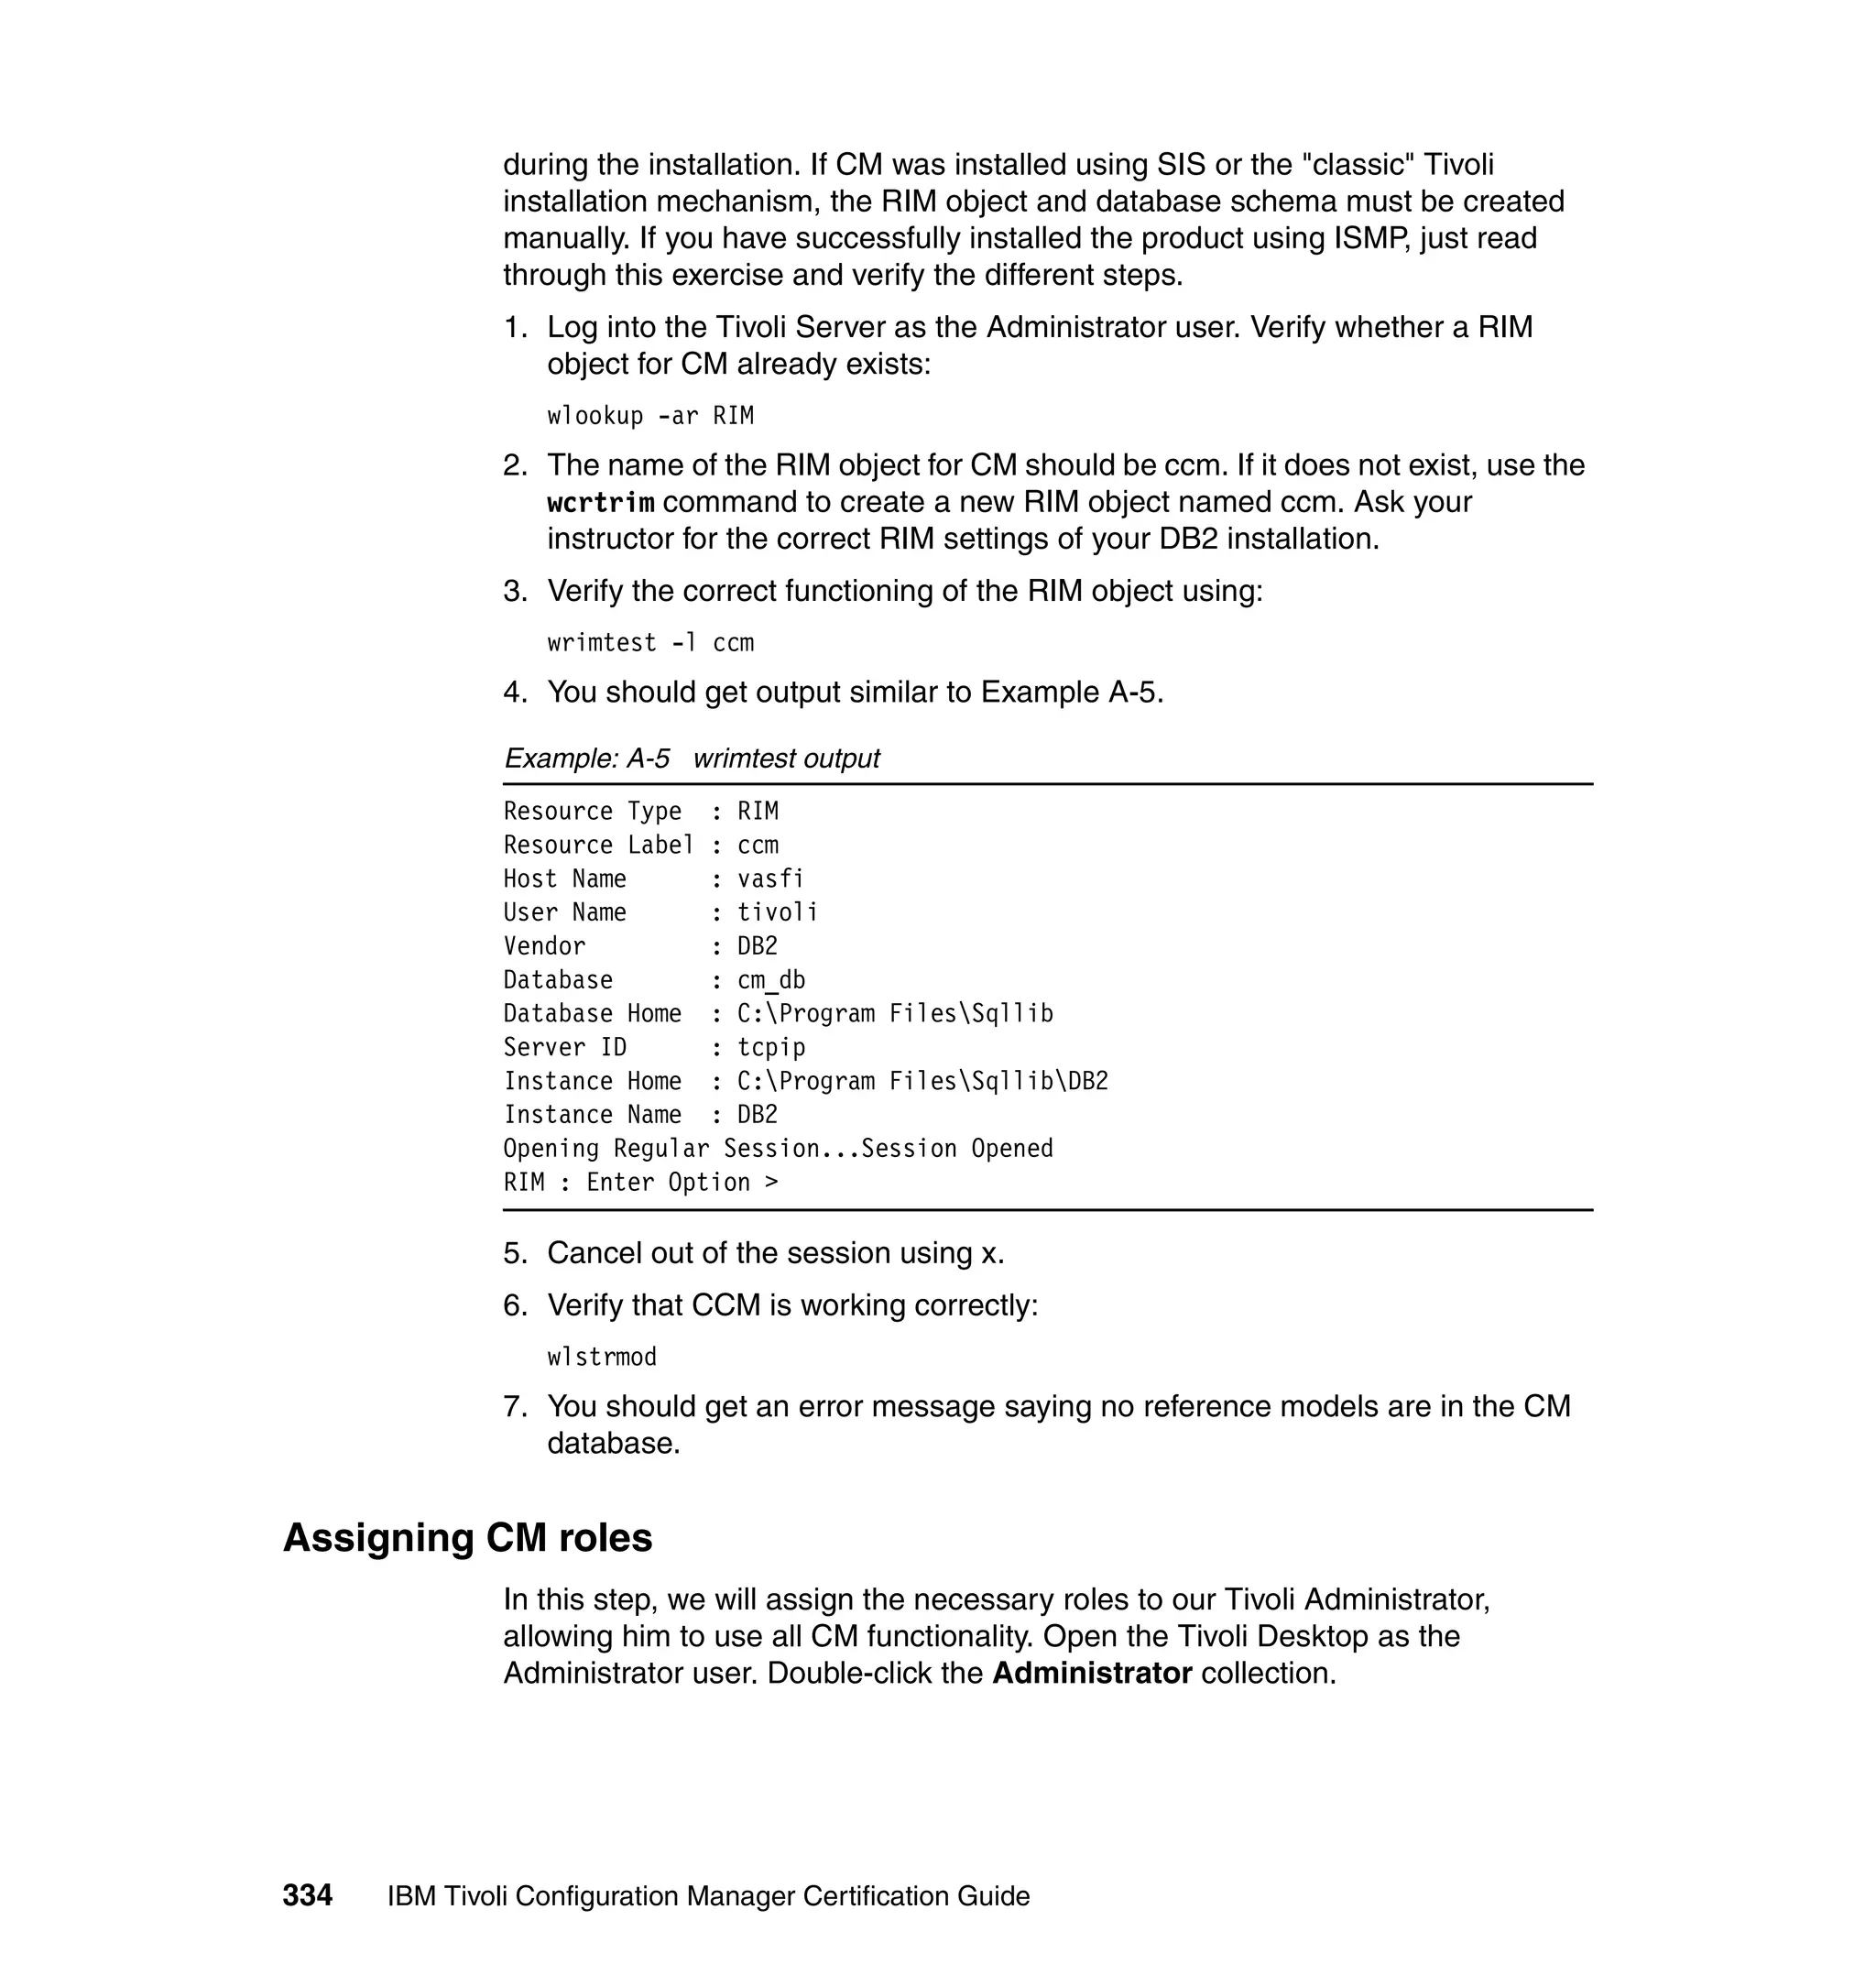
![Although RIM objects are created during installation, you can create additional
RIM objects using the wcrtrim command, or by moving a RIM object from one
managed node to another using the wmvrim command.
You can also change the database information for a given RIM object using the
wsetrim command.
The syntax for the wsetrim command is given below:
wsetrim [–n name] [–d database] [–u user] [–H db_home] [–s server_id] [–I
instance_home] [–t instance_name] [–a application_label] [–m max_connections]
rim_name
Where:
–a application_label changes the application label for the RIM object.
–d database changes the name of the database or data source to which the
RIM object connects.
–H db_home changes the path to the database home directory.
–I instance_home (for DB2 only) changes the path to the DB2 instance for the
specified RIM object.
–m max_connections changes the maximum number of connections between
the RIM object and the RDBMS.
–n name changes the name of the RIM object to name.
–s server_id changes the server ID for the database
–t instance_name (for DB2 only) changes the name of the DB2 instance for
the specified RIM object.
–u user changes the name of the database user that the RIM object uses.
To change the vendor for a RIM object, you must delete the object using the wdel
command and re-create it using the wcrtrim command.
Note: Vendor specification specifies the vendor of the RDBMS you are using
when creating the RIM object (one entry for each RDBMS system that is
supported by the Tivoli RIM component). Valid entries are as follows:
DB2
Oracle
Sybase
Informix®
MS_SQL
Note that Microsoft® SQL is supported on Windows systems only.
90 Certification Study Guide for IBM Tivoli Configuration Manager 4.2](https://image.slidesharecdn.com/certificationstudyguideforibmtivoliconfigurationmanager4-2redp3946-120522221807-phpapp01/75/Certification-study-guide-for-ibm-tivoli-configuration-manager-4-2-redp3946-108-2048.jpg)
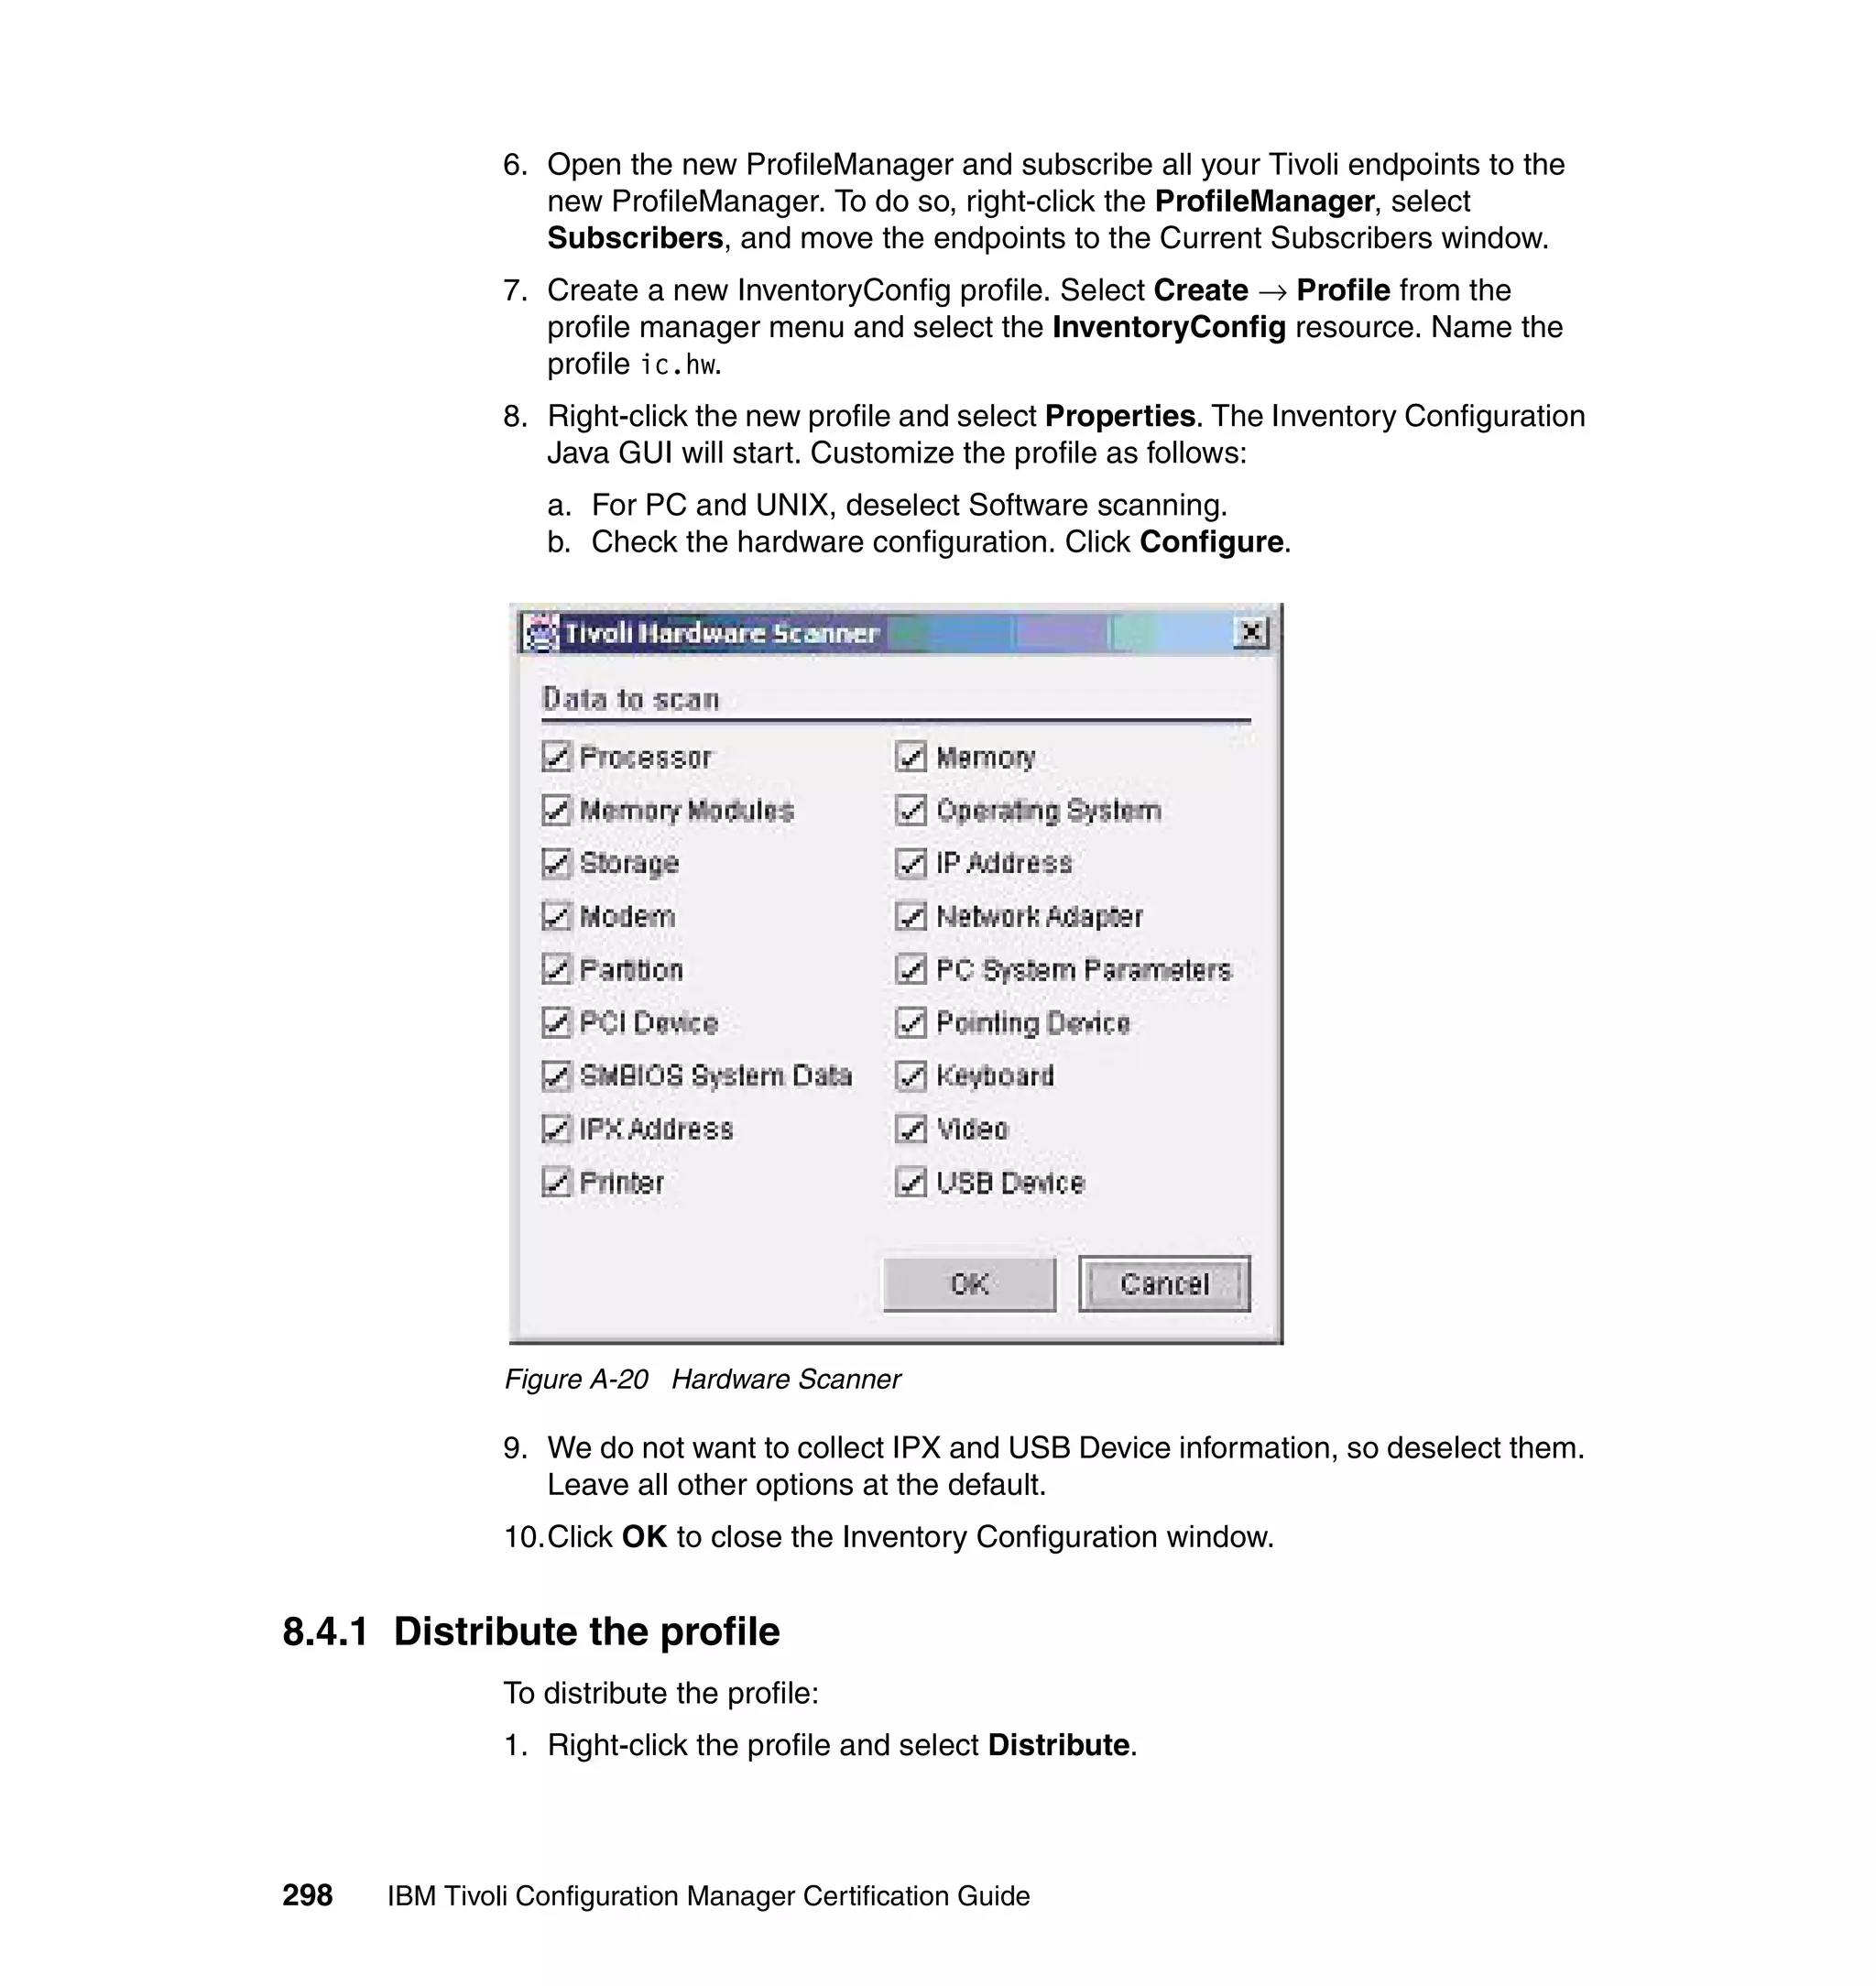
![Note: If the correct version of Java is not installed, the following message
appears at the beginning of the install:
#java -Dis.external.home=/img/cd5/FRESH -jar setup.jar -jar : illegal
argument
Usage: java [-options] class
Windows
From the /FRESH subdirectory of the IBM Tivoli Configuration Manager
Installation CD5, run the Setup.exe file.
3.11 Desktop Install
With IBM Tivoli Configuration Manager 4.2 you can now make a Tivoli endpoint a
fully operational Tivoli Console on the following Windows systems:
Windows 2000
Windows XP
Windows Server 2003
The following components are installed on a Windows PC via Desktop Install:
Tivoli Desktop for Windows
Tivoli Java components
Distribution Status Console
Activity Planner GUI
Change Manager GUI
Inventory GUI
Software Package Editor
During the Desktop InstalI, ISMP synchronously runs the following activities
behind the scenes:
Install Desktop for Windows.
Temporary unpack Software Distribution disconnected commands (SPB).
Install a prerequisite SPB for environment setup.
Install all Java mandatory prerequisites.
Install selected applications.
Clean up the environment.
Chapter 3. Tivoli Configuration Manager fundamentals and installation 97](https://image.slidesharecdn.com/certificationstudyguideforibmtivoliconfigurationmanager4-2redp3946-120522221807-phpapp01/75/Certification-study-guide-for-ibm-tivoli-configuration-manager-4-2-redp3946-115-2048.jpg)
![– Intel: c:Program FilesTivolilcfHORecovery - Second installation
– UNIX: /opt/Tivoli/lcfHO
– UNIX: /opt/Tivoli/lcfHORecovery
The port number must be unique for communication purposes, and not
overlap.
If your endpoint policy utilizes the ep_ipadd (5$), you must modify it
accordingly.
3.13 Uninstallation of IBM Tivoli Configuration Manager
For uninstallation of IBM Tivoli Configuration Manager you need to use the
wuninst command. The wuninst command is not specific to IBM Tivoli
Configuration Manager. It is used for all Tivoli Enterprise products. It is a wrapper
script that invokes product-specific uninstall scripts. This command removes the
component for the specified machines in your Tivoli environment or from the
entire local Tivoli region. To uninstall the component using the wuninst
command, you need to specify the component tag for that component.
The syntax for this command is as follows:
wuninst tag hostname... [-rmfiles]
Where:
tag specifies the registered product tag for the Tivoli Enterprise product to
remove.
Tip: The list of these tags can be found in the IBM Tivoli Configuration
Manager Planning and Installation Guide, GC23-4702. You can also list the
registered product tags by running wuninst -list.
hostname specifies the name of the managed node from which to remove the
product. If you specify the Tivoli server, the product is removed from all
managed nodes in the Tivoli region.
–rmfiles indicates that all product files are to be removed from specified
managed nodes. When you do not specify this option, the command removes
the database entries only. When you issue this command from the Tivoli
server and specify this option, all entries for each managed node in the Tivoli
region are removed.
100 Certification Study Guide for IBM Tivoli Configuration Manager 4.2](https://image.slidesharecdn.com/certificationstudyguideforibmtivoliconfigurationmanager4-2redp3946-120522221807-phpapp01/75/Certification-study-guide-for-ibm-tivoli-configuration-manager-4-2-redp3946-118-2048.jpg)

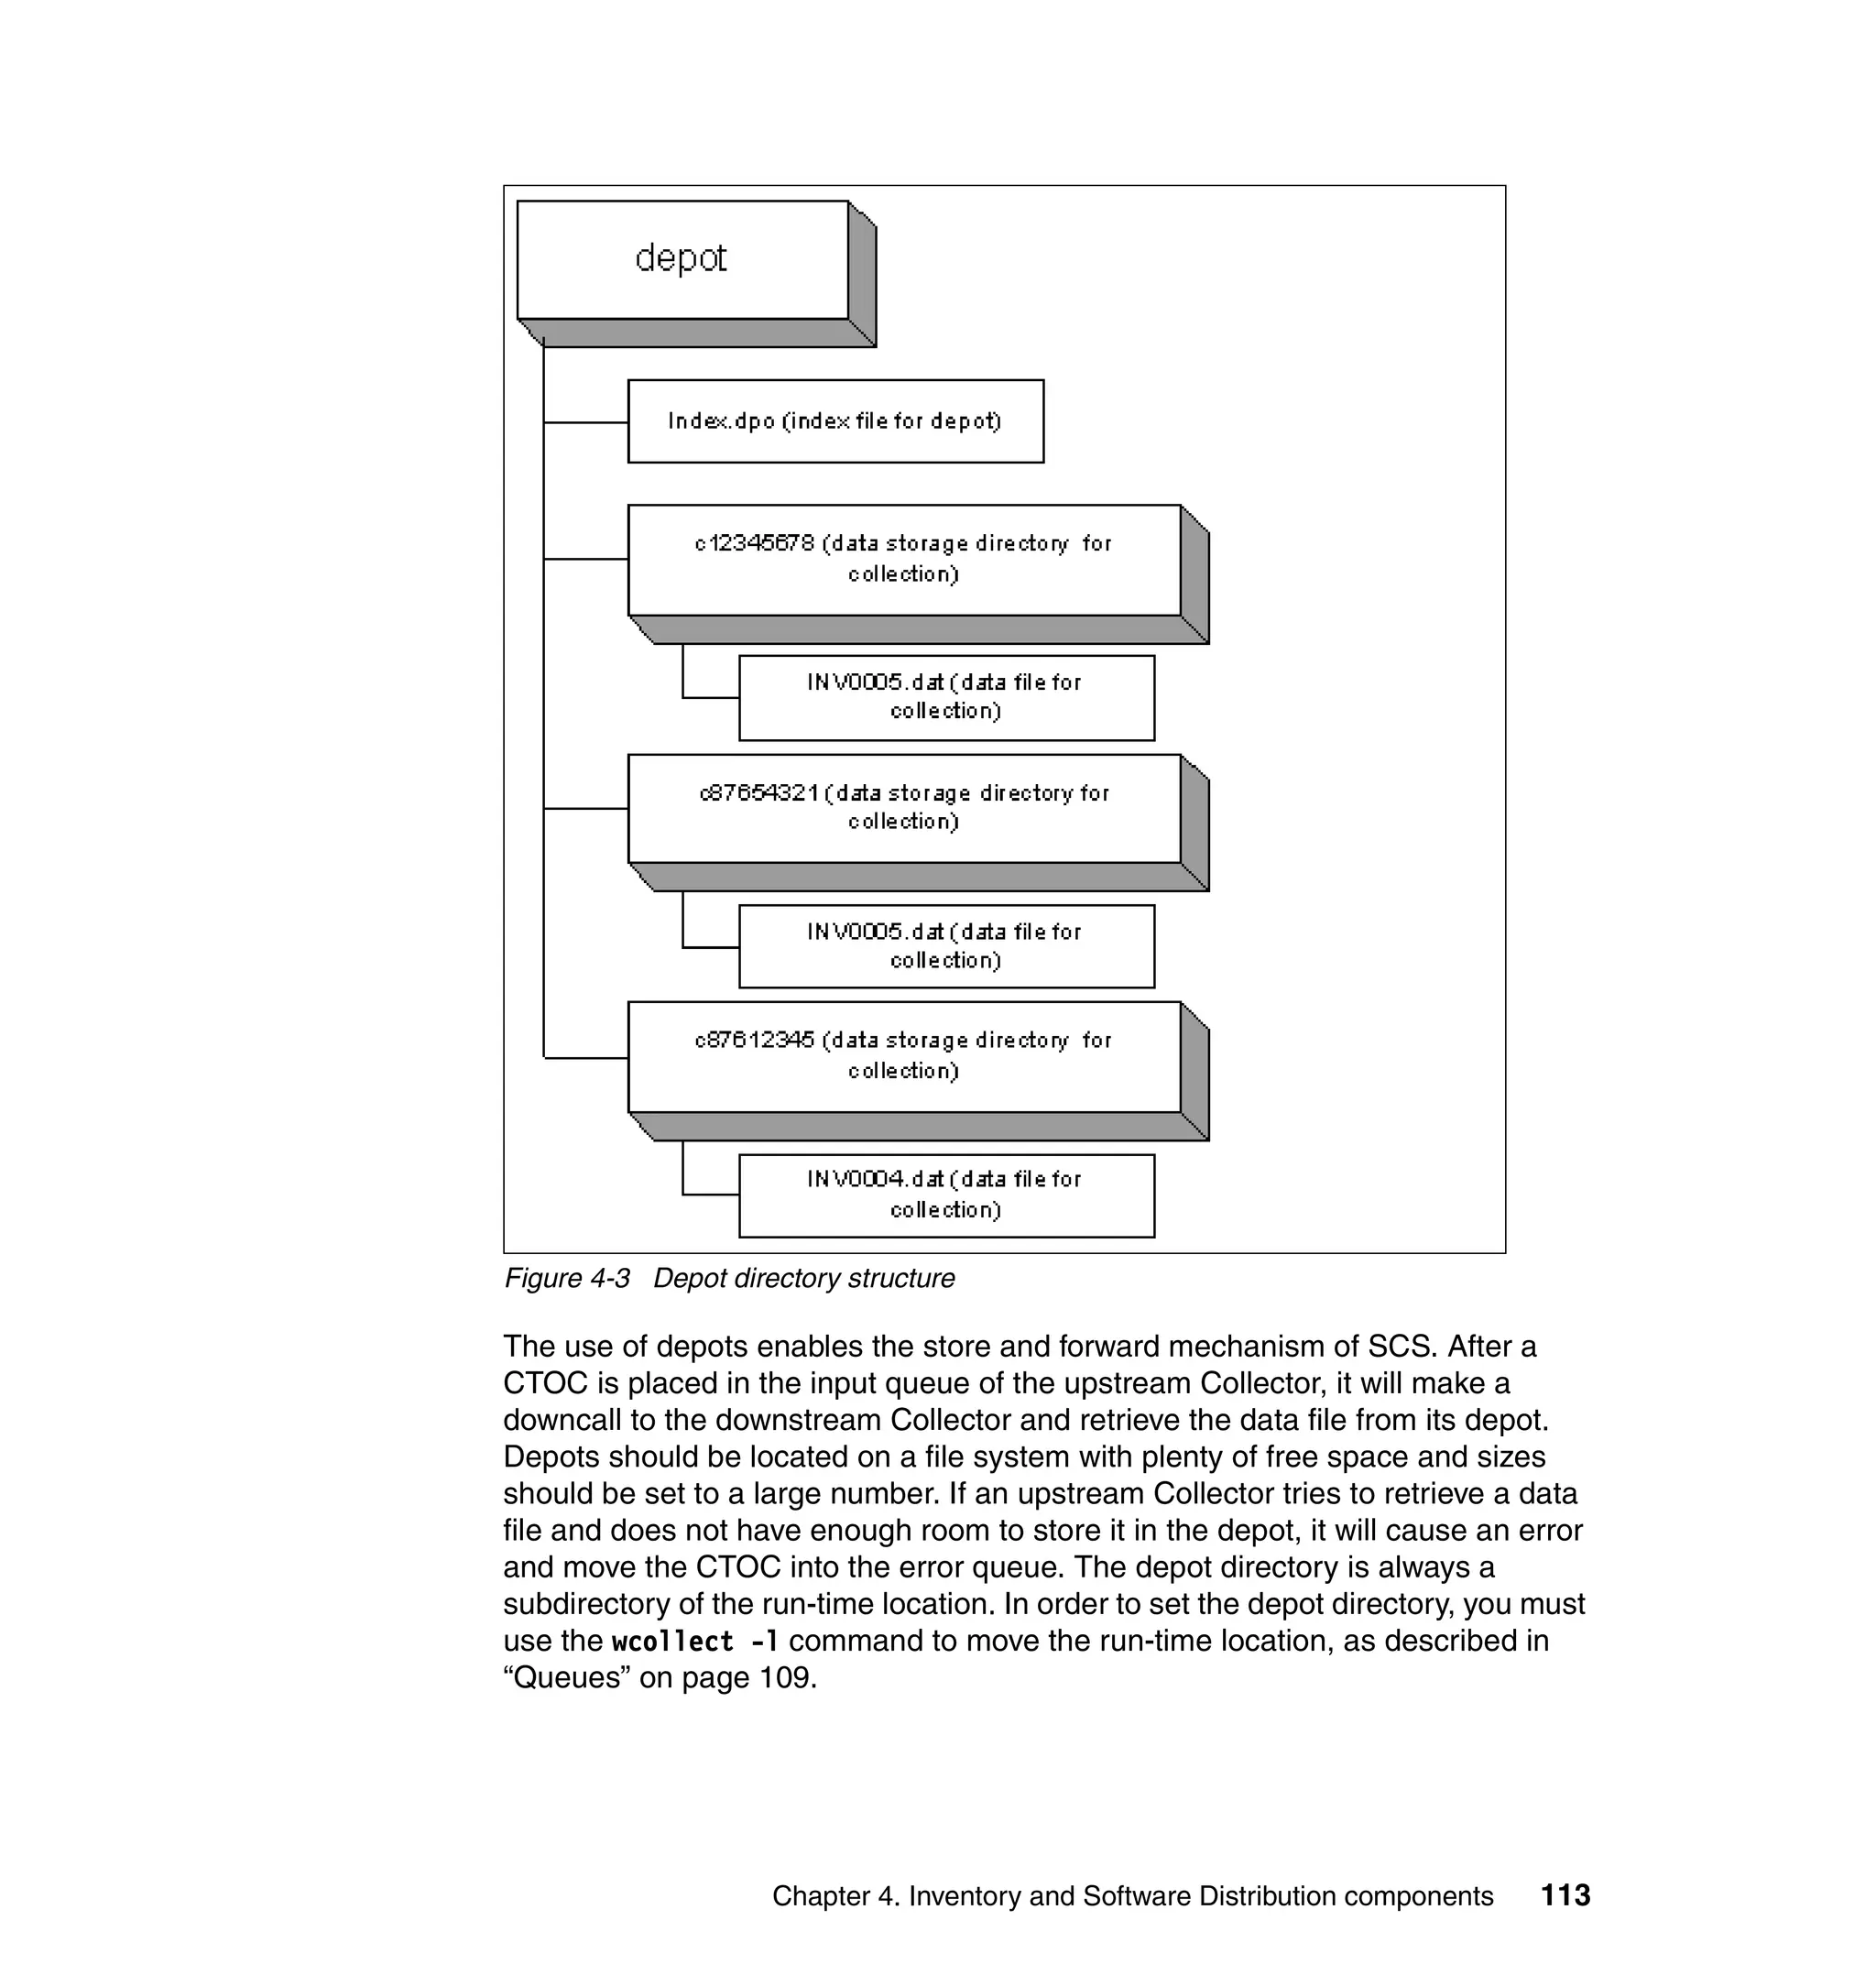
![Error queue
Deferred queue
Each queue has a checkpoint file used to back up a copy of the queue’s contents
to the file system. These files are stored in the SCS run-time directory.
Checkpoint files are binary files and are named checkpointGL_[queue]qfile.dat.
The checkpoint files are not the queues themselves, but are used by the
Collector process to restore the queue if it is stopped or killed. The Collector will
append a CTOC to the checkpoint file when it places it in the corresponding
queue. When a CTOC is removed from a queue, the Collector also removes it
from the corresponding file. Similar to the checkpoint files, a Collector maintains
a log file of all completed collections. This log file is named CTOC_log.dat, and it
is stored in the same directory as the checkpoint files. CTOC_log.dat also uses
the same binary format as the checkpoint files, and its contents can be viewed
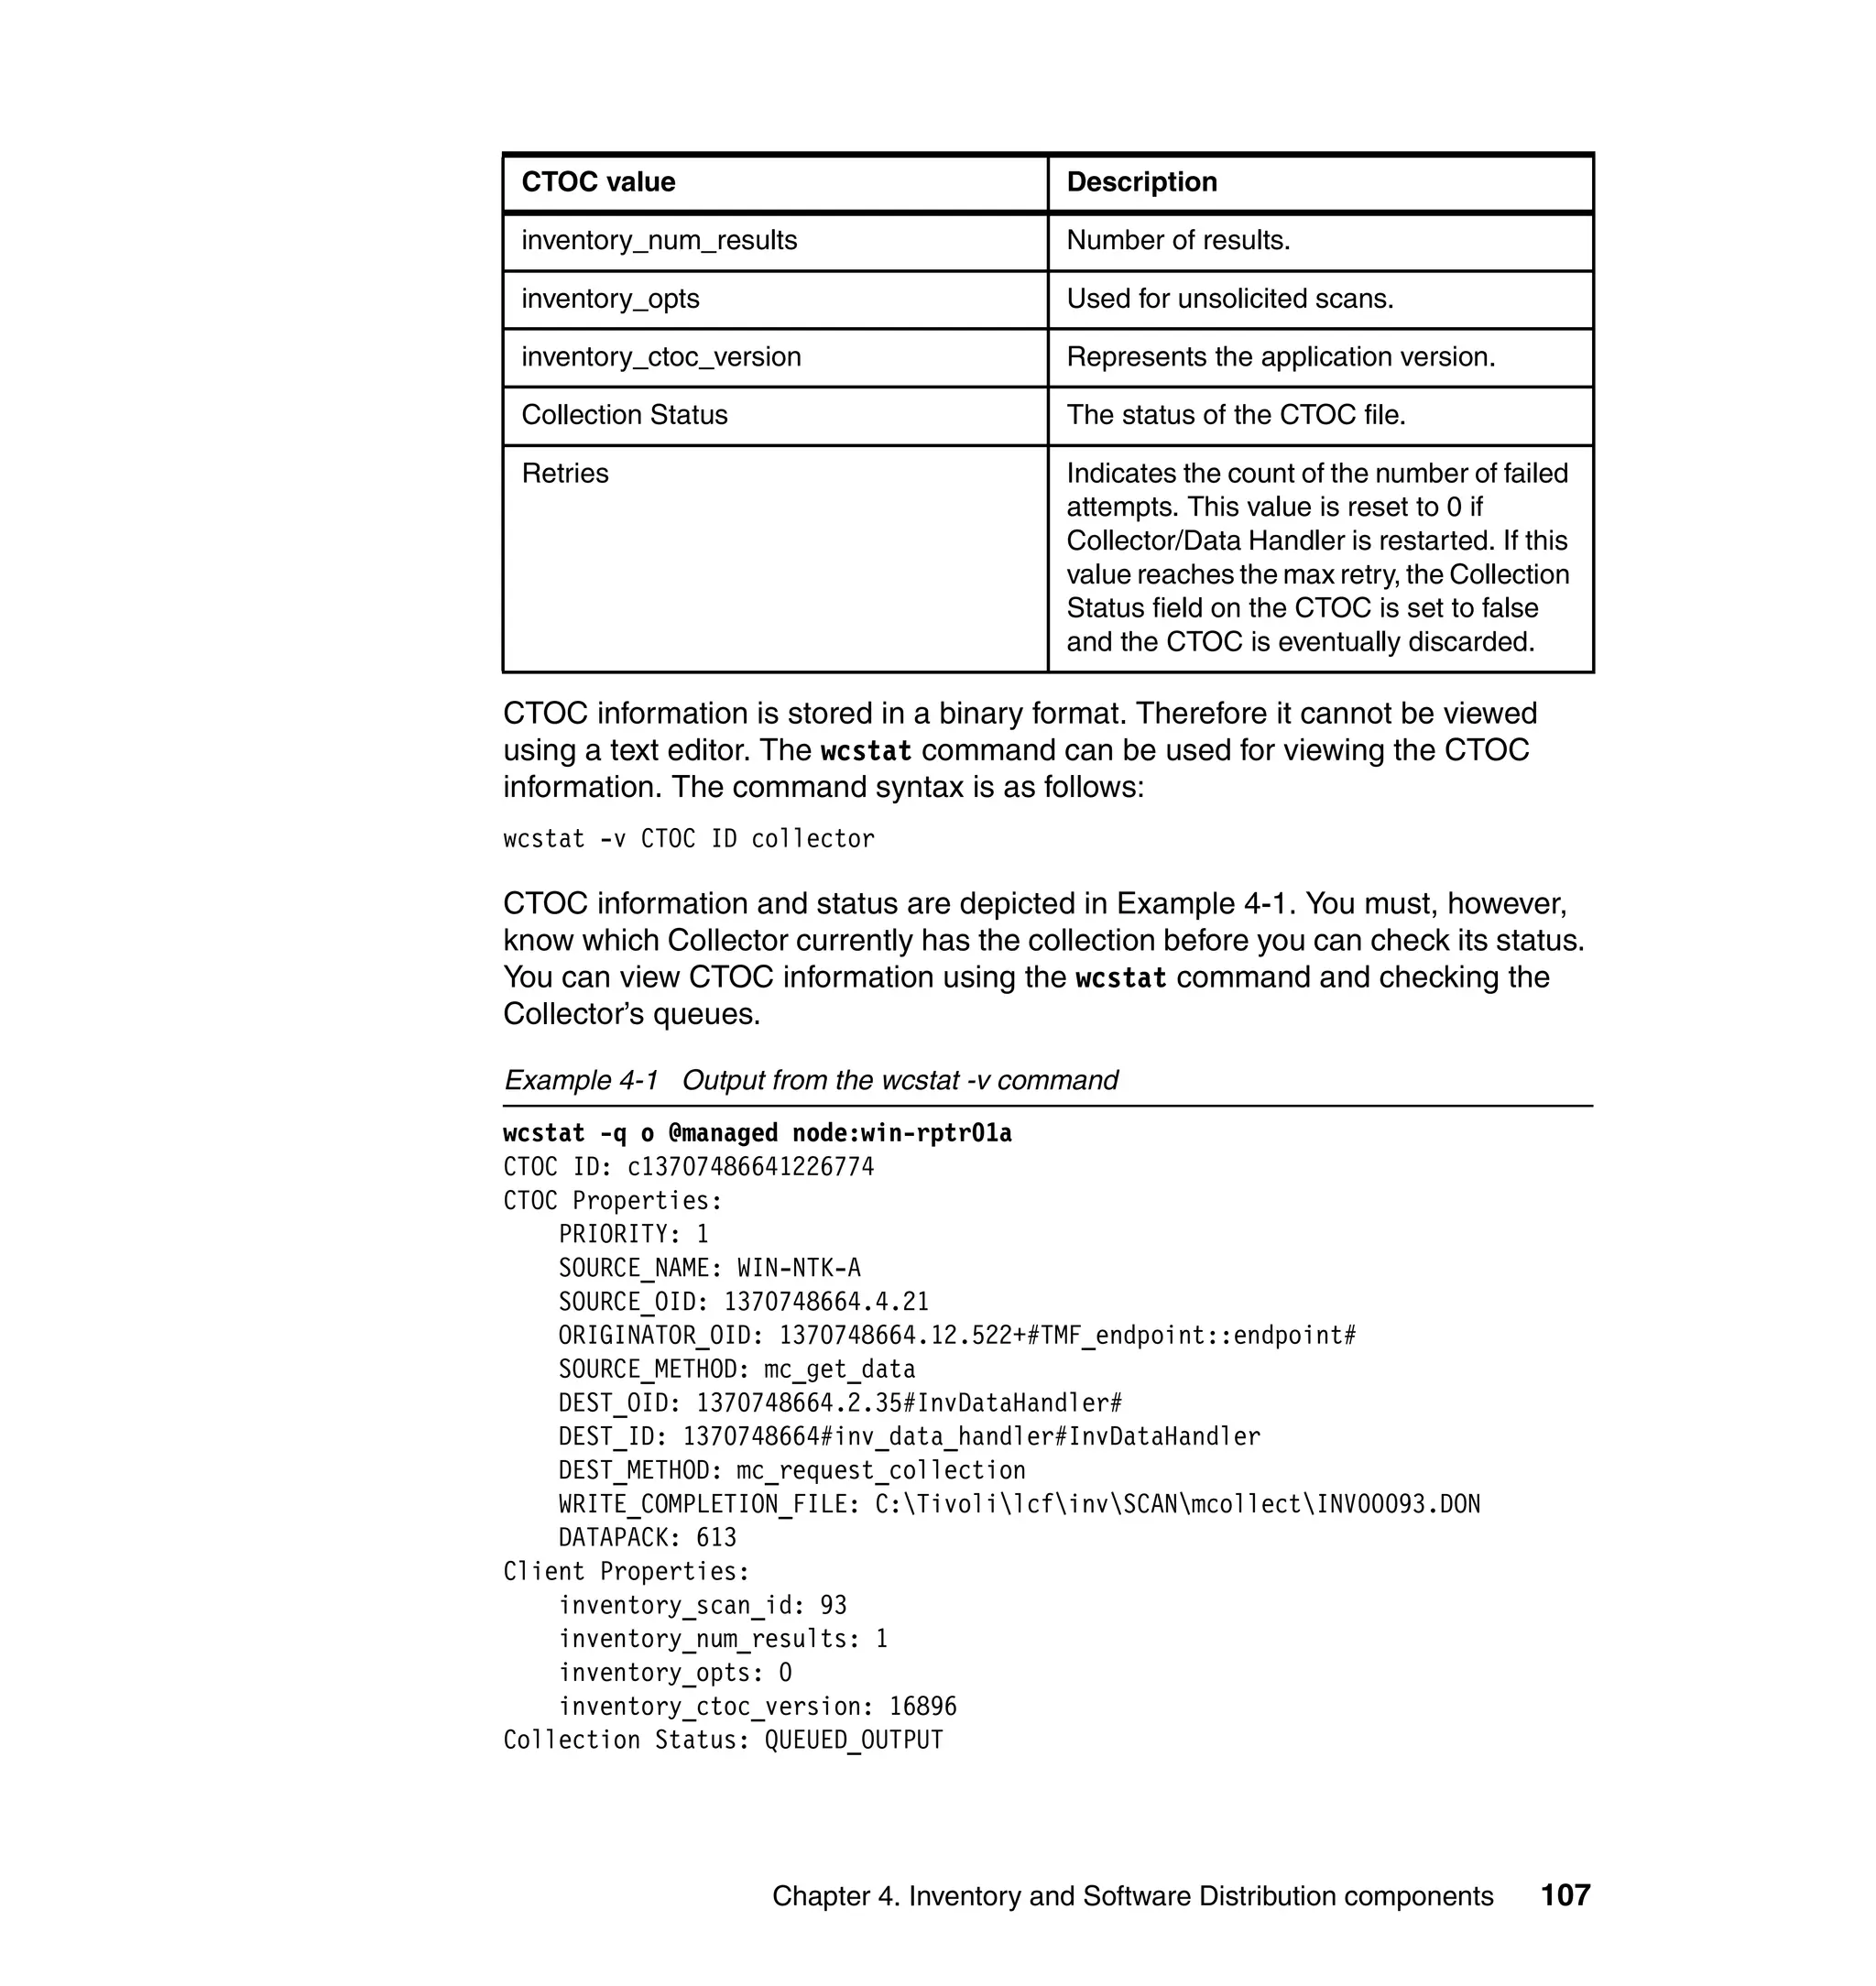
with the wcstat command.
You can check the status of a Collector’s queues using wcstat. The syntax is:
wcstat -q queue collector
This gives essentially the same output as the wcstat -v command (described in
Example 4-2) for each CTOC in the queue.
Example 4-2 shows sample output from this command. You can also use wcstat
to read from the completed CTOC log file by using c for the queue option.
Example 4-2 Output from wcstat -q command
wcstat -q o @managed node:win-rptr01a
CTOC ID: c1370748664612628
CTOC Properties:
PRIORITY: 1
SOURCE_NAME: WIN-ARCH01A
SOURCE_OID: 1370748664.4.21
ORIGINATOR_OID: 1370748664.6.522+#TMF_endpoint::endpoint#
SOURCE_METHOD: mc_get_data
DEST_OID: 1370748664.2.35#InvDataHandler#
DEST_ID: 1370748664#inv_data_handler#InvDataHandler
DEST_METHOD: mc_request_collection
WRITE_COMPLETION_FILE: C:Program
FilesTivolilcfinvSCANmcollectINV00100.DON
DATAPACK: 484
Client Properties:
inventory_scan_id: 100
inventory_num_results: 1
inventory_opts: 0
inventory_ctoc_version: 16896
110 Certification Study Guide for IBM Tivoli Configuration Manager 4.2](https://image.slidesharecdn.com/certificationstudyguideforibmtivoliconfigurationmanager4-2redp3946-120522221807-phpapp01/75/Certification-study-guide-for-ibm-tivoli-configuration-manager-4-2-redp3946-128-2048.jpg)


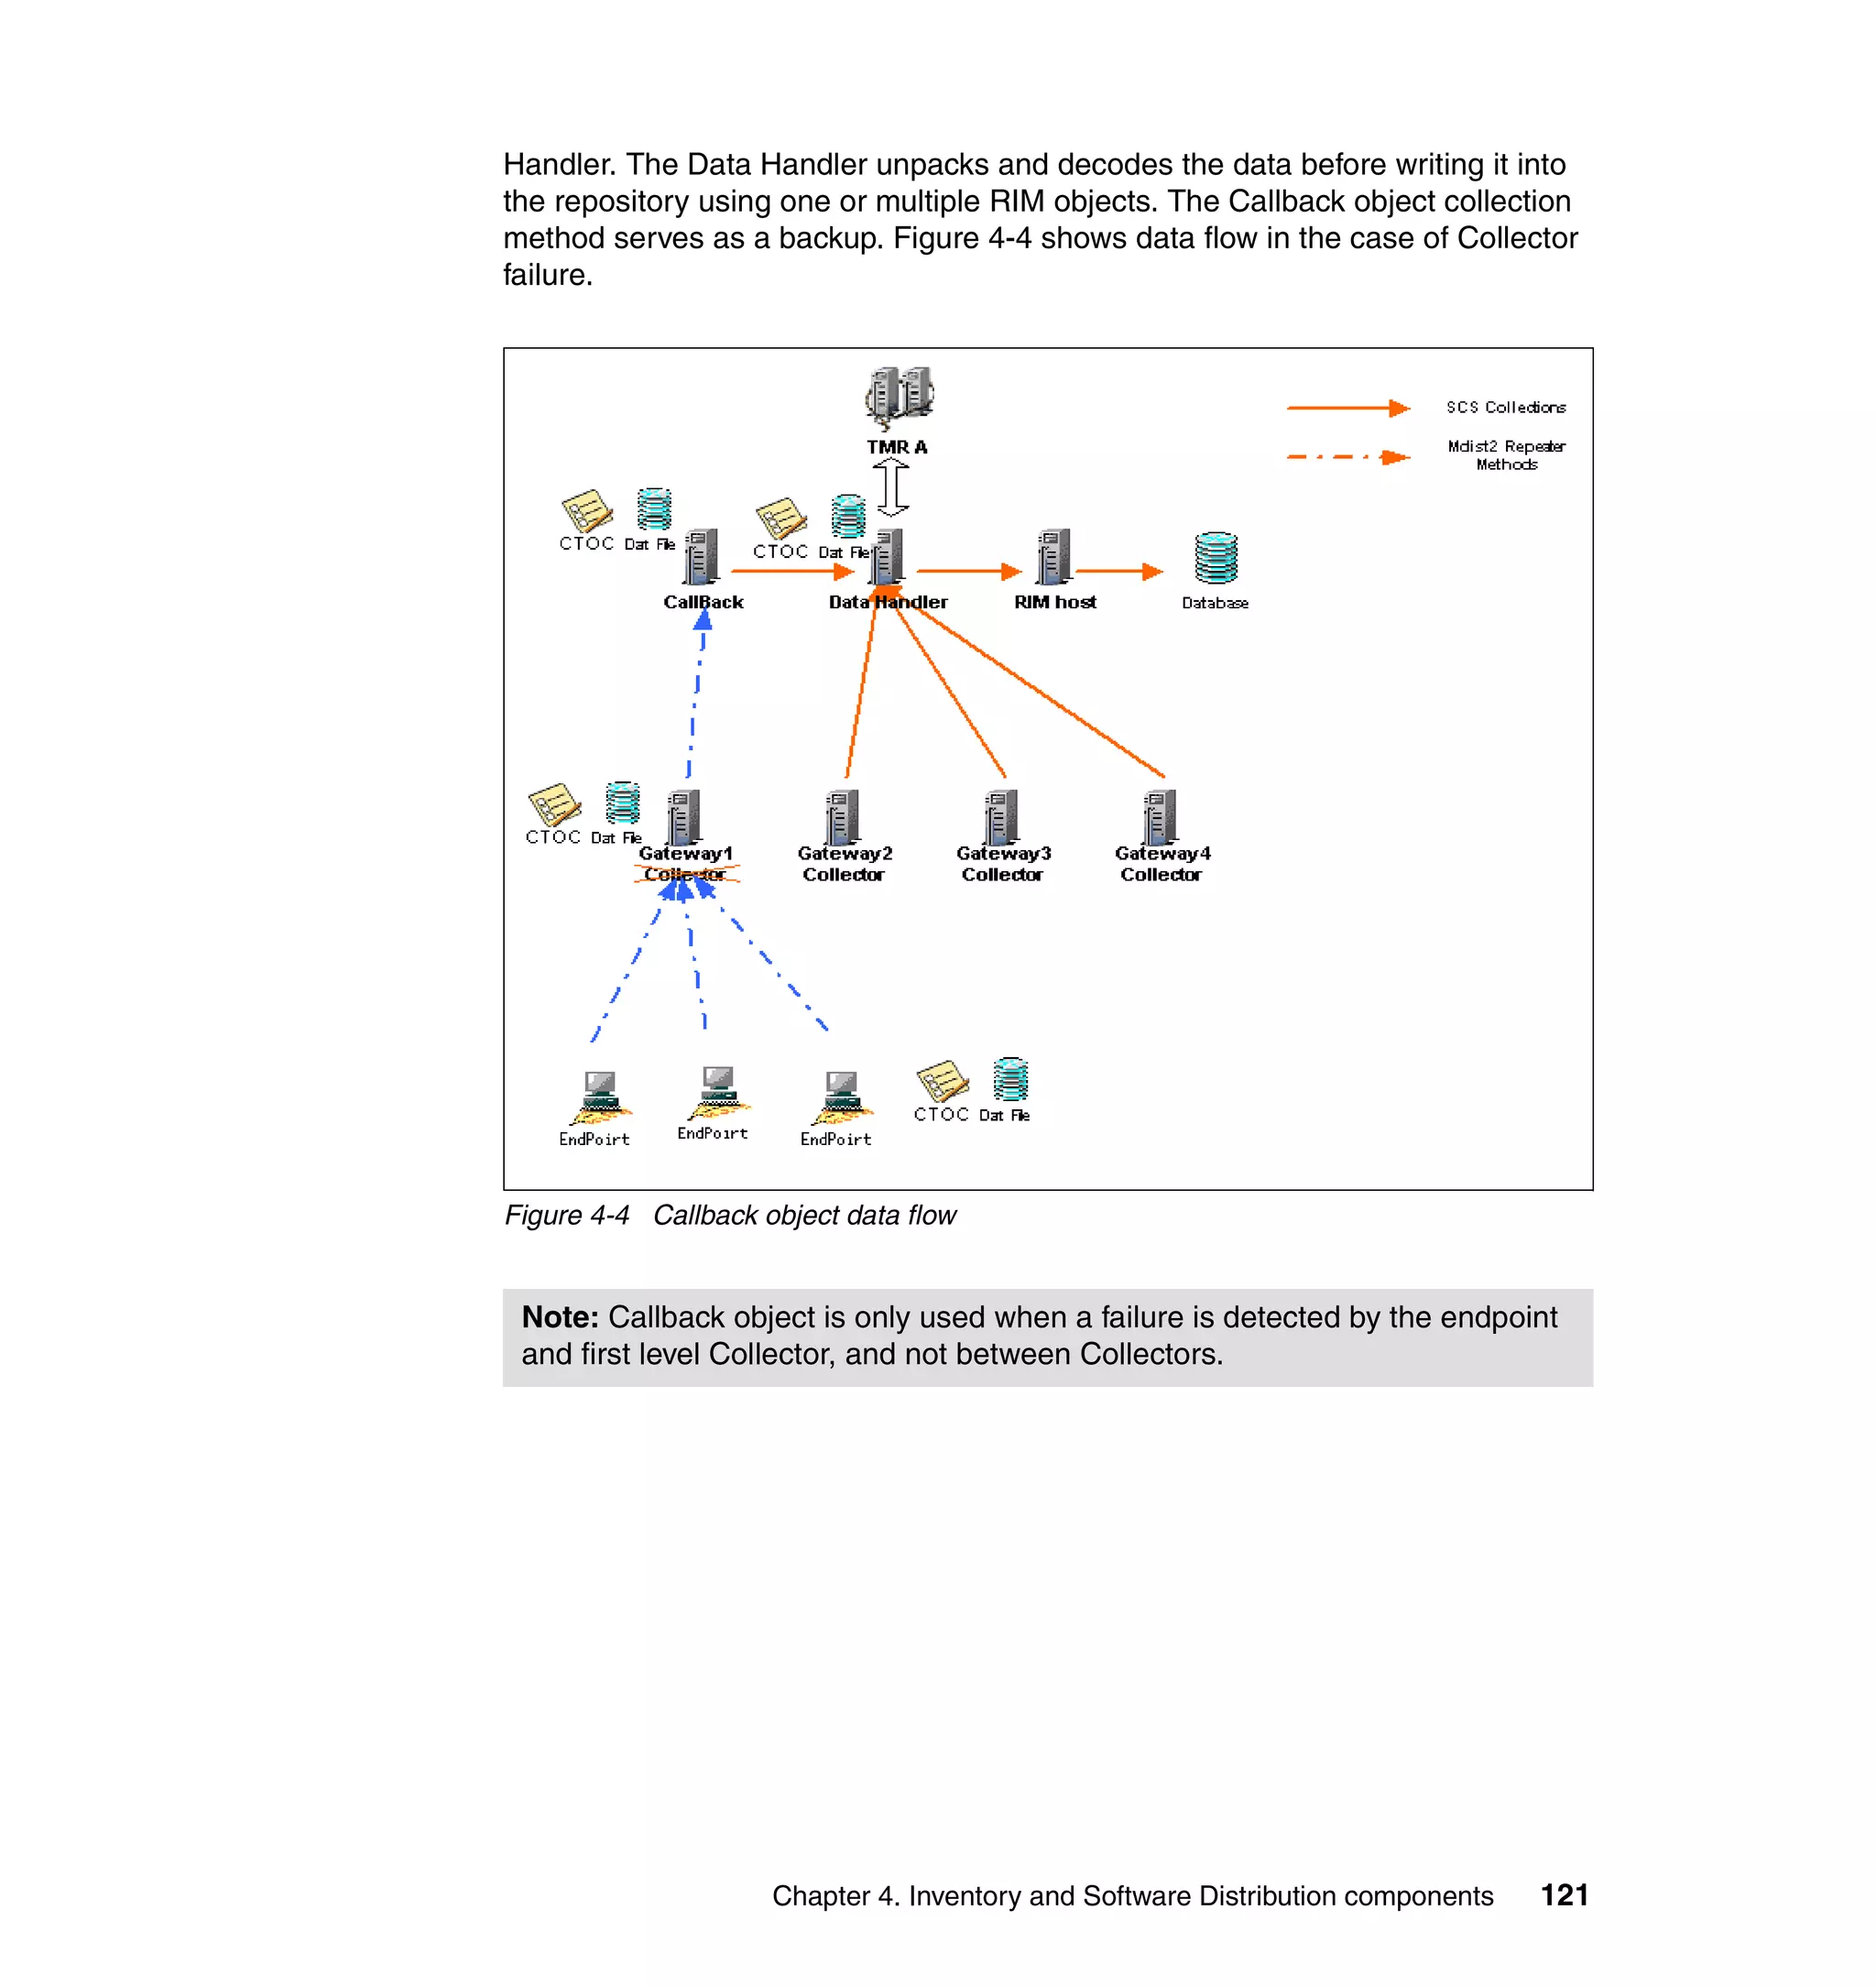
![Tip: In large environments we recommend moving the Callback object to a
different managed node than the TMR server, because in the event of a
Collector failure all scan data will be sent to the TMR server. This could easily
overwhelm the TMR server. The Callback object can be moved once created
by using the wmvinvcb command. The command syntax is as follows:
wmvinvcb -t timeout_value managed_node
Where:
-t specifies the number of seconds after which the command will wait
before it times out. If you do not specify this option the default of 120
seconds is used.
managed_node specifies the managed node to which you want to move
the Inventory Callback object. You must have Scalable Collection Service
installed on the managed node in order to use it as a Callback object.
Using multiple RIM objects
Starting with Inventory 4.0, Data Handler is now able to use multiple RIM objects
to place Inventory information in the Inventory database. RIM objects could be on
different managed nodes, which could increase performance.
Architecturally, each RIM object represents the termination point of a complete
data path from the Tivoli endpoint to the database. Setting the number of RIM
objects that you need depends on how many endpoints you plan to scan
simultaneously, and how much data you are collecting from each endpoint. You
should consider creating a new RIM object for the following reasons:
To increase the number of connections to the RDBMS. The maximum number
of connections per RIM object is 16.
To distribute the work performed by RIM objects across multiple systems. For
example, you can create RIM objects on separate managed nodes so that the
processing required by the RIM objects is divided between the two systems.
For RIM objects that the Inventory Data Handler uses, you must set the
application label and maximum number of RDBMS connections. You can set
these values using the wsetrim command. The following is the command syntax:
wsetrim [-a application_label] [-m max_connections]
Where application_label should be invdh for Data Handler.
122 Certification Study Guide for IBM Tivoli Configuration Manager 4.2](https://image.slidesharecdn.com/certificationstudyguideforibmtivoliconfigurationmanager4-2redp3946-120522221807-phpapp01/75/Certification-study-guide-for-ibm-tivoli-configuration-manager-4-2-redp3946-140-2048.jpg)


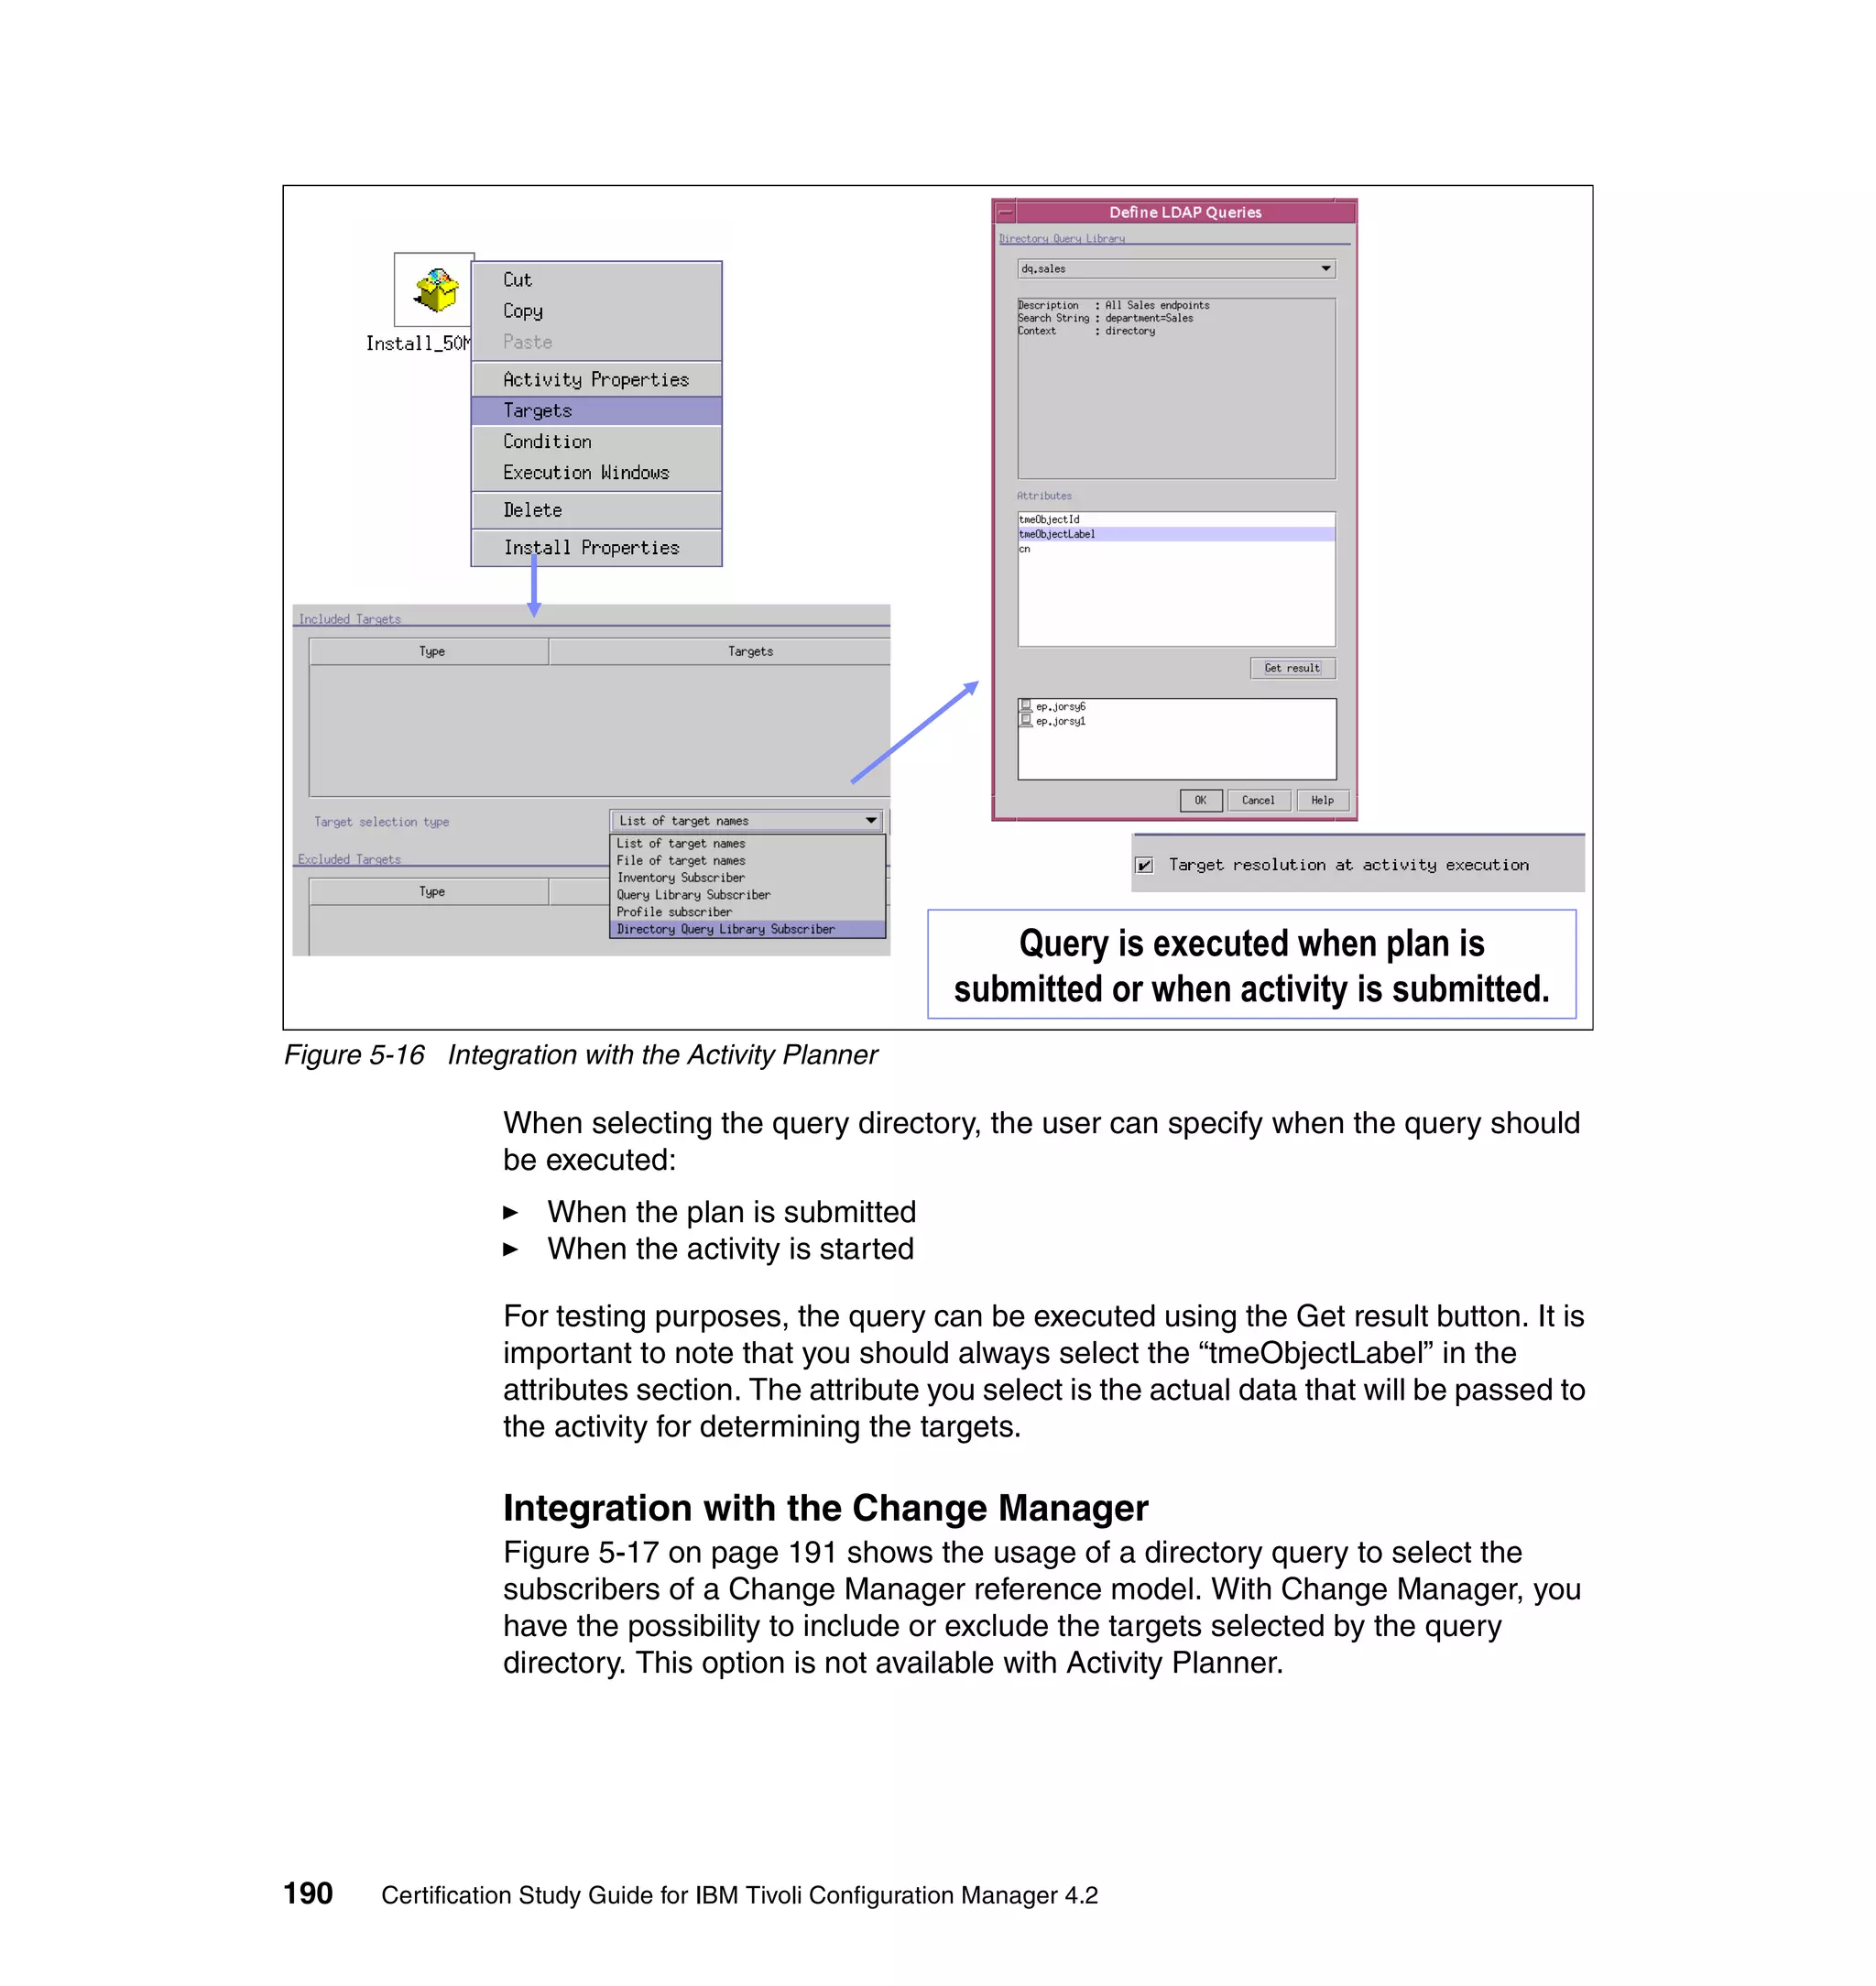
![The directory schema has to be modified using the ldifde command (which is
available on the directory server) and an LDAP Data Interchange Format (LDIF)
file. The LDIF template file is provided on the Tivoli management region server in
$BINDIR/TAS/QueryDir/SCRIPTS. The template file has to be edited, and the
correct directory context has to be provided.
After running the ldifde command on the directory server, the Enterprise
Directory schema is changed to accept three new attributes: tmeObjectId,
tmeObjectLabel, and tmeTrmId. These attributes will be used to link directory
users to Tivoli endpoints (tmeObjectId and tmeObjectLabel) or Tivoli Resource
Manager devices (tmeTrmId).
5.3.1 Exchanging data with a directory server
In order to exchange data with a directory server, a DirectoryContext object
should be used. A DirectoryContext object is comparable to a RIM object. The
DirectoryContext object contains the settings needed to access the directory
server, just like a RIM object contains the settings to connect to an RDBMS.
Connections to the directory server are always initiated from the directory server
(RIM can use different RIM hosts). The installation of the Directory Query Facility
creates one default DirectoryContext object named directory. Other
DirectoryContext objects can be created later; these can be used to access
different directory servers.
Note that the Tivoli Resource Manager uses the directory DirectoryContext
object hardcoded (this setting cannot be changed).
5.3.2 Manipulating DirectoryContext objects
DirectoryContext objects are managed using the command line interface; no GUI
is available to create, configure, or remove DirectoryContext objects.
The wcrtdirctx command is used to create a directory query context.
The syntax is:
wcrtdirctx [-i] -s server -u user -c naming_context [-f provider] [-p port] [-P
ssl_port] [-S y|n] [-k keystore_path] directory_context_name
Where:
i input
Specifies that the password must be read from standard input.
s server
Chapter 5. Deployment Services 185](https://image.slidesharecdn.com/certificationstudyguideforibmtivoliconfigurationmanager4-2redp3946-120522221807-phpapp01/75/Certification-study-guide-for-ibm-tivoli-configuration-manager-4-2-redp3946-203-2048.jpg)


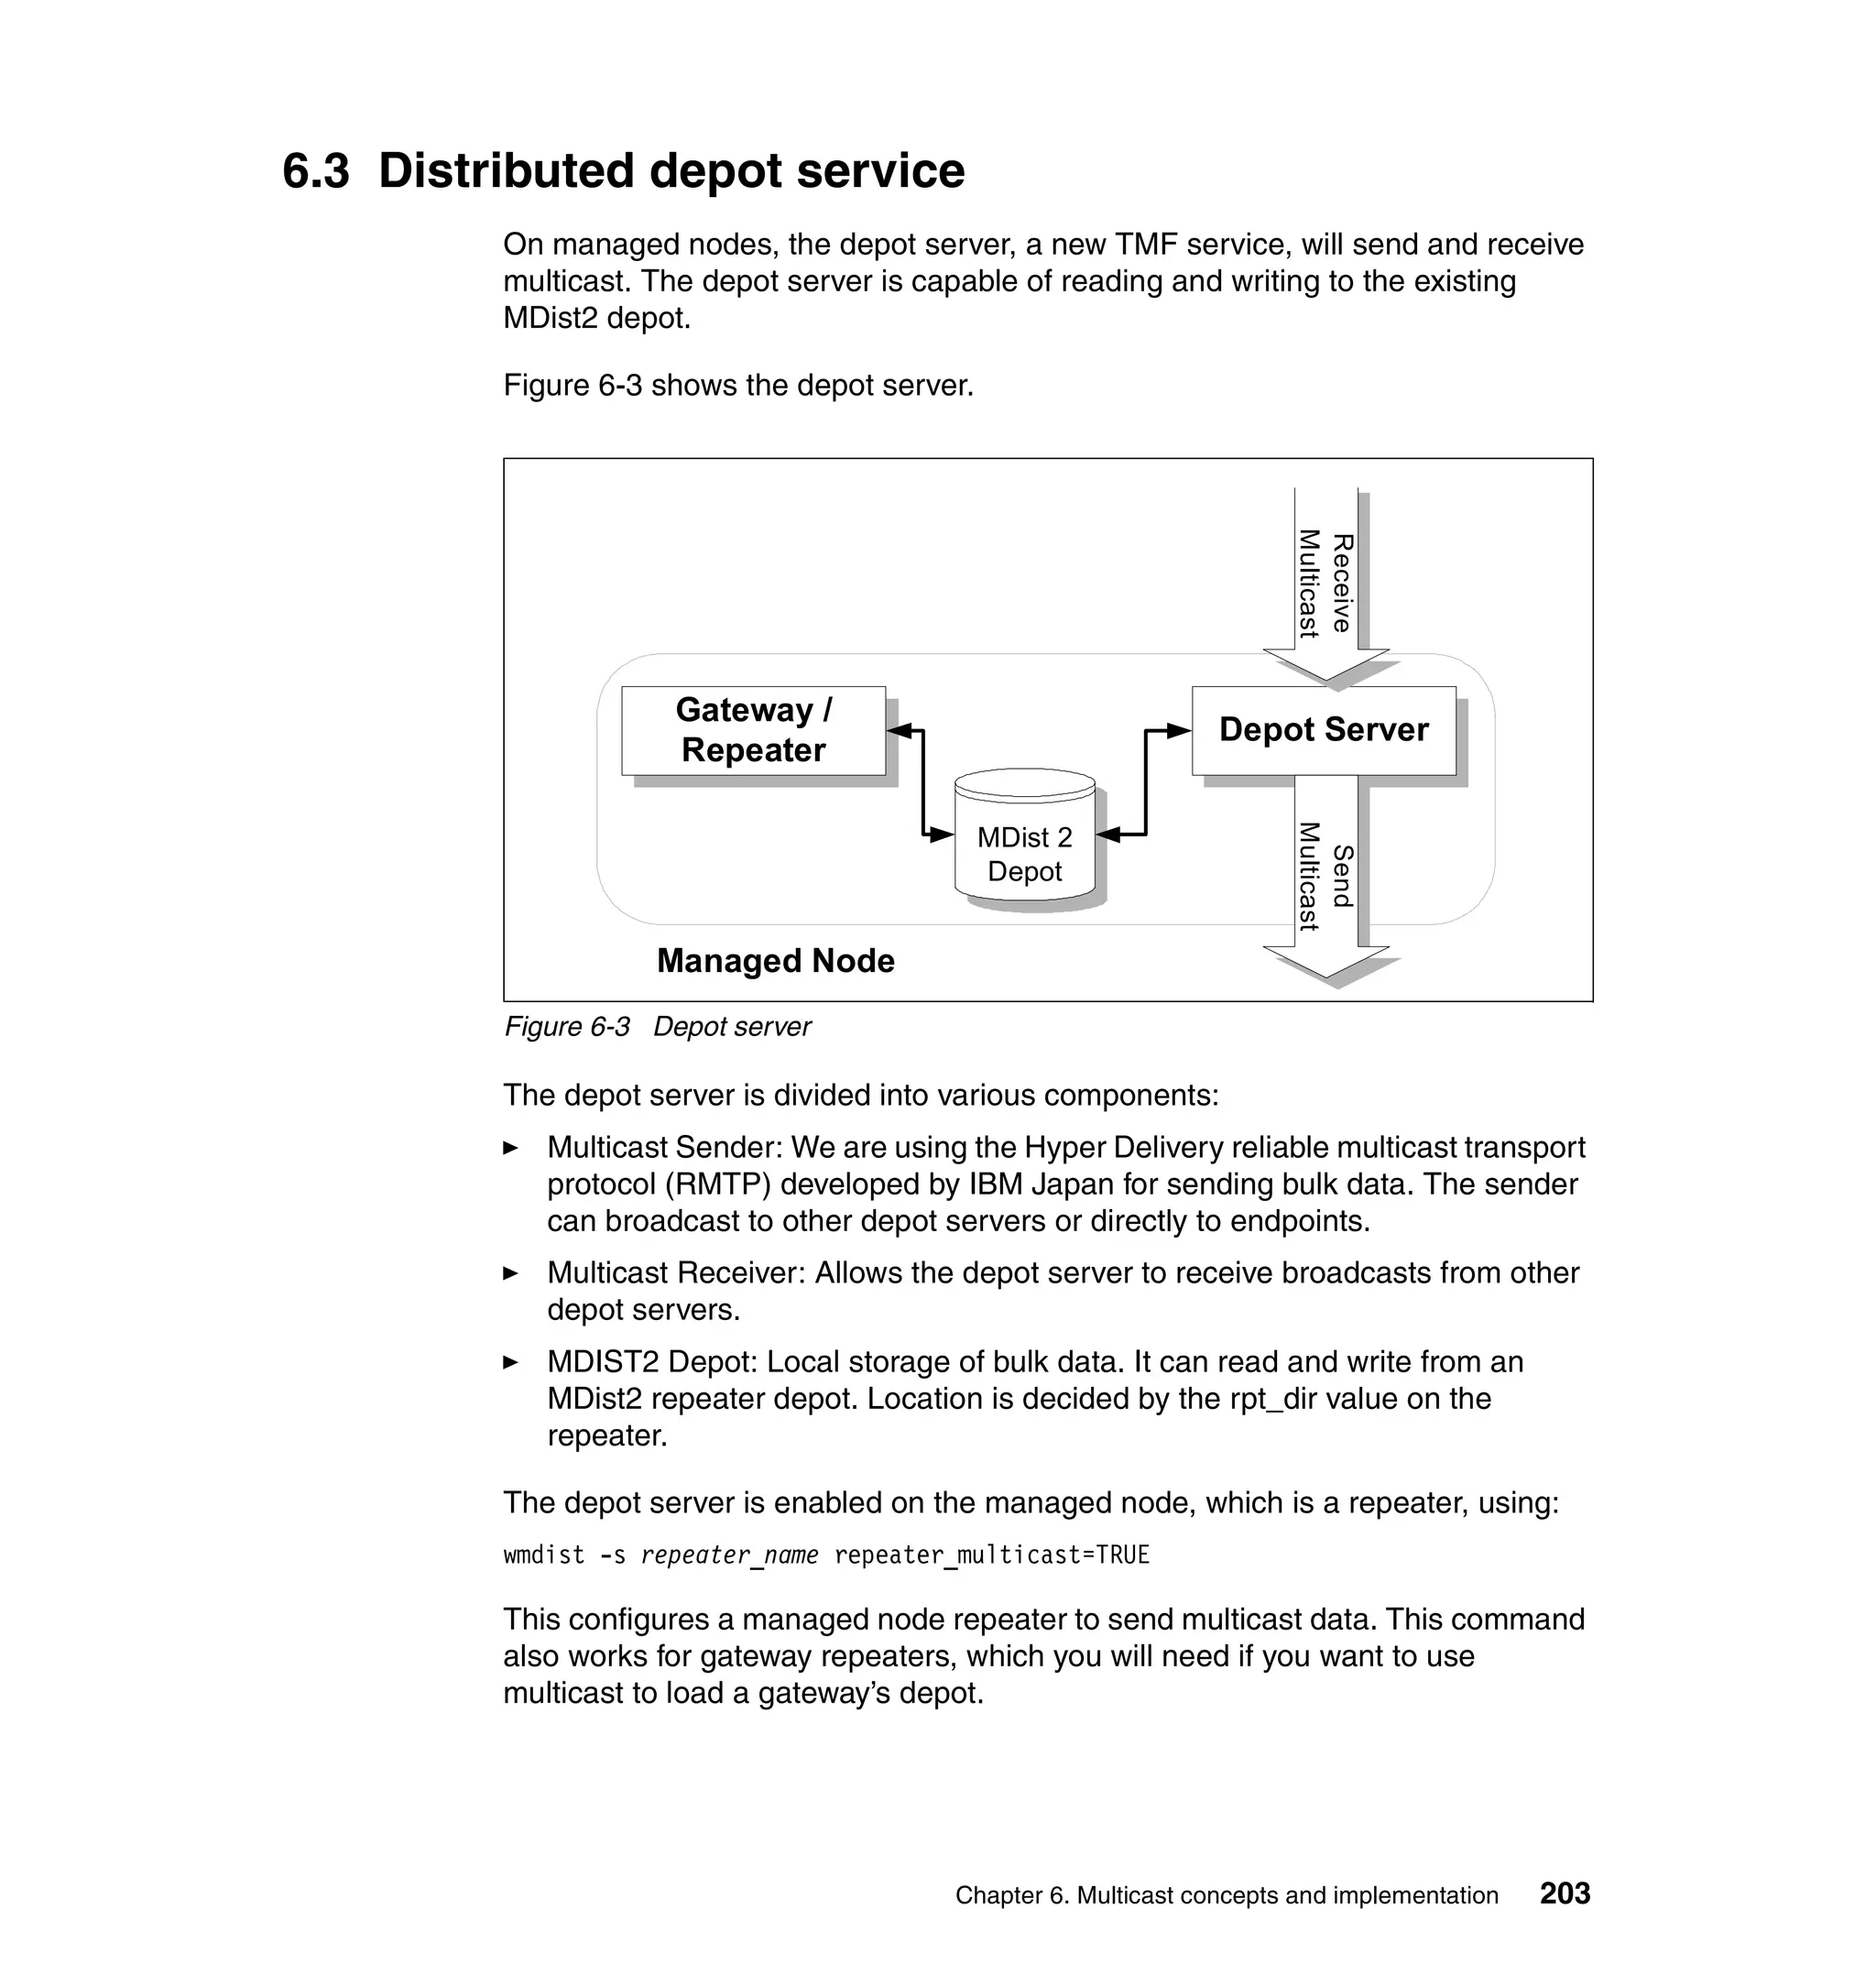
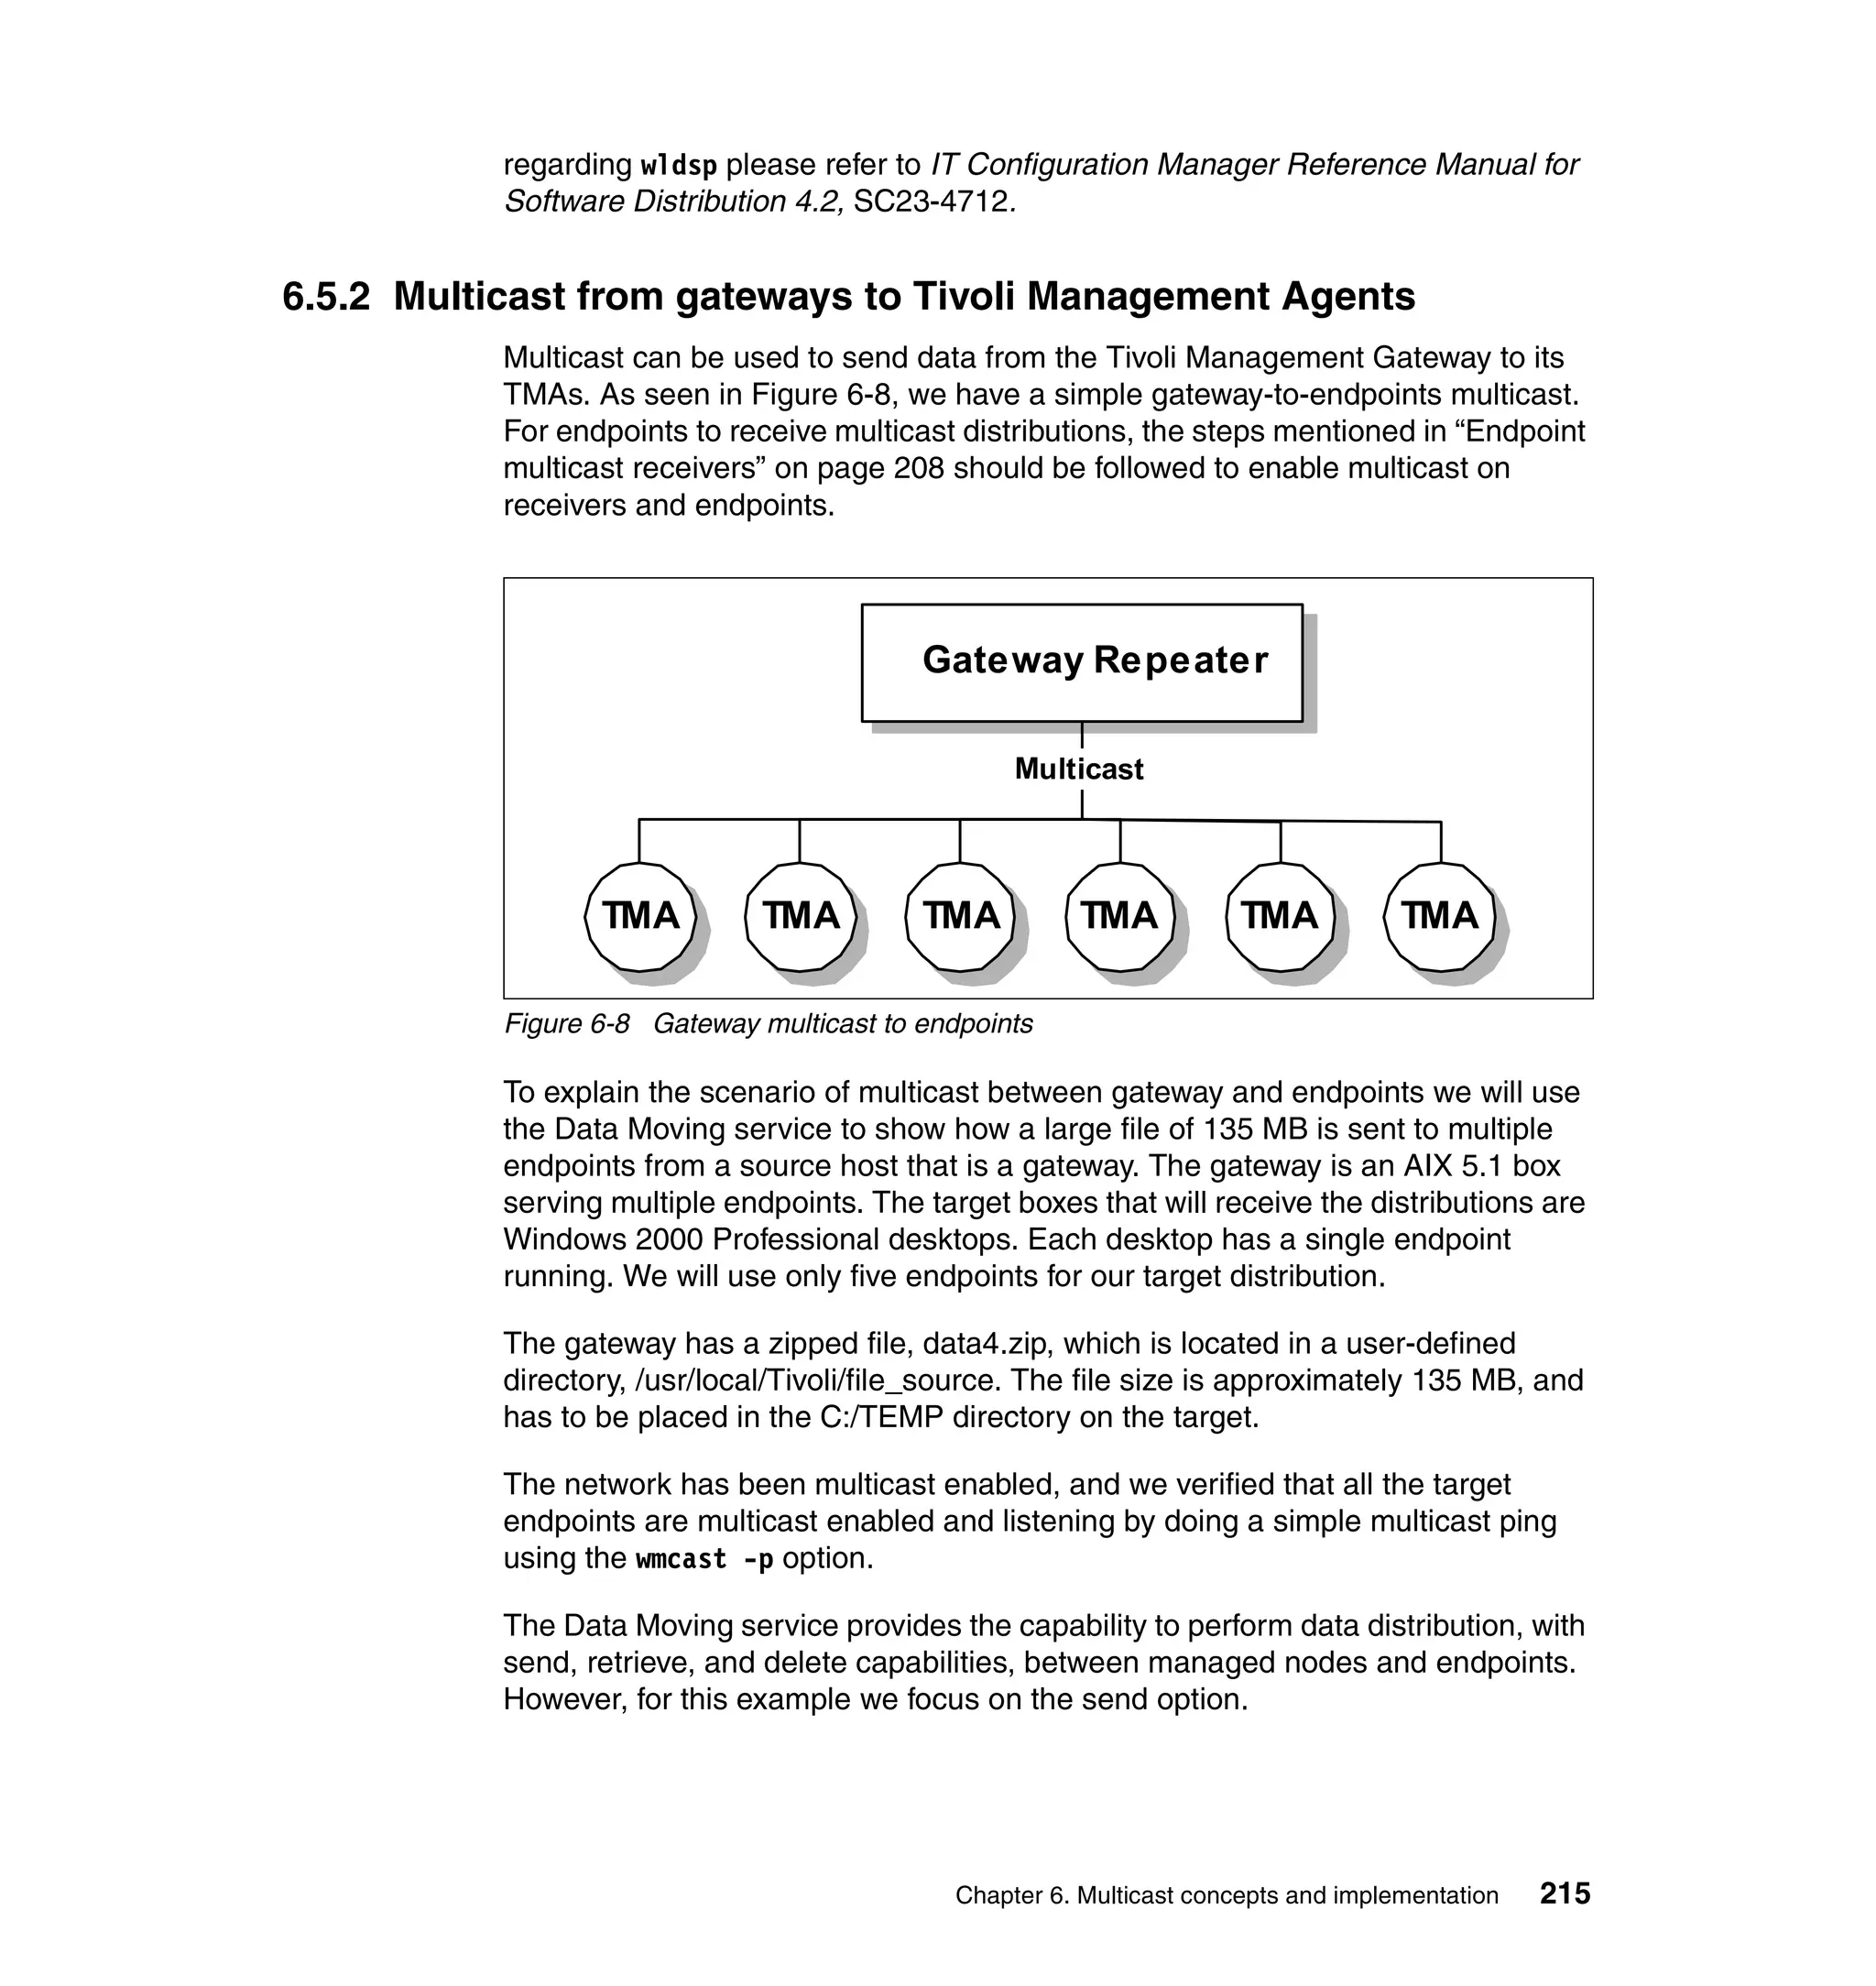
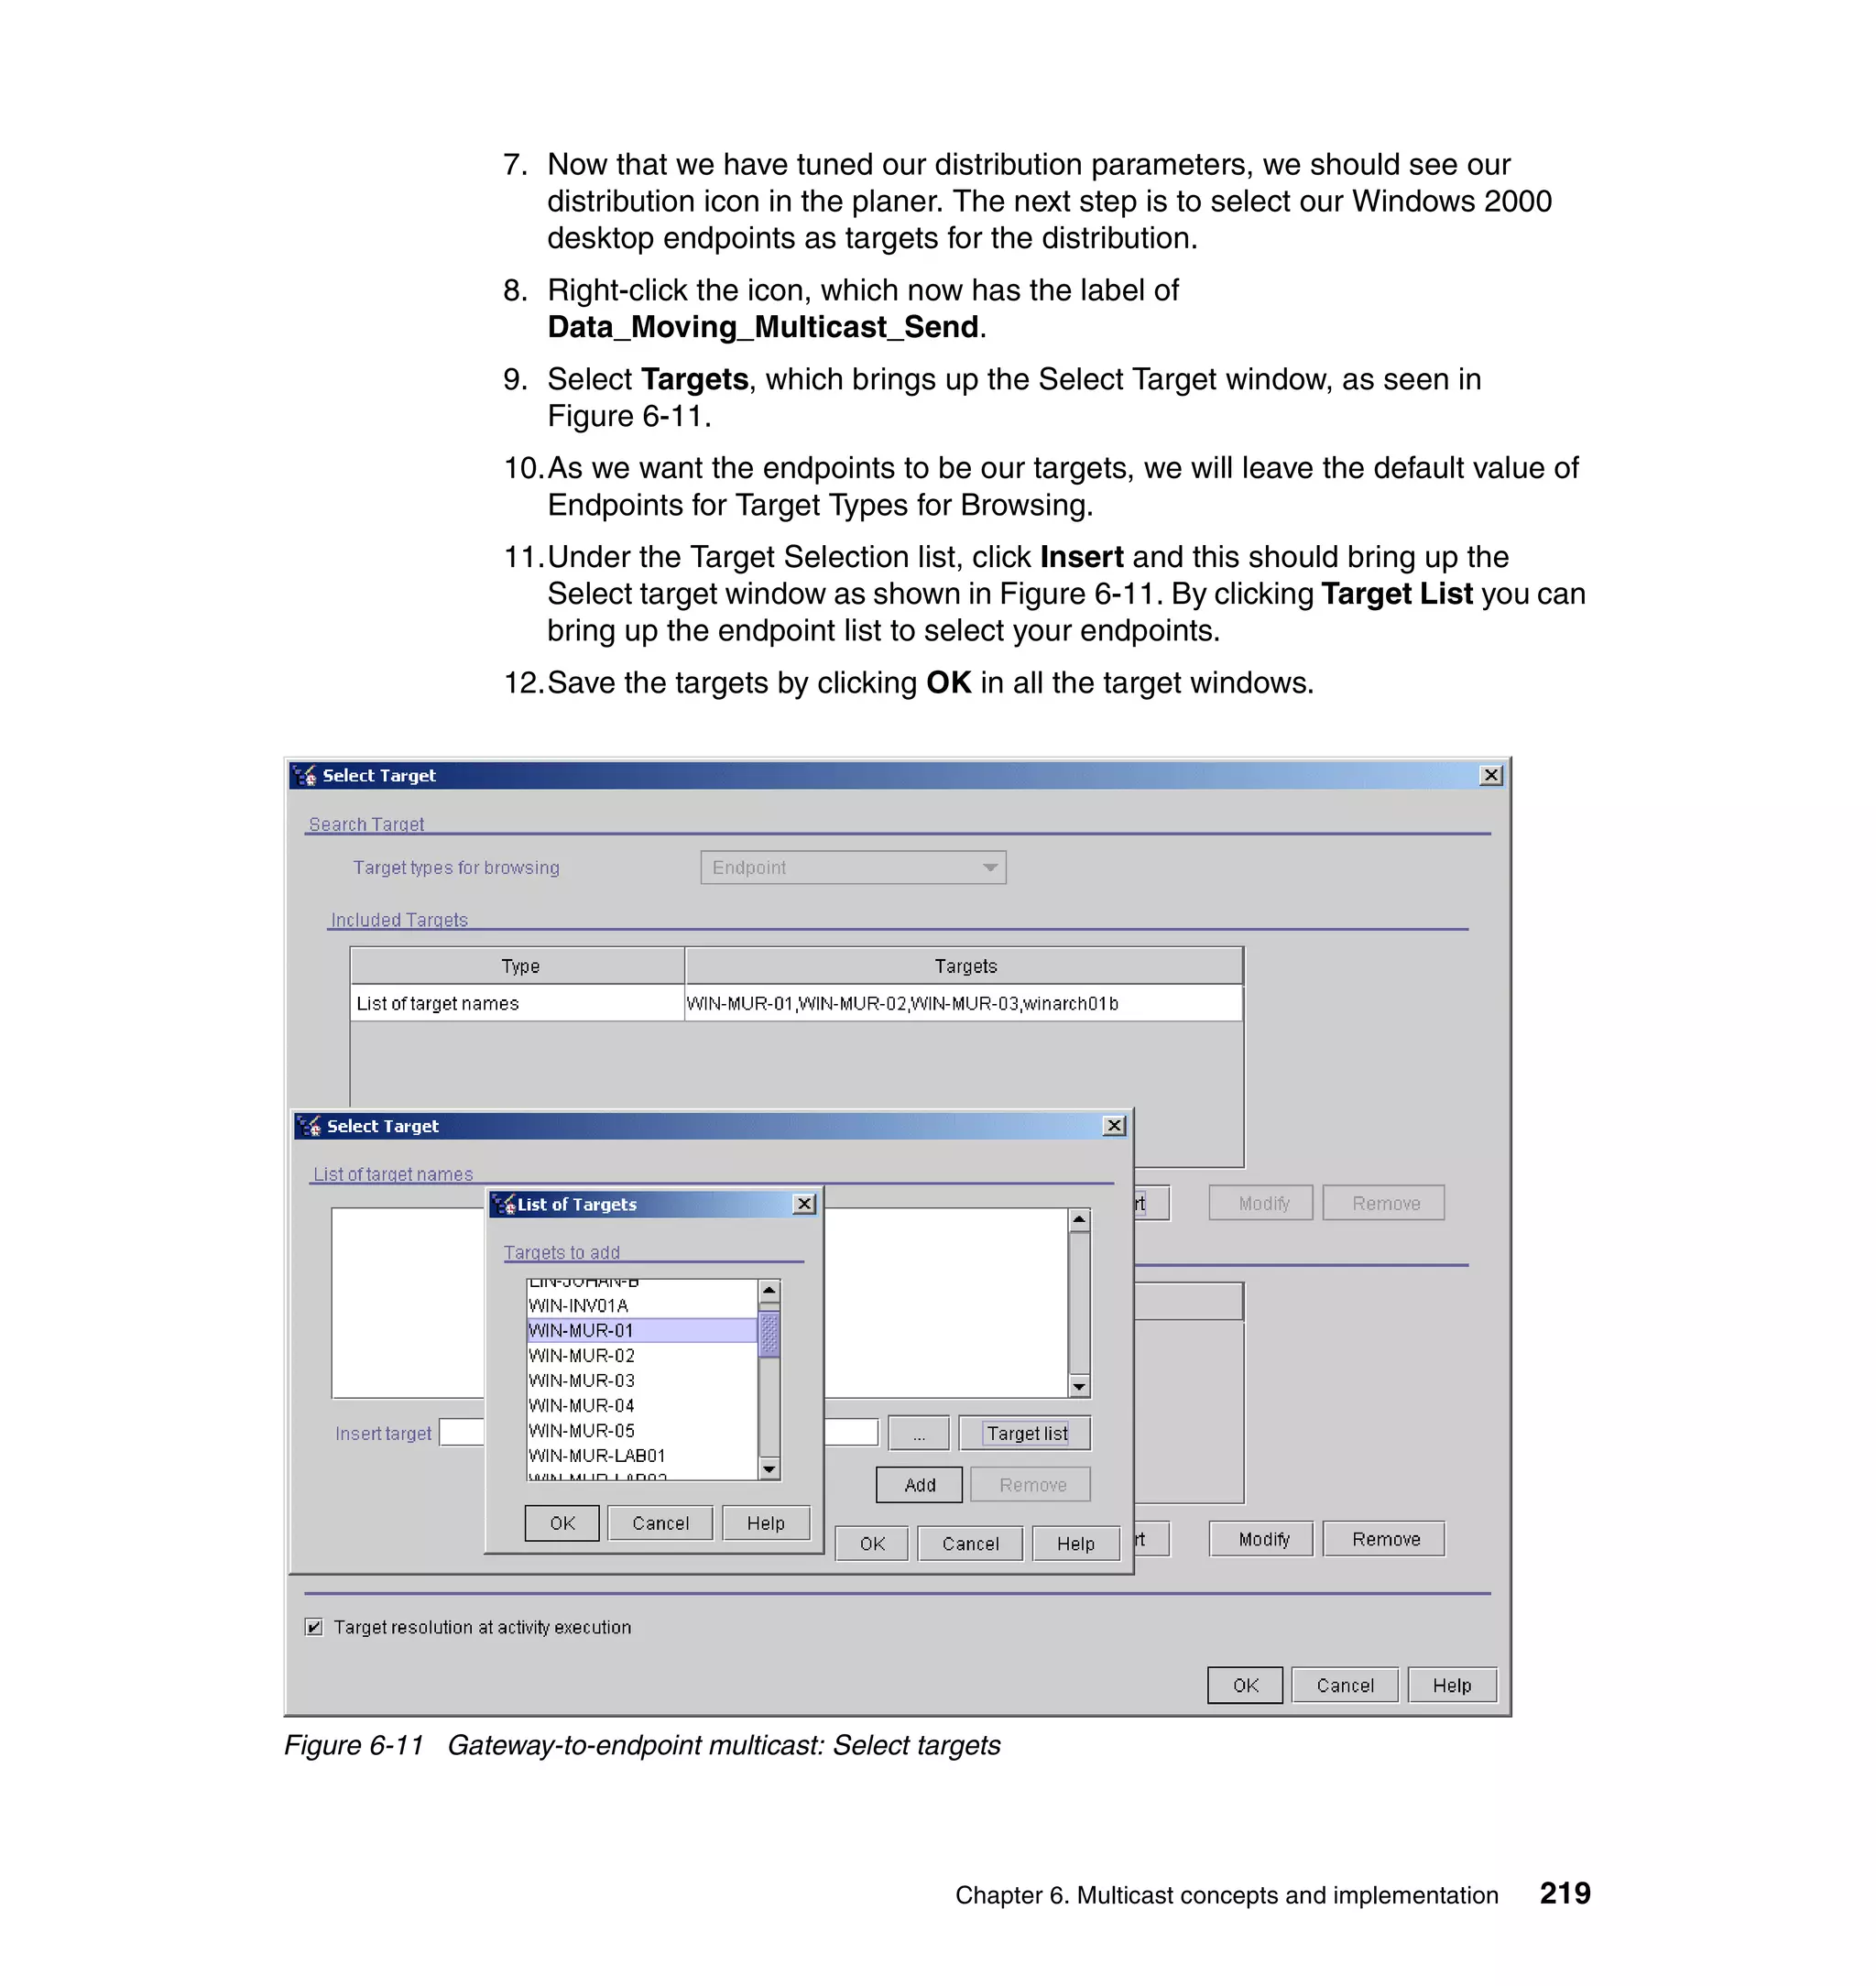
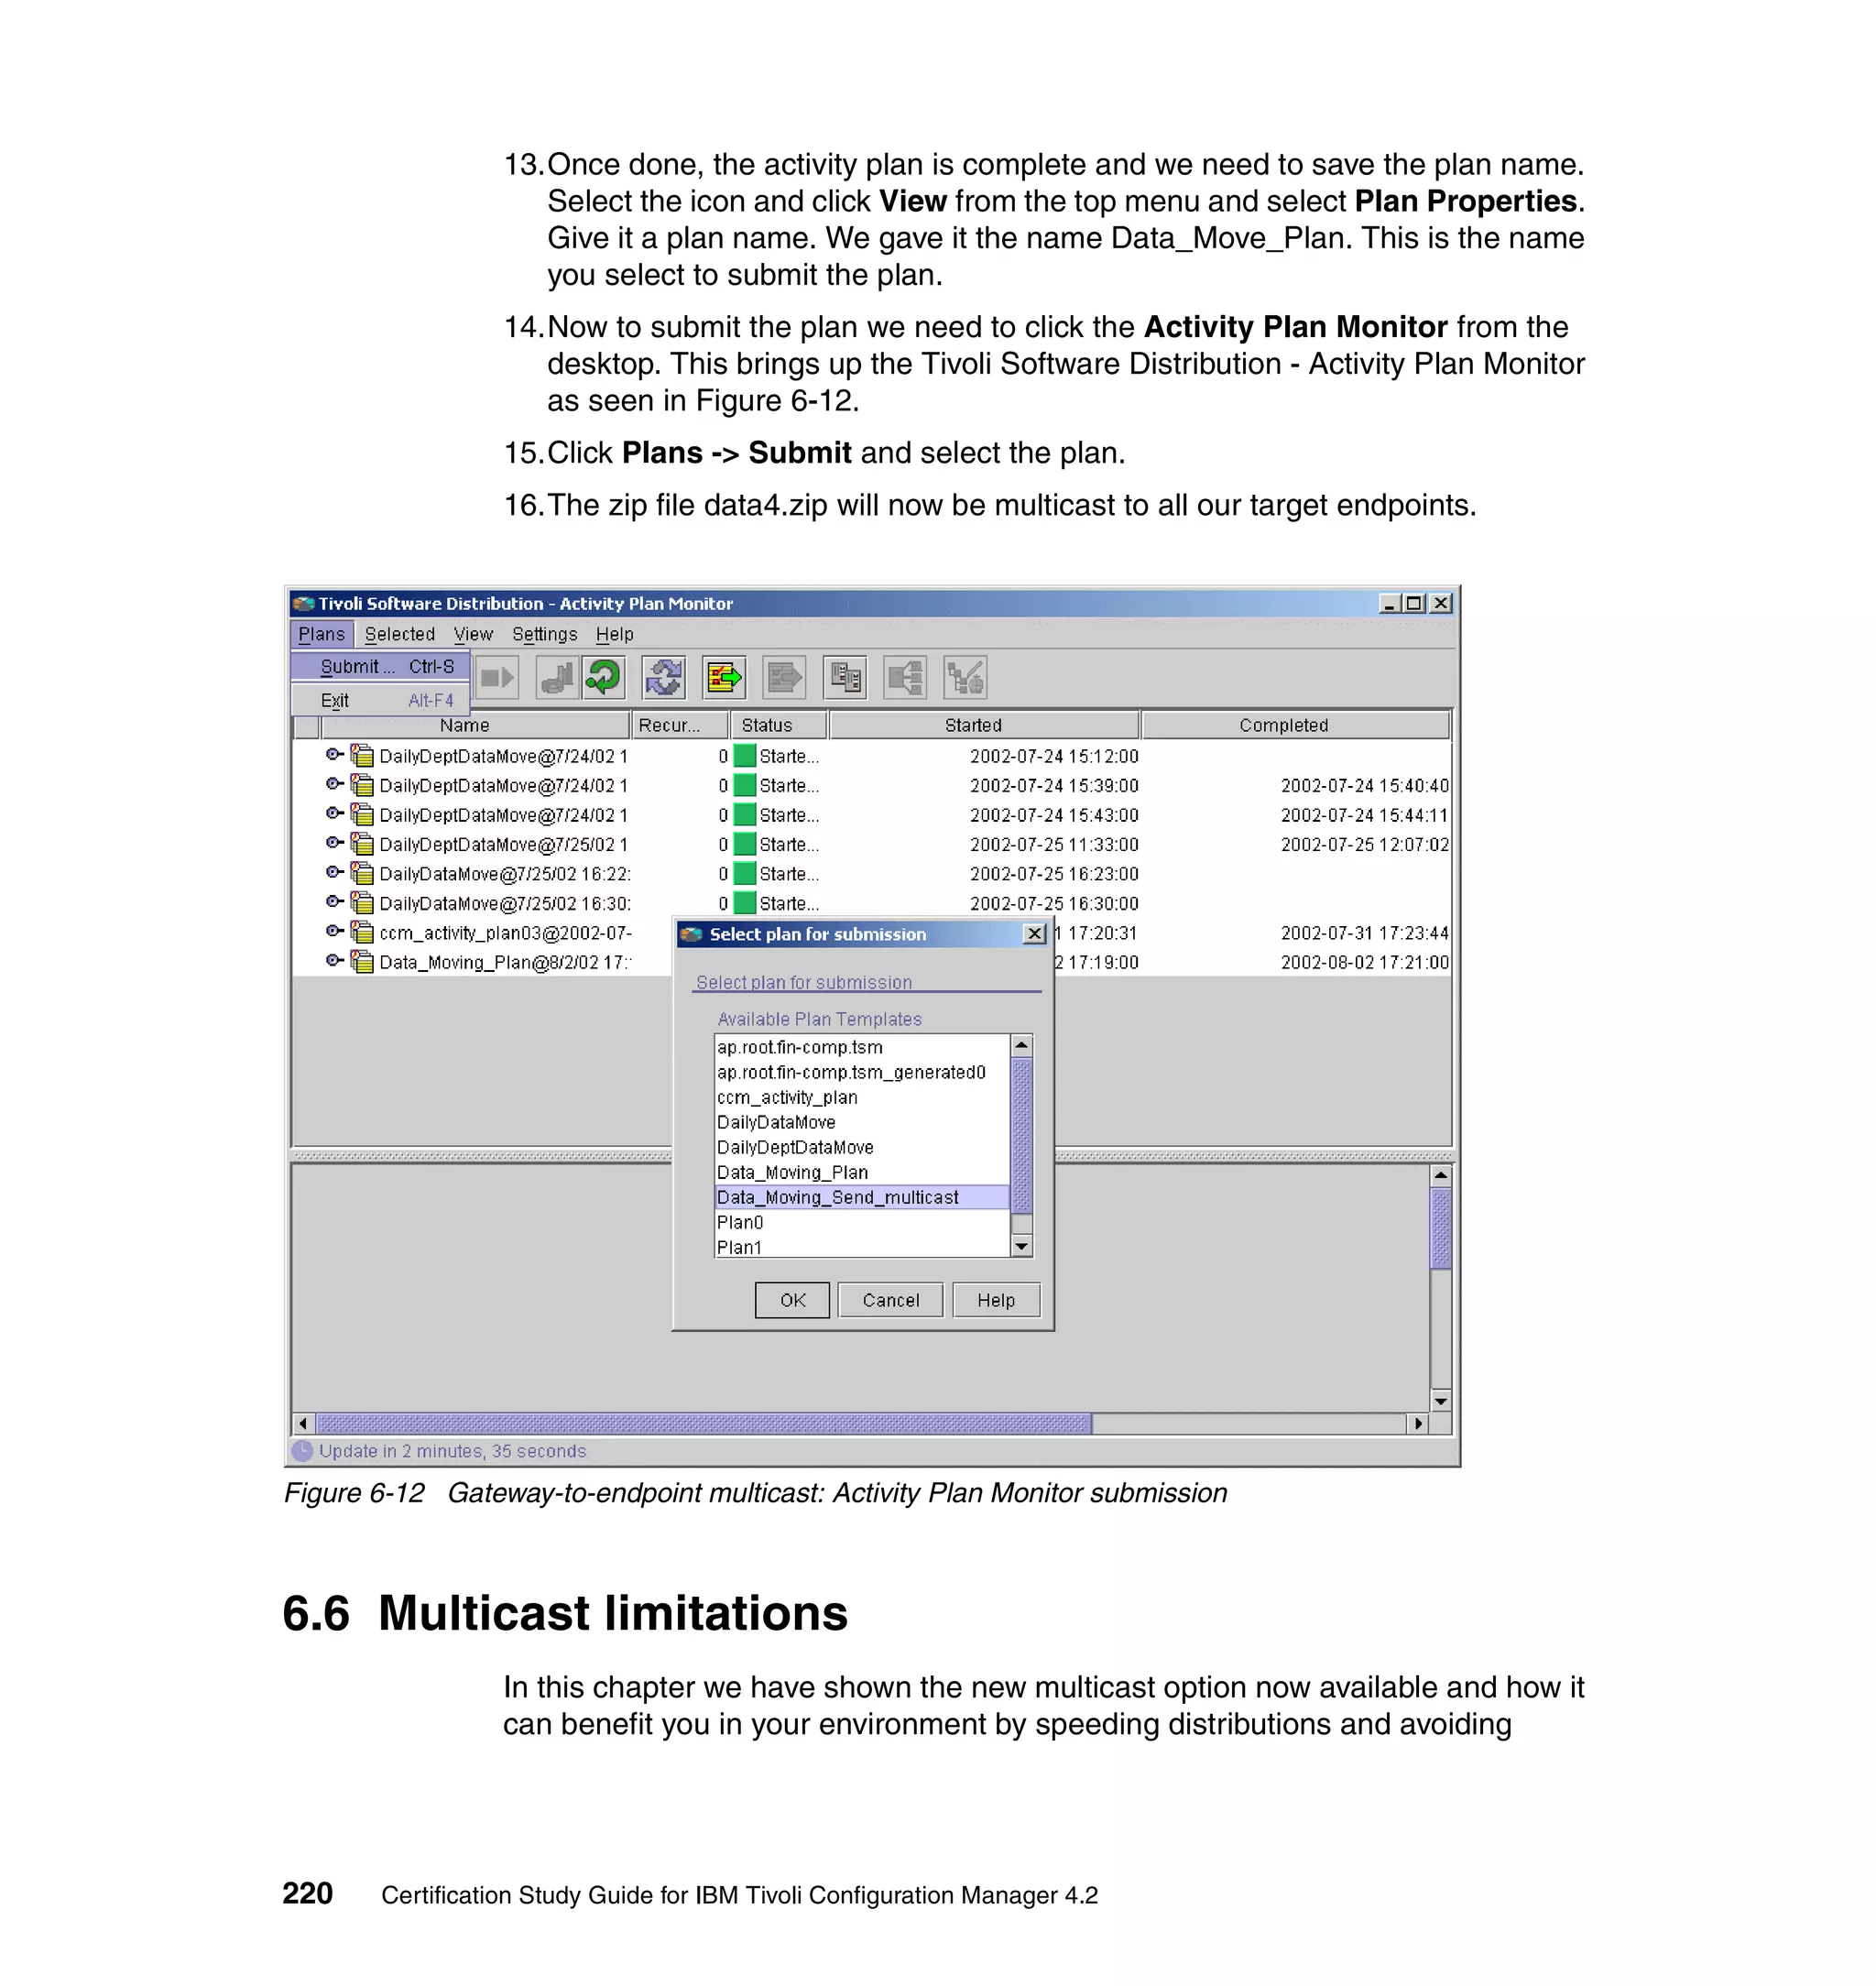
![6.3.1 Configuring repeaters for multicast
Configuring a repeater for multicast involves the wmcast and wmdist commands.
Use the wmdist command to enable the repeater for multicast distribution. Use
the wmcast command to set the configuration parameters for multicast
distributions.
For complete details on the commands and keywords used throughout this
section, refer to the Tivoli Management Framework Reference Manual.
To enable a repeater for multicast, use the wmdist -s command with the
following keywords:
repeater_multicast Whether the repeater sends distributions to other
repeaters using multicast. The default is FALSE.
endpoint_multicast Whether the repeater sends distributions to endpoints
using multicast. The default is FALSE.
default_multicast Back-level applications that use MDist2 but do not have
the multicast distribution option built in can take
advantage of multicast if this parameter is set to TRUE.
This will cause that application to send all distributions
from the specified repeater using multicast first. If the
distribution fails then it will attempt to do unicast
depending on the fail_unavailable settings.
fail_unavailable When set to TRUE, repeater will not attempt a unicast
retry for endpoints that failed to receive multicast. The
default is False. This option is hidden and does not show
up. This parameter is also for back-level applications and
only relevant to gateway repeaters.
The wmcast command sets repeater properties for MDist2 multicast distributions.
The defaults provided are designed for use in most LAN environments. However,
if a repeater sends multicast over both fast and slow links, configure multicast
repeater settings for the slowest link.
wmcast –s repeater_name [keyword=value...]
The settings are:
backofftm=time_in_milliseconds
Specifies the back-off time in milliseconds. When receivers acknowledge
receipt of a multicast advertisement, the receiver waits for a random time
interval between 0 ms and the number of ms specified by this keyword before
responding to the sender. This reduces congestion. As you add more
receivers, this number might need to be increased to improve performance.
The default is 100.
Chapter 6. Multicast concepts and implementation 205](https://image.slidesharecdn.com/certificationstudyguideforibmtivoliconfigurationmanager4-2redp3946-120522221807-phpapp01/75/Certification-study-guide-for-ibm-tivoli-configuration-manager-4-2-redp3946-223-2048.jpg)


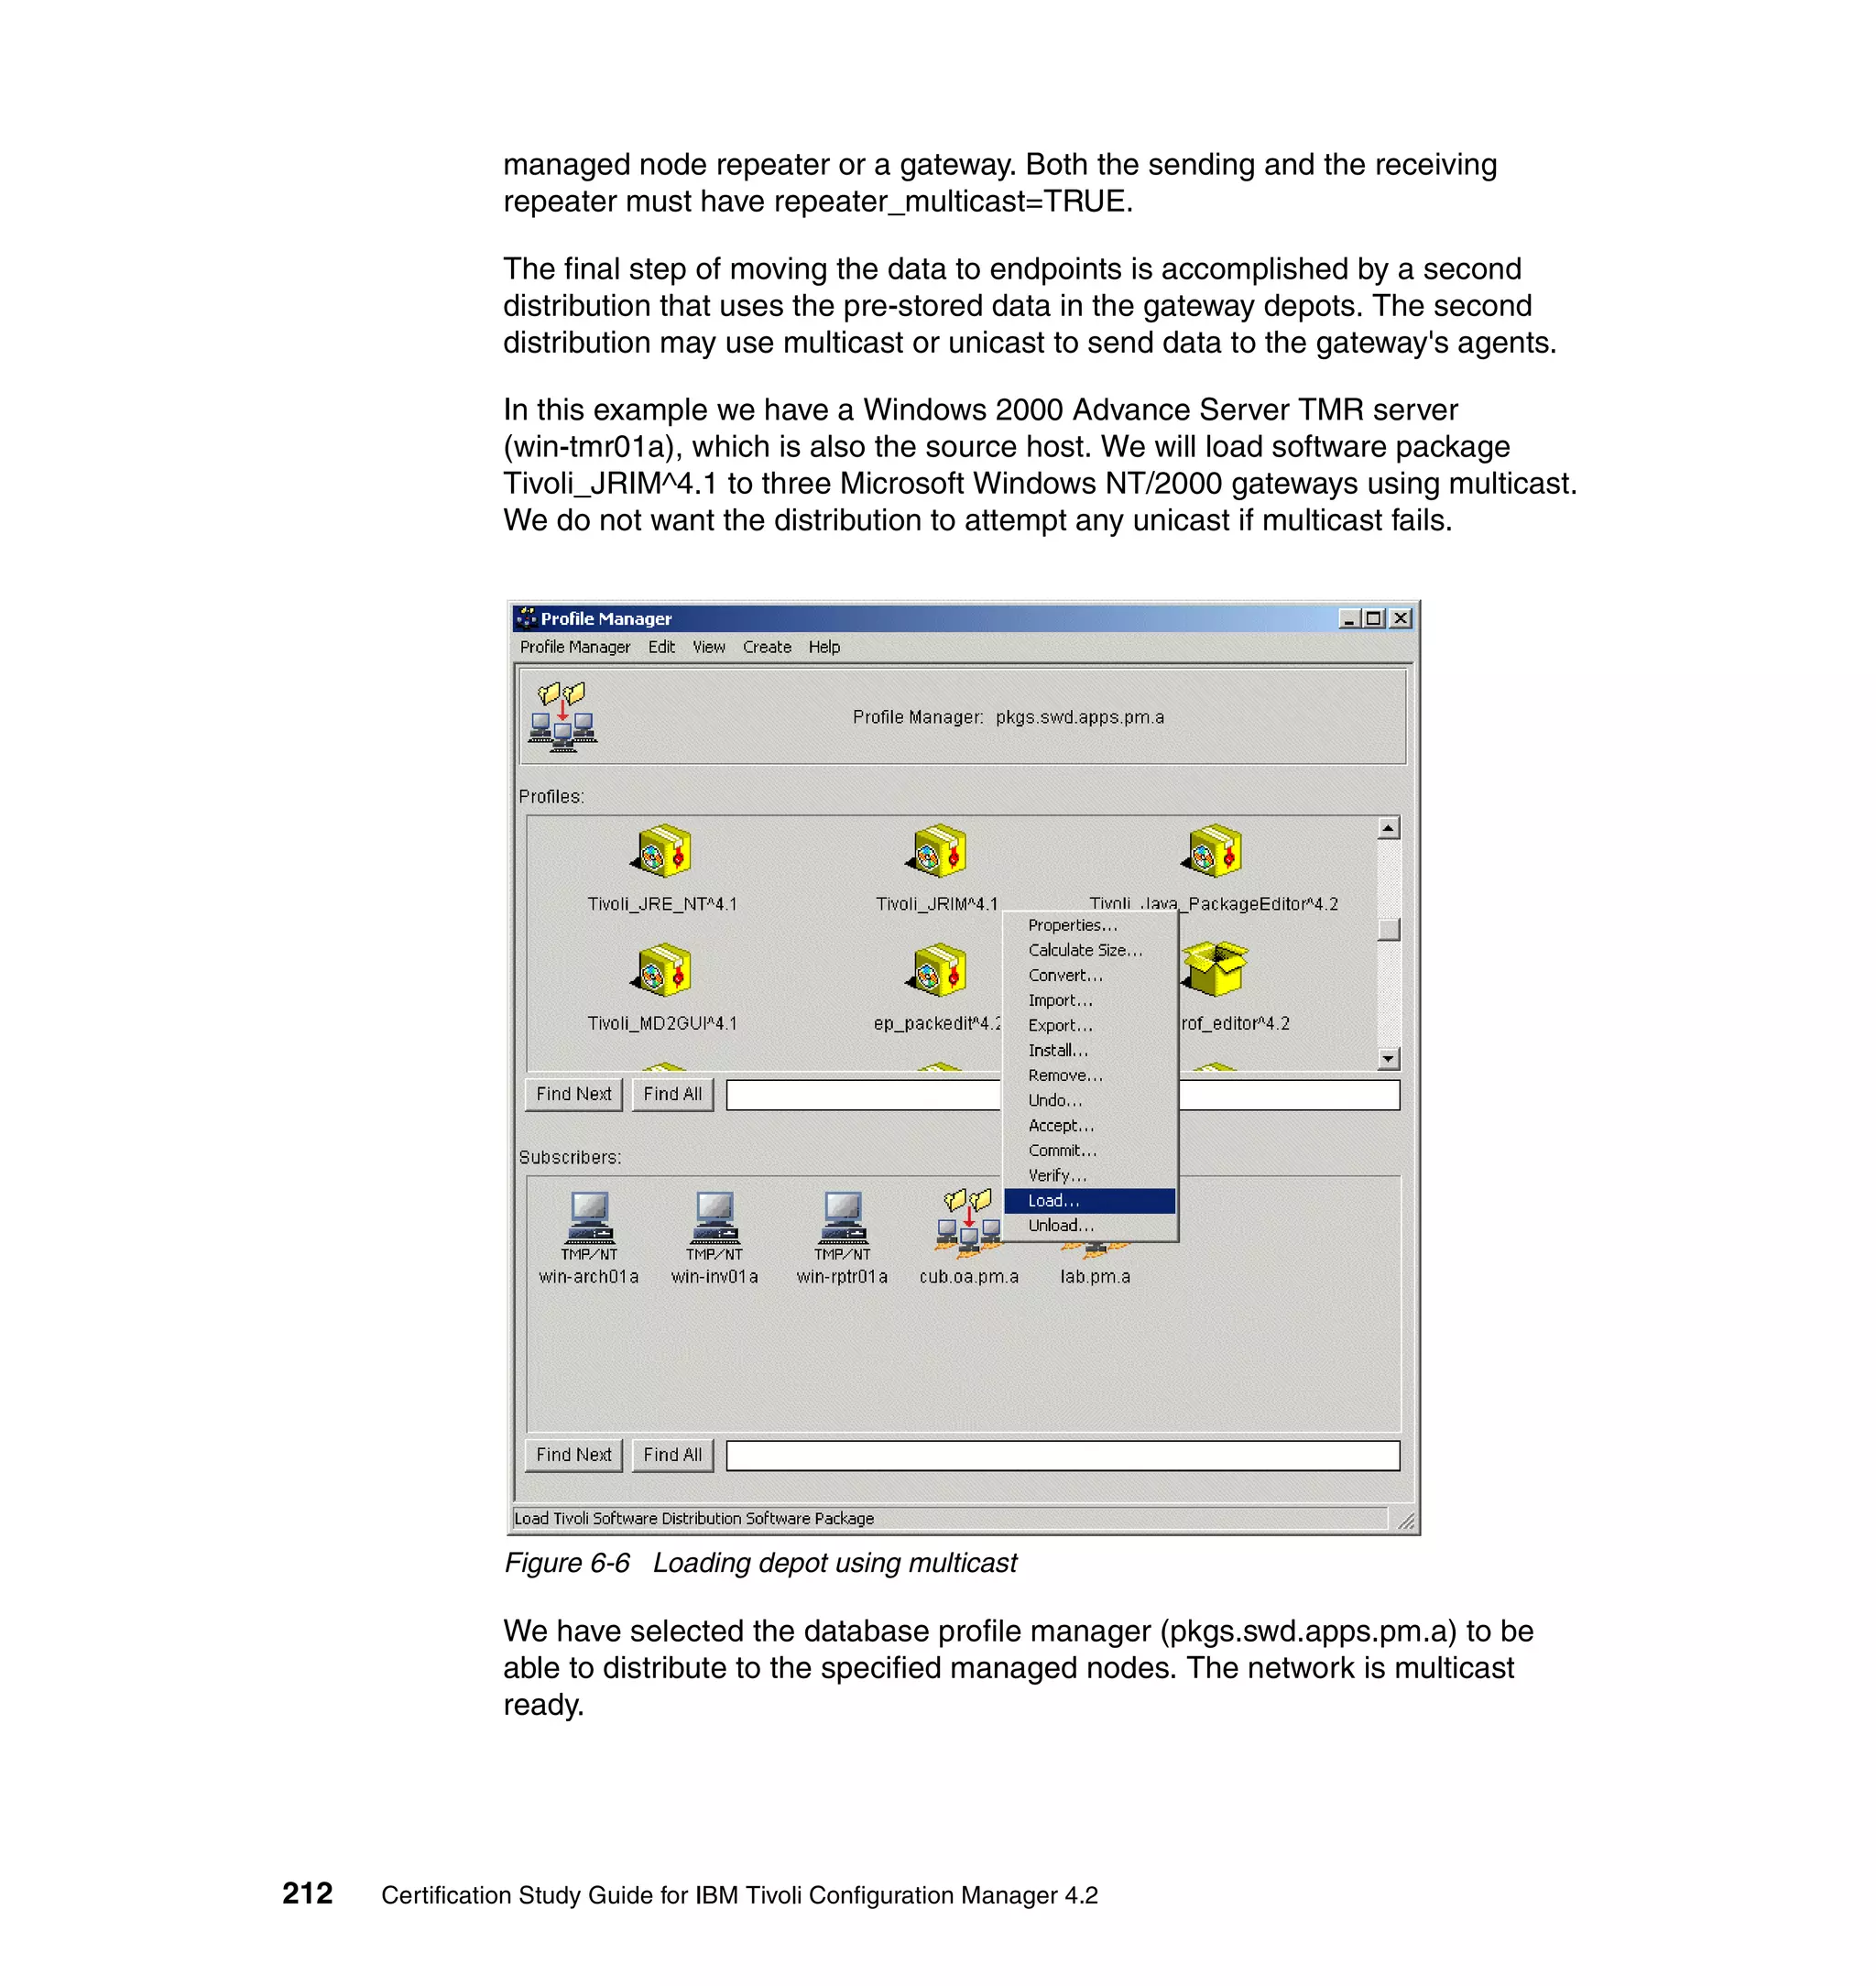

![Figure 6-7 Configuring depot load for multicast
5. After making the selections, click Set and Close, followed by Load and
Close. This will cause the software package to be loaded to the respective
depots using multicast.
Note: If a multicast distribution is attempted to a single endpoint, then unicast
will be used irrespective of the distribution mode. You can still multicast to a
single repeater.
Command line
Loading of depot using multicast can also be achieved via command line by
using wldsp with -l is_multicast [ t | f ] set to t. Setting the
enable_multicast token to t enables the retry_unicast token. To disable and
unicast attempt you have to set the retry_unicast to f. This option can be used
only if the enable_multicast option is set to t. For more detailed information
214 Certification Study Guide for IBM Tivoli Configuration Manager 4.2](https://image.slidesharecdn.com/certificationstudyguideforibmtivoliconfigurationmanager4-2redp3946-120522221807-phpapp01/75/Certification-study-guide-for-ibm-tivoli-configuration-manager-4-2-redp3946-232-2048.jpg)


![7.4.7 Software Distribution traces
Traces provide more detailed information about packaging or distributions
enabled for the specific component related to the failure or failed Software
Distribution operation. Therefore, traces may be taken on the server, source host,
endpoint, preparation site, or disconnected CLI.
On endpoints the trace level is set in the Software Distribution base configuration
file, swdis.ini, located in the system directory on the target system for the
respective OS platform:
Windows: winnt or winnt40
OS/2: os2
NetWare: sys:System
UNIX:
/etc/Tivoli/ (global for root user)
$HOME/.swdis/ (local / private for non-root user)
Important: Setting the trace level using swdist.ini works only for endpoints,
starting with IBM Tivoli Configuration Manager Version 4.2. New with IBM
Tivoli Configuration Manager Version 4.2, there is a command, wswdcfg, to set
trace information on the Software Distribution servers and managed nodes.
The syntax follows:
wswdcfg –s trace_level= 0, 1, .....6
wswdcfg –h hostname
This command is not applicable for endpoints, where swdist.ini should be
used.
There is also another troubleshooting command that is new with IBM Tivoli
Configuration Manager Version 4.2: wmsgbrowse. It is used for investigating the
Notification Manager queue (browse the message queue, filter it, find
undelivered messages, etc.) in order to understand the problem.
For details on both of these troubleshooting commands please refer to the IBM
Tivoli Configuration Manager Reference Manual for Software Distribution
Version 4, SC23-4712.
The trace level by default is zero (as seen in Example 7-1) or none, which really
indicates no tracing or that tracing is, in effect, disabled. The new trace level
takes effect on the next distribution or execution.
Example 7-1 swdis.ini
[#SERVER]
product_dir=/usr/local/Tivoli/bin/swdis
working_dir=/usr/local/Tivoli/bin/swdis/work
Chapter 7. Troubleshooting IBM Tivoli Configuration Manager 237](https://image.slidesharecdn.com/certificationstudyguideforibmtivoliconfigurationmanager4-2redp3946-120522221807-phpapp01/75/Certification-study-guide-for-ibm-tivoli-configuration-manager-4-2-redp3946-255-2048.jpg)
![backup_dir=/usr/local/Tivoli/bin/swdis/backup
trace_level=0
trace_size=1000000
report_threads_limit=10
inventory_rim_name=inv_query
autopack_dir=/usr/local/Tivoli/bin/swdis/autopack
staging_dir=usr/local/Tivoli/bin/swdis/service
user_file_variables=/usr/local/Tivoli/bin/swdis/swdis.var
import_libraries=spd,libscimp
[aix-tmr01b]
product_dir=/opt/Tivoli/swdis/1
working_dir=/opt/Tivoli/swdis/1/work
backup_dir=/opt/Tivoli/swdis/1/backup
trace_level=0
trace_size=1000000
send_timeout=300
autopack_dir=/opt/Tivoli/swdis/1/autopack
staging_dir=opt/Tivoli/swdis/1/service
user_file_variables=/opt/Tivoli/swdis/1/swdis.var
import_libraries=spd,libecimp
inventory_scan_file=/opt/Tivoli/lcf/inv/SCANNER/sd_scan.nfo
There is no maximum size of each trace file; the default size per type is
1,000,000 bytes. When the trace_size specified is reached, the first trace file is
overwritten. For example, the trace files can be written from spo1.trc up to
spo9.trc (sp01.trc, sp02.trc, etc.), and if the specified maximum size is reached
and sp09 gets full, sp01.trc is overwritten (unless the trace_style keyword is
activated).
The trace file depends on the machine role for the installed component. The
trace files themselves are created initially, with trace_level = 0, zero byte, until the
trace_level is increased. Example 7-2 shows the swdist.ini file with the trace level
set to 5.
Example 7-2 Listing in swdis.ini on endpoint
C:WINNT>type swdis.ini |more
[3B-053]
speditor_dir=C:Tivoliswdis1speditor
product_dir=C:Tivoliswdis1
working_dir=C:Tivoliswdis1work
backup_dir=C:Tivoliswdis1backup
profile_dir=C:Tivoliswdis1workprofiles
trace_level=5
trace_size=1000000
send_timeout=300
autopack_dir=C:Tivoliswdis1autopack
staging_dir=Tivoliswdis1service
238 Certification Study Guide for IBM Tivoli Configuration Manager 4.2](https://image.slidesharecdn.com/certificationstudyguideforibmtivoliconfigurationmanager4-2redp3946-120522221807-phpapp01/75/Certification-study-guide-for-ibm-tivoli-configuration-manager-4-2-redp3946-256-2048.jpg)
![user_file_variables=C:Tivoliswdis1swdis.var
inventory_scan_file=C:TivolilcfinvSCANNERsd_scan.nfo
[#MOBILE]
speditor_dir=C:Tivoliswdis1speditor
product_dir=C:Tivoliswdis1
working_dir=C:Tivoliswdis1work
backup_dir=C:Tivoliswdis1backup
profile_dir=C:Tivoliswdis1workprofiles
trace_level=5
trace_size=1000000
send_timeout=300
autopack_dir=C:Tivoliswdis1autopack
staging_dir=Tivoliswdis1service
user_file_variables=C:Tivoliswdis1swdis.var
inventory_scan_file=C:TivolilcfinvSCANNERsd_scan.nfo
It may be worthwhile to erase any existing trace files to ensure a good capture for
recreation or diagnosis.
Software Distribution trace levels
– 0: None (default)
– 1: Fatal
– 2; Error
– 3: Warning
– 4: Information
– 5: Verbose
– 6: On L3/Development request only
Software Distribution trace flags
– [F]: Fatal Failure
– [E]: Error
– [W]: Warning
– [I]: Information
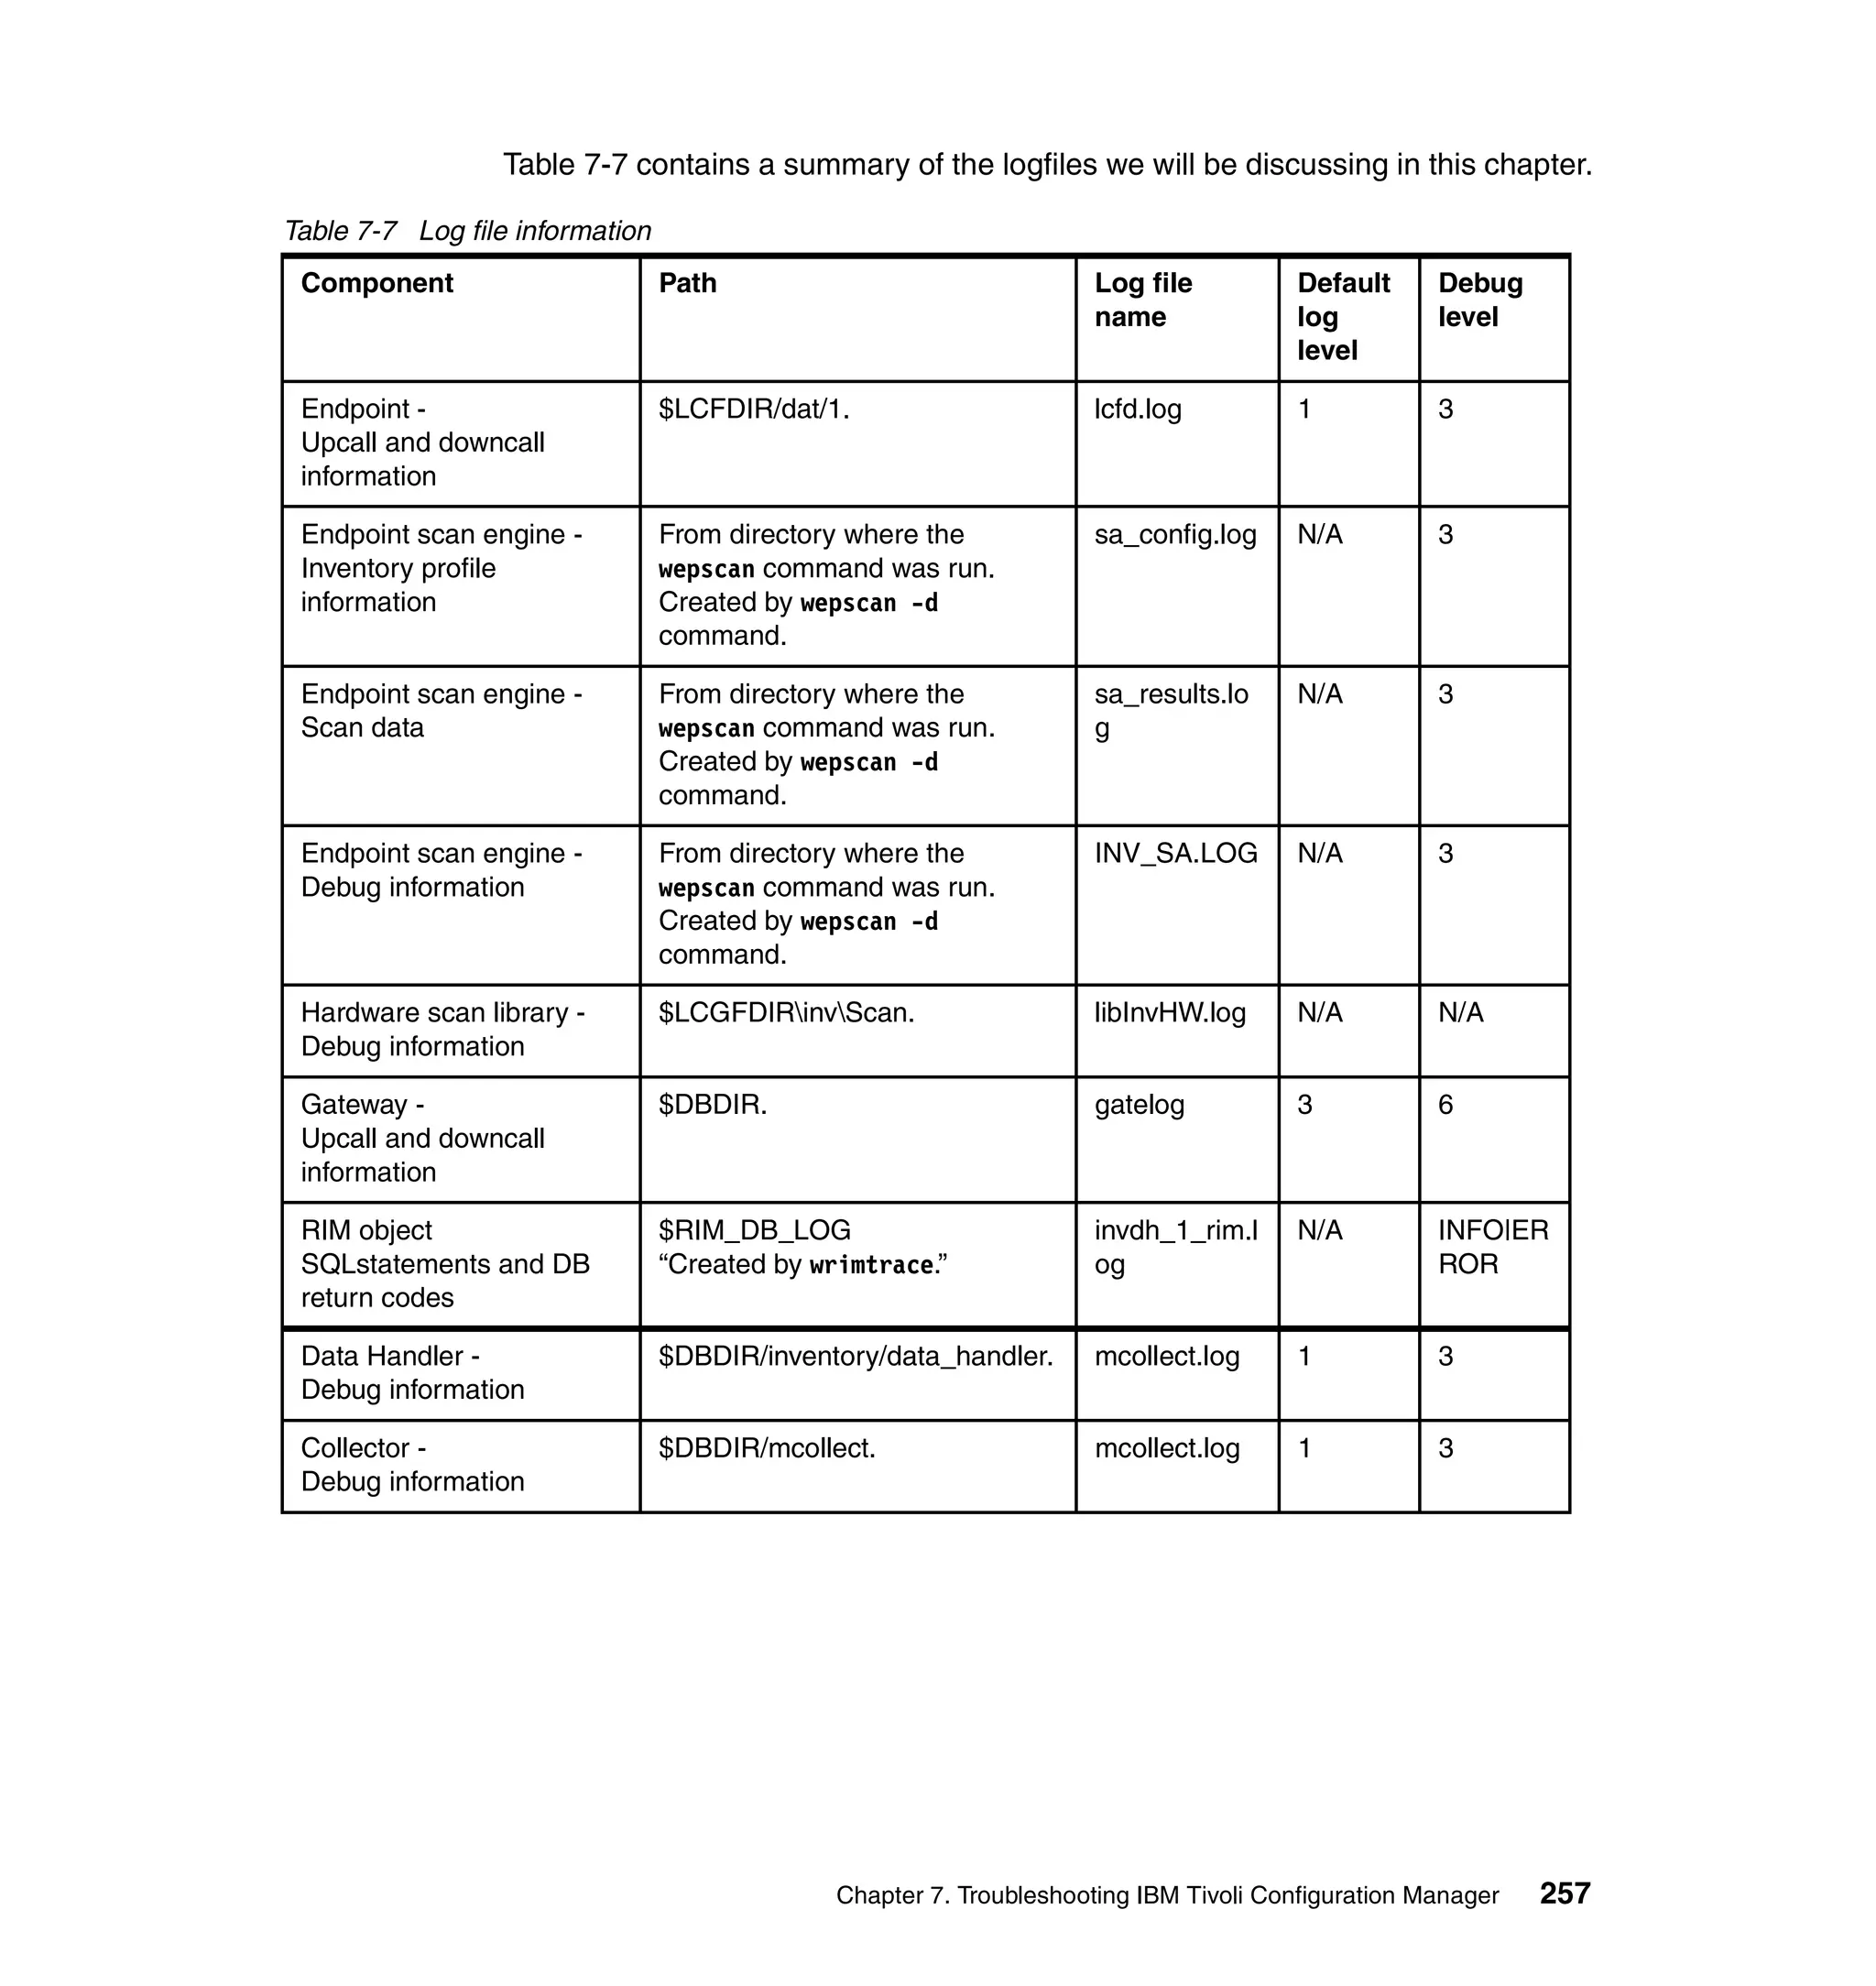
Here is a summary of the logfiles at the different locations.
Server (spo_core.exe)
– tmesdis*.trc
CLI
– spo*.trc
• Import/export
• Requests to source host
Source Host (spd_eng.exe)
– spde*.trc
Chapter 7. Troubleshooting IBM Tivoli Configuration Manager 239](https://image.slidesharecdn.com/certificationstudyguideforibmtivoliconfigurationmanager4-2redp3946-120522221807-phpapp01/75/Certification-study-guide-for-ibm-tivoli-configuration-manager-4-2-redp3946-257-2048.jpg)

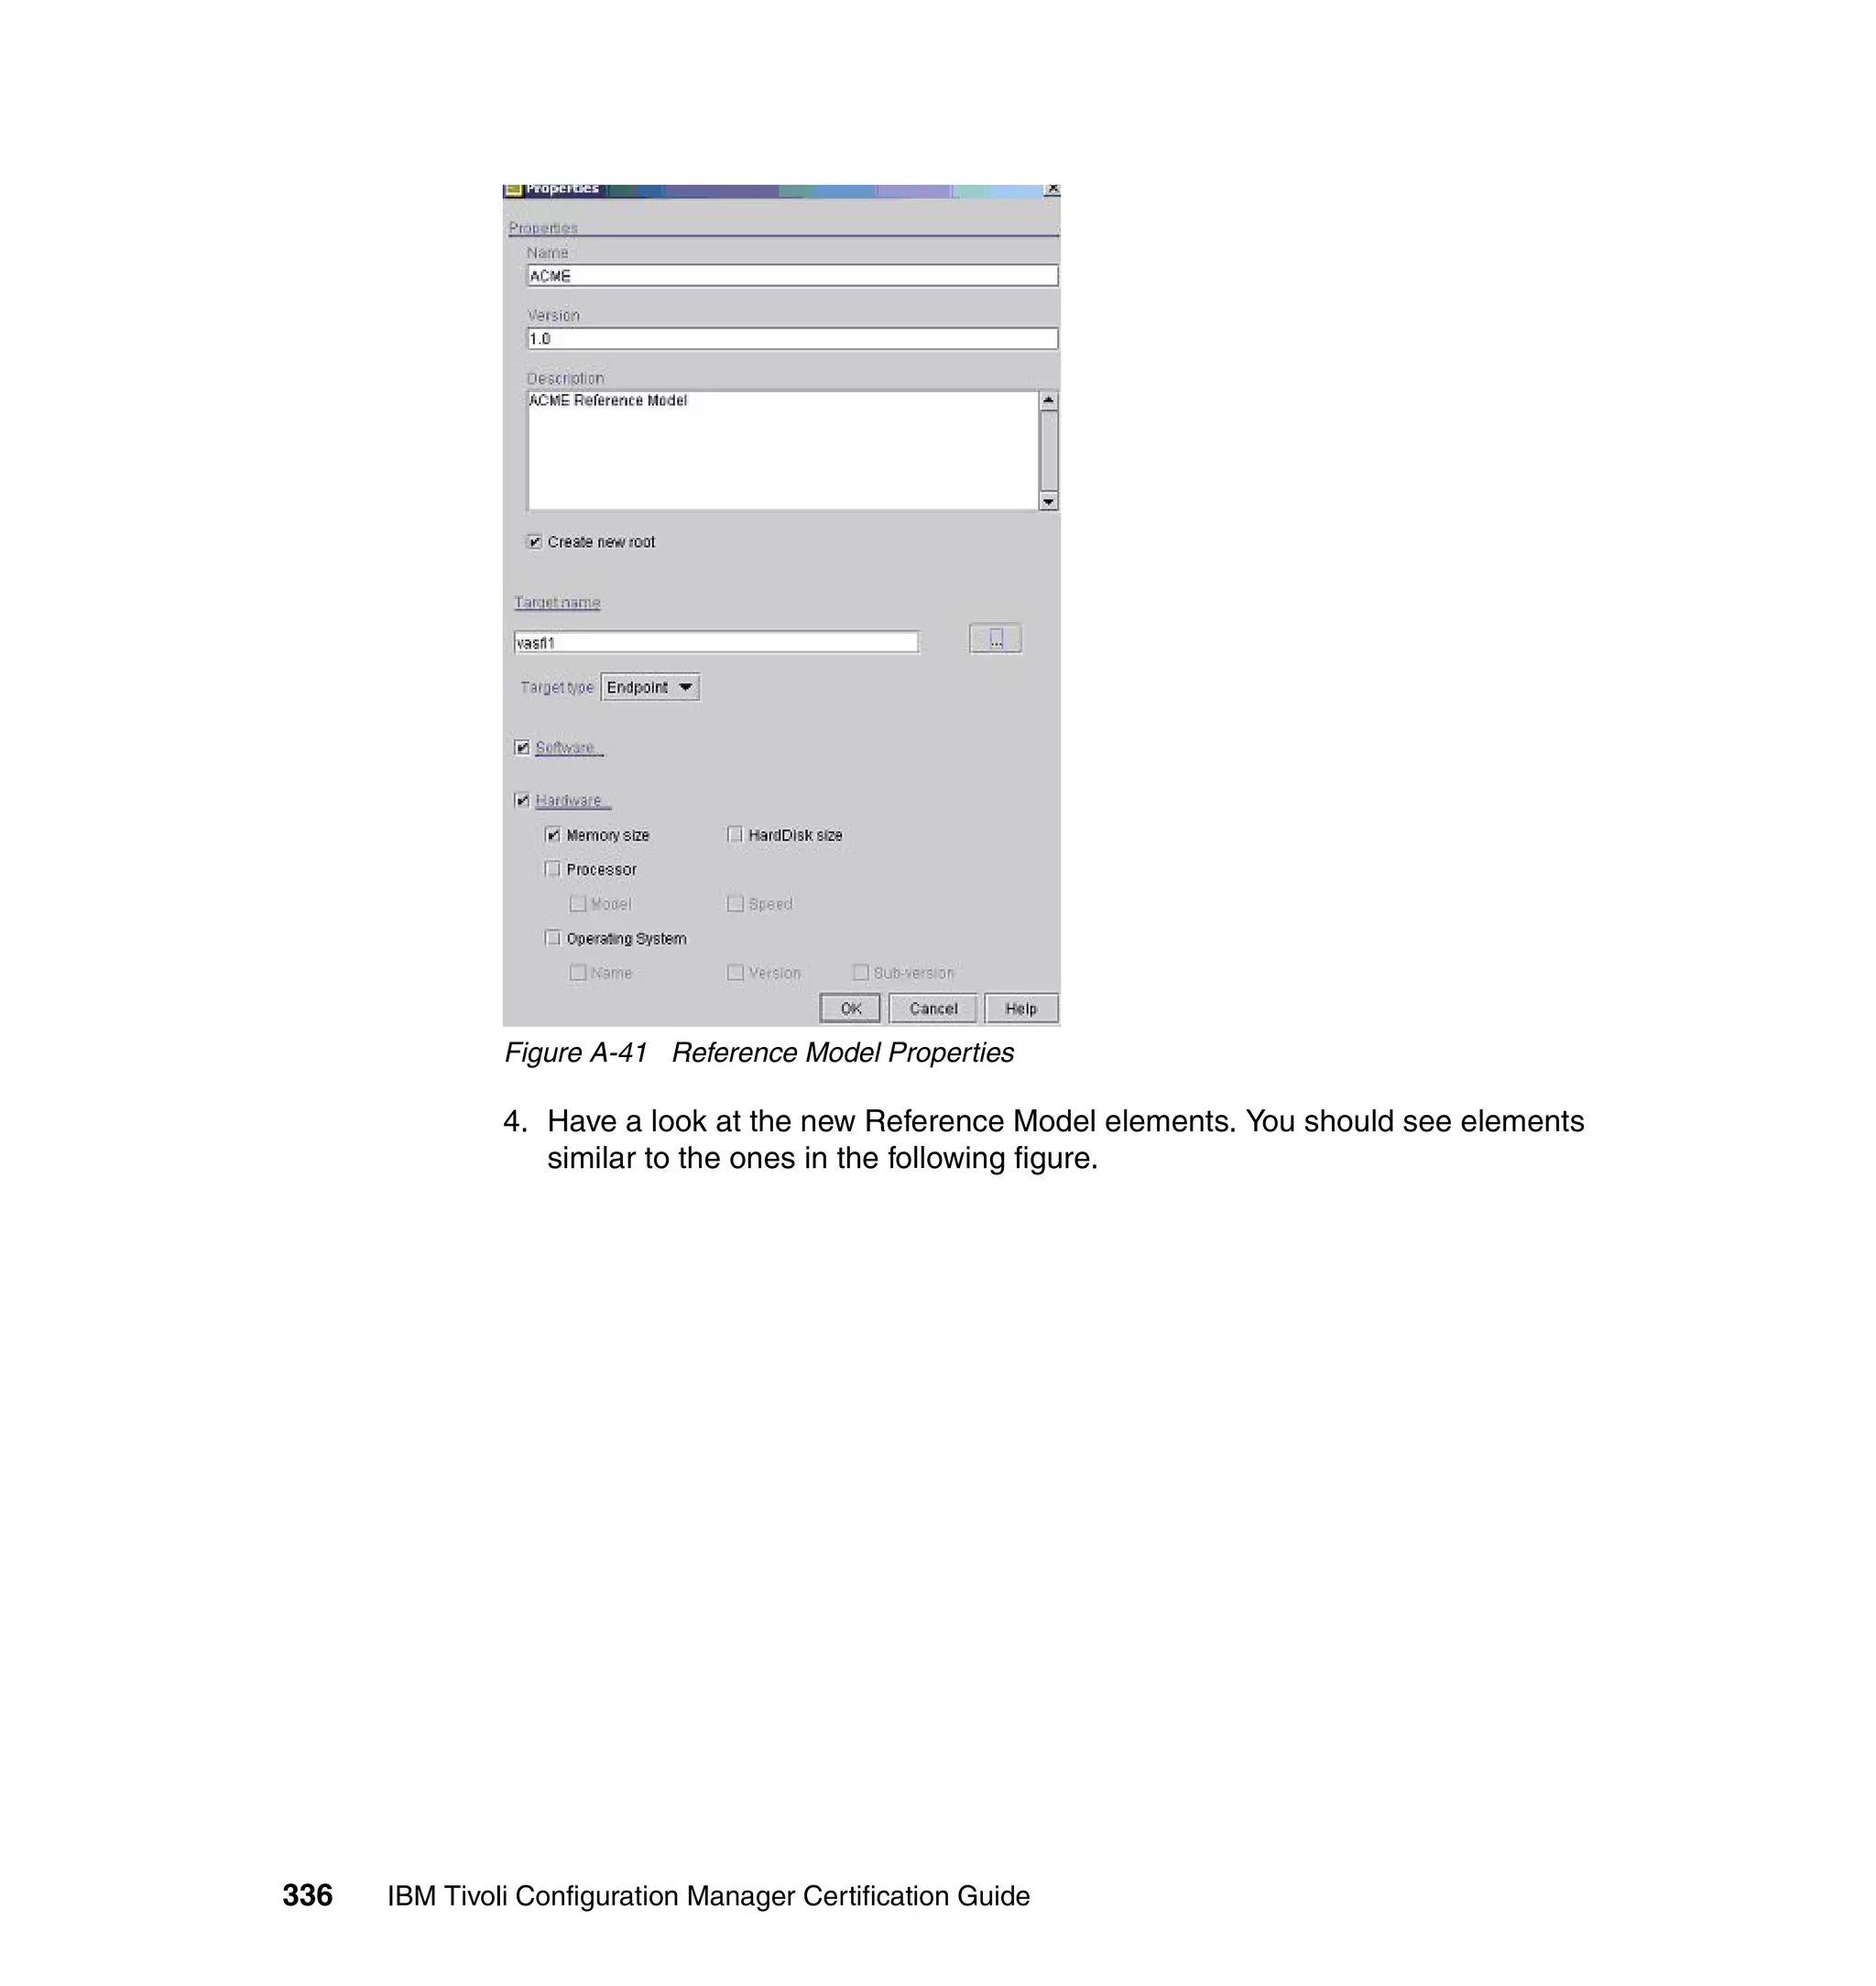
![The table below shows the location of the AP configuration file, apm.ini, for the
operating system.
Table 7-2 Location of apm.ini, APM configuration file
File name OpSys Path
apm.ini UNIX /etc/Tivoli
apm.ini NT/W2000 $SystemDriveWINNT
A sample apm.ini file is shown in Example 7-3.
Example 7-3 Sample apm.ini
;APM configuration file
[DEFAULT]
trace_level=0
working_dir=C:Tivolibinw32-ix86..w32-ix86..apm
trace_size=1000000
log_max_file=100000
log_level=5
plugin_download=enabled
log_file=apmlog
TME_Host=morbidelli
TME_User=tivapm
[MAIN]
trace_level=0
working_dir=C:Tivolibinw32-ix86..w32-ix86..apm
trace_size=1000000
[HANDLER]
trace_level=0
working_dir=C:Tivolibinw32-ix86..w32-ix86..apm
trace_size=1000000
[EXECUTER]
trace_level=0
working_dir=C:Tivolibinw32-ix86..w32-ix86..apm
trace_size=1000000
[APMCLI]
trace_level=0
working_dir=C:Tivolibinw32-ix86..w32-ix86..apm
trace_size=1000000
[APMEDITOR]
trace_level=0
working_dir=C:Tivolibinw32-ix86..w32-ix86..apm
trace_size=1000000
plugin_download=enabled
[MONITOR]
enable_auto_update=true
auto_update_interval=180
244 Certification Study Guide for IBM Tivoli Configuration Manager 4.2](https://image.slidesharecdn.com/certificationstudyguideforibmtivoliconfigurationmanager4-2redp3946-120522221807-phpapp01/75/Certification-study-guide-for-ibm-tivoli-configuration-manager-4-2-redp3946-262-2048.jpg)
![trace_level=0
working_dir=C:Tivolibinw32-ix86..w32-ix86..apm
trace_size=1000000
plugin_download=enabled
Tip: A new command, wtrcapm, can be used to change or view the current log
and trace settings for the activity plan engine components. For example, the
following changes the value of trace_level key in the [HANDLER] session in
apm.ini file to 3.
wtrcapm –H –s trace_level=3
7.5.3 Activity Planner logfiles
Table 7-3 summarizes the logfiles for AP.
Table 7-3 Location of APM logfiles
Log type File name OpSys Path
AP Monitor apmon.log UNIX /tmp/
AP Monitor apmon.log NT/W2000 $SystemDriveWIN
NT
AP Editor apmed.log UNIX /tmp/
AP Editor apmed.log NT/W2000 $SystemDriveWIN
NT
APM General apmlog* UNIX working_dir in
apm.ini
APM General apmlog* NT/W2000 working_dir in
apm.in
APM Internal apm.log UNIX /tmp/
APM Internal apm.log NT/W2000 $SystemDrive
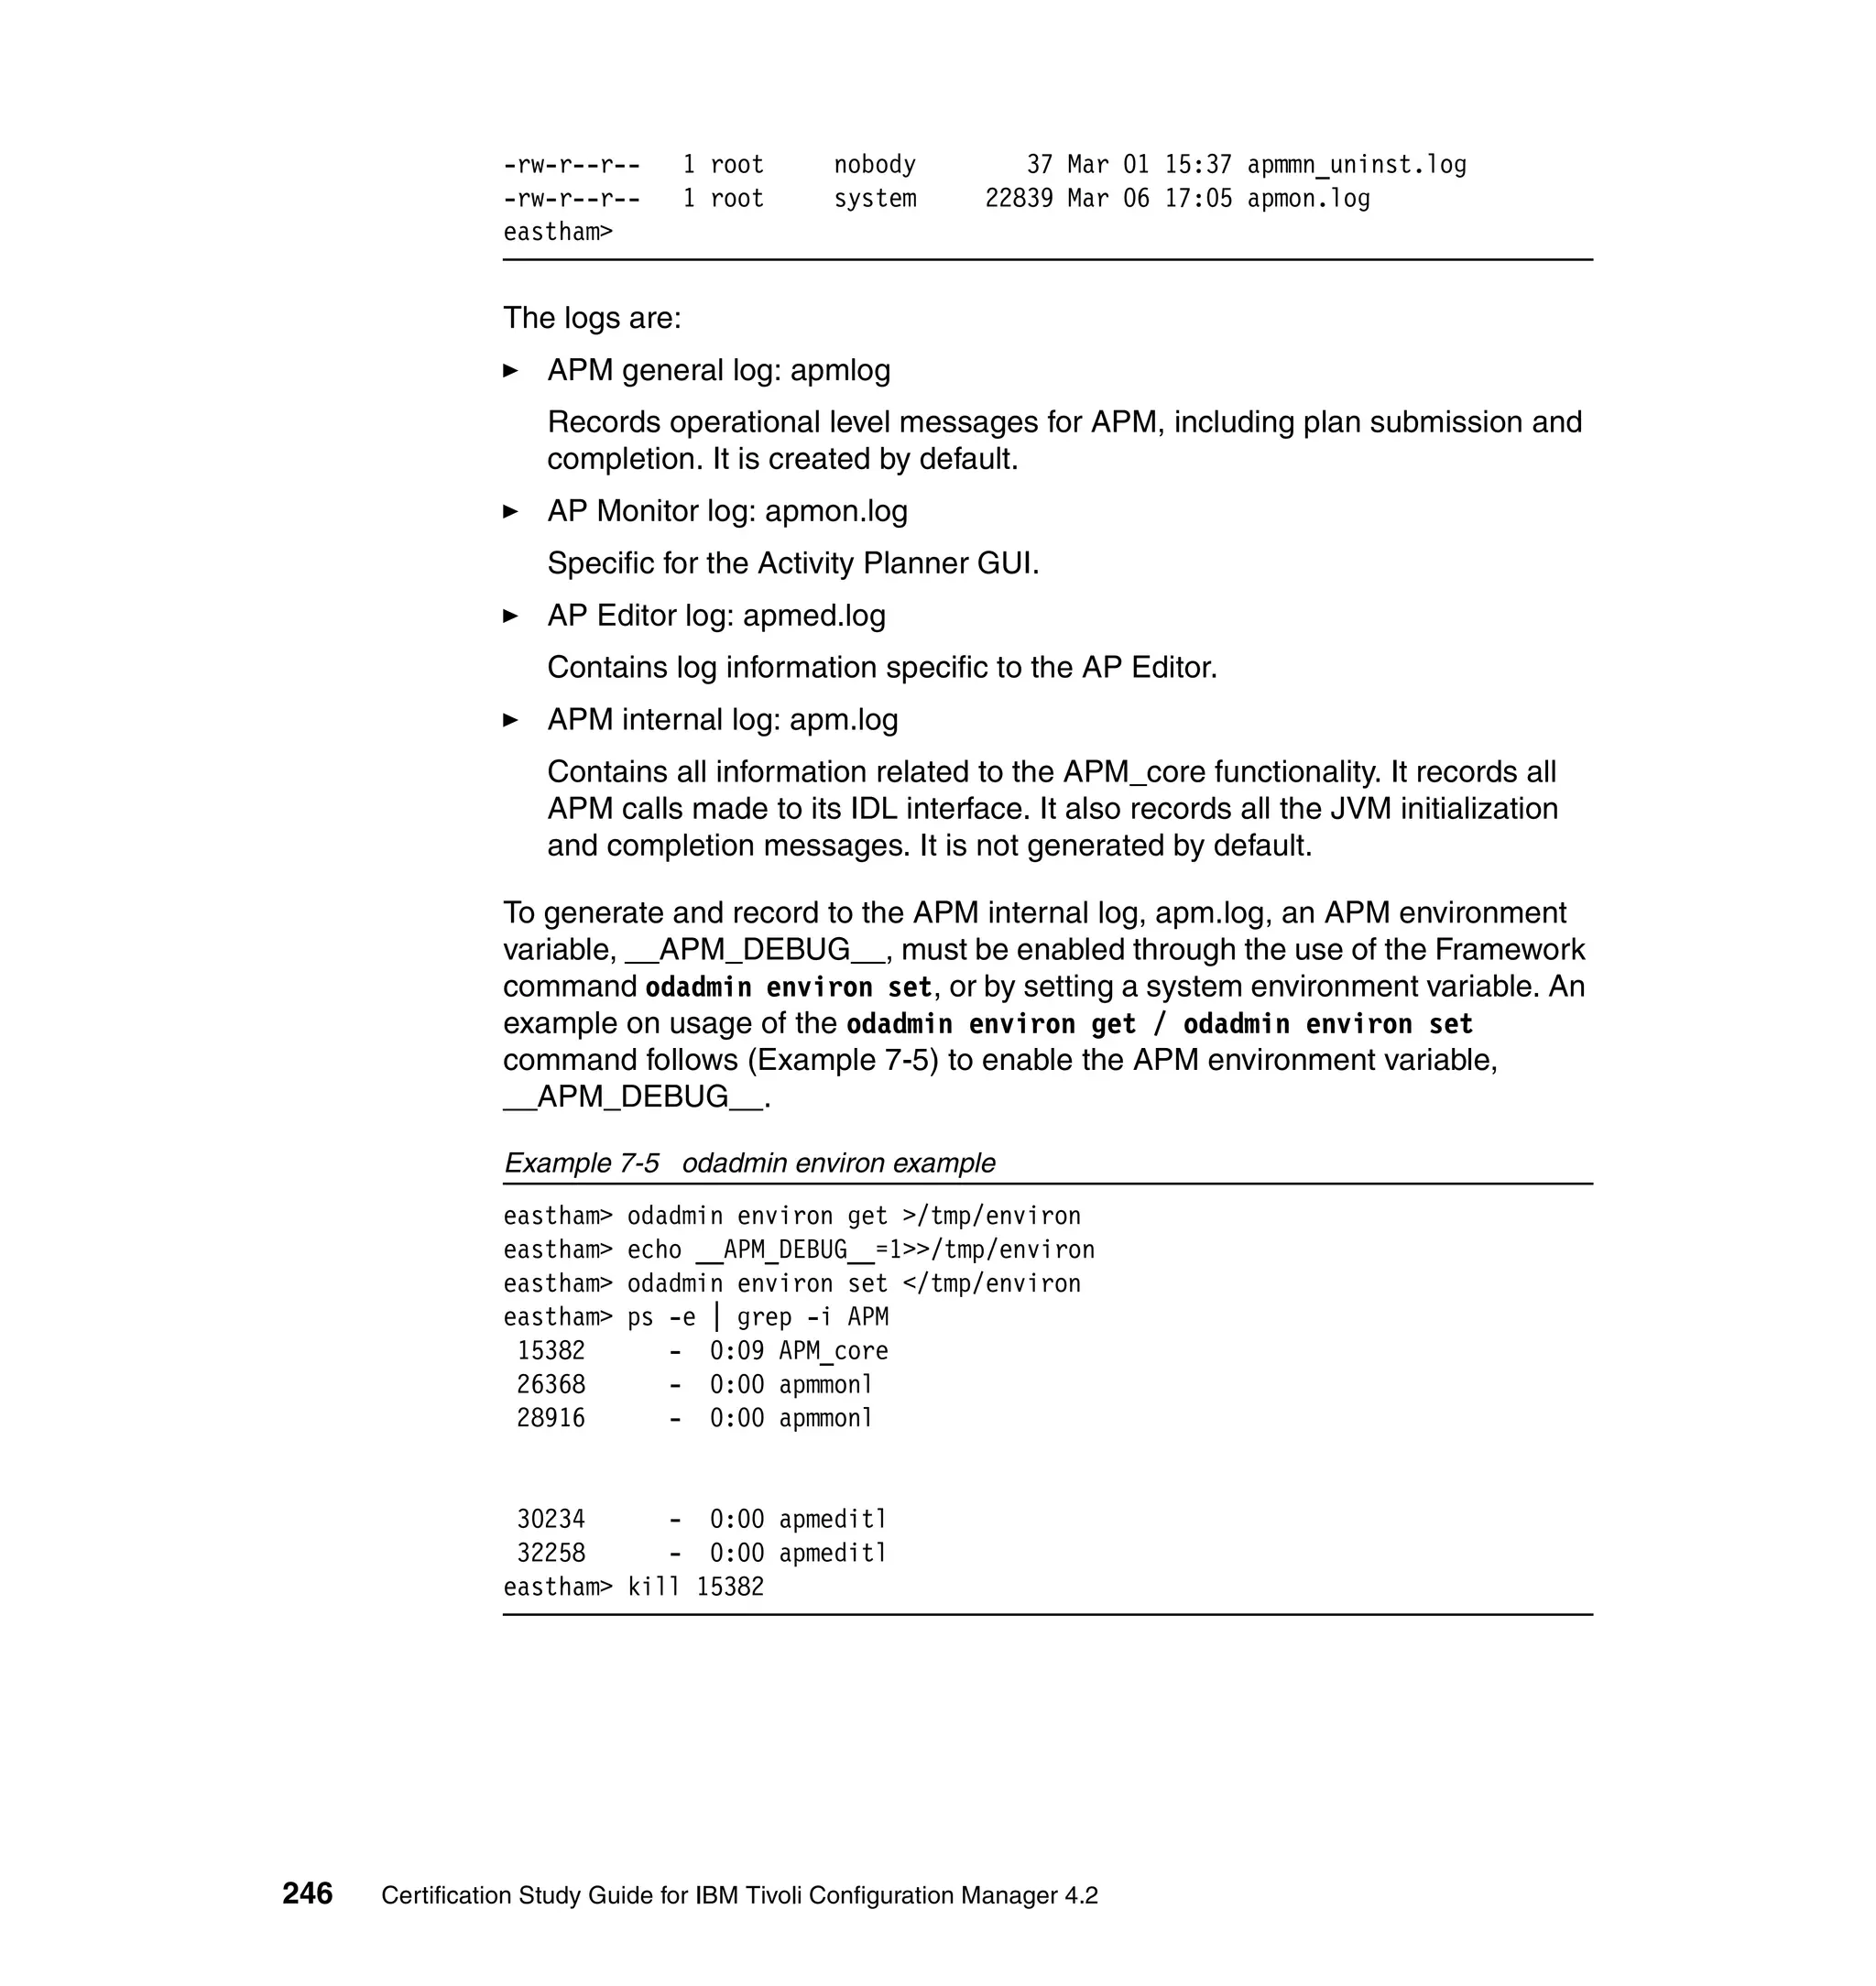
Example 7-4 shows the APM logfiles on our UNIX TMR server.
Example 7-4 APM logfiles
eastham> pwd
/tmp
eastham> ls -al ap*.*
-rw------- 1 root system 735094 Mar 07 06:10 apm.log
-rw-r--r-- 1 root nobody 204 Mar 01 15:43 apm_uninst.log
-rw-r--r-- 1 root system 22334 Mar 06 18:51 apmed.log
Chapter 7. Troubleshooting IBM Tivoli Configuration Manager 245](https://image.slidesharecdn.com/certificationstudyguideforibmtivoliconfigurationmanager4-2redp3946-120522221807-phpapp01/75/Certification-study-guide-for-ibm-tivoli-configuration-manager-4-2-redp3946-263-2048.jpg)


![7.8.2 Tracing the Web User Interface
You can use wwebcfg to set the tracing parameters for the Web User Interface.
The output trace files, WebUI*.trc, are located in the $DBDIR/WebUI directory.
The available parameters for wwebcfg are:
product_dir
working_dir
trace_size
trace_level
The default for product_dir is $DBDIR/WebUI and $DBDIR/WebUI/work for
working_dir. The default trace_size is 1000000 and when the trace file size
reaches this size, a new file is created.
The trace_level can be set from 0 to 6. Your support personnel may request a
higher level depending on the situation.
Table 7-6 Settings for trace_level
trace_level Specifies
0 No traces
1 Level fatal
2 Level error
3 Level warning
4 Level info
5 Level verbose
6 Maximum level
Tracing Software Distribution WEB UI plug-in
Set the trace_level parameter of wswdcfg to a level by running:
wswdcfg -s trace_level=9
The traces (*.trc) are located on the TMR server (by default) in the $product_dir
directory, which is specified in the [#SERVER] section of the swdis.ini file. The
swdis.ini is located on C:/WINNT for the Windows Tivoli Server and /etc/Tivoli for
the UNIX TMR server.
In the $product_dir, the spo*.trc and spde*.trc should have traces of the
publishing of software packages to TWG. The swdmgr*.trc should have the
results of the publishing.
Chapter 7. Troubleshooting IBM Tivoli Configuration Manager 255](https://image.slidesharecdn.com/certificationstudyguideforibmtivoliconfigurationmanager4-2redp3946-120522221807-phpapp01/75/Certification-study-guide-for-ibm-tivoli-configuration-manager-4-2-redp3946-273-2048.jpg)


This document is a study guide for the IBM Tivoli Configuration Manager 4.2 certification. It explains the certification path and prerequisites, provides an overview of the Tivoli Management Framework and Tivoli Configuration Manager components and installation, and includes sample test questions and answers to help readers prepare for the certification exam.


![Vibe Coding vs. Spec-Driven Development [Free Meetup]](https://cdn.slidesharecdn.com/ss_thumbnails/vibecodingvsspecdrivendevelopment-251209105622-43f455e7-thumbnail.jpg?width=640&height=640&fit=bounds)


