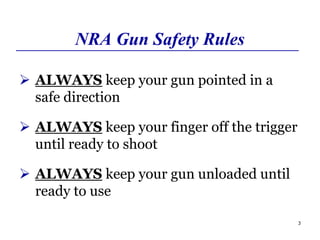
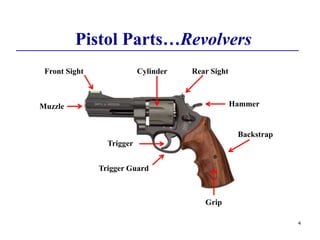
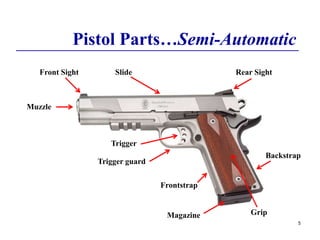
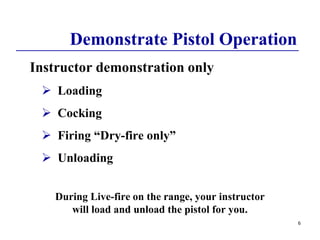
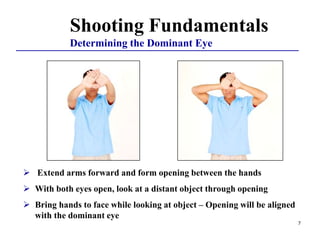
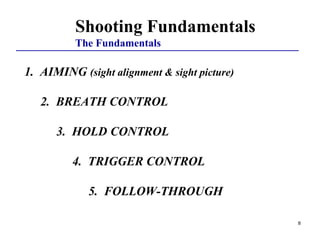
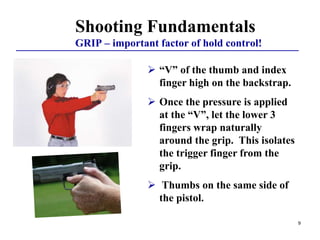
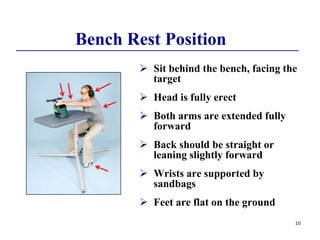
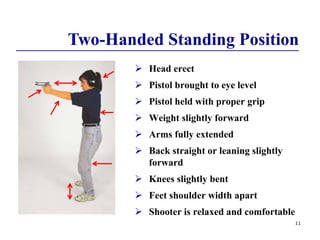
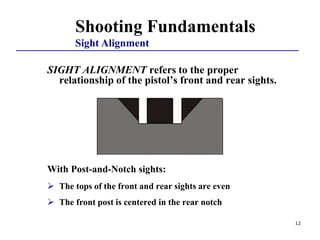
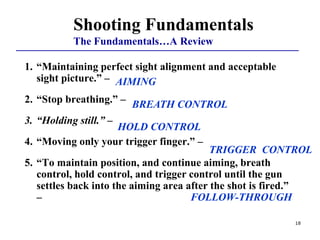
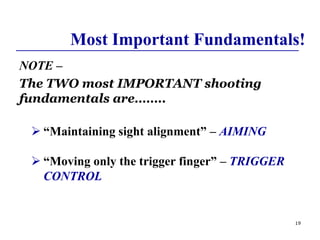
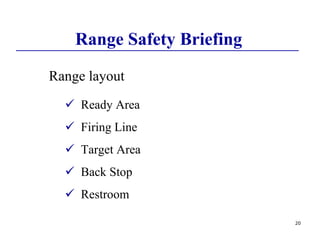
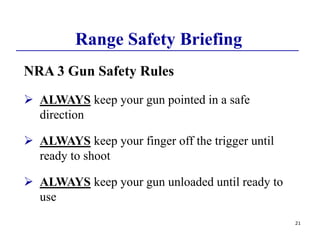
1
BSA 30 Minute
Pistol Briefing
NO AMMUNITION
in the classroom
NO EXCEPTIONS!
2
Orientation Goal
To provide beginning shooters with the
knowledge, skills, and attitude necessary to shoot
a pistol safely under the direct supervision of a
NRA Certified Pistol Instructor.
3
NRA Gun Safety Rules
 ALWAYS keep your gun pointed in a
safe direction
 ALWAYS keep your finger off the trigger
until ready to shoot
 ALWAYS keep your gun unloaded until
ready to use
4
Pistol Parts…Revolvers
Rear Sight
Front Sight
Trigger
Hammer
Backstrap
Muzzle
Trigger Guard
Cylinder
Grip
5
Pistol Parts…Semi-Automatic
Backstrap
Frontstrap
Trigger guard
Muzzle
Front Sight Rear Sight
Trigger
Slide
Magazine Grip
Demonstrate Pistol Operation
Instructor demonstration only
 Loading
 Cocking
 Firing “Dry-fire only”
 Unloading
During Live-fire on the range, your instructor
will load and unload the pistol for you.
6
7
 Extend arms forward and form opening between the hands
 With both eyes open, look at a distant object through opening
 Bring hands to face while looking at object – Opening will be aligned
with the dominant eye
Shooting Fundamentals
Determining the Dominant Eye
8
Shooting Fundamentals
The Fundamentals
1. AIMING (sight alignment & sight picture)
2. BREATH CONTROL
3. HOLD CONTROL
4. TRIGGER CONTROL
5. FOLLOW-THROUGH
9
Shooting Fundamentals
GRIP – important factor of hold control!
 “V” of the thumb and index
finger high on the backstrap.
 Once the pressure is applied
at the “V”, let the lower 3
fingers wrap naturally
around the grip. This isolates
the trigger finger from the
grip.
 Thumbs on the same side of
the pistol.
10
 Sit behind the bench, facing the
target
 Head is fully erect
 Both arms are extended fully
forward
 Back should be straight or
leaning slightly forward
 Wrists are supported by
sandbags
 Feet are flat on the ground
Bench Rest Position
11
 Head erect
 Pistol brought to eye level
 Pistol held with proper grip
 Weight slightly forward
 Arms fully extended
 Back straight or leaning slightly
forward
 Knees slightly bent
 Feet shoulder width apart
 Shooter is relaxed and comfortable
Two-Handed Standing Position
12
SIGHT ALIGNMENT refers to the proper
relationship of the pistol’s front and rear sights.
With Post-and-Notch sights:
 The tops of the front and rear sights are even
 The front post is centered in the rear notch
Shooting Fundamentals
Sight Alignment
13
Shooting Fundamentals
Sight Picture
Focus is on the… front sight
14
Body movement while breathing can
produce gun movement that impairs
shooting.
 Stop breathing momentarily while firing the
shot! (Respiratory pause)
Shooting Fundamentals
Breath Control
15
Shooting Fundamentals
Hold Control
Body movement affects the shot.
 Hold your body still.
 Hold control allows you to maintain the
proper sight picture and sight alignment
during the process of firing the shot.
16
Shooting Fundamentals
Trigger Control
 Trigger is squeezed straight to the rear in a
smooth, continuous manner without disturbing
the sight alignment.
 Gradually and evenly increasing pressure until
the mechanism releases.
SURPRISE yourself when the gun shoots.
Shooting Fundamentals
Follow-Through
In Pistol Shooting:
Follow-through means to maintain aiming
(perfect sight alignment and acceptable
sight picture), breath control, hold control,
and trigger control until the gun settles
back into the aiming area after firing.
17
18
Shooting Fundamentals
The Fundamentals…A Review
1. “Maintaining perfect sight alignment and acceptable
sight picture.” –
2. “Stop breathing.” –
3. “Holding still.” –
4. “Moving only your trigger finger.” –
5. “To maintain position, and continue aiming, breath
control, hold control, and trigger control until the gun
settles back into the aiming area after the shot is fired.”
–
AIMING
BREATH CONTROL
HOLD CONTROL
TRIGGER CONTROL
FOLLOW-THROUGH
19
Most Important Fundamentals!
NOTE –
The TWO most IMPORTANT shooting
fundamentals are……..
 “Maintaining sight alignment” – AIMING
 “Moving only the trigger finger” – TRIGGER
CONTROL
20
Range Safety Briefing
Range layout
 Ready Area
 Firing Line
 Target Area
 Back Stop
 Restroom
21
Range Safety Briefing
NRA 3 Gun Safety Rules
 ALWAYS keep your gun pointed in a safe
direction
 ALWAYS keep your finger off the trigger until
ready to shoot
 ALWAYS keep your gun unloaded until ready to
use
22
Range Safety Briefing
Other Safety Rules
 Know your target and what is beyond
 Wear eye and ear protection as appropriate
 Never use alcohol or drugs before or while shooting
 Be aware that certain types of guns and many shooting
activities require additional safety precautions
Range Commands
 “Commence Firing”
 “Cease Firing”
23
At The Firing Point
One instructor will be at each firing point.
1. The instructor will hold the pistol by the slide or barrel.
2. Place your hands on the grip. When you have control of the pistol,
say “Thank you” and the instructor will let go.
3. You will then Dry-fire. TAKE YOUR TIME. Focus on safety and the
shooting fundamentals. When you are comfortable, tell the Instructor
you are ready to shoot.
4. Your instructor will then load the pistol and hold it by the slide or
barrel.
5. Place your hands on the grip. When you have control of the pistol,
say “Thank you” and the instructor will let go.
6. You will Live-fire the prescribed number of shoots. Strive for
consistent shot groups.
24
Questions
Do you have any questions before you move to the
Ready Area?

bsa_30_min_pistol_briefing_final_4_30_10.ppt

  • 1.
    1 BSA 30 Minute PistolBriefing NO AMMUNITION in the classroom NO EXCEPTIONS!
  • 2.
    2 Orientation Goal To providebeginning shooters with the knowledge, skills, and attitude necessary to shoot a pistol safely under the direct supervision of a NRA Certified Pistol Instructor.
  • 3.
    3 NRA Gun SafetyRules  ALWAYS keep your gun pointed in a safe direction  ALWAYS keep your finger off the trigger until ready to shoot  ALWAYS keep your gun unloaded until ready to use
  • 4.
    4 Pistol Parts…Revolvers Rear Sight FrontSight Trigger Hammer Backstrap Muzzle Trigger Guard Cylinder Grip
  • 5.
  • 6.
    Demonstrate Pistol Operation Instructordemonstration only  Loading  Cocking  Firing “Dry-fire only”  Unloading During Live-fire on the range, your instructor will load and unload the pistol for you. 6
  • 7.
    7  Extend armsforward and form opening between the hands  With both eyes open, look at a distant object through opening  Bring hands to face while looking at object – Opening will be aligned with the dominant eye Shooting Fundamentals Determining the Dominant Eye
  • 8.
    8 Shooting Fundamentals The Fundamentals 1.AIMING (sight alignment & sight picture) 2. BREATH CONTROL 3. HOLD CONTROL 4. TRIGGER CONTROL 5. FOLLOW-THROUGH
  • 9.
    9 Shooting Fundamentals GRIP –important factor of hold control!  “V” of the thumb and index finger high on the backstrap.  Once the pressure is applied at the “V”, let the lower 3 fingers wrap naturally around the grip. This isolates the trigger finger from the grip.  Thumbs on the same side of the pistol.
  • 10.
    10  Sit behindthe bench, facing the target  Head is fully erect  Both arms are extended fully forward  Back should be straight or leaning slightly forward  Wrists are supported by sandbags  Feet are flat on the ground Bench Rest Position
  • 11.
    11  Head erect Pistol brought to eye level  Pistol held with proper grip  Weight slightly forward  Arms fully extended  Back straight or leaning slightly forward  Knees slightly bent  Feet shoulder width apart  Shooter is relaxed and comfortable Two-Handed Standing Position
  • 12.
    12 SIGHT ALIGNMENT refersto the proper relationship of the pistol’s front and rear sights. With Post-and-Notch sights:  The tops of the front and rear sights are even  The front post is centered in the rear notch Shooting Fundamentals Sight Alignment
  • 13.
  • 14.
    14 Body movement whilebreathing can produce gun movement that impairs shooting.  Stop breathing momentarily while firing the shot! (Respiratory pause) Shooting Fundamentals Breath Control
  • 15.
    15 Shooting Fundamentals Hold Control Bodymovement affects the shot.  Hold your body still.  Hold control allows you to maintain the proper sight picture and sight alignment during the process of firing the shot.
  • 16.
    16 Shooting Fundamentals Trigger Control Trigger is squeezed straight to the rear in a smooth, continuous manner without disturbing the sight alignment.  Gradually and evenly increasing pressure until the mechanism releases. SURPRISE yourself when the gun shoots.
  • 17.
    Shooting Fundamentals Follow-Through In PistolShooting: Follow-through means to maintain aiming (perfect sight alignment and acceptable sight picture), breath control, hold control, and trigger control until the gun settles back into the aiming area after firing. 17
  • 18.
    18 Shooting Fundamentals The Fundamentals…AReview 1. “Maintaining perfect sight alignment and acceptable sight picture.” – 2. “Stop breathing.” – 3. “Holding still.” – 4. “Moving only your trigger finger.” – 5. “To maintain position, and continue aiming, breath control, hold control, and trigger control until the gun settles back into the aiming area after the shot is fired.” – AIMING BREATH CONTROL HOLD CONTROL TRIGGER CONTROL FOLLOW-THROUGH
  • 19.
    19 Most Important Fundamentals! NOTE– The TWO most IMPORTANT shooting fundamentals are……..  “Maintaining sight alignment” – AIMING  “Moving only the trigger finger” – TRIGGER CONTROL
  • 20.
    20 Range Safety Briefing Rangelayout  Ready Area  Firing Line  Target Area  Back Stop  Restroom
  • 21.
    21 Range Safety Briefing NRA3 Gun Safety Rules  ALWAYS keep your gun pointed in a safe direction  ALWAYS keep your finger off the trigger until ready to shoot  ALWAYS keep your gun unloaded until ready to use
  • 22.
    22 Range Safety Briefing OtherSafety Rules  Know your target and what is beyond  Wear eye and ear protection as appropriate  Never use alcohol or drugs before or while shooting  Be aware that certain types of guns and many shooting activities require additional safety precautions Range Commands  “Commence Firing”  “Cease Firing”
  • 23.
    23 At The FiringPoint One instructor will be at each firing point. 1. The instructor will hold the pistol by the slide or barrel. 2. Place your hands on the grip. When you have control of the pistol, say “Thank you” and the instructor will let go. 3. You will then Dry-fire. TAKE YOUR TIME. Focus on safety and the shooting fundamentals. When you are comfortable, tell the Instructor you are ready to shoot. 4. Your instructor will then load the pistol and hold it by the slide or barrel. 5. Place your hands on the grip. When you have control of the pistol, say “Thank you” and the instructor will let go. 6. You will Live-fire the prescribed number of shoots. Strive for consistent shot groups.
  • 24.
    24 Questions Do you haveany questions before you move to the Ready Area?