1. BOXING IN PIPES
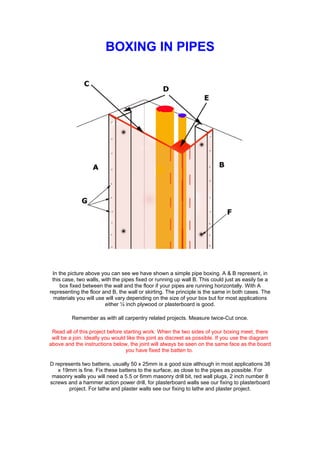
In the picture above you can see we have shown a simple pipe boxing. A & B represent, in
this case, two walls, with the pipes fixed or running up wall B. This could just as easily be a
box fixed between the wall and the floor if your pipes are running horizontally. With A
representing the floor and B, the wall or skirting. The principle is the same in both cases. The
materials you will use will vary depending on the size of your box but for most applications
either ¼ inch plywood or plasterboard is good.
Remember as with all carpentry related projects. Measure twice-Cut once.
Read all of this project before starting work. When the two sides of your boxing meet, there
will be a join. Ideally you would like this joint as discreet as possible. If you use the diagram
above and the instructions below, the joint will always be seen on the same face as the board
you have fixed the batten to.
D represents two battens, usually 50 x 25mm is a good size although in most applications 38
x 19mm is fine. Fix these battens to the surface, as close to the pipes as possible. For
masonry walls you will need a 5.5 or 6mm masonry drill bit, red wall plugs, 2 inch number 8
screws and a hammer action power drill, for plasterboard walls see our fixing to plasterboard
project. For lathe and plaster walls see our fixing to lathe and plaster project.
2. The screws, shown as F above, should be about 400mm apart. Next you need to measure
along the line of C, I.E. from wall A, to the face of the batten you have fixed on wall B. Then
measure the length of the piece of board you need from floor to ceiling or whatever two
surfaces this box is between.
Having cut the board C you now need to fix batten E to it. The size of this batten again
depends on the size of your boxing but normally 38 x 38mm is fine. Batten E is cut to the
same length as your boxing and maybe just a mm or so longer. This will give it enough length
to fit tightly between the two surfaces and give the boxing greater strength. Be careful not to
cut it too long and damage the ceiling or walls as you push it into position. The batten can be
fixed with either screws or panel pins, but whatever you use for any of the surface fixings,
remember you may need to decorate so get the heads of the fixings slightly below the surface
of your box. The holes can be filled later. We always use a little wood glue on these joints as
well.
Having fixed board C to batten E place them in position against the batten on wall A. A little
glue and some panel pins or screws (as shown by G) will hold the board in position together
with the tightness of batten E "wedged" into position.
Next cut the other side of the board and glue, pin or screw into position. If you are using
plasterboard for your boxing then its best to use drywall screws as they are guaranteed not to
rust and bleed through either your plaster or paint. Fill all the screw holes and pin holes and
you can then run around the edges with some decorators caulk ( Flexible filler in a tube
applied using a sealant gun) to hide the joints between box and walls/ceiling. If this box is in a
bathroom and you intend to tile it, use an undiluted coat of PVA adhesive to paint the boxing
before you tile. This allows the tile adhesive to stick properly on the surface you have used.