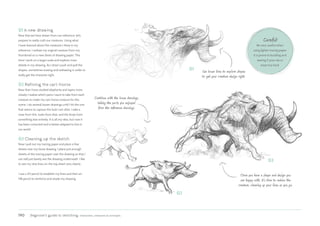
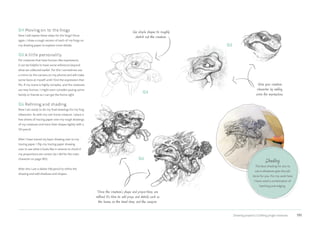
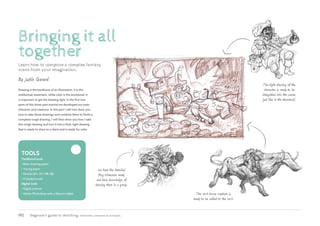
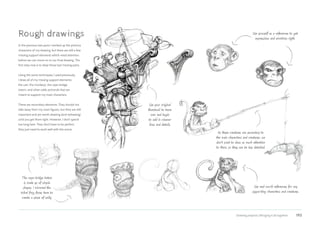
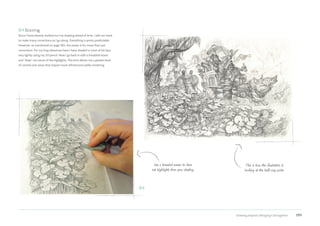
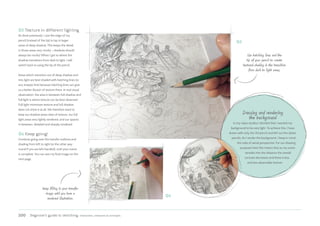
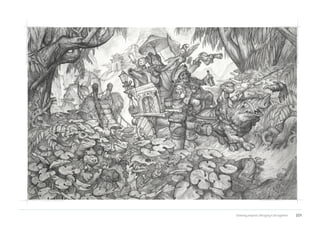
Discover a brand-new approach to drawing the human form with this unique
guide by expert Tom Fox (aka tomfoxdraws). Tom’s accessible trademark
teaching style uses innovative box mannequins made from simplified shapes.
His less-is-more approach to drawing the body ensures believable results even
when tackling traditionally tricky subjects such as perspective, proportion,
and three-dimensional form. Checking the silhouette and contour of a pose
will become intuitive, while the benefits of simplified linework for creating
authenticity are illustrated throughout. Of course, Tom covers all the usual
features of the body, including the bones, muscles, bony landmarks, and soft
tissues that contribute to the human form. But by truly understanding what an
artist needs to know (and why!), everything he teaches is relevant and easily
applied to your own work.
LEARN HOW TO USE:
• box mannequins
• XYZ dimensions
• form and 3D detail
• simplified bones and muscles
• silhouette, contour, and proportion
176 Beginner’s guide to sketching: characters, creatures & concepts
Crafting a jolly
character
Learn how to design and sketch a fantasy
character from your imagination.
Drawing a complex scene with multiple figures and
background elements can seem highly daunting
at first, even when you are very experienced. In
this tutorial I will show you how to break your
composition down into manageable chunks so that
they can be tackled one at a time. I will begin from
the thumbnail stages and demonstrate how I work
on rough drawings, collect and utilize reference, and
finally take those rough sketches and turn them into
finished drawings ready to be placed into our scene.
Here we will go through the process of developing
a character, although I’ll first create the thumbnail
of the whole image to place everything in context.
By Justin Gerard
Tools
• 
Pencils (2H, HB, 2B, 4B)
• 
Basic drawing paper
• 
Tracing paper
• 
Kneaded eraser
The face is the most important part of the
character, and maybe even the whole scene. It
will be the first place a viewer looks. This is why
I always spend the most time on the face.
Hands are the second-
most important element
of the character. They
can communicate volumes
of information. Good
photo reference is very
helpful for getting their
complex shapes correct.
Shape is important! Your character’s
shape needs to be distinct so that it
will stand out from what is behind it.
Line work is more
interesting if it
has a little variety
to it. When I work
I try to vary my
line widths from
thick to thin.
Drawing projects | Crafting a jolly character 177
Here we see the basic
shapes of the scene.
With my thumbnail I
can work out where
my characters are
in relation to one
another so that the
image flows better.
I draw my thumbnails very small,
usually 1-3” wide. This helps me
to keep the overall composition
together in my mind.
Even though I am drawing on a smaller scale and am not worried about
details, I do try to work out the general pose for each character.
Before I begin my scene, I need to have a
fixed idea of what will be in it and where
everything will be placed. To do this, I will
draw several tiny sketches (or thumbnails) of
my scene as I see it in my imagination. The
thumbnail I select will be my guide for the
rest of the project and I will revisit it again
and again as I work through my scene.
Thumbnailing Thumbnailing
In the thumbnail stage I do not worry
about my drawing being very detailed (or
even very good). I treat my scene like a stage
and constantly move my characters and set
pieces around until I am happy with it. Things
will be messy and unrefined but that’s okay;
I will have plenty of time later to add
details and polish to the image.
178 Beginner’s guide to sketching: characters, creatures  concepts
Drawing the face
For this exercise we are going to be focusing
on our character, and specifically, on his
expression. The expression is the linchpin of
the whole scene. If we get it wrong, the whole
scene won’t make sense. Now that I know
what my main character’s pose will be, I need
some reference to get the expression right.
In order to research the expressions I need,
I take a number of very quick photos, using
my thumbnail as a guide. I will also collect
reference for costume and background using
imagery from my library and from the web.
Our disreputable character has just stolen
a sacred artifact and is about to be
ambushed by the frogs he stole it from…
Is he suspicious? Gleeful? Drunk?
I need to know, and doing roughs will help
me discover more clues about him.
I try to only use reference I get from
the web to help me get the details
right, and never for the poses or
arrangements. It always feels derivative
to copy someone else’s photo.
Drawing projects | Crafting a jolly character 179
01 Face shape
When trying to work out just who your character
is, it can sometimes be a helpful exercise to
experiment by drawing different expressions
to help you learn more about them.
Experiment with different face shapes. Is your
character a weaselly thief? A noble captain? An
overfed banker? Is their face shaped more like
a pear or a plum? More like an owl or a fox? Be
imaginative and don’t be afraid to try out crazy
things. This is the preliminary phase so now is
the best time to try out any of these wild ideas.
02 Mouths
They say that the eyes are the windows to the soul.
Personally I think this is untrue and that mouths are
the true windows. Notice how small changes in the
muscles around the mouth can make such large
differences to your character’s expression.
03 Eyes
While eyes may not always be as helpful as people
claim, I think eyebrows are particularly interesting
and can communicate a great deal about a
character. Pay careful attention to the shape of the
eye and make sure that the eyes line up correctly
on the face. Nothing will ruin a face faster than
having one eye sliding off unevenly on the face.
A more angular face shape can age a
character and using blocky hard-edged
shapes can give them a rugged feel.
The angle at which you draw your
eyebrows can drastically alter your
character’s expression.
Full, round cheeks can
add a jolly quality to your
character’s expression and
personality
Round face shapes convey
a friendly nature.
Pointy, sharp shapes
can represent an evil
disposition!
Practice
in the mirror
To practice drawing mouths, grab
a mirror and make some expressions
in it. Keep the expression while you are
drawing. This trick has been used by artists
for centuries to inject vast amounts
of personality into their characters.
Experiment until you find the
right expression for your
character.
01
02
03
180 Beginner’s guide to sketching: characters, creatures  concepts
04 Creating a template
Using a very light pencil, such as a 2H or
even an HB with a light touch, fill out a whole
page of paper with a variety of different head
shapes. Try round ones, long ones, pointy
ones; experiment as much as you can!
05 Placing your guidelines
Once you have them filled out, place a grid line
for each face. You may be surprised to learn how
a small shift in where the eyes are can change
a face drastically. Don’t be afraid to move the
eyes up or down dramatically if necessary.
06 Features and expression
Now it’s time to work further on the features.
Using a darker pencil, such as a 2B or 4B,
draw in the features using the template and
lines as a guide. You can do this from your
imagination or take inspiration from real life.
As you work through this exercise, stay
on the lookout for faces and expressions
that might fit your own character.
Working with a darker
pencil, begin to define the
features further, darkening
around the eyes and mouth
creases.
Don’t always place your eyes
in the same place. Move your
guidelines around to see what
result you get.
Pay attention
Ensure your eyes are the right
shape and line up correctly (especially
when in perspective). In order to make
this easier, it is helpful to begin drawing
your subject’s face with a grid with a
center “+” sign to help keep the
proportions correct.
04
05
06
Experiment with a heap of
different face shapes.
Drawing projects | Crafting a jolly character 181
10
07 Rough shapes
So how do you draw these rough sketches of your
character? Using a classical academic approach to
drawing, that is, understanding the principles of shape,
proportion, value, and form, you can draw from your
imagination, from your photographic reference, or as I
have done here, from a little of both. I draw out the rough
shape of the character very lightly using a 2H pencil.
08 Basic outlines
Still using the lighter 2H pencil, I rough in the basic outlines
of my character, paying close attention to the overall shape.
09 Cleaning up your lines
Now with a darker pencil (here I switch to HB), I redraw
the lines from the previous step that are correct, and leave
out the ones that are not correct. When you finish you
should have a tighter line drawing of your character.
10 Final rendering
Now with an even darker pencil (here I switch to 2B), I
draw in the shadows and render my character and all the
details. This is my favorite stage because this is where
we finally begin to see our character come to life and
get to know them a little better. Where do they live?
Where are they going? What have they been up to?
As I spent so much effort getting the outline and drawing
right, I can now have fun working on details and nuances of
light and shadow (refer back to pages 19–24 for tips) without
having to worry about my character’s proportions falling apart.
It’s okay to be a little messy
here as you explore, just as
long as you draw lightly.
Don’t be afraid to erase out to get the
shapes and outlines right. Don’t worry too
much about the details yet.
Here I will look at my references more closely to
see where I might have gone wrong or if there
are any interesting details that I have missed.
07
08
09
Don’t forget to mark in
where your eyes will go.
Darkening the features
really starts to add
character to the face.
182 Beginner’s guide to sketching: characters, creatures  concepts
The costume your character wears is significant
because it gives us very helpful clues as
to who they are, what they do, and where
they have been – all of which contribute
to the narrative quality of your picture.
For this tutorial I use unprofessional models, a
volunteer photographer, and materials I procured
locally (translation: I grabbed an old jacket and
asked my wife to take a quick photo of me making
faces at the camera). Though I sometimes actually
do pay professionals to model, I will more often
than not shoot reference using friends and family
as stand-ins for my characters. Now that I have a
better idea of what I am after in my character, it is
easier to me to get the pose and expressions right.
My disreputable character will be pictured in
this scene as being in possession of the sacred
frog-king relic. I couldn’t manage to find a sacred
frog-king relic in my studio, but I did manage
to find the goose you can see in the photo here
to act as a substitute. Having some real-world
material that matches the material in your
illustration always helps, even if it’s the wrong
shape and design. The main issue is that you
want to have some reference for how an object’s
surface will take light and shadow in your scene.
Drawing the costume
Don’t forget about headwear and
other accessories such as jewelry.
A bandana and earring portrays a
pirate-type character.
Use your reference to add in
accessories and props to help
convey the story.
Drawing projects | Crafting a jolly character 183
01 Developing ideas
Try out different types of clothing to help you
define what type of person your character
is. Remember that your character’s outfit
tells its own story within the story of the
picture. Make sure you spend some time
considering what they should be wearing in
order to make their story more interesting.
Is he a lowly ship’s hand who went AWOL to
pursue riches and adventure in the jungle? Or is
he a beset-upon good man who was marooned
by his pirate colleagues for not going along
with their schemes? Was he a captain who
owes some very powerful people a great deal
of money? In all these cases, the outfit can
assist in telling your character’s story.
02 Guidelines
In the next few steps I’ll take you
through the stages of drawing
the hat; you can follow the
same process for other items
of clothing and props. First
I establish the outline of the
object. In this case I draw a simple
triangle guideline for the object in
perspective and draw in some wavy
lines along the guide for the shape
of the hat.
Try out different types of
clothing to help you define
what type of person your
character is. Adding fancy frills
and embellishments, suggests he
is wealthy.
02
Use a triangle shape for
the initial guidelines.
01
Think about what type of materials
your character’s costume is made
of as this will also help.
184 Beginner’s guide to sketching: characters, creatures  concepts
03 Shading guides
I then draw very light lines to suggest where the shadows
should fall. Once I have established this, I am ready to begin
laying in shadows lightly.
Shading is the means by which we show a value transition
from dark into light. There is no set rule for how to shade and
artists have classically been very inventive, from extremely
precise hatching to just scribbling circles, to rubbing the edge
of the pencil instead of the tip. You should experiment and find
the way that works best for you. Whatever way you decide to
employ, it needs to have the ability to adequately depict subtle
transitions in lighting. Control over light and shadow should
be the primary concern of the artist who is drawing from life.
04 Hatching
Here I then fill in the shadow areas with a series of hatch lines
that go diagonally from the bottom left to the upper right.
05 Final shading
I then switch to a darker pencil and begin to lay my
shading in more strongly. I have also begun to
move away from simple diagonal strokes and my
hatch lines have begun to
follow the contour
of the hat to give
a more three-
dimensional
look to the
drawing.
When I shade I
tend to prefer
to use hatching,
cross-hatching,
or a combination
of the two.
Hatching
to give form
In this example you can see how
hatching has been used to give a sense
of the contour of the eye and face. You
can use this simple trick to help give a
sense of the surface of the object and
make it appear as though it exists
in three-dimensional space.
04
Use diagonal pencil strokes
for the shadow areas.
Use a darker pencil such as
2B to add form to the hat.
05
Edging
Along with drawing with
the tip of your pencil, you can
also flip it on its side to use the edge!
This can be extremely helpful in getting
interesting and murky shadows as well as achieving
a variety of line widths. This is part of the basic
academic approach to drawing and has been
used by representational artists for centuries to
achieve accurate and life-like drawings. It has
worked for countless artists in the past
and it will work for you too!
03
Adding in a faint guide for
where the shadows will be
will help you later on.
Drawing projects | Crafting a jolly character 185
01
02
03
Eraser
highlights
The eraser is not just for
corrections! Don’t be afraid to
use to it to pull out highlights and
reinforce the outlines of
your shapes.
Mirroring with
tracing paper
An added benefit of tracing paper is
that you can flip it over to see how your
drawing looks from the reverse angle.
This can help reveal errors in propor-
tion. As you work, take advantage of
this in order to arrive at a more
successful drawing.
01 Initial drawing
I used my thumbnail from page 177 as a guide to create
my initial drawing as shown here. I drew freehand using
a 2H pencil on drawing paper. This drawing is fun and
carries the overall energy I am after, but it lacks the
necessary polish to truly communicate my ideas.
02 Revising
Now, using a darker pencil, I revise this initial drawing using
the same academic approach to edging I mentioned. As a
result of using it we have arrived at a much nicer drawing.
Upon closer inspection we can see that even though we
have redrawn our image, our proportions are incorrect and
our character appears misshapen. We could try to erase it
and redraw the broken parts, but I actually really like them;
they are just in the wrong places or are the wrong sizes (as
you can see in the absurdly oversized hand holding the
bottle). To fix this, artists both classical and contemporary
use tracing paper, as described in the next step.
03 Final changes
I place a few loose sheets of tracing paper over the
drawing until I can just make out the details. Using a highly
sharpened HB, I redraw my character and add in extra
details. As I come across areas where the shape is incorrect,
I move the tracing paper around so that the misplaced
element (such as the hand) is in the right place before I
commit my lines to the tracing paper. If you draw something
and don’t like it, don’t be afraid to redraw that area using a
different sheet of tracing paper. You can easily cut out and
reassemble the various sheets of tracing paper later on.
Your initial drawing doesn’t have
to be accurate. Try to capture
the nature of your character.
Use a 2B pencil to
revise your lines.
Use a sharp HB pencil to
add in your final details
Refining the sketch
Follow Pascal Campion’s authentic and relatable
depictions of life as a freelance artist, family man,
and human being just making his way through
life! Pascal traces his path through school and
college, living and working in different locations,
and meeting his wife. He also tracks his progress
through key industry roles and the development
of his trademark art and comic strips. His
“Sketch Of the Day” project on Instagram attracts
over 860K followers to Pascal’s characters and
stories. He digs deep to pinpoint how his style
and skills have evolved, and case studies and tips
on storytelling will delight artists who want to
pursue this side of their own art. With extensive
galleries of his work, it’s a book for Pascal fans
and newcomers alike.
• Enter the dynamic, fun,
fascinating,
and thought-provoking world of
Pascal Campion.
• Enjoy beautifully printed pages
featuring his famous comic
strips, stunning artwork, and
entertaining doodles.
• Discover the techniques - such
as storytelling, lighting, and
brush choices – that Pascal
employs to such great effect.
186 Beginner’s guide to sketching: characters, creatures  concepts
Crafting jungle creatures
Learn how to create convincing fantasy
creatures from your imagination.
Drawing fantasy creatures from your imagination is
often very fun, but left to imagination alone they often
can feel too abstract and lose their believability. The
best way to make your creatures convincing is to study
real-world beings. When I began to study animals in
nature, I came to realize that there are already some
pretty fantastic creatures loping around out there.
Using real-world mammals as a basis, we have an
amazing range of possibilities for imaginative and
fantastic creatures that still feel like they belong here.
This part of the tutorial will emphasize the
usage of reference from nature, although we
will be begin by using just our imaginations.
I have two separate types of creatures for
which I need designs: the ambushing frog
tribesmen and the cart-horse brute.
The cart-horse creature needs
to be strong, as it needs to be
able to pull the cart along.
The ambushing tribal
frog carries sticks
and weapons, perfect
for stealing from
unsuspecting passers-by.
I need a creature appropriate
for trekking through the jungle.
I use tribal imagery for the
frog creatures, such as bones,
leaves, and feathers.
By Justin Gerard
Tools
• Basic drawing paper
• Tracing paper
• 
Pencils (2H, HB, 2B)
• Kneaded eraser
Drawing projects | Crafting jungle creatures 187
Creature ideas
As I design these creatures I need to consider
where they came from and where they live.
Are they heavily furred creatures adapted to a
colder climate? Are they multi-limbed marsupials
dwelling in a very arid climate? Do they live
under damp rocks? Use your imagination and
get to know your creatures before you ever
begin to put your pencil down on paper.
My scene takes place
in a jungle and I would
like a jungle-appropriate
animal as my cart-horse.
Perhaps a boar? Or a
tapir? Or an elephant?
Do my tribesmen have head-dresses of leaves? Or maybe they
wear eagle skulls with feathers? Are they using sticks and spears?
Or obsidian daggers? As I draw my roughs I think about these
ideas and try to get to know my little antagonists better.
I don’t know what the tribal frogs will look like yet, so I
do some rough exploration. As with the cart-horse creature,
I draw quick, small thumbnails on cheap paper stock.
First I scribble down the general look
and feel that I want my creatures to have.
I draw these ideas very small, just a few
inches in size, and never spend more than
a few minutes on each little drawing.
Since this is a jungle scene, I will
go with tree frogs as the basis
for my ambushing tribesmen.
188 Beginner’s guide to sketching: characters, creatures  concepts
01 Drawing a group
My frog ambushers are gathered in a small group. Drawing
groups can be daunting at first, so it is important to simplify
things a little to keep the mob under control. To draw large
groups of figures I place the major joints first (shoulders,
elbows, hands, and so on), just enough to get the shapes
right and placed properly in relation to one another. I’m not
worried about fine details at this stage, just the rough shapes.
02 Massing and form
I begin with very rough scribbles in circles in an effort to
really understand where the muscles form around the joints.
This “massing” up of the shapes will help you to capture your
figures in three-dimensional form.
03 Cleaning it up
Once I have a nice set of scribbles, I place a sheet of tracing
paper over this and redraw it, this time with more precise
lines. I can now clean up my scribbles and turn them into
solid forms. As you can see here I have left all of their
adornments off for the moment. I really want to understand
their shapes first; we can add all the fun weapons and gear
onto them later.
03
01
02
Use simple shapes to mark
out the important parts and
joints of the creatures.
Use a scribbling technique
to add volume and
form to the shapes.
Clean up the gesture
drawings, so that
you are left with
solid contours of
the creatures.
Detail later
Don’t worry about trying to
draw all the details at this stage.
That will come later. Right now
focus on the shape and design
of your creatures.
Why not use
reference at this stage?
It is important to get your own ideas down
first, straight from your imagination, before you
gather too much reference. You can always change
your ideas later to fit your reference, but it can often be
hard to change your reference to fit your ideas. If you
dwell too much on reference at the beginning, or even
worse, copy straight from photos, you may lose
some of the special individuality of your idea
that makes it uniquely yours. In short:
ideas first, then reference.
Drawing projects | Crafting jungle creatures 189
Study the details, shapes, and
overall structures. Memorize the
elements and try to pay attention
to how each part relates to
the others. How far is the eye
from the ear? How far from the
nose? Where does the jaw line
end? As you draw you will be
subconsciously storing these details
in your library for use later on.
For my cart-horse creature I
utilized a book on mammals of
South America which had been
collecting dust on my bookshelf.
Collect
references
For my tribal frogs, I found many
pictures online of South American
tree frogs. I also supplemented these
with pictures of local tree frogs
that I had taken myself, such
as this one here.
Now for science!
Now that we have our ideas locked down from our
imagination, let’s go reference hunting! By drawing from
photos (or even better, from life) you are committing
the details and forms of these creatures to memory and
building a visual library in your brain for future use. Now
when you draw from your imagination in the future
your brain will be supplying more information to your
imagination about how animals look and function.
I am still undecided as
to whether it will be a
tapir, an elephant, or a
giant boar creature, so I
gather reference on all of
those animals and head
back to my drawing desk.
Working rough
When doing studies from
life, you don’t have to be perfect.
Their purpose is to help the creatures
in your painting look more real and
authentic. Don’t spend too long here,
just draw quickly and as faithfully
to the image as you can!
190 Beginner’s guide to sketching: characters, creatures  concepts
01
01 A new drawing
Now that we have drawn from our reference, let’s
prepare to really craft our creatures. Using what
I have learned about the creatures I drew in my
reference, I redraw my original creature from my
thumbnail on a new sheet of drawing paper. This
time I work on a larger scale and explore more
details in my drawing. As I draw I push and pull the
shapes, sometimes erasing and redrawing in order to
really get the character right.
02 Refining the cart-horse
Now that I have studied elephants and tapirs more
closely I realize which parts I want to take from each
creature to make my cart-horse creature for this
scene. I do several looser drawings until I hit the one
that seems to capture the look I am after. I take a
nose from this, tusks from that, and the body from
something else entirely. It is all my idea, but now it
has been corrected and is better adapted to live in
our world.
03 Cleaning up the sketch
Now I pull out my tracing paper and place a few
sheets over my loose drawing. I place just enough
sheets of the tracing paper over the drawing so that I
can still just barely see the drawing underneath. I like
to see my new lines on the top sheet very clearly.
I use a 2H pencil to establish my lines and then an
HB pencil to reinforce and shade my drawing.
Careful!
Be very careful when
using lighter tracing paper.
It is prone to buckling and
tearing if your rub or
erase too hard.
Use loose lines to explore shapes
to get your creature design right.
02
Continue with the loose drawings,
taking the parts you enjoyed
from the reference drawings.
03
Once you have a shape and design you
are happy with, it’s time to redraw the
creature, cleaning up your lines as you go.
Drawing projects | Crafting jungle creatures 191
06
04 Moving on to the frogs
Now I will repeat these steps for the frogs! Once
again, I draw a rough version of each of my frogs on
my drawing paper to explore more details.
05 A little personality
For creatures that have human-like expressions,
it can be helpful to have some reference beyond
what we collected earlier. For this I sometimes use
a mirror (or the camera on my phone) and will make
some faces at myself until I find the expression that
fits. If my scene is highly complex, and the creatures
are near human, I might even consider posing some
family or friends so I can get the forms right.
06 Refining and shading
Now I am ready to do my final drawings for my frog
tribesmen. As with my cart-horse creature, I place a
few sheets of tracing paper over my rough drawings
of my creatures and trace their shapes lightly with a
2H pencil.
After I have traced my basic drawing over to my
tracing paper, I flip my tracing paper drawing
over to see what it looks like in reverse to check if
my proportions are correct (as I did for the main
character on page 185).
After this I use a darker HB pencil to refine the
drawing and add shadows and shapes.
Once the creature’s shape and proportions are
refined it’s time to add props and details such as
the leaves on the head-dress and the weapon.
Shading
The best shading for you to
use is whatever gets the job
done for you. For my work here
I have used a combination of
hatching and edging.
05
Give your creature
character by adding
some fun expressions.
04
Use simple shapes to roughly
sketch out the creature.
192 Beginner’s guide to sketching: characters, creatures  concepts
Bringing it all
together
Learn how to compose a complex fantasy
scene from your imagination.
Drawing is the backbone of an illustration. It is the
intellectual statement, while color is the emotional. It
is important to get the drawing right. In the first two
parts of this three-part tutorial we developed our main
character and creatures. In this part I will now show you
how to take those drawings and combine them to finish a
complete rough drawing. I will then show you how I take
this rough drawing and turn it into a final, tight drawing
that is ready to show to a client and is ready for color.
By Justin Gerard
Tools
Traditional tools
• 
Basic drawing paper
• 
Tracing paper
• 
Pencils (6H, 2H, HB, 2B)
• 
Kneaded eraser
Digital tools
• 
Digital scanner
• 
Adobe Photoshop with a Wacom tablet
The tight drawing of the
character is ready to be
integrated into the scene,
just like in the thumbnail.
The cart-horse creature is
ready to be added to the cart.
We have the detailed
frog tribesmen ready
and have knowledge of
drawing them in a group.
Drawing projects | Bringing it all together 193
Rough drawings
In the previous two parts I worked up the primary
characters of my drawing, but there are still a few
missing support elements which need attention
before we can move on to our final drawing. The
first step now is to draw those last missing parts.
Using the same techniques I used previously,
I draw all of my missing support elements:
the cart, the monkeys, the rope-bridge
totem, and other odds and ends that are
meant to support my main characters.
These are secondary elements. They should not
take away from my main figures, but they are still
important and are worth drawing (and redrawing)
until you get them right. However, I don’t spend
too long here. They don’t have to be perfect;
they just need to work well with the scene.
Use yourself as a references to get
expressions and emotions right.
As these creatures are secondary to
the main characters and creatures, we
don’t want to draw as much attention
to them, so they can be less detailed.
Use your original
thumbnail to trace
over and begin
to add in cleaner
lines and details.
The rope-bridge totem
is made up of simple
shapes. I mirrored the
tribal frog faces here to
create a sense of unity.
Use real-world references for any
supporting characters and creatures.
194 Beginner’s guide to sketching: characters, creatures  concepts
Collage work
Now that I have all the drawings I need completed,
I scan everything into Photoshop. If you haven’t
worked with Photoshop before, you can
download a free trial of Photoshop or Photoshop
Elements from www.adobe.com. There are other
alternatives available such as Affinity Designer
(www.affinity.serif.com), Mischief
(www.madewithmischief.com), and
ArtRage (www.artrage.com).
I use a flatbed scanner to scan in my drawings.
However, if you don’t have one, don’t worry! You can
use a basic digital camera or even the camera on
your phone to get your drawings into Photoshop.
I open my initial thumbnail in Photoshop and
make a new layer (Layer  New  Layer) over
the top of it. I fill this layer with white and set
its opacity to 80%. This allows me to see it as a
guide, without it overpowering my new drawings.
Next I open all of my new drawings and drag
each drawing into my file. As I drag them in I
change their layer blending modes to Multiply.
I then click Image  Adjustments  Levels and
drag the input sliders so that only the black
line remains (and there is no paper texture).
This cleans up the drawings so there isn’t too
much clutter or competing paper textures.
I begin to arrange my detailed drawings of
the character, creatures, and surrounding
elements over my original thumbnail.
Want to stay
traditional?
You can also complete this step
with traditional collage work by
cutting out your drawings and laying
them over your thumbnail on a
new piece of tracing paper.
Drawing projects | Bringing it all together 195
Adding in the final elements
Once I have laid out all of my various elements over my thumbnail, there
will be areas that have I have yet to draw. I could print the whole file out
on copy paper and finish the areas by hand, but I find it quicker to do this
in Photoshop. I will therefore be staying on the computer for this stage.
01 Digital brushes
When I do rough clean-up work like this in Photoshop, I only use basic
brushes without any textures or fancy brush settings. For this tutorial I
use a standard round brush, which has been squashed and angled just a
bit to give the line a little life. Please note that in the Transfer settings I
have set both Flow Jitter and Opacity Jitter to Pen Pressure.
02Environmental additions
Using this digital brush, I work on any environmental areas that I haven’t
drawn, for example the jungle plants and tree shapes, as well as any
areas on or around my figures that haven’t been drawn yet. I also tighten
up my background areas. I do not spend long doing this as foliage,
landscape, and backgrounds can be very, very organic. It is making sure
the characters are working that I am mainly concerned with.
03Last-minute adjustments
Photoshop has many wonderful tools for adjusting your drawing. At this
stage I want to check all of my perspective lines and proportions before
I move on to my final refined drawing. To do this I mirror my image by
clicking Image  Image Rotation  Flip Canvas Horizontal.
Mirroring the image in this way is similar to what we did earlier with
tracing paper and will often reveal many errors that I couldn’t see before.
To fix them I will either redraw them or select the offending area and
click Edit  Free Transform or Edit  Transform  Warp to achieve what
I need to in order to make the image look proportional and correct (just
remember to flip your canvas back when you are finished).
Create quick, organic sketches for the
foliage, a less detailed background element.
I will use a basic round brush
to fill in the blank areas.
01
02
It is always a good idea to flip
your image horizontally (try
vertically as well), as any errors
will jump right out at you. If
working traditionally, use a mirror
to see the image in reverse.
03
196 Beginner’s guide to sketching: characters, creatures  concepts
Lighting and value studies
We now need to plan out our lighting. This
is an important stage so that we know how
to shade and render our characters. To
decide on my lighting I am going to make
some tiny value studies of my drawing.
In Photoshop I shrink my file to something very
tiny to prevent myself from getting caught up
in the details. For this image I reduce my file to
450 pixels tall by 600 pixels wide. I then create
several thumbnails using only black, white,
and gray. I treat my compositions like they are
a stage and have a foreground, main middle
ground, and background. Do I want to darken
my foreground to play up the setting in the
background? Do I want to darken the background
to give more dramatic lighting to the foreground?
This is where I experiment and decide.
If the area
surrounding the
character is dark,
the character
should be light to
make it “pop”.
Lightening the
background
will highlight
the background
setting.
Darkening the background
creates a dramatic lighting
scenario in the foreground.
Foreground framing
In order to make our characters “pop”, we
want to make sure that they are distinct from
the background. So if our character is to be dark,
the area behind them should be brighter; if the area
behind them is dark, the character should be light.
Making these little simple value studies will help
you to decide how to proceed in the next stage
when you are shading and adding values. This
is extremely important, especially if you
plan to paint over this drawing.
My chosen value study.
Drawing projects | Bringing it all together 197
The final drawing
Now that I have completed all of my preliminary work I am
ready to begin my final drawing. I can approach my final drawing
with more confidence now that I have worked out all of the
details and have already dealt with any potential pitfalls.
01 The transfer
We need to transfer our drawing from our computer screen to
our drawing paper. There are a variety of ways of doing this, and
you should use whatever feels the best for you. Light tables,
projectors, even printing out lightly on your paper are all great
possibilities. I find that I get the best end results when I do a soft
pastel transfer, so that is what I will be using for my drawing here.
To do a soft pastel transfer I first print out my drawing on
copy paper. I then make my transfer sheet by rubbing soft pastel (any
dark color you like) on tracing paper so that it completely covers the
surface (note that after I finish, I blow off any remaining dust to help
keep my transfer clean). Finally, I place this sheet of tracing paper face
down on my drawing paper. I place my printout over this and tape
the top of the paper down to my drawing surface. This way I can lift it
up to check the transfer and do not have to worry about my drawing
or transfer coming out of alignment. I am now ready to transfer.
I use a very hard pencil – 4H or 6H are best because they will hold
a very sharp point and give a clean, solid transfer line. I redraw
over my printout, pressing firmly enough so that the pressure of
the pencil makes the pastel transfer onto my drawing paper.
02 Drawing
I begin drawing with a 2H pencil to lightly reinforce my
transferred lines. Once I have established my lines, I
go over them with a HB pencil to darken them.
Begin to go over
the transfered lines,
darkening and refining
them as you go.
The final
composition
ready to print.
01
02
Work around
If your drawing is a bigger
size than your printer can print,
you can always print out the
drawing in sections and
tape them together.
198 Beginner’s guide to sketching: characters, creatures  concepts
03 Shading
For shading I tend to prefer using hatching lines. These allow me to give some
sense of movement and texture. Usually I will save the majority of my shading
until after I have drawn all of my lines. Since this is a larger piece, however,
and I know very well what I want my values to be like, I am going to shade as
I go along. Whenever I get to deep shadow areas that need to read as black,
I switch to a 2B pencil, which if pressed firmly can achieve very rich darks.
The smudge patrol
Remember you can place a few
sheets of paper underneath your hand
while you draw to avoid smudging the lines
underneath. Again, make sure you work left
to right if you are right-handed,
and right to left if your
are left-handed.
Use hatching and cross-
hatching to create
texture in your shading.
Use a 2B pencil to
shade the darker areas,
such as cast shadows
and occlusions.
03
Drawing projects | Bringing it all together 199
04 Erasing
Since I have already worked out my drawing ahead of time, I will not need
to make many corrections as I go along. Everything is pretty predictable.
However, as mentioned on page 185, the eraser is for more than just
corrections. For my frog tribesman here I have shaded in most of his face
very lightly using my 2H pencil. Now I go back in with a kneaded eraser
and “draw” out some of the highlights. This trick allows me a greater level
of control over areas that require more refined and subtle rendering.
Use a kneaded eraser to draw
out highlights from your shading.
This is how the illustration is
looking at the half-way point.
04
200 Beginner’s guide to sketching: characters, creatures  concepts
05 Texture in different lighting
As done previously, I use the edge of my
pencil (instead of the tip) to lay in larger
areas of deep shadow. This keeps the detail
in those areas very murky – shadows should
always be murky! When I get to where the
shadow transitions from dark to light, I will
switch back to using the tip of the pencil.
Areas which transition out of deep shadow and
into light are best shaded with hatching lines (or
any sharper line) because hatching lines can give
us a better illusion of texture there. In real visual
observation, the area in between full shadow and
full light is where texture can be best observed.
Full light minimizes texture and full shadow
does not show it at all. We therefore want to
keep our shadow areas clear of texture, our full
light areas very lightly rendered, and our spaces
in between, detailed and sharply rendered.
06 Keep going!
Continue going over the transfer outlines and
shading from left to right (or the other way
round if you are left-handed), until your scene
is complete. You can see my final image on the
next page.
Drawing and rendering
the background
In my value studies I decided that I wanted my
background to be very light. To achieve this, I have
drawn with only the 2H pencil and left out the darker
pencils. As I render the background, I keep in mind
the rules of aerial perspective. For our drawing
purposes here this means that as my scene
recedes into the distance the overall
contrast decreases and there is less
and less observable texture.
05
Use hatching lines and the
tip of your pencil to create
textured shading in the transition
from dark to light areas,
06
Keep filling in your transfer
image until you have a
rendered illustration.
Drawing projects | Bringing it all together 201
Take a giant leap into a futuristic world of
dynamic droids, high-tech vehicles, and space-
age characters in this exciting introduction to
creating sci-fi drawings. Learn how experienced
artists turn the wonders of their imagination into
believable concepts, with clear steps, invaluable
tips, and art theory made simple.
LEARN TO DRAW
10 INCREDIBLE
SCI-FI CONCEPTS
SPACE GUN • SOLARPUNK BIKER GIRL
BUTLER DROID • LIFESAVING DROID
DRILLER SPACESHIP • SPACE SOLDIER
CLEANING BOTS • SCI-FI SUSHI BAR
SPACECRAFT • MARTIAN TRANSPORT
DISCOVER HOW TO:
• 
Create finished images, from
rough sketches to final rendering
• Tackle essential subjects including
research, color, human-to-droid anatomy,
and vehicle design
• Use pens, pencils, and paints to achieve a
range of fun and engaging styles
• 
Develop your own creations using
downloadable resources

Beginners Guide to Sketching Chapter 06.pdf

  • 2.
    Discover a brand-newapproach to drawing the human form with this unique guide by expert Tom Fox (aka tomfoxdraws). Tom’s accessible trademark teaching style uses innovative box mannequins made from simplified shapes. His less-is-more approach to drawing the body ensures believable results even when tackling traditionally tricky subjects such as perspective, proportion, and three-dimensional form. Checking the silhouette and contour of a pose will become intuitive, while the benefits of simplified linework for creating authenticity are illustrated throughout. Of course, Tom covers all the usual features of the body, including the bones, muscles, bony landmarks, and soft tissues that contribute to the human form. But by truly understanding what an artist needs to know (and why!), everything he teaches is relevant and easily applied to your own work. LEARN HOW TO USE: • box mannequins • XYZ dimensions • form and 3D detail • simplified bones and muscles • silhouette, contour, and proportion
  • 3.
    176 Beginner’s guideto sketching: characters, creatures & concepts Crafting a jolly character Learn how to design and sketch a fantasy character from your imagination. Drawing a complex scene with multiple figures and background elements can seem highly daunting at first, even when you are very experienced. In this tutorial I will show you how to break your composition down into manageable chunks so that they can be tackled one at a time. I will begin from the thumbnail stages and demonstrate how I work on rough drawings, collect and utilize reference, and finally take those rough sketches and turn them into finished drawings ready to be placed into our scene. Here we will go through the process of developing a character, although I’ll first create the thumbnail of the whole image to place everything in context. By Justin Gerard Tools • Pencils (2H, HB, 2B, 4B) • Basic drawing paper • Tracing paper • Kneaded eraser The face is the most important part of the character, and maybe even the whole scene. It will be the first place a viewer looks. This is why I always spend the most time on the face. Hands are the second- most important element of the character. They can communicate volumes of information. Good photo reference is very helpful for getting their complex shapes correct. Shape is important! Your character’s shape needs to be distinct so that it will stand out from what is behind it. Line work is more interesting if it has a little variety to it. When I work I try to vary my line widths from thick to thin.
  • 4.
    Drawing projects |Crafting a jolly character 177 Here we see the basic shapes of the scene. With my thumbnail I can work out where my characters are in relation to one another so that the image flows better. I draw my thumbnails very small, usually 1-3” wide. This helps me to keep the overall composition together in my mind. Even though I am drawing on a smaller scale and am not worried about details, I do try to work out the general pose for each character. Before I begin my scene, I need to have a fixed idea of what will be in it and where everything will be placed. To do this, I will draw several tiny sketches (or thumbnails) of my scene as I see it in my imagination. The thumbnail I select will be my guide for the rest of the project and I will revisit it again and again as I work through my scene. Thumbnailing Thumbnailing In the thumbnail stage I do not worry about my drawing being very detailed (or even very good). I treat my scene like a stage and constantly move my characters and set pieces around until I am happy with it. Things will be messy and unrefined but that’s okay; I will have plenty of time later to add details and polish to the image.
  • 5.
    178 Beginner’s guideto sketching: characters, creatures concepts Drawing the face For this exercise we are going to be focusing on our character, and specifically, on his expression. The expression is the linchpin of the whole scene. If we get it wrong, the whole scene won’t make sense. Now that I know what my main character’s pose will be, I need some reference to get the expression right. In order to research the expressions I need, I take a number of very quick photos, using my thumbnail as a guide. I will also collect reference for costume and background using imagery from my library and from the web. Our disreputable character has just stolen a sacred artifact and is about to be ambushed by the frogs he stole it from… Is he suspicious? Gleeful? Drunk? I need to know, and doing roughs will help me discover more clues about him. I try to only use reference I get from the web to help me get the details right, and never for the poses or arrangements. It always feels derivative to copy someone else’s photo.
  • 6.
    Drawing projects |Crafting a jolly character 179 01 Face shape When trying to work out just who your character is, it can sometimes be a helpful exercise to experiment by drawing different expressions to help you learn more about them. Experiment with different face shapes. Is your character a weaselly thief? A noble captain? An overfed banker? Is their face shaped more like a pear or a plum? More like an owl or a fox? Be imaginative and don’t be afraid to try out crazy things. This is the preliminary phase so now is the best time to try out any of these wild ideas. 02 Mouths They say that the eyes are the windows to the soul. Personally I think this is untrue and that mouths are the true windows. Notice how small changes in the muscles around the mouth can make such large differences to your character’s expression. 03 Eyes While eyes may not always be as helpful as people claim, I think eyebrows are particularly interesting and can communicate a great deal about a character. Pay careful attention to the shape of the eye and make sure that the eyes line up correctly on the face. Nothing will ruin a face faster than having one eye sliding off unevenly on the face. A more angular face shape can age a character and using blocky hard-edged shapes can give them a rugged feel. The angle at which you draw your eyebrows can drastically alter your character’s expression. Full, round cheeks can add a jolly quality to your character’s expression and personality Round face shapes convey a friendly nature. Pointy, sharp shapes can represent an evil disposition! Practice in the mirror To practice drawing mouths, grab a mirror and make some expressions in it. Keep the expression while you are drawing. This trick has been used by artists for centuries to inject vast amounts of personality into their characters. Experiment until you find the right expression for your character. 01 02 03
  • 7.
    180 Beginner’s guideto sketching: characters, creatures concepts 04 Creating a template Using a very light pencil, such as a 2H or even an HB with a light touch, fill out a whole page of paper with a variety of different head shapes. Try round ones, long ones, pointy ones; experiment as much as you can! 05 Placing your guidelines Once you have them filled out, place a grid line for each face. You may be surprised to learn how a small shift in where the eyes are can change a face drastically. Don’t be afraid to move the eyes up or down dramatically if necessary. 06 Features and expression Now it’s time to work further on the features. Using a darker pencil, such as a 2B or 4B, draw in the features using the template and lines as a guide. You can do this from your imagination or take inspiration from real life. As you work through this exercise, stay on the lookout for faces and expressions that might fit your own character. Working with a darker pencil, begin to define the features further, darkening around the eyes and mouth creases. Don’t always place your eyes in the same place. Move your guidelines around to see what result you get. Pay attention Ensure your eyes are the right shape and line up correctly (especially when in perspective). In order to make this easier, it is helpful to begin drawing your subject’s face with a grid with a center “+” sign to help keep the proportions correct. 04 05 06 Experiment with a heap of different face shapes.
  • 8.
    Drawing projects |Crafting a jolly character 181 10 07 Rough shapes So how do you draw these rough sketches of your character? Using a classical academic approach to drawing, that is, understanding the principles of shape, proportion, value, and form, you can draw from your imagination, from your photographic reference, or as I have done here, from a little of both. I draw out the rough shape of the character very lightly using a 2H pencil. 08 Basic outlines Still using the lighter 2H pencil, I rough in the basic outlines of my character, paying close attention to the overall shape. 09 Cleaning up your lines Now with a darker pencil (here I switch to HB), I redraw the lines from the previous step that are correct, and leave out the ones that are not correct. When you finish you should have a tighter line drawing of your character. 10 Final rendering Now with an even darker pencil (here I switch to 2B), I draw in the shadows and render my character and all the details. This is my favorite stage because this is where we finally begin to see our character come to life and get to know them a little better. Where do they live? Where are they going? What have they been up to? As I spent so much effort getting the outline and drawing right, I can now have fun working on details and nuances of light and shadow (refer back to pages 19–24 for tips) without having to worry about my character’s proportions falling apart. It’s okay to be a little messy here as you explore, just as long as you draw lightly. Don’t be afraid to erase out to get the shapes and outlines right. Don’t worry too much about the details yet. Here I will look at my references more closely to see where I might have gone wrong or if there are any interesting details that I have missed. 07 08 09 Don’t forget to mark in where your eyes will go. Darkening the features really starts to add character to the face.
  • 9.
    182 Beginner’s guideto sketching: characters, creatures concepts The costume your character wears is significant because it gives us very helpful clues as to who they are, what they do, and where they have been – all of which contribute to the narrative quality of your picture. For this tutorial I use unprofessional models, a volunteer photographer, and materials I procured locally (translation: I grabbed an old jacket and asked my wife to take a quick photo of me making faces at the camera). Though I sometimes actually do pay professionals to model, I will more often than not shoot reference using friends and family as stand-ins for my characters. Now that I have a better idea of what I am after in my character, it is easier to me to get the pose and expressions right. My disreputable character will be pictured in this scene as being in possession of the sacred frog-king relic. I couldn’t manage to find a sacred frog-king relic in my studio, but I did manage to find the goose you can see in the photo here to act as a substitute. Having some real-world material that matches the material in your illustration always helps, even if it’s the wrong shape and design. The main issue is that you want to have some reference for how an object’s surface will take light and shadow in your scene. Drawing the costume Don’t forget about headwear and other accessories such as jewelry. A bandana and earring portrays a pirate-type character. Use your reference to add in accessories and props to help convey the story.
  • 10.
    Drawing projects |Crafting a jolly character 183 01 Developing ideas Try out different types of clothing to help you define what type of person your character is. Remember that your character’s outfit tells its own story within the story of the picture. Make sure you spend some time considering what they should be wearing in order to make their story more interesting. Is he a lowly ship’s hand who went AWOL to pursue riches and adventure in the jungle? Or is he a beset-upon good man who was marooned by his pirate colleagues for not going along with their schemes? Was he a captain who owes some very powerful people a great deal of money? In all these cases, the outfit can assist in telling your character’s story. 02 Guidelines In the next few steps I’ll take you through the stages of drawing the hat; you can follow the same process for other items of clothing and props. First I establish the outline of the object. In this case I draw a simple triangle guideline for the object in perspective and draw in some wavy lines along the guide for the shape of the hat. Try out different types of clothing to help you define what type of person your character is. Adding fancy frills and embellishments, suggests he is wealthy. 02 Use a triangle shape for the initial guidelines. 01 Think about what type of materials your character’s costume is made of as this will also help.
  • 11.
    184 Beginner’s guideto sketching: characters, creatures concepts 03 Shading guides I then draw very light lines to suggest where the shadows should fall. Once I have established this, I am ready to begin laying in shadows lightly. Shading is the means by which we show a value transition from dark into light. There is no set rule for how to shade and artists have classically been very inventive, from extremely precise hatching to just scribbling circles, to rubbing the edge of the pencil instead of the tip. You should experiment and find the way that works best for you. Whatever way you decide to employ, it needs to have the ability to adequately depict subtle transitions in lighting. Control over light and shadow should be the primary concern of the artist who is drawing from life. 04 Hatching Here I then fill in the shadow areas with a series of hatch lines that go diagonally from the bottom left to the upper right. 05 Final shading I then switch to a darker pencil and begin to lay my shading in more strongly. I have also begun to move away from simple diagonal strokes and my hatch lines have begun to follow the contour of the hat to give a more three- dimensional look to the drawing. When I shade I tend to prefer to use hatching, cross-hatching, or a combination of the two. Hatching to give form In this example you can see how hatching has been used to give a sense of the contour of the eye and face. You can use this simple trick to help give a sense of the surface of the object and make it appear as though it exists in three-dimensional space. 04 Use diagonal pencil strokes for the shadow areas. Use a darker pencil such as 2B to add form to the hat. 05 Edging Along with drawing with the tip of your pencil, you can also flip it on its side to use the edge! This can be extremely helpful in getting interesting and murky shadows as well as achieving a variety of line widths. This is part of the basic academic approach to drawing and has been used by representational artists for centuries to achieve accurate and life-like drawings. It has worked for countless artists in the past and it will work for you too! 03 Adding in a faint guide for where the shadows will be will help you later on.
  • 12.
    Drawing projects |Crafting a jolly character 185 01 02 03 Eraser highlights The eraser is not just for corrections! Don’t be afraid to use to it to pull out highlights and reinforce the outlines of your shapes. Mirroring with tracing paper An added benefit of tracing paper is that you can flip it over to see how your drawing looks from the reverse angle. This can help reveal errors in propor- tion. As you work, take advantage of this in order to arrive at a more successful drawing. 01 Initial drawing I used my thumbnail from page 177 as a guide to create my initial drawing as shown here. I drew freehand using a 2H pencil on drawing paper. This drawing is fun and carries the overall energy I am after, but it lacks the necessary polish to truly communicate my ideas. 02 Revising Now, using a darker pencil, I revise this initial drawing using the same academic approach to edging I mentioned. As a result of using it we have arrived at a much nicer drawing. Upon closer inspection we can see that even though we have redrawn our image, our proportions are incorrect and our character appears misshapen. We could try to erase it and redraw the broken parts, but I actually really like them; they are just in the wrong places or are the wrong sizes (as you can see in the absurdly oversized hand holding the bottle). To fix this, artists both classical and contemporary use tracing paper, as described in the next step. 03 Final changes I place a few loose sheets of tracing paper over the drawing until I can just make out the details. Using a highly sharpened HB, I redraw my character and add in extra details. As I come across areas where the shape is incorrect, I move the tracing paper around so that the misplaced element (such as the hand) is in the right place before I commit my lines to the tracing paper. If you draw something and don’t like it, don’t be afraid to redraw that area using a different sheet of tracing paper. You can easily cut out and reassemble the various sheets of tracing paper later on. Your initial drawing doesn’t have to be accurate. Try to capture the nature of your character. Use a 2B pencil to revise your lines. Use a sharp HB pencil to add in your final details Refining the sketch
  • 13.
    Follow Pascal Campion’sauthentic and relatable depictions of life as a freelance artist, family man, and human being just making his way through life! Pascal traces his path through school and college, living and working in different locations, and meeting his wife. He also tracks his progress through key industry roles and the development of his trademark art and comic strips. His “Sketch Of the Day” project on Instagram attracts over 860K followers to Pascal’s characters and stories. He digs deep to pinpoint how his style and skills have evolved, and case studies and tips on storytelling will delight artists who want to pursue this side of their own art. With extensive galleries of his work, it’s a book for Pascal fans and newcomers alike. • Enter the dynamic, fun, fascinating, and thought-provoking world of Pascal Campion. • Enjoy beautifully printed pages featuring his famous comic strips, stunning artwork, and entertaining doodles. • Discover the techniques - such as storytelling, lighting, and brush choices – that Pascal employs to such great effect.
  • 14.
    186 Beginner’s guideto sketching: characters, creatures concepts Crafting jungle creatures Learn how to create convincing fantasy creatures from your imagination. Drawing fantasy creatures from your imagination is often very fun, but left to imagination alone they often can feel too abstract and lose their believability. The best way to make your creatures convincing is to study real-world beings. When I began to study animals in nature, I came to realize that there are already some pretty fantastic creatures loping around out there. Using real-world mammals as a basis, we have an amazing range of possibilities for imaginative and fantastic creatures that still feel like they belong here. This part of the tutorial will emphasize the usage of reference from nature, although we will be begin by using just our imaginations. I have two separate types of creatures for which I need designs: the ambushing frog tribesmen and the cart-horse brute. The cart-horse creature needs to be strong, as it needs to be able to pull the cart along. The ambushing tribal frog carries sticks and weapons, perfect for stealing from unsuspecting passers-by. I need a creature appropriate for trekking through the jungle. I use tribal imagery for the frog creatures, such as bones, leaves, and feathers. By Justin Gerard Tools • Basic drawing paper • Tracing paper • Pencils (2H, HB, 2B) • Kneaded eraser
  • 15.
    Drawing projects |Crafting jungle creatures 187 Creature ideas As I design these creatures I need to consider where they came from and where they live. Are they heavily furred creatures adapted to a colder climate? Are they multi-limbed marsupials dwelling in a very arid climate? Do they live under damp rocks? Use your imagination and get to know your creatures before you ever begin to put your pencil down on paper. My scene takes place in a jungle and I would like a jungle-appropriate animal as my cart-horse. Perhaps a boar? Or a tapir? Or an elephant? Do my tribesmen have head-dresses of leaves? Or maybe they wear eagle skulls with feathers? Are they using sticks and spears? Or obsidian daggers? As I draw my roughs I think about these ideas and try to get to know my little antagonists better. I don’t know what the tribal frogs will look like yet, so I do some rough exploration. As with the cart-horse creature, I draw quick, small thumbnails on cheap paper stock. First I scribble down the general look and feel that I want my creatures to have. I draw these ideas very small, just a few inches in size, and never spend more than a few minutes on each little drawing. Since this is a jungle scene, I will go with tree frogs as the basis for my ambushing tribesmen.
  • 16.
    188 Beginner’s guideto sketching: characters, creatures concepts 01 Drawing a group My frog ambushers are gathered in a small group. Drawing groups can be daunting at first, so it is important to simplify things a little to keep the mob under control. To draw large groups of figures I place the major joints first (shoulders, elbows, hands, and so on), just enough to get the shapes right and placed properly in relation to one another. I’m not worried about fine details at this stage, just the rough shapes. 02 Massing and form I begin with very rough scribbles in circles in an effort to really understand where the muscles form around the joints. This “massing” up of the shapes will help you to capture your figures in three-dimensional form. 03 Cleaning it up Once I have a nice set of scribbles, I place a sheet of tracing paper over this and redraw it, this time with more precise lines. I can now clean up my scribbles and turn them into solid forms. As you can see here I have left all of their adornments off for the moment. I really want to understand their shapes first; we can add all the fun weapons and gear onto them later. 03 01 02 Use simple shapes to mark out the important parts and joints of the creatures. Use a scribbling technique to add volume and form to the shapes. Clean up the gesture drawings, so that you are left with solid contours of the creatures. Detail later Don’t worry about trying to draw all the details at this stage. That will come later. Right now focus on the shape and design of your creatures. Why not use reference at this stage? It is important to get your own ideas down first, straight from your imagination, before you gather too much reference. You can always change your ideas later to fit your reference, but it can often be hard to change your reference to fit your ideas. If you dwell too much on reference at the beginning, or even worse, copy straight from photos, you may lose some of the special individuality of your idea that makes it uniquely yours. In short: ideas first, then reference.
  • 17.
    Drawing projects |Crafting jungle creatures 189 Study the details, shapes, and overall structures. Memorize the elements and try to pay attention to how each part relates to the others. How far is the eye from the ear? How far from the nose? Where does the jaw line end? As you draw you will be subconsciously storing these details in your library for use later on. For my cart-horse creature I utilized a book on mammals of South America which had been collecting dust on my bookshelf. Collect references For my tribal frogs, I found many pictures online of South American tree frogs. I also supplemented these with pictures of local tree frogs that I had taken myself, such as this one here. Now for science! Now that we have our ideas locked down from our imagination, let’s go reference hunting! By drawing from photos (or even better, from life) you are committing the details and forms of these creatures to memory and building a visual library in your brain for future use. Now when you draw from your imagination in the future your brain will be supplying more information to your imagination about how animals look and function. I am still undecided as to whether it will be a tapir, an elephant, or a giant boar creature, so I gather reference on all of those animals and head back to my drawing desk. Working rough When doing studies from life, you don’t have to be perfect. Their purpose is to help the creatures in your painting look more real and authentic. Don’t spend too long here, just draw quickly and as faithfully to the image as you can!
  • 18.
    190 Beginner’s guideto sketching: characters, creatures concepts 01 01 A new drawing Now that we have drawn from our reference, let’s prepare to really craft our creatures. Using what I have learned about the creatures I drew in my reference, I redraw my original creature from my thumbnail on a new sheet of drawing paper. This time I work on a larger scale and explore more details in my drawing. As I draw I push and pull the shapes, sometimes erasing and redrawing in order to really get the character right. 02 Refining the cart-horse Now that I have studied elephants and tapirs more closely I realize which parts I want to take from each creature to make my cart-horse creature for this scene. I do several looser drawings until I hit the one that seems to capture the look I am after. I take a nose from this, tusks from that, and the body from something else entirely. It is all my idea, but now it has been corrected and is better adapted to live in our world. 03 Cleaning up the sketch Now I pull out my tracing paper and place a few sheets over my loose drawing. I place just enough sheets of the tracing paper over the drawing so that I can still just barely see the drawing underneath. I like to see my new lines on the top sheet very clearly. I use a 2H pencil to establish my lines and then an HB pencil to reinforce and shade my drawing. Careful! Be very careful when using lighter tracing paper. It is prone to buckling and tearing if your rub or erase too hard. Use loose lines to explore shapes to get your creature design right. 02 Continue with the loose drawings, taking the parts you enjoyed from the reference drawings. 03 Once you have a shape and design you are happy with, it’s time to redraw the creature, cleaning up your lines as you go.
  • 19.
    Drawing projects |Crafting jungle creatures 191 06 04 Moving on to the frogs Now I will repeat these steps for the frogs! Once again, I draw a rough version of each of my frogs on my drawing paper to explore more details. 05 A little personality For creatures that have human-like expressions, it can be helpful to have some reference beyond what we collected earlier. For this I sometimes use a mirror (or the camera on my phone) and will make some faces at myself until I find the expression that fits. If my scene is highly complex, and the creatures are near human, I might even consider posing some family or friends so I can get the forms right. 06 Refining and shading Now I am ready to do my final drawings for my frog tribesmen. As with my cart-horse creature, I place a few sheets of tracing paper over my rough drawings of my creatures and trace their shapes lightly with a 2H pencil. After I have traced my basic drawing over to my tracing paper, I flip my tracing paper drawing over to see what it looks like in reverse to check if my proportions are correct (as I did for the main character on page 185). After this I use a darker HB pencil to refine the drawing and add shadows and shapes. Once the creature’s shape and proportions are refined it’s time to add props and details such as the leaves on the head-dress and the weapon. Shading The best shading for you to use is whatever gets the job done for you. For my work here I have used a combination of hatching and edging. 05 Give your creature character by adding some fun expressions. 04 Use simple shapes to roughly sketch out the creature.
  • 20.
    192 Beginner’s guideto sketching: characters, creatures concepts Bringing it all together Learn how to compose a complex fantasy scene from your imagination. Drawing is the backbone of an illustration. It is the intellectual statement, while color is the emotional. It is important to get the drawing right. In the first two parts of this three-part tutorial we developed our main character and creatures. In this part I will now show you how to take those drawings and combine them to finish a complete rough drawing. I will then show you how I take this rough drawing and turn it into a final, tight drawing that is ready to show to a client and is ready for color. By Justin Gerard Tools Traditional tools • Basic drawing paper • Tracing paper • Pencils (6H, 2H, HB, 2B) • Kneaded eraser Digital tools • Digital scanner • Adobe Photoshop with a Wacom tablet The tight drawing of the character is ready to be integrated into the scene, just like in the thumbnail. The cart-horse creature is ready to be added to the cart. We have the detailed frog tribesmen ready and have knowledge of drawing them in a group.
  • 21.
    Drawing projects |Bringing it all together 193 Rough drawings In the previous two parts I worked up the primary characters of my drawing, but there are still a few missing support elements which need attention before we can move on to our final drawing. The first step now is to draw those last missing parts. Using the same techniques I used previously, I draw all of my missing support elements: the cart, the monkeys, the rope-bridge totem, and other odds and ends that are meant to support my main characters. These are secondary elements. They should not take away from my main figures, but they are still important and are worth drawing (and redrawing) until you get them right. However, I don’t spend too long here. They don’t have to be perfect; they just need to work well with the scene. Use yourself as a references to get expressions and emotions right. As these creatures are secondary to the main characters and creatures, we don’t want to draw as much attention to them, so they can be less detailed. Use your original thumbnail to trace over and begin to add in cleaner lines and details. The rope-bridge totem is made up of simple shapes. I mirrored the tribal frog faces here to create a sense of unity. Use real-world references for any supporting characters and creatures.
  • 22.
    194 Beginner’s guideto sketching: characters, creatures concepts Collage work Now that I have all the drawings I need completed, I scan everything into Photoshop. If you haven’t worked with Photoshop before, you can download a free trial of Photoshop or Photoshop Elements from www.adobe.com. There are other alternatives available such as Affinity Designer (www.affinity.serif.com), Mischief (www.madewithmischief.com), and ArtRage (www.artrage.com). I use a flatbed scanner to scan in my drawings. However, if you don’t have one, don’t worry! You can use a basic digital camera or even the camera on your phone to get your drawings into Photoshop. I open my initial thumbnail in Photoshop and make a new layer (Layer New Layer) over the top of it. I fill this layer with white and set its opacity to 80%. This allows me to see it as a guide, without it overpowering my new drawings. Next I open all of my new drawings and drag each drawing into my file. As I drag them in I change their layer blending modes to Multiply. I then click Image Adjustments Levels and drag the input sliders so that only the black line remains (and there is no paper texture). This cleans up the drawings so there isn’t too much clutter or competing paper textures. I begin to arrange my detailed drawings of the character, creatures, and surrounding elements over my original thumbnail. Want to stay traditional? You can also complete this step with traditional collage work by cutting out your drawings and laying them over your thumbnail on a new piece of tracing paper.
  • 23.
    Drawing projects |Bringing it all together 195 Adding in the final elements Once I have laid out all of my various elements over my thumbnail, there will be areas that have I have yet to draw. I could print the whole file out on copy paper and finish the areas by hand, but I find it quicker to do this in Photoshop. I will therefore be staying on the computer for this stage. 01 Digital brushes When I do rough clean-up work like this in Photoshop, I only use basic brushes without any textures or fancy brush settings. For this tutorial I use a standard round brush, which has been squashed and angled just a bit to give the line a little life. Please note that in the Transfer settings I have set both Flow Jitter and Opacity Jitter to Pen Pressure. 02Environmental additions Using this digital brush, I work on any environmental areas that I haven’t drawn, for example the jungle plants and tree shapes, as well as any areas on or around my figures that haven’t been drawn yet. I also tighten up my background areas. I do not spend long doing this as foliage, landscape, and backgrounds can be very, very organic. It is making sure the characters are working that I am mainly concerned with. 03Last-minute adjustments Photoshop has many wonderful tools for adjusting your drawing. At this stage I want to check all of my perspective lines and proportions before I move on to my final refined drawing. To do this I mirror my image by clicking Image Image Rotation Flip Canvas Horizontal. Mirroring the image in this way is similar to what we did earlier with tracing paper and will often reveal many errors that I couldn’t see before. To fix them I will either redraw them or select the offending area and click Edit Free Transform or Edit Transform Warp to achieve what I need to in order to make the image look proportional and correct (just remember to flip your canvas back when you are finished). Create quick, organic sketches for the foliage, a less detailed background element. I will use a basic round brush to fill in the blank areas. 01 02 It is always a good idea to flip your image horizontally (try vertically as well), as any errors will jump right out at you. If working traditionally, use a mirror to see the image in reverse. 03
  • 24.
    196 Beginner’s guideto sketching: characters, creatures concepts Lighting and value studies We now need to plan out our lighting. This is an important stage so that we know how to shade and render our characters. To decide on my lighting I am going to make some tiny value studies of my drawing. In Photoshop I shrink my file to something very tiny to prevent myself from getting caught up in the details. For this image I reduce my file to 450 pixels tall by 600 pixels wide. I then create several thumbnails using only black, white, and gray. I treat my compositions like they are a stage and have a foreground, main middle ground, and background. Do I want to darken my foreground to play up the setting in the background? Do I want to darken the background to give more dramatic lighting to the foreground? This is where I experiment and decide. If the area surrounding the character is dark, the character should be light to make it “pop”. Lightening the background will highlight the background setting. Darkening the background creates a dramatic lighting scenario in the foreground. Foreground framing In order to make our characters “pop”, we want to make sure that they are distinct from the background. So if our character is to be dark, the area behind them should be brighter; if the area behind them is dark, the character should be light. Making these little simple value studies will help you to decide how to proceed in the next stage when you are shading and adding values. This is extremely important, especially if you plan to paint over this drawing. My chosen value study.
  • 25.
    Drawing projects |Bringing it all together 197 The final drawing Now that I have completed all of my preliminary work I am ready to begin my final drawing. I can approach my final drawing with more confidence now that I have worked out all of the details and have already dealt with any potential pitfalls. 01 The transfer We need to transfer our drawing from our computer screen to our drawing paper. There are a variety of ways of doing this, and you should use whatever feels the best for you. Light tables, projectors, even printing out lightly on your paper are all great possibilities. I find that I get the best end results when I do a soft pastel transfer, so that is what I will be using for my drawing here. To do a soft pastel transfer I first print out my drawing on copy paper. I then make my transfer sheet by rubbing soft pastel (any dark color you like) on tracing paper so that it completely covers the surface (note that after I finish, I blow off any remaining dust to help keep my transfer clean). Finally, I place this sheet of tracing paper face down on my drawing paper. I place my printout over this and tape the top of the paper down to my drawing surface. This way I can lift it up to check the transfer and do not have to worry about my drawing or transfer coming out of alignment. I am now ready to transfer. I use a very hard pencil – 4H or 6H are best because they will hold a very sharp point and give a clean, solid transfer line. I redraw over my printout, pressing firmly enough so that the pressure of the pencil makes the pastel transfer onto my drawing paper. 02 Drawing I begin drawing with a 2H pencil to lightly reinforce my transferred lines. Once I have established my lines, I go over them with a HB pencil to darken them. Begin to go over the transfered lines, darkening and refining them as you go. The final composition ready to print. 01 02 Work around If your drawing is a bigger size than your printer can print, you can always print out the drawing in sections and tape them together.
  • 26.
    198 Beginner’s guideto sketching: characters, creatures concepts 03 Shading For shading I tend to prefer using hatching lines. These allow me to give some sense of movement and texture. Usually I will save the majority of my shading until after I have drawn all of my lines. Since this is a larger piece, however, and I know very well what I want my values to be like, I am going to shade as I go along. Whenever I get to deep shadow areas that need to read as black, I switch to a 2B pencil, which if pressed firmly can achieve very rich darks. The smudge patrol Remember you can place a few sheets of paper underneath your hand while you draw to avoid smudging the lines underneath. Again, make sure you work left to right if you are right-handed, and right to left if your are left-handed. Use hatching and cross- hatching to create texture in your shading. Use a 2B pencil to shade the darker areas, such as cast shadows and occlusions. 03
  • 27.
    Drawing projects |Bringing it all together 199 04 Erasing Since I have already worked out my drawing ahead of time, I will not need to make many corrections as I go along. Everything is pretty predictable. However, as mentioned on page 185, the eraser is for more than just corrections. For my frog tribesman here I have shaded in most of his face very lightly using my 2H pencil. Now I go back in with a kneaded eraser and “draw” out some of the highlights. This trick allows me a greater level of control over areas that require more refined and subtle rendering. Use a kneaded eraser to draw out highlights from your shading. This is how the illustration is looking at the half-way point. 04
  • 28.
    200 Beginner’s guideto sketching: characters, creatures concepts 05 Texture in different lighting As done previously, I use the edge of my pencil (instead of the tip) to lay in larger areas of deep shadow. This keeps the detail in those areas very murky – shadows should always be murky! When I get to where the shadow transitions from dark to light, I will switch back to using the tip of the pencil. Areas which transition out of deep shadow and into light are best shaded with hatching lines (or any sharper line) because hatching lines can give us a better illusion of texture there. In real visual observation, the area in between full shadow and full light is where texture can be best observed. Full light minimizes texture and full shadow does not show it at all. We therefore want to keep our shadow areas clear of texture, our full light areas very lightly rendered, and our spaces in between, detailed and sharply rendered. 06 Keep going! Continue going over the transfer outlines and shading from left to right (or the other way round if you are left-handed), until your scene is complete. You can see my final image on the next page. Drawing and rendering the background In my value studies I decided that I wanted my background to be very light. To achieve this, I have drawn with only the 2H pencil and left out the darker pencils. As I render the background, I keep in mind the rules of aerial perspective. For our drawing purposes here this means that as my scene recedes into the distance the overall contrast decreases and there is less and less observable texture. 05 Use hatching lines and the tip of your pencil to create textured shading in the transition from dark to light areas, 06 Keep filling in your transfer image until you have a rendered illustration.
  • 29.
    Drawing projects |Bringing it all together 201
  • 30.
    Take a giantleap into a futuristic world of dynamic droids, high-tech vehicles, and space- age characters in this exciting introduction to creating sci-fi drawings. Learn how experienced artists turn the wonders of their imagination into believable concepts, with clear steps, invaluable tips, and art theory made simple. LEARN TO DRAW 10 INCREDIBLE SCI-FI CONCEPTS SPACE GUN • SOLARPUNK BIKER GIRL BUTLER DROID • LIFESAVING DROID DRILLER SPACESHIP • SPACE SOLDIER CLEANING BOTS • SCI-FI SUSHI BAR SPACECRAFT • MARTIAN TRANSPORT DISCOVER HOW TO: • Create finished images, from rough sketches to final rendering • Tackle essential subjects including research, color, human-to-droid anatomy, and vehicle design • Use pens, pencils, and paints to achieve a range of fun and engaging styles • Develop your own creations using downloadable resources