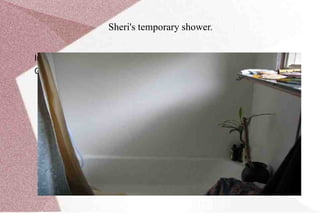
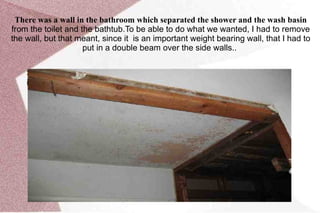
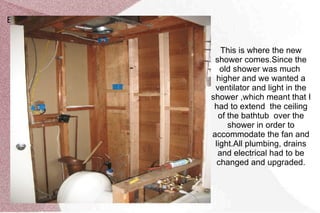
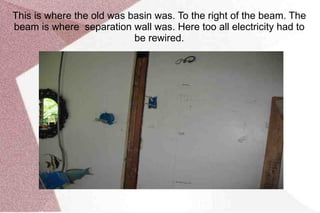
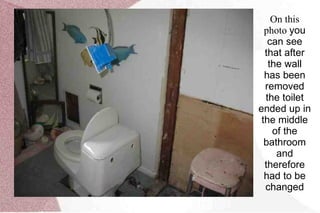
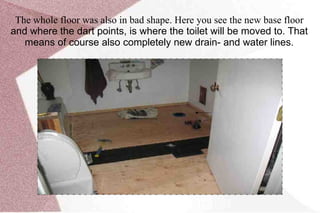
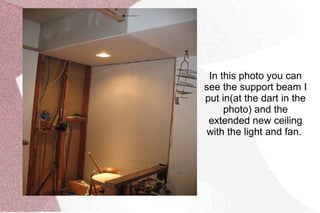
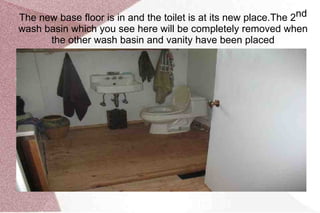
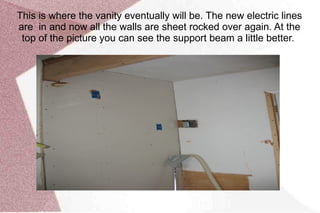
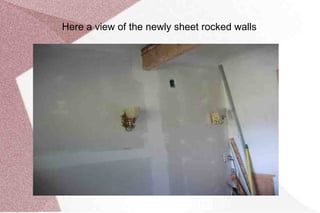
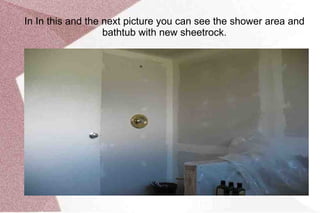
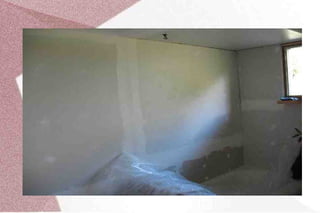
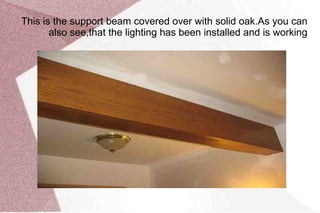
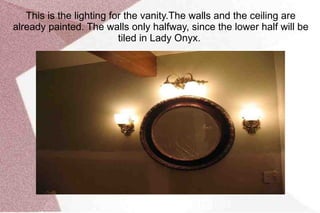
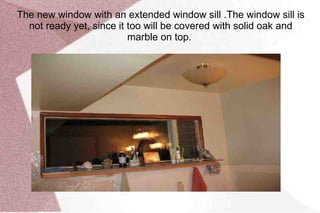
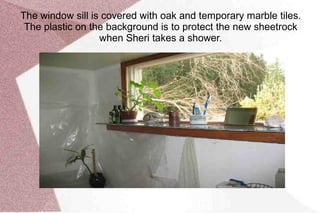
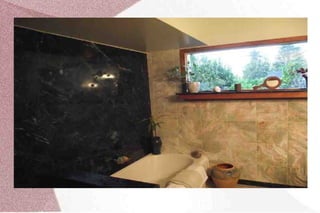
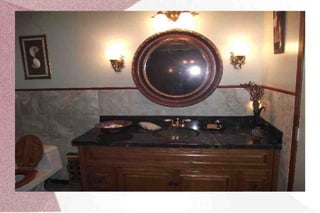
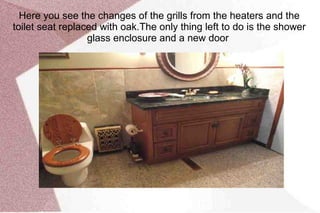
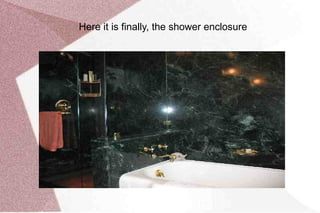
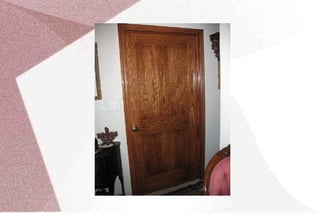
The  beginning  of changing  the  bathroom. The  older  window out and a larger window in its place
The first part is out, but now comes increasing the opening, before the  new window can be placed there in. Badkamer verbouwing
This is the window which goes in. It is the same height but about 3ft  wider .It is an old window which we bought in a building materials recycling place State the intended goal
That's done, now to the inside Describe customer needs and wishes
Explain the requirements
The window is in and the shower is now  completely broken out but Sheri must of course  be able  to  take her  daily shower  and I therefor made a temporary hand shower in the bathtub. Describe the main attributes of the product
Link the product attributes to customer needs
Sheri's temporary shower. Indicate the financial advantages for the customer
Compare quality and price with those of the competition
There was a wall in the bathroom which separated the shower and the wash basin  from the toilet and the bathtub.To be able to do what we wanted, I had to remove the wall, but that meant, since it  is an important weight bearing wall, that I had to put in a double beam over the side walls. .  Summarize the special features and advantages of the product being introduced
This is where the  new shower comes.Since the old shower was  much  higher and we wanted a ventilator and light in the shower ,which meant that I had to extend  the ceiling of the bathtub  over the shower in order to accommodate the fan and light.All plumbing, drains and electrical had to be changed and upgraded. Explain the steps that now need to be taken
This is where the old was basin was. To the right of the beam. The beam  is where  separation wall was. Here too all electricity had to be rewired.
On this photo  you can see that after the wall has been removed the toilet ended up in the middle of the bathroom and therefore had to be changed
The whole floor was also in bad shape. Here you see the new base floor  and where the dart points, is where the toilet will be moved to. That means of course also completely new drain- and water lines.
In this photo you can see  the support beam I put in(at the dart in the photo) and the extended new ceiling with the light and fan.
The new base floor is in and the toilet is at its new place. The 2 nd  wash basin which you see here will be completely removed when the other wash basin and vanity have been placed
This is where the vanity eventually will be. The new electric lines are  in  and now all the walls are sheet rocked over again. At the top of the picture you can see the support beam a little better.
Here a view of the newly sheet rocked walls
In In this and the next picture you can see the shower area and bathtub with  new sheetrock.
 
This is the support beam covered over with solid oak. As you can also see,that the lighting has been installed and is working
This is the lighting for the vanity. The walls and the ceiling are already painted. The walls only halfway, since the lower half will be tiled in Lady Onyx.
The new window with an extended window sill . The window sill is not ready yet, since it too will be covered with solid oak and marble on top.
The window sill is covered with oak and temporary marble tiles. The plastic on the background is to protect the new sheetrock when Sheri takes a shower.
Once more the temporary shower
Another picture of the lighting and mirror of the vanity.
The new faucets  installed in the bathtub.  The spigot not yet because of  the hand shower. The drain and drain handle are yet to be replaced
The copper shower base installed
The vanity and part of the granite floor. Far left one can see the wall heater of which the  cover still will be replaced and the same for the central heating vent on the floor in front of the vanity.
The Empress Green marble slabs installed by the bathtub and shower. Of course I had some  help here. 300 plus lb a piece is just a little to much to do by myself .
A look from the other side
The vanity with the marble installed.
The window sill completed with the marble.
Laying down the granite floor.
The floor is in except for filling in the joints. Also the 2 nd  wash basin is gone. The pipes will still be eliminated before the Lady Onyx can be installed.
In this photo and the next two you see the Lady Onyx installed on the  walls.
 
 
Here you see the changes of the grills from the heaters and the toilet seat  replaced with oak.The only thing left to do is the shower glass enclosure and a new door
Here it is finally, the shower enclosure
The door is coming

Bathroom remodel

  • 1.
    The beginning of changing the bathroom. The older window out and a larger window in its place
  • 2.
    The first partis out, but now comes increasing the opening, before the new window can be placed there in. Badkamer verbouwing
  • 3.
    This is thewindow which goes in. It is the same height but about 3ft wider .It is an old window which we bought in a building materials recycling place State the intended goal
  • 4.
    That's done, nowto the inside Describe customer needs and wishes
  • 5.
  • 6.
    The window isin and the shower is now completely broken out but Sheri must of course be able to take her daily shower and I therefor made a temporary hand shower in the bathtub. Describe the main attributes of the product
  • 7.
    Link the productattributes to customer needs
  • 8.
    Sheri's temporary shower.Indicate the financial advantages for the customer
  • 9.
    Compare quality andprice with those of the competition
  • 10.
    There was awall in the bathroom which separated the shower and the wash basin from the toilet and the bathtub.To be able to do what we wanted, I had to remove the wall, but that meant, since it is an important weight bearing wall, that I had to put in a double beam over the side walls. . Summarize the special features and advantages of the product being introduced
  • 11.
    This is wherethe new shower comes.Since the old shower was much higher and we wanted a ventilator and light in the shower ,which meant that I had to extend the ceiling of the bathtub over the shower in order to accommodate the fan and light.All plumbing, drains and electrical had to be changed and upgraded. Explain the steps that now need to be taken
  • 12.
    This is wherethe old was basin was. To the right of the beam. The beam is where separation wall was. Here too all electricity had to be rewired.
  • 13.
    On this photo you can see that after the wall has been removed the toilet ended up in the middle of the bathroom and therefore had to be changed
  • 14.
    The whole floorwas also in bad shape. Here you see the new base floor and where the dart points, is where the toilet will be moved to. That means of course also completely new drain- and water lines.
  • 15.
    In this photoyou can see the support beam I put in(at the dart in the photo) and the extended new ceiling with the light and fan.
  • 16.
    The new basefloor is in and the toilet is at its new place. The 2 nd wash basin which you see here will be completely removed when the other wash basin and vanity have been placed
  • 17.
    This is wherethe vanity eventually will be. The new electric lines are in and now all the walls are sheet rocked over again. At the top of the picture you can see the support beam a little better.
  • 18.
    Here a viewof the newly sheet rocked walls
  • 19.
    In In thisand the next picture you can see the shower area and bathtub with new sheetrock.
  • 20.
  • 21.
    This is thesupport beam covered over with solid oak. As you can also see,that the lighting has been installed and is working
  • 22.
    This is thelighting for the vanity. The walls and the ceiling are already painted. The walls only halfway, since the lower half will be tiled in Lady Onyx.
  • 23.
    The new windowwith an extended window sill . The window sill is not ready yet, since it too will be covered with solid oak and marble on top.
  • 24.
    The window sillis covered with oak and temporary marble tiles. The plastic on the background is to protect the new sheetrock when Sheri takes a shower.
  • 25.
    Once more thetemporary shower
  • 26.
    Another picture ofthe lighting and mirror of the vanity.
  • 27.
    The new faucets installed in the bathtub. The spigot not yet because of the hand shower. The drain and drain handle are yet to be replaced
  • 28.
    The copper showerbase installed
  • 29.
    The vanity andpart of the granite floor. Far left one can see the wall heater of which the cover still will be replaced and the same for the central heating vent on the floor in front of the vanity.
  • 30.
    The Empress Greenmarble slabs installed by the bathtub and shower. Of course I had some help here. 300 plus lb a piece is just a little to much to do by myself .
  • 31.
    A look fromthe other side
  • 32.
    The vanity withthe marble installed.
  • 33.
    The window sillcompleted with the marble.
  • 34.
    Laying down thegranite floor.
  • 35.
    The floor isin except for filling in the joints. Also the 2 nd wash basin is gone. The pipes will still be eliminated before the Lady Onyx can be installed.
  • 36.
    In this photoand the next two you see the Lady Onyx installed on the walls.
  • 37.
  • 38.
  • 39.
    Here you seethe changes of the grills from the heaters and the toilet seat replaced with oak.The only thing left to do is the shower glass enclosure and a new door
  • 40.
    Here it isfinally, the shower enclosure
  • 41.