Download as PDF, PPTX


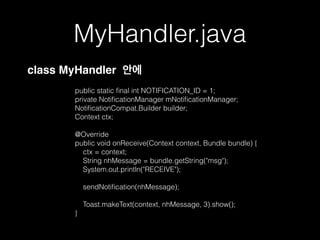


This document discusses using Azure Notification Hubs and Mobile Services for push notifications and database operations. It provides code samples for registering with Notification Hubs in Android, handling notifications, and inserting data into a Mobile Services database table. Links are included for Microsoft Azure and Google Cloud Messaging documentation.


![Microsoft Azure Training - [3] Azure Accounts, Subscriptions and Admin Roles ...](https://cdn.slidesharecdn.com/ss_thumbnails/azureaccountssubscriptionsandadminroles-150728055139-lva1-app6891-thumbnail.jpg?width=640&height=640&fit=bounds)


![[협업 도구] 위키를 활용한 협업 노하우](https://cdn.slidesharecdn.com/ss_thumbnails/p31730-130303134516-phpapp02-thumbnail.jpg?width=640&height=640&fit=bounds)


