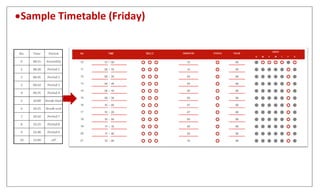
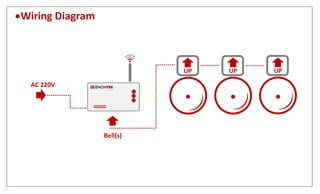
INSTRUCTION MANUAL DEN-280
How to connect
 Turn on device.
 Open PC’s/Android/IOS Wi-Fi manager, find SSID “DENONTEK-280”.
 Connect “DENONTEK-280” by entering password (default password 123456789)
 Open any latest browser (Google Chrome is recommended)
 Put IP 192.168.4.1 in address bar of browser (IP is already printed on label at device) and hit Enter or Go
Device will prompt Login Key dialogue window. As “Please enter a key” (See fig 01)
 Enter device interface key (default key 123)
 Press Login & wait a bit.
After successful login attempt device will show its main interface (See fig 02)
Fig. 01 Fig. 02
Understand your device interface
Device real date & Time, to set
time go to “Setting->Sync Time”
Enter Time here, each lecture
in single row (24hrs format)
How many seconds
alarm will ring
Status is ON/OFF switch of
specific alarm, must be ON.
Pulse used for “Period-Wise”
ring, e.g. 2 times ring for 2nd
period, default is 0, Zero is
considered as 1, Alarm will ring on selected
days
Scroll down for more alarms
Settings (Wi-Fi & Device Time)
To test bell connection/ 1
press = 3 seconds ring
Save timetable to device after
enter/update new timetable
Load timetable from device’s
memory, normally device
loads timetable automatically
at startup
Sample Timetable (Monday to Saturday)
Recommended duration for lectures are:
 Institute Start/End 10 Sec(s)
 Break Start/End 07 Sec(s)
 Periods 03 Sec(s)
 If Pulse >1 then duration should be < 3
Sample Timetable (Friday)
Wiring Diagram
AC 220V
Bell(s)
Automatic Electric Bell Ring Instruction Manual

Automatic Electric Bell Ring Instruction Manual

  • 1.
  • 2.
    How to connect Turn on device.  Open PC’s/Android/IOS Wi-Fi manager, find SSID “DENONTEK-280”.  Connect “DENONTEK-280” by entering password (default password 123456789)  Open any latest browser (Google Chrome is recommended)  Put IP 192.168.4.1 in address bar of browser (IP is already printed on label at device) and hit Enter or Go Device will prompt Login Key dialogue window. As “Please enter a key” (See fig 01)  Enter device interface key (default key 123)  Press Login & wait a bit. After successful login attempt device will show its main interface (See fig 02) Fig. 01 Fig. 02
  • 3.
    Understand your deviceinterface Device real date & Time, to set time go to “Setting->Sync Time” Enter Time here, each lecture in single row (24hrs format) How many seconds alarm will ring Status is ON/OFF switch of specific alarm, must be ON. Pulse used for “Period-Wise” ring, e.g. 2 times ring for 2nd period, default is 0, Zero is considered as 1, Alarm will ring on selected days Scroll down for more alarms Settings (Wi-Fi & Device Time) To test bell connection/ 1 press = 3 seconds ring Save timetable to device after enter/update new timetable Load timetable from device’s memory, normally device loads timetable automatically at startup
  • 4.
    Sample Timetable (Mondayto Saturday) Recommended duration for lectures are:  Institute Start/End 10 Sec(s)  Break Start/End 07 Sec(s)  Periods 03 Sec(s)  If Pulse >1 then duration should be < 3
  • 5.
  • 6.