ASP NET Professional Projects 1st Edition Hersh Bhasin
ASP NET Professional Projects 1st Edition Hersh Bhasin
ASP NET Professional Projects 1st Edition Hersh Bhasin
ASP NET Professional Projects 1st Edition Hersh Bhasin
ASP NET Professional Projects 1st Edition Hersh Bhasin
1.
ASP NET ProfessionalProjects 1st Edition Hersh
Bhasin - PDF Download (2025)
https://ebookultra.com/download/asp-net-professional-
projects-1st-edition-hersh-bhasin/
Visit ebookultra.com today to download the complete set of
ebooks or textbooks
2.
We believe theseproducts will be a great fit for you. Click
the link to download now, or visit ebookultra.com
to discover even more!
Professional ASP NET Design Patterns Scott Millett
https://ebookultra.com/download/professional-asp-net-design-patterns-
scott-millett/
Professional ASP NET MVC 4 1st Edition Jon Galloway
https://ebookultra.com/download/professional-asp-net-mvc-4-1st-
edition-jon-galloway/
Professional ASP NET MVC 3 1st Edition Jon Galloway
https://ebookultra.com/download/professional-asp-net-mvc-3-1st-
edition-jon-galloway/
Professional ASP NET 2 0 XML Thiru Thangarathinam
https://ebookultra.com/download/professional-asp-net-2-0-xml-thiru-
thangarathinam/
3.
Professional IIS 7and ASP NET Integrated Programming Dr.
Shahram Khosravi
https://ebookultra.com/download/professional-iis-7-and-asp-net-
integrated-programming-dr-shahram-khosravi/
Pro Telerik ASP NET and Silverlight Controls Master
Telerik Controls for Advanced ASP NET and Silverlight
Projects 1st Edition José Rolando Guay Paz (Auth.)
https://ebookultra.com/download/pro-telerik-asp-net-and-silverlight-
controls-master-telerik-controls-for-advanced-asp-net-and-silverlight-
projects-1st-edition-jose-rolando-guay-paz-auth/
ASP NET AJAX programmer s reference with ASP NET 2 0 or
ASP NET 3 5 Dr. Shahram Khosravi
https://ebookultra.com/download/asp-net-ajax-programmer-s-reference-
with-asp-net-2-0-or-asp-net-3-5-dr-shahram-khosravi/
Professional ASP NET 3 5 in C Sharp and Visual Basic Bill
Evjen
https://ebookultra.com/download/professional-asp-net-3-5-in-c-sharp-
and-visual-basic-bill-evjen/
ASP NET Bible 1st Edition Mridula Parihar
https://ebookultra.com/download/asp-net-bible-1st-edition-mridula-
parihar/
5.
ASP NET ProfessionalProjects 1st Edition Hersh Bhasin
Digital Instant Download
Author(s): Hersh Bhasin
ISBN(s): 9781931841214, 1931841217
Edition: 1
File Details: PDF, 4.42 MB
Year: 2002
Language: english
wading through mywork and fixing what was wrong and Mingyong Yang for reviewing
my source code and giving valuable suggestions.
About the Author
Hersh Bhasin has been consulting on Microsoft technologies for some nine odd years
and maintains a Web site on emerging technologies like .NET, SOAP, XML at
http://hersh.weblogs.com. He qualified as a Management Accountant from The
Chartered Institute of Management Accountants - UK (CIMA) and also obtained a
Bachelor of Science degree from the University of Punjab, India. He can be contacted at
hersh_b@yahoo.com
Part I: The ASP.NET Programming Environment
Chapter List
Chapter 1: Introducing ASP.NET
Chapter 2: Introducing ASP.NET Web Forms and Controls
Chapter 3: Using ADO.NET in the .NET Framework
Chapter 4: Data Binding
Chapter 5: Input Validation
Chapter 6: User Controls
Chapter 7: Custom Controls
Chapter 8: Business Objects
Chapter 9: Working with ASP.NET Web Services
Chapter 10: ASP.NET Applications
Chapter 11: Caching
Chapter 12: Tracing
Chapter 13: Security
Chapter 1: Introducing ASP.NET
Overview
ASP.NET is a radical evolution of ASP and its associated data access service, ADO,
which is now called ADO.NET. ASP suffered from many limitations—it was unstructured,
so the code intermingled with the presentation logic, which made applications difficult to
understand and maintain. Due to this limitation of ASP, code segregation was not
possible. You could not hand over the presentation logic to a Web designer and the code
to a developer and ask both to work simultaneously on the application. Unlike windows-
based application development, ASP did not have an inherent component or
programming model. ASP developers had to use a combination of markup languages,
scripting environments, and server platforms to get their work done. Tool support was
limited and although Visual InterDev introduced a Visual Basic type interface that
allowed you to drag and drop components such as text boxes and labels onto a form, it
was clunky and added tons of code to the form, which needless to say scared away most
developers from ever using this product.
ADO, the Data Access component of ASP, had been designed with a view to serving the
data access needs of client/server-based applications. Programming for the Web,
however, followed different rules. A client/server application had no need to optimize
database connections and a typical database operation would open a database
connection and leave it open until the looping operation of an ADO recordset was
complete. Database connections in a Web-based environment, however, were
expensive. Web programming required a disconnected way of manipulating data. Thus
the Remote Data Services (RDS) were born. With the advent of XML (eXtensible Markup
Language), the request/response paradigm became the order of the day. To keep up
with this message-based system of communication, HTTP support was added to RDS,
which allowed business logic to be called at the middle tier. XML follows a
9.
heterogeneous and hierarchicaldata model (XMLDOM) whereas MDAC (Microsoft Data
Access Technologies) follows a relational model. To work with XML data we had to make
a choice between MSXML and MDAC. But ADO.NET solves this dilemma. XML support
is built at a very basic level and it is quite similar to working with "database" data. No
longer is choosing between MDAC and MSXML an issue.
Web forms, which will be discussed in Chapter 2, "Introducing ASP.NET Web Forms and
Controls," are the fundamental building blocks of ASP.NET. The concept of "Code
Behind" has been introduced, which is the process of writing pres entation logic and
script in separate files. Code Behind seeks to eliminate the clutter and "spaghetti" code
(spaghetti code is code where the scripting portion intermingles with the presentation
logic) that traditional ASP seemed to encourage. ASP.NET provides a server-based,
event-driven programming model similar to Visual Basic, which enables WYSIWYG tools
like Visual Studio to be used.
ASP.NET introduces two sets of controls, the HTML controls and the Web controls,
which are collectively known as "server controls." These controls render HTML for Web
browsers in addition to providing means of preserving state across round trips, detecting
the browser types (and rendering HTML accordingly), and serving as the building blocks
for composite controls. These controls reside on the server and output plain HTML to the
browser. Since all browsers can understand HTML, they are able to overcome the
classic cross-browser compatibility problem.
The HTML controls (textbox, form, button, and so on) are the normal HTML controls that
we have been using so far, with a new runat="server" attribute added. The sole use
of these controls is to provide a quick migration path to ASP.NET as any HTML control
can be converted to an ASP.NET control by adding the runat="server" attribute. The
Web controls, however, provide a high degree of abstraction and usefulness. Four types
of Web controls exist: Intrinsic controls, Rich controls, List Bound controls, and Validation
controls. Intrinsic controls are the ASP.NET versions of traditional HTML controls, such
as textboxes, buttons, and DropDownList. These controls have a special prefix of
ASP.NET that distinguishes them from the normal HTML controls and they also have a
runat ="server" attribute. Thus a textbox is created as follows:
<asp:TextBox id="Text1" runat="server"/>
The purpose of Web controls is to simplify the nomenclature of a control. Controls that
overlapped in their functionality have been reduced to a single control. Properties like
ForeColor, Font, BackColor, Enabled, and so on are consistent among controls.
The developer thus needs to remember one property setting that he can apply to all
controls.
Rich controls consist of the Calendar and AdRotator. The Calendar outputs HTML for
downlevel browsers (these are browsers that do not support DHTML) or DHTML for
uplevel browsers. The AdRotator displays rotating advertisements.
List bound controls are the subject matter of Chapter 4, "Data Binding." There are three
controls in this category: the DataGrid, the DataList and the DataRepeater. These
controls automate the task of displaying database data as lists and data grids. The
developer applies a number of templates to these controls to achieve a high degree of
customization. The DataGrid can even be used for in-place editing of data.
Validation controls, which are discussed in Chapter 5, "Input Validation," automate the
mundane activity of writing validation code. There are five validation controls and one
validation summary control. The validation controls are the
RequiredFieldValidator, RegularExpressionValidator,
CompareValidator, RangeValidator, CustomValidator, and the
ValidationSummary. The work of each of these controls is evident from its name. For
example, the RequiredFieldValidator does not allow the user to leave the required
field blank. Similarly, the RangeValidator verifies whether user input falls within a
specified range. It is a simple task to incorporate validation in an ASP.NET web form. All
you need to do is associate an input text box with the appropriate validation control.
ADO.NET, the latest avatar of ADO, is discussed in Chapter 3, "Using ADO.NET in the
.NET Framework." ADO has seen a massive overhaul (a complete rewrite would be a
better choice of words) in ADO.NET. The foundation of ADO—the recordset—has been
given the golden handshake. As noted above, the recordset understood only the
10.
relational way ofdoing things, which was appropriate for handling database data. With
the advent of XML, which followed a heterogeneous and hierarchical data model, the
recordset had a hard time keeping up. A new object called the DataSet has been
introduced in ASP.NET. The DataSet is an in-memory copy of the database, complete
with tables, columns, relationships, constraints, and data. It allows relationships to exist
between multiple tables, analogous to a foreign-key relationship in a database. You can
navigate between tables based upon their relationships. The DataSet has some
outstanding qualities. For example, it can talk to a variety of datasources; it can receive
data from a database, an XML file, code, or user input. No matter what the source of the
data within the DataSet is, it is manipulated through the same set of standard APIs. The
DataSet is transmitted as an XML stream and can thus be passed between any objects
(not just COM objects) without interference from firewalls. To transmit an ADO
disconnected recordset from one component to another, COM marshalling had to be
used.
User controls, which are discussed in Chapter 6, "User Controls," are the evolution of the
server-side include files. Include files are static files. User controls, on the
other hand, provide object model support, which enables you to program against
properties and use methods. User controls work much like the ASP intrinsic controls in
that they can expose properties and methods. In Chapter 6, I design a user control that
automates building of the navigation links for a Web site based on the URLs specified in
an XML file.
ASP.NET has a very clean and elegant approach to authoring custom controls. In
Chapter 7, "Custom Controls," I discuss the process of authoring custom controls in
detail. I also show you how to build a component (which I call "GenEditAdd") that you
can use to extend the DataGrid's functionality. The DataGrid does not have the
functionality to insert records. Using the GenEditAdd component, you can automate the
process of record insertion. You can also use the GenEditAdd component in lieu of the
editing functionality provided by the DataGrid, which requires you to code a number of
events. The GenEditAdd component requires simple property settings and the code
generation is automatic.
Encapsulating business logic into components has always been an important part of both
Web and client/server applications. ASP.NET has greatly simplified the process of
registering components. If you have developed COM objects in the past, you must know
the pain involved in registering components. A component had to be registered using the
regsvr32 utility. If the component was modified, the entire Web server had to be stopped
in order to re-register the component. This was called "DLL Hell." In ASP.NET,
components are simply copied and pasted in the bin directory and no registry updates
are required. Chapter 8, "Business Objects," looks at this important topic.
Web service is the main protagonist of the .NET arena and the content of this book and
its projects reflect its importance. A web service is a combination of three things: a
function written in a .NET-compliant language, SOAP, and XML. When you need to
reuse logic in a number of places, the best way to do so is to write the code as a
function. A collection of functions that share some common goal can be combined into a
business object. For example, the four basic database operations are insert, delete,
update, and select. We can write a generic function for each operation and pack them
together in a business object called (say) DataBaseClass. Now this class, together
with its functions, can be initiated and called in any object that needs to use its
functionality. A web service is a Web-enabled business object, which is a collection of
functions that can be called over the Web. Functions written for a web service are written
as normal functions, and the only difference is that the functions are preceded with a
special tag that marks them as web services. A standard called SOAP (Simple Object
Access Protocol) sets out the rules that must be followed by the machine that makes a
function call and the machine that responds to that call by sending a resultset back. The
request and response is made in XML and the XML document follows the rules set out in
the SOAP standard. Exchanging information as XML enables a client application to call a
function on the server, regardless of what operating system each is running, what
programming language each is written in, or what component model is supported on
each. This is because XML is basically a text file that all machines can understand and
because SOAP uses HTTP, which is the most common Internet transfer protocol and
11.
one that isused by essentially all Web browsers. Chapter 9 "Working with ASP.NET
Web Services," provides a detailed discussion on web services.
Chapter 10, "ASP.NET Applications," covers ASP.NET applications. An ASP.NET
application is an IIS virtual directory and its subdirectories. All of your Web application
files go into this folder. This folder has a special subdirectory called bin. All the compiled
business objects and web services reside here. When you want to register a new
component, you just copy and paste the DLL file in this folder (as opposed to using
regsvr32). This folder also contains two special files: web.config and global.asax. The
web.config file is an XML file that you use to configure various facets of the application.
For example, you can use it to set up and configure security, caching, or tracing. The
global.asax file contains application-level program directives, handlers for application
and session-level events, and declarations of objects that are globally accessible to all
parts of the application. In general, this file enhances the functionality that was provided
by the global.asa file in ASP.
Chapter 11, "Caching," deals with caching, which is the process of keeping frequently
visited Web pages in memory. The theory behind caching is that there are some items of
the Web site that are very expensive to construct and that such items should be created
once and then stashed away in memory for a fixed duration of time or until they change.
Subsequent calls to these resources will not re-create the resource but simply retrieve it
from the cache. Such items are typically resources that remain unchanged over a period
of time; for example, shopping lists or price lists.
Chapter 12, "Tracing," discusses tracing. Developers have often resorted to writing a
number of Response.Write() statements in the code to try to debug errant code.
When the problem is located, these debugging statements must be cleared out. This
method is cumbersome and error-prone, because you might accidentally remove code
along with the debugging statements. ASP.NET introduces an elgant way of writing such
debugging code. Debugging is enabled by adding a page-level directive (or by enabling it
in the web.config file). Debugging statements are then written using Trace.write()
instead of Response.Write(). When the form has been debugged, there is no need to
remove these statements from the body of the form. You can simply disable Trace and
these statements will not be displayed in the browser.
Security is discussed in Chapter 13. ASP.NET implements authentication through
authentication providers. These authentication providers are modules that contain code
required to authenticate the credentials of the requesting user. Three authentication
providers are currently available: Windows Authentication, Passport Authentication, and
Cookie Authentication. All three providers are discussed.
In Project 1 (Chapters 14 to 17), I show you how to build a Web-enabled personal
finance manager using ASP.NET web forms. This project is spread over four chapters. In
this project, I take a product that has its roots in the client/server era—a personal finance
accounting module—and revamp it for the Web. A personal finance manager is an
accounting application, such as Quicken or Microsoft Money that enables you to
maintain bank, cash, credit cards, and investment accounts. This project is designed to
be a production quality accounting application and makes use of stored procedures and
database triggers. It's comprised of web forms to maintain your chart of accounts,
transactions details and it even draws up a trial balance report.
The Internet brings some exciting possibilities to the traditional way of designing
applications. The various modules of an accounting application need no longer be
connected with "wire." Using ASP.NET and web services, we can design applications
that can send and receive data using the Internet and HTTP. In Project 2 (which spreads
over five chapters), I build generic database access services that can then be used to
interact with any database. This service has functionality to insert, update, delete, and
select records from a database. This web service accepts a database connection and a
valid SQL query as parameters. If the query is an action query (insert, update, or delete),
the appropriate action is performed. If the query is a select query (which returns a
resultset), a DataSet is returned to the calling object. This DataSet can then be used to
bind a control like a DataGrid. I demonstrate this service by incorporating it in the
personal finance manager that was developed in Project 1. This project also
demonstrates use of the navigation user control that was built in Chapter 6, "User
Controls." This navigation control builds the site navigation of the application using URLs
defined in an XML file.
12.
The advantage ofhaving a navigation system separate from the main application is that
you can add or delete links (by modifying the XML file) without having to change the Web
pages in the application.
In Project 3 (Chapters 23 to 26), I have taken another application that has traditionally
been a client/server application and revamped it for the Web. This is an inventory
management application. This application makes use of the database web service class
that was developed in Project 2. It also makes use of various stored procedures and
triggers.
In Project 4 (Chapters 27 and 28), I enhance the functionality of the custom control
GenEditAdd (which was initially developed in Chapter 7). The GenEditAdd control can be
used to insert or update database records. The DataGrid does not have the capability to
insert records, although it does have editing capabilities. The edit mode of the DataGrid
is quite cumbersome, as you have to code a number of events in the DataGrid for the
process to work. This control was developed to enhance the usefulness of the DataGrid.
It can be hooked up to a DataGrid to provide both editing and insertion capabilities in a
consistent manner. This control works by setting various properties and the code
generation is automated.
In Project 5 (Chapters 29 to 31), I discuss the important features of Visual Studio. In
Chapter 29, "Displaying Database Data Using a Strongly-Typed DataSet," I begin with
an overview of the important features of Visual Studio.NET, focusing on the various
wizards, tools and components available. I'll also show you how to use the typed
DataSet to display database information using the Visual Studio.NET drag and drop
features. In Chapter 30, "Writing CRUD Applications with Visual Studio.NET," I'll show
you how to interact with the database using Visual Studio.NET. I'll show you how to add,
delete, and update database rows. I'll also show you how to customize a DataGrid by
enabling paging and sorting from within the Visual Studio.NET. Finally, in Chapter 31,
"Creating a Web Service Using Visual Studio.NET," I'll show you how to develop and
consume web services with Visual Studio.NET.
Installing the .NET Framework SDK
The .NET SDK can be downloaded from the Microsoft download site at
http://msdn.microsoft.com/net/. It is quite a large download and you might want to
consider ordering a CD, which will ship at a nominal charge.
There are two versions available; a standard version or a premium version. The premium
version includes additional features like output caching, web farm session state, code
access hosting and support for four and above CPUs.
Installation is straightforward and involves running the setup.exe. If prompted, you
should update the Windows Installer Components. You should also apply the latest
patches for your Windows version. You should also update your version of MDAC
(Microsoft Data Access Components) to the latest version, which is currently version 2.7.
If the installer complains that ADO 2.7 is not installed, you can still proceed with the
installation by disregarding the complaint. You will be given a choice to install the SDK
samples. The samples are a rich source of information and you should choose to install
them. A named instance of the Microsoft Data Engine (MSDE) is installed along with the
samples and this contains the sample database.
Tip A limited-time evaluation copy of Microsoft SQL Server can be
obtained from
http://www.microsoft.com/sql/evaluation/trial/2000/default.asp. You
can also order this copy on a CD and only pay the cost of shipping.
After you have SQL Server up and running, install the ASP.NET QuickStart samples.
These samples are an excellent training resource on ASP.NET. To install these samples,
open the Microsoft NET Framework SDK/Samples and QuickStart
Tutorials link, which is added to your programs during the SDK installation and follow
the installation steps. Once the samples are installed, they can be accessed at
http://localhost/quickstart/default.aspx.
13.
After you installthe SDK, all you need is a text editor to write your scripts. You can also
order the Visual Studio CD set (again at a nominal charge) and use it to develop your
scripts. If you have the Visual Studio CDs, the Framework SDK is on the second CD.
I have discussed development with Visual Studio, where appropriate, and one entire
project (Project 5) is dedicated to exploring this development tool. I have left discussion
of Visual Studio till the end because I want my readers to be familiar with the internals of
ASP.NET before using the wizard-like tools of the Visual Studio IDE, which hides the
intricacies of code development. A text editor that
I highly recommend is TextPad, which is shareware and available at
http://www.textpad.com. You can also download the syntax definition file for .NET from
its site. This file will display various ASP.NET keywords in different colors.
Chapter 2: Introducing ASP.NET Web Forms and
Controls
ASP.NET forms are designed to overcome a number of shortcomings inherent in ASP
pages. In these pages the HTML elements and script code are necessarily intertwined
making the resultant page very cluttered. These pages are not easily edited with
WYSIWYG tools. ASP.NET improves on the ASP page and adds many interesting
enhancements to it. It provides a server-based, event-based programming model similar
to Visual Basic. It introduces a technique called "Code Behind," which allows the
developer to keep the script code in a file separate from the HTML markup. ASP.NET
introduces two sets of controls, the HTML controls and the Web Controls, which are
collectively known as "server controls." These controls render HTML for Web browsers in
addition to providing means of preserving state across round trips, detecting the browser
types (and rendering HTML accordingly), and serving as the building blocks for
composite controls. A round trip occurs whenever the user submits a form or an event
occurs that causes a post to the server; for example, the user fills out a text box on a
form and clicks on the submit button. The server processes the information passed onto
it and sends the page back to the client for display. The original state of the form is
maintained by ASP.NET. This means that when the user fills out a text box and submits
the form to the server, the text box will retain this information even after the round trip.
This is a welcome change from traditional ASP programming where the developer had to
take care of maintaining state, as the user-input values were lost after every post.
Basic Techniques
To create an ASP.NET form you simply save a text or HTML file with the .aspx
extension. No special tools are needed and you can use an editor like Notepad for the
job. You can also use Visual Studio.NET, a rapid application development environment
(RAD) that allows you to drag and drop controls onto a form.
ASP.NET forms also provide selective backward compatibility. For example, you can use
normal ASP code and mix script tags with HTML elements using the <% %> blocks. ASP
and ASP.NET applications can run side by side on the IIS without interference. However
ASP applications developed using the Visual Basic Scripting Edition will need to be
modified to port to ASP.NET.
In ASP.NET, script blocks are compiled and not interpreted, leading to enhanced
performance. Compiling the code involves converting the code instructions to the
machine language. In ASP.NET however, code is not compiled to machine language
directly. It is instead compiled to an intermediate language called Microsoft Intermediate
Language (MSIL or IL). IL code is further compiled to machine language using the JIT
compiler (just-in-time compiler). The JIT compiler compiles each portion of code as it is
called, instead of compiling the complete application in one go. This leads to faster start -
up time. The resultant compiled code is stored till the application exits and hence does
not have to be recompiled each time that portion of code gets called. Using this process,
it is expected that execution of IL code will be almost as fast as executing native
machine code.
14.
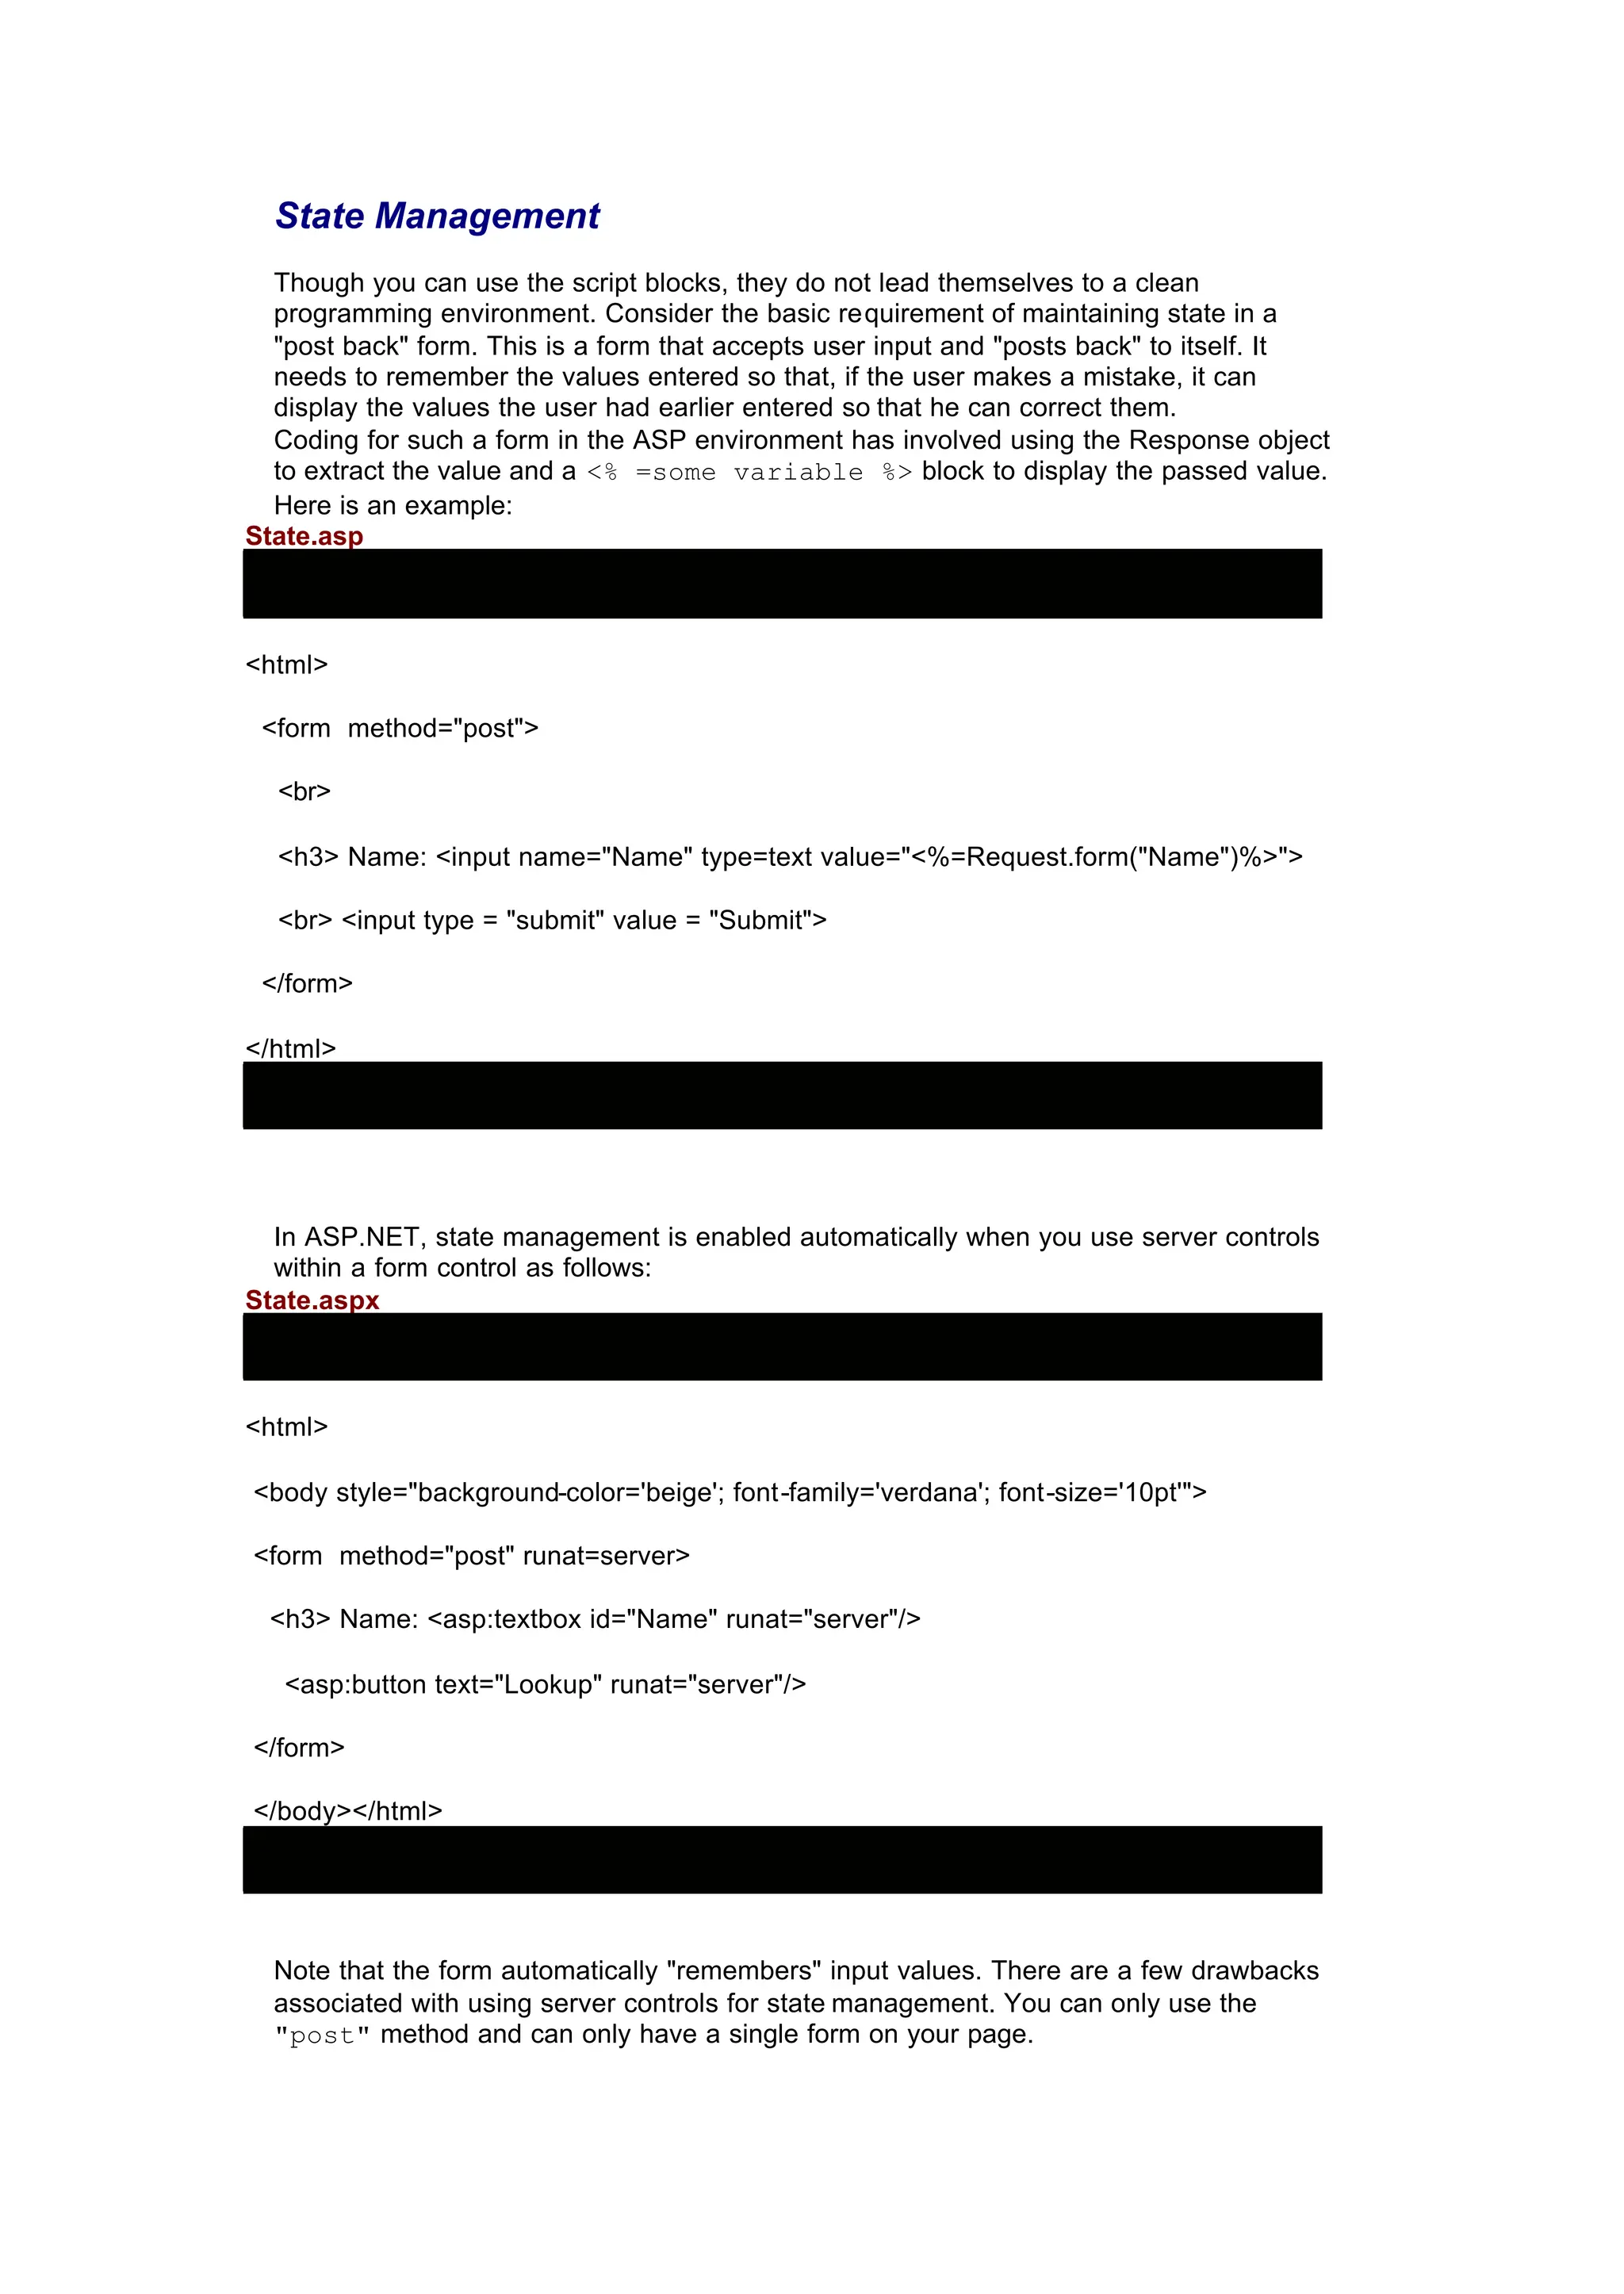
State Management
Though youcan use the script blocks, they do not lead themselves to a clean
programming environment. Consider the basic requirement of maintaining state in a
"post back" form. This is a form that accepts user input and "posts back" to itself. It
needs to remember the values entered so that, if the user makes a mistake, it can
display the values the user had earlier entered so that he can correct them.
Coding for such a form in the ASP environment has involved using the Response object
to extract the value and a <% =some variable %> block to display the passed value.
Here is an example:
State.asp
<html>
<form method="post">
<br>
<h3> Name: <input name="Name" type=text value="<%=Request.form("Name")%>">
<br> <input type = "submit" value = "Submit">
</form>
</html>
In ASP.NET, state management is enabled automatically when you use server controls
within a form control as follows:
State.aspx
<html>
<body style="background-color='beige'; font-family='verdana'; font-size='10pt'">
<form method="post" runat=server>
<h3> Name: <asp:textbox id="Name" runat="server"/>
<asp:button text="Lookup" runat="server"/>
</form>
</body></html>
Note that the form automatically "remembers" input values. There are a few drawbacks
associated with using server controls for state management. You can only use the
"post" method and can only have a single form on your page.
15.
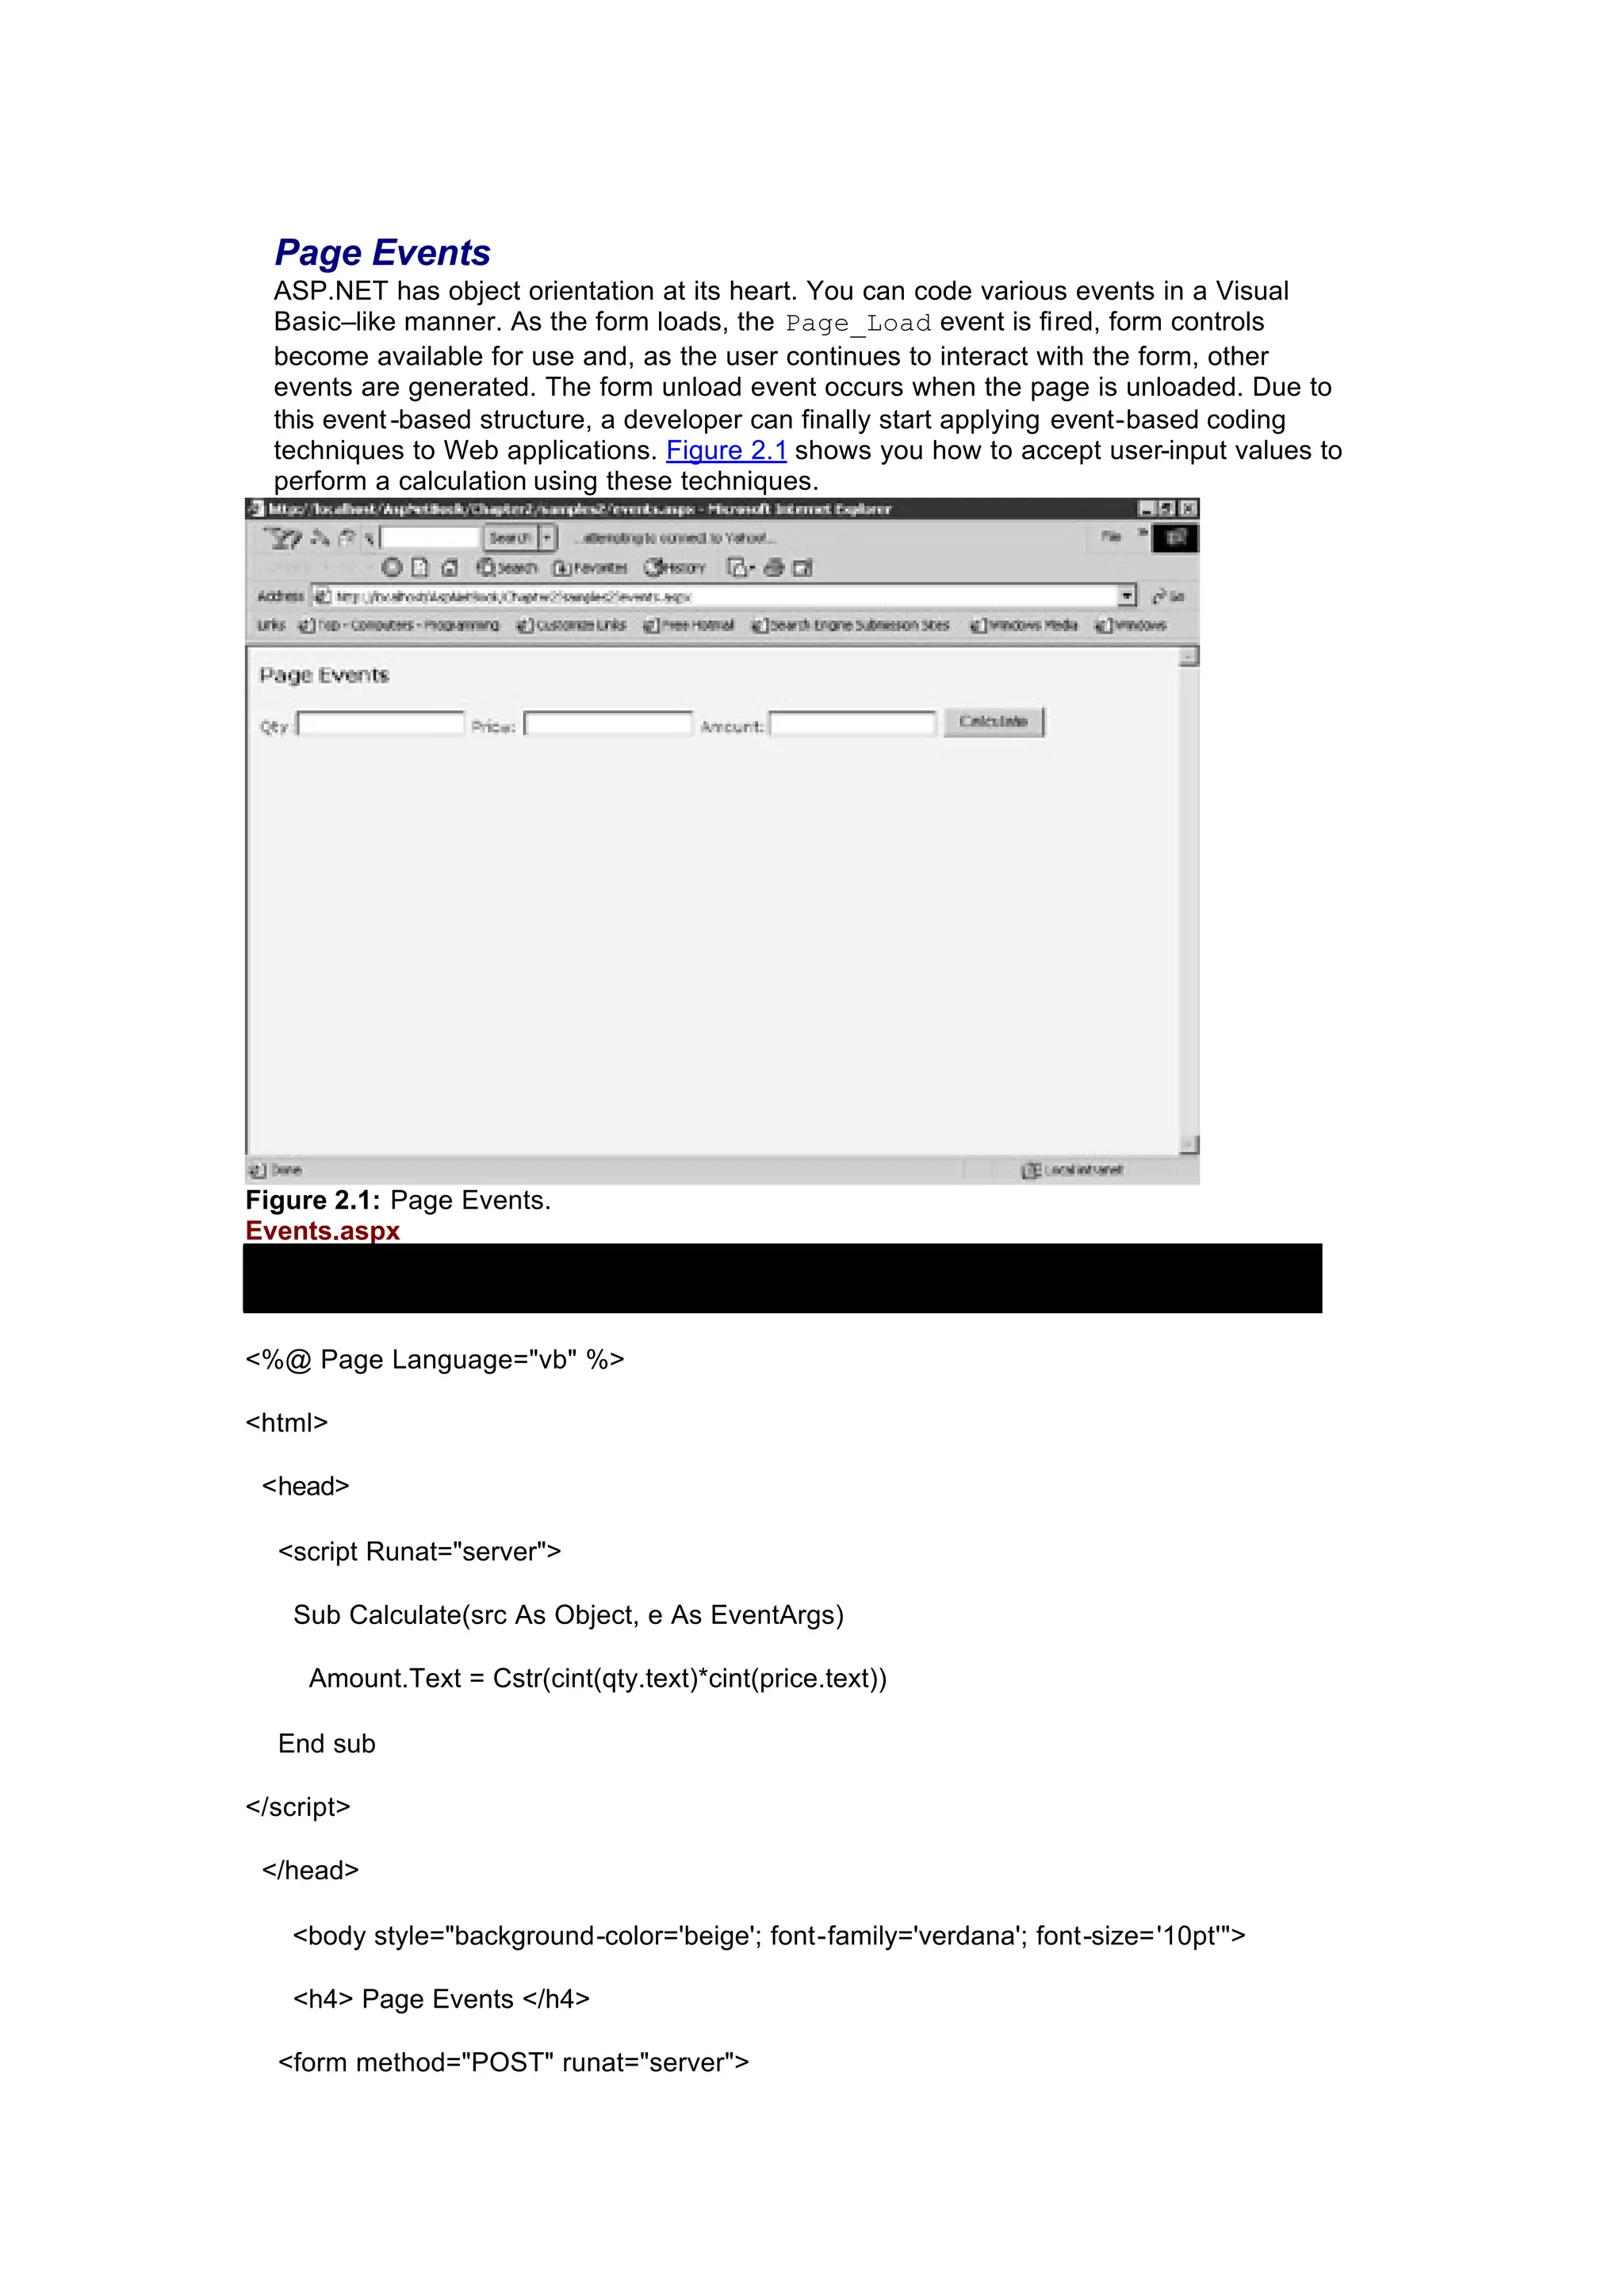
Page Events
ASP.NET hasobject orientation at its heart. You can code various events in a Visual
Basic–like manner. As the form loads, the Page_Load event is fired, form controls
become available for use and, as the user continues to interact with the form, other
events are generated. The form unload event occurs when the page is unloaded. Due to
this event-based structure, a developer can finally start applying event-based coding
techniques to Web applications. Figure 2.1 shows you how to accept user-input values to
perform a calculation using these techniques.
Figure 2.1: Page Events.
Events.aspx
<%@ Page Language="vb" %>
<html>
<head>
<script Runat="server">
Sub Calculate(src As Object, e As EventArgs)
Amount.Text = Cstr(cint(qty.text)*cint(price.text))
End sub
</script>
</head>
<body style="background-color='beige'; font-family='verdana'; font-size='10pt'">
<h4> Page Events </h4>
<form method="POST" runat="server">
16.
Qty:<asp:TextBox id="Qty" Runat="server"/>
Price:<asp:TextBox id="Price" Runat="server"/>
Amount:<asp:TextBox id="Amount" ReadOnly = "true" Runat="server"/>
<asp:Button id="btnCalculate" Text="Calculate" OnClick="Calculate"
Runat="server"/><br>
</form>
</body>
</html>
At the top of the page, I specify that we are going to be using Visual Basic as the
scripting language with the @ Page Language declaration. Each object can be assigned
an id property. This enables me to extract property values for the object using its id
property. In this example, I am accessing the text property for the Price and Qty
textboxes instead of accessing the posted data using the response object. I put my code
in the OnClick event of the button, thus making use of the new event-based paradigm
of ASP.NET. Finally, note how I am able to set the ReadOnly property of the Amount
textbox simply by setting its property value to "true".
Code Behind
As mentioned earlier, a major limitation of ASP is the way the script code intermingles
with the HTML tags. This makes the separation of content from presentation difficult. The
page becomes difficult to maintain and, in shops where developers and designers work
together, segregation of tasks becomes impossible.
Code Behind is a technique to separate the content from the script. A form can become
really cluttered with script code and html tags. To reduce this clutter you can lift out all
the script code from a web form and put it in a separate file. If you are using Visual Basic
code, this file will have an extension of .vb and if you are using C#, .cs.
The first thing you do in a Code Behind file is to import namespaces. This is the first
construct in the Code Behind file. Namespaces can be thought of as including references
in a Visual Basic project. When you make a reference to a DLL in Visual Basic, you can
access the methods contained in that DLL. Similarly, by importing a namespace, you can
access all the functionality residing within that namespace in your web form. If you do not
use this declaration, you have to provide a fully qualified path when referring to a method
residing in a particular namespace. This fully qualified path name can become very long
(and a pain to type). Using the import directive allows you to directly refer to the method
by name. Here are some of the commonly used Namespaces:
§ The System namespace contains fundamental classes and base classes that
define commonly-used value and reference data types, events and event
handlers, interfaces, attributes, and processing exceptions.
§ The System.Collection namespace contains classes that define lists,
queues, arrays, hashtables and dictionaries.
§ The System.Web.UI.Control is the parent of all Web Form Controls. Three
commonly used controls belong to this namespace—Page, UserControl and
LiteralControl. Every ASP.NET page is compiled to the Page control by the
ASP.NET page framework.
§ The System.Web.UI.WebControl namespace contains classes that define
the ASP.NET server controls.
17.
§ The System.Web.UI.HTMLControlsnamespacecontains classes that define
HTML controls.
§ Namespaces like System.Data, System.Data.OleDb, System.Data.
SqlClient, System.XML are classes that deal with manipulating database, XML
and other data. I will look at these namespaces in Chapter 3.
I will be discussing these namespaces at various places in the book. In this chapter, I will
be discussing the System.Web.UI.WebControl namespace and the
System.Web.UI.HTMLControls namespace.
Note "Imports" is a Visual Basic construct. If you are using C#, you
will substitute "Using" for "Imports".
If you have included Web Controls in your .aspx form and want to refer to them in your
Code Behind file your import construct will look like the following:
Imports System
Imports System.Collections
Imports System.Web.UI
Imports System.Web.UI.WebControls
You then define a class. All your functions and subs go in this class. A Visual Basic Code
Behind file might look like this:
Imports System.Data
Public Class BaseClass
Inherits System.Web.UI.Page
Sub somesub()
End Sub
Function somefunction()
End Function
End Class
Note that I have introduced the Inherits keyword here. The difference between the
Inherits and Imports keyword is that the Imports statement only brings in the
definition of a set of functionality, but does not actually make use of it. It is comparable to
including a reference in Visual Basic. The Inherits keyword is more dynamic. An
object that inherits certain functionality can also override and/or extend the parent
functionality.
This form becomes a base class and one that your aspx page will inherit from.
Inheritance is quite simple. You just have to put a statement at the top of the aspx form:
<%@Page Language="VB" Inherits="BaseClass" Src="nameofCodeBehind.vb" %>
Let's take a look at an example. We will take the Events.aspx file and split it into two
files: events_cb.aspx and events_cb.vb, the Code Behind file.
events_cb.aspx
<%@Page Language="VB" Inherits="BaseClass" Src="events_cb.vb" %>
<html>
<body style="background-color='beige'; font-family='verdana'; font -size='10pt'">
<form method="POST" runat="server">
18.
Qty:<asp:TextBox id="Qty" Runat="server"/>
Price:<asp:TextBox id="Price" Runat="server"/>
Amount:<asp:TextBox id="Amount" ReadOnly = "true" Runat="server"/>
<asp:Button id="btnCalculate" Text="Calculate" OnClick="Calculate"
Runat="server"/><br>
</form>
</body>
</html>
Events_cb.vb
Imports System
Imports System.Collections
Imports System.Web.UI
Imports System.Web.UI.WebControls
Public Class BaseClass
Inherits System.Web.UI.Page
'Each control used on events.aspx to be declared here with same id
Protected qty as textbox
Protected price as textbox
Protected amount as textbox
Sub Page_Load(Source As Object, E As EventArgs)
'this is the page load event
'gets fired each time the page is loaded
response.write("Page Load Event : -->fired <br>")
if NOT (isPostBack)
'the code here gets fired only one at page load
'subsequent reloads do not fire it due to the not isPostBack construct
19.
response.write("The not isPostBackconstruct:--> ensures this does not get fired at
reloads")
end if
End Sub
'This sub moved from the events.aspx form
Sub Calculate(src As Object,e As EventArgs)
Amount.Text = Cstr(cint(qty.text)*cint(price.text))
End Sub
End Class
Let's discuss the example in detail:
1. I have defined a class called BaseClass in the Code Behind file and moved
the Calculate sub from the aspx form into this class. This class inherits
from the System.Web.UI.Page.
2. I will be extracting the text value of textboxes Qty and Price, multi- plying
the two, and putting the result in the Amount textbox. Since I need to access
the property values of these three textboxes from my Code Behind file, I
declare three textboxes with the same id in the Code Behind file like this:
3. Protected qty as textbox
4. Protected price as textbox
Protected amount as textbox
5. The Qty, Price, and Amount textboxes are WebControls since I have
initialized them with the asp: tag prefix. For example, the Qty textbox is
created as follows:
<asp:TextBox id="Qty" Runat="server"/>
Controls exist in the System.Web.UI.WebControls namespace hence I must
import this namespace before I can access their properties by code. This is
done by the import directive at the top of the page:
Imports System.Web.UI.WebControls
6. Finally, I have coded the Page_Load Event to display a message when it gets
fired. This event gets fired each time the page gets loaded.
At times we need to code events that get fired only at the initial page load and
not on subsequent reloads. For example, we can bind a Web Control to a
data source (I will be discussing data binding in Chapter 4) and want the
binding to occur only once at page load.
The isPostBack property of the page lets us determine if posting has
already occurred to the page. Thus we use the following construct to display a
message only on the first load of the page:
IF NOT (isPostBack)
response.write("The not isPostBack construct:—>……")
End If
20.
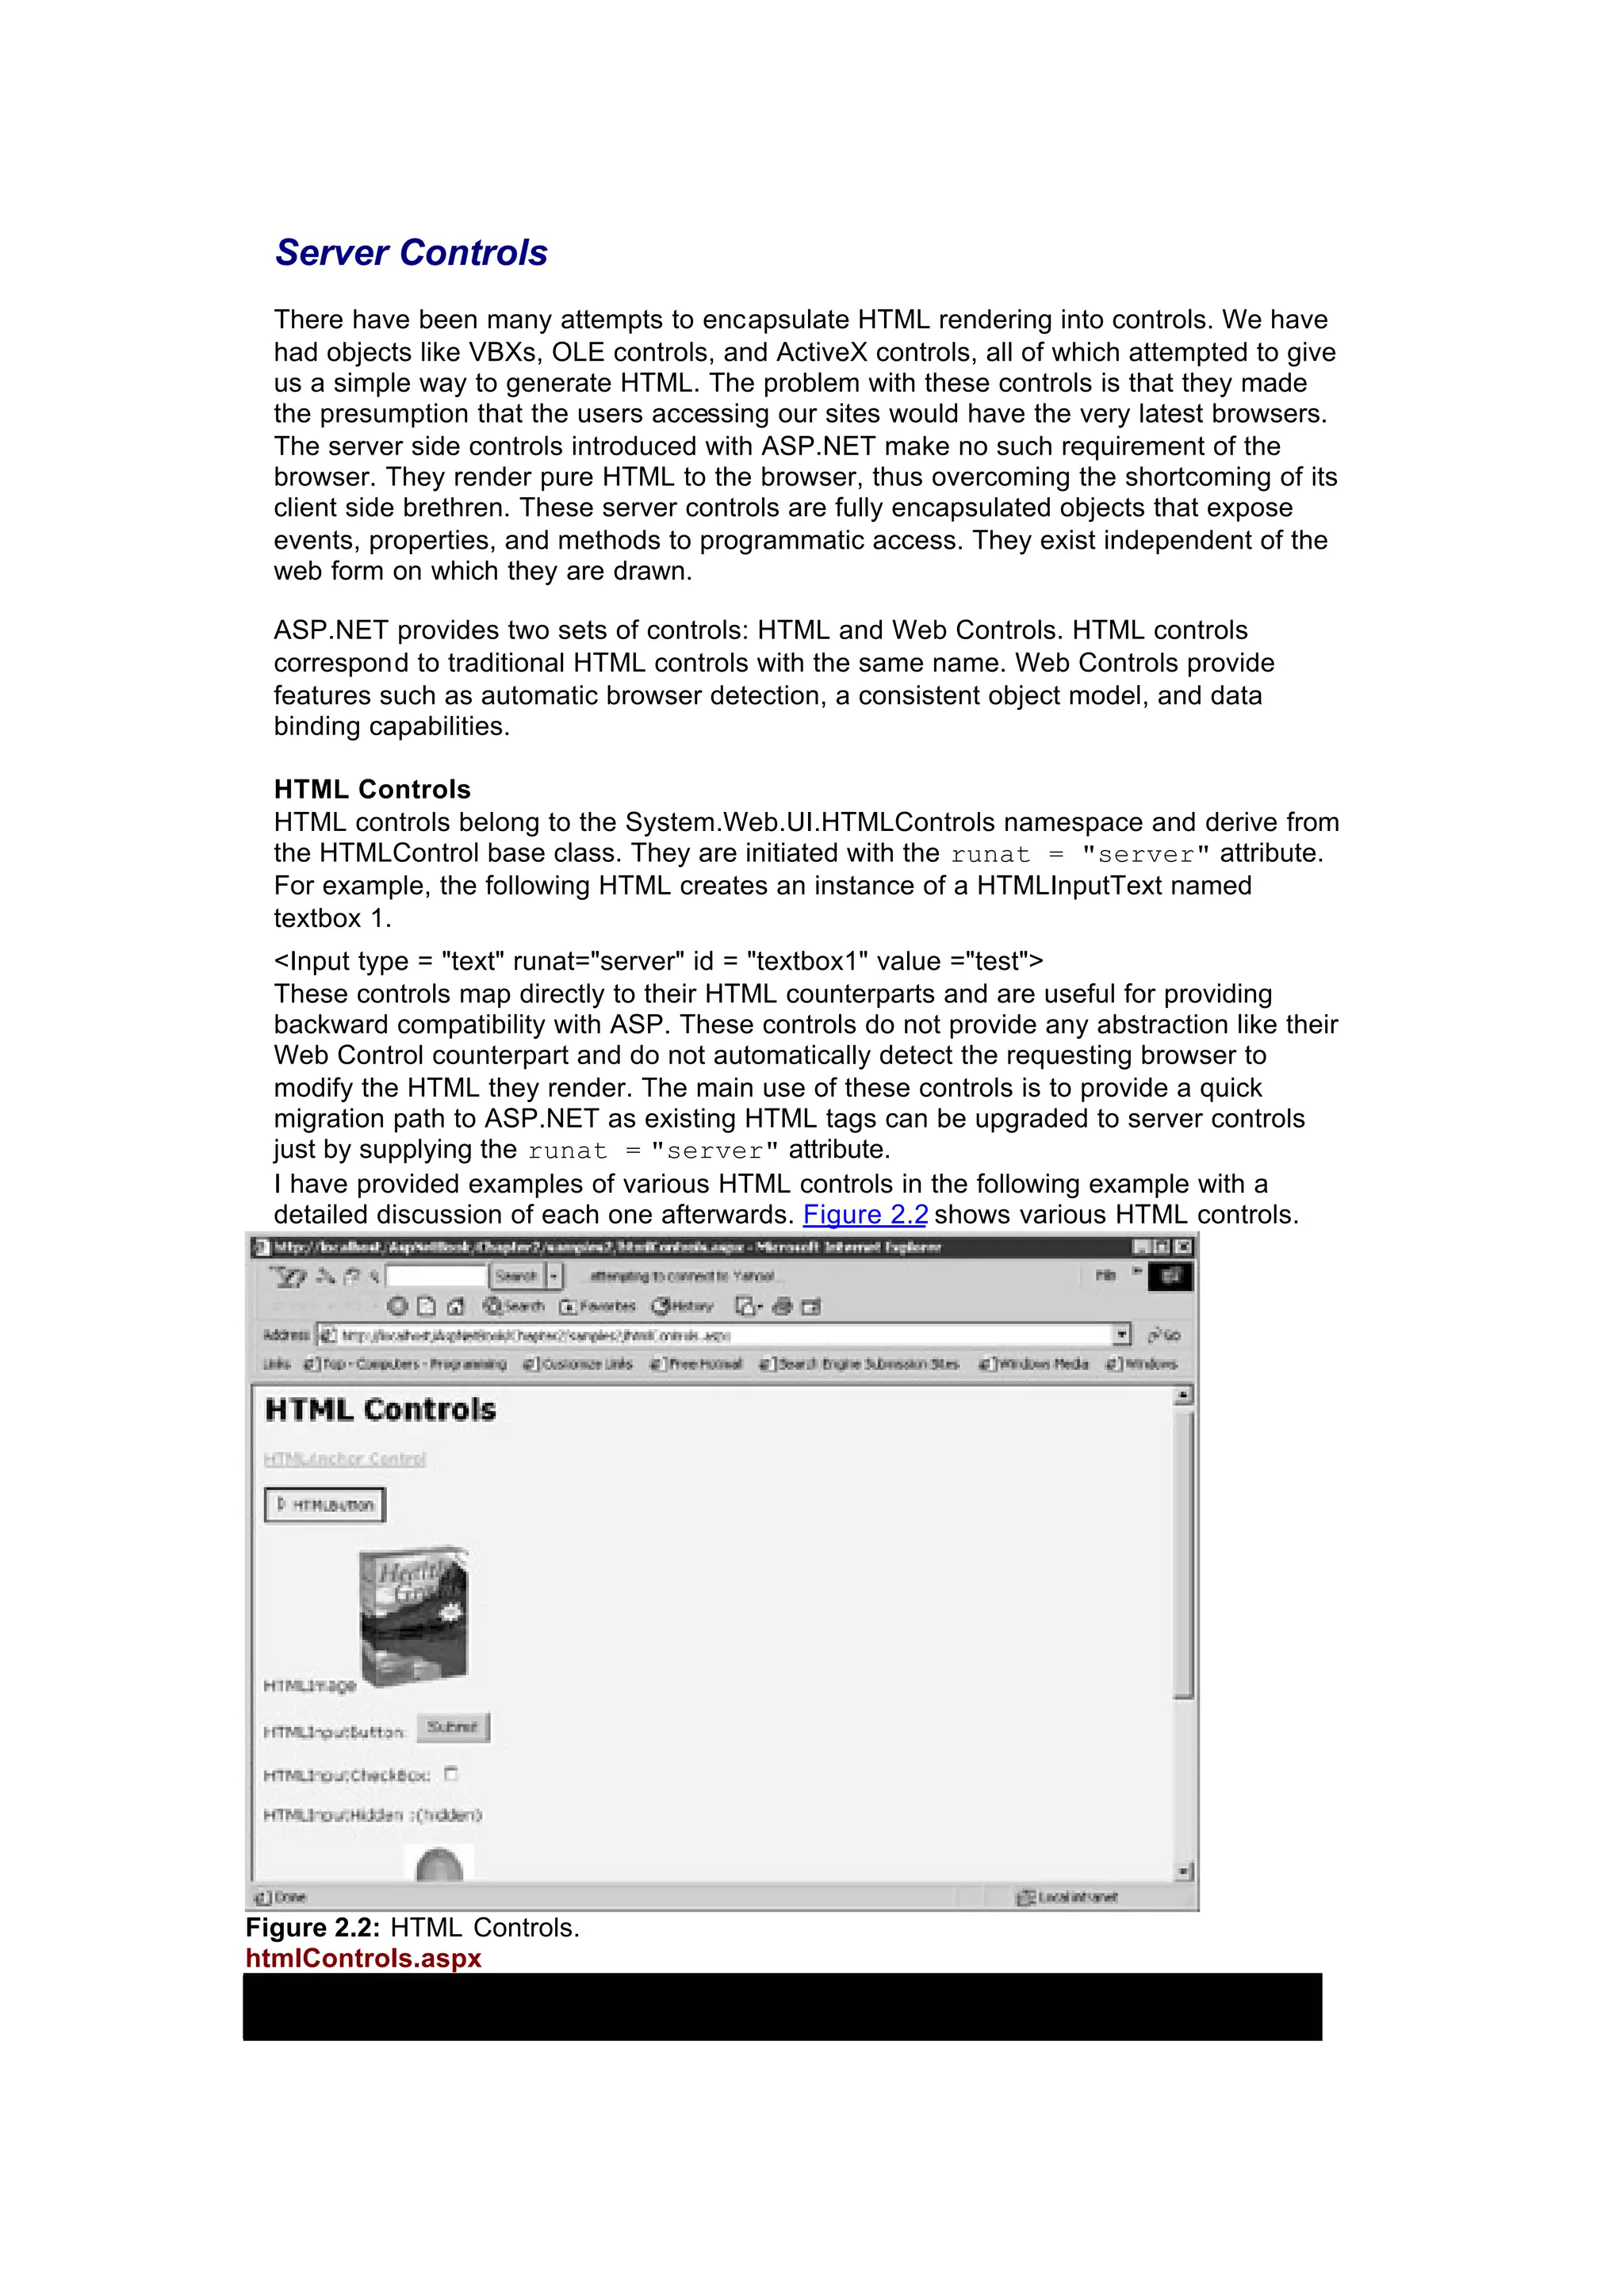
Server Controls
There havebeen many attempts to encapsulate HTML rendering into controls. We have
had objects like VBXs, OLE controls, and ActiveX controls, all of which attempted to give
us a simple way to generate HTML. The problem with these controls is that they made
the presumption that the users accessing our sites would have the very latest browsers.
The server side controls introduced with ASP.NET make no such requirement of the
browser. They render pure HTML to the browser, thus overcoming the shortcoming of its
client side brethren. These server controls are fully encapsulated objects that expose
events, properties, and methods to programmatic access. They exist independent of the
web form on which they are drawn.
ASP.NET provides two sets of controls: HTML and Web Controls. HTML controls
correspond to traditional HTML controls with the same name. Web Controls provide
features such as automatic browser detection, a consistent object model, and data
binding capabilities.
HTML Controls
HTML controls belong to the System.Web.UI.HTMLControls namespace and derive from
the HTMLControl base class. They are initiated with the runat = "server" attribute.
For example, the following HTML creates an instance of a HTMLInputText named
textbox 1.
<Input type = "text" runat="server" id = "textbox1" value ="test">
These controls map directly to their HTML counterparts and are useful for providing
backward compatibility with ASP. These controls do not provide any abstraction like their
Web Control counterpart and do not automatically detect the requesting browser to
modify the HTML they render. The main use of these controls is to provide a quick
migration path to ASP.NET as existing HTML tags can be upgraded to server controls
just by supplying the runat = "server" attribute.
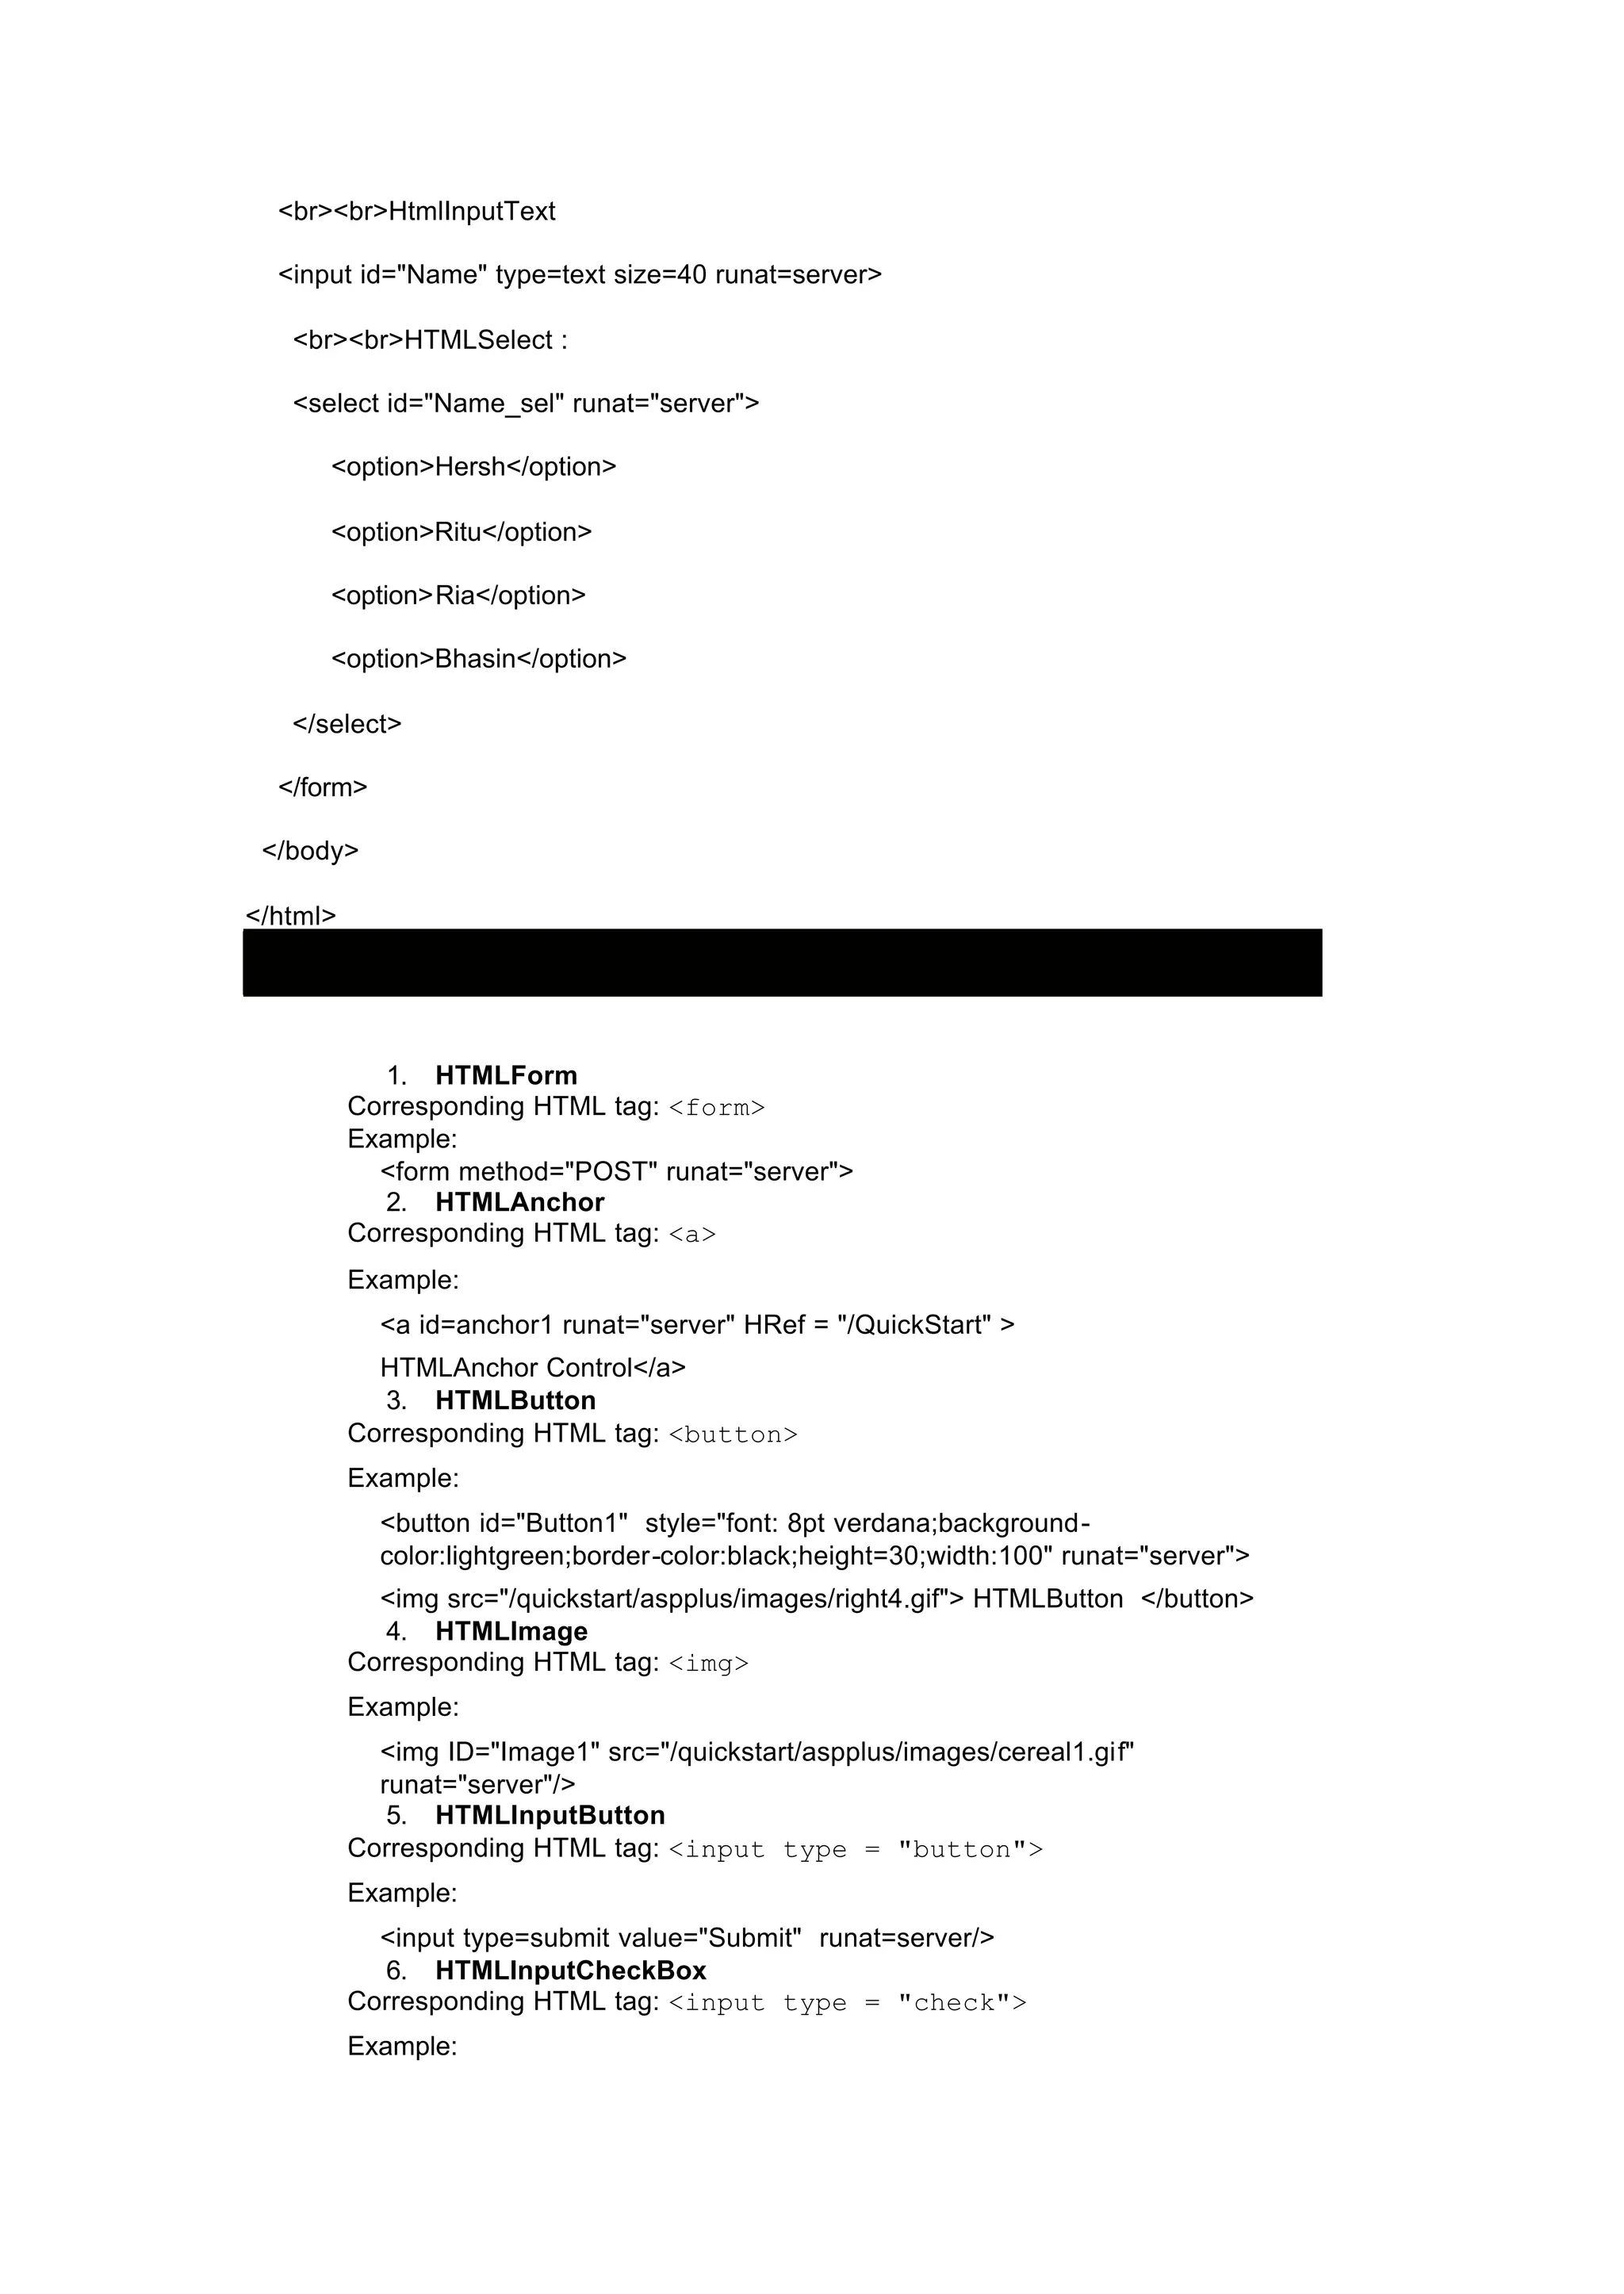
I have provided examples of various HTML controls in the following example with a
detailed discussion of each one afterwards. Figure 2.2 shows various HTML controls.
Figure 2.2: HTML Controls.
htmlControls.aspx
<input id="Check1" type=checkboxrunat="server"/>
7. HTMLInputHidden
Corresponding HTML tag: <input type = "hidden">
Example:
<input id="HiddenValue" type=hidden value="Initial Value" runat=server>
8. HTMLInputImage
Corresponding HTML tag: <input type = "image">
Example:
<input type=image id="InputImage1"
src="/quickstart/aspplus/images/mango.jpg" runat="server"/>
9. HTMLInputRadioButton
Corresponding HTML tag: <input type = "radio">
Example:
<input type="radio" id="Radio1" name="Mode" runat="server"/>Option
1<br>
<input type="radio" id="Radio2" name="Mode" runat="server"/>Option
2<br>
10. HTMLInputText (password)
Corresponding HTML tag: <input type = "password">
Example:
<input id="Password" type=password size=40 runat=server>
11. HTMLInputText
Corresponding HTML tag: <input type = "text">
Example:
<input id="Name" type=text size=40 runat=server>
12. HTMLSelect
Corresponding HTML tag: <select>
Example:
<select id="Name_sel" runat="server">
<option>Hersh</option>
<option>Ritu</option>
<option>Ria</option>
<option>Bhasin</option>
</select>
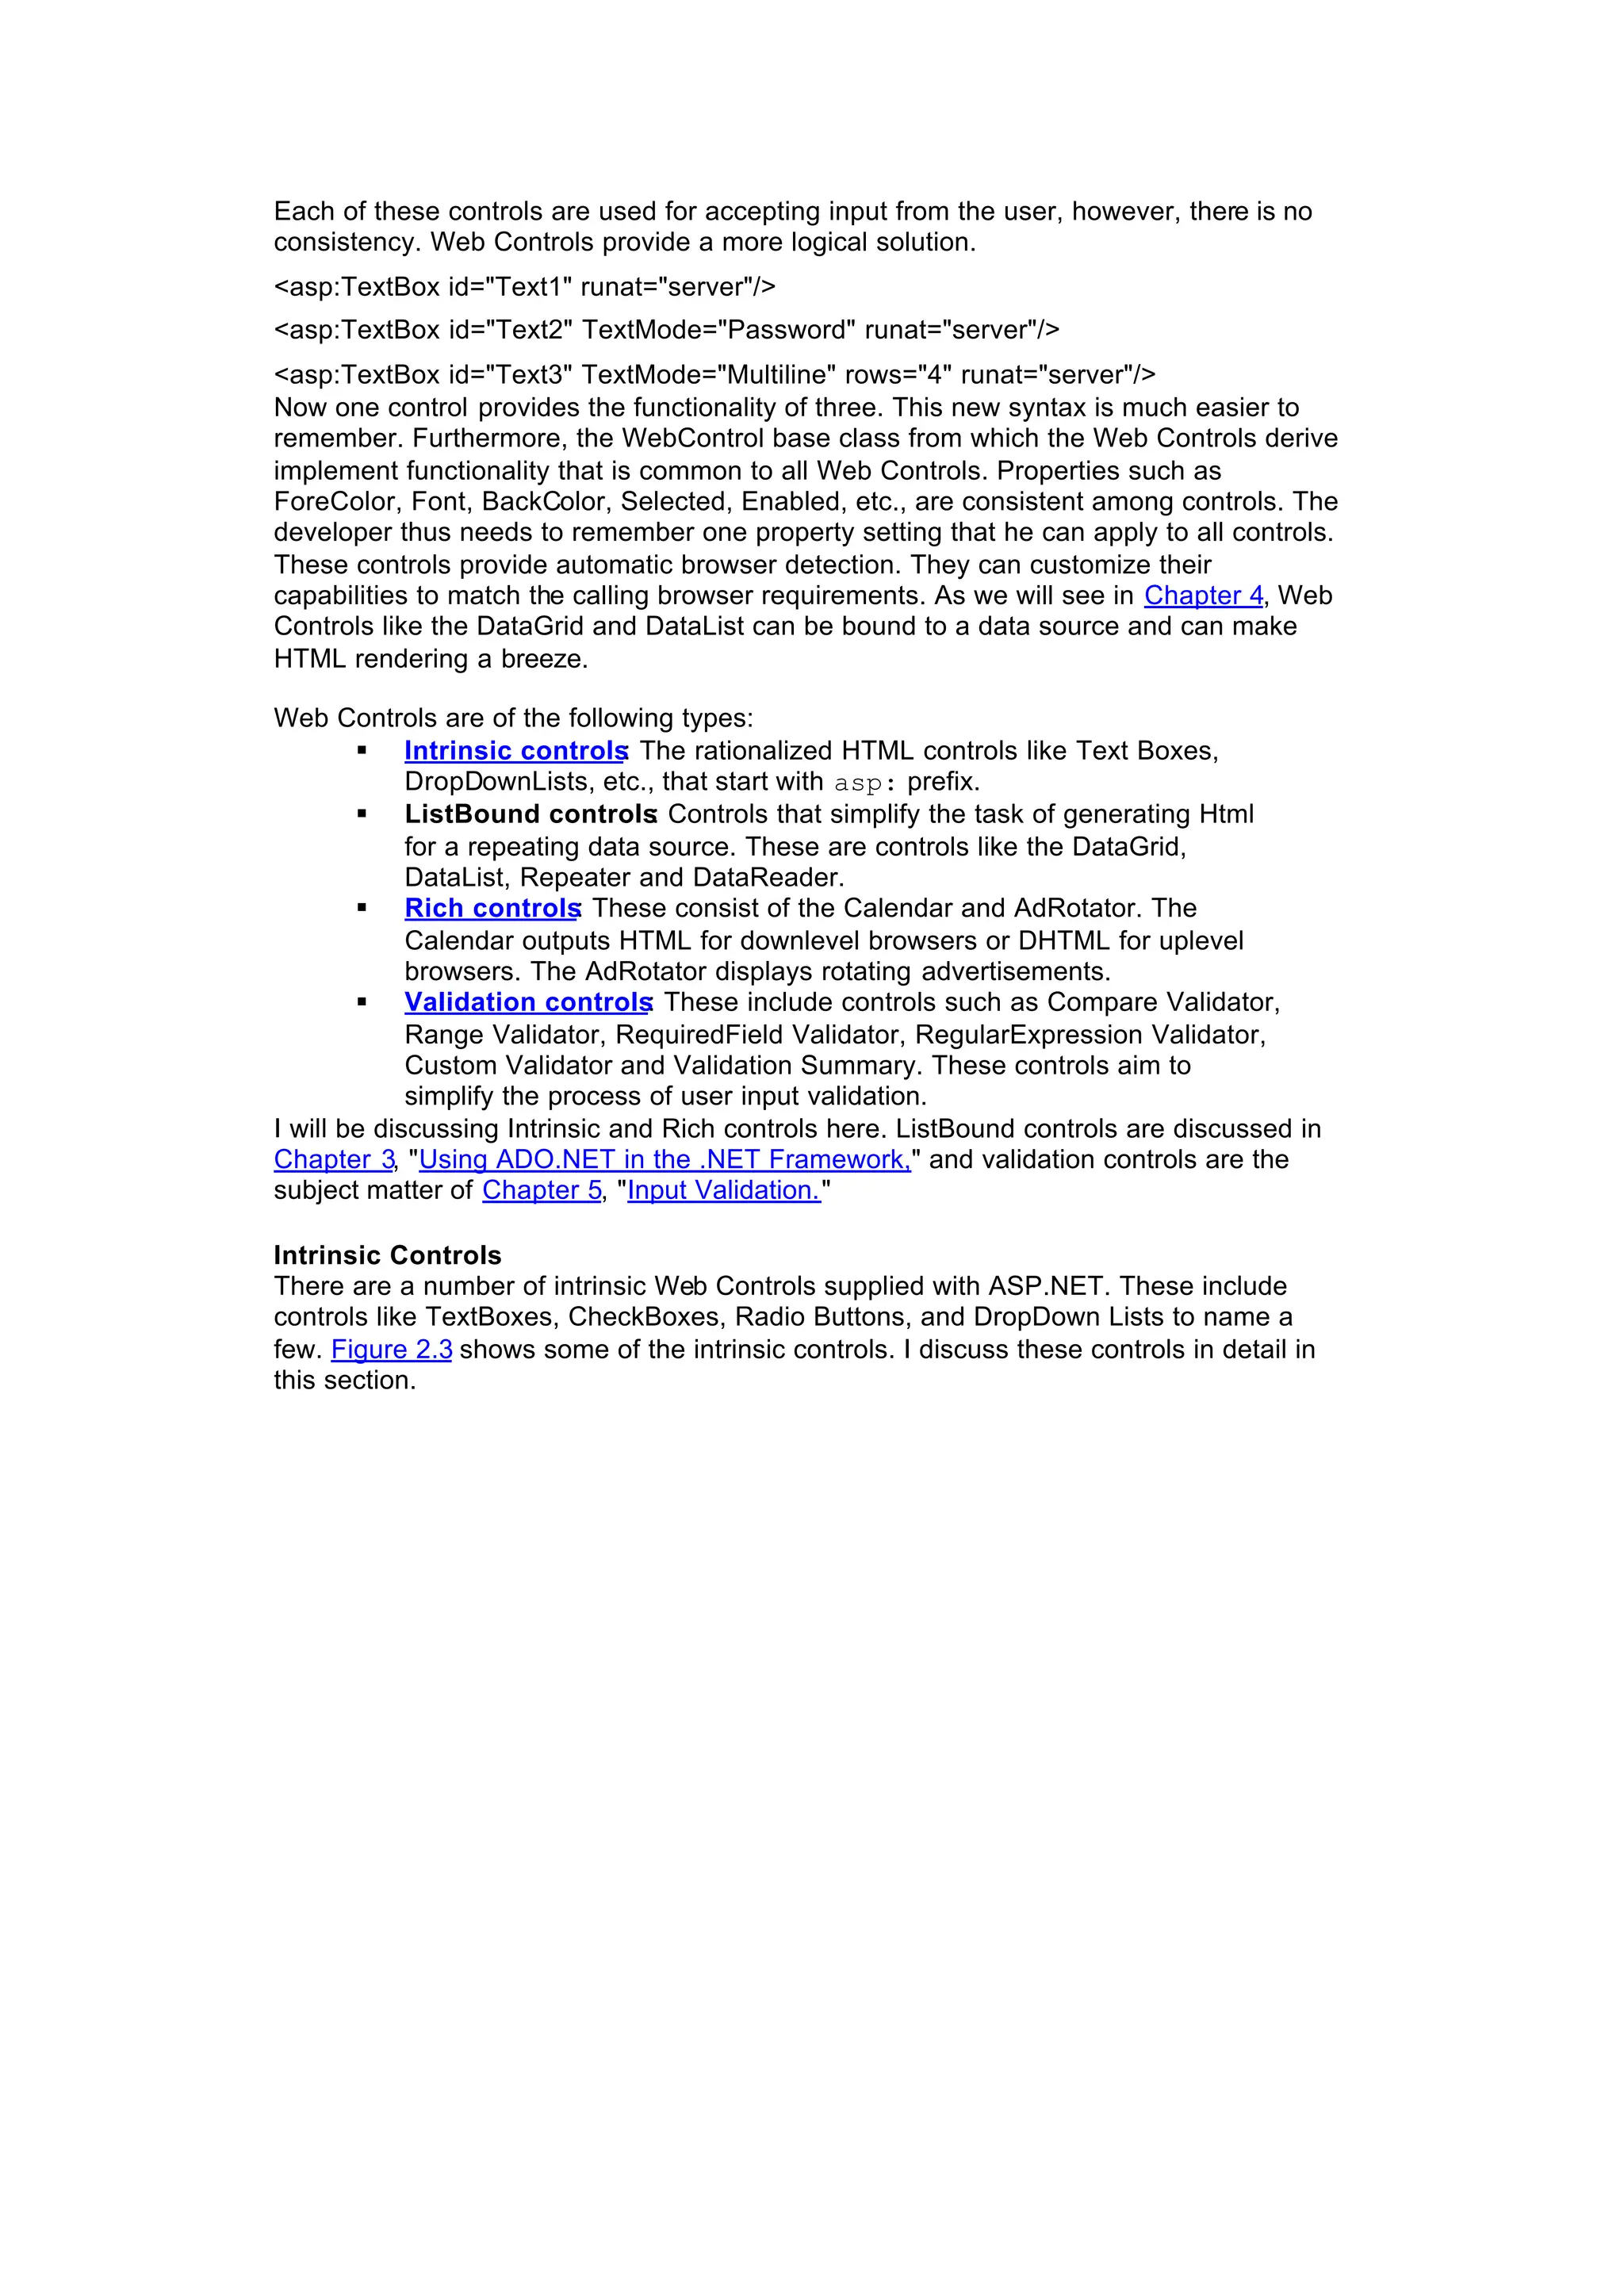
Web Controls
A Web Control is created by adding a prefix of asp before a control. This prefix is
actually a namespace of the run time control. The remainder of the tag is the name of the
run time control itself. Like the HTML controls these controls also contain a runat =
"server" attribute. This is an example of a textbox Web Control:
<asp:TextBox runat="server" id = textbox1 value ="test"/>
Since HTML controls can be used server side, we might question the need for another
set of controls that provide similar functionality. The idea with Web Controls is that it
simplifies the nomenclature of a control. Controls that overlapped in their functionality
have been reduced to a single control. For example, consider the three input controls in
the following:
<input id="Name" type=text size=40 runat=server>
<input id="Password" type=password size=40 runat=server>
<textarea id="TextArea1" cols=40 rows=4 runat=server />
24.
Each of thesecontrols are used for accepting input from the user, however, there is no
consistency. Web Controls provide a more logical solution.
<asp:TextBox id="Text1" runat="server"/>
<asp:TextBox id="Text2" TextMode="Password" runat="server"/>
<asp:TextBox id="Text3" TextMode="Multiline" rows="4" runat="server"/>
Now one control provides the functionality of three. This new syntax is much easier to
remember. Furthermore, the WebControl base class from which the Web Controls derive
implement functionality that is common to all Web Controls. Properties such as
ForeColor, Font, BackColor, Selected, Enabled, etc., are consistent among controls. The
developer thus needs to remember one property setting that he can apply to all controls.
These controls provide automatic browser detection. They can customize their
capabilities to match the calling browser requirements. As we will see in Chapter 4, Web
Controls like the DataGrid and DataList can be bound to a data source and can make
HTML rendering a breeze.
Web Controls are of the following types:
§ Intrinsic controls
: The rationalized HTML controls like Text Boxes,
DropDownLists, etc., that start with asp: prefix.
§ ListBound controls
: Controls that simplify the task of generating Html
for a repeating data source. These are controls like the DataGrid,
DataList, Repeater and DataReader.
§ Rich controls
: These consist of the Calendar and AdRotator. The
Calendar outputs HTML for downlevel browsers or DHTML for uplevel
browsers. The AdRotator displays rotating advertisements.
§ Validation controls
: These include controls such as Compare Validator,
Range Validator, RequiredField Validator, RegularExpression Validator,
Custom Validator and Validation Summary. These controls aim to
simplify the process of user input validation.
I will be discussing Intrinsic and Rich controls here. ListBound controls are discussed in
Chapter 3, "Using ADO.NET in the .NET Framework," and validation controls are the
subject matter of Chapter 5, "Input Validation."
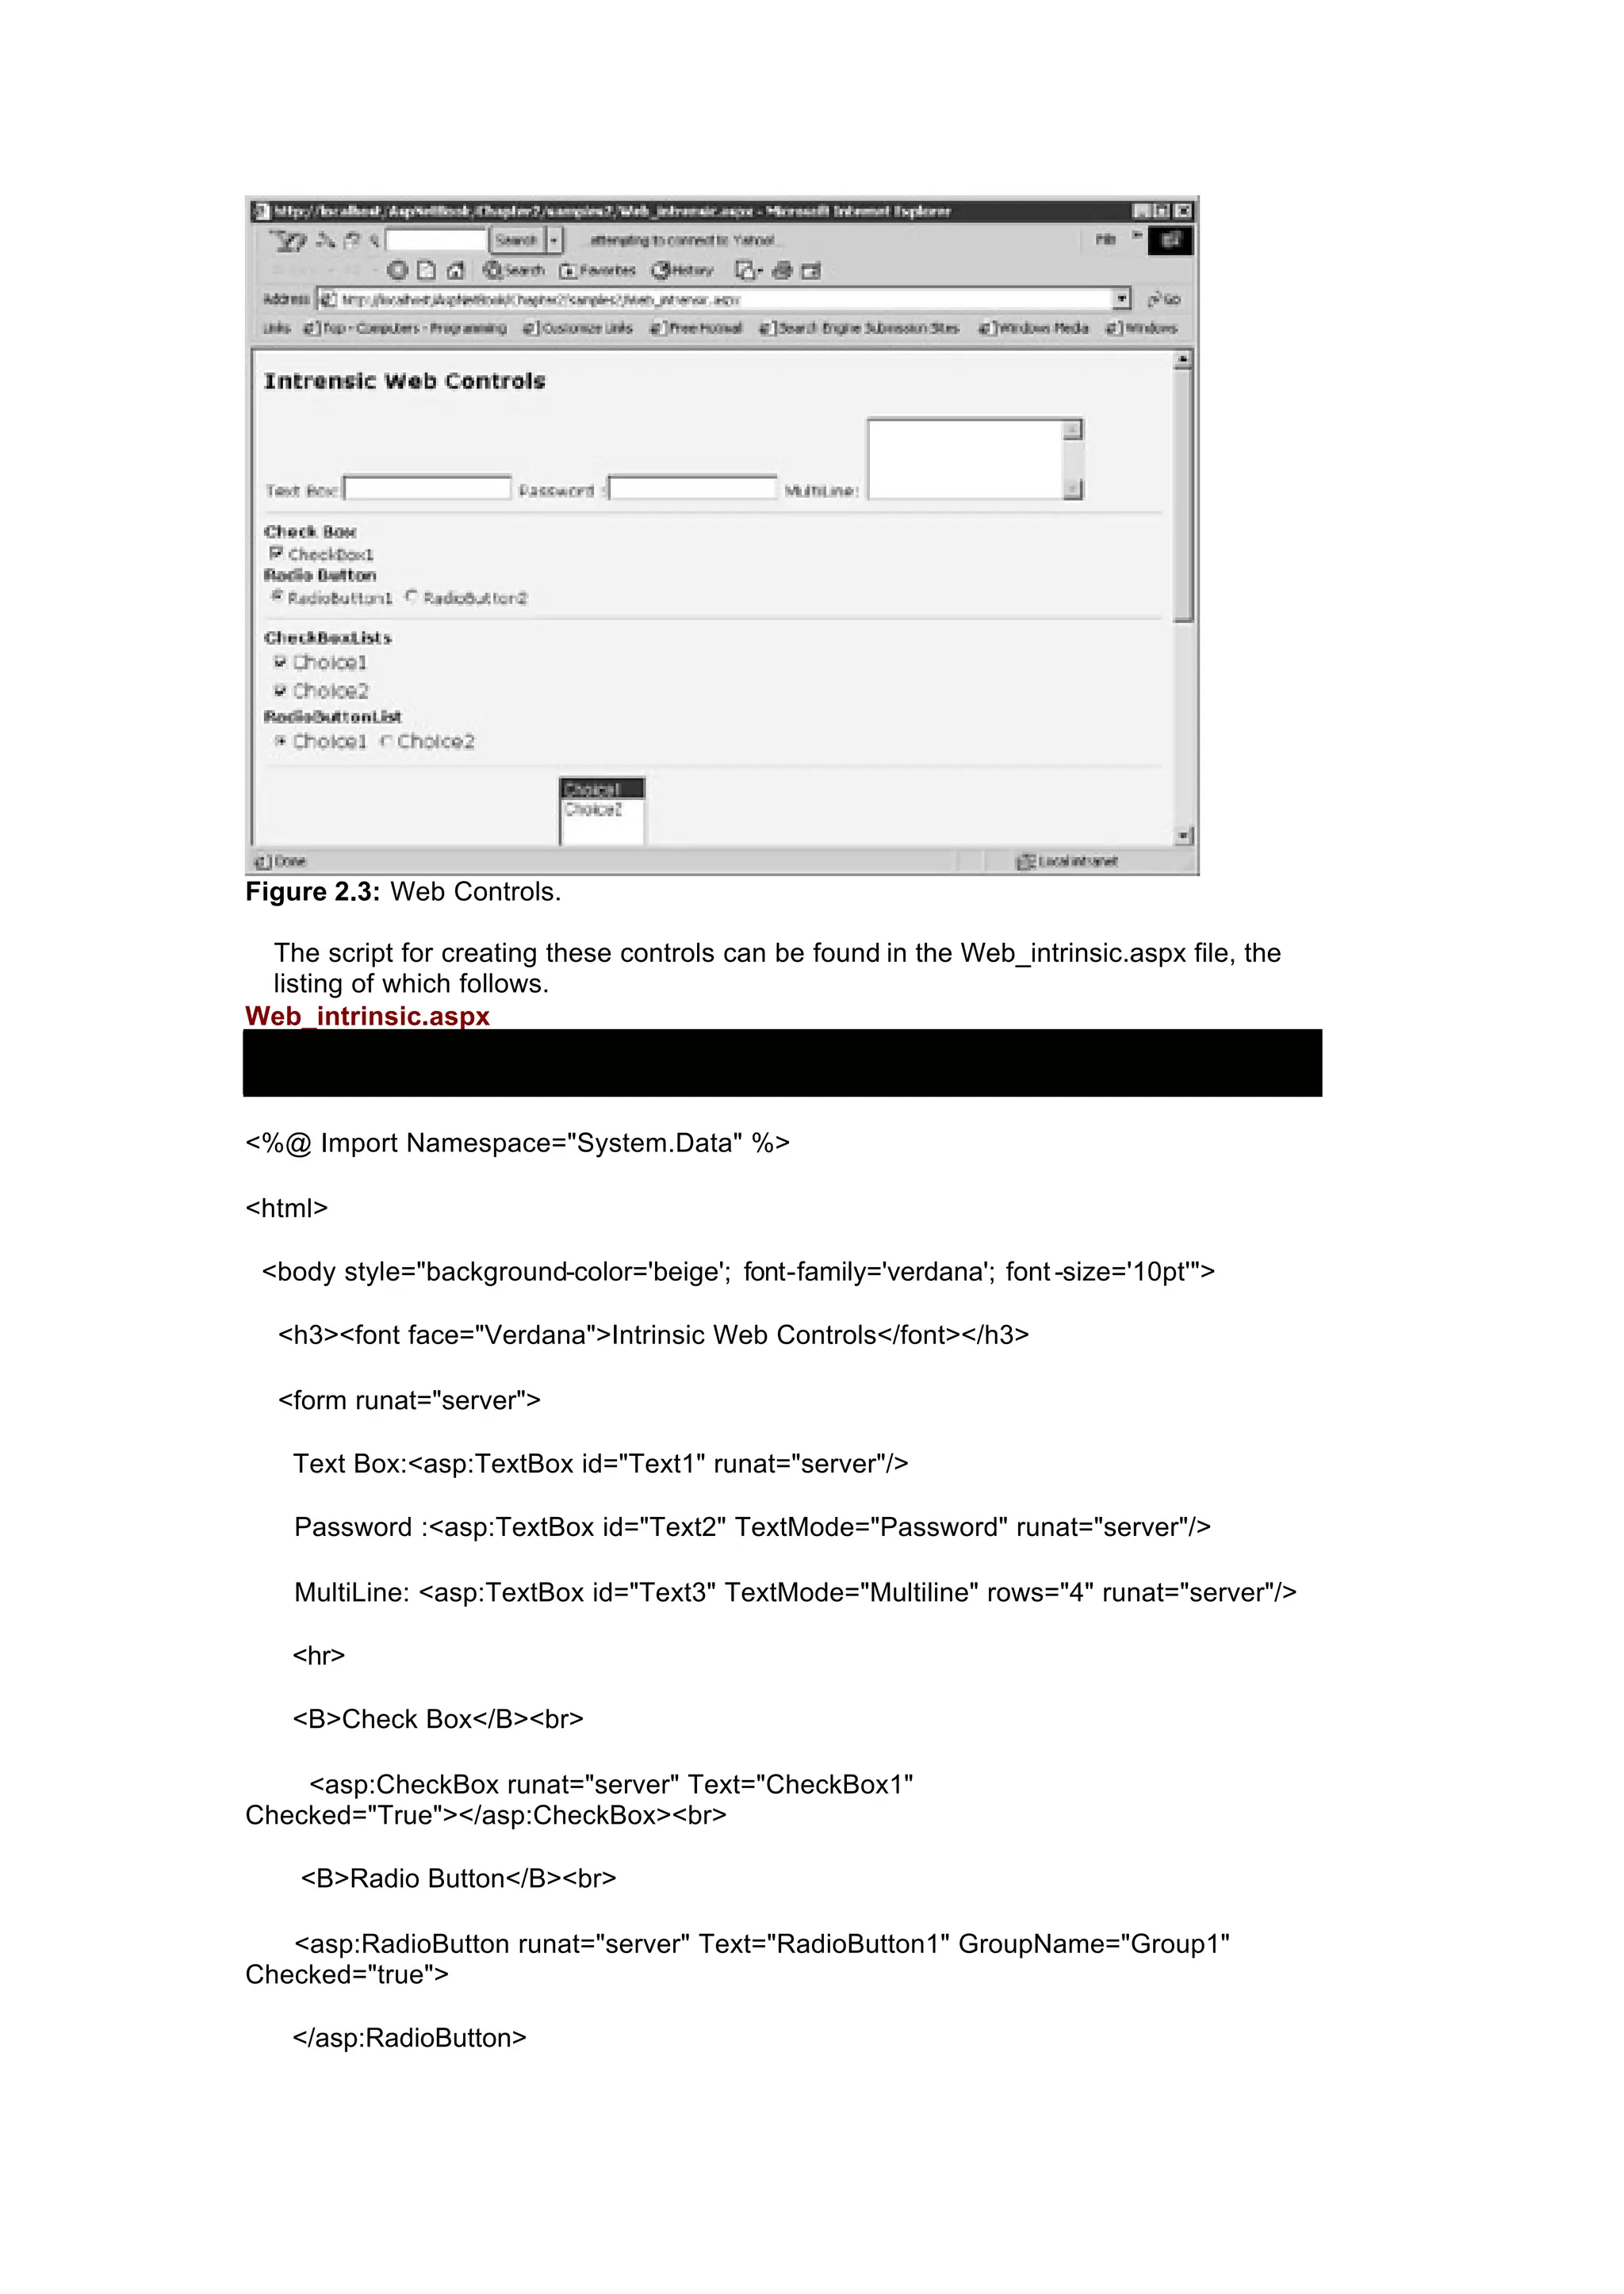
Intrinsic Controls
There are a number of intrinsic Web Controls supplied with ASP.NET. These include
controls like TextBoxes, CheckBoxes, Radio Buttons, and DropDown Lists to name a
few. Figure 2.3 shows some of the intrinsic controls. I discuss these controls in detail in
this section.
25.
Figure 2.3: WebControls.
The script for creating these controls can be found in the Web_intrinsic.aspx file, the
listing of which follows.
Web_intrinsic.aspx
<%@ Import Namespace="System.Data" %>
<html>
<body style="background-color='beige'; font-family='verdana'; font -size='10pt'">
<h3><font face="Verdana">Intrinsic Web Controls</font></h3>
<form runat="server">
Text Box:<asp:TextBox id="Text1" runat="server"/>
Password :<asp:TextBox id="Text2" TextMode="Password" runat="server"/>
MultiLine: <asp:TextBox id="Text3" TextMode="Multiline" rows="4" runat="server"/>
<hr>
<B>Check Box</B><br>
<asp:CheckBox runat="server" Text="CheckBox1"
Checked="True"></asp:CheckBox><br>
<B>Radio Button</B><br>
<asp:RadioButton runat="server" Text="RadioButton1" GroupName="Group1"
Checked="true">
</asp:RadioButton>
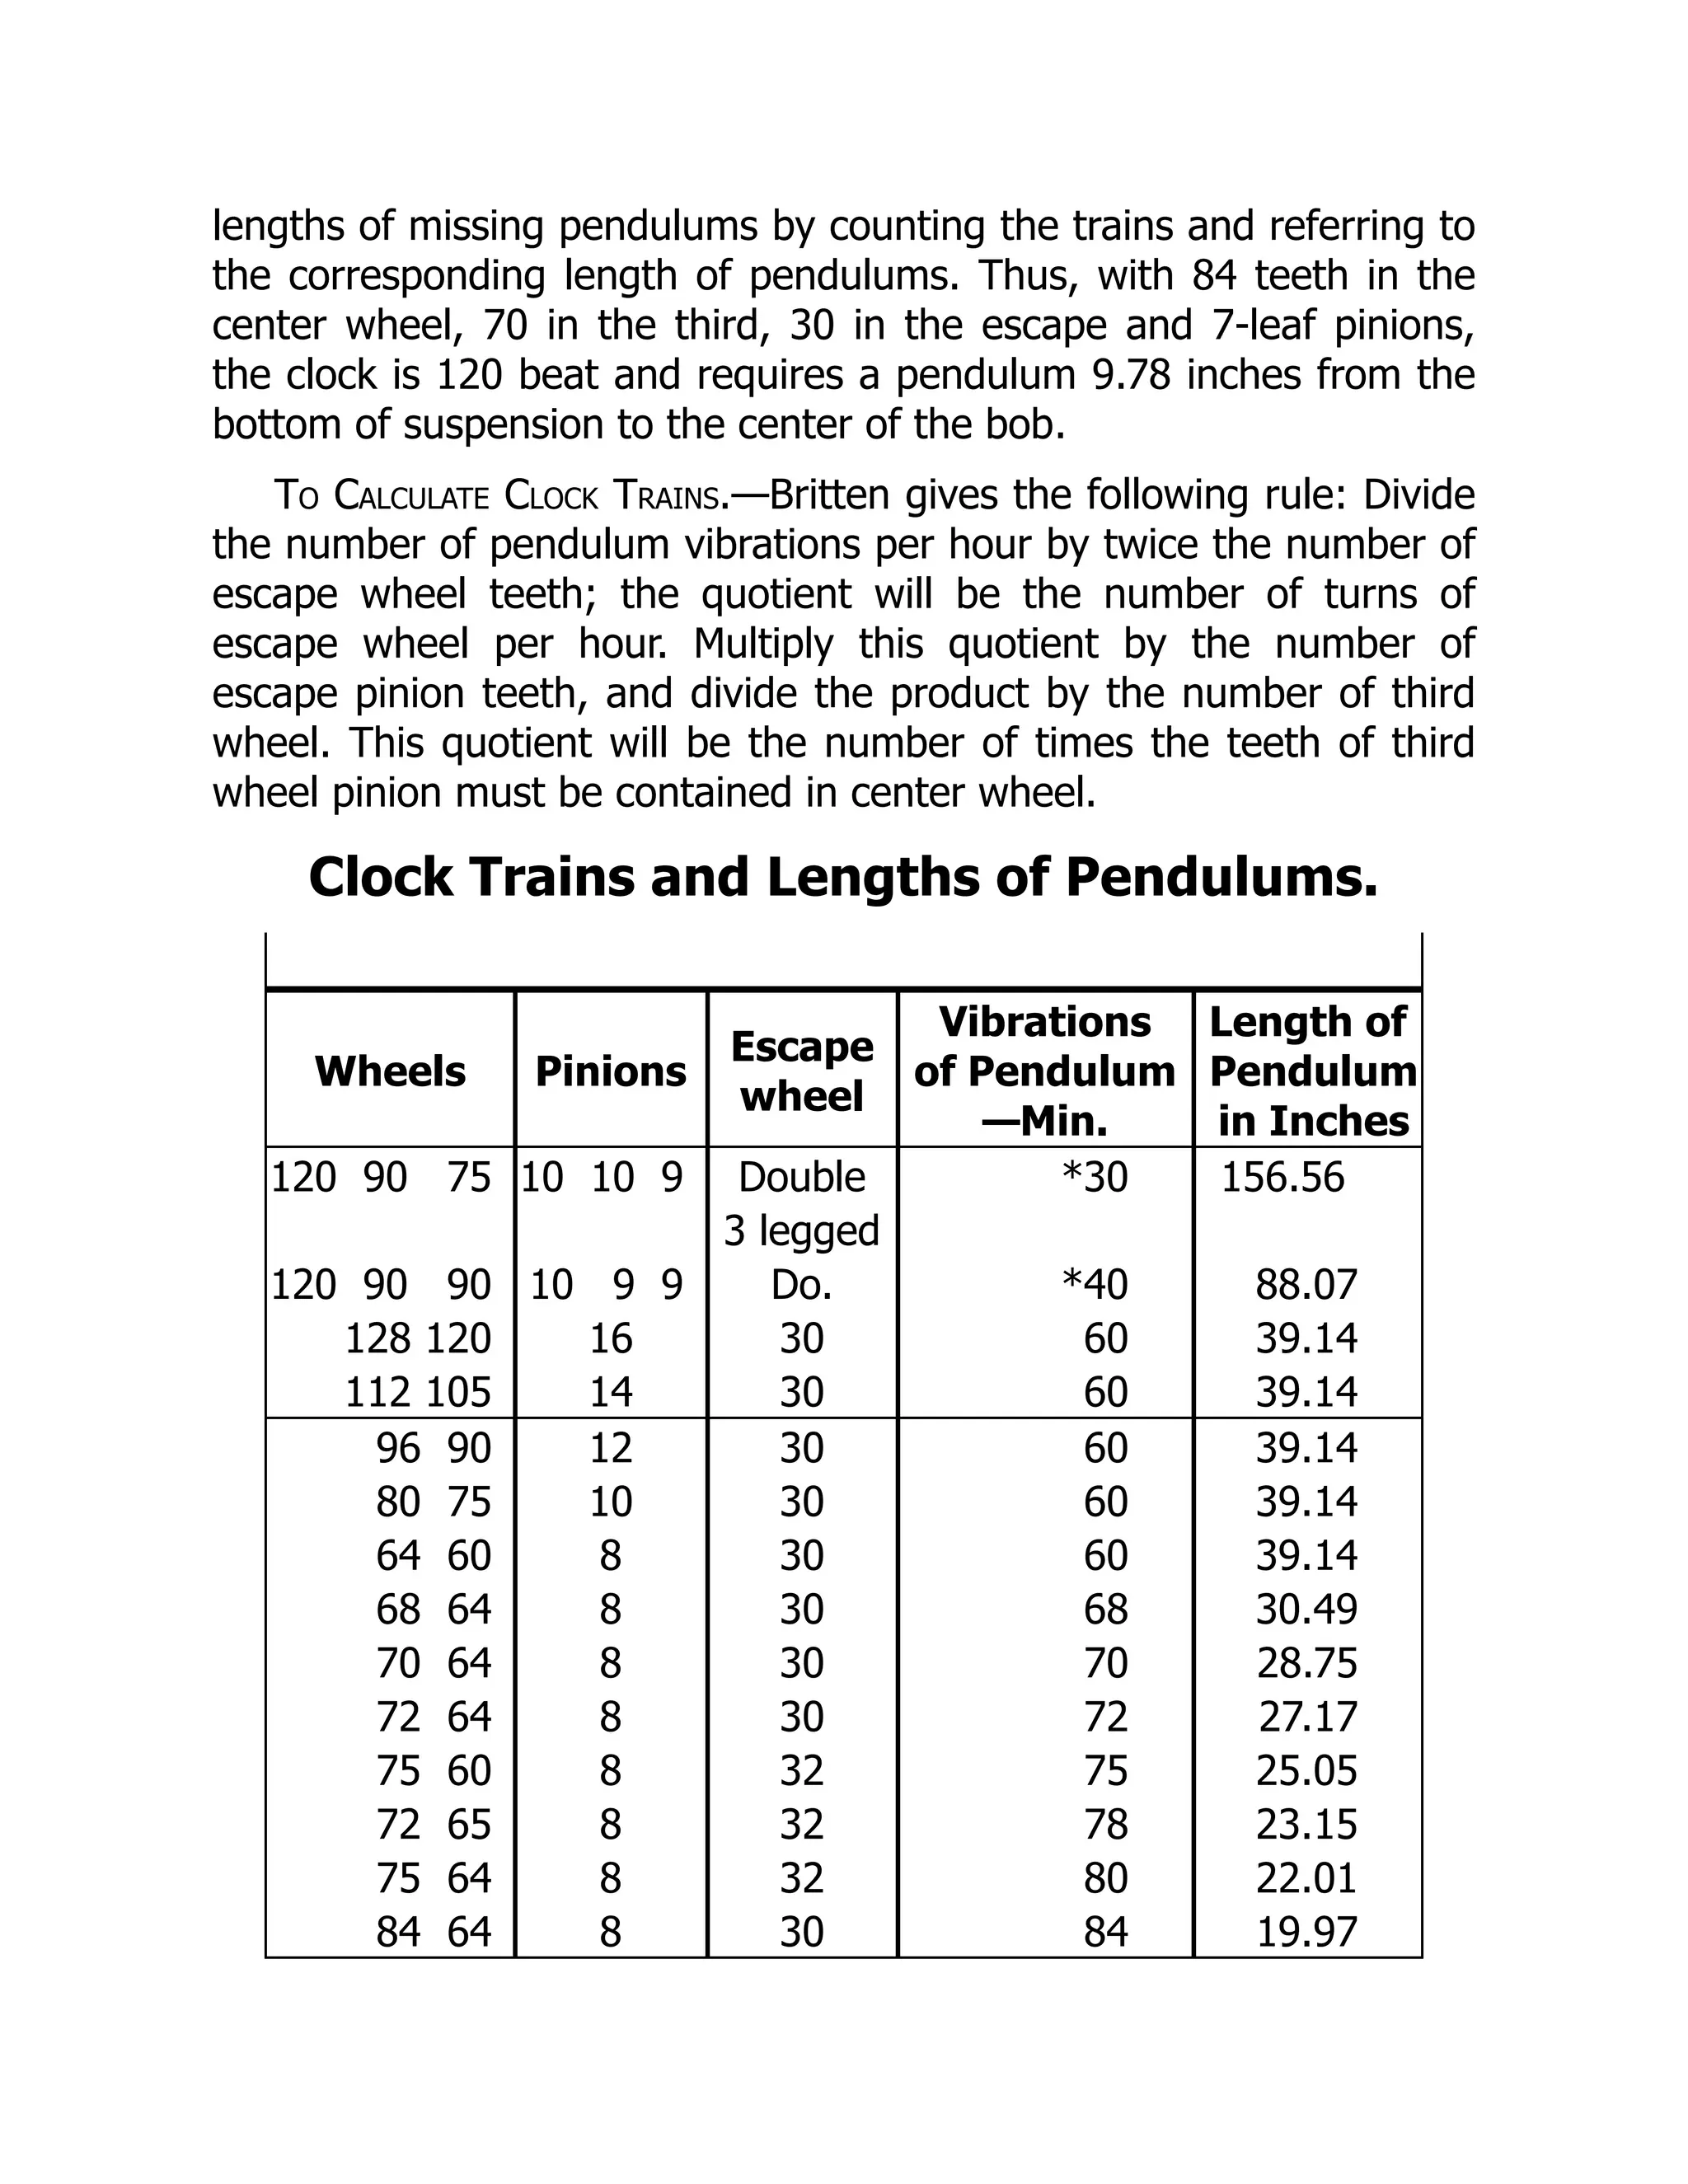
must take itsstacks of wheels from a magazine and discharge the
work when done, so that one attendant could look after a number of
machines. This would result in economy, as well as accuracy, but has
not been done owing to the great variations in sizes of wheels and
numbers of teeth required in clock work.
Figure 82 shows one of these machines, a photograph of which
was taken especially for us by the courtesy of the Seth Thomas
Clock Company at their factory in Thomaston, Conn.
About every ten years some factory decides to try stamping out
the teeth of wheels at the same time they are being blanked; this
can, of course, be done by simply using a more expensive punch
and die, and at first it looks very attractive; but it is soon found that
the cost of keeping up such expensive dies makes the wheels cost
more than if regularly cut and for reasons of economy the return is
made to the older and better looking cut wheels.
After an acid dip to remove the scale on the sheet brass, followed
by a dip in lacquer, to prevent further tarnish, the wheels are riveted
on the pinions in a specially constructed jig which keeps them
central during the riveting and when finished the truth of every
wheel and its pinions and pivots are all tested before they are put
into the clocks. The total waste on all processes in making wheels
and pinions is from two to five per cent, so that it will readily be
seen that accuracy is demanded by the inspectors. European writers
have often found fault with nearly everything else about the Yankee
clock, but they all unite in agreeing that the cutting and centering of
wheels, pinions and pivots (and the depthing) are perfect, while the
clocks of Germany, France, Switzerland and England (particularly
France) leave much to be desired in this respect; and much of the
reputation of the Yankee clock in Europe comes from the fact that it
will run under conditions which would stop those of European make.
We give herewith a table of clock trains as usually manufactured,
from which lost wheels and pinions may be easily identified by
counting the teeth of wheels and pinions which remain in the
movement and referring to the table. It will also assist in getting the
28.
lengths of missingpendulums by counting the trains and referring to
the corresponding length of pendulums. Thus, with 84 teeth in the
center wheel, 70 in the third, 30 in the escape and 7-leaf pinions,
the clock is 120 beat and requires a pendulum 9.78 inches from the
bottom of suspension to the center of the bob.
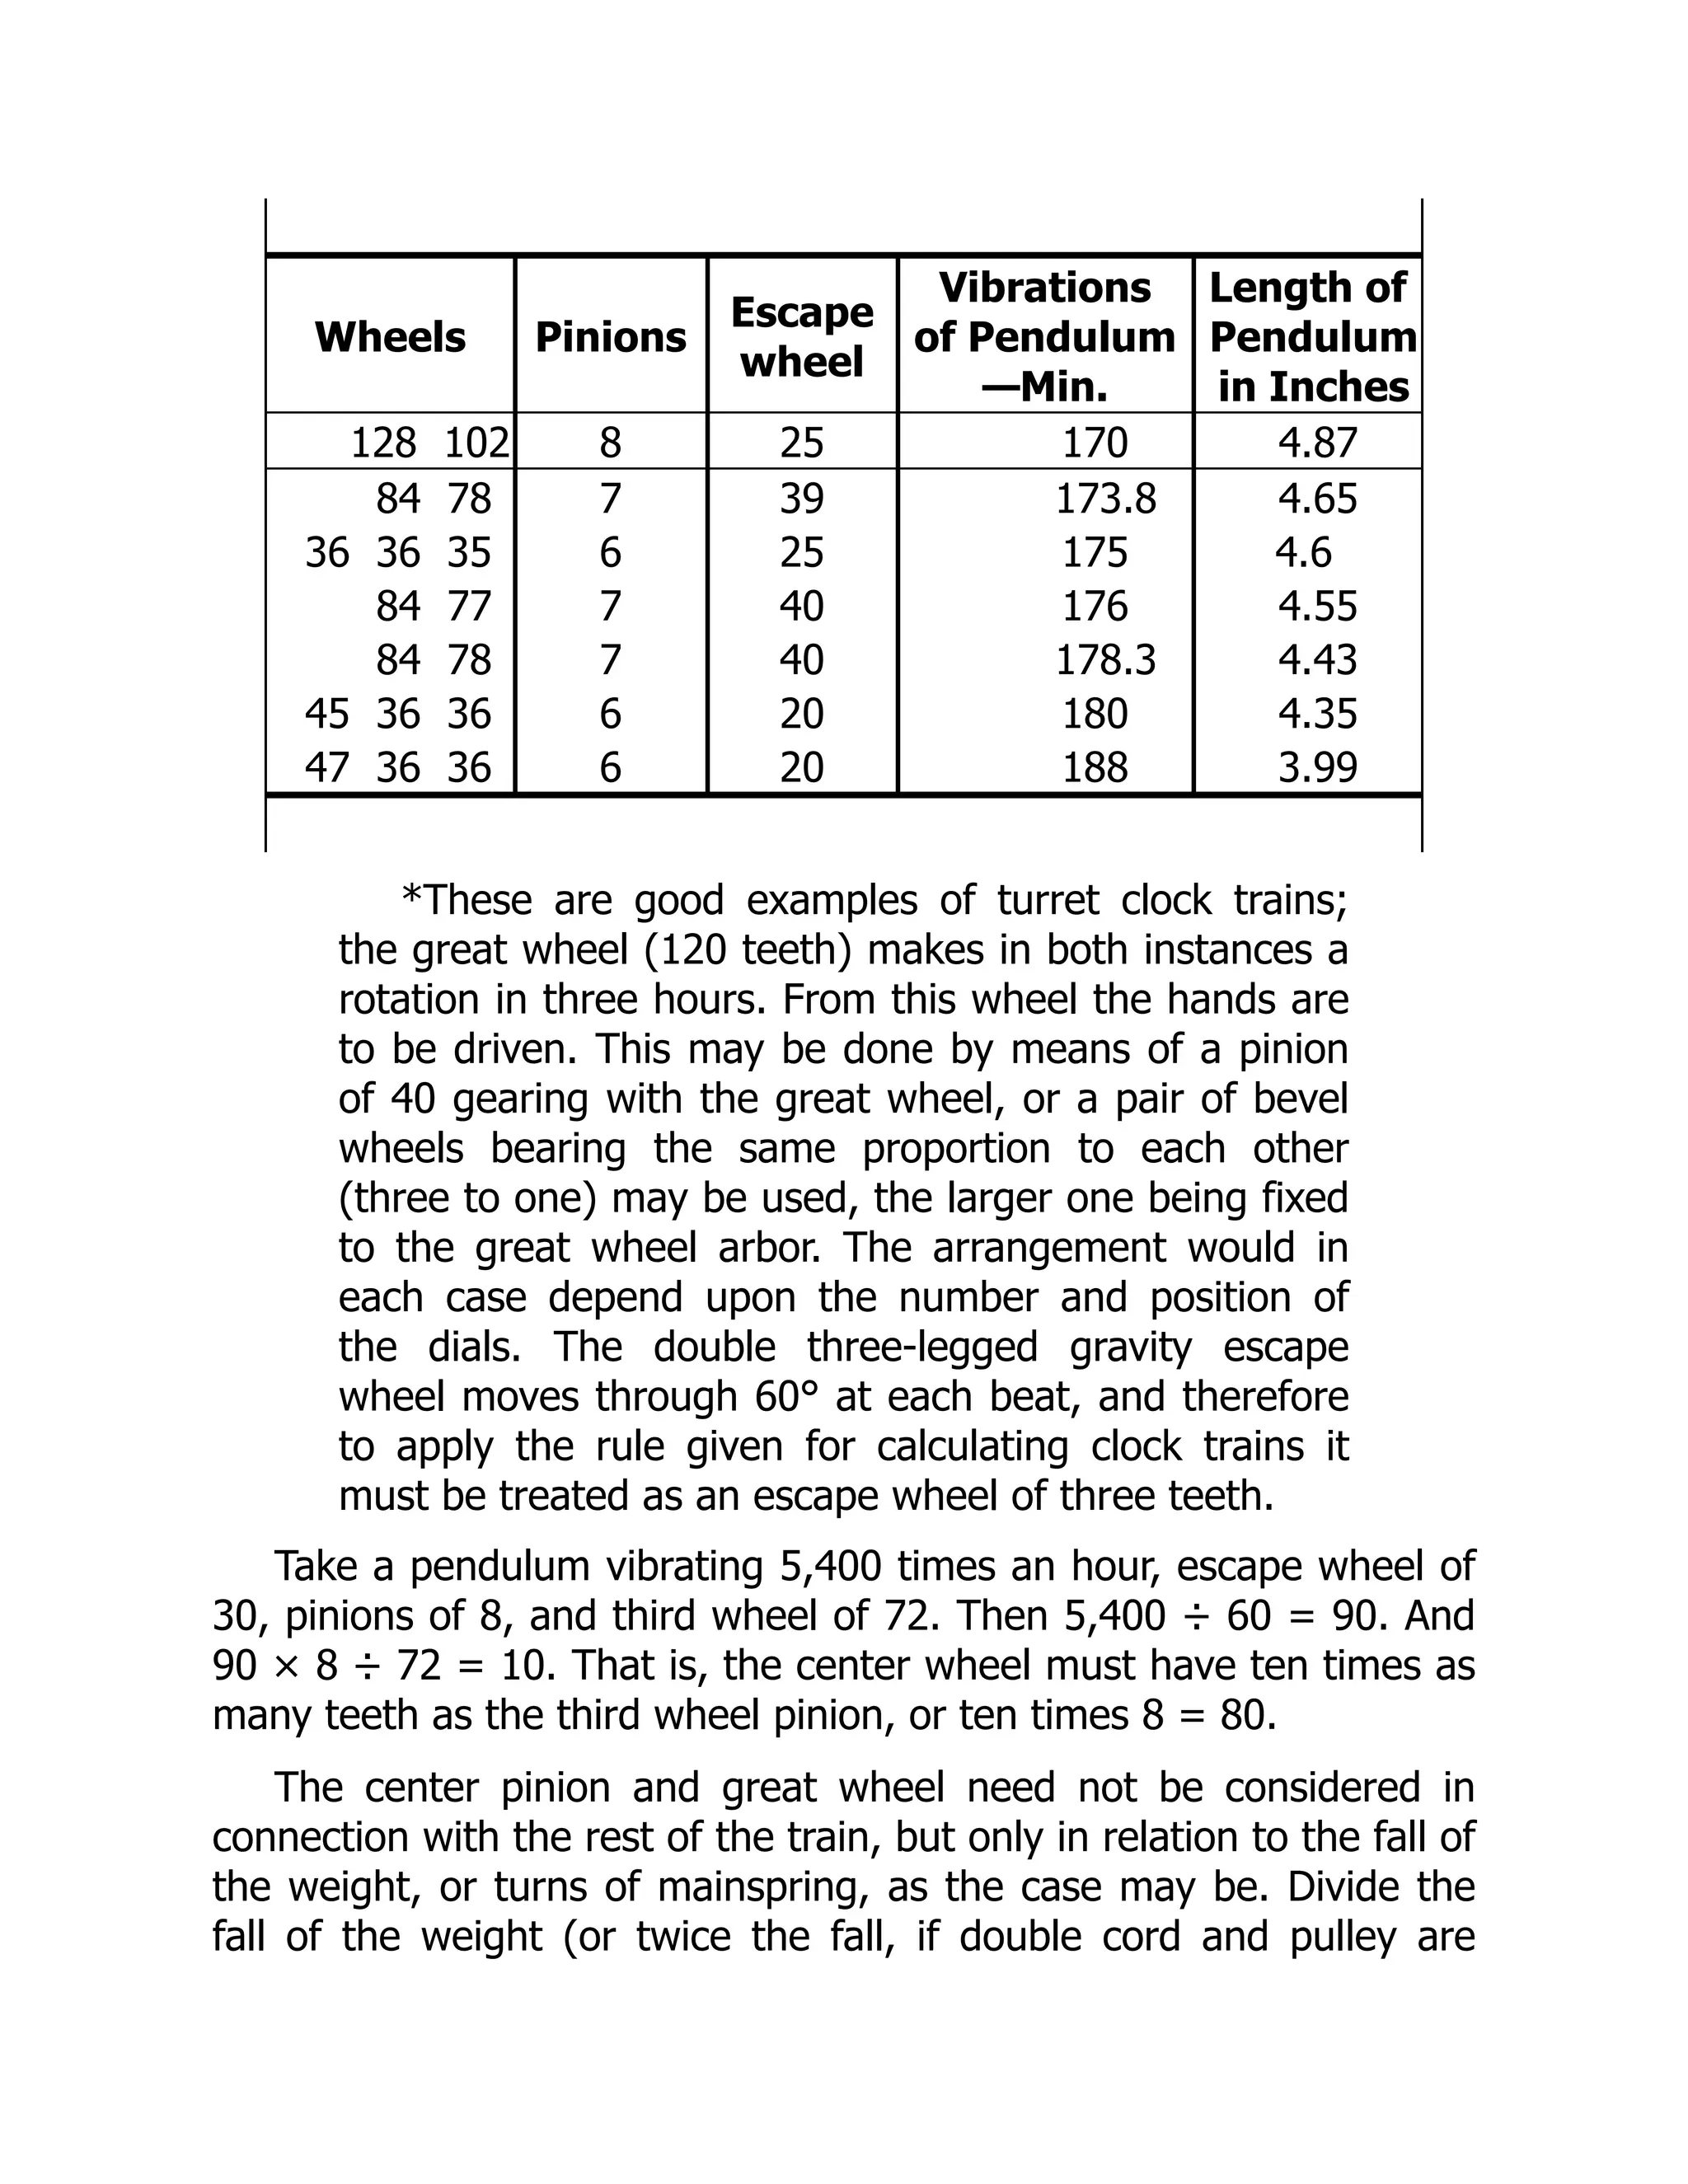
To Calculate Clock Trains.—Britten gives the following rule: Divide
the number of pendulum vibrations per hour by twice the number of
escape wheel teeth; the quotient will be the number of turns of
escape wheel per hour. Multiply this quotient by the number of
escape pinion teeth, and divide the product by the number of third
wheel. This quotient will be the number of times the teeth of third
wheel pinion must be contained in center wheel.
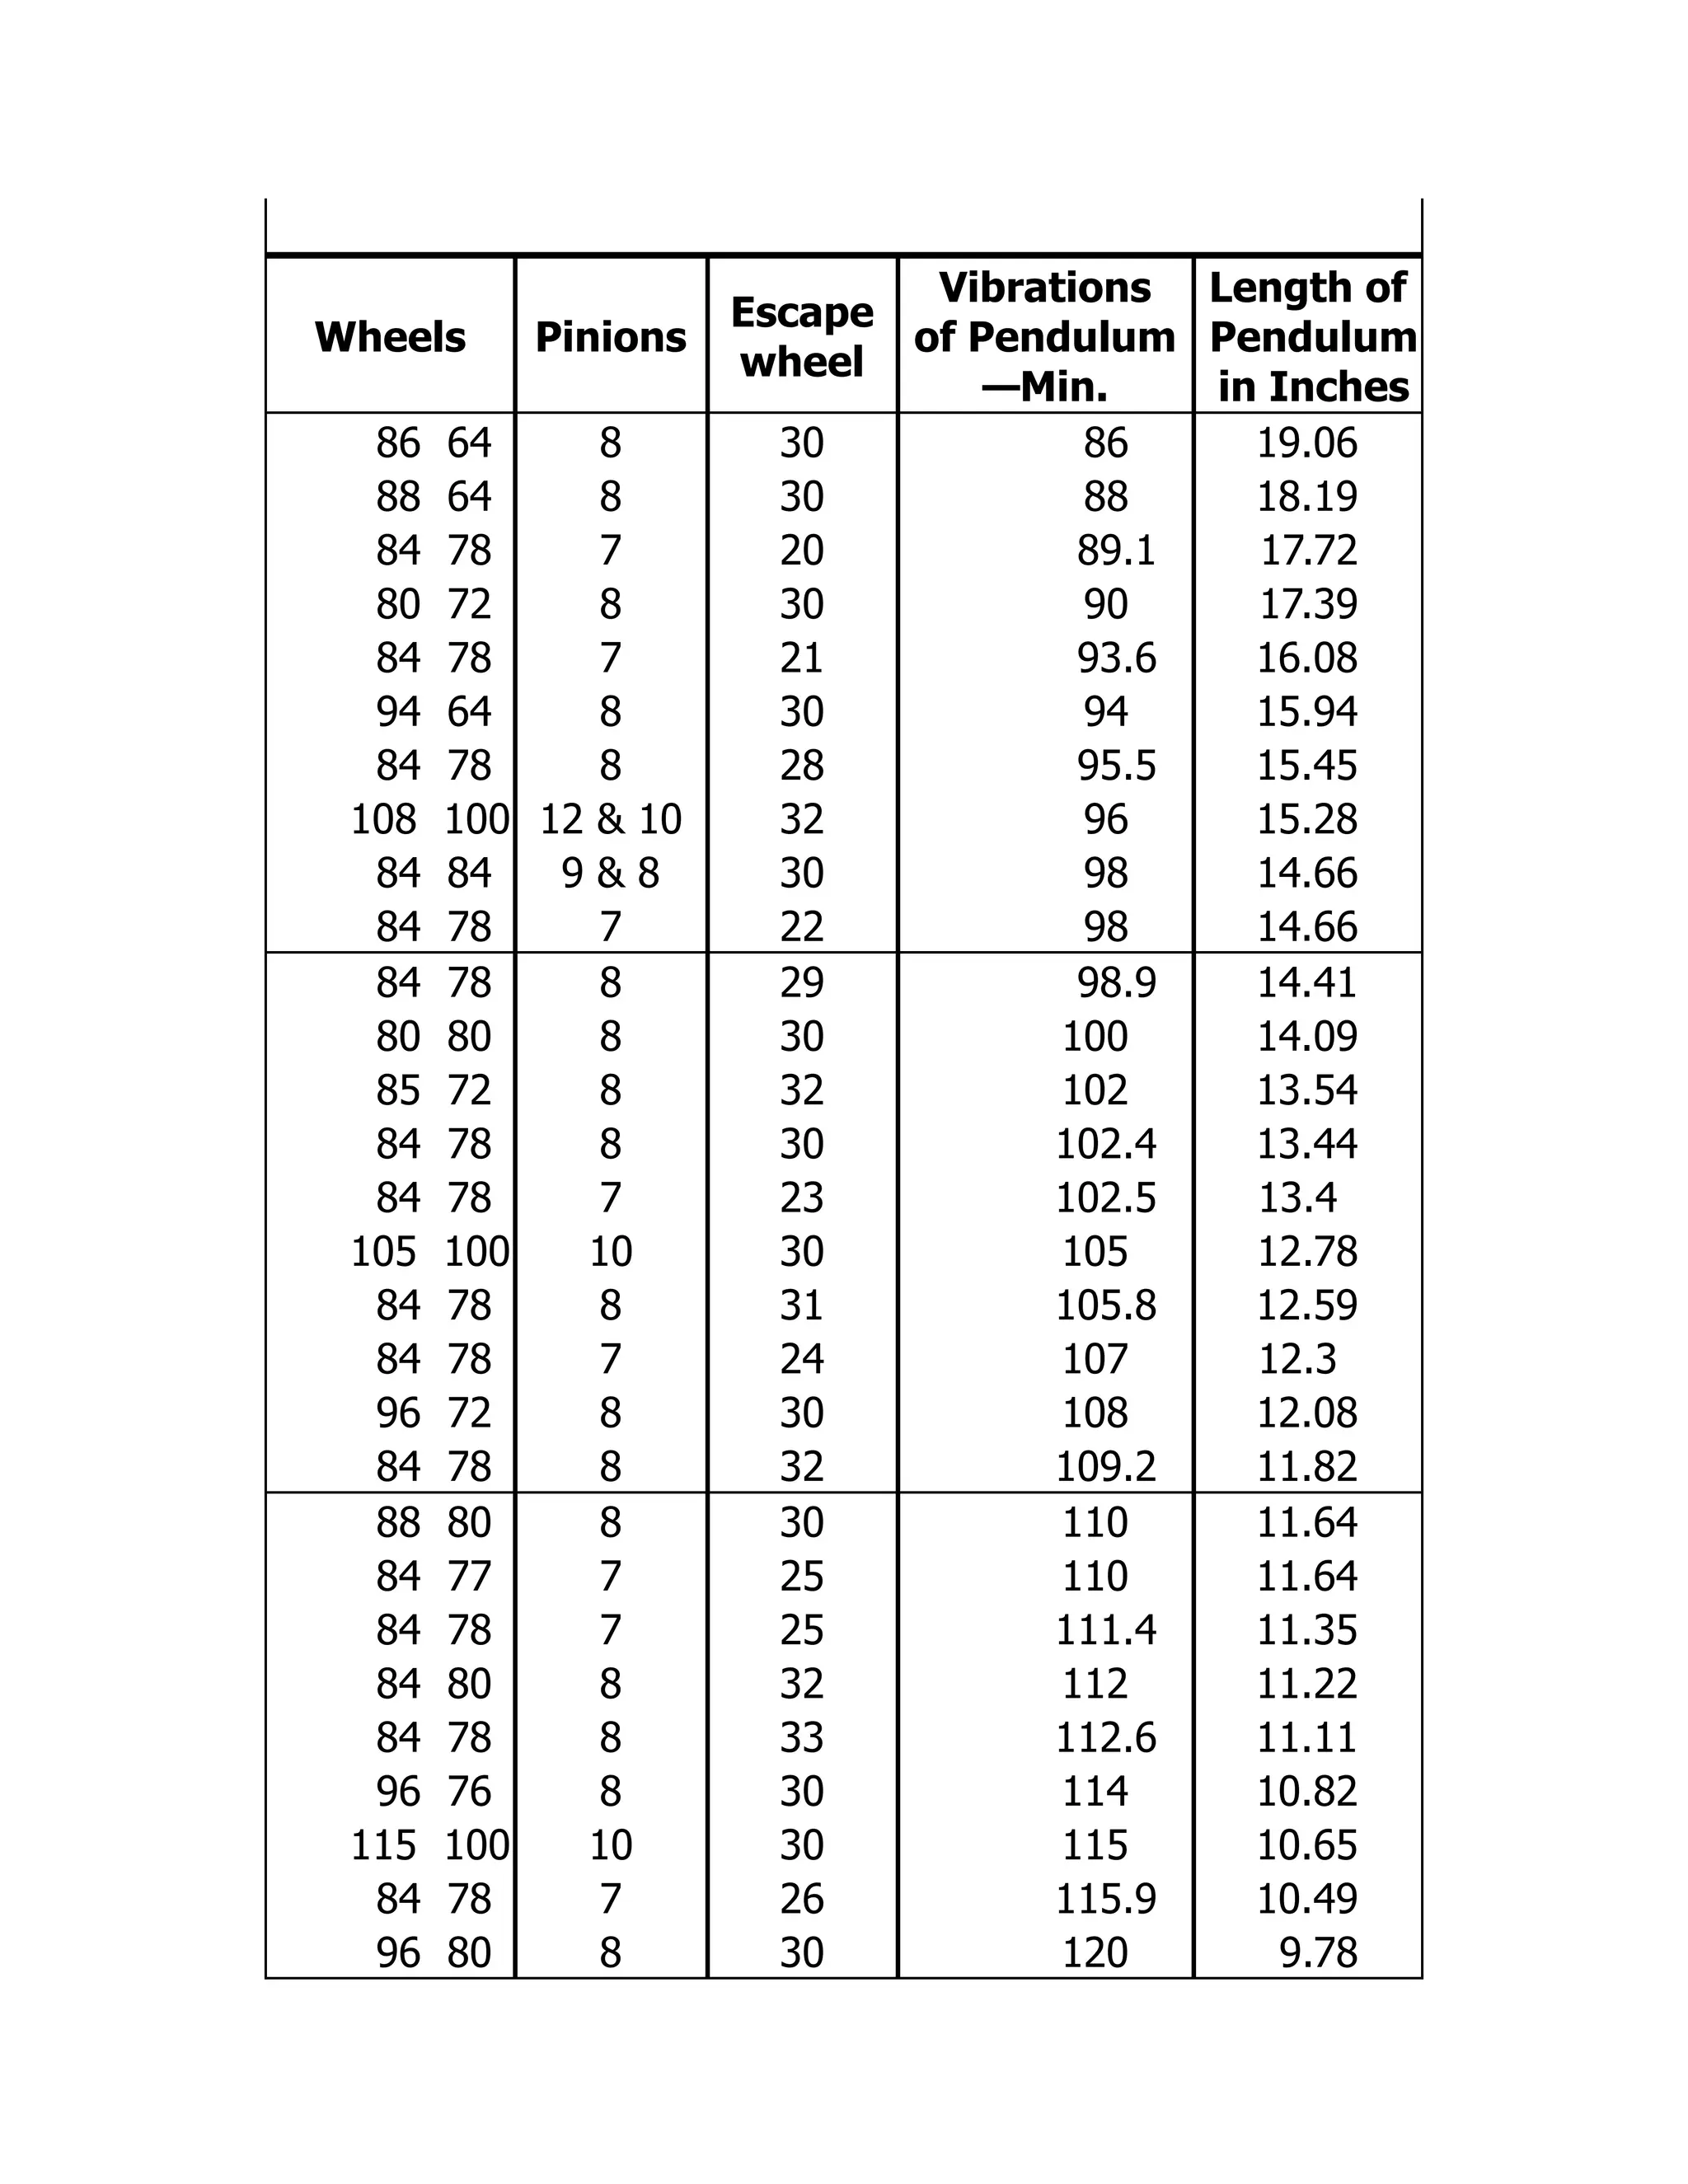
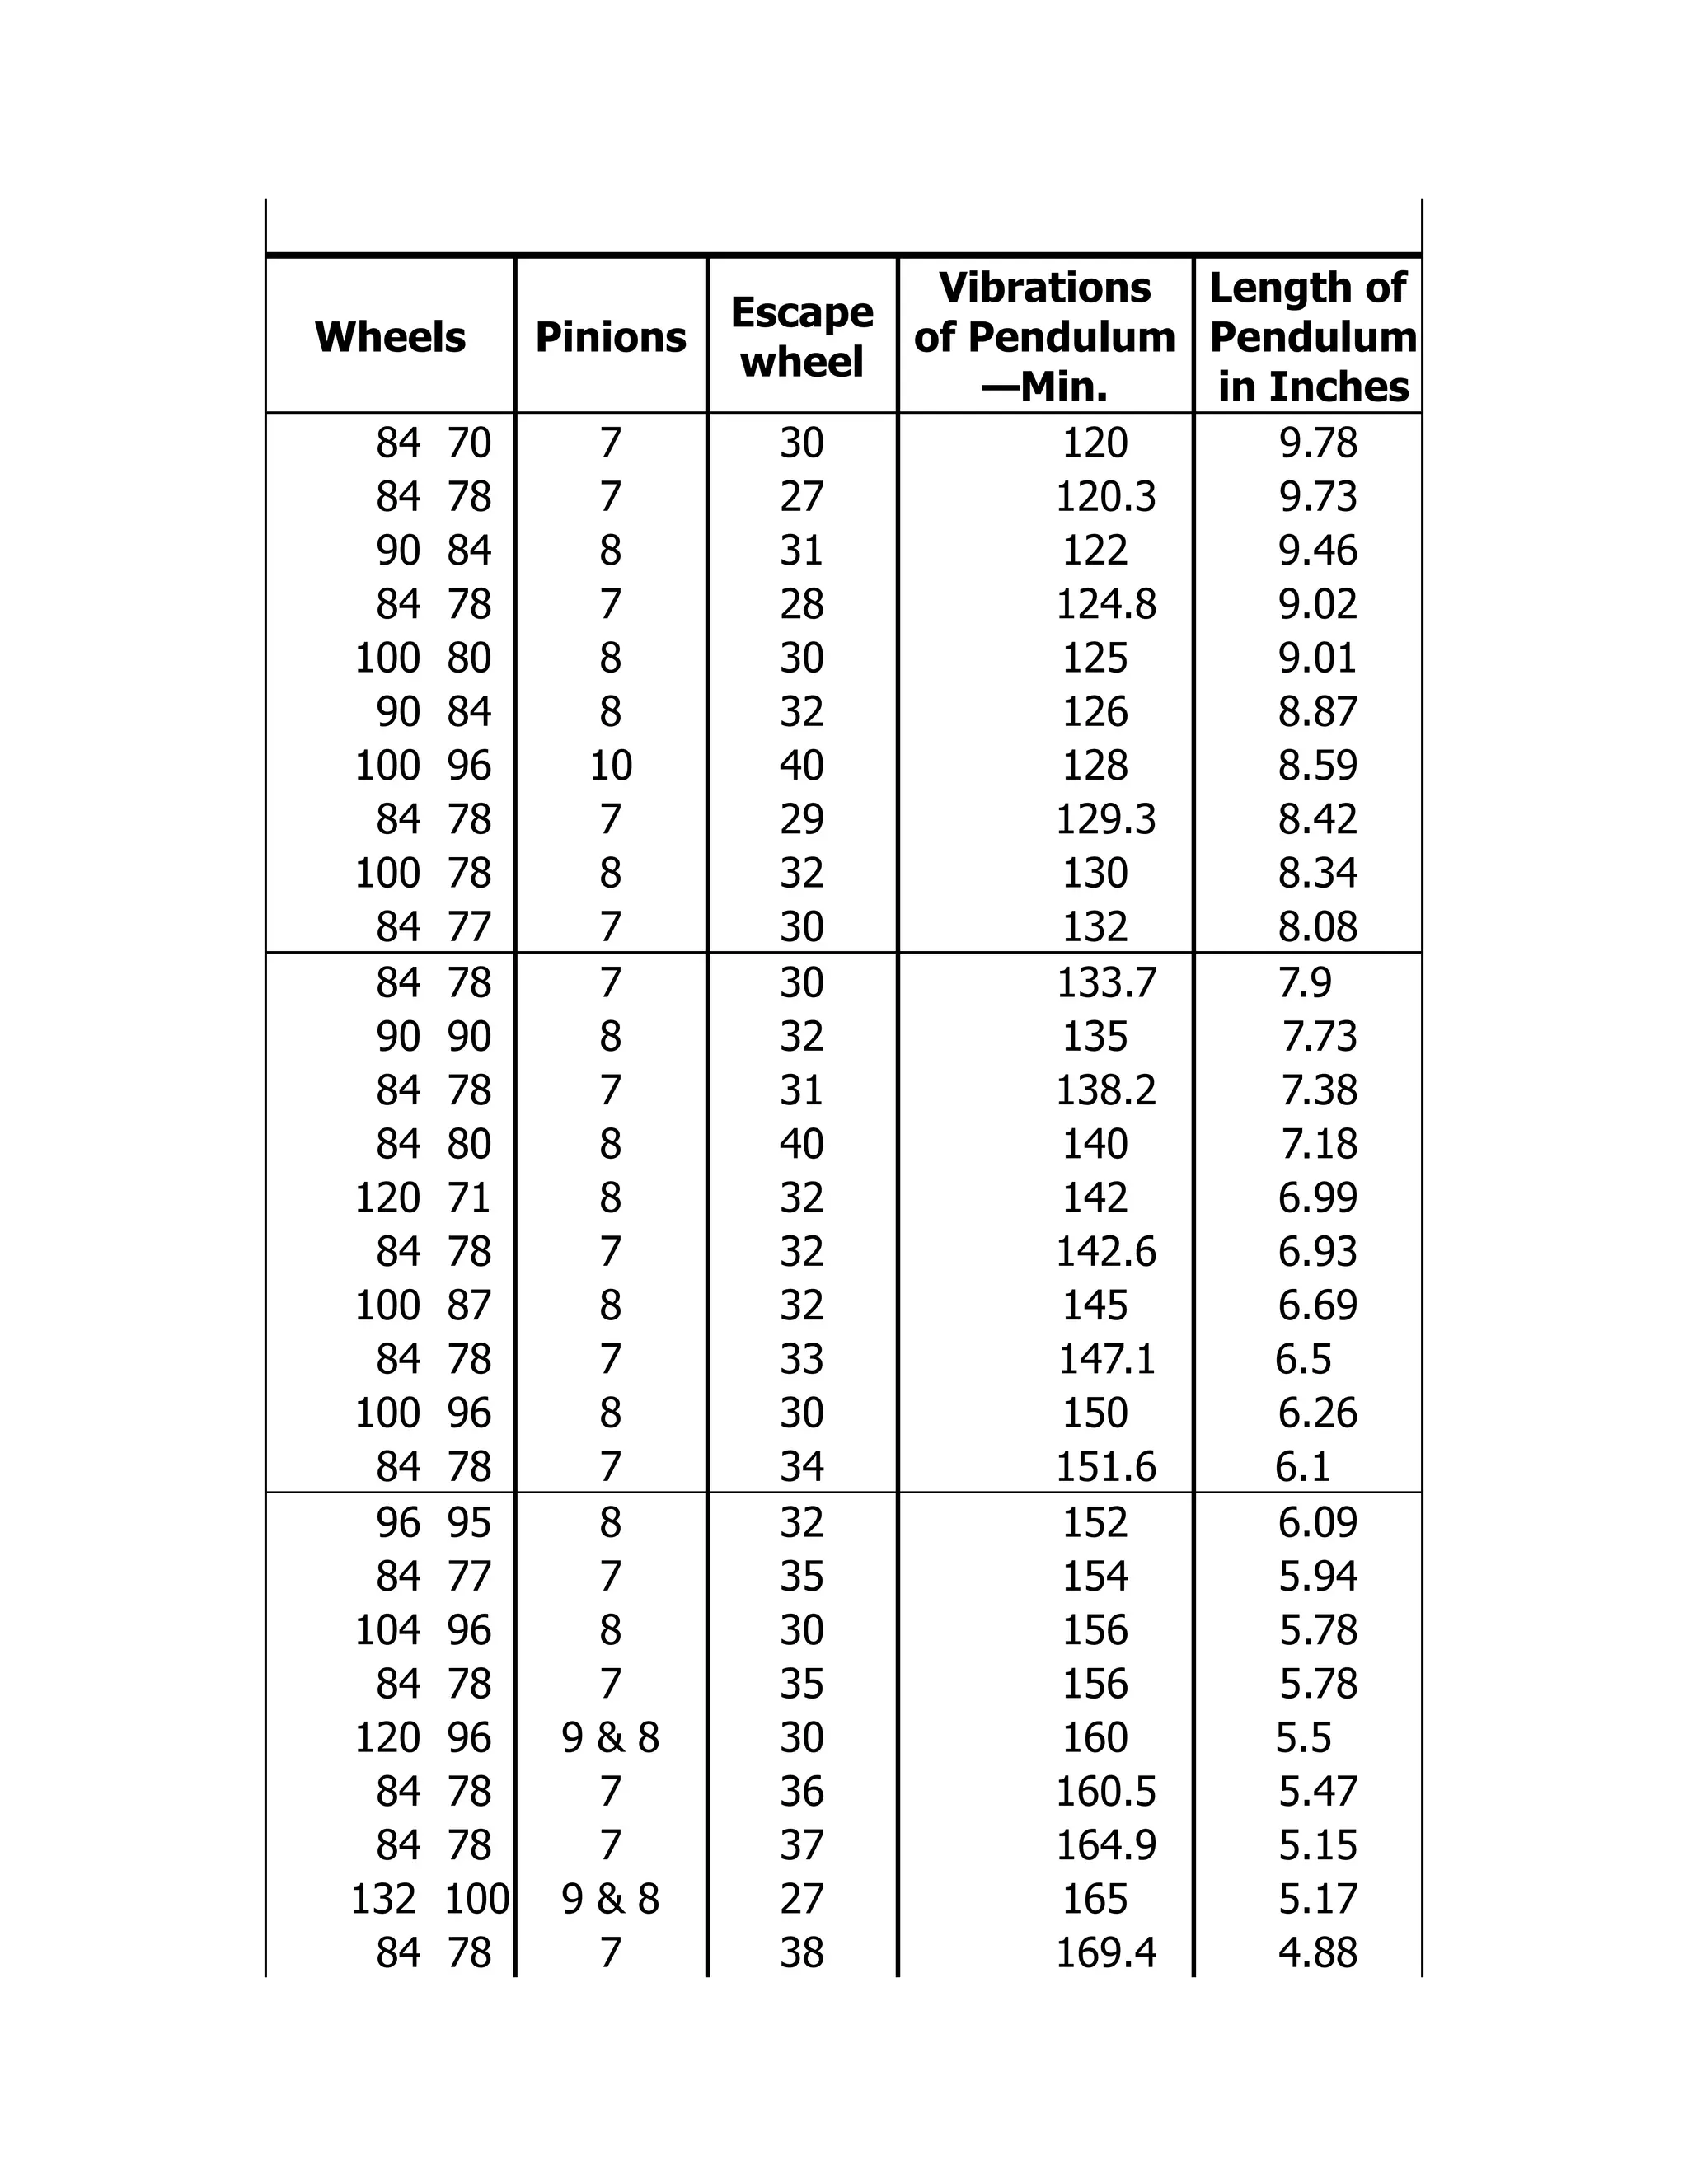
Clock Trains and Lengths of Pendulums.
Wheels Pinions
Escape
wheel
Vibrations
of Pendulum
—Min.
Length of
Pendulum
in Inches
120 90 75 10 10 9 Double *30 156.56
3 legged
120 90 90 10 9 9 Do. *40 88.07
128 120 16 30 60 39.14
112 105 14 30 60 39.14
96 90 12 30 60 39.14
80 75 10 30 60 39.14
64 60 8 30 60 39.14
68 64 8 30 68 30.49
70 64 8 30 70 28.75
72 64 8 30 72 27.17
75 60 8 32 75 25.05
72 65 8 32 78 23.15
75 64 8 32 80 22.01
84 64 8 30 84 19.97
Wheels Pinions
Escape
wheel
Vibrations
of Pendulum
—Min.
Lengthof
Pendulum
in Inches
128 102 8 25 170 4.87
84 78 7 39 173.8 4.65
36 36 35 6 25 175 4.6
84 77 7 40 176 4.55
84 78 7 40 178.3 4.43
45 36 36 6 20 180 4.35
47 36 36 6 20 188 3.99
*These are good examples of turret clock trains;
the great wheel (120 teeth) makes in both instances a
rotation in three hours. From this wheel the hands are
to be driven. This may be done by means of a pinion
of 40 gearing with the great wheel, or a pair of bevel
wheels bearing the same proportion to each other
(three to one) may be used, the larger one being fixed
to the great wheel arbor. The arrangement would in
each case depend upon the number and position of
the dials. The double three-legged gravity escape
wheel moves through 60° at each beat, and therefore
to apply the rule given for calculating clock trains it
must be treated as an escape wheel of three teeth.
Take a pendulum vibrating 5,400 times an hour, escape wheel of
30, pinions of 8, and third wheel of 72. Then 5,400 ÷ 60 = 90. And
90 × 8 ÷ 72 = 10. That is, the center wheel must have ten times as
many teeth as the third wheel pinion, or ten times 8 = 80.
The center pinion and great wheel need not be considered in
connection with the rest of the train, but only in relation to the fall of
the weight, or turns of mainspring, as the case may be. Divide the
fall of the weight (or twice the fall, if double cord and pulley are
32.
used) by thecircumference of the barrel (taken at the center of the
cord); the quotient will be the number of turns the barrel must
make. Take this number as a divisor, and the number of turns made
by the center wheel during the period from winding to winding as
the dividend; the quotient will be the number of times the center
pinion must be contained in the great wheel. Or if the numbers of
the great wheel and center pinion and the fall of the weight are
fixed, to find the circumference of the barrel, divide the number of
turns of the center wheel by the proportion between the center
pinion and the great wheel; take the quotient obtained as a divisor,
and the fall of the weight as a dividend (or twice the fall if the pulley
is used), and the quotient will be the circumference of the barrel. To
take an ordinary regulator or 8-day clock as an example—192
(number of turns of center pinion in 8 days) ÷ 12 (proportion
between center pinion and barrel wheel) = 16 (number of turns of
barrel). Then if the fall of the cord = 40 inches, 40 × 2 ÷ 16 = 5,
which would be circumference of barrel at the center of the cord.
If the numbers of the wheels are given, the vibrations per hour
of the pendulum may be obtained by dividing the product of the
wheel teeth multiplied together by the product of the pinions
multiplied together, and dividing the quotient by twice the number of
escape wheel teeth.
The numbers generally used by clock makers for clocks with less
than half-second pendulum are center wheel 84, gearing with a
pinion of 7; third wheel 78, gearing with a pinion of 7.
The product obtained by multiplying together the center and
third wheels = 84 × 78 = 6,552. The two pinions multiplied together
= 7 × 7 = 49. Then 6,552 ÷ 49 = 133.7. So that for every turn of
the center wheel the escape pinion turns 133.7 times. Or
133.7 ÷ 60 = 2.229, which is the number of turns in a minute of the
escape pinion.
The length of the pendulum, and therefore the number of escape
wheel teeth, in clocks of this class is generally decided with
reference to the room to be had in the clock case, with this
33.
restriction, the escapewheel should not have less than 20 nor more
than 40 teeth, or the performance will not be satisfactory. The
length of the pendulum for all escape wheels within this limit is given
in the preceding table. The length there stated is of course the
theoretical length, and the ready rule adopted by clockmakers is to
measure from the center arbor to the bottom of the inside of the
case, in order to ascertain the greatest length of pendulum which
can be used. For instance, if from the center arbor to the bottom of
the case is 10 inches, they would decide to use a 10-inch pendulum,
and cut the escape wheel accordingly with the number of teeth
required as shown in the table. But they would make the pendulum
rod of such a length as just to clear the bottom of the case when the
pendulum was fixed in the clock.
In the clocks just referred to the barrel or first wheel has 96
teeth, and gears with a pinion of eight.
Month clocks have an intermediate wheel and pinion between the
great and center wheels. This extra wheel and pinion must have a
proportion to each other of 4 to 1 to enable the 8-day clock to go 32
days from winding to winding. The weight will have to be four times
as heavy, plus the extra friction, or if the same weight is used there
must be a proportionately longer fall.
Six-months clock have two extra wheels and pinions between the
great and center wheels, one pair having a proportion of 4½ to 1
and the other of 6 to 1. But there is an enormous amount of extra
friction generated in these clocks, and they are not to be
recommended.
The pivot holes and all the other holes in the frames, are
punched at one operation after the frames have been blanked and
flattened. They are placed in the press, and a large die having
punches in it of the proper size and in the right position for the
holes, comes down on the frame and makes the holes with great
rapidity and accuracy. These holes are finished afterwards by a
broach. In some kinds of clocks, where some of the pivot holes are
very small, the small holes are simply marked with a sharp point in
34.
the die, andafterwards drilled by small vertical drills. These
machines are very convenient for boring a number of holes rapidly.
The drill is rotated with great speed, and a jig or plate on which the
work rests is moved upwards towards the drill by a movement of the
operator’s foot. All the boring, countersinking, etc., in American
clocks, is done through the agency of these drills. Bending the small
wires for the locking work, the pendulum ball, etc., is rapidly effected
by forming. As no objectionable marks have been made on the
surface of either the thick or smaller wires during any process of
construction, all that is necessary to finish the iron work is simply to
clean it well, which is done in a very effective manner by placing a
quantity of work in a revolving tumbling box, which is simply a barrel
containing a quantity of sawdust.
Milling the winding squares on barrel arbors is an ingenious
operation. The machine for milling squares and similar work is made
on the principle of a wheel cutting engine. The work is held in a
frame, attached to which is a small index plate, like that of a cutting
engine. In the machine two large mills or cutters, with teeth in them
like a file, are running, and the part to be squared is moved in
between the revolving cutters, which operation immediately forms
two sides of the square. The work is then drawn back, and the index
turned round, and in a like manner the other two sides of the square
are formed. The cutting sides of the mills are a little bevelled, so that
they will produce a slight taper on the squares.
Winding keys have shown great improvements. Some
manufacturers originally used cast iron ones, but the squares were
never good in them, and brass ones were adopted. At first the
squares were made by first drilling a hole and driving a square
punch in with a hammer; and to make the squares in eighteen
hundred keys by this method was considered a good day’s work.
Restless Yankee ingenuity, however, has contrived a device by which
twenty or twenty-five thousand squares can be made in a day, while
at the same time they are better and straighter squares than those
by the old method; but we are not at liberty to describe the process
35.
at present, butonly to state that it is done by what machinists call
drilling a square hole.
Pendulum rods are made from soft iron wire, and the springs on
the ends rolled out by rollers. Two operations are necessary. The
first roughs the spring out on rollers of eccentric shape, and the
spring is afterwards finished on plain smooth rollers. The pendulum
balls in the best clocks are made of lead, on account of its weight,
and cast in an iron mold in the same manner as lead bullets, at the
rate of about eighteen hundred a day. A movable mandrel is placed
in the mold to produce the hole that is in the center of the ball. The
balls are afterwards covered with a shell of brass, polished with a
bloodstone burnisher. The various cocks used in these clocks are all
struck up from sheet brass, and the pins in the wheels in the striking
part are all swedged into their shape from plain wire. The hands are
die struck out of sheet steel, and afterwards polished on emery
belts, and blued in a furnace.
All the little pieces of these clocks are riveted together by hand,
and the different parts of the movement, when complete, are put
together by workmen continually employed in that department.
Although the greatest vigilance is used in constructing the different
parts to see that they are perfect, when they come to be put
together they are subjected to another examination, and after the
movements are put in the case the clocks are put to the test by
actual trial before they are packed ready for the market. As a
general rule, all the different operations are done by workmen
employed only at one particular branch; and in the largest factories
from thirty to fifty thousand clocks of all classes may be seen in the
various stages of construction.
Such is a description of the main points in which the manufacture
of American clock movements differs from those manufactured by
other systems. All admit that these clocks perform the duties for
which they are designed in an admirable manner, while they require
but little care to manage, and when out of order but little skill is
necessary to repair them. Of late years there has been a growing
36.
demand for ornamentalmantel-piece clocks in metallic cases of
superior quality, and large numbers of these cases of both bronze
and gold finish are being manufactured, which, for beauty of design
and fine execution, in many instances rival those of French
production. The shapes of the ordinary American movements were,
however, unsuitable for some patterns of the highest class of cases,
and the full plate, round movements of the same size as the French,
but with improvements in them that in some respects render them
more simple than the French, are now manufactured. Exactly the
same system is employed in the manufacture of the different parts
of these clocks that is practiced in making the ordinary American
movements.
37.
CHAPTER XV.
SPRINGS, WEIGHTSAND POWER.
We see by the preceding calculations that there is one definite
point in the time train of a clock; the center arbor, which carries the
minute hand, must revolve once in one hour; from this point we may
vary the train both ways, toward the escape wheel to suit the length
of pendulum which we desire to use, and toward the barrel to suit
the length of time we want the clock to run. The center arbor is
therefore generally used as the point at which to begin calculations,
and it is also for this reason that the number of teeth in the center
wheel is the starting point in train calculations toward the escape
wheel, while the center pinion is the starting point in calculations of
the length of time the weight or spring is to drive the clock. Most
writers on horology ignore this point, because it seems self-evident,
but its omission has been the cause of much mystification to so
many students that it is better to state it in plain terms, so that even
temporary confusion may be avoided.
Sometimes there is a second fixed point in a time train; this
occurs only when there is a seconds hand to be provided for; when
this is the case the seconds hand must revolve once every minute. If
it is a seconds pendulum the hand is generally carried on the escape
wheel and the relation of revolutions between the hour and seconds
wheels must then be as one is to sixty. This might be accomplished
with a single wheel having sixty times as many teeth as the pinion
on the seconds arbor; but the wheel would take up so much room,
on account of its large circumference, that the movement would
become unwieldy because there would be no room left for the other
wheels; so it is cheaper to make more wheels and pinions and
thereby get a smaller clock. Now the best practical method of
38.
dividing this motionis by giving the wheels and pinions a relative
velocity of seven and a half and eight, because 7.5 × 8 = 60.
Thus if the center wheel has 80 teeth, gearing into a pinion of
10, the pinion will be driven eight times for each revolution of the
center wheel, while the third wheel, with 75 teeth, will drive its
pinion of 10 leaves 7.5 times, so that this arbor will go 7.5 times
eight, or 60 times as fast as the center wheel.
If the clock has no seconds hand this second fixed point is not
present in the calculations and other considerations may then
govern. These are generally the securing of an even motion, with
teeth of wheels and pinions properly meshing into each other,
without incurring undue expense in manufacture by making too
many teeth in the pinions and consequently in the wheels. For these
reasons pinions of less than seven or more than ten leaves are rarely
used in the common clocks, although regulators and fine clocks,
where the depthing is important, frequently have 12, 14 or 16 leaves
in the pinions, as is also the case with tower clocks, where the
increased size of the movement is not as important as a smoothly
running train. Clocks without pendulums, carriage clocks, locomotive
levers and nickel alarms, also have different trains, many of which
have the six leaf pinion, with its attendant evils, in their trains.
Weights.--Weights have the great advantage of driving a train
with uniform power, which a spring does not accomplish: They are
therefore always used where exactness of time is of more
importance than compactness or portability of the clock. In making
calculations for a weight movement, the first consideration is that as
the coils of the cord must be side by side upon the barrel and each
takes up a definite amount of space, a thicker movement (with
longer arbors) will be necessary, as the barrel must give a sufficient
number of turns of the cord to run the clock the desired time and
the length of the barrel, with the wheel and maintaining power all
mounted upon the one arbor, will determine the thickness of the
movement. If the clock is to have striking trains their barrels will
generally be of more turns and consequently longer than the time
39.
barrel and inthat case the distance between the plates is governed
by the length of the longest barrel and its mechanism.
The center wheel, upon the arbor of which sits the canon pinion
with the minute hand, must, since the hand has to accomplish its
revolution in one hour, also revolve once in an hour. When,
therefore, the pinion of the center arbor has 8 leaves and the barrel
wheel 144, then the 8 pinion leaves, which makes one revolution per
hour, would require the advancing of 8 teeth of the barrel wheel,
which is equal to the eighteenth part of its circumference. But when
the eighteenth part in its advancing consumes 1 hour, then the
entire barrel wheel will consume 18 hours to accomplish one
revolution. If, now, 10 coils of the weight cord were laid around the
barrel, the clock would then run 10 × 18 = 180 hours, or 7½ days,
before it is run down.
Referring to what was said in a previous chapter on wheels being
merely compound levers, it will be seen that as we gain motion we
lose power in the same ratio. We shall also see that by working the
rule backwards we may arrive at the amount of force exerted on the
pendulum by the pallets. If we multiply the circumference of the
escape wheel in inches by the number of its revolutions in one hour
we will get the number of inches of motion the escape wheel has in
one hour. Now if we multiply the weight by the distance the barrel
wheel travels in one hour and divide by the first number we shall
have the force exerted on the escape wheel. It will be simpler to
turn the weight into grains before starting, as the division is less
cumbersome.
Another way is to find how many times the escape wheel
revolves to one turn of the barrel and divide the weight by that
number, which will give the proportion of weight at the escape
wheel, or rather would do so if there were no power lost by friction.
It is usual to estimate that three-quarters of the power is used up in
frictions of teeth and pivots, so that the amount actually used for
propulsion of the pendulum is very small, being merely sufficient to
40.
overcome the bendingmoment of the suspension spring and the
resistance of the air.
It is for this reason that clocks with finely cut trains and jeweled
pivots, thus having little train friction, will run with very small
weights. The writer knows of a Howard regulator with jeweled pivots
and pallets running a 14-pound pendulum with a five-ounce driving
weight. Of course this is an extreme instance and was the result of
an experiment by an expert watchmaker who wanted to see what he
could do in this direction.
Usually the method adopted to determine the amount of weight
that is necessary for a movement is to hang a small tin pail on the
weight cord and fill it with shot sufficient to barely make the clock
keep time. When this point has been determined, then weigh the
pail of shot and make your driving weight from eight to sixteen
ounces heavier. In doing this be sure the clock is in beat and that it
is the lack of power which stops the clock; the latter point can be
readily determined by adding or taking out shot from the pail until
the amount of weight is determined. The extra weight is then added
as a reserve power, to counteract the increase of friction produced
by the thickening of the oil.
Many clock barrels have spiral grooves turned in them to assist in
keeping the coils from riding on each other, as where such riding
occurs the riding coils are farther from the center of the barrel than
the others, which gives them a longer leverage and greater power
while they are unwinding, so that the power thus becomes irregular
and affects the rate of the clock, slowing it if the escapement is dead
beat and making it go faster if it is a recoil escapement.
Clock cords should be attached to the barrel at the end which is
the farthest from the pendulum, so that as they unwind the weight
is carried away from the pendulum. This is done to avoid
sympathetic vibrations of the weight as it passes the pendulum,
which interfere with the timekeeping when they occur. If the weight
cannot be brought far enough away to avoid vibrations a sheet of
glass may be drilled at its four corners and fixed with screws to
41.
posts placed inthe back of the case at the point where vibration
occurs, so that the glass is between the pendulum rod and the
weight, but does not interfere with either. This looks well and cures
the trouble.
We have, heretofore, been speaking of weights which hang
directly from the barrel, as was the case with the older clocks with
long cases, so that the weight had plenty of room to fall. Where the
cases are too short to allow of this method, recourse is had to
hanging the weight on a pulley and fastening one end of the cord to
the seat board. This involves doubling the amount of weight and
also taking care that the end of the cord is fastened far enough from
the slot through which it unwinds so that the cords will not twist, as
they are likely to do if they are near together and the cord has been
twisted too much while putting it on the barrel. Twisting weight
cords are a frequent source of trouble when new cords have been
put on a clock. The pulley is another source of trouble, especially if
wire cords (picture cords) or cables are used. Wire cable should not
be bent in a circle smaller than forty times its diameter if flexibility is
to be maintained, hence pulleys which were all right for gut or silk
frequently prove too small when wire is substituted and kinks,
twisted and broken cables frequently result from this cause. This is
especially the case with the heavy weight of striking trains of hall
and chiming clocks, where double pulleys are used, and also leads to
trouble by jamming and cutting the cables and dropping of the
weights in tower clocks where a new cable of larger size is used to
replace an old one which has become unsafe from rust, or cut by the
sheaves.
Weight cords on the striking side of a clock should always be left
long enough so that they will not run down and stop before the time
train has stopped. This is particularly the case with the old English
hall clocks, as many of them will drop or push their gathering racks
free of the gathering pinion under such conditions and then when
the clock is wound it will go on striking continuously until the dial is
taken off and the rack replaced in mesh with the gathering pinion.
As clocks are usually wound at night, the watchmaker can see the
42.
disturbance that wouldbe caused in a house in the “wee sma’
hours” by such a clock going on a rampage and striking
continuously.
Oiling Cables.--Clock cables, if of wire and small in size, should be
oiled by dipping in vaseline thinned with benzine of good quality.
Both benzine and vaseline must be free from acid, as if the latter is
present it will attack the cable. This thinning will permit the vaseline
to permeate the entire cable and when the benzine evaporates it will
leave a thin film of vaseline over every wire, thus preventing rust.
Tower clock cables should be oiled with a good mineral oil, well
soaked into them to prevent rusting. Gut clock cords, when dry and
hard, are best treated with clock oil, but olive oil or sperm oil will
also be found good to soften and preserve them. New cords should
always be oiled until they are soft and flexible. If the weight is under
ten pounds silk cords are preferable to gut or wire as they are very
soft and flexible.
In putting on a new cable or weight cord the course of the
weight and cord should be closely watched at all points, to see that
they remain free and do not chafe or bind anywhere and also that
the coils run evenly and freely, side by side; sometimes, especially
with wire, a new cable gets kinked by riding the first time of winding
and is then very difficult to cure of this serious fault. Another point
to watch is to see that the position of the cord when wound up will
not cause an end thrust upon the barrel, which will interfere with the
timekeeping if it is overwound, so that the weight is jammed against
the seatboard; this frequently happens with careless winding, if
there is no stop work.
To determine the lengths of clock cords or weights, we may have
to approach the question from either end. If the clock be brought in
without the cords, we first count the number of turns we can get on
the barrel. This may be done by measuring the length of the barrel
and dividing it by the thickness of the cord, if the barrel is smooth,
or by counting the grooves if it be a grooved barrel. Next we caliper
the diameter and add the thickness of one cord, which gives us the
43.
diameter of thebarrel to the center of the cords, which is the real or
working diameter. Multiply the distance so found by 3.14156, which
gives the circumference of the barrel, or the length of cord for one
turn of the barrel. Multiply the length of one turn by the number of
turns and we have the length of cord on the barrel, when it is fully
wound. If the cord is to be attached to the weight, measure the
distance from the center of barrel to the bottom of the seat board
and leave enough for tying. If the weight is on a pulley it will
generally require about twelve inches to reach from the barrel
through the slot of the seat board, through the pulley to the point of
fastening.
To get the fall of the weight, stand it on the bottom of the case
and measure the distance from the top of the point of attachment to
the bottom of the seat board. This will generally allow the weight to
fall within two inches of the bottom and thus keep the cable tight
when the clock runs down; thus avoiding kinks and over-riding when
we wind again after allowing the clock to run down. If the weight
has a pulley and double cord, measure from the top of the pulley to
the seatboard, with the weight on the bottom, and then double this
measurement for the length of the cord. This measure is multiplied
by as many times as there are pulleys in the case of additional
sheaves. Striking trains are frequently run with two coils or layers of
cord, on the barrel, time trains never have but one.
Now, having the greatest available length of cord determined
according either of the above conditions, we can determine the
number of turns for which we have room on our barrel and divide
the length of cord by the number of turns. This will give us the
length of one turn of the cord on our barrel and thus having found
the circumference it is easy to find the diameter which we must give
our barrel in suiting a movement to given dimensions of the case.
This is frequently done where the factory may want a movement to
fit a particular style and size of case which has proved popular, or
when a watchmaker desires to make a movement for which he has,
or will buy, a case already made.
44.
As to towerclock cables, getting the length of cable on the barrel
is, of course, the same as given above, but the rest of it is an
individual problem in every case, as cables are led so differently and
the length of fall varies so that only the professional tower clock men
are fitted to make the measurements for new work and they require
no instruction from me. It might be well to add, however, that in the
tower clocks by far the greater part of the cable is always outside
the clock and only the inner end coils and uncoils about the barrel. It
is for this reason that the outer ends of the cables are so generally
neglected by watchmakers in charge of tower clocks and allowed to
cut and rust until they drop their weights. Caretakers of tower clocks
should remember that the inner ends of cables are always the best
ends; the parts that need watching are those in the sheaves or
leading to the sheaves. Tower clocks should have the cables marked
where to stop to prevent overwinding.
In chain drives for the weights of cuckoo and other clocks with
exposed weights, we have generally a steel sprocket wheel with
convex guiding surfaces each side of the sprocket and projecting
flanges each side of the guides; one of these flanges is generally the
ratchet wheel. The ratchet wheel, guide, sprocket, guide and flange,
form a built-up wheel which is loose on the arbor and is pinned close
to the great wheel, which is driven by a click on the wheel working
into the ratchet of the drive. It must be loose on the arbor, because
the clock is wound by pulling the sprocket and ratchet backward by
means of the chain until the weight is raised clear up to the seat
board. There are no squares on the arbors, which have ordinary
pivots at both ends, and the great wheel is fast on the arbor. The
diameter of the convex portion of the wheel each side of the
sprocket is the diameter of the barrel, and the chain should fit so
that alternate links will fit nicely in the teeth of the sprocket; where
this is not the case they will miss a link occasionally and the weight
will then fall until the chain catches again, when it will stop with a
jerk; bent or jammed links in the chain will do the same thing.
Sometimes a light chain on a heavy weight will stretch or spread the
links enough to make their action faulty. If examination shows a
45.
tendency to openthe links, they should be soldered; if they are
stretching, a heavier chain of correct lengths of links should be
substituted. Twisted chains are another characteristic fault and are
usually the result of bent or jammed links. A close examination of
such a chain will generally reveal several links in succession which
are not quite flat and careful straightening of these links will
generally cure the tendency to twist.
Mainsprings for Clocks.--There are many points of difference
between mainsprings for clocks and those for watches. They differ in
size, strength, number of coils and in their effect on the rates of the
clock.
Watch springs are practically all for 30-hour lever escapements,
with a few cylinder, duplex and chronometer escapements. If a fusee
watch happens into a shop nowadays it is so rare as to be a curiosity
worth stopping work to look at.
The clocks range all the way from 30 hours to 400 days in length
of time between windings and include lever, cylinder, duplex, dead
beat, half dead beat, recoil and other escapements. Furthermore
some of these, even of the same form of escapements, will vary so
in weight and the consequent influence of the spring that what will
pass in one case will give a wildly erratic rate in another instance.
Many of the small French clocks have such small and light
pendulums that very nice management of the stop works is
necessary to prevent the clock from gaining wildly when wound or
stopping altogether when half run down.
Nothing will cause a clock with a cylinder escapement to vary in
time more than a set or gummy mainspring, for it will gain time
when first wound and lose when half run down, or when there is but
little power on the train. In such a case examine the mainspring and
see that it is neither gummy nor set. If it is set, put in a new spring
and you can probably bring it to time.
With a clock it depends entirely on the kind of escapement that it
contains, whether it runs faster or slower, with a stronger spring; if
46.
you put astronger mainspring in a clock that contains a recoil
escapement the clock will gain time, because the extra power,
transmitted to the pallets will cause the pendulum to take a shorter
arc, therefore gain time, where the reverse occurs in the dead-beat
escapement. A stronger spring will cause the dead-beat pendulum to
take a longer arc and therefore lose time.
If a pendulum is short and light these effects will be much
greater than with a long and heavy pendulum.
At all clock factories they test the mainsprings for power and to
see that they unwind evenly; those that do are marked No. 1, and
those that do not are called “seconds.” The seconds are used only
for the striking side of the clocks, while the perfect ones are used for
the running, or time side. Sometimes, however, a seconds’ spring
will be put on the time side and will cause the clock to vary in a
most erratic way. This changing of springs is very often done by
careless or ignorant workmen in cleaning and then they cannot
locate the trouble.
All mainsprings for both clocks and watches should be smooth
and well polished. Proper attention to this one item will save many
dollars’ worth of time in examining movements to try to detect the
cause of variations.
A rough mainspring (that is, an emery finished mainspring) will
lose one-third of its power from coil friction, and in certain instances
even one-half. The deceptive feature about this to the watchmaker is
that the clock will take a good motion with a rough spring fully
found, but will fall off when partly unwound, and the consequence is
that he finds a good motion when the spring is put in and wound,
and he afterward neglects to examine the spring when he examines
the rate as faulty. The best springs are cheap enough, so that only
the best quality should be used, as it is easy for a watchmaker to
lose three or four dollars’ worth of time looking for faults in the
escapement, train and everywhere else, except the barrel, when he
has inserted a rough, thick, poorly made spring. The most that he
can save on the cheaper qualities of springs is about five cents per
47.
spring and wewill ask any watchmaker how long it would take to
lose five cents in examination of a movement to see what is
defective.
Here is something which you can try yourself at the bench. Take
a rough watch mainspring; coil it small enough to be grasped in the
hand and then press on the spring evenly and steadily. You will find
it difficult to make the coils slide on one another as the inner coils
get smaller; they will stick together and give way by jerks. Now open
your hand slowly and you will feel the spring uncoiling in an abrupt,
jerky way, sometimes exerting very little pressure on the hand, at
other times a great deal. A dirty, gummy spring will do the same
thing. Now take a clean, well polished spring and try it the same
way; notice how much more even and steady is the pressure
required to move the coils upon each other, either in compressing or
expanding. Now oil the well polished spring and try it again. You will
find you now have something that is instantly responding, evenly
and smoothly, to every variation of pressure. You can also compress
the spring two or three turns farther with the same force. This is
what goes on in the barrel of every clock or watch; you have merely
been using your hand as a barrel and feeling the action of the
springs.
Now a well finished mainspring that is gummy is as irregular in
its action as the worst of the springs described above, yet very few
watchmakers will take out the springs of a clock if they are in a
barrel. One of them once said to me, “Why, who ever takes out
springs? I’ll bet I clean a hundred clocks before I take out the
springs of one of them!” Yet this same man had then a clock which
had come back to him and which was the cause of the conversation.
There must be in this country over 25,000 fine French clocks in
expensive marble or onyx cases, which were given as wedding
presents to their owners, and which have never run properly and in
many instances cannot be made to run by the watchmakers to
whom they were taken when they stopped. Let me give the history
of one of them. It was an eight-day French marble clock which cost
48.
Welcome to ourwebsite – the ideal destination for book lovers and
knowledge seekers. With a mission to inspire endlessly, we offer a
vast collection of books, ranging from classic literary works to
specialized publications, self-development books, and children's
literature. Each book is a new journey of discovery, expanding
knowledge and enriching the soul of the reade
Our website is not just a platform for buying books, but a bridge
connecting readers to the timeless values of culture and wisdom. With
an elegant, user-friendly interface and an intelligent search system,
we are committed to providing a quick and convenient shopping
experience. Additionally, our special promotions and home delivery
services ensure that you save time and fully enjoy the joy of reading.
Let us accompany you on the journey of exploring knowledge and
personal growth!
ebookultra.com