Downloaded 146 times


![Earthshine Design Arduino Starters Kit Manual - A Complete Beginners Guide to the Arduino
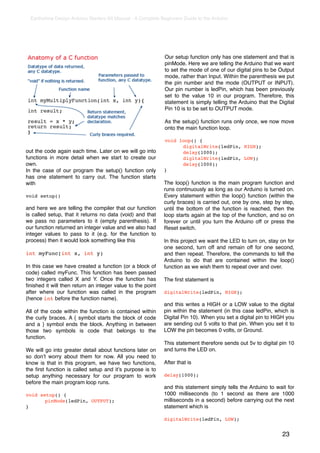
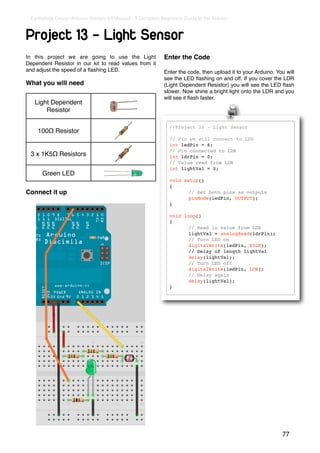
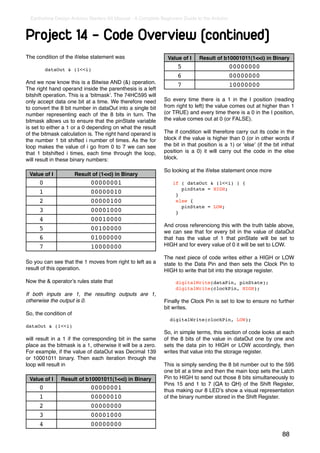
Project 5 - LED Chase Effect
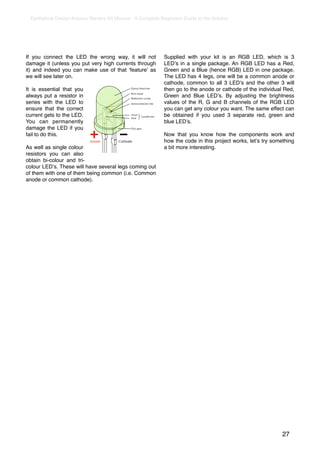
We are now going to use a string of LEDʼs (10 in total) Connect it up
to make an LED chase effect, similar to that used on
the car KITT in the Knightrider TV Series and on the
way introduce the concept of arrays.
What you will need
10 x Red Diffused
LEDʼs
10 x 220Ω Resistors
Enter the code
// Project 5 - LED Chase Effect
// Create array for LED pins
byte ledPin[] = {4, 5, 6, 7, 8, 9, 10, 11, 12, 13};
int ledDelay(65); // delay between changes
int direction = 1;
int currentLED = 0;
unsigned long changeTime;
void setup() {
// set all pins to output
for (int x=0; x<10; x++) {
pinMode(ledPin[x], OUTPUT); }
changeTime = millis();
}
void loop() {
// if it has been ledDelay ms since last change
if ((millis() - changeTime) > ledDelay) {
changeLED();
changeTime = millis();
}
}
void changeLED() {
// turn off all LED's
for (int x=0; x<10; x++) {
digitalWrite(ledPin[x], LOW);
}
// turn on the current LED
digitalWrite(ledPin[currentLED], HIGH);
// increment by the direction value
currentLED += direction;
// change direction if we reach the end
if (currentLED == 9) {direction = -1;}
if (currentLED == 0) {direction = 1;}
}
41](https://image.slidesharecdn.com/askmanualrev4-111105084311-phpapp02/85/Ask-manual-rev4-41-320.jpg)
![Earthshine Design Arduino Starters Kit Manual - A Complete Beginners Guide to the Arduino
Project 5 - Code Overview
Our very first line in this sketch is The function we created is
byte ledPin[] = {4, 5, 6, 7, 8, 9, 10, 11, 12, void changeLED() {
13}; // turn off all LED's
for (int x=0; x<10; x++) {
and this is a declaration of a variable of data type digitalWrite(ledPin[x], LOW);
}
array. An array is a collection of variables that are
// turn on the current LED
accessed using an index number. In our sketch we digitalWrite(ledPin[currentLED], HIGH);
have declared an array of data type byte and called it // increment by the direction value
ledPin. We have then initialised the array with 10 currentLED += direction;
values, which are the digital pins 4 through to 13. To // change direction if we reach the end
if (currentLED == 9) {direction = -1;}
access an element of the array we simply refer to the
if (currentLED == 0) {direction = 1;}
index number of that element. Arrays are zero }
indexed, which simply means that the first index starts
at zero and not 1. So in our 10 element array the index and the job of this function is to turn all LEDʼs off and
numbers are 0 to 9. then turn on the current LED (this is done so fast you
will not see it happening), which is stored in the
In this case, element 3 (ledPin[2]) has the value of variable currentLED.
6 and element 7 (ledPin[6]) has a value of 10.
This variable then has direction added to it. As
You have to tell the size of the array if you do not direction can only be either a 1 or a -1 then the
initialise it with data first. In our sketch we did not number will either increase (+1) or decrease by one
explicitly choose a size as the compiler is able to (currentLED +(-1)).
count the values we have assigned to the array to
work out that the size is 10 elements. If we had We then have an if statement to see if we have
declared the array but not initialised it with values at reached the end of the row of LEDʼs and if so we then
the same time, we would need to declare a size, for reverse the direction variable.
example we could have done this:
By changing the value of ledDelay you can make the
byte ledPin[10]; LED ping back and forth at different speeds. Try
different values to see what happens.
and then loaded data into the elements later on. To
retrieve a value from the array we would do something However, you have to stop the program and manually
like this: change the value of ledDelay then upload the
amended code to see any changes. Wouldnʼt it be
x = ledpin[5]; nice to be able to adjust the speed whilst the program
is running? Yes it would, so letʼs do exactly that in the
In this example x would now hold a value of 8. To get next project by introducing a way to interact with the
back to your program, we have started off by declaring program and adjust the speed using a potentiometer.
and initialising an array and have stored 10 values that
are the digital pins used for the outputs to our 10
LEDʼs.
In our mail loop we check that at least ledDelay milli-
seconds have passed since the last change of LEDʼs
and if so it passes control to our function. The reason
we are only going to pass control to the changeLED()
function in this way, rather than using delay()
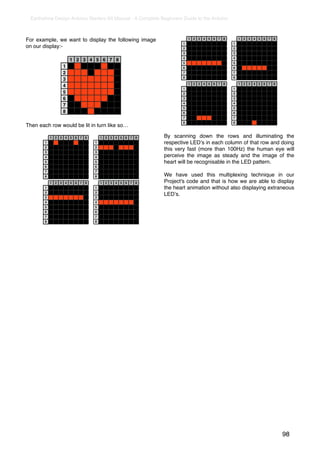
commands, is to allow other code if needed to run in
the main program loop (as long as that code takes
less than ledDelay to run.
42](https://image.slidesharecdn.com/askmanualrev4-111105084311-phpapp02/85/Ask-manual-rev4-42-320.jpg)
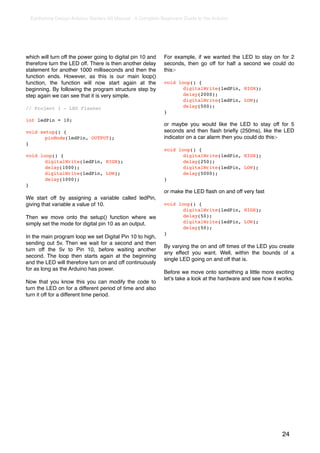
![Earthshine Design Arduino Starters Kit Manual - A Complete Beginners Guide to the Arduino
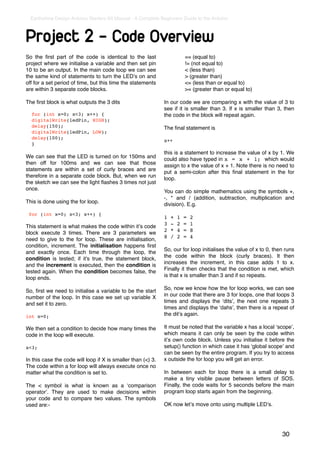
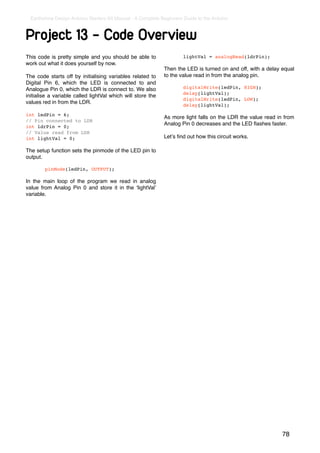
Project 6 - Interactive LED Chase Effect
We are now going to use a string of LEDʼs (10 in total) Enter the code
to make an LED chase effect, similar to that used on
the car KITT in the Knightrider TV Series and on the
way introduce the concept of arrays. // Create array for LED pins
byte ledPin[] = {4, 5, 6, 7, 8, 9, 10,
What you will need 11, 12, 13};
int ledDelay; // delay between changes
int direction = 1;
Parts from previous int currentLED = 0;
project plus.... unsigned long changeTime;
int potPin = 2; // select the input
pin for the potentiometer
4K7 Potentiometer void setup() {
// set all pins to output
for (int x=0; x<10; x++) {
pinMode(ledPin[x], OUTPUT); }
Connect it up changeTime = millis();
}
void loop() {
// read the value from the pot
ledDelay = analogRead(potPin);
// if it has been ledDelay ms since
last change
if ((millis() - changeTime) >
ledDelay) {
changeLED();
changeTime = millis();
}
}
void changeLED() {
// turn off all LED's
for (int x=0; x<10; x++) {
digitalWrite(ledPin[x], LOW);
}
// turn on the current LED
digitalWrite(ledPin[currentLED],
HIGH);
// increment by the direction value
currentLED += direction;
// change direction if we reach the
end
if (currentLED == 9) {direction =
-1;}
This is the same circuit as in Project 5, but we have
if (currentLED == 0) {direction = 1;}
simply added the potentiometer and connected it to
}
5v, Ground and Analog Pin 5.
This time when verify and upload your code, you
should now see the lit LED appear to bounce back
and forth between each end of the string of lights as
before. But, by turning the knob of the potentiometer,
you will change the value of ledDelay and speed up
or slow down the effect.
Letʼs take a look at how this works and find our what a
potentiometer is.
44](https://image.slidesharecdn.com/askmanualrev4-111105084311-phpapp02/85/Ask-manual-rev4-44-320.jpg)
![Earthshine Design Arduino Starters Kit Manual - A Complete Beginners Guide to the Arduino
Project 6 - Code Overview
// Create array for LED pins The code for this Project is almost identical to the
byte ledPin[] = {4, 5, 6, 7, 8, 9, 10, 11, previous project. We have simply added a
12, 13}; potentiometer to our hardware and the code has
int ledDelay; // delay between changes additions to enable us to read the values from the
int direction = 1;
potentiometer and use them to adjust the speed of the
int currentLED = 0;
LED chase effect.
unsigned long changeTime;
int potPin = 2; // select the input pin
for the potentiometer We first declare a variable for the potentiometer pin
void setup() { int potPin = 2;
// set all pins to output
for (int x=0; x<10; x++) { as our potentiometer is connected to analog pin 2. To
pinMode(ledPin[x], OUTPUT); } read the value from an analog pin we use the
changeTime = millis(); analogRead command. The Arduino has 6 analog
} input/outputs with a 10-bit analog to digital convertor
(we will discuss bits later on). This means the analog
void loop() { pin can read in voltages between 0 to 5 volts in integer
// read the value from the pot
values between 0 (0 volts) and 1023 (5 volts). This
ledDelay = analogRead(potPin);
gives a resolution of 5 volts / 1024 units or 0.0049
// if it has been ledDelay ms since last
change volts (4.9mV) per unit.
if ((millis() - changeTime) > ledDelay) {
changeLED(); We need to set our delay using the potentiometer so
changeTime = millis(); we will simply use the direct values read in from the
} pin to adjust the delay between 0 and 1023
} milliseconds. We do this by directly reading the value
of the potentiometer pin into ledDelay. Notice that we
void changeLED() { do not need to set an analog pin to be an input or
// turn off all LED's output like we need to with a digital pin.
for (int x=0; x<10; x++) {
digitalWrite(ledPin[x], LOW);
ledDelay = analogRead(potPin);
}
// turn on the current LED
This is done during our main loop and therefore it is
digitalWrite(ledPin[currentLED], HIGH);
// increment by the direction value constantly being read and adjusted. By turning the
currentLED += direction; knob you can adjust the delay value between 0 and
// change direction if we reach the end 1023 milliseconds (or just over a second) and
if (currentLED == 9) {direction = -1;} therefore have full control over the speed of the effect.
if (currentLED == 0) {direction = 1;}
} OK letʼs find out what a potentiometer is and how it
works.
45](https://image.slidesharecdn.com/askmanualrev4-111105084311-phpapp02/85/Ask-manual-rev4-45-320.jpg)


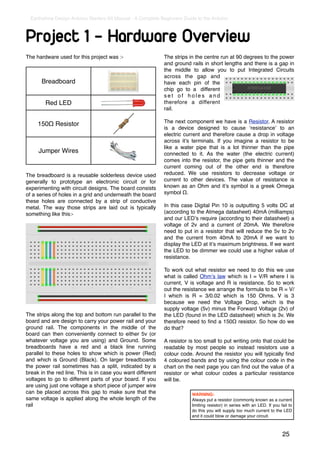
![Earthshine Design Arduino Starters Kit Manual - A Complete Beginners Guide to the Arduino
Project 8 - Mood Lamp
In the last project we saw that we could adjust the Enter the code
brightness of an LED using the PWM capabilities of
the Atmega chip. We will now take advantage of this
capability by using a red, green and blue LED and by // Project 8 - Mood Lamp
mixing their colours to create any colour we wish. float RGB1[3];
From that, we will create a mood lamp similar to the float RGB2[3];
kind you see for sale all over the place nowadays. float INC[3];
int red, green, blue;
What you will need
int RedPin = 11;
int GreenPin = 10;
Red Clear LED int BluePin = 9;
Green Clear LED void setup()
{
Serial.begin(9600);
Blue Clear LED randomSeed(analogRead(0));
3 x 220Ω Resistor RGB1[0] = 0;
RGB1[1] = 0;
RGB1[2] = 0;
Connect it up RGB2[0] = random(256);
RGB2[1] = random(256);
RGB2[2] = random(256);
}
void loop()
{
randomSeed(analogRead(0));
for (int x=0; x<3; x++) {
INC[x] = (RGB1[x] - RGB2[x]) / 256; }
for (int x=0; x<256; x++) {
red = int(RGB1[0]);
green = int(RGB1[1]);
blue = int(RGB1[2]);
analogWrite (RedPin, red);
analogWrite (GreenPin, green);
analogWrite (BluePin, blue);
delay(100);
RGB1[0] -= INC[0];
RGB1[1] -= INC[1];
RGB1[2] -= INC[2];
}
for (int x=0; x<3; x++) {
RGB2[x] = random(556)-300;
RGB2[x] = constrain(RGB2[x], 0, 255);
delay(1000);
}
Get a piece of paper about A5 size, roll it into a }
cylinder then tape it so it remains that way. Then place
the cylinder over the top of the 3 LEDʼs.
When you run this you will see the colours slowly
change. Youʼve just made youʼre own mood lamp.
51](https://image.slidesharecdn.com/askmanualrev4-111105084311-phpapp02/85/Ask-manual-rev4-51-320.jpg)
![Earthshine Design Arduino Starters Kit Manual - A Complete Beginners Guide to the Arduino
Project 8 - Code Overview
The LEDʼs that make up the mood lamp are red, green In the setup function we have
and blue. In the same way that your computer monitor
is made up of tiny red, green and blue (RGB) dots, the randomSeed(analogRead(0));
map can generate different colours by adjusting the
brightness of each of the 3 LEDʼs in such a way to The randomSeed command is used for creating
give us a different RGB value. random (actually pseudo-random) numbers. Computer
chips are not able to produce truly random numbers
An RGB value of 255, 0, 0 would give us pure red. A so they tend to look at data in a part of itʼs memory
value of 0, 255, 0 would give pure green and 0, 0, 255 that may differ or look at a table of different values and
pure blue. By mixing these we can get any colour we use those as a pseudo-random number. By setting a
like with This is the additive colour model. If you were ʻseedʼ, you can tell the computer where in memory or
just turn the LEDʼs ON or OFF (i.e. Not have different in that table to start counting from. In this case the
brightnesses) you would still get different colours as in value we give to the randomSeed is a value read from
this table. Analog Pin 0. As we donʼt have anything connected to
Analog Pin 0 all we will read is a random number
created by analog noise.
Red Green Blue Colour
255 0 0 Red Once we have set a ʻseedʼ for our random number we
can create one using the random() function. We then
0 255 0 Green have two sets of RGB values stored in a 3 element
array. RGB1 is the RGB values we want the lamp to
0 0 255 Blue start with (in this case all zeros or off).
255 255 0 Yellow RGB1[0] = 0;
RGB1[1] = 0;
0 255 255 Cyan
RGB1[2] = 0;
255 0 255 Magenta
Then the RGB2 array is a set of random RGB values
255 255 255 White that we want the lamp to transition to,
RGB2[0] = random(256);
By adjusting the brightnesses using PWM we can get RGB2[1] = random(256);
every other colour in between too. By placing the RGB2[2] = random(256);
LEDʼs close together and by mixing their values, the
light spectra of the 3 colours added together make a In this case we have set them to a random number set
single colour. By diffusing the light with our paper by random(256) which will give is a number between 0
cylinder we ensure the colours are mixed nicely. The and 255 inclusive (as the number will always range
LEDʼs can be placed into any object that will diffuse from zero upwards).
the light or you can bounce the light off a reflective
diffuser. Try putting the lights inside a ping pong ball or If you pass a single number to the random() function
a small white plastic bottle (the thinner the plastic the then it will return a value between 0 and 1 less than
better). the number, e.g. random(1000) will return a number
between 0 and 999. If you supply two numbers as itʼs
The total range of colours we can get using PWM with parameters then it will return a random number
a range of 0 to 255 is 16,777, 216 colours between the lower number inclusive and the maximum
(256x256x256) which is way more than we would ever number (-1). E.g. random(10,100) will return a random
need. number between 10 and 99.
In the code, we start off by declaring some floating In the main program loop we first take a look at the
point arrays and also some integer variables that will start and end RGB values and work out what value is
store our RGB values as well as an increment value. needed as an increment to progress from one value to
the other in 256 steps (as the PWM value can only be
float RGB1[3]; between 0 and 255). We do this with
float RGB2[3];
float INC[3]; for (int x=0; x<3; x++) {
INC[x] = (RGB1[x] - RGB2[x]) / 256; }
int red, green, blue;
52](https://image.slidesharecdn.com/askmanualrev4-111105084311-phpapp02/85/Ask-manual-rev4-52-320.jpg)
![Earthshine Design Arduino Starters Kit Manual - A Complete Beginners Guide to the Arduino
This for loop sets the INCrement values for the R, G The random number is chosen by picking a random
and B channels by working out the difference between number between 0 and 556 (256+300) and then
the two brightness values and dividing that by 256. deducting 300. The reason we do that is to try and
force primary colours from time to time to ensure we
We then have another for loop donʼt always just get pastel shades. We have 300
chances out of 556 in getting a negative number and
for (int x=0; x<256; x++) { therefore forcing a bias towards one or more of the
other two colour channels. The next command makes
red = int(RGB1[0]); sure that the numbers sent to the PWM pins are not
green = int(RGB1[1]); negative by using the constrain() function.
blue = int(RGB1[2]);
The constrain function requires 3 parameters - x, a
analogWrite (RedPin, red);
analogWrite (GreenPin, green); and b as in constrain(x, a, b) where x is the number
analogWrite (BluePin, blue); we want to constrain, a is the lower end of the range
delay(100); and b is the higher end. So, the constrain functions
looks at the value of x and makes sure it is within the
RGB1[0] -= INC[0]; range of a to b. If it is lower than a then it sets it to a, if
RGB1[1] -= INC[1]; it is higher than b it sets it to b. In our case we make
RGB1[2] -= INC[2]; sure that the number is between 0 and 255 which is
} the range or our PWM output.
and this sets the red, green and blue values to the As we use random(556)-300 for our RGB values,
values in the RGB1 array, writes those values to pins some of those values will be lower than zero and the
9, 10 and 11, then deducts the increment value then constrain function makes sure that the value sent to
repeats this process 256 times to slowly fade from one the PWM is not lower than zero.
random colour to the next. The delay of 100ms in
between each step ensures a slow and steady Forcing a bias towards one or more of the other two
progression. You can of course adjust this value if you channels ensures more vibrant and less pastel shades
want it slower or faster or you can add a potentiometer of colour and also ensures that from time to time one
to allow the user to set the speed. or more channels are turned off completely giving a
more interesting change of lights (or moods).
After we have taken 256 slow steps from one random
colour to the next, the RGB1 array will have the same
values (nearly) as the RGB2 array. We now need to
decide upon another set of 3 random values ready for
the next time. We do this with another for loop
for (int x=0; x<3; x++) {
RGB2[x] = random(556)-300;
RGB2[x] = constrain(RGB2[x], 0, 255);
delay(1000);
}
Exercise
See if you can make
the lights cycle throu
rainbow rather than be gh the colours of the
tween random colours.
53](https://image.slidesharecdn.com/askmanualrev4-111105084311-phpapp02/85/Ask-manual-rev4-53-320.jpg)


![Earthshine Design Arduino Starters Kit Manual - A Complete Beginners Guide to the Arduino
Project 10 - Serial Controlled Mood Lamp
We will now use the same circuit as in Project 9, but will now delve into the world of serial communications and
control our lamp by sending commands from the PC to the Arduino using the Serial Monitor in the Arduino IDE.
This project also introduces how we manipulate text strings. So leave the hardware set up the same as before
and enter the new code.
Enter the code
// Project 10 - Serial controlled RGB Lamp
char buffer[18];
int red, green, blue;
int RedPin = 11;
int GreenPin = 10;
int BluePin = 9;
void setup()
{
Serial.begin(9600);
Serial.flush();
pinMode(RedPin, OUTPUT);
pinMode(GreenPin, OUTPUT);
pinMode(BluePin, OUTPUT);
}
void loop()
{
if (Serial.available() > 0) {
int index=0;
delay(100); // let the buffer fill up
int numChar = Serial.available();
if (numChar>15) {
numChar=15;
}
while (numChar--) {
buffer[index++] = Serial.read();
}
splitString(buffer);
}
}
void splitString(char* data) {
Serial.print("Data entered: ");
Serial.println(data);
char* parameter;
parameter = strtok (data, " ,");
while (parameter != NULL) {
setLED(parameter);
parameter = strtok (NULL, " ,");
}
// Clear the text and serial buffers
for (int x=0; x<16; x++) {
buffer[x]='0';
}
Serial.flush();
}
(continued on next page.......)
58](https://image.slidesharecdn.com/askmanualrev4-111105084311-phpapp02/85/Ask-manual-rev4-58-320.jpg)
![Earthshine Design Arduino Starters Kit Manual - A Complete Beginners Guide to the Arduino
(continued from previous page.......)
void setLED(char* data) {
if ((data[0] == 'r') || (data[0] == 'R')) {
int Ans = strtol(data+1, NULL, 10);
Ans = constrain(Ans,0,255);
analogWrite(RedPin, Ans);
Serial.print("Red is set to: ");
Serial.println(Ans);
}
if ((data[0] == 'g') || (data[0] == 'G')) {
int Ans = strtol(data+1, NULL, 10);
Ans = constrain(Ans,0,255);
analogWrite(GreenPin, Ans);
Serial.print("Green is set to: ");
Serial.println(Ans);
}
if ((data[0] == 'b') || (data[0] == 'B')) {
int Ans = strtol(data+1, NULL, 10);
Ans = constrain(Ans,0,255);
analogWrite(BluePin, Ans);
Serial.print("Blue is set to: ");
Serial.println(Ans);
}
}
Once youʼve verified the code, upload it to your The input text is designed to accept both a lower-
Arduino. case or upper-case R, G and B and then a value
from 0 to 255. Any values over 255 will be dropped
Now when you upload the program nothing seems to down to 255 maximum. You can enter a comma or a
happen. This is because the program is waiting for space in between parameters and you can enter 1, 2
your input. Start the Serial Monitor by clicking itʼs icon or 3 LED values at any one time.
in the Arduino IDE taskbar.
E.g.
In the Serial Monitor text window you can now enter
the R, G and B values for each of the 3 LEDʼs r255 b100
manually and the LEDʼs will change to the colour you
have input. r127 b127 g127
E.g. If you enter R255 the Red LED will display at full G255, B0
brightness.
B127, R0, G255
If you enter R255, G255, then both the red and green
LEDʼs will display at full brightness. Etc.
Now enter R127, G100, B255 and you will get a nice
purplish colour.
If you type, r0, g0, b0 all the LEDʼs will turn off.
59](https://image.slidesharecdn.com/askmanualrev4-111105084311-phpapp02/85/Ask-manual-rev4-59-320.jpg)
![Earthshine Design Arduino Starters Kit Manual - A Complete Beginners Guide to the Arduino
Project 10 - Code Overview
This project introduces a whole bunch of new met and the code within the if statements code block
concepts, including serial communication, pointers is now executed.
and string manipulation. So, hold on to your hats this
will take a lot of explaining. if (Serial.available() > 0) {
int index=0;
First we set up an array of char (characters) to hold delay(100); // let the buffer fill up
int numChar = Serial.available();
our text string. We have made it 18 characters long,
if (numChar>15) {
whichis longer than the maximum of 16 we will allow numChar=15;
to ensure we donʼt get “buffer overflow” errors. }
while (numChar--) {
char buffer[18]; buffer[index++] = Serial.read();
}
We then set up the integers to hold the red, green splitString(buffer);
and blue values as well as the values for the digital }
pins. }
int red, green, blue; An integer called index is declared and initialised as
zero. This integer will hold the position of a pointer to
int RedPin = 11; the characters within the char array.
int GreenPin = 10;
int BluePin = 9; We then set a delay of 100. The purpose of this is to
ensure that the serial buffer (the place in memory
In our setup function we set the 3 digital pins to be where the serial data that is received is stored prior
outputs. But, before that we have the Serial.begin to processing) is full before we carry on and process
command. the data. If we donʼt do that, it is possible that the
function will execute and start to process the text
void setup()
string, before we have received all of the data. The
{
serial communications line is very slow compared to
Serial.begin(9600);
Serial.flush(); the speed the rest of the code is executing at. When
pinMode(RedPin, OUTPUT); you send a string of characters the Serial.available
pinMode(GreenPin, OUTPUT); function will immediately have a value higher than
pinMode(BluePin, OUTPUT); zero and the if function will start to execute. If we
} didnʼt have the delay(100) statement in there it could
start to execute the code within the if statement
Serial.begin tells the Arduino to start serial before all of the text string had been received and the
communications and the number within the serial data may only be the first few characters of the
parenthesis, in this case 9600, sets the baud rate line of text entered.
(characters per second) that the serial line will
communicate at. After we have waited for 100ms for the serial buffer
to fill up with the data sent, we then declare and
The Serial.flush command will flush out any initialise the numChar integer to be the number of
characters that happen to be in the serial line so that characters within the text string.
it is empty and ready for input/output.
E.g. If we sent this text in the Serial Monitor:
The serial communications line is simply a way for
the Arduino to communicate with the outside world, in R255, G255, B255
this case to and from the PC and the Arduino IDEʼs
Serial Monitor. Then the value of numChar would be 17. It is 17 and
not 16 as at the end of each line of text there is an
In the main loop we have an if statement. The invisible character called a NULL character. This is a
condition it is checking for is ʻnothingʼ symbol and simply tells the Arduino that the
end of the line of text has been reached.
if (Serial.available() > 0) {
The next if statement checks if the value of numChar
The Serial.available command checks to see if any is greater than 15 or not and if so it sets it to be 15.
characters have been sent down the serial line. If any This ensures that we donʼt overflow the array char
characters have been received then the condition is buffer[18];
60](https://image.slidesharecdn.com/askmanualrev4-111105084311-phpapp02/85/Ask-manual-rev4-60-320.jpg)
![Earthshine Design Arduino Starters Kit Manual - A Complete Beginners Guide to the Arduino
After this comes a while command. This is something splitString(buffer);
we havenʼt come across before so let me explain.
Which is a call to one of the two functions we have
We have already used the for loop, which will loop a created and called splitString(). The function looks
set number of times. The while statement is also a like this:
loop, but one that executes only while a condition is
true. void splitString(char* data) {
Serial.print("Data entered: ");
The syntax is Serial.println(data);
char* parameter;
parameter = strtok (data, " ,");
while(expression) {
while (parameter != NULL) {
! // statement(s)
setLED(parameter);
}
parameter = strtok (NULL, " ,");
}
In our code the while loop is
// Clear the text and serial buffers
while (numChar--) { for (int x=0; x<16; x++) {
buffer[index++] = Serial.read(); buffer[x]='0';
} }
Serial.flush();
The condition it is checking is simply numChar, so in }
other words it is checking that the value stored in the
integer numChar is not zero. numChar has -- after it. We can see that the function returns no data, hence
This is what is known as a post-decrement. In other itʼs data type has been set to void. We pass the
words, the value is decremented AFTER it is used. If function one parameter and that is a char data type
we had used --numChar the value in numChar would that we have called data. However, in the C and C++
be decremented (have one subtracted from it) before programming languages you are not allowed to send
it was evaluated. In our case, the while loop checks a character array to a function. We have got around
the value of numChar and then subtracts one from it. that by using a pointer. We know we have used a
If the value of numChar was not zero before the pointer as an asterisk ʻ*ʼ has been added to the
decrement, it then carries out the code within its code variable name *data. Pointers are quite an advanced
block. subject in C so we wonʼt go into too much detail
about them. All you need to know for now is that by
numChar is set to the length of the text string that we declaring ʻdataʼ as a pointer it is simply a variable that
have entered into the Serial Monitor window. So, the points to another variable.
code within the while loop will execute that many
times. You can either point it to the address that the variable
is stored within memory by using the & symbol, or in
The code within the while loop is our case, to the value stored at that memory address
using the * symbol. We have used it to ʻcheatʼ the
buffer[index++] = Serial.read(); system, as we are not allowed to send a character
array to a function. However we are allowed to send
Which sets each element of the buffer array to each a pointer to a character array to our function. So, we
character read in from the Serial line. In other words, have declared a variable of data type Char and called
it fills up the buffer array with the letters we have it data, but the * symbol before it means that it is
entered into the Serial Monitorʼs text window. ʻpointing toʼ the value stored within the ʻbufferʼ
variable.
The Serial.read() command reads incoming serial
data, one byte at a time. When we called splitString we sent it the contents of
ʻbufferʼ (actually a pointer to it as we saw above).
So now that our character array has been filled with
the characters we entered in the Serial Monitor the splitString(buffer);
while loop will end once numChar reaches zero (i.e.
The length of the string). So we have called the function and passed it the
entire contents of the buffer character array.
After the while loop we have
The first command is
61](https://image.slidesharecdn.com/askmanualrev4-111105084311-phpapp02/85/Ask-manual-rev4-61-320.jpg)

![Earthshine Design Arduino Starters Kit Manual - A Complete Beginners Guide to the Arduino
Which we will look at later on. Then it sets the if ((data[0] == 'r') || (data[0] == 'R'))
variable ʻparameterʼ to the next part of the string up {
to the next space or comma. We do this by passing int Ans = strtol(data+1, NULL, 10);
to strtok a NULL parameter Ans = constrain(Ans,0,255);
analogWrite(RedPin, Ans);
Serial.print("Red is set to: ");
parameter = strtok (NULL, " ,");
Serial.println(Ans);
}
This tells the strtok command to carry on where it last if ((data[0] == 'g') || (data[0] == 'G'))
left off. {
int Ans = strtol(data+1, NULL, 10);
So this whole part of the function Ans = constrain(Ans,0,255);
analogWrite(GreenPin, Ans);
char* parameter; Serial.print("Green is set to: ");
parameter = strtok (data, " ,"); Serial.println(Ans);
while (parameter != NULL) { }
setLED(parameter); if ((data[0] == 'b') || (data[0] == 'B'))
parameter = strtok (NULL, " ,"); {
} int Ans = strtol(data+1, NULL, 10);
Ans = constrain(Ans,0,255);
is simply stripping out each part of the text string that analogWrite(BluePin, Ans);
is separated by spaces or commas and sending that Serial.print("Blue is set to: ");
part of the string to the next function called setLED(). Serial.println(Ans);
}
}
The final part of this function simply fills the buffer
array with NULL character, which is done with the /0
symbol and then flushes the Serial data out of the
We can see that this function contains 3 very similar
Serial buffer ready for the next set of data to be
if statements. We will therefore take a look at just one
entered.
of them as the other 2 are almost identical.
// Clear the text and serial buffers
for (int x=0; x<16; x++) { if ((data[0] == 'r') || (data[0] == 'R')) {
buffer[x]='0'; int Ans = strtol(data+1, NULL, 10);
} Ans = constrain(Ans,0,255);
Serial.flush(); analogWrite(RedPin, Ans);
Serial.print("Red is set to: ");
Serial.println(Ans);
The setLED function is going to take each part of the
}
text string and set the corresponding LED to the
colour we have chosen. So, if the text string we enter
The if statement checks that the first character in the
is
string data[0] is either the letter r or R (upper case
and lower case characters are totally different as far
! G125 B55
as C is concerned. We use the logical OR command
whose symbol is || to check if the letter is an r OR an
Then the splitString() function splits that into the two
R as either will do.
separate components
If it is an r or an R then the if statement knows we
! G125
wish to change the brightness of the Red LED and so
! B55
the code within executes. First we declare an integer
called Ans (which has scope local to the setLED
and send that shortened text string onto the setLED()
function only) and use the strtol (String to long
function, which will read it, decide what LED we have
integer) command to convert the characters after the
chosen and set it to the corresponding brightness
letter R to an integer. The strtol command takes 3
value.
parameters and these are the string we are passing
it, a pointer to the character after the integer (which
So letʼs take a look at the second function called
we donʼt use as we have already stripped the string
setLED().
using the strtok command and hence pass a NULL
character) and then the ʻbaseʼ, which in our case is
void setLED(char* data) {
base 10 as we are using normal decimal numbers
63](https://image.slidesharecdn.com/askmanualrev4-111105084311-phpapp02/85/Ask-manual-rev4-63-320.jpg)
![Earthshine Design Arduino Starters Kit Manual - A Complete Beginners Guide to the Arduino
(as opposed to binary, octal or hexadecimal which exactly the same but for the Green and the Blue
would be base 2, 8 and 16 respectively). So in other LEDʼs.
words we declare an integer and set it to the value of
the text string after the letter R (or the number bit). We have covered a lot of ground and a lot of new
concepts in this project. To make sure you
Next we use the constrain command to make sure understand exactly what is going on in this code I am
that Ans goes from 0 to 255 and no more. We then going to set the project code side by side with
carry out an analogWrite command to the red pin and pseudo-code (an fake computer language that is
send it the value of Ans. The code then sends out essentially the computer language translated into a
“Red is set to: “ followed by the value of Ans back to language humans can understand).
the Serial Monitor. The other two if statements do
The C Programming Language Pseudo-Code
// Project 10 - Serial controlled RGB Lamp A comment with the project number and name
char buffer[18]; Declare a character array of 18 letters
int red, green, blue; Declare 3 integers called red, green and blue
int RedPin = 11; An integer for which pin to use for Red LED
int GreenPin = 10; “ “ Green
int BluePin = 9; “ “ Blue
void setup() The setup function
{
Serial.begin(9600); Set serial comms to run at 9600 chars per second
Serial.flush(); Flush the serial line
pinMode(RedPin, OUTPUT); Set the red led pin to be an output pin
pinMode(GreenPin, OUTPUT); Same for green
pinMode(BluePin, OUTPUT); And blue
}
void loop() The main program loop
{
if (Serial.available() > 0) { If data is sent down the serial line...
int index=0; Declare integer called index and set to 0
delay(100); // let the buffer fill up Wait 100 millseconds
int numChar = Serial.available(); Set numChar to the incoming data from serial
if (numChar>15) { If numchar is greater than 15 characters...
numChar=15; Make it 15 and no more
}
while (numChar--) { While numChar is not zero (subtract 1 from it)
buffer[index++] = Serial.read(); Set element[index] to value read in (add 1)
}
splitString(buffer); Call splitString function and send it data in
} buffer
}
void splitString(char* data) { The splitstring function references buffer data
Serial.print("Data entered: "); Print “Data entered: “
Serial.println(data); Print value of data and then drop down a line
char* parameter; Declare char data type parameter
parameter = strtok (data, " ,"); Set it to text up to the first space or comma
while (parameter != NULL) { While contents of parameter are not empty..
setLED(parameter); ! Call the setLED function
parameter = strtok (NULL, " ,"); Set parameter to next part of text string
}
// Clear the text and serial buffers Another comment
for (int x=0; x<16; x++) { We will do the next line 16 times
buffer[x]='0'; Set each element of buffer to NULL (empty)
}
Serial.flush(); Flush the serial comms
}
Continued on next page......
64](https://image.slidesharecdn.com/askmanualrev4-111105084311-phpapp02/85/Ask-manual-rev4-64-320.jpg)
![Earthshine Design Arduino Starters Kit Manual - A Complete Beginners Guide to the Arduino
The C Programming Language Pseudo-Code
(continued from previous page.......)
void setLED(char* data) { A function called setLED is passed buffer
if ((data[0] == 'r') || (data[0] == 'R')) { If first letter is r or R...
int Ans = strtol(data+1, NULL, 10); Set integer Ans to number in next part of text
Ans = constrain(Ans,0,255); Make sure it is between o and 255
analogWrite(RedPin, Ans); Write that value out to the red pin
Serial.print("Red is set to: "); Print out “Red is set to: “
Serial.println(Ans); And then the value of Ans
}
if ((data[0] == 'g') || (data[0] == 'G')) { If first letter is g or G...
int Ans = strtol(data+1, NULL, 10); Set integer Ans to number in next part of text
Ans = constrain(Ans,0,255); Make sure it is between o and 255
analogWrite(GreenPin, Ans); Write that value out to the green pin
Serial.print("Green is set to: "); Print out “Green is set to: “
Serial.println(Ans); And then the value of Ans
}
if ((data[0] == 'b') || (data[0] == 'B')) { If first letter is b or B...
int Ans = strtol(data+1, NULL, 10); Set integer Ans to number in next part of text
Ans = constrain(Ans,0,255); Make sure it is between o and 255
analogWrite(BluePin, Ans); Write that value out to the blue pin
Serial.print("Blue is set to: "); Print out “Blue is set to: “
Serial.println(Ans); And then the value of Ans
}
}
Hopefully you can use this ʻpseudo-codeʼ to make We are now going to leave LEDʼs behind for a little
sure you understand exactly what is going on in this while and look at how to makes sounds with your
projects code. Arduino.
65](https://image.slidesharecdn.com/askmanualrev4-111105084311-phpapp02/85/Ask-manual-rev4-65-320.jpg)

![Earthshine Design Arduino Starters Kit Manual - A Complete Beginners Guide to the Arduino
Project 11 - Piezo Sounder Melody Player
In this project we are going to use a super simple
circuit to produce sounds from our Arduino using a Connect it up
Piezo Sounder.
What you will need
Piezo Disc
Terminal Block
(courtesy of http://www.arduino.cc/en/Tutorial/Melody)
// Project 11 - Melody Player
When you run this code the
int speakerPin = 9;
int length = 15; // the number of notes Arduino will play a very nice
char notes[] = "ccggaagffeeddc "; // a space represents a rest (yeah ok itʼs terrible) rendition
int beats[] = { 1, 1, 1, 1, 1, 1, 2, 1, 1, 1, 1, 1, 1, 2, 4 }; of ʻTwinkle Twinkle Little Starʼ.
int tempo = 300; Sounding very similar to those
annoying birthday cards you
void playTone(int tone, int duration) {
for (long i = 0; i < duration * 1000L; i += tone * 2) { can buy that play a tune when
digitalWrite(speakerPin, HIGH); you open it up.
delayMicroseconds(tone);
digitalWrite(speakerPin, LOW); Letʼs take a look at this code
delayMicroseconds(tone);
and see how it works and find
}
} out what a piezo disc is.
void playNote(char note, int duration) {
char names[] = { 'c', 'd', 'e', 'f', 'g', 'a', 'b', 'C' };
int tones[] = { 1915, 1700, 1519, 1432, 1275, 1136, 1014, 956 };
// play the tone corresponding to the note name
for (int i = 0; i < 8; i++) {
if (names[i] == note) {
playTone(tones[i], duration);
}
}
}
void setup() {
pinMode(speakerPin, OUTPUT);
}
void loop() {
for (int i = 0; i < length; i++) {
if (notes[i] == ' ') {
delay(beats[i] * tempo); // rest
} else {
playNote(notes[i], beats[i] * tempo);
}
// pause between notes
delay(tempo / 2);
}
}
67](https://image.slidesharecdn.com/askmanualrev4-111105084311-phpapp02/85/Ask-manual-rev4-67-320.jpg)
![Earthshine Design Arduino Starters Kit Manual - A Complete Beginners Guide to the Arduino
Project 11 - Code Overview
In this project we are making sounds using a piezo As you can see, the first if statement has as itʼs
disc. A piezo disc can do nothing more than make a condition, that the array element [i] that the element
click when we apply a voltage to it. So to get the contains a space character.
tones we can hear out of it we need to make it click
many times a second fast enough that it becomes a if (notes[i] == ' ')
recognisable note.
If this is TRUE then the code within itʼs block is
The program starts off by setting up the variables we executed.
need. The piezo sounders positive (red) cable is delay(beats[i] * tempo); // rest
attached to Pin 9.
and this simply works out the value of beats[i] *
int speakerPin = 9;
tempo and causes a delay of that length to cause a
The tune we are going to play is made up of 15 rest in the notes. We then have an else statement.
notes.
else {
playNote(notes[i], beats[i] * tempo);
int length = 15; // the number of notes
}
The notes of the tune are stored in a character array
as a text string. After an if statement we can extend it with an else
statement. An else statements is carried out if the
char notes[] = "ccggaagffeeddc "; condition within the if statement is false. So, for
example. Letʼs say we had an integer called test and
Another array, this time of integers, is set up to store itʼs value was 10 and this if/else statement:
the length of each note.
if (test == 10) {
int beats[] = { 1, 1, 1, 1, 1, 1, 2, 1, 1, 1, 1, digitalWrite(ledPin, HIGH)
1, 1, 2, 4 }; } else {
digitalWrite(ledPin, LOW)
And finally we set a tempo for the tune to be played }
at,
Then if ʻtestʼ had a value of 10 (which it does) the
int tempo = 300; ledPin would be set to HIGH. If the value of test was
anything other than 10, the code within the else
Next you will notice that we declare two functions
statement would be carried out instead and the
before our setup() and loop() functions. It doesnʼt
ledPin would be set to LOW.
matter if we put our own functions before or after
setup() and loop(). When the program runs, the code
The else statement calls a function called playNote
within these two functions will not run before setup()
and passes two parameters. The first parameter is
runs as we have not called those functions yet.
the value of notes[i] and the second is the value
calculated from beats[i] * tempo.
Letʼs look at the setup and loop functions before we
look at the playTone and playNote functions. playNote(notes[i], beats[i] * tempo);
All that happens in setup() is we assign the speaker After if/else statement has been carried out, there is
pin (9) as an output. a delay whose value is calculated by dividing tempo
by 2.
void setup() {
pinMode(speakerPin, OUTPUT); delay(tempo / 2);
}
Let us now take a look at the two functions we have
In the main program loop we have an if/else
created for this project.
statement inside a for loop.
for (int i = 0; i < length; i++) {
if (notes[i] == ' ') {
delay(beats[i] * tempo); // rest
} else {
playNote(notes[i], beats[i] * tempo);
}
68](https://image.slidesharecdn.com/askmanualrev4-111105084311-phpapp02/85/Ask-manual-rev4-68-320.jpg)
![Earthshine Design Arduino Starters Kit Manual - A Complete Beginners Guide to the Arduino
The first function that is called from the main program corresponding tone using in the tones[] array using a
loop is playNote. note length of ʻdurationʼ.
void playNote(char note, int duration) { The second function is called playTone.
char names[] = { 'c', 'd', 'e', 'f', 'g', 'a',
'b', 'C' };
void playTone(int tone, int duration) {
int tones[] = { 1915, 1700, 1519, 1432, 1275,
for (long i = 0; i < duration * 1000L; i +=
1136, 1014, 956 };
tone * 2) {
// play the tone corresponding to the note name
digitalWrite(speakerPin, HIGH);
for (int i = 0; i < 8; i++) {
delayMicroseconds(tone);
if (names[i] == note) {
digitalWrite(speakerPin, LOW);
playTone(tones[i], duration);
delayMicroseconds(tone);
}
}
}
}
}
Two parameters have been passed to the function Two parameters are passed to this function. The first
and within the function these have been given the is the tone (in kilohertz) that we want the piezo
names note (character) and duration (integer). speaker to reproduce and the second is the duration
(made up by calculating beats[i] * tempo.
The function sets up a local variable array of data
type char called ʻnamesʼ. This variable has local The function starts a for loop
scope so is only visible to this function and not
for (long i = 0; i < duration * 1000L; i += tone
outside of it. * 2)
This array stores the names of the notes from middle As each for loop must be of a different length to
C to high C. make each note the same length (as the delay differs
between clicks to produce the desired frequency) the
We then create another array of data type integer for loop will run to ʻdurationʼ multiplied by 1000 and
and this array stores numbers that correspond to the the increment of the loop is the value of ʻtoneʼ
frequency of the tones, in Kilohertz, of each of the multiplied by 2.
notes in the names[] array.
Inside the for loop we simply make the pin connected
int tones[] = { 1915, 1700, 1519, 1432, 1275,
1136, 1014, 956 }; to the piezo speaker go high, wait a short period of
time, then go low, then wait another short period of
After setting up the two arrays there is a for loop that time, then repeat.
looks through the 8 notes in the names[] array and
digitalWrite(speakerPin, HIGH);
compares it to the note sent to the function. delayMicroseconds(tone);
digitalWrite(speakerPin, LOW);
for (int i = 0; i < 8; i++) { delayMicroseconds(tone);
if (names[i] == note) {
playTone(tones[i], duration);
} These repetitive clicks, of different lengths and with
} different pauses (of only microseconds in length) in
between clicks, makes the piezo produce a tone of
The tune that is sent to this function is varying frequencies.
ʻccggaagffeeddc’ so the first note will be a middle C.
The for loop compares that note with the notes in the
names[] array and if there is a match, calls up the
second function, called playTone, to play the
69](https://image.slidesharecdn.com/askmanualrev4-111105084311-phpapp02/85/Ask-manual-rev4-69-320.jpg)


![Earthshine Design Arduino Starters Kit Manual - A Complete Beginners Guide to the Arduino
Enter the Code
// Project 16
#include <TimerOne.h>
//Pin connected to Pin 12 of 74HC595 (Latch)
int latchPin = 8;
//Pin connected to Pin 11 of 74HC595 (Clock)
int clockPin = 12;
//Pin connected to Pin 14 of 74HC595 (Data)
int dataPin = 11;
uint8_t led[8];
long counter1 = 0;
long counter2 = 0;
void setup() {
//set pins to output
pinMode(latchPin, OUTPUT);
pinMode(clockPin, OUTPUT);
pinMode(dataPin, OUTPUT);
led[0] = B11111111;
led[1] = B10000001;
led[2] = B10111101;
led[3] = B10100101;
led[4] = B10100101;
led[5] = B10111101;
led[6] = B10000001;
led[7] = B11111111;
Timer1.initialize(10000);
Timer1.attachInterrupt(screenUpdate);
}
void loop() {
counter1++;
if (counter1 >=100000) {counter2++;}
if (counter2 >= 10000) {
counter1 = 0;
counter2 = 0;
for (int i=0; i<8; i++) {
led[i]= ~led[i];
}
}
}
void screenUpdate() {
uint8_t row = B00000001;
for (byte k = 0; k < 9; k++) {
// Open up the latch ready to receive data
! digitalWrite(latchPin, LOW);
shiftIt(~row );
shiftIt(led[k] ); // LED array
// Close the latch, sending the data in the registers out to the
matrix
digitalWrite(latchPin, HIGH); row = row << 1;
}
}
95](https://image.slidesharecdn.com/askmanualrev4-111105084311-phpapp02/85/Ask-manual-rev4-95-320.jpg)
![Earthshine Design Arduino Starters Kit Manual - A Complete Beginners Guide to the Arduino
Project 16 - Code Overview
The code for this project uses a feature of the Atmega led[0] = B11111111;
chip called a Hardware Timer. This is essentially a led[1] = B10000001;
timer on the chip that can be used to trigger an event. led[2] = B10111101;
In our case we are setting our ISR (Interrupt Service led[3] = B10100101;
led[4] = B10100101;
Routine) to fire every 10000 microseconds, which is
led[5] = B10111101;
every 100th of a second. led[6] = B10000001;
led[7] = B11111111;
We make use of a library that has already been written
for us to enable easy use of interrupts and this is the By looking at the array above you can make out the
TimerOne library. TimerOne makes creating an ISR image that will be displayed, which is a box within a
very easy. We simply tell the function what the interval box. You can, of course, adjust the 1ʼs and 0ʼs yourself
is, in this case 10000 microseconds, and the name of to make any 8x8 sprite you wish.
the function we wish to activate every time the
interrupt is fired, in our case this is the ʻscreenUpdateʼ After this the Timer1 function is used. First, the
function. function needs to be initialised with the frequency it
will be activated at. In this case we set its period to
TimerOne is an external library and we therefore need 10000 microseconds, or 1/100th of a second. Once the
to include it in our code. This is easily done using the interrupt has been initialised we need to attach to the
include command. interrupt a function that will be executed every time the
time period is reached. This is the ʻscreenUpdateʼ
#include <TimerOne.h> function which will fire every 1/100th of a second.
After this the pins used to interface with the shift Timer1.initialize(10000);
registers are declared. Timer1.attachInterrupt(screenUpdate);
//Pin connected to Pin 12 of 74HC595 (Latch) In the main loop we set a counter that counts to
int latchPin = 8; 1,000,000,000 to create a delay. This is done by two
//Pin connected to Pin 11 of 74HC595 (Clock) loops, one that loops 100,000 times and the other one
int clockPin = 12; that loops 10,000 times. I have done it this way,
//Pin connected to Pin 14 of 74HC595 (Data)
instead of using delay() as the current version of the
int dataPin = 11;
Timer1 library seems to interfere with the delay
function. You may try delay() instead and see if it
We now create an array of type uint8_t that has 8
works (updates to the libraries are occurring from time
elements and two counters of type long. An uint8_t is
to time). counter1 and counter2 are reset to zero once
simply the same as a byte. It is an unsigned integer of
they reach their targets.
8 bits.
void loop() {
uint8_t led[8]; counter1++;
long counter1 = 0; if (counter1 >=100000) {counter2++;}
long counter2 = 0; if (counter2 >= 10000) {
counter1 = 0;
The led[8] array will be used to store the image we are counter2 = 0;
going to display on the Dot Matrix display. The
counters will be used to create a delay. Once the end of the delay is reached, a for loop cycles
through each of the 8 elements of the led array and
In the setup routine we set the latch, clock and data inverts the contents using the ~ or NOT bitwise
pins as outputs. operator.
void setup() { for (int i=0; i<8; i++) {
//set pins to output led[i]= ~led[i];
pinMode(latchPin, OUTPUT); }
pinMode(clockPin, OUTPUT); }
pinMode(dataPin, OUTPUT); }
Once the pins have been set to outputs, the led array This simply turns the binary image into a negative of
is loaded with the 8-bit binary images that will be itself by turning all 1ʼs to 0ʼs and all 0ʼs to 1ʼs.
displayed in each row of the 8x8 Dot Matrix Display.
99](https://image.slidesharecdn.com/askmanualrev4-111105084311-phpapp02/85/Ask-manual-rev4-99-320.jpg)
![Earthshine Design Arduino Starters Kit Manual - A Complete Beginners Guide to the Arduino
We now have the screenUpdate function. This is the Once we have shifted out that current rows 8 bits the
function that the interrupt is activating every 100th of a value in row is bitshifted left 1 place so that the next
second. This whole routine is very important as it is row is displayed.
responsible for ensuring our LEDʼs in the DOt Matrix
array are lit correctly and displays the image we wish row = row << 1;
to convey. It is a very simple but very effective
function. Remember from the hardware overview that the
multiplexing routine is only displaying one row at a
void screenUpdate() { time, turning it off and then displaying the next row.
uint8_t row = B00000001; This is done at 100Hz which is too fast for the human
for (byte k = 0; k < 9; k++) { eye to see the flicker.
// Open up the latch ready to receive
data Finally, we have a ShiftOut function, the same as in
! digitalWrite(latchPin, LOW);
the previous Shift Register based projects, that sends
shiftIt(~row );
the data out to the 74HC595 chips.
shiftIt(led[k] ); // LED array
void shiftIt(byte dataOut)
// Close the latch, sending the data in
the registers out to the matrix
digitalWrite(latchPin, HIGH); row = row So, the basic concept here is that we have an interruot
<< 1; routine that executes every 100th of a second. In that
} routine we simply take a look at the contents of a
} screen buffer array (in this case led[] ) and display it
on the dot matrix unit one row at a time, but do this so
An 8 bit integer called ʻrowʼ is declared and initialised fast that to the human eye it all seems to be lit at once.
with the value B00000001.
The main loop of the program is simply changing the
uint8_t row = B00000001; contents of the screen buffer array and letting the ISR
do the rest.
We now simply cycle through the led array and send
that data out to the Shift Registers preceded by the The animation in this project is very simple, but by
row (which is processed with the bitwise NOT ~ to manipulating the 1ʼs and 0ʼs in the buffer we can make
make sure the row we want to display is turned off, or anything we like appear on the Dot Matrix unit from
grounded). shapes to scrolling text.
for (byte k = 0; k < 9; k++) {
// Open up the latch ready to receive
data
! digitalWrite(latchPin, LOW);
shiftIt(~row );
shiftIt(led[k] ); // LED array
100](https://image.slidesharecdn.com/askmanualrev4-111105084311-phpapp02/85/Ask-manual-rev4-100-320.jpg)


This document is an instruction manual for an Arduino starter kit published by Earthshine Electronics. It provides a complete beginner's guide to using the Arduino microcontroller. The manual is published under a Creative Commons license that allows sharing and copying with attribution, but not for commercial purposes. It is regularly revised and updated by Earthshine Electronics and the original author Mike McRoberts.