More Related Content
Similar to Applet 5 class_inheritance
Similar to Applet 5 class_inheritance (20)
More from Nitigan Nakjuatong
More from Nitigan Nakjuatong (19)
Applet 5 class_inheritance
- 1. การออกแบบ Class แบบ Inheritance ssc
การออกแบบ Class แบบ Inheritance คือ ...........................................................................................................................
............................................................................................................................................................................................
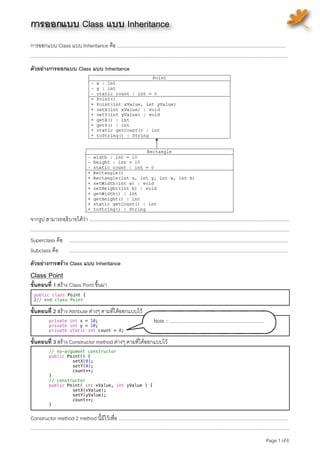
ตัวอยางการออกแบบ Class แบบ Inheritance
จากรูป สามารถอธิบายไดวา ..................................................................................................................................................
.............................................................................................................................................................................................
Superclass คือ7 ................................................................................................................................................................
Subclass คือ7 ................................................................................................................................................................
ตัวอยางการสราง Class แบบ Inheritance
Class Point
ขั้นตอนที่ 1 สราง Class Point ขึ้นมา
public class Point {
}// end class Point
ขั้นตอนที่ 2 สราง Attribute ตางๆ ตามที่ไดออกแบบไว
! private int x = 10; Note :: .....................................................................
! private int y = 10;
! private static int count = 0;
ขั้นตอนที่ 3 สราง Constructor method ตางๆ ตามที่ไดออกแบบไว
! // no-argument constructor
! public Point() {
! ! setX(0);
! ! setY(0);
! ! count++;
! }
! // constructor
! public Point( int xValue, int yValue ) {
! ! setX(xValue);
! ! setY(yValue);
! ! count++;
! }
Constructor method 2 method นี้มีไวเพื่อ ............................................................................................................................
.............................................................................................................................................................................................
Page 1 of 6
- 2. ขั้นตอนที่ 4 สราง “set” method ตางๆ ตามที่ไดออกแบบไว
! // set x in coordinate pair
! public void setX( int xValue ) {
! ! x = xValue; // no need for validation
! }
! // set y in coordinate pair
! public void setY( int yValue ) {
! ! y = yValue; // no need for validation
! }
“set” method 2 method นี้มีไวเพื่อ ........................................................................................................................................
.............................................................................................................................................................................................
ขั้นตอนที่ 5 สราง “get” method ตางๆ ตามที่ไดออกแบบไว
! // return x from coordinate pair
! public int getX() {
! ! return x;
! }
! // return y from coordinate pair
! public int getY() {
! ! return y;
! }
“get” method 2 method นี้มีไวเพื่อ .......................................................................................................................................
.............................................................................................................................................................................................
ขั้นตอนที่ 6 สราง Facilities method ตางๆ ตามที่ไดออกแบบไว
! public static int getCount() {
! ! return count;
! }
! // return String representation of Point object
! public String toString() {
! ! return "[" + getX() + ", " + getY() + "]";
! }!
// finalizer
! protected void finalize() {
! ! count--;
! }
Facilities method 3 method นี้มีไวเพื่อ .................................................................................................................................
.............................................................................................................................................................................................
.............................................................................................................................................................................................
ขั้นตอนที่ 7 ทำการ Compile
โดยใชคำสั่ง ..........................................................................................................................................................................
ผลลัพธที่ได ..........................................................................................................................................................................
ขั้นตอนที่ 8 ทดสอบการทำงานของ Class Point เพียง Class เดียวกอน
1) สราง testPoint.html เอาไวสำหรับ Run
2) สราง testPoint.java เอาไวทดสอบ Class Point
ตัวอยางหนาจอการทำงาน (http://202.44.47.108/~ssc/inheritance/testPoint.html)
Page 2 of 6
- 3. testPoint.html
<html>
! <body>
<h1>Test Class Point</h1>
<h3>Create by: 5366261111 Supaporn Simcharoen IT1-RC</h3>
! ! <applet code="testPoint.class" height="200" width="400">
! ! </applet>
! </body>
</html>
testPoint.java
ขั้นตอนที่ 1 สราง Class พรอมกับ import package ที่ตองใช และสราง Method ที่นาจะมี
import java.awt.*;
import javax.swing.*;
public class testPoint extends JApplet{
! public void init(){
! }
! public void paint(Graphics g) {
! }
}
method init มีไวเพื่อ .............................................................................................................................................................
method paint มีไวเพื่อ ..........................................................................................................................................................
ขั้นตอนที่ 2 กำหนดคาเริ่มตนที่ method init พรอมกับตัวแปรตางๆ ที่ตองใช
! int num;
! Point p[] ;
public void init()
! {
! ! String input; // user's input
! ! // obtain user's choice
! ! input = JOptionPane.showInputDialog("Enter number of point : " );
! ! num = Integer.parseInt( input ); // convert input to int
! ! p = new Point[num];
! ! for(int n = 0 ; n < p.length ; n++) {
! ! ! int x = 5 + (int) (Math.random() * 400);
! ! ! int y = 5 + (int) (Math.random() * 200);
! ! ! p[n] = new Point(x, y);
! ! }
! } // end method init
Note:: ..................................................................................................................................................................................
.............................................................................................................................................................................................
ขั้นตอนที่ 3 ทดลอง Compile และ Run
วิธีในการ Run คือ .................................................................................................................................................................
ขั้นตอนที่ 4 กำหนดการทำงานใน method paint
! // draw shapes on applet's background
! public void paint( Graphics g )
! {
! ! super.paint( g ); //call paint method inherited from JApplet
! ! for ( int n = 0; n < p.length; n++ ) {
! ! ! // set color
! ! ! g.setColor( new Color(255,0,0) );
! ! ! // plot point
! ! ! g.drawLine( p[n].getX(), p[n].getY(), p[n].getX(), p[n].getY() );
! ! } // end for
! ! showStatus("จำนวน Object : "+ Point.getCount());
! } // end method paint
Note:: ..................................................................................................................................................................................
.............................................................................................................................................................................................
ขั้นตอนที่ 5 ทดลอง Compile และ Run อีกครั้ง
Page 3 of 6
- 4. Class Rectangle
ขั้นตอนที่ 1 สราง Class Rectangle ขึ้นมา
public class Rectangle extends Point {
}
Note:: ..................................................................................................................................................................................
ขั้นตอนที่ 2 สราง Attribute ตางๆ ตามที่ไดออกแบบไว
! private int width = 10;
! private int height = 10;
! private static int count = 0;
ขั้นตอนที่ 3 สราง Constructor method ตางๆ ตามที่ไดออกแบบไว
! public Rectangle() {
! }
! public Rectangle(int x, int y, int w, int h ) {
! ! super(x,y);
! ! setWidth(w);
! ! setHeight(h);
! }
super(x,y); คือ .....................................................................................................................................................................
Constructor method 2 method นี้มีไวเพื่อ ............................................................................................................................
............................................................................................................................................................................................
ขั้นตอนที่ 4 สราง “set” method ตางๆ ตามที่ไดออกแบบไว
! public void setWidth(int w) {
! ! width = w;
! }
! public void setHeight(int h) {
! ! height = h;
! }
“set” method 2 method นี้มีไวเพื่อ ........................................................................................................................................
.............................................................................................................................................................................................
ขั้นตอนที่ 5 สราง “get” method ตางๆ ตามที่ไดออกแบบไว
! public int getWidth() {
! ! return width;
! }
! public int getHeight() {
! ! return height;
! }
! public int getArea() {
! ! return width*height;
! }
! public static int getCount() {
! ! return count;
! }
“get” method 4 method นี้มีไวเพื่อ .......................................................................................................................................
.............................................................................................................................................................................................
ขั้นตอนที่ 6 สราง Facilities method ตางๆ ตามที่ไดออกแบบไว
! protected void finalize() {
! ! count--;
! }
! public String toString() {
! ! return "Point[x,y]Left = " + super.toString() + "; Width = " +
! ! getWidth() + "; Height = " + getHeight();
! }
Facilities method 2 method นี้มีไวเพื่อ .................................................................................................................................
.............................................................................................................................................................................................
ขั้นตอนที่ 7 ทำการ Compile
โดยใชคำสั่ง ..........................................................................................................................................................................
ผลลัพธที่ได ..........................................................................................................................................................................
Page 4 of 6
- 5. ขั้นตอนที่ 8 ทดสอบการทำงานของ Class Rectangle
1) สราง testRectangle.html เอาไวสำหรับ Run
2) สราง testRectangle.java เอาไวทดสอบ Class Rectangle
ตัวอยางหนาจอการทำงาน (http://202.44.47.108/~ssc/inheritance/testRectangle.html)
testRectangle.html
<html>
! <body>
<h1>Test Class Rectangle</h1>
<h3>Create by: 5366261111 Supaporn Simcharoen IT1-RC</h3>
! ! <applet code="testRectangle.class" height="250" width="400">
! ! </applet>
! </body>
</html>
testRectangel.java
ขั้นตอนที่ 1 สราง Class พรอมกับ import package ที่ตองใช และสราง Method ที่นาจะมี
import java.awt.*;
import javax.swing.*;
public class testRectangle extends JApplet{
! public void init(){
! }
! public void paint(Graphics g) {
! }
}
ขั้นตอนที่ 2 กำหนดคาเริ่มตนที่ method init พรอมกับตัวแปรตางๆ ที่ตองใช
! int x, y;
! Rectangle r ;
! public void init()
! {
! ! String input; // user's input
! ! // obtain user's choice
! ! input = JOptionPane.showInputDialog("Enter value x of left point : " );
! ! x = Integer.parseInt( input ); // convert input to int
! ! input = JOptionPane.showInputDialog("Enter value y of left point : " );
! ! y = Integer.parseInt( input ); // convert input to int
! ! int w = 10 + (int) (Math.random() * 280);
! ! int h = 10 + (int) (Math.random() * 180);
! ! r = new Rectangle(x, y, w, h);
! } // end method init
Note:: ..................................................................................................................................................................................
.............................................................................................................................................................................................
ขั้นตอนที่ 3 ทดลอง Compile และ Run
Page 5 of 6
- 6. ขั้นตอนที่ 4 กำหนดการทำงานใน method paint
! // draw shapes on applet's background
! public void paint( Graphics g )
! {
! ! super.paint( g ); //call paint method inherited from JApplet
! ! // set color
! ! g.setColor( Color.ORANGE );
! ! g.drawRect(r.getX(), r.getY(), r.getWidth(),r.getHeight() );
! ! g.setColor( Color.BLUE );
! ! g.drawString( "Point Left : " + r.getX() + ", " + r.getY(), r.getX(), r.getY());
! ! g.drawString( "Width : " + r.getWidth() , r.getX(), r.getY() + 15);
! ! g.drawString( "Height : " + r.getHeight() , r.getX(), r.getY() + 30);
! ! g.drawString( "Area : " + r.getArea() , r.getX(), r.getY() + 45);
! } // end method paint
Note:: ..................................................................................................................................................................................
.............................................................................................................................................................................................
ขั้นตอนที่ 5 ทดลอง Compile และ Run อีกครั้ง
การบาน
แกไขการทำงานของ testRectangle ใหสามารถรับคาจำนวนของ Rectangle ที่จะสรางได
ตัวอยางหนาจอการทำงาน (http://202.44.47.108/~ssc/inheritance-hw/testRectangle.html)
Page 6 of 6

![ขั้นตอนที่ 4 สราง “set” method ตางๆ ตามที่ไดออกแบบไว
! // set x in coordinate pair
! public void setX( int xValue ) {
! ! x = xValue; // no need for validation
! }
! // set y in coordinate pair
! public void setY( int yValue ) {
! ! y = yValue; // no need for validation
! }
“set” method 2 method นี้มีไวเพื่อ ........................................................................................................................................
.............................................................................................................................................................................................
ขั้นตอนที่ 5 สราง “get” method ตางๆ ตามที่ไดออกแบบไว
! // return x from coordinate pair
! public int getX() {
! ! return x;
! }
! // return y from coordinate pair
! public int getY() {
! ! return y;
! }
“get” method 2 method นี้มีไวเพื่อ .......................................................................................................................................
.............................................................................................................................................................................................
ขั้นตอนที่ 6 สราง Facilities method ตางๆ ตามที่ไดออกแบบไว
! public static int getCount() {
! ! return count;
! }
! // return String representation of Point object
! public String toString() {
! ! return "[" + getX() + ", " + getY() + "]";
! }!
// finalizer
! protected void finalize() {
! ! count--;
! }
Facilities method 3 method นี้มีไวเพื่อ .................................................................................................................................
.............................................................................................................................................................................................
.............................................................................................................................................................................................
ขั้นตอนที่ 7 ทำการ Compile
โดยใชคำสั่ง ..........................................................................................................................................................................
ผลลัพธที่ได ..........................................................................................................................................................................
ขั้นตอนที่ 8 ทดสอบการทำงานของ Class Point เพียง Class เดียวกอน
1) สราง testPoint.html เอาไวสำหรับ Run
2) สราง testPoint.java เอาไวทดสอบ Class Point
ตัวอยางหนาจอการทำงาน (http://202.44.47.108/~ssc/inheritance/testPoint.html)
Page 2 of 6](data:image/gif;base64,R0lGODlhAQABAIAAAAAAAP///yH5BAEAAAAALAAAAAABAAEAAAIBRAA7)