
Recommended
More Related Content
Similar to Ana White Tiny House Free Plans Quartz with Bathroom Framing.pdf
Similar to Ana White Tiny House Free Plans Quartz with Bathroom Framing.pdf (20)
Recently uploaded
Recently uploaded (20)
Ana White Tiny House Free Plans Quartz with Bathroom Framing.pdf
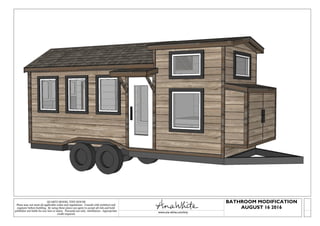
- 1. QUARTZ MODEL TINY HOUSE Plans may not meet all applicable codes and regulations. Consult with architect and engineer before building. By using these plans you agree to accept all risk and hold publisher not liable for any loss or injury. Personal use only. Attribution - Appropriate credit required. www.ana-white.com/tiny BATHROOM MODIFICATION AUGUST 16 2016
- 2. QUARTZ MODEL TINY HOUSE Plans may not meet all applicable codes and regulations. Consult with architect and engineer before building. By using these plans you agree to accept all risk and hold publisher not liable for any loss or injury. Personal use only. Attribution - Appropriate credit required. June 4, 2016 25'-11 1/4" 2'-1 1/2" 2'-1 1/2" 8'-5 1/2" 13'-3" Exterior Elevations 8'-9 3/4" 10'-4 3/8" 23-7/8" May not meet road restrictions when overhangs and roof are installed. Check applicable regulations. 12" 27'-3/4" 32"
- 3. QUARTZ MODEL TINY HOUSE Plans may not meet all applicable codes and regulations. Consult with architect and engineer before building. By using these plans you agree to accept all risk and hold publisher not liable for any loss or injury. Personal use only. Attribution - Appropriate credit required. June 4, 2016 Queen Size Mattress Full Size Mattress 6'-11 1/2" 3'-0" wheels well wheel well Floor Plan 2'-9 3/4" 6'-7 3/4" 5'-1/8" Tilt out storage pipe ladder Loft Above at Line 32" Door Great Room Area Entry Bedroom DIMENSIONS 24' x 8'6" x 13'6" Base Dimensions Exterior trim,overhangs and siding may increase overall dimensions. Check local road restrictions for transporting requirements. KITCHEN FEATURES 20" Freestanding Stove 30" Sink Cabinet 24" wide fridge, full height or below counter Flexible corner space for storage or possible utilities and tanks 34" wall cabinet or shelving space 24" cabinet space above fridge ADDITIONAL AMENITIES Private Bedroom with Queen Mattress 3 - Drawers, 24" x 24" x 6" Tilt out shoe storage, 6 standard pairs Optional hidden storage area 60" x 30" x 18" tall Full Size Trundle Sofa with lift up storage Built in bookshelf ladder wall for display storage LOFT 80" x 94-1/2" Interior height at peak: 46" * Interior side wall height: 37-1/2"* No egress window *Ceiling and loft floor finish will affect overall height Ceiling height under loft: 76" DOOR 32" 2x4 framing exterior door, right hand swing - living area door WINDOWS (3) 30" wide x 42" tall - kitchen 72" wide x 60" tall - living area window 36" wide x 42" tall - bedroom 36" wide x 24" tall - loft 48" wide x 24" tall - loft MODIFIED FLOOR PLANS This is a modified floor plan from the original Quartz Tiny House. This exact floor plan has not been built or tested www.ana-white.com/tinyhouseplans FRAMING MATERIALS 2x4 Floor and Wall Framing 3/4" Plywood Tongue and Groove Subfloor 2x6 Rafters and Ridgepole 1/2" Exterior Plywood Sheathing 5/8" Roof Sheathing 3 Large storage drawers under bed 32" x 32" Shower Space for compost toilet 93-3/4" Fridge 20" Stove Shelves or Wall Cabinets 30" 30" 30" 30"
- 4. QUARTZ MODEL TINY HOUSE Plans may not meet all applicable codes and regulations. Consult with architect and engineer before building. By using these plans you agree to accept all risk and hold publisher not liable for any loss or injury. Personal use only. Attribution - Appropriate credit required. June 4, 2016 Detailed free interior project plans available at www.ana-white.com/tiny Interior Views
- 5. QUARTZ MODEL TINY HOUSE Plans may not meet all applicable codes and regulations. Consult with architect and engineer before building. By using these plans you agree to accept all risk and hold publisher not liable for any loss or injury. Personal use only. Attribution - Appropriate credit required. June 4, 2016 TRAILER USED: PJ TRAILERS 6" Channel Super Wide B6 58-1/2" 118-1/2" 8-1/8" 8-1/8" 98-1/2" 98-1/2" 124" 21-3/4" 22-1/2" 22-1/2" 22-1/2" 22-1/2" 22-1/2" 22-1/2" 8-1/8" 8-1/8" 22-1/2" 22-1/2" 22-1/2" 22-1/2" 21-3/4" 84-1/4" Extra support for loft post FLOOR FRAMING CUT LIST 11 - 2x4 @ 98-1/2" (main joists) 4 - 2x4 @ 79-1/4" (joists between wheel wells) 2 - 2x4 @ 58-1/2" (end ledger boards) 2 - 2x4 @ 118-1/2" (wheel well ledger boards) 2 - 2x4 @ 124" (tongue end ledger boards) 4 - 2x4 @ 8-1/8" (blocking around wheel well) Attach floor framing with 3-1/4" galvanized framing nails, two nails per joint. Joists are placed 24" on center . Additional framing is recommended (as shown) to support loft load point. Framing must also be attached to trailer with bolts or other hardware. 23-1/4" 47-1/4" 22-1/2" 48" 70-1/2" 94-1/2" 3-1/4" 27-1/4" 51-1/4" 75-1/4" 99-1/4" Floor Framing 3/4" tongue and groove floor sheathing 8D nails with subfloor adhesive. 9 sheets needed as shown Adjust floor framing if necessary to allow 1/2" gap around floor for wall sheathing 24'-0" PLANS SHOULD BE ADJUSTED TO FIT TRAILER, AS TRAILER SIZE MAY VARY. 25'-5 3/8" 24'-0" 8'-5 1/2" 25'-5 3/8" 79-1/4" 25'-5 3/8"
- 6. QUARTZ MODEL TINY HOUSE Plans may not meet all applicable codes and regulations. Consult with architect and engineer before building. By using these plans you agree to accept all risk and hold publisher not liable for any loss or injury. Personal use only. Attribution - Appropriate credit required. June 4, 2016 Wall Framing - Back Wall NOTCH IN CROSS BRACING AT CORNERS FOR LATERAL SUPPORT 75" 5-5/8" 6-1/2" 30-1/2" 54-1/2" 85-1/8" 91-5/8" 3" 110-7/8" 14-1/2" 38-1/2" 62-1/2" 87-1/4" 23-1/4" 47-1/4" 66-1/2" 71-1/4" 95-1/4" 111-1/4" 119-1/4" 143-1/4" 167-1/4" 186-1/4" 191-1/4" 200-3/4" 3-1/4" 27-1/4" 43-1/4" 51-1/4" 75-1/4" 86-1/2" 3" 14-1/4" 33-1/4" 38-1/4" 46-1/4" 62-1/4" 86-1/4" 110-1/4" 135" 23-1/4" 47-1/4" 69-1/2" flat to inside of wall for nailing wall finish to flat to inside of wall Header sizes may vary depending on snow load and type of wood used. Check local regulations and wood species types to size headers. 2x6 header shown 60" 19" 12-1/2" 6-1/2" 30-1/2" 40-1/4" 54-1/2"
- 7. QUARTZ MODEL TINY HOUSE Plans may not meet all applicable codes and regulations. Consult with architect and engineer before building. By using these plans you agree to accept all risk and hold publisher not liable for any loss or injury. Personal use only. Attribution - Appropriate credit required. June 4, 2016 Wall Framing - Front Wall NOTCH IN CROSS BRACING AT CORNERS FOR LATERAL SUPPORT ESPECIALLY IMPORTANT IF NOT SPRAY FOAM INSULATING 3" 3-1/4" 27-1/4" 69-1/2" 86-1/2" 3" 8-3/4" 46-1/4" 62-1/4" 68-1/2" 86-1/4" 107-1/2" 135" 16-1/4" 39" 21-7/8" 16-1/4" 39" 42" 24" 13-1/8" 87-1/4" 200-3/4" 81" 37-1/2" 7-1/8" 91-5/8" 110-7/8" 2x4 flat on inside edge for nailing wal lfinish 2x4 header as shown Header sizes may vary depending on snow load and type of wood used. Check local regulations and wood species types to size headers. 2x4 header shown 2x4 header shown 16-1/2" 23-1/4" 47-1/4" 51" 66-1/2" 71-1/4" 95-1/4" 101" 116-1/2" 143-1/4" 149-1/2" 153" 161-3/4" 167-1/4" 191-1/4" 33" 42" 25-1/4" 7-1/8" 30-3/4" 37-1/4" 91-5/8" 5-1/4" 29-1/4" 31-1/2" 48-1/2" 75-1/4" 81-1/2" 3-1/4" 27-1/4" 4" 28"
- 8. QUARTZ MODEL TINY HOUSE Plans may not meet all applicable codes and regulations. Consult with architect and engineer before building. By using these plans you agree to accept all risk and hold publisher not liable for any loss or injury. Personal use only. Attribution - Appropriate credit required. June 4, 2016 Wall Framing - End Walls 94-1/2" NOTCH IN CROSS BRACING AT CORNERS IF FOR LATERAL SUPPORT 91-5/8" 19-3/4" 51" 51" 22" 46" 110-7/8" 81-7/8" 94-1/2" 18-3/4" 43-3/4" 67-3/4" 71-1/4" 2x4 header shown 43-3/4" 67-3/4" 91-1/2"
- 9. QUARTZ MODEL TINY HOUSE Plans may not meet all applicable codes and regulations. Consult with architect and engineer before building. By using these plans you agree to accept all risk and hold publisher not liable for any loss or injury. Personal use only. Attribution - Appropriate credit required. June 4, 2016 Wall Top Plates Stand long walls first and brace with 2x4s. Ensure walls are square. Attach to floor with 16D nails. Walls should also be bolted to trailer. 1/2" plywood sheathing attached with 8D nails to studs, first row of plywood must cover the floor framing. Stand end walls and attach to side walls with 16D Nails and floor. Plywood on end walls also ties in side wall framing First row of plywood can be attached to side walls before standing to help keep wall square while standing wall. It is also easier to attach plywood on ground instead of vertically when installed. Overhang plywood 4-1/4" on bottom to account for covering floor framing. Cut wheel wells out before standing. TOP PLATE CUT LIST 2 - 2x4 @ 16' 5-1/4" 2 - 2x4 @ 8' 5-1/2" 2 - 2x4 @ 6'11-3/4" 225" 225" 1 3 3 - 7 / 8 " 1 3 3 - 7 / 8 " Dimensions taken to outside corners of framing Take diagonals at tops of walls and adjust until diagonals are equal to ensure walls are square Top Plates are nailed on over walls, overlapping corners, to tie all walls together at tops 6'-11 7/8" 8'-5 1/2" 16'-5 1/4" 225" 131-1/4"
- 10. QUARTZ MODEL TINY HOUSE Plans may not meet all applicable codes and regulations. Consult with architect and engineer before building. By using these plans you agree to accept all risk and hold publisher not liable for any loss or injury. Personal use only. Attribution - Appropriate credit required. June 4, 2016 Rafter Schedule 21-3/4" 21-3/4" 22-1/2" 22-1/2" 22-1/2" 22-1/2" 22-1/2" 22-1/2" 22-1/2" 22-1/2" 22-1/2" 22-1/2" 8" 31-1/4" 55-1/4" 79-1/4" 103-1/4" 127-1/4" 151-1/4" 175-1/4" 199-1/4" 207-1/4" 223-1/4" 247-1/4" 271-1/4" 8" 144" 160" 22-1/2" Splice 2x6 ridge pole boards with 2x4 blocking Begin dormer rafters Mark ridgepole and top plates as shown before stacking rafters Top of floor to bottom of ridgepole is 123-7/8" if temporary support is needed while building roof system Ridge Pole Gable End Supports 1 - 2x4 @ 27-3/4" 1 - 2x4 @ 8-3/8" Ridge Pole Cut List 1 - 2x6 @ 144" 1 - 2x6 @ 160" 2 - 2x4 @ 22-1/2" Rafers spaced 24" on center
- 11. QUARTZ MODEL TINY HOUSE Plans may not meet all applicable codes and regulations. Consult with architect and engineer before building. By using these plans you agree to accept all risk and hold publisher not liable for any loss or injury. Personal use only. Attribution - Appropriate credit required. June 4, 2016 Main Rafters Cut rafters 58-1/4" long, both ends cut at 30 degrees off square, long point to short point measurement. Then mark end 4" down and use a square to mark off bottom perpendicular to end cut. Cut off. View from kitchen door side 7/12 Roof Pitch 30 Degree Miter Cut 58-1/4" 4" 4" hold all rafters flush to top edge of ridgepole 1/2" overhang on rafter tails for plywood sheathing
- 12. QUARTZ MODEL TINY HOUSE Plans may not meet all applicable codes and regulations. Consult with architect and engineer before building. By using these plans you agree to accept all risk and hold publisher not liable for any loss or injury. Personal use only. Attribution - Appropriate credit required. June 4, 2016 Dormer Rafters View from Shed End 2/12 Roof Pitch 10 Degree Miter Cut 51-3/8" 5" does NOT work out perfect on inside 1/2" overhang on outside cut dormer rafters at 10 degrees off square, both ends parallel, long point to short point measurement. Then cut bottom tail off at 90 degrees from end cut, leaving 5" of exposed rafter on end.
- 13. QUARTZ MODEL TINY HOUSE Plans may not meet all applicable codes and regulations. Consult with architect and engineer before building. By using these plans you agree to accept all risk and hold publisher not liable for any loss or injury. Personal use only. Attribution - Appropriate credit required. June 4, 2016 Gable Blocking Main End 2x4 attached flat to inside of last rafter. This 2x4 board is a nailer used for attaching interior wall finish to top angle is 30 degrees off square Angles are 30 degeees off square bottom angle is 60 degrees off square Length long point to long point is57-1/8"
- 14. QUARTZ MODEL TINY HOUSE Plans may not meet all applicable codes and regulations. Consult with architect and engineer before building. By using these plans you agree to accept all risk and hold publisher not liable for any loss or injury. Personal use only. Attribution - Appropriate credit required. June 4, 2016 Gable Blocking Dormer End top angle is 10 degrees off square End can be cut square Bottom edge of 2x4 blocking and bottom edge of rafter are flush cripple studs placed 24" on center for plywood placement Nail with 16D Framing Nails
- 15. QUARTZ MODEL TINY HOUSE Plans may not meet all applicable codes and regulations. Consult with architect and engineer before building. By using these plans you agree to accept all risk and hold publisher not liable for any loss or injury. Personal use only. Attribution - Appropriate credit required. June 4, 2016 Exterior Wall Sheathing 1/2" plywood sheathing attached with 8D Nails, staggered seams, run to top of top plates on eaves On gable ends, run plywood sheathing up rafters, leaving 3-1/2" space for installtion of 2x4 sofit blocking Cut out windows and doors Bottom plate of door to be cut out 1/2" Exterior sheathing, staggering seams landing seams on 24" on center pattern studs, 8D nails to all studs.
- 16. QUARTZ MODEL TINY HOUSE Plans may not meet all applicable codes and regulations. Consult with architect and engineer before building. By using these plans you agree to accept all risk and hold publisher not liable for any loss or injury. Personal use only. Attribution - Appropriate credit required. June 4, 2016 Fascia and Roof Sheathing both ends cut at 30 degrees of square, ends parallel Eave fascia held down to not overextend past top of roof plane Bottom corner may be clipped to complete roof trim out 5/8" roofing plywood Exterior sheathing staggered seams Dormer fascia angle is 10 degrees off square 60-7/8" 209" 209" 8" Fascia boards are 2x6. Sofit Blocking is 2x4 - 8" long spaced approx. 16" appart 103-1/4" 5 3 - 3 / 4 " 60-7/8"
- 17. QUARTZ MODEL TINY HOUSE Plans may not meet all applicable codes and regulations. Consult with architect and engineer before building. By using these plans you agree to accept all risk and hold publisher not liable for any loss or injury. Personal use only. Attribution - Appropriate credit required. June 4, 2016 Dormer Overhang Framing 70 degrees off square Dormer overhang fascia is installed on top of roof sheathing. Nailthrough sheathing into rafter below Dormer overhang on inside is framed up on top of main roof. Difference in roof pitches will be covered by roofing ridge cap. Plywood sheathing should be staggered in seams, joints landing on 24" on center pattern studs. 50-5/8" 36-1/2" 8" 2x4 sofit blocking held to top edge of 2x6 rafters 40-7/8" 46-3/8" 16 -1 /8 " top edge is 10 degrees off square bottom edge is 30 degrees off square leave room at top for 2x4 sofit blocking 10 degrees off square long point on bottom 1/2" PLYWOOD WALL SHEATHING between roof and dormer detail ridgecap will cover small roof differences between pitches
- 18. QUARTZ MODEL TINY HOUSE Plans may not meet all applicable codes and regulations. Consult with architect and engineer before building. By using these plans you agree to accept all risk and hold publisher not liable for any loss or injury. Personal use only. Attribution - Appropriate credit required. June 4, 2016 Exterior Trim Suggestion 2x4 trim brought flush to edge of door and notched out for main roof eave fascia. This then trims out dormer corner 2x6 trim above door for larger area to attach porch overhang roof too Install drip edge flashing over bottom trim if using or omit bottom trim and run siding to base of framing As shown trimmed out in 2x4 and 2x6 material. Siding can be applied between trim pieces. Install windows, doors and house wrap prior to trim out Optional shed plans available at www.ana-white.com/tiny Trim does not have to be continuous between door and dormer corner
- 19. QUARTZ MODEL TINY HOUSE Plans may not meet all applicable codes and regulations. Consult with architect and engineer before building. By using these plans you agree to accept all risk and hold publisher not liable for any loss or injury. Personal use only. Attribution - Appropriate credit required. June 4, 2016 Bathroom Framing Suggestion Bottom and end 2x4 turned flat to surround shower and conserve wall space Evenly space floor joists Fits standard 28" wide interior door, recommend right hand swinging into kitchen over fridge Cover exterior in plywood or tongue and groove
- 20. QUARTZ MODEL TINY HOUSE Plans may not meet all applicable codes and regulations. Consult with architect and engineer before building. By using these plans you agree to accept all risk and hold publisher not liable for any loss or injury. Personal use only. Attribution - Appropriate credit required. June 4, 2016 Thank you for using this tiny house model. While I have done my best to ensure accuracy and best building practices, I am only human. If you do find any suggestions for improvement or errors in this plan, kindly let me know so I can fix the plans. Please also share your experience, negative or positive, to give new builders an honest perspective on this plan before they begin building. I can't wait to see your tiny houses! XO Ana