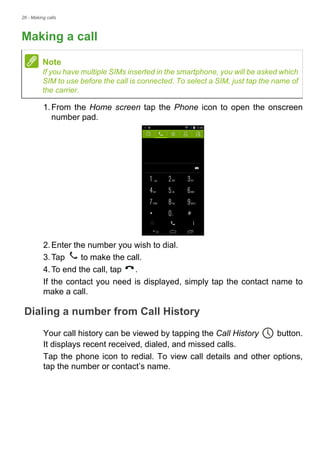
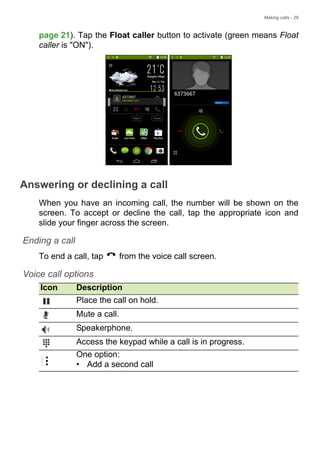
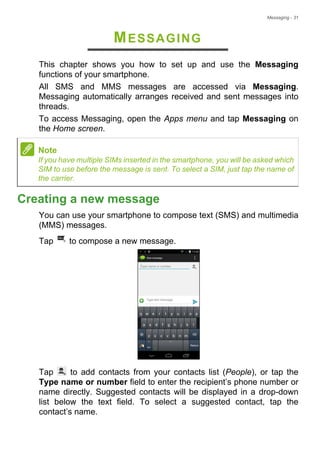
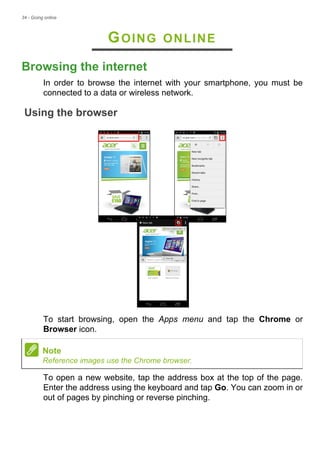
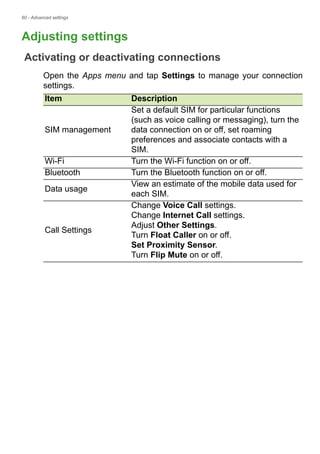
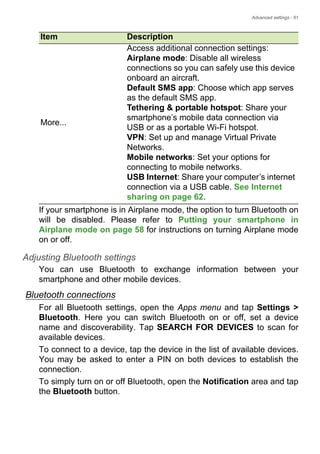
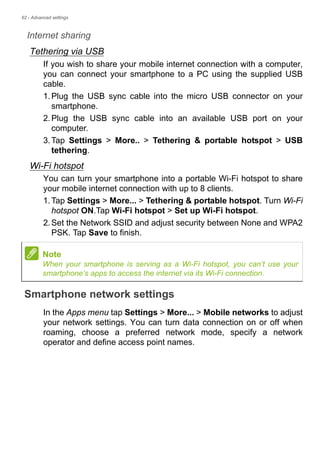
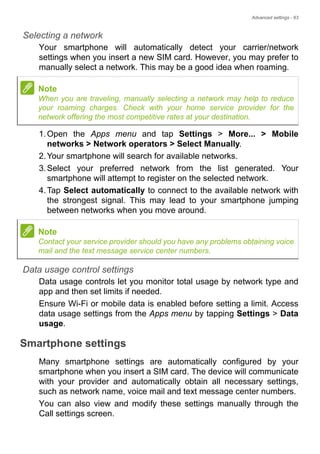
User’s Manual
2 -
© 2015 All Rights Reserved
Acer Liquid Jade Z User’s Manual
Model: S57
This revision: March 2015
Acer Liquid Jade Z smartphone
Model number:_______________________________________________
Serial number: _______________________________________________
Date of purchase: ____________________________________________
Place of purchase: ___________________________________________
Important
This manual contains proprietary information that is protected by
copyright laws. The information contained in this manual is subject to
change without notice. Images provided herein are for reference only
and may contain information or features that do not apply to your
computer. Acer Group shall not be liable for technical or editorial errors
or omissions contained in this manual.
Sign up for an Acer ID and enjoy great benefits
Open the Acer Portal app from the Start screen to sign up for an Acer ID or
sign in if you already have an Acer ID.
There are three great reasons for you to get an Acer ID:
• Build Your Own Cloud with Acer BYOC.
• Get the latest offers and product information.
• Register your device for warranty service.
For more information, please visit the AcerCloud website:
www.acer.com/byoc-start
Table of contents - 3
TABLE OF CONTENTS
Setting up 5
Unpacking your smartphone.................... 5
Getting to know your smartphone............ 5
Views .......................................................... 5
Charging the battery ................................... 6
Installing a SIM or microSD card............. 7
SIM card lock .............................................. 9
Using your smartphone 10
Turning on for the first time.................... 10
Sign in to or create a Google account ... 10
Entering your PIN...................................... 10
Activating a new SIM card ........................ 10
Locking your smartphone ...................... 10
Waking your smartphone.......................... 11
Navigating through menus and options. 11
Using the touchscreen........................... 12
Onscreen keyboards ............................. 12
Changing the text input method................ 12
Swype ....................................................... 13
Google keyboard....................................... 14
Predictive text ........................................... 15
The Home screen.................................. 16
Change your Home screen interface ........ 16
Search....................................................... 17
The extended Home screen...................... 18
Personalizing the Home screen................ 18
The Apps menu......................................... 21
Notification and status area ...................... 21
Multitasking............................................... 22
Managing contacts 23
Managing your contacts ........................ 23
Adding a contact ....................................... 23
Making calls 25
Before making a call.............................. 25
Making a call.......................................... 26
Dialing a number from Call History ........... 26
Viewing missed calls................................. 27
Making a call to one of your contacts........ 27
Dialing an international number ................ 27
Direct dial widget....................................... 28
The voice call screen............................. 28
Answering or declining a call .................... 29
Conference calls ....................................... 30
Messaging 31
Creating a new message....................... 31
Replying to a message.......................... 32
Multimedia messages............................ 33
Receiving multimedia messages .............. 33
Going online 34
Browsing the internet............................. 34
Using the browser .................................... 34
Setting up Email..................................... 35
Google services ..................................... 35
Setting up your Google email ................... 36
Voice search............................................. 36
Play Store ................................................. 37
Google Hangouts...................................... 38
Maps......................................................... 39
Using the Camera 40
Camera/camcorder icons and indicators 40
Mode selector ........................................... 42
Settings..................................................... 43
Taking a photo ....................................... 44
Using the Dual Shot feature...................... 45
Taking a panoramic photo ........................ 45
Shooting a video .................................... 46
Supported formats .................................... 46
Viewing photos and videos .................... 46
Geotagging ............................................ 46
Using your smartphone with
AcerEXTEND 47
PC system requirements .......................... 47
Smartphone system requirements............ 47
Install PC application software............... 47
AcerEXTEND toolbar............................. 49
AcerEXTEND wireless connection ........... 51
AcerEXTEND functions ............................ 53
AcerEXTEND FAQ ................................... 55
Advanced settings 58
Putting your smartphone in Airplane
mode...................................................... 58
Turning Airplane mode on or off ............... 58
Restarting your smartphone .................. 59
Adjusting settings................................... 60
Activating or deactivating connections...... 60
Smartphone network settings ................... 62
Smartphone settings................................. 63
Sound ....................................................... 64
Audio profiles............................................ 64
Display...................................................... 65
Setting the date and time.......................... 65
Setting alarms........................................... 65
Changing language and text options ........ 66
Connecting to a PC................................ 66
Synchronization ........................................ 66
FM radio................................................. 67
Applications (apps) ................................ 68
Closing an app.......................................... 68
Uninstalling an app ................................... 68
Restoring to factory settings .................. 68
4 - Table of contents
Accessories and tips 70
Using the headset.................................. 70
Using a Bluetooth headset..................... 70
Creating a new access point.................... 70
Inserting a microSD card ....................... 71
Managing your SIM cards 72
SIM Management..................................... 72
Appendix 75
FAQ and troubleshooting....................... 75
Other sources of help............................. 77
Warnings and precautions 78
Medical devices ....................................... 79
Vehicles ................................................... 80
Potentially explosive environments........... 80
Emergency calls..................................... 81
Taking care of your smartphone............. 81
Specifications ......................................... 83
Performance ............................................. 83
Display ...................................................... 83
Multimedia ................................................ 83
USB connector.......................................... 83
Connectivity .............................................. 84
Camera ..................................................... 84
Expansion ................................................. 84
Battery ...................................................... 84
Dimensions ............................................... 85
End User License Agreement 86
Setting up - 5
SETTING UP
Unpacking your smartphone
Your new smartphone comes packed in a protective box. Carefully
unpack the box and remove the contents. If any of the following items
is missing or damaged, contact your dealer immediately:
• Your new Acer smartphone
• USB cable
• AC adapter
• Headset
Getting to know your smartphone
Views
5
4
6
9
12
2
1
7
14
10
8
3
11
13
Note
In-box content varies depending on country and region.
6 - Setting up
Charging the battery
For initial use, you need to charge your smartphone for eight hours.
After that you can recharge the battery as needed.
No. Item Description
1 microSD card / SIM card
tray
Accepts a microSD card and one or two SIM cards
(depends on model purchased).
Note: The microSD card replaces a SIM card in
models that support two SIMs.
2 3.5 mm headphone jack Connects to stereo headphones.
3 Second microphone Internal microphone for noise cancelation.
4 Power button Press to turn the screen on/off or enter sleep
mode; press and hold to turn the smartphone on
or off.
5 Phone speaker Emits audio from your smartphone; suitable for
holding to your ear.
6 Touchscreen Touchscreen to display data, smartphone content
and enter information.
7 Front camera Front-facing camera suitable for video chats and
self-portraits.
8 Ambient light and
proximity sensors
Detect ambient light and proximity to control
screen brightness.
9 Flash LED flash for taking photos in low-light
environments.
10 Camera A camera for taking high-resolution images.
11 Speaker Built-in speaker for handsfree use or media
playback.
12 Volume up/down button Increases or decreases the smartphone volume.
13 Micro USB connector Connects to a USB cable/charger.
14 Microphone Internal microphone.
Setting up - 7
Connect the AC adapter cord to the micro USB connector on your
smartphone.
Installing a SIM or microSD card
To take full advantage of your smartphone’s telephony capabilities,
you must install a SIM card.
Your new smartphone has multiple SIM card holders; install any
combination of SIM cards.
Additionally, you may wish to increase your smartphone’s storage by
inserting a microSD card into the labeled slot.
1.Turn off the smartphone by pressing and holding the power button.
2.Pull out the SIM / microSD card carrier.
Note
The information in this UM may vary according to the number of SIMs you are
using.
8 - Setting up
3.Insert the SIM and/or microSD card as shown.
Note
Your smartphone can accept one nano SIM and one microSD card, OR two
nano SIMs. Take care not to damage your cards when you reinsert the
carrier.
Specifications vary depending on model purchased.
microSD card
SIM 1
SIM 2 (optional)
Setting up - 9
4.Insert the carrier, taking care to ensure that the card(s) remain
correctly seated in the carrier.
SIM card lock
Your smartphone may come with a SIM card lock, i.e., you will only be
able to use the SIM card provided by your network operator.
To cancel the SIM lock, contact your network provider.
10 - Using your smartphone
USING YOUR SMARTPHONE
Turning on for the first time
To turn on your smartphone for the first time, press and hold the
power button until the screen turns on. You will then be asked to
configure some settings before you can use your smartphone.
Follow the onscreen instructions to complete setup.
Sign in to or create a Google account
If you have Internet access, your smartphone allows you to
synchronize information with a Google account.
You may create or sign in to an existing Google account, which will be
used to synchronize your contact list, email, calendar and other
information.Open the Apps menu and then tap Settings > Add
account. Tap the type of account you want to add (e.g. Google). You
will need internet access to complete the synchronization process.
You can create and easily access multiple Google accounts.
Entering your PIN
When you install a SIM card for the first time, you may need to enter a
PIN using the onscreen number pad.
Activating a new SIM card
If you are using your SIM card for the first time, it may require
activation. Contact your network operator for details on how to do this.
Locking your smartphone
If you will not use your smartphone for a while, briefly press the power
button to lock access. This saves power and ensures your
Important
Depending on your settings, you may be required to enter your PIN
each time you switch on the smartphone function.
Using your smartphone - 11
smartphone does not unintentionally use any services. Your
smartphone will lock automatically if it is not used for one minute.
Waking your smartphone
If the screen is off and the smartphone does not
react to any taps on the screen or front panel
button, then it has been locked and is in sleep
mode.
Press the power button to wake your smartphone.
Unlock your smartphone by sliding your finger from
one side of the screen to the other (it works both
ways).
For additional security, you may set an unlock
pattern, a set of dots that must be touched in the
correct order to access the smartphone. Open the
Apps menu and then tap Settings > Security >
Screen lock. If you forget your unlock pattern, please refer to Unlock
pattern on page 77.
You may also directly enter the lock screen apps. Tap and hold the
lock screen icon, move your finer slightly in any direction, and release.
The smartphone unlocks and opens that app.
Navigating through menus and options
To navigate through menus and options,
there are three buttons beneath the
screen.
Back
Tap this button to go to the previous page, or to go up one level in a
menu.
Home
Tap this button to go directly to the Home screen. Tap and hold this
button to open Search.
Back Home Menu
12 - Using your smartphone
Menu
Tap this button to see recently opened apps. Tap an app to open it. At
the bottom of the Menu screen are Acer Float apps. Tap a Float app
to open the app in its own window while keeping what you were doing
visible. You can customize which apps appear. Swipe to the right in
the Acer Float apps bar and tap the gear icon. Choose from float
Browser, Buttons, Calculator, Camera, Maps, Notes, Stopwatch, and
Text.
Tap and hold the Menu button to open a menu of actions that are valid
for the current app or screen. Tap anywhere on the screen to return to
the Home screen. See Multitasking on page 22.
Using the touchscreen
Your smartphone uses a touchscreen for selecting items and entering
information. Use your finger to tap the screen.
Tap: Touch the screen once to open items and select options.
Drag: Hold your finger on the screen and drag across the screen to
select text and images.
Tap and hold: Tap and hold an item to see a list of actions available
for that item. On the pop-up menu that appears, tap the action you
want to perform.
Scroll: To scroll up or down the screen, simply drag your finger up or
down the screen in the direction that you want to scroll.
Onscreen keyboards
Your new smartphone has the Swype keyboard set as the default for
entering text. See Swype on page 13.
Changing the text input method
To change the input method:
1.Open the Apps menu.
Note
The keyboard layout varies slightly, depending on the application and
information that is required.
Using your smartphone - 13
2.Tap Settings > Language & input > Default.
3.Tap your preferred input method(s) from the list (if only one method
is selected, all options will be grayed out).
4.Uncheck the method(s) you do not wish to use.
5.Tap Default to set one method as your default.
Swype
Swype is a fast way to enter text. It allows
you to type with one continuous motion
across the screen keyboard; you create a
word by drawing through letters.
Put your finger on the first letter of the word
and draw a path from letter to letter, lifting up
only after the last letter. Swype will insert
spaces where necessary.
Swype will usually add a double letter in a
word when needed, but you can help Swype
recognize you want a double letter by
scribbling slightly or making a loop on the
letter. For example, to get the "ll" in "hello", scribble (or make a loop)
on the "l" key.
When there are multiple suggestions for the
word you want to enter, Swype displays a
Word Choice List. To accept the default
word in the Word Choice List, just keep
Swyping. Otherwise, scroll through the list by
dragging your finger, and tap the word you
want.
Press and hold the Swype key to access settings, features,
updates, preferences, and help.
Tap the +!= button to see numbers and special characters; tap
the page (shift) key to see even more.
Additional keys vary depending on the type of text you enter, e.g. a
key to add a smiley is available when typing a text message. Like
other keys, tap and hold for additional options.
14 - Using your smartphone
To change the input method, open the Notification area (see
Notification and status area on page 21) and tap Choose input
method.
Text assistance
The Swype keyboard has various features that assist you to enter
correct text. In the Application menu, tap Settings > Language &
input and then tap the Settings button to the right of Swype. You can
also tap and hold the Swype key . From here you can enable or
disable the following:
Google keyboard
This is a standard onscreen QWERTY
keyboard that allows you to enter text. Tap
and hold a key with numbers at the top to
select alternative characters, such as letters
with accents.
Tap the ?123 button to see numbers and
special characters, and then tap the =< key to see even more.
You can choose another input language by tapping and holding the
forward slash key. Alternatively, you can open the Apps menu and
then tap Settings > Language & input. Then tap the Settings button
Function Description
How to Swype Learn how to use the Swype keyboard.
Gestures Use how to use Swype gestures.
Preferences Change your text input preferences.
Language Options Set the language used by the keyboard.
Swype Connect
Add contact names and words used in posts
to your personal dictionary.
Change data settings.
Personalization
Change keyboard theme, edit your personal
dictionary and personalize your experience
by signing in to Facebook, Twitter or Gmail to
populate your dictionary.
Updates Check for app and dictionary updates.
Using your smartphone - 15
next to Google keyboard > Input languages. The keyboard layout
changes according to the selected language.
After setting up more than one language, the world button
appears next to the space bar. Tap this button to quickly toggle
between multiple input languages.
Text assistance
The Google keyboard has various features that assist you to enter
correct text. In the Apps menu, tap Settings > Language & input.
Then tap the Settings button next to Google keyboard. From here
you can enable or disable several keyboard-related settings.
Predictive text
Google keyboard provides predictive text input for the browser. As
you tap the letters of a word, a selection of words are displayed above
the keyboard that continue the sequence of letters tapped, or are a
close match allowing for errors. The word list changes after every key
press. If the word you need is displayed, you can tap on it to insert it
into your text.
16 - Using your smartphone
The Home screen
The Home screen gives you quick access to information and simple
controls with widgets or shortcuts. These display information such as
the time and weather, or provide additional controls and direct access
to apps and other frequently used features of your smartphone.
At the bottom of the screen is the application dock which displays
default apps. Tap an icon to open the app. Tap the Apps menu icon in
the middle of the application dock to view your apps. To change apps,
see Changing application dock icons on page 20.
Change your Home screen interface
Your new smartphone offers a Quick Mode user interface that
provides three customized layout options that are designed for
specific groups of users.
Standard Mode
Provides easy-to-understand icons for commonly used functions on
the smartphone and three themes to choose from.
Easy Mode
Provides large icons for commonly used functions and two themes to
choose from. This mode is ideal for older users and users who have
reduced vision and/or mobility.
Search
Time and Status
Widgets
Application (Apps) menu
Using your smartphone - 17
Basic Mode
This provides photo-based dialing and messaging options that are
ideally suited to younger and/or inexperienced smartphone users.
Turning Quick Mode on
To turn Quick Mode on:
1.Open the Apps menu > Quick Mode.
2.Select the mode you would like to use, then tap Next.
3.Choose whether you would like to add more content or not.
4.Choose your theme, and set the widgets.
Set a passcode for Quick Mode
Once you have activated Quick Mode you have the option of setting a
passcode to prevent unauthorized changes.
1.Swipe down from the top of the screen to open the Notification area.
2.Tap the Settings icon in the lower right-hand corner of the screen.
3.Enter the passcode twice and tap OK.
Turning Quick Mode off
To turn Quick Mode off:
1.Swipe down from the top of the screen to open the Notification area.
2.Tap the Settings icon in the lower right-hand corner of the screen.
3.Set a passcode if you have not previously set one.
4.Tap OK.
5.Tap the Settings icon in the lower right-hand corner of the screen.
6.Tap Exit Quick Mode.
Search
To search for apps, files or for information on the Internet,
tap the Google icon.
Simply enter the text you want to find and tap or tap one of the
suggestions, apps or files shown in the list.
18 - Using your smartphone
In order to search or browse the Internet, you must be connected to a
cellular data (if available) or wireless network. See Going online on
page 34.
Voice search
If voice search is available, tap the microphone and speak your
search request. See Voice search on page 36.
The extended Home screen
The Home screen extends to either side of the screen, giving you
more room to add icons, widgets or features. To view the extended
screen, slide your finger to the left or right.
Personalizing the Home screen
You may personalize your Home screen by adding or removing app
shortcuts or widgets, and by changing the wallpaper.
Adding and removing shortcuts and widgets
To add shortcuts or widgets, tap the Apps menu icon in the bottom-
center of the Home screen.
Tap Apps to see a list of shortcuts to apps you can drag to a Home
screen.
Using your smartphone - 19
Tap Widgets to see small apps and links (such as
custom shortcuts, contacts or bookmarks) that you
can add to a Home screen. Widgets are small apps
that display constantly-updated information or quick
shortcuts to apps or special functions.
To move an app or widget to the Home screen, tap
and hold an item until it is selected. The Home screen
will open. Drag the item to any free area on the
screen. To view information about the app or widget,
drag it to the icon at the top of the screen.
To move the item to a different Home screen, drag it
to the side of the screen, the Home screen will switch
to the screen in that direction. Release the item when
it is positioned correctly.
To remove a shortcut or widget from the Home
screen, tap and drag it to Remove at the top of the
screen.
Resizing widgets
Some widgets can be resized. As soon as you place a widget on the
Home screen, you can resize it by dragging the corners.
To resize a widget that is already on the Home screen, tap and hold
the widget. Once the Remove icon appears, release the widget. If the
widget is resizable, you will be able to drag the sides of the widget to
resize it.
Adding or removing folders
You can also add folders to your Home screen. To create a new folder
drag and drop an app icon onto another app icon in the Home screen.
20 - Using your smartphone
This will create an Unnamed Folder. Tap the folder icon and then tap
the name of the folder to rename it.
To delete an app shortcut from a folder, tap on the folder icon to
display the apps inside and then tap and hold the app icon that you
want to remove. Drag and drop the icon on Remove that will appear
at the top of the screen.
To delete a folder, tap and hold on the folder and then drag and drop
the folder on Remove that will appear at the top of the screen.
Changing application dock icons
You can set icons for installed apps in the application dock. Open the
Apps menu and find the app you want to add. Tap and hold the icon,
then drag it to any open position in the dock. Dragging the new app to
an existing dock icon will create a folder for both icons.
To remove an icon from the dock, tap and hold the icon to select it.
Either drag the icon to a different location outside the dock or to
Remove at the top of the screen.
Changing the wallpaper
In the Apps menu, tap Settings > Personalize > Wallpaper. Choose
from images stored in the Gallery, Live Wallpapers (featuring
animated or interactive backgrounds), Photos, Video Wallpaper
(enabling you to use videos as your background), or Wallpapers.
Using your smartphone - 21
The Apps menu
To access the Apps menu, on the Home screen tap
in the center of the dock.
Apps are displayed in alphabetical order. Swipe the
page to the left or right to see more apps.When you
are on the last page of apps, swipe to the left to
see widgets available on your tablet, or tap
Widgets at the top of the page.
To quickly jump to apps or widgets, tap Apps or
Widgets at the top of the Apps menu.
Notification and status area
Notification and status icons are shown at the top of the screen. The
top-right area displays a variety of status information, such as Wi-Fi
connectivity, signal strength, battery status, and time. The top-left
area displays event icons, such as a new message.
• Dual-SIM models:
• Single-SIM models:
Drag the Notification area down the screen to
view more information about new events and
access Quick Settings.
22 - Using your smartphone
Multitasking
You can have multiple apps open at the same time.
To open a new app, tap the home button to return
to the Home screen, then start the new app. Tap
the Menu button to quickly navigate back and forth
between previously-opened apps.
Note
To prolong battery life, it is better to close an app when you’ve finished using
it. Do this by either pressing the Back key or the Menu button and selecting
Exit (if available).
Managing contacts - 23
MANAGING CONTACTS
Managing your contacts
Your smartphone features an address book that
allows you to save contacts to either the internal
memory or onto your SIM card.
Tap the Contacts app from the Apps menu or tap
All contacts from the Dialer to view your contacts.
If you don’t have any contacts stored on your
smartphone, you can import your Google account
contacts, add a new contact or import contacts
from your SIM or SD card. Open the People app
from the Apps menu and then tap to add a
contact, to search for a contact, or tap the
Menu button to open the menu.
Adding a contact
Tap to add a new contact. You may also scan a person’s profile
barcode to add the person to your contact list or group.
To create a contact, first choose where you want to store the contact’s
information. You will then be asked to enter the contact’s information,
such as name, address, and phone number.
24 - Managing contacts
You may scroll down the page and tap Add another field to add
things such as:
• IM addresses.
• Add any personal notes about the contact.
• Phonetic name
• Link a website
To assign an image to your contact, tap the silhouette and select
whether to take a photo or select an image from your smartphone’s
picture gallery.
When done, click Done at the top of the screen.
Tapping on the contacts name will bring up their profile. Tap while
viewing a contact’s profile to edit, share, delete, or print the contact.
You may also set a ringtone for the contact, block incoming calls from
this contact, or place the contact on your Home screen.
You may also create a contact from an already dialed or received
number, see Saving a dialed number to contacts on page 30.
Making calls - 25
MAKING CALLS
This chapter shows you how to make phone calls, and the various
options available to you during your call.
Before making a call
Check that the phone function is on before you make a call. You can
confirm the phone status from the Notification area.
Note
Status and notification icon colors may vary. You will see an indicator icon for
each SIM card inserted.
Icon Description
Connected to the network: You may make a call.
Airplane mode: Wireless connectivity disconnected (Wi-Fi,
Bluetooth, and cellular services). Please disable airplane
mode before trying to make a call.
26 - Making calls
Making a call
1.From the Home screen tap the Phone icon to open the onscreen
number pad.
2.Enter the number you wish to dial.
3.Tap to make the call.
4.To end the call, tap .
If the contact you need is displayed, simply tap the contact name to
make a call.
Dialing a number from Call History
Your call history can be viewed by tapping the Call History button.
It displays recent received, dialed, and missed calls.
Tap the phone icon to redial. To view call details and other options,
tap the number or contact’s name.
Note
If you have multiple SIMs inserted in the smartphone, you will be asked which
SIM to use before the call is connected. To select a SIM, just tap the name of
the carrier.
Making calls - 27
Viewing missed calls
Missed call notifications are displayed in the following three areas:
1.The Notification area with the missed call icon. Open the
Notification area and tap the missed call notification to display the
missed call details.
2.By the phone icon (the number in the box is the number of missed
calls). Tap Phone from either the Home screen or the Apps menu to
directly display the missed call details.
3.On your smartphone’s lock screen. Tap
the notification and slide to the left or right
to display the missed call details.
Making a call to one of your contacts
Calling a contact from the Contacts tab
1.Tap the All contacts to view your contacts.
2.Tap on a contact to call them.
Calling a contact from the Contacts app
1.Tap the People icon the Apps menu to view your contacts.
2.Tap on a contact to open their profile.
3.Tap on the contact’s phone number to call them.
Dialing an international number
When dialing international numbers, there is no need to enter the
international direct dialing prefix (’00’ etc.) before the country code.
28 - Making calls
Simply tap and hold 0+ on the onscreen number pad until + appears
onscreen.
Direct dial widget
You may add a direct dial widget for a contact on your Home screen.
Open the Apps menu, then tap the Widgets tab. Tap and hold Direct
dial and you will be able to place the widget on your Home screen.
Once placed, you will be able to select a contact to associate with that
particular widget on your Home screen.
The voice call screen
You can minimize the call window to appear as a movable dialog
instead of a whole screen by tapping the icon. You can even set
this "floating" dialog box as the default voice call screen. To do so,
open the Notification area and tap the down arrow to display more
Quick Settings options(see Notification and status area on
Important
International call rates can vary greatly depending on the country you
are calling and your network provider. We suggest you check all call
rates with your network provider, to avoid excessive bills. If you are
using your smartphone abroad, roaming charges will apply. Consult
your network provider for roaming rates specific to the country you are
visiting before you leave.
Making calls - 29
page 21). Tap the Float caller button to activate (green means Float
caller is "ON").
Answering or declining a call
When you have an incoming call, the number will be shown on the
screen. To accept or decline the call, tap the appropriate icon and
slide your finger across the screen.
Ending a call
To end a call, tap from the voice call screen.
Voice call options
Icon Description
Place the call on hold.
Mute a call.
Speakerphone.
Access the keypad while a call is in progress.
One option:
• Add a second call
30 - Making calls
Saving a dialed number to contacts
You can save a number you have dialed to your contacts for future
use.
1.From the Call History , tap the number and then tap Add to
contacts .
2.Tap Create new contact and enter the information. See Adding a
contact on page 23.
Conference calls
If you have one call on hold and another on line, you can combine
both calls to create a conference call.
After the first call is established, tap to add a second call. Tap
to start the conference call.
Messaging - 31
MESSAGING
This chapter shows you how to set up and use the Messaging
functions of your smartphone.
All SMS and MMS messages are accessed via Messaging.
Messaging automatically arranges received and sent messages into
threads.
To access Messaging, open the Apps menu and tap Messaging on
the Home screen.
Creating a new message
You can use your smartphone to compose text (SMS) and multimedia
(MMS) messages.
Tap to compose a new message.
Tap to add contacts from your contacts list (People), or tap the
Type name or number field to enter the recipient’s phone number or
name directly. Suggested contacts will be displayed in a drop-down
list below the text field. To select a suggested contact, tap the
contact’s name.
Note
If you have multiple SIMs inserted in the smartphone, you will be asked which
SIM to use before the message is sent. To select a SIM, just tap the name of
the carrier.
32 - Messaging
Enter your message in the text box labeled Type text message.
Tap the Menu button to see what options are available when creating
a new message. The options change depending on the status of the
message.
Replying to a message
When a new text message arrives a message icon appears in the
Notification area and the message icon at the bottom of the
smartphone displays the number of unread text messages.
Tap Messaging from the Apps menu to view the message list or open
the Notification area to see a summary of the message. Tap the
summary to open the message list.
To reply to an SMS or MMS message, open the message from the
message list. Enter your text in the text box labeled Type text
message. Tap the Menu button to see available options.
Note
Text messages may be up to 160 characters long. If your message is longer
than 160 characters, it will be sent as multiple linked messages. Most phones
will automatically join the linked messages to present the recipient with a
single long message, however, some older phones do not have this ability.
Option Description
Insert quick text Insert pre-defined text content.
Insert contact Add a contact to the recipients list.
Add subject Add a subject to the message.
Discard Discard the message.
Option Description
Select message Select multiple messages.
Insert quick text Insert pre-defined text content.
Insert contact Add a contact to the recipients list.
Add subject Add a subject to the message.
Add to contacts Add the other contact to your contacts list.
Chat settings Modify various messaging settings.
Messaging - 33
Multimedia messages
Multimedia messages are similar to text messages but also allow you
to attach files such as pictures, audio or video clips. Each message
can be up to 300 kB in size.
Receiving multimedia messages
When a new multimedia message arrives, a message icon appears at
the top of the screen and a notification message is displayed.
1.The notification message displays a summary of the message. Tap
View to view a summary of the message.
2.Tap Download to download the message content. Downloads can
take a long time, depending on your connection quality. If you reply
or open another app, the download will be stopped.
3.Tap the message to view the content.
4.To reply to the message, enter your text in the text box labeled
Type message and tap the Send icon. Simple text replies will be
sent as SMS messages. If you wish to attach a file, tap . You will
be presented with a menu of options.
5.When you have finished composing the message, tap the Menu
button and tap Send.
Note
You need to set up an MMS profile before you can send MMS messages.
Normally, your smartphone will set up the profile for you based on information
retrieved from your provider.
Ask your network provider for the necessary information if you need to
manually set up the MMS profile.
Important
You may be charged to download message content, especially if you
are roaming. Please contact your provider if you have any questions.
34 - Going online
GOING ONLINE
Browsing the internet
In order to browse the internet with your smartphone, you must be
connected to a data or wireless network.
Using the browser
To start browsing, open the Apps menu and tap the Chrome or
Browser icon.
To open a new website, tap the address box at the top of the page.
Enter the address using the keyboard and tap Go. You can zoom in or
out of pages by pinching or reverse pinching.
Note
Reference images use the Chrome browser.
Going online - 35
To navigate forward and backward in your browser’s history, view
your bookmarks, adjust browser settings, and perform other tasks, tap
the Menu button.
Chrome enables you to open multiple pages. Tap at the top of any
webpage to display all of your open tabs (tap again to close). Tap a
tab from the list to open it. To open a new tab, tap New tab. The
number in the icon represents the number of open tabs.
Setting up Email
Your smartphone enables you to access your email. Most popular
ISPs can be set up in two steps. In the Apps menu tap Email to start
setting up your email account.
If necessary, enter your email address and tap Manual setup to enter
the parameters manually. Tap Next to finish the setup process.
Google services
You must activate a Google account before using Google services.
The first time you access Google services, you must read and accept
the Terms of Service.
Note
Apps may not be available in all countries and regions.
36 - Going online
Setting up your Google email
1.Make sure your smartphone is connected to a data or Wi-Fi
connection.
2.From the Apps menu tap Gmail.
If you did not enter your Gmail account address and password when
you first started your smartphone, follow the onscreen instructions.
Composing an email
1.Make sure your smartphone is connected to a data or Wi-Fi
connection.
2.From the Apps menu tap Gmail.
3.Tap .
4.Enter the recipient's email address, the subject and message.
5.When you are finished composing your message, tap .
Voice search
With voice actions, you can send text messages, place calls, send
emails, find directions of establishments, automatically call
establishments, search the internet and even send a note to yourself
using your voice. Tap Voice Search from the Apps menu, or tap the
microphone icon on the Home screen.
Going online - 37
Play Store
Tap Play Store from the Apps menu to open the Google Play. Here
you can obtain a variety of add-on programs and apps to enhance the
functionality of your smartphone.
The contents and design of Google Play varies by region. For
example, in some regions, you can also browse for and purchase
movies, books, magazines, or music. Updates may add new
categories or change how to navigate Google Play at any time.
You can browse the store by category or tap the search icon to search
for a specific app.
Once you have selected an app, tap the Install button to download
and install the app. You will be told which services the app requires
access in order to function correctly (e.g. contact information, wireless
access, GPS). If none of these services seem unusual, tap Accept &
download to proceed with the installation.
Important
For connection issues with Play Store, see FAQ and troubleshooting
on page 75
38 - Going online
You may keep track of the download progress from both the app’s
page and the notification area.
Using downloaded apps
Once you’ve downloaded and installed an app, you may find it in the
Apps or Widgets sections of the Apps menu.
Certain apps provide both an App and widget, or only provide a widget
(with no app icon). See Personalizing the Home screen on
page 18.
Uninstalling downloaded apps
Once you’ve downloaded and installed an app, you may uninstall the
app by opening the Apps menu and tapping Settings > Apps. In the
downloaded tab, select the the app you wish to uninstall and tap
Uninstall. Deleting an app icon from the Home screen only deletes
the shortcut.
Google Hangouts
Tap Hangouts from the Apps menu to open Google Hangouts. Here
you can see a list of your contacts connected to Google Hangouts
Important
Some apps may require payment before you can download them. You
will need to have a Google Wallet account in order to pay for these
apps, or a credit card number associated with your Google account.
Going online - 39
services. Tap on a contact to open a chat session. After you have
connected, you can open a video chat session.
Maps
Get easy-to-follow directions using Google Maps, view real-time traffic
condition and navigate by using spoken, turn-by-turn driving
instructions. Also, view where your friends are, places of interest, and
local businesses.
Using Maps
Tap the Maps icon in the Apps menu. Drag the map with your finger
to move the map around.
To zoom in or out:
1.Double tap a location on the map to zoom in on the location, and tap
once to zoom out, or
2.Touch an area with two fingers at once and spread them apart to
zoom in, and pinch them together to zoom out.
Note
Maps does not have information about every location.
Some locations may not have all zoom levels.
40 - Using the Camera
USING THE CAMERA
Your smartphone features two digital cameras mounted on the front
and on the rear. This section will take you through all the steps in
taking photos and videos with your smartphone.
To activate the camera, open the Apps menu and tap Camera.
Camera/camcorder icons and indicators
Flash
Camcorder button
Switch camera
Last picture / Mode selector
Shutter
Mute microphone
Settings
video taken
button
Zoom slider
Favorite shot
selector
The camera window provides multiple controls on the image screen.
Tap the area of the image you want to be the point of focus for the
auto-focus lens (only available on the rear camera). Zoom in or zoom
out using the zoom slider.
Tap the Shutter button or press the volume key to take a picture. Tap
the thumbnail in the bottom-right corner to open the gallery. Tap the
flash button to cycle the settings between off, automatic, and on.
Using the Camera - 41
Tap the Camcorder button and the camcorder immediately begins
filming. While filming, you are unable to access camera/camcorder
settings; however, you can still take pictures.
Tap the Pause button to temporarily stop recording and tap it again to
restart recording. Tap the Stop recording button to stop filming.
Time elapsed
Pause
Stop recording
Last picture /
Shutter button
video taken
42 - Using the Camera
Mode selector
Tap the Mode selector icon to open the list of modes you can choose
from. Tap the icons along the top to select different items.
Camera
Capture mode: Select a capture mode.
Scene mode: Adjust photo parameters for a particular environment.
Color effect: Applies a color effect to the image.
Normal Smile shutter
HDR Multi-angle view
Panorama Presentation
Beautification Dual Shot
Best shot Gourmet
Bright magic
Auto Backlight
Landscape Backlight portrait
Night Portrait
Night portrait
None Negative
Using the Camera - 43
Camcorder
Record mode: Select from Normal or Time lapse.
White balance
Compensate for different lighting environments.
Image properties
Adjust the Sharpness, Hue, Saturation, Brightness, and Contrast.
Timer
Set the delay before the shutter is activated.
Settings
Tap the Settings icon to open the settings menu; scroll up or down the
list to view more settings
Mono Aqua
Sepia
Auto Fluorescent
Daylight Incandescent
Cloudy
44 - Using the Camera
Photo
You may adjust the following:
• Resolution: Set the picture resolution.
• Set the ISO.
• Set a mode as your Favorite shot.
• Continuous shutter: Set the maximum number of photos taken in a
single burst.
• Turn Touch to capture on or off: Takes the photo immediately when
you tap the shutter button.
Video
You may adjust the following:
• Turn Video stabiliser on or off.
• Set the Resolution.
• Set the Audio mode to Normal or Mute.
Other
You may adjust the following:
• Turn location on or off: Stores GPS information in the image
information.
• Voice control: Enable taking photos with voice commands.
• Set a Voice command for Voice Control.
• Grid: Turn the composition grid on or off.
• Storage: Choose between Internal storage and SD card.
• Reset to default.
Taking a photo
1.Ensure you have adjusted the settings described above.
2.Frame your subject and steady your smartphone.
3.Zoom in or out as needed.
Note
Some of the following settings are not available for the front camera.
Using the Camera - 45
4.Tap the Shutter button to take a picture.
Using the Dual Shot feature
Dual Shot takes a photo using both cameras
simultaneously and superimposes one on the
other. This way you can add yourself into family
pictures, scenic shots, etc. After selecting Dual
Shot, a box appears on the screen displaying the
superimposed image.
• Tap, hold, and slide the box to reposition it.
• Tap and drag the + symbol to rotate and resize
the box.
• Tap the box to switch cameras.
Taking a panoramic photo
Panoramic mode allows you to take a series of up to nine photos that
the camera app will ‘stitch’ together to make a single extended image.
1.To take a panoramic photo, select Panorama mode.
2.Align the camera to take a photo of one end of the panoramic scene
(the furthest left, right, top or bottom).
3.Press the camera button to take the first image; then slowly and
smoothly turn the camera to the other end of the image.
• Two lines display on the screen: a flashing white line and a solid
blue line. As you move the camea, align the blue line to the
unmoving white line.
Note
If your photo needs fewer than nine images, tap the tick icon to stop the
selection process and process the captured images.
Panoramic images work best with static outdoor scenes. Objects too close to
the camera or large straight edges may confuse the detection process.
46 - Using the Camera
The camera app will process the images and save a single extended
image to your smartphone’s gallery.
Shooting a video
1.Frame your subject and steady your smartphone and zoom in or out
as needed.
2.Tap the Camcorder button to start taking a video. The icon will turn
red to indicate that recording is in progress. Tap the icon again to
stop recording.
Supported formats
Viewing photos and videos
After you have taken your photo or video, it is automatically saved.
Once you have taken a photo or video, you can view it in Gallery by
tapping the thumbnail in the corner of the image screen. Alternatively,
open the Apps menu and tap Gallery. From Gallery you can share the
file directly using various services. Services vary depending on the file
type.
You may also edit individual photos you have taken by tapping the
pencil icon in the lower left-hand corner of the screen.
Geotagging
Geotagging allows you to store the location where a photo or videa
was taken right in the photo or video itself.
For the geotag to display, pictures must be taken with GPS location
info turned on.
Note
To see supported image, video, and audio formats, see Multimedia on
page 83.
Using your smartphone with AcerEXTEND - 47
USING YOUR SMARTPHONE WITH
ACEREXTEND
PC system requirements
• PC or notebook with Windows 8 / 8.1 installed
• USB 2.0 / 3.0 port
• Memory: 1 GB and above
• Graphics with Microsoft DirectX support
Smartphone system requirements
• Android device with Android 4.2 or higher
• Micro USB port
• Wireless network
• Memory: 512 MB and above
Install PC application software
In order to use AcerEXTEND, you will first need to install the software
on your computer. Connect your smartphone to your computer using
a USB cable. The PC application software installer can be extracted
directly from the smartphone's internal storage or from an SD card.
Once you have successfully installed the software and followed the
onscreen setup instructions, your smartphone's screen will be
displayed on your computer. You will be able to operate your
smartphone from your computer via a USB cable or wireless
connection.
1.Connect your Acer smartphone to your computer via a USB cable.
2.Once you have successfully established a connection (installation
procedures may vary depending on smartphone model), follow the
instructions to continue the setup.
3.Tap AcerEXTEND on your smartphone and follow the onscreen
instructions to continue setup.
48 - Using your smartphone with AcerEXTEND
4.In Settings > Developer options, USB
debugging must be enabled. Tap the empty
checkbox and tap OK to allow USB debugging.
5.Open the smartphone's MTP drive (internal storage or SD card) in
My Computer and find AcerEXTENDInstaller.exe. Double-click to
start the installation.
Note
To enable Developer options go to Settings > About phone, and tap Build
number until you see "You are now a developer" appear at the bottom of the
screen.
Using your smartphone with AcerEXTEND - 49
If you see the Windows security popup window after double-clicking
the installer, click More info and click Run anyway.
The AcerEXTEND application software will begin uncompressing
and installing onto your computer. Follow the instructions on your
computer to complete the installation. When the installation is
complete, AcerEXTEND will automatically detect and connect to
your smartphone. See the following figure for reference.
6.You may be prompted to Allow USB debugging? Tap OK.
7.The button in the center of your smartphone’s
screen indicates AcerEXTEND’s current status.
Tap the button to turn AcerEXTEND on or off.
8.Once the connection is established, the
smartphone's screen will appear on your
computer's desktop. An AcerEXTEND Wireless
Connection Tutorial will also appear.
AcerEXTEND toolbar
Once the smartphone's screen is displayed on your computer's
desktop, you can click the button to extend the toolbar. From here,
Note
Some antivirus software may prevent this installer from running on your
computer. You may copy the installer from the smartphone's internal storage
drive onto your computer's desktop and run the installer from there.
50 - Using your smartphone with AcerEXTEND
you can control all of your smartphone features. Click the button again
to hide the toolbar.
The toolbar functions are described below:
Icon Function Icon Function
Back Home
Switch app
Turn Always on top on or
off
Minimize AcerEXTEND
window
Close AcerEXTEND
Turn wireless connection
on or off
Turn power saving on or
off
Resume or suspend your
smartphone
Rotate the screen to the
left or right
Increase or decrease the
volume
Go to the next or previous
page
Switch the input between the smartphone and computer
keyboard
Using your smartphone with AcerEXTEND - 51
AcerEXTEND wireless connection
There are four ways to establish a wireless connection between your
smartphone and your computer:
1.Right-click the AcerEXTEND icon in your computer's system tray
and select AcerEXTEND (Wireless).
2.Double-click the AcerEXTEND shortcut on your computer's desktop
or double-click the AcerEXTEND icon in the system tray.
You will be reminded to connect your smartphone via a USB port.
An AcerEXTEND window will display any connected smartphones.
Select your smartphone and click it to start the wireless connection.
3.You may switch to a wireless connection once you have
successfully connected to your smartphone via a USB cable. If a
wireless connection is available between your computer and
smartphone, the wireless symbol at the top of the extended toolbar
Note
Your Acer smartphone and computer must both be connected to the same
wireless network before you can establish an AcerEXTEND wireless
connection.
52 - Using your smartphone with AcerEXTEND
will change to . Click the button to toggle the connection from
USB cable to wireless.
4.You may also use Sound Trigger. Sound Trigger must first be
enabled on your smartphone. Tap the setup menu in the top right-
hand corner of the AcerEXTEND panel on your smartphone. Tap the
switch ON to Enable Sound Trigger. When your smartphone is close
to your computer, a wireless connection will automatically sync your
smartphone to the computer.
You can delete or turn Sound Trigger on or off for each paired
smartphone by tapping the red trash bin or checking and unchecking
the box next to each paired smartphone. By default, all paired
smartphones are named My smartphone. You can change the
default name for your paired smartphone by clicking My
smartphone and renaming the paired smartphone.
There are two options located in the Settings window that can be
used to control Sound Trigger detection. To display the Settings, click
the left-bottom button in Pairing Maintenance.
Enable the first option Auto extend when the smartphone moves
close to this computer. (enabled by default) and AcerEXTEND will
automatically start when the smartphone is close to the computer.
Enable Auto disconnect when the smartphone moves away from this
computer. (disabled by default) and AcerEXTEND will automatically
disconnect when the smartphone moves away from your computer
for a specified period of time.
Note
To connect your smartphone with your computer via a wireless network, you
will need to first pair your smartphone with your computer via a USB cable.
Using your smartphone with AcerEXTEND - 53
AcerEXTEND functions
1.Bidirectional control: Once an AcerEXTEND connection has been
made, your smartphone's screen will be displayed on the computer.
You can view and control the smartphone by using your computer's
mouse or directly touch your computer's screen if your computer is
equipped with a touchscreen panel. You can also share files
between your computer and smartphone. The screen of your
smartphone will dynamically mirror onto your computer.
AcerEXTEND will auto rotate the screen on the computer when it
detects that the orientation of the smartphone has changed.
2.Air Wireless Play: AcerEXTEND supports Acer smartphone user
control from your computer via a wireless connection and can be
auto started by Sound Trigger if it is enabled. Your smartphone and
computer must both be connected to the same wireless access
point. Operating your smartphone via wireless connection may be
more convenient than connecting via a USB cable.
3.Directly input text: You can easily input text into your smartphone by
using the keyboard of your computer. Easily toggle between the
smartphone's onscreen keyboard and the computer's keyboard from
the AcerEXTEND extended toolbar.
4.Copy and paste: With the clipboard sharing feature, you can edit
and copy and paste the clipboard contents between the computer
and your smartphone.
• Open the source file, select and right-click on the text that you
want to copy, and choose Copy from the content menu.
• Move the cursor to the smartphone's screen on your computer
and open the destination editor file.
54 - Using your smartphone with AcerEXTEND
• Move the cursor to the location you want to place the text, left-
click and hold, and click Paste.
5.Drag and drop: Drag and drop the file by selecting and dragging the
file on your computer with your mouse to the smartphone screen on
your desktop to transfer the file to your smartphone.
6.Share to open: Transfer files like photos and videos from your
smartphone to your computer by directly using the smartphone or
the smartphone's screen on the computer's display. Open the file
and click the AcerEXTEND icon to transfer the file. The shared file
will be downloaded to the specified path on your computer. Once the
file has finished downloading, an AcerEXTEND window will confirm
that the shared file has been downloaded.
• Share a picture immediately after it is taken by tapping the Share
icon and then tapping the AcerEXTEND icon. The file will be
downloaded to the specified path on the computer.
• Send a web page or a YouTube link from your smartphone to your
computer. Tap on the Settings icon in the upper right-hand corner
and tap Share page. In Share via, tap AcerEXTEND and the web
page will be opened on your computer.
• When sharing a YouTube video, tap on the Share icon. In Share
this video via, tap AcerEXTEND and the YouTube video will
open on your computer.
Note
You can also copy and paste text from your smartphone to your computer by
following the same instructions.
You can also use your computer's keyboard's hotkeys to control your
smartphone's editor: <Ctrl>+<A> (select all); <Ctrl>+<C> (copy); and
<Ctrl>+<V> (paste).
This function depends on the capabilities of the smartphone's editor and may
not work in all apps.
Using your smartphone with AcerEXTEND - 55
AcerEXTEND FAQ
Why can't I use my smartphone's onscreen keyboard to enter
text with AcerEXTEND?
AcerEXTEND may have crashed or did not properly shut down,
therefore, causing the AcerEXTEND software keyboard to remain as
the default keyboard input method. Follow the steps below to recover
your smartphone's onscreen keyboard:
1.Open Settings from the Applications menu.
2.Select Language & input.
3.Choose your input method by tapping Default.
Why can’t I connect to AcerEXTEND wirelessly?
• Make sure your smartphone and computer are both connected to
the same wireless network.
• If your smartphone is not showing on the AcerEXTEND (wireless)
list, click the refresh button in the upper-right corner to refresh.
• Try to connect your smartphone via a USB cable first and then
switch to a wireless connection by clicking the wireless button on the
extended toolbar.
• You may need to first disable AcerEXTEND on your smartphone
and then re-enable it. If you cannot disable AcerEXTEND, try
rebooting the smartphone first before disabling AcerEXTEND.
• If you have followed the instructions above and still see a blank
wireless button in the extended toolbar after establishing a
connection via a USB cable, check if the antivirus software installed
on your computer has blocked your wireless connection. Disable
your antivirus and try again.
Why does my AcerEXTEND screen keep freezing after
connecting to a wireless network?
• The problem may be caused by a poor wireless signal or you may
be experiencing high interference in the area. In this situation, a
USB cable will provide a more stable AcerEXTEND connection.
• Another alternative will be to enable your smartphone's mobile
hotspot and sync your computer through this hotspot.
56 - Using your smartphone with AcerEXTEND
Why do I constantly see the AcerEXTEND ON/OFF warning
window?
You may be encountering this problem because the driver for the
smartphone's USB debugging interface was not installed properly.
Please connect your USB cable to a USB 2.0 port on your computer
first and then restart AcerEXTEND.
How do I dismiss the AcerEXTEND - Acer smartphone Not
Found warning?
• Unlock the smartphone. If you see a window asking you to Always
allow from this computer, make sure it is checked and tap OK.
• If you do not see the alert window, try disconnecting and re-
connecting the USB cable to see if the alert window appears.
• Make sure the date and time on your computer are correct. If it is not
correct, adjust the time and restart AcerEXTEND.
• Check if there are any third party smartphone assistant applications
installed on your computer. Turn any third party smartphone
assistant applications off and restart AcerEXTEND.
I can’t control my smartphone with computer’s mouse, how do I
fix it?
• Make sure you have the latest version of AcerEXTEND installed on
your smartphone and computer.
• Try rebooting your smartphone.
How can I copy files from my smartphone to my computer?
Android does not support dragging and dropping files. To copy a file
from your smartphone to your computer, please select the file using
an app, such as a File Manager, and use the Share function to share
the file to your computer via AcerEXTEND.
I can’t share a file or web link from my smartphone, how can I fix
this?
Android may have terminated the AcerEXTEND service due to a
resource shortage. Re-start the AcerEXTEND connection.
How can I improve the quality of AcerEXTEND wireless
connections?
If you experience screen lag or it freezes frequently when you are
using AcerEXTEND over a wireless connection, the Wi-Fi channel
Using your smartphone with AcerEXTEND - 57
used by your smartphone is experiencing interference from other
devices, or the Wi-Fi signal is weak. You can try to use your
smartphone’s Hotspot feature and let your computer join the
smartphone’s Hotspot network.
58 - Advanced settings
ADVANCED SETTINGS
Putting your smartphone in Airplane mode
You can enable Airplane mode (also known as flight mode) to turn off
telephone, wireless and Bluetooth functions and use your smartphone
as a handheld device during a flight. Check with your airline to make
sure this is permitted onboard.
Switch your smartphone off during takeoff and landing as it may
interfere with aircraft electronic systems.
Turning Airplane mode on or off
1. Open the Notification area and tap the grid icon in the upper
right-hand corner.
2. Tap .
-OR-
Advanced settings - 59
1.Press and hold the power button until you get the smartphone
options menu.
2.Tap Airplane mode to switch it ON or OFF.
Restarting your smartphone
You can restart (reboot) your smartphone if you find apps are not
responding.
1.Press and hold the power button until you get the smartphone
options menu.
2.Tap Restart.
Note
When Airplane mode is active, the icon will be displayed in the Notification
area.
60 - Advanced settings
Adjusting settings
Activating or deactivating connections
Open the Apps menu and tap Settings to manage your connection
settings.
Item Description
SIM management
Set a default SIM for particular functions
(such as voice calling or messaging), turn the
data connection on or off, set roaming
preferences and associate contacts with a
SIM.
Wi-Fi Turn the Wi-Fi function on or off.
Bluetooth Turn the Bluetooth function on or off.
Data usage
View an estimate of the mobile data used for
each SIM.
Call Settings
Change Voice Call settings.
Change Internet Call settings.
Adjust Other Settings.
Turn Float Caller on or off.
Set Proximity Sensor.
Turn Flip Mute on or off.
Advanced settings - 61
If your smartphone is in Airplane mode, the option to turn Bluetooth on
will be disabled. Please refer to Putting your smartphone in
Airplane mode on page 58 for instructions on turning Airplane mode
on or off.
Adjusting Bluetooth settings
You can use Bluetooth to exchange information between your
smartphone and other mobile devices.
Bluetooth connections
For all Bluetooth settings, open the Apps menu and tap Settings >
Bluetooth. Here you can switch Bluetooth on or off, set a device
name and discoverability. Tap SEARCH FOR DEVICES to scan for
available devices.
To connect to a device, tap the device in the list of available devices.
You may be asked to enter a PIN on both devices to establish the
connection.
To simply turn on or off Bluetooth, open the Notification area and tap
the Bluetooth button.
More...
Access additional connection settings:
Airplane mode: Disable all wireless
connections so you can safely use this device
onboard an aircraft.
Default SMS app: Choose which app serves
as the default SMS app.
Tethering & portable hotspot: Share your
smartphone’s mobile data connection via
USB or as a portable Wi-Fi hotspot.
VPN: Set up and manage Virtual Private
Networks.
Mobile networks: Set your options for
connecting to mobile networks.
USB Internet: Share your computer’s internet
connection via a USB cable. See Internet
sharing on page 62.
Item Description
62 - Advanced settings
Internet sharing
Tethering via USB
If you wish to share your mobile internet connection with a computer,
you can connect your smartphone to a PC using the supplied USB
cable.
1.Plug the USB sync cable into the micro USB connector on your
smartphone.
2.Plug the USB sync cable into an available USB port on your
computer.
3.Tap Settings > More.. > Tethering & portable hotspot > USB
tethering.
Wi-Fi hotspot
You can turn your smartphone into a portable Wi-Fi hotspot to share
your mobile internet connection with up to 8 clients.
1.Tap Settings > More... > Tethering & portable hotspot. Turn Wi-Fi
hotspot ON.Tap Wi-Fi hotspot > Set up Wi-Fi hotspot.
2.Set the Network SSID and adjust security between None and WPA2
PSK. Tap Save to finish.
Smartphone network settings
In the Apps menu tap Settings > More... > Mobile networks to adjust
your network settings. You can turn data connection on or off when
roaming, choose a preferred network mode, specify a network
operator and define access point names.
Note
When your smartphone is serving as a Wi-Fi hotspot, you can’t use your
smartphone’s apps to access the internet via its Wi-Fi connection.
Advanced settings - 63
Selecting a network
Your smartphone will automatically detect your carrier/network
settings when you insert a new SIM card. However, you may prefer to
manually select a network. This may be a good idea when roaming.
1.Open the Apps menu and tap Settings > More... > Mobile
networks > Network operators > Select Manually.
2.Your smartphone will search for available networks.
3.Select your preferred network from the list generated. Your
smartphone will attempt to register on the selected network.
4.Tap Select automatically to connect to the available network with
the strongest signal. This may lead to your smartphone jumping
between networks when you move around.
Data usage control settings
Data usage controls let you monitor total usage by network type and
app and then set limits if needed.
Ensure Wi-Fi or mobile data is enabled before setting a limit. Access
data usage settings from the Apps menu by tapping Settings > Data
usage.
Smartphone settings
Many smartphone settings are automatically configured by your
smartphone when you insert a SIM card. The device will communicate
with your provider and automatically obtain all necessary settings,
such as network name, voice mail and text message center numbers.
You can also view and modify these settings manually through the
Call settings screen.
Note
When you are traveling, manually selecting a network may help to reduce
your roaming charges. Check with your home service provider for the
network offering the most competitive rates at your destination.
Note
Contact your service provider should you have any problems obtaining voice
mail and the text message service center numbers.
64 - Advanced settings
Sound
To adjust your smartphone’s sound settings, in the Apps menu tap
Settings > Sound.
Adjusting the volume
Adjust the volume of your smartphone using the volume button on the
side of the smartphone. Alternatively, you can set the Ringtone,
Notifications, and Alarms volume by opening the Apps menu and
tapping Settings > Sound > Volumes.
Audio profiles
To adjust your smartphone’s sound settings, in the Apps menu tap
Settings > Audio profiles. Choose from General, Silent, Meeting, or
Outdoor.
Item Description
Vibrate Vibrates the device for incoming calls.
Volumes
Adjust the Ringtone, Notifications, and Alarm
volumes.
SIM1 ringtone Sets your default ringtone for SIM1.
SIM2 ringtone Sets your default ringtone for SIM2.
Default notification
sound
Set your smartphone’s default notification
sound.
Dial pad touch tones Play tones when using dial pad.
Touch sounds
Play sounds when touching certain UI
elements.
Screen lock sound
Play sound when locking and unlocking the
screen.
Vibrate on touch
Vibrate when pressing soft keys and on
certain UI interactions.
Advanced settings - 65
Display
To adjust your smartphone’s display settings, in the Apps menu tap
Settings > Display.
Setting the date and time
To set the date and time, open the Apps menu and tap Settings >
Date & time.
If you travel frequently or live in an area that uses daylight saving
time, activate Automatic date & time > Use network-provided time
from this menu. This will enable your smartphone to set the date and
time based on information it receives from the network.
Setting alarms
There are two predefined alarms on your smartphone by default. Tap
Clock in the Apps menu, and then tap to edit alarm settings. You
may:
• Turn the alarm on or off.
• Set the alarm time.
Item Description
Theme Change the Home screen’s theme.
Brightness Adjust screen brightness.
Auto-rotate screen
Enable rotation of the screen when device is
tilted.
Sleep
Adjust the delay before the screen
automatically turns off.
Daydream
Controls what happens when the smartphone
is docked and/or sleeping.
Font size Change the default font size for the UI.
Wireless Display
Mirrors your smartphone’s display on a
compatible monitor or display.
Pairing your smartphone to the display is
required before use and may require a
dongle. See the instructions that came with
your display or dongle to pair.
66 - Advanced settings
• Set which days to repeat the alarm.
• Set a ringtone.
• Enable or disable vibrate.
• Give it a label.
Changing language and text options
Set your location and language input preferences by opening the
Apps menu and going to Settings > Language & input.
Connecting to a PC
If you wish to transfer information between your
device and your computer (either the microSD
card in your device or the device’s internal
memory), you can connect your device to a PC
using the supplied USB cable.
1.Plug the USB sync cable into the micro USB
connector on your smartphone.
2.Plug the USB sync cable into an available USB
port on your computer.
3.Open the notification area and tap Connected
as a media device to choose whether to
connect as a Media device (MTP) (the default
option) or Camera (PTP).
Your device will now be available as a drive in your computer’s file
explorer.
Synchronization
You can sync your calendar, email and contacts on your smartphone
and never worry about losing them again. Sync in real time or adjust it
as you please. In the Apps menu, tap Settings. Under ACCOUNTS,
Note
After turning on USB storage, you will not be able to access the files in the
microSD card or apps such as Gallery or Music.
Advanced settings - 67
tap the appropriate account and again under ACCOUNTS tap that
account’s email address to access the synchronization settings.
To add a new account, tap Add account. Select the type of account
and then follow the onscreen instructions.
Google Sync
In Google, you can set synchronization for Google services. In your
Google account’s synchronization settings menu, tap the checkmark
next to the item you would like to have sync automatically. Tap again
to uncheck for manual synchronization.
To manually synchronize an item, make sure the item is checked, tap
the Menu button and then tap Sync now.
FM radio
The FM radio allows you to listen to your favorite stations while on the
move. Headphones must be inserted to the 3.5 mm jack as the cable
functions as an antenna.
You can access the radio by tapping FM Radio from the Apps menu.
Note
You need a Google account to sync your calendar and appointments.
68 - Advanced settings
Tap the back icon to turn the radio off.
Applications (apps)
Closing an app
To close an active app, in the Apps menu tap Settings > Apps.
Swipe over to the Running tab, then tap the program you wish to
close. Select Stop to close the program.
Uninstalling an app
You can remove programs installed on your smartphone to free up
extra storage memory.
1.In the Apps menu tap Settings > Apps.
2.Swipe over to the Downloaded tab.
3.Find the app in the list and tap on it.
4.Tap the Uninstall button and then tap OK.
Restoring to factory settings
You may perform a clean boot to restore your smartphone to the
factory settings. Before performing a clean boot, ensure that your
Important
You should only remove programs if you are familiar with the Android
operating system.
Advanced settings - 69
smartphone is not locked. Press any key or tap the screen to see if
the smartphone responds.
If your smartphone is responding to screen input, then open Settings
from the Apps menu. Tap Backup & reset > Factory data reset >
Reset phone and then Erase everything to format your smartphone.
Important
You should only perform a clean boot when all other options have failed
to restore your smartphone to an operational state.
This will erase all your personal information, any contacts stored on
your smartphone and any programs you installed.
70 - Accessories and tips
ACCESSORIES AND TIPS
This chapter shows you how to use accessories with your
smartphone, as well as provide useful tips for when you are using
your smartphone.
Using the headset
Your smartphone is compatible with headsets with built-in microphone
for handsfree use when making calls.
To use the headset, plug it into the 3.5 mm headphone jack at the top
of the smartphone.
When the headset is plugged in, all audio is routed to the headset,
and the speakers are turned off.
• To answer an incoming call, press the button on the microphone.
• Adjust the volume using the volume up/down button on the
smartphone.
• End the call by pressing the button again.
Using a Bluetooth headset
Your smartphone’s Bluetooth functions make it fully compatible with
all Bluetooth headsets. This allows you to use the unit handsfree
when making calls, without the inconvenience of wires.
Creating a new access point
When you need to add another GPRS / EDGE / 3G / 4G connection
on your smartphone, obtain the access point name and settings
(including username and password if required) from your wireless
service provider.
1.Open the Apps menu and tap Settings > More... > Mobile
networks > Access Point Names, and select an operator.
2.Tap the Menu button and then tap New APN.
3.Enter the APN settings. Tap an item to adjust it.
Accessories and tips - 71
4.When you have finished tap the Menu button and then tap Save.
Inserting a microSD card
Your smartphone features a memory expansion slot that accepts a
microSD card to expand memory and storage capacity.
Please refer to Installing a SIM or microSD card on page 7 for
instructions on installing a microSD card.
Important
Some providers and countries do not allow the use of a smartphone as
a modem over HSDPA. Please check with your provider before
attempting to do so.
72 - Managing your SIM cards
MANAGING YOUR SIM CARDS
If your smartphone detects a new SIM card, you
will be asked to confirm the preferred SIM to use
for each action.
It indicates the following information:
1.The color used for each SIM card and its
network name.
• The preferred SIM for outgoing calls.
• The preferred SIM for sending messages.
• The preferred SIM for mobile data.
Tap Change to edit these settings from the SIM
Management screen. You can also access the
SIM Management functions by opening the Apps menu and tapping
Settings > SIM management.
SIM Management
Open the Apps menu and tap Settings > SIM
management. From this screen, you can:
1.Enable or disable each SIM.
2.Configure each SIM’s name, phone number,
display numbers, and assign a color to each
SIM (allowing you to quickly and easily
recognize which SIM is active).
3.Set the default SIM for voice calls, messaging,
data connection, and 4G/3G service.
4.General settings for each SIM.
Note
This chapter is for models with more than one SIM card.
Managing your SIM cards - 73
Selecting which SIM to use when making a call
If you have set Voice call to Always ask, you will be asked which SIM
to use each time you make call. Enter the number, then tap . A
dialog opens; tap the SIM to use and the call will be connected.
Selecting which SIM to use when sending a text message
If you have set Messaging to Always ask, you will be asked which
SIM to use each time you send a text message. Enter the message
and recipient information, then tap Send. A dialog opens; tap the SIM
to use and the message will be sent.
74 - Managing your SIM cards
Identifying calls
Whenever you receive a call, the caller’s number will be shown using
the color defined for the SIM that the call is being received on. You will
also be shown the name of the SIM receiving the call.
In the call log, the name of the SIM will be shown beneath the number
of the call -- whether the call was missed, answered or was an
outgoing call -- in the color you defined for that SIM.
Limitations when using multiple SIMs
When a SIM is: Other SIM cannot:
In a call Dial out
Ringing
Receive a call (caller will get a
"number not available" message)
Sending or receiving a message Send or receive a message
Using a data connection Use a data connection
Note
If you are using data on one SIM and you make or receive a call, or send or
receive a text message on another SIM, the first SIM’s data connection will
be temporarily halted.
Appendix - 75
APPENDIX
FAQ and troubleshooting
This section lists frequently asked questions that may arise during the
use of your smartphone, and gives easy answers and solutions to
these questions.
Aspect Question Suggestions
Audio
Why is there no
sound coming
from the device?
If the headset is plugged into the
device, the speaker is
automatically shut off. Disconnect
the headset.
Check that the device volume
setting is not muted.
Check that the volume control is
not at its lowest setting.
Multimedia
files
Why can’t I view
my picture files?
You may be trying to view an
image that is not supported. See
Multimedia on page 83.
Why can’t I view
my video files?
You may be trying to view a video
that is not supported. See
Multimedia on page 83.
Why can’t I play
my music files?
You may be trying to play a file that
is not supported. See Multimedia
on page 83.
76 - Appendix
Google Play
Store
Why can’t I
connect to the
Play Store?
1.First check that you have a Wi-Fi
or data connection (some Wi-Fi
"hotspots" require you to log in
before accessing the internet)
and then try again.
2.If you still cannot connect, try
adjusting your date/time settings.
Open the Apps menu and tap
Settings > Date & time >
Automatic date & time set to
off.
3.Manually adjust the time and
then try to reconnect to the Play
Store.
System
information
and
performance
How do I check
the OS version
of my device?
Tap Settings > About phone to
check the OS version (Build
number) and other hardware and
software information.
Power
I can’t turn on
the device.
The battery power may be
depleted. Recharge the device.
See Charging the battery on
page 6 for more information.
RAM / ROM
How do I check
the RAM and
ROM memory
status?
To check the ROM status, tap
Settings > Storage.
To check RAM status, tap Settings
> APPS > RUNNING.
Internal
storage
My device’s
available
internal storage
is full or almost
full.
Uninstall apps to increase available
storage. See Uninstalling an app
on page 68.
Aspect Question Suggestions
Appendix - 77
Other sources of help
For information on Refer to ...
Up-to-date information regarding
your smartphone
www.acer.com
mobile.acer.com
Service enquiries www.acer.com/support
Unlock pattern
I forgot my
unlock pattern.
After a certain number of wrong
entries, you will be presented with
an option to reset your pattern. Tap
Forgot pattern? and enter your
Google account username and
password.
You must have an active Google
account on the smartphone.
Alternatively, you restore your
smartphone to factory settings. See
Restoring to factory settings on
page 68.
Heat
The smartphone
heats up when
charging or
making long
duration calls.
It is normal for the smartphone to
heat up when charging. When
charging is complete, it will return
to its normal temperature.
It is also normal for the smartphone
to heat up during long periods of
use, such as watching a video or a
long smartphone conversation.
Aspect Question Suggestions
78 - Warnings and precautions
WARNINGS AND PRECAUTIONS
• Do not use this product near water.
• Do not place this product on an unstable cart, stand or table. If the
product falls, it could be seriously damaged.
• Slots and openings are provided for ventilation to ensure reliable
operation of the product and to protect it from overheating. These
openings must not be blocked or covered. The openings should
never be blocked by placing the product on a bed, sofa, rug or other
similar surface. This product should never be placed near or over a
radiator or heat register, or in a built-in installation unless proper
ventilation is provided.
• Never push objects of any kind into this product through cabinet
slots as they may touch dangerous voltage points or short-out parts
that could result in a fire or electric shock. Never spill liquid of any
kind onto or into the product.
• To avoid damage of internal components and to prevent battery
leakage, do not place the product on a vibrating surface.
• Never use this product when engaging in sporting activities,
exercising, or in any vibrating environment which may cause a short
circuit or damage, and even a risk of explosion from the battery
pack.
Protecting your hearing
To protect your hearing, follow these instructions.
• Increase the volume gradually until you can hear clearly and
comfortably.
• Do not increase the volume level after your ears have adjusted.
• Do not listen to music at high volumes for extended periods.
• Do not increase the volume to block out noisy surroundings.
• Decrease the volume if you can’t hear people speaking near you.
Additional safety information
Your device and its enhancements may contain small parts. Keep
them out of the reach of small children.
Warnings and precautions - 79
Operating environment
Remember to follow any special regulations in force in any area, and
always switch off your device when its use is prohibited or when it
may cause interference or danger. Use the device only in its normal
operating positions. To successfully transmit data files or messages,
this device requires a good quality connection to the network. In some
cases, transmission of data files or messages may be delayed until
such a connection is available. Ensure that the above separation
distance instructions are followed until the transmission is completed.
Parts of the device are magnetic. Metallic materials may be attracted
to the device, and persons with hearing aids should not hold the
device to the ear with the hearing aid. Do not place credit cards or
other magnetic storage media near the device, because information
stored on them may be erased.
Medical devices
Operation of any radio transmitting equipment, including wireless
smartphones, may interfere with the functionality of inadequately
protected medical devices. Consult a physician or the manufacturer of
the medical device to determine if they are adequately shielded from
external RF energy or if you have any questions. Switch off your
device in health care facilities when any regulations posted in these
areas instruct you to do so. Hospitals or health care facilities may be
using equipment that could be sensitive to external RF transmissions.
Pacemakers. Pacemaker manufacturers recommend that a minimum
separation of 15.3 cm (6") be maintained between wireless devices
and a pacemaker to avoid potential interference with the pacemaker.
These recommendations are consistent with the independent
research by and recommendations of Wireless Technology Research.
Persons with pacemakers should do the following:
• Always keep the device more than 15.3 cm (6") from the pacemaker.
Important
For safety reasons, turn off all wireless or radio transmitting devices
when using your smartphone device under the following conditions.
These devices may include, but are not limited to: wireless LAN
(WLAN), Bluetooth and/or cellular services.
80 - Warnings and precautions
• Not carry the device near your pacemaker when the device is
switched on. If you suspect interference, switch off your device, and
move it.
Hearing aids. Some digital wireless devices may interfere with some
hearing aids. If interference occurs, consult your service provider.
Vehicles
RF signals may affect improperly installed or inadequately shielded
electronic systems in motor vehicles such as electronic fuel injection
systems, electronic anti-skid (anti-lock) braking systems, electronic
speed control systems, and air bag systems. For more information,
check with the manufacturer, or its representative, of your vehicle or
any equipment that has been added. Only qualified personnel should
service the device, or install the device in a vehicle. Faulty installation
or service may be dangerous and may invalidate any warranty that
may apply to the device. Check regularly that all wireless equipment
in your vehicle is mounted and operating properly. Do not store or
carry flammable liquids, gases, or explosive materials in the same
compartment as the device, its parts, or enhancements. For vehicles
equipped with an air bag, remember that air bags inflate with great
force. Do not place objects, including installed or portable wireless
equipment in the area over the air bag or in the air bag deployment
area. If in-vehicle wireless equipment is improperly installed, and the
air bag inflates, serious injury could result. Using your device while
flying in aircraft is prohibited. Switch off your device before boarding
an aircraft. The use of wireless teledevices in an aircraft may be
dangerous to the operation of the aircraft, disrupt the wireless
telephone network, and may be illegal.
Potentially explosive environments
Switch off your device when in any area with a potentially explosive
atmosphere and obey all signs and instructions. Potentially explosive
atmospheres include areas where you would normally be advised to
turn off your vehicle engine. Sparks in such areas could cause an
explosion or fire resulting in bodily injury or even death. Switch off the
device at refueling points such as near gas pumps at service stations.
Observe restrictions on the use of radio equipment in fuel depots,
Warnings and precautions - 81
storage, and distribution areas; chemical plants; or where blasting
operations are in progress. Areas with a potentially explosive
atmospheres are often, but not always, clearly marked. They include
below deck on boats, chemical transfer or storage facilities, vehicles
using liquefied petroleum gas (such as propane or butane), and areas
where the air contains chemicals or particles such as grain, dust or
metal powders.
Follow any restrictions. Do not use the device where blasting is in
progress.
Emergency calls
If certain features are in use, you may first need to turn those features
off before you can make an emergency call. Consult this guide or your
service provider for more information.
When making an emergency call, give all the necessary information
as accurately as possible. Your wireless device may be the only
means of communication at the scene of an accident. Do not end the
call until given permission to do so.
Taking care of your smartphone
1.DO take care not to scratch the screen of your smartphone. Keep
the screen clean. When working with your smartphone, use your
finger or fingernail. Never use an actual pen or pencil or other sharp
object on the screen surface.
2.DO NOT expose your smartphone to rain or moisture. Do not let
water enter the circuitry through the front panel buttons or expansion
slots. In general, treat your smartphone as you would a mobile
phone or other small electronic device.
Important
Wireless smartphones, including this device, operate using radio
signals, wireless networks, landline networks, and user-programmed
functions. Because of this, connections in all conditions cannot be
guaranteed. You should never rely solely on any wireless device for
essential communications like medical emergencies.
82 - Warnings and precautions
3.DO be careful not to drop your smartphone or subject it to any
strong impact. Do not place your smartphone in your back pocket.
4.DO NOT expose your smartphone to extreme temperatures. For
example, do not leave your smartphone on the dashboard of a car
on a hot day or when temperatures are below freezing point. Also,
keep it away from heaters and other sources of heat.
5.DO NOT use or store your smartphone in any location that is dusty,
damp or wet.
6.DO use a soft, damp cloth to clean your smartphone. If the surface
of the screen becomes soiled, clean it with a soft cloth moistened
with diluted window-cleaning solution.
7.DO NOT press down on the screen with force, otherwise you may
crack the screen.
- 83
Specifications
Performance
• 1.5 GHz quad-core processor
• System memory:
• 1 GB or 2 GB of RAM (depending on model)
• 8 GB or 16 GB of ROM (depending on model)
• Android operating system
Display
• 5" TFT LCD, capacitive touchscreen
• 1280 x 720 resolution
Multimedia
Formats supported:
USB connector
• Micro USB connector
• USB client
• DC power-in (5.2 V, 1.35 A)
Note
Specifications may vary depending on region and configuration.
Type Formats
Image JPEG, GIF, PNG, BMP
Audio playback MP3, AMR, AAC LC, AAC+, eAAC+, Vorbis, FLAC,
MIDI, WAVE
Ringtone MP3, AMR, AAC LC, AAC+, eAAC+, Vorbis, FLAC,
MIDI, WAVE
Video recording H.263, H.264, MPEG4
Video playback H.263, H.264, MPEG4, VP8
84 -
Connectivity
• Bluetooth 4.0
• IEEE 802.11b/g/n
• LTE Band 1, 3, 7, 20 (Europe and Asia); 2, 4, 7, 17 (Americas)
• * GSM 850 / 900 / 1800 / 1900 MHz
• UMTS 900 / 2100 MHz
• HSPA+ / GPRS / EDGE
• GPS
* Frequencies depend on model.
Camera
• 13 MP rear camera
• Auto-focus
• LED flash
• 5 MP front camera
• Fixed focus
Expansion
• microSD memory card slot (up to 32 GB)
Battery
• 2300 mAh Lithium-ion battery (not user-replaceable)
Note
Length of battery operation will depend on power consumption which is
based on system resource use. For example, constantly using the backlight
or using power-demanding apps will shorten battery life between charges.
- 85
Dimensions
Height 143 mm
Width 69 mm
Thickness 7.8 mm
Weight 116 g (with battery)
86 - End User License Agreement
END USER LICENSE AGREEMENT
IMPORTANT-READ CAREFULLY: THIS END USER LICENSE AGREEMENT ("AGREEMENT")
IS A LEGAL AGREEMENT BETWEEN YOU (EITHER AN INDIVIDUAL OR A SINGLE ENTITY),
AND ACER INC. INCLUDING ITS SUBSIDIARIES ("ACER") FOR THE SOFTWARE (WHETHER
PROVIDED BY ACER OR BY ACER'S LICENSORS OR SUPPLIERS) THAT ACCOMPANIES
THIS AGREEMENT, INCLUDING ANY ASSOCIATED MEDIA, PRINTED MATERIALS AND
RELATED USER ELECTRONIC DOCUMENTATION WHICH MAY BE BRANDED "ACER"
("SOFTWARE"). AGREEMENTS RELATING TO ANY OTHER PRODUCT OR TOPIC ARE
NEITHER INTENDED NOR SHOULD THEY BE IMPLIED. BY INSTALLING THE
ACCOMPANYING SOFTWARE OR ANY PORTION THEREOF, YOU AGREE TO BE BOUND BY
THE TERMS AND CONDITIONS OF THIS AGREEMENT. IF YOU DO NOT AGREE TO ALL OF
THE TERMS AND CONDITIONS OF THIS AGREEMENT, DO NOT CONTINUE THE
INSTALLATION PROCESS AND IMMEDIATELY DELETE ALL INSTALLED FILES, IF ANY, OF
THE ACCOMPANYING SOFTWARE FROM YOUR SMARTPHONE.
IF YOU DO NOT HAVE A VALIDLY-LICENSED COPY OF THE APPLICABLE SOFTWARE, YOU
ARE NOT AUTHORIZED TO INSTALL, COPY OR OTHERWISE USE THE SOFTWARE, AND
HAVE NO RIGHTS UNDER THIS AGREEMENT.
The Software is protected by U.S. and international copyright laws and conventions as well as
other intellectual property laws and treaties. The Software is licensed, not sold.
GRANT OF LICENSE
Acer grants to you the following non-exclusive and non-transferable rights with respect to the
Software. Under this Agreement, you may:
1. Install and use the Software only on a single designated smartphone. A separate license is
required for each smartphone on which the Software will be used;
2. Make one copy of the Software solely for backup or archival purposes;
3. Make one hardcopy of any electronic documents included in the Software, provided that you
receive the documents electronically.
RESTRICTIONS
You may NOT:
1. Use or copy the Software except as provided in this Agreement;
2. Rent or lease the Software to any third party;
3. Modify, adapt, or translate the Software in whole or in part;
4. Reverse engineer, decompile, or disassemble the Software or create derivative works based
upon the Software;
5. Merge the Software with any other program or modify the Software, except for your personal
use; and
6. Sublicense or otherwise make the Software available to third parties, except that you may,
after prior written notification to Acer, transfer the Software as a whole to a third party so long
as you do not retain any copies of the Software and such third party accepts the terms of this
Agreement.
7. Transfer your rights under this Agreement to any third parties.
8. Export the Software in contravention of applicable export laws and regulations, or (i) sell,
export, re-export, transfer, divert, disclose technical data, or dispose of, any Software to any
prohibited person, entity, or destination including, without limitation, Cuba, Iran, North Korea,
End User License Agreement - 87
Sudan and Syria; or (ii) use any Software for any use prohibited by the laws or regulations of
the United States.
SUPPORT SERVICES
Acer is not obligated to provide technical or other support for the Software.
ACER LIVE UPDATE
Certain of the software contains elements that enable the use of the Acer Live Update service,
which allows for updates for such software to be automatically downloaded and installed on your
smartphone. By installing the software, you hereby agree and consent that Acer (or its licensors)
may automatically check the version of such software that you are using on your smartphone and
may provide upgrades to such software that may be automatically downloaded on to your
smartphone.
OWNERSHIP AND COPYRIGHT
Title, ownership rights and intellectual property rights in and to the Software and all copies thereof
shall remain with Acer or Acer's licensors or suppliers (as applicable). You do not have or shall not
gain any proprietary interest in the Software (including any modifications or copies made by or for
you) or any related intellectual property rights. Title and related rights in the content accessed
through the Software is the property of the applicable content owner and may be protected by
applicable law. This license gives you no rights to such contents. You hereby agree
1. Not to remove any copyright or other proprietary notices from the Software;
2. To reproduce all such notices on any authorized copies you make; and
3. To use best efforts to prevent any unauthorized copying of the Software.
TRADEMARKS
This Agreement does not grant to you any rights in connection with any trademarks or service
marks of Acer or of Acer's licensors or suppliers.
DISCLAIMER OF WARRANTIES
TO THE MAXIMUM EXTENT PERMITTED BY APPLICABLE LAW, ACER, ITS SUPPLIERS,
AND ITS LICENSORS, PROVIDE THE SOFTWARE "AS IS" AND WITH ALL FAULTS, AND
HEREBY DISCLAIM ALL OTHER WARRANTIES AND CONDITIONS, EITHER EXPRESS,
IMPLIED OR STATUTORY, INCLUDING, BUT NOT LIMITED TO, ANY IMPLIED WARRANTIES,
DUTIES OR CONDITIONS OF MERCHANTABILITY, OF FITNESS FOR A PARTICULAR
PURPOSE, OF ACCURACY OR COMPLETENESS OF RESPONSES, OF RESULTS, OF
WORKMANLIKE EFFORT, OF LACK OF VIRUSES, AND OF LACK OF NEGLIGENCE, ALL
WITH REGARD TO THE SOFTWARE AND THE PROVISION OF OR FAILURE TO PROVIDE
SUPPORT SERVICES. ALSO, THERE IS NO WARRANTY OR CONDITION OF TITLE, QUIET
ENJOYMENT, QUIET POSSESSION, CORRESPONDENCE TO DESCRIPTION OR NON-
INFRINGEMENT WITH REGARD TO THE SOFTWARE.
EXCLUSION OF INCIDENTAL, CONSEQUENTIAL AND CERTAIN OTHER DAMAGES
TO THE MAXIMUM EXTENT PERMITTED BY APPLICABLE LAW, IN NO EVENT SHALL ACER,
ACER'S SUPPLIERS, OR ACER'S LICENSORS, BE LIABLE FOR ANY SPECIAL, INCIDENTAL,
INDIRECT, PUNITIVE, OR CONSEQUENTIAL DAMAGES WHATSOEVER (INCLUDING, BUT
NOT LIMITED TO, DAMAGES FOR LOSS OF PROFITS OR CONFIDENTIAL OR OTHER
INFORMATION, FOR BUSINESS INTERRUPTION, FOR PERSONAL INJURY, FOR LOSS OF
PRIVACY, FOR FAILURE TO MEET ANY DUTY INCLUDING OF GOOD FAITH OR OF
REASONABLE CARE, FOR NEGLIGENCE, AND FOR ANY OTHER PECUNIARY OR OTHER
LOSS WHATSOEVER) ARISING OUT OF OR IN ANY WAY RELATED TO THE USE OF OR
INABILITY TO USE THE SOFTWARE, THE PROVISION OF OR FAILURE TO PROVIDE
SUPPORT SERVICES, OR OTHERWISE UNDER OR IN CONNECTION WITH ANY
88 - End User License Agreement
PROVISION OF THIS AGREEMENT, EVEN IN THE EVENT OF THE FAULT, TORT (INCLUDING
NEGLIGENCE), STRICT LIABILITY, BREACH OF CONTRACT OR BREACH OF WARRANTY
OF ACER OR ITS SUPPLIERS OR LICENSORS, AND EVEN IF ACER AND ITS SUPPLIERS
AND LICENSORS HAVE BEEN ADVISED OF THE POSSIBILITY OF SUCH DAMAGES.
LIMITATION OF LIABILITY AND REMEDIES
NOTWITHSTANDING ANY DAMAGES THAT YOU MIGHT INCUR FOR ANY REASON
WHATSOEVER (INCLUDING, WITHOUT LIMITATION, ALL DAMAGES REFERENCED ABOVE
AND ALL DIRECT OR GENERAL DAMAGES), THE ENTIRE LIABILITY OF ACER, ITS
SUPPLIERS, AND ITS LICENSORS, UNDER ANY PROVISION OF THIS AGREEMENT, AND
YOUR EXCLUSIVE REMEDY FOR ALL OF THE FOREGOING, SHALL BE LIMITED TO THE
AGGREGATE AMOUNT PAID BY YOU FOR THE SOFTWARE. THE FOREGOING
LIMITATIONS, EXCLUSIONS AND DISCLAIMERS (INCLUDING DISCLAIMER OF
WARRANTIES AND EXCLUSION OF INCIDENTAL, CONSEQUENTIAL AND CERTAIN OTHER
DAMAGES ABOVE) SHALL APPLY TO THE MAXIMUM EXTENT PERMITTED BY
APPLICABLE LAW, EVEN IF ANY REMEDY FAILS ITS ESSENTIAL PURPOSE; PROVIDED,
HOWEVER, THAT BECAUSE SOME JURISDICTIONS DO NOT ALLOW THE EXCLUSION OR
LIMITATION OR LIABILITY FOR CONSEQUENTIAL OR INCIDENTAL DAMAGES, THE ABOVE
LIMITATION MAY NOT APPLY TO YOU.
TERMINATION
Without prejudice to any other rights, Acer may immediately terminate this Agreement without
notice if you fail to comply with any terms and conditions of this Agreement.
In such event, you must:
1. Cease all use of the Software;
2. Destroy or return to Acer the original and all copies of the Software; and
3. Delete the Software from all smartphones on which it was resident.
All disclaimers of warranties and limitation of liability set forth in this Agreement shall survive
termination of this Agreement.
GENERAL
This Agreement represents the complete agreement between you and Acer relating to this license
for the Software and supersedes all prior agreements, communications, proposals and
representations between the parties and prevails over any conflicting or additional terms of any
quote, order, acknowledgement or similar communication. This Agreement may only be modified
by a written document signed by both parties. If any provision of this Agreement is held by a court
of competent jurisdiction to be contrary to law that provision will be enforced to the maximum
extent permissible and the remaining provisions of this Agreement will remain in full force and
effect.
ADDITIONAL PROVISIONS APPLICABLE TO THIRD PARTY SOFTWARE AND SERVICES
Software provided hereunder by Acer's licensors or suppliers ("Third Party Software") is made
available to you for your personal, non-commercial use only. You may not use the Third Party
Software in any manner that could damage, disable, overburden, or impair the services provided
by Acer's licensors or suppliers hereunder ("Third Party Services"). Furthermore, you may not use
the Third Party Software in any manner that could interfere with any other party's use and
enjoyment of the Third Party Services, or the services and products of Acer's licensors' or
suppliers' third party licensors. Your use of the Third Party Software and Third Party Services is
also subject to additional terms and conditions and policies which can be accessed through our
global website.
End User License Agreement - 89
Privacy policy
During registration you will be asked to submit some information to Acer. Please refer to Acer’s
privacy policy at www.acer.com or your local Acer website.
TRADEMARK INFORMATION
DTS Premium Sound
For DTS patents, see http://patents.dts.com. Manufactured under license from DTS Licensing
Limited. DTS the Symbol, & DTS and the Symbol together are registered trademarks, and DTS
Studio Sound is a trademark of DTS, Inc. © DTS, Inc. All Rights Reserved.

Acer Liquid Jade Z Manual / User Guide

  • 1.
  • 2.
    2 - © 2015All Rights Reserved Acer Liquid Jade Z User’s Manual Model: S57 This revision: March 2015 Acer Liquid Jade Z smartphone Model number:_______________________________________________ Serial number: _______________________________________________ Date of purchase: ____________________________________________ Place of purchase: ___________________________________________ Important This manual contains proprietary information that is protected by copyright laws. The information contained in this manual is subject to change without notice. Images provided herein are for reference only and may contain information or features that do not apply to your computer. Acer Group shall not be liable for technical or editorial errors or omissions contained in this manual. Sign up for an Acer ID and enjoy great benefits Open the Acer Portal app from the Start screen to sign up for an Acer ID or sign in if you already have an Acer ID. There are three great reasons for you to get an Acer ID: • Build Your Own Cloud with Acer BYOC. • Get the latest offers and product information. • Register your device for warranty service. For more information, please visit the AcerCloud website: www.acer.com/byoc-start
  • 3.
    Table of contents- 3 TABLE OF CONTENTS Setting up 5 Unpacking your smartphone.................... 5 Getting to know your smartphone............ 5 Views .......................................................... 5 Charging the battery ................................... 6 Installing a SIM or microSD card............. 7 SIM card lock .............................................. 9 Using your smartphone 10 Turning on for the first time.................... 10 Sign in to or create a Google account ... 10 Entering your PIN...................................... 10 Activating a new SIM card ........................ 10 Locking your smartphone ...................... 10 Waking your smartphone.......................... 11 Navigating through menus and options. 11 Using the touchscreen........................... 12 Onscreen keyboards ............................. 12 Changing the text input method................ 12 Swype ....................................................... 13 Google keyboard....................................... 14 Predictive text ........................................... 15 The Home screen.................................. 16 Change your Home screen interface ........ 16 Search....................................................... 17 The extended Home screen...................... 18 Personalizing the Home screen................ 18 The Apps menu......................................... 21 Notification and status area ...................... 21 Multitasking............................................... 22 Managing contacts 23 Managing your contacts ........................ 23 Adding a contact ....................................... 23 Making calls 25 Before making a call.............................. 25 Making a call.......................................... 26 Dialing a number from Call History ........... 26 Viewing missed calls................................. 27 Making a call to one of your contacts........ 27 Dialing an international number ................ 27 Direct dial widget....................................... 28 The voice call screen............................. 28 Answering or declining a call .................... 29 Conference calls ....................................... 30 Messaging 31 Creating a new message....................... 31 Replying to a message.......................... 32 Multimedia messages............................ 33 Receiving multimedia messages .............. 33 Going online 34 Browsing the internet............................. 34 Using the browser .................................... 34 Setting up Email..................................... 35 Google services ..................................... 35 Setting up your Google email ................... 36 Voice search............................................. 36 Play Store ................................................. 37 Google Hangouts...................................... 38 Maps......................................................... 39 Using the Camera 40 Camera/camcorder icons and indicators 40 Mode selector ........................................... 42 Settings..................................................... 43 Taking a photo ....................................... 44 Using the Dual Shot feature...................... 45 Taking a panoramic photo ........................ 45 Shooting a video .................................... 46 Supported formats .................................... 46 Viewing photos and videos .................... 46 Geotagging ............................................ 46 Using your smartphone with AcerEXTEND 47 PC system requirements .......................... 47 Smartphone system requirements............ 47 Install PC application software............... 47 AcerEXTEND toolbar............................. 49 AcerEXTEND wireless connection ........... 51 AcerEXTEND functions ............................ 53 AcerEXTEND FAQ ................................... 55 Advanced settings 58 Putting your smartphone in Airplane mode...................................................... 58 Turning Airplane mode on or off ............... 58 Restarting your smartphone .................. 59 Adjusting settings................................... 60 Activating or deactivating connections...... 60 Smartphone network settings ................... 62 Smartphone settings................................. 63 Sound ....................................................... 64 Audio profiles............................................ 64 Display...................................................... 65 Setting the date and time.......................... 65 Setting alarms........................................... 65 Changing language and text options ........ 66 Connecting to a PC................................ 66 Synchronization ........................................ 66 FM radio................................................. 67 Applications (apps) ................................ 68 Closing an app.......................................... 68 Uninstalling an app ................................... 68 Restoring to factory settings .................. 68
  • 4.
    4 - Tableof contents Accessories and tips 70 Using the headset.................................. 70 Using a Bluetooth headset..................... 70 Creating a new access point.................... 70 Inserting a microSD card ....................... 71 Managing your SIM cards 72 SIM Management..................................... 72 Appendix 75 FAQ and troubleshooting....................... 75 Other sources of help............................. 77 Warnings and precautions 78 Medical devices ....................................... 79 Vehicles ................................................... 80 Potentially explosive environments........... 80 Emergency calls..................................... 81 Taking care of your smartphone............. 81 Specifications ......................................... 83 Performance ............................................. 83 Display ...................................................... 83 Multimedia ................................................ 83 USB connector.......................................... 83 Connectivity .............................................. 84 Camera ..................................................... 84 Expansion ................................................. 84 Battery ...................................................... 84 Dimensions ............................................... 85 End User License Agreement 86
  • 5.
    Setting up -5 SETTING UP Unpacking your smartphone Your new smartphone comes packed in a protective box. Carefully unpack the box and remove the contents. If any of the following items is missing or damaged, contact your dealer immediately: • Your new Acer smartphone • USB cable • AC adapter • Headset Getting to know your smartphone Views 5 4 6 9 12 2 1 7 14 10 8 3 11 13 Note In-box content varies depending on country and region.
  • 6.
    6 - Settingup Charging the battery For initial use, you need to charge your smartphone for eight hours. After that you can recharge the battery as needed. No. Item Description 1 microSD card / SIM card tray Accepts a microSD card and one or two SIM cards (depends on model purchased). Note: The microSD card replaces a SIM card in models that support two SIMs. 2 3.5 mm headphone jack Connects to stereo headphones. 3 Second microphone Internal microphone for noise cancelation. 4 Power button Press to turn the screen on/off or enter sleep mode; press and hold to turn the smartphone on or off. 5 Phone speaker Emits audio from your smartphone; suitable for holding to your ear. 6 Touchscreen Touchscreen to display data, smartphone content and enter information. 7 Front camera Front-facing camera suitable for video chats and self-portraits. 8 Ambient light and proximity sensors Detect ambient light and proximity to control screen brightness. 9 Flash LED flash for taking photos in low-light environments. 10 Camera A camera for taking high-resolution images. 11 Speaker Built-in speaker for handsfree use or media playback. 12 Volume up/down button Increases or decreases the smartphone volume. 13 Micro USB connector Connects to a USB cable/charger. 14 Microphone Internal microphone.
  • 7.
    Setting up -7 Connect the AC adapter cord to the micro USB connector on your smartphone. Installing a SIM or microSD card To take full advantage of your smartphone’s telephony capabilities, you must install a SIM card. Your new smartphone has multiple SIM card holders; install any combination of SIM cards. Additionally, you may wish to increase your smartphone’s storage by inserting a microSD card into the labeled slot. 1.Turn off the smartphone by pressing and holding the power button. 2.Pull out the SIM / microSD card carrier. Note The information in this UM may vary according to the number of SIMs you are using.
  • 8.
    8 - Settingup 3.Insert the SIM and/or microSD card as shown. Note Your smartphone can accept one nano SIM and one microSD card, OR two nano SIMs. Take care not to damage your cards when you reinsert the carrier. Specifications vary depending on model purchased. microSD card SIM 1 SIM 2 (optional)
  • 9.
    Setting up -9 4.Insert the carrier, taking care to ensure that the card(s) remain correctly seated in the carrier. SIM card lock Your smartphone may come with a SIM card lock, i.e., you will only be able to use the SIM card provided by your network operator. To cancel the SIM lock, contact your network provider.
  • 10.
    10 - Usingyour smartphone USING YOUR SMARTPHONE Turning on for the first time To turn on your smartphone for the first time, press and hold the power button until the screen turns on. You will then be asked to configure some settings before you can use your smartphone. Follow the onscreen instructions to complete setup. Sign in to or create a Google account If you have Internet access, your smartphone allows you to synchronize information with a Google account. You may create or sign in to an existing Google account, which will be used to synchronize your contact list, email, calendar and other information.Open the Apps menu and then tap Settings > Add account. Tap the type of account you want to add (e.g. Google). You will need internet access to complete the synchronization process. You can create and easily access multiple Google accounts. Entering your PIN When you install a SIM card for the first time, you may need to enter a PIN using the onscreen number pad. Activating a new SIM card If you are using your SIM card for the first time, it may require activation. Contact your network operator for details on how to do this. Locking your smartphone If you will not use your smartphone for a while, briefly press the power button to lock access. This saves power and ensures your Important Depending on your settings, you may be required to enter your PIN each time you switch on the smartphone function.
  • 11.
    Using your smartphone- 11 smartphone does not unintentionally use any services. Your smartphone will lock automatically if it is not used for one minute. Waking your smartphone If the screen is off and the smartphone does not react to any taps on the screen or front panel button, then it has been locked and is in sleep mode. Press the power button to wake your smartphone. Unlock your smartphone by sliding your finger from one side of the screen to the other (it works both ways). For additional security, you may set an unlock pattern, a set of dots that must be touched in the correct order to access the smartphone. Open the Apps menu and then tap Settings > Security > Screen lock. If you forget your unlock pattern, please refer to Unlock pattern on page 77. You may also directly enter the lock screen apps. Tap and hold the lock screen icon, move your finer slightly in any direction, and release. The smartphone unlocks and opens that app. Navigating through menus and options To navigate through menus and options, there are three buttons beneath the screen. Back Tap this button to go to the previous page, or to go up one level in a menu. Home Tap this button to go directly to the Home screen. Tap and hold this button to open Search. Back Home Menu
  • 12.
    12 - Usingyour smartphone Menu Tap this button to see recently opened apps. Tap an app to open it. At the bottom of the Menu screen are Acer Float apps. Tap a Float app to open the app in its own window while keeping what you were doing visible. You can customize which apps appear. Swipe to the right in the Acer Float apps bar and tap the gear icon. Choose from float Browser, Buttons, Calculator, Camera, Maps, Notes, Stopwatch, and Text. Tap and hold the Menu button to open a menu of actions that are valid for the current app or screen. Tap anywhere on the screen to return to the Home screen. See Multitasking on page 22. Using the touchscreen Your smartphone uses a touchscreen for selecting items and entering information. Use your finger to tap the screen. Tap: Touch the screen once to open items and select options. Drag: Hold your finger on the screen and drag across the screen to select text and images. Tap and hold: Tap and hold an item to see a list of actions available for that item. On the pop-up menu that appears, tap the action you want to perform. Scroll: To scroll up or down the screen, simply drag your finger up or down the screen in the direction that you want to scroll. Onscreen keyboards Your new smartphone has the Swype keyboard set as the default for entering text. See Swype on page 13. Changing the text input method To change the input method: 1.Open the Apps menu. Note The keyboard layout varies slightly, depending on the application and information that is required.
  • 13.
    Using your smartphone- 13 2.Tap Settings > Language & input > Default. 3.Tap your preferred input method(s) from the list (if only one method is selected, all options will be grayed out). 4.Uncheck the method(s) you do not wish to use. 5.Tap Default to set one method as your default. Swype Swype is a fast way to enter text. It allows you to type with one continuous motion across the screen keyboard; you create a word by drawing through letters. Put your finger on the first letter of the word and draw a path from letter to letter, lifting up only after the last letter. Swype will insert spaces where necessary. Swype will usually add a double letter in a word when needed, but you can help Swype recognize you want a double letter by scribbling slightly or making a loop on the letter. For example, to get the "ll" in "hello", scribble (or make a loop) on the "l" key. When there are multiple suggestions for the word you want to enter, Swype displays a Word Choice List. To accept the default word in the Word Choice List, just keep Swyping. Otherwise, scroll through the list by dragging your finger, and tap the word you want. Press and hold the Swype key to access settings, features, updates, preferences, and help. Tap the +!= button to see numbers and special characters; tap the page (shift) key to see even more. Additional keys vary depending on the type of text you enter, e.g. a key to add a smiley is available when typing a text message. Like other keys, tap and hold for additional options.
  • 14.
    14 - Usingyour smartphone To change the input method, open the Notification area (see Notification and status area on page 21) and tap Choose input method. Text assistance The Swype keyboard has various features that assist you to enter correct text. In the Application menu, tap Settings > Language & input and then tap the Settings button to the right of Swype. You can also tap and hold the Swype key . From here you can enable or disable the following: Google keyboard This is a standard onscreen QWERTY keyboard that allows you to enter text. Tap and hold a key with numbers at the top to select alternative characters, such as letters with accents. Tap the ?123 button to see numbers and special characters, and then tap the =< key to see even more. You can choose another input language by tapping and holding the forward slash key. Alternatively, you can open the Apps menu and then tap Settings > Language & input. Then tap the Settings button Function Description How to Swype Learn how to use the Swype keyboard. Gestures Use how to use Swype gestures. Preferences Change your text input preferences. Language Options Set the language used by the keyboard. Swype Connect Add contact names and words used in posts to your personal dictionary. Change data settings. Personalization Change keyboard theme, edit your personal dictionary and personalize your experience by signing in to Facebook, Twitter or Gmail to populate your dictionary. Updates Check for app and dictionary updates.
  • 15.
    Using your smartphone- 15 next to Google keyboard > Input languages. The keyboard layout changes according to the selected language. After setting up more than one language, the world button appears next to the space bar. Tap this button to quickly toggle between multiple input languages. Text assistance The Google keyboard has various features that assist you to enter correct text. In the Apps menu, tap Settings > Language & input. Then tap the Settings button next to Google keyboard. From here you can enable or disable several keyboard-related settings. Predictive text Google keyboard provides predictive text input for the browser. As you tap the letters of a word, a selection of words are displayed above the keyboard that continue the sequence of letters tapped, or are a close match allowing for errors. The word list changes after every key press. If the word you need is displayed, you can tap on it to insert it into your text.
  • 16.
    16 - Usingyour smartphone The Home screen The Home screen gives you quick access to information and simple controls with widgets or shortcuts. These display information such as the time and weather, or provide additional controls and direct access to apps and other frequently used features of your smartphone. At the bottom of the screen is the application dock which displays default apps. Tap an icon to open the app. Tap the Apps menu icon in the middle of the application dock to view your apps. To change apps, see Changing application dock icons on page 20. Change your Home screen interface Your new smartphone offers a Quick Mode user interface that provides three customized layout options that are designed for specific groups of users. Standard Mode Provides easy-to-understand icons for commonly used functions on the smartphone and three themes to choose from. Easy Mode Provides large icons for commonly used functions and two themes to choose from. This mode is ideal for older users and users who have reduced vision and/or mobility. Search Time and Status Widgets Application (Apps) menu
  • 17.
    Using your smartphone- 17 Basic Mode This provides photo-based dialing and messaging options that are ideally suited to younger and/or inexperienced smartphone users. Turning Quick Mode on To turn Quick Mode on: 1.Open the Apps menu > Quick Mode. 2.Select the mode you would like to use, then tap Next. 3.Choose whether you would like to add more content or not. 4.Choose your theme, and set the widgets. Set a passcode for Quick Mode Once you have activated Quick Mode you have the option of setting a passcode to prevent unauthorized changes. 1.Swipe down from the top of the screen to open the Notification area. 2.Tap the Settings icon in the lower right-hand corner of the screen. 3.Enter the passcode twice and tap OK. Turning Quick Mode off To turn Quick Mode off: 1.Swipe down from the top of the screen to open the Notification area. 2.Tap the Settings icon in the lower right-hand corner of the screen. 3.Set a passcode if you have not previously set one. 4.Tap OK. 5.Tap the Settings icon in the lower right-hand corner of the screen. 6.Tap Exit Quick Mode. Search To search for apps, files or for information on the Internet, tap the Google icon. Simply enter the text you want to find and tap or tap one of the suggestions, apps or files shown in the list.
  • 18.
    18 - Usingyour smartphone In order to search or browse the Internet, you must be connected to a cellular data (if available) or wireless network. See Going online on page 34. Voice search If voice search is available, tap the microphone and speak your search request. See Voice search on page 36. The extended Home screen The Home screen extends to either side of the screen, giving you more room to add icons, widgets or features. To view the extended screen, slide your finger to the left or right. Personalizing the Home screen You may personalize your Home screen by adding or removing app shortcuts or widgets, and by changing the wallpaper. Adding and removing shortcuts and widgets To add shortcuts or widgets, tap the Apps menu icon in the bottom- center of the Home screen. Tap Apps to see a list of shortcuts to apps you can drag to a Home screen.
  • 19.
    Using your smartphone- 19 Tap Widgets to see small apps and links (such as custom shortcuts, contacts or bookmarks) that you can add to a Home screen. Widgets are small apps that display constantly-updated information or quick shortcuts to apps or special functions. To move an app or widget to the Home screen, tap and hold an item until it is selected. The Home screen will open. Drag the item to any free area on the screen. To view information about the app or widget, drag it to the icon at the top of the screen. To move the item to a different Home screen, drag it to the side of the screen, the Home screen will switch to the screen in that direction. Release the item when it is positioned correctly. To remove a shortcut or widget from the Home screen, tap and drag it to Remove at the top of the screen. Resizing widgets Some widgets can be resized. As soon as you place a widget on the Home screen, you can resize it by dragging the corners. To resize a widget that is already on the Home screen, tap and hold the widget. Once the Remove icon appears, release the widget. If the widget is resizable, you will be able to drag the sides of the widget to resize it. Adding or removing folders You can also add folders to your Home screen. To create a new folder drag and drop an app icon onto another app icon in the Home screen.
  • 20.
    20 - Usingyour smartphone This will create an Unnamed Folder. Tap the folder icon and then tap the name of the folder to rename it. To delete an app shortcut from a folder, tap on the folder icon to display the apps inside and then tap and hold the app icon that you want to remove. Drag and drop the icon on Remove that will appear at the top of the screen. To delete a folder, tap and hold on the folder and then drag and drop the folder on Remove that will appear at the top of the screen. Changing application dock icons You can set icons for installed apps in the application dock. Open the Apps menu and find the app you want to add. Tap and hold the icon, then drag it to any open position in the dock. Dragging the new app to an existing dock icon will create a folder for both icons. To remove an icon from the dock, tap and hold the icon to select it. Either drag the icon to a different location outside the dock or to Remove at the top of the screen. Changing the wallpaper In the Apps menu, tap Settings > Personalize > Wallpaper. Choose from images stored in the Gallery, Live Wallpapers (featuring animated or interactive backgrounds), Photos, Video Wallpaper (enabling you to use videos as your background), or Wallpapers.
  • 21.
    Using your smartphone- 21 The Apps menu To access the Apps menu, on the Home screen tap in the center of the dock. Apps are displayed in alphabetical order. Swipe the page to the left or right to see more apps.When you are on the last page of apps, swipe to the left to see widgets available on your tablet, or tap Widgets at the top of the page. To quickly jump to apps or widgets, tap Apps or Widgets at the top of the Apps menu. Notification and status area Notification and status icons are shown at the top of the screen. The top-right area displays a variety of status information, such as Wi-Fi connectivity, signal strength, battery status, and time. The top-left area displays event icons, such as a new message. • Dual-SIM models: • Single-SIM models: Drag the Notification area down the screen to view more information about new events and access Quick Settings.
  • 22.
    22 - Usingyour smartphone Multitasking You can have multiple apps open at the same time. To open a new app, tap the home button to return to the Home screen, then start the new app. Tap the Menu button to quickly navigate back and forth between previously-opened apps. Note To prolong battery life, it is better to close an app when you’ve finished using it. Do this by either pressing the Back key or the Menu button and selecting Exit (if available).
  • 23.
    Managing contacts -23 MANAGING CONTACTS Managing your contacts Your smartphone features an address book that allows you to save contacts to either the internal memory or onto your SIM card. Tap the Contacts app from the Apps menu or tap All contacts from the Dialer to view your contacts. If you don’t have any contacts stored on your smartphone, you can import your Google account contacts, add a new contact or import contacts from your SIM or SD card. Open the People app from the Apps menu and then tap to add a contact, to search for a contact, or tap the Menu button to open the menu. Adding a contact Tap to add a new contact. You may also scan a person’s profile barcode to add the person to your contact list or group. To create a contact, first choose where you want to store the contact’s information. You will then be asked to enter the contact’s information, such as name, address, and phone number.
  • 24.
    24 - Managingcontacts You may scroll down the page and tap Add another field to add things such as: • IM addresses. • Add any personal notes about the contact. • Phonetic name • Link a website To assign an image to your contact, tap the silhouette and select whether to take a photo or select an image from your smartphone’s picture gallery. When done, click Done at the top of the screen. Tapping on the contacts name will bring up their profile. Tap while viewing a contact’s profile to edit, share, delete, or print the contact. You may also set a ringtone for the contact, block incoming calls from this contact, or place the contact on your Home screen. You may also create a contact from an already dialed or received number, see Saving a dialed number to contacts on page 30.
  • 25.
    Making calls -25 MAKING CALLS This chapter shows you how to make phone calls, and the various options available to you during your call. Before making a call Check that the phone function is on before you make a call. You can confirm the phone status from the Notification area. Note Status and notification icon colors may vary. You will see an indicator icon for each SIM card inserted. Icon Description Connected to the network: You may make a call. Airplane mode: Wireless connectivity disconnected (Wi-Fi, Bluetooth, and cellular services). Please disable airplane mode before trying to make a call.
  • 26.
    26 - Makingcalls Making a call 1.From the Home screen tap the Phone icon to open the onscreen number pad. 2.Enter the number you wish to dial. 3.Tap to make the call. 4.To end the call, tap . If the contact you need is displayed, simply tap the contact name to make a call. Dialing a number from Call History Your call history can be viewed by tapping the Call History button. It displays recent received, dialed, and missed calls. Tap the phone icon to redial. To view call details and other options, tap the number or contact’s name. Note If you have multiple SIMs inserted in the smartphone, you will be asked which SIM to use before the call is connected. To select a SIM, just tap the name of the carrier.
  • 27.
    Making calls -27 Viewing missed calls Missed call notifications are displayed in the following three areas: 1.The Notification area with the missed call icon. Open the Notification area and tap the missed call notification to display the missed call details. 2.By the phone icon (the number in the box is the number of missed calls). Tap Phone from either the Home screen or the Apps menu to directly display the missed call details. 3.On your smartphone’s lock screen. Tap the notification and slide to the left or right to display the missed call details. Making a call to one of your contacts Calling a contact from the Contacts tab 1.Tap the All contacts to view your contacts. 2.Tap on a contact to call them. Calling a contact from the Contacts app 1.Tap the People icon the Apps menu to view your contacts. 2.Tap on a contact to open their profile. 3.Tap on the contact’s phone number to call them. Dialing an international number When dialing international numbers, there is no need to enter the international direct dialing prefix (’00’ etc.) before the country code.
  • 28.
    28 - Makingcalls Simply tap and hold 0+ on the onscreen number pad until + appears onscreen. Direct dial widget You may add a direct dial widget for a contact on your Home screen. Open the Apps menu, then tap the Widgets tab. Tap and hold Direct dial and you will be able to place the widget on your Home screen. Once placed, you will be able to select a contact to associate with that particular widget on your Home screen. The voice call screen You can minimize the call window to appear as a movable dialog instead of a whole screen by tapping the icon. You can even set this "floating" dialog box as the default voice call screen. To do so, open the Notification area and tap the down arrow to display more Quick Settings options(see Notification and status area on Important International call rates can vary greatly depending on the country you are calling and your network provider. We suggest you check all call rates with your network provider, to avoid excessive bills. If you are using your smartphone abroad, roaming charges will apply. Consult your network provider for roaming rates specific to the country you are visiting before you leave.
  • 29.
    Making calls -29 page 21). Tap the Float caller button to activate (green means Float caller is "ON"). Answering or declining a call When you have an incoming call, the number will be shown on the screen. To accept or decline the call, tap the appropriate icon and slide your finger across the screen. Ending a call To end a call, tap from the voice call screen. Voice call options Icon Description Place the call on hold. Mute a call. Speakerphone. Access the keypad while a call is in progress. One option: • Add a second call
  • 30.
    30 - Makingcalls Saving a dialed number to contacts You can save a number you have dialed to your contacts for future use. 1.From the Call History , tap the number and then tap Add to contacts . 2.Tap Create new contact and enter the information. See Adding a contact on page 23. Conference calls If you have one call on hold and another on line, you can combine both calls to create a conference call. After the first call is established, tap to add a second call. Tap to start the conference call.
  • 31.
    Messaging - 31 MESSAGING Thischapter shows you how to set up and use the Messaging functions of your smartphone. All SMS and MMS messages are accessed via Messaging. Messaging automatically arranges received and sent messages into threads. To access Messaging, open the Apps menu and tap Messaging on the Home screen. Creating a new message You can use your smartphone to compose text (SMS) and multimedia (MMS) messages. Tap to compose a new message. Tap to add contacts from your contacts list (People), or tap the Type name or number field to enter the recipient’s phone number or name directly. Suggested contacts will be displayed in a drop-down list below the text field. To select a suggested contact, tap the contact’s name. Note If you have multiple SIMs inserted in the smartphone, you will be asked which SIM to use before the message is sent. To select a SIM, just tap the name of the carrier.
  • 32.
    32 - Messaging Enteryour message in the text box labeled Type text message. Tap the Menu button to see what options are available when creating a new message. The options change depending on the status of the message. Replying to a message When a new text message arrives a message icon appears in the Notification area and the message icon at the bottom of the smartphone displays the number of unread text messages. Tap Messaging from the Apps menu to view the message list or open the Notification area to see a summary of the message. Tap the summary to open the message list. To reply to an SMS or MMS message, open the message from the message list. Enter your text in the text box labeled Type text message. Tap the Menu button to see available options. Note Text messages may be up to 160 characters long. If your message is longer than 160 characters, it will be sent as multiple linked messages. Most phones will automatically join the linked messages to present the recipient with a single long message, however, some older phones do not have this ability. Option Description Insert quick text Insert pre-defined text content. Insert contact Add a contact to the recipients list. Add subject Add a subject to the message. Discard Discard the message. Option Description Select message Select multiple messages. Insert quick text Insert pre-defined text content. Insert contact Add a contact to the recipients list. Add subject Add a subject to the message. Add to contacts Add the other contact to your contacts list. Chat settings Modify various messaging settings.
  • 33.
    Messaging - 33 Multimediamessages Multimedia messages are similar to text messages but also allow you to attach files such as pictures, audio or video clips. Each message can be up to 300 kB in size. Receiving multimedia messages When a new multimedia message arrives, a message icon appears at the top of the screen and a notification message is displayed. 1.The notification message displays a summary of the message. Tap View to view a summary of the message. 2.Tap Download to download the message content. Downloads can take a long time, depending on your connection quality. If you reply or open another app, the download will be stopped. 3.Tap the message to view the content. 4.To reply to the message, enter your text in the text box labeled Type message and tap the Send icon. Simple text replies will be sent as SMS messages. If you wish to attach a file, tap . You will be presented with a menu of options. 5.When you have finished composing the message, tap the Menu button and tap Send. Note You need to set up an MMS profile before you can send MMS messages. Normally, your smartphone will set up the profile for you based on information retrieved from your provider. Ask your network provider for the necessary information if you need to manually set up the MMS profile. Important You may be charged to download message content, especially if you are roaming. Please contact your provider if you have any questions.
  • 34.
    34 - Goingonline GOING ONLINE Browsing the internet In order to browse the internet with your smartphone, you must be connected to a data or wireless network. Using the browser To start browsing, open the Apps menu and tap the Chrome or Browser icon. To open a new website, tap the address box at the top of the page. Enter the address using the keyboard and tap Go. You can zoom in or out of pages by pinching or reverse pinching. Note Reference images use the Chrome browser.
  • 35.
    Going online -35 To navigate forward and backward in your browser’s history, view your bookmarks, adjust browser settings, and perform other tasks, tap the Menu button. Chrome enables you to open multiple pages. Tap at the top of any webpage to display all of your open tabs (tap again to close). Tap a tab from the list to open it. To open a new tab, tap New tab. The number in the icon represents the number of open tabs. Setting up Email Your smartphone enables you to access your email. Most popular ISPs can be set up in two steps. In the Apps menu tap Email to start setting up your email account. If necessary, enter your email address and tap Manual setup to enter the parameters manually. Tap Next to finish the setup process. Google services You must activate a Google account before using Google services. The first time you access Google services, you must read and accept the Terms of Service. Note Apps may not be available in all countries and regions.
  • 36.
    36 - Goingonline Setting up your Google email 1.Make sure your smartphone is connected to a data or Wi-Fi connection. 2.From the Apps menu tap Gmail. If you did not enter your Gmail account address and password when you first started your smartphone, follow the onscreen instructions. Composing an email 1.Make sure your smartphone is connected to a data or Wi-Fi connection. 2.From the Apps menu tap Gmail. 3.Tap . 4.Enter the recipient's email address, the subject and message. 5.When you are finished composing your message, tap . Voice search With voice actions, you can send text messages, place calls, send emails, find directions of establishments, automatically call establishments, search the internet and even send a note to yourself using your voice. Tap Voice Search from the Apps menu, or tap the microphone icon on the Home screen.
  • 37.
    Going online -37 Play Store Tap Play Store from the Apps menu to open the Google Play. Here you can obtain a variety of add-on programs and apps to enhance the functionality of your smartphone. The contents and design of Google Play varies by region. For example, in some regions, you can also browse for and purchase movies, books, magazines, or music. Updates may add new categories or change how to navigate Google Play at any time. You can browse the store by category or tap the search icon to search for a specific app. Once you have selected an app, tap the Install button to download and install the app. You will be told which services the app requires access in order to function correctly (e.g. contact information, wireless access, GPS). If none of these services seem unusual, tap Accept & download to proceed with the installation. Important For connection issues with Play Store, see FAQ and troubleshooting on page 75
  • 38.
    38 - Goingonline You may keep track of the download progress from both the app’s page and the notification area. Using downloaded apps Once you’ve downloaded and installed an app, you may find it in the Apps or Widgets sections of the Apps menu. Certain apps provide both an App and widget, or only provide a widget (with no app icon). See Personalizing the Home screen on page 18. Uninstalling downloaded apps Once you’ve downloaded and installed an app, you may uninstall the app by opening the Apps menu and tapping Settings > Apps. In the downloaded tab, select the the app you wish to uninstall and tap Uninstall. Deleting an app icon from the Home screen only deletes the shortcut. Google Hangouts Tap Hangouts from the Apps menu to open Google Hangouts. Here you can see a list of your contacts connected to Google Hangouts Important Some apps may require payment before you can download them. You will need to have a Google Wallet account in order to pay for these apps, or a credit card number associated with your Google account.
  • 39.
    Going online -39 services. Tap on a contact to open a chat session. After you have connected, you can open a video chat session. Maps Get easy-to-follow directions using Google Maps, view real-time traffic condition and navigate by using spoken, turn-by-turn driving instructions. Also, view where your friends are, places of interest, and local businesses. Using Maps Tap the Maps icon in the Apps menu. Drag the map with your finger to move the map around. To zoom in or out: 1.Double tap a location on the map to zoom in on the location, and tap once to zoom out, or 2.Touch an area with two fingers at once and spread them apart to zoom in, and pinch them together to zoom out. Note Maps does not have information about every location. Some locations may not have all zoom levels.
  • 40.
    40 - Usingthe Camera USING THE CAMERA Your smartphone features two digital cameras mounted on the front and on the rear. This section will take you through all the steps in taking photos and videos with your smartphone. To activate the camera, open the Apps menu and tap Camera. Camera/camcorder icons and indicators Flash Camcorder button Switch camera Last picture / Mode selector Shutter Mute microphone Settings video taken button Zoom slider Favorite shot selector The camera window provides multiple controls on the image screen. Tap the area of the image you want to be the point of focus for the auto-focus lens (only available on the rear camera). Zoom in or zoom out using the zoom slider. Tap the Shutter button or press the volume key to take a picture. Tap the thumbnail in the bottom-right corner to open the gallery. Tap the flash button to cycle the settings between off, automatic, and on.
  • 41.
    Using the Camera- 41 Tap the Camcorder button and the camcorder immediately begins filming. While filming, you are unable to access camera/camcorder settings; however, you can still take pictures. Tap the Pause button to temporarily stop recording and tap it again to restart recording. Tap the Stop recording button to stop filming. Time elapsed Pause Stop recording Last picture / Shutter button video taken
  • 42.
    42 - Usingthe Camera Mode selector Tap the Mode selector icon to open the list of modes you can choose from. Tap the icons along the top to select different items. Camera Capture mode: Select a capture mode. Scene mode: Adjust photo parameters for a particular environment. Color effect: Applies a color effect to the image. Normal Smile shutter HDR Multi-angle view Panorama Presentation Beautification Dual Shot Best shot Gourmet Bright magic Auto Backlight Landscape Backlight portrait Night Portrait Night portrait None Negative
  • 43.
    Using the Camera- 43 Camcorder Record mode: Select from Normal or Time lapse. White balance Compensate for different lighting environments. Image properties Adjust the Sharpness, Hue, Saturation, Brightness, and Contrast. Timer Set the delay before the shutter is activated. Settings Tap the Settings icon to open the settings menu; scroll up or down the list to view more settings Mono Aqua Sepia Auto Fluorescent Daylight Incandescent Cloudy
  • 44.
    44 - Usingthe Camera Photo You may adjust the following: • Resolution: Set the picture resolution. • Set the ISO. • Set a mode as your Favorite shot. • Continuous shutter: Set the maximum number of photos taken in a single burst. • Turn Touch to capture on or off: Takes the photo immediately when you tap the shutter button. Video You may adjust the following: • Turn Video stabiliser on or off. • Set the Resolution. • Set the Audio mode to Normal or Mute. Other You may adjust the following: • Turn location on or off: Stores GPS information in the image information. • Voice control: Enable taking photos with voice commands. • Set a Voice command for Voice Control. • Grid: Turn the composition grid on or off. • Storage: Choose between Internal storage and SD card. • Reset to default. Taking a photo 1.Ensure you have adjusted the settings described above. 2.Frame your subject and steady your smartphone. 3.Zoom in or out as needed. Note Some of the following settings are not available for the front camera.
  • 45.
    Using the Camera- 45 4.Tap the Shutter button to take a picture. Using the Dual Shot feature Dual Shot takes a photo using both cameras simultaneously and superimposes one on the other. This way you can add yourself into family pictures, scenic shots, etc. After selecting Dual Shot, a box appears on the screen displaying the superimposed image. • Tap, hold, and slide the box to reposition it. • Tap and drag the + symbol to rotate and resize the box. • Tap the box to switch cameras. Taking a panoramic photo Panoramic mode allows you to take a series of up to nine photos that the camera app will ‘stitch’ together to make a single extended image. 1.To take a panoramic photo, select Panorama mode. 2.Align the camera to take a photo of one end of the panoramic scene (the furthest left, right, top or bottom). 3.Press the camera button to take the first image; then slowly and smoothly turn the camera to the other end of the image. • Two lines display on the screen: a flashing white line and a solid blue line. As you move the camea, align the blue line to the unmoving white line. Note If your photo needs fewer than nine images, tap the tick icon to stop the selection process and process the captured images. Panoramic images work best with static outdoor scenes. Objects too close to the camera or large straight edges may confuse the detection process.
  • 46.
    46 - Usingthe Camera The camera app will process the images and save a single extended image to your smartphone’s gallery. Shooting a video 1.Frame your subject and steady your smartphone and zoom in or out as needed. 2.Tap the Camcorder button to start taking a video. The icon will turn red to indicate that recording is in progress. Tap the icon again to stop recording. Supported formats Viewing photos and videos After you have taken your photo or video, it is automatically saved. Once you have taken a photo or video, you can view it in Gallery by tapping the thumbnail in the corner of the image screen. Alternatively, open the Apps menu and tap Gallery. From Gallery you can share the file directly using various services. Services vary depending on the file type. You may also edit individual photos you have taken by tapping the pencil icon in the lower left-hand corner of the screen. Geotagging Geotagging allows you to store the location where a photo or videa was taken right in the photo or video itself. For the geotag to display, pictures must be taken with GPS location info turned on. Note To see supported image, video, and audio formats, see Multimedia on page 83.
  • 47.
    Using your smartphonewith AcerEXTEND - 47 USING YOUR SMARTPHONE WITH ACEREXTEND PC system requirements • PC or notebook with Windows 8 / 8.1 installed • USB 2.0 / 3.0 port • Memory: 1 GB and above • Graphics with Microsoft DirectX support Smartphone system requirements • Android device with Android 4.2 or higher • Micro USB port • Wireless network • Memory: 512 MB and above Install PC application software In order to use AcerEXTEND, you will first need to install the software on your computer. Connect your smartphone to your computer using a USB cable. The PC application software installer can be extracted directly from the smartphone's internal storage or from an SD card. Once you have successfully installed the software and followed the onscreen setup instructions, your smartphone's screen will be displayed on your computer. You will be able to operate your smartphone from your computer via a USB cable or wireless connection. 1.Connect your Acer smartphone to your computer via a USB cable. 2.Once you have successfully established a connection (installation procedures may vary depending on smartphone model), follow the instructions to continue the setup. 3.Tap AcerEXTEND on your smartphone and follow the onscreen instructions to continue setup.
  • 48.
    48 - Usingyour smartphone with AcerEXTEND 4.In Settings > Developer options, USB debugging must be enabled. Tap the empty checkbox and tap OK to allow USB debugging. 5.Open the smartphone's MTP drive (internal storage or SD card) in My Computer and find AcerEXTENDInstaller.exe. Double-click to start the installation. Note To enable Developer options go to Settings > About phone, and tap Build number until you see "You are now a developer" appear at the bottom of the screen.
  • 49.
    Using your smartphonewith AcerEXTEND - 49 If you see the Windows security popup window after double-clicking the installer, click More info and click Run anyway. The AcerEXTEND application software will begin uncompressing and installing onto your computer. Follow the instructions on your computer to complete the installation. When the installation is complete, AcerEXTEND will automatically detect and connect to your smartphone. See the following figure for reference. 6.You may be prompted to Allow USB debugging? Tap OK. 7.The button in the center of your smartphone’s screen indicates AcerEXTEND’s current status. Tap the button to turn AcerEXTEND on or off. 8.Once the connection is established, the smartphone's screen will appear on your computer's desktop. An AcerEXTEND Wireless Connection Tutorial will also appear. AcerEXTEND toolbar Once the smartphone's screen is displayed on your computer's desktop, you can click the button to extend the toolbar. From here, Note Some antivirus software may prevent this installer from running on your computer. You may copy the installer from the smartphone's internal storage drive onto your computer's desktop and run the installer from there.
  • 50.
    50 - Usingyour smartphone with AcerEXTEND you can control all of your smartphone features. Click the button again to hide the toolbar. The toolbar functions are described below: Icon Function Icon Function Back Home Switch app Turn Always on top on or off Minimize AcerEXTEND window Close AcerEXTEND Turn wireless connection on or off Turn power saving on or off Resume or suspend your smartphone Rotate the screen to the left or right Increase or decrease the volume Go to the next or previous page Switch the input between the smartphone and computer keyboard
  • 51.
    Using your smartphonewith AcerEXTEND - 51 AcerEXTEND wireless connection There are four ways to establish a wireless connection between your smartphone and your computer: 1.Right-click the AcerEXTEND icon in your computer's system tray and select AcerEXTEND (Wireless). 2.Double-click the AcerEXTEND shortcut on your computer's desktop or double-click the AcerEXTEND icon in the system tray. You will be reminded to connect your smartphone via a USB port. An AcerEXTEND window will display any connected smartphones. Select your smartphone and click it to start the wireless connection. 3.You may switch to a wireless connection once you have successfully connected to your smartphone via a USB cable. If a wireless connection is available between your computer and smartphone, the wireless symbol at the top of the extended toolbar Note Your Acer smartphone and computer must both be connected to the same wireless network before you can establish an AcerEXTEND wireless connection.
  • 52.
    52 - Usingyour smartphone with AcerEXTEND will change to . Click the button to toggle the connection from USB cable to wireless. 4.You may also use Sound Trigger. Sound Trigger must first be enabled on your smartphone. Tap the setup menu in the top right- hand corner of the AcerEXTEND panel on your smartphone. Tap the switch ON to Enable Sound Trigger. When your smartphone is close to your computer, a wireless connection will automatically sync your smartphone to the computer. You can delete or turn Sound Trigger on or off for each paired smartphone by tapping the red trash bin or checking and unchecking the box next to each paired smartphone. By default, all paired smartphones are named My smartphone. You can change the default name for your paired smartphone by clicking My smartphone and renaming the paired smartphone. There are two options located in the Settings window that can be used to control Sound Trigger detection. To display the Settings, click the left-bottom button in Pairing Maintenance. Enable the first option Auto extend when the smartphone moves close to this computer. (enabled by default) and AcerEXTEND will automatically start when the smartphone is close to the computer. Enable Auto disconnect when the smartphone moves away from this computer. (disabled by default) and AcerEXTEND will automatically disconnect when the smartphone moves away from your computer for a specified period of time. Note To connect your smartphone with your computer via a wireless network, you will need to first pair your smartphone with your computer via a USB cable.
  • 53.
    Using your smartphonewith AcerEXTEND - 53 AcerEXTEND functions 1.Bidirectional control: Once an AcerEXTEND connection has been made, your smartphone's screen will be displayed on the computer. You can view and control the smartphone by using your computer's mouse or directly touch your computer's screen if your computer is equipped with a touchscreen panel. You can also share files between your computer and smartphone. The screen of your smartphone will dynamically mirror onto your computer. AcerEXTEND will auto rotate the screen on the computer when it detects that the orientation of the smartphone has changed. 2.Air Wireless Play: AcerEXTEND supports Acer smartphone user control from your computer via a wireless connection and can be auto started by Sound Trigger if it is enabled. Your smartphone and computer must both be connected to the same wireless access point. Operating your smartphone via wireless connection may be more convenient than connecting via a USB cable. 3.Directly input text: You can easily input text into your smartphone by using the keyboard of your computer. Easily toggle between the smartphone's onscreen keyboard and the computer's keyboard from the AcerEXTEND extended toolbar. 4.Copy and paste: With the clipboard sharing feature, you can edit and copy and paste the clipboard contents between the computer and your smartphone. • Open the source file, select and right-click on the text that you want to copy, and choose Copy from the content menu. • Move the cursor to the smartphone's screen on your computer and open the destination editor file.
  • 54.
    54 - Usingyour smartphone with AcerEXTEND • Move the cursor to the location you want to place the text, left- click and hold, and click Paste. 5.Drag and drop: Drag and drop the file by selecting and dragging the file on your computer with your mouse to the smartphone screen on your desktop to transfer the file to your smartphone. 6.Share to open: Transfer files like photos and videos from your smartphone to your computer by directly using the smartphone or the smartphone's screen on the computer's display. Open the file and click the AcerEXTEND icon to transfer the file. The shared file will be downloaded to the specified path on your computer. Once the file has finished downloading, an AcerEXTEND window will confirm that the shared file has been downloaded. • Share a picture immediately after it is taken by tapping the Share icon and then tapping the AcerEXTEND icon. The file will be downloaded to the specified path on the computer. • Send a web page or a YouTube link from your smartphone to your computer. Tap on the Settings icon in the upper right-hand corner and tap Share page. In Share via, tap AcerEXTEND and the web page will be opened on your computer. • When sharing a YouTube video, tap on the Share icon. In Share this video via, tap AcerEXTEND and the YouTube video will open on your computer. Note You can also copy and paste text from your smartphone to your computer by following the same instructions. You can also use your computer's keyboard's hotkeys to control your smartphone's editor: <Ctrl>+<A> (select all); <Ctrl>+<C> (copy); and <Ctrl>+<V> (paste). This function depends on the capabilities of the smartphone's editor and may not work in all apps.
  • 55.
    Using your smartphonewith AcerEXTEND - 55 AcerEXTEND FAQ Why can't I use my smartphone's onscreen keyboard to enter text with AcerEXTEND? AcerEXTEND may have crashed or did not properly shut down, therefore, causing the AcerEXTEND software keyboard to remain as the default keyboard input method. Follow the steps below to recover your smartphone's onscreen keyboard: 1.Open Settings from the Applications menu. 2.Select Language & input. 3.Choose your input method by tapping Default. Why can’t I connect to AcerEXTEND wirelessly? • Make sure your smartphone and computer are both connected to the same wireless network. • If your smartphone is not showing on the AcerEXTEND (wireless) list, click the refresh button in the upper-right corner to refresh. • Try to connect your smartphone via a USB cable first and then switch to a wireless connection by clicking the wireless button on the extended toolbar. • You may need to first disable AcerEXTEND on your smartphone and then re-enable it. If you cannot disable AcerEXTEND, try rebooting the smartphone first before disabling AcerEXTEND. • If you have followed the instructions above and still see a blank wireless button in the extended toolbar after establishing a connection via a USB cable, check if the antivirus software installed on your computer has blocked your wireless connection. Disable your antivirus and try again. Why does my AcerEXTEND screen keep freezing after connecting to a wireless network? • The problem may be caused by a poor wireless signal or you may be experiencing high interference in the area. In this situation, a USB cable will provide a more stable AcerEXTEND connection. • Another alternative will be to enable your smartphone's mobile hotspot and sync your computer through this hotspot.
  • 56.
    56 - Usingyour smartphone with AcerEXTEND Why do I constantly see the AcerEXTEND ON/OFF warning window? You may be encountering this problem because the driver for the smartphone's USB debugging interface was not installed properly. Please connect your USB cable to a USB 2.0 port on your computer first and then restart AcerEXTEND. How do I dismiss the AcerEXTEND - Acer smartphone Not Found warning? • Unlock the smartphone. If you see a window asking you to Always allow from this computer, make sure it is checked and tap OK. • If you do not see the alert window, try disconnecting and re- connecting the USB cable to see if the alert window appears. • Make sure the date and time on your computer are correct. If it is not correct, adjust the time and restart AcerEXTEND. • Check if there are any third party smartphone assistant applications installed on your computer. Turn any third party smartphone assistant applications off and restart AcerEXTEND. I can’t control my smartphone with computer’s mouse, how do I fix it? • Make sure you have the latest version of AcerEXTEND installed on your smartphone and computer. • Try rebooting your smartphone. How can I copy files from my smartphone to my computer? Android does not support dragging and dropping files. To copy a file from your smartphone to your computer, please select the file using an app, such as a File Manager, and use the Share function to share the file to your computer via AcerEXTEND. I can’t share a file or web link from my smartphone, how can I fix this? Android may have terminated the AcerEXTEND service due to a resource shortage. Re-start the AcerEXTEND connection. How can I improve the quality of AcerEXTEND wireless connections? If you experience screen lag or it freezes frequently when you are using AcerEXTEND over a wireless connection, the Wi-Fi channel
  • 57.
    Using your smartphonewith AcerEXTEND - 57 used by your smartphone is experiencing interference from other devices, or the Wi-Fi signal is weak. You can try to use your smartphone’s Hotspot feature and let your computer join the smartphone’s Hotspot network.
  • 58.
    58 - Advancedsettings ADVANCED SETTINGS Putting your smartphone in Airplane mode You can enable Airplane mode (also known as flight mode) to turn off telephone, wireless and Bluetooth functions and use your smartphone as a handheld device during a flight. Check with your airline to make sure this is permitted onboard. Switch your smartphone off during takeoff and landing as it may interfere with aircraft electronic systems. Turning Airplane mode on or off 1. Open the Notification area and tap the grid icon in the upper right-hand corner. 2. Tap . -OR-
  • 59.
    Advanced settings -59 1.Press and hold the power button until you get the smartphone options menu. 2.Tap Airplane mode to switch it ON or OFF. Restarting your smartphone You can restart (reboot) your smartphone if you find apps are not responding. 1.Press and hold the power button until you get the smartphone options menu. 2.Tap Restart. Note When Airplane mode is active, the icon will be displayed in the Notification area.
  • 60.
    60 - Advancedsettings Adjusting settings Activating or deactivating connections Open the Apps menu and tap Settings to manage your connection settings. Item Description SIM management Set a default SIM for particular functions (such as voice calling or messaging), turn the data connection on or off, set roaming preferences and associate contacts with a SIM. Wi-Fi Turn the Wi-Fi function on or off. Bluetooth Turn the Bluetooth function on or off. Data usage View an estimate of the mobile data used for each SIM. Call Settings Change Voice Call settings. Change Internet Call settings. Adjust Other Settings. Turn Float Caller on or off. Set Proximity Sensor. Turn Flip Mute on or off.
  • 61.
    Advanced settings -61 If your smartphone is in Airplane mode, the option to turn Bluetooth on will be disabled. Please refer to Putting your smartphone in Airplane mode on page 58 for instructions on turning Airplane mode on or off. Adjusting Bluetooth settings You can use Bluetooth to exchange information between your smartphone and other mobile devices. Bluetooth connections For all Bluetooth settings, open the Apps menu and tap Settings > Bluetooth. Here you can switch Bluetooth on or off, set a device name and discoverability. Tap SEARCH FOR DEVICES to scan for available devices. To connect to a device, tap the device in the list of available devices. You may be asked to enter a PIN on both devices to establish the connection. To simply turn on or off Bluetooth, open the Notification area and tap the Bluetooth button. More... Access additional connection settings: Airplane mode: Disable all wireless connections so you can safely use this device onboard an aircraft. Default SMS app: Choose which app serves as the default SMS app. Tethering & portable hotspot: Share your smartphone’s mobile data connection via USB or as a portable Wi-Fi hotspot. VPN: Set up and manage Virtual Private Networks. Mobile networks: Set your options for connecting to mobile networks. USB Internet: Share your computer’s internet connection via a USB cable. See Internet sharing on page 62. Item Description
  • 62.
    62 - Advancedsettings Internet sharing Tethering via USB If you wish to share your mobile internet connection with a computer, you can connect your smartphone to a PC using the supplied USB cable. 1.Plug the USB sync cable into the micro USB connector on your smartphone. 2.Plug the USB sync cable into an available USB port on your computer. 3.Tap Settings > More.. > Tethering & portable hotspot > USB tethering. Wi-Fi hotspot You can turn your smartphone into a portable Wi-Fi hotspot to share your mobile internet connection with up to 8 clients. 1.Tap Settings > More... > Tethering & portable hotspot. Turn Wi-Fi hotspot ON.Tap Wi-Fi hotspot > Set up Wi-Fi hotspot. 2.Set the Network SSID and adjust security between None and WPA2 PSK. Tap Save to finish. Smartphone network settings In the Apps menu tap Settings > More... > Mobile networks to adjust your network settings. You can turn data connection on or off when roaming, choose a preferred network mode, specify a network operator and define access point names. Note When your smartphone is serving as a Wi-Fi hotspot, you can’t use your smartphone’s apps to access the internet via its Wi-Fi connection.
  • 63.
    Advanced settings -63 Selecting a network Your smartphone will automatically detect your carrier/network settings when you insert a new SIM card. However, you may prefer to manually select a network. This may be a good idea when roaming. 1.Open the Apps menu and tap Settings > More... > Mobile networks > Network operators > Select Manually. 2.Your smartphone will search for available networks. 3.Select your preferred network from the list generated. Your smartphone will attempt to register on the selected network. 4.Tap Select automatically to connect to the available network with the strongest signal. This may lead to your smartphone jumping between networks when you move around. Data usage control settings Data usage controls let you monitor total usage by network type and app and then set limits if needed. Ensure Wi-Fi or mobile data is enabled before setting a limit. Access data usage settings from the Apps menu by tapping Settings > Data usage. Smartphone settings Many smartphone settings are automatically configured by your smartphone when you insert a SIM card. The device will communicate with your provider and automatically obtain all necessary settings, such as network name, voice mail and text message center numbers. You can also view and modify these settings manually through the Call settings screen. Note When you are traveling, manually selecting a network may help to reduce your roaming charges. Check with your home service provider for the network offering the most competitive rates at your destination. Note Contact your service provider should you have any problems obtaining voice mail and the text message service center numbers.
  • 64.
    64 - Advancedsettings Sound To adjust your smartphone’s sound settings, in the Apps menu tap Settings > Sound. Adjusting the volume Adjust the volume of your smartphone using the volume button on the side of the smartphone. Alternatively, you can set the Ringtone, Notifications, and Alarms volume by opening the Apps menu and tapping Settings > Sound > Volumes. Audio profiles To adjust your smartphone’s sound settings, in the Apps menu tap Settings > Audio profiles. Choose from General, Silent, Meeting, or Outdoor. Item Description Vibrate Vibrates the device for incoming calls. Volumes Adjust the Ringtone, Notifications, and Alarm volumes. SIM1 ringtone Sets your default ringtone for SIM1. SIM2 ringtone Sets your default ringtone for SIM2. Default notification sound Set your smartphone’s default notification sound. Dial pad touch tones Play tones when using dial pad. Touch sounds Play sounds when touching certain UI elements. Screen lock sound Play sound when locking and unlocking the screen. Vibrate on touch Vibrate when pressing soft keys and on certain UI interactions.
  • 65.
    Advanced settings -65 Display To adjust your smartphone’s display settings, in the Apps menu tap Settings > Display. Setting the date and time To set the date and time, open the Apps menu and tap Settings > Date & time. If you travel frequently or live in an area that uses daylight saving time, activate Automatic date & time > Use network-provided time from this menu. This will enable your smartphone to set the date and time based on information it receives from the network. Setting alarms There are two predefined alarms on your smartphone by default. Tap Clock in the Apps menu, and then tap to edit alarm settings. You may: • Turn the alarm on or off. • Set the alarm time. Item Description Theme Change the Home screen’s theme. Brightness Adjust screen brightness. Auto-rotate screen Enable rotation of the screen when device is tilted. Sleep Adjust the delay before the screen automatically turns off. Daydream Controls what happens when the smartphone is docked and/or sleeping. Font size Change the default font size for the UI. Wireless Display Mirrors your smartphone’s display on a compatible monitor or display. Pairing your smartphone to the display is required before use and may require a dongle. See the instructions that came with your display or dongle to pair.
  • 66.
    66 - Advancedsettings • Set which days to repeat the alarm. • Set a ringtone. • Enable or disable vibrate. • Give it a label. Changing language and text options Set your location and language input preferences by opening the Apps menu and going to Settings > Language & input. Connecting to a PC If you wish to transfer information between your device and your computer (either the microSD card in your device or the device’s internal memory), you can connect your device to a PC using the supplied USB cable. 1.Plug the USB sync cable into the micro USB connector on your smartphone. 2.Plug the USB sync cable into an available USB port on your computer. 3.Open the notification area and tap Connected as a media device to choose whether to connect as a Media device (MTP) (the default option) or Camera (PTP). Your device will now be available as a drive in your computer’s file explorer. Synchronization You can sync your calendar, email and contacts on your smartphone and never worry about losing them again. Sync in real time or adjust it as you please. In the Apps menu, tap Settings. Under ACCOUNTS, Note After turning on USB storage, you will not be able to access the files in the microSD card or apps such as Gallery or Music.
  • 67.
    Advanced settings -67 tap the appropriate account and again under ACCOUNTS tap that account’s email address to access the synchronization settings. To add a new account, tap Add account. Select the type of account and then follow the onscreen instructions. Google Sync In Google, you can set synchronization for Google services. In your Google account’s synchronization settings menu, tap the checkmark next to the item you would like to have sync automatically. Tap again to uncheck for manual synchronization. To manually synchronize an item, make sure the item is checked, tap the Menu button and then tap Sync now. FM radio The FM radio allows you to listen to your favorite stations while on the move. Headphones must be inserted to the 3.5 mm jack as the cable functions as an antenna. You can access the radio by tapping FM Radio from the Apps menu. Note You need a Google account to sync your calendar and appointments.
  • 68.
    68 - Advancedsettings Tap the back icon to turn the radio off. Applications (apps) Closing an app To close an active app, in the Apps menu tap Settings > Apps. Swipe over to the Running tab, then tap the program you wish to close. Select Stop to close the program. Uninstalling an app You can remove programs installed on your smartphone to free up extra storage memory. 1.In the Apps menu tap Settings > Apps. 2.Swipe over to the Downloaded tab. 3.Find the app in the list and tap on it. 4.Tap the Uninstall button and then tap OK. Restoring to factory settings You may perform a clean boot to restore your smartphone to the factory settings. Before performing a clean boot, ensure that your Important You should only remove programs if you are familiar with the Android operating system.
  • 69.
    Advanced settings -69 smartphone is not locked. Press any key or tap the screen to see if the smartphone responds. If your smartphone is responding to screen input, then open Settings from the Apps menu. Tap Backup & reset > Factory data reset > Reset phone and then Erase everything to format your smartphone. Important You should only perform a clean boot when all other options have failed to restore your smartphone to an operational state. This will erase all your personal information, any contacts stored on your smartphone and any programs you installed.
  • 70.
    70 - Accessoriesand tips ACCESSORIES AND TIPS This chapter shows you how to use accessories with your smartphone, as well as provide useful tips for when you are using your smartphone. Using the headset Your smartphone is compatible with headsets with built-in microphone for handsfree use when making calls. To use the headset, plug it into the 3.5 mm headphone jack at the top of the smartphone. When the headset is plugged in, all audio is routed to the headset, and the speakers are turned off. • To answer an incoming call, press the button on the microphone. • Adjust the volume using the volume up/down button on the smartphone. • End the call by pressing the button again. Using a Bluetooth headset Your smartphone’s Bluetooth functions make it fully compatible with all Bluetooth headsets. This allows you to use the unit handsfree when making calls, without the inconvenience of wires. Creating a new access point When you need to add another GPRS / EDGE / 3G / 4G connection on your smartphone, obtain the access point name and settings (including username and password if required) from your wireless service provider. 1.Open the Apps menu and tap Settings > More... > Mobile networks > Access Point Names, and select an operator. 2.Tap the Menu button and then tap New APN. 3.Enter the APN settings. Tap an item to adjust it.
  • 71.
    Accessories and tips- 71 4.When you have finished tap the Menu button and then tap Save. Inserting a microSD card Your smartphone features a memory expansion slot that accepts a microSD card to expand memory and storage capacity. Please refer to Installing a SIM or microSD card on page 7 for instructions on installing a microSD card. Important Some providers and countries do not allow the use of a smartphone as a modem over HSDPA. Please check with your provider before attempting to do so.
  • 72.
    72 - Managingyour SIM cards MANAGING YOUR SIM CARDS If your smartphone detects a new SIM card, you will be asked to confirm the preferred SIM to use for each action. It indicates the following information: 1.The color used for each SIM card and its network name. • The preferred SIM for outgoing calls. • The preferred SIM for sending messages. • The preferred SIM for mobile data. Tap Change to edit these settings from the SIM Management screen. You can also access the SIM Management functions by opening the Apps menu and tapping Settings > SIM management. SIM Management Open the Apps menu and tap Settings > SIM management. From this screen, you can: 1.Enable or disable each SIM. 2.Configure each SIM’s name, phone number, display numbers, and assign a color to each SIM (allowing you to quickly and easily recognize which SIM is active). 3.Set the default SIM for voice calls, messaging, data connection, and 4G/3G service. 4.General settings for each SIM. Note This chapter is for models with more than one SIM card.
  • 73.
    Managing your SIMcards - 73 Selecting which SIM to use when making a call If you have set Voice call to Always ask, you will be asked which SIM to use each time you make call. Enter the number, then tap . A dialog opens; tap the SIM to use and the call will be connected. Selecting which SIM to use when sending a text message If you have set Messaging to Always ask, you will be asked which SIM to use each time you send a text message. Enter the message and recipient information, then tap Send. A dialog opens; tap the SIM to use and the message will be sent.
  • 74.
    74 - Managingyour SIM cards Identifying calls Whenever you receive a call, the caller’s number will be shown using the color defined for the SIM that the call is being received on. You will also be shown the name of the SIM receiving the call. In the call log, the name of the SIM will be shown beneath the number of the call -- whether the call was missed, answered or was an outgoing call -- in the color you defined for that SIM. Limitations when using multiple SIMs When a SIM is: Other SIM cannot: In a call Dial out Ringing Receive a call (caller will get a "number not available" message) Sending or receiving a message Send or receive a message Using a data connection Use a data connection Note If you are using data on one SIM and you make or receive a call, or send or receive a text message on another SIM, the first SIM’s data connection will be temporarily halted.
  • 75.
    Appendix - 75 APPENDIX FAQand troubleshooting This section lists frequently asked questions that may arise during the use of your smartphone, and gives easy answers and solutions to these questions. Aspect Question Suggestions Audio Why is there no sound coming from the device? If the headset is plugged into the device, the speaker is automatically shut off. Disconnect the headset. Check that the device volume setting is not muted. Check that the volume control is not at its lowest setting. Multimedia files Why can’t I view my picture files? You may be trying to view an image that is not supported. See Multimedia on page 83. Why can’t I view my video files? You may be trying to view a video that is not supported. See Multimedia on page 83. Why can’t I play my music files? You may be trying to play a file that is not supported. See Multimedia on page 83.
  • 76.
    76 - Appendix GooglePlay Store Why can’t I connect to the Play Store? 1.First check that you have a Wi-Fi or data connection (some Wi-Fi "hotspots" require you to log in before accessing the internet) and then try again. 2.If you still cannot connect, try adjusting your date/time settings. Open the Apps menu and tap Settings > Date & time > Automatic date & time set to off. 3.Manually adjust the time and then try to reconnect to the Play Store. System information and performance How do I check the OS version of my device? Tap Settings > About phone to check the OS version (Build number) and other hardware and software information. Power I can’t turn on the device. The battery power may be depleted. Recharge the device. See Charging the battery on page 6 for more information. RAM / ROM How do I check the RAM and ROM memory status? To check the ROM status, tap Settings > Storage. To check RAM status, tap Settings > APPS > RUNNING. Internal storage My device’s available internal storage is full or almost full. Uninstall apps to increase available storage. See Uninstalling an app on page 68. Aspect Question Suggestions
  • 77.
    Appendix - 77 Othersources of help For information on Refer to ... Up-to-date information regarding your smartphone www.acer.com mobile.acer.com Service enquiries www.acer.com/support Unlock pattern I forgot my unlock pattern. After a certain number of wrong entries, you will be presented with an option to reset your pattern. Tap Forgot pattern? and enter your Google account username and password. You must have an active Google account on the smartphone. Alternatively, you restore your smartphone to factory settings. See Restoring to factory settings on page 68. Heat The smartphone heats up when charging or making long duration calls. It is normal for the smartphone to heat up when charging. When charging is complete, it will return to its normal temperature. It is also normal for the smartphone to heat up during long periods of use, such as watching a video or a long smartphone conversation. Aspect Question Suggestions
  • 78.
    78 - Warningsand precautions WARNINGS AND PRECAUTIONS • Do not use this product near water. • Do not place this product on an unstable cart, stand or table. If the product falls, it could be seriously damaged. • Slots and openings are provided for ventilation to ensure reliable operation of the product and to protect it from overheating. These openings must not be blocked or covered. The openings should never be blocked by placing the product on a bed, sofa, rug or other similar surface. This product should never be placed near or over a radiator or heat register, or in a built-in installation unless proper ventilation is provided. • Never push objects of any kind into this product through cabinet slots as they may touch dangerous voltage points or short-out parts that could result in a fire or electric shock. Never spill liquid of any kind onto or into the product. • To avoid damage of internal components and to prevent battery leakage, do not place the product on a vibrating surface. • Never use this product when engaging in sporting activities, exercising, or in any vibrating environment which may cause a short circuit or damage, and even a risk of explosion from the battery pack. Protecting your hearing To protect your hearing, follow these instructions. • Increase the volume gradually until you can hear clearly and comfortably. • Do not increase the volume level after your ears have adjusted. • Do not listen to music at high volumes for extended periods. • Do not increase the volume to block out noisy surroundings. • Decrease the volume if you can’t hear people speaking near you. Additional safety information Your device and its enhancements may contain small parts. Keep them out of the reach of small children.
  • 79.
    Warnings and precautions- 79 Operating environment Remember to follow any special regulations in force in any area, and always switch off your device when its use is prohibited or when it may cause interference or danger. Use the device only in its normal operating positions. To successfully transmit data files or messages, this device requires a good quality connection to the network. In some cases, transmission of data files or messages may be delayed until such a connection is available. Ensure that the above separation distance instructions are followed until the transmission is completed. Parts of the device are magnetic. Metallic materials may be attracted to the device, and persons with hearing aids should not hold the device to the ear with the hearing aid. Do not place credit cards or other magnetic storage media near the device, because information stored on them may be erased. Medical devices Operation of any radio transmitting equipment, including wireless smartphones, may interfere with the functionality of inadequately protected medical devices. Consult a physician or the manufacturer of the medical device to determine if they are adequately shielded from external RF energy or if you have any questions. Switch off your device in health care facilities when any regulations posted in these areas instruct you to do so. Hospitals or health care facilities may be using equipment that could be sensitive to external RF transmissions. Pacemakers. Pacemaker manufacturers recommend that a minimum separation of 15.3 cm (6") be maintained between wireless devices and a pacemaker to avoid potential interference with the pacemaker. These recommendations are consistent with the independent research by and recommendations of Wireless Technology Research. Persons with pacemakers should do the following: • Always keep the device more than 15.3 cm (6") from the pacemaker. Important For safety reasons, turn off all wireless or radio transmitting devices when using your smartphone device under the following conditions. These devices may include, but are not limited to: wireless LAN (WLAN), Bluetooth and/or cellular services.
  • 80.
    80 - Warningsand precautions • Not carry the device near your pacemaker when the device is switched on. If you suspect interference, switch off your device, and move it. Hearing aids. Some digital wireless devices may interfere with some hearing aids. If interference occurs, consult your service provider. Vehicles RF signals may affect improperly installed or inadequately shielded electronic systems in motor vehicles such as electronic fuel injection systems, electronic anti-skid (anti-lock) braking systems, electronic speed control systems, and air bag systems. For more information, check with the manufacturer, or its representative, of your vehicle or any equipment that has been added. Only qualified personnel should service the device, or install the device in a vehicle. Faulty installation or service may be dangerous and may invalidate any warranty that may apply to the device. Check regularly that all wireless equipment in your vehicle is mounted and operating properly. Do not store or carry flammable liquids, gases, or explosive materials in the same compartment as the device, its parts, or enhancements. For vehicles equipped with an air bag, remember that air bags inflate with great force. Do not place objects, including installed or portable wireless equipment in the area over the air bag or in the air bag deployment area. If in-vehicle wireless equipment is improperly installed, and the air bag inflates, serious injury could result. Using your device while flying in aircraft is prohibited. Switch off your device before boarding an aircraft. The use of wireless teledevices in an aircraft may be dangerous to the operation of the aircraft, disrupt the wireless telephone network, and may be illegal. Potentially explosive environments Switch off your device when in any area with a potentially explosive atmosphere and obey all signs and instructions. Potentially explosive atmospheres include areas where you would normally be advised to turn off your vehicle engine. Sparks in such areas could cause an explosion or fire resulting in bodily injury or even death. Switch off the device at refueling points such as near gas pumps at service stations. Observe restrictions on the use of radio equipment in fuel depots,
  • 81.
    Warnings and precautions- 81 storage, and distribution areas; chemical plants; or where blasting operations are in progress. Areas with a potentially explosive atmospheres are often, but not always, clearly marked. They include below deck on boats, chemical transfer or storage facilities, vehicles using liquefied petroleum gas (such as propane or butane), and areas where the air contains chemicals or particles such as grain, dust or metal powders. Follow any restrictions. Do not use the device where blasting is in progress. Emergency calls If certain features are in use, you may first need to turn those features off before you can make an emergency call. Consult this guide or your service provider for more information. When making an emergency call, give all the necessary information as accurately as possible. Your wireless device may be the only means of communication at the scene of an accident. Do not end the call until given permission to do so. Taking care of your smartphone 1.DO take care not to scratch the screen of your smartphone. Keep the screen clean. When working with your smartphone, use your finger or fingernail. Never use an actual pen or pencil or other sharp object on the screen surface. 2.DO NOT expose your smartphone to rain or moisture. Do not let water enter the circuitry through the front panel buttons or expansion slots. In general, treat your smartphone as you would a mobile phone or other small electronic device. Important Wireless smartphones, including this device, operate using radio signals, wireless networks, landline networks, and user-programmed functions. Because of this, connections in all conditions cannot be guaranteed. You should never rely solely on any wireless device for essential communications like medical emergencies.
  • 82.
    82 - Warningsand precautions 3.DO be careful not to drop your smartphone or subject it to any strong impact. Do not place your smartphone in your back pocket. 4.DO NOT expose your smartphone to extreme temperatures. For example, do not leave your smartphone on the dashboard of a car on a hot day or when temperatures are below freezing point. Also, keep it away from heaters and other sources of heat. 5.DO NOT use or store your smartphone in any location that is dusty, damp or wet. 6.DO use a soft, damp cloth to clean your smartphone. If the surface of the screen becomes soiled, clean it with a soft cloth moistened with diluted window-cleaning solution. 7.DO NOT press down on the screen with force, otherwise you may crack the screen.
  • 83.
    - 83 Specifications Performance • 1.5GHz quad-core processor • System memory: • 1 GB or 2 GB of RAM (depending on model) • 8 GB or 16 GB of ROM (depending on model) • Android operating system Display • 5" TFT LCD, capacitive touchscreen • 1280 x 720 resolution Multimedia Formats supported: USB connector • Micro USB connector • USB client • DC power-in (5.2 V, 1.35 A) Note Specifications may vary depending on region and configuration. Type Formats Image JPEG, GIF, PNG, BMP Audio playback MP3, AMR, AAC LC, AAC+, eAAC+, Vorbis, FLAC, MIDI, WAVE Ringtone MP3, AMR, AAC LC, AAC+, eAAC+, Vorbis, FLAC, MIDI, WAVE Video recording H.263, H.264, MPEG4 Video playback H.263, H.264, MPEG4, VP8
  • 84.
    84 - Connectivity • Bluetooth4.0 • IEEE 802.11b/g/n • LTE Band 1, 3, 7, 20 (Europe and Asia); 2, 4, 7, 17 (Americas) • * GSM 850 / 900 / 1800 / 1900 MHz • UMTS 900 / 2100 MHz • HSPA+ / GPRS / EDGE • GPS * Frequencies depend on model. Camera • 13 MP rear camera • Auto-focus • LED flash • 5 MP front camera • Fixed focus Expansion • microSD memory card slot (up to 32 GB) Battery • 2300 mAh Lithium-ion battery (not user-replaceable) Note Length of battery operation will depend on power consumption which is based on system resource use. For example, constantly using the backlight or using power-demanding apps will shorten battery life between charges.
  • 85.
    - 85 Dimensions Height 143mm Width 69 mm Thickness 7.8 mm Weight 116 g (with battery)
  • 86.
    86 - EndUser License Agreement END USER LICENSE AGREEMENT IMPORTANT-READ CAREFULLY: THIS END USER LICENSE AGREEMENT ("AGREEMENT") IS A LEGAL AGREEMENT BETWEEN YOU (EITHER AN INDIVIDUAL OR A SINGLE ENTITY), AND ACER INC. INCLUDING ITS SUBSIDIARIES ("ACER") FOR THE SOFTWARE (WHETHER PROVIDED BY ACER OR BY ACER'S LICENSORS OR SUPPLIERS) THAT ACCOMPANIES THIS AGREEMENT, INCLUDING ANY ASSOCIATED MEDIA, PRINTED MATERIALS AND RELATED USER ELECTRONIC DOCUMENTATION WHICH MAY BE BRANDED "ACER" ("SOFTWARE"). AGREEMENTS RELATING TO ANY OTHER PRODUCT OR TOPIC ARE NEITHER INTENDED NOR SHOULD THEY BE IMPLIED. BY INSTALLING THE ACCOMPANYING SOFTWARE OR ANY PORTION THEREOF, YOU AGREE TO BE BOUND BY THE TERMS AND CONDITIONS OF THIS AGREEMENT. IF YOU DO NOT AGREE TO ALL OF THE TERMS AND CONDITIONS OF THIS AGREEMENT, DO NOT CONTINUE THE INSTALLATION PROCESS AND IMMEDIATELY DELETE ALL INSTALLED FILES, IF ANY, OF THE ACCOMPANYING SOFTWARE FROM YOUR SMARTPHONE. IF YOU DO NOT HAVE A VALIDLY-LICENSED COPY OF THE APPLICABLE SOFTWARE, YOU ARE NOT AUTHORIZED TO INSTALL, COPY OR OTHERWISE USE THE SOFTWARE, AND HAVE NO RIGHTS UNDER THIS AGREEMENT. The Software is protected by U.S. and international copyright laws and conventions as well as other intellectual property laws and treaties. The Software is licensed, not sold. GRANT OF LICENSE Acer grants to you the following non-exclusive and non-transferable rights with respect to the Software. Under this Agreement, you may: 1. Install and use the Software only on a single designated smartphone. A separate license is required for each smartphone on which the Software will be used; 2. Make one copy of the Software solely for backup or archival purposes; 3. Make one hardcopy of any electronic documents included in the Software, provided that you receive the documents electronically. RESTRICTIONS You may NOT: 1. Use or copy the Software except as provided in this Agreement; 2. Rent or lease the Software to any third party; 3. Modify, adapt, or translate the Software in whole or in part; 4. Reverse engineer, decompile, or disassemble the Software or create derivative works based upon the Software; 5. Merge the Software with any other program or modify the Software, except for your personal use; and 6. Sublicense or otherwise make the Software available to third parties, except that you may, after prior written notification to Acer, transfer the Software as a whole to a third party so long as you do not retain any copies of the Software and such third party accepts the terms of this Agreement. 7. Transfer your rights under this Agreement to any third parties. 8. Export the Software in contravention of applicable export laws and regulations, or (i) sell, export, re-export, transfer, divert, disclose technical data, or dispose of, any Software to any prohibited person, entity, or destination including, without limitation, Cuba, Iran, North Korea,
  • 87.
    End User LicenseAgreement - 87 Sudan and Syria; or (ii) use any Software for any use prohibited by the laws or regulations of the United States. SUPPORT SERVICES Acer is not obligated to provide technical or other support for the Software. ACER LIVE UPDATE Certain of the software contains elements that enable the use of the Acer Live Update service, which allows for updates for such software to be automatically downloaded and installed on your smartphone. By installing the software, you hereby agree and consent that Acer (or its licensors) may automatically check the version of such software that you are using on your smartphone and may provide upgrades to such software that may be automatically downloaded on to your smartphone. OWNERSHIP AND COPYRIGHT Title, ownership rights and intellectual property rights in and to the Software and all copies thereof shall remain with Acer or Acer's licensors or suppliers (as applicable). You do not have or shall not gain any proprietary interest in the Software (including any modifications or copies made by or for you) or any related intellectual property rights. Title and related rights in the content accessed through the Software is the property of the applicable content owner and may be protected by applicable law. This license gives you no rights to such contents. You hereby agree 1. Not to remove any copyright or other proprietary notices from the Software; 2. To reproduce all such notices on any authorized copies you make; and 3. To use best efforts to prevent any unauthorized copying of the Software. TRADEMARKS This Agreement does not grant to you any rights in connection with any trademarks or service marks of Acer or of Acer's licensors or suppliers. DISCLAIMER OF WARRANTIES TO THE MAXIMUM EXTENT PERMITTED BY APPLICABLE LAW, ACER, ITS SUPPLIERS, AND ITS LICENSORS, PROVIDE THE SOFTWARE "AS IS" AND WITH ALL FAULTS, AND HEREBY DISCLAIM ALL OTHER WARRANTIES AND CONDITIONS, EITHER EXPRESS, IMPLIED OR STATUTORY, INCLUDING, BUT NOT LIMITED TO, ANY IMPLIED WARRANTIES, DUTIES OR CONDITIONS OF MERCHANTABILITY, OF FITNESS FOR A PARTICULAR PURPOSE, OF ACCURACY OR COMPLETENESS OF RESPONSES, OF RESULTS, OF WORKMANLIKE EFFORT, OF LACK OF VIRUSES, AND OF LACK OF NEGLIGENCE, ALL WITH REGARD TO THE SOFTWARE AND THE PROVISION OF OR FAILURE TO PROVIDE SUPPORT SERVICES. ALSO, THERE IS NO WARRANTY OR CONDITION OF TITLE, QUIET ENJOYMENT, QUIET POSSESSION, CORRESPONDENCE TO DESCRIPTION OR NON- INFRINGEMENT WITH REGARD TO THE SOFTWARE. EXCLUSION OF INCIDENTAL, CONSEQUENTIAL AND CERTAIN OTHER DAMAGES TO THE MAXIMUM EXTENT PERMITTED BY APPLICABLE LAW, IN NO EVENT SHALL ACER, ACER'S SUPPLIERS, OR ACER'S LICENSORS, BE LIABLE FOR ANY SPECIAL, INCIDENTAL, INDIRECT, PUNITIVE, OR CONSEQUENTIAL DAMAGES WHATSOEVER (INCLUDING, BUT NOT LIMITED TO, DAMAGES FOR LOSS OF PROFITS OR CONFIDENTIAL OR OTHER INFORMATION, FOR BUSINESS INTERRUPTION, FOR PERSONAL INJURY, FOR LOSS OF PRIVACY, FOR FAILURE TO MEET ANY DUTY INCLUDING OF GOOD FAITH OR OF REASONABLE CARE, FOR NEGLIGENCE, AND FOR ANY OTHER PECUNIARY OR OTHER LOSS WHATSOEVER) ARISING OUT OF OR IN ANY WAY RELATED TO THE USE OF OR INABILITY TO USE THE SOFTWARE, THE PROVISION OF OR FAILURE TO PROVIDE SUPPORT SERVICES, OR OTHERWISE UNDER OR IN CONNECTION WITH ANY
  • 88.
    88 - EndUser License Agreement PROVISION OF THIS AGREEMENT, EVEN IN THE EVENT OF THE FAULT, TORT (INCLUDING NEGLIGENCE), STRICT LIABILITY, BREACH OF CONTRACT OR BREACH OF WARRANTY OF ACER OR ITS SUPPLIERS OR LICENSORS, AND EVEN IF ACER AND ITS SUPPLIERS AND LICENSORS HAVE BEEN ADVISED OF THE POSSIBILITY OF SUCH DAMAGES. LIMITATION OF LIABILITY AND REMEDIES NOTWITHSTANDING ANY DAMAGES THAT YOU MIGHT INCUR FOR ANY REASON WHATSOEVER (INCLUDING, WITHOUT LIMITATION, ALL DAMAGES REFERENCED ABOVE AND ALL DIRECT OR GENERAL DAMAGES), THE ENTIRE LIABILITY OF ACER, ITS SUPPLIERS, AND ITS LICENSORS, UNDER ANY PROVISION OF THIS AGREEMENT, AND YOUR EXCLUSIVE REMEDY FOR ALL OF THE FOREGOING, SHALL BE LIMITED TO THE AGGREGATE AMOUNT PAID BY YOU FOR THE SOFTWARE. THE FOREGOING LIMITATIONS, EXCLUSIONS AND DISCLAIMERS (INCLUDING DISCLAIMER OF WARRANTIES AND EXCLUSION OF INCIDENTAL, CONSEQUENTIAL AND CERTAIN OTHER DAMAGES ABOVE) SHALL APPLY TO THE MAXIMUM EXTENT PERMITTED BY APPLICABLE LAW, EVEN IF ANY REMEDY FAILS ITS ESSENTIAL PURPOSE; PROVIDED, HOWEVER, THAT BECAUSE SOME JURISDICTIONS DO NOT ALLOW THE EXCLUSION OR LIMITATION OR LIABILITY FOR CONSEQUENTIAL OR INCIDENTAL DAMAGES, THE ABOVE LIMITATION MAY NOT APPLY TO YOU. TERMINATION Without prejudice to any other rights, Acer may immediately terminate this Agreement without notice if you fail to comply with any terms and conditions of this Agreement. In such event, you must: 1. Cease all use of the Software; 2. Destroy or return to Acer the original and all copies of the Software; and 3. Delete the Software from all smartphones on which it was resident. All disclaimers of warranties and limitation of liability set forth in this Agreement shall survive termination of this Agreement. GENERAL This Agreement represents the complete agreement between you and Acer relating to this license for the Software and supersedes all prior agreements, communications, proposals and representations between the parties and prevails over any conflicting or additional terms of any quote, order, acknowledgement or similar communication. This Agreement may only be modified by a written document signed by both parties. If any provision of this Agreement is held by a court of competent jurisdiction to be contrary to law that provision will be enforced to the maximum extent permissible and the remaining provisions of this Agreement will remain in full force and effect. ADDITIONAL PROVISIONS APPLICABLE TO THIRD PARTY SOFTWARE AND SERVICES Software provided hereunder by Acer's licensors or suppliers ("Third Party Software") is made available to you for your personal, non-commercial use only. You may not use the Third Party Software in any manner that could damage, disable, overburden, or impair the services provided by Acer's licensors or suppliers hereunder ("Third Party Services"). Furthermore, you may not use the Third Party Software in any manner that could interfere with any other party's use and enjoyment of the Third Party Services, or the services and products of Acer's licensors' or suppliers' third party licensors. Your use of the Third Party Software and Third Party Services is also subject to additional terms and conditions and policies which can be accessed through our global website.
  • 89.
    End User LicenseAgreement - 89 Privacy policy During registration you will be asked to submit some information to Acer. Please refer to Acer’s privacy policy at www.acer.com or your local Acer website. TRADEMARK INFORMATION DTS Premium Sound For DTS patents, see http://patents.dts.com. Manufactured under license from DTS Licensing Limited. DTS the Symbol, & DTS and the Symbol together are registered trademarks, and DTS Studio Sound is a trademark of DTS, Inc. © DTS, Inc. All Rights Reserved.