SlideShare a Scribd company logo
1 of 154
Download to read offline
Microsoft-Access Tutorial
                                                               Soren Lauesen
                                                             E-mail: slauesen@itu.dk

                                                             Version 2.4b: July 2011


Contents
1. The hotel system................................................... 4             5.2.2 Computed SQL and live search...............74
2. Creating a database ............................................. 6               5.2.3 Composite search criteria........................76
   2.1 Create a database in Access ............................. 6                   5.2.4 Event sequence for text box ....................78
   2.2 Create more tables ......................................... 10            5.3 Visual Basic tools...........................................80
   2.3 Create relationships ....................................... 12            5.4 Command buttons ..........................................84
   2.4 Look-up fields, enumeration type .................. 14                     5.5 Forms .............................................................86
   2.5 Dealing with trees and networks.................... 16                        5.5.1 Open, close, and events...........................86
3. Access-based user interfaces ............................. 18                     5.5.2 CRUD control in Forms ..........................87
   3.1 Forms and simple controls............................. 18                     5.5.3 The OpenForm parameters......................89
      3.1.1 Text box, label and command button...... 18                              5.5.4 Multi-purpose forms (hotel system)........90
      3.1.2 Adjusting the controls............................. 20                   5.5.5 Dialog boxes (modal dialog)...................92
      3.1.3 Cleaning up the form .............................. 20                   5.5.6 Controlling record selection....................93
      3.1.4 Shortcut keys for the user ....................... 22                    5.5.7 Column order, column hidden, etc. .........94
      3.1.5 Lines, checkbox, calendar....................... 22                      5.5.8 Area selection, SelTop, etc......................94
      3.1.6 Combo box - enumeration type .............. 24                           5.5.9 Key preview ............................................97
      3.1.7 Combo box - table look up ..................... 26                       5.5.10 Error preview ........................................97
      3.1.8 Control properties - text box................... 28                      5.5.11 Timer and loop breaking .......................98
   3.2 Subforms........................................................ 30           5.5.12 Multiple form instances.........................99
      3.2.1 Subform in Datasheet view..................... 31                        5.5.13 Resize..................................................100
      3.2.2 Adjust the subform ................................. 34               5.6 Record sets (DAO).......................................102
      3.2.3 Mockup subform..................................... 36                   5.6.1 Programmed record updates..................102
      3.2.4 Subform in Form view............................ 36                      5.6.2 How the record set works......................104
      3.2.5 Summary of subforms............................. 38                      5.6.3 The bound record set in a Form ............106
      3.2.6 Prefixes ................................................... 38          5.6.4 Record set properties, survey ................108
   3.3 Bound, unbound and computed controls........ 40                            5.7 Modules and menu functions .......................110
      3.3.1 Showing subform fields in the main form42                                5.7.1 Create a menu function .........................110
      3.3.2 Variable colors - conditional formatting. 42                             5.7.2 Define the menu item............................112
   3.4 Tab controls and option groups...................... 44                       5.7.3 Managing modules and class modules ..112
   3.5 Menus ............................................................ 46         5.7.4 Global variables ....................................114
      3.5.1 Create a new menu bar............................ 46               6. Visual Basic reference......................................116
      3.5.2 Add commands to the menu list ............. 48                        6.1 Statements ....................................................116
      3.5.3 Attach the toolbar to a form.................... 48                   6.2 Declarations .................................................120
      3.5.4 Startup settings - hiding developer stuff . 48                        6.3 Constants and addresses...............................122
   3.6 Control tips, messages, mockup prints .......... 50                        6.4 Operators and conversion functions .............124
4. Queries - computed tables................................. 52                  6.5 Other functions.............................................128
   4.1 Query: join two tables.................................... 52              6.6 Display formats and regional settings ..........132
   4.2 SQL and how it works ................................... 54             7. Access and SQL................................................134
   4.3 Outer join ....................................................... 56      7.1 Action queries - CRUD with SQL ...............134
   4.4 Aggregate query - Group By.......................... 58                       7.1.1 Temporary table for editing ..................134
   4.5 Query a query, handling null values .............. 62                      7.2 UNION query...............................................136
   4.6 Query with user criteria ................................. 64              7.3 Subqueries (EXISTS, IN, ANY, ALL . . .) ..138
   4.7 Bound main form and subform ...................... 66                      7.4 Multiple join and matrix presentation ..........140
      4.7.1 Editing a GROUP BY query................... 67                        7.5 Dynamic matrix presentation .......................142
5. Access through Visual Basic ............................. 68                   7.6 Crosstab and matrix presentation .................144
   5.1 The objects in Access .................................... 68           8. References.........................................................148
   5.2 Event procedures (for text box) ..................... 72                Index......................................................................149
      5.2.1 More text box properties......................... 72
Printing instructions
Print on A4 paper with 2-sided printing so that text and associated figures are on
opposing pages.

Version 1: October 2004.

Version 2.1: November 2004. Changes:
a. Restructured section 3.2 with small additions.
b. Section 7.1 on action queries added.
c. Small changes and additions to Chapter 6 with corresponding changes in the
   Reference Card.
d. Index provided

Version 2.2: April 2004. Changes:
a. SQL HAVING introduced in section 4.2 and the example in section 4.4.
b. More on aggregate functions in section 4.4.
c. ColumnOrder, ColumnWidth discussed in section 5.5.7.
d. Selection of an area in the datasheet is discussed in section 5.5.8.
e. Section 5.7 (action queries) now moved to Chapter 7.
f. Action queries, Union, Subqueries, Crosstab, etc. discussed in Chapter 7 (a new
   chapter).
g. Various small changes and improved explanations here and there.

Version 2.3: September 2006. Changes:
a. Access 2003 dialog when opening a database changed (page 8).
b. Look-up fields for foreign keys deleted (last part of section 2.4). Access's
   automatic creation of relationships caused too much confusion.
c. Combo boxes described in sections 3.1.6 and 3.1.7.
d. More events explained in section 5.2.3.
e. Various misprints corrected.

Version 2.4: August 2007 and July 2011. Changes:
a. Partial integrity (page 12).
b. Adding a label to a control (page 20).
c. DateTime Picker (page 22).
d. More Null rules (page 62, 77, 124).
e. Access data model and experiments improved (page 68-70).
f. Composite search criteria, more computed SQL, date comparison (page 76-77).
g. Event sequence for textbox: small corrections, e.g. OldValue (page 78).
h. Improved area selection (page 95-96).
i. Error handling, user errors (page 97-98).
j. Timer and loop breaking (page 98-99).
k. Managing modules and class modules (page 112).
l. Error handling, VBA errors, Err object (page 117).
m. Enum type (page 121).
n. Partition operator (page 124).
o. Week number in the Format function (page 126).
p. Dynamic matrix simplified (page 136).
q. Minor corrections and improvements in many places.
r. Version 2.4a: Note on AutoNumber added to Figures 2.1C and 2.4.
s. Version 2.4b: Copyright notice more liberal. Misprint corrected (page 65, step
    14 and 15). Figure 52B (page 75) shows quote-stuff more clearly. SendKeys on
    page 99 elaborated.


© Soren Lauesen, 2007
Permission is granted to use, print and copy the file on a non-profit basis as long as
the source is clearly stated. The document is available on the author's web site on
these conditions.


2                                                       Preface
Preface
This booklet shows how to construct a complex appli-                6. Visual Basic reference. A reference guide to the
cation in Microsoft Access (MS-Access). We assume                      Visual Basic language for Applications (VBA).
that the user interface has been designed already as a
paper-based mockup (a prototype). How to design a                   7. Access and SQL. An overview of the remaining
good user interface is a separate story explained in                   parts of SQL, for instance how to update the
User Interface Design - a Software Engineering Per-                    database through SQL. We also explain how to
spective, by Soren Lauesen.                                            generate matrices of data with dynamically chan-
                                                                       ging headings.
After design, development continues with constructing
the database, constructing the user interface, binding              Using the booklet for teaching
the user interface to the database, and finally develop             We have experimented with using the booklet for
the program. This is what this booklet is about.                    teaching. First we tried to present part of the material
                                                                    with a projector, then let the students try it out on their
The reason we illustrate the construction process with              own, next present some more, etc. Although the
MS-Access is that it is a widely available tool. Any-               students listened carefully, it turned out to be a waste
body who has Microsoft Office with MS-Word, also                    of time, partly because the students worked with vastly
has Access and the programming language Visual Ba-                  different pace.
sic behind Access.
                                                                    Now we give a 15 minute introduction to the main
MS-Access is also a good illustration of many princi-               parts of Access: the database window, the tables, the
ples that exist on other platforms too, for instance a re-          forms - and how they relate to what they have learned
lational database, a Graphical User Interface (GUI),                in user interface design. Then the students work on
event handling, and an object-oriented programming                  their own. We have instructors to help them out when
language. MS-Access contains all of these parts - co-               they get stuck.
operating reasonably smoothly.
                                                                    The hotel system
Organization of the booklet                                         We have chosen to illustrate the construction process
The chapters in the booklet are organized like this:                with a hotel example, because most people have an
                                                                    idea what it is about, yet it is sufficiently complex to
1. An introduction to the hotel system that is used as              show typical solutions in larger systems. Some of the
   an example throughout the booklet.                               complexities are that a hotel has many types of rooms
                                                                    at different prices; a guest can book several rooms,
2. Creating a database. Construct a database that cor-              maybe in overlapping periods; a room may need reno-
   responds to the data model behind the design. The                vation or repair, making it unavailable for a period; the
   user will only see the database indirectly - through             hotel keeps track of regular guests and their visits over
   the screens we construct.                                        time.
3. Access-based user interfaces. Construct the screens              Simplifications
   and menus that the user will see. We follow the pa-              However, we have simplified the system in many other
   per-based mockup designed in User Interface De-                  ways to shorten the discussion. For instance we ignore
   sign. You can use the result as a tool-based                     that in most hotels, rooms are not booked by room
   mockup.                                                          number, but by room type; hotels usually overbook, i.e.
                                                                    book more rooms than they have, expecting that some
4. Queries - computed tables. Connect the screens to                customers will not turn up. We also ignore all the other
   the database, usually by means of queries - com-                 aspects of operating a hotel, for instance keeping track
   puted data tables. The result will be a partially                of when rooms are cleaned and ready for the next
   functional prototype.                                            guest, purchasing goods, planning who is to be on duty
                                                                    for the next weeks, payroll and general accounting. In
5. Access through Visual Basic. Program what the
                                                                    spite of these simplifications, the example still shows
   buttons and menus will do when the user activates
                                                                    the structure of larger systems.
   them. The result will be a fully functional prototype
   and later the final system to be delivered to the                On-line resources
   customer. The first part of the chapter is tutorial -            A demo-version of the hotel system, a VBA reference
   mandatory reading if you want to work with Visual                card, etc. are available from the authors's web site:
   Basic and Access. The rest of the chapter is for                 www.itu.dk/people/slauesen. Comments are welcome.
   looking up various subjects. We assume you know
   a bit of programming already.                                    Soren Lauesen, slauesen@itu.dk


                                                          Preface                                                             3
1. The hotel system
In this booklet we illustrate MS-Access by means of a            record services that the guest has received. The system
system for supporting a hotel reception. The system is           uses the term Stay to mean a booking or a guest who
used as the main example in User Interface Design - a            has checked in.
Software Engineering Perspective, by Soren Lauesen.
If you know the book, skip this section and go straight          Breakfast list. The Breakfast screen shows the break-
to Chapter 2.                                                    fast servings for a specific date. It handles just two
                                                                 kinds of breakfast: self-service breakfast in the restau-
Screens                                                          rant (buffet) and breakfast served in the room. The
The hotel system consists of the screens shown in Fig-           waiter in the restaurant has a paper copy of the list and
ure 1A.                                                          records the servings here. Later the receptionist enters
                                                                 the data through the Breakfast screen.
Find guest. The Find guest screen allows the recep-
tionist to find a guest or a booking in the database. The        Service list. The Service list shows the price for each
receptionist may enter part of the guest name and click          kind of service. Hotel management uses this list to
the Find guest button. The system then updates the               change service prices or add new kinds of service.
lower part of the screen to show the guests or bookings
that match. The receptionist may also find the guest by          Database
his phone number, room number, or stay number (also              The system uses a database with several tables. They
called booking number).                                          are shown as an E/R data model on Figure 1B.

The receptionist can select the guest from the list and          tblGuest has a record for each guest with his address
click the buttons to see details of the booking or create        and phone number.
a new booking for the guest.
                                                                 tblStay has a record for each stay (booking or checked
Room Selection. The Room Selection screen gives an               in) with a booking number (stay number) and the pay
overview of available rooms in a certain period. Avail-          method.
ability is shown as IN when the room is occupied,
BOO when it is booked, etc. The receptionist may                 tblRoom has a record for each room in the hotel.
specify the period of interest and the type of room, then
click the Find room button. The system updates the ta-           tblRoomState has a record for each date where a room
ble at the bottom of the screen to show the rooms of             is occupied. It connects to the room occupied and the
interest. The receptionist can then choose a room and            stay that occupies it. If the room is occupied for repair,
book it for the guest – or check a guest into the room.          it doesn’t connect to a stay.

Stay. The Stay screen shows all the details of a book-           tblRoomType has a record for each type of room (room
ing, for instance the guest and his address, the rooms           class) with a short description of the room type, the
he has booked and the prices. When the guest is                  number of beds, and the prices.
checked in, the Stay screen also shows breakfast and
                                                                 tblService has a record for each type of service with its
other services he has received. The system shows these
                                                                 name and price per unit.
details on the Services tab. Here the receptionist can
                                                                 tblServiceReceived has a record for each delivery of
                                                                 service to a guest. It connects to the type of service and
                                                                 to the stay where the service is charged (there is an in-
                                                                 voice for each stay).
Fig 1B. Tables as E/R model

    tblGuest


    tblStay      tblServiceReceived             tblServiceType


tblRoomState


    tblRoom            tblRoomType


4                                                 1. The hotel system
Fig 1A. Hotel system screens


                               1. The hotel system   5
2. Creating a database
Highlights                                                          there are only small differences from Access 97 and
• Transform the data model to a database in MS-                     Access 2003. We will mention the more important
   Access.                                                          ones.
• Use lookup-fields to enter foreign keys and enu-
   meration types.                                                  In this and the following chapters we will use the hotel
                                                                    system as an example, and you will construct several
                                                                    parts of the system. However, the purpose is not to
In this chapter you learn how to realize a data model as            construct the hotel system, but to show how MS-
a relational database in Microsoft Access. We assume                Access works. This knowledge will enable you to con-
that you know about data modeling, tables, attributes,              struct a functional version of your own system - for in-
and foreign keys as explained in User Interface Design.             stance the one you have designed when reading User
The description below is based on Access 2000, but                  Interface Design.


2.1 Create a database in Access
In Microsoft Access a database consists of one single
file. The file contains all the tables of the database, the         Warning: Make sure you follow the steps below
relationships (the crow's feet), queries (computed ta-              closely. Don't skip any of the numbered steps. The
bles), forms (user windows), and many other things.                 result might be that you get stuck later in the text.

As a systems developer you will design tables and user              Create the database
windows. As a user you will enter data into the tables              1. Locate the Access program. Depending on the way
(usually through user windows) and get data out of the                 the system is set up, you may find it under Pro-
tables, for instance through the same windows or                       grams -> Microsoft Access or Programs -> Micro-
through printed reports.                                               soft Office -> Microsoft Access.
                                                                    2. In Access 97 and 2000: Open Access and ask for a
In Access it is very easy to switch between the devel-                 "blank" database.
oper role and the user role. As a developer you will                   In Access 2003: Open Access and click the New
typically design some tables, then switch to the user                  icon (under the File menu). Then click Blank da-
role to enter data into them, then switch back to the de-              tabase in the help area to the far right.
veloper role to change the design, design more tables,              3. Access now asks where to store the new database.
etc. Access can to a large extent restructure the data                 Select the folder you want and give the database
that already is in the database so that it matches the                 the name hotel (or hotel.mdb).
new table design.
                                                                    The screen now shows the database window. It should
                                                                    look like Figure 2.1A. (In Access 97 it looks slightly


    Fig 2.1A The Access database window

                                  One Access database = one file.
                                  File name = hotel.mdb


    Use the table.
    Shortcut: Enter

                                                                           Create a
                                                                           table
    Design the table.
    Shortcut: Ctrl+Enter

                                                              The database window:
                                                              List of tables
                                                              (empty initially)


6                                                 2. Creating a database
Fig 2.1B Define a table (design view)

                               Table name. Access asks for it the
                               first time you close the window.


 Primary key.
 Right click


 One line                                                                     Possible
 per field                                                                    data types


                                                                    Field properties.
                                                                    Also use F1 - Help.


different). We have selected the Tables tab, but there                      of type Text, except the guestID which is of type
are no tables or other things in the database as yet.                       AutoNumber.
However, you see three icons that can create tables for
you. When you have created a table, it will appear in               Note that although we say phone number and passport
the table window and you can then Open it and enter                 number, these fields are texts because the "numbers"
data into it, or you can Design it, i.e. change the defi-           contain parentheses, dashes and maybe letters.
nition of it. (In Access 97 the database window looks
like a traditional tab form. There are no create-icons,             When you have chosen a data type, you can choose a
but function buttons for the same purpose.)                         number of other field properties. They are in the lower
                                                                    part of the window. On the figure you can see that the
Define a table                                                      name field is a text field with space for 50 characters.
4. Double click on Create table in Design view.                     You can also see that the user doesn't have to enter
                                                                    anything in the name field (Required=No). You should
Now you get a window as shown on Figure 2.1B. Here                  change this to Yes since it doesn't make sense to have a
you define the fields (attributes) of the table. The list of        guest without a name.
fields runs downwards with one line per field. Initially
there are only empty lines. The table hasn't got a name             Try to use Access's help to find more information about
yet. Access asks for the name when you close the win-               the data types and their properties. For instance, put the
dow.                                                                cursor in the Data Type of a field and click F1. Or
                                                                    point at one of the properties and click F1.
The figure shows the finished guest table. You see the
field names to the left. In the middle column is the type           Lookup Wizard is not a field type. If you select Lookup
of the field - Data Type. The figure shows all the pos-             Wizard, it makes the field into a combo box where the
sible types as a combo box. The most important data                 user can select a value instead of typing it into the
types are Text, Number, Date/Time, and AutoNumber.                  field. We will look closer at Lookup in section 2.4.
An AutoNumber is a counter that Access increases for
each new record, so that it serves as a unique key. The             Key fields
value is a Long Integer (32-bit integer). We explain                Often you have to define a key field so that other tables
more about data types in the next section.                          can refer to this one. In our case, guestID must be the
                                                                    key field:
5.   Fill in all the field lines according to the attributes
     in the guest table (see the figure). All the fields are        6.      Right-click somewhere in the guestID line. Then
                                                                            select Primary Key. Access now shows that the
                                                                            field is the key.

                                                   2. Creating a database                                                       7
You can remove the key property again by once more                12. The file may not be safe. Do you want to open it?
selecting Primary Key. If the key consists of more than               Your database is safe, so answer Open.
one field, you first select all the fields by clicking on         13. Unsafe expressions are not blocked. Do you want
their left-hand marker with Ctrl down. Then select                    to block them? You want full freedom, so answer
Primary Key by right-clicking inside one of the field                 No.
lines.                                                            14. Access warns you one more time whether you
                                                                      want to open. Say Open or Yes. (In some versions
7.   Close the window. Access asks you for the name                   the question is a very long text box, and you
     of the table. Call it tblGuest. (The prefix tbl will             cannot understand it. Say yes anyway.)
     help you remember that it is a table. As the system
     grows, there will be guest windows, guest buttons            As an alternative, you may say yes to blocking the
     and many other things. Without discipline on your            unsafe expressions. This will save you some questions
     part, it becomes a mess.)                                    when you open the file in the future. However, some
                                                                  installations don't allow you to block expressions.
If you have not defined a primary key, Access will
warn you and suggest that it makes one for you. Don't             Note that Access 2003 shows that your database is in
let it - do it yourself. Or at least check what Access            Access 2000 format. This is all right. It allows you to
makes in its excessive helpfulness.                               use it also from Access 2000. You can convert it to
                                                                  other formats with Tools -> Database Utilities -> Con-
Enter data                                                        vert Database.
After these efforts, it is time to record some guests.
Fortunately it is easy:                                           Undo. Use Esc to undo the changes you have made to
                                                                  the current record.
8.   Select the guest table in the database window.
     Click Open or just use Enter.                                • The first Esc undoes changes to the field where the
                                                                    cursor is.
Now the system shows the table in user mode (Da-
                                                                  • The second Esc undoes all changes to the record
tasheet view) so that you can enter guest data.
                                                                    where the cursor is.
9.   Enter the guests shown on Figure 2.1C. You add a
     new guest in the empty line of the table - the one           As soon as you move the cursor to the next line,
     marked with a star. Notice that as soon you start            Access stores the record in the database and you cannot
     entering something, the record indicator changes to          make an automatic undo anymore. However, you can
     a pencil and a new star line appears. The pencil             manually edit the stored record. Notice that the pencil
     shows that you are editing the record, and the               disappears when the record is stored in the database.
     record you see is not yet in the database.
                                                                  Shortcut keys for data entry
On Figure 2.1C we originally entered a guest that got             F2: Toggles between selecting the entire field and se-
guestID 4, later deleted this guest. Access will never                lecting a data entry point.
reuse number 4 for a guest.                                       Shift+F2: Opens a small window with space for the
                                                                      entire field. Useful for entering long texts into a
Close and reopen the database                                         field that is shown only partly in the table. How-
To feel confident with Access, it is a good idea to close             ever, the text cannot be longer than you specified in
and open the database now.                                            the table definition.
                                                                  Alt+ArrowDown: Opens a combo box. Choose with
10. Close the large Access window. (Not the small                     the arrows and Enter.
    database window inside the Access window.)
                                                                  Shortcut keys for navigation
Notice that Access doesn't ask whether you want to                Tab and Shift+Tab: Moves from field to field.
save changes. Access saves them all along, for instance           Ctrl+Tab: Moves from one tab form to the next, for in-
when you define a table or when you enter a record in                 stance in the lower part of the table definition win-
the table.                                                            dow.
                                                                  F6: Moves between upper and lower section of a win-
11. Find your database file (hotel.mdb) in the file fold-             dow, for instance in the table definition window.
    ers. Use Enter or double click to open it.                    Ctrl+Enter: Opens the table in design mode (in the da-
                                                                      tabase window).
Access 2003 is very security concerned and asks you
several questions when you open the file. The dialog              See also shortcuts on the reference card
may vary from one installation to another, but is
something like this:


8                                                2. Creating a database
Fig 2.1C Enter data in user mode (datasheet view)

In database window:
Select table -> Open (or Enter)


AutoNumber: You get
1, 2, 3, 4. Don't worry
that it is different
from the figure.


       Record
       selector


       Add
       record                     F2 to select entire field           Shift+F2 to see field in a separate window


                  Edit                                        Esc to undo.
                indicator                                     First Esc: Undo field change
                                                              Second: Undo record changes


                                              2. Creating a database                                               9
2.2 Create more tables
You should now create the remaining tables for the               tblRoomState:
hotel. The data model on Figure 2.2 shows the tables             stayID and roomID are foreign keys. Ensure their types
we will use. To simplify your job, we have shown all                 match what they refer to. Notice that roomID refers
the keys, including the foreign keys and the artificial              to a natural key, not to an AutoNumber.
keys.                                                            date should be a Date/Time field with Format = Short
                                                                     Date.
1.   Close the guest table.                                      personCount is the number of persons staying in the
2.   Create all the remaining tables in the same way as              room. An integer should suffice.
     you created the guest table (from the Tables tab            state is similar to state for tblStay, although the values
     use Create table in Design view - or click New).                are slightly different.
                                                                 The key consists of two fields: roomID and date. It is a
 Make sure you define all the fields. Otherwise you will             bit tricky to specify this: select both fields by
get stuck when later constructing the user interface.                clicking on the left-hand marker (hold down Ctrl
Here are a few notes about the various tables:                       while selecting the second field). Then right-click
                                                                     somewhere on the text inside the line.
tblStay:
stayID is the primary key of tblStay. Make it an Auto-           Optional tables
    Number.
                                                                 The following two tables are needed for the full sys-
guestID is a foreign key that refers to the AutoNumber
                                                                 tem. However, you don't need to create them in order
    in tblGuest. The foreign key must have a matching
                                                                 to follow the tutorial.
    data type - a long integer. Choose Data Type =
    Number and Field Size = Long Integer. Warning:               tblServiceType:
    Don't make the foreign key an AutoNumber. This               serviceID is an artificial key. Should be an Auto-
    would cause Access to fill in the foreign key fields             Number.
    automatically, and you cannot change the numbers             name and price should be obvious. The price should be
    so that they point to the primary keys in the guest              a decimal number. Choose Data Type=Number,
    table.                                                           Field Size= Single, Decimal Places =2.
paymethod is an enumeration type. Make it an integer
    (a 16-bit integer, not a long integer). Choose Data          tblServiceReceived:
    Type = Number and Field Size= Integer. We will               stayID and serviceID are foreign keys that refer to
    use the value 1 to denote Cash, the value 2 to de-               AutoNumbers. The foreign keys must thus be long
    note Visa, etc. We will look closer at this in section           integers.
    2.4.                                                         roomID is an optional reference to a room. An integer
state must also be an enumeration type. Make it an in-               should suffice. (This reference is needed when a
    teger. Here the value 1 will denote booked, 2 in, etc.           waiter records a service for a specific room and the
                                                                     guest has more than one room.)
tblRoomType:                                                     date should be a Date/Time field. Choose Format =
Contains one record for each type of room, for instance              Short Date.
one for double rooms, one for single rooms, etc. (In the         quantity is the number of items the guest has got - an
book User Interface Design, we added this table late in              integer should suffice.
the design process to illustrate the normalization con-
cept.)                                                           Data types
                                                                 Data is stored in the computer according to its type.
roomType is an artificial key. An AutoNumber is okay.
                                                                 Here is a description of the most important types in the
description is a short text, for instance "double room,
                                                                 data base. Visual Basic deals with almost the same
    bath".
                                                                 types (see section 6.2 and the reference card under
bedCount is the number of beds in the room, including
                                                                 Declarations).
    temporary beds.
price1 and price2 are the standard price and a possible          Text. The field can contain any characters. The Field
    discount price. The price should be a decimal num-           Size property defines the maximum number of charac-
    ber. Choose Data Type=Number, Field Size= Sin-               ters. The maximum cannot be above 255 characters.
    gle, Decimal Places =2.
                                                                 Memo. Like a text field, but the maximum number of
tblRoom:                                                         characters is 65,535. Access takes more time to process
roomID is a natural key - the number on the door. So             a memo field, so use text fields if adequate.
   don't use an AutoNumber. Use an integer.
roomType is a foreign key that refers to tblRoomType.            Number. The field can contain a number. The Field
   (You should by know how to deal with it.)                     Size property defines what kind of number:


10                                              2. Creating a database
•     Integer. A small integer. It must be in the range -           Also here you can choose a format that adapts to the
      32,768 to +32,767 (a 16-bit integer).                         regional setting.
•     Long Integer. It must be in the range from around
      -2,140 million to +2,140 million (a 32-bit integer).          Yes/No. The field contains a Boolean value shown
•     Single. A decimal number in the range from                    either as Yes/No, True/False, or On/Off. The format
      -3.4*1038 to +3.4*1038 with an accuracy of 6 or 7             property specifies this.
      significant digits (a 32-bit floating point number).
                                                                    AutoNumber. The field is a long integer (32 bits) that
•     Double. A decimal number in the range from
                                                                    Access generates itself as a unique number in the table.
      -1.8*10308 to +1.8*10308 with 14 significant digits
                                                                    Access numbers the records 1, 2, . . . as you enter the
      (a 64-bit floating point number).
                                                                    records. However, you cannot trust that the sequence is
•     Decimal. A very long integer with a decimal point             unbroken. For instance when you add a record and
      placed somewhere. Intended for monetary calcula-              undo the addition before having completed it, Access
      tions where rounding must be strictly controlled.             uses the next number in the sequence anyway.
      In the book we use Single or Double instead.
                                                                    A foreign key is a field (or several fields) that refer to
Numbers can be shown in many ways depending on the                  something unique in another table - usually the primary
format property of the field. You may for instance                  key. Be careful here. The foreign key and the primary
show them with a fixed number of decimals, with a                   key must have the same type. However, when the
currency symbol, etc.                                               primary key is an AutoNumber, the foreign key must
                                                                    be a long integer.
Some formats show data in a way that depends on the
regional settings of the computer. If you for instance              Changing a data type. Access is quite liberal with
specify the format of a number as Currency, the                     changing a data type to something else - even if there
number will show with a $ on a US computer and with                 are data in the records. It can also change an Auto-
a £ on a British computer.                                          Number field to a number field, but not the other way
Date/Time. The field gives a point in time. In the                  around. If you need to change field B to an Auto-
                                                                    Number, create a new field C and make it an Auto-
computer it is stored as the number of days since
                                                                    Number. Then delete field B and rename field C to B.
30/12-1899 at 0:00. It is really a Double number, so the
number of days may include a fraction of a day. In this             If you for some reason want to store a record with an
way the field specifies the date as well as the time with           AutoNumber of your own choice (for instance create a
high precision. As an example, the number 1 corre-                  stay with stayID=728), you need to append the record
sponds to 31/12-1899 at 0:00, the number 1.75 to                    with an INSERT query (see section 7.1). You cannot
31/12-1899 at 18:00 (6 PM).                                         just type in the stayID.
Usually we don't show a date field as a number, but as
a date and/or a time. The format property specifies this.


    Fig 2.2 Create remaining tables
                                                                     Optional tables
    guestID, name, address1,
    address2, address3,
    phone, passport
                                  tblGuest            stayID, serviceID,
                                                                                         serviceID, name, price
                                                      roomID, date, quantity

    stayID, guestID,
                                      tblStay        tblServiceReceived                    tblServiceType
    paymethod (cash | visa ...),
    state (booked | in |out | canceled)

    stayID, roomID,
    date, personCount,           tblRoomState
    state (booked | occupied | repair)

                                                                                 roomType, description
    roomID, roomType              tblRoom              tblRoomType               bedCount, price1, price2


                                                 2. Creating a database                                                    11
2.3 Create relationships
When we have several tables, we can make relation-                 In the edit-relationship window, you can specify
ships (crow's feet). Then we get an E/R model instead              foreign keys that consist of several fields. You can also
of a simple collection of tables. The relationships allow          specify that the relationship has referential integrity, so
Access to help us retrieve data across tables, check ref-          that all records on the m-side point to a record on the 1-
erential integrity, etc.                                           side.

Figure 2.3 shows the hotel relationships in Access. It             7.      In our case, all stays must point to a guest, so mark
resembles the crow's feet model quite well. You define                     the connector enforce referential integrity. (If
the relationships in this way:                                             Access refuses this, it is most likely because you
                                                                           have not defined the foreign key as a long integer.)
1.   Start in the database window and right-click                  8.      Close the relationship window. The relationship
     somewhere.                                                            connector now appears in the window between the
2.   Choose Relationships.                                                 foreign key and its target.
Now you see an empty Relationship Window. You                      The referential integrity makes Access show the con-
have to tell Access which tables to show here. Some-               nector as 1-∞ (1:m). Based on referential integrity and
times a Show Table window pops up by itself. Other-                whether the connected fields are primary keys, Access
wise you have to invoke it with a right-click in the re-           may also decide that it is a 1:1 relationship. It is not
lationship window.                                                 important what Access decides in these matters. You
                                                                   can later tell it otherwise when you want to use the
3.   In the Show Table window, select the tables you               connector.
     want to include. In the hotel system it is all the ta-
     bles.                                                         9.      Create the remaining relationships too. Note that
4.   Click Add and close the window. Now the tables                        there is no referential integrity between tblStay and
     should be in the relationship window.                                 tblRoomState. It is on purpose - if the room is in
5.   Create the relationship between tblGuest and                          repair state there is no connected stay.
     tblStay by dragging guestID from one table to
     guestID in the other.                                         Partial integrity. Access provides a more relaxed
6.   An edit-relationship window pops up. If not, right-           version of referential integrity. It allows the foreign key
     click on the relationship connector and choose the            to be either empty (Null) or point to a record on the 1-
     edit window.                                                  side. This is the case for the relationship between
                                                                   tblStay and tblRoomState. Give it partial integrity in
Access may complain:                                               this way:

Relationships must be on the same number of fields                 10. Open tblRoomState in design view. For stayID
with the same data types.                                              (the foreign key) set the Default Value to empty
                                                                       (delete all characters in the field). Also set
The cause is often that one end of the connector is an                 Required to No.
AutoNumber and the other end a simple integer. It                  11. In the relationship window, right-click on the
must be a long integer to match the AutoNumber.                        connector and choose the edit window. Select
                                                                       enforce referential integrity.

                                                                   Note that you cannot see in the relationship window
                                                                   whether the relationship has full or partial referential
                                                                   integrity.

                                                                   Deleting a relationship. If you need to delete a rela-
                                                                   tionship, click it and press Del.


12                                                2. Creating a database
Fig 2.3 Create relationships

Right-click in database window.
Select Relationships

                                         Choose tables to show               Right-click in ER diagram.
                                         in the ER diagram                   Select Show Table


                                                               Foreign key


               Primary key


 Create a relationship:
 Drag 1-side field to m-side field (or opposite).
 Edit the relationship - Referential integrity!


                                                    2. Creating a database                                13
2.4 Look-up fields, enumeration type
Your next task will be to fill in some data in all the ta-        How the look-up field works
bles. However, some of the fields are cumbersome to               Open tblStay in design mode and study the Lookup tab
fill in correctly. As an example, the pay method field is         for paymethod (bottom of Figure 2.4). The display
a code where 1 means Cash, 2 Visa, etc. The user                  control property is Combo Box. It means that when the
should not have to remember these codes, so we will               user is to fill in the paymethod, he sees a combo box.
let the user choose the value from a list. It is an
enumeration-type field:                                           •       For ordinary fields Display Control is Text Box. A
                                                                          text box shows texts, numbers, etc. as a string of
       paymethod(Cash | Visa | . . . )                                    characters. If you want to change the field back to
                                                                          an ordinary field, just set Display Control to Text
Figure 2.4 shows what we want when the user fills in                      Box.
the paymethod field. We want the field to be a combo
box where the user can select the mnemonic text while             The values the user can choose between are listed in
Access stores the number code. Here is how to do it:              Row Source. You may edit the values here. Column
                                                                  Count shows that these values are to be displayed as
1.   Open tblStay in design view. (Select it and click            two columns. Notice that Limit to List is No. It means
     Design or use Ctrl+Enter).                                   that the user can enter other values than those in the
2.   Select the paymethod field and the data type                 list. In our case, it is not desirable, so set the property
     Lookup Wizard.                                               to Yes. Sections 3.1.6 and 3.1.7 explain more about
3.   Access asks whether you (as a user) want to select           combo boxes.
     the values from a table or from a list of values that
     you (as a designer) type in. Choose to type them
     in. Then click Next.
4.   Access asks how many columns your combo box                  Undo the Lookup Wizard?
     should have. Choose two and fill in the columns as           How do you make the field an ordinary field rather
     shown on the figure. Then click Next.                        than a lookup field? It doesn't help to make it an integer
5.   Access asks which column holds the value to store            or a text. Choose the Lookup tab at the bottom of the
     in the table. In our case it is column 1.                    table design window. Change Display Control to Text
6.   Finally, Access asks for the column name that the            Box. (See bottom of Figure 2.4.)
     user will see. In our case, paymethod is okay.
     Click Finish.
                                                                  Panic? Undo data entry
Fill in some stay records                                         When you enter data into the tables, Access checks
You are now going to create some stay records and                 against the rules you have defined for the tables and the
connect them to a guest.                                          relationships. For instance, when you enter the guestID
                                                                  in tblStay, this ID must correspond to a guest in the
7.  Close the table design window and open it in user
                                                                  guest table. Access doesn't allow you to leave the
    mode.
                                                                  record before this is fixed. The reason is that Access
8. Also open tblGuest in user mode. Keep the two
                                                                  stores the record in the database as soon as you move
    tables side by side so you can see both. Make sure
                                                                  the cursor away from the record. And the database
    you have created some guests. Otherwise do it
                                                                  must meet all the rules you have stated.
    now.
9. Fill in a stay record using the combo box for                  Sometimes you may not know what to type to satisfy
    paymethod. Notice that what you see as a designer,            Access, and on the other hand you cannot leave the re-
    is the number stored in the database. The user                cord to look at what to type. Many users panic here and
    should not see the number, but the text. We can               even switch off the power to close down the system.
    arrange for this when the field becomes a text box            The solution is to use Esc twice:
    in the user window (see section 3.2.2).
10. Also fill in the foreign key guestID so that it refers        •       First Esc: Undoes the correction you made in the
    to one of the guests. Since there is referential                      field where the cursor is.
    integrity, Access won't let you store the stay record         •       Second Esc: Undoes all the changes you made to
    without a proper guestID. If you get into real                        the record where the cursor is. This means that the
    trouble, use Esc twice (see the Panic box for the                     database returns to a consistent state where all the
    explanation).                                                         rules are met.
11. Fill in a few more stay records in the same way.


14                                               2. Creating a database
Fig 2.4 Look-up fields, enumeration type


                        Desired result

                                AutoNumber: You get
                       How?

                                1, 2, 3, 4. Don't worry.


   Table in design mode:
   Select Paymethod ->
   Data Type -> Lookup Wizard


       What to store          The values the
       in the table           user sees
                                                                                               To undo the Wizard:
                                                                                               Change to Text Box


                                                                                                  Possible values


                                                                                                   User may enter
                                                                                                   anything.
                                                                                                   Should be Yes?


Populate the database                                                   You may soon find that a simple little database uses
12. Define the other enumeration fields as lookup                       several megabytes. Fortunately, Access can compact
    fields in the same way (the state fields in tblStay                 the database. Do that every now and then in this way:
    and tblRoomState).
13. Fill in some realistic data in all the tables. You                  14. Select Tools->Database Utilities->Compact and
    may for instance use data corresponding to the                          Repair Database. That is all. You may check that
    situation in Figure 1A. Now you have test data for                      the file length actually became much smaller. (In
    the rest of the booklet.                                                Access 97, the Compact and the Repair utilities are
                                                                            separate.)
Important: Compact the database
Access is very liberate with disk space and when you
change things, it consumes new blocks on the disk.


                                                       2. Creating a database                                               15
2.5 Dealing with trees and networks
E/R models can neatly describe complex relationships,           1.      Create a new database, FlightRoutes. Create the
for instance as we saw it for the flight routes in User                 tables City, Leg and Route in the usual way.
Interface Design. Figure 2.5 shows the E/R model, but
Access cannot show such a model directly.                       2.      Open the relationship window and add all three ta-
                                                                        bles to the relationship window. Then add City and
The problem is that Access identifies a relationship by                 Leg once more. The relationship window should
means of the two tables it connects. This means that                    now contain also a City_1 and a Leg_1 as shown
Access cannot have two connectors between the same                      on the figure.
two tables. Also you cannot have a self-referential con-
nector. In the flight route model we need both of these.        3.      Drag the connectors as shown. You now have two
                                                                        connectors between City and Leg. One is deter-
As a compensation, Access offers shadow copies of a                     mined by City and the foreign key from. The other
table. The table and its shadow copies are the same ta-                 is determined by City_1 and the foreign key to.
ble, but they have different names. You can now create                  You also have a self-referential connector from
connectors to the shadow copies and thus indirectly                     Leg to itself. It is determined by Leg_1 and the
create multiple connectors between the same two ta-                     foreign key next.
bles.
                                                                4.      Try to fill in data for AA331 according to the fig-
Figure 2.5 shows how to handle the flight routes in                     ure. Note that there are only one City table and one
Access by means of shadow copies.                                       Leg table to fill in. The shadow tables are not real
                                                                        tables.


16                                             2. Creating a database
Fig 2.5 Flight routes - shadow tables

                           Route           routeID, mon, tue,          Route: AA331. Mon, Wed
                                           wed, thu, fri, sat, sun
                                                                                       Arr          Dep
cityID, name
                                                                       Chicago                      10:45
               from                        legID,
                                                                       Columbus        11:40        12:20
  City                          Leg        route, next, from, to       Washington      13:30        14:15 A leg
                to                         deptTime, arrTime,          New York        15:10
                                  next


   Right-click -> Show table.
   Show City once more.


                         Two relationships between City              Relationship between Leg and
                         and Leg: Shadow copy of City.               Leg: Shadow copy of Leg.


                                              2. Creating a database                                              17
3. Access-based user interfaces
Highlights                                                        (control tips). These are the things the user sees on the
• Construct user windows (Forms).                                 screen. Access provides a lot of built-in functionality
• Add fields, sub-windows, etc. (Controls).                       that makes the user interface respond to user actions.
• Construct menus and other details.                              However, for a real system the built-in functionality is
                                                                  rarely sufficient, and you will have to add your own
                                                                  program pieces written in Visual Basic.
An Access-based user interface consists of user win-
                                                                  In this chapter we look only at what the user sees on
dows (called Forms in Access) , menus, and all the
                                                                  the screen. We hardly put real data into the fields. What
little things such as error messages (message boxes)
                                                                  we are after is a tool-based mockup. Later we will add
and pop up help when the cursor rests on a field
                                                                  real data and functionality to the screens.

3.1 Forms and simple controls
In this section we will gradually implement the                   3.1.1 Text box, label and command button
mockup window you see in Figure 3.1A. This window                 4.   The screen should show a toolbox window where
helps the receptionist find a guest or a booking in the                you can choose between various controls (bottom
database. Large hotels may have more than 100,000                      left on the figure). If it doesn't, use View ->
guests in the database.                                                Toolbox to see it.
                                                                  5.   Click the Text Box tool that looks like ab| and then
In the Access world, the window consists of a Form                     draw the white part of the field Last name. Draw it
with various Controls on it. A control may be a simple                 so that it is two grid units high and about ten units
field such as Last name, a button such as Find guest, an               wide.
area for a list of records such as the list of stays, and
several other things.                                             At this stage, don't worry if your controls are not prop-
                                                                  erly aligned and sized. We explain about these details
Let us get started:                                               below. To delete a control, select it and click Del. Or
                                                                  use Esc to undo the last thing you made.
1.   Start in the database window, click the Forms tab,
     and select Create form in Design view.                       6.   Access has automatically added a label part to the
                                                                       left of the field. Click it and change the label for
You now get an empty form in design mode, looking
                                                                       the control to Last name:
somewhat like the one at the bottom of the figure. We
                                                                  7.   Draw the two next text boxes as shown on the fig-
will put some of the controls on this form in a moment.
                                                                       ure (Street and Phone). If you double click the text
In order to align the controls nicely, it is best to show a            box icon in the toolbox, the draw tool remains se-
visible grid of dots on the form:                                      lected so that you can draw many text boxes.
                                                                       (Click Esc to get rid of it.)
2.   The property box for the form should be open. If             8.   Also draw a spare text box for later experiments
     not, double click on the anonymous little square on               (Text 6 on the figure).
     the form - where the rulers meet.
3.   Set the grid dots. The form has a grid of lines.             9.  Now make sure the Wizard button is off at the top
     They may be spaced as on the figure - a one-cm                   of the toolbox.
     grid. Or with larger cells - a one-inch grid. We also        10. Select the Command Button tool and draw the New
     want to see the grid dots. Look at the Format tab                guest button. Make it three grid units high to allow
     and find the Grid X and Grid Y properties. (They                 space for the text on the button. Click on the text
     are far down the list - you may have to scroll down              in the box to change it.
     to them). For a one-cm grid, set Grid X=5 and
                                                                  If you have the Wizard button on, Access will try to
     Grid Y=5. For a one-inch grid set Grid X=12 and
                                                                  make the button do something. (Our mockup has
     Grid Y=12. Move the cursor to another property to
                                                                  nothing to do, so don't use the Wizard.)
     make the changes take effect. You should now see
     a grid of dots as on the figure.                             In general, two grid units are a good height for a text
                                                                  box and three units are suited for a command button.


18                                           3. Access-based user interfaces
Fig 3.1A Create a Form - a user window


                                                                                   The Form


                                                                                   Controls

                                   Wanted:
                                   Tool-based
                                   mockup


The Forms
(user windows)
of the database                                                    Create a Form


                                                          List of forms
                                                          (empty initially)


                                                           Property box for
                                                           the Form.


Click for
Form
properties


                  Toolbox:
                  Click Text Box control.
                  Draw a box on the Form.


                                                                                              Set grid size to
                                                                                              5 units per cm .


                                            3. Access-based user interfaces                                      19
Using the fields                                                       try to move and resize the controls with the key-
You may wonder why Access writes unbound inside                        board, or drag them with the mouse.
all the boxes. It means that the box is not bound to any          9.   Undo. You can undo your last operation with the
record in the database. The user may enter something                   Undo button or Ctrl+Z. But only the last! You can
but it is not automatically stored in the database. Try                undo all changes since you last opened the form by
this:                                                                  closing the form and saying No to saving the
                                                                       changes. Try it now - you don't want to save the
11. Close the form. Access asks for its name. Call it                  last adjustments.
    frmFindStay. (We use the prefix frm for forms.)
12. Open it again in user mode. It should now look                Make sure you see all menu items
    like the bottom of Figure 3.1B. This is how the               Access 2000 and 2003 have an annoying feature where
    user would see the form.                                      it shows only the last menu items you have used. It
13. Try to enter something in the fields. It stays on the         makes it difficult to follow the procedures below. Get
    screen, but is it persistent data?                            rid of this feature:
14. Close the form and open it again (in user mode).
    All the fields are blank - no data was saved. It was          10. Right-click anywhere in the menus. Select Cus-
    just dialog data - not persistent data. Click the                 tomize->Options. Access 2000: Look at the
    command button - nothing happens. It is just a                    checkbox "Menus show recently used commands
    mockup we have made. (In the next chapters we                     first". Make sure that there is no check mark here.
    will add real data and functionality.)                            Access 2003: Look at the checkbox "Always show
                                                                      full menus". Make sure there is check mark here.
3.1.2 Adjusting the controls
1.   Close the form and open it in design mode. Select            The Format menu and the grid
     one of the text boxes. Notice the two black han-             Open the form in design mode and select a control.
     dles, one on the label part and one on the text box.         Now look at the Format menu at the top of the Access
2.   Moving and sizing. Point the mouse at the label              window. There are several things here that can help
     handle. The cursor changes to a finger. Try to drag          you design the form:
     the label part around. The text box itself doesn't
     move. Point at the text box handle and use the fin-          •    Snap to Grid. If you check this box, all controls
     ger to drag it around.                                            you draw or move with the mouse will snap to the
3.   Point at the border of the text box. The cursor                   grid in all four corners. If the grid points are
     changes to a hand. Drag it - both label and text box              closely spaced - more than 9 per cm - Access
     should move.                                                      doesn't show the grid, but snaps to it anyway.
4.   Point at one of the sizing handles in the corners or         •    Align. You can align the selected controls to the
     on the middle of a side. Drag here and the box                    left, right, etc. or you can align them to the grid.
     changes size.                                                     Only their top-left point is aligned. They don't
5.   Deleting a control. Click on the text box and click               change size.
     Delete. Oops - both box and label disappeared!               •    Size. You can change the size of the selected con-
     Undo it using the Undo button or Ctrl+Z.                          trols so that they just fit the data in the control
6.   Click on the label part. Notice that now the sizing               (matching the chosen font size). Or you can make
     handles are on the label part. Click Delete. The la-              them fit the grid in all four corners. Finally, you
     bel part disappears.                                              can give all the selected controls the same width or
                                                                       height.
If you want a label without the text box, select the label        •    Change to ... You can transform the selected con-
tool from the toolbox and draw a label control.                        trol to another one - with reasonable limitations.
                                                                       For instance you can turn a text box into a combo
If you want to add a label to a label-less text box, select            box or vice versa.
some label, copy it (Ctrl+C), select the text box and
paste the label (Ctrl+V).                                         3.1.3 Cleaning up the form
                                                                  You may notice that the form has things in the corners
7.   Moving and sizing with the keyboard. Select a                that we don't want in the final user window (bottom of
     control, then try moving it around with Ctrl+up,             Figure 3.1B). The title bar, for instance, holds our pro-
     Ctrl+down, etc. Try moving it with Shift+up, etc.            grammer-oriented form name, frmFindStay. It should
     Now it changes size. This is one way to fine-tune            be Find Guest. There are also record selectors, naviga-
     the positions and sizes. There is no way to enlarge          tion buttons, and space for a scroll bar that we don't
     the picture as you can do in Word and many other             need in the final window. We can correct all of this by
     programs.                                                    setting properties of the form:
8.   Select several controls at the same time. Either
     hold Shift down while clicking on the controls one           11. Make sure the form is open in design mode. Show
     by one, or drag a rectangle around them. (All con-               the property box for the form (double-click the lit-
     trols touching the rectangle will be selected.) Now              tle square where the rulers meet).

20                                           3. Access-based user interfaces
Fig 3.1B Adjusting controls and the Form

    Form name. Access asks for it          Handle for moving       Handle for moving      Drag here to
    when you first close the form.         Label part .            Text Box part .        move both.


                                                                  MinMax buttons
                             Control Box


    Caption


    Record
    Selector                                   Form View:
                                               User mode

    Navigation                                          Underline letter for
    Buttons                                             shortcut: &New guest              Space for
                                                                                          scroll bar


12. Set these properties on the Format tab: Caption                   Look and feel - Autoformat
    (the form name the user sees), Scroll bars (not                   You can give the form another look by means of Auto-
    needed), Record selector (not needed), Naviga-                    format. This changes the style, that is the background
    tion buttons (not needed).                                        of the form and the appearance of all fields and
                                                                      buttons. You may try it if you like:
There are other interesting properties on the Format tab
that you may need for other windows:                                  •   Open the form in design mode. From the Format
                                                                          menu at the top of the Access window, select
•      Border Style specifies whether the form looks like                 AutoFormat.
       a resizable window, a dialog box or a message                  •   You can choose various auto-formats. Through the
       box.                                                               Options button you can determine whether you
•      Control Box is the buttons on the left and right of                want to change also field colors, fonts and borders.
       the title bar. You may hide them.                                  When you close the AutoFormat box, the form has
•      MinMax buttons and Close button are shown                          changed its look.
       when the control box is shown, but you may dis-                •   You may also create a new auto-format style based
       able them.                                                         on one of your forms. Open the form in design
•      Picture is none in our case, but you may specify a                 view. In the AutoFormat box, select Customize ->
       picture file to be used as background.                             Create a new, and give the new AutoFormat a
                                                                          name. You can then use this auto-format for other
You can get a good explanation of most of the proper-                     forms.
ties by selecting the property and clicking F1.


                                               3. Access-based user interfaces                                             21
3.1.4 Shortcut keys for the user                                       may in some cases be a good way of grouping
In the final system, the user should be able to work                   controls visually.
without a mouse. An easy way to do this is to assign a           4.    Checkbox. Select the checkbox tool and put a
shortcut key for each button and each label. As an                     checkbox on the form. The checkbox has function-
example, we might want the user to activate New Guest                  ality and shows a yes/no variable (a Boolean vari-
with Alt+N. Why not do it now?                                         able). You can of course change the value in user
                                                                       mode. If the variable is undefined - as it is initially
1.   Change the name on the button into &New guest.                    - the checkbox is gray in user mode.
     Change to user mode with the little icon in the top
     left corner (Figure 3.1C). You should see that the          Calendar control. The middle part of Figure 3.1C also
     N is underlined.                                            shows a calendar control.
2.   Try Alt+N to move the cursor to NewGuest. Try
     Tab and Shift+Tab to move between fields.                   5.    To make room for the calendar control, extend the
                                                                       grid area of the form by dragging its borders in
3.   Add shortcut keys for the other labels too, for in-               design mode.
     stance as &Last name. Try it out in user mode.              6.    Select the lower right icon of the toolbox (the
                                                                       hammer). It gives access to more controls, most of
What if you want a label with an &, such as                            them rather complex. Depending on the way
Bed&Breakfast? Access will treat & as a shortcut                       Access was installed, you can see more or less of
mark. Remedy: Write && instead of &.                                   the many controls. One of them is a Calendar con-
                                                                       trol.
Tip: Changing mode/view. During design, you fre-
quently change between design mode and user mode.                If you cannot see any Calendar control, you may have
The little icon at the top left (Figure 3.1C) allows you         to tell Access to look for it. Use Tools -> References.
to toggle between the modes. Click it - you change to            You now see a list of the software packages Access
user mode (called Form View in Access). Click it again           may look at. Find a Calendar Control and make sure it
- you change to design mode (Design View).                       has a check mark. Then close the reference list and se-
                                                                 lect once more the hammer from the toolbox.
The icon has also a menu of views that you can roll
down as shown on the figure. There is one more view,             7.    Select the Calendar from the tool list and draw a
Datasheet View, which we will use later. It shows all                  large rectangle with the tool.
fields of the form as a table.
                                                                 The Calendar control shows a single date variable. In
Saving. The form is not saved when you change mode.              user mode you can click on a date in the calendar and
You can thus experiment easily with the design. Saving           in that way store a date in the variable. In principle, the
is not done until you close the form or explicitly save it       Calendar control is just a kind of text box with a differ-
with Ctrl+S.                                                     ent way of presenting and editing the text value.

Shortcuts. You can change to design mode with                    DateTime picker. The bottom part of Figure 3.1C
Alt+V+Enter, and to user mode with F5.                           shows two DateTime pickers. They look like combo
                                                                 boxes, but when the user clicks the down-arrow, a
                                                                 calendar appears.
3.1.5 Lines, checkbox, calendar
Above we have tried some of the controls: text box,              8.    Extend the grid area further, or remove the
label, and command button. Figure 3.1C shows some                      calendar control.
other controls you may try now:                                  9.    Select the hammer tool again and look for
                                                                       Microsoft Date and Time Picker Control. Select it.
1.   Line. Select the Line tool from the toolbox and                   (You may have to include it from Tools ->
     draw a line somewhere on the form. The line is                    Reference, as above.)
     just a visual effect. It has no functionality.              10.   Draw the combo-box part of the control. You now
2.   Rectangle. Select Rectangle from the toolbox and                  have a control that holds a date-time variable. Try
     draw a rectangle around some of the existing con-                 it out in user mode. Notice how the user can
     trols, for instance the left fields. The rectangle is             increase or decrease dates and months with arrow
     just a visual effect without functionality.                       up and down.
3.   Colors. Double click on the rectangle to open its           11.   The control doesn't have label. Give it one: Select
     property box. On the format tab, give the rectangle               one of the other labels. Copy it (Ctrl+C). Select the
     a back color and set back style to normal. Now it                 date-time control and paste it (Ctrl-V).
     hides the controls it surrounds. Use the main               12.   Create the other date-time control in the same way
     Access menu, Format -> SendToBack, to move it                     - or copy and paste the first one.
     behind the other controls. Experiment with differ-          13.   Experiment with the properties of the DateTime
     ent back colors, border styles, and border colors. It             picker: In design mode, double-click the control. A


22                                          3. Access-based user interfaces
Fig 3.1C Form after changes

                                        Select view mode:
                                        Design, Form, Datasheet


                                                                                                          Line
                                                                                                   (visual effect only)


            Shortcut keys


                 Rectangle
             (visual effect only)

                                                                                                   Checkbox
                                                                                                    control


                                                                                                   Calendar
                                                                                                    control


                                                              DateTimePicker
                                                                  control


                                                                  DateTimePicker
                                                                    drop-down


    special DTPicker properties window should                     Try other changes too, for instance the UpDown
    appear.                                                       checkbox and the colors.

(You can also get to this special window from Access's            15. We are not going to use this fancy version of the
standard property window: Select the Other-tab and                    form in the following. If you want to keep it, save
then Custom.)                                                         a copy of it: Select the form in the database win-
                                                                      dow and use copy and paste.
14. Try changing the date format: Select format 3,                16. Delete the line, rectangle, checkbox and calendar
    dtpCustom. In the CustomFormat box, define the                    controls. We don't need them in the following.
    format as dd-MM-yyyy. Note that MM means
    month, while mm means minute. (See also Figure
    6.4B, Format function).


                                         3. Access-based user interfaces                                                  23
3.1.6 Combo box - enumeration type                                7.   The Wizard asks you to specify whether the stored
Combo boxes are a bit more complex. We will first                      value is column one or two. Select column 1 and
make the Include combo box shown on Figure 3.1D. It                    click Next.
is one of the search criteria for guests, and with some           8.   Finally, you may specify the label text in front of
programming it will allow the user to display only                     the combo box. Use the text Include: (Or modify
booked stays, only canceled stays, etc.                                the text directly on the Form). Finish the Wizard.

Technically speaking, this combo box holds a value of             Look a the result in user mode. It doesn't look quite
enumeration type:                                                 right. The drop-down list has two columns and the box
                                                                  itself shows the number - not the user text. We have to
       include(booked | canceled | . . . )                        repair this:

In the same way as in the database, the user should see           9.  Look at the property box of the combo box. The
the values booked, canceled, etc., but they should be                 Format tab has a field called Column Widths. It
stored as the values 1, 2, etc.                                       shows the widths of the two columns. Set the
                                                                      width of the first column to 0 (see the bottom of
1.   Switch to design mode.                                           Figure 3.1D).
2.   Set the Wizard button on at the top of the toolbox.          10. Try it out in user mode. Everything should look
3.   Select the Combo box tool and draw the Include                   right by now.
     box as shown at the top right of the figure.                 • The Format tab has other interesting fields. You
                                                                      may for instance adjust the List Width for the drop
The Wizard appears. It works much the same way as                     down list.
when you defined an enumeration-type field in the
database (section 2.4):                                           11. Select the Data tab. Row Source holds the values
                                                                      in the list. You may edit them here.
4.   The Wizard asks you whether you want to look up              12. Limit to List defines whether the user is allowed to
     the values from a table or type them in yourself.                enter other values than those in the list. In this
     Select the latter and click Next.                                case, it should be set to Yes.
5.   The Wizard asks you how many columns you
                                                                  • Bound Column defines which column to use for
     want. Choose two: one for the stored value and
                                                                      the stored value.
     one for the value the user should see.
6.   Fill in the columns as shown, and click Next.


24                                           3. Access-based user interfaces
Fig 3.1D Combo Box - enumeration type


                   Wanted:
                  Combo box


                          Width of first
                           column = 0


                         3. Access-based user interfaces   25
3.1.7 Combo box - table look up                                 Try out the combo box in user mode. It should look all
We will now make the Room type combo box shown                  right.
on Figure 3.1E. This combo box might be another
sorting criteria. The combo box is not an enumeration           The bottom of Figure 3.1E shows the Data tab for the
type where the designer has typed in the values, but a          combo box:
table look up. In the example it stores a roomType ID,
but the user will see the name of the room type.                •    Row Source now contains a formula called an
                                                                     SQL-expression. It specifies how to compute the
1.   Switch to design mode and make sure the Wizard                  list that the user will see. We will look at SQL-
     button is on.                                                   expressions in section 4.2.
2.   Select the Combo box tool and draw the Room
                                                                •    Bound Column indicates the column that holds the
     Type box.
                                                                     value to be stored in the table. In our case it is col-
3.   Tell the Wizard that you want the combo box to
                                                                     umn one, which holds roomType.
     look up the values in a table. Click Next.
4.   Select tblRoomType as the source. Click Next.              We won't use these combo boxes later in the booklet.
5.   Tell the Wizard that you want to show these fields         You may leave them on the form or delete them.
     as columns: roomType, description. Click Next.
6.   Ask the Wizard to hide the key column. This
     means that the key will be stored, but the
     description shown to the user. Finish the Wizard.


26                                         3. Access-based user interfaces
Fig 3.1E Combo Box - table lookup


        Wanted:
       Combo box


                           3. Access-based user interfaces   27
3.1.8 Control properties - text box                               •    When Locked is Yes, the user cannot enter data
Each control has a lot of properties that define its color,            into the text box.
font, and many other things. We will explain some of
these properties below, using the text box as an exam-            •    When Enabled is Yes, the text box can have the
ple.                                                                   focus.

Select a text box and look at its property box (Figure                 When Enabled is No, the user cannot enter any-
3.1F). If the property box isn't open, bring it up by                  thing in the box because the cursor doesn't stop
double clicking on some control. There are more than                   there. In this case, Locked has an interesting influ-
60 properties for a text box. Here we will look at some                ence on the box color. If Locked is No, the field is
of them.                                                               gray. If it is Yes, the color follows the normal pat-
                                                                       tern determined by Back color and Fore color.
Text box - properties on the Format tab
• Format and decimal places specify the data type                 Text box - properties on the Other tab
    of the control, much the same way as you can                  • Name is the programmer's name for the text box.
    specify the data type for a database field. You can               Visual Basic programs refer to the text box with
    select among a number of predefined formats, or                   this name. The designer can change the name. No-
    type your own format into the format field. The                   tice that the name is shown in the title bar too.
    formats are similar to the Visual Basic formats
    (see section 6.4 and the reference card).                     •    Tab Index determines how the cursor moves
                                                                       through the controls when the user tabs through
•    Scroll Bars. A text box may be large and show a                   the form. Tab indexes run from 0 and up. When
     text consisting of many lines. This property speci-               the form opens, the cursor is in the control with tab
     fies whether it should have scrollbars.                           index 0. The tab key moves the cursor though tab
                                                                       index 0, 1, 2, etc.
•    Left, Top, Width, Height specify the position and
     size of the control. You may set these properties            •    ControlTip is the pop-up text the user sees when
     instead of dragging with the mouse.                               the mouse rests on the text box.

•    Back color, fore color, font name, etc. specify              Label control - properties on the Format tab
     colors, borders and other visible properties of the          The text box has an associated label. The label has a
     control.                                                     programmer's name. In the example, Access has given
                                                                  the label the name Label7.
•    Text Align. You can align the text, e.g. left for a
     name, right for a number.                                    •    Caption is the label text the user sees. In this case
                                                                       Access generated the caption Text6: The designer
Text box - properties on the Data tab                                  can change it, of course.
• Control Source specifies how the value is com-
    puted and where it is stored. For unbound controls            Many of these properties exist also for other control
    as those on the FindGuest form, control source is             types, for instance for the combo box. For the com-
    blank. We look at the other possibilities in section          mand button, many of them work too. For some strange
    3.3.                                                          reason, however, you cannot align the text on a com-
                                                                  mand button. It is always centered. In the hotel system
•    Input Mask specifies the text box format when                we have made a fake left align by entering spaces after
     the box has the focus and the user types into it.            the name. You have to enter the spaces directly on the
     The mask may for instance be used to enter dates             button - you cannot do it in the Caption property.
     with predefined slashes and hyphens. The input
     mask follows different rules than the format                 To learn more about a property, click the property line
     property. (Not described in this booklet.)                   and click F1 for help.


28                                           3. Access-based user interfaces
Access tutorial
Access tutorial
Access tutorial
Access tutorial
Access tutorial
Access tutorial
Access tutorial
Access tutorial
Access tutorial
Access tutorial
Access tutorial
Access tutorial
Access tutorial
Access tutorial
Access tutorial
Access tutorial
Access tutorial
Access tutorial
Access tutorial
Access tutorial
Access tutorial
Access tutorial
Access tutorial
Access tutorial
Access tutorial
Access tutorial
Access tutorial
Access tutorial
Access tutorial
Access tutorial
Access tutorial
Access tutorial
Access tutorial
Access tutorial
Access tutorial
Access tutorial
Access tutorial
Access tutorial
Access tutorial
Access tutorial
Access tutorial
Access tutorial
Access tutorial
Access tutorial
Access tutorial
Access tutorial
Access tutorial
Access tutorial
Access tutorial
Access tutorial
Access tutorial
Access tutorial
Access tutorial
Access tutorial
Access tutorial
Access tutorial
Access tutorial
Access tutorial
Access tutorial
Access tutorial
Access tutorial
Access tutorial
Access tutorial
Access tutorial
Access tutorial
Access tutorial
Access tutorial
Access tutorial
Access tutorial
Access tutorial
Access tutorial
Access tutorial
Access tutorial
Access tutorial
Access tutorial
Access tutorial
Access tutorial
Access tutorial
Access tutorial
Access tutorial
Access tutorial
Access tutorial
Access tutorial
Access tutorial
Access tutorial
Access tutorial
Access tutorial
Access tutorial
Access tutorial
Access tutorial
Access tutorial
Access tutorial
Access tutorial
Access tutorial
Access tutorial
Access tutorial
Access tutorial
Access tutorial
Access tutorial
Access tutorial
Access tutorial
Access tutorial
Access tutorial
Access tutorial
Access tutorial
Access tutorial
Access tutorial
Access tutorial
Access tutorial
Access tutorial
Access tutorial
Access tutorial
Access tutorial
Access tutorial
Access tutorial
Access tutorial
Access tutorial
Access tutorial
Access tutorial
Access tutorial
Access tutorial
Access tutorial
Access tutorial
Access tutorial
Access tutorial
Access tutorial

More Related Content

What's hot

Connecting audiocodes-sbc-to-microsoft-teams-direct-routing-enterprise-model-...
Connecting audiocodes-sbc-to-microsoft-teams-direct-routing-enterprise-model-...Connecting audiocodes-sbc-to-microsoft-teams-direct-routing-enterprise-model-...
Connecting audiocodes-sbc-to-microsoft-teams-direct-routing-enterprise-model-...hredca
 
Gdfs sg246374
Gdfs sg246374Gdfs sg246374
Gdfs sg246374Accenture
 
Da package usersguide
Da package usersguideDa package usersguide
Da package usersguideVishwa Mohan
 
WebSphere Business Integration for SAP
WebSphere Business Integration for SAPWebSphere Business Integration for SAP
WebSphere Business Integration for SAPlargeman
 
AD Manager Plus Help Document
AD Manager Plus Help DocumentAD Manager Plus Help Document
AD Manager Plus Help DocumentZoho Corporation
 
What's New in ZW3D 2012 v1.0
What's New in ZW3D 2012 v1.0What's New in ZW3D 2012 v1.0
What's New in ZW3D 2012 v1.0VX
 
Robust data synchronization with ibm tivoli directory integrator sg246164
Robust data synchronization with ibm tivoli directory integrator sg246164Robust data synchronization with ibm tivoli directory integrator sg246164
Robust data synchronization with ibm tivoli directory integrator sg246164Banking at Ho Chi Minh city
 
Db2 udb backup and recovery with ess copy services
Db2 udb backup and recovery with ess copy servicesDb2 udb backup and recovery with ess copy services
Db2 udb backup and recovery with ess copy servicesbupbechanhgmail
 
Implementing IBM InfoSphere BigInsights on IBM System x
Implementing IBM InfoSphere BigInsights on IBM System xImplementing IBM InfoSphere BigInsights on IBM System x
Implementing IBM InfoSphere BigInsights on IBM System xIBM India Smarter Computing
 
Maximo76 designer431 report development guide_rev8
Maximo76 designer431 report development guide_rev8Maximo76 designer431 report development guide_rev8
Maximo76 designer431 report development guide_rev8mohamed gamal
 
BOOK - IBM Implementing ibm system directory 6.1
BOOK - IBM Implementing ibm system directory 6.1BOOK - IBM Implementing ibm system directory 6.1
BOOK - IBM Implementing ibm system directory 6.1Satya Harish
 
Sg247692 Websphere Accounting Chargeback For Tuam Guide
Sg247692 Websphere Accounting Chargeback For Tuam GuideSg247692 Websphere Accounting Chargeback For Tuam Guide
Sg247692 Websphere Accounting Chargeback For Tuam Guidebrzaaap
 

What's hot (17)

Connecting audiocodes-sbc-to-microsoft-teams-direct-routing-enterprise-model-...
Connecting audiocodes-sbc-to-microsoft-teams-direct-routing-enterprise-model-...Connecting audiocodes-sbc-to-microsoft-teams-direct-routing-enterprise-model-...
Connecting audiocodes-sbc-to-microsoft-teams-direct-routing-enterprise-model-...
 
Gdfs sg246374
Gdfs sg246374Gdfs sg246374
Gdfs sg246374
 
Performance tuning for content manager sg246949
Performance tuning for content manager sg246949Performance tuning for content manager sg246949
Performance tuning for content manager sg246949
 
Da package usersguide
Da package usersguideDa package usersguide
Da package usersguide
 
WebSphere Business Integration for SAP
WebSphere Business Integration for SAPWebSphere Business Integration for SAP
WebSphere Business Integration for SAP
 
AD Manager Plus Help Document
AD Manager Plus Help DocumentAD Manager Plus Help Document
AD Manager Plus Help Document
 
What's New in ZW3D 2012 v1.0
What's New in ZW3D 2012 v1.0What's New in ZW3D 2012 v1.0
What's New in ZW3D 2012 v1.0
 
Ca 7 primer
Ca 7 primerCa 7 primer
Ca 7 primer
 
Robust data synchronization with ibm tivoli directory integrator sg246164
Robust data synchronization with ibm tivoli directory integrator sg246164Robust data synchronization with ibm tivoli directory integrator sg246164
Robust data synchronization with ibm tivoli directory integrator sg246164
 
Db2 udb backup and recovery with ess copy services
Db2 udb backup and recovery with ess copy servicesDb2 udb backup and recovery with ess copy services
Db2 udb backup and recovery with ess copy services
 
Implementing IBM InfoSphere BigInsights on IBM System x
Implementing IBM InfoSphere BigInsights on IBM System xImplementing IBM InfoSphere BigInsights on IBM System x
Implementing IBM InfoSphere BigInsights on IBM System x
 
Maximo76 designer431 report development guide_rev8
Maximo76 designer431 report development guide_rev8Maximo76 designer431 report development guide_rev8
Maximo76 designer431 report development guide_rev8
 
BOOK - IBM Implementing ibm system directory 6.1
BOOK - IBM Implementing ibm system directory 6.1BOOK - IBM Implementing ibm system directory 6.1
BOOK - IBM Implementing ibm system directory 6.1
 
Sg247692 Websphere Accounting Chargeback For Tuam Guide
Sg247692 Websphere Accounting Chargeback For Tuam GuideSg247692 Websphere Accounting Chargeback For Tuam Guide
Sg247692 Websphere Accounting Chargeback For Tuam Guide
 
installation_manual
installation_manualinstallation_manual
installation_manual
 
P4 perforce
P4 perforceP4 perforce
P4 perforce
 
Akeeba backup-guide
Akeeba backup-guideAkeeba backup-guide
Akeeba backup-guide
 

Similar to Access tutorial

Access tutorial
Access tutorialAccess tutorial
Access tutorialAjoenk8
 
Access tutorial (1)
Access tutorial (1)Access tutorial (1)
Access tutorial (1)yersyorrego
 
Access tutorial (1)
Access tutorial (1)Access tutorial (1)
Access tutorial (1)yersyorrego
 
Access tutorial.ander
Access tutorial.anderAccess tutorial.ander
Access tutorial.anderAnderrr
 
Yii blog-1.1.9
Yii blog-1.1.9Yii blog-1.1.9
Yii blog-1.1.9Netechsrl
 
java web_programming
java web_programmingjava web_programming
java web_programmingbachector
 
C++ annotations version
C++ annotations versionC++ annotations version
C++ annotations versionPL Sharma
 
Dimensional modelling sg247138
Dimensional modelling sg247138Dimensional modelling sg247138
Dimensional modelling sg247138Sourav Singh
 
Algorithmic Problem Solving with Python.pdf
Algorithmic Problem Solving with Python.pdfAlgorithmic Problem Solving with Python.pdf
Algorithmic Problem Solving with Python.pdfEmily Smith
 
eclipse.pdf
eclipse.pdfeclipse.pdf
eclipse.pdfPerPerso
 

Similar to Access tutorial (20)

Access tutorial
Access tutorialAccess tutorial
Access tutorial
 
Access tutorial
Access tutorialAccess tutorial
Access tutorial
 
Access tutorial (1)
Access tutorial (1)Access tutorial (1)
Access tutorial (1)
 
Access tutorial
Access tutorialAccess tutorial
Access tutorial
 
Access tutorial
Access tutorialAccess tutorial
Access tutorial
 
Access tutorial
Access tutorialAccess tutorial
Access tutorial
 
Access tutorial
Access tutorialAccess tutorial
Access tutorial
 
Access tutorial (1)
Access tutorial (1)Access tutorial (1)
Access tutorial (1)
 
Access tutorial.ander
Access tutorial.anderAccess tutorial.ander
Access tutorial.ander
 
Access tutorial
Access tutorialAccess tutorial
Access tutorial
 
Libro 1
Libro 1Libro 1
Libro 1
 
Access tutorial
Access tutorialAccess tutorial
Access tutorial
 
Access tutorial
Access tutorialAccess tutorial
Access tutorial
 
Access tutorial
Access tutorialAccess tutorial
Access tutorial
 
Yii blog-1.1.9
Yii blog-1.1.9Yii blog-1.1.9
Yii blog-1.1.9
 
java web_programming
java web_programmingjava web_programming
java web_programming
 
C++ annotations version
C++ annotations versionC++ annotations version
C++ annotations version
 
Dimensional modelling sg247138
Dimensional modelling sg247138Dimensional modelling sg247138
Dimensional modelling sg247138
 
Algorithmic Problem Solving with Python.pdf
Algorithmic Problem Solving with Python.pdfAlgorithmic Problem Solving with Python.pdf
Algorithmic Problem Solving with Python.pdf
 
eclipse.pdf
eclipse.pdfeclipse.pdf
eclipse.pdf
 

Access tutorial

  • 1. Microsoft-Access Tutorial Soren Lauesen E-mail: slauesen@itu.dk Version 2.4b: July 2011 Contents 1. The hotel system................................................... 4 5.2.2 Computed SQL and live search...............74 2. Creating a database ............................................. 6 5.2.3 Composite search criteria........................76 2.1 Create a database in Access ............................. 6 5.2.4 Event sequence for text box ....................78 2.2 Create more tables ......................................... 10 5.3 Visual Basic tools...........................................80 2.3 Create relationships ....................................... 12 5.4 Command buttons ..........................................84 2.4 Look-up fields, enumeration type .................. 14 5.5 Forms .............................................................86 2.5 Dealing with trees and networks.................... 16 5.5.1 Open, close, and events...........................86 3. Access-based user interfaces ............................. 18 5.5.2 CRUD control in Forms ..........................87 3.1 Forms and simple controls............................. 18 5.5.3 The OpenForm parameters......................89 3.1.1 Text box, label and command button...... 18 5.5.4 Multi-purpose forms (hotel system)........90 3.1.2 Adjusting the controls............................. 20 5.5.5 Dialog boxes (modal dialog)...................92 3.1.3 Cleaning up the form .............................. 20 5.5.6 Controlling record selection....................93 3.1.4 Shortcut keys for the user ....................... 22 5.5.7 Column order, column hidden, etc. .........94 3.1.5 Lines, checkbox, calendar....................... 22 5.5.8 Area selection, SelTop, etc......................94 3.1.6 Combo box - enumeration type .............. 24 5.5.9 Key preview ............................................97 3.1.7 Combo box - table look up ..................... 26 5.5.10 Error preview ........................................97 3.1.8 Control properties - text box................... 28 5.5.11 Timer and loop breaking .......................98 3.2 Subforms........................................................ 30 5.5.12 Multiple form instances.........................99 3.2.1 Subform in Datasheet view..................... 31 5.5.13 Resize..................................................100 3.2.2 Adjust the subform ................................. 34 5.6 Record sets (DAO).......................................102 3.2.3 Mockup subform..................................... 36 5.6.1 Programmed record updates..................102 3.2.4 Subform in Form view............................ 36 5.6.2 How the record set works......................104 3.2.5 Summary of subforms............................. 38 5.6.3 The bound record set in a Form ............106 3.2.6 Prefixes ................................................... 38 5.6.4 Record set properties, survey ................108 3.3 Bound, unbound and computed controls........ 40 5.7 Modules and menu functions .......................110 3.3.1 Showing subform fields in the main form42 5.7.1 Create a menu function .........................110 3.3.2 Variable colors - conditional formatting. 42 5.7.2 Define the menu item............................112 3.4 Tab controls and option groups...................... 44 5.7.3 Managing modules and class modules ..112 3.5 Menus ............................................................ 46 5.7.4 Global variables ....................................114 3.5.1 Create a new menu bar............................ 46 6. Visual Basic reference......................................116 3.5.2 Add commands to the menu list ............. 48 6.1 Statements ....................................................116 3.5.3 Attach the toolbar to a form.................... 48 6.2 Declarations .................................................120 3.5.4 Startup settings - hiding developer stuff . 48 6.3 Constants and addresses...............................122 3.6 Control tips, messages, mockup prints .......... 50 6.4 Operators and conversion functions .............124 4. Queries - computed tables................................. 52 6.5 Other functions.............................................128 4.1 Query: join two tables.................................... 52 6.6 Display formats and regional settings ..........132 4.2 SQL and how it works ................................... 54 7. Access and SQL................................................134 4.3 Outer join ....................................................... 56 7.1 Action queries - CRUD with SQL ...............134 4.4 Aggregate query - Group By.......................... 58 7.1.1 Temporary table for editing ..................134 4.5 Query a query, handling null values .............. 62 7.2 UNION query...............................................136 4.6 Query with user criteria ................................. 64 7.3 Subqueries (EXISTS, IN, ANY, ALL . . .) ..138 4.7 Bound main form and subform ...................... 66 7.4 Multiple join and matrix presentation ..........140 4.7.1 Editing a GROUP BY query................... 67 7.5 Dynamic matrix presentation .......................142 5. Access through Visual Basic ............................. 68 7.6 Crosstab and matrix presentation .................144 5.1 The objects in Access .................................... 68 8. References.........................................................148 5.2 Event procedures (for text box) ..................... 72 Index......................................................................149 5.2.1 More text box properties......................... 72
  • 2. Printing instructions Print on A4 paper with 2-sided printing so that text and associated figures are on opposing pages. Version 1: October 2004. Version 2.1: November 2004. Changes: a. Restructured section 3.2 with small additions. b. Section 7.1 on action queries added. c. Small changes and additions to Chapter 6 with corresponding changes in the Reference Card. d. Index provided Version 2.2: April 2004. Changes: a. SQL HAVING introduced in section 4.2 and the example in section 4.4. b. More on aggregate functions in section 4.4. c. ColumnOrder, ColumnWidth discussed in section 5.5.7. d. Selection of an area in the datasheet is discussed in section 5.5.8. e. Section 5.7 (action queries) now moved to Chapter 7. f. Action queries, Union, Subqueries, Crosstab, etc. discussed in Chapter 7 (a new chapter). g. Various small changes and improved explanations here and there. Version 2.3: September 2006. Changes: a. Access 2003 dialog when opening a database changed (page 8). b. Look-up fields for foreign keys deleted (last part of section 2.4). Access's automatic creation of relationships caused too much confusion. c. Combo boxes described in sections 3.1.6 and 3.1.7. d. More events explained in section 5.2.3. e. Various misprints corrected. Version 2.4: August 2007 and July 2011. Changes: a. Partial integrity (page 12). b. Adding a label to a control (page 20). c. DateTime Picker (page 22). d. More Null rules (page 62, 77, 124). e. Access data model and experiments improved (page 68-70). f. Composite search criteria, more computed SQL, date comparison (page 76-77). g. Event sequence for textbox: small corrections, e.g. OldValue (page 78). h. Improved area selection (page 95-96). i. Error handling, user errors (page 97-98). j. Timer and loop breaking (page 98-99). k. Managing modules and class modules (page 112). l. Error handling, VBA errors, Err object (page 117). m. Enum type (page 121). n. Partition operator (page 124). o. Week number in the Format function (page 126). p. Dynamic matrix simplified (page 136). q. Minor corrections and improvements in many places. r. Version 2.4a: Note on AutoNumber added to Figures 2.1C and 2.4. s. Version 2.4b: Copyright notice more liberal. Misprint corrected (page 65, step 14 and 15). Figure 52B (page 75) shows quote-stuff more clearly. SendKeys on page 99 elaborated. © Soren Lauesen, 2007 Permission is granted to use, print and copy the file on a non-profit basis as long as the source is clearly stated. The document is available on the author's web site on these conditions. 2 Preface
  • 3. Preface This booklet shows how to construct a complex appli- 6. Visual Basic reference. A reference guide to the cation in Microsoft Access (MS-Access). We assume Visual Basic language for Applications (VBA). that the user interface has been designed already as a paper-based mockup (a prototype). How to design a 7. Access and SQL. An overview of the remaining good user interface is a separate story explained in parts of SQL, for instance how to update the User Interface Design - a Software Engineering Per- database through SQL. We also explain how to spective, by Soren Lauesen. generate matrices of data with dynamically chan- ging headings. After design, development continues with constructing the database, constructing the user interface, binding Using the booklet for teaching the user interface to the database, and finally develop We have experimented with using the booklet for the program. This is what this booklet is about. teaching. First we tried to present part of the material with a projector, then let the students try it out on their The reason we illustrate the construction process with own, next present some more, etc. Although the MS-Access is that it is a widely available tool. Any- students listened carefully, it turned out to be a waste body who has Microsoft Office with MS-Word, also of time, partly because the students worked with vastly has Access and the programming language Visual Ba- different pace. sic behind Access. Now we give a 15 minute introduction to the main MS-Access is also a good illustration of many princi- parts of Access: the database window, the tables, the ples that exist on other platforms too, for instance a re- forms - and how they relate to what they have learned lational database, a Graphical User Interface (GUI), in user interface design. Then the students work on event handling, and an object-oriented programming their own. We have instructors to help them out when language. MS-Access contains all of these parts - co- they get stuck. operating reasonably smoothly. The hotel system Organization of the booklet We have chosen to illustrate the construction process The chapters in the booklet are organized like this: with a hotel example, because most people have an idea what it is about, yet it is sufficiently complex to 1. An introduction to the hotel system that is used as show typical solutions in larger systems. Some of the an example throughout the booklet. complexities are that a hotel has many types of rooms at different prices; a guest can book several rooms, 2. Creating a database. Construct a database that cor- maybe in overlapping periods; a room may need reno- responds to the data model behind the design. The vation or repair, making it unavailable for a period; the user will only see the database indirectly - through hotel keeps track of regular guests and their visits over the screens we construct. time. 3. Access-based user interfaces. Construct the screens Simplifications and menus that the user will see. We follow the pa- However, we have simplified the system in many other per-based mockup designed in User Interface De- ways to shorten the discussion. For instance we ignore sign. You can use the result as a tool-based that in most hotels, rooms are not booked by room mockup. number, but by room type; hotels usually overbook, i.e. book more rooms than they have, expecting that some 4. Queries - computed tables. Connect the screens to customers will not turn up. We also ignore all the other the database, usually by means of queries - com- aspects of operating a hotel, for instance keeping track puted data tables. The result will be a partially of when rooms are cleaned and ready for the next functional prototype. guest, purchasing goods, planning who is to be on duty for the next weeks, payroll and general accounting. In 5. Access through Visual Basic. Program what the spite of these simplifications, the example still shows buttons and menus will do when the user activates the structure of larger systems. them. The result will be a fully functional prototype and later the final system to be delivered to the On-line resources customer. The first part of the chapter is tutorial - A demo-version of the hotel system, a VBA reference mandatory reading if you want to work with Visual card, etc. are available from the authors's web site: Basic and Access. The rest of the chapter is for www.itu.dk/people/slauesen. Comments are welcome. looking up various subjects. We assume you know a bit of programming already. Soren Lauesen, slauesen@itu.dk Preface 3
  • 4. 1. The hotel system In this booklet we illustrate MS-Access by means of a record services that the guest has received. The system system for supporting a hotel reception. The system is uses the term Stay to mean a booking or a guest who used as the main example in User Interface Design - a has checked in. Software Engineering Perspective, by Soren Lauesen. If you know the book, skip this section and go straight Breakfast list. The Breakfast screen shows the break- to Chapter 2. fast servings for a specific date. It handles just two kinds of breakfast: self-service breakfast in the restau- Screens rant (buffet) and breakfast served in the room. The The hotel system consists of the screens shown in Fig- waiter in the restaurant has a paper copy of the list and ure 1A. records the servings here. Later the receptionist enters the data through the Breakfast screen. Find guest. The Find guest screen allows the recep- tionist to find a guest or a booking in the database. The Service list. The Service list shows the price for each receptionist may enter part of the guest name and click kind of service. Hotel management uses this list to the Find guest button. The system then updates the change service prices or add new kinds of service. lower part of the screen to show the guests or bookings that match. The receptionist may also find the guest by Database his phone number, room number, or stay number (also The system uses a database with several tables. They called booking number). are shown as an E/R data model on Figure 1B. The receptionist can select the guest from the list and tblGuest has a record for each guest with his address click the buttons to see details of the booking or create and phone number. a new booking for the guest. tblStay has a record for each stay (booking or checked Room Selection. The Room Selection screen gives an in) with a booking number (stay number) and the pay overview of available rooms in a certain period. Avail- method. ability is shown as IN when the room is occupied, BOO when it is booked, etc. The receptionist may tblRoom has a record for each room in the hotel. specify the period of interest and the type of room, then click the Find room button. The system updates the ta- tblRoomState has a record for each date where a room ble at the bottom of the screen to show the rooms of is occupied. It connects to the room occupied and the interest. The receptionist can then choose a room and stay that occupies it. If the room is occupied for repair, book it for the guest – or check a guest into the room. it doesn’t connect to a stay. Stay. The Stay screen shows all the details of a book- tblRoomType has a record for each type of room (room ing, for instance the guest and his address, the rooms class) with a short description of the room type, the he has booked and the prices. When the guest is number of beds, and the prices. checked in, the Stay screen also shows breakfast and tblService has a record for each type of service with its other services he has received. The system shows these name and price per unit. details on the Services tab. Here the receptionist can tblServiceReceived has a record for each delivery of service to a guest. It connects to the type of service and to the stay where the service is charged (there is an in- voice for each stay). Fig 1B. Tables as E/R model tblGuest tblStay tblServiceReceived tblServiceType tblRoomState tblRoom tblRoomType 4 1. The hotel system
  • 5. Fig 1A. Hotel system screens 1. The hotel system 5
  • 6. 2. Creating a database Highlights there are only small differences from Access 97 and • Transform the data model to a database in MS- Access 2003. We will mention the more important Access. ones. • Use lookup-fields to enter foreign keys and enu- meration types. In this and the following chapters we will use the hotel system as an example, and you will construct several parts of the system. However, the purpose is not to In this chapter you learn how to realize a data model as construct the hotel system, but to show how MS- a relational database in Microsoft Access. We assume Access works. This knowledge will enable you to con- that you know about data modeling, tables, attributes, struct a functional version of your own system - for in- and foreign keys as explained in User Interface Design. stance the one you have designed when reading User The description below is based on Access 2000, but Interface Design. 2.1 Create a database in Access In Microsoft Access a database consists of one single file. The file contains all the tables of the database, the Warning: Make sure you follow the steps below relationships (the crow's feet), queries (computed ta- closely. Don't skip any of the numbered steps. The bles), forms (user windows), and many other things. result might be that you get stuck later in the text. As a systems developer you will design tables and user Create the database windows. As a user you will enter data into the tables 1. Locate the Access program. Depending on the way (usually through user windows) and get data out of the the system is set up, you may find it under Pro- tables, for instance through the same windows or grams -> Microsoft Access or Programs -> Micro- through printed reports. soft Office -> Microsoft Access. 2. In Access 97 and 2000: Open Access and ask for a In Access it is very easy to switch between the devel- "blank" database. oper role and the user role. As a developer you will In Access 2003: Open Access and click the New typically design some tables, then switch to the user icon (under the File menu). Then click Blank da- role to enter data into them, then switch back to the de- tabase in the help area to the far right. veloper role to change the design, design more tables, 3. Access now asks where to store the new database. etc. Access can to a large extent restructure the data Select the folder you want and give the database that already is in the database so that it matches the the name hotel (or hotel.mdb). new table design. The screen now shows the database window. It should look like Figure 2.1A. (In Access 97 it looks slightly Fig 2.1A The Access database window One Access database = one file. File name = hotel.mdb Use the table. Shortcut: Enter Create a table Design the table. Shortcut: Ctrl+Enter The database window: List of tables (empty initially) 6 2. Creating a database
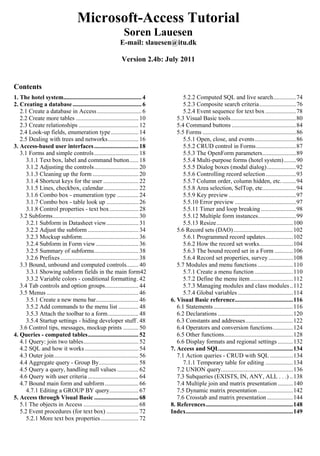
  • 7. Fig 2.1B Define a table (design view) Table name. Access asks for it the first time you close the window. Primary key. Right click One line Possible per field data types Field properties. Also use F1 - Help. different). We have selected the Tables tab, but there of type Text, except the guestID which is of type are no tables or other things in the database as yet. AutoNumber. However, you see three icons that can create tables for you. When you have created a table, it will appear in Note that although we say phone number and passport the table window and you can then Open it and enter number, these fields are texts because the "numbers" data into it, or you can Design it, i.e. change the defi- contain parentheses, dashes and maybe letters. nition of it. (In Access 97 the database window looks like a traditional tab form. There are no create-icons, When you have chosen a data type, you can choose a but function buttons for the same purpose.) number of other field properties. They are in the lower part of the window. On the figure you can see that the Define a table name field is a text field with space for 50 characters. 4. Double click on Create table in Design view. You can also see that the user doesn't have to enter anything in the name field (Required=No). You should Now you get a window as shown on Figure 2.1B. Here change this to Yes since it doesn't make sense to have a you define the fields (attributes) of the table. The list of guest without a name. fields runs downwards with one line per field. Initially there are only empty lines. The table hasn't got a name Try to use Access's help to find more information about yet. Access asks for the name when you close the win- the data types and their properties. For instance, put the dow. cursor in the Data Type of a field and click F1. Or point at one of the properties and click F1. The figure shows the finished guest table. You see the field names to the left. In the middle column is the type Lookup Wizard is not a field type. If you select Lookup of the field - Data Type. The figure shows all the pos- Wizard, it makes the field into a combo box where the sible types as a combo box. The most important data user can select a value instead of typing it into the types are Text, Number, Date/Time, and AutoNumber. field. We will look closer at Lookup in section 2.4. An AutoNumber is a counter that Access increases for each new record, so that it serves as a unique key. The Key fields value is a Long Integer (32-bit integer). We explain Often you have to define a key field so that other tables more about data types in the next section. can refer to this one. In our case, guestID must be the key field: 5. Fill in all the field lines according to the attributes in the guest table (see the figure). All the fields are 6. Right-click somewhere in the guestID line. Then select Primary Key. Access now shows that the field is the key. 2. Creating a database 7
  • 8. You can remove the key property again by once more 12. The file may not be safe. Do you want to open it? selecting Primary Key. If the key consists of more than Your database is safe, so answer Open. one field, you first select all the fields by clicking on 13. Unsafe expressions are not blocked. Do you want their left-hand marker with Ctrl down. Then select to block them? You want full freedom, so answer Primary Key by right-clicking inside one of the field No. lines. 14. Access warns you one more time whether you want to open. Say Open or Yes. (In some versions 7. Close the window. Access asks you for the name the question is a very long text box, and you of the table. Call it tblGuest. (The prefix tbl will cannot understand it. Say yes anyway.) help you remember that it is a table. As the system grows, there will be guest windows, guest buttons As an alternative, you may say yes to blocking the and many other things. Without discipline on your unsafe expressions. This will save you some questions part, it becomes a mess.) when you open the file in the future. However, some installations don't allow you to block expressions. If you have not defined a primary key, Access will warn you and suggest that it makes one for you. Don't Note that Access 2003 shows that your database is in let it - do it yourself. Or at least check what Access Access 2000 format. This is all right. It allows you to makes in its excessive helpfulness. use it also from Access 2000. You can convert it to other formats with Tools -> Database Utilities -> Con- Enter data vert Database. After these efforts, it is time to record some guests. Fortunately it is easy: Undo. Use Esc to undo the changes you have made to the current record. 8. Select the guest table in the database window. Click Open or just use Enter. • The first Esc undoes changes to the field where the cursor is. Now the system shows the table in user mode (Da- • The second Esc undoes all changes to the record tasheet view) so that you can enter guest data. where the cursor is. 9. Enter the guests shown on Figure 2.1C. You add a new guest in the empty line of the table - the one As soon as you move the cursor to the next line, marked with a star. Notice that as soon you start Access stores the record in the database and you cannot entering something, the record indicator changes to make an automatic undo anymore. However, you can a pencil and a new star line appears. The pencil manually edit the stored record. Notice that the pencil shows that you are editing the record, and the disappears when the record is stored in the database. record you see is not yet in the database. Shortcut keys for data entry On Figure 2.1C we originally entered a guest that got F2: Toggles between selecting the entire field and se- guestID 4, later deleted this guest. Access will never lecting a data entry point. reuse number 4 for a guest. Shift+F2: Opens a small window with space for the entire field. Useful for entering long texts into a Close and reopen the database field that is shown only partly in the table. How- To feel confident with Access, it is a good idea to close ever, the text cannot be longer than you specified in and open the database now. the table definition. Alt+ArrowDown: Opens a combo box. Choose with 10. Close the large Access window. (Not the small the arrows and Enter. database window inside the Access window.) Shortcut keys for navigation Notice that Access doesn't ask whether you want to Tab and Shift+Tab: Moves from field to field. save changes. Access saves them all along, for instance Ctrl+Tab: Moves from one tab form to the next, for in- when you define a table or when you enter a record in stance in the lower part of the table definition win- the table. dow. F6: Moves between upper and lower section of a win- 11. Find your database file (hotel.mdb) in the file fold- dow, for instance in the table definition window. ers. Use Enter or double click to open it. Ctrl+Enter: Opens the table in design mode (in the da- tabase window). Access 2003 is very security concerned and asks you several questions when you open the file. The dialog See also shortcuts on the reference card may vary from one installation to another, but is something like this: 8 2. Creating a database
  • 9. Fig 2.1C Enter data in user mode (datasheet view) In database window: Select table -> Open (or Enter) AutoNumber: You get 1, 2, 3, 4. Don't worry that it is different from the figure. Record selector Add record F2 to select entire field Shift+F2 to see field in a separate window Edit Esc to undo. indicator First Esc: Undo field change Second: Undo record changes 2. Creating a database 9
  • 10. 2.2 Create more tables You should now create the remaining tables for the tblRoomState: hotel. The data model on Figure 2.2 shows the tables stayID and roomID are foreign keys. Ensure their types we will use. To simplify your job, we have shown all match what they refer to. Notice that roomID refers the keys, including the foreign keys and the artificial to a natural key, not to an AutoNumber. keys. date should be a Date/Time field with Format = Short Date. 1. Close the guest table. personCount is the number of persons staying in the 2. Create all the remaining tables in the same way as room. An integer should suffice. you created the guest table (from the Tables tab state is similar to state for tblStay, although the values use Create table in Design view - or click New). are slightly different. The key consists of two fields: roomID and date. It is a Make sure you define all the fields. Otherwise you will bit tricky to specify this: select both fields by get stuck when later constructing the user interface. clicking on the left-hand marker (hold down Ctrl Here are a few notes about the various tables: while selecting the second field). Then right-click somewhere on the text inside the line. tblStay: stayID is the primary key of tblStay. Make it an Auto- Optional tables Number. The following two tables are needed for the full sys- guestID is a foreign key that refers to the AutoNumber tem. However, you don't need to create them in order in tblGuest. The foreign key must have a matching to follow the tutorial. data type - a long integer. Choose Data Type = Number and Field Size = Long Integer. Warning: tblServiceType: Don't make the foreign key an AutoNumber. This serviceID is an artificial key. Should be an Auto- would cause Access to fill in the foreign key fields Number. automatically, and you cannot change the numbers name and price should be obvious. The price should be so that they point to the primary keys in the guest a decimal number. Choose Data Type=Number, table. Field Size= Single, Decimal Places =2. paymethod is an enumeration type. Make it an integer (a 16-bit integer, not a long integer). Choose Data tblServiceReceived: Type = Number and Field Size= Integer. We will stayID and serviceID are foreign keys that refer to use the value 1 to denote Cash, the value 2 to de- AutoNumbers. The foreign keys must thus be long note Visa, etc. We will look closer at this in section integers. 2.4. roomID is an optional reference to a room. An integer state must also be an enumeration type. Make it an in- should suffice. (This reference is needed when a teger. Here the value 1 will denote booked, 2 in, etc. waiter records a service for a specific room and the guest has more than one room.) tblRoomType: date should be a Date/Time field. Choose Format = Contains one record for each type of room, for instance Short Date. one for double rooms, one for single rooms, etc. (In the quantity is the number of items the guest has got - an book User Interface Design, we added this table late in integer should suffice. the design process to illustrate the normalization con- cept.) Data types Data is stored in the computer according to its type. roomType is an artificial key. An AutoNumber is okay. Here is a description of the most important types in the description is a short text, for instance "double room, data base. Visual Basic deals with almost the same bath". types (see section 6.2 and the reference card under bedCount is the number of beds in the room, including Declarations). temporary beds. price1 and price2 are the standard price and a possible Text. The field can contain any characters. The Field discount price. The price should be a decimal num- Size property defines the maximum number of charac- ber. Choose Data Type=Number, Field Size= Sin- ters. The maximum cannot be above 255 characters. gle, Decimal Places =2. Memo. Like a text field, but the maximum number of tblRoom: characters is 65,535. Access takes more time to process roomID is a natural key - the number on the door. So a memo field, so use text fields if adequate. don't use an AutoNumber. Use an integer. roomType is a foreign key that refers to tblRoomType. Number. The field can contain a number. The Field (You should by know how to deal with it.) Size property defines what kind of number: 10 2. Creating a database
  • 11. Integer. A small integer. It must be in the range - Also here you can choose a format that adapts to the 32,768 to +32,767 (a 16-bit integer). regional setting. • Long Integer. It must be in the range from around -2,140 million to +2,140 million (a 32-bit integer). Yes/No. The field contains a Boolean value shown • Single. A decimal number in the range from either as Yes/No, True/False, or On/Off. The format -3.4*1038 to +3.4*1038 with an accuracy of 6 or 7 property specifies this. significant digits (a 32-bit floating point number). AutoNumber. The field is a long integer (32 bits) that • Double. A decimal number in the range from Access generates itself as a unique number in the table. -1.8*10308 to +1.8*10308 with 14 significant digits Access numbers the records 1, 2, . . . as you enter the (a 64-bit floating point number). records. However, you cannot trust that the sequence is • Decimal. A very long integer with a decimal point unbroken. For instance when you add a record and placed somewhere. Intended for monetary calcula- undo the addition before having completed it, Access tions where rounding must be strictly controlled. uses the next number in the sequence anyway. In the book we use Single or Double instead. A foreign key is a field (or several fields) that refer to Numbers can be shown in many ways depending on the something unique in another table - usually the primary format property of the field. You may for instance key. Be careful here. The foreign key and the primary show them with a fixed number of decimals, with a key must have the same type. However, when the currency symbol, etc. primary key is an AutoNumber, the foreign key must be a long integer. Some formats show data in a way that depends on the regional settings of the computer. If you for instance Changing a data type. Access is quite liberal with specify the format of a number as Currency, the changing a data type to something else - even if there number will show with a $ on a US computer and with are data in the records. It can also change an Auto- a £ on a British computer. Number field to a number field, but not the other way Date/Time. The field gives a point in time. In the around. If you need to change field B to an Auto- Number, create a new field C and make it an Auto- computer it is stored as the number of days since Number. Then delete field B and rename field C to B. 30/12-1899 at 0:00. It is really a Double number, so the number of days may include a fraction of a day. In this If you for some reason want to store a record with an way the field specifies the date as well as the time with AutoNumber of your own choice (for instance create a high precision. As an example, the number 1 corre- stay with stayID=728), you need to append the record sponds to 31/12-1899 at 0:00, the number 1.75 to with an INSERT query (see section 7.1). You cannot 31/12-1899 at 18:00 (6 PM). just type in the stayID. Usually we don't show a date field as a number, but as a date and/or a time. The format property specifies this. Fig 2.2 Create remaining tables Optional tables guestID, name, address1, address2, address3, phone, passport tblGuest stayID, serviceID, serviceID, name, price roomID, date, quantity stayID, guestID, tblStay tblServiceReceived tblServiceType paymethod (cash | visa ...), state (booked | in |out | canceled) stayID, roomID, date, personCount, tblRoomState state (booked | occupied | repair) roomType, description roomID, roomType tblRoom tblRoomType bedCount, price1, price2 2. Creating a database 11
  • 12. 2.3 Create relationships When we have several tables, we can make relation- In the edit-relationship window, you can specify ships (crow's feet). Then we get an E/R model instead foreign keys that consist of several fields. You can also of a simple collection of tables. The relationships allow specify that the relationship has referential integrity, so Access to help us retrieve data across tables, check ref- that all records on the m-side point to a record on the 1- erential integrity, etc. side. Figure 2.3 shows the hotel relationships in Access. It 7. In our case, all stays must point to a guest, so mark resembles the crow's feet model quite well. You define the connector enforce referential integrity. (If the relationships in this way: Access refuses this, it is most likely because you have not defined the foreign key as a long integer.) 1. Start in the database window and right-click 8. Close the relationship window. The relationship somewhere. connector now appears in the window between the 2. Choose Relationships. foreign key and its target. Now you see an empty Relationship Window. You The referential integrity makes Access show the con- have to tell Access which tables to show here. Some- nector as 1-∞ (1:m). Based on referential integrity and times a Show Table window pops up by itself. Other- whether the connected fields are primary keys, Access wise you have to invoke it with a right-click in the re- may also decide that it is a 1:1 relationship. It is not lationship window. important what Access decides in these matters. You can later tell it otherwise when you want to use the 3. In the Show Table window, select the tables you connector. want to include. In the hotel system it is all the ta- bles. 9. Create the remaining relationships too. Note that 4. Click Add and close the window. Now the tables there is no referential integrity between tblStay and should be in the relationship window. tblRoomState. It is on purpose - if the room is in 5. Create the relationship between tblGuest and repair state there is no connected stay. tblStay by dragging guestID from one table to guestID in the other. Partial integrity. Access provides a more relaxed 6. An edit-relationship window pops up. If not, right- version of referential integrity. It allows the foreign key click on the relationship connector and choose the to be either empty (Null) or point to a record on the 1- edit window. side. This is the case for the relationship between tblStay and tblRoomState. Give it partial integrity in Access may complain: this way: Relationships must be on the same number of fields 10. Open tblRoomState in design view. For stayID with the same data types. (the foreign key) set the Default Value to empty (delete all characters in the field). Also set The cause is often that one end of the connector is an Required to No. AutoNumber and the other end a simple integer. It 11. In the relationship window, right-click on the must be a long integer to match the AutoNumber. connector and choose the edit window. Select enforce referential integrity. Note that you cannot see in the relationship window whether the relationship has full or partial referential integrity. Deleting a relationship. If you need to delete a rela- tionship, click it and press Del. 12 2. Creating a database
  • 13. Fig 2.3 Create relationships Right-click in database window. Select Relationships Choose tables to show Right-click in ER diagram. in the ER diagram Select Show Table Foreign key Primary key Create a relationship: Drag 1-side field to m-side field (or opposite). Edit the relationship - Referential integrity! 2. Creating a database 13
  • 14. 2.4 Look-up fields, enumeration type Your next task will be to fill in some data in all the ta- How the look-up field works bles. However, some of the fields are cumbersome to Open tblStay in design mode and study the Lookup tab fill in correctly. As an example, the pay method field is for paymethod (bottom of Figure 2.4). The display a code where 1 means Cash, 2 Visa, etc. The user control property is Combo Box. It means that when the should not have to remember these codes, so we will user is to fill in the paymethod, he sees a combo box. let the user choose the value from a list. It is an enumeration-type field: • For ordinary fields Display Control is Text Box. A text box shows texts, numbers, etc. as a string of paymethod(Cash | Visa | . . . ) characters. If you want to change the field back to an ordinary field, just set Display Control to Text Figure 2.4 shows what we want when the user fills in Box. the paymethod field. We want the field to be a combo box where the user can select the mnemonic text while The values the user can choose between are listed in Access stores the number code. Here is how to do it: Row Source. You may edit the values here. Column Count shows that these values are to be displayed as 1. Open tblStay in design view. (Select it and click two columns. Notice that Limit to List is No. It means Design or use Ctrl+Enter). that the user can enter other values than those in the 2. Select the paymethod field and the data type list. In our case, it is not desirable, so set the property Lookup Wizard. to Yes. Sections 3.1.6 and 3.1.7 explain more about 3. Access asks whether you (as a user) want to select combo boxes. the values from a table or from a list of values that you (as a designer) type in. Choose to type them in. Then click Next. 4. Access asks how many columns your combo box Undo the Lookup Wizard? should have. Choose two and fill in the columns as How do you make the field an ordinary field rather shown on the figure. Then click Next. than a lookup field? It doesn't help to make it an integer 5. Access asks which column holds the value to store or a text. Choose the Lookup tab at the bottom of the in the table. In our case it is column 1. table design window. Change Display Control to Text 6. Finally, Access asks for the column name that the Box. (See bottom of Figure 2.4.) user will see. In our case, paymethod is okay. Click Finish. Panic? Undo data entry Fill in some stay records When you enter data into the tables, Access checks You are now going to create some stay records and against the rules you have defined for the tables and the connect them to a guest. relationships. For instance, when you enter the guestID in tblStay, this ID must correspond to a guest in the 7. Close the table design window and open it in user guest table. Access doesn't allow you to leave the mode. record before this is fixed. The reason is that Access 8. Also open tblGuest in user mode. Keep the two stores the record in the database as soon as you move tables side by side so you can see both. Make sure the cursor away from the record. And the database you have created some guests. Otherwise do it must meet all the rules you have stated. now. 9. Fill in a stay record using the combo box for Sometimes you may not know what to type to satisfy paymethod. Notice that what you see as a designer, Access, and on the other hand you cannot leave the re- is the number stored in the database. The user cord to look at what to type. Many users panic here and should not see the number, but the text. We can even switch off the power to close down the system. arrange for this when the field becomes a text box The solution is to use Esc twice: in the user window (see section 3.2.2). 10. Also fill in the foreign key guestID so that it refers • First Esc: Undoes the correction you made in the to one of the guests. Since there is referential field where the cursor is. integrity, Access won't let you store the stay record • Second Esc: Undoes all the changes you made to without a proper guestID. If you get into real the record where the cursor is. This means that the trouble, use Esc twice (see the Panic box for the database returns to a consistent state where all the explanation). rules are met. 11. Fill in a few more stay records in the same way. 14 2. Creating a database
  • 15. Fig 2.4 Look-up fields, enumeration type Desired result AutoNumber: You get How? 1, 2, 3, 4. Don't worry. Table in design mode: Select Paymethod -> Data Type -> Lookup Wizard What to store The values the in the table user sees To undo the Wizard: Change to Text Box Possible values User may enter anything. Should be Yes? Populate the database You may soon find that a simple little database uses 12. Define the other enumeration fields as lookup several megabytes. Fortunately, Access can compact fields in the same way (the state fields in tblStay the database. Do that every now and then in this way: and tblRoomState). 13. Fill in some realistic data in all the tables. You 14. Select Tools->Database Utilities->Compact and may for instance use data corresponding to the Repair Database. That is all. You may check that situation in Figure 1A. Now you have test data for the file length actually became much smaller. (In the rest of the booklet. Access 97, the Compact and the Repair utilities are separate.) Important: Compact the database Access is very liberate with disk space and when you change things, it consumes new blocks on the disk. 2. Creating a database 15
  • 16. 2.5 Dealing with trees and networks E/R models can neatly describe complex relationships, 1. Create a new database, FlightRoutes. Create the for instance as we saw it for the flight routes in User tables City, Leg and Route in the usual way. Interface Design. Figure 2.5 shows the E/R model, but Access cannot show such a model directly. 2. Open the relationship window and add all three ta- bles to the relationship window. Then add City and The problem is that Access identifies a relationship by Leg once more. The relationship window should means of the two tables it connects. This means that now contain also a City_1 and a Leg_1 as shown Access cannot have two connectors between the same on the figure. two tables. Also you cannot have a self-referential con- nector. In the flight route model we need both of these. 3. Drag the connectors as shown. You now have two connectors between City and Leg. One is deter- As a compensation, Access offers shadow copies of a mined by City and the foreign key from. The other table. The table and its shadow copies are the same ta- is determined by City_1 and the foreign key to. ble, but they have different names. You can now create You also have a self-referential connector from connectors to the shadow copies and thus indirectly Leg to itself. It is determined by Leg_1 and the create multiple connectors between the same two ta- foreign key next. bles. 4. Try to fill in data for AA331 according to the fig- Figure 2.5 shows how to handle the flight routes in ure. Note that there are only one City table and one Access by means of shadow copies. Leg table to fill in. The shadow tables are not real tables. 16 2. Creating a database
  • 17. Fig 2.5 Flight routes - shadow tables Route routeID, mon, tue, Route: AA331. Mon, Wed wed, thu, fri, sat, sun Arr Dep cityID, name Chicago 10:45 from legID, Columbus 11:40 12:20 City Leg route, next, from, to Washington 13:30 14:15 A leg to deptTime, arrTime, New York 15:10 next Right-click -> Show table. Show City once more. Two relationships between City Relationship between Leg and and Leg: Shadow copy of City. Leg: Shadow copy of Leg. 2. Creating a database 17
  • 18. 3. Access-based user interfaces Highlights (control tips). These are the things the user sees on the • Construct user windows (Forms). screen. Access provides a lot of built-in functionality • Add fields, sub-windows, etc. (Controls). that makes the user interface respond to user actions. • Construct menus and other details. However, for a real system the built-in functionality is rarely sufficient, and you will have to add your own program pieces written in Visual Basic. An Access-based user interface consists of user win- In this chapter we look only at what the user sees on dows (called Forms in Access) , menus, and all the the screen. We hardly put real data into the fields. What little things such as error messages (message boxes) we are after is a tool-based mockup. Later we will add and pop up help when the cursor rests on a field real data and functionality to the screens. 3.1 Forms and simple controls In this section we will gradually implement the 3.1.1 Text box, label and command button mockup window you see in Figure 3.1A. This window 4. The screen should show a toolbox window where helps the receptionist find a guest or a booking in the you can choose between various controls (bottom database. Large hotels may have more than 100,000 left on the figure). If it doesn't, use View -> guests in the database. Toolbox to see it. 5. Click the Text Box tool that looks like ab| and then In the Access world, the window consists of a Form draw the white part of the field Last name. Draw it with various Controls on it. A control may be a simple so that it is two grid units high and about ten units field such as Last name, a button such as Find guest, an wide. area for a list of records such as the list of stays, and several other things. At this stage, don't worry if your controls are not prop- erly aligned and sized. We explain about these details Let us get started: below. To delete a control, select it and click Del. Or use Esc to undo the last thing you made. 1. Start in the database window, click the Forms tab, and select Create form in Design view. 6. Access has automatically added a label part to the left of the field. Click it and change the label for You now get an empty form in design mode, looking the control to Last name: somewhat like the one at the bottom of the figure. We 7. Draw the two next text boxes as shown on the fig- will put some of the controls on this form in a moment. ure (Street and Phone). If you double click the text In order to align the controls nicely, it is best to show a box icon in the toolbox, the draw tool remains se- visible grid of dots on the form: lected so that you can draw many text boxes. (Click Esc to get rid of it.) 2. The property box for the form should be open. If 8. Also draw a spare text box for later experiments not, double click on the anonymous little square on (Text 6 on the figure). the form - where the rulers meet. 3. Set the grid dots. The form has a grid of lines. 9. Now make sure the Wizard button is off at the top They may be spaced as on the figure - a one-cm of the toolbox. grid. Or with larger cells - a one-inch grid. We also 10. Select the Command Button tool and draw the New want to see the grid dots. Look at the Format tab guest button. Make it three grid units high to allow and find the Grid X and Grid Y properties. (They space for the text on the button. Click on the text are far down the list - you may have to scroll down in the box to change it. to them). For a one-cm grid, set Grid X=5 and If you have the Wizard button on, Access will try to Grid Y=5. For a one-inch grid set Grid X=12 and make the button do something. (Our mockup has Grid Y=12. Move the cursor to another property to nothing to do, so don't use the Wizard.) make the changes take effect. You should now see a grid of dots as on the figure. In general, two grid units are a good height for a text box and three units are suited for a command button. 18 3. Access-based user interfaces
  • 19. Fig 3.1A Create a Form - a user window The Form Controls Wanted: Tool-based mockup The Forms (user windows) of the database Create a Form List of forms (empty initially) Property box for the Form. Click for Form properties Toolbox: Click Text Box control. Draw a box on the Form. Set grid size to 5 units per cm . 3. Access-based user interfaces 19
  • 20. Using the fields try to move and resize the controls with the key- You may wonder why Access writes unbound inside board, or drag them with the mouse. all the boxes. It means that the box is not bound to any 9. Undo. You can undo your last operation with the record in the database. The user may enter something Undo button or Ctrl+Z. But only the last! You can but it is not automatically stored in the database. Try undo all changes since you last opened the form by this: closing the form and saying No to saving the changes. Try it now - you don't want to save the 11. Close the form. Access asks for its name. Call it last adjustments. frmFindStay. (We use the prefix frm for forms.) 12. Open it again in user mode. It should now look Make sure you see all menu items like the bottom of Figure 3.1B. This is how the Access 2000 and 2003 have an annoying feature where user would see the form. it shows only the last menu items you have used. It 13. Try to enter something in the fields. It stays on the makes it difficult to follow the procedures below. Get screen, but is it persistent data? rid of this feature: 14. Close the form and open it again (in user mode). All the fields are blank - no data was saved. It was 10. Right-click anywhere in the menus. Select Cus- just dialog data - not persistent data. Click the tomize->Options. Access 2000: Look at the command button - nothing happens. It is just a checkbox "Menus show recently used commands mockup we have made. (In the next chapters we first". Make sure that there is no check mark here. will add real data and functionality.) Access 2003: Look at the checkbox "Always show full menus". Make sure there is check mark here. 3.1.2 Adjusting the controls 1. Close the form and open it in design mode. Select The Format menu and the grid one of the text boxes. Notice the two black han- Open the form in design mode and select a control. dles, one on the label part and one on the text box. Now look at the Format menu at the top of the Access 2. Moving and sizing. Point the mouse at the label window. There are several things here that can help handle. The cursor changes to a finger. Try to drag you design the form: the label part around. The text box itself doesn't move. Point at the text box handle and use the fin- • Snap to Grid. If you check this box, all controls ger to drag it around. you draw or move with the mouse will snap to the 3. Point at the border of the text box. The cursor grid in all four corners. If the grid points are changes to a hand. Drag it - both label and text box closely spaced - more than 9 per cm - Access should move. doesn't show the grid, but snaps to it anyway. 4. Point at one of the sizing handles in the corners or • Align. You can align the selected controls to the on the middle of a side. Drag here and the box left, right, etc. or you can align them to the grid. changes size. Only their top-left point is aligned. They don't 5. Deleting a control. Click on the text box and click change size. Delete. Oops - both box and label disappeared! • Size. You can change the size of the selected con- Undo it using the Undo button or Ctrl+Z. trols so that they just fit the data in the control 6. Click on the label part. Notice that now the sizing (matching the chosen font size). Or you can make handles are on the label part. Click Delete. The la- them fit the grid in all four corners. Finally, you bel part disappears. can give all the selected controls the same width or height. If you want a label without the text box, select the label • Change to ... You can transform the selected con- tool from the toolbox and draw a label control. trol to another one - with reasonable limitations. For instance you can turn a text box into a combo If you want to add a label to a label-less text box, select box or vice versa. some label, copy it (Ctrl+C), select the text box and paste the label (Ctrl+V). 3.1.3 Cleaning up the form You may notice that the form has things in the corners 7. Moving and sizing with the keyboard. Select a that we don't want in the final user window (bottom of control, then try moving it around with Ctrl+up, Figure 3.1B). The title bar, for instance, holds our pro- Ctrl+down, etc. Try moving it with Shift+up, etc. grammer-oriented form name, frmFindStay. It should Now it changes size. This is one way to fine-tune be Find Guest. There are also record selectors, naviga- the positions and sizes. There is no way to enlarge tion buttons, and space for a scroll bar that we don't the picture as you can do in Word and many other need in the final window. We can correct all of this by programs. setting properties of the form: 8. Select several controls at the same time. Either hold Shift down while clicking on the controls one 11. Make sure the form is open in design mode. Show by one, or drag a rectangle around them. (All con- the property box for the form (double-click the lit- trols touching the rectangle will be selected.) Now tle square where the rulers meet). 20 3. Access-based user interfaces
  • 21. Fig 3.1B Adjusting controls and the Form Form name. Access asks for it Handle for moving Handle for moving Drag here to when you first close the form. Label part . Text Box part . move both. MinMax buttons Control Box Caption Record Selector Form View: User mode Navigation Underline letter for Buttons shortcut: &New guest Space for scroll bar 12. Set these properties on the Format tab: Caption Look and feel - Autoformat (the form name the user sees), Scroll bars (not You can give the form another look by means of Auto- needed), Record selector (not needed), Naviga- format. This changes the style, that is the background tion buttons (not needed). of the form and the appearance of all fields and buttons. You may try it if you like: There are other interesting properties on the Format tab that you may need for other windows: • Open the form in design mode. From the Format menu at the top of the Access window, select • Border Style specifies whether the form looks like AutoFormat. a resizable window, a dialog box or a message • You can choose various auto-formats. Through the box. Options button you can determine whether you • Control Box is the buttons on the left and right of want to change also field colors, fonts and borders. the title bar. You may hide them. When you close the AutoFormat box, the form has • MinMax buttons and Close button are shown changed its look. when the control box is shown, but you may dis- • You may also create a new auto-format style based able them. on one of your forms. Open the form in design • Picture is none in our case, but you may specify a view. In the AutoFormat box, select Customize -> picture file to be used as background. Create a new, and give the new AutoFormat a name. You can then use this auto-format for other You can get a good explanation of most of the proper- forms. ties by selecting the property and clicking F1. 3. Access-based user interfaces 21
  • 22. 3.1.4 Shortcut keys for the user may in some cases be a good way of grouping In the final system, the user should be able to work controls visually. without a mouse. An easy way to do this is to assign a 4. Checkbox. Select the checkbox tool and put a shortcut key for each button and each label. As an checkbox on the form. The checkbox has function- example, we might want the user to activate New Guest ality and shows a yes/no variable (a Boolean vari- with Alt+N. Why not do it now? able). You can of course change the value in user mode. If the variable is undefined - as it is initially 1. Change the name on the button into &New guest. - the checkbox is gray in user mode. Change to user mode with the little icon in the top left corner (Figure 3.1C). You should see that the Calendar control. The middle part of Figure 3.1C also N is underlined. shows a calendar control. 2. Try Alt+N to move the cursor to NewGuest. Try Tab and Shift+Tab to move between fields. 5. To make room for the calendar control, extend the grid area of the form by dragging its borders in 3. Add shortcut keys for the other labels too, for in- design mode. stance as &Last name. Try it out in user mode. 6. Select the lower right icon of the toolbox (the hammer). It gives access to more controls, most of What if you want a label with an &, such as them rather complex. Depending on the way Bed&Breakfast? Access will treat & as a shortcut Access was installed, you can see more or less of mark. Remedy: Write && instead of &. the many controls. One of them is a Calendar con- trol. Tip: Changing mode/view. During design, you fre- quently change between design mode and user mode. If you cannot see any Calendar control, you may have The little icon at the top left (Figure 3.1C) allows you to tell Access to look for it. Use Tools -> References. to toggle between the modes. Click it - you change to You now see a list of the software packages Access user mode (called Form View in Access). Click it again may look at. Find a Calendar Control and make sure it - you change to design mode (Design View). has a check mark. Then close the reference list and se- lect once more the hammer from the toolbox. The icon has also a menu of views that you can roll down as shown on the figure. There is one more view, 7. Select the Calendar from the tool list and draw a Datasheet View, which we will use later. It shows all large rectangle with the tool. fields of the form as a table. The Calendar control shows a single date variable. In Saving. The form is not saved when you change mode. user mode you can click on a date in the calendar and You can thus experiment easily with the design. Saving in that way store a date in the variable. In principle, the is not done until you close the form or explicitly save it Calendar control is just a kind of text box with a differ- with Ctrl+S. ent way of presenting and editing the text value. Shortcuts. You can change to design mode with DateTime picker. The bottom part of Figure 3.1C Alt+V+Enter, and to user mode with F5. shows two DateTime pickers. They look like combo boxes, but when the user clicks the down-arrow, a calendar appears. 3.1.5 Lines, checkbox, calendar Above we have tried some of the controls: text box, 8. Extend the grid area further, or remove the label, and command button. Figure 3.1C shows some calendar control. other controls you may try now: 9. Select the hammer tool again and look for Microsoft Date and Time Picker Control. Select it. 1. Line. Select the Line tool from the toolbox and (You may have to include it from Tools -> draw a line somewhere on the form. The line is Reference, as above.) just a visual effect. It has no functionality. 10. Draw the combo-box part of the control. You now 2. Rectangle. Select Rectangle from the toolbox and have a control that holds a date-time variable. Try draw a rectangle around some of the existing con- it out in user mode. Notice how the user can trols, for instance the left fields. The rectangle is increase or decrease dates and months with arrow just a visual effect without functionality. up and down. 3. Colors. Double click on the rectangle to open its 11. The control doesn't have label. Give it one: Select property box. On the format tab, give the rectangle one of the other labels. Copy it (Ctrl+C). Select the a back color and set back style to normal. Now it date-time control and paste it (Ctrl-V). hides the controls it surrounds. Use the main 12. Create the other date-time control in the same way Access menu, Format -> SendToBack, to move it - or copy and paste the first one. behind the other controls. Experiment with differ- 13. Experiment with the properties of the DateTime ent back colors, border styles, and border colors. It picker: In design mode, double-click the control. A 22 3. Access-based user interfaces
  • 23. Fig 3.1C Form after changes Select view mode: Design, Form, Datasheet Line (visual effect only) Shortcut keys Rectangle (visual effect only) Checkbox control Calendar control DateTimePicker control DateTimePicker drop-down special DTPicker properties window should Try other changes too, for instance the UpDown appear. checkbox and the colors. (You can also get to this special window from Access's 15. We are not going to use this fancy version of the standard property window: Select the Other-tab and form in the following. If you want to keep it, save then Custom.) a copy of it: Select the form in the database win- dow and use copy and paste. 14. Try changing the date format: Select format 3, 16. Delete the line, rectangle, checkbox and calendar dtpCustom. In the CustomFormat box, define the controls. We don't need them in the following. format as dd-MM-yyyy. Note that MM means month, while mm means minute. (See also Figure 6.4B, Format function). 3. Access-based user interfaces 23
  • 24. 3.1.6 Combo box - enumeration type 7. The Wizard asks you to specify whether the stored Combo boxes are a bit more complex. We will first value is column one or two. Select column 1 and make the Include combo box shown on Figure 3.1D. It click Next. is one of the search criteria for guests, and with some 8. Finally, you may specify the label text in front of programming it will allow the user to display only the combo box. Use the text Include: (Or modify booked stays, only canceled stays, etc. the text directly on the Form). Finish the Wizard. Technically speaking, this combo box holds a value of Look a the result in user mode. It doesn't look quite enumeration type: right. The drop-down list has two columns and the box itself shows the number - not the user text. We have to include(booked | canceled | . . . ) repair this: In the same way as in the database, the user should see 9. Look at the property box of the combo box. The the values booked, canceled, etc., but they should be Format tab has a field called Column Widths. It stored as the values 1, 2, etc. shows the widths of the two columns. Set the width of the first column to 0 (see the bottom of 1. Switch to design mode. Figure 3.1D). 2. Set the Wizard button on at the top of the toolbox. 10. Try it out in user mode. Everything should look 3. Select the Combo box tool and draw the Include right by now. box as shown at the top right of the figure. • The Format tab has other interesting fields. You may for instance adjust the List Width for the drop The Wizard appears. It works much the same way as down list. when you defined an enumeration-type field in the database (section 2.4): 11. Select the Data tab. Row Source holds the values in the list. You may edit them here. 4. The Wizard asks you whether you want to look up 12. Limit to List defines whether the user is allowed to the values from a table or type them in yourself. enter other values than those in the list. In this Select the latter and click Next. case, it should be set to Yes. 5. The Wizard asks you how many columns you • Bound Column defines which column to use for want. Choose two: one for the stored value and the stored value. one for the value the user should see. 6. Fill in the columns as shown, and click Next. 24 3. Access-based user interfaces
  • 25. Fig 3.1D Combo Box - enumeration type Wanted: Combo box Width of first column = 0 3. Access-based user interfaces 25
  • 26. 3.1.7 Combo box - table look up Try out the combo box in user mode. It should look all We will now make the Room type combo box shown right. on Figure 3.1E. This combo box might be another sorting criteria. The combo box is not an enumeration The bottom of Figure 3.1E shows the Data tab for the type where the designer has typed in the values, but a combo box: table look up. In the example it stores a roomType ID, but the user will see the name of the room type. • Row Source now contains a formula called an SQL-expression. It specifies how to compute the 1. Switch to design mode and make sure the Wizard list that the user will see. We will look at SQL- button is on. expressions in section 4.2. 2. Select the Combo box tool and draw the Room • Bound Column indicates the column that holds the Type box. value to be stored in the table. In our case it is col- 3. Tell the Wizard that you want the combo box to umn one, which holds roomType. look up the values in a table. Click Next. 4. Select tblRoomType as the source. Click Next. We won't use these combo boxes later in the booklet. 5. Tell the Wizard that you want to show these fields You may leave them on the form or delete them. as columns: roomType, description. Click Next. 6. Ask the Wizard to hide the key column. This means that the key will be stored, but the description shown to the user. Finish the Wizard. 26 3. Access-based user interfaces
  • 27. Fig 3.1E Combo Box - table lookup Wanted: Combo box 3. Access-based user interfaces 27
  • 28. 3.1.8 Control properties - text box • When Locked is Yes, the user cannot enter data Each control has a lot of properties that define its color, into the text box. font, and many other things. We will explain some of these properties below, using the text box as an exam- • When Enabled is Yes, the text box can have the ple. focus. Select a text box and look at its property box (Figure When Enabled is No, the user cannot enter any- 3.1F). If the property box isn't open, bring it up by thing in the box because the cursor doesn't stop double clicking on some control. There are more than there. In this case, Locked has an interesting influ- 60 properties for a text box. Here we will look at some ence on the box color. If Locked is No, the field is of them. gray. If it is Yes, the color follows the normal pat- tern determined by Back color and Fore color. Text box - properties on the Format tab • Format and decimal places specify the data type Text box - properties on the Other tab of the control, much the same way as you can • Name is the programmer's name for the text box. specify the data type for a database field. You can Visual Basic programs refer to the text box with select among a number of predefined formats, or this name. The designer can change the name. No- type your own format into the format field. The tice that the name is shown in the title bar too. formats are similar to the Visual Basic formats (see section 6.4 and the reference card). • Tab Index determines how the cursor moves through the controls when the user tabs through • Scroll Bars. A text box may be large and show a the form. Tab indexes run from 0 and up. When text consisting of many lines. This property speci- the form opens, the cursor is in the control with tab fies whether it should have scrollbars. index 0. The tab key moves the cursor though tab index 0, 1, 2, etc. • Left, Top, Width, Height specify the position and size of the control. You may set these properties • ControlTip is the pop-up text the user sees when instead of dragging with the mouse. the mouse rests on the text box. • Back color, fore color, font name, etc. specify Label control - properties on the Format tab colors, borders and other visible properties of the The text box has an associated label. The label has a control. programmer's name. In the example, Access has given the label the name Label7. • Text Align. You can align the text, e.g. left for a name, right for a number. • Caption is the label text the user sees. In this case Access generated the caption Text6: The designer Text box - properties on the Data tab can change it, of course. • Control Source specifies how the value is com- puted and where it is stored. For unbound controls Many of these properties exist also for other control as those on the FindGuest form, control source is types, for instance for the combo box. For the com- blank. We look at the other possibilities in section mand button, many of them work too. For some strange 3.3. reason, however, you cannot align the text on a com- mand button. It is always centered. In the hotel system • Input Mask specifies the text box format when we have made a fake left align by entering spaces after the box has the focus and the user types into it. the name. You have to enter the spaces directly on the The mask may for instance be used to enter dates button - you cannot do it in the Caption property. with predefined slashes and hyphens. The input mask follows different rules than the format To learn more about a property, click the property line property. (Not described in this booklet.) and click F1 for help. 28 3. Access-based user interfaces