Advantages ofGUI over CUI
The AWT class hierarchy- Component, Frame
User interface components:
Labels, button, scrollbars
Text components, check box, check box groups, choices
Lists panels – ScrollPane, MenuBar, graphics
Layout manager – layout manager types
boarder, grid, flow and card layouts.
Applications:
Developing calculator, Developing feedback
form,Developing biodata.
3.
Advantages of GUIover CUI
Presents a user-friendly mechanism for interacting with an
application.
Built from GUI components.
It need more resources
Speed is less compare to the CUI
In a Command Line Interface, the commands are entered from
the keyboard. It is not user-friendly.
Difficult to remember commands.
It need less resources
Speed is more compare to the GUI
4.
Most modern programsuse a GUI.
Graphical: Not just text or characters but windows, menus,
buttons, ..
User: Person using the program
Interface: Way to interact with the program
Graphical Elements include:
Window List
Choice Label
Menu Scrollbar
Button TextComponent etc.,
5.
AWT (AbstractWindowingToolkit)is an API to develop GUI
or window-based application in java.
AWT contains large number of classes and methods that
allows you to create and manage windows GUI application
AWT components are platform-dependent i.e. components
are displayed according to the view of operating system.
AWT is heavyweight i.e. its components uses the resources of
system.
The java.awt package provides classes for AWT api such as
TextField, Label,TextArea, RadioButton, CheckBox, Choice,
List etc.
6.
button menus titlebar menu bar combo box
scroll
bars
Internet Explorer Window with GUI components
AWT class hierarchy
MenuBar
Component
Container
WindowPanel
Frame
Label
Button
TextComponent
TextField
TextArea
Choice
CheckBox
CheckBoxGroup
Scrollbar
MenuComponent
List
MenuItem
Menu
Dialog
Canvas
ScrollPane
Applet
9.
Component: (java.awt)
Component classis at the top of AWT hierarchy.
Component is an abstract class that encapsulates all of
the attributes of a visual component.
It is a super class of all user interface classes.
A component is something that can be displayed on a
two-dimensional screen and with which the user can
interact.
Attributes of a component include a size, a location,
foreground and background colors, whether or not visible
etc.,
10.
Methods defined inclass Component are:
setLocation(int, int), getLocation() ---To set and get component
location
setSize(int, int), getSize() ---To set and get component
size
setVisible() ---To show or hide the
component
setForeground(Color), getForeground() ---To set and get
foreground colors
setBackground(Color), getBackground() ---To set and get
background colors
11.
Container
The Containeris a component inAWT that can contain
another components like buttons, textfields, labels etc.
The classes that extends Container class are known as
container such as Frame, Dialog and Panel.
This is a type of component that can nest other
components within it.
Ex:- Window, Frame, and panel are examples of
containers.
Container is a subclass of component
class. Conatiner class keeps track of components that
are added to another component.
12.
Methods defined ina class Container are:
setLayout(LayoutManager) ---To set layout
manager for display.
add( Component ) ---To add component to
the display.
remove( Component ) ---To remove
component from display.
13.
Frames
Frame isa window that is not contained inside another window.
Frame is the basis to contain other user interface components in Java
graphical applications.
Frame’s constructors:
Frame( )
Frame(String title)
After a frame window has been created, it will not be visible until you call
setVisible( true).
14.
Frame Location
Bydefault, a frame is displayed at the upper- left corner
of the screen.
To display a frame at a specified location, use
setLocation(x,y) method.
Method-II
import java.awt.*;
public classMyFrame extends Frame
{
MyFrame()
{
super(“title of Frame”);
Label l=new Label(“userId”);
add(l);
setSize(300,200);
setVisible(true);
}
}
class ExFrame
{
public static void main( String args[] )
{
new MyFrame();
}
}
17.
Panel: (java.awt)
ThePanel class is a concrete subclass of Container class.
A panel is a window that does not contain a title bar, or border.
It provides space in which an application can attach any other component,
including other panels.
It is the superclass for Applet.
Other components can be added to a Panel object by its add() method.
The default layout manager for a panel is the FlowLayout layout manager.
18.
Panel
This class createspanels,which are containers used to organize
and control the layout of other components such as labels, buttons,
text fields, and so on.
A Panel looks like a window that does not contain a title bar, menu
bar, or border.
It is recommended that you place the user interface components in
panels and place the panels in a frame.
You can also place panels in a panel.
FlowLayout is the default layout for panel.
Panel()
Panel(LayoutManager layout)
19.
import java.awt.*;
public classEx013Panel extends Frame
{
public Ex013Panel()
{
super("Panel test");
setLayout(null);
Panel pan1 = new Panel();
pan1.setSize(200,100);
pan1.setBackground(Color.red);
pan1.setLocation(50,50);
add( pan1 );
Button button1 = new Button(“ok");
Button button2 = new Button(“cancel");
pan1.add( button1 );
pan1.add( button2 );
......................
Panel
20.
Window: (java.awt)
The windowis the container that have no borders and menu bars.
The Window class creates a top-level window.
A top-level window is not contained within any other object; it sits
directly on the desktop.
Generally, we won’t create Window objects directly. Instead, we use
a subclass of Window called Frame.
21.
Frame: (java.awt)
Itis a type of Window with a title bar, menu bar , borders, and
resizing corners. It can have other components like button, textfield
etc.
Methods defined in a Frame class are:
setTitle(String), getTitle() ---To set or get title
setMenuBar(MenuBar) ---To set menu bar for
window
Frame is a sub class of Window and have resizing canvas. It is a container
that contain several different components like button, title bar, textfield,
label etc. In Java, most of theAWT applications are created
using Framewindow. Frame class has two different constructors,
Frame() throws HeadlessException
Frame(String title) throws HeadlessException
22.
Layout Manager:
Amanager is used to position and place components in a
Container
23.
USER INTERFACE COMPONENTS
To simplify user interaction and make data entry easier, you
can use java controls.
Controls are components, such as
buttons
labels
text boxes, etc
that can be added to containers like
frames,
panels and
applets.
25.
AWT Packages
AWT ishuge! It consists of 12 packages, only 2 packages –
java.awt and
java.awt.event - are commonly-used.
The java.awt package contains the core AWT graphics classes:
GUI Component classes (such as Button, TextField, and Label),
GUI Container classes (such
as Frame, Panel, Dialog and ScrollPane),
Layout managers (such
as FlowLayout, BorderLayout and GridLayout),
Custom graphics classes (such as Graphics, Color and Font).
26.
Controls in Java
ControlsFunctions
Textbox Accepts single line alphanumeric entry.
TextArea
Accepts multiple line alphanumeric
entry.
Push button Triggers a sequence of actions.
Label Displays Text.
Check box
Accepts data that has a yes/no value.
More than one checkbox can be
selected.
Radio button
Similar to check box except that it allows
the user to select a single option from a
group.
Combo box
Displays a drop-down list for single item
selection. It allows new value to be
entered.
Similar to combo box except that it
27.
Classes Involved
Controls Class
TextboxTextField
TextArea TextArea
Push button Button
Check box CheckBox
Radio button CheckboxGroup with CheckBox
Combo box Choice
List box List
28.
AWT GUI Component:java.awt.Button
A java.awt.Button is a GUI component that triggers a
certain programmed action upon clicking.
To create a button use, one of the following constructors:
Button() creates a button with no text label.
Button(String) creates a button with the given string as
label.
Constructors
public Button(String buttonLabel); // Construct a Button
with the given label
public Button(); // Construct a Button with empty label
29.
Now let ustartwith the simplest UI Component the Button
import java.awt.*;
class First extends Frame{
First(){
Button b=new Button("click me");
b.setBounds(30,100,80,30);// setting button position
add(b);//adding button into frame
setSize(300,300);//frame size 300 width and 300 height
setLayout(null);//no layout manager
setVisible(true);//now frame will be visible, by default not visible
}
public static void main(String args[]){
First f=new First();
}}
31.
The setBounds(intxaxis, int yaxis, int width, int height)
method is used in the above example that sets the position of
the awt button.
We can use the setLabel( ) method to change the label of the
button and the getLabel( ) method to retrieve the caption
32.
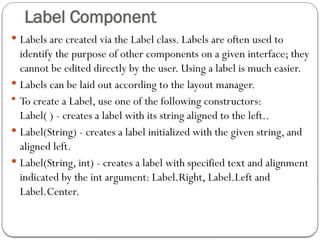
Label Component
Labelsare created via the Label class. Labels are often used to
identify the purpose of other components on a given interface; they
cannot be edited directly by the user. Using a label is much easier.
Labels can be laid out according to the layout manager.
To create a Label, use one of the following constructors:
Label( ) - creates a label with its string aligned to the left..
Label(String) - creates a label initialized with the given string, and
aligned left.
Label(String, int) - creates a label with specified text and alignment
indicated by the int argument: Label.Right, Label.Left and
Label.Center.
33.
Label
Label()
Label( String text)
setText(String text)
getText()
We can use label’s getText( ) method to indicate the
current label’s text and setText( ) method to change
the label’s text
Labels are passive controls that do not support
any interaction with the user.
User-Interface Components
34.
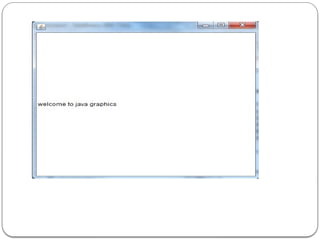
import java.awt.*;
public classTestawt{
Testawt()
{
Frame fm=new Frame(); //Creating a frame.
Label lb = new Label("welcome to java graphics"); //Creating a
label
fm.add(lb); //adding label to the frame.
fm.setSize(300, 300); //setting frame size.
fm.setVisible(true); //set frame visibilty true.
}
public static void main(String args[]) {
Testawt ta = newTestawt();
} }
36.
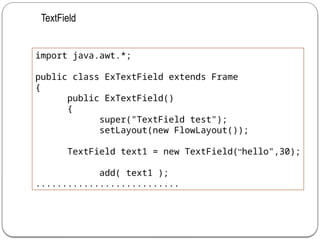
Text Components
Toaccept textual data from a user,AWT provided two
classes, TextField andTextArea.
TheTextField handles a single line of text and does not have
scrollbars, whereas theTextArea class handles multiple lines
of text. Both the classes are derived from theTextComponent
class
37.
To createa text field, use one of the following constructors:
TextField() creates an emptyTextField with no specified width.
TextField(int) creates an empty text field with enough width to
display the specified number of characters (this has been
depreciated in Java2).
TextField(String) creates a text field initialized with the given
string.
TextField(String, int) creates a text field with specified text and
specified width.
38.
Methods of TextField-
setText(String)–
getText() –
setEchoChar(char) – The text Field allows you to specify
an echo character that helps you accept a password without
displaying what the user has keyed in.
Example:
TextField tf = newTextField(30);
tf.setEchoCharacter('*');
setEditable(bolean) –
39.
import java.awt.*;
public classExTextField extends Frame
{
public ExTextField()
{
super("TextField test");
setLayout(new FlowLayout());
TextField text1 = new TextField(“hello",30);
add( text1 );
...........................
TextField
40.
TextArea
TheTextArea isan editable text field that can handle more than one
line of input.Text areas have horizontal and vertical scrollbars to
scroll through the text.Adding a text area to a container is similar to
adding a text field.
To create a text area use one of the following constructors:
TextArea() creates an empty text area with unspecified width and
height.
TextArea(int, int) creates an empty text area with indicated number
of lines and specified width in characters.
TextArea(String) creates a text area initialized with the given string.
TextField(String, int, int) creates a text area containing the indicated
text and specified number of lines and width in the characters.
41.
import java.awt.*;
public classExTextArea extends Frame
{
public ExTextArea()
{
super("TextArea test");
setLayout(new FlowLayout());
TextArea text1 = new TextArea(5,30);
add( text1 );
..........................
TextArea
import java.awt.*;
public classExCheckbox extends Frame
{
public ExCheckbox()
{
super("Checkbox test");
setLayout(new FlowLayout());
Checkbox check1 = new Checkbox(“java");
Checkbox check2 = new Checkbox(“dbms");
Checkbox check3 = new Checkbox(“se");
add( check1 );
add( check2 );
add( check3 );
setSize(300,200);
setVisible(true);
}
.............................
Checkbox
44.
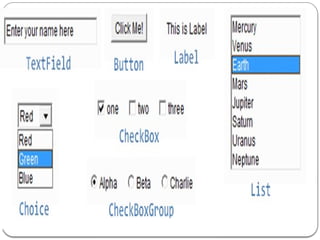
Checkbox Groups, Choices,and Lists
Three types of interface components are used to select one
item from a set of possibilities.
First is a group of connected check boxes with the property that
only one can be selected at a time.( also called radio buttons ).
Second is choice. A choice displays only one selection, but when
the user clicks in the selection area, a pop-up menu appears that
allows the choice to be changed to a different selection.
A third is a List. A List is similar to a choice, but several items out of
the range can be displayed at a time and we can select multiple
items.
Use checkbox Group when the number of alternatives is
small.
CheckboxGroup/Radio Buttons
import java.awt.*;
publicclass ExRadioButton extends Frame
{
public ExRadioButton()
{
super("Radio Button test");
setLayout(new FlowLayout());
CheckboxGroup cbg = new
CheckboxGroup();
Checkbox check1 = new Checkbox(“java",cbg,true);
Checkbox check2 = new Checkbox(“dbms",cbg,false);
Checkbox check3 = new Checkbox(“se",cbg,false);
add( check1 );
add( check2 );
add( check3 );
.....................
47.
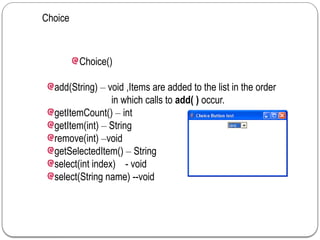
Choice
Choice()
add(String) – void,Items are added to the list in the order
in which calls to add( ) occur.
getItemCount() – int
getItem(int) – String
remove(int) –void
getSelectedItem() – String
select(int index) - void
select(String name) --void
48.
import java.awt.*;
public classExChoice extends Frame
{
public ExChoice()
{
super("Choice Button test");
setLayout(new FlowLayout());
Choice choice1 = new Choice();
choice1.add(“java");
choice1.add(“dbms");
choice1.add(“se");
add( choice1 );
setSize(300,200);
setVisible(true);
....................
Choice
49.
List
List()
List(int rows)
List(int rows,boolean multipleMode)
add(String) – adds item to the end of the list
add(String,int index) – adds item at index
getItemCount() –
getItem(int) –
remove(int) –
getSelectedItem() –
getSelectedItems()
50.
import java.awt.*;
public classExList extends Frame
{
public ExList()
{
super("List test");
setLayout(new FlowLayout());
List List1 = new List(3,false);
List1.add(“java");
List1.add(“dbms");
List1.add(“se");
List1.add(“ppl");
List1.add(“co");
add( List1 );
...................
List
51.
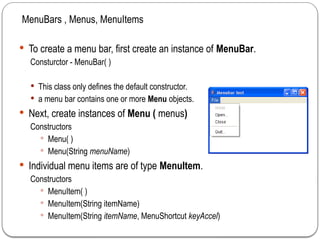
To createa menu bar, first create an instance of MenuBar.
Consturctor - MenuBar( )
This class only defines the default constructor.
a menu bar contains one or more Menu objects.
Next, create instances of Menu ( menus)
Constructors
Menu( )
Menu(String menuName)
Individual menu items are of type MenuItem.
Constructors
MenuItem( )
MenuItem(String itemName)
MenuItem(String itemName, MenuShortcut keyAccel)
MenuBars , Menus, MenuItems
52.
Contd..
You candisable or enable a menu item by using the setEnabled( )
method of menuItem.
You can determine an item’s status by calling isEnabled( ) method of
menuItem.
You can change the name of a menu item by calling setLabel( )
method of menuItem.
53.
import java.awt.*;
public classExMenubar extends Frame
{
public Exmenubar()
{
super(“Menubar test");
MenuBar mbar = new MenuBar();
setMenuBar(mbar);
Menu file = new Menu("File");
MenuItem item1, item2, item3, item4, item5;
file.add(item1 = new MenuItem("New..."));
file.add(item2 = new MenuItem("Open..."));
file.add(item3 = new MenuItem("Close"));
file.add(item4 = new MenuItem("-"));
file.add(item5 = new MenuItem("Quit..."));
mbar.add(file);
..........................
54.
Scrollbar
Scroll bars areused to select continuous values between a specified
minimum and maximum.
The maximum and minimum values can be specified .
The line increment can be specified( the amount scroll bar will move
when it is touched in the line ends).
The page increment can be specified ( the amount scroll bar will move
when it is touched in the background area between the thumb and the
end).
55.
Scrollbar()
Scrollbar(intstyle)
Scrollbar(int style,int initialValue, int thumbSize, int min, int max)
Constants
Scrollbar.VERTICAL
Scrollbar.HORIZONTAL
getValue()
Scrollbar(Scrollbar.HORIZONTAL,0, 60, 0, 300);
getValue()
setValue(int newValue);
Minimum : default 0.
Maximum : default 100
Default line increment is 1 unit
Default page increment is 10 unit.
56.
import java.awt.*;
public classExScrollbar extends Frame
{
public ExScrollbar()
{
super("Scrollbar test");
setLayout(new FlowLayout());
Scrollbar scroll1 = new Scrollbar(Scrollbar.HORIZON
Scrollbar scroll2 =
new Scrollbar(Scrollbar.HORIZONTAL,100, 60, 0, 30
add( scroll1 );
add( scroll2 );
...........................
Scrollbar
57.
ScrollPane
It is similarto a panel.
It can hold only one Component.
If size of the component held is larger than the size of the
ScrollPane, scroll bars will be automatically generated.
It does not have a LayoutManager
ScrollPane()
58.
import java.awt.*;
public classExScrollPane extends Frame
{
public Ex014ScrollPane()
{
super("ScrollPan test");
setLayout(null);
ScrollPane sPane1 = new
ScrollPane();
sPane1.setSize(200,100);
sPane1.setBackground(Color.red);
sPane1.setLocation(50,50);
Panel pan1 = new Panel();
TextArea text1 = new
TextArea(300,500);
pan1.add( text1 );
sPane1.add( pan1 );
add( sPane1 );
......................
ScrollPane
59.
Layout
Layout meansthe arrangement of components within
the container. In other way we can say that placing the
components at a particular position within the
container.
Layout Manager:
The layout manager automatically positions all the
components within the container.
Java provide us with various layout manager to
position the controls.
60.
The propertieslike size,shape and arrangement varies
from one layout manager to other layout manager.
The layout manager is associated with every Container
object.
Every container has a default Layout Manager:
Panel FlowLayout
Window (Frame) BorderLayout
To set layout manager:
myContainer.setLayout( new
LayoutManger() );
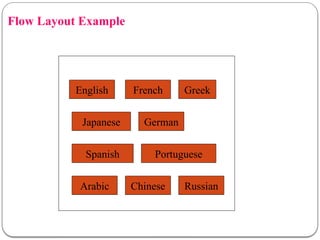
Flow Layout
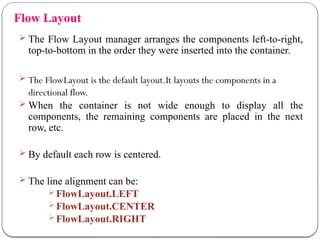
TheFlow Layout manager arranges the components left-to-right,
top-to-bottom in the order they were inserted into the container.
The FlowLayout is the default layout.It layouts the components in a
directional flow.
When the container is not wide enough to display all the
components, the remaining components are placed in the next
row, etc.
By default each row is centered.
The line alignment can be:
FlowLayout.LEFT
FlowLayout.CENTER
FlowLayout.RIGHT
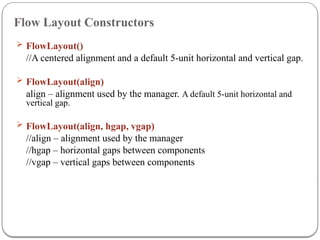
Flow Layout Constructors
FlowLayout()
//A centered alignment and a default 5-unit horizontal and vertical gap.
FlowLayout(align)
align – alignment used by the manager. A default 5-unit horizontal and
vertical gap.
FlowLayout(align, hgap, vgap)
//align – alignment used by the manager
//hgap – horizontal gaps between components
//vgap – vertical gaps between components
65.
import java.awt.*;
public classMyFrame
{
public static void main( String args[] )
{
Button b1=new Button("1");
Button b2=new Button("2");
Button b3=new Button("3");
Button b4=new Button("4");
Button b5=new Button("5");
Frame f = new Frame("MyFrame");
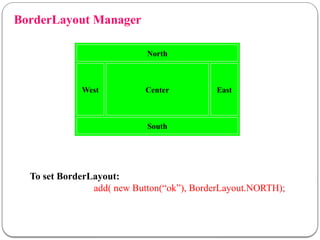
The BorderLayoutis used to arrange the components in five regions:
north, south, east, west and center. Each region (area) may contain
one component only. It is the default layout of frame or window.The
BorderLayout provides five constants for each region:
public static final int NORTH
public static final int SOUTH
public static final int EAST
public static final intWEST
public static final int CENTER
BorderLayout
68.
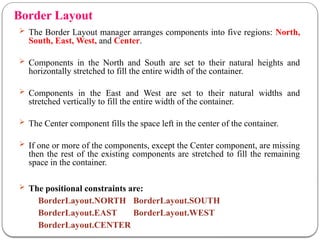
Border Layout
TheBorder Layout manager arranges components into five regions: North,
South, East, West, and Center.
Components in the North and South are set to their natural heights and
horizontally stretched to fill the entire width of the container.
Components in the East and West are set to their natural widths and
stretched vertically to fill the entire width of the container.
The Center component fills the space left in the center of the container.
If one or more of the components, except the Center component, are missing
then the rest of the existing components are stretched to fill the remaining
space in the container.
The positional constraints are:
BorderLayout.NORTH BorderLayout.SOUTH
BorderLayout.EAST BorderLayout.WEST
BorderLayout.CENTER
69.
Components inthe North and South are set to their natural
heights and horizontally stretched to fill the entire width of the
container.
Components in the East andWest are set to their natural widths
and stretched vertically to fill the entire height of the container.
The Center component fills the space left in the center of the
container.
If one or more of the components, except the Center
component, are missing then the rest of the existing
components are stretched to fill the remaining space in
the container.
GridLayout
The GridLayoutis used to arrange the components in
rectangular grid. One component is displayed in each
rectangle.
75.
Grid Layout
Containeris divided into a grid where components are placed in
rows and columns.
Every component has the same width and height.
Example
76.
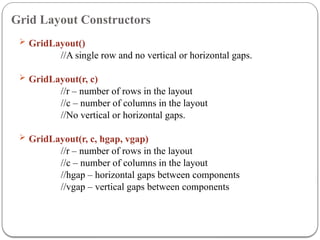
Grid Layout Constructors
GridLayout()
//A single row and no vertical or horizontal gaps.
GridLayout(r, c)
//r – number of rows in the layout
//c – number of columns in the layout
//No vertical or horizontal gaps.
GridLayout(r, c, hgap, vgap)
//r – number of rows in the layout
//c – number of columns in the layout
//hgap – horizontal gaps between components
//vgap – vertical gaps between components
CARD LAYOUT CLASS
The CardLayout class manages the components in such a
manner that only one component is visible at a time. It treats
each component as a card that is why it is known as
CardLayout.
• You can see only one card at a time.
• By default, the first card is visible.
• We can put any card on top using the methods
next(), previous(), first(), last(), and show().
80.
Constructors of CardLayoutclass:
CardLayout(): creates a card layout with zero horizontal
and vertical gap.
CardLayout(int hgap, int vgap): creates a card layout
with the given horizontal and vertical gap.
81.
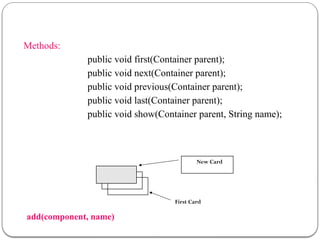
Methods:
public void first(Containerparent);
public void next(Container parent);
public void previous(Container parent);
public void last(Container parent);
public void show(Container parent, String name);
First Card
add(component, name)
New Card


![Frame Method-1
import java.awt.*;
public class MyFrame
{
public static void main( String args[] )
{
Label l=new Label(“userId”);
Button b1=new Button(“ok”);
Textfield t1=newTextField();
Frame f = new Frame(“MyFrame");
f.add(l);
f.add(b1);
f.add(t1);
f.setSize(300,200);
f.setVisible(true);
}
}](https://image.slidesharecdn.com/awt-250714170203-d9104740/85/AbstractWindowToolkit33333333333333-pptx-15-320.jpg)
![Method-II
import java.awt.*;
public class MyFrame extends Frame
{
MyFrame()
{
super(“title of Frame”);
Label l=new Label(“userId”);
add(l);
setSize(300,200);
setVisible(true);
}
}
class ExFrame
{
public static void main( String args[] )
{
new MyFrame();
}
}](https://image.slidesharecdn.com/awt-250714170203-d9104740/85/AbstractWindowToolkit33333333333333-pptx-16-320.jpg)


![Now let ustart with the simplest UI Component the Button
import java.awt.*;
class First extends Frame{
First(){
Button b=new Button("click me");
b.setBounds(30,100,80,30);// setting button position
add(b);//adding button into frame
setSize(300,300);//frame size 300 width and 300 height
setLayout(null);//no layout manager
setVisible(true);//now frame will be visible, by default not visible
}
public static void main(String args[]){
First f=new First();
}}](https://image.slidesharecdn.com/awt-250714170203-d9104740/85/AbstractWindowToolkit33333333333333-pptx-29-320.jpg)


![import java.awt.*;
public classTestawt {
Testawt()
{
Frame fm=new Frame(); //Creating a frame.
Label lb = new Label("welcome to java graphics"); //Creating a
label
fm.add(lb); //adding label to the frame.
fm.setSize(300, 300); //setting frame size.
fm.setVisible(true); //set frame visibilty true.
}
public static void main(String args[]) {
Testawt ta = newTestawt();
} }](https://image.slidesharecdn.com/awt-250714170203-d9104740/85/AbstractWindowToolkit33333333333333-pptx-34-320.jpg)


![import java.awt.*;
public class MyFrame
{
public static void main( String args[] )
{
Button b1=new Button("1");
Button b2=new Button("2");
Button b3=new Button("3");
Button b4=new Button("4");
Button b5=new Button("5");
Frame f = new Frame("MyFrame");](https://image.slidesharecdn.com/awt-250714170203-d9104740/85/AbstractWindowToolkit33333333333333-pptx-65-320.jpg)


![f.add(b4,BorderLayout.WEST);
f.add(b5,BorderLayout.CENTER);
f.setSize(300,300);
f.setVisible(true);
}
public static void main(String args[])
{
new BorderLayout();
}
}](https://image.slidesharecdn.com/awt-250714170203-d9104740/85/AbstractWindowToolkit33333333333333-pptx-73-320.jpg)

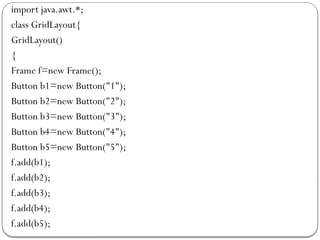
![f.setLayout(GridLayout(3,3));
f.setSize(300,300);
f.setVisible(true);
}
public static void main(String args[])
{
new GridLayout();
}
}](https://image.slidesharecdn.com/awt-250714170203-d9104740/85/AbstractWindowToolkit33333333333333-pptx-78-320.jpg)