SlideShare a Scribd company logo
2003 ENGINE
Engine Mechanical - 3.0L (L81) - Saturn L Series
SPECIFICATIONS
FASTENER TIGHTENING SPECIFICATIONS
Fastener Tightening Specifications
Application
Specification
Metric English
A/C Compressor Bolts 20 N.m 15 lb ft
A/C Compressor Bracket Bolt 40 N.m 30 lb ft
A/C Compressor and Power Steering Pump Bracket Bolts 40 N.m 30 lb ft
Air Box Mount Bolt 6 N.m 53 lb in
Battery Terminal Bolts 17 N.m 13 lb in
Belt Tensioner Bolts 40 N.m 30 lb ft
Brake Vacuum Line 20 N.m 15 lb ft
Camshaft Bearing Cap Bolt 8 N.m 71 lb in
Camshaft Cover Bolts 8 N.m 71 lb ft
Camshaft Sprocket Bolt
 First Pass 50 N.m 37 lb ft
 Second Pass 60 degrees
 Final Pass 15 degrees
Connecting Rod Cap Bolts
 First Pass 35 N.m 26 lb ft
 Second Pass 45 degrees
 Final Pass 15 degrees
Coolant Bridge Bolt 30 N.m 22 lb ft
Coolant Extension Housing Bolt 20 N.m 15 lb ft
Coolant Intake Housing Bolts 20 N.m 15 lb ft
Coolant Pipe/Engine Lift Bracket Bolt 20 N.m 15 lb ft
Crankshaft Balancer Bolt 20 N.m 15 lb ft
Crankshaft Bearing Bridge Adjusting Sleeves 8 N.m 71 lb in
Crankshaft Bearing Bridge Bolts 20 N.m 15 lb ft
Crankshaft Bearing Cap
 First Pass 50 N.m 37 lb ft
 Second Pass 60 degrees
 Final Pass 15 degrees
2003 Saturn L200
2003 ENGINE Engine Mechanical - 3.0L (L81) - Saturn L Series
2003 Saturn L200
2003 ENGINE Engine Mechanical - 3.0L (L81) - Saturn L Series
steve
Monday, May 09, 2011 12:20:05 PM Page 1 © 2006 Mitchell Repair Information Company, LLC.
steve
Monday, May 09, 2011 12:20:25 PM Page 1 © 2006 Mitchell Repair Information Company, LLC.
Crankshaft Drive Gear Bolt
 First Pass 250 N.m 184 lb ft
 Second Pass 45 degrees
 Final Pass 15 degrees
Crankshaft Position Sensor Bolt 8 N.m 71 lb in
Crankshaft Reluctor Ring Screw 15 N.m 11 lb ft
Cylinder Head Bolt
 First Pass 25 N.m 18 lb ft
 Second Pass 90 degrees
 Third Pass 90 degrees
 Fourth Pass 90 degrees
 Final Pass 15 degrees
EGR Manifold Bolt 8 N.m 71 lb in
EGR Pipe Bolts 25 N.m 18 lb ft
Engine Control Module Bolts 8 N.m 71 lb in
Engine Lift Bracket Bolts 8 N.m 71 lb in
Engine Mount Bracket Bolt 55 N.m 41 lb ft
Engine Mount-to-Bracket Bolt 55 N.m 41 lb ft
Engine Mount-to-Frame Bolt 55 N.m 41 lb ft
Engine Oil Cooler Cover Bolt 30 N.m 22 lb ft
Engine Oil Cooler Inlet and Outlet Nut 20 N.m 15 lb ft
Engine Ventilation Chamber Bolts 8 N.m 71 lb in
Exhaust Manifold Nut 20 N.m 15 lb ft
Exhaust Manifold Pipe-to-Exhaust Manifold Nuts 30 N.m 25 lb ft
Flex Plate Bolt
 First Pass 65 N.m 48 lb ft
 Second Pass 30 degrees
 Final Pass 15 degrees
Front Timing Belt Cover Bolt 8 N.m 71 lb in
Fuel Rail Bolts 8 N.m 71 lb in
Generator Mounting Bolts 40 N.m 30 lb ft
Idler Pulley Bolt 40 N.m 30 lb ft
Idler Pulley Fastener 40 N.m 30 lb ft
Ignition Module Bolt 8 N.m 71 lb in
Intake Manifold Bolt 20 N.m 15 lb ft
Intake Manifold Runner Bolts 8 N.m 71 lb in
Intake Manifold Runner Bracket Bolt 20 N.m 15 lb ft
Intake Manifold Spacer Plate Bolt 20 N.m 15 lb ft
2003 Saturn L200
2003 ENGINE Engine Mechanical - 3.0L (L81) - Saturn L Series
steve
Monday, May 09, 2011 12:20:05 PM Page 2 © 2006 Mitchell Repair Information Company, LLC.
ENGINE MECHANICAL SPECIFICATIONS
Engine Block Specifications
Intake Plenum Bolts 8 N.m 71 lb in
Lower Engine-to-Transaxle Bell Housing Bolts 65 N.m 48 lb ft
Nose Cone Bracket-to-Oil Pan Bolts - Transaxle Nose
Bracket Bolts
40 N.m 30 lb ft
Oil Cooler Feed and Return Lines to Engine Block 30 N.m 22 lb ft
Oil Drain Plug 10 N.m 89 lb in
Oil Filter Cap 15 N.m 11 lb ft
Oil Filter Cartridge Housing-to-Engine 45 N.m 33 lb ft
Oil Level Indicator Tube Bolt 20 N.m 15 lb ft
Oil Pan Baffle Bolt 8 N.m 71 lb in
Oil Pan Bolts 15 N.m 11 lb ft
Oil Pickup Tube bolts 8 N.m 71 lb in
Oil Pump Bolts 27 N.m 20 lb ft
Oxygen Sensors - Exhaust Manifold 50 N.m 37 lb ft
Power Steering Pump Bolts 20 N.m 15 lb ft
Power Steering Pump Pulley Bolt 20 N.m 15 lb ft
Rear Timing Belt Cover Bolt 8 N.m 71 lb ft
Rear Timing Belt Cover Threaded Pin 10 N.m 89 lb in
Spark Plug 25 N.m 18 lb ft
Thermostat Housing Bolts 20 N.m 15 lb ft
Throttle Body Nut 8 N.m 71 lb in
Timing Belt Tensioner Bracket Bolt 40 N.m 30 lb ft
Timing Belt Tensioner Fastening Nut 20 N.m 15 lb ft
Torque Converter Bolts 65 N.m 48 lb ft
Transaxle Mount Through Bolt 55 N.m 41 lb ft
Transaxle-to-Oil Pan Bolts 65 N.m 48 lb ft
Upper Bell Housing Bolts 65 N.m 48 lb ft
Upper Pulley Bolt 40 N.m 30 lb ft
Ventilation Housing Bolts 8 N.m 71 lb in
Water Pump Bolt 25 N.m 18 lb ft
Water Pump Pulley Bolt 8 N.m 71 lb in
Wheel Bolts 125 N.m 92 lb ft
Application
Service Limit
Metric English
Cylinder Bore - Select Fit Designation Stamped on Block
 (8) 85.975-85.985 mm 3.3848-3.3852 in
 (99) 85.985-85.995 mm 3.3852-3.3856 in
2003 Saturn L200
2003 ENGINE Engine Mechanical - 3.0L (L81) - Saturn L Series
steve
Monday, May 09, 2011 12:20:05 PM Page 3 © 2006 Mitchell Repair Information Company, LLC.
 (00) 85.995-86.005 mm 3.3856-3.3860 in
 (01) 86.005-86.015 mm 3.3860-3.3864 in
 (02) 86.015-86.025 mm 3.3864-3.3868 in
 (7 + 0.5) Oversize 86.465-86.475 mm 3.4041-3.4045 in
 Maximum Out-of-Round 0.065 mm 0.0003 in
 Taper 0.0065 mm 0.0003 in
Piston - Select Fit Designation Stamped on Top of Piston
 (8) 85.940-85.950 mm 3.3834-3.3838 in
 (99) 85.950-85.960 mm 3.3838-3.3842 in
 (00) 85.960-85.970 mm 3.3842-3.3846 in
 (01) 85.970-85.980 mm 3.3846-3.3850 in
 (02) 85.980-85.990 mm 3.3850-3.3854 in
 (7 + 0.5) Oversize 86.430-86.440 mm 3.4027-3.4031 in
 Piston Bore Clearance 0.025-0.045 mm 0.0010-0.0018 in
 Piston Pin Diameter 21 mm 0.8267 in
 Clearance in Piston 0.003-0.008 mm 0.0001-0.0003 in
Piston Ring - Compression
 Thickness 1.5 mm 0.0590 in
 Ring Groove Clearance 0.02-0.04 mm 0.0008-0.0015 in
 Ring Gap 0.30-0.50 mm 0.0118-0.0196 in
Piston Ring - Oil
 Thickness 3.0 mm 0.1181 in
 Ring Groove Clearance 0.01-0.03 mm 0.0004-0.0012 in
 Ring Gap 0.40-1.40 mm 0.0157-0.0551 in
Piston Pin
 Diameter 21 mm 0.8267 in
 Clearance in Piston 0.001-0.015 mm 0.0001-0.0003 in
Crankshaft - Main Journal
 Standard Size - Green 67.980-67.988 mm 2.6763-2.6766 in
 Standard Size - Brown 67.988-67.996 mm 2.6766-2.6770 in
 Undersize - 0.25 - Green/Blue 67.730-67.738 mm 2.6656-2.6668 in
 Undersize - 0.25 - Brown/Blue 67.738-67.746 mm 2.668-2.6671 in
 Undersize - 0.50 - Green/White 67.480-67.488 mm 2.666-2.6570 in
 Undersize - 0.50 - Brown/Blue 67.488-67.496 mm 2.6570-2.6573 in
2003 Saturn L200
2003 ENGINE Engine Mechanical - 3.0L (L81) - Saturn L Series
steve
Monday, May 09, 2011 12:20:05 PM Page 4 © 2006 Mitchell Repair Information Company, LLC.
Cylinder Head Specifications
 Main Journal Maximum Out-of-Round 0.03 mm 0.0012 in
 Crankshaft Bearing Clearance 0.014-0.043 mm 0.0006-0.0017 in
 Crankshaft End Play 0.010-0.76 mm 0.0004-0.0300 in
 Connecting Rod Journal Diameter 48.971-48.990 mm 1.927-1.928 in
 Undersize - 0.25 48.721-48.740 mm 1.918-1.919 in
 Undersize - 0.50 48.471-48.490 mm 1.908-1.909 in
Connecting Rod
 Side Clearance 0.07-0.28 mm 0.0027-0.0110 in
 Bearing Clearance 0.013-0.061 mm 0.0005-0.0024 in
 Big End Diameter 52.000-52.012 mm 2.0472-2.0477 mm
Measurement
Standard Service Limit
Metric English Metric English
Compression (Hot)
250 RPM (Open
Throttle) 1310 kPa 190 psi min 1,241 kPa 180 psi min
Cylinder Leakage (Hot)
689 kPa (100 psi)
Input 69 kPa 10% max 10 psi max 138 kPa 15% max 20 psi max
Cylinder Head
Total Height 134.0 mm 5.276 in 133.9-134.1 mm 5.272-5.280 in
Maximum Distortion
(Length)
- -
0.05/100 mm 0.0020/3.937 in
Valve
Lifter - - - -
Face Angle - - - 45 degrees
Seat Angle - - - 45 degrees
Seat Width - - - -
Intake 1.0-1.4 mm 0.0394-0.0551 in - -
Exhaust 1.4-1.8 mm 0.0551-0.0709 in - -
Valve Length - Production
Intake 102.1 mm 4.016 in - -
Exhaust 92.25 mm 3.632 in - -
Valve Length - Service
Intake 101.7 mm 4.0039 in - -
Exhaust 91.8 mm 3.6141 in - -
Valve Stem Diameter
Standard (K) Intake 5.955-5.970 mm 0.2344-0.2350 in - -
2003 Saturn L200
2003 ENGINE Engine Mechanical - 3.0L (L81) - Saturn L Series
steve
Monday, May 09, 2011 12:20:05 PM Page 5 © 2006 Mitchell Repair Information Company, LLC.
SEALERS, ADHESIVES, AND LUBRICANTS
Sealers, Adhesives, and Lubricants
Standard (K)
Exhaust
5.945-5.960 mm 0.2341-0.2346 in - -
Oversize (K 1-0.075)
Intake 6.030 mm 0.2374 in
- -
Oversize (K 1-0.075)
Exhaust 6.020 mm 0.2370 in
- -
Valve Guide Diameter
Standard (K) 6.000-6.012 mm 0.2362-0.2367 in - -
Oversize (K 1-0.075) 6.075-6.090 mm 0.2392-0.2398 in - -
Valve Guide
Installed Height
13.7-14.0 mm 0.5394-0.5512 in - -
Stem Clearance
Intake 0.030-0.057 mm 0.0012-0.0022 in - -
Exhaust 0.040-0.067 mm 0.0016-0.0026 in - -
Valve Height
Intake 39.2 mm 1.543 in - -
Exhaust 39.2 mm 1.543 in - -
Intake and Exhaust
Compressed at 252 N
(56.6 lbs) 34 mm 1.338 in
- -
Camshaft
Exhaust Cam Lobe
Lift Rise 8.66-8.74 mm 0.3409-0.344 in 8.61 mm 0.339 in min
Lifter Body
Diameter
32.959-32.975 mm 1.2976-1.282 in 32.947 mm 1.297 in min
Lifter Body
Clearance
0.025-0.066 mm 0.0010-0.0026 in 0.083 mm 0.003 in max
Journal Diameter 27.939-27.960 mm 1.099-1.101 in - -
Bearing Clearance 0.040-0.082 mm 0.0015-0.0020 in - -
End Play 0.04-0.144 mm 0.0016-0.0057 in - -
Spark Plug
Type
Bosch FLR-LTE, GM
P/N 90541059
-
Gap 0.9-1.1 mm 0.035-0.043 in - -
Torque - - 25 N.m 19 lb ft
Oil Pressure - Minimum
Engine Idle - at
Normal Operating
Temperature
- -
110 kPa 16 psi
2003 Saturn L200
2003 ENGINE Engine Mechanical - 3.0L (L81) - Saturn L Series
steve
Monday, May 09, 2011 12:20:05 PM Page 6 © 2006 Mitchell Repair Information Company, LLC.
COMPONENT LOCATOR
DISASSEMBLED VIEWS
Application Type of Material
GM Part Number
United States Canada
Camshaft Bearing
Engine Assembly
Lubricant
1052367 992869
Camshaft Cover Sealant 12346286 10953472
Camshaft Front Bearing Cap Sealant 1052942 10953466
Camshaft Lobes
Engine Assembly
Lubricant
1052367 992869
Connecting Rod Bearings
Engine Assembly
Lubricant
1052367 992869
Coolant Jacket Plugs Sealant 12346004 10953480
Crankcase Vent Housing Sealant 1052942 10953466
Crankshaft Bearing Bridge Adjusting Sleeves Thread Adhesive 12345493 10953488
Crankshaft Main Bearings
Engine Assembly
Lubricant
1052367 992869
Crankshaft Fourth Main Bearing Cap Sealant 12346286 10953472
Flywheel Bolts Thread Adhesive 12345493 10953488
Intake Manifold Flange Bolts Thread Adhesive 12345382 10953489
Oil Cooler Cover Sealant 12378521 88901148
Oil Cooler Cover Bolts Thread Adhesive 12345382 10953489
Oil Level Indicator Tube Bolt Thread Adhesive 12345493 10953488
Oil Pan Sealant 1052942 10953466
Oil Pan Bolts Thread Adhesive 21485278 10953480
Oil Pump Bolts Thread Adhesive 21485278 10953480
Oil Pump Pickup Brace Bolts Thread Adhesive 12345382 10953489
Thermostat Housing Bolts Sealant 12346004 10953480
Timing Belt Rear Cover Bolt Thread Adhesive 12345382 10953489
Water Pump Pulley Bolts Thread Adhesive 12345382 10953489
Water Pump Seal Silicone 12345579 1974984
Valve Lifter
Engine Assembly
Lubricant
1052367 992869
2003 Saturn L200
2003 ENGINE Engine Mechanical - 3.0L (L81) - Saturn L Series
steve
Monday, May 09, 2011 12:20:05 PM Page 7 © 2006 Mitchell Repair Information Company, LLC.
Fig. 1: Front of Engine Disassembled View
Courtesy of GENERAL MOTORS CORP.
Callouts For Fig. 1
Callout Component Name
1 Timing Belt Front Cover Bolt
2 Timing Belt Front Cover Seal
3 Timing Belt
4 Timing Belt Tensioner Bracket Bolt
5 Timing Belt Tensioner Bracket, Includes 1-2 Idler Pulley and Tensioner
6 Water Pump
7 Timing Belt Rear Cover
8 Camshaft Sprocket Bolt
9 Camshaft Sprocket Washer
10 Camshaft Sprocket
11 3-4 Timing Belt Idler
12 3-4 Timing Belt Idler Bolt
13 Oil Pump Collar
2003 Saturn L200
2003 ENGINE Engine Mechanical - 3.0L (L81) - Saturn L Series
steve
Monday, May 09, 2011 12:20:05 PM Page 8 © 2006 Mitchell Repair Information Company, LLC.
14 Timing Belt Rear Cover Bolt
15 Water Pump Bolt
16 Crankshaft Pulley
17 Crankshaft Pulley Bolt
18 Crankshaft Balancer
19 Crankshaft Balancer Bolt
20 Timing Belt Front Cover
21 Water Pump Pulley
22 Water Pump Pulley Bolts
2003 Saturn L200
2003 ENGINE Engine Mechanical - 3.0L (L81) - Saturn L Series
steve
Monday, May 09, 2011 12:20:05 PM Page 9 © 2006 Mitchell Repair Information Company, LLC.
2003 Saturn L200
2003 ENGINE Engine Mechanical - 3.0L (L81) - Saturn L Series
steve
Monday, May 09, 2011 12:20:05 PM Page 10 © 2006 Mitchell Repair Information Company, LLC.
Fig. 2: Crankshaft/Pistons Disassembled View
Courtesy of GENERAL MOTORS CORP.
Callouts For Fig. 2
Callout Component Name
1 Piston Pin Retaining Clip
2 Piston Pin
3 Upper Compression Ring
4 Lower Compression Ring
5 Oil Control Rings
6 Connecting Rod
7 Connecting Rod Bearing
8 Connecting Rod Cap
9 Connecting Rod Bolt
10 Crankshaft Sensor
11 Flywheel Bolt
12 Flywheel
13 Crankshaft Sensor Reluctor Ring Bolt
14 Crankshaft Sensor Reluctor Ring
15 Crankshaft Lower Main Bearings
16 Crankshaft Main Bearing Cap Bolt
17 Crankshaft Main Bearing Caps
18 Crankshaft Bearing Bridge
19 Crankshaft Bearing Bridge Bolt
20 Crankshaft Bearing Bridge Adjusting Sleeve
21 Crankshaft
22 Crankshaft Upper Main Bearings
23 Left Knock Sensor
2003 Saturn L200
2003 ENGINE Engine Mechanical - 3.0L (L81) - Saturn L Series
steve
Monday, May 09, 2011 12:20:05 PM Page 11 © 2006 Mitchell Repair Information Company, LLC.
Fig. 3: Manifold and Related Disassembled View
2003 Saturn L200
2003 ENGINE Engine Mechanical - 3.0L (L81) - Saturn L Series
steve
Monday, May 09, 2011 12:20:05 PM Page 12 © 2006 Mitchell Repair Information Company, LLC.
Courtesy of GENERAL MOTORS CORP.
Callouts For Fig. 3
Callout Component Name
1 Fuel Injection Rail
2 Fuel Injection Fuel Feed and Return Bolt
3 Fuel Injector Fuel Feed and Return
4 Intake Plenum Bolt Cap
5 PCV Vent Tube Adapter Bolt
6 PCV Vent Tube Adapter
7 Intake Manifold Tuning Valve
8 Intake Manifold Tuning Valve Actuator
9 Intake Manifold Tuning Valve Bolt
10 Intake Manifold Tuning Valve Solenoid Valve Hose
11 Intake Manifold Tuning Valve O-ring
12 Intake Manifold Plenum Bolt
13 PCV Vent Tube Adapter O-ring
14 Idle Air Valve
15 Intake Plenum
16 Intake Manifold
17 Intake Manifold Gasket
18 Intake Manifold Flange
19 Intake Manifold Flange Gasket
20 Intake Manifold Flange Bolt
21 Intake Manifold Bolt
22 Intake Plenum O-ring
23 Throttle Body Bolt
24 Throttle Body
25 Throttle Body O-ring
26 Ignition Coil Cassette
27 Left Exhaust Manifold
2003 Saturn L200
2003 ENGINE Engine Mechanical - 3.0L (L81) - Saturn L Series
steve
Monday, May 09, 2011 12:20:05 PM Page 13 © 2006 Mitchell Repair Information Company, LLC.
Fig. 4: Cylinder Head and Components Disassembled View
Courtesy of GENERAL MOTORS CORP.
Callouts For Fig. 4
Callout Component Name
1 Camshaft Bearing Cap
2 Camshaft Bearing Cap Bolt
3 Exhaust Camshaft
4 Intake Camshaft
2003 Saturn L200
2003 ENGINE Engine Mechanical - 3.0L (L81) - Saturn L Series
steve
Monday, May 09, 2011 12:20:05 PM Page 14 © 2006 Mitchell Repair Information Company, LLC.
5 Camshaft Cover Bolt
6 Camshaft Cover
7 Oil Fill Tube
8 Oil Fill Cap O-ring
9 Oil Fill Cap
10 Camshaft Cover Gasket
11 Camshaft Cover O-ring
12 Left Cylinder Head
13 Left Cylinder Head Gasket
14 Valve
15 Valve Spring Seat
16 Valve Seal
17 Valve Spring
18 Valve Spring Cap
19 Valve Spring Retaining Keys
20 Valve Lifter
21 Right Cylinder Head Gasket
22 Camshaft Seal
23 Right Cylinder Head
24 Cylinder Head Bolt
2003 Saturn L200
2003 ENGINE Engine Mechanical - 3.0L (L81) - Saturn L Series
steve
Monday, May 09, 2011 12:20:05 PM Page 15 © 2006 Mitchell Repair Information Company, LLC.
Fig. 5: Oil Pan and Delivery Components Disassembled View
Courtesy of GENERAL MOTORS CORP.
Callouts For Fig. 5
Callout Component Name
1 Oil Cooler Inlet/Outlet Nuts
2 Oil Cooler Pipe Seals
3 Oil Cooler Line Banjo Fittings
4 Oil Cooler Inlet Pipe
5 Oil Cooler Outlet Pipe
6 Oil Filter Adapter
7 Oil Filter Bypass Valve
8 Oil Filter Bypass Check Ball
2003 Saturn L200
2003 ENGINE Engine Mechanical - 3.0L (L81) - Saturn L Series
steve
Monday, May 09, 2011 12:20:05 PM Page 16 © 2006 Mitchell Repair Information Company, LLC.
ENGINE IDENTIFICATION
9 Oil Filter Bypass Spring
10 Oil Pan Baffle
11 Oil Pan
12 Oil Pump Gasket
13 Oil Pump Pipe Plug
14 Oil Intake Pipe O-ring
15 Oil Intake Pipe
16 Oil Intake Pipe Bolt
17 Oil Pump Inlet Screen
18 Oil Intake Pipe Bolt
19 Oil Pump Collar
20 Oil Pump
21 Oil Pressure Relief Valve
22 Oil Pressure Relief Valve Spring
23 Oil Pressure Relief Valve Seal
24 Oil Pressure Relief Valve Plug
25 Oil Pressure Regulator Valve Spring
26 Oil Pressure Regulator Valve
27 Oil Pressure Regulator Valve Seal
28 Oil Pressure Regulator Valve Plug
29 Oil Cooler
30 Oil Cooler Inlet/Outlet Seals
31 Oil Cooler Cover
32 Oil Cooler Cover Bolt
2003 Saturn L200
2003 ENGINE Engine Mechanical - 3.0L (L81) - Saturn L Series
steve
Monday, May 09, 2011 12:20:05 PM Page 17 © 2006 Mitchell Repair Information Company, LLC.
Fig. 6: Locating Engine Identification Markings
Courtesy of GENERAL MOTORS CORP.
The Vehicle Identification Number (VIN) Derivative (2) is located on the lower right side of the engine block
and is a nine digit number stamped or laser etched onto the engine at the vehicle assembly plant. If reading the
identification number from the left, the following information can be obtained:
 The first digit identifies the vehicle division.
 The second digit identifies the model year.
 The third digit identifies the assembly plant.
 The fourth through ninth digits are the last six digits of the Vehicle Identification Number (VIN).
2003 Saturn L200
2003 ENGINE Engine Mechanical - 3.0L (L81) - Saturn L Series
steve
Monday, May 09, 2011 12:20:05 PM Page 18 © 2006 Mitchell Repair Information Company, LLC.
Engine displacement (1) is cast into the engine block under the starter motor.
DIAGNOSTIC INFORMATION AND PROCEDURES
DIAGNOSTIC STARTING POINT - ENGINE MECHANICAL
Begin the system diagnosis by reviewing the Disassembled Views, Engine Component Description,
Lubrication Description and the Drive Belt System Description. Reviewing the description and operation
information will help you determine the correct symptom diagnostic procedure when a malfunction exists.
Reviewing the description and operation information will also help you determine if the condition described by
the customer is normal operation. Refer to Symptoms - Engine Mechanical in order to identify the correct
procedure for diagnosing the system and where the procedure is located.
SYMPTOMS - ENGINE MECHANICAL
Strategy Based Diagnostics
1. Perform a Diagnostic Starting Point - Engine Mechanical before using the symptom tables, if
applicable.
2. Review the system operations in order to familiarize yourself with the system functions. Refer to
Disassembled Views, Engine Component Description, Lubrication Description and the Drive Belt
System Description.
All diagnosis on a vehicle should follow a logical process. Strategy based diagnostics is a uniform approach for
repairing all systems. The diagnostic flow may always be used in order to resolve a system problem. The
diagnostic flow is the place to start when repairs are necessary. For a detailed explanation, refer to Strategy
Based Diagnosis in General Information.
Visual/Physical Inspection
 Inspect for aftermarket devices which could affect the operation of the Engine. Refer to Checking
Aftermarket Accessories in Wiring Systems.
 Inspect the easily accessible or visible system components for obvious damage or conditions which could
cause the symptom.
 Check for the correct oil level, proper oil viscosity, and correct filter application.
 Verify the exact operating conditions under which the concern exists. Note factors such as engine RPM,
ambient temperature, engine temperature, amount of engine warm-up time, and other specifics.
 Compare the engine sounds - if applicable to a known good engine and make sure you are not trying to
correct a normal condition.
Intermittent
Test the vehicle under the same conditions that the customer reported in order to verify the system is operating
properly.
Symptom List
2003 Saturn L200
2003 ENGINE Engine Mechanical - 3.0L (L81) - Saturn L Series
steve
Monday, May 09, 2011 12:20:05 PM Page 19 © 2006 Mitchell Repair Information Company, LLC.
Refer to a symptom diagnostic procedure from the following list in order to diagnose the symptom:
 Base Engine Misfire without Internal Engine Noises
 Base Engine Misfire with Abnormal Internal Lower Engine Noises
 Base Engine Misfire with Abnormal Valve Train Noise
 Base Engine Misfire with Coolant Consumption
 Base Engine Misfire with Excessive Oil Consumption
 Engine Noise on Start-Up, but Only Lasting a Few Seconds
 Upper Engine Noise, Regardless of Engine Speed
 Lower Engine Noise, Regardless of Engine Speed
 Engine Noise Under Load
 Engine Will Not Crank - Crankshaft Will Not Rotate
 Engine Compression Test
 Oil Consumption Diagnosis
 Oil Pressure Diagnosis and Testing
 Oil Leak Diagnosis
BASE ENGINE MISFIRE WITHOUT INTERNAL ENGINE NOISES
Base Engine Misfire without Internal Engine Noises
Cause Correction
Abnormalities - severe cracking, bumps, or missing
areas in the accessory drive belt
Abnormalities in the accessory drive system and/or
components may cause engine RPM variations and
lead to a misfire DTC. A misfire code may be
present without an actual misfire condition.
Replace the drive belt. Refer to Drive Belt
Replacement.
Worn, damaged, or mis-aligned accessory drive
components or excessive pulley runout and may
lead to a misfire DTC.
A misfire code may be present without an actual
misfire condition.
Inspect the components, repair or replace as
required.
Improperly installed or damaged vacuum hoses Repair or replace as required.
Improperly installed or damaged MAP sensor
and/or seal
The sealing grommet of the MAP sensor should not
be torn or damaged
Repair or replace the MAP sensor as required.
Improperly installed or damaged EVAP purge
solenoid and/or O-ring seal
Repair or replace the EVAP purge solenoid as
required.
Restricted exhaust system
A severe restriction in the exhaust flow can cause
significant loss of engine performance and may set a
DTC. Possible causes of restrictions include
Repair or replace as required.
2003 Saturn L200
2003 ENGINE Engine Mechanical - 3.0L (L81) - Saturn L Series
steve
Monday, May 09, 2011 12:20:06 PM Page 20 © 2006 Mitchell Repair Information Company, LLC.
collapsed or dented pipes or plugged mufflers
and/or catalytic converters.
Excessively worn or mis-aligned timing belt Replace the timing belt and sprockets as required.
Worn camshaft lobes Replace the camshaft or camshafts and SHLAs,
valve lifters.
Excessive oil pressure
A lubrication system with excessive oil pressure
may lead to excessive valve lifter pump-up and loss
of compression.
 Perform an oil pressure test. Refer to Oil
Pressure Diagnosis and Testing.
 Repair or replace the oil pump as required.
Stuck valves
Carbon buildup on the valve stem can cause the
valve not to close properly.
Repair or replace as required.
Improper sealing between the intake manifold and
cylinder heads, intake manifold and plenum duct,
plenum duct and water crossover, water crossover
and throttle body and/or pressure relief valve and
intake manifold.
Replace the intake manifold, plenum duct, gaskets,
cylinder heads, throttle body and/or pressure relief
valve as required.
Faulty cylinder head gaskets and/or cracking or
other damage to the cylinder heads and engine block
cooling system passages. Refer to Diagnostic
Starting Point - Engine Cooling in Engine
Cooling.
Coolant consumption may or may not cause the
engine to overheat.
 Inspect for spark plugs saturated by coolant.
Refer to SPARK PLUGS in Service &
Adjustment Specifications in Engine
Performance.
 Inspect the cylinder heads, engine block,
and/or head gaskets.
 Repair or replace as required.
Loose or improperly installed engine flywheel or
crankshaft balancer
A misfire code may be present without an actual
misfire condition.
Repair or replace the flywheel and/or balancer as
required. Refer to Engine Flywheel Replacement or
Crankshaft Balancer Replacement.
Worn Piston Rings
Oil consumption may or may not cause the engine
to misfire.
 Inspect the spark plugs for oil deposits. Refer
to SPARK PLUGS in Service & Adjustment
Specifications in Engine Performance.
 Inspect the cylinders for a loss of
compression. Refer to Engine Compression
Test.
 Perform cylinder leak down and compression
testing to identify the cause.
 Repair or replace as required.
A damaged crankshaft reluctor wheel
A damaged crankshaft reluctor wheel can result in
different symptoms depending on the severity and
location of the damage.
 Systems with SEVERE reluctor ring damage
may exhibit periodic loss of crankshaft
Replace the crankshaft as required.
2003 Saturn L200
2003 ENGINE Engine Mechanical - 3.0L (L81) - Saturn L Series
steve
Monday, May 09, 2011 12:20:06 PM Page 21 © 2006 Mitchell Repair Information Company, LLC.
BASE ENGINE MISFIRE WITH ABNORMAL INTERNAL LOWER ENGINE NOISES
Base Engine Misfire with Abnormal Internal Lower Engine Noises
BASE ENGINE MISFIRE WITH ABNORMAL VALVE TRAIN NOISE
Base Engine Misfire with Abnormal Valve Train Noise
position, stop delivering a signal, and then re-
sync the crankshaft position.
 Systems with SLIGHT reluctor ring damage
may exhibit no loss of crankshaft position and
no misfire may occur. However, a P0300
DTC may be set.
Cause Correction
Abnormalities - severe cracking, bumps or missing
areas- in the accessory drive belt
Abnormalities in the accessory drive system and/or
components may cause engine RPM variations,
noises similar to a faulty lower engine and also lead
to a misfire condition. A misfire code may be
present without an actual misfire condition.
Replace the drive belt. Refer to Drive Belt
Replacement.
Worn, damaged, or mis-aligned accessory drive
components or excessive pulley runout
A misfire code may be present without an actual
misfire condition.
Inspect the components, repair or replace as
required.
Loose or improperly installed engine flywheel or
crankshaft balancer
A misfire code may be present without an actual
misfire condition.
Repair or replace the engine flywheel and/or
crankshaft balancer as required. Refer to Engine
Flywheel Replacement or Crankshaft Balancer
Replacement.
Worn or Broken Piston Rings
Oil consumption may or may not cause the engine
to misfire.
 Inspect the spark plugs for oil deposits. Refer
to SPARK PLUGS in Service & Adjustment
Specifications in Engine Performance.
 Inspect the cylinders for a loss of
compression. Refer to Engine Compression
Test.
 Perform cylinder leak down and compression
testing to determine the cause.
 Repair or replace as required.
Worn Crankshaft Thrust Bearings
Severely worn thrust surfaces on the crankshaft
and/or thrust bearing may permit fore and aft
movement of the crankshaft and create a DTC
without an actual misfire condition.
Replace the crankshaft and bearings as required.
2003 Saturn L200
2003 ENGINE Engine Mechanical - 3.0L (L81) - Saturn L Series
steve
Monday, May 09, 2011 12:20:06 PM Page 22 © 2006 Mitchell Repair Information Company, LLC.
BASE ENGINE MISFIRE WITH COOLANT CONSUMPTION
Base Engine Misfire with Coolant Consumption
BASE ENGINE MISFIRE WITH EXCESSIVE OIL CONSUMPTION
Base Engine Misfire with Excessive Oil Consumption
ENGINE NOISE ON START-UP, BUT ONLY LASTING A FEW SECONDS
Cause Correction
Excessively worn or mis-aligned timing belt Replace the timing belt as required.
Worn camshaft lobes Replace the camshaft or camshafts and SHLAs -
valve lifters.
Sticking SHLAs - valve lifters Replace the SHLAs as required.
Stuck valves
Carbon buildup on the valve stem can cause the
valve not to close properly.
Repair or replace as required.
Cause Correction
Faulty cylinder head gaskets and/or cracking or
other damage to the cylinder heads and engine
block cooling system passages. Refer to Diagnostic
Starting Point - Engine Cooling in Engine
Cooling.
Coolant consumption may or may not cause the
engine to overheat.
 Inspect for spark plugs saturated by coolant.
Refer to SPARK PLUGS in Service &
Adjustment Specifications in Engine
Performance.
 Perform a cylinder leak down test.
 Inspect the cylinder heads and engine block
for damage to the coolant passages and/or a
faulty head gasket.
 Repair or replace as required.
Cause Correction
Worn valves, valve guides and/or valve stem oil
seals
 Inspect the spark plugs for oil deposits. Refer
to SPARK PLUGS in Service & Adjustment
Specifications in Engine Performance.
 Repair or replace as required.
Worn Piston Rings
Oil consumption may or may not cause the engine
to misfire.
 Inspect the spark plugs for oil deposits. Refer
to SPARK PLUGS in Service & Adjustment
Specifications in Engine Performance.
 Inspect the cylinders for a loss of
compression. Refer to Engine Compression
Test.
 Perform cylinder leak down and compression
testing to determine the cause.
 Repair or replace as required.
2003 Saturn L200
2003 ENGINE Engine Mechanical - 3.0L (L81) - Saturn L Series
steve
Monday, May 09, 2011 12:20:06 PM Page 23 © 2006 Mitchell Repair Information Company, LLC.
Engine Noise on Start-Up, but Only Lasting a Few Seconds
UPPER ENGINE NOISE, REGARDLESS OF ENGINE SPEED
Upper Engine Noise, Regardless of Engine Speed
Cause Correction
Incorrect oil filter without anti-drainback feature Install the correct oil filter.
Incorrect oil viscosity Drain the engine oil and replace with the correct
viscosity oil.
Damaged or faulty oil filter by-pass valve  Inspect the oil filter by-pass valve for proper
operation.
 Repair or replace as required.
High SHLA, valve lifter, leak down rate Replace the SHLA, valve lifters, as required.
Worn crankshaft thrust bearing  Inspect the thrust bearing and crankshaft.
 Repair or replace as required.
Cause Correction
Low oil pressure  Perform an oil pressure test. Refer to Oil
Pressure Diagnosis and Testing.
 Repair or replace as required.
Improper lubrication to the valve lifters Inspect the following components, and repair or
replace as required:
 The SHLA - valve lifter
 The oil filter bypass valve
 The oil pump and pump screen
 The cylinder head oil galleries
 The engine block oil galleries
Worn or dirty SHLAs, valve lifters Replace the SHLAs - valve lifters.
Stretched or broken timing belt and/or damaged
sprocket teeth
Replace the timing belt and sprockets.
Worn timing belt tensioner or tensioners Replace the timing belt tensioner or tensioners as
required.
Worn engine camshaft lobes  Inspect the engine camshaft lobes.
 Replace the camshaft or camshafts and
SHLAs, valve lifters, as required.
Worn valve guides or valve stems Inspect the following components, and repair as
required:
 The valves
 The valve guides
Stuck Valves Inspect the following components, and repair as
2003 Saturn L200
2003 ENGINE Engine Mechanical - 3.0L (L81) - Saturn L Series
steve
Monday, May 09, 2011 12:20:06 PM Page 24 © 2006 Mitchell Repair Information Company, LLC.
LOWER ENGINE NOISE, REGARDLESS OF ENGINE SPEED
Lower Engine Noise, Regardless of Engine Speed
Carbon on the valve stem or valve seat may cause
the valve to stay open
required:
 The valves
 The valve guides
Cause Correction
Worn accessory drive components
Abnormalities such as severe cracking, bumps or
missing areas in the accessory drive belt and/or
misalignment of system components.
 Inspect the accessory drive system.
 Repair or replace as required.
Detonation or spark knock Verify the correct operation of the ignition controls
system. Refer to DETONATION/SPARK
KNOCK in Troubleshooting - No Codes in Engine
Performance.
Low oil pressure  Perform an oil pressure test. Refer to Oil
Pressure Diagnosis and Testing.
 Repair or replace damaged components as
required.
Loose or damaged crankshaft balancer  Inspect the crankshaft balancer.
 Repair or replace as required.
Loose torque converter bolts  Inspect the torque converter bolts and engine
flywheel.
 Repair or replace as required.
Loose or damaged engine flywheel Repair or replace the engine flywheel.
Oil pump screen loose, damaged or restricted  Inspect the oil pump screen.
 Repair or replace as required.
Incorrect piston, piston pin and connecting rod
installation
Pistons must be installed with the mark or dimple
on the top of the piston facing the front of the
engine. Piston pins must be centered in the
connecting rod pin bore.
 Verify the pistons, piston pins and connecting
rods are installed correctly.
 Repair as required.
Excessive crankshaft bearing clearance Inspect the following components, and repair as
required:
 The crankshaft bearings
 The crankshaft journals
Excessive connecting rod bearing clearance Inspect the following components, and repair as
required:
2003 Saturn L200
2003 ENGINE Engine Mechanical - 3.0L (L81) - Saturn L Series
steve
Monday, May 09, 2011 12:20:06 PM Page 25 © 2006 Mitchell Repair Information Company, LLC.
ENGINE NOISE UNDER LOAD
Engine Noise Under Load
ENGINE WILL NOT CRANK - CRANKSHAFT WILL NOT ROTATE
 The connecting rod bearings
 The connecting rods
 The crankshaft
 The crankshaft journals
Excessive piston-to-cylinder bore clearance  Inspect the piston and cylinder bore.
 Repair as required.
Excessive piston pin-to-bore clearance  Inspect the piston, piston pin, and the
connecting rod.
 Repair or replace as required.
Cause Correction
Detonation or spark knock Verify the correct operation of the ignition controls.
Refer to DETONATION/SPARK KNOCK in
Troubleshooting - No Codes in Engine Performance.
Low oil pressure  Perform an oil pressure test. Refer to Oil
Pressure Diagnosis and Testing.
 Repair or replace as required.
Loose torque converter bolts  Inspect the torque converter bolts and engine
flywheel.
 Repair as required.
Cracked engine flywheel  Inspect the engine flywheel and bolts.
 Repair as required.
Excessive connecting rod bearing clearance Inspect the following components, and repair as
required:
 The connecting rod bearings
 The connecting rods
 The crankshaft
Excessive crankshaft bearing clearance Inspect the following components, and repair as
required:
 The crankshaft bearings
 The crankshaft journals
 The cylinder block crankshaft bearing bore
2003 Saturn L200
2003 ENGINE Engine Mechanical - 3.0L (L81) - Saturn L Series
steve
Monday, May 09, 2011 12:20:06 PM Page 26 © 2006 Mitchell Repair Information Company, LLC.
Engine Will Not Crank - Crankshaft Will Not Rotate
Cause Correction
Seized accessory drive system component 1. Remove accessory drive belt or drive belts.
2. Rotate crankshaft by hand at the crankshaft
balancer or engine flywheel location.
3. Repair or replace as required.
Hydraulically locked cylinder
 Coolant/Antifreeze in cylinder
 Oil in cylinder
 Fuel in cylinder
1. Remove spark plugs and check for fluid.
2. Inspect for broken head gasket or gaskets.
3. Inspect for cracked engine block or cylinder
head.
4. Inspect for a sticking fuel injector.
5. Repair or replace as required.
Seized or broken camshaft 1. Inspect camshaft or camshafts.
2. Inspect cylinder head camshaft journals for
damage.
3. Repair as required.
Seized or broken camshaft timing components 1. Inspect the following sprockets:
 Crankshaft sprocket
 Exhaust sprockets
 Intake sprockets
2. Inspect the timing belt.
3. Inspect the following tensioners:
 Timing belt idler pulley for camshaft
gears 1 and 2
 Timing belt idler pulley for camshaft
gears 3 and 4
 Timing belt tensioner
4. Repair as required.
Seized or broken valve train components 1. Inspect lifters.
2. Inspect valves.
3. Inspect cams.
4. Repair as required.
Seized automatic transmission torque converter 1. Remove the torque converter bolts.
2. Rotate crankshaft by hand at the crankshaft
balancer or engine flywheel location.
3. Repair or replace as required.
Seized manual transmission 1. Disengage the clutch.
2. Rotate crankshaft by hand at the crankshaft
2003 Saturn L200
2003 ENGINE Engine Mechanical - 3.0L (L81) - Saturn L Series
steve
Monday, May 09, 2011 12:20:06 PM Page 27 © 2006 Mitchell Repair Information Company, LLC.
COOLANT IN COMBUSTION CHAMBER
Coolant in Combustion Chamber
balancer or engine flywheel location.
3. Repair or replace as required.
Material in cylinder
 Broken valve
 Piston material
 Foreign material
1. Inspect cylinder for damaged components
and/or foreign materials.
2. Repair or replace as required.
Seized crankshaft or connecting rod bearings 1. Inspect crankshaft and connecting rod
bearings.
2. Repair as required.
Bent or broken connecting rod 1. Inspect connecting rods.
2. Repair as required.
Broken crankshaft 1. Inspect crankshaft.
2. Repair as required.
Cause Correction
DEFINITION: Excessive white smoke and/or coolant type odor coming from the exhaust pipe may
indicate coolant in the combustion chamber. Low coolant levels, an inoperative cooling fan, or a faulty
thermostat may lead to an "overtemperature" condition which may cause engine component damage.
1. A slower than normal cranking speed may indicate coolant entering the combustion chamber. Refer
to Engine Will Not Crank - Crankshaft Will Not Rotate.
2. Remove the spark plugs and inspect for spark plugs saturated by coolant or coolant in the cylinder
bore.
3. Inspect by performing a cylinder leak-down test. During this test, excessive air bubbles within the
coolant may indicate a faulty gasket or damaged component.
4. Inspect by performing a cylinder compression test. Two cylinders "side-by-side" on the engine
block, with low compression, may indicate a failed cylinder head gasket. Refer to Engine
Compression Test.
Cracked intake manifold or failed gasket Replace the components as required.
Faulty cylinder head gasket Replace the head gasket and components as
required. Refer to Cylinder Head Cleaning and
Inspection and Cylinder Head Replacement
(Front) or Cylinder Head Replacement (Rear).
Warped cylinder head Machine the cylinder head to the proper flatness, if
applicable and replace the cylinder head gasket.
Refer to Cylinder Head Cleaning and Inspection.
Cracked cylinder head Replace the cylinder head and gasket.
Cracked cylinder liner or engine block Replace the components as required.
2003 Saturn L200
2003 ENGINE Engine Mechanical - 3.0L (L81) - Saturn L Series
steve
Monday, May 09, 2011 12:20:06 PM Page 28 © 2006 Mitchell Repair Information Company, LLC.
COOLANT IN ENGINE OIL
Coolant in Engine Oil
ENGINE COMPRESSION TEST
Tools Required
SA9127E Gage Bar Set
If there is a lack of power, excessive oil consumption, or poor fuel economy, etc., measure the compression
pressure.
Cylinder head or engine block porosity Replace the components as required.
Cause Correction
DEFINITION: Foamy or discolored oil or an engine oil "overfill" condition may indicate coolant
entering the engine crankcase. Low coolant levels, an inoperative cooling fan, or a faulty thermostat may
lead to an "overtemperature" condition which may cause engine component damage. Contaminated
engine oil and oil filter should be changed.
1. Inspect the oil for excessive foaming or an overfill condition. Oil diluted by coolant may not
properly lubricate the crankshaft bearings and may lead to component damage. Refer to Lower
Engine Noise, Regardless of Engine Speed.
2. Inspect by performing a cylinder leak-down test. During this test, excessive air bubbles within the
cooling system may indicate a faulty gasket or damaged component.
3. Inspect by performing a cylinder compression test. Two cylinders "side-by-side" on the engine
block with low compression may indicate a failed cylinder head gasket. Refer to Engine
Compression Test.
Faulty external engine oil cooler Replace the components as required.
Faulty cylinder head gasket Replace the head gasket and components as
required. Refer to Cylinder Head Cleaning and
Inspection and Cylinder Head Replacement
(Front) or Cylinder Head Replacement (Rear).
Warped cylinder head Machine the cylinder head to proper flatness, if
applicable, and replace the cylinder head gasket.
Refer to Cylinder Head Cleaning and Inspection.
Cracked cylinder head Replace the cylinder head and gasket.
Cracked cylinder liner or engine block Replace the components as required.
Cylinder head, block, or manifold porosity Replace the components as required.
2003 Saturn L200
2003 ENGINE Engine Mechanical - 3.0L (L81) - Saturn L Series
steve
Monday, May 09, 2011 12:20:06 PM Page 29 © 2006 Mitchell Repair Information Company, LLC.
Fig. 7: Removing & Installing Ignition Control Modules
Courtesy of GENERAL MOTORS CORP.
1. Start the engine and allow it to reach normal operating temperature.
2. Shut the engine OFF and disconnect the ignition module wiring harness plugs.
3. Remove the ignition modules. Refer to ELECTRONIC IGNITION MODULE in Removal and
Installation in Engine Performance.
4. Remove all 6 spark plugs.
CAUTION: Compression checks must be performed with the vehicle in park or
neutral and the parking brake applied.
2003 Saturn L200
2003 ENGINE Engine Mechanical - 3.0L (L81) - Saturn L Series
steve
Monday, May 09, 2011 12:20:06 PM Page 30 © 2006 Mitchell Repair Information Company, LLC.
5. Insert the SA9127E into the spark plug hole.
6. Fully open the throttle.
7. While cranking the engine, measure the compression. The cylinder should puff or the compression gage
needle should bounce a minimum of 10 times.
8. Repeat the previous steps for each cylinder.
IMPORTANT: Always use a fully charged battery to obtain engine revolutions of a 250
RPM minimum. Do not crank the engine for more than 15 seconds.
IMPORTANT: All measurements must be completed in as short a time as possible.
Check low cylinders and make sure a minimum of 10 puffs are obtained
prior to reading the gage.
2003 Saturn L200
2003 ENGINE Engine Mechanical - 3.0L (L81) - Saturn L Series
steve
Monday, May 09, 2011 12:20:06 PM Page 31 © 2006 Mitchell Repair Information Company, LLC.
Fig. 8: 3.0L RPO Code L81 V6 Engine Assembly
Courtesy of GENERAL MOTORS CORP.
 Normal compression: Builds up quickly and evenly to specification in each cylinder.
 Low compression: Damaged piston, rings, valves, or head gasket.
IMPORTANT: No compression in 2 or more cylinders is an indication of damaged
timing chain sprockets, camshafts, and crankshaft key or pins.
IMPORTANT: The minimum compression in any one cylinder should not be less
than 70 percent of the highest cylinder. No cylinder should read less
than 690 kPa (100 psi).
2003 Saturn L200
2003 ENGINE Engine Mechanical - 3.0L (L81) - Saturn L Series
steve
Monday, May 09, 2011 12:20:06 PM Page 32 © 2006 Mitchell Repair Information Company, LLC.
 High compression: Carbon on pistons/combustion chamber.
Fig. 9: Adding Engine Oil To Cylinder Through Spark Plug Hole
Courtesy of GENERAL MOTORS CORP.
9. If the cylinder compression in one or more cylinders is low, pour a small amount (1 teaspoon) of engine
oil into the cylinder through the spark plug hole.
IMPORTANT: A cylinder leakage test can be performed to further determine the location
of the compression leakage if one or more cylinders are extremely low.
2003 Saturn L200
2003 ENGINE Engine Mechanical - 3.0L (L81) - Saturn L Series
steve
Monday, May 09, 2011 12:20:06 PM Page 33 © 2006 Mitchell Repair Information Company, LLC.
Fig. 10: Placing Shop Towel Over Spark Plug Holes
Courtesy of GENERAL MOTORS CORP.
10. Place a shop towel over the plug holes to capture any oil mist/spray.
11. Crank the engine over for a few seconds without the compression gage or spark plugs installed.
12. Repeat previous steps 4-7 and measure the compression.
2003 Saturn L200
2003 ENGINE Engine Mechanical - 3.0L (L81) - Saturn L Series
steve
Monday, May 09, 2011 12:20:06 PM Page 34 © 2006 Mitchell Repair Information Company, LLC.
Fig. 11: Checking Piston Rings & Piston Ring Land Wear
Courtesy of GENERAL MOTORS CORP.
13. If adding oil increases the compression readings the piston rings are leaking.
Compression is low on the first stroke (first gage puff) and tends to build up on following strokes, but
does not reach normal compression pressure. The compression Improves considerably with oil. Inspect
for worn or broken rings and piston ring land wear (pound out).
2003 Saturn L200
2003 ENGINE Engine Mechanical - 3.0L (L81) - Saturn L Series
steve
Monday, May 09, 2011 12:20:06 PM Page 35 © 2006 Mitchell Repair Information Company, LLC.
Fig. 12: Fixed Timing Chain Guide Access Plug
Courtesy of GENERAL MOTORS CORP.
14. If adding oil does not increase the compression:
 Valves or head gasket leaking: Compression is low on the first stroke. Compression does not tend
to build up on the following strokes. Compression does not improve with adding oil to the cylinder.
2003 Saturn L200
2003 ENGINE Engine Mechanical - 3.0L (L81) - Saturn L Series
steve
Monday, May 09, 2011 12:20:06 PM Page 36 © 2006 Mitchell Repair Information Company, LLC.
Fig. 13: Checking Head Gasket If Two Adjacent Cylinders Have Lower Than Normal
Compression
Courtesy of GENERAL MOTORS CORP.
 Head gasket: Two adjacent cylinders have lower than normal compression and adding oil to the
cylinder does not improve compression.
2003 Saturn L200
2003 ENGINE Engine Mechanical - 3.0L (L81) - Saturn L Series
steve
Monday, May 09, 2011 12:20:06 PM Page 37 © 2006 Mitchell Repair Information Company, LLC.
Fig. 14: Removing & Installing Ignition Control Modules
Courtesy of GENERAL MOTORS CORP.
15. Remove the compression tester and install the spark plugs.
Tighten: Tighten the spark plugs to 25 N.m (18 lb ft).
16. Install the ignition module.
Tighten: Tighten the ignition module bolt to 8 N.m (71 lb in).
NOTE: Refer to FASTENER NOTICE in Cautions and Notices.
2003 Saturn L200
2003 ENGINE Engine Mechanical - 3.0L (L81) - Saturn L Series
steve
Monday, May 09, 2011 12:20:06 PM Page 38 © 2006 Mitchell Repair Information Company, LLC.
17. Connect the ignition module electrical connection.
CYLINDER LEAKAGE TEST
Tools Required
SA9127E Gage Bar Set
If there is a lack of power, excessive oil consumption, or poor fuel economy, etc., cylinder leakage can be
measured.
Fig. 15: Removing & Installing Ignition Control Modules
Courtesy of GENERAL MOTORS CORP.
2003 Saturn L200
2003 ENGINE Engine Mechanical - 3.0L (L81) - Saturn L Series
steve
Monday, May 09, 2011 12:20:06 PM Page 39 © 2006 Mitchell Repair Information Company, LLC.
1. Start the engine and allow it to reach normal operating temperature.
2. Disconnect both ignition module connectors.
3. Remove the ignition modules and remove the plugs.
4. Rotate the crankshaft so each cylinder to be checked is at TDC. Timing marks are located on the front
cover and vibration damper assembly for TDC verification. Access to the front crankshaft damper bolt
can be achieved from the top of the vehicle with an open end wrench. A 3.175 mm (1/8 in) brass rod can
be inserted through the spark plug hole to determine piston location relative to TDC.
CAUTION: Cylinder leakage checks must be performed with the vehicle in park
or neutral and the parking brake applied.
IMPORTANT: The piston must be located at exactly top dead center (TDC) or the
crankshaft will rotate when air pressure is applied.
2003 Saturn L200
2003 ENGINE Engine Mechanical - 3.0L (L81) - Saturn L Series
steve
Monday, May 09, 2011 12:20:06 PM Page 40 © 2006 Mitchell Repair Information Company, LLC.
Fig. 16: Connecting Special Tools To Perform Cylinder Leakage Test
Courtesy of GENERAL MOTORS CORP.
5. Attach an air supply to the SA9127E . The desired regulator In minimum pressure is 861 kPa (125 psi).
The maximum is 1 034 kPa (150 psi).
6. Insert the cylinder leakage adapter in the spark plug hole with the piston at TDC.
NOTE: Air supply for the tester should be clean and free from oil, moisture, and/or
foreign particles that might be injected into the regulator or orifice
chamber. Foreign debris can cause improper operation and erroneous
readings.
2003 Saturn L200
2003 ENGINE Engine Mechanical - 3.0L (L81) - Saturn L Series
steve
Monday, May 09, 2011 12:20:06 PM Page 41 © 2006 Mitchell Repair Information Company, LLC.
7. Close the gate valve and adjust the regulator pressure to 689 kPa (100 psi).
8. Open the gate valve. Observe the crankshaft during this operation.
Fig. 17: Listening For Escaping Air At Throttle Body Air Inlet, Oil Fill Cap & Exhaust Outlet
Courtesy of GENERAL MOTORS CORP.
1. Allow 60 seconds for the air pressure in the cylinder to stabilize. Observe the cylinder pressure
gage and record the pressure.
IMPORTANT: If the crankshaft rotates, the piston was not at TDC. The crankshaft will
have to be relocated at TDC.
2003 Saturn L200
2003 ENGINE Engine Mechanical - 3.0L (L81) - Saturn L Series
steve
Monday, May 09, 2011 12:20:06 PM Page 42 © 2006 Mitchell Repair Information Company, LLC.
2. Listen for escaping air at the throttle body air inlet, oil fill cap, and exhaust outlet.
3. Remove the coolant bottle pressure cap and look for bubbles.
Fig. 18: Removing & Installing Ignition Control Modules
Courtesy of GENERAL MOTORS CORP.
9. Repeat the previous steps on other cylinders. Record the readings.
 Normal Cylinder Leakage: 10 percent - 69 kPa (10 psi)
IMPORTANT: Make sure all cylinder leakage adapter fittings are tight and the
piston is at TDC or incorrect readings will be obtained. Check the
lower cylinders.
2003 Saturn L200
2003 ENGINE Engine Mechanical - 3.0L (L81) - Saturn L Series
steve
Monday, May 09, 2011 12:20:06 PM Page 43 © 2006 Mitchell Repair Information Company, LLC.
 Maximum Leakage: 20 percent - 138 kPa (20 psi)
 Difference Between Cylinders: 5 percent - 34 kPa (5 psi)
10. Remove the cylinder leakage tester and install the spark plugs.
Tighten: Tighten the spark plugs to 25 N.m (18 lb ft).
11. Install the ignition modules.
Tighten: Tighten the ignition module bolt to 8 N.m (71 lb in).
12. Connect the ignition module harness plugs.
OIL CONSUMPTION DIAGNOSIS
Excessive oil consumption (not due to leaks) is the use of 0.95L (1 qt) or more of engine oil within 3200
kilometers (2,000 miles). The causes of excessive oil consumption include the following conditions:
 External oil leaks
Tighten bolts and/or replace gaskets and oil seals as necessary.
 Incorrect oil level or improper reading of oil level indicator
With the vehicle on a level surface, allow adequate drain down time and check for the correct oil level.
 Improper oil viscosity
Use recommended SAE viscosity for the prevailing temperatures.
 Continuous high speed driving and/or severe usage
 Crankcase ventilation system restrictions or malfunctioning components
 Valve guides and/or valve stem oil seals worn, or the seal omitted
Ream guides and install oversize service valves and/or new valve stem oil seals.
 Piston rings broken, improperly installed, worn, or not seated properly
Allow adequate time for rings to seat. Replace broken or worn rings as necessary.
 Piston improperly installed or misfitted
OIL PRESSURE DIAGNOSIS AND TESTING
NOTE: Refer to FASTENER NOTICE in Cautions and Notices.
2003 Saturn L200
2003 ENGINE Engine Mechanical - 3.0L (L81) - Saturn L Series
steve
Monday, May 09, 2011 12:20:06 PM Page 44 © 2006 Mitchell Repair Information Company, LLC.
 With the vehicle on a level surface, allow adequate drain down time (2-3 minutes) and measure for a low
oil level.
 Add the recommended grade engine oil and fill the crankcase until the oil level measures full on the oil
level indicator.
 Run the engine and verify low or no oil pressure on the vehicle gage or light.
 Listen for a noisy valve train or a knocking noise.
 Inspect for the following:
 Oil diluted by moisture or unburned fuel mixtures
 Improper oil viscosity for the expected temperature
 Incorrect or malfunctioning oil pressure sender
 Incorrect or malfunctioning oil pressure gage
 Plugged oil filter
 Malfunctioning oil bypass valve
 Remove the oil pressure sender or another engine block oil gallery plug.
 Install a oil pressure gage and measure the engine oil pressure.
 Compare the readings to specifications. Refer to Engine Mechanical Specifications.
 If the engine oil pressure is below specifications, inspect the engine for one or more of the following:
 Oil pump worn or dirty
Refer to Oil Pump Inspection.
 Oil pump-to-engine front cover bolts loose
Refer to Oil Pump Assemble.
 Oil pump screen loose, plugged, or damaged
 Oil pump screen O-ring seal missing or damaged
 Malfunctioning oil pump pressure regulator valve
 Excessive bearing clearance
Refer to Crankshaft and Bearings Cleaning and Inspection.
 Cracked, porous or restricted oil galleries
 Oil gallery plugs missing or incorrectly installed
 Broken lash adjusters
CRANKCASE VENTILATION SYSTEM INSPECTION/DIAGNOSIS
Tools Required
SA9127E Gage Bar Set
2003 Saturn L200
2003 ENGINE Engine Mechanical - 3.0L (L81) - Saturn L Series
steve
Monday, May 09, 2011 12:20:06 PM Page 45 © 2006 Mitchell Repair Information Company, LLC.
High crankcase pressure indicates an excessive amount of air passing between the rings and cylinder walls into
the crankcase. A loss of engine lubricating oil into the air intake tube/filter housing or out the dipstick hole is
indicative of excessive crankcase pressure. High negative pressure or vacuum can be caused by a plugged air
filter element or restricted air intake.
Test method:
1. Remove the dipstick and connect a 0-15 kPa gage (0-16 in H2O) manometer or magnahelix in the
SA9127E Gage Bar Set to the dipstick tube.
2. Operate the engine until it reaches normal operating temperature and observe the crankcase pressure with
engine at 4,000 RPM.
3. The crankcase pressure should not exceed:
Crankcase Pressure (New Engine)
 Positive: 1 kPa (4 in) H2O Max.
 Negative: 3 kPa (12 in) H2O Max.
Crankcase Pressure (Used Engine)
 Positive: 2.5 kPa (10 in) H2O Max.
 Negative: 3.5 kPa (14 in) H2O Max.
4. If the crankcase pressure exceeds specifications, ensure the PCV system is functioning properly.
Positive Crank Case Ventilation (PCV) System
Always Perform a Visual Check of the PCV System:
 Properly mounted PCV valve, firmly seated in the grommet on rocker arm cover
 PCV Hose, grommet, fresh air hose, and clamps in place, no damage to PCV hose, rocker arm cover
grommet, fresh air hose. Ensure the clamps are on tight.
Crankcase Ventilation System Inspection/Diagnosis
CAUTION: The crankcase pressure check must be performed with the vehicle in park
or neutral and the parking brake applied.
IMPORTANT: It may be necessary to complete a compression and cylinder leakage
check for evaluation of piston rings and cylinder walls when there is high,
positive crankcase pressure. Low, negative crankcase pressure indicates
a possible restricted air intake system.
CONDITION POSSIBLE CAUSE CORRECTION
Rough Idle, Stalling or Slow Idle 1. Repair or replace hoses as
2003 Saturn L200
2003 ENGINE Engine Mechanical - 3.0L (L81) - Saturn L Series
steve
Monday, May 09, 2011 12:20:06 PM Page 46 © 2006 Mitchell Repair Information Company, LLC.
Functional Check
If engine is idling rough, check for a clogged PCV valve or hose. Check the PCV valve identification number to
be sure the correct valve is installed. Replace as required.
Use the following procedure to determine if the PCV valve is functioning properly:
1. Remove PCV valve from cam cover grommet.
2. Run engine at idle.
3. Place your thumb over end of PCV valve to check for strong vacuum signal. If there is no vacuum
present, check for clogged hose, plugged valve or plugged intake manifold port. Replace any clogged
components or clean out plugged port.
4. Turn off engine and remove PCV valve from hose. Shake valve and listen for the plugger to rattle inside
the valve. If valve does not rattle, replace valve.
Other Crankcase Ventilation System Faults
If there is evidence of engine oil in the throttle body or air cleaner and all the PCV components appear and
function properly it may indicate excessive crankcase pressure.
OIL LEAK DIAGNOSIS
Tool Required
J 39400 Leak Detector
Most oil leaks are easily located by visual inspection and repaired by replacing and/or repairing the necessary
parts.
Use the following steps in order to find the leak:
1. Identify the fluid. Determine whether it is engine oil, automatic transmission fluid, or power steering
fluid.
2. From what point is the fluid leaking? After running the vehicle at normal operating temperature, park the
vehicle over a large sheet of paper. After a few minutes, you should be able to find the approximate
location of the leak by the drippings on the paper.
3. Visually check around the suspected component. Check around the gasket mating surfaces for leaks. A
mirror is useful for finding leaks in hard-to-reach areas.
4. If the leak still cannot be found, it may be necessary to clean the suspected area with a degreaser, steam or
Speed, Oil Leaks, Oil in Throttle
Body/Plenum, or Sludge in
Engine.
1. Clogged hose. necessary.
2. Clogged PCV valve. 2. Replace PCV valve.
Rough Idle, Stalling, or
High Idle Speed.
1. Leaking hose. 1. Replace hose.
2. Leaking PCV valve. 2. Replace PCV valve.
2003 Saturn L200
2003 ENGINE Engine Mechanical - 3.0L (L81) - Saturn L Series
steve
Monday, May 09, 2011 12:20:06 PM Page 47 © 2006 Mitchell Repair Information Company, LLC.
spray solvent. Clean the area well, then dry the area. Operate the vehicle for several miles at normal
operating temperature and varying speeds. After operating the vehicle, visually check the suspected
component. If you still cannot locate the leak, try using the powder or black light-and-dye method.
Perform the following steps in order to use the black light-and-dye method:
1. Pour specified amount of dye into the leaking component system.
2. Operate the vehicle under normal operating conditions as directed by the J 39400 .
3. Direct the light toward the suspect area. The dyed fluid will appear as a yellow path leading to the source.
See the J 39400 kit directions for the color of the fluid and the dye mix.
Perform the following steps in order to perform the powder method:
1. Clean the suspected area.
2. Apply an aerosol-type powder - such as foot powder to the suspected area.
3. Operate the vehicle under normal operating conditions.
4. Visually inspect the suspected component. You should be able to trace the leak path over the white
powder surface to the source.
Repairing the Leak
Once the origin of the leak has been pinpointed and traced back to its source, the cause of the leak must be
determined in order for it to be repaired properly. If a gasket is replaced, but the sealing surface is damaged, the
new gasket will not repair the leak. The surface must be repaired or replaced. Before attempting to repair a leak,
be sure that the gasket and sealing surfaces are correct.
Perform the following steps in order to check for gasket leaks:
1. Inspect the fluid level/pressure to see if it is too high.
2. Check the crankcase ventilation system for restrictions or malfunctioning components.
3. Inspect for improperly tightened fasteners or dirty/damaged threads.
4. Look for warped flanges or sealing surfaces.
5. Check for scratches, burrs, or other damage to the sealing surface.
6. Look for a damaged or worn gasket.
7. Check for cracking or porosity of the component.
8. Check for use of an improper sealant used - where applicable.
Perform the following steps in order to check for seal leaks:
1. Inspect the fluid level/pressure to see if it is too high.
2. Check the crankcase ventilation system for restrictions or malfunctioning components.
3. Check for a damaged O-ring seal bore - scratched, burred or nicked.
4. Look for a damaged or worn oil seal.
2003 Saturn L200
2003 ENGINE Engine Mechanical - 3.0L (L81) - Saturn L Series
steve
Monday, May 09, 2011 12:20:06 PM Page 48 © 2006 Mitchell Repair Information Company, LLC.
5. Check for improper component installation.
6. Look for cracks in the component.
7. Inspect the shaft surface for scratches, nicks, or damage.
8. Check for a loose or worn bearing which may lead to premature oil seal wear.
DRIVE BELT CHIRPING DIAGNOSIS
Diagnostic Aids
The symptom may be intermittent due to moisture on the drive belt or the pulleys. It may be necessary to spray
a small amount of water on the drive belt in order to duplicate the customers concern. If spraying water on the
drive belt duplicates the symptom, cleaning the belt pulleys may be the probable solution.
A loose or improper installation of a body component, a suspension component, or other items of the vehicle
may cause the chirping noise.
Test Description
The numbers below refer to the step number on the diagnostic table.
2: The noise may not be engine related. This step is to verify that the engine is making the noise. If the
engine is not making the noise do not proceed further with this table.
3: The noise may be an internal engine noise. Removing the drive belt and operating the engine for a brief
period will verify the noise is related to the drive belt. When removing the drive belt the water pump may
not be operating and the engine may overheat. Also DTCs may set when the engine is operating with the
drive belt removed.
4: Inspect all drive belt pulleys for pilling. Pilling is the small balls or pills or it can be strings in the drive
belt grooves from the accumulation of rubber dust.
6: Misalignment of the pulleys may be caused from improper mounting of the accessory drive
component, incorrect installation of the accessory drive component pulley, or the pulley bent inward or
outward from a previous repair. Test for a misalign pulley using a straight edge in the pulley grooves
across 2 or 3 pulleys. If a misalign pulley is found refer to that accessory drive component for the proper
installation procedure for that pulley.
10: Inspecting of the fasteners can eliminate the possibility that a wrong bolt, nut, spacer, or washer was
installed.
12: Inspecting the pulleys for being bent should include inspecting for a dent or other damage to the
pulleys that would prevent the drive belt from not seating properly in all of the pulley grooves or on the
smooth surface of a pulley when the back side of the belt is used to drive the pulley.
14: Replacing the drive belt when it is not damaged or there is not excessive pilling will only be a
temporary repair.
Drive Belt Chirping Diagnosis
Step Action Yes No
NOTE:
2003 Saturn L200
2003 ENGINE Engine Mechanical - 3.0L (L81) - Saturn L Series
steve
Monday, May 09, 2011 12:20:06 PM Page 49 © 2006 Mitchell Repair Information Company, LLC.
DEFINITION: The following items are indications of chirping:
 A high pitched noise that is heard once per revolution of the drive belt or a pulley.
 It usually occurs on cold damp mornings.
Refer to BELT DRESSING NOTICE in Cautions and Notices.
1
Did you review the Symptoms - Engine Mechanical
operation and perform the necessary inspections? Go to Step 2
Go to Symptoms -
Engine Mechanical
2
Verify that there is a chirping noise.
Does the engine make the chirping noise? Go to Step 3
Go to Diagnostic
Aids
3
1. Remove the drive belt. Refer to Drive Belt
Replacement.
2. Operate the engine for no longer than 30 to 40
seconds.
Does the chirping noise still exist?
Go to Engine Noise
on Start-Up, but
Only Lasting a
Few Seconds ,
Upper Engine
Noise, Regardless
of Engine Speed ,
Lower Engine
Noise, Regardless
of Engine Speed ,
or Engine Noise
Under Load Go to Step 4
4
Inspect for severe pilling exceeding 1/3 of the belt
groove depth.
Does the belt grooves have pilling? Go to Step 5 Go to Step 6
5
Clean the drive belt pulleys with a suitable wire brush.
Did you complete the repair? Go to Step 15 Go to Step 6
6
Inspect for misalignment of the pulleys.
Are any of the pulleys misaligned? Go to Step 7 Go to Step 8
7
Replace or repair any misaligned pulleys.
Did you complete the repair? Go to Step 15 Go to Step 8
8
Inspect for bent or cracked brackets.
Did you find any bent or cracked brackets? Go to Step 9 Go to Step 10
9
Replace any bent or cracked brackets.
Did you complete the repair? Go to Step 15 Go to Step 10
10
Inspect for improper, loose or missing fasteners.
Did you find the condition? Go to Step 11 Go to Step 12
11
Tighten any loose fasteners. Refer to Fastener
Tightening Specifications.
Did you complete the repair? Go to Step 15 Go to Step 12
12
Inspect for a bent pulley.
Did you find the condition? Go to Step 13 Go to Step 14
13
Replace the bent pulley.
Did you complete the repair? Go to Step 15 Go to Step 14
2003 Saturn L200
2003 ENGINE Engine Mechanical - 3.0L (L81) - Saturn L Series
steve
Monday, May 09, 2011 12:20:06 PM Page 50 © 2006 Mitchell Repair Information Company, LLC.
DRIVE BELT SQUEAL DIAGNOSIS
Diagnostic Aids
A loose or improper installation of a body component, a suspension component, or other items of the vehicle
may cause the squeal noise.
If the noise is intermittent, verify the accessory drive components by varying their loads making sure they are
operated to their maximum capacity. An overcharged A/C system, power steering system with a pinched hose
or wrong fluid, or a generator failing are suggested items to inspect.
Test Description
The numbers below refer to the step numbers on the diagnostic table.
2: The noise may not be engine related. This step is to verify that the engine is making the noise. If the
engine is not making the noise do not proceed further with this table.
3: The noise may be an internal engine noise. Removing the drive belt and operating the engine for a brief
period will verify the squeal noise is the drive belt or an accessory drive component. When removing the
drive belt the water pump may not be operating and the engine may overheat. Also DTCs may set when
the engine is operating with the drive belt removed.
4: This test is to verify that an accessory drive component does not have a seized bearing. With the belt
removed, test the bearings in the accessory drive components for turning smoothly. Also test the
accessory drive components with the engine operating by varying the load on the components to verify
that the components operate properly.
5: This test is to verify that the drive belt tensioner operates properly. If the drive belt tensioner is not
operating properly, proper belt tension may not be achieved to keep the drive belt from slipping which
could cause a squeal noise.
6: This test is to verify that the drive belt is not too long, which would prevent the drive belt tensioner
from working properly. Also if an incorrect length drive belt was installed, it may not be routed properly
and may be turning an accessory drive component in the wrong direction.
7: Misalignment of the pulleys may be caused from improper mounting of the accessory drive
component, incorrect installation of the accessory drive component pulley, or the pulley bent inward or
outward from a previous repair. Test for a misalign pulley using a straight edge in the pulley grooves
across two or three pulleys. If a misalign pulley is found refer to that accessory drive component for the
proper installation procedure for that pulley.
8: This test is to verify that the pulleys are the correct diameter or width. Using a known good vehicle
compare the pulley sizes.
14
Replace the drive belt. Refer to Drive Belt
Replacement.
Did you complete the repair? Go to Step 15
Go to Diagnostic
Aids
15
Operate the system in order to verify the repair.
Did you correct the condition? System OK Go to Step 3
2003 Saturn L200
2003 ENGINE Engine Mechanical - 3.0L (L81) - Saturn L Series
steve
Monday, May 09, 2011 12:20:06 PM Page 51 © 2006 Mitchell Repair Information Company, LLC.
Drive Belt Squeal Diagnosis
DRIVE BELT WHINE DIAGNOSIS
Diagnostic Aids
The drive belt will not cause the whine noise.
If the whine noise is intermittent, verify the accessory drive components by varying their loads making sure
Step Action Yes No
DEFINITION: The following items are indications of drive belt squeal:
 A loud screeching noise that is caused by a slipping drive belt.
 The noise occurs when a heavy load is applied to the drive belt, such as an air conditioning
compressor engagement snapping the throttle, or slipping on a seized pulley or a faulty accessory
drive component.
NOTE:
Refer toBELT DRESSING NOTICE in Cautions and Notices.
1
Did you review the Symptoms - Engine Mechanical
operation and perform the necessary inspections? Go to Step 2
Go to Symptoms -
Engine Mechanical
2
Verify that there is a squeal noise.
Does the engine make the squeal noise? Go to Step 3
Go to Diagnostic
Aids
3
1. Remove the drive belt. Refer to Drive Belt
Replacement.
2. Operate the engine for no longer than 30 to 40
seconds.
Does the noise still exist?
Go to Engine Noise
Diagnosis Go to Step 4
4
Inspect for an accessory drive component seized
bearing or a faulty accessory drive component.
Did you find and correct the condition? Go to Step 9 Go to Step 5
5
Test the drive belt tensioner for proper operation. Refer
to Drive Belt Tensioner Diagnosis.
Did you find and correct the condition? Go to Step 9 Go to Step 6
6
Inspect for the correct drive belt length. Refer to Drive
Belt Replacement.
Did you find and correct the condition? Go to Step 9 Go to Step 7
7
Inspect for misalignment of a pulley.
Did you find and correct the condition? Go to Step 9 Go to Step 8
8
Inspect for the correct pulley size.
Did you find and correct the condition? Go to Step 9
Go to Diagnostic
Aids
9
Operate the system in order to verify the repair.
Did you correct the condition? System OK Go to Step 3
2003 Saturn L200
2003 ENGINE Engine Mechanical - 3.0L (L81) - Saturn L Series
steve
Monday, May 09, 2011 12:20:06 PM Page 52 © 2006 Mitchell Repair Information Company, LLC.
they are operated to their maximum capacity. Such items but not limited to may be an A/C system overcharged,
the power steering system restricted or the wrong fluid, or the generator failing.
Test Description
The numbers below refer to the step numbers on the diagnostic table.
3: This test is to verify that the noise is being caused by the drive belt or the accessory drive components.
When removing the drive belt the water pump may not be operating and the engine may overheat. Also
DTCs may set when the engine is operating with the drive belt removed.
4: The inspection should include checking the drive belt tensioner and the drive belt idler pulley bearings.
The drive belt may have to be installed and the accessory drive components operated separately by
varying their loads. Refer to the suspected accessory drive component for the proper inspection and
replacement procedure.
Drive Belt Whine Diagnosis
DRIVE BELT RUMBLING DIAGNOSIS
Step Action Yes No
DEFINITION: A high pitched continuous noise that may be caused by an accessory drive component
failed bearing.
NOTE:
Refer to BELT DRESSING NOTICE in Cautions and Notices.
1
Did you review the Symptoms - Engine Mechanical
operation and perform the necessary inspections?
Go to Step 2
Go to Symptoms -
Engine
Mechanical
2
Verify that there is a whine noise.
Does the engine make the whine noise? Go to Step 3
Go to Diagnostic
Aids
3
1. Remove the drive belt. Refer to Drive Belt
Replacement.
2. Operate the engine for no longer than 30 to 40
seconds.
Does the whine noise still exist?
Go to Engine
Noise on Start-
Up, but Only
Lasting a Few
Seconds , Upper
Engine Noise,
Regardless of
Engine Speed ,
Lower Engine
Noise, Regardless
of Engine Speed ,
or Engine Noise
Under Load Go to Step 4
4
Inspect for a failed accessory drive component bearing.
Did you find and repair the condition? Go to Step 5
Go to Diagnostic
Aids
5
Operate the system in order to verify the repair.
Did you correct the condition? System OK
-
2003 Saturn L200
2003 ENGINE Engine Mechanical - 3.0L (L81) - Saturn L Series
steve
Monday, May 09, 2011 12:20:06 PM Page 53 © 2006 Mitchell Repair Information Company, LLC.
Diagnostic Aids
Vibration from the engine operating may cause a body component or another part of the vehicle to make
rumbling noise.
The drive belt may have a condition that can not be seen or felt. Sometimes replacing the drive belt may be the
only repair for the symptom.
If replacing the drive belt, completing the diagnostic table, and the noise is only heard when the drive belt is
installed, there might be an accessory drive component with a failure. Varying the load on the different
accessory drive components may aid in identifying which component is causing the rumbling noise.
Test Description
The numbers below refer to the step numbers on the diagnostic table.
2: This test is to verify that the symptom is present during diagnosing. Other vehicle components may
cause a similar symptom.
3: This test is to verify that the drive belt is causing the rumbling noise. Rumbling noise may be confused
with an internal engine noise due to the similarity in the description. Remove only one drive belt at a time
if the vehicle has multiple drive belts. When removing the drive belt the water pump may not be
operating and the engine may overheat. Also DTCs may set when the engine is operating with the drive
belt removed.
4: Inspecting the drive belt is to ensure that it is not causing a the noise. Small cracks across the ribs of
the drive belt will not cause the noise. Belt separation is identified by the plys of the belt separating and
may be seen at the edge of the belt our felt as a lump in the belt.
5: Small amounts of pilling is normal condition and acceptable. When the pilling is severe the drive belt
does not have a smooth surface for proper operation.
Drive Belt Rumbling Diagnosis
Step Action Yes No
DEFINITION:
 A low pitch tapping, knocking, or thumping noise heard at or just above idle.
 Heard once per revolution of the drive belt or a pulley.
 Rumbling may be caused from:
 Pilling, the accumulation of rubber dust that forms small balls or strings in the drive belt
pulley groove
 The separation of the drive belt
 A damaged drive belt
NOTE:
Refer to BELT DRESSING NOTICE in Cautions and Notices.
Did you review the Symptoms - Engine Mechanical
Go to Symptoms -
2003 Saturn L200
2003 ENGINE Engine Mechanical - 3.0L (L81) - Saturn L Series
steve
Monday, May 09, 2011 12:20:06 PM Page 54 © 2006 Mitchell Repair Information Company, LLC.
DRIVE BELT VIBRATION DIAGNOSIS
Diagnostic Aids
The accessory drive components can have an affect on engine vibration. Such as but not limited to the A/C
system over charged, the power steering system restricted or the incorrect fluid, or an extra load on the
generator. To help identify an intermittent or an improper condition, vary the loads on the accessory drive
components.
Test Description
1
operation and perform the necessary inspections?
Go to Step 2
Engine
Mechanical
2
Verify that there is a rumbling noise.
Does the engine make the rumbling noise? Go to Step 3
Go to Diagnostic
Aids
3
1. Remove the drive belt. Refer to Drive Belt
Replacement.
2. Operate the engine for no longer than 30 to 40
seconds.
Does the rumbling noise still exist?
Go to Engine
Noise on Start-
Up, but Only
Lasting a Few
Seconds , Upper
Engine Noise,
Regardless of
Engine Speed ,
Lower Engine
Noise, Regardless
of Engine Speed ,
or Engine Noise
Under Load Go to Step 4
4
Inspect the drive belt for damage, separation, or sections
of missing ribs.
Did you find any of these conditions? Go to Step 7 Go to Step 5
5
Inspect for severe pilling of more than 1/3 of the drive
belt pulley grooves.
Did you find severe pilling? Go to Step 6 Go to Step 7
6
1. Clean the drive belt pulleys using a suitable wire
brush.
2. Reinstall the drive belt. Refer to Drive Belt
Replacement.
Did you complete the repair? Go to Step 8 Go to Step 7
7
Install a new drive belt. Refer to Drive Belt
Replacement.
Did you complete the replacement? Go to Step 8 -
8
Operate the system in order to verify the repair.
Did you correct the condition? System OK
Go to Diagnostic
Aids
2003 Saturn L200
2003 ENGINE Engine Mechanical - 3.0L (L81) - Saturn L Series
steve
Monday, May 09, 2011 12:20:06 PM Page 55 © 2006 Mitchell Repair Information Company, LLC.
The numbers below refer to the step numbers on the diagnostic table.
2: This test is to verify that the symptom is present during diagnosing. Other vehicle components may
cause a similar symptom such as the exhaust system, or the drivetrain.
3: This test is to verify that the drive belt or accessory drive components may be causing the vibration.
When removing the drive belt the water pump may not be operating and the engine may overheat. Also
DTCs may set when the engine is operating with the drive belt removed.
4: The drive belt may cause a vibration. While the drive belt is removed this is the best time to inspect the
condition of the belt.
6: Inspecting of the fasteners can eliminate the possibility that a wrong bolt, nut, spacer, or washer was
installed.
8: This step should only be performed if the fan is driven by the drive belt. Inspect the engine cooling fan
for bent, twisted, loose, or cracked blades. Inspect the fan clutch for smoothness, ease of turning. Inspect
for a bent fan shaft or bent mounting flange.
9: This step should only be performed if the water pump is driven by the drive belt. Inspect the water
pump shaft for being bent. Also inspect the water pump bearings for smoothness and excessive play.
Compare the water pump with a known good water pump.
10: Accessory drive component brackets that are bent, cracked, or loose may put extra strain on that
accessory component causing it to vibrate.
Drive Belt Vibration Diagnosis
Step Action Yes No
DEFINITION: The following items are indications of drive belt vibration:
 The vibration is engine-speed related.
 The vibration may be sensitive to accessory load.
NOTE:
Refer to BELT DRESSING NOTICE in Cautions and Notices.
1
Did you review the Symptoms - Engine Mechanical
operation and perform the necessary inspections?
Go to Step 2
Go to Symptoms -
Engine
Mechanical
2
Verify that the vibration is engine related.
Does the engine make the vibration? Go to Step 3
Go to Diagnostic
Aids
3
1. Remove the drive belt. Refer to Drive Belt
Replacement.
2. Operate the engine for no longer than 30 to 40
seconds.
Does the engine still make the vibration?
Go to Diagnostic
Starting Point -
Vibration
Diagnosis and
Correction in
Vibration
Diagnosis and
Correction Go to Step 4
4
Inspect the drive belt for wear, damage, debris build-up
and missing drive belt ribs.
2003 Saturn L200
2003 ENGINE Engine Mechanical - 3.0L (L81) - Saturn L Series
steve
Monday, May 09, 2011 12:20:06 PM Page 56 © 2006 Mitchell Repair Information Company, LLC.
DRIVE BELT FALLS OFF DIAGNOSIS
Diagnostic Aids
If the drive belts repeatedly falls off the drive belt pulleys, this is because of pulley misalignment.
An extra load that is quickly applied or released by an accessory drive component may cause the drive belt to
fall off the pulleys. Verify the accessory drive components operate properly.
If the drive belt is the incorrect length, the drive belt tensioner may not keep the proper tension on the drive belt.
Test Description
The numbers below refer to the step numbers on the diagnostic table.
2: This inspection is to verify the condition of the drive belt. Damage to the belt may have occurred when
it came off of the pulleys. The drive belt may have been damaged, which caused the drive belt to fall off.
Inspect the belt for cuts, tears, sections of ribs missing, or damaged belt plys.
4: Misalignment of the pulleys may be caused from improper mounting of the accessory drive
component, incorrect installation of the accessory drive component pulley, or the pulley bent inward or
outward from a previous repair. Test for a misaligned pulley using a straight edge in the pulley grooves
across 2 or 3 pulleys. If a misaligned pulley is found refer to that accessory drive component for the
Did you find any of these conditions? Go to Step 5 Go to Step 6
5
Install a new drive belt. Refer to Drive Belt
Replacement.
Did you complete the replacement? Go to Step 11 -
6
Inspect for improper, loose or missing fasteners.
Did you find any of these conditions? Go to Step 7 Go to Step 8
7
1. Tighten any loose fasteners.
2. Replace improper or missing fasteners. Refer to
Fastener Tightening Specifications.
Did you complete the repair? Go to Step 11 -
8
Inspect for damaged fan blades or bent fan clutch shaft, if
the fan is belt driven.
Did you find and correct the condition? Go to Step 11 Go to Step 9
9
Inspect for a bent water pump shaft, if the water pump is
belt driven. Refer to Water Pump Replacement (L61) or
Water Pump Replacement (L81) in Engine Cooling.
Did you find and correct the condition? Go to Step 11 Go to Step 10
10
Inspect for bent or cracked brackets.
Did you find and correct the condition? Go to Step 11
Go to Diagnostic
Aids
11
Operate the system in order to verify the repair.
Did you correct the condition? System OK Go to Step 3
2003 Saturn L200
2003 ENGINE Engine Mechanical - 3.0L (L81) - Saturn L Series
steve
Monday, May 09, 2011 12:20:06 PM Page 57 © 2006 Mitchell Repair Information Company, LLC.
proper installation procedure for that pulley.
5: Inspecting the pulleys for being bent should include inspecting for a dent or other damage to the
pulleys that would prevent the drive belt from not seating properly in all of the pulley grooves or on the
smooth surface of a pulley when the back side of the belt is used to drive the pulley.
6: Accessory drive component brackets that are bent or cracked will let the drive belt fall off.
7: Inspecting of the fasteners can eliminate the possibility that a wrong bolt, nut, spacer, or washer was
installed. Missing, loose, or the wrong fasteners may cause pulley misalignment from the bracket moving
under load. Over tightening of the fasteners may cause misalignment of the accessory component bracket.
Drive Belt Falls Off Diagnosis
Step Action Yes No
DEFINITION: The drive belt falls off the pulleys or may not ride correctly on the pulleys.
NOTE:
Refer to BELT DRESSING NOTICE in Cautions and Notices.
1
Did you review the Symptoms - Engine Mechanical
operation and perform the necessary inspections?
Go to Step 2
Go to Drive Belt
Tensioner
Diagnosis
2
Inspect for a damaged drive belt.
Did you find the condition? Go to Step 3 Go to Step 4
3
Install a new drive belt. Refer to Drive Belt
Replacement.
Does the drive belt continue to fall off? Go to Step 4 System OK
4
Inspect for misalignment of the pulleys.
Did you find and repair the condition? Go to Step 12 Go to Step 5
5
Inspect for a bent or dented pulley.
Did you find and repair the condition? Go to Step 12 Go to Step 6
6
Inspect for a bent or a cracked bracket.
Did you find and repair the condition? Go to Step 12 Go to Step 7
7
Inspect for improper, loose or missing fasteners.
Did you find loose or missing fasteners? Go to Step 8 Go to Step 9
8
 Tighten any loose fasteners.
 Replace improper or missing fasteners. Refer to
FASTENERS in General Information.
Does the drive belt continue to fall off? Go to Step 9 System OK
9
Test the drive belt tensioner for operating correctly.
Refer to Drive Belt Tensioner Diagnosis.
Does the drive belt tensioner operate correctly? Go to Step 11 Go to Step 10
10
Replace the drive belt tensioner. Refer to Drive Belt
Tensioner Diagnosis.
Does the drive belt continue to fall off? Go to Step 11 System OK
Inspect for failed drive belt idler and drive belt
2003 Saturn L200
2003 ENGINE Engine Mechanical - 3.0L (L81) - Saturn L Series
steve
Monday, May 09, 2011 12:20:06 PM Page 58 © 2006 Mitchell Repair Information Company, LLC.
DRIVE BELT EXCESSIVE WEAR DIAGNOSIS
Fig. 19: Minor Cracks DO NOT Warrant Drive Belt Replacement
Courtesy of GENERAL MOTORS CORP.
Minor cracks in the belt rib are normal. They are the result of reverse bending around a backside pulley. Do not
replace belts for minor cracks.
11
tensioner pulley bearings.
Did you find and repair the condition? Go to Step 12
Go to Diagnostic
Aids
12
Operate the system in order to verify the repair.
Did you correct the condition? System OK Go to Step 2
2003 Saturn L200
2003 ENGINE Engine Mechanical - 3.0L (L81) - Saturn L Series
steve
Monday, May 09, 2011 12:20:06 PM Page 59 © 2006 Mitchell Repair Information Company, LLC.
2003 Saturn L200
2003 ENGINE Engine Mechanical - 3.0L (L81) - Saturn L Series
steve
Monday, May 09, 2011 12:20:06 PM Page 60 © 2006 Mitchell Repair Information Company, LLC.
Fig. 20: Chunking, Cord Breakage Or Separation DO Warrant Drive Belt Replacement
Courtesy of GENERAL MOTORS CORP.
Belts that have chunking longer than 5 mm (13/16 in) in one or more places should be replaced.
Belts should also be replaced if cord breakage or fabric separation is observed.
DRIVE BELT TENSIONER DIAGNOSIS
Tools Required
SA9181NE Belt Tension Gage
Belt and Tensioner Load Inspection
2003 Saturn L200
2003 ENGINE Engine Mechanical - 3.0L (L81) - Saturn L Series
steve
Monday, May 09, 2011 12:20:06 PM Page 61 © 2006 Mitchell Repair Information Company, LLC.
Fig. 21: Drive Belt Routing Illustration
Courtesy of GENERAL MOTORS CORP.
1. The following procedure is to be used when the belt or tensioner is suspected of allowing pulleys to slip
or causing any unusual belt noises.
1. Warm up the engine for approximately 10 minutes with all accessories turned ON.
2. The steering wheel must be turned full left and right several times, if equipped with power steering.
2003 Saturn L200
2003 ENGINE Engine Mechanical - 3.0L (L81) - Saturn L Series
steve
Monday, May 09, 2011 12:20:06 PM Page 62 © 2006 Mitchell Repair Information Company, LLC.
Fig. 22: Using 15 mm Wrench To Rotate Tensioner Pulley
Courtesy of GENERAL MOTORS CORP.
2. Shut the engine OFF.
3. Using a 15 mm wrench, rotate the tensioner arm clockwise until the belt becomes loose on the pulleys.
Slowly allow the tensioner to apply tension back on the belt.
2003 Saturn L200
2003 ENGINE Engine Mechanical - 3.0L (L81) - Saturn L Series
steve
Monday, May 09, 2011 12:20:06 PM Page 63 © 2006 Mitchell Repair Information Company, LLC.
Fig. 23: View of Tensioner Pulley
Courtesy of GENERAL MOTORS CORP.
4. The tensioner pulley must not be allowed to snap against the belt.
IMPORTANT: The marking on the tensioner arm must fall within the operating range (2
marks) on the tensioner body. If the tensioner marks fall outside the
operating range, the accessory drive belt must be replaced.
2003 Saturn L200
2003 ENGINE Engine Mechanical - 3.0L (L81) - Saturn L Series
steve
Monday, May 09, 2011 12:20:06 PM Page 64 © 2006 Mitchell Repair Information Company, LLC.
Fig. 24: Checking Belt Tension
Courtesy of GENERAL MOTORS CORP.
5. Using a calibrated SA9181NE , or equivalent, (OTC® OEM 1294), read and record the belt tension at
mid span for the following drive combinations. This check can be performed on an engine assembly
removed from the vehicle. It can not be performed with the engine in the vehicle unless the upper engine
mount is removed.
6. Repeat steps 2 and 5 three times and record the information.
2003 Saturn L200
2003 ENGINE Engine Mechanical - 3.0L (L81) - Saturn L Series
steve
Monday, May 09, 2011 12:20:06 PM Page 65 © 2006 Mitchell Repair Information Company, LLC.
Fig. 25: Belt Tensioner Chart
Courtesy of GENERAL MOTORS CORP.
7. Add the 3 readings together and divide the total by 3, as shown in the example:
 Belt Tension = Readings / (# of readings)
 Belt Tension = [(1)+(2)+(3)] / 3
 Example: (54 + 58 + 52) = 164 / 3
 Belt Tension = 55 lb.
8. Refer the belt tension chart for specifications.
Accessory Drive Belt Inspection
2003 Saturn L200
2003 ENGINE Engine Mechanical - 3.0L (L81) - Saturn L Series
steve
Monday, May 09, 2011 12:20:06 PM Page 66 © 2006 Mitchell Repair Information Company, LLC.
2003 Saturn L200
2003 ENGINE Engine Mechanical - 3.0L (L81) - Saturn L Series
steve
Monday, May 09, 2011 12:20:06 PM Page 67 © 2006 Mitchell Repair Information Company, LLC.
Fig. 26: Chunking, Cord Breakage Or Separation DO Warrant Drive Belt Replacement
Courtesy of GENERAL MOTORS CORP.
1. Minor cracks in the belt rib are normal. They are the result of reverse bending around a backside pulley.
Do not replace belts for minor cracks.
Belts that have chunking longer than 5 mm (13/16 in) in one or more places should be replaced.
Fig. 27: Minor Cracks DO NOT Warrant Drive Belt Replacement
Courtesy of GENERAL MOTORS CORP.
2. Belts should also be replaced if cord breakage or fabric separation is observed.
2003 Saturn L200
2003 ENGINE Engine Mechanical - 3.0L (L81) - Saturn L Series
steve
Monday, May 09, 2011 12:20:06 PM Page 68 © 2006 Mitchell Repair Information Company, LLC.
REPAIR INSTRUCTIONS
DRIVE BELT REPLACEMENT
Removal Procedure
Fig. 28: Removing & Installing Engine Mount Bracket
Courtesy of GENERAL MOTORS CORP.
1. Disconnect the negative battery cable. Refer to Battery Negative Cable Disconnect/Connect Procedure
in Battery.
IMPORTANT: The engine must be supported upon removal of the engine mount.
2003 Saturn L200
2003 ENGINE Engine Mechanical - 3.0L (L81) - Saturn L Series
steve
Monday, May 09, 2011 12:20:06 PM Page 69 © 2006 Mitchell Repair Information Company, LLC.
2. Remove the right front engine mount and engine mount bracket from the engine block. Refer to Engine
Mount Replacement.
Fig. 29: Using 15 mm Wrench To Rotate Tensioner Pulley
Courtesy of GENERAL MOTORS CORP.
3. Use a 15 mm wrench to rotate the tensioner pulley clockwise while sliding the drive belt off the tensioner
or water pump pulley.
4. Remove the drive belt.
5. Clean and inspect the serpentine drive belt surfaces.
Installation Procedure
2003 Saturn L200
2003 ENGINE Engine Mechanical - 3.0L (L81) - Saturn L Series
steve
Monday, May 09, 2011 12:20:06 PM Page 70 © 2006 Mitchell Repair Information Company, LLC.
Fig. 30: Drive Belt Routing Illustration
Courtesy of GENERAL MOTORS CORP.
1. Route the belt around all pulleys, except the tensioner or water pump.
2. Use a 15 mm wrench to rotate the tensioner pulley clockwise.
3. Slip the belt over the idler or water pump pulley.
4. Install the right front engine mount. Refer to Engine Mount Replacement.
IMPORTANT: Ensure that the drive belt is aligned into the proper grooves on the drive
pulley.
2003 Saturn L200
2003 ENGINE Engine Mechanical - 3.0L (L81) - Saturn L Series
steve
Monday, May 09, 2011 12:20:06 PM Page 71 © 2006 Mitchell Repair Information Company, LLC.
5. Connect the negative battery cable.
Tighten: Tighten the battery terminal bolts to 17 N.m (13 lb ft).
ENGINE MOUNT INSPECTION
1. Install the engine support fixture.
2. Observe the engine mount while raising the engine. Raising the engine removes the weight from the
engine mount and creates slight tension on the rubber.
3. Replace the engine mount if the engine mount exhibits any of the following conditions:
 The hard rubber is covered with heat check cracks.
 The rubber is separated from the metal plate of the engine mount.
 The rubber is split through the center of the engine mount.
 The engine mount itself is leaking fluid.
4. For engine mount replacement. Refer to Engine Mount Replacement.
DRIVE BELT TENSIONER REPLACEMENT
Removal Procedure
NOTE: Refer to FASTENER NOTICE in Cautions and Notices.
IMPORTANT: Before replacing any engine mount due to suspected fluid loss, verify that
the source of the fluid is the engine mount, not the engine or accessories.
2003 Saturn L200
2003 ENGINE Engine Mechanical - 3.0L (L81) - Saturn L Series
steve
Monday, May 09, 2011 12:20:06 PM Page 72 © 2006 Mitchell Repair Information Company, LLC.
Fig. 31: Using 15 mm Wrench To Rotate Tensioner Pulley Clockwise
Courtesy of GENERAL MOTORS CORP.
1. Use a 15-mm wrench to rotate the tensioner pulley clockwise while lifting the drive belt off the idler
pulley.
2. Raise the vehicle.
IMPORTANT: Complete accessory drive belt removal is not required for tensioner
replacement.
2003 Saturn L200
2003 ENGINE Engine Mechanical - 3.0L (L81) - Saturn L Series
steve
Monday, May 09, 2011 12:20:06 PM Page 73 © 2006 Mitchell Repair Information Company, LLC.
Fig. 32: Removing & Installing Accessory Drive Belt Tensioner Assembly (L81 V6 Only)
Courtesy of GENERAL MOTORS CORP.
3. Remove the drive belt tensioner bolts.
4. Remove the drive belt tensioner from the engine.
Installation Procedure
2003 Saturn L200
2003 ENGINE Engine Mechanical - 3.0L (L81) - Saturn L Series
steve
Monday, May 09, 2011 12:20:06 PM Page 74 © 2006 Mitchell Repair Information Company, LLC.
Fig. 33: Removing & Installing Accessory Drive Belt Tensioner Assembly (L81 V6 Only)
Courtesy of GENERAL MOTORS CORP.
1. Install the drive belt tensioner to the engine.
2. Install the drive belt tensioner bolts.
Tighten: Tighten the belt tensioner bolts to 40 N.m (30 lb ft).
3. Lower the vehicle.
NOTE: Refer to FASTENER NOTICE in Cautions and Notices.
2003 Saturn L200
2003 ENGINE Engine Mechanical - 3.0L (L81) - Saturn L Series
steve
Monday, May 09, 2011 12:20:06 PM Page 75 © 2006 Mitchell Repair Information Company, LLC.
Fig. 34: Using 15 mm Wrench To Rotate Tensioner Pulley Clockwise
Courtesy of GENERAL MOTORS CORP.
4. Route the drive belt around all pulleys except the idler or water pump pulley.
5. Use a 15-mm wrench to rotate the tensioner pulley clockwise.
6. Slip the drive belt over the idler or water pump pulley.
INTAKE RUNNER REPLACEMENT (FRONT)
IMPORTANT: Ensure that the drive belt is aligned into the proper grooves on the drive
pulleys.
2003 Saturn L200
2003 ENGINE Engine Mechanical - 3.0L (L81) - Saturn L Series
steve
Monday, May 09, 2011 12:20:06 PM Page 76 © 2006 Mitchell Repair Information Company, LLC.
Tools Required
J 43914 Universal Clamp Pliers
Removal Procedure
Fig. 35: Removing/Installing Intake Hose Assembly
Courtesy of GENERAL MOTORS CORP.
1. Disconnect the negative battery cable.
2. Remove the intake hose assembly.
2003 Saturn L200
2003 ENGINE Engine Mechanical - 3.0L (L81) - Saturn L Series
steve
Monday, May 09, 2011 12:20:06 PM Page 77 © 2006 Mitchell Repair Information Company, LLC.
Fig. 36: Removing Intake Runner Rubber Boot Hose Clamps
Courtesy of GENERAL MOTORS CORP.
3. Remove 4 rubber boot hose clamps using the J 43914 .
IMPORTANT: Clamps are reusable if not damaged. Do not discard.
2003 Saturn L200
2003 ENGINE Engine Mechanical - 3.0L (L81) - Saturn L Series
steve
Monday, May 09, 2011 12:20:06 PM Page 78 © 2006 Mitchell Repair Information Company, LLC.
Fig. 37: Removing & Installing Front Intake Manifold Runner
Courtesy of GENERAL MOTORS CORP.
4. Remove the intake runner mounting bolts.
5. Disconnect the intake runner from the rubber boots and remove the intake runner.
Installation Procedure
2003 Saturn L200
2003 ENGINE Engine Mechanical - 3.0L (L81) - Saturn L Series
steve
Monday, May 09, 2011 12:20:06 PM Page 79 © 2006 Mitchell Repair Information Company, LLC.
Fig. 38: Removing & Installing Front Intake Manifold Runner
Courtesy of GENERAL MOTORS CORP.
1. Install the intake runner onto the rubber boots.
2. Install the intake runner mounting bolts.
Tighten: Tighten the intake manifold runner bolts to 8 N.m (71 lb in).
NOTE: Refer to FASTENER NOTICE in Cautions and Notices.
2003 Saturn L200
2003 ENGINE Engine Mechanical - 3.0L (L81) - Saturn L Series
steve
Monday, May 09, 2011 12:20:06 PM Page 80 © 2006 Mitchell Repair Information Company, LLC.
Fig. 39: Installing Intake Runner Rubber Boot Hose Clamps
Courtesy of GENERAL MOTORS CORP.
3. Install the 4 rubber boot hose clamps using the J 43914 .
IMPORTANT: Inspect the hose clamps for damage. Replace if damaged.
2003 Saturn L200
2003 ENGINE Engine Mechanical - 3.0L (L81) - Saturn L Series
steve
Monday, May 09, 2011 12:20:06 PM Page 81 © 2006 Mitchell Repair Information Company, LLC.
Fig. 40: Removing/Installing Intake Hose Assembly
Courtesy of GENERAL MOTORS CORP.
4. Install the hose assembly.
5. Connect the negative battery cable.
Tighten: Tighten the battery terminal bolts to 17 N.m (13 lb ft).
INTAKE RUNNER REPLACEMENT (REAR)
Tools Required
J 43914 Universal Clamp Pliers
2003 Saturn L200
2003 ENGINE Engine Mechanical - 3.0L (L81) - Saturn L Series
steve
Monday, May 09, 2011 12:20:06 PM Page 82 © 2006 Mitchell Repair Information Company, LLC.
Removal Procedure
Fig. 41: Removing/Installing Intake Hose Assembly
Courtesy of GENERAL MOTORS CORP.
1. Disconnect the negative battery cable.
2. Remove the intake hose assembly.
2003 Saturn L200
2003 ENGINE Engine Mechanical - 3.0L (L81) - Saturn L Series
steve
Monday, May 09, 2011 12:20:06 PM Page 83 © 2006 Mitchell Repair Information Company, LLC.
Fig. 42: Removing & Installing ECM Electrical Connectors
Courtesy of GENERAL MOTORS CORP.
3. Remove the ECM electrical connectors.
4. Remove the ECM bolts and the ECM.
2003 Saturn L200
2003 ENGINE Engine Mechanical - 3.0L (L81) - Saturn L Series
steve
Monday, May 09, 2011 12:20:06 PM Page 84 © 2006 Mitchell Repair Information Company, LLC.
Fig. 43: Removing Intake Runner Rubber Boot Hose Clamps
Courtesy of GENERAL MOTORS CORP.
5. Remove the 4 rubber boot hose clamps using the J 43914 .
IMPORTANT: Clamps are reusable if not damaged. Do not discard.
2003 Saturn L200
2003 ENGINE Engine Mechanical - 3.0L (L81) - Saturn L Series
steve
Monday, May 09, 2011 12:20:06 PM Page 85 © 2006 Mitchell Repair Information Company, LLC.
Fig. 44: Removing & Installing Threaded Brake Vacuum Hose
Courtesy of GENERAL MOTORS CORP.
6. Disconnect the threaded brake vacuum hose.
2003 Saturn L200
2003 ENGINE Engine Mechanical - 3.0L (L81) - Saturn L Series
steve
Monday, May 09, 2011 12:20:06 PM Page 86 © 2006 Mitchell Repair Information Company, LLC.
Fig. 45: Connecting Intake Plenum Switch-Over Valve Vacuum Hose At Switch-Over Valve
Courtesy of GENERAL MOTORS CORP.
7. Disconnect the intake plenum switch-over valve vacuum hose at the switch-over valve. Note the hose
routing.
2003 Saturn L200
2003 ENGINE Engine Mechanical - 3.0L (L81) - Saturn L Series
steve
Monday, May 09, 2011 12:20:06 PM Page 87 © 2006 Mitchell Repair Information Company, LLC.
Fig. 46: Removing & Installing Rear Intake Manifold Runner
Courtesy of GENERAL MOTORS CORP.
8. Remove the intake runner mounting bolts.
9. Disconnect the vent hose from the throttle body.
10. Disconnect the intake runner from the rubber boots and remove the intake runner. Note the throttle body
vent hose routing.
Installation Procedure
2003 Saturn L200
2003 ENGINE Engine Mechanical - 3.0L (L81) - Saturn L Series
steve
Monday, May 09, 2011 12:20:06 PM Page 88 © 2006 Mitchell Repair Information Company, LLC.
Fig. 47: Removing & Installing Rear Intake Manifold Runner
Courtesy of GENERAL MOTORS CORP.
1. Install the intake runner onto the rubber boots.
2. Route the throttle body vent hose under the vacuum reservoir and connect to the throttle body.
3. Install the intake runner mounting bolts.
Tighten: Tighten the intake manifold runner bolts to 8 N.m (71 lb in).
NOTE: Refer to FASTENER NOTICE in Cautions and Notices.
2003 Saturn L200
2003 ENGINE Engine Mechanical - 3.0L (L81) - Saturn L Series
steve
Monday, May 09, 2011 12:20:06 PM Page 89 © 2006 Mitchell Repair Information Company, LLC.
3.0 l engine
3.0 l engine
3.0 l engine
3.0 l engine
3.0 l engine
3.0 l engine
3.0 l engine
3.0 l engine
3.0 l engine
3.0 l engine
3.0 l engine
3.0 l engine
3.0 l engine
3.0 l engine
3.0 l engine
3.0 l engine
3.0 l engine
3.0 l engine
3.0 l engine
3.0 l engine
3.0 l engine
3.0 l engine
3.0 l engine
3.0 l engine
3.0 l engine
3.0 l engine
3.0 l engine
3.0 l engine
3.0 l engine
3.0 l engine
3.0 l engine
3.0 l engine
3.0 l engine
3.0 l engine
3.0 l engine
3.0 l engine
3.0 l engine
3.0 l engine
3.0 l engine
3.0 l engine
3.0 l engine
3.0 l engine
3.0 l engine
3.0 l engine
3.0 l engine
3.0 l engine
3.0 l engine
3.0 l engine
3.0 l engine
3.0 l engine
3.0 l engine
3.0 l engine
3.0 l engine
3.0 l engine
3.0 l engine
3.0 l engine
3.0 l engine
3.0 l engine
3.0 l engine
3.0 l engine
3.0 l engine
3.0 l engine
3.0 l engine
3.0 l engine
3.0 l engine
3.0 l engine
3.0 l engine
3.0 l engine
3.0 l engine
3.0 l engine
3.0 l engine
3.0 l engine
3.0 l engine
3.0 l engine
3.0 l engine
3.0 l engine
3.0 l engine
3.0 l engine
3.0 l engine
3.0 l engine
3.0 l engine
3.0 l engine
3.0 l engine
3.0 l engine
3.0 l engine
3.0 l engine
3.0 l engine
3.0 l engine
3.0 l engine
3.0 l engine
3.0 l engine
3.0 l engine
3.0 l engine
3.0 l engine
3.0 l engine
3.0 l engine
3.0 l engine
3.0 l engine
3.0 l engine
3.0 l engine
3.0 l engine
3.0 l engine
3.0 l engine
3.0 l engine
3.0 l engine
3.0 l engine
3.0 l engine
3.0 l engine
3.0 l engine
3.0 l engine
3.0 l engine
3.0 l engine
3.0 l engine
3.0 l engine
3.0 l engine
3.0 l engine
3.0 l engine
3.0 l engine
3.0 l engine
3.0 l engine
3.0 l engine
3.0 l engine
3.0 l engine
3.0 l engine
3.0 l engine
3.0 l engine
3.0 l engine
3.0 l engine
3.0 l engine
3.0 l engine
3.0 l engine
3.0 l engine
3.0 l engine
3.0 l engine
3.0 l engine
3.0 l engine
3.0 l engine
3.0 l engine
3.0 l engine
3.0 l engine
3.0 l engine
3.0 l engine
3.0 l engine
3.0 l engine
3.0 l engine
3.0 l engine
3.0 l engine
3.0 l engine
3.0 l engine
3.0 l engine
3.0 l engine
3.0 l engine
3.0 l engine
3.0 l engine
3.0 l engine
3.0 l engine
3.0 l engine
3.0 l engine
3.0 l engine
3.0 l engine
3.0 l engine
3.0 l engine
3.0 l engine
3.0 l engine
3.0 l engine
3.0 l engine
3.0 l engine
3.0 l engine
3.0 l engine
3.0 l engine
3.0 l engine
3.0 l engine
3.0 l engine
3.0 l engine
3.0 l engine
3.0 l engine
3.0 l engine
3.0 l engine
3.0 l engine
3.0 l engine
3.0 l engine
3.0 l engine
3.0 l engine
3.0 l engine
3.0 l engine
3.0 l engine
3.0 l engine
3.0 l engine
3.0 l engine
3.0 l engine
3.0 l engine
3.0 l engine
3.0 l engine
3.0 l engine
3.0 l engine
3.0 l engine
3.0 l engine
3.0 l engine
3.0 l engine
3.0 l engine
3.0 l engine
3.0 l engine
3.0 l engine
3.0 l engine
3.0 l engine
3.0 l engine
3.0 l engine
3.0 l engine
3.0 l engine
3.0 l engine
3.0 l engine
3.0 l engine
3.0 l engine
3.0 l engine
3.0 l engine
3.0 l engine
3.0 l engine
3.0 l engine
3.0 l engine
3.0 l engine
3.0 l engine
3.0 l engine
3.0 l engine
3.0 l engine
3.0 l engine
3.0 l engine
3.0 l engine
3.0 l engine
3.0 l engine
3.0 l engine
3.0 l engine
3.0 l engine
3.0 l engine
3.0 l engine
3.0 l engine
3.0 l engine
3.0 l engine
3.0 l engine
3.0 l engine
3.0 l engine
3.0 l engine
3.0 l engine
3.0 l engine
3.0 l engine
3.0 l engine
3.0 l engine
3.0 l engine
3.0 l engine
3.0 l engine
3.0 l engine
3.0 l engine
3.0 l engine
3.0 l engine
3.0 l engine
3.0 l engine
3.0 l engine
3.0 l engine
3.0 l engine
3.0 l engine
3.0 l engine
3.0 l engine
3.0 l engine
3.0 l engine
3.0 l engine
3.0 l engine
3.0 l engine
3.0 l engine
3.0 l engine
3.0 l engine
3.0 l engine
3.0 l engine
3.0 l engine
3.0 l engine
3.0 l engine
3.0 l engine
3.0 l engine
3.0 l engine
3.0 l engine
3.0 l engine
3.0 l engine
3.0 l engine
3.0 l engine
3.0 l engine
3.0 l engine
3.0 l engine
3.0 l engine
3.0 l engine
3.0 l engine
3.0 l engine
3.0 l engine
3.0 l engine
3.0 l engine
3.0 l engine
3.0 l engine
3.0 l engine
3.0 l engine
3.0 l engine
3.0 l engine
3.0 l engine
3.0 l engine
3.0 l engine
3.0 l engine
3.0 l engine
3.0 l engine
3.0 l engine
3.0 l engine
3.0 l engine
3.0 l engine
3.0 l engine
3.0 l engine
3.0 l engine
3.0 l engine
3.0 l engine
3.0 l engine
3.0 l engine
3.0 l engine
3.0 l engine
3.0 l engine
3.0 l engine
3.0 l engine
3.0 l engine
3.0 l engine
3.0 l engine
3.0 l engine
3.0 l engine
3.0 l engine
3.0 l engine
3.0 l engine
3.0 l engine
3.0 l engine
3.0 l engine
3.0 l engine
3.0 l engine
3.0 l engine
3.0 l engine
3.0 l engine
3.0 l engine
3.0 l engine
3.0 l engine
3.0 l engine
3.0 l engine
3.0 l engine
3.0 l engine
3.0 l engine
3.0 l engine
3.0 l engine
3.0 l engine
3.0 l engine
3.0 l engine
3.0 l engine
3.0 l engine
3.0 l engine
3.0 l engine
3.0 l engine
3.0 l engine
3.0 l engine
3.0 l engine
3.0 l engine
3.0 l engine
3.0 l engine
3.0 l engine
3.0 l engine
3.0 l engine
3.0 l engine
3.0 l engine
3.0 l engine
3.0 l engine
3.0 l engine
3.0 l engine
3.0 l engine
3.0 l engine
3.0 l engine
3.0 l engine
3.0 l engine
3.0 l engine
3.0 l engine
3.0 l engine
3.0 l engine
3.0 l engine
3.0 l engine
3.0 l engine
3.0 l engine
3.0 l engine
3.0 l engine
3.0 l engine
3.0 l engine
3.0 l engine
3.0 l engine
3.0 l engine
3.0 l engine
3.0 l engine
3.0 l engine
3.0 l engine
3.0 l engine
3.0 l engine
3.0 l engine
3.0 l engine
3.0 l engine
3.0 l engine
3.0 l engine
3.0 l engine
3.0 l engine
3.0 l engine
3.0 l engine
3.0 l engine
3.0 l engine
3.0 l engine
3.0 l engine
3.0 l engine
3.0 l engine
3.0 l engine
3.0 l engine
3.0 l engine
3.0 l engine
3.0 l engine
3.0 l engine
3.0 l engine
3.0 l engine
3.0 l engine
3.0 l engine
3.0 l engine
3.0 l engine
3.0 l engine
3.0 l engine
3.0 l engine
3.0 l engine
3.0 l engine
3.0 l engine
3.0 l engine
3.0 l engine
3.0 l engine
3.0 l engine
3.0 l engine
3.0 l engine
3.0 l engine
3.0 l engine
3.0 l engine
3.0 l engine
3.0 l engine
3.0 l engine
3.0 l engine
3.0 l engine
3.0 l engine
3.0 l engine
3.0 l engine
3.0 l engine
3.0 l engine
3.0 l engine
3.0 l engine
3.0 l engine
3.0 l engine
3.0 l engine
3.0 l engine
3.0 l engine
3.0 l engine
3.0 l engine
3.0 l engine
3.0 l engine
3.0 l engine
3.0 l engine
3.0 l engine
3.0 l engine
3.0 l engine
3.0 l engine
3.0 l engine
3.0 l engine
3.0 l engine
3.0 l engine
3.0 l engine
3.0 l engine
3.0 l engine
3.0 l engine
3.0 l engine
3.0 l engine
3.0 l engine
3.0 l engine
3.0 l engine
3.0 l engine
3.0 l engine
3.0 l engine
3.0 l engine
3.0 l engine
3.0 l engine
3.0 l engine
3.0 l engine
3.0 l engine
3.0 l engine
3.0 l engine

More Related Content

What's hot

trator Massey Ferguson 275
trator Massey Ferguson 275trator Massey Ferguson 275
trator Massey Ferguson 275
Catalogo Fácil Agro Mecânica Tatuí
 
Catalogo Valmet 60 id
Catalogo Valmet 60 idCatalogo Valmet 60 id
Manual de serviço supl nx4 falcon
Manual de serviço supl nx4 falconManual de serviço supl nx4 falcon
Manual de serviço supl nx4 falcon
Thiago Huari
 
Manual de serviço ms nx 4 falcon - 00 x6b-mcg-002 transmis
Manual de serviço ms nx 4 falcon - 00 x6b-mcg-002 transmisManual de serviço ms nx 4 falcon - 00 x6b-mcg-002 transmis
Manual de serviço ms nx 4 falcon - 00 x6b-mcg-002 transmis
Thiago Huari
 
CASE 1010 GRAIN HEADER parts catalog
CASE 1010 GRAIN HEADER parts catalogCASE 1010 GRAIN HEADER parts catalog
CASE 1010 GRAIN HEADER parts catalog
PartCatalogs Net
 
Mf 7415
Mf 7415Mf 7415
MF4283
MF4283MF4283
CATALOGO DE PEÇAS MASSEY FERGUNSO 290
CATALOGO DE PEÇAS MASSEY FERGUNSO 290CATALOGO DE PEÇAS MASSEY FERGUNSO 290
CATALOGO DE PEÇAS MASSEY FERGUNSO 290
Catalogo Fácil Agro Mecânica Tatuí
 
2000 01 engine cooling
2000 01 engine cooling2000 01 engine cooling
2000 01 engine cooling
Jeff Sparks
 
Catalogo 4292
Catalogo 4292Catalogo 4292
Catalogo 4292
Claison Ribeiro
 
Claas Ares 507-607 Tractor repair manual
Claas Ares 507-607 Tractor repair manualClaas Ares 507-607 Tractor repair manual
Claas Ares 507-607 Tractor repair manual
Best Manuals
 
Steiger 430 CASE IH 4WD Tractor parts catalog
Steiger 430 CASE IH 4WD Tractor parts catalog Steiger 430 CASE IH 4WD Tractor parts catalog
Steiger 430 CASE IH 4WD Tractor parts catalog
PartCatalogs Net
 
Mitsubishi forklift spare parts manufacturer from zefeng 8618721729659
Mitsubishi forklift spare parts manufacturer from zefeng 8618721729659Mitsubishi forklift spare parts manufacturer from zefeng 8618721729659
Mitsubishi forklift spare parts manufacturer from zefeng 8618721729659
chu aimee
 
FARMTRAC AND FORD TRACTORS PARTS PHOTO CATALOG (S6-S10)
FARMTRAC AND FORD TRACTORS PARTS PHOTO CATALOG (S6-S10)FARMTRAC AND FORD TRACTORS PARTS PHOTO CATALOG (S6-S10)
FARMTRAC AND FORD TRACTORS PARTS PHOTO CATALOG (S6-S10)
Deepjot Rekhi
 
Catalogo TL New Holland - Sistema el+®trico
Catalogo TL New Holland - Sistema el+®tricoCatalogo TL New Holland - Sistema el+®trico
Catalogo TL New Holland - Sistema el+®trico
Catalogo Fácil Agro Mecânica Tatuí
 
Massey ferguson mf390 tractor ( b18009) parts catalogue manual
Massey ferguson mf390 tractor (  b18009) parts catalogue manualMassey ferguson mf390 tractor (  b18009) parts catalogue manual
Massey ferguson mf390 tractor ( b18009) parts catalogue manual
fjjskqazxedmmem
 
CATALOGO PEÇAS DIST CALCAREO DCCO/DCA DC/DCA2 TATU
CATALOGO PEÇAS DIST CALCAREO DCCO/DCA DC/DCA2 TATUCATALOGO PEÇAS DIST CALCAREO DCCO/DCA DC/DCA2 TATU
CATALOGO PEÇAS DIST CALCAREO DCCO/DCA DC/DCA2 TATU
Catalogo Fácil Agro Mecânica Tatuí
 
FARMTRAC AND FORD TRACTORS PARTS PHOTO CATALOG (S31-S35)
FARMTRAC AND FORD TRACTORS PARTS PHOTO CATALOG (S31-S35)FARMTRAC AND FORD TRACTORS PARTS PHOTO CATALOG (S31-S35)
FARMTRAC AND FORD TRACTORS PARTS PHOTO CATALOG (S31-S35)
Deepjot Rekhi
 
Lemken vari-diamant 10-x parts catalog
Lemken vari-diamant 10-x parts catalog Lemken vari-diamant 10-x parts catalog
Lemken vari-diamant 10-x parts catalog
PartCatalogs Net
 
CASE 1020 Grain header
CASE 1020 Grain headerCASE 1020 Grain header
CASE 1020 Grain header
PartCatalogs Net
 

What's hot (20)

trator Massey Ferguson 275
trator Massey Ferguson 275trator Massey Ferguson 275
trator Massey Ferguson 275
 
Catalogo Valmet 60 id
Catalogo Valmet 60 idCatalogo Valmet 60 id
Catalogo Valmet 60 id
 
Manual de serviço supl nx4 falcon
Manual de serviço supl nx4 falconManual de serviço supl nx4 falcon
Manual de serviço supl nx4 falcon
 
Manual de serviço ms nx 4 falcon - 00 x6b-mcg-002 transmis
Manual de serviço ms nx 4 falcon - 00 x6b-mcg-002 transmisManual de serviço ms nx 4 falcon - 00 x6b-mcg-002 transmis
Manual de serviço ms nx 4 falcon - 00 x6b-mcg-002 transmis
 
CASE 1010 GRAIN HEADER parts catalog
CASE 1010 GRAIN HEADER parts catalogCASE 1010 GRAIN HEADER parts catalog
CASE 1010 GRAIN HEADER parts catalog
 
Mf 7415
Mf 7415Mf 7415
Mf 7415
 
MF4283
MF4283MF4283
MF4283
 
CATALOGO DE PEÇAS MASSEY FERGUNSO 290
CATALOGO DE PEÇAS MASSEY FERGUNSO 290CATALOGO DE PEÇAS MASSEY FERGUNSO 290
CATALOGO DE PEÇAS MASSEY FERGUNSO 290
 
2000 01 engine cooling
2000 01 engine cooling2000 01 engine cooling
2000 01 engine cooling
 
Catalogo 4292
Catalogo 4292Catalogo 4292
Catalogo 4292
 
Claas Ares 507-607 Tractor repair manual
Claas Ares 507-607 Tractor repair manualClaas Ares 507-607 Tractor repair manual
Claas Ares 507-607 Tractor repair manual
 
Steiger 430 CASE IH 4WD Tractor parts catalog
Steiger 430 CASE IH 4WD Tractor parts catalog Steiger 430 CASE IH 4WD Tractor parts catalog
Steiger 430 CASE IH 4WD Tractor parts catalog
 
Mitsubishi forklift spare parts manufacturer from zefeng 8618721729659
Mitsubishi forklift spare parts manufacturer from zefeng 8618721729659Mitsubishi forklift spare parts manufacturer from zefeng 8618721729659
Mitsubishi forklift spare parts manufacturer from zefeng 8618721729659
 
FARMTRAC AND FORD TRACTORS PARTS PHOTO CATALOG (S6-S10)
FARMTRAC AND FORD TRACTORS PARTS PHOTO CATALOG (S6-S10)FARMTRAC AND FORD TRACTORS PARTS PHOTO CATALOG (S6-S10)
FARMTRAC AND FORD TRACTORS PARTS PHOTO CATALOG (S6-S10)
 
Catalogo TL New Holland - Sistema el+®trico
Catalogo TL New Holland - Sistema el+®tricoCatalogo TL New Holland - Sistema el+®trico
Catalogo TL New Holland - Sistema el+®trico
 
Massey ferguson mf390 tractor ( b18009) parts catalogue manual
Massey ferguson mf390 tractor (  b18009) parts catalogue manualMassey ferguson mf390 tractor (  b18009) parts catalogue manual
Massey ferguson mf390 tractor ( b18009) parts catalogue manual
 
CATALOGO PEÇAS DIST CALCAREO DCCO/DCA DC/DCA2 TATU
CATALOGO PEÇAS DIST CALCAREO DCCO/DCA DC/DCA2 TATUCATALOGO PEÇAS DIST CALCAREO DCCO/DCA DC/DCA2 TATU
CATALOGO PEÇAS DIST CALCAREO DCCO/DCA DC/DCA2 TATU
 
FARMTRAC AND FORD TRACTORS PARTS PHOTO CATALOG (S31-S35)
FARMTRAC AND FORD TRACTORS PARTS PHOTO CATALOG (S31-S35)FARMTRAC AND FORD TRACTORS PARTS PHOTO CATALOG (S31-S35)
FARMTRAC AND FORD TRACTORS PARTS PHOTO CATALOG (S31-S35)
 
Lemken vari-diamant 10-x parts catalog
Lemken vari-diamant 10-x parts catalog Lemken vari-diamant 10-x parts catalog
Lemken vari-diamant 10-x parts catalog
 
CASE 1020 Grain header
CASE 1020 Grain headerCASE 1020 Grain header
CASE 1020 Grain header
 

Similar to 3.0 l engine

2007 GMC YUKON Service Repair Manual
2007 GMC YUKON Service Repair Manual2007 GMC YUKON Service Repair Manual
2007 GMC YUKON Service Repair Manual
jkmdmm mkueoi
 
2008 GMC YUKON Service Repair Manual
2008 GMC YUKON Service Repair Manual2008 GMC YUKON Service Repair Manual
2008 GMC YUKON Service Repair Manual
jhsjenfn ysehfjn
 
Allis chalmers models 7020 tractor service repair manual
Allis chalmers models 7020 tractor service repair manualAllis chalmers models 7020 tractor service repair manual
Allis chalmers models 7020 tractor service repair manual
fjjskekkdmme
 
Allis chalmers models 7040 tractor service repair manual
Allis chalmers models 7040 tractor service repair manualAllis chalmers models 7040 tractor service repair manual
Allis chalmers models 7040 tractor service repair manual
ufjjsjekkdemd
 
Allis chalmers models 7020 tractor service repair manual
Allis chalmers models 7020 tractor service repair manualAllis chalmers models 7020 tractor service repair manual
Allis chalmers models 7020 tractor service repair manual
ufusejkksemm
 
Allis chalmers models 7020 tractor service repair manual
Allis chalmers models 7020 tractor service repair manualAllis chalmers models 7020 tractor service repair manual
Allis chalmers models 7020 tractor service repair manual
fjskekazxdmmme
 
Allis chalmers models 7010 tractor service repair manual
Allis chalmers models 7010 tractor service repair manualAllis chalmers models 7010 tractor service repair manual
Allis chalmers models 7010 tractor service repair manual
ufusejkksemm
 
Allis chalmers models 7020 tractor service repair manual
Allis chalmers models 7020 tractor service repair manualAllis chalmers models 7020 tractor service repair manual
Allis chalmers models 7020 tractor service repair manual
fjskkkdmem
 
Allis chalmers models 7060 tractor service repair manual
Allis chalmers models 7060 tractor service repair manualAllis chalmers models 7060 tractor service repair manual
Allis chalmers models 7060 tractor service repair manual
fjjskqazxedmmem
 
Allis chalmers models 7030 tractor service repair manual
Allis chalmers models 7030 tractor service repair manualAllis chalmers models 7030 tractor service repair manual
Allis chalmers models 7030 tractor service repair manual
fjjsekfksmemer
 
Allis chalmers models 7010 tractor service repair manual
Allis chalmers models 7010 tractor service repair manualAllis chalmers models 7010 tractor service repair manual
Allis chalmers models 7010 tractor service repair manual
jfjkskekfmsme
 
Allis chalmers models 7030 tractor service repair manual
Allis chalmers models 7030 tractor service repair manualAllis chalmers models 7030 tractor service repair manual
Allis chalmers models 7030 tractor service repair manual
ufjjsjekkdemd
 
Allis chalmers models 7040 tractor service repair manual
Allis chalmers models 7040 tractor service repair manualAllis chalmers models 7040 tractor service repair manual
Allis chalmers models 7040 tractor service repair manual
fjjsekwsxkdmmem
 
Allis chalmers models 7045 tractor service repair manual
Allis chalmers models 7045 tractor service repair manualAllis chalmers models 7045 tractor service repair manual
Allis chalmers models 7045 tractor service repair manual
fjjfyjsekdmme
 
Allis chalmers models 7050 tractor service repair manual
Allis chalmers models 7050 tractor service repair manualAllis chalmers models 7050 tractor service repair manual
Allis chalmers models 7050 tractor service repair manual
fjjfyjsekdmme
 
Allis chalmers models 7080 tractor service repair manual
Allis chalmers models 7080 tractor service repair manualAllis chalmers models 7080 tractor service repair manual
Allis chalmers models 7080 tractor service repair manual
fjskekfksmem
 
Allis chalmers models 7045 tractor service repair manual
Allis chalmers models 7045 tractor service repair manualAllis chalmers models 7045 tractor service repair manual
Allis chalmers models 7045 tractor service repair manual
ufjjsjkkskemmd
 
Allis chalmers models 7020 tractor service repair manual
Allis chalmers models 7020 tractor service repair manualAllis chalmers models 7020 tractor service repair manual
Allis chalmers models 7020 tractor service repair manual
fudjjjskeskmmd
 
Allis chalmers models 7080 tractor service repair manual
Allis chalmers models 7080 tractor service repair manualAllis chalmers models 7080 tractor service repair manual
Allis chalmers models 7080 tractor service repair manual
fjseoldkekm
 
Allis chalmers models 7010 tractor service repair manual
Allis chalmers models 7010 tractor service repair manualAllis chalmers models 7010 tractor service repair manual
Allis chalmers models 7010 tractor service repair manual
fjjskekkdmme
 

Similar to 3.0 l engine (20)

2007 GMC YUKON Service Repair Manual
2007 GMC YUKON Service Repair Manual2007 GMC YUKON Service Repair Manual
2007 GMC YUKON Service Repair Manual
 
2008 GMC YUKON Service Repair Manual
2008 GMC YUKON Service Repair Manual2008 GMC YUKON Service Repair Manual
2008 GMC YUKON Service Repair Manual
 
Allis chalmers models 7020 tractor service repair manual
Allis chalmers models 7020 tractor service repair manualAllis chalmers models 7020 tractor service repair manual
Allis chalmers models 7020 tractor service repair manual
 
Allis chalmers models 7040 tractor service repair manual
Allis chalmers models 7040 tractor service repair manualAllis chalmers models 7040 tractor service repair manual
Allis chalmers models 7040 tractor service repair manual
 
Allis chalmers models 7020 tractor service repair manual
Allis chalmers models 7020 tractor service repair manualAllis chalmers models 7020 tractor service repair manual
Allis chalmers models 7020 tractor service repair manual
 
Allis chalmers models 7020 tractor service repair manual
Allis chalmers models 7020 tractor service repair manualAllis chalmers models 7020 tractor service repair manual
Allis chalmers models 7020 tractor service repair manual
 
Allis chalmers models 7010 tractor service repair manual
Allis chalmers models 7010 tractor service repair manualAllis chalmers models 7010 tractor service repair manual
Allis chalmers models 7010 tractor service repair manual
 
Allis chalmers models 7020 tractor service repair manual
Allis chalmers models 7020 tractor service repair manualAllis chalmers models 7020 tractor service repair manual
Allis chalmers models 7020 tractor service repair manual
 
Allis chalmers models 7060 tractor service repair manual
Allis chalmers models 7060 tractor service repair manualAllis chalmers models 7060 tractor service repair manual
Allis chalmers models 7060 tractor service repair manual
 
Allis chalmers models 7030 tractor service repair manual
Allis chalmers models 7030 tractor service repair manualAllis chalmers models 7030 tractor service repair manual
Allis chalmers models 7030 tractor service repair manual
 
Allis chalmers models 7010 tractor service repair manual
Allis chalmers models 7010 tractor service repair manualAllis chalmers models 7010 tractor service repair manual
Allis chalmers models 7010 tractor service repair manual
 
Allis chalmers models 7030 tractor service repair manual
Allis chalmers models 7030 tractor service repair manualAllis chalmers models 7030 tractor service repair manual
Allis chalmers models 7030 tractor service repair manual
 
Allis chalmers models 7040 tractor service repair manual
Allis chalmers models 7040 tractor service repair manualAllis chalmers models 7040 tractor service repair manual
Allis chalmers models 7040 tractor service repair manual
 
Allis chalmers models 7045 tractor service repair manual
Allis chalmers models 7045 tractor service repair manualAllis chalmers models 7045 tractor service repair manual
Allis chalmers models 7045 tractor service repair manual
 
Allis chalmers models 7050 tractor service repair manual
Allis chalmers models 7050 tractor service repair manualAllis chalmers models 7050 tractor service repair manual
Allis chalmers models 7050 tractor service repair manual
 
Allis chalmers models 7080 tractor service repair manual
Allis chalmers models 7080 tractor service repair manualAllis chalmers models 7080 tractor service repair manual
Allis chalmers models 7080 tractor service repair manual
 
Allis chalmers models 7045 tractor service repair manual
Allis chalmers models 7045 tractor service repair manualAllis chalmers models 7045 tractor service repair manual
Allis chalmers models 7045 tractor service repair manual
 
Allis chalmers models 7020 tractor service repair manual
Allis chalmers models 7020 tractor service repair manualAllis chalmers models 7020 tractor service repair manual
Allis chalmers models 7020 tractor service repair manual
 
Allis chalmers models 7080 tractor service repair manual
Allis chalmers models 7080 tractor service repair manualAllis chalmers models 7080 tractor service repair manual
Allis chalmers models 7080 tractor service repair manual
 
Allis chalmers models 7010 tractor service repair manual
Allis chalmers models 7010 tractor service repair manualAllis chalmers models 7010 tractor service repair manual
Allis chalmers models 7010 tractor service repair manual
 

More from Jeff Sparks

2005 front suspension
2005 front suspension2005 front suspension
2005 front suspension
Jeff Sparks
 
2005 engine electrical
2005 engine electrical2005 engine electrical
2005 engine electrical
Jeff Sparks
 
2005 engine cooling
2005 engine cooling2005 engine cooling
2005 engine cooling
Jeff Sparks
 
2005 elelctrical component locator
2005 elelctrical component locator2005 elelctrical component locator
2005 elelctrical component locator
Jeff Sparks
 
2005 disc brakes
2005 disc brakes2005 disc brakes
2005 disc brakes
Jeff Sparks
 
2005 axle shafts
2005 axle shafts2005 axle shafts
2005 axle shafts
Jeff Sparks
 
2005 antilock brakes
2005 antilock brakes2005 antilock brakes
2005 antilock brakes
Jeff Sparks
 
2004 wiring part 3
2004 wiring part 32004 wiring part 3
2004 wiring part 3
Jeff Sparks
 
2004 wiring part 2
2004 wiring part 22004 wiring part 2
2004 wiring part 2Jeff Sparks
 
2003 power steering
2003 power steering2003 power steering
2003 power steering
Jeff Sparks
 
2001 fuses
2001 fuses2001 fuses
2001 fuses
Jeff Sparks
 
2001 electrical component locator
2001 electrical component locator2001 electrical component locator
2001 electrical component locator
Jeff Sparks
 
2001 drive belt routing
2001 drive belt routing2001 drive belt routing
2001 drive belt routing
Jeff Sparks
 
2000 02 rear suspension
2000 02 rear suspension2000 02 rear suspension
2000 02 rear suspensionJeff Sparks
 
2000 01 steering column
2000 01 steering column2000 01 steering column
2000 01 steering columnJeff Sparks
 
2000 01 power steering
2000 01 power steering2000 01 power steering
2000 01 power steering
Jeff Sparks
 
2000 01 brakes
2000 01 brakes2000 01 brakes
2000 01 brakes
Jeff Sparks
 

More from Jeff Sparks (20)

2005 front suspension
2005 front suspension2005 front suspension
2005 front suspension
 
2005 engine electrical
2005 engine electrical2005 engine electrical
2005 engine electrical
 
2005 engine cooling
2005 engine cooling2005 engine cooling
2005 engine cooling
 
2005 elelctrical component locator
2005 elelctrical component locator2005 elelctrical component locator
2005 elelctrical component locator
 
2005 disc brakes
2005 disc brakes2005 disc brakes
2005 disc brakes
 
2005 axle shafts
2005 axle shafts2005 axle shafts
2005 axle shafts
 
2005 antilock brakes
2005 antilock brakes2005 antilock brakes
2005 antilock brakes
 
2004 wiring
2004 wiring2004 wiring
2004 wiring
 
2004 wiring part 3
2004 wiring part 32004 wiring part 3
2004 wiring part 3
 
2004 wiring part 2
2004 wiring part 22004 wiring part 2
2004 wiring part 2
 
2003 power steering
2003 power steering2003 power steering
2003 power steering
 
2001 fuses
2001 fuses2001 fuses
2001 fuses
 
2001 electrical component locator
2001 electrical component locator2001 electrical component locator
2001 electrical component locator
 
2001 drive belt routing
2001 drive belt routing2001 drive belt routing
2001 drive belt routing
 
2001 airbag
2001 airbag2001 airbag
2001 airbag
 
2000 02 rear suspension
2000 02 rear suspension2000 02 rear suspension
2000 02 rear suspension
 
2000 01 steering column
2000 01 steering column2000 01 steering column
2000 01 steering column
 
2000 01 hvac
2000 01 hvac2000 01 hvac
2000 01 hvac
 
2000 01 power steering
2000 01 power steering2000 01 power steering
2000 01 power steering
 
2000 01 brakes
2000 01 brakes2000 01 brakes
2000 01 brakes
 

3.0 l engine

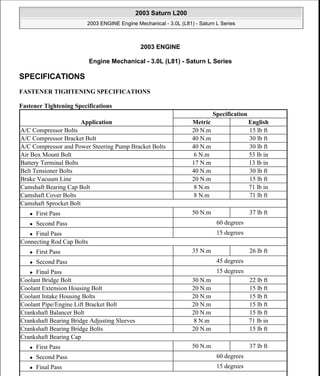
  • 1. 2003 ENGINE Engine Mechanical - 3.0L (L81) - Saturn L Series SPECIFICATIONS FASTENER TIGHTENING SPECIFICATIONS Fastener Tightening Specifications Application Specification Metric English A/C Compressor Bolts 20 N.m 15 lb ft A/C Compressor Bracket Bolt 40 N.m 30 lb ft A/C Compressor and Power Steering Pump Bracket Bolts 40 N.m 30 lb ft Air Box Mount Bolt 6 N.m 53 lb in Battery Terminal Bolts 17 N.m 13 lb in Belt Tensioner Bolts 40 N.m 30 lb ft Brake Vacuum Line 20 N.m 15 lb ft Camshaft Bearing Cap Bolt 8 N.m 71 lb in Camshaft Cover Bolts 8 N.m 71 lb ft Camshaft Sprocket Bolt  First Pass 50 N.m 37 lb ft  Second Pass 60 degrees  Final Pass 15 degrees Connecting Rod Cap Bolts  First Pass 35 N.m 26 lb ft  Second Pass 45 degrees  Final Pass 15 degrees Coolant Bridge Bolt 30 N.m 22 lb ft Coolant Extension Housing Bolt 20 N.m 15 lb ft Coolant Intake Housing Bolts 20 N.m 15 lb ft Coolant Pipe/Engine Lift Bracket Bolt 20 N.m 15 lb ft Crankshaft Balancer Bolt 20 N.m 15 lb ft Crankshaft Bearing Bridge Adjusting Sleeves 8 N.m 71 lb in Crankshaft Bearing Bridge Bolts 20 N.m 15 lb ft Crankshaft Bearing Cap  First Pass 50 N.m 37 lb ft  Second Pass 60 degrees  Final Pass 15 degrees 2003 Saturn L200 2003 ENGINE Engine Mechanical - 3.0L (L81) - Saturn L Series 2003 Saturn L200 2003 ENGINE Engine Mechanical - 3.0L (L81) - Saturn L Series steve Monday, May 09, 2011 12:20:05 PM Page 1 © 2006 Mitchell Repair Information Company, LLC. steve Monday, May 09, 2011 12:20:25 PM Page 1 © 2006 Mitchell Repair Information Company, LLC.
  • 2. Crankshaft Drive Gear Bolt  First Pass 250 N.m 184 lb ft  Second Pass 45 degrees  Final Pass 15 degrees Crankshaft Position Sensor Bolt 8 N.m 71 lb in Crankshaft Reluctor Ring Screw 15 N.m 11 lb ft Cylinder Head Bolt  First Pass 25 N.m 18 lb ft  Second Pass 90 degrees  Third Pass 90 degrees  Fourth Pass 90 degrees  Final Pass 15 degrees EGR Manifold Bolt 8 N.m 71 lb in EGR Pipe Bolts 25 N.m 18 lb ft Engine Control Module Bolts 8 N.m 71 lb in Engine Lift Bracket Bolts 8 N.m 71 lb in Engine Mount Bracket Bolt 55 N.m 41 lb ft Engine Mount-to-Bracket Bolt 55 N.m 41 lb ft Engine Mount-to-Frame Bolt 55 N.m 41 lb ft Engine Oil Cooler Cover Bolt 30 N.m 22 lb ft Engine Oil Cooler Inlet and Outlet Nut 20 N.m 15 lb ft Engine Ventilation Chamber Bolts 8 N.m 71 lb in Exhaust Manifold Nut 20 N.m 15 lb ft Exhaust Manifold Pipe-to-Exhaust Manifold Nuts 30 N.m 25 lb ft Flex Plate Bolt  First Pass 65 N.m 48 lb ft  Second Pass 30 degrees  Final Pass 15 degrees Front Timing Belt Cover Bolt 8 N.m 71 lb in Fuel Rail Bolts 8 N.m 71 lb in Generator Mounting Bolts 40 N.m 30 lb ft Idler Pulley Bolt 40 N.m 30 lb ft Idler Pulley Fastener 40 N.m 30 lb ft Ignition Module Bolt 8 N.m 71 lb in Intake Manifold Bolt 20 N.m 15 lb ft Intake Manifold Runner Bolts 8 N.m 71 lb in Intake Manifold Runner Bracket Bolt 20 N.m 15 lb ft Intake Manifold Spacer Plate Bolt 20 N.m 15 lb ft 2003 Saturn L200 2003 ENGINE Engine Mechanical - 3.0L (L81) - Saturn L Series steve Monday, May 09, 2011 12:20:05 PM Page 2 © 2006 Mitchell Repair Information Company, LLC.
  • 3. ENGINE MECHANICAL SPECIFICATIONS Engine Block Specifications Intake Plenum Bolts 8 N.m 71 lb in Lower Engine-to-Transaxle Bell Housing Bolts 65 N.m 48 lb ft Nose Cone Bracket-to-Oil Pan Bolts - Transaxle Nose Bracket Bolts 40 N.m 30 lb ft Oil Cooler Feed and Return Lines to Engine Block 30 N.m 22 lb ft Oil Drain Plug 10 N.m 89 lb in Oil Filter Cap 15 N.m 11 lb ft Oil Filter Cartridge Housing-to-Engine 45 N.m 33 lb ft Oil Level Indicator Tube Bolt 20 N.m 15 lb ft Oil Pan Baffle Bolt 8 N.m 71 lb in Oil Pan Bolts 15 N.m 11 lb ft Oil Pickup Tube bolts 8 N.m 71 lb in Oil Pump Bolts 27 N.m 20 lb ft Oxygen Sensors - Exhaust Manifold 50 N.m 37 lb ft Power Steering Pump Bolts 20 N.m 15 lb ft Power Steering Pump Pulley Bolt 20 N.m 15 lb ft Rear Timing Belt Cover Bolt 8 N.m 71 lb ft Rear Timing Belt Cover Threaded Pin 10 N.m 89 lb in Spark Plug 25 N.m 18 lb ft Thermostat Housing Bolts 20 N.m 15 lb ft Throttle Body Nut 8 N.m 71 lb in Timing Belt Tensioner Bracket Bolt 40 N.m 30 lb ft Timing Belt Tensioner Fastening Nut 20 N.m 15 lb ft Torque Converter Bolts 65 N.m 48 lb ft Transaxle Mount Through Bolt 55 N.m 41 lb ft Transaxle-to-Oil Pan Bolts 65 N.m 48 lb ft Upper Bell Housing Bolts 65 N.m 48 lb ft Upper Pulley Bolt 40 N.m 30 lb ft Ventilation Housing Bolts 8 N.m 71 lb in Water Pump Bolt 25 N.m 18 lb ft Water Pump Pulley Bolt 8 N.m 71 lb in Wheel Bolts 125 N.m 92 lb ft Application Service Limit Metric English Cylinder Bore - Select Fit Designation Stamped on Block  (8) 85.975-85.985 mm 3.3848-3.3852 in  (99) 85.985-85.995 mm 3.3852-3.3856 in 2003 Saturn L200 2003 ENGINE Engine Mechanical - 3.0L (L81) - Saturn L Series steve Monday, May 09, 2011 12:20:05 PM Page 3 © 2006 Mitchell Repair Information Company, LLC.
  • 4.  (00) 85.995-86.005 mm 3.3856-3.3860 in  (01) 86.005-86.015 mm 3.3860-3.3864 in  (02) 86.015-86.025 mm 3.3864-3.3868 in  (7 + 0.5) Oversize 86.465-86.475 mm 3.4041-3.4045 in  Maximum Out-of-Round 0.065 mm 0.0003 in  Taper 0.0065 mm 0.0003 in Piston - Select Fit Designation Stamped on Top of Piston  (8) 85.940-85.950 mm 3.3834-3.3838 in  (99) 85.950-85.960 mm 3.3838-3.3842 in  (00) 85.960-85.970 mm 3.3842-3.3846 in  (01) 85.970-85.980 mm 3.3846-3.3850 in  (02) 85.980-85.990 mm 3.3850-3.3854 in  (7 + 0.5) Oversize 86.430-86.440 mm 3.4027-3.4031 in  Piston Bore Clearance 0.025-0.045 mm 0.0010-0.0018 in  Piston Pin Diameter 21 mm 0.8267 in  Clearance in Piston 0.003-0.008 mm 0.0001-0.0003 in Piston Ring - Compression  Thickness 1.5 mm 0.0590 in  Ring Groove Clearance 0.02-0.04 mm 0.0008-0.0015 in  Ring Gap 0.30-0.50 mm 0.0118-0.0196 in Piston Ring - Oil  Thickness 3.0 mm 0.1181 in  Ring Groove Clearance 0.01-0.03 mm 0.0004-0.0012 in  Ring Gap 0.40-1.40 mm 0.0157-0.0551 in Piston Pin  Diameter 21 mm 0.8267 in  Clearance in Piston 0.001-0.015 mm 0.0001-0.0003 in Crankshaft - Main Journal  Standard Size - Green 67.980-67.988 mm 2.6763-2.6766 in  Standard Size - Brown 67.988-67.996 mm 2.6766-2.6770 in  Undersize - 0.25 - Green/Blue 67.730-67.738 mm 2.6656-2.6668 in  Undersize - 0.25 - Brown/Blue 67.738-67.746 mm 2.668-2.6671 in  Undersize - 0.50 - Green/White 67.480-67.488 mm 2.666-2.6570 in  Undersize - 0.50 - Brown/Blue 67.488-67.496 mm 2.6570-2.6573 in 2003 Saturn L200 2003 ENGINE Engine Mechanical - 3.0L (L81) - Saturn L Series steve Monday, May 09, 2011 12:20:05 PM Page 4 © 2006 Mitchell Repair Information Company, LLC.
  • 5. Cylinder Head Specifications  Main Journal Maximum Out-of-Round 0.03 mm 0.0012 in  Crankshaft Bearing Clearance 0.014-0.043 mm 0.0006-0.0017 in  Crankshaft End Play 0.010-0.76 mm 0.0004-0.0300 in  Connecting Rod Journal Diameter 48.971-48.990 mm 1.927-1.928 in  Undersize - 0.25 48.721-48.740 mm 1.918-1.919 in  Undersize - 0.50 48.471-48.490 mm 1.908-1.909 in Connecting Rod  Side Clearance 0.07-0.28 mm 0.0027-0.0110 in  Bearing Clearance 0.013-0.061 mm 0.0005-0.0024 in  Big End Diameter 52.000-52.012 mm 2.0472-2.0477 mm Measurement Standard Service Limit Metric English Metric English Compression (Hot) 250 RPM (Open Throttle) 1310 kPa 190 psi min 1,241 kPa 180 psi min Cylinder Leakage (Hot) 689 kPa (100 psi) Input 69 kPa 10% max 10 psi max 138 kPa 15% max 20 psi max Cylinder Head Total Height 134.0 mm 5.276 in 133.9-134.1 mm 5.272-5.280 in Maximum Distortion (Length) - - 0.05/100 mm 0.0020/3.937 in Valve Lifter - - - - Face Angle - - - 45 degrees Seat Angle - - - 45 degrees Seat Width - - - - Intake 1.0-1.4 mm 0.0394-0.0551 in - - Exhaust 1.4-1.8 mm 0.0551-0.0709 in - - Valve Length - Production Intake 102.1 mm 4.016 in - - Exhaust 92.25 mm 3.632 in - - Valve Length - Service Intake 101.7 mm 4.0039 in - - Exhaust 91.8 mm 3.6141 in - - Valve Stem Diameter Standard (K) Intake 5.955-5.970 mm 0.2344-0.2350 in - - 2003 Saturn L200 2003 ENGINE Engine Mechanical - 3.0L (L81) - Saturn L Series steve Monday, May 09, 2011 12:20:05 PM Page 5 © 2006 Mitchell Repair Information Company, LLC.
  • 6. SEALERS, ADHESIVES, AND LUBRICANTS Sealers, Adhesives, and Lubricants Standard (K) Exhaust 5.945-5.960 mm 0.2341-0.2346 in - - Oversize (K 1-0.075) Intake 6.030 mm 0.2374 in - - Oversize (K 1-0.075) Exhaust 6.020 mm 0.2370 in - - Valve Guide Diameter Standard (K) 6.000-6.012 mm 0.2362-0.2367 in - - Oversize (K 1-0.075) 6.075-6.090 mm 0.2392-0.2398 in - - Valve Guide Installed Height 13.7-14.0 mm 0.5394-0.5512 in - - Stem Clearance Intake 0.030-0.057 mm 0.0012-0.0022 in - - Exhaust 0.040-0.067 mm 0.0016-0.0026 in - - Valve Height Intake 39.2 mm 1.543 in - - Exhaust 39.2 mm 1.543 in - - Intake and Exhaust Compressed at 252 N (56.6 lbs) 34 mm 1.338 in - - Camshaft Exhaust Cam Lobe Lift Rise 8.66-8.74 mm 0.3409-0.344 in 8.61 mm 0.339 in min Lifter Body Diameter 32.959-32.975 mm 1.2976-1.282 in 32.947 mm 1.297 in min Lifter Body Clearance 0.025-0.066 mm 0.0010-0.0026 in 0.083 mm 0.003 in max Journal Diameter 27.939-27.960 mm 1.099-1.101 in - - Bearing Clearance 0.040-0.082 mm 0.0015-0.0020 in - - End Play 0.04-0.144 mm 0.0016-0.0057 in - - Spark Plug Type Bosch FLR-LTE, GM P/N 90541059 - Gap 0.9-1.1 mm 0.035-0.043 in - - Torque - - 25 N.m 19 lb ft Oil Pressure - Minimum Engine Idle - at Normal Operating Temperature - - 110 kPa 16 psi 2003 Saturn L200 2003 ENGINE Engine Mechanical - 3.0L (L81) - Saturn L Series steve Monday, May 09, 2011 12:20:05 PM Page 6 © 2006 Mitchell Repair Information Company, LLC.
  • 7. COMPONENT LOCATOR DISASSEMBLED VIEWS Application Type of Material GM Part Number United States Canada Camshaft Bearing Engine Assembly Lubricant 1052367 992869 Camshaft Cover Sealant 12346286 10953472 Camshaft Front Bearing Cap Sealant 1052942 10953466 Camshaft Lobes Engine Assembly Lubricant 1052367 992869 Connecting Rod Bearings Engine Assembly Lubricant 1052367 992869 Coolant Jacket Plugs Sealant 12346004 10953480 Crankcase Vent Housing Sealant 1052942 10953466 Crankshaft Bearing Bridge Adjusting Sleeves Thread Adhesive 12345493 10953488 Crankshaft Main Bearings Engine Assembly Lubricant 1052367 992869 Crankshaft Fourth Main Bearing Cap Sealant 12346286 10953472 Flywheel Bolts Thread Adhesive 12345493 10953488 Intake Manifold Flange Bolts Thread Adhesive 12345382 10953489 Oil Cooler Cover Sealant 12378521 88901148 Oil Cooler Cover Bolts Thread Adhesive 12345382 10953489 Oil Level Indicator Tube Bolt Thread Adhesive 12345493 10953488 Oil Pan Sealant 1052942 10953466 Oil Pan Bolts Thread Adhesive 21485278 10953480 Oil Pump Bolts Thread Adhesive 21485278 10953480 Oil Pump Pickup Brace Bolts Thread Adhesive 12345382 10953489 Thermostat Housing Bolts Sealant 12346004 10953480 Timing Belt Rear Cover Bolt Thread Adhesive 12345382 10953489 Water Pump Pulley Bolts Thread Adhesive 12345382 10953489 Water Pump Seal Silicone 12345579 1974984 Valve Lifter Engine Assembly Lubricant 1052367 992869 2003 Saturn L200 2003 ENGINE Engine Mechanical - 3.0L (L81) - Saturn L Series steve Monday, May 09, 2011 12:20:05 PM Page 7 © 2006 Mitchell Repair Information Company, LLC.
  • 8. Fig. 1: Front of Engine Disassembled View Courtesy of GENERAL MOTORS CORP. Callouts For Fig. 1 Callout Component Name 1 Timing Belt Front Cover Bolt 2 Timing Belt Front Cover Seal 3 Timing Belt 4 Timing Belt Tensioner Bracket Bolt 5 Timing Belt Tensioner Bracket, Includes 1-2 Idler Pulley and Tensioner 6 Water Pump 7 Timing Belt Rear Cover 8 Camshaft Sprocket Bolt 9 Camshaft Sprocket Washer 10 Camshaft Sprocket 11 3-4 Timing Belt Idler 12 3-4 Timing Belt Idler Bolt 13 Oil Pump Collar 2003 Saturn L200 2003 ENGINE Engine Mechanical - 3.0L (L81) - Saturn L Series steve Monday, May 09, 2011 12:20:05 PM Page 8 © 2006 Mitchell Repair Information Company, LLC.
  • 9. 14 Timing Belt Rear Cover Bolt 15 Water Pump Bolt 16 Crankshaft Pulley 17 Crankshaft Pulley Bolt 18 Crankshaft Balancer 19 Crankshaft Balancer Bolt 20 Timing Belt Front Cover 21 Water Pump Pulley 22 Water Pump Pulley Bolts 2003 Saturn L200 2003 ENGINE Engine Mechanical - 3.0L (L81) - Saturn L Series steve Monday, May 09, 2011 12:20:05 PM Page 9 © 2006 Mitchell Repair Information Company, LLC.
  • 10. 2003 Saturn L200 2003 ENGINE Engine Mechanical - 3.0L (L81) - Saturn L Series steve Monday, May 09, 2011 12:20:05 PM Page 10 © 2006 Mitchell Repair Information Company, LLC.
  • 11. Fig. 2: Crankshaft/Pistons Disassembled View Courtesy of GENERAL MOTORS CORP. Callouts For Fig. 2 Callout Component Name 1 Piston Pin Retaining Clip 2 Piston Pin 3 Upper Compression Ring 4 Lower Compression Ring 5 Oil Control Rings 6 Connecting Rod 7 Connecting Rod Bearing 8 Connecting Rod Cap 9 Connecting Rod Bolt 10 Crankshaft Sensor 11 Flywheel Bolt 12 Flywheel 13 Crankshaft Sensor Reluctor Ring Bolt 14 Crankshaft Sensor Reluctor Ring 15 Crankshaft Lower Main Bearings 16 Crankshaft Main Bearing Cap Bolt 17 Crankshaft Main Bearing Caps 18 Crankshaft Bearing Bridge 19 Crankshaft Bearing Bridge Bolt 20 Crankshaft Bearing Bridge Adjusting Sleeve 21 Crankshaft 22 Crankshaft Upper Main Bearings 23 Left Knock Sensor 2003 Saturn L200 2003 ENGINE Engine Mechanical - 3.0L (L81) - Saturn L Series steve Monday, May 09, 2011 12:20:05 PM Page 11 © 2006 Mitchell Repair Information Company, LLC.
  • 12. Fig. 3: Manifold and Related Disassembled View 2003 Saturn L200 2003 ENGINE Engine Mechanical - 3.0L (L81) - Saturn L Series steve Monday, May 09, 2011 12:20:05 PM Page 12 © 2006 Mitchell Repair Information Company, LLC.
  • 13. Courtesy of GENERAL MOTORS CORP. Callouts For Fig. 3 Callout Component Name 1 Fuel Injection Rail 2 Fuel Injection Fuel Feed and Return Bolt 3 Fuel Injector Fuel Feed and Return 4 Intake Plenum Bolt Cap 5 PCV Vent Tube Adapter Bolt 6 PCV Vent Tube Adapter 7 Intake Manifold Tuning Valve 8 Intake Manifold Tuning Valve Actuator 9 Intake Manifold Tuning Valve Bolt 10 Intake Manifold Tuning Valve Solenoid Valve Hose 11 Intake Manifold Tuning Valve O-ring 12 Intake Manifold Plenum Bolt 13 PCV Vent Tube Adapter O-ring 14 Idle Air Valve 15 Intake Plenum 16 Intake Manifold 17 Intake Manifold Gasket 18 Intake Manifold Flange 19 Intake Manifold Flange Gasket 20 Intake Manifold Flange Bolt 21 Intake Manifold Bolt 22 Intake Plenum O-ring 23 Throttle Body Bolt 24 Throttle Body 25 Throttle Body O-ring 26 Ignition Coil Cassette 27 Left Exhaust Manifold 2003 Saturn L200 2003 ENGINE Engine Mechanical - 3.0L (L81) - Saturn L Series steve Monday, May 09, 2011 12:20:05 PM Page 13 © 2006 Mitchell Repair Information Company, LLC.
  • 14. Fig. 4: Cylinder Head and Components Disassembled View Courtesy of GENERAL MOTORS CORP. Callouts For Fig. 4 Callout Component Name 1 Camshaft Bearing Cap 2 Camshaft Bearing Cap Bolt 3 Exhaust Camshaft 4 Intake Camshaft 2003 Saturn L200 2003 ENGINE Engine Mechanical - 3.0L (L81) - Saturn L Series steve Monday, May 09, 2011 12:20:05 PM Page 14 © 2006 Mitchell Repair Information Company, LLC.
  • 15. 5 Camshaft Cover Bolt 6 Camshaft Cover 7 Oil Fill Tube 8 Oil Fill Cap O-ring 9 Oil Fill Cap 10 Camshaft Cover Gasket 11 Camshaft Cover O-ring 12 Left Cylinder Head 13 Left Cylinder Head Gasket 14 Valve 15 Valve Spring Seat 16 Valve Seal 17 Valve Spring 18 Valve Spring Cap 19 Valve Spring Retaining Keys 20 Valve Lifter 21 Right Cylinder Head Gasket 22 Camshaft Seal 23 Right Cylinder Head 24 Cylinder Head Bolt 2003 Saturn L200 2003 ENGINE Engine Mechanical - 3.0L (L81) - Saturn L Series steve Monday, May 09, 2011 12:20:05 PM Page 15 © 2006 Mitchell Repair Information Company, LLC.
  • 16. Fig. 5: Oil Pan and Delivery Components Disassembled View Courtesy of GENERAL MOTORS CORP. Callouts For Fig. 5 Callout Component Name 1 Oil Cooler Inlet/Outlet Nuts 2 Oil Cooler Pipe Seals 3 Oil Cooler Line Banjo Fittings 4 Oil Cooler Inlet Pipe 5 Oil Cooler Outlet Pipe 6 Oil Filter Adapter 7 Oil Filter Bypass Valve 8 Oil Filter Bypass Check Ball 2003 Saturn L200 2003 ENGINE Engine Mechanical - 3.0L (L81) - Saturn L Series steve Monday, May 09, 2011 12:20:05 PM Page 16 © 2006 Mitchell Repair Information Company, LLC.
  • 17. ENGINE IDENTIFICATION 9 Oil Filter Bypass Spring 10 Oil Pan Baffle 11 Oil Pan 12 Oil Pump Gasket 13 Oil Pump Pipe Plug 14 Oil Intake Pipe O-ring 15 Oil Intake Pipe 16 Oil Intake Pipe Bolt 17 Oil Pump Inlet Screen 18 Oil Intake Pipe Bolt 19 Oil Pump Collar 20 Oil Pump 21 Oil Pressure Relief Valve 22 Oil Pressure Relief Valve Spring 23 Oil Pressure Relief Valve Seal 24 Oil Pressure Relief Valve Plug 25 Oil Pressure Regulator Valve Spring 26 Oil Pressure Regulator Valve 27 Oil Pressure Regulator Valve Seal 28 Oil Pressure Regulator Valve Plug 29 Oil Cooler 30 Oil Cooler Inlet/Outlet Seals 31 Oil Cooler Cover 32 Oil Cooler Cover Bolt 2003 Saturn L200 2003 ENGINE Engine Mechanical - 3.0L (L81) - Saturn L Series steve Monday, May 09, 2011 12:20:05 PM Page 17 © 2006 Mitchell Repair Information Company, LLC.
  • 18. Fig. 6: Locating Engine Identification Markings Courtesy of GENERAL MOTORS CORP. The Vehicle Identification Number (VIN) Derivative (2) is located on the lower right side of the engine block and is a nine digit number stamped or laser etched onto the engine at the vehicle assembly plant. If reading the identification number from the left, the following information can be obtained:  The first digit identifies the vehicle division.  The second digit identifies the model year.  The third digit identifies the assembly plant.  The fourth through ninth digits are the last six digits of the Vehicle Identification Number (VIN). 2003 Saturn L200 2003 ENGINE Engine Mechanical - 3.0L (L81) - Saturn L Series steve Monday, May 09, 2011 12:20:05 PM Page 18 © 2006 Mitchell Repair Information Company, LLC.
  • 19. Engine displacement (1) is cast into the engine block under the starter motor. DIAGNOSTIC INFORMATION AND PROCEDURES DIAGNOSTIC STARTING POINT - ENGINE MECHANICAL Begin the system diagnosis by reviewing the Disassembled Views, Engine Component Description, Lubrication Description and the Drive Belt System Description. Reviewing the description and operation information will help you determine the correct symptom diagnostic procedure when a malfunction exists. Reviewing the description and operation information will also help you determine if the condition described by the customer is normal operation. Refer to Symptoms - Engine Mechanical in order to identify the correct procedure for diagnosing the system and where the procedure is located. SYMPTOMS - ENGINE MECHANICAL Strategy Based Diagnostics 1. Perform a Diagnostic Starting Point - Engine Mechanical before using the symptom tables, if applicable. 2. Review the system operations in order to familiarize yourself with the system functions. Refer to Disassembled Views, Engine Component Description, Lubrication Description and the Drive Belt System Description. All diagnosis on a vehicle should follow a logical process. Strategy based diagnostics is a uniform approach for repairing all systems. The diagnostic flow may always be used in order to resolve a system problem. The diagnostic flow is the place to start when repairs are necessary. For a detailed explanation, refer to Strategy Based Diagnosis in General Information. Visual/Physical Inspection  Inspect for aftermarket devices which could affect the operation of the Engine. Refer to Checking Aftermarket Accessories in Wiring Systems.  Inspect the easily accessible or visible system components for obvious damage or conditions which could cause the symptom.  Check for the correct oil level, proper oil viscosity, and correct filter application.  Verify the exact operating conditions under which the concern exists. Note factors such as engine RPM, ambient temperature, engine temperature, amount of engine warm-up time, and other specifics.  Compare the engine sounds - if applicable to a known good engine and make sure you are not trying to correct a normal condition. Intermittent Test the vehicle under the same conditions that the customer reported in order to verify the system is operating properly. Symptom List 2003 Saturn L200 2003 ENGINE Engine Mechanical - 3.0L (L81) - Saturn L Series steve Monday, May 09, 2011 12:20:05 PM Page 19 © 2006 Mitchell Repair Information Company, LLC.
  • 20. Refer to a symptom diagnostic procedure from the following list in order to diagnose the symptom:  Base Engine Misfire without Internal Engine Noises  Base Engine Misfire with Abnormal Internal Lower Engine Noises  Base Engine Misfire with Abnormal Valve Train Noise  Base Engine Misfire with Coolant Consumption  Base Engine Misfire with Excessive Oil Consumption  Engine Noise on Start-Up, but Only Lasting a Few Seconds  Upper Engine Noise, Regardless of Engine Speed  Lower Engine Noise, Regardless of Engine Speed  Engine Noise Under Load  Engine Will Not Crank - Crankshaft Will Not Rotate  Engine Compression Test  Oil Consumption Diagnosis  Oil Pressure Diagnosis and Testing  Oil Leak Diagnosis BASE ENGINE MISFIRE WITHOUT INTERNAL ENGINE NOISES Base Engine Misfire without Internal Engine Noises Cause Correction Abnormalities - severe cracking, bumps, or missing areas in the accessory drive belt Abnormalities in the accessory drive system and/or components may cause engine RPM variations and lead to a misfire DTC. A misfire code may be present without an actual misfire condition. Replace the drive belt. Refer to Drive Belt Replacement. Worn, damaged, or mis-aligned accessory drive components or excessive pulley runout and may lead to a misfire DTC. A misfire code may be present without an actual misfire condition. Inspect the components, repair or replace as required. Improperly installed or damaged vacuum hoses Repair or replace as required. Improperly installed or damaged MAP sensor and/or seal The sealing grommet of the MAP sensor should not be torn or damaged Repair or replace the MAP sensor as required. Improperly installed or damaged EVAP purge solenoid and/or O-ring seal Repair or replace the EVAP purge solenoid as required. Restricted exhaust system A severe restriction in the exhaust flow can cause significant loss of engine performance and may set a DTC. Possible causes of restrictions include Repair or replace as required. 2003 Saturn L200 2003 ENGINE Engine Mechanical - 3.0L (L81) - Saturn L Series steve Monday, May 09, 2011 12:20:06 PM Page 20 © 2006 Mitchell Repair Information Company, LLC.
  • 21. collapsed or dented pipes or plugged mufflers and/or catalytic converters. Excessively worn or mis-aligned timing belt Replace the timing belt and sprockets as required. Worn camshaft lobes Replace the camshaft or camshafts and SHLAs, valve lifters. Excessive oil pressure A lubrication system with excessive oil pressure may lead to excessive valve lifter pump-up and loss of compression.  Perform an oil pressure test. Refer to Oil Pressure Diagnosis and Testing.  Repair or replace the oil pump as required. Stuck valves Carbon buildup on the valve stem can cause the valve not to close properly. Repair or replace as required. Improper sealing between the intake manifold and cylinder heads, intake manifold and plenum duct, plenum duct and water crossover, water crossover and throttle body and/or pressure relief valve and intake manifold. Replace the intake manifold, plenum duct, gaskets, cylinder heads, throttle body and/or pressure relief valve as required. Faulty cylinder head gaskets and/or cracking or other damage to the cylinder heads and engine block cooling system passages. Refer to Diagnostic Starting Point - Engine Cooling in Engine Cooling. Coolant consumption may or may not cause the engine to overheat.  Inspect for spark plugs saturated by coolant. Refer to SPARK PLUGS in Service & Adjustment Specifications in Engine Performance.  Inspect the cylinder heads, engine block, and/or head gaskets.  Repair or replace as required. Loose or improperly installed engine flywheel or crankshaft balancer A misfire code may be present without an actual misfire condition. Repair or replace the flywheel and/or balancer as required. Refer to Engine Flywheel Replacement or Crankshaft Balancer Replacement. Worn Piston Rings Oil consumption may or may not cause the engine to misfire.  Inspect the spark plugs for oil deposits. Refer to SPARK PLUGS in Service & Adjustment Specifications in Engine Performance.  Inspect the cylinders for a loss of compression. Refer to Engine Compression Test.  Perform cylinder leak down and compression testing to identify the cause.  Repair or replace as required. A damaged crankshaft reluctor wheel A damaged crankshaft reluctor wheel can result in different symptoms depending on the severity and location of the damage.  Systems with SEVERE reluctor ring damage may exhibit periodic loss of crankshaft Replace the crankshaft as required. 2003 Saturn L200 2003 ENGINE Engine Mechanical - 3.0L (L81) - Saturn L Series steve Monday, May 09, 2011 12:20:06 PM Page 21 © 2006 Mitchell Repair Information Company, LLC.
  • 22. BASE ENGINE MISFIRE WITH ABNORMAL INTERNAL LOWER ENGINE NOISES Base Engine Misfire with Abnormal Internal Lower Engine Noises BASE ENGINE MISFIRE WITH ABNORMAL VALVE TRAIN NOISE Base Engine Misfire with Abnormal Valve Train Noise position, stop delivering a signal, and then re- sync the crankshaft position.  Systems with SLIGHT reluctor ring damage may exhibit no loss of crankshaft position and no misfire may occur. However, a P0300 DTC may be set. Cause Correction Abnormalities - severe cracking, bumps or missing areas- in the accessory drive belt Abnormalities in the accessory drive system and/or components may cause engine RPM variations, noises similar to a faulty lower engine and also lead to a misfire condition. A misfire code may be present without an actual misfire condition. Replace the drive belt. Refer to Drive Belt Replacement. Worn, damaged, or mis-aligned accessory drive components or excessive pulley runout A misfire code may be present without an actual misfire condition. Inspect the components, repair or replace as required. Loose or improperly installed engine flywheel or crankshaft balancer A misfire code may be present without an actual misfire condition. Repair or replace the engine flywheel and/or crankshaft balancer as required. Refer to Engine Flywheel Replacement or Crankshaft Balancer Replacement. Worn or Broken Piston Rings Oil consumption may or may not cause the engine to misfire.  Inspect the spark plugs for oil deposits. Refer to SPARK PLUGS in Service & Adjustment Specifications in Engine Performance.  Inspect the cylinders for a loss of compression. Refer to Engine Compression Test.  Perform cylinder leak down and compression testing to determine the cause.  Repair or replace as required. Worn Crankshaft Thrust Bearings Severely worn thrust surfaces on the crankshaft and/or thrust bearing may permit fore and aft movement of the crankshaft and create a DTC without an actual misfire condition. Replace the crankshaft and bearings as required. 2003 Saturn L200 2003 ENGINE Engine Mechanical - 3.0L (L81) - Saturn L Series steve Monday, May 09, 2011 12:20:06 PM Page 22 © 2006 Mitchell Repair Information Company, LLC.
  • 23. BASE ENGINE MISFIRE WITH COOLANT CONSUMPTION Base Engine Misfire with Coolant Consumption BASE ENGINE MISFIRE WITH EXCESSIVE OIL CONSUMPTION Base Engine Misfire with Excessive Oil Consumption ENGINE NOISE ON START-UP, BUT ONLY LASTING A FEW SECONDS Cause Correction Excessively worn or mis-aligned timing belt Replace the timing belt as required. Worn camshaft lobes Replace the camshaft or camshafts and SHLAs - valve lifters. Sticking SHLAs - valve lifters Replace the SHLAs as required. Stuck valves Carbon buildup on the valve stem can cause the valve not to close properly. Repair or replace as required. Cause Correction Faulty cylinder head gaskets and/or cracking or other damage to the cylinder heads and engine block cooling system passages. Refer to Diagnostic Starting Point - Engine Cooling in Engine Cooling. Coolant consumption may or may not cause the engine to overheat.  Inspect for spark plugs saturated by coolant. Refer to SPARK PLUGS in Service & Adjustment Specifications in Engine Performance.  Perform a cylinder leak down test.  Inspect the cylinder heads and engine block for damage to the coolant passages and/or a faulty head gasket.  Repair or replace as required. Cause Correction Worn valves, valve guides and/or valve stem oil seals  Inspect the spark plugs for oil deposits. Refer to SPARK PLUGS in Service & Adjustment Specifications in Engine Performance.  Repair or replace as required. Worn Piston Rings Oil consumption may or may not cause the engine to misfire.  Inspect the spark plugs for oil deposits. Refer to SPARK PLUGS in Service & Adjustment Specifications in Engine Performance.  Inspect the cylinders for a loss of compression. Refer to Engine Compression Test.  Perform cylinder leak down and compression testing to determine the cause.  Repair or replace as required. 2003 Saturn L200 2003 ENGINE Engine Mechanical - 3.0L (L81) - Saturn L Series steve Monday, May 09, 2011 12:20:06 PM Page 23 © 2006 Mitchell Repair Information Company, LLC.
  • 24. Engine Noise on Start-Up, but Only Lasting a Few Seconds UPPER ENGINE NOISE, REGARDLESS OF ENGINE SPEED Upper Engine Noise, Regardless of Engine Speed Cause Correction Incorrect oil filter without anti-drainback feature Install the correct oil filter. Incorrect oil viscosity Drain the engine oil and replace with the correct viscosity oil. Damaged or faulty oil filter by-pass valve  Inspect the oil filter by-pass valve for proper operation.  Repair or replace as required. High SHLA, valve lifter, leak down rate Replace the SHLA, valve lifters, as required. Worn crankshaft thrust bearing  Inspect the thrust bearing and crankshaft.  Repair or replace as required. Cause Correction Low oil pressure  Perform an oil pressure test. Refer to Oil Pressure Diagnosis and Testing.  Repair or replace as required. Improper lubrication to the valve lifters Inspect the following components, and repair or replace as required:  The SHLA - valve lifter  The oil filter bypass valve  The oil pump and pump screen  The cylinder head oil galleries  The engine block oil galleries Worn or dirty SHLAs, valve lifters Replace the SHLAs - valve lifters. Stretched or broken timing belt and/or damaged sprocket teeth Replace the timing belt and sprockets. Worn timing belt tensioner or tensioners Replace the timing belt tensioner or tensioners as required. Worn engine camshaft lobes  Inspect the engine camshaft lobes.  Replace the camshaft or camshafts and SHLAs, valve lifters, as required. Worn valve guides or valve stems Inspect the following components, and repair as required:  The valves  The valve guides Stuck Valves Inspect the following components, and repair as 2003 Saturn L200 2003 ENGINE Engine Mechanical - 3.0L (L81) - Saturn L Series steve Monday, May 09, 2011 12:20:06 PM Page 24 © 2006 Mitchell Repair Information Company, LLC.
  • 25. LOWER ENGINE NOISE, REGARDLESS OF ENGINE SPEED Lower Engine Noise, Regardless of Engine Speed Carbon on the valve stem or valve seat may cause the valve to stay open required:  The valves  The valve guides Cause Correction Worn accessory drive components Abnormalities such as severe cracking, bumps or missing areas in the accessory drive belt and/or misalignment of system components.  Inspect the accessory drive system.  Repair or replace as required. Detonation or spark knock Verify the correct operation of the ignition controls system. Refer to DETONATION/SPARK KNOCK in Troubleshooting - No Codes in Engine Performance. Low oil pressure  Perform an oil pressure test. Refer to Oil Pressure Diagnosis and Testing.  Repair or replace damaged components as required. Loose or damaged crankshaft balancer  Inspect the crankshaft balancer.  Repair or replace as required. Loose torque converter bolts  Inspect the torque converter bolts and engine flywheel.  Repair or replace as required. Loose or damaged engine flywheel Repair or replace the engine flywheel. Oil pump screen loose, damaged or restricted  Inspect the oil pump screen.  Repair or replace as required. Incorrect piston, piston pin and connecting rod installation Pistons must be installed with the mark or dimple on the top of the piston facing the front of the engine. Piston pins must be centered in the connecting rod pin bore.  Verify the pistons, piston pins and connecting rods are installed correctly.  Repair as required. Excessive crankshaft bearing clearance Inspect the following components, and repair as required:  The crankshaft bearings  The crankshaft journals Excessive connecting rod bearing clearance Inspect the following components, and repair as required: 2003 Saturn L200 2003 ENGINE Engine Mechanical - 3.0L (L81) - Saturn L Series steve Monday, May 09, 2011 12:20:06 PM Page 25 © 2006 Mitchell Repair Information Company, LLC.
  • 26. ENGINE NOISE UNDER LOAD Engine Noise Under Load ENGINE WILL NOT CRANK - CRANKSHAFT WILL NOT ROTATE  The connecting rod bearings  The connecting rods  The crankshaft  The crankshaft journals Excessive piston-to-cylinder bore clearance  Inspect the piston and cylinder bore.  Repair as required. Excessive piston pin-to-bore clearance  Inspect the piston, piston pin, and the connecting rod.  Repair or replace as required. Cause Correction Detonation or spark knock Verify the correct operation of the ignition controls. Refer to DETONATION/SPARK KNOCK in Troubleshooting - No Codes in Engine Performance. Low oil pressure  Perform an oil pressure test. Refer to Oil Pressure Diagnosis and Testing.  Repair or replace as required. Loose torque converter bolts  Inspect the torque converter bolts and engine flywheel.  Repair as required. Cracked engine flywheel  Inspect the engine flywheel and bolts.  Repair as required. Excessive connecting rod bearing clearance Inspect the following components, and repair as required:  The connecting rod bearings  The connecting rods  The crankshaft Excessive crankshaft bearing clearance Inspect the following components, and repair as required:  The crankshaft bearings  The crankshaft journals  The cylinder block crankshaft bearing bore 2003 Saturn L200 2003 ENGINE Engine Mechanical - 3.0L (L81) - Saturn L Series steve Monday, May 09, 2011 12:20:06 PM Page 26 © 2006 Mitchell Repair Information Company, LLC.
  • 27. Engine Will Not Crank - Crankshaft Will Not Rotate Cause Correction Seized accessory drive system component 1. Remove accessory drive belt or drive belts. 2. Rotate crankshaft by hand at the crankshaft balancer or engine flywheel location. 3. Repair or replace as required. Hydraulically locked cylinder  Coolant/Antifreeze in cylinder  Oil in cylinder  Fuel in cylinder 1. Remove spark plugs and check for fluid. 2. Inspect for broken head gasket or gaskets. 3. Inspect for cracked engine block or cylinder head. 4. Inspect for a sticking fuel injector. 5. Repair or replace as required. Seized or broken camshaft 1. Inspect camshaft or camshafts. 2. Inspect cylinder head camshaft journals for damage. 3. Repair as required. Seized or broken camshaft timing components 1. Inspect the following sprockets:  Crankshaft sprocket  Exhaust sprockets  Intake sprockets 2. Inspect the timing belt. 3. Inspect the following tensioners:  Timing belt idler pulley for camshaft gears 1 and 2  Timing belt idler pulley for camshaft gears 3 and 4  Timing belt tensioner 4. Repair as required. Seized or broken valve train components 1. Inspect lifters. 2. Inspect valves. 3. Inspect cams. 4. Repair as required. Seized automatic transmission torque converter 1. Remove the torque converter bolts. 2. Rotate crankshaft by hand at the crankshaft balancer or engine flywheel location. 3. Repair or replace as required. Seized manual transmission 1. Disengage the clutch. 2. Rotate crankshaft by hand at the crankshaft 2003 Saturn L200 2003 ENGINE Engine Mechanical - 3.0L (L81) - Saturn L Series steve Monday, May 09, 2011 12:20:06 PM Page 27 © 2006 Mitchell Repair Information Company, LLC.
  • 28. COOLANT IN COMBUSTION CHAMBER Coolant in Combustion Chamber balancer or engine flywheel location. 3. Repair or replace as required. Material in cylinder  Broken valve  Piston material  Foreign material 1. Inspect cylinder for damaged components and/or foreign materials. 2. Repair or replace as required. Seized crankshaft or connecting rod bearings 1. Inspect crankshaft and connecting rod bearings. 2. Repair as required. Bent or broken connecting rod 1. Inspect connecting rods. 2. Repair as required. Broken crankshaft 1. Inspect crankshaft. 2. Repair as required. Cause Correction DEFINITION: Excessive white smoke and/or coolant type odor coming from the exhaust pipe may indicate coolant in the combustion chamber. Low coolant levels, an inoperative cooling fan, or a faulty thermostat may lead to an "overtemperature" condition which may cause engine component damage. 1. A slower than normal cranking speed may indicate coolant entering the combustion chamber. Refer to Engine Will Not Crank - Crankshaft Will Not Rotate. 2. Remove the spark plugs and inspect for spark plugs saturated by coolant or coolant in the cylinder bore. 3. Inspect by performing a cylinder leak-down test. During this test, excessive air bubbles within the coolant may indicate a faulty gasket or damaged component. 4. Inspect by performing a cylinder compression test. Two cylinders "side-by-side" on the engine block, with low compression, may indicate a failed cylinder head gasket. Refer to Engine Compression Test. Cracked intake manifold or failed gasket Replace the components as required. Faulty cylinder head gasket Replace the head gasket and components as required. Refer to Cylinder Head Cleaning and Inspection and Cylinder Head Replacement (Front) or Cylinder Head Replacement (Rear). Warped cylinder head Machine the cylinder head to the proper flatness, if applicable and replace the cylinder head gasket. Refer to Cylinder Head Cleaning and Inspection. Cracked cylinder head Replace the cylinder head and gasket. Cracked cylinder liner or engine block Replace the components as required. 2003 Saturn L200 2003 ENGINE Engine Mechanical - 3.0L (L81) - Saturn L Series steve Monday, May 09, 2011 12:20:06 PM Page 28 © 2006 Mitchell Repair Information Company, LLC.
  • 29. COOLANT IN ENGINE OIL Coolant in Engine Oil ENGINE COMPRESSION TEST Tools Required SA9127E Gage Bar Set If there is a lack of power, excessive oil consumption, or poor fuel economy, etc., measure the compression pressure. Cylinder head or engine block porosity Replace the components as required. Cause Correction DEFINITION: Foamy or discolored oil or an engine oil "overfill" condition may indicate coolant entering the engine crankcase. Low coolant levels, an inoperative cooling fan, or a faulty thermostat may lead to an "overtemperature" condition which may cause engine component damage. Contaminated engine oil and oil filter should be changed. 1. Inspect the oil for excessive foaming or an overfill condition. Oil diluted by coolant may not properly lubricate the crankshaft bearings and may lead to component damage. Refer to Lower Engine Noise, Regardless of Engine Speed. 2. Inspect by performing a cylinder leak-down test. During this test, excessive air bubbles within the cooling system may indicate a faulty gasket or damaged component. 3. Inspect by performing a cylinder compression test. Two cylinders "side-by-side" on the engine block with low compression may indicate a failed cylinder head gasket. Refer to Engine Compression Test. Faulty external engine oil cooler Replace the components as required. Faulty cylinder head gasket Replace the head gasket and components as required. Refer to Cylinder Head Cleaning and Inspection and Cylinder Head Replacement (Front) or Cylinder Head Replacement (Rear). Warped cylinder head Machine the cylinder head to proper flatness, if applicable, and replace the cylinder head gasket. Refer to Cylinder Head Cleaning and Inspection. Cracked cylinder head Replace the cylinder head and gasket. Cracked cylinder liner or engine block Replace the components as required. Cylinder head, block, or manifold porosity Replace the components as required. 2003 Saturn L200 2003 ENGINE Engine Mechanical - 3.0L (L81) - Saturn L Series steve Monday, May 09, 2011 12:20:06 PM Page 29 © 2006 Mitchell Repair Information Company, LLC.
  • 30. Fig. 7: Removing & Installing Ignition Control Modules Courtesy of GENERAL MOTORS CORP. 1. Start the engine and allow it to reach normal operating temperature. 2. Shut the engine OFF and disconnect the ignition module wiring harness plugs. 3. Remove the ignition modules. Refer to ELECTRONIC IGNITION MODULE in Removal and Installation in Engine Performance. 4. Remove all 6 spark plugs. CAUTION: Compression checks must be performed with the vehicle in park or neutral and the parking brake applied. 2003 Saturn L200 2003 ENGINE Engine Mechanical - 3.0L (L81) - Saturn L Series steve Monday, May 09, 2011 12:20:06 PM Page 30 © 2006 Mitchell Repair Information Company, LLC.
  • 31. 5. Insert the SA9127E into the spark plug hole. 6. Fully open the throttle. 7. While cranking the engine, measure the compression. The cylinder should puff or the compression gage needle should bounce a minimum of 10 times. 8. Repeat the previous steps for each cylinder. IMPORTANT: Always use a fully charged battery to obtain engine revolutions of a 250 RPM minimum. Do not crank the engine for more than 15 seconds. IMPORTANT: All measurements must be completed in as short a time as possible. Check low cylinders and make sure a minimum of 10 puffs are obtained prior to reading the gage. 2003 Saturn L200 2003 ENGINE Engine Mechanical - 3.0L (L81) - Saturn L Series steve Monday, May 09, 2011 12:20:06 PM Page 31 © 2006 Mitchell Repair Information Company, LLC.
  • 32. Fig. 8: 3.0L RPO Code L81 V6 Engine Assembly Courtesy of GENERAL MOTORS CORP.  Normal compression: Builds up quickly and evenly to specification in each cylinder.  Low compression: Damaged piston, rings, valves, or head gasket. IMPORTANT: No compression in 2 or more cylinders is an indication of damaged timing chain sprockets, camshafts, and crankshaft key or pins. IMPORTANT: The minimum compression in any one cylinder should not be less than 70 percent of the highest cylinder. No cylinder should read less than 690 kPa (100 psi). 2003 Saturn L200 2003 ENGINE Engine Mechanical - 3.0L (L81) - Saturn L Series steve Monday, May 09, 2011 12:20:06 PM Page 32 © 2006 Mitchell Repair Information Company, LLC.
  • 33.  High compression: Carbon on pistons/combustion chamber. Fig. 9: Adding Engine Oil To Cylinder Through Spark Plug Hole Courtesy of GENERAL MOTORS CORP. 9. If the cylinder compression in one or more cylinders is low, pour a small amount (1 teaspoon) of engine oil into the cylinder through the spark plug hole. IMPORTANT: A cylinder leakage test can be performed to further determine the location of the compression leakage if one or more cylinders are extremely low. 2003 Saturn L200 2003 ENGINE Engine Mechanical - 3.0L (L81) - Saturn L Series steve Monday, May 09, 2011 12:20:06 PM Page 33 © 2006 Mitchell Repair Information Company, LLC.
  • 34. Fig. 10: Placing Shop Towel Over Spark Plug Holes Courtesy of GENERAL MOTORS CORP. 10. Place a shop towel over the plug holes to capture any oil mist/spray. 11. Crank the engine over for a few seconds without the compression gage or spark plugs installed. 12. Repeat previous steps 4-7 and measure the compression. 2003 Saturn L200 2003 ENGINE Engine Mechanical - 3.0L (L81) - Saturn L Series steve Monday, May 09, 2011 12:20:06 PM Page 34 © 2006 Mitchell Repair Information Company, LLC.
  • 35. Fig. 11: Checking Piston Rings & Piston Ring Land Wear Courtesy of GENERAL MOTORS CORP. 13. If adding oil increases the compression readings the piston rings are leaking. Compression is low on the first stroke (first gage puff) and tends to build up on following strokes, but does not reach normal compression pressure. The compression Improves considerably with oil. Inspect for worn or broken rings and piston ring land wear (pound out). 2003 Saturn L200 2003 ENGINE Engine Mechanical - 3.0L (L81) - Saturn L Series steve Monday, May 09, 2011 12:20:06 PM Page 35 © 2006 Mitchell Repair Information Company, LLC.
  • 36. Fig. 12: Fixed Timing Chain Guide Access Plug Courtesy of GENERAL MOTORS CORP. 14. If adding oil does not increase the compression:  Valves or head gasket leaking: Compression is low on the first stroke. Compression does not tend to build up on the following strokes. Compression does not improve with adding oil to the cylinder. 2003 Saturn L200 2003 ENGINE Engine Mechanical - 3.0L (L81) - Saturn L Series steve Monday, May 09, 2011 12:20:06 PM Page 36 © 2006 Mitchell Repair Information Company, LLC.
  • 37. Fig. 13: Checking Head Gasket If Two Adjacent Cylinders Have Lower Than Normal Compression Courtesy of GENERAL MOTORS CORP.  Head gasket: Two adjacent cylinders have lower than normal compression and adding oil to the cylinder does not improve compression. 2003 Saturn L200 2003 ENGINE Engine Mechanical - 3.0L (L81) - Saturn L Series steve Monday, May 09, 2011 12:20:06 PM Page 37 © 2006 Mitchell Repair Information Company, LLC.
  • 38. Fig. 14: Removing & Installing Ignition Control Modules Courtesy of GENERAL MOTORS CORP. 15. Remove the compression tester and install the spark plugs. Tighten: Tighten the spark plugs to 25 N.m (18 lb ft). 16. Install the ignition module. Tighten: Tighten the ignition module bolt to 8 N.m (71 lb in). NOTE: Refer to FASTENER NOTICE in Cautions and Notices. 2003 Saturn L200 2003 ENGINE Engine Mechanical - 3.0L (L81) - Saturn L Series steve Monday, May 09, 2011 12:20:06 PM Page 38 © 2006 Mitchell Repair Information Company, LLC.
  • 39. 17. Connect the ignition module electrical connection. CYLINDER LEAKAGE TEST Tools Required SA9127E Gage Bar Set If there is a lack of power, excessive oil consumption, or poor fuel economy, etc., cylinder leakage can be measured. Fig. 15: Removing & Installing Ignition Control Modules Courtesy of GENERAL MOTORS CORP. 2003 Saturn L200 2003 ENGINE Engine Mechanical - 3.0L (L81) - Saturn L Series steve Monday, May 09, 2011 12:20:06 PM Page 39 © 2006 Mitchell Repair Information Company, LLC.
  • 40. 1. Start the engine and allow it to reach normal operating temperature. 2. Disconnect both ignition module connectors. 3. Remove the ignition modules and remove the plugs. 4. Rotate the crankshaft so each cylinder to be checked is at TDC. Timing marks are located on the front cover and vibration damper assembly for TDC verification. Access to the front crankshaft damper bolt can be achieved from the top of the vehicle with an open end wrench. A 3.175 mm (1/8 in) brass rod can be inserted through the spark plug hole to determine piston location relative to TDC. CAUTION: Cylinder leakage checks must be performed with the vehicle in park or neutral and the parking brake applied. IMPORTANT: The piston must be located at exactly top dead center (TDC) or the crankshaft will rotate when air pressure is applied. 2003 Saturn L200 2003 ENGINE Engine Mechanical - 3.0L (L81) - Saturn L Series steve Monday, May 09, 2011 12:20:06 PM Page 40 © 2006 Mitchell Repair Information Company, LLC.
  • 41. Fig. 16: Connecting Special Tools To Perform Cylinder Leakage Test Courtesy of GENERAL MOTORS CORP. 5. Attach an air supply to the SA9127E . The desired regulator In minimum pressure is 861 kPa (125 psi). The maximum is 1 034 kPa (150 psi). 6. Insert the cylinder leakage adapter in the spark plug hole with the piston at TDC. NOTE: Air supply for the tester should be clean and free from oil, moisture, and/or foreign particles that might be injected into the regulator or orifice chamber. Foreign debris can cause improper operation and erroneous readings. 2003 Saturn L200 2003 ENGINE Engine Mechanical - 3.0L (L81) - Saturn L Series steve Monday, May 09, 2011 12:20:06 PM Page 41 © 2006 Mitchell Repair Information Company, LLC.
  • 42. 7. Close the gate valve and adjust the regulator pressure to 689 kPa (100 psi). 8. Open the gate valve. Observe the crankshaft during this operation. Fig. 17: Listening For Escaping Air At Throttle Body Air Inlet, Oil Fill Cap & Exhaust Outlet Courtesy of GENERAL MOTORS CORP. 1. Allow 60 seconds for the air pressure in the cylinder to stabilize. Observe the cylinder pressure gage and record the pressure. IMPORTANT: If the crankshaft rotates, the piston was not at TDC. The crankshaft will have to be relocated at TDC. 2003 Saturn L200 2003 ENGINE Engine Mechanical - 3.0L (L81) - Saturn L Series steve Monday, May 09, 2011 12:20:06 PM Page 42 © 2006 Mitchell Repair Information Company, LLC.
  • 43. 2. Listen for escaping air at the throttle body air inlet, oil fill cap, and exhaust outlet. 3. Remove the coolant bottle pressure cap and look for bubbles. Fig. 18: Removing & Installing Ignition Control Modules Courtesy of GENERAL MOTORS CORP. 9. Repeat the previous steps on other cylinders. Record the readings.  Normal Cylinder Leakage: 10 percent - 69 kPa (10 psi) IMPORTANT: Make sure all cylinder leakage adapter fittings are tight and the piston is at TDC or incorrect readings will be obtained. Check the lower cylinders. 2003 Saturn L200 2003 ENGINE Engine Mechanical - 3.0L (L81) - Saturn L Series steve Monday, May 09, 2011 12:20:06 PM Page 43 © 2006 Mitchell Repair Information Company, LLC.
  • 44.  Maximum Leakage: 20 percent - 138 kPa (20 psi)  Difference Between Cylinders: 5 percent - 34 kPa (5 psi) 10. Remove the cylinder leakage tester and install the spark plugs. Tighten: Tighten the spark plugs to 25 N.m (18 lb ft). 11. Install the ignition modules. Tighten: Tighten the ignition module bolt to 8 N.m (71 lb in). 12. Connect the ignition module harness plugs. OIL CONSUMPTION DIAGNOSIS Excessive oil consumption (not due to leaks) is the use of 0.95L (1 qt) or more of engine oil within 3200 kilometers (2,000 miles). The causes of excessive oil consumption include the following conditions:  External oil leaks Tighten bolts and/or replace gaskets and oil seals as necessary.  Incorrect oil level or improper reading of oil level indicator With the vehicle on a level surface, allow adequate drain down time and check for the correct oil level.  Improper oil viscosity Use recommended SAE viscosity for the prevailing temperatures.  Continuous high speed driving and/or severe usage  Crankcase ventilation system restrictions or malfunctioning components  Valve guides and/or valve stem oil seals worn, or the seal omitted Ream guides and install oversize service valves and/or new valve stem oil seals.  Piston rings broken, improperly installed, worn, or not seated properly Allow adequate time for rings to seat. Replace broken or worn rings as necessary.  Piston improperly installed or misfitted OIL PRESSURE DIAGNOSIS AND TESTING NOTE: Refer to FASTENER NOTICE in Cautions and Notices. 2003 Saturn L200 2003 ENGINE Engine Mechanical - 3.0L (L81) - Saturn L Series steve Monday, May 09, 2011 12:20:06 PM Page 44 © 2006 Mitchell Repair Information Company, LLC.
  • 45.  With the vehicle on a level surface, allow adequate drain down time (2-3 minutes) and measure for a low oil level.  Add the recommended grade engine oil and fill the crankcase until the oil level measures full on the oil level indicator.  Run the engine and verify low or no oil pressure on the vehicle gage or light.  Listen for a noisy valve train or a knocking noise.  Inspect for the following:  Oil diluted by moisture or unburned fuel mixtures  Improper oil viscosity for the expected temperature  Incorrect or malfunctioning oil pressure sender  Incorrect or malfunctioning oil pressure gage  Plugged oil filter  Malfunctioning oil bypass valve  Remove the oil pressure sender or another engine block oil gallery plug.  Install a oil pressure gage and measure the engine oil pressure.  Compare the readings to specifications. Refer to Engine Mechanical Specifications.  If the engine oil pressure is below specifications, inspect the engine for one or more of the following:  Oil pump worn or dirty Refer to Oil Pump Inspection.  Oil pump-to-engine front cover bolts loose Refer to Oil Pump Assemble.  Oil pump screen loose, plugged, or damaged  Oil pump screen O-ring seal missing or damaged  Malfunctioning oil pump pressure regulator valve  Excessive bearing clearance Refer to Crankshaft and Bearings Cleaning and Inspection.  Cracked, porous or restricted oil galleries  Oil gallery plugs missing or incorrectly installed  Broken lash adjusters CRANKCASE VENTILATION SYSTEM INSPECTION/DIAGNOSIS Tools Required SA9127E Gage Bar Set 2003 Saturn L200 2003 ENGINE Engine Mechanical - 3.0L (L81) - Saturn L Series steve Monday, May 09, 2011 12:20:06 PM Page 45 © 2006 Mitchell Repair Information Company, LLC.
  • 46. High crankcase pressure indicates an excessive amount of air passing between the rings and cylinder walls into the crankcase. A loss of engine lubricating oil into the air intake tube/filter housing or out the dipstick hole is indicative of excessive crankcase pressure. High negative pressure or vacuum can be caused by a plugged air filter element or restricted air intake. Test method: 1. Remove the dipstick and connect a 0-15 kPa gage (0-16 in H2O) manometer or magnahelix in the SA9127E Gage Bar Set to the dipstick tube. 2. Operate the engine until it reaches normal operating temperature and observe the crankcase pressure with engine at 4,000 RPM. 3. The crankcase pressure should not exceed: Crankcase Pressure (New Engine)  Positive: 1 kPa (4 in) H2O Max.  Negative: 3 kPa (12 in) H2O Max. Crankcase Pressure (Used Engine)  Positive: 2.5 kPa (10 in) H2O Max.  Negative: 3.5 kPa (14 in) H2O Max. 4. If the crankcase pressure exceeds specifications, ensure the PCV system is functioning properly. Positive Crank Case Ventilation (PCV) System Always Perform a Visual Check of the PCV System:  Properly mounted PCV valve, firmly seated in the grommet on rocker arm cover  PCV Hose, grommet, fresh air hose, and clamps in place, no damage to PCV hose, rocker arm cover grommet, fresh air hose. Ensure the clamps are on tight. Crankcase Ventilation System Inspection/Diagnosis CAUTION: The crankcase pressure check must be performed with the vehicle in park or neutral and the parking brake applied. IMPORTANT: It may be necessary to complete a compression and cylinder leakage check for evaluation of piston rings and cylinder walls when there is high, positive crankcase pressure. Low, negative crankcase pressure indicates a possible restricted air intake system. CONDITION POSSIBLE CAUSE CORRECTION Rough Idle, Stalling or Slow Idle 1. Repair or replace hoses as 2003 Saturn L200 2003 ENGINE Engine Mechanical - 3.0L (L81) - Saturn L Series steve Monday, May 09, 2011 12:20:06 PM Page 46 © 2006 Mitchell Repair Information Company, LLC.
  • 47. Functional Check If engine is idling rough, check for a clogged PCV valve or hose. Check the PCV valve identification number to be sure the correct valve is installed. Replace as required. Use the following procedure to determine if the PCV valve is functioning properly: 1. Remove PCV valve from cam cover grommet. 2. Run engine at idle. 3. Place your thumb over end of PCV valve to check for strong vacuum signal. If there is no vacuum present, check for clogged hose, plugged valve or plugged intake manifold port. Replace any clogged components or clean out plugged port. 4. Turn off engine and remove PCV valve from hose. Shake valve and listen for the plugger to rattle inside the valve. If valve does not rattle, replace valve. Other Crankcase Ventilation System Faults If there is evidence of engine oil in the throttle body or air cleaner and all the PCV components appear and function properly it may indicate excessive crankcase pressure. OIL LEAK DIAGNOSIS Tool Required J 39400 Leak Detector Most oil leaks are easily located by visual inspection and repaired by replacing and/or repairing the necessary parts. Use the following steps in order to find the leak: 1. Identify the fluid. Determine whether it is engine oil, automatic transmission fluid, or power steering fluid. 2. From what point is the fluid leaking? After running the vehicle at normal operating temperature, park the vehicle over a large sheet of paper. After a few minutes, you should be able to find the approximate location of the leak by the drippings on the paper. 3. Visually check around the suspected component. Check around the gasket mating surfaces for leaks. A mirror is useful for finding leaks in hard-to-reach areas. 4. If the leak still cannot be found, it may be necessary to clean the suspected area with a degreaser, steam or Speed, Oil Leaks, Oil in Throttle Body/Plenum, or Sludge in Engine. 1. Clogged hose. necessary. 2. Clogged PCV valve. 2. Replace PCV valve. Rough Idle, Stalling, or High Idle Speed. 1. Leaking hose. 1. Replace hose. 2. Leaking PCV valve. 2. Replace PCV valve. 2003 Saturn L200 2003 ENGINE Engine Mechanical - 3.0L (L81) - Saturn L Series steve Monday, May 09, 2011 12:20:06 PM Page 47 © 2006 Mitchell Repair Information Company, LLC.
  • 48. spray solvent. Clean the area well, then dry the area. Operate the vehicle for several miles at normal operating temperature and varying speeds. After operating the vehicle, visually check the suspected component. If you still cannot locate the leak, try using the powder or black light-and-dye method. Perform the following steps in order to use the black light-and-dye method: 1. Pour specified amount of dye into the leaking component system. 2. Operate the vehicle under normal operating conditions as directed by the J 39400 . 3. Direct the light toward the suspect area. The dyed fluid will appear as a yellow path leading to the source. See the J 39400 kit directions for the color of the fluid and the dye mix. Perform the following steps in order to perform the powder method: 1. Clean the suspected area. 2. Apply an aerosol-type powder - such as foot powder to the suspected area. 3. Operate the vehicle under normal operating conditions. 4. Visually inspect the suspected component. You should be able to trace the leak path over the white powder surface to the source. Repairing the Leak Once the origin of the leak has been pinpointed and traced back to its source, the cause of the leak must be determined in order for it to be repaired properly. If a gasket is replaced, but the sealing surface is damaged, the new gasket will not repair the leak. The surface must be repaired or replaced. Before attempting to repair a leak, be sure that the gasket and sealing surfaces are correct. Perform the following steps in order to check for gasket leaks: 1. Inspect the fluid level/pressure to see if it is too high. 2. Check the crankcase ventilation system for restrictions or malfunctioning components. 3. Inspect for improperly tightened fasteners or dirty/damaged threads. 4. Look for warped flanges or sealing surfaces. 5. Check for scratches, burrs, or other damage to the sealing surface. 6. Look for a damaged or worn gasket. 7. Check for cracking or porosity of the component. 8. Check for use of an improper sealant used - where applicable. Perform the following steps in order to check for seal leaks: 1. Inspect the fluid level/pressure to see if it is too high. 2. Check the crankcase ventilation system for restrictions or malfunctioning components. 3. Check for a damaged O-ring seal bore - scratched, burred or nicked. 4. Look for a damaged or worn oil seal. 2003 Saturn L200 2003 ENGINE Engine Mechanical - 3.0L (L81) - Saturn L Series steve Monday, May 09, 2011 12:20:06 PM Page 48 © 2006 Mitchell Repair Information Company, LLC.
  • 49. 5. Check for improper component installation. 6. Look for cracks in the component. 7. Inspect the shaft surface for scratches, nicks, or damage. 8. Check for a loose or worn bearing which may lead to premature oil seal wear. DRIVE BELT CHIRPING DIAGNOSIS Diagnostic Aids The symptom may be intermittent due to moisture on the drive belt or the pulleys. It may be necessary to spray a small amount of water on the drive belt in order to duplicate the customers concern. If spraying water on the drive belt duplicates the symptom, cleaning the belt pulleys may be the probable solution. A loose or improper installation of a body component, a suspension component, or other items of the vehicle may cause the chirping noise. Test Description The numbers below refer to the step number on the diagnostic table. 2: The noise may not be engine related. This step is to verify that the engine is making the noise. If the engine is not making the noise do not proceed further with this table. 3: The noise may be an internal engine noise. Removing the drive belt and operating the engine for a brief period will verify the noise is related to the drive belt. When removing the drive belt the water pump may not be operating and the engine may overheat. Also DTCs may set when the engine is operating with the drive belt removed. 4: Inspect all drive belt pulleys for pilling. Pilling is the small balls or pills or it can be strings in the drive belt grooves from the accumulation of rubber dust. 6: Misalignment of the pulleys may be caused from improper mounting of the accessory drive component, incorrect installation of the accessory drive component pulley, or the pulley bent inward or outward from a previous repair. Test for a misalign pulley using a straight edge in the pulley grooves across 2 or 3 pulleys. If a misalign pulley is found refer to that accessory drive component for the proper installation procedure for that pulley. 10: Inspecting of the fasteners can eliminate the possibility that a wrong bolt, nut, spacer, or washer was installed. 12: Inspecting the pulleys for being bent should include inspecting for a dent or other damage to the pulleys that would prevent the drive belt from not seating properly in all of the pulley grooves or on the smooth surface of a pulley when the back side of the belt is used to drive the pulley. 14: Replacing the drive belt when it is not damaged or there is not excessive pilling will only be a temporary repair. Drive Belt Chirping Diagnosis Step Action Yes No NOTE: 2003 Saturn L200 2003 ENGINE Engine Mechanical - 3.0L (L81) - Saturn L Series steve Monday, May 09, 2011 12:20:06 PM Page 49 © 2006 Mitchell Repair Information Company, LLC.
  • 50. DEFINITION: The following items are indications of chirping:  A high pitched noise that is heard once per revolution of the drive belt or a pulley.  It usually occurs on cold damp mornings. Refer to BELT DRESSING NOTICE in Cautions and Notices. 1 Did you review the Symptoms - Engine Mechanical operation and perform the necessary inspections? Go to Step 2 Go to Symptoms - Engine Mechanical 2 Verify that there is a chirping noise. Does the engine make the chirping noise? Go to Step 3 Go to Diagnostic Aids 3 1. Remove the drive belt. Refer to Drive Belt Replacement. 2. Operate the engine for no longer than 30 to 40 seconds. Does the chirping noise still exist? Go to Engine Noise on Start-Up, but Only Lasting a Few Seconds , Upper Engine Noise, Regardless of Engine Speed , Lower Engine Noise, Regardless of Engine Speed , or Engine Noise Under Load Go to Step 4 4 Inspect for severe pilling exceeding 1/3 of the belt groove depth. Does the belt grooves have pilling? Go to Step 5 Go to Step 6 5 Clean the drive belt pulleys with a suitable wire brush. Did you complete the repair? Go to Step 15 Go to Step 6 6 Inspect for misalignment of the pulleys. Are any of the pulleys misaligned? Go to Step 7 Go to Step 8 7 Replace or repair any misaligned pulleys. Did you complete the repair? Go to Step 15 Go to Step 8 8 Inspect for bent or cracked brackets. Did you find any bent or cracked brackets? Go to Step 9 Go to Step 10 9 Replace any bent or cracked brackets. Did you complete the repair? Go to Step 15 Go to Step 10 10 Inspect for improper, loose or missing fasteners. Did you find the condition? Go to Step 11 Go to Step 12 11 Tighten any loose fasteners. Refer to Fastener Tightening Specifications. Did you complete the repair? Go to Step 15 Go to Step 12 12 Inspect for a bent pulley. Did you find the condition? Go to Step 13 Go to Step 14 13 Replace the bent pulley. Did you complete the repair? Go to Step 15 Go to Step 14 2003 Saturn L200 2003 ENGINE Engine Mechanical - 3.0L (L81) - Saturn L Series steve Monday, May 09, 2011 12:20:06 PM Page 50 © 2006 Mitchell Repair Information Company, LLC.
  • 51. DRIVE BELT SQUEAL DIAGNOSIS Diagnostic Aids A loose or improper installation of a body component, a suspension component, or other items of the vehicle may cause the squeal noise. If the noise is intermittent, verify the accessory drive components by varying their loads making sure they are operated to their maximum capacity. An overcharged A/C system, power steering system with a pinched hose or wrong fluid, or a generator failing are suggested items to inspect. Test Description The numbers below refer to the step numbers on the diagnostic table. 2: The noise may not be engine related. This step is to verify that the engine is making the noise. If the engine is not making the noise do not proceed further with this table. 3: The noise may be an internal engine noise. Removing the drive belt and operating the engine for a brief period will verify the squeal noise is the drive belt or an accessory drive component. When removing the drive belt the water pump may not be operating and the engine may overheat. Also DTCs may set when the engine is operating with the drive belt removed. 4: This test is to verify that an accessory drive component does not have a seized bearing. With the belt removed, test the bearings in the accessory drive components for turning smoothly. Also test the accessory drive components with the engine operating by varying the load on the components to verify that the components operate properly. 5: This test is to verify that the drive belt tensioner operates properly. If the drive belt tensioner is not operating properly, proper belt tension may not be achieved to keep the drive belt from slipping which could cause a squeal noise. 6: This test is to verify that the drive belt is not too long, which would prevent the drive belt tensioner from working properly. Also if an incorrect length drive belt was installed, it may not be routed properly and may be turning an accessory drive component in the wrong direction. 7: Misalignment of the pulleys may be caused from improper mounting of the accessory drive component, incorrect installation of the accessory drive component pulley, or the pulley bent inward or outward from a previous repair. Test for a misalign pulley using a straight edge in the pulley grooves across two or three pulleys. If a misalign pulley is found refer to that accessory drive component for the proper installation procedure for that pulley. 8: This test is to verify that the pulleys are the correct diameter or width. Using a known good vehicle compare the pulley sizes. 14 Replace the drive belt. Refer to Drive Belt Replacement. Did you complete the repair? Go to Step 15 Go to Diagnostic Aids 15 Operate the system in order to verify the repair. Did you correct the condition? System OK Go to Step 3 2003 Saturn L200 2003 ENGINE Engine Mechanical - 3.0L (L81) - Saturn L Series steve Monday, May 09, 2011 12:20:06 PM Page 51 © 2006 Mitchell Repair Information Company, LLC.
  • 52. Drive Belt Squeal Diagnosis DRIVE BELT WHINE DIAGNOSIS Diagnostic Aids The drive belt will not cause the whine noise. If the whine noise is intermittent, verify the accessory drive components by varying their loads making sure Step Action Yes No DEFINITION: The following items are indications of drive belt squeal:  A loud screeching noise that is caused by a slipping drive belt.  The noise occurs when a heavy load is applied to the drive belt, such as an air conditioning compressor engagement snapping the throttle, or slipping on a seized pulley or a faulty accessory drive component. NOTE: Refer toBELT DRESSING NOTICE in Cautions and Notices. 1 Did you review the Symptoms - Engine Mechanical operation and perform the necessary inspections? Go to Step 2 Go to Symptoms - Engine Mechanical 2 Verify that there is a squeal noise. Does the engine make the squeal noise? Go to Step 3 Go to Diagnostic Aids 3 1. Remove the drive belt. Refer to Drive Belt Replacement. 2. Operate the engine for no longer than 30 to 40 seconds. Does the noise still exist? Go to Engine Noise Diagnosis Go to Step 4 4 Inspect for an accessory drive component seized bearing or a faulty accessory drive component. Did you find and correct the condition? Go to Step 9 Go to Step 5 5 Test the drive belt tensioner for proper operation. Refer to Drive Belt Tensioner Diagnosis. Did you find and correct the condition? Go to Step 9 Go to Step 6 6 Inspect for the correct drive belt length. Refer to Drive Belt Replacement. Did you find and correct the condition? Go to Step 9 Go to Step 7 7 Inspect for misalignment of a pulley. Did you find and correct the condition? Go to Step 9 Go to Step 8 8 Inspect for the correct pulley size. Did you find and correct the condition? Go to Step 9 Go to Diagnostic Aids 9 Operate the system in order to verify the repair. Did you correct the condition? System OK Go to Step 3 2003 Saturn L200 2003 ENGINE Engine Mechanical - 3.0L (L81) - Saturn L Series steve Monday, May 09, 2011 12:20:06 PM Page 52 © 2006 Mitchell Repair Information Company, LLC.
  • 53. they are operated to their maximum capacity. Such items but not limited to may be an A/C system overcharged, the power steering system restricted or the wrong fluid, or the generator failing. Test Description The numbers below refer to the step numbers on the diagnostic table. 3: This test is to verify that the noise is being caused by the drive belt or the accessory drive components. When removing the drive belt the water pump may not be operating and the engine may overheat. Also DTCs may set when the engine is operating with the drive belt removed. 4: The inspection should include checking the drive belt tensioner and the drive belt idler pulley bearings. The drive belt may have to be installed and the accessory drive components operated separately by varying their loads. Refer to the suspected accessory drive component for the proper inspection and replacement procedure. Drive Belt Whine Diagnosis DRIVE BELT RUMBLING DIAGNOSIS Step Action Yes No DEFINITION: A high pitched continuous noise that may be caused by an accessory drive component failed bearing. NOTE: Refer to BELT DRESSING NOTICE in Cautions and Notices. 1 Did you review the Symptoms - Engine Mechanical operation and perform the necessary inspections? Go to Step 2 Go to Symptoms - Engine Mechanical 2 Verify that there is a whine noise. Does the engine make the whine noise? Go to Step 3 Go to Diagnostic Aids 3 1. Remove the drive belt. Refer to Drive Belt Replacement. 2. Operate the engine for no longer than 30 to 40 seconds. Does the whine noise still exist? Go to Engine Noise on Start- Up, but Only Lasting a Few Seconds , Upper Engine Noise, Regardless of Engine Speed , Lower Engine Noise, Regardless of Engine Speed , or Engine Noise Under Load Go to Step 4 4 Inspect for a failed accessory drive component bearing. Did you find and repair the condition? Go to Step 5 Go to Diagnostic Aids 5 Operate the system in order to verify the repair. Did you correct the condition? System OK - 2003 Saturn L200 2003 ENGINE Engine Mechanical - 3.0L (L81) - Saturn L Series steve Monday, May 09, 2011 12:20:06 PM Page 53 © 2006 Mitchell Repair Information Company, LLC.
  • 54. Diagnostic Aids Vibration from the engine operating may cause a body component or another part of the vehicle to make rumbling noise. The drive belt may have a condition that can not be seen or felt. Sometimes replacing the drive belt may be the only repair for the symptom. If replacing the drive belt, completing the diagnostic table, and the noise is only heard when the drive belt is installed, there might be an accessory drive component with a failure. Varying the load on the different accessory drive components may aid in identifying which component is causing the rumbling noise. Test Description The numbers below refer to the step numbers on the diagnostic table. 2: This test is to verify that the symptom is present during diagnosing. Other vehicle components may cause a similar symptom. 3: This test is to verify that the drive belt is causing the rumbling noise. Rumbling noise may be confused with an internal engine noise due to the similarity in the description. Remove only one drive belt at a time if the vehicle has multiple drive belts. When removing the drive belt the water pump may not be operating and the engine may overheat. Also DTCs may set when the engine is operating with the drive belt removed. 4: Inspecting the drive belt is to ensure that it is not causing a the noise. Small cracks across the ribs of the drive belt will not cause the noise. Belt separation is identified by the plys of the belt separating and may be seen at the edge of the belt our felt as a lump in the belt. 5: Small amounts of pilling is normal condition and acceptable. When the pilling is severe the drive belt does not have a smooth surface for proper operation. Drive Belt Rumbling Diagnosis Step Action Yes No DEFINITION:  A low pitch tapping, knocking, or thumping noise heard at or just above idle.  Heard once per revolution of the drive belt or a pulley.  Rumbling may be caused from:  Pilling, the accumulation of rubber dust that forms small balls or strings in the drive belt pulley groove  The separation of the drive belt  A damaged drive belt NOTE: Refer to BELT DRESSING NOTICE in Cautions and Notices. Did you review the Symptoms - Engine Mechanical Go to Symptoms - 2003 Saturn L200 2003 ENGINE Engine Mechanical - 3.0L (L81) - Saturn L Series steve Monday, May 09, 2011 12:20:06 PM Page 54 © 2006 Mitchell Repair Information Company, LLC.
  • 55. DRIVE BELT VIBRATION DIAGNOSIS Diagnostic Aids The accessory drive components can have an affect on engine vibration. Such as but not limited to the A/C system over charged, the power steering system restricted or the incorrect fluid, or an extra load on the generator. To help identify an intermittent or an improper condition, vary the loads on the accessory drive components. Test Description 1 operation and perform the necessary inspections? Go to Step 2 Engine Mechanical 2 Verify that there is a rumbling noise. Does the engine make the rumbling noise? Go to Step 3 Go to Diagnostic Aids 3 1. Remove the drive belt. Refer to Drive Belt Replacement. 2. Operate the engine for no longer than 30 to 40 seconds. Does the rumbling noise still exist? Go to Engine Noise on Start- Up, but Only Lasting a Few Seconds , Upper Engine Noise, Regardless of Engine Speed , Lower Engine Noise, Regardless of Engine Speed , or Engine Noise Under Load Go to Step 4 4 Inspect the drive belt for damage, separation, or sections of missing ribs. Did you find any of these conditions? Go to Step 7 Go to Step 5 5 Inspect for severe pilling of more than 1/3 of the drive belt pulley grooves. Did you find severe pilling? Go to Step 6 Go to Step 7 6 1. Clean the drive belt pulleys using a suitable wire brush. 2. Reinstall the drive belt. Refer to Drive Belt Replacement. Did you complete the repair? Go to Step 8 Go to Step 7 7 Install a new drive belt. Refer to Drive Belt Replacement. Did you complete the replacement? Go to Step 8 - 8 Operate the system in order to verify the repair. Did you correct the condition? System OK Go to Diagnostic Aids 2003 Saturn L200 2003 ENGINE Engine Mechanical - 3.0L (L81) - Saturn L Series steve Monday, May 09, 2011 12:20:06 PM Page 55 © 2006 Mitchell Repair Information Company, LLC.
  • 56. The numbers below refer to the step numbers on the diagnostic table. 2: This test is to verify that the symptom is present during diagnosing. Other vehicle components may cause a similar symptom such as the exhaust system, or the drivetrain. 3: This test is to verify that the drive belt or accessory drive components may be causing the vibration. When removing the drive belt the water pump may not be operating and the engine may overheat. Also DTCs may set when the engine is operating with the drive belt removed. 4: The drive belt may cause a vibration. While the drive belt is removed this is the best time to inspect the condition of the belt. 6: Inspecting of the fasteners can eliminate the possibility that a wrong bolt, nut, spacer, or washer was installed. 8: This step should only be performed if the fan is driven by the drive belt. Inspect the engine cooling fan for bent, twisted, loose, or cracked blades. Inspect the fan clutch for smoothness, ease of turning. Inspect for a bent fan shaft or bent mounting flange. 9: This step should only be performed if the water pump is driven by the drive belt. Inspect the water pump shaft for being bent. Also inspect the water pump bearings for smoothness and excessive play. Compare the water pump with a known good water pump. 10: Accessory drive component brackets that are bent, cracked, or loose may put extra strain on that accessory component causing it to vibrate. Drive Belt Vibration Diagnosis Step Action Yes No DEFINITION: The following items are indications of drive belt vibration:  The vibration is engine-speed related.  The vibration may be sensitive to accessory load. NOTE: Refer to BELT DRESSING NOTICE in Cautions and Notices. 1 Did you review the Symptoms - Engine Mechanical operation and perform the necessary inspections? Go to Step 2 Go to Symptoms - Engine Mechanical 2 Verify that the vibration is engine related. Does the engine make the vibration? Go to Step 3 Go to Diagnostic Aids 3 1. Remove the drive belt. Refer to Drive Belt Replacement. 2. Operate the engine for no longer than 30 to 40 seconds. Does the engine still make the vibration? Go to Diagnostic Starting Point - Vibration Diagnosis and Correction in Vibration Diagnosis and Correction Go to Step 4 4 Inspect the drive belt for wear, damage, debris build-up and missing drive belt ribs. 2003 Saturn L200 2003 ENGINE Engine Mechanical - 3.0L (L81) - Saturn L Series steve Monday, May 09, 2011 12:20:06 PM Page 56 © 2006 Mitchell Repair Information Company, LLC.
  • 57. DRIVE BELT FALLS OFF DIAGNOSIS Diagnostic Aids If the drive belts repeatedly falls off the drive belt pulleys, this is because of pulley misalignment. An extra load that is quickly applied or released by an accessory drive component may cause the drive belt to fall off the pulleys. Verify the accessory drive components operate properly. If the drive belt is the incorrect length, the drive belt tensioner may not keep the proper tension on the drive belt. Test Description The numbers below refer to the step numbers on the diagnostic table. 2: This inspection is to verify the condition of the drive belt. Damage to the belt may have occurred when it came off of the pulleys. The drive belt may have been damaged, which caused the drive belt to fall off. Inspect the belt for cuts, tears, sections of ribs missing, or damaged belt plys. 4: Misalignment of the pulleys may be caused from improper mounting of the accessory drive component, incorrect installation of the accessory drive component pulley, or the pulley bent inward or outward from a previous repair. Test for a misaligned pulley using a straight edge in the pulley grooves across 2 or 3 pulleys. If a misaligned pulley is found refer to that accessory drive component for the Did you find any of these conditions? Go to Step 5 Go to Step 6 5 Install a new drive belt. Refer to Drive Belt Replacement. Did you complete the replacement? Go to Step 11 - 6 Inspect for improper, loose or missing fasteners. Did you find any of these conditions? Go to Step 7 Go to Step 8 7 1. Tighten any loose fasteners. 2. Replace improper or missing fasteners. Refer to Fastener Tightening Specifications. Did you complete the repair? Go to Step 11 - 8 Inspect for damaged fan blades or bent fan clutch shaft, if the fan is belt driven. Did you find and correct the condition? Go to Step 11 Go to Step 9 9 Inspect for a bent water pump shaft, if the water pump is belt driven. Refer to Water Pump Replacement (L61) or Water Pump Replacement (L81) in Engine Cooling. Did you find and correct the condition? Go to Step 11 Go to Step 10 10 Inspect for bent or cracked brackets. Did you find and correct the condition? Go to Step 11 Go to Diagnostic Aids 11 Operate the system in order to verify the repair. Did you correct the condition? System OK Go to Step 3 2003 Saturn L200 2003 ENGINE Engine Mechanical - 3.0L (L81) - Saturn L Series steve Monday, May 09, 2011 12:20:06 PM Page 57 © 2006 Mitchell Repair Information Company, LLC.
  • 58. proper installation procedure for that pulley. 5: Inspecting the pulleys for being bent should include inspecting for a dent or other damage to the pulleys that would prevent the drive belt from not seating properly in all of the pulley grooves or on the smooth surface of a pulley when the back side of the belt is used to drive the pulley. 6: Accessory drive component brackets that are bent or cracked will let the drive belt fall off. 7: Inspecting of the fasteners can eliminate the possibility that a wrong bolt, nut, spacer, or washer was installed. Missing, loose, or the wrong fasteners may cause pulley misalignment from the bracket moving under load. Over tightening of the fasteners may cause misalignment of the accessory component bracket. Drive Belt Falls Off Diagnosis Step Action Yes No DEFINITION: The drive belt falls off the pulleys or may not ride correctly on the pulleys. NOTE: Refer to BELT DRESSING NOTICE in Cautions and Notices. 1 Did you review the Symptoms - Engine Mechanical operation and perform the necessary inspections? Go to Step 2 Go to Drive Belt Tensioner Diagnosis 2 Inspect for a damaged drive belt. Did you find the condition? Go to Step 3 Go to Step 4 3 Install a new drive belt. Refer to Drive Belt Replacement. Does the drive belt continue to fall off? Go to Step 4 System OK 4 Inspect for misalignment of the pulleys. Did you find and repair the condition? Go to Step 12 Go to Step 5 5 Inspect for a bent or dented pulley. Did you find and repair the condition? Go to Step 12 Go to Step 6 6 Inspect for a bent or a cracked bracket. Did you find and repair the condition? Go to Step 12 Go to Step 7 7 Inspect for improper, loose or missing fasteners. Did you find loose or missing fasteners? Go to Step 8 Go to Step 9 8  Tighten any loose fasteners.  Replace improper or missing fasteners. Refer to FASTENERS in General Information. Does the drive belt continue to fall off? Go to Step 9 System OK 9 Test the drive belt tensioner for operating correctly. Refer to Drive Belt Tensioner Diagnosis. Does the drive belt tensioner operate correctly? Go to Step 11 Go to Step 10 10 Replace the drive belt tensioner. Refer to Drive Belt Tensioner Diagnosis. Does the drive belt continue to fall off? Go to Step 11 System OK Inspect for failed drive belt idler and drive belt 2003 Saturn L200 2003 ENGINE Engine Mechanical - 3.0L (L81) - Saturn L Series steve Monday, May 09, 2011 12:20:06 PM Page 58 © 2006 Mitchell Repair Information Company, LLC.
  • 59. DRIVE BELT EXCESSIVE WEAR DIAGNOSIS Fig. 19: Minor Cracks DO NOT Warrant Drive Belt Replacement Courtesy of GENERAL MOTORS CORP. Minor cracks in the belt rib are normal. They are the result of reverse bending around a backside pulley. Do not replace belts for minor cracks. 11 tensioner pulley bearings. Did you find and repair the condition? Go to Step 12 Go to Diagnostic Aids 12 Operate the system in order to verify the repair. Did you correct the condition? System OK Go to Step 2 2003 Saturn L200 2003 ENGINE Engine Mechanical - 3.0L (L81) - Saturn L Series steve Monday, May 09, 2011 12:20:06 PM Page 59 © 2006 Mitchell Repair Information Company, LLC.
  • 60. 2003 Saturn L200 2003 ENGINE Engine Mechanical - 3.0L (L81) - Saturn L Series steve Monday, May 09, 2011 12:20:06 PM Page 60 © 2006 Mitchell Repair Information Company, LLC.
  • 61. Fig. 20: Chunking, Cord Breakage Or Separation DO Warrant Drive Belt Replacement Courtesy of GENERAL MOTORS CORP. Belts that have chunking longer than 5 mm (13/16 in) in one or more places should be replaced. Belts should also be replaced if cord breakage or fabric separation is observed. DRIVE BELT TENSIONER DIAGNOSIS Tools Required SA9181NE Belt Tension Gage Belt and Tensioner Load Inspection 2003 Saturn L200 2003 ENGINE Engine Mechanical - 3.0L (L81) - Saturn L Series steve Monday, May 09, 2011 12:20:06 PM Page 61 © 2006 Mitchell Repair Information Company, LLC.
  • 62. Fig. 21: Drive Belt Routing Illustration Courtesy of GENERAL MOTORS CORP. 1. The following procedure is to be used when the belt or tensioner is suspected of allowing pulleys to slip or causing any unusual belt noises. 1. Warm up the engine for approximately 10 minutes with all accessories turned ON. 2. The steering wheel must be turned full left and right several times, if equipped with power steering. 2003 Saturn L200 2003 ENGINE Engine Mechanical - 3.0L (L81) - Saturn L Series steve Monday, May 09, 2011 12:20:06 PM Page 62 © 2006 Mitchell Repair Information Company, LLC.
  • 63. Fig. 22: Using 15 mm Wrench To Rotate Tensioner Pulley Courtesy of GENERAL MOTORS CORP. 2. Shut the engine OFF. 3. Using a 15 mm wrench, rotate the tensioner arm clockwise until the belt becomes loose on the pulleys. Slowly allow the tensioner to apply tension back on the belt. 2003 Saturn L200 2003 ENGINE Engine Mechanical - 3.0L (L81) - Saturn L Series steve Monday, May 09, 2011 12:20:06 PM Page 63 © 2006 Mitchell Repair Information Company, LLC.
  • 64. Fig. 23: View of Tensioner Pulley Courtesy of GENERAL MOTORS CORP. 4. The tensioner pulley must not be allowed to snap against the belt. IMPORTANT: The marking on the tensioner arm must fall within the operating range (2 marks) on the tensioner body. If the tensioner marks fall outside the operating range, the accessory drive belt must be replaced. 2003 Saturn L200 2003 ENGINE Engine Mechanical - 3.0L (L81) - Saturn L Series steve Monday, May 09, 2011 12:20:06 PM Page 64 © 2006 Mitchell Repair Information Company, LLC.
  • 65. Fig. 24: Checking Belt Tension Courtesy of GENERAL MOTORS CORP. 5. Using a calibrated SA9181NE , or equivalent, (OTC® OEM 1294), read and record the belt tension at mid span for the following drive combinations. This check can be performed on an engine assembly removed from the vehicle. It can not be performed with the engine in the vehicle unless the upper engine mount is removed. 6. Repeat steps 2 and 5 three times and record the information. 2003 Saturn L200 2003 ENGINE Engine Mechanical - 3.0L (L81) - Saturn L Series steve Monday, May 09, 2011 12:20:06 PM Page 65 © 2006 Mitchell Repair Information Company, LLC.
  • 66. Fig. 25: Belt Tensioner Chart Courtesy of GENERAL MOTORS CORP. 7. Add the 3 readings together and divide the total by 3, as shown in the example:  Belt Tension = Readings / (# of readings)  Belt Tension = [(1)+(2)+(3)] / 3  Example: (54 + 58 + 52) = 164 / 3  Belt Tension = 55 lb. 8. Refer the belt tension chart for specifications. Accessory Drive Belt Inspection 2003 Saturn L200 2003 ENGINE Engine Mechanical - 3.0L (L81) - Saturn L Series steve Monday, May 09, 2011 12:20:06 PM Page 66 © 2006 Mitchell Repair Information Company, LLC.
  • 67. 2003 Saturn L200 2003 ENGINE Engine Mechanical - 3.0L (L81) - Saturn L Series steve Monday, May 09, 2011 12:20:06 PM Page 67 © 2006 Mitchell Repair Information Company, LLC.
  • 68. Fig. 26: Chunking, Cord Breakage Or Separation DO Warrant Drive Belt Replacement Courtesy of GENERAL MOTORS CORP. 1. Minor cracks in the belt rib are normal. They are the result of reverse bending around a backside pulley. Do not replace belts for minor cracks. Belts that have chunking longer than 5 mm (13/16 in) in one or more places should be replaced. Fig. 27: Minor Cracks DO NOT Warrant Drive Belt Replacement Courtesy of GENERAL MOTORS CORP. 2. Belts should also be replaced if cord breakage or fabric separation is observed. 2003 Saturn L200 2003 ENGINE Engine Mechanical - 3.0L (L81) - Saturn L Series steve Monday, May 09, 2011 12:20:06 PM Page 68 © 2006 Mitchell Repair Information Company, LLC.
  • 69. REPAIR INSTRUCTIONS DRIVE BELT REPLACEMENT Removal Procedure Fig. 28: Removing & Installing Engine Mount Bracket Courtesy of GENERAL MOTORS CORP. 1. Disconnect the negative battery cable. Refer to Battery Negative Cable Disconnect/Connect Procedure in Battery. IMPORTANT: The engine must be supported upon removal of the engine mount. 2003 Saturn L200 2003 ENGINE Engine Mechanical - 3.0L (L81) - Saturn L Series steve Monday, May 09, 2011 12:20:06 PM Page 69 © 2006 Mitchell Repair Information Company, LLC.
  • 70. 2. Remove the right front engine mount and engine mount bracket from the engine block. Refer to Engine Mount Replacement. Fig. 29: Using 15 mm Wrench To Rotate Tensioner Pulley Courtesy of GENERAL MOTORS CORP. 3. Use a 15 mm wrench to rotate the tensioner pulley clockwise while sliding the drive belt off the tensioner or water pump pulley. 4. Remove the drive belt. 5. Clean and inspect the serpentine drive belt surfaces. Installation Procedure 2003 Saturn L200 2003 ENGINE Engine Mechanical - 3.0L (L81) - Saturn L Series steve Monday, May 09, 2011 12:20:06 PM Page 70 © 2006 Mitchell Repair Information Company, LLC.
  • 71. Fig. 30: Drive Belt Routing Illustration Courtesy of GENERAL MOTORS CORP. 1. Route the belt around all pulleys, except the tensioner or water pump. 2. Use a 15 mm wrench to rotate the tensioner pulley clockwise. 3. Slip the belt over the idler or water pump pulley. 4. Install the right front engine mount. Refer to Engine Mount Replacement. IMPORTANT: Ensure that the drive belt is aligned into the proper grooves on the drive pulley. 2003 Saturn L200 2003 ENGINE Engine Mechanical - 3.0L (L81) - Saturn L Series steve Monday, May 09, 2011 12:20:06 PM Page 71 © 2006 Mitchell Repair Information Company, LLC.
  • 72. 5. Connect the negative battery cable. Tighten: Tighten the battery terminal bolts to 17 N.m (13 lb ft). ENGINE MOUNT INSPECTION 1. Install the engine support fixture. 2. Observe the engine mount while raising the engine. Raising the engine removes the weight from the engine mount and creates slight tension on the rubber. 3. Replace the engine mount if the engine mount exhibits any of the following conditions:  The hard rubber is covered with heat check cracks.  The rubber is separated from the metal plate of the engine mount.  The rubber is split through the center of the engine mount.  The engine mount itself is leaking fluid. 4. For engine mount replacement. Refer to Engine Mount Replacement. DRIVE BELT TENSIONER REPLACEMENT Removal Procedure NOTE: Refer to FASTENER NOTICE in Cautions and Notices. IMPORTANT: Before replacing any engine mount due to suspected fluid loss, verify that the source of the fluid is the engine mount, not the engine or accessories. 2003 Saturn L200 2003 ENGINE Engine Mechanical - 3.0L (L81) - Saturn L Series steve Monday, May 09, 2011 12:20:06 PM Page 72 © 2006 Mitchell Repair Information Company, LLC.
  • 73. Fig. 31: Using 15 mm Wrench To Rotate Tensioner Pulley Clockwise Courtesy of GENERAL MOTORS CORP. 1. Use a 15-mm wrench to rotate the tensioner pulley clockwise while lifting the drive belt off the idler pulley. 2. Raise the vehicle. IMPORTANT: Complete accessory drive belt removal is not required for tensioner replacement. 2003 Saturn L200 2003 ENGINE Engine Mechanical - 3.0L (L81) - Saturn L Series steve Monday, May 09, 2011 12:20:06 PM Page 73 © 2006 Mitchell Repair Information Company, LLC.
  • 74. Fig. 32: Removing & Installing Accessory Drive Belt Tensioner Assembly (L81 V6 Only) Courtesy of GENERAL MOTORS CORP. 3. Remove the drive belt tensioner bolts. 4. Remove the drive belt tensioner from the engine. Installation Procedure 2003 Saturn L200 2003 ENGINE Engine Mechanical - 3.0L (L81) - Saturn L Series steve Monday, May 09, 2011 12:20:06 PM Page 74 © 2006 Mitchell Repair Information Company, LLC.
  • 75. Fig. 33: Removing & Installing Accessory Drive Belt Tensioner Assembly (L81 V6 Only) Courtesy of GENERAL MOTORS CORP. 1. Install the drive belt tensioner to the engine. 2. Install the drive belt tensioner bolts. Tighten: Tighten the belt tensioner bolts to 40 N.m (30 lb ft). 3. Lower the vehicle. NOTE: Refer to FASTENER NOTICE in Cautions and Notices. 2003 Saturn L200 2003 ENGINE Engine Mechanical - 3.0L (L81) - Saturn L Series steve Monday, May 09, 2011 12:20:06 PM Page 75 © 2006 Mitchell Repair Information Company, LLC.
  • 76. Fig. 34: Using 15 mm Wrench To Rotate Tensioner Pulley Clockwise Courtesy of GENERAL MOTORS CORP. 4. Route the drive belt around all pulleys except the idler or water pump pulley. 5. Use a 15-mm wrench to rotate the tensioner pulley clockwise. 6. Slip the drive belt over the idler or water pump pulley. INTAKE RUNNER REPLACEMENT (FRONT) IMPORTANT: Ensure that the drive belt is aligned into the proper grooves on the drive pulleys. 2003 Saturn L200 2003 ENGINE Engine Mechanical - 3.0L (L81) - Saturn L Series steve Monday, May 09, 2011 12:20:06 PM Page 76 © 2006 Mitchell Repair Information Company, LLC.
  • 77. Tools Required J 43914 Universal Clamp Pliers Removal Procedure Fig. 35: Removing/Installing Intake Hose Assembly Courtesy of GENERAL MOTORS CORP. 1. Disconnect the negative battery cable. 2. Remove the intake hose assembly. 2003 Saturn L200 2003 ENGINE Engine Mechanical - 3.0L (L81) - Saturn L Series steve Monday, May 09, 2011 12:20:06 PM Page 77 © 2006 Mitchell Repair Information Company, LLC.
  • 78. Fig. 36: Removing Intake Runner Rubber Boot Hose Clamps Courtesy of GENERAL MOTORS CORP. 3. Remove 4 rubber boot hose clamps using the J 43914 . IMPORTANT: Clamps are reusable if not damaged. Do not discard. 2003 Saturn L200 2003 ENGINE Engine Mechanical - 3.0L (L81) - Saturn L Series steve Monday, May 09, 2011 12:20:06 PM Page 78 © 2006 Mitchell Repair Information Company, LLC.
  • 79. Fig. 37: Removing & Installing Front Intake Manifold Runner Courtesy of GENERAL MOTORS CORP. 4. Remove the intake runner mounting bolts. 5. Disconnect the intake runner from the rubber boots and remove the intake runner. Installation Procedure 2003 Saturn L200 2003 ENGINE Engine Mechanical - 3.0L (L81) - Saturn L Series steve Monday, May 09, 2011 12:20:06 PM Page 79 © 2006 Mitchell Repair Information Company, LLC.
  • 80. Fig. 38: Removing & Installing Front Intake Manifold Runner Courtesy of GENERAL MOTORS CORP. 1. Install the intake runner onto the rubber boots. 2. Install the intake runner mounting bolts. Tighten: Tighten the intake manifold runner bolts to 8 N.m (71 lb in). NOTE: Refer to FASTENER NOTICE in Cautions and Notices. 2003 Saturn L200 2003 ENGINE Engine Mechanical - 3.0L (L81) - Saturn L Series steve Monday, May 09, 2011 12:20:06 PM Page 80 © 2006 Mitchell Repair Information Company, LLC.
  • 81. Fig. 39: Installing Intake Runner Rubber Boot Hose Clamps Courtesy of GENERAL MOTORS CORP. 3. Install the 4 rubber boot hose clamps using the J 43914 . IMPORTANT: Inspect the hose clamps for damage. Replace if damaged. 2003 Saturn L200 2003 ENGINE Engine Mechanical - 3.0L (L81) - Saturn L Series steve Monday, May 09, 2011 12:20:06 PM Page 81 © 2006 Mitchell Repair Information Company, LLC.
  • 82. Fig. 40: Removing/Installing Intake Hose Assembly Courtesy of GENERAL MOTORS CORP. 4. Install the hose assembly. 5. Connect the negative battery cable. Tighten: Tighten the battery terminal bolts to 17 N.m (13 lb ft). INTAKE RUNNER REPLACEMENT (REAR) Tools Required J 43914 Universal Clamp Pliers 2003 Saturn L200 2003 ENGINE Engine Mechanical - 3.0L (L81) - Saturn L Series steve Monday, May 09, 2011 12:20:06 PM Page 82 © 2006 Mitchell Repair Information Company, LLC.
  • 83. Removal Procedure Fig. 41: Removing/Installing Intake Hose Assembly Courtesy of GENERAL MOTORS CORP. 1. Disconnect the negative battery cable. 2. Remove the intake hose assembly. 2003 Saturn L200 2003 ENGINE Engine Mechanical - 3.0L (L81) - Saturn L Series steve Monday, May 09, 2011 12:20:06 PM Page 83 © 2006 Mitchell Repair Information Company, LLC.
  • 84. Fig. 42: Removing & Installing ECM Electrical Connectors Courtesy of GENERAL MOTORS CORP. 3. Remove the ECM electrical connectors. 4. Remove the ECM bolts and the ECM. 2003 Saturn L200 2003 ENGINE Engine Mechanical - 3.0L (L81) - Saturn L Series steve Monday, May 09, 2011 12:20:06 PM Page 84 © 2006 Mitchell Repair Information Company, LLC.
  • 85. Fig. 43: Removing Intake Runner Rubber Boot Hose Clamps Courtesy of GENERAL MOTORS CORP. 5. Remove the 4 rubber boot hose clamps using the J 43914 . IMPORTANT: Clamps are reusable if not damaged. Do not discard. 2003 Saturn L200 2003 ENGINE Engine Mechanical - 3.0L (L81) - Saturn L Series steve Monday, May 09, 2011 12:20:06 PM Page 85 © 2006 Mitchell Repair Information Company, LLC.
  • 86. Fig. 44: Removing & Installing Threaded Brake Vacuum Hose Courtesy of GENERAL MOTORS CORP. 6. Disconnect the threaded brake vacuum hose. 2003 Saturn L200 2003 ENGINE Engine Mechanical - 3.0L (L81) - Saturn L Series steve Monday, May 09, 2011 12:20:06 PM Page 86 © 2006 Mitchell Repair Information Company, LLC.
  • 87. Fig. 45: Connecting Intake Plenum Switch-Over Valve Vacuum Hose At Switch-Over Valve Courtesy of GENERAL MOTORS CORP. 7. Disconnect the intake plenum switch-over valve vacuum hose at the switch-over valve. Note the hose routing. 2003 Saturn L200 2003 ENGINE Engine Mechanical - 3.0L (L81) - Saturn L Series steve Monday, May 09, 2011 12:20:06 PM Page 87 © 2006 Mitchell Repair Information Company, LLC.
  • 88. Fig. 46: Removing & Installing Rear Intake Manifold Runner Courtesy of GENERAL MOTORS CORP. 8. Remove the intake runner mounting bolts. 9. Disconnect the vent hose from the throttle body. 10. Disconnect the intake runner from the rubber boots and remove the intake runner. Note the throttle body vent hose routing. Installation Procedure 2003 Saturn L200 2003 ENGINE Engine Mechanical - 3.0L (L81) - Saturn L Series steve Monday, May 09, 2011 12:20:06 PM Page 88 © 2006 Mitchell Repair Information Company, LLC.
  • 89. Fig. 47: Removing & Installing Rear Intake Manifold Runner Courtesy of GENERAL MOTORS CORP. 1. Install the intake runner onto the rubber boots. 2. Route the throttle body vent hose under the vacuum reservoir and connect to the throttle body. 3. Install the intake runner mounting bolts. Tighten: Tighten the intake manifold runner bolts to 8 N.m (71 lb in). NOTE: Refer to FASTENER NOTICE in Cautions and Notices. 2003 Saturn L200 2003 ENGINE Engine Mechanical - 3.0L (L81) - Saturn L Series steve Monday, May 09, 2011 12:20:06 PM Page 89 © 2006 Mitchell Repair Information Company, LLC.