This document provides a summary of the history of Android on Intel processors from 2009 to present day. It discusses the unofficial Android-x86 project in 2009 that first ported Android to x86 chips. In 2010, Intel announced the Moorestown platform to target Android devices. In 2011, Intel and Google partnered to optimize future Android versions for Intel processors. Since then several Android phones and tablets with Intel chips have been released, including the first Intel-powered Android phone, the Lava Xolo X900, in 2012.


![Intel®
Technology Journal | Volume 18, Issue 2, 2014
An Introduction to Android* on Intel Processors | 9
Moorestown Platform
In 2010, Intel Corporation unveiled its newest Intel® Atom™ processor-based
platform, codenamed Moorestown. This platform used significantly less power
than previous Intel Atom processor–based platforms and allowed Intel to start
targeting smartphones, tablets, and other mobile devices.
The new platform supported a range of scalable frequencies, up to 1.5 GHz
for high-end smartphones and up to 1.9 GHz for tablets and other handheld
devices. The chipset also brought support for Wi-Fi*, 3G/HSPA, and WiMAX,
as well as a range of operation systems, including Android, MeeGo*, Moblin*,
and Windows* 7.
Intel and Google Partnership
On September 13, 2011, Intel Corporation and Google Inc. announced that
they would work to enable and optimize future versions of Android for the
Intel Atom family of low power processors. This meant that future versions
of the Android platform would support Intel technology in addition to other
architectures in the software released by Google.
“By optimizing the Android platform for Intel architecture, we bring a powerful
new capability to market that will accelerate more industry adoption and choice,
and bring exciting new products to market that harness the combined potential
of Intel technology and the Android platform,” said Intel President and CEO
at the time, Paul Otellini. “Together we are accelerating Intel architecture and
bringing new levels of innovation to a maturing Android platform.”
“Combining Android with Intel’s low power smartphone roadmap opens up
more opportunity for innovation and choice,” said Andy Rubin, Senior Vice
President of Mobile at Google at the time. “This collaboration will drive the
Android ecosystem forward.”
The announcement built upon the two companies’ recent joint initiatives to
enable Intel architecture on Google products, which include Chrome OS and
Google TV along with the Android Software Development Kit (SDK) and
Native Development Kit (NDK).
International Consumer Electronics Show (CES) 2012
January of 2012, at CES, Intel Corporation announced a number of
advancements in its mobile strategy, including a strategic relationship with
Motorola Mobility, Inc., a subsidiary of Google Inc., and a handset by Lenovo,
the K800*, based on the company’s new Intel Atom processor platform.
The Intel Atom processor Z2460 platform, formerly codenamed Medfield,
was, according to Intel, “specifically designed for smartphones and tablets,
and delivers leading performance with competitive energy efficiency.” The
partnership with Motorola Mobility included smartphones that Motorola
would begin to ship in the second half of 2012 using Intel Atom processors
“…[Moorestown] used significantly
less power than previous Intel Atom
processor–based platforms…”
“…future versions of the Android
platform would support Intel
technology in addition to other
architectures in the software released
by Google.”](https://image.slidesharecdn.com/c1e98a76-6293-4a30-9873-abe8040257f9-160127191746/75/2014-vol18-iss-2-intel-technology-journal-9-2048.jpg)
![Intel®
Technology Journal | Volume 18, Issue 2, 2014
10 | An Introduction to Android* on Intel Processors
and the Android platform. The first product to come of this partnership was
the Razr i* smartphone. The collaboration, which also covers tablets, “combines
Intel’s leadership in silicon technology and computing innovation with
Motorola’s mobile device design expertise” said Intel.
Intel also announced the Intel® Smartphone Reference Design, with the aim
of shrinking device development time and costs for phone OEMs and carriers.
This fully functioning smartphone featured a 4.03-inch high-resolution LCD
touchscreen, and two cameras, front and back, delivering advanced imaging
capabilities, including burst mode that allows individuals to capture 15 pictures
in less than a second with 8-megapixel quality.
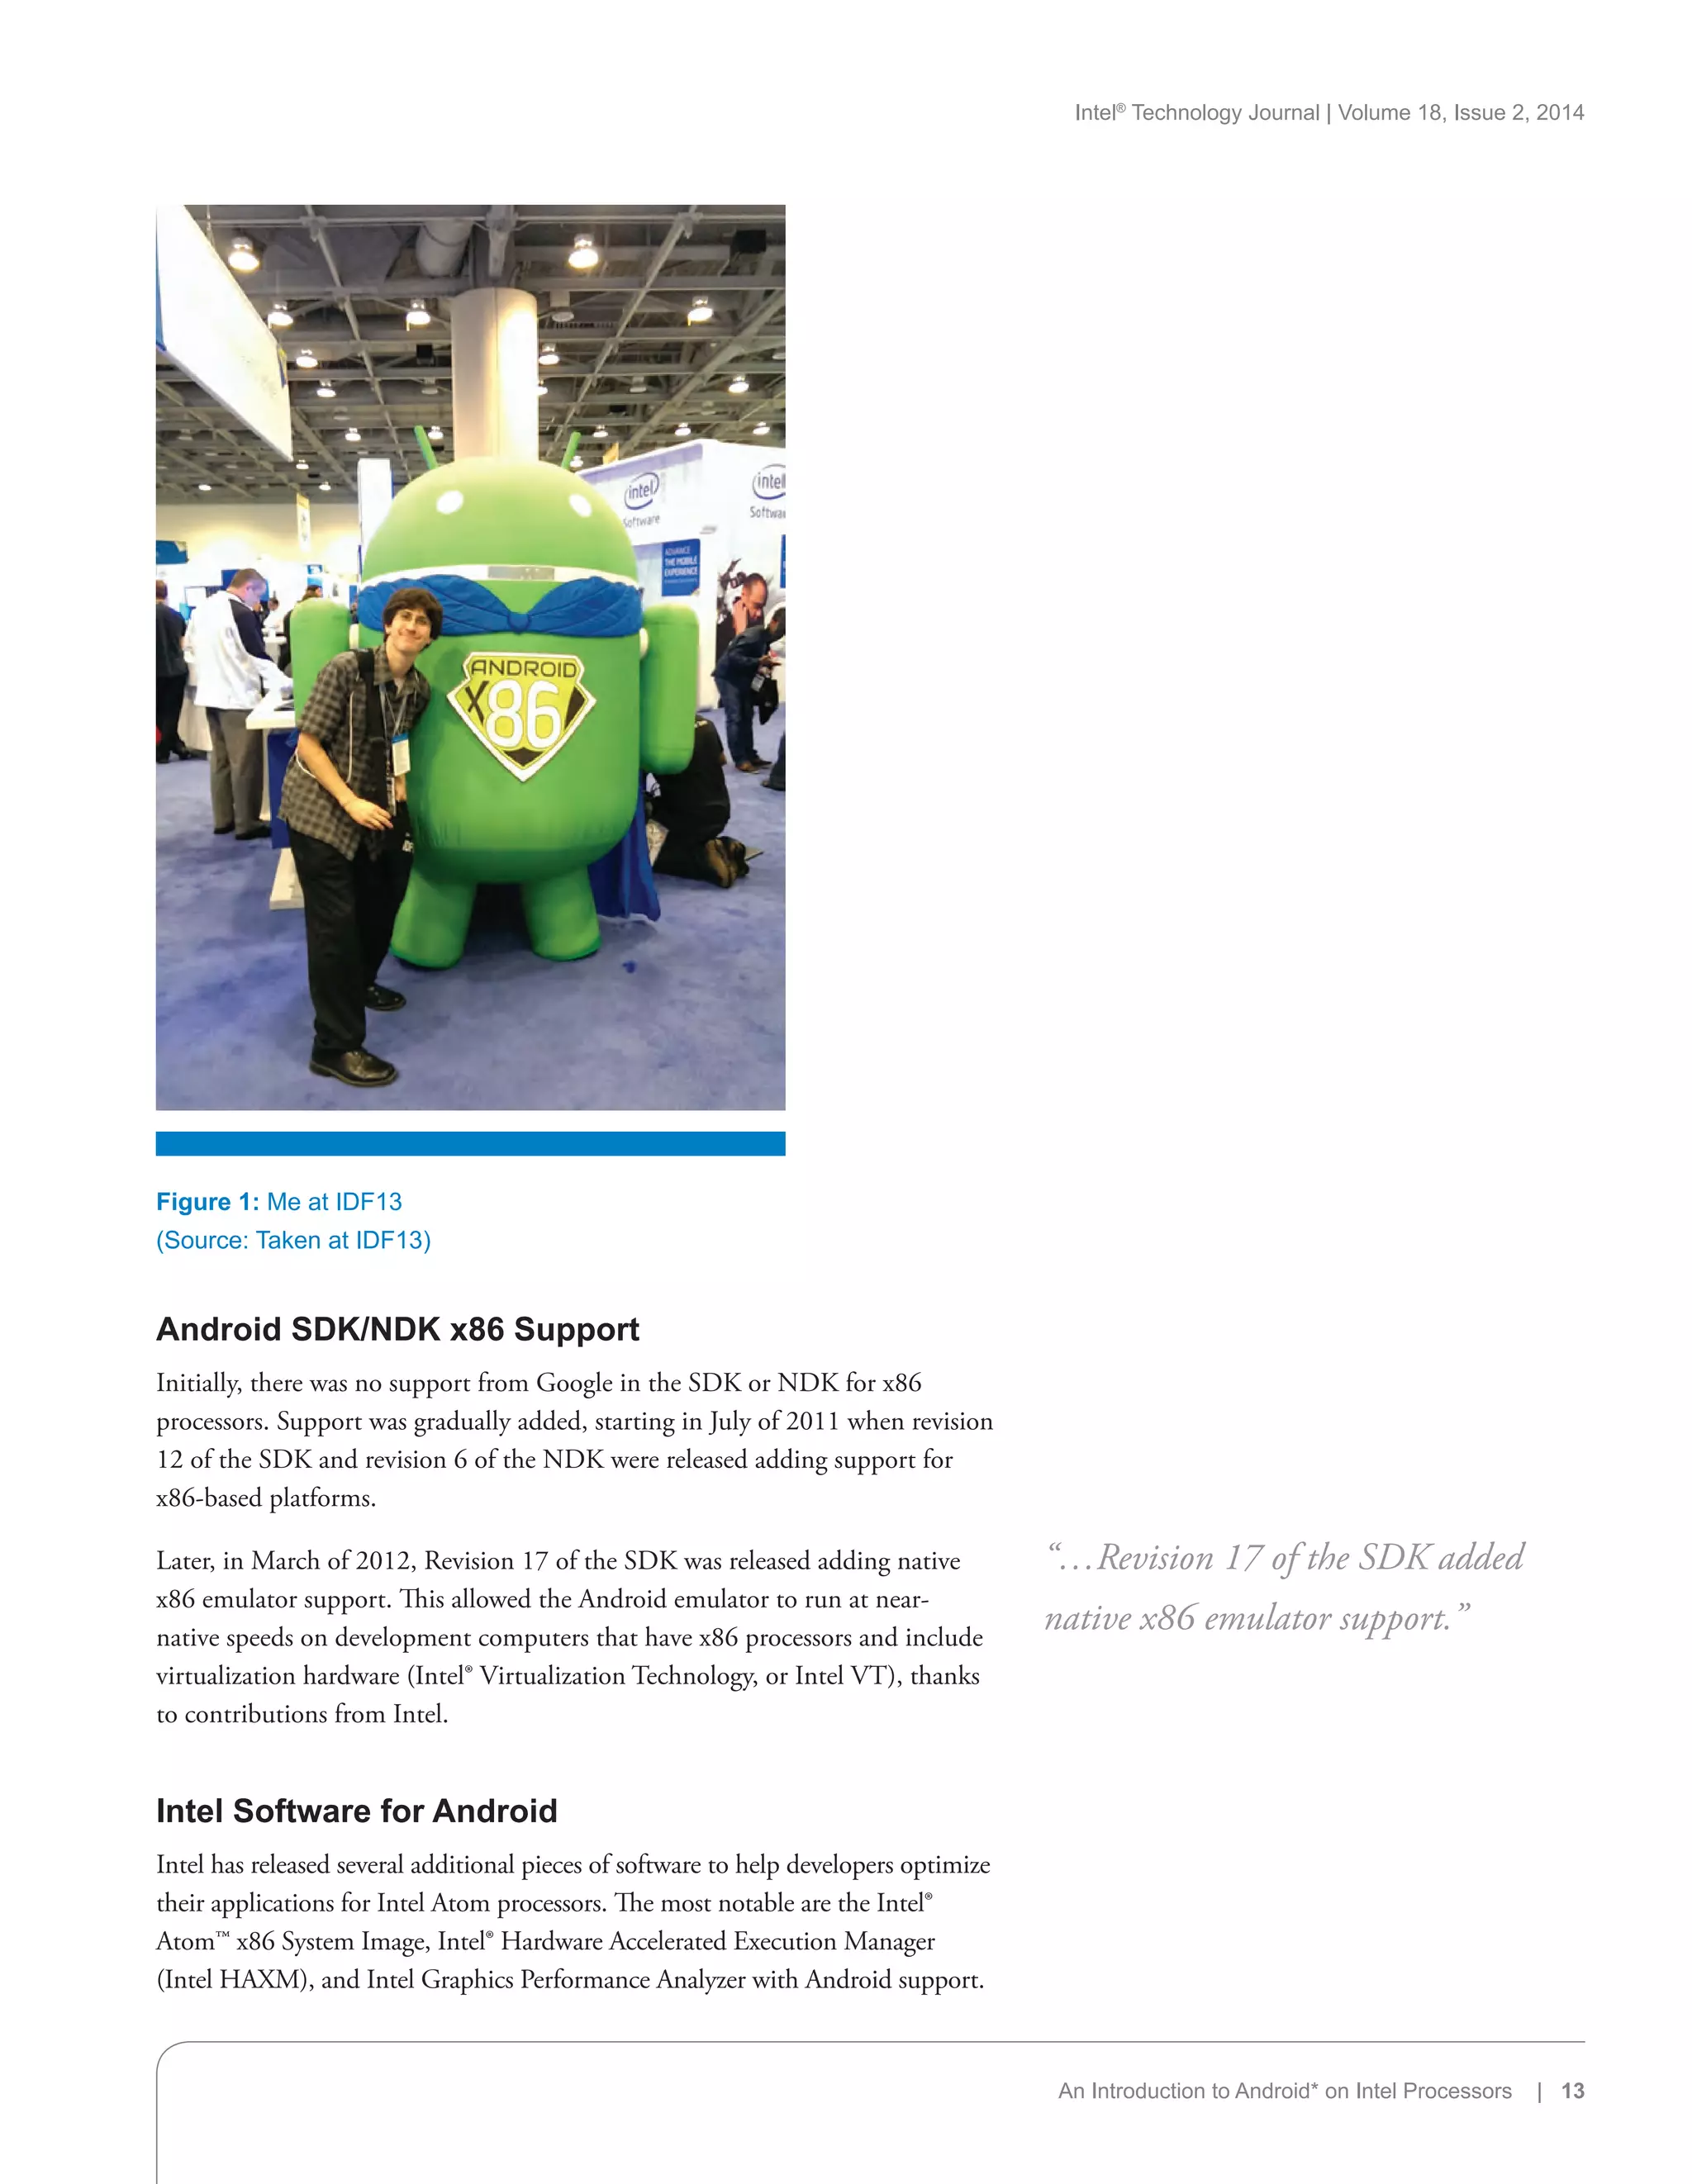
International Consumer Electronics Show (CES) 2013
At CES 2013, Intel announced their newest low power Intel Atom processor
based platform aimed at emerging markets. The new value offering includes
many high-end features including the Intel Atom processor Z2420. Intel also
made announcements about their forthcoming Intel Atom Z2580 processor
platform targeted at performance and mainstream smartphones. The platform
included a dual-core Intel Atom processor with Intel® Hyper-Threading
Technology and also featured a dual-core graphics engine. According to
Intel “the new platform [would] deliver up to two times the performance
benefits over our current-generation solution (Intel Atom processor Z2460
platform), while also offering competitive power and battery life.” Finally,
Intel announced a new tablet platform, Bay Trail, which would be Intel’s first
quad-core SoC.
Lenovo* announced the IdeaPhone K900* at CES 2013, which is based on the
Intel Atom processor Z2580. The K900 is 6.9-mm thin and also features the
world’s first 5.5-inch full high-definition 400 + PPI screen. The K900 was the
first product to market based on the Intel Atom processor Z2580.
Mobile World Congress (MWC) 2013
Intel made several announcements at MWC 2013 in Barcelona, Spain. The
announcements included more details about a new dual-core Intel Atom
SoC platform for smartphones and tablets, and the company’s first global,
multimode-multiband LTE solution. Intel also discussed Bay Trail momentum,
mobile device enabling efforts, and continued smartphone momentum in
emerging markets with the Intel Atom Z2420 processor-based platform.
Finally, Intel highlighted its forthcoming 22-nm smartphone Intel Atom SoC
(codename Merrifield). The product is based on Intel’s “leading-edge 22-nm
process and an entirely new Intel Atom microarchitecture that will help enable
increased smartphone performance, power efficiency, and battery life.”
ASUS* announced the FonePad at MWC 2013. The Fonepad combines
features of a smartphone with the versatility of a 7-inch tablet. Powered by a
new Intel Atom Z2420 processor with Android 4.1, the Fonepad includes
3G mobile data and a vibrant HD display with IPS technology for “wide
viewing angles and outstanding clarity.” The Fonepad launched in April of 2013.
“…Intel announced their newest low
power Intel Atom processor based
platform aimed at emerging markets.”
“[Intel announced] the company’s first
global, multimode-multiband LTE
solution”](https://image.slidesharecdn.com/c1e98a76-6293-4a30-9873-abe8040257f9-160127191746/75/2014-vol18-iss-2-intel-technology-journal-10-2048.jpg)

![Intel®
Technology Journal | Volume 18, Issue 2, 2014
An Introduction to Android* on Intel Processors | 15
a 1.3-megapixel front-facing camera, four to six hours of battery life, and a
weight of 1.93 pounds, the ViewPad 10 was on par with other tablets of
the time.
Lava Xolo X900*
The X900 was the first Android smartphone powered by an Intel Atom
processor. It was released April 2012 in India and is based on Intel’s reference
design. It has a 4-inch (1024 × 600) display, 8-megapixel rear camera,
1.3-megapixel front camera, and Near Field Communication (NFC).
NFC allows communication with other devices with NFC technology or
unpowered NFC chips (tags). This technology has several uses, such as
transferring data, making purchases, and changing settings on the phones,
to name a few. The X900 runs on a Z2460 1.6-GHz processor with Intel®
Hyper-Threading Technology (Intel HT Technology). Intel HT Technology
allows one core on the processor to appear like two cores to the operating
system. This doubles the execution resources available to the OS, which
potentially increases the performance of your overall system. This feature
is not available on ARM processors. The device also features a 400-MHz
graphics core, 1 GB of RAM, and 16 GB of internal storage, putting it on
par with the average high-end smartphone of the time. The X900 came
loaded with Android 2.3 (Gingerbread) with no custom UI, like Sense or
TouchWiz, but was updated to Android 4.0 (Ice Cream Sandwich) later in
2012. Unlike many Android phones in existence, the Xolo has no removable
battery or SD card slot. This is seen as a disadvantage to some in the Android
community, but this appears to be the trend for new high-end Android
smartphones, including HTC’s new One series. The reason for the new trend
of nonremovable batteries is that it allows for thinner smartphones. The move
away from SD card slots is an effort to increase smartphone performance,
since internal storage is faster than SD cards.
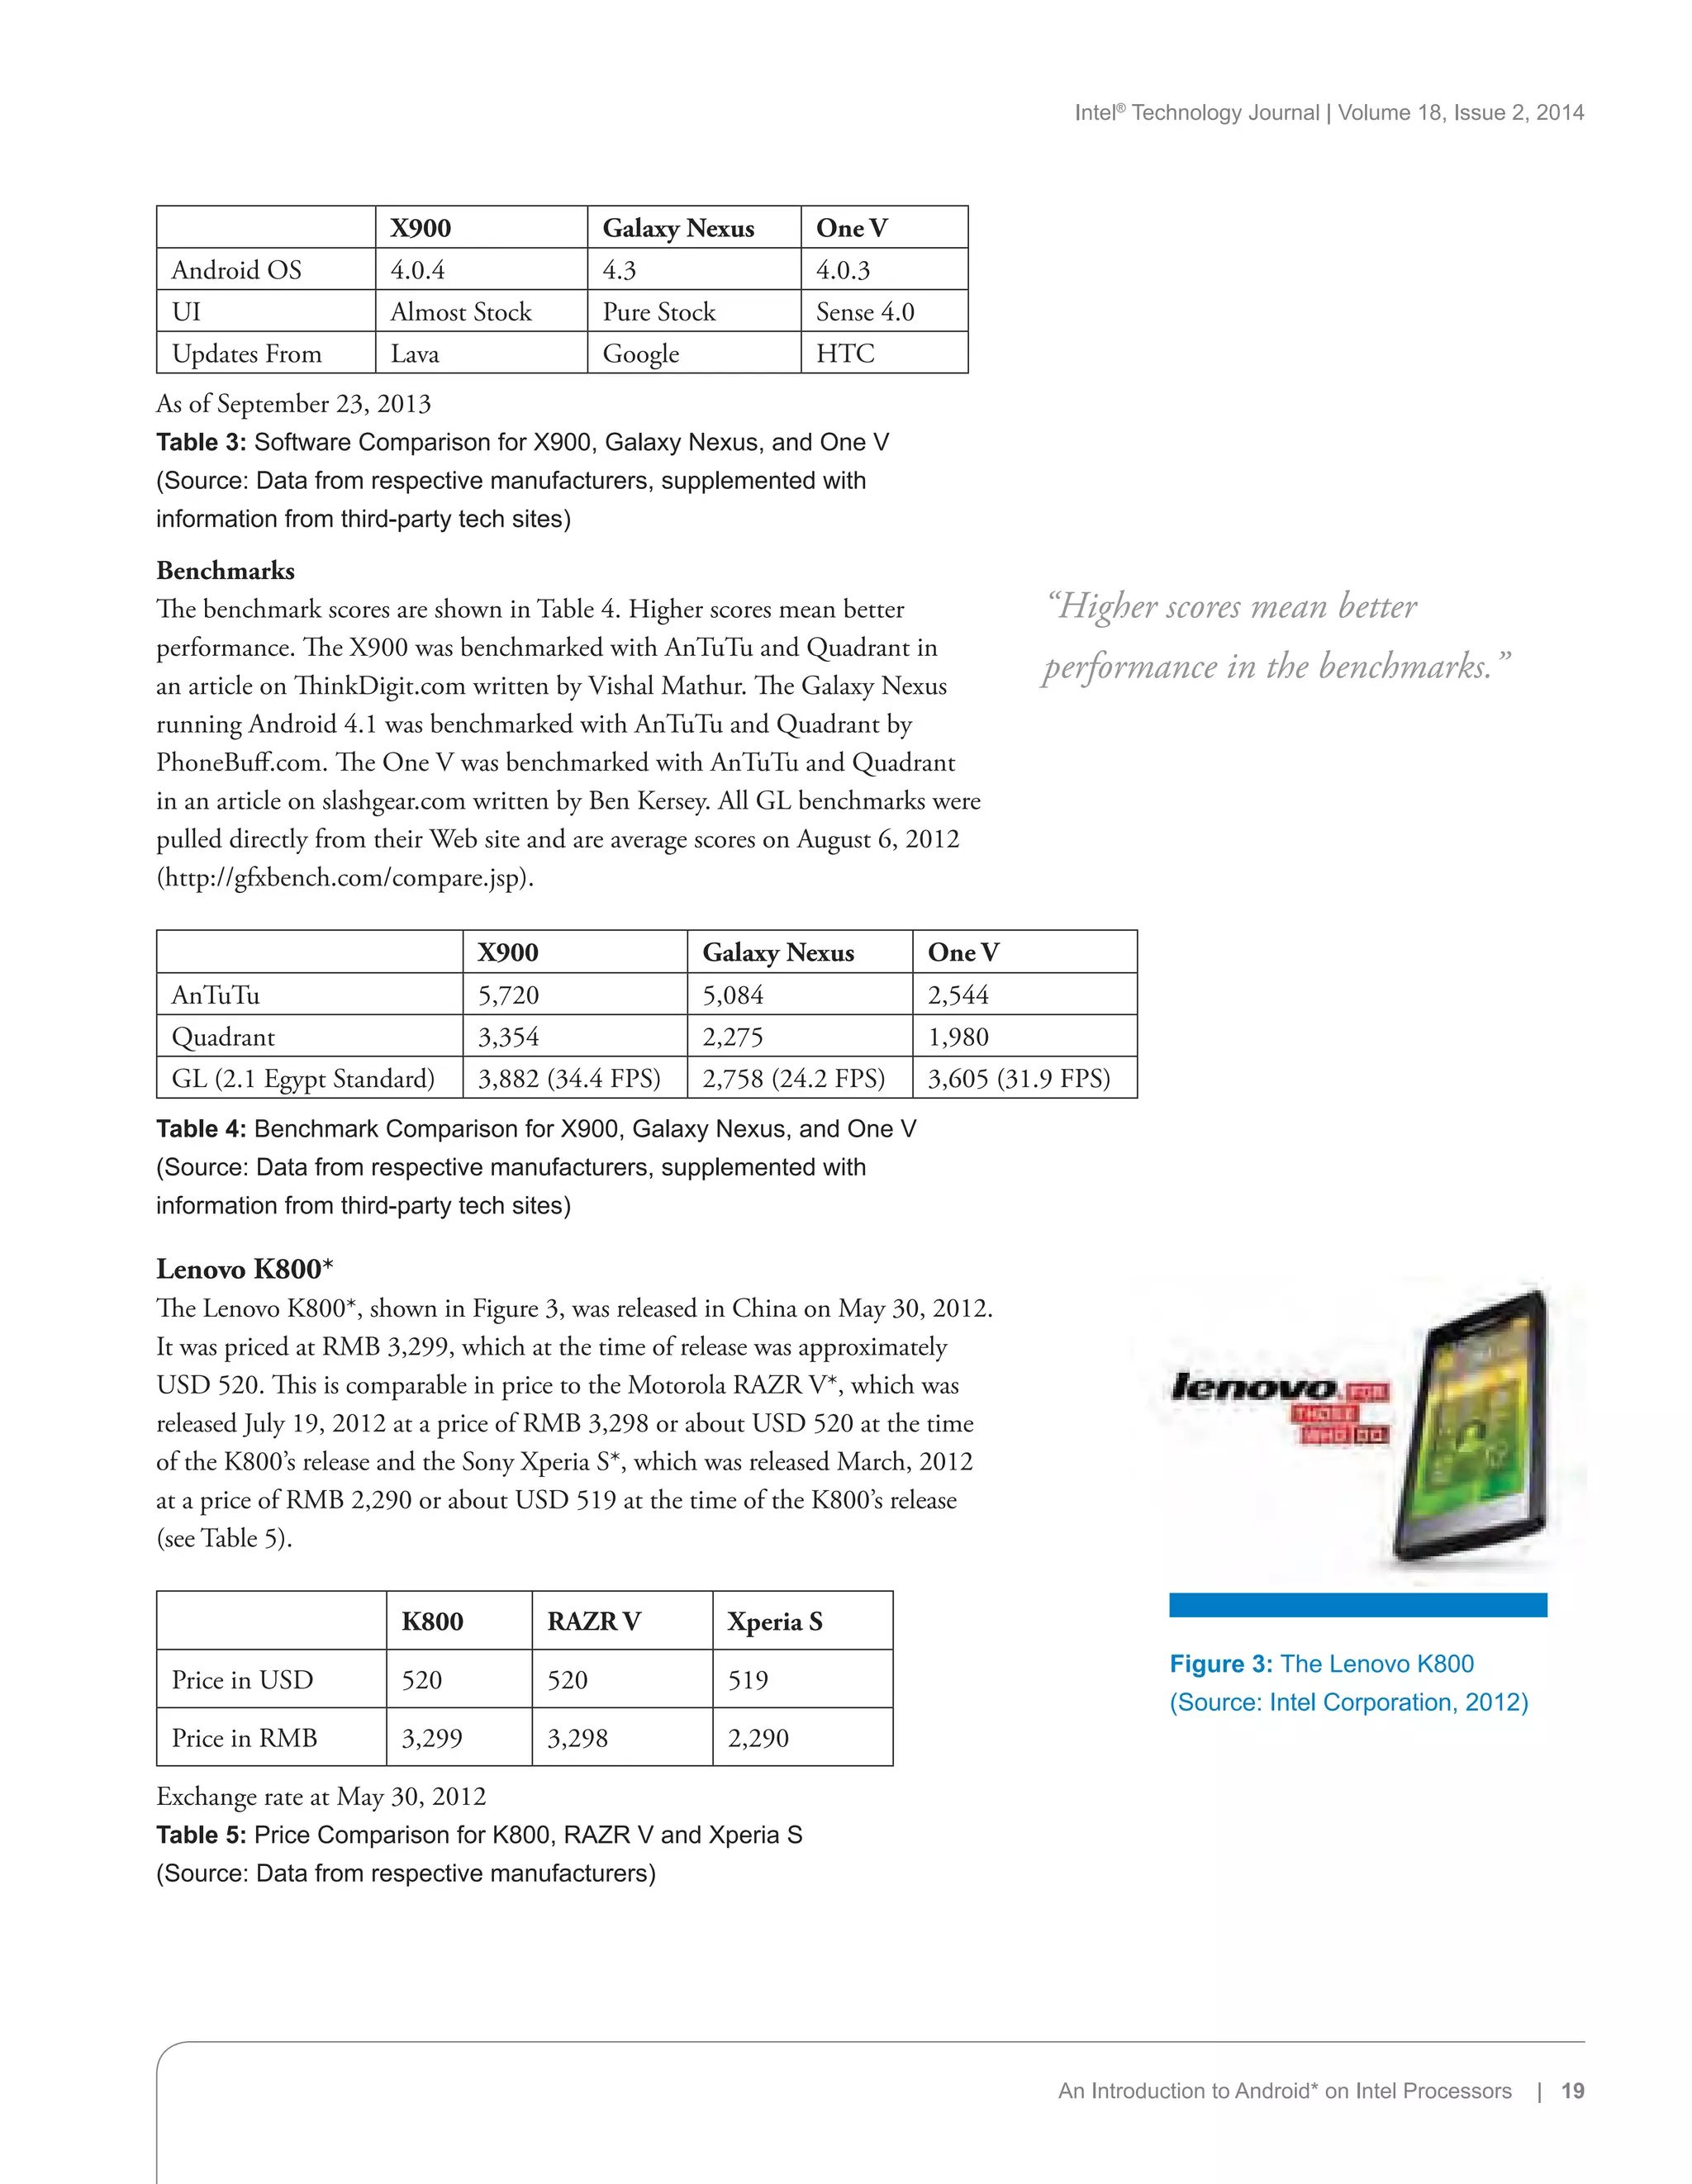
Lenovo K800*
The K800 was released in China at the end of May 2012. It features many
of the same specifications as the Xolo X900, since it is also based on Intel’s
reference design, including the same 1.6-GHz Intel Atom processor with
Intel HT Technology and a 400-MHz graphics processor. Just like the Xolo,
the K800 has an 8-megapixel rear camera, a 1.3-megapixel front camera, 1
GB of RAM, and 16 GB of internal storage. It came running Android 2.3
(Gingerbread) with a custom Lenovo UI and was later updated to Android 4.0
(Ice Cream Sandwich). It also has no removable battery. There are few notable
differences besides the UI including the larger 4.5-inch screen, larger battery,
and an SD card slot.
Orange San Diego*
The third Intel powered smartphone was released in the United Kingdom in
June of 2012. Also based on the Intel reference design, this phone is almost
identical to the Xolo X900. It has the same 1.6-GHz Intel Atom processor
with Intel HT Technology and a 400-MHz graphics processor, the same
“The X900 was the first Android
smartphone powered by an Intel Atom
processor.”
“[The K800] is also based on Intel’s
reference design…”](https://image.slidesharecdn.com/c1e98a76-6293-4a30-9873-abe8040257f9-160127191746/75/2014-vol18-iss-2-intel-technology-journal-15-2048.jpg)
![Intel®
Technology Journal | Volume 18, Issue 2, 2014
16 | An Introduction to Android* on Intel Processors
cameras, 1 GB of RAM, 16 GB of internal storage, and a 4-inch screen. It ran
Android 2.3 (Gingerbread) with a custom UI by Orange out of the box, which
is different from the custom UI on the K800. The San Diego was later updated
to Android 4.0 (Ice Cream Sandwich). Like the two smartphones before it, the
battery is not removable and there is no SD card slot.
Smartphones and Tablets with Intel Processors
In this section, I analyze several smartphones and tablets released with Intel
processors. These devices are compared with their ARM-based competition
based on price, hardware, software, and benchmarks.
All pricing and release date information is pulled directly from manufacturer
announcements made just prior to device releases.
Details about hardware and software for devices was pulled directly from
the manufacturers’ Web sites whenever possible and supplemented with
information from third-party tech sites when not.
The benchmarks used for device comparisons are listed below, along with
descriptions of the benchmarking tools provided by the respective sites.
AnTuTu Benchmark* is a benchmarking tool for Android smartphones and
tablets. It tests memory performance, CPU integer performance, CPU floating
point performance, 2D and 3D graphics performance, SD card reading/writing
speed, and database I/O performance testing.
Quadrant* is a benchmarking tool for Android smartphones and tablets
made by Aurora Softworks. It measures CPU, Memory, I/O, and graphics
performance using twelve CPU tests, one memory test, four I/O tests, one
2D graphics test, and three 3D graphics tests.
GFX Benchmark*, formerly GL Benchmark*, is a cross-platform
benchmarking tool. It performs graphics and computation capability tests for
OpenGL ES–compliant mobile devices and embedded environments. It can
test planar reflection, advanced shading system, animated water with normal
maps, triangles with vertex shader texture and lighting, and space portioning
and occlusion system with PVS.
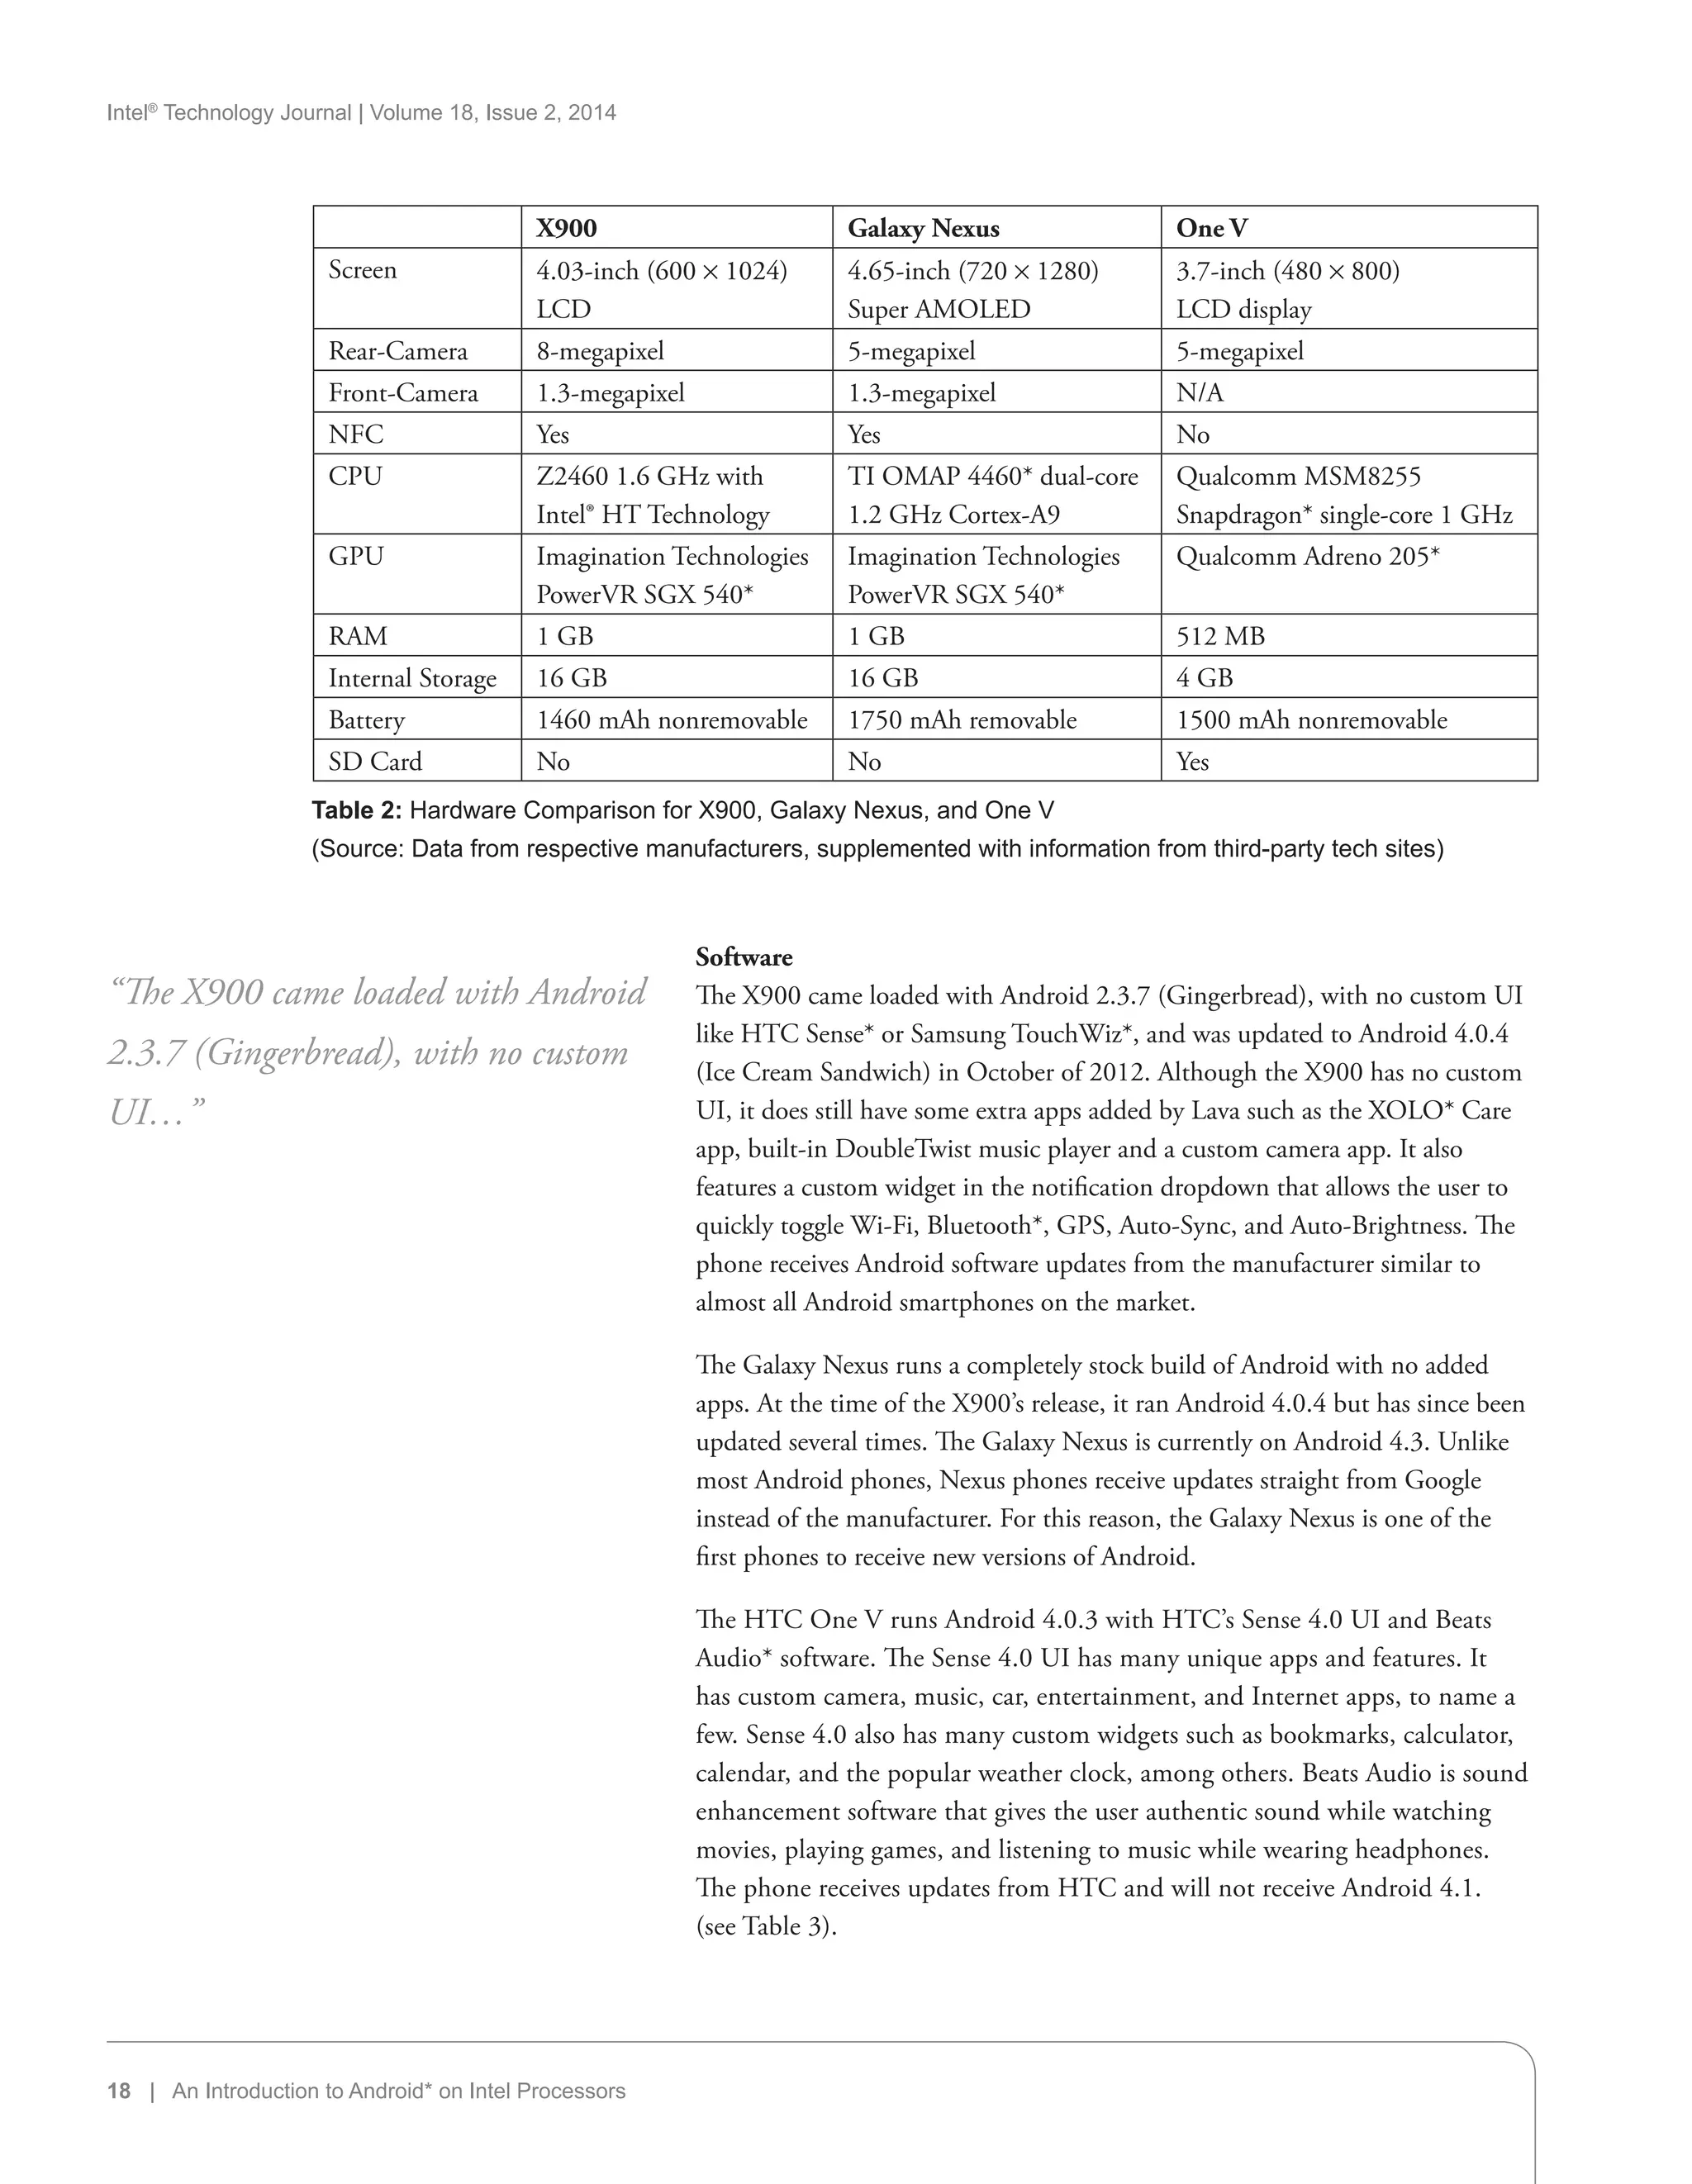
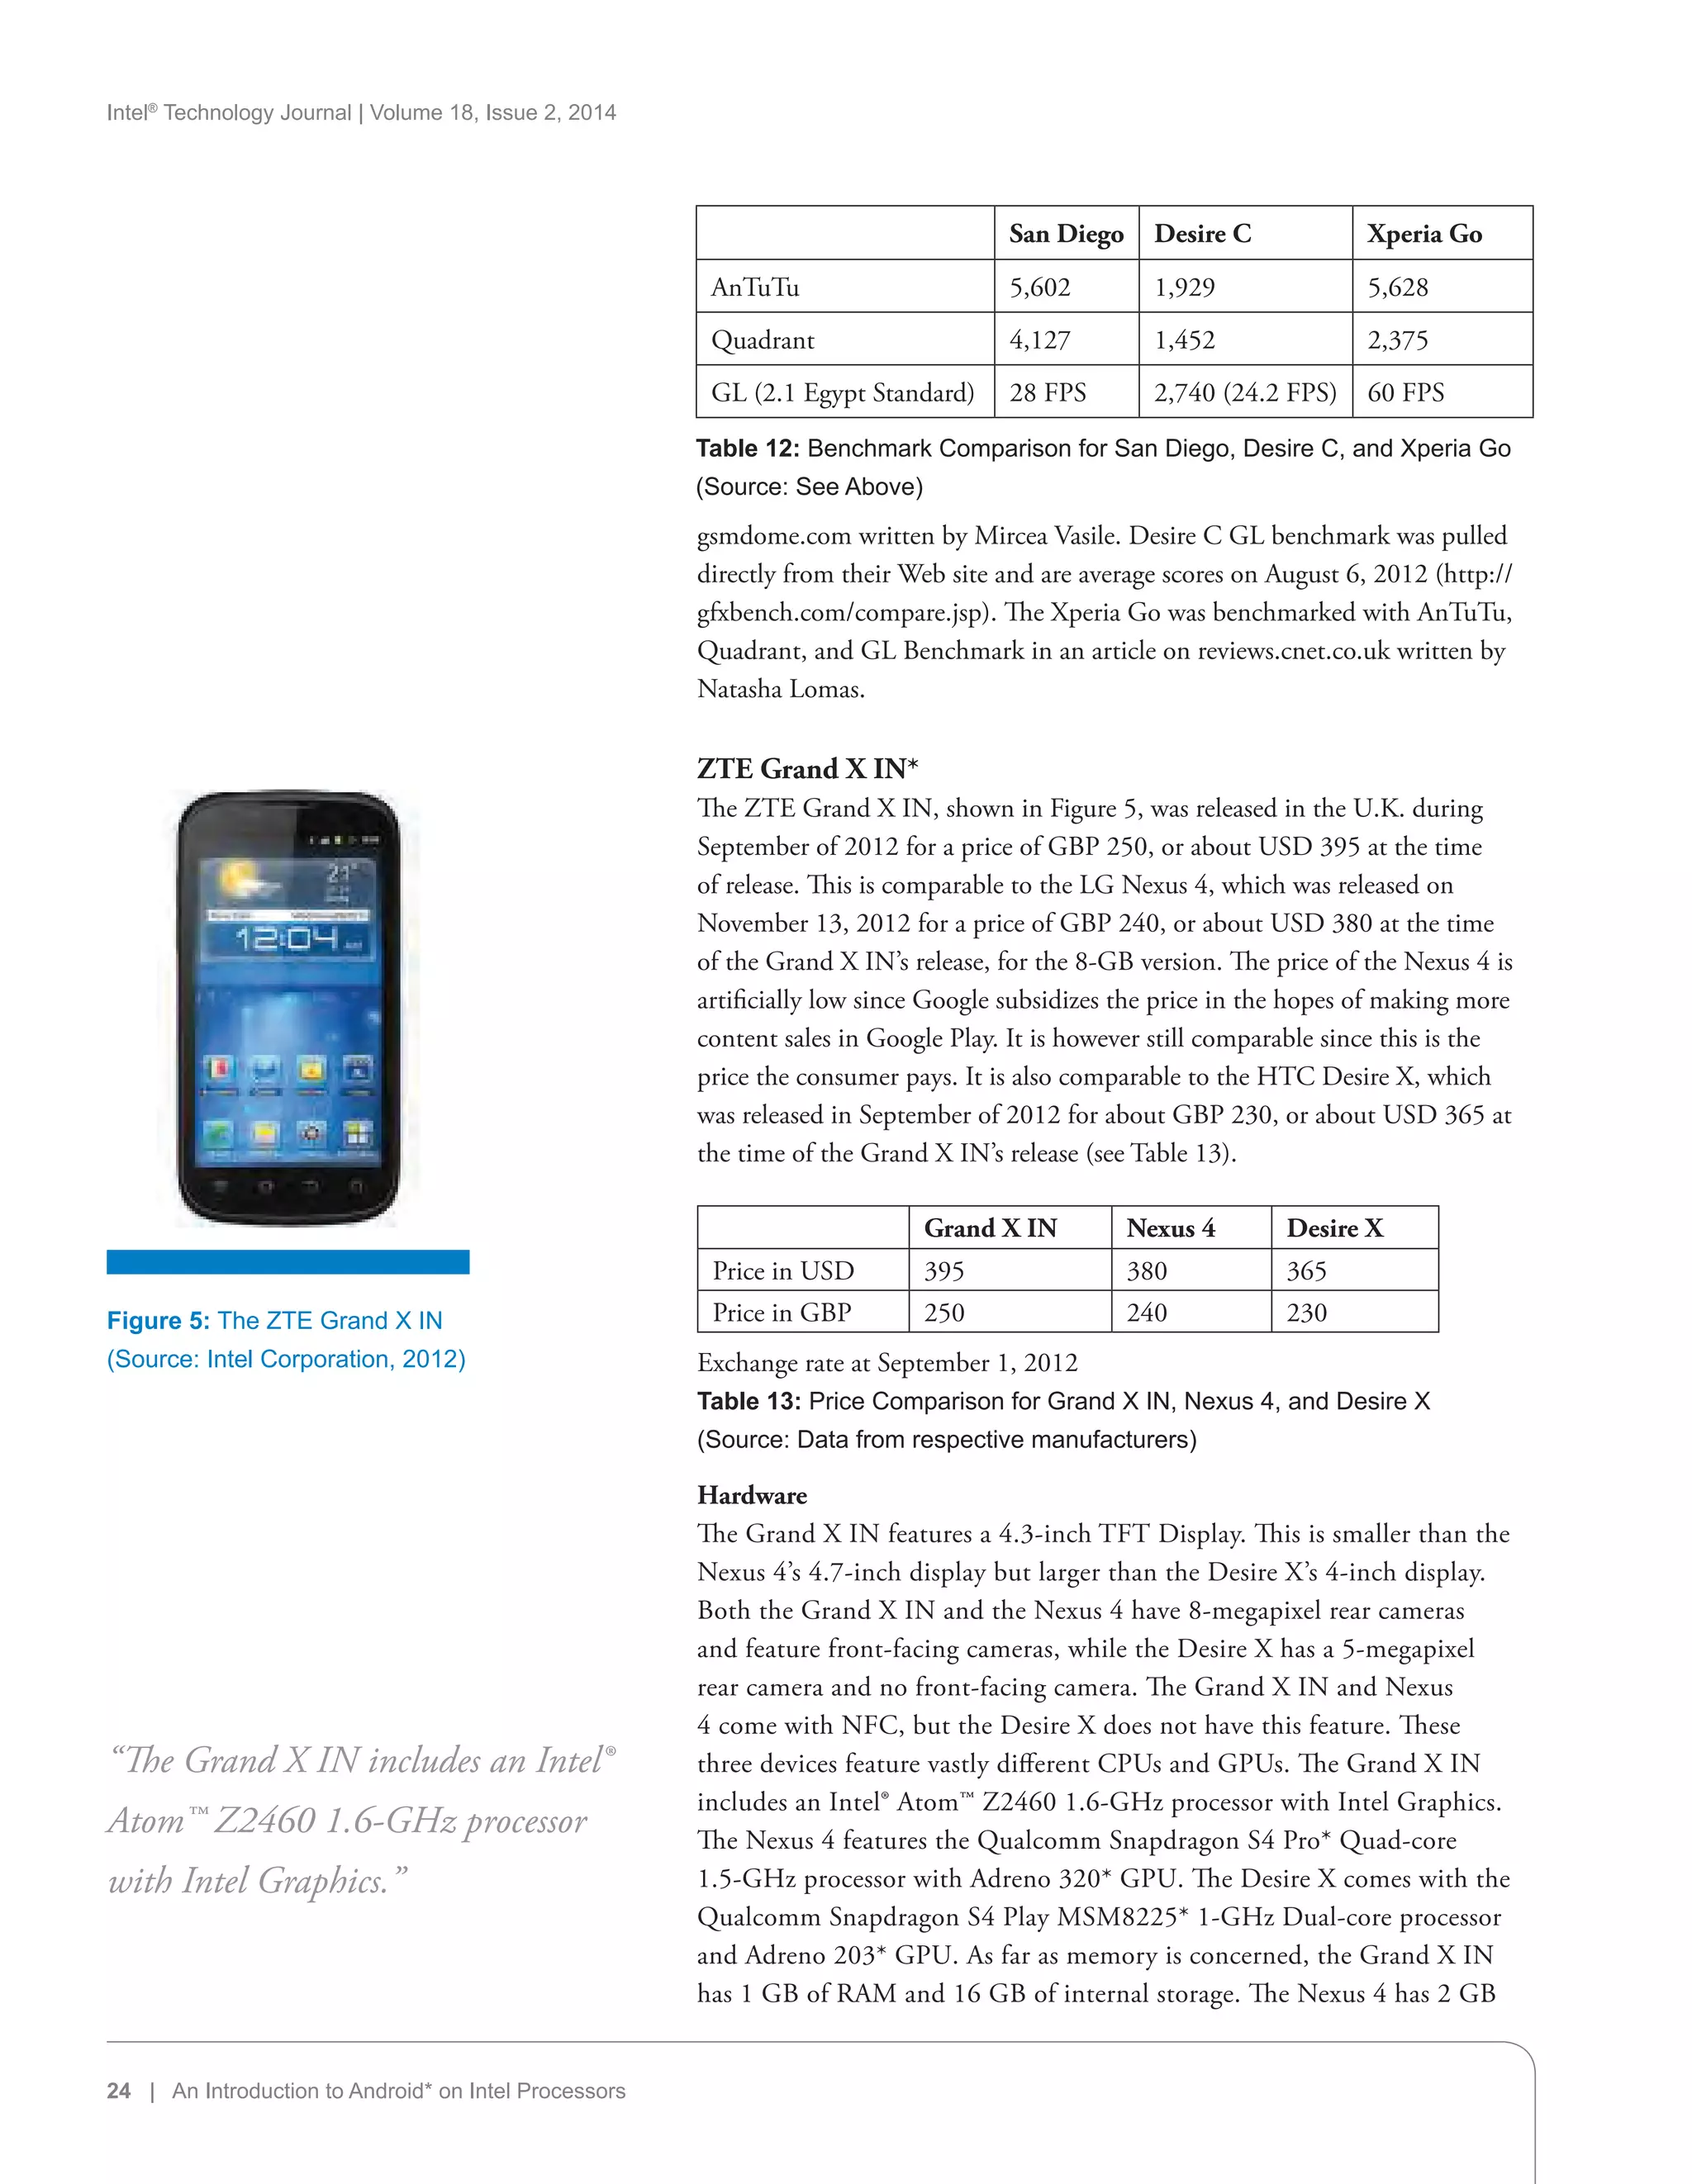
Lava Xolo X900*
The Lava Xolo X900, shown in Figure 2, was the first Android smartphone
powered by the Intel Atom processor. It was released April 19, 2012 in India
and based on Intel’s reference design. The phone was priced at 22,000 Rupees
(INR 22,000), which was approximately 420 U.S. Dollars (USD 420) at
the time of release. This is comparable in price to the GSM Samsung Galaxy
Nexus*, which was released at the end of 2011 and was USD 400, or about
INR 20,900, at the time of the X900’s release. The price of the Galaxy Nexus
is artificially low since Google subsidizes the price in the hopes of making more
content sales in Google Play*. It is however still comparable since this is the
price the consumer pays. It is also comparable to the HTC One V*, which was
“These devices are compared with
their ARM-based competition based
on price, hardware, software, and
benchmarks.”
“[The X900] was the first Android
smartphone powered by the Intel Atom
processor.”](https://image.slidesharecdn.com/c1e98a76-6293-4a30-9873-abe8040257f9-160127191746/75/2014-vol18-iss-2-intel-technology-journal-16-2048.jpg)

![Intel®
Technology Journal | Volume 18, Issue 2, 2014
An Introduction to Android* on Intel Processors | 21
The RAZR V comes with Android 4.0 and Motorola’s custom UI. The rollout
of Android 4.1 started in March of 2013. The Custom UI is much closer to
stock Android than Motorola’s previous UI, MotoBlur*. It has its own custom
icons and widgets and slight changes to the app drawer. The RAZR V receives
updates from Motorola.
The Xperia S launched with Android 2.3, but was updated to Android 4.0
in the second quarter of 2012 and later Android 4.1 in 2013, and has Sony’s
custom UI. The custom UI is close to stock Android but has a few added
features such as Overview Mode*, which allows you to pinch out on the screen
and see all of the active widgets on one screen. It also displays notifications on
the lock-screen such as Facebook* events. There are also many custom Sony
widgets not available in other UIs. See Table 7 for a product comparison.
K800* RAZR V Xperia S
Android OS 4.0.4 4.1.2 4.1.
UI LeOS* Motorola UI Sony UI
Updates From Lenovo Motorola Sony
As of September 23, 2013
Table 7: Software Comparison for K800, RAZR V, and Xperia S
(Source: Data from respective manufacturers, supplemented with
information from third-party tech sites)
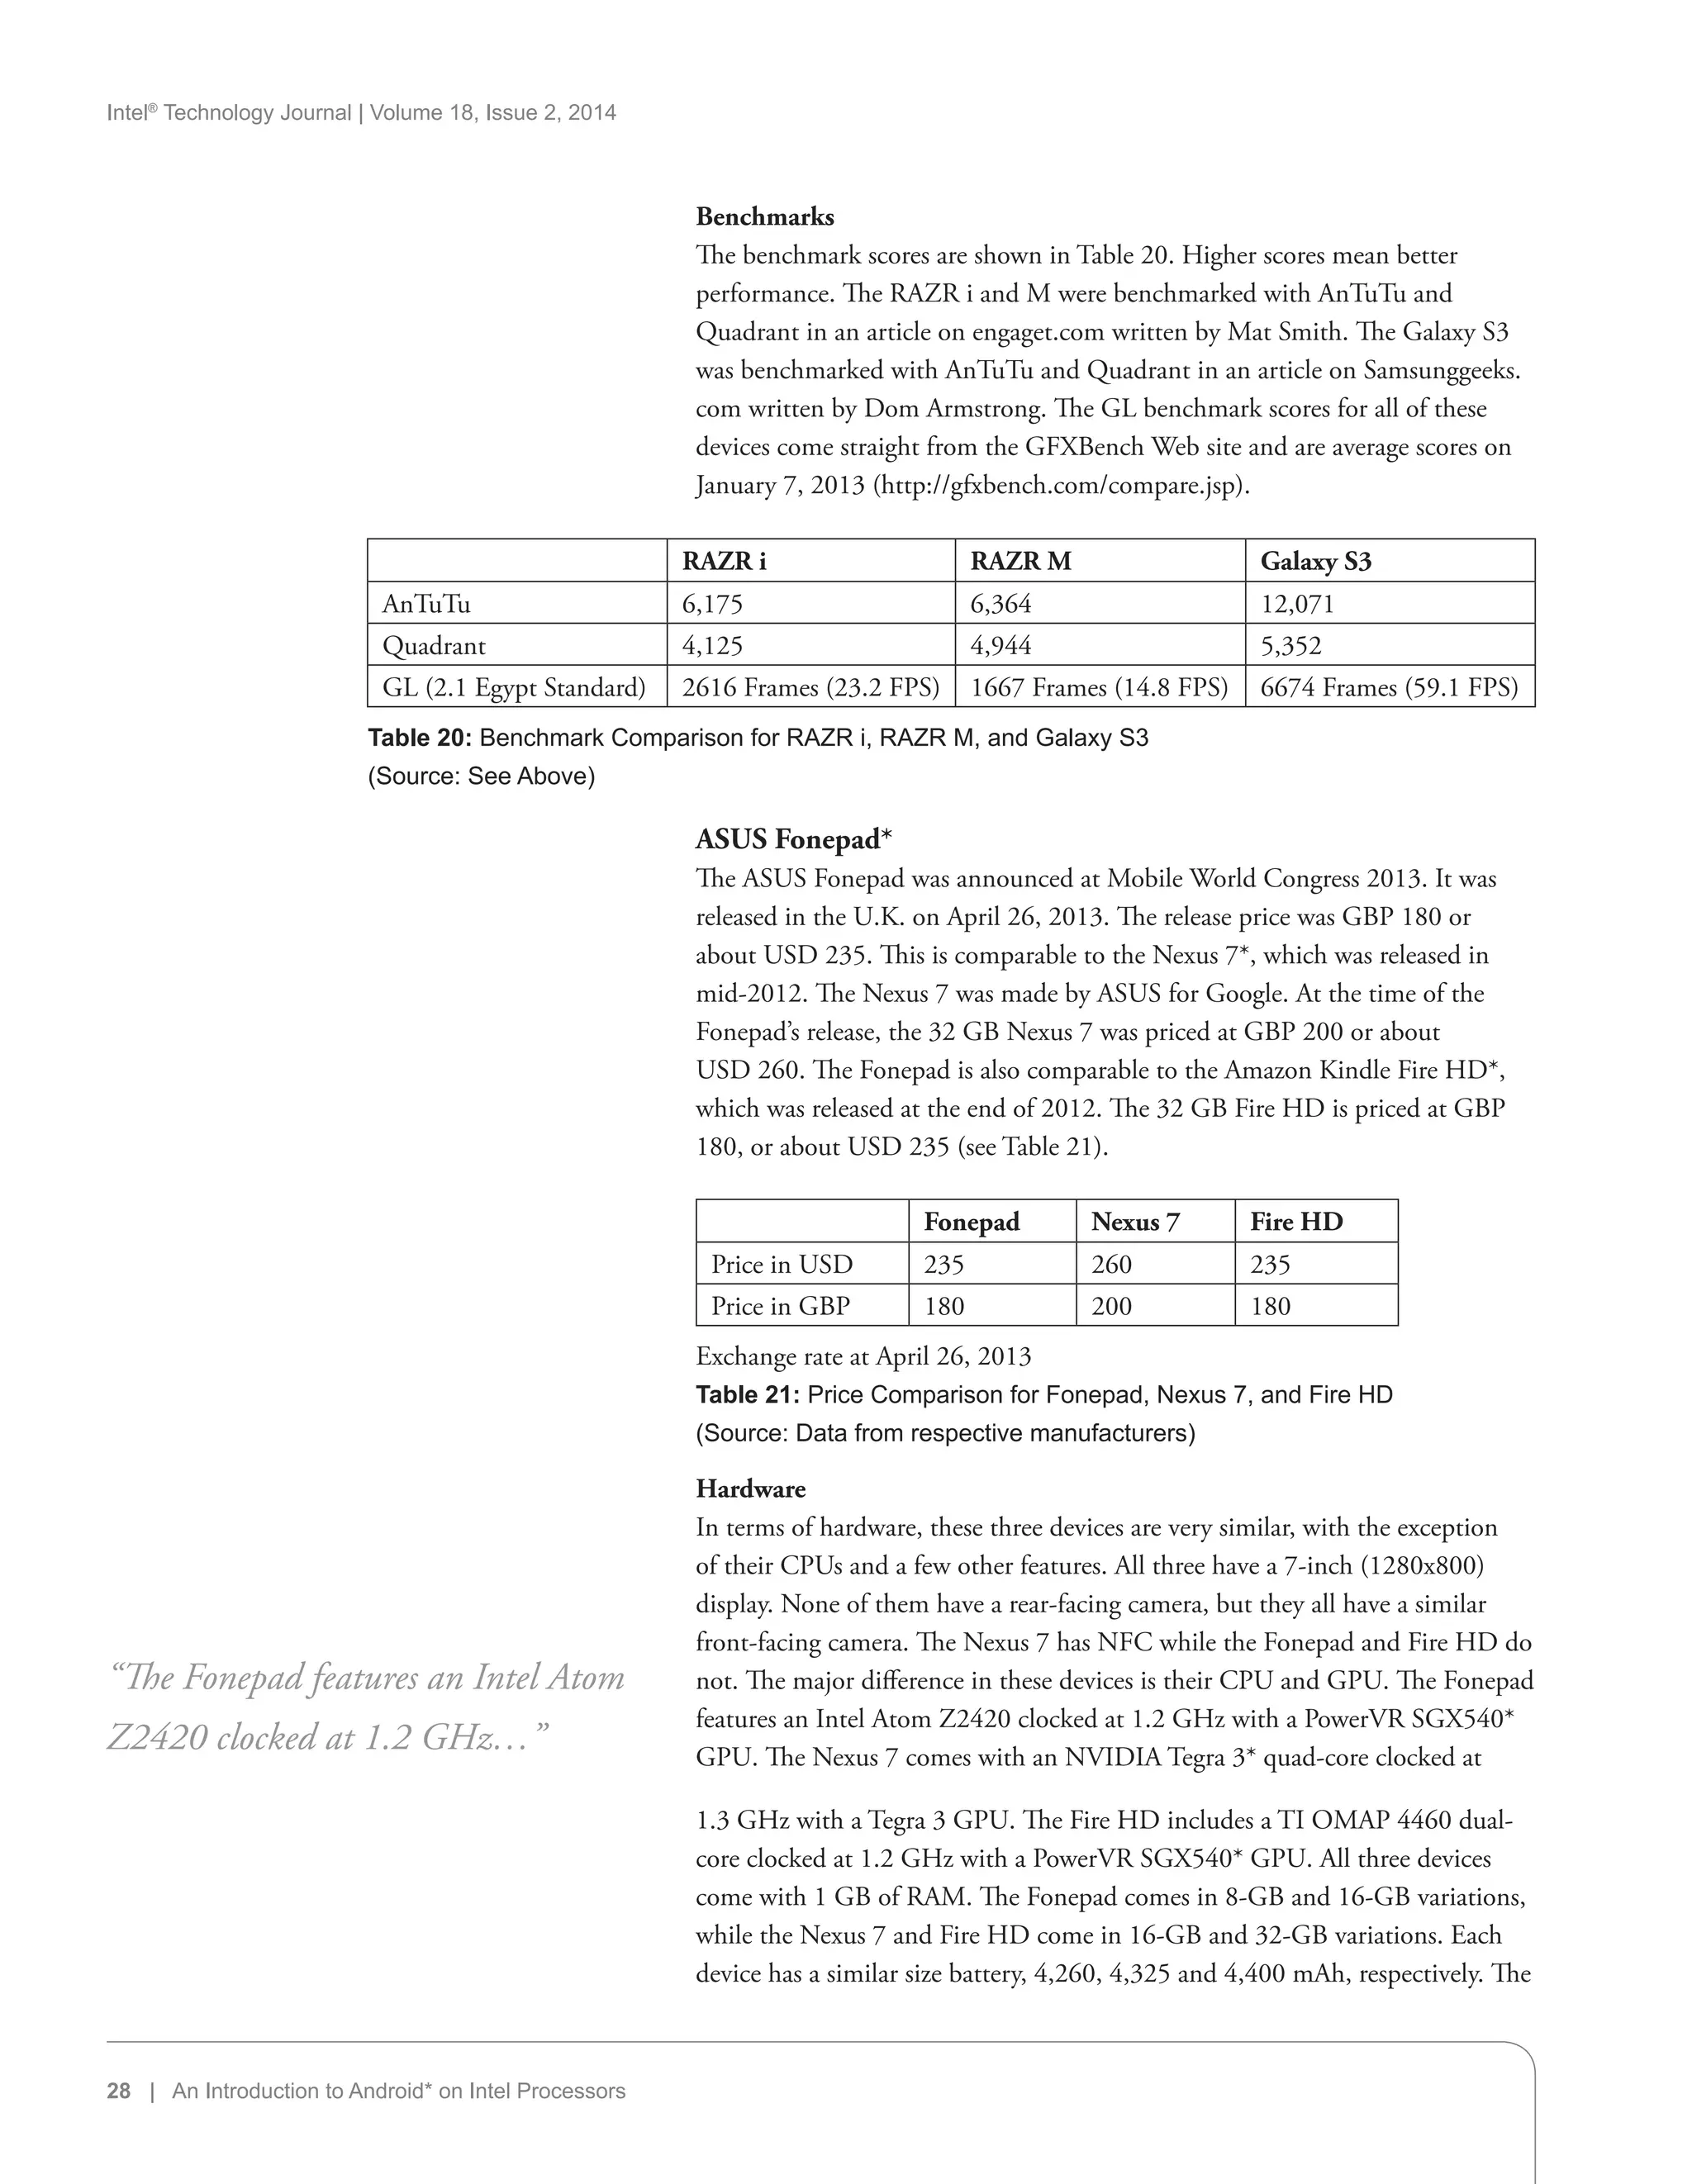
Benchmarks
The benchmark scores are shown in Table 8. Higher scores mean better
performance. The K800 was benchmarked with AnTuTu in an article on
netbooknews.com written by Nicole Scott. The Xperia S was benchmarked on
AnTuTu by PhoneArena.com in February while it was still running Android 2.3.
The K800 was benchmarked with Quadrant in an article on Engaget.com written
by Richard Lai. The Xperia S was benchmarked on Quadrant by PhoneArena.
com in February while it was still running Android 2.3. All GL benchmarks were
pulled directly from their Web site and are average scores on September 2, 2012
(http://gfxbench.com/compare.jsp).
K800 RAZR V Xperia S
AnTuTu 5,335 N/A 6,466
Quadrant 3,850 N/A 3,062
GL (2.1 Egypt Standard) 2,913 (25.8 FPS) N/A 3,365 (29.8 FBS)
Table 8: Benchmark Comparison for K800, RAZR V, and Xperia S
(Source: See Above)
Orange San Diego*
The third smartphone powered by Intel technology, the Orange San Diego*,
shown in Figure 4, was released in the United Kingdom on June 6, 2012. Also
based on the Intel reference design, this phone is almost identical to the
Xolo X900. The price at release was 199 British pounds (GBP 199), which at
“The third smartphone powered by
Intel technology [was], the Orange
San Diego*”
Figure 4: The Orange San Diego
(Source: Intel Corporation, 2012)](https://image.slidesharecdn.com/c1e98a76-6293-4a30-9873-abe8040257f9-160127191746/75/2014-vol18-iss-2-intel-technology-journal-21-2048.jpg)


![34 | Android* Security: Issues and Future Directions
Intel®
Technology Journal | Volume 18, Issue 2, 2014
Contributor
Any way you look at it, the rise of Android has been a remarkable story
within the mobile device world. At the time of this writing, 75 percent of all
smartphones now run the Android operating system. With more than
1.0 billion smartphones forecast to ship in 2013, that’s a large number of
devices.[1]
Meanwhile, the number of applications (“apps”) available on
Google Play* (formerly Android Market) has continued to balloon. A recent
announcement from Google puts the number of application downloads at 50
billion and counting.[2]
In an environment of such rapid proliferation, questions surrounding Android
security become acute. Is Android’s security model robust enough to handle
the explosion of new application types and device usages? Can millions of new
users understand its permission-based framework for application installation?
Are there pitfalls that developers are beginning to show in their handling
of intra- or inter-application communication? How might the Android
application market better help users to understand the security implications of
a given app?
One way to explore these and other questions is through university research.
In this article, we describe Intel’s participation in a collaborative university
research center for secure computing. We discuss a number of important results
and studies that shed light on three different aspects of Android security: user,
developer, and marketplace. Readers will gain a broader perspective on security
issues in Android devices and think about potential directions for future
frameworks and enhancements.
ISTC for Secure Computing
The Intel Science and Technology Center for Secure Computing was founded in
2011 as an industry-academia collaboration for the purpose of “developing
security technology that preserves the immense value of digital devices by
making them safer.”[3]
The center is located at the University of California,
Berkeley and includes additional researchers from Carnegie Mellon University,
Drexel University, Duke University, and University of Illinois at Urbana-
Champaign in what is described as a “hub and spokes” model of organization.
The center is led jointly by UC Berkeley professor, David Wagner, and Intel
senior principal engineer, John Manferdelli.
A key pillar in the ISTC research agenda is “developing secure mobile
devices that can be used in all facets of our lives.” This includes “dramatically
improving the security of smart phones and other mobile devices” and “making
“In this article, we describe Intel’s
participation in a collaborative
university research center for secure
computing. We discuss a number of
important results and studies that
shed light on three different aspects of
Android security: user, developer, and
marketplace.”
Android* Security: Issues and Future
Directions
David Ott
University Research Office,
Intel Labs](https://image.slidesharecdn.com/c1e98a76-6293-4a30-9873-abe8040257f9-160127191746/75/2014-vol18-iss-2-intel-technology-journal-34-2048.jpg)
![Intel®
Technology Journal | Volume 18, Issue 2, 2014
Android* Security: Issues and Future Directions | 35
third-party applications safe and secure, while supporting a rich market for
these applications.” In particular, researchers see an opportunity to establish
security foundations early on within the evolution of mobile platforms, before
legacy architectures constrain the industry’s ability to make bold changes that
address security shortcomings.[4]
ISTC researchers identify a number of key challenges needed to make mobile
platforms more secure: scalable solutions for screening new applications
introduced into the marketplace, improved permission frameworks that help
users to understand install-time requests and data usage, improved modes of
collective feedback by users across the application ecosystem, safe integration
of mobile applications and cloud computing, and stronger authentication
schemes that better balance tradeoffs between usability and protection against
device loss or theft.
This article describes a number of research results that speak to issues and
possible future directions in Android security. The discussion is organized into
three key areas: users, developers, and marketplace.
Users
Research on security and privacy perceptions[5]
demonstrates that mobile
platform users are less willing to use their device for tasks that involve money
(such as banking and shopping) and sensitive data (such as social security
numbers and health records) when compared to laptop computing devices. On
the other hand, users are more willing to experiment by installing non-brand-
name applications that they discover while browsing or viewing advertisements.
In fact, applications play a key role in defining a user’s experience of their
smartphone device overall.
Understanding user perceptions and behaviors is a key requirement in the
very human world of Android device usage, and in designing effective security
frameworks and enhancements. This section describes research in two key areas
of work: user permissions and user authentication.
User Permissions
Android developers are given considerable freedom to design applications
that make broad use of system resources. This includes both hardware
resources like the device camera, microphone, storage, SMS, or Internet
access, and information resources like user location, calendar, contact
data, and phone state and identity. Application access to these resources is
governed by an install-time permission exchange with the user. During this
exchange, the application lists its requirements and then solicits approval
from the user, who can choose whether or not to grant permission and install
the application.
ISTC research on user permissions in Android has uncovered some surprising
results that suggest the need for a reexamination of this familiar framework.
“Understanding user perceptions and
behaviors is a key requirement in
the very human world of Android
device usage, and in designing
effective security frameworks and
enhancements.”](https://image.slidesharecdn.com/c1e98a76-6293-4a30-9873-abe8040257f9-160127191746/75/2014-vol18-iss-2-intel-technology-journal-35-2048.jpg)
![Intel®
Technology Journal | Volume 18, Issue 2, 2014
36 | Android* Security: Issues and Future Directions
Researchers in one usability study[6]
used both Web surveys and laboratory
interviews to study user interaction with permission prompts during the
application installation sequence. Their results show that only 17 percent of
participants paid attention to permissions during an install and 42 percent
of lab participants were unaware of the existence of permissions at all. Only
3 percent of Web survey participants could correctly answer questions
about Android permissions, and only 24 percent of lab participants could
demonstrate competent comprehension. Finally, while a majority of survey
participants claimed to not have installed an application at least once due to
permission requests, only 20 percent of lab participants could provide any
details to support this claim.
Results would seem to suggest that users do not pay attention or understand
permission requests in the manner intended by Android designers. Researchers
make several suggestions to mitigate the problems they observe. First, they
suggest a review and reorganization of permission categories and a permission
renaming effort to improve clarity for the general user. Current categories are
often overly broad and are ignored as a result since users quickly learn that
almost all applications require dangerous privileges. Second, unnecessary
warnings should be eliminated to avoid user “warning fatigue,” which occurs
when users learn to ignore all warnings due to overly frequent warnings that are
often inconsequential. Third, the total number of permissions used by Android
(currently 100) should be reduced to improve a user’s ability to remember
and reason about the presence and absence of permission types within a given
install context.
Another research team[7]
performed a study of 188,389 Android applications
from the Android Market in order to find patterns in permission requests.
Using data mining techniques, they observed 30 permission request patterns
and then considered whether such patterns could be used as a guide when
considering permission risks for a given application install. Results showed that
low-reputation applications differ from high-reputation applications in how
they request permissions. This result suggests that permission request patterns
could be used as an indicator of application quality and user popularity.
Perhaps more conservatively, they could be used for comparison when
evaluating permission requests for an unfamiliar application.
Another study[8]
considers how permission systems should best be designed and
implemented by the Android UI, especially one where no application review
information is available. Researchers identified two key guiding principles
that follow from previous research on closed-form questions (grant or deny)
and the contrast between “optimizing” and “satisficing” users: conservation
of user attention and avoiding interruptions. To conserve user attention,
permission requests should be reserved for only those permissions with severe
consequences. Failure to observe this guideline risks user habituation in which
users pay less and less attention to the meaning of requests and simply approve
indiscriminately. Interruptions to a user’s primary task likewise promotes
indiscriminate click-through behavior (satisficing) with little attempt to
“…results show only 17 percent
of participants paid attention to
permissions during an install and
42 percent of lab participants were
unaware of the existence of permissions
at all.”
“Researchers identified two key
guiding principles that follow from
previous research on closed-form
questions (grant or deny) and the
contrast between “optimizing” and
“satisficing” users: conservation of user
attention and avoiding interruptions.”](https://image.slidesharecdn.com/c1e98a76-6293-4a30-9873-abe8040257f9-160127191746/75/2014-vol18-iss-2-intel-technology-journal-36-2048.jpg)
![Intel®
Technology Journal | Volume 18, Issue 2, 2014
Android* Security: Issues and Future Directions | 37
understand the consequences. Whenever possible, researchers recommend that
a UI avoid interrupting a user with explicit security decisions.
Researchers go on to consider four permission-granting mechanisms in order
of preference: automatic grant, trusted UI, confirmation dialog, and install-
time warning. For any permission that can easily be undone (revertible) or
whose misconfiguration may be merely annoying, automatic grants can be
used that avoid user involvement entirely. For example, automatic adjustment
of global audio settings or phone vibration behavior in response to Web
alerts can be handled in an automated manner with the option to undo the
permission decision after the fact as needed. To guarantee that users cannot
be tricked in various ways, applications may introduce trusted UI elements
that can be controlled only by the platform itself. Example elements include
choosers, review screens, and embedded buttons. Trusted UI elements are
useful when the user can initiate a request or when an action can be altered
by the user. Confirmation dialogs interrupt the user but are necessary when an
application will not work without immediate user approval. Too many dialogs
are to be avoided because of the potential for satisficing as described above.
Finally, install-time warnings can be used when no other permission-granting
mechanism will suffice.
User Authentication
Even conservative users of mobile devices routinely store and access personal
data on their devices[7]
, for example, photos, email, text messages, GPS
traces, and social media feeds. Furthermore, an attacker who has obtained
physical possession of the device can easily use one account to gain access
to another, for example, using an email account to request a password reset
for another service. Add to this the fact that the small, portable form factor
of mobile devices makes them easily lost, forgotten, or stolen when users
carry them around in the public domain. What better case could there be
for widespread use of user authentication mechanisms on nearly all mobile
Android devices?
Surprisingly, Fischer et al.[9]
note in the literature that 38 percent to 70 percent
of smartphone users do not lock their device with passwords or PINs. It would
appear that users do not see the need, or else that current password input
routines are cumbersome and inconvenient for users who access their device
scores of times on an average day of usage. Could there be alternatives that
are less cumbersome? Could there be a range of protection mechanisms that
offer strong protection in risky environments (such as those encountered when
traveling) while offering less protection in routine environments (such as in the
home)?
Fischer et al.[9]
note that today’s mobile devices offer a variety of sensors
that could be leveraged in various ways to provide authentication security
in smarter, more flexible ways. Some examples of such sensors include GPS
location information, accelerometers, gyroscopes, magnetometers, proximity
sensors, microphones, cameras, and radio antennas (cellular, Bluetooth*,
“Whenever possible, researchers
recommend avoid interrupting a user
with explicit security decisions.”
“Fischer et al. note that today’s mobile
devices offer a variety of sensors that
could be leveraged in various ways
to provide authentication security in
smarter, more flexible ways.”](https://image.slidesharecdn.com/c1e98a76-6293-4a30-9873-abe8040257f9-160127191746/75/2014-vol18-iss-2-intel-technology-journal-37-2048.jpg)
![Intel®
Technology Journal | Volume 18, Issue 2, 2014
38 | Android* Security: Issues and Future Directions
Wi-Fi*, RFID, NFC). Sensors might, for instance, be used to distinguish a
device user by recognizing them biometrically through their gait or face. At
the same time, sensors might be used to recognize the location context of use,
for example, by enabling user authentication when a user leaves home or when
surrounding noise indicates a public context.
ISTC researchers consider several examples of how device context could
enable the dynamic scaling of authentication requirements. Current device
unlock approaches rely on the familiar screenlock, which hides screen
information and blocks user input until the correct password or PIN is
provided. A context-driven approach might examine whether Wi-Fi radio
access points exist, analyze location information, and possibly use image
recognition techniques to evaluate the level of risk in the surroundings
and whether screenlock mechanisms should be activated. Mobile shopping
applications might consider a user’s device and location context to identify
a frequent shopper in addition to conventional passwords. Patterns in
prior shopping behavior and facial recognition may be used to assess risk
and increase or decrease authentication tests accordingly. Mobile banking
could use context information to categorize an environment as high or low
risk. If high risk, two-factor authentication is required and the application
restricts operations that can be performed (for example, adding a new user
to an existing account). If low risk, then device sensor information is used
for additional verification in a transparent manner and operations are not
restricted. Context information is collected as part of a transaction for future
reference.
Another research team[10]
looked more specifically at whether patterns of touch-
screen behavior can be used to authenticate a device user. Researchers propose
a set of 30 behavioral features that can be extracted from touch-screen input
of commodity mobile devices, including metrics describing direction, stroke
length, velocity, acceleration, finger and phone orientation, stroke pressure,
and so on. Multiple strokes were also considered to make estimations of user
authenticity more robust. A classifier framework is proposed that learns the
touch behavior of users during an enrollment phase and then is able to accept
or reject the current user by monitoring interaction with the touch screen.
Median equal error rates are shown to be below 4 percent for various scenarios
comparing touch-screen behavior at different time scales (intra-session, inter-
session, one week later).
While this and other research on biometric authentication may suggest
interesting alternatives to widely used password-based schemes, perhaps
this overlooks an even bigger opportunity to enhance current schemes in
context-intelligent ways. Patterns of touch-screen behavior could be used as
part of a multimodal biometric authentication system that secures a device
from unknown users, even when a screenlock has been bypassed. Even
more powerful, touch analytics may provide an approach to continuous
authentication that could curb the activities of an intruder or be used as an
indicator for further dynamic security mechanisms.
“A context-driven approach might
examine whether Wi-Fi radio
access points exist, analyze location
information, and possibly use image
recognition techniques to evaluate the
level of risk in the surroundings and
whether screenlock mechanisms should
be activated.”
“While this and other research on
biometric authentication may suggest
interesting alternatives to widely used
password-based schemes, perhaps this
overlooks an even bigger opportunity
to enhance current schemes in context-
intelligent ways.”](https://image.slidesharecdn.com/c1e98a76-6293-4a30-9873-abe8040257f9-160127191746/75/2014-vol18-iss-2-intel-technology-journal-38-2048.jpg)
![Intel®
Technology Journal | Volume 18, Issue 2, 2014
Android* Security: Issues and Future Directions | 39
Developers
Another key focus of ISTC research led by UC Berkeley is Android application
development. As the number of developers and applications sharply increases,
there is a need for research to look at common pitfalls and systemic issues that
could be improved in subsequent Android versions. Insights further inform our
understanding of software aspects of mobile security more generally.
Communication Between Apps
Isolation between applications on Android is achieved by requiring each to
run under its own UID. This effectively “sandboxes” execution by creating
a separate resource environment for each. However, Android facilitates
component reuse among applications by supporting a message-passing
mechanism called Intents. By implementing related APIs, applications can
make functionality available to other applications that use the API to invoke
services on demand. A key problem identified by researchers in this scheme[11]
is that of confusion between intra- and inter-application message passing.
Developers may mistakenly expose a component or message unintentionally to
a third-party application by implementing the wrong API type.
More specifically, Intents include fields specifying the action to perform,
the data to act on, and a category or kind of component that should receive
the Intent. Intents can be explicit by naming the receiving component or
application, or implicit by allowing the system to search for a receiving
component or application. An application will use an Android API to dispatch
the Intent message, an action that implicitly specifies the type of destination
component to invoke. Applications implement Intent Filters to specify which
Intents a component will support. A dispatched Intent will be matched to
all Intent Filters using various rules. For example, a Service Intent will be
delivered to one receiver at random while a Broadcast Intent will be delivered
to all matching receivers.
Researchers identified two types of Intent-based attacks by applications not
holding a common signature. The first is unauthorized Intent receipt. In this
attack, an untrusted application implements matching Intent Filters as a
way of eavesdropping on Intent messages intended for other components.
This may occur when an application implements Intents intended for intra-
communication between components implicitly. It also occurs when an
application uses Broadcast Intents. Ordered Broadcast Intents are vulnerable
to both denial-of-service attacks and malicious data injection attacks since
recipients can fail to propagate the message or change the data before
propagating. Activity and Service Intents can be hijacked since a malicious
attacker may start an Activity or Service in place of the intended recipient in a
manner that is difficult to detect.
A second Intent-based attack is that of Intent spoofing. In this attack, a
malicious application sends an Intent to an exposed component that
implements a matching Intent Filter intended for implicit Intents within
the same application. Broadcast recipients are vulnerable to broadcast
“As the number of developers and
applications sharply increases, there is
a need for research to look at common
pitfalls and systemic issues that could
be improved in subsequent Android
versions. Insights further inform our
understanding of software aspects of
mobile security more generally.”](https://image.slidesharecdn.com/c1e98a76-6293-4a30-9873-abe8040257f9-160127191746/75/2014-vol18-iss-2-intel-technology-journal-39-2048.jpg)
![Intel®
Technology Journal | Volume 18, Issue 2, 2014
40 | Android* Security: Issues and Future Directions
injection attacks, for example, when a malicious application causes a victim
component to change its state in response to a spoofed Intent message.
Activities and Services may be invoked in an unauthorized launch or bind
attack.
Researchers propose heuristics that could be used to prevent both types of
attacks. For unauthorized Intent receipt, they propose that any implicit Intent
that does not use a “standard action” (defined in the Android documentation
or used by Android applications bundled with the distribution) should
automatically be treated as application internal when dispatched. For Intent
spoofing, they propose the heuristic that if an Intent Filter is not protected
with a signature, it can only be exported if the “exported” flag is explicitly
set, if the data field has been set, if it is registered to receive system-only or
standard action Intents, or if it is an entry-point Activity (that is, it is an
application starting point). Essentially, the heuristic restricts the circumstance
under which the Intent Filter can be exported. Researchers augment this
scheme with two additional mechanisms: a new “protected” property for
Broadcast receivers that ensures only system-only broadcasts match an
Intent Filter, and the creation of an “exported” flag for each Intent Filter of a
Dynamic receiver.
Researchers evaluated the change for 969 popular applications from the
Android Market, building upon the ComDroid tool (a static analysis tool
identifying message vulnerabilities). Results showed that 99.4 percent of
applications were compatible with the first change, and that 93.0 percent were
compatible with the second change. Furthermore, the approach solves
31.3 percent of the total security flaws uncovered by their previous work using
ComDroid. In general, researchers propose that software systems require
software engineers to make their intentions explicit. Sound system design
principles should assume strict isolation unless a developer makes an explicit
request to the contrary.
Advertising Privileges
Developer handling of advertising is another much-needed area of study in
the Android development ecosystem. Researchers at UC Berkeley[12]
looked
at 964 real-world applications and found that 49 percent contain at least
one advertising networking library. Advertising networks provide libraries
to developers to facilitate the insertion of advertisements in application UIs.
Libraries handle such operations as fetching, rendering, and tracking of
advertisements.
An important security issue with the use of advertisement libraries is that
of permission handling. In Android, application permissions are handled
in a monolithic manner that doesn’t make distinctions between third-party
libraries and a developer’s own code. As such, advertising libraries inherit all
of the permissions requested by their host application. A host application
will, furthermore, be required to request permissions that will be used by the
advertising network library. Common permissions associated with advertising
“In general, researchers propose that
software systems require software
engineers to make their intentions
explicit. Sound system design
principles should assume strict
isolation unless a developer makes an
explicit request to the contrary.”
“Developer handling of advertising is
another much-needed area of study in
the Android development ecosystem.”](https://image.slidesharecdn.com/c1e98a76-6293-4a30-9873-abe8040257f9-160127191746/75/2014-vol18-iss-2-intel-technology-journal-40-2048.jpg)

![Intel®
Technology Journal | Volume 18, Issue 2, 2014
42 | Android* Security: Issues and Future Directions
using the application, how to prevent other applications from interacting
with the advertising network application as it is running, how to modify the
Android framework and marketplace to support application dependencies and
co-installation, and how to prevent rogue or imposter advertisement network
libraries that do not, for example, pay the developer properly or handle user
data in a reputable manner.
The option chosen by researchers is to add advertisement support directly to
the Android operating system itself. Known as AdDroid, the solution extends
the Android API to relay advertising metadata from applications to advertising
network servers, to relay advertisements from network servers to applications,
and then to assist with user interface events.
Researchers propose the addition of two new permissions to aid the scheme:
ADVERTISING, and its location-specific counterpart, LOCATION_
ADVERTISING. These permissions would be included in the permission
request list presented to the user at application installation time. Granting
these permissions would provide advertising network libraries with restricted
access to network and location information via the Android API extensions.
The solution addresses the five overprivileging threats described above in
various ways: by informing the user when advertising network libraries
are being used, by allowing the user to understand which non-advertising
permissions are being requested by the host application, by not overprivileging
advertisement libraries with host application privileges, by removing
advertisement library vulnerabilities from host applications, and by not
allowing host applications to abuse information intended only for advertisers.
Researchers suggest that the scheme could help to evolve and directly integrate
advertisements into the Android market in a way that would not only address
security and privacy concerns, but could improve the economic benefits to and
incentives for advertisers, developers, and Android itself.
WebView Vulnerabilities
ISTC researchers Chin and Wagner[13]
, by way of background, explain that
WebViews allow Android application developers to display Web content
within their application in a seamless and integrated manner. In many ways,
WebViews provide application developers with an embedded browser in that
not only can content be displayed, but developers can manage the content of
what is displayed (for example, address bar, browsing history, search behavior)
and the layout (for example, full screen). The framework, furthermore,
allows developers to create HTML content and JavaScript code that will be
downloaded by the application. This provides an easy and powerful mechanism
to update and customize application content, and to extend UI functionality.
More specifically, default WebViews support basic Web document downloads
(http://, https://) and file downloads (file://) but do not allow JavaScript
execution or the interaction of web content with the application. However,
additional capabilities are enabled by API calls like setWebViewClient(),
“The option chosen by researchers is
to add advertisement support directly
to the Android operating system itself.
Known as AdDroid, the solution
extends the Android API to relay
advertising metadata from applications
to advertising network servers, to relay
advertisements from network servers
to applications, and then to assist with
user interface events.”](https://image.slidesharecdn.com/c1e98a76-6293-4a30-9873-abe8040257f9-160127191746/75/2014-vol18-iss-2-intel-technology-journal-42-2048.jpg)
![Intel®
Technology Journal | Volume 18, Issue 2, 2014
44 | Android* Security: Issues and Future Directions
the attacks described. Sixty-five of these register interfaces that are vulnerable
to excess authorization attacks. Only two load files with remote JavaScript,
suggesting that the attack is relatively rare.
Recommendations to developers include disabling JavaScript entirely,
restricting WebView navigability, limiting the registration of APIs, and using
recently added Android mechanisms that more explicitly flag accessible
interface methods. Recommendations to Android include the use of policies
that narrow the domain origin of content to be loaded in a particular
WebView.
Marketplace
A third key focus of ISTC research is the Android application marketplace.
Taking a broader view of an exploding software ecosystem, researchers ask
whether comparative studies or consumer information might be leveraged to
address Android security considerations.
Detecting Code Reuse Among Applications
One avenue of ISTC research[14]
asks whether automated code comparisons
between applications could help to identify security vulnerabilities, malware,
and software piracy. Researchers point out that traditional methods for
identifying such issues include review-based approaches in which marketplace
experts manually examine new applications for vulnerabilities or malicious
behavior and reactive approaches where user reports or ratings identify
misbehaving applications which are flagged for manual investigation. Neither
approach is scalable as the number of new applications on the market
continues to explode.
Automated code reuse detection could quickly compare hundreds of
thousands of applications and identify a small, manageable subset for further
investigation during any given time period. The problem, of course, is how
to create such a system in a way that is scalable, resilient to code modification
and obfuscation (which are common in Android), and resistant to false
positives and false negatives. Researchers answer the challenge with a solution
they call Juxtapplication for leveraging k-gram opcode sequences of compiled
applications and feature hashing. Their techniques provide a robust and efficient
representation of applications that can be used to compute pairwise similarities
between applications.
Feature hashing, a popular technique from machine learning, compresses a
large data space into a smaller, randomized feature space. In this technique,
a hash function is applied to each feature under consideration, and then
hash values are used as feature indices into a vector that stores ones and
zeros indicating presence or absence of the feature. Within the Android
application context, feature hashing may be applied to a representation
of DEX files that fully describe the application, including class structure,
function information, and so on. For each application, researchers use XML
“Taking a broader view of an
exploding software ecosystem,
researchers ask whether comparative
studies or consumer information
might be leveraged to address Android
security considerations.”
“Automated code reuse detection
could quickly compare hundreds of
thousands of applications and identify
a small, manageable subset for further
investigation during any given time
period.”](https://image.slidesharecdn.com/c1e98a76-6293-4a30-9873-abe8040257f9-160127191746/75/2014-vol18-iss-2-intel-technology-journal-44-2048.jpg)
![Intel®
Technology Journal | Volume 18, Issue 2, 2014
Android* Security: Issues and Future Directions | 45
to represent each DEX file, extracting each basic block and labeling it by
package. They then process each basic block and retain only opcodes and
some constant data.
Feature extraction is accomplished using the djb2 hash function to construct the
k-gram using a moving window of size k. The result is a bit vector representing the
features present in the data. The similarity of two applications can be computed
using a Jaccard similarity metric and bitwise comparison operations. Two key
parameters must be determined. First is k-gram length k. This governs the
granularity of comparisons and needs to be small enough to detect similarities
but large enough to make them meaningful. An empirical evaluation of various
alternatives leads researchers to choose k = 5. The second parameter is bit vector
size m. The tradeoff here is between computational efficiency and error. If m is
too large, then computing pairwise similarity becomes computationally expensive.
If m is too small, then too many hash collisions compromises the accuracy of the
experiment. Researchers argue that m should be just large enough to exceed the
number of k-grams extracted from an application.
Researchers apply their methodology to more than 58,000 applications,
including 30,000 from what was then called the Android Market and another
28,159 applications from a third-party application market. In addition,
72 malware applications were used from the Contagio malware dump and
other sources to provide samples for code reuse analysis. Results show that
code reuse of Google In-Application Billing (IAB) and License Verification
Library (LVL) example code is common, both of which include vulnerability
caveats in the documentation. Thirty-four instances of malware are detected
in applications from the third-party market, 13 of which are repackaged,
previously unknown variants. Additionally, pirated applications are identified
in third-party markets, illustrating that even significant code variation cannot
prevent the tool from identifying code reuse.
Product Labels
As the Android application market continues to rapidly scale, another
group of ISTC researchers[15]
asks why there isn’t better information
symmetry between application developers and users. That is, application
developers know a great deal about the real quality and features of the
applications they create. Meanwhile, users know relatively little about the
software applications they browse on the market. One consequence for
developers is that they find it hard to differentiate their offerings. This
removes incentive for developers to invest in developing products of high
quality, reliability, and security. Lessons from the world of economics (for
example, automobiles) demonstrate that markets thrive when they reduce
or eliminate information asymmetry. For example, services like CarFax
prevent the used automobile market from becoming a market of lemons by
providing accurate vehicle history to consumers. By eliminating information
asymmetry between the seller and buyer, the size of a market can expand
as both sellers and buyers understand and negotiate product value in a
mutually satisfying way.
“As the Android application market
continues to rapidly scale, another group
of ISTC researchers asks why there isn’t
better information symmetry between
application developers and users.”
“By eliminating information
asymmetry between the seller and
buyer, the size of a market can expand
as both sellers and buyers understand
and negotiate product value in a
mutually satisfying way.”](https://image.slidesharecdn.com/c1e98a76-6293-4a30-9873-abe8040257f9-160127191746/75/2014-vol18-iss-2-intel-technology-journal-45-2048.jpg)
![Intel®
Technology Journal | Volume 18, Issue 2, 2014
Android* Security: Issues and Future Directions | 47
who abort installation after reviewing application permission requests” or
“rate at which users uninstall an application after auditing its usage.” Once
again, a central point of application distribution makes possible the use of
crowdsourcing data as input to metrics.
In general, researchers call for more user studies to evaluate project label
effectiveness and usage.
Summary
In an era of rapid Android proliferation and application development, Intel has
invested in collaborative university research to explore the issues surrounding
mobile security, including Android. The Intel Science and Technology Center for
Secure Computing, led by the University of California, Berkeley, has worked
to produce research “developing secure mobile devices that can be used in all
facets of our lives, dramatically improving the security of smart phones and
other mobile devices,” and “making third-party applications safe and secure,
while supporting a rich market for these applications.” In this article, we
described a number of research results that speak to issues and possible future
directions in Android security. Discussion was organized into three key areas:
users, developers, and marketplace. University research provides a broader
perspective on security issues in Android devices, including potential directions
for future frameworks and enhancements.
References
[1] IDC Press Release, September 4, 2013. http://www.idc.com/
getdoc.jsp?containerId=prUS24302813
[2] Daily Android activations grow to 1.5 million, Google Play
surpasses 50 billion downloads. Yahoo! News. July 20, 2013.
http://news.yahoo.com/daily-android-activations-grow-1-5-
million-google-041552461.html
[3] Introducing the Intel Science and Technology Center for Secure
Computing. The SCRUB Center. 2011.
[4] Intel Science and Technology Center for Secure Computing:
Secure Computing Research for User Benefit. The SCRUB
Center. 2012.
[5] Erika Chin, Adrienne Porter Felt, Vyas Sekar, and David Wagner.
Measuring User Confidence in Smartphone Security and Privacy.
Symposium on Usable Privacy and Security (SOUPS) 2012.
[6] Adrienne Porter Felt, Elizabeth Ha, Serge Egelman, Ariel Haney,
Erika Chin, and David Wagner. Android Permissions: User
Attention, Comprehension, and Behavior. Symposium on Usable
Privacy and Security (SOUPS) 2012.
“In an era of rapid Android
proliferation and application
development, Intel has invested in
collaborative university research to
explore the issues surrounding mobile
security, including Android.”](https://image.slidesharecdn.com/c1e98a76-6293-4a30-9873-abe8040257f9-160127191746/75/2014-vol18-iss-2-intel-technology-journal-47-2048.jpg)
![Intel®
Technology Journal | Volume 18, Issue 2, 2014
48 | Android* Security: Issues and Future Directions
[7] Mario Frank, Ben Dong, Adrienne Porter-Felt, Dawn Song.
Mining Permission Request Patterns from Android and Facebook
Applications. IEEE International Conference on Data Mining
(ICDM) 2012.
[8] Adrienne Porter Felt, Serge Egelman, Matthew Finifter, Devdatta
Akhawe, and David Wagner. How To Ask For Permission.
USENIX Workshop on Hot Topics in Security 2012.
[9] Ian Fischer, Cynthia Kuo, Ling Huang, Mario Frank.
Smartphones: Not Smart Enough? ACM CCS Workshop on
Security and Privacy in Mobile Devices (SPSM 2012).
[10] Mario Frank, Ralf Biedert, Eugene Ma, Ivan Martinovic, Dawn
Song. Touchalytics: On the Applicability of Touchscreen Input
as a Behavioral Biometric for Continuous Authentication. IEEE
Transactions on Information Forensics and Security (Vol. 8, No. 1),
pages 136-148.
[11] David Kantola, Erika Chin, Warren He, and David Wagner.
Reducing Attack Surfaces for Intra-Application Communication in
Android. ACM Workshop on Security and Privacy in Mobile Devices
(SPSM) 2012
[12] Paul Pearce, Adrienne Porter Felt, Gabriel Nunez, David Wagner.
AdDroid: Privilege Separation for Applications and Advertisers
in Android. ACM Symposium on Information, Computer and
Communications Security (ASIACCS) 2012.
[13] Erika Chin, David Wagner. Bifocals: Analyzing WebView
Vulnerabilities in Android Applications. Proceedings of the
14th International Workshop on Information Security Applications
(WISA). 2013.
[14] Steve Hanna, Ling Huang, Edward Wu, Saung Li, Charles Chen
and Dawn Song. Juxtapp: A Scalable System for Detecting Code
Reuse Among Android Applications. Detection of Intrusions and
Malware & Vulnerability Assessment (DIMVA) 2012.
[15] Devdatta Akhawe, Matthew Finifter. Product Labels for Mobile
Application Markets. Mobile Security Technologies Workshop
(MoST) 2012.
Author Biography
David Ott is a research director for the University Research Office in Intel
Labs. His work involves identifying key research challenges and opportunities
for innovative technology development in the areas of computer security and
communications. Such challenges form the basis for collaborative university](https://image.slidesharecdn.com/c1e98a76-6293-4a30-9873-abe8040257f9-160127191746/75/2014-vol18-iss-2-intel-technology-journal-48-2048.jpg)


![Intel®
Technology Journal | Volume 18, Issue 2, 2014
}
@Override
public View onCreateView(LayoutInflater inflater,
ViewGroup container,
Bundle savedInstanceState) {
mContentView =
inflater.inflate(R.layout.content_sensorinfo_main,
null);
mContentView.setDrawingCacheEnabled(false);
mSensorManager =
(SensorManager)getActivity().
getSystemService(Context.SENSOR_SERVICE);
mSensorInfoList =
(ListView)mContentView.findViewById
(R.id.listSensorInfo);
mSensorInfoList.setOnItemClickListener( new
OnItemClickListener() {
@Override
public void onItemClick(AdapterView<?> arg0, View
view, int index, long arg3) {
// with the index, figure out what sensor was
pressed
Sensor sensor = mSensorList.get(index);
// pass the sensor to the dialog.
SensorDialog dialog = new SensorDialog(getActivity (),
sensor);
dialog.setContentView(R.layout.sensor_display);
dialog.setTitle(“Sensor Data”);
dialog.show();
}
});
returnmContentView;
}
void updateContent(int category, int position) {
mSensorInfoListAdapter = new SimpleAdapter(getActivity
(),
getData() , android.R.layout.simple_list_
item_2,
new String[] {
“NAME”,
“VALUE”
Developing Sensor Applications on Intel®
Atom™ Processor-Based Android* Phones and Tablets | 53](https://image.slidesharecdn.com/c1e98a76-6293-4a30-9873-abe8040257f9-160127191746/75/2014-vol18-iss-2-intel-technology-journal-53-2048.jpg)
![Intel®
Technology Journal | Volume 18, Issue 2, 2014
},
new int[] { android.R.id.text1,
android.R.id.text2 });
mSensorInfoList.setAdapter(mSensorInfoListAdap
ter);
}
protected void addItem(ListMapString, String
data, String name, String value) {
MapString, String temp = new HashMapString,
String();
temp.put(“NAME”, name);
temp.put(“VALUE”, value);
data.add(temp);
}
private List? extends MapString, ? getData() {
ListMapString, String myData = new
ArrayListMapString, String();
mSensorList =
mSensorManager.getSensorList(Sensor.TYPE_ALL);
for (Sensor sensor : mSensorList ) {
addItem(myData, sensor.getName(), “Vendor: “ +
sensor.getVendor() + “, min. delay: “ +
sensor.getMinDelay() +”, power while in use: “ +
sensor.getPower() + “mA, maximum range: “ +
sensor.getMaximumRange() + “, resolution: “ +
sensor.getResolution());
}
returnmyData;
}
}
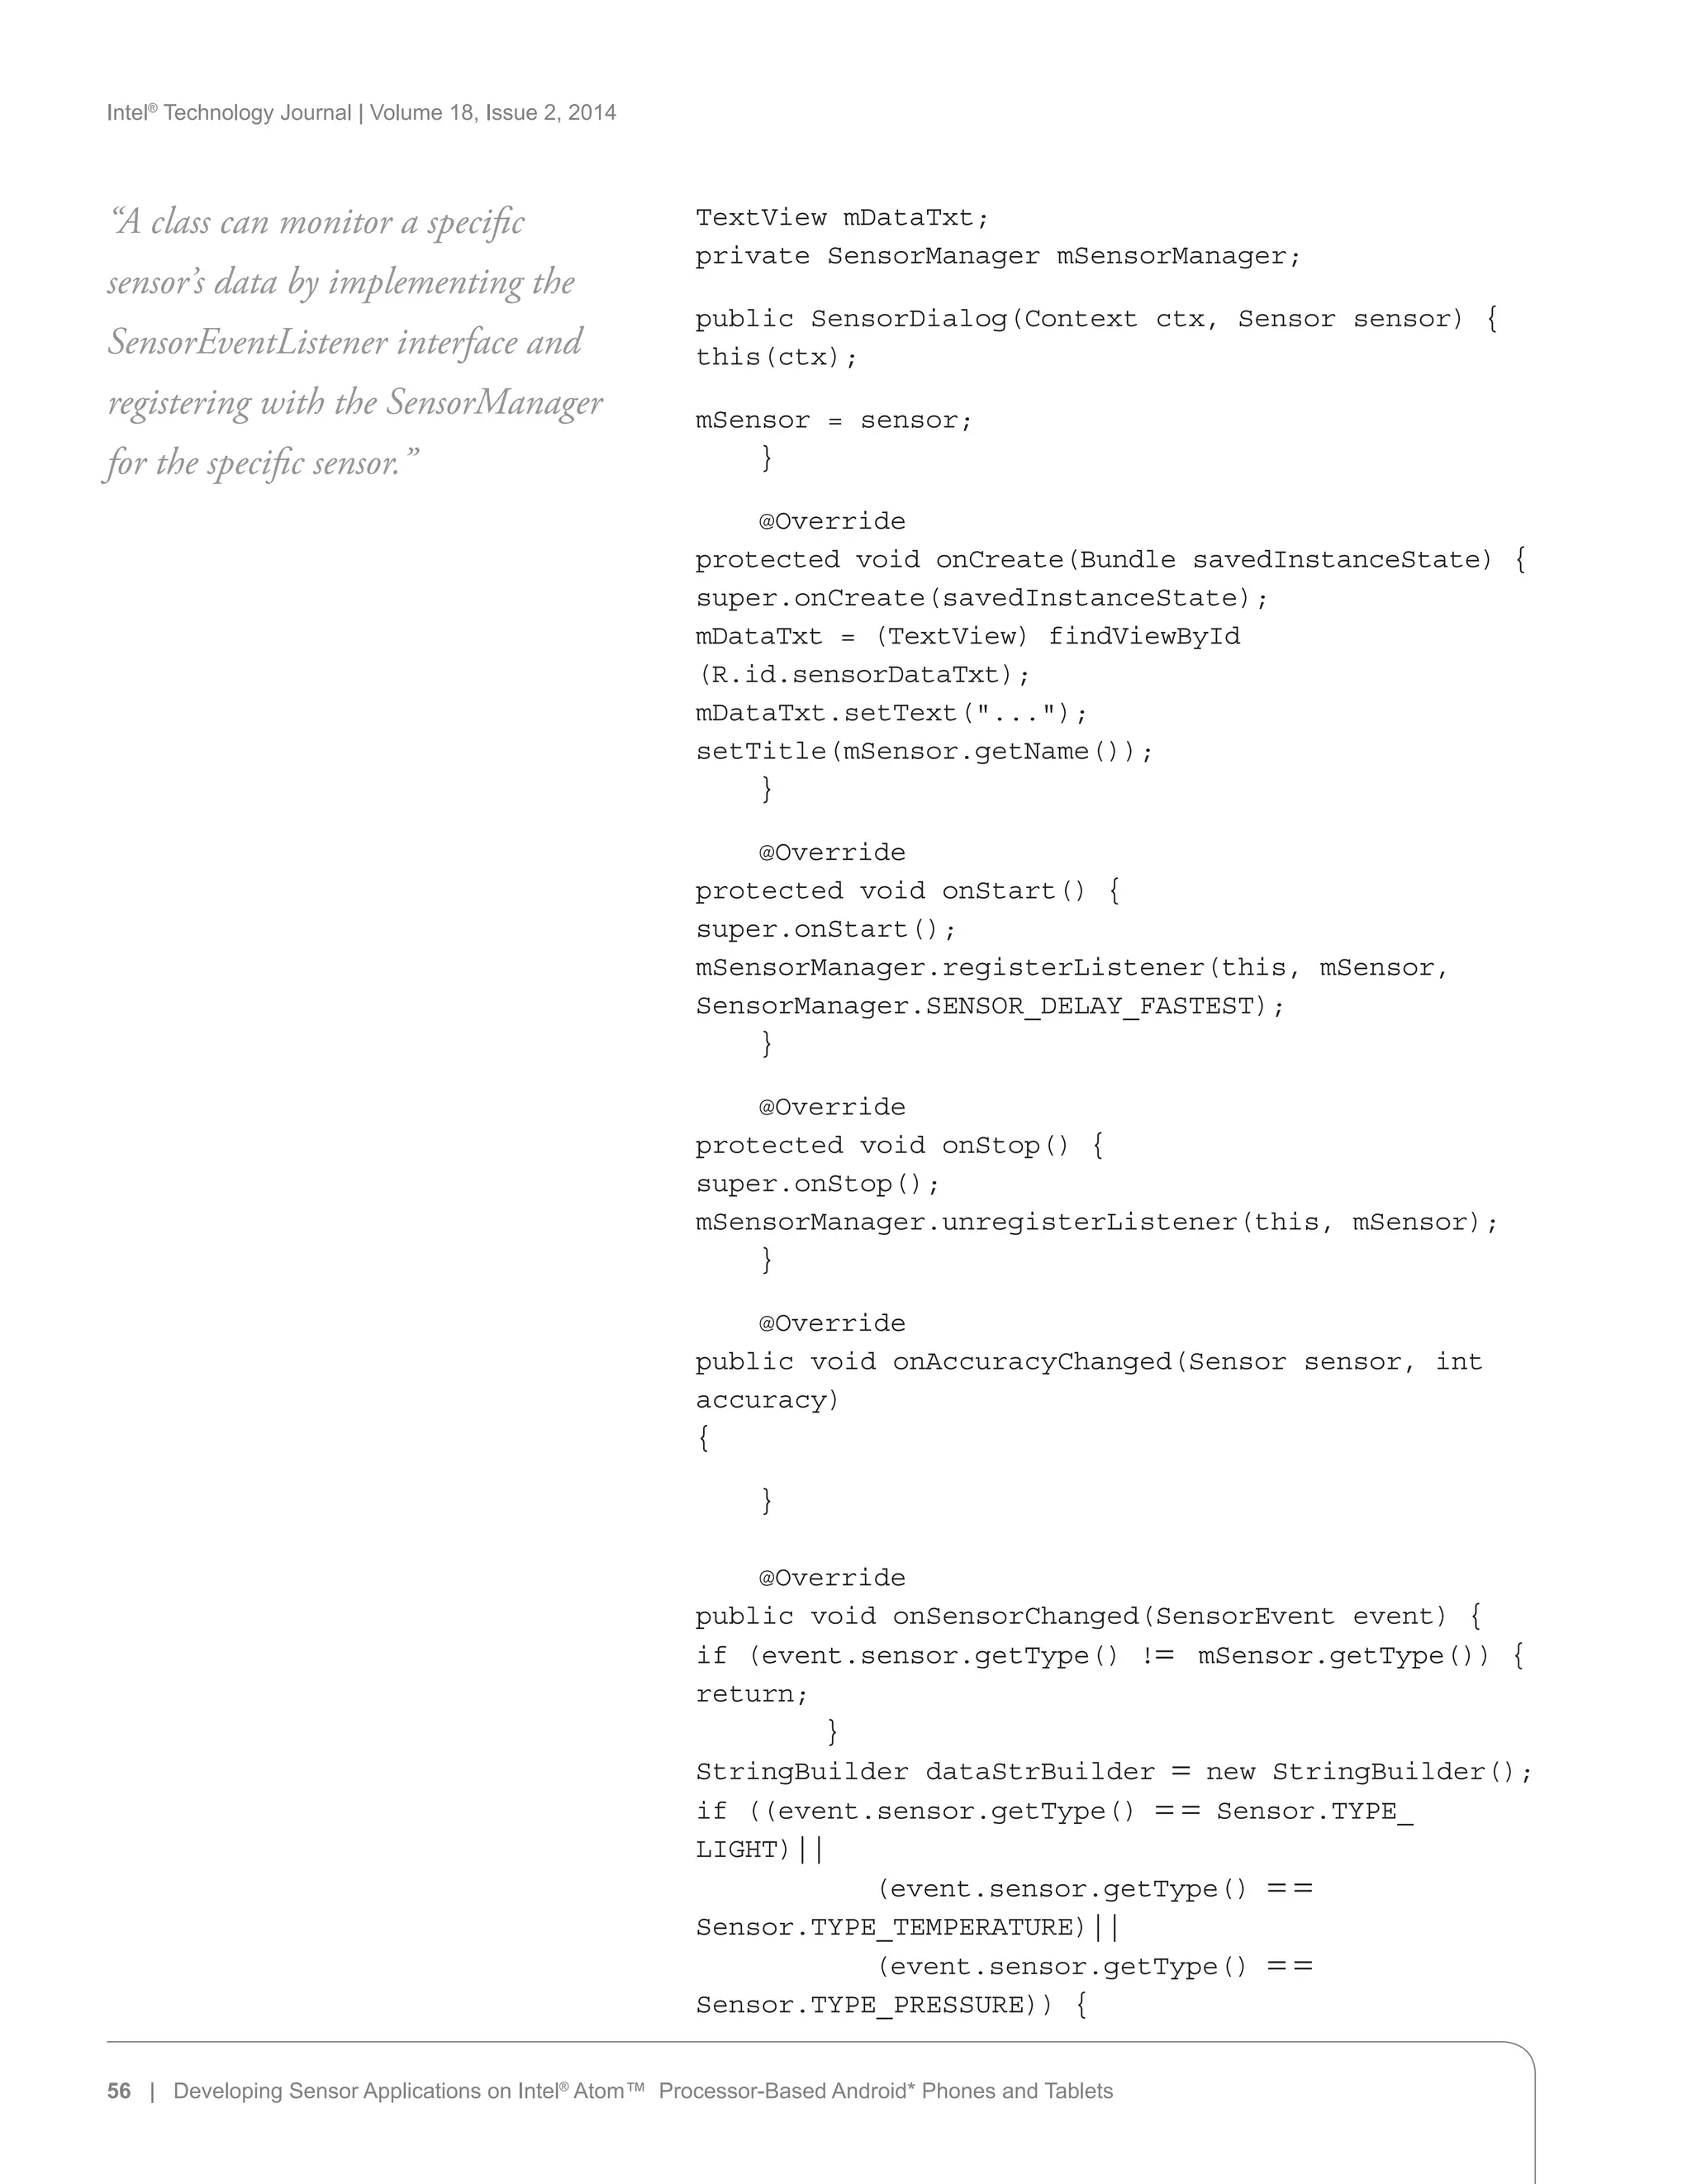
Code Example 1: A Fragment that Displays the List of Sensors**
Source: Intel Corporation, 2013
Sensor Coordinate System
The sensor framework reports sensor data using a standard 3-axis coordinate
system, in which the X, Y, and Z are represented by values[0], values[1], and
values[2] in the SensorEvent object, respectively.
Some sensors, such as the light sensor, the temperature sensor, the proximity
sensor, and the pressure sensor, return only a single value. For these sensors
only values[0] in the SensorEvent object is used.
“The sensor framework reports
sensor data using a standard 3-axis
coordinate system…”
54 | Developing Sensor Applications on Intel®
Atom™ Processor-Based Android* Phones and Tablets](https://image.slidesharecdn.com/c1e98a76-6293-4a30-9873-abe8040257f9-160127191746/75/2014-vol18-iss-2-intel-technology-journal-54-2048.jpg)

![Intel®
Technology Journal | Volume 18, Issue 2, 2014
dataStrBuilder.append(String.format(“Data: %.3fn”,
event.values[0]));
}
else{
dataStrBuilder.append(
String.format(Data: %.3f, %.3f, %.3fn,
event.values[0], event.values[1], event.values[2] ));
}
mDataTxt.setText(dataStrBuilder.toString());
}
}
Code Example 2: A Dialog that Shows the Sensor Values**
Source: Intel Corporation, 2013
Motion Sensors
Motion sensors are used to monitor device movement, such as shake, rotate,
swing, or tilt. The accelerometer and gyroscope are two motion sensors
available on many tablet and phone devices.
Motion sensors report data using the sensor coordinate system, where the three
values in the SensorEvent object, values[0], values[1], and values[2], represent
values for the x-, y-, and z-axis, respectively.
To understand the motion sensors and apply the data in an application, we
need apply some physics formulas related to force, mass, acceleration, Newton’s
laws of motion, and the relationship between several of these entities in time.
To learn more about these formulas and relationships, you may refer to physics
textbooks or public domain sources.
Accelerometer
The accelerometer measures the acceleration applied on the device, and its
properties are summarized in Table 3.
The concept for the accelerometer is derived from Newton’s second law of motion:
“Motion sensors are used to monitor
device movement, such as shake,
rotate, swing, or tilt.”
“The accelerometer measures the
acceleration applied on the device…”
Sensor Type
SensorEvent
Data (m/s2
) Description
Accelerometer TYPE_
ACCELEROMETER
values[0]
values[1]
values[2]
Acceleration along the x-axis
Acceleration along the y-axis
Acceleration along the z-axis
Table 3: The Accelerometer
(Source: Intel Corporation, 2013)
a = F/m
The acceleration of an object is the result of the net external force applied to
the object. The external forces include the one that applied to all objects on
Developing Sensor Applications on Intel®
Atom™ Processor-Based Android* Phones and Tablets | 57](https://image.slidesharecdn.com/c1e98a76-6293-4a30-9873-abe8040257f9-160127191746/75/2014-vol18-iss-2-intel-technology-journal-57-2048.jpg)

![Intel®
Technology Journal | Volume 18, Issue 2, 2014
SENSOR_SERVICE);
mSensor =
mSensorManager.getDefaultSensor(Sensor.TYPE_
ACCELEROMETER);
. . .
}
Code Example 3: Instantiation of an Accelerometer **
Source: Intel Corporation, 2013
Sometimes we don’t use all three dimension data values. Sometimes we may also need
to take the device’s orientation into consideration. For example, when we develop a
maze application, we only use the x-axis and the y-axis gravitational acceleration to
calculate the ball’s moving directions and distances based on the orientation of the
device. The following code fragment (Code Example 4) outlines the logic.
@Override
public void onSensorChanged(SensorEvent event) {
if (event.sensor.getType() != Sensor.TYPE_
ACCELEROMETER) {
return;
}
floataccelX, accelY;
. . .
//detect the current rotation currentRotation from
its “natural orientation”
//using the WindowManager
switch (currentRotation) {
case Surface.ROTATION_0:
accelX = event.values[0];
accelY = event.values[1];
break;
case Surface.ROTATION_90:
accelX = -event.values[0];
accelY = event.values[1];
break;
case Surface.ROTATION_180:
accelX = -event.values[0];
accelY = -event.values[1];
break;
case Surface.ROTATION_270:
accelX = event.values[0];
accelY = -event.values[1];
break;
}
//calculate the ball’s moving distances along
x, and y using accelX, accelY and the time delta
Developing Sensor Applications on Intel®
Atom™ Processor-Based Android* Phones and Tablets | 59](https://image.slidesharecdn.com/c1e98a76-6293-4a30-9873-abe8040257f9-160127191746/75/2014-vol18-iss-2-intel-technology-journal-59-2048.jpg)
![Intel®
Technology Journal | Volume 18, Issue 2, 2014
Figure 4: Using the “right-
hand rule” to decide the
positive rotation direction
(Source: Intel Corporation,
2013)
x, y, or z Axis
Positive rotation
Sensor Type
SensorEvent
Data (rad/s) Description
Gyroscope TYPE_
GYROSCOPE
values[0]
values[1]
values[2]
Rotation rate around the x-axis
Rotation rate around the y-axis
Rotation rate around the z-axis
Table 4: The Gyroscope
(Source: Intel Corporation, 2013)
. . .
}
}
Code Example 4: Considering the Device Orientation When Using the
Accelerometer Data in a Maze Game**
Source: Intel Corporation, 2013
Gyroscope
The gyroscope (or simply gyro) measures the device’s rate of rotation around
the x-, y-, and z-axis, as shown in Table 4. The gyroscope data values can be
positive or negative. By looking at the origin from a position along the positive
half of the axis, if the rotation is counterclockwise around the axis, the value is
positive; if the rotation around the axis is clockwise, the value is negative. We
can also determine the direction of a gyroscope value using the “right-hand
rule,” illustrated in Figure 4.
60 | Developing Sensor Applications on Intel®
Atom™ Processor-Based Android* Phones and Tablets
Code Example 5 shows how to instantiate a gyroscope.
public class SensorDialog extends Dialog implements
SensorEventListener {
. . .
private Sensor mGyro;
private SensorManager mSensorManager;
public SensorDialog(Context context) {
super(context);
mSensorManager =
(SensorManager)context.getSystemService(Context.
SENSOR_SERVICE);
mGyro =
mSensorManager.getDefaultSensor(Sensor.TYPE_
GYROSCOPE);
. . .
}
Code Example 5: Instantiation of a Gyroscope**
Source: Intel Corporation, 2013
Position Sensors
Many Android tablets support two position sensors: the magnetometer and
the proximity sensor. The magnetometer measures the strengths of the Earth’s
“The gyroscope measures the device’s
rate of rotation around the x-, y-, and
z-axis…”
“The magnetometer measures the
strengths of the Earth’s magnetic field
along the x-, y-, and z-axis, while the
proximity sensor detects the distance of
the device from another object.”](https://image.slidesharecdn.com/c1e98a76-6293-4a30-9873-abe8040257f9-160127191746/75/2014-vol18-iss-2-intel-technology-journal-60-2048.jpg)
![Intel®
Technology Journal | Volume 18, Issue 2, 2014
magnetic field along the x-, y-, and z-axis, while the proximity sensor detects
the distance of the device from another object.
Magnetometer
The most important usage of the magnetometer (described in Table 5) by the
Android system is to implement the compass.
Sensor Type
SensorEvent
Data (µT) Description
Magnetometer TYPE_
MAGNETIC_
FIELD
values[0]
values[1]
values[2]
Earth magnetic field strength along the x-axis
Earth magnetic field strength along the y-axis
Earth magnetic field strength along the z-axis
Table 5: The Magnetometer
(Source: Intel Corporation, 2013)
Sensor Type SensorEvent Data Description
Proximity TYPE_
PROXIMITY
values[0] Distance from an object in cm.
Some proximity sensors only
report a Boolean value to indicate
if the object is close enough.
Table 6: The Proximity Sensor
(Source: Intel Corporation, 2013)
Code Example 6 shows how to instantiate a magnetometer.
public class SensorDialog extends Dialog implements
SensorEventListener {
. . .
private Sensor mMagnetometer;
private SensorManager mSensorManager;
public SensorDialog(Context context) {
super(context);
mSensorManager =
(SensorManager)context.getSystemService(Context.
SENSOR_SERVICE);
mMagnetometer =
mSensorManager.getDefaultSensor(Sensor.TYPE_
MAGNETIC_FIELD);
. . .
}
Code Example 6: Instantiation of a Magnetometer**
Source: Intel Corporation, 2013
Proximity
The proximity sensor provides the distance between the device and another
object. The device can use it to detect if the device is being held close to the
user (see Table 6), thus determining if the user is making or receiving a phone
call and turning off the display during the period of the phone call.
Developing Sensor Applications on Intel®
Atom™ Processor-Based Android* Phones and Tablets | 61](https://image.slidesharecdn.com/c1e98a76-6293-4a30-9873-abe8040257f9-160127191746/75/2014-vol18-iss-2-intel-technology-journal-61-2048.jpg)
![Intel®
Technology Journal | Volume 18, Issue 2, 2014
Code Example 7 shows how to instantiate a proximity sensor.
public class SensorDialog extends Dialog implements
SensorEventListener {
. . .
private Sensor mProximity;
private SensorManager mSensorManager;
public SensorDialog(Context context) {
super(context);
mSensorManager =
(SensorManager)context.getSystemService(Context.
SENSOR_SERVICE);
mProximity =
mSensorManager.getDefaultSensor(Sensor.TYPE_
PROXIMITY);
. . .
}
Code Example 7: Instantiation of a Proximity Sensor**
Source: Intel Corporation, 2013
Environment Sensors
The environment sensors detect and report the device’s ambient environment
parameters, such as the light, temperature, pressure, or humidity. The
availability of a specific sensor is solely determined by the device manufacturer.
The ambient light sensor (ALS) and the pressure sensor (barometer) are
available on many Android tablets.
Ambient Light Sensor (ALS)
The ambient light sensor, described in Table 7, is used by the system to detect
the illumination of the surrounding environment and automatically adjust the
screen brightness accordingly.
“The environment sensors detect
and report the device’s ambient
environment parameters, such as
the light, temperature, pressure, or
humidity.”
Sensor Type SensorEvent Data (lx) Description
ALS TYPE_LIGHT values[0] The illumination
around the device
Table 7: The Ambient Light Sensor
(Source: Intel Corporation, 2013)
Code Example 8 shows how to instantiate the ALS.
. . .
private Sensor mALS;
private SensorManager mSensorManager;
. . .
mSensorManager =
(SensorManager)context.getSystemService(Context.
SENSOR_SERVICE);
mALS = mSensorManager.getDefaultSensor(Sensor.
62 | Developing Sensor Applications on Intel®
Atom™ Processor-Based Android* Phones and Tablets](https://image.slidesharecdn.com/c1e98a76-6293-4a30-9873-abe8040257f9-160127191746/75/2014-vol18-iss-2-intel-technology-journal-62-2048.jpg)
![Intel®
Technology Journal | Volume 18, Issue 2, 2014
TYPE_LIGHT);
. . .
Code Example 8: Instantiation of an Ambient Light Sensor**
Source: Intel Corporation, 2013
Barometer
The atmosphere pressure sensor (barometer), described in Table 8, can be used
by the applications to calculate the altitude of the device’s current location.
Sensor Type SensorEvent
Data (lx)
Description
Barometer TYPE_PRESSURE values[0] The ambient air
pressure in mbar
Table 8: The Atmosphere Pressure Sensor
(Source: Intel Corporation, 2013)
Developing Sensor Applications on Intel®
Atom™ Processor-Based Android* Phones and Tablets | 63
Code Example 9 shows how to instantiate the barometer.
. . .
private Sensor mBarometer;
private SensorManager mSensorManager;
. . .
mSensorManager =
(SensorManager)context.getSystemService(Context.
SENSOR_SERVICE);
mBarometer =
mSensorManager.getDefaultSensor(Sensor.TYPE_
PRESSURE);
. . .
Code Example 9: Instantiation of a barometer**
Source: Intel Corporation, 2013
Sensor Data Optimization
In developing sensor applications, one thing we should know is the raw data
returned from the sensors may be quite noisy. Sometimes it may include lots
of jitters and interference (Figure 5). To improve the user experience of sensor
applications, sometimes we may use techniques to optimize the sensor data.
Sensor Data Filtering
One way to remove high frequency noise in sensor data is to use a “rolling
average” data value. At a specific data point, the current reading from the
sensor only contributes to a portion of the data value; the rolling average value
contributes to the rest. This can be represented in the following equation, in
which Sxi
,Syi
,and Szi
are the data values to be used at the data point on the x-,
y-, and z-axes, respectively. Xi
, Yi
, and Zi
are the raw sensor readings on the
x-, y-, and z-axes, respectively. Rx
, Ry
, and Rz
are the rolling averages up to the
previous data point, and a is a selected value; in this case we set it to .15 (15
percent).
“…One thing we should know is the
raw data returned from the sensors
may be quite noisy.”
“To improve the user experience of
sensor applications, sometimes we may
use techniques to optimize the sensor
data.”](https://image.slidesharecdn.com/c1e98a76-6293-4a30-9873-abe8040257f9-160127191746/75/2014-vol18-iss-2-intel-technology-journal-63-2048.jpg)

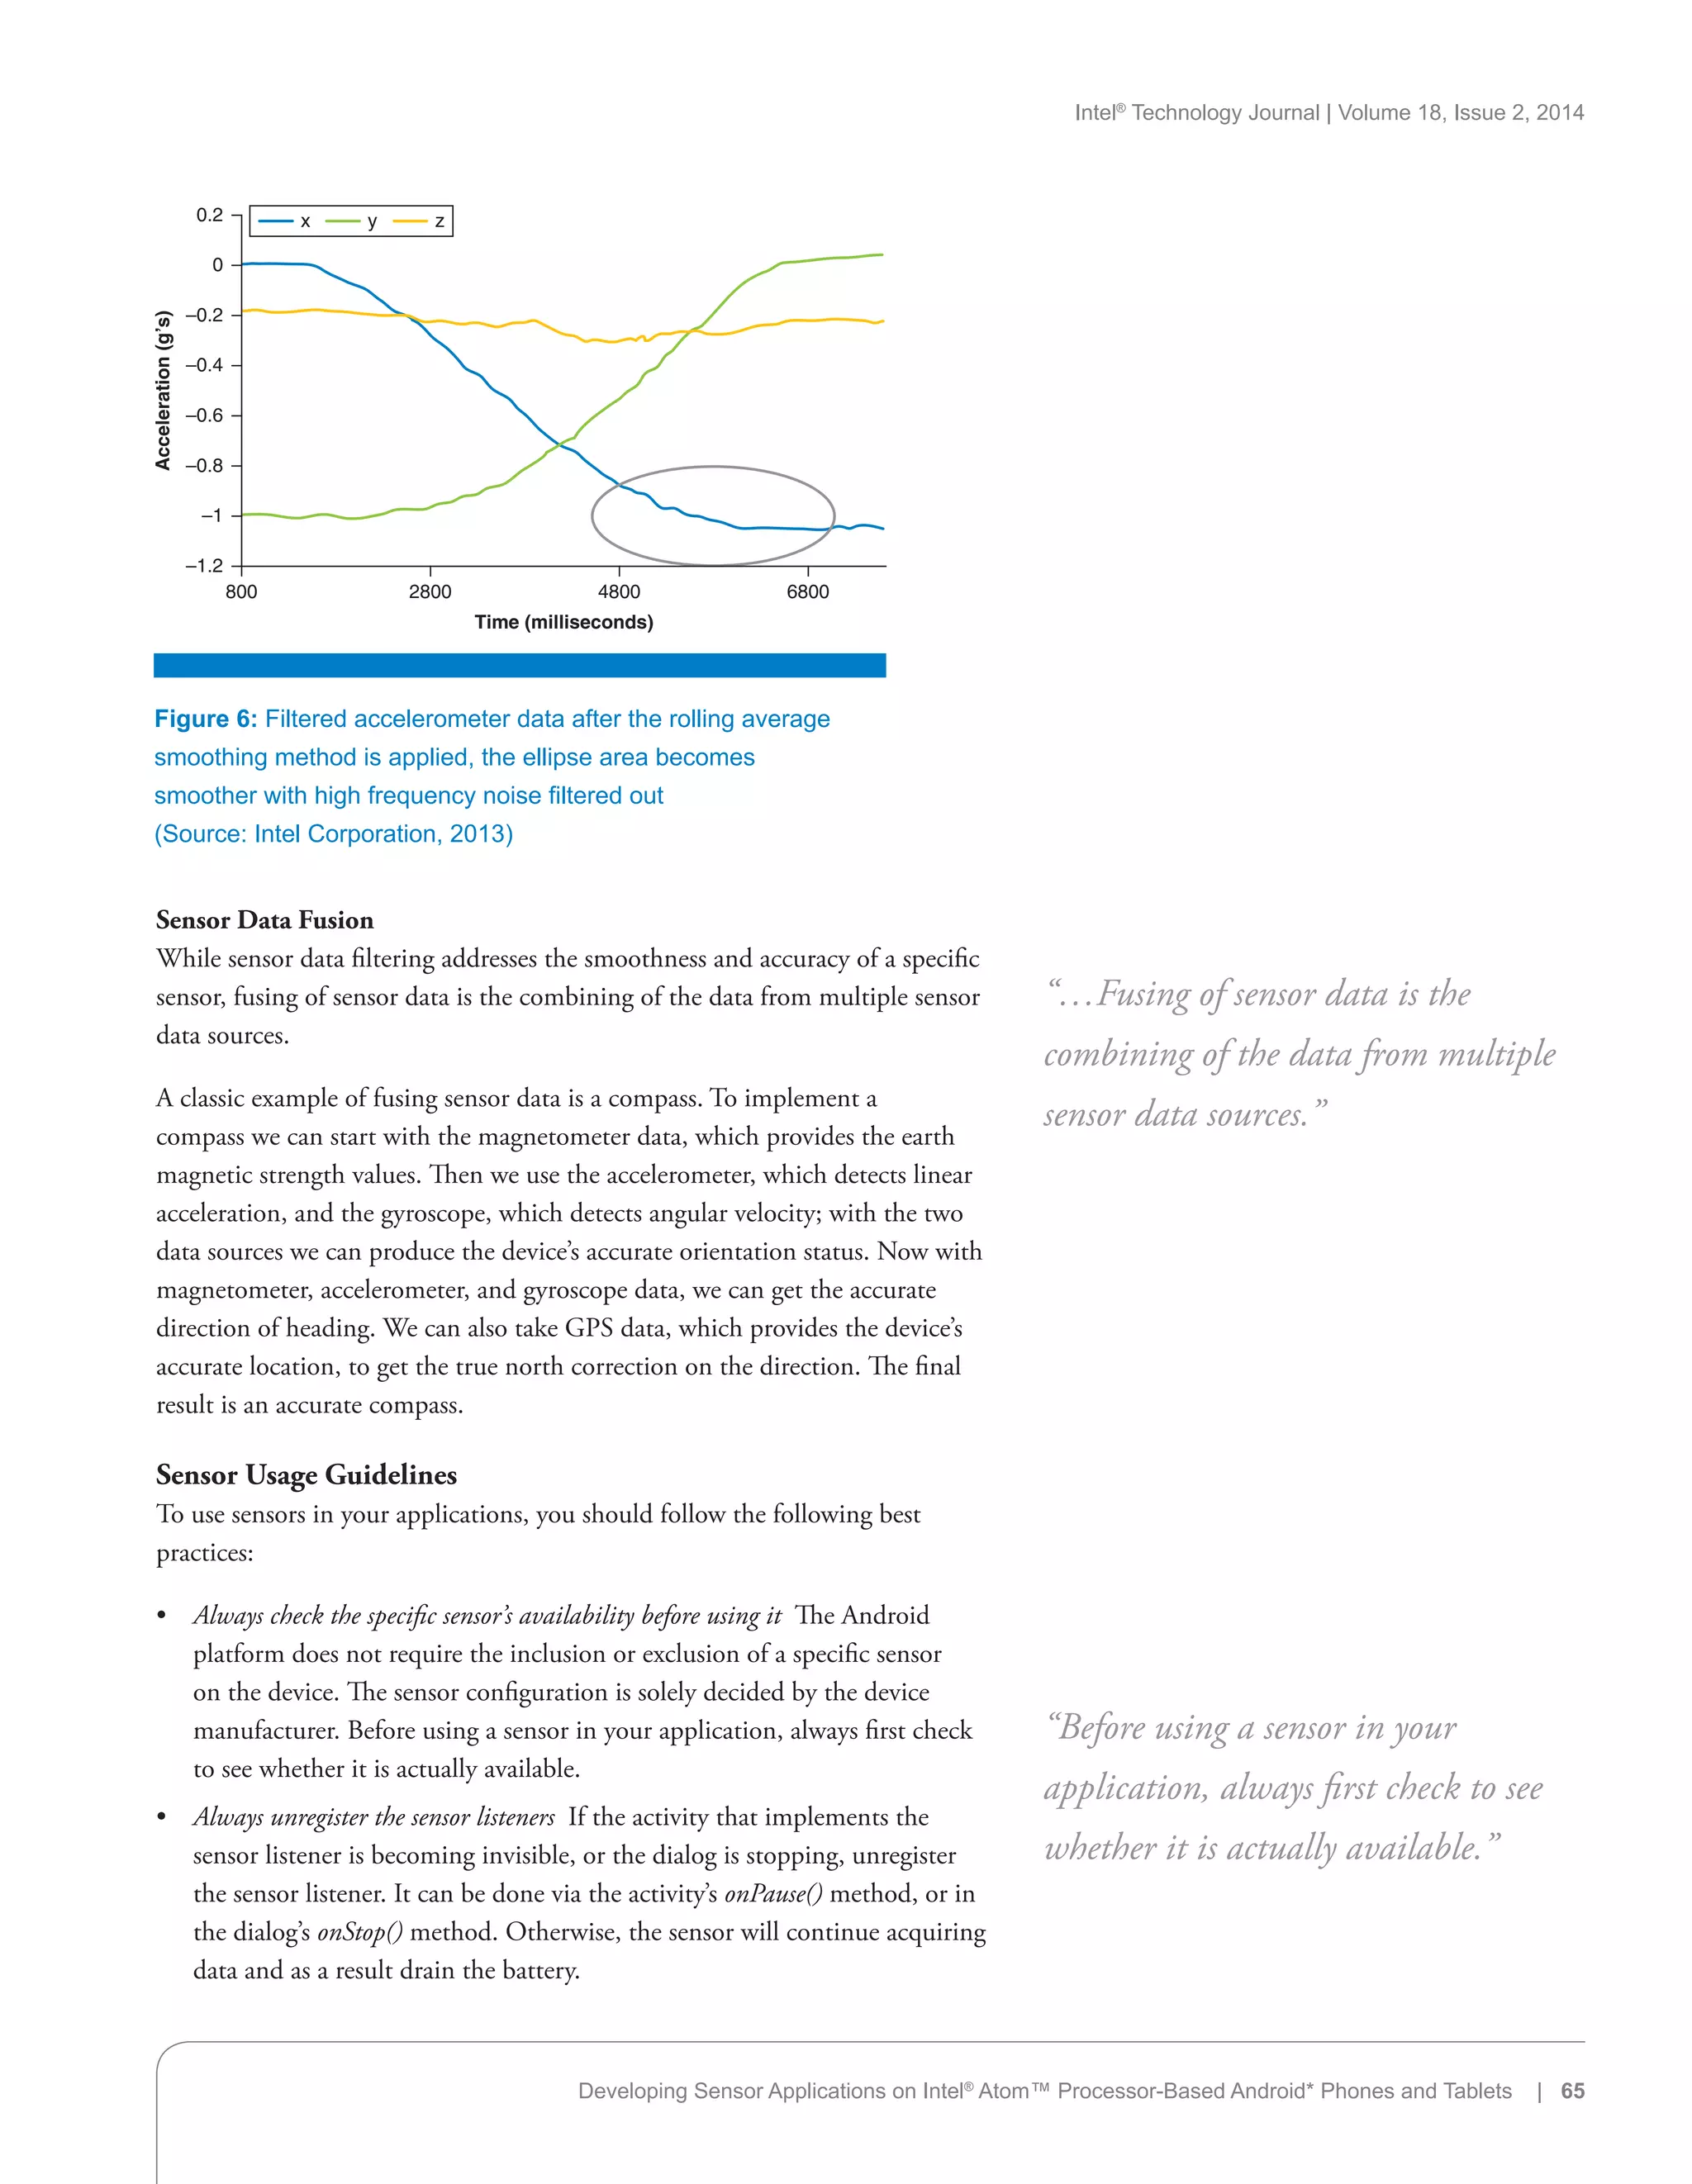


![Intel®
Technology Journal | Volume 18, Issue 2, 2014
Installing the Android* SDK for Intel®
Architecture | 73
Beacon Mountain
When I attended the Intel Developers Forum 2013 in San Francisco, Beacon
Mountain was a major focus at all of the technical sessions on Android
development. At the time of this writing, Beacon Mountain is in beta and
on version 0.6. All statements made about the program going forward are
based on this version and are likely to change as it moves closer to a 1.0
release. Beacon Mountain supports both Apple* OS X (10.8.3) and Microsoft
Windows 7 and 8 (64-bit) operating systems.
At this point, Beacon Mountain includes some Intel tools that only support
Android 4.1 (Jelly Bean) and up. Because of this, I will be focusing on
development on Android 4.1 and up so that you can take advantage of these
tools. If you wish to develop for a lower version of Android, all of the third-
party tools included in Beacon Mountain will work with Android 2.3
(Gingerbread) and up. So Beacon Mountain is still the best way to get
everything you need installed if you wish to develop for any Android version
2.3 and up.
When deciding what version of Android to develop for, there are a few factors
you should consider. First, do you want to use Intel’s provided tools that
require Android 4.1? If you do, then you don’t have much of a choice but to
develop for that version, or above, of Android. Second, what Android features
do you need for your application? If you are not doing anything that requires
a later version of Android, and you don’t want to use Intel’s tools, there is
probably no reason to set the minimum SDK level to higher than 2.3.3.
Finally, you should consider the distribution of Android versions on devices.
Google provides a distribution chart at the developer Website (http://developer.
android.com/about/dashboards/index.html). At the time of this writing,
about 97 percent of devices are running Android 2.3.3 or higher and about
66 percent of devices are running Android 4.0.3 or higher. Ultimately this is
a decision you will need to make after doing your own research, considering
what you want to do with your application and determining the audience you
wish to target.
What Does Beacon Mountain Install?
Beacon Mountain installs several Intel and third-party tools that will allow
you to start developing your Android applications. I have listed these tools
below.
Intel x86 Tools
•• Intel® Hardware Accelerated Execution Manager (Intel HAXM)
•• Intel® Graphics Performance Analyzers System Analyzer (Intel GPA)
•• Intel® Integrated Performance Primitives Preview for Android (Intel IPP)
•• Intel® Threading Building Blocks
•• Intel Software Manager
“…Beacon Mountain was a major
focus [at the Intel Developers Forum].”
“Beacon Mountain installs several
Intel and third-party tools that will
allow you to start developing your
Android applications.”](https://image.slidesharecdn.com/c1e98a76-6293-4a30-9873-abe8040257f9-160127191746/75/2014-vol18-iss-2-intel-technology-journal-73-2048.jpg)
![Intel®
Technology Journal | Volume 18, Issue 2, 2014
Installing the Android* SDK for Intel®
Architecture | 75
and device hardware capabilities. The Android Emulator uses these AVD
configurations to configure and start the appropriate Android virtual image on
the emulator.
As documented on the Android Website (http://developer.android.com/guide/
developing/devices/index.html), a typical AVD configuration has:
•• A hardware profile that specifies all the device capabilities (examples:
camera, sensors).
•• A System image, which will be used by the emulator for this AVD (API
level to target, such as Ice Cream Sandwich or Jelly Bean).
•• A Data image that acts as the dedicated storage space for user’s data,
settings, and SD card.
•• Other options including emulator skin, the screen dimensions, and SD
card size.
Developers are encouraged to target different API levels, screen sizes, and
hardware capabilities (such as camera, sensors, and multitouch). The AVD
configuration can be used to customize the emulator as needed. Developers
can create as many AVDs as desired, each one targeting a different Intel
architecture–based Android device: for example, a developer can create an
Intel architecture–based Ice Cream Sandwich AVD with a built-in skin like
WVGA800, or a custom one manually specifying the screen resolution to
be used.
The Android SDK has supported Intel architecture–based Android Emulation
since Revision 12. The SDK integrates this support into all developer tools
including the Eclipse ADT plugin.
For detailed instructions on how to use the emulator, please refer to the
following Android documentation: http://developer.android.com/guide/
developing/devices/emulator.html.
What Emulator Should You Use?
At the time of this writing, there are five emulator images available for Intel
architecture (x86): one each for Android 2.3.7 (Gingerbread), 4.0.4 (Ice Cream
Sandwich), 4.1.2 (Jelly Bean), 4.2.2 (Jelly Bean), and 4.3 (Jelly Bean).
While there are many advantages to developing for the latest Android
operating system release, many developers prefer to target Android 2.x.
When I started this paper, I was informed that some of Intel’s tools in Beacon
Mountain would only support Android 4.2 and up, so I chose to target
Android 4.2. I later found out that this is not the case, so you can develop for
Android 4.1 and still take advantage of Intel’s tools.
Why Use the Emulator?
First of all, it’s free. The Android SDK and its third-party add-ons cost
absolutely nothing and allow developers to emulate devices that they do not
own and may not have access to. This is important because not all phones
“Developers are encouraged to target
different API levels, screen sizes, and
hardware capabilities (such as camera,
sensors, and multitouch).”
“…[The emulator] allow[s] developers
to emulate devices that they do not
own and may not have access to.”](https://image.slidesharecdn.com/c1e98a76-6293-4a30-9873-abe8040257f9-160127191746/75/2014-vol18-iss-2-intel-technology-journal-75-2048.jpg)


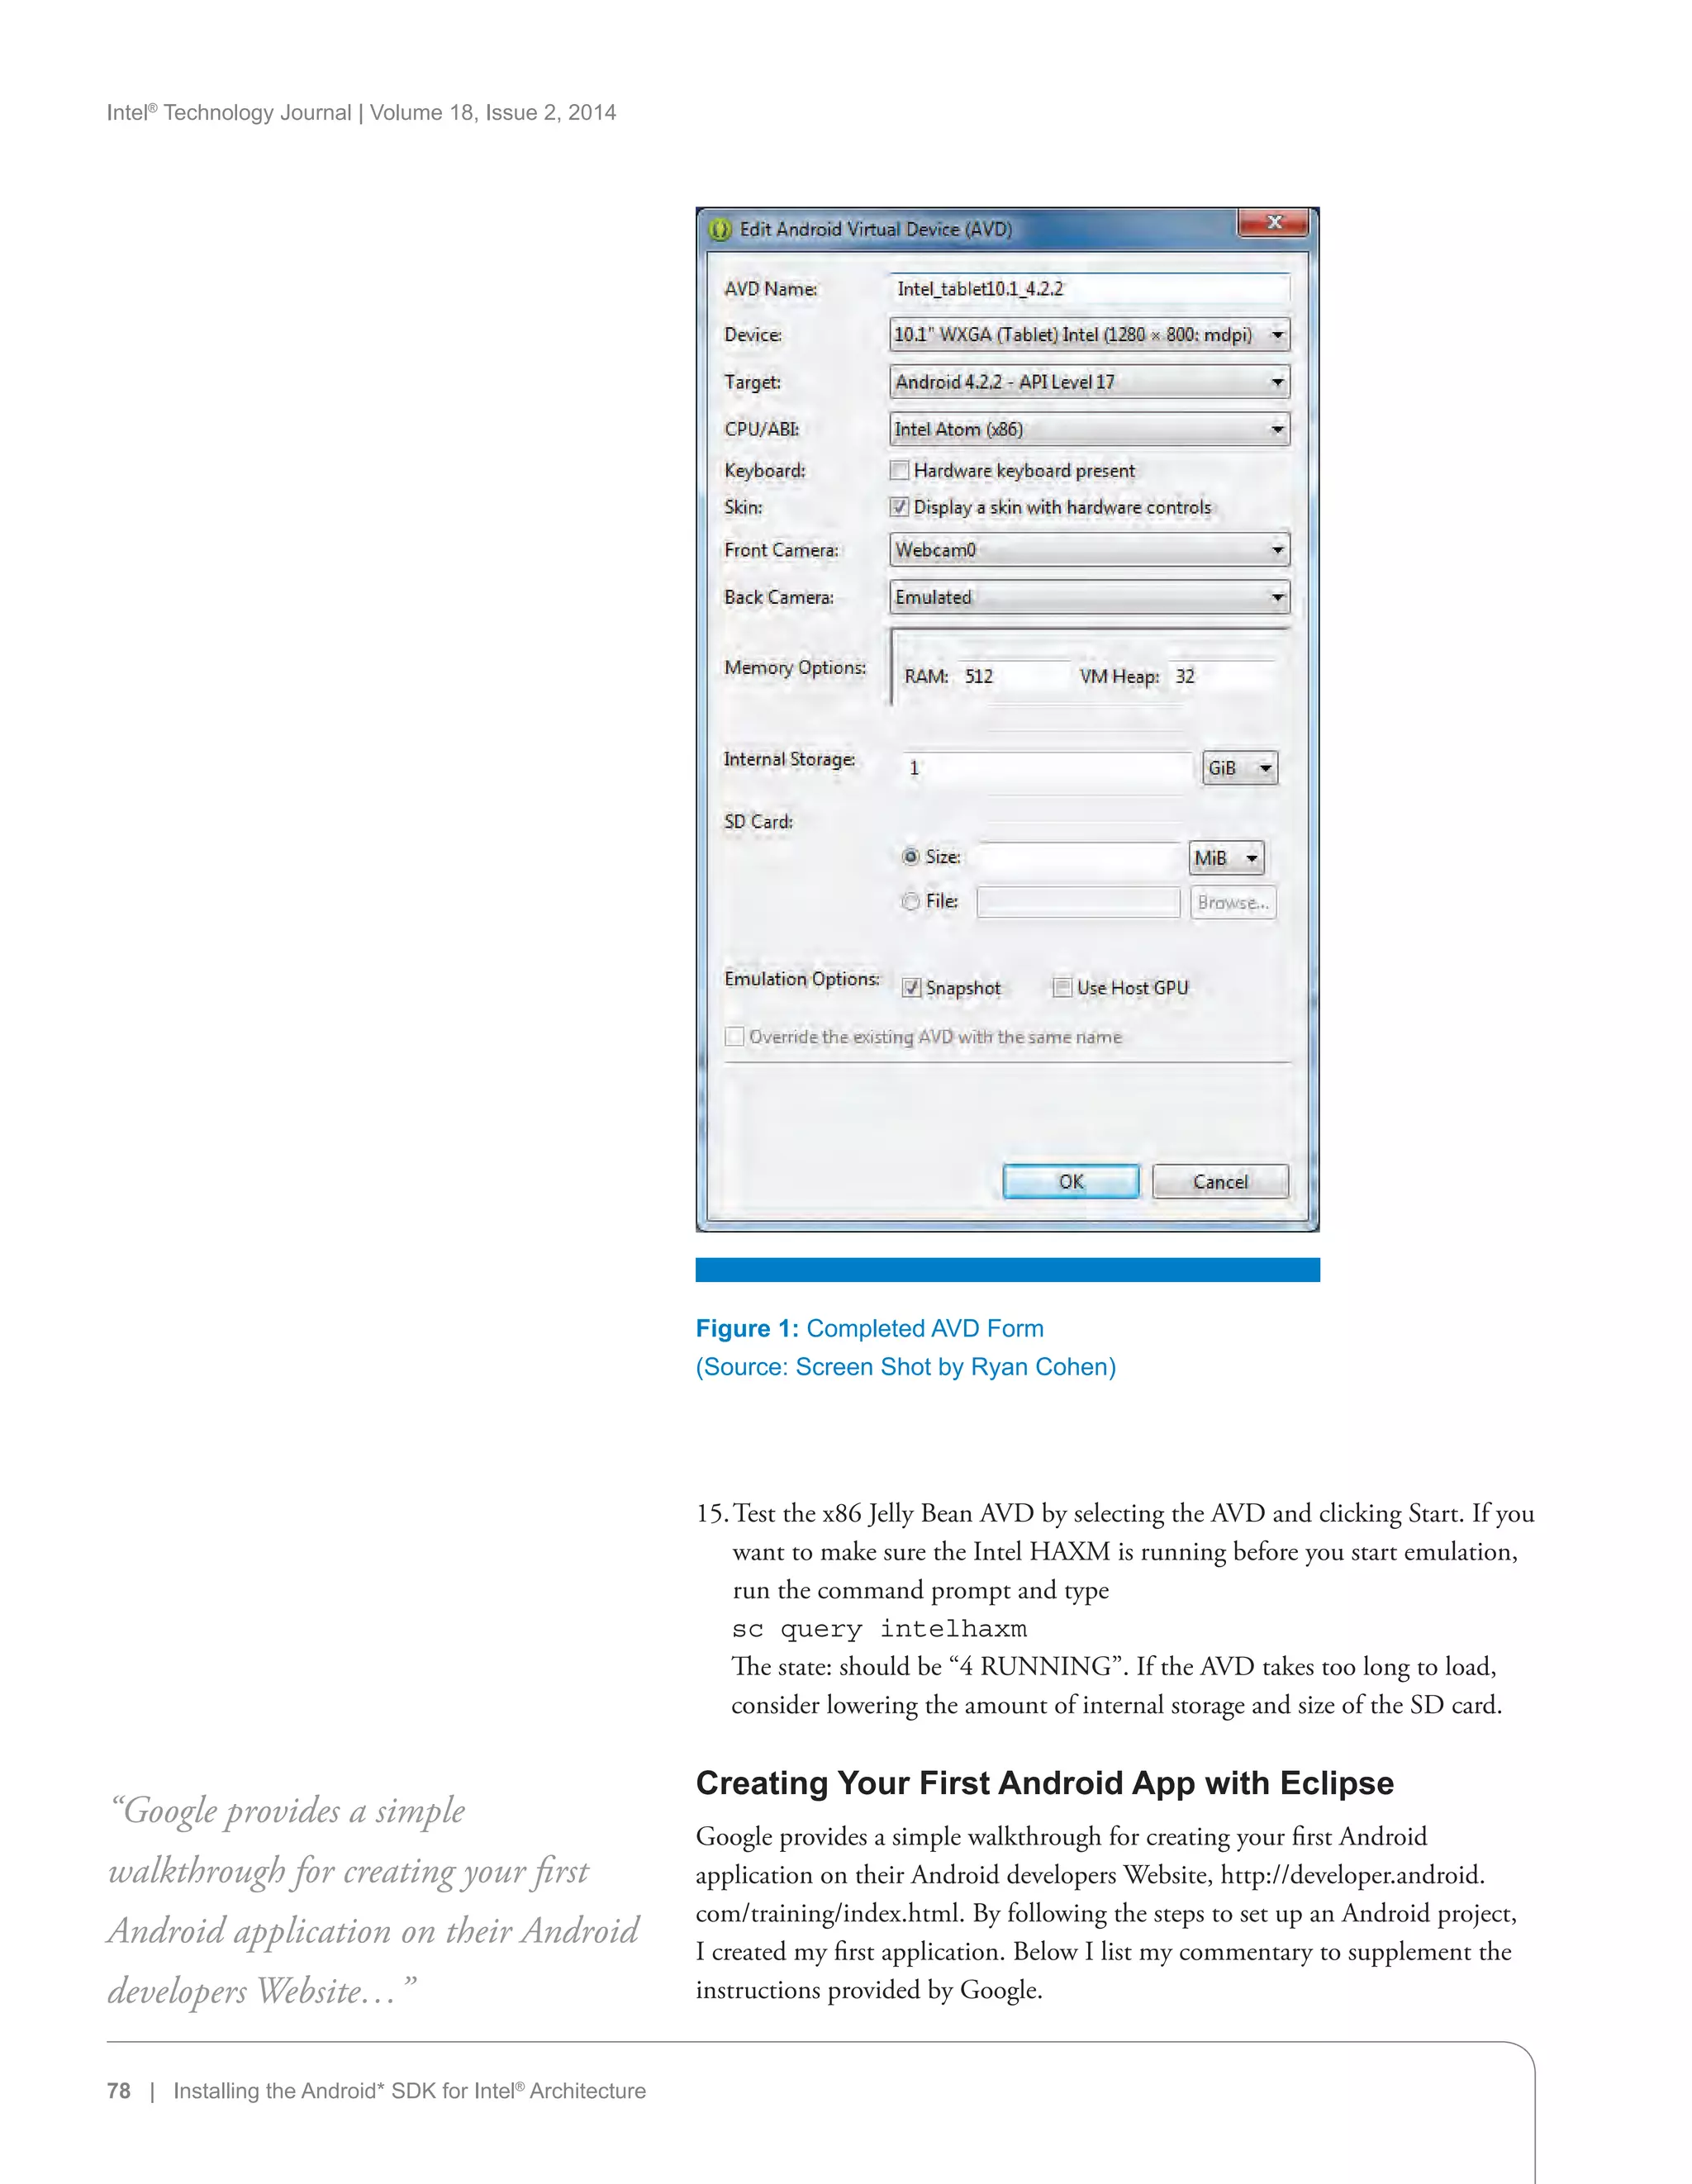


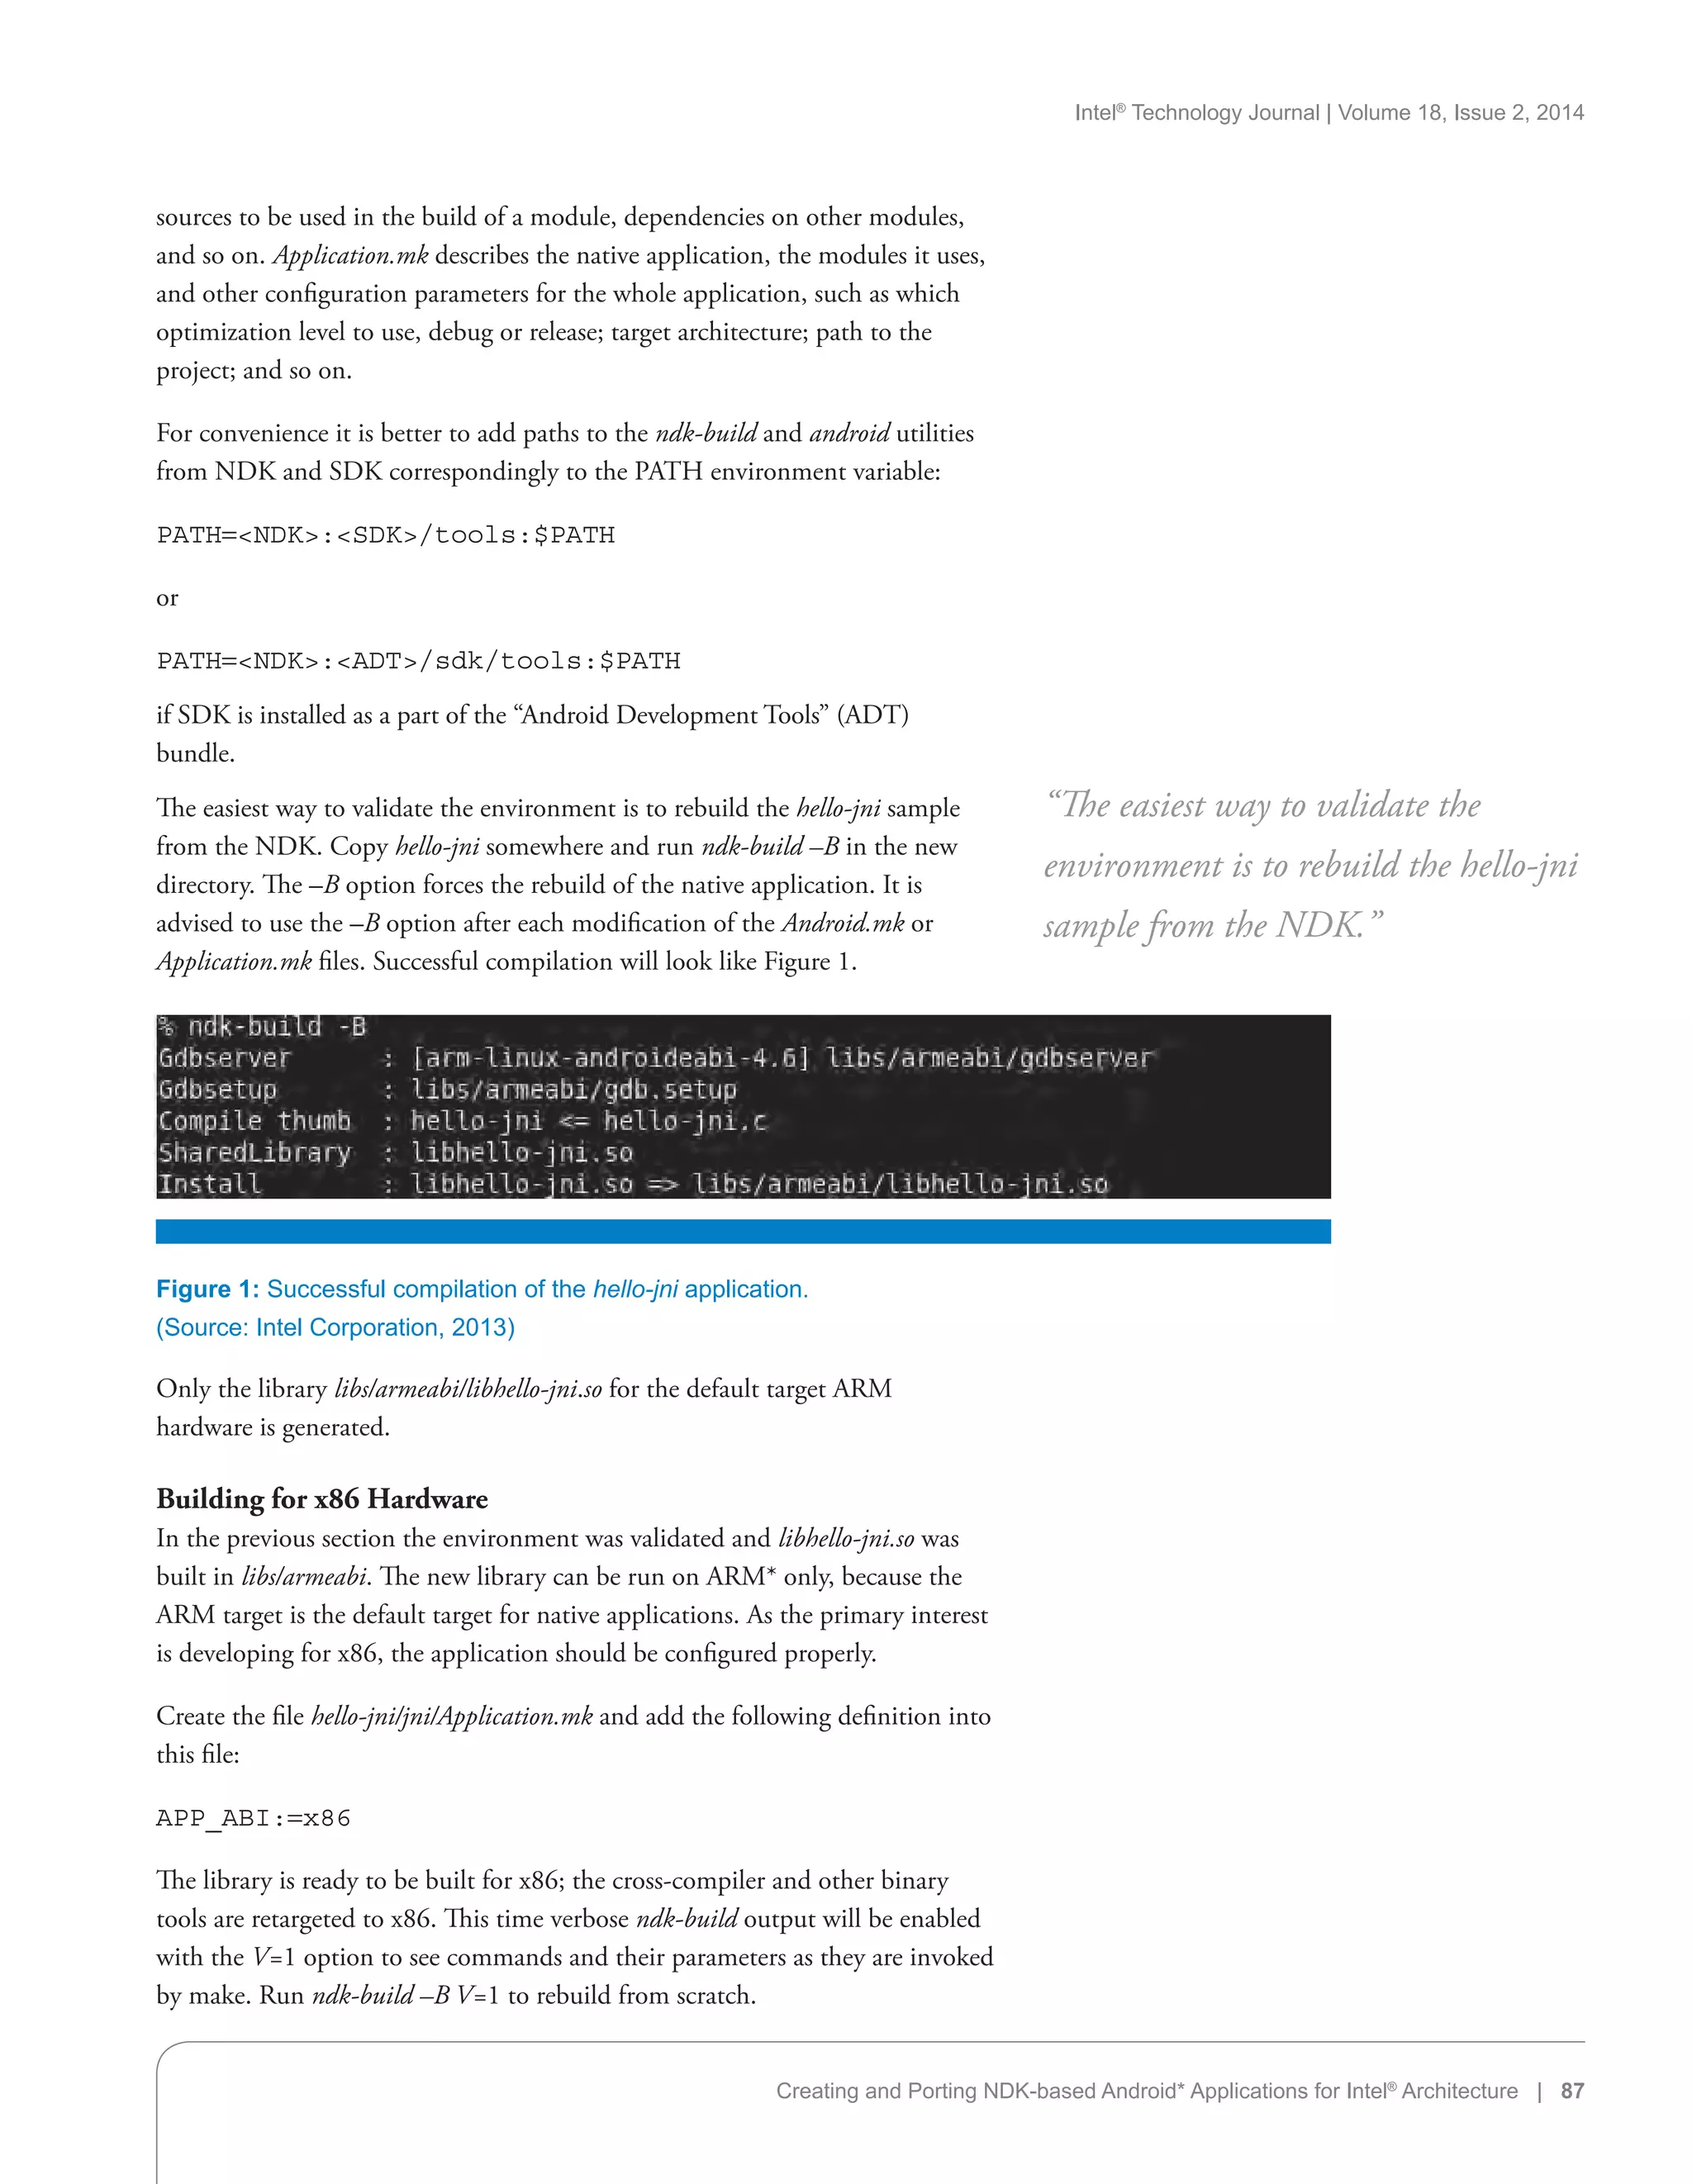
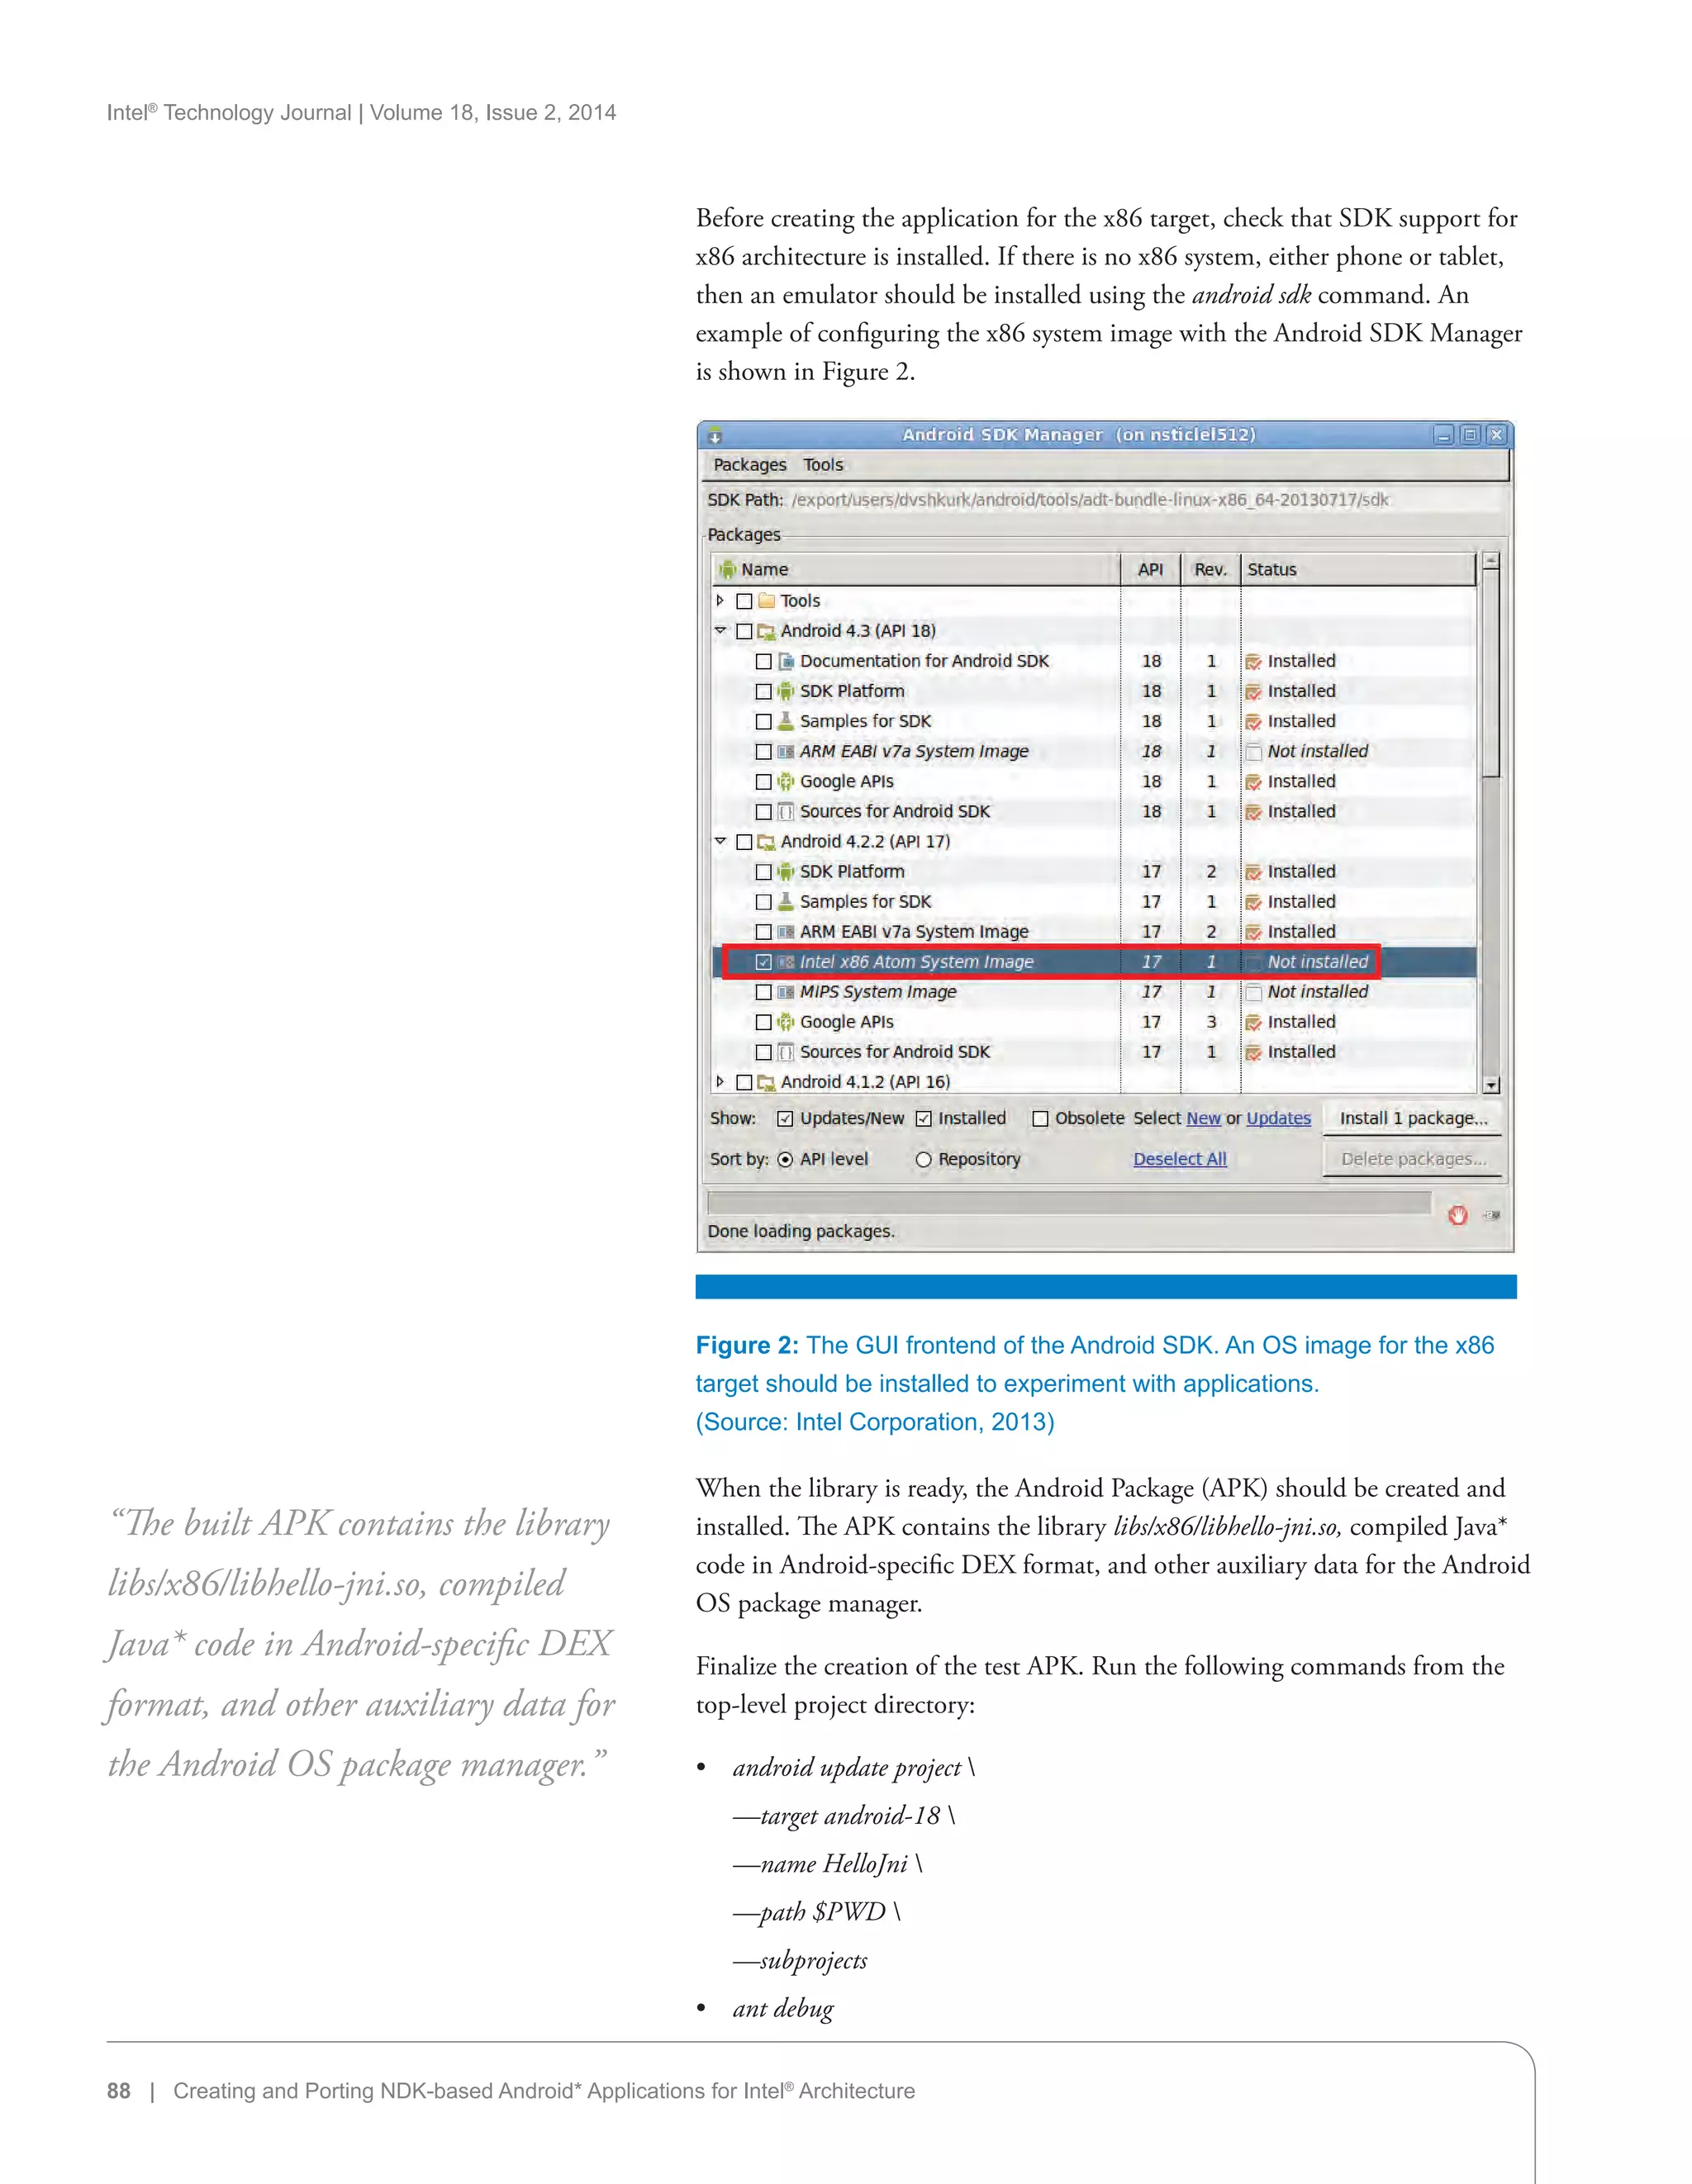
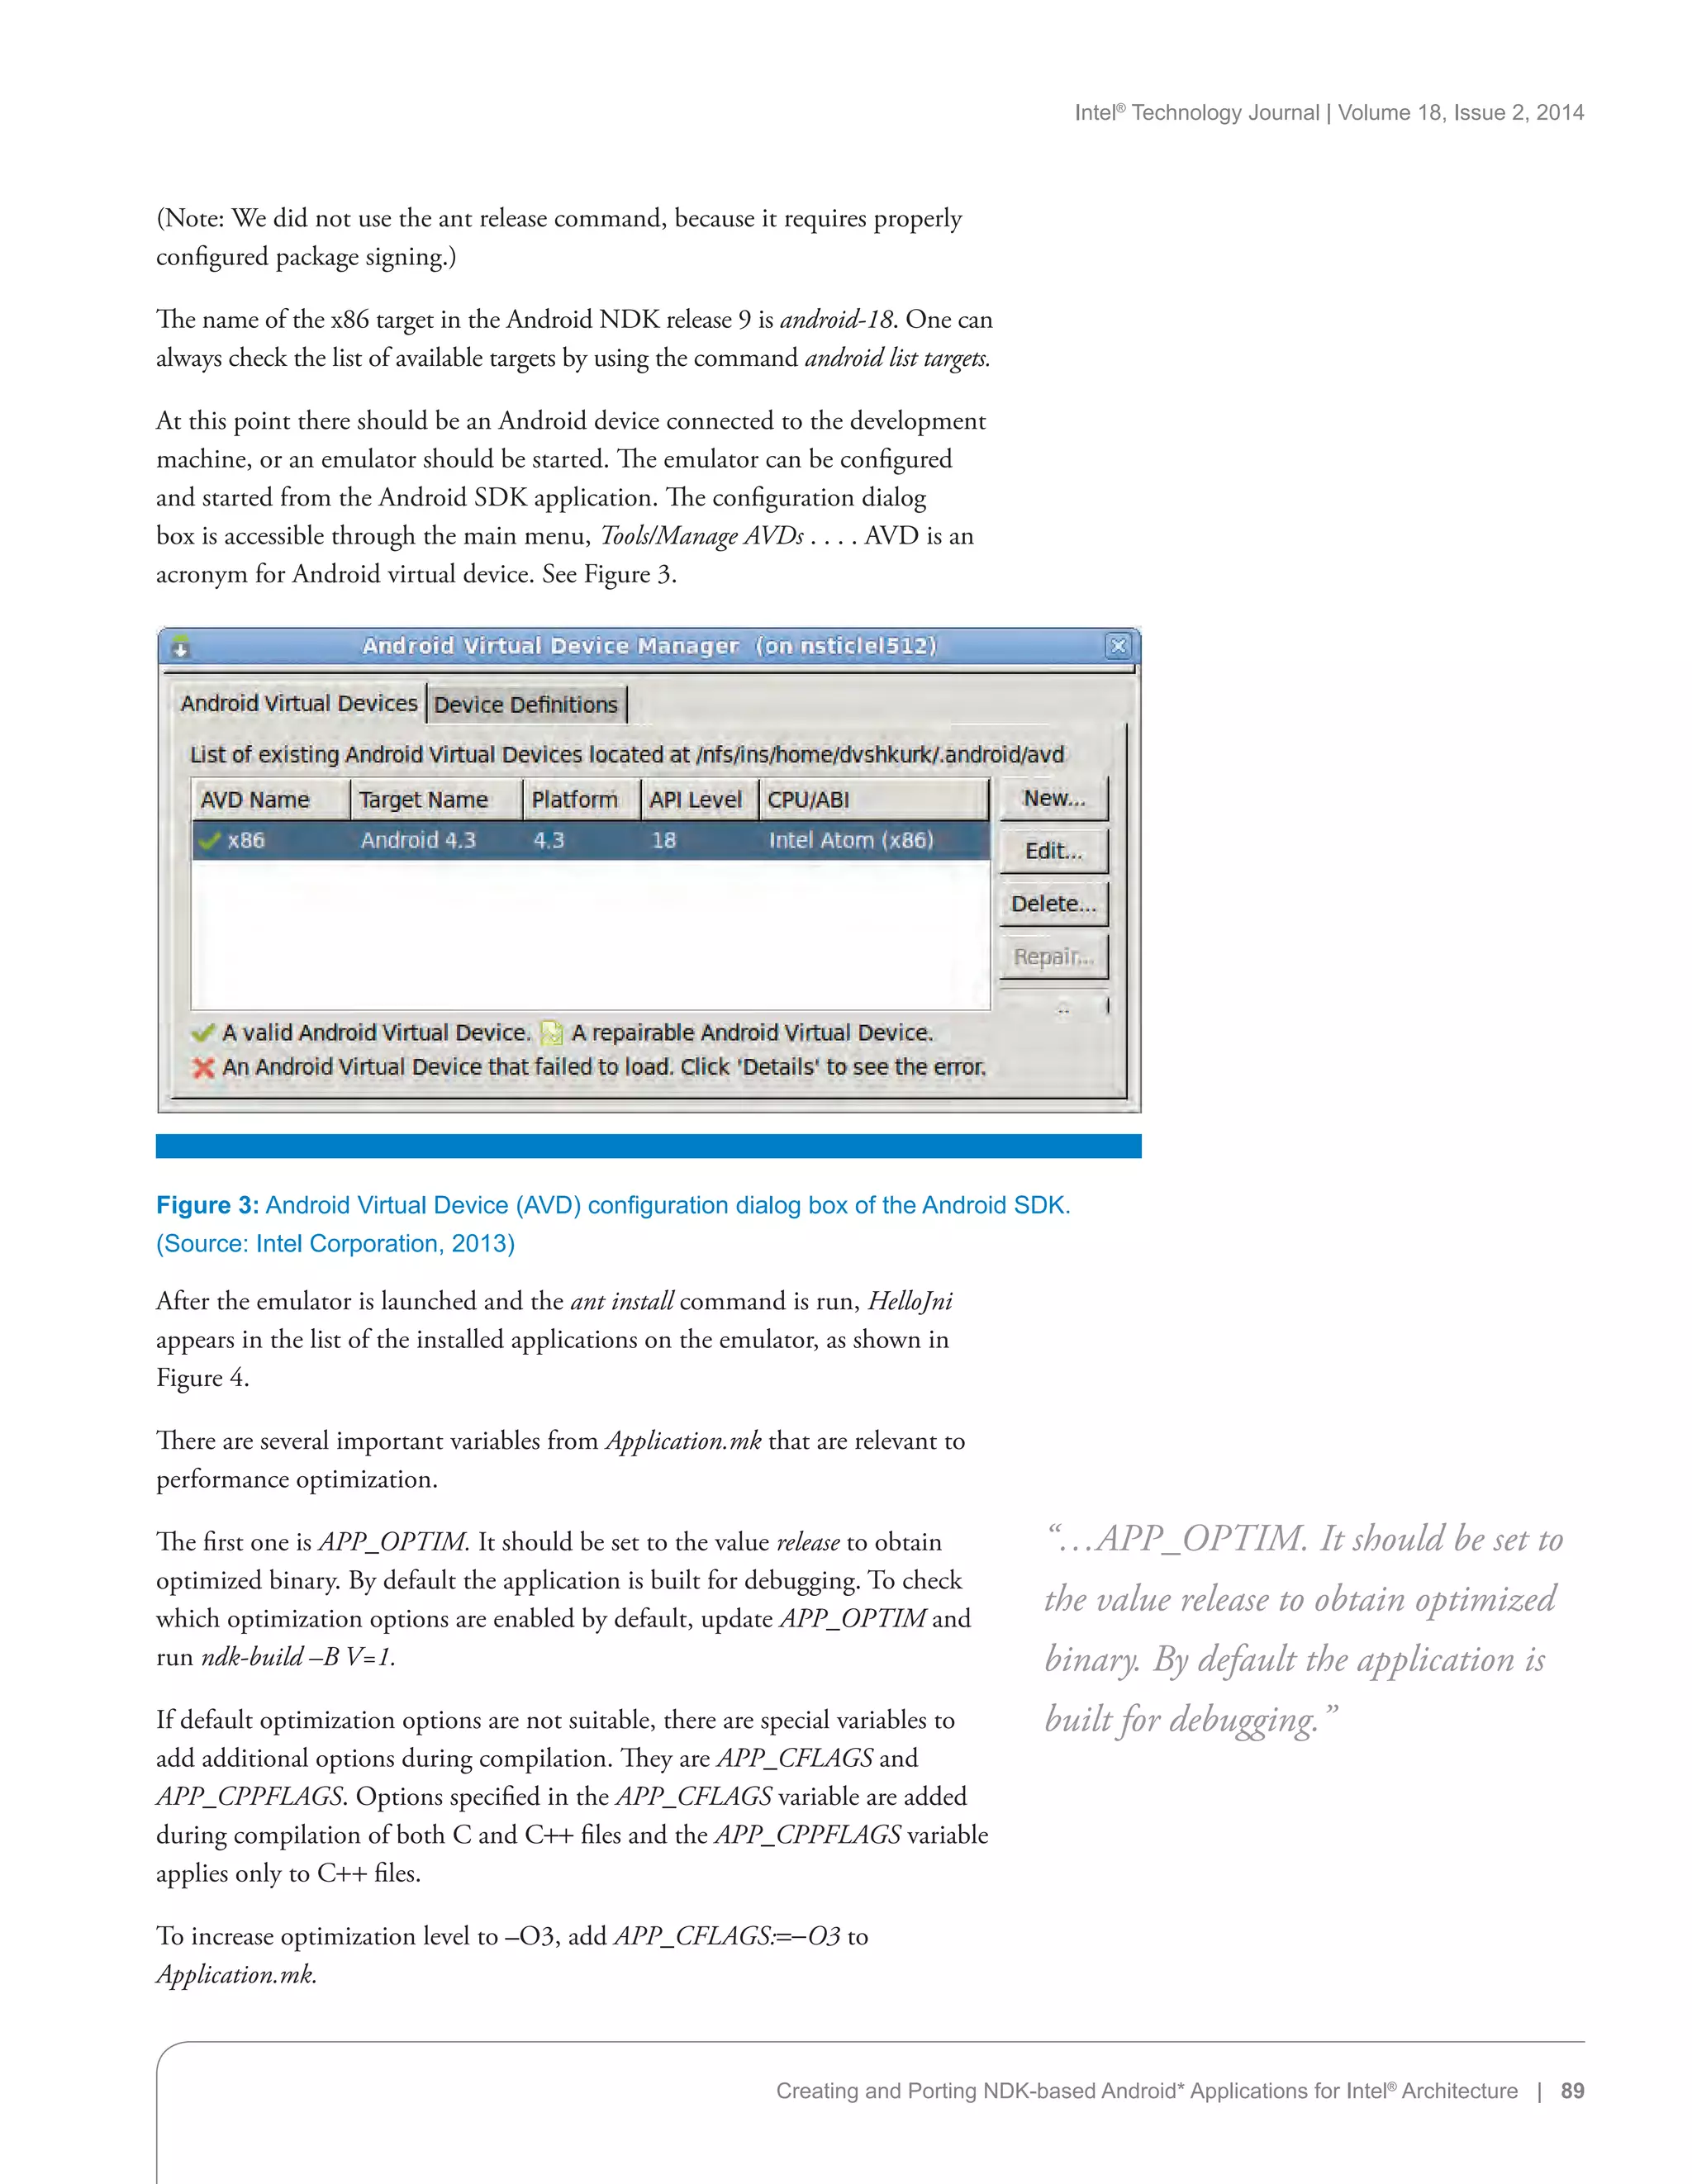


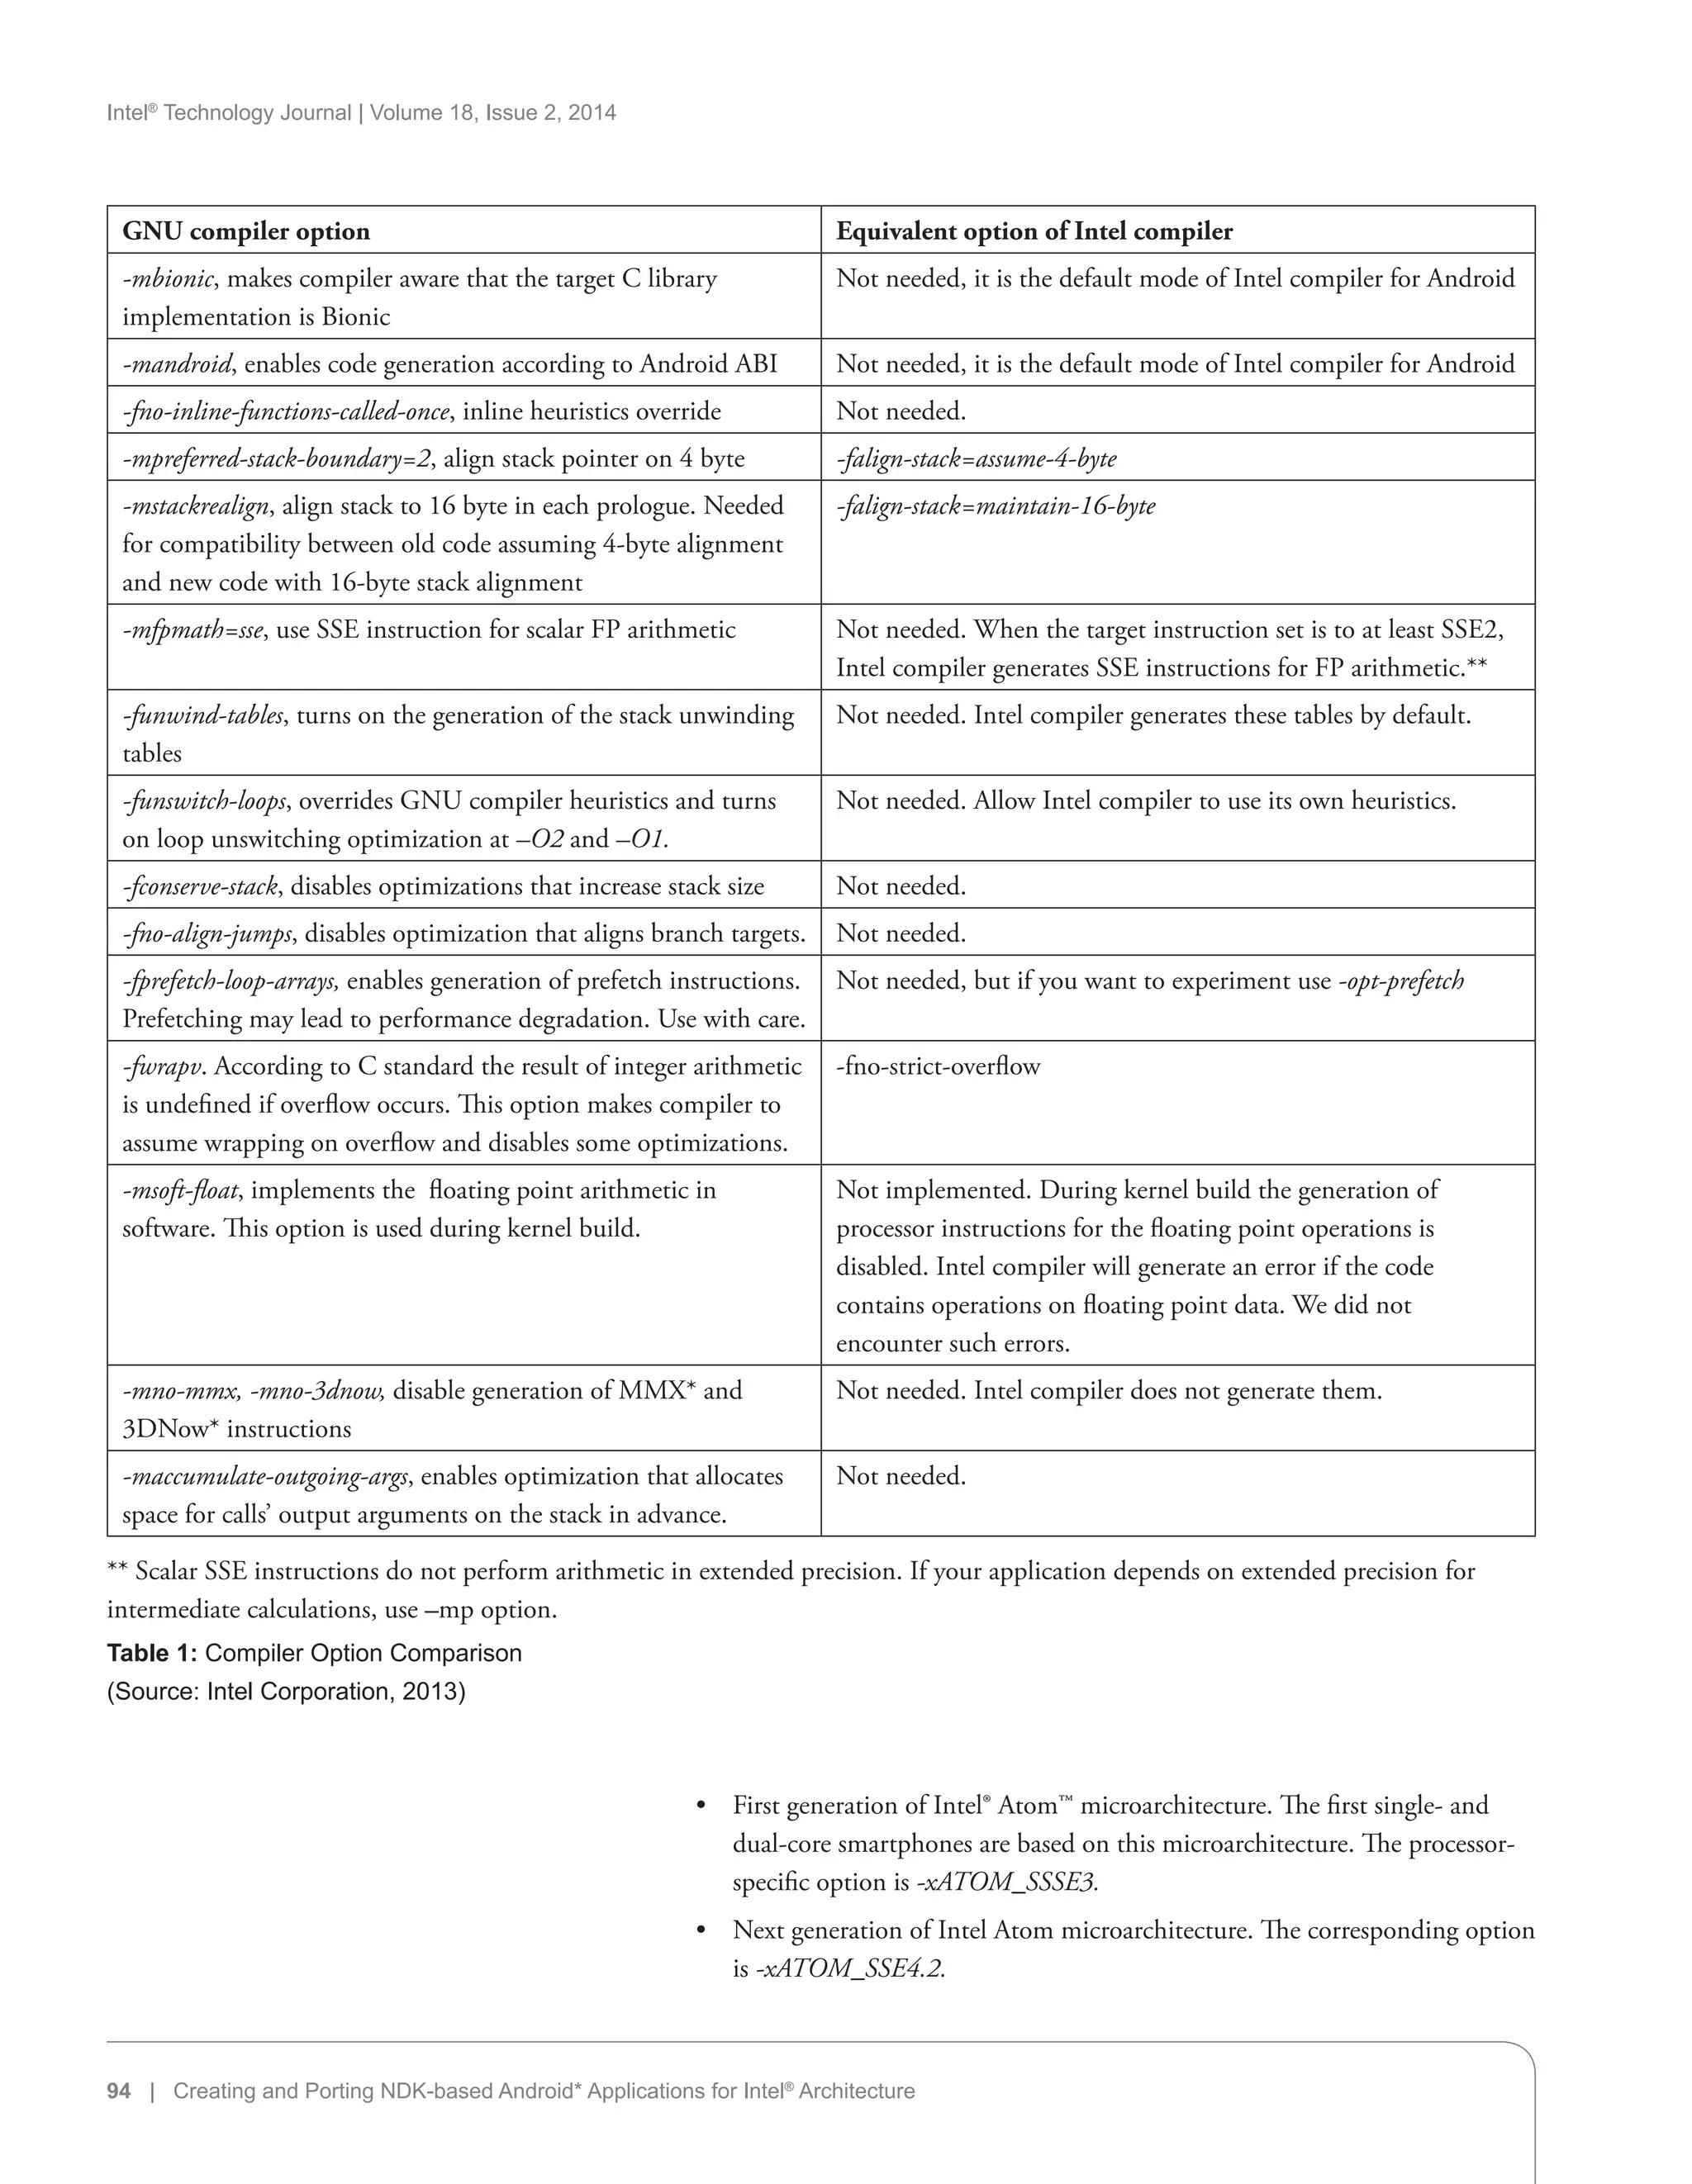


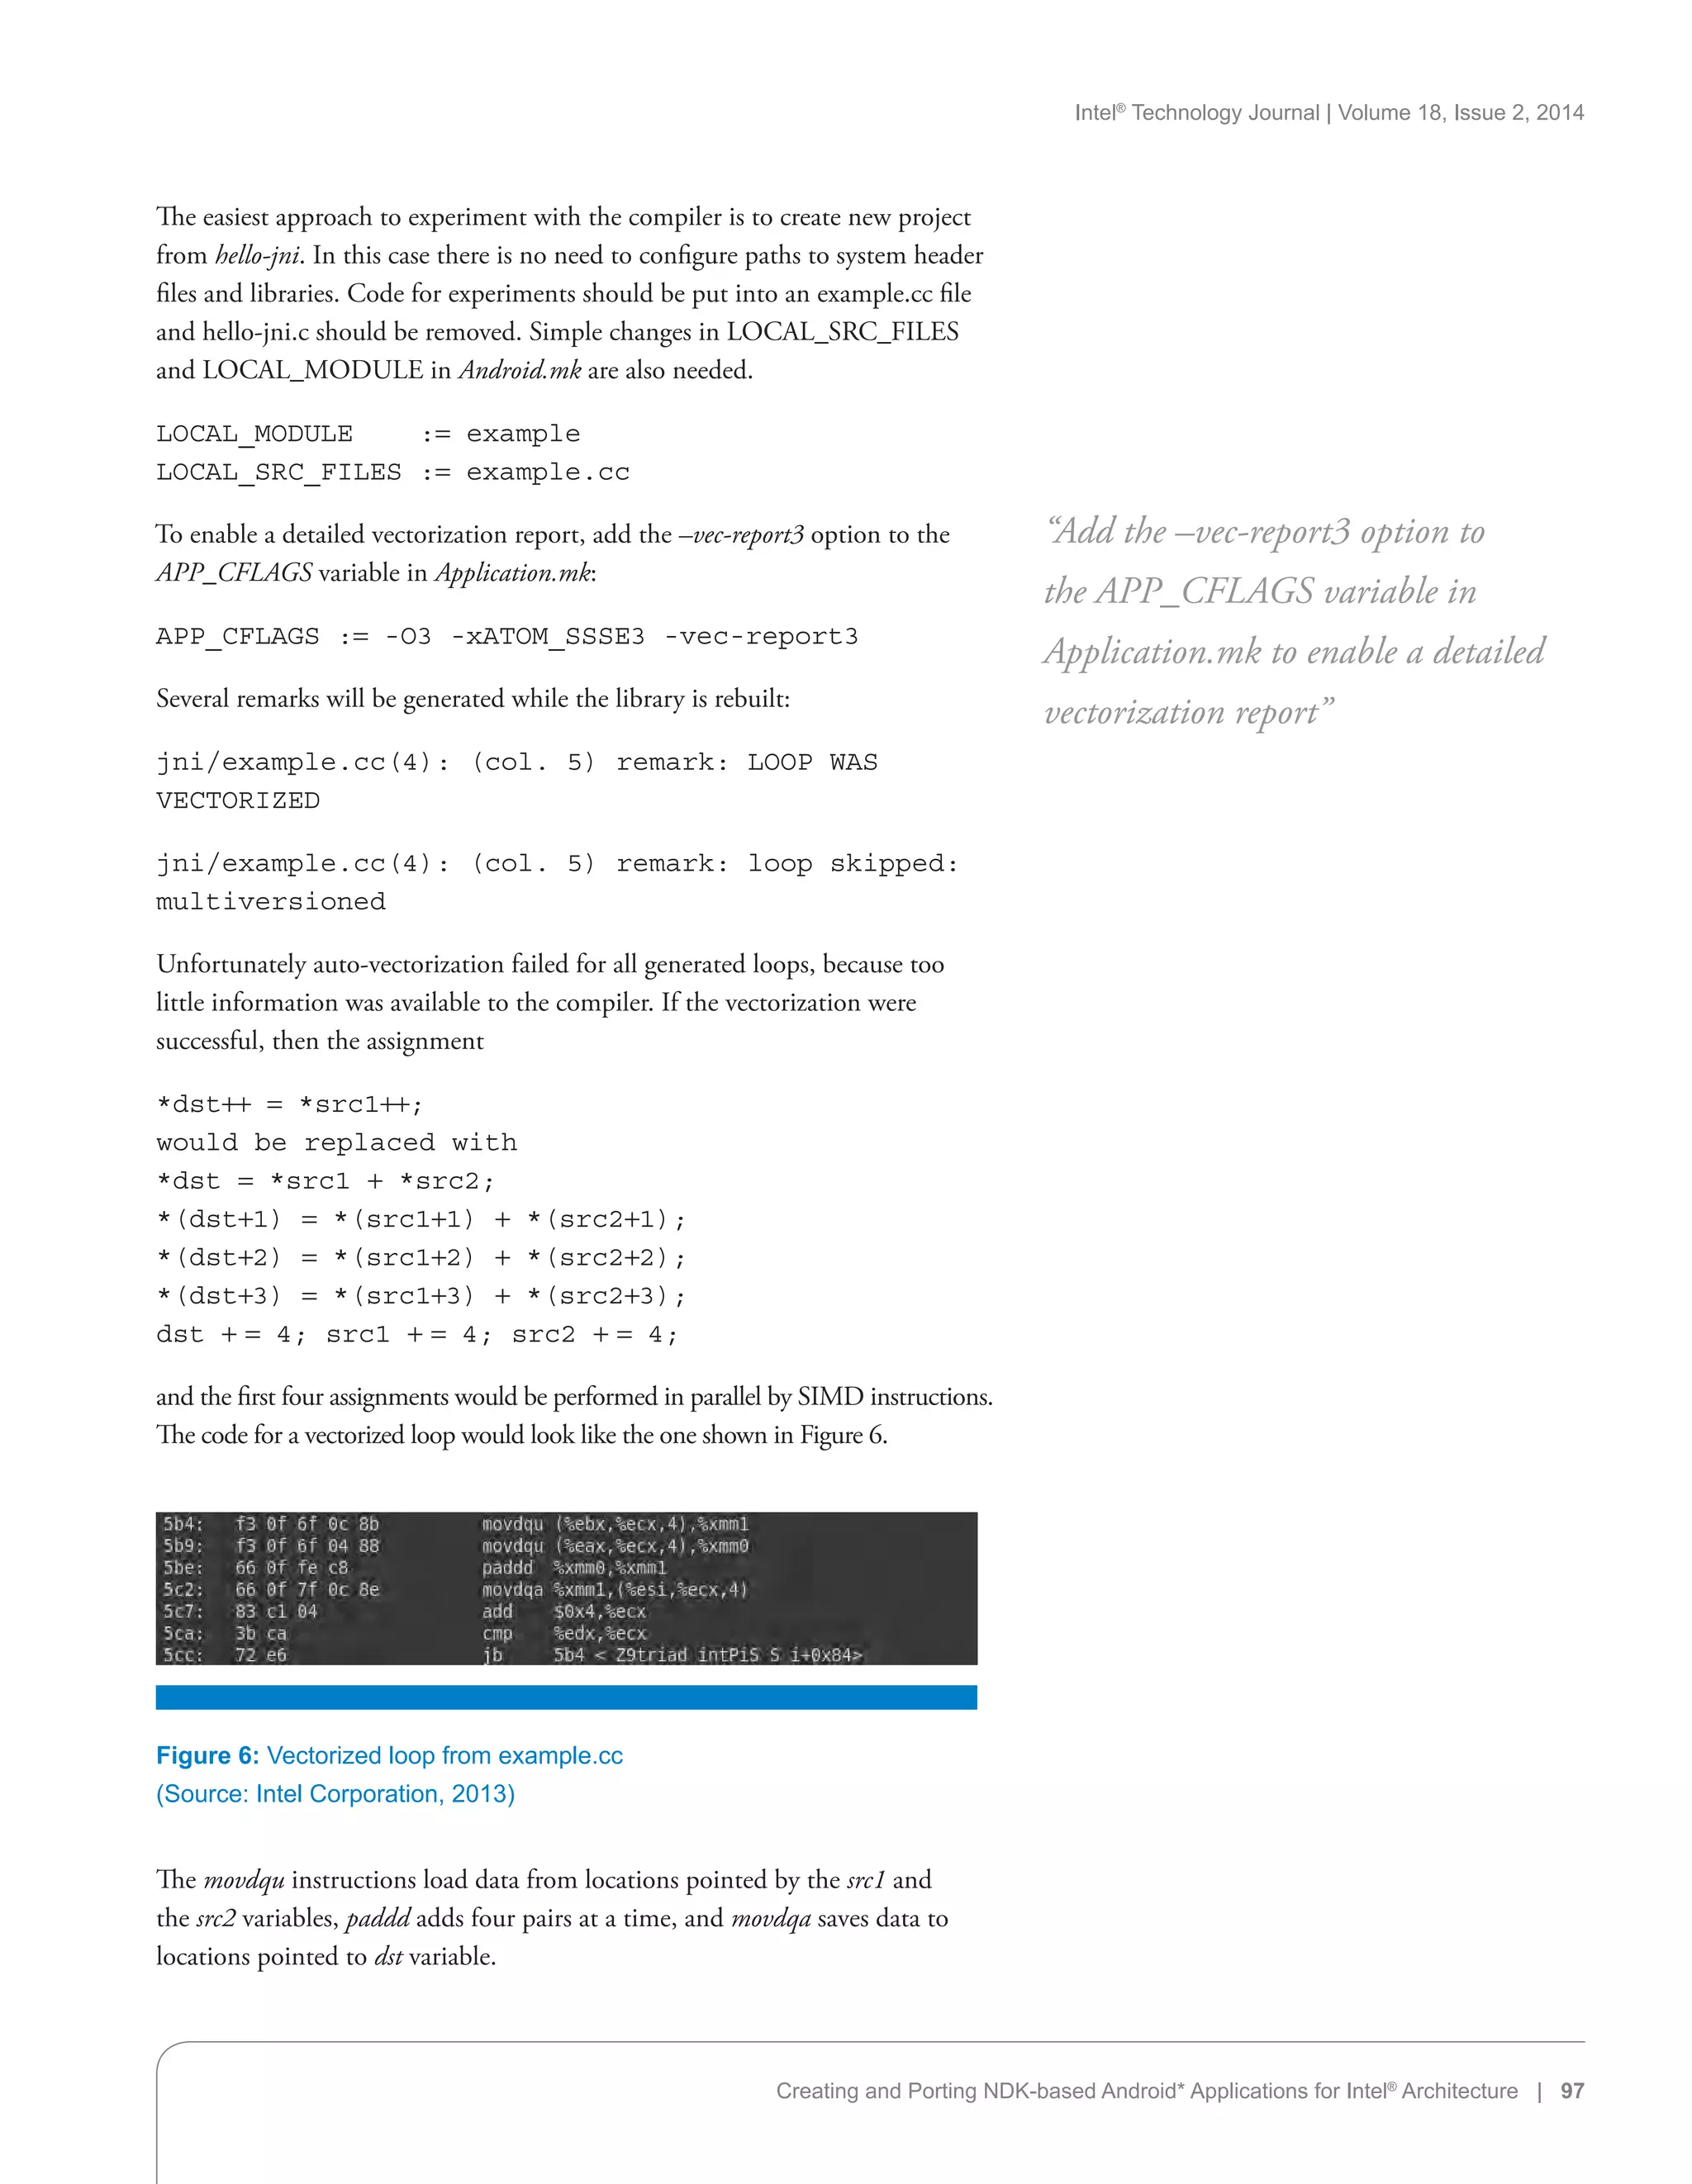

![Intel®
Technology Journal | Volume 18, Issue 2, 2014
Creating and Porting NDK-based Android* Applications for Intel®
Architecture | 103
JNI functions can use protected visibility if they are not subject for
preemption.
Parallelization Using Intel® Cilk™ Plus
Modern mobile platforms use multi-core CPUs where each core in its turn
supports vector instructions. Serialized code works well on these CPUs but
to effectively utilize the power of mobile x86 platforms a program may be
parallelized. Intel® Cilk™ Plus technology enables fine-grained parallelism in a
native code. This technology employs both SIMD instructions and multiple
cores of modern CPUs—it provides language extensions to control task and
data parallelism in C and C++ programs.
Task parallelism in Intel Cilk Plus is represented by a set of keywords
(_Cilk_spawn,_Cilk_sync and _Cilk_for)and reducers that eliminate contention
for shared data between the tasks running in parallel. Data parallelism is
represented by array notations that provide parallel work on sub-arrays or on
arrays as whole, elemental functions that can operate on multiple data at once,
and the simd pragma already discussed above. For detailed description of the
Intel Cilk Plus technology refer to compiler documentation or look for the
information on https://www.cilkplus.org/.
Consider the example loop we managed to vectorize when we learned the simd
pragma:
void triad_int(int *dst, int *src1, int *src2, int num)
{
#pragma simd
for (int i = 0; i num; i++) {
*dst++ = *src1++ + *src2++;
}
}
This loop does simple arithmetic operations. For such operations vectorization
works effectively by employing simd instructions. But what if our code does
something more sophisticated than numeric calculations? For example,
consider that we have a function doing some work on every array element:
void arr_work(int *arr, int num)
{
for (int i = 0; i num; i++) {
do_some_work(arr[num]);
}
}
This work can be effectively parallelized by using _Cilk_for loops:
void arr_work(int* arr, int num) {
int i;
_Cilk_for (i = 0; i num; i++) {
“Intel® Cilk™ Plus technology enables
fine-grained parallelism in a native
code.”](https://image.slidesharecdn.com/c1e98a76-6293-4a30-9873-abe8040257f9-160127191746/75/2014-vol18-iss-2-intel-technology-journal-103-2048.jpg)
![Intel®
Technology Journal | Volume 18, Issue 2, 2014
104 | Creating and Porting NDK-based Android* Applications for Intel®
Architecture
do_some_work(arr[num]);
}
}
In _Cilk_for loops the compiler converts the loop body to a function that is
called recursively using a divide-and-conquer strategy. Thus the work done on
loop iterations may be distributed on several available threads and finally on
several available cores. This approach gives significantly better performance on
multi-core platforms.
Programming using Intel Cilk Plus on Android is in large part similar to
programming on Linux or Windows*, though some peculiarities still exist. The
Intel Cilk Plus runtime library requires a Standard C++ Library implementation
to work on a target platform. Android has several implementations available
to a user and only some of them may work with Intel Cilk Plus: gnustl_shared,
gnustl_static and stlport_shared. Other implementations do not provide required
functionality and are not supported with Intel Cilk Plus; static linking is not
recommended by Google and we do not specifically support the stlport_static
standard library implementation. If the remaining code of your application does
not require standard C++ library, we recommend using gnustl_static library. In
this case no additional dependency on a shared library is introduced.
There is no static implementation of the Intel Cilk Plus library. If you’re curious
why this is so, the reasons are explained in detail here: https://www
.cilkplus.org/faq/there-version-intel-cilk-plus-provides-statically-linked-
libraries. For Android development with JNI that means the application must
load the Intel Cilk Plus library:
System.loadLibrary(cilkrts);
Since the default system STL implementation in the Android NDK is not
compatible with Intel Cilk Plus, you have to redefine the default STL library
when using Intel Cilk Plus and use it consistently across the program. The STL
implementation that should be used in the program can be specified by the
APP_STL parameter in the Application.mk file:
APP_STL:=gnustl_static
Starting from the Intel Compiler for Android version 14.0, Intel Cilk Plus
libraries are linked automatically if a compatible C++ library implementation is
specified for the application.
The NDK build system does not link C++ libraries for modules written in C;
as a result, the compiler cannot choose the correct Intel Cilk Plus library during
linking and there could be linking errors. Add an empty C++ file to the project
to force standard C++ library linking and rebuild the application.
ndk-build -B APP_OPTIM=release
NDK_TOOLCHAIN_VERSION=icc V=1
APP_ABI=x86 APP_STL:=gnustl_static
“Programming using Intel Cilk
Plus on Android is in large part
similar to programming on Linux or
Windows*,…”
“Intel Cilk Plus libraries are linked
automatically if a compatible C++
library implementation is specified for
the application.”](https://image.slidesharecdn.com/c1e98a76-6293-4a30-9873-abe8040257f9-160127191746/75/2014-vol18-iss-2-intel-technology-journal-104-2048.jpg)


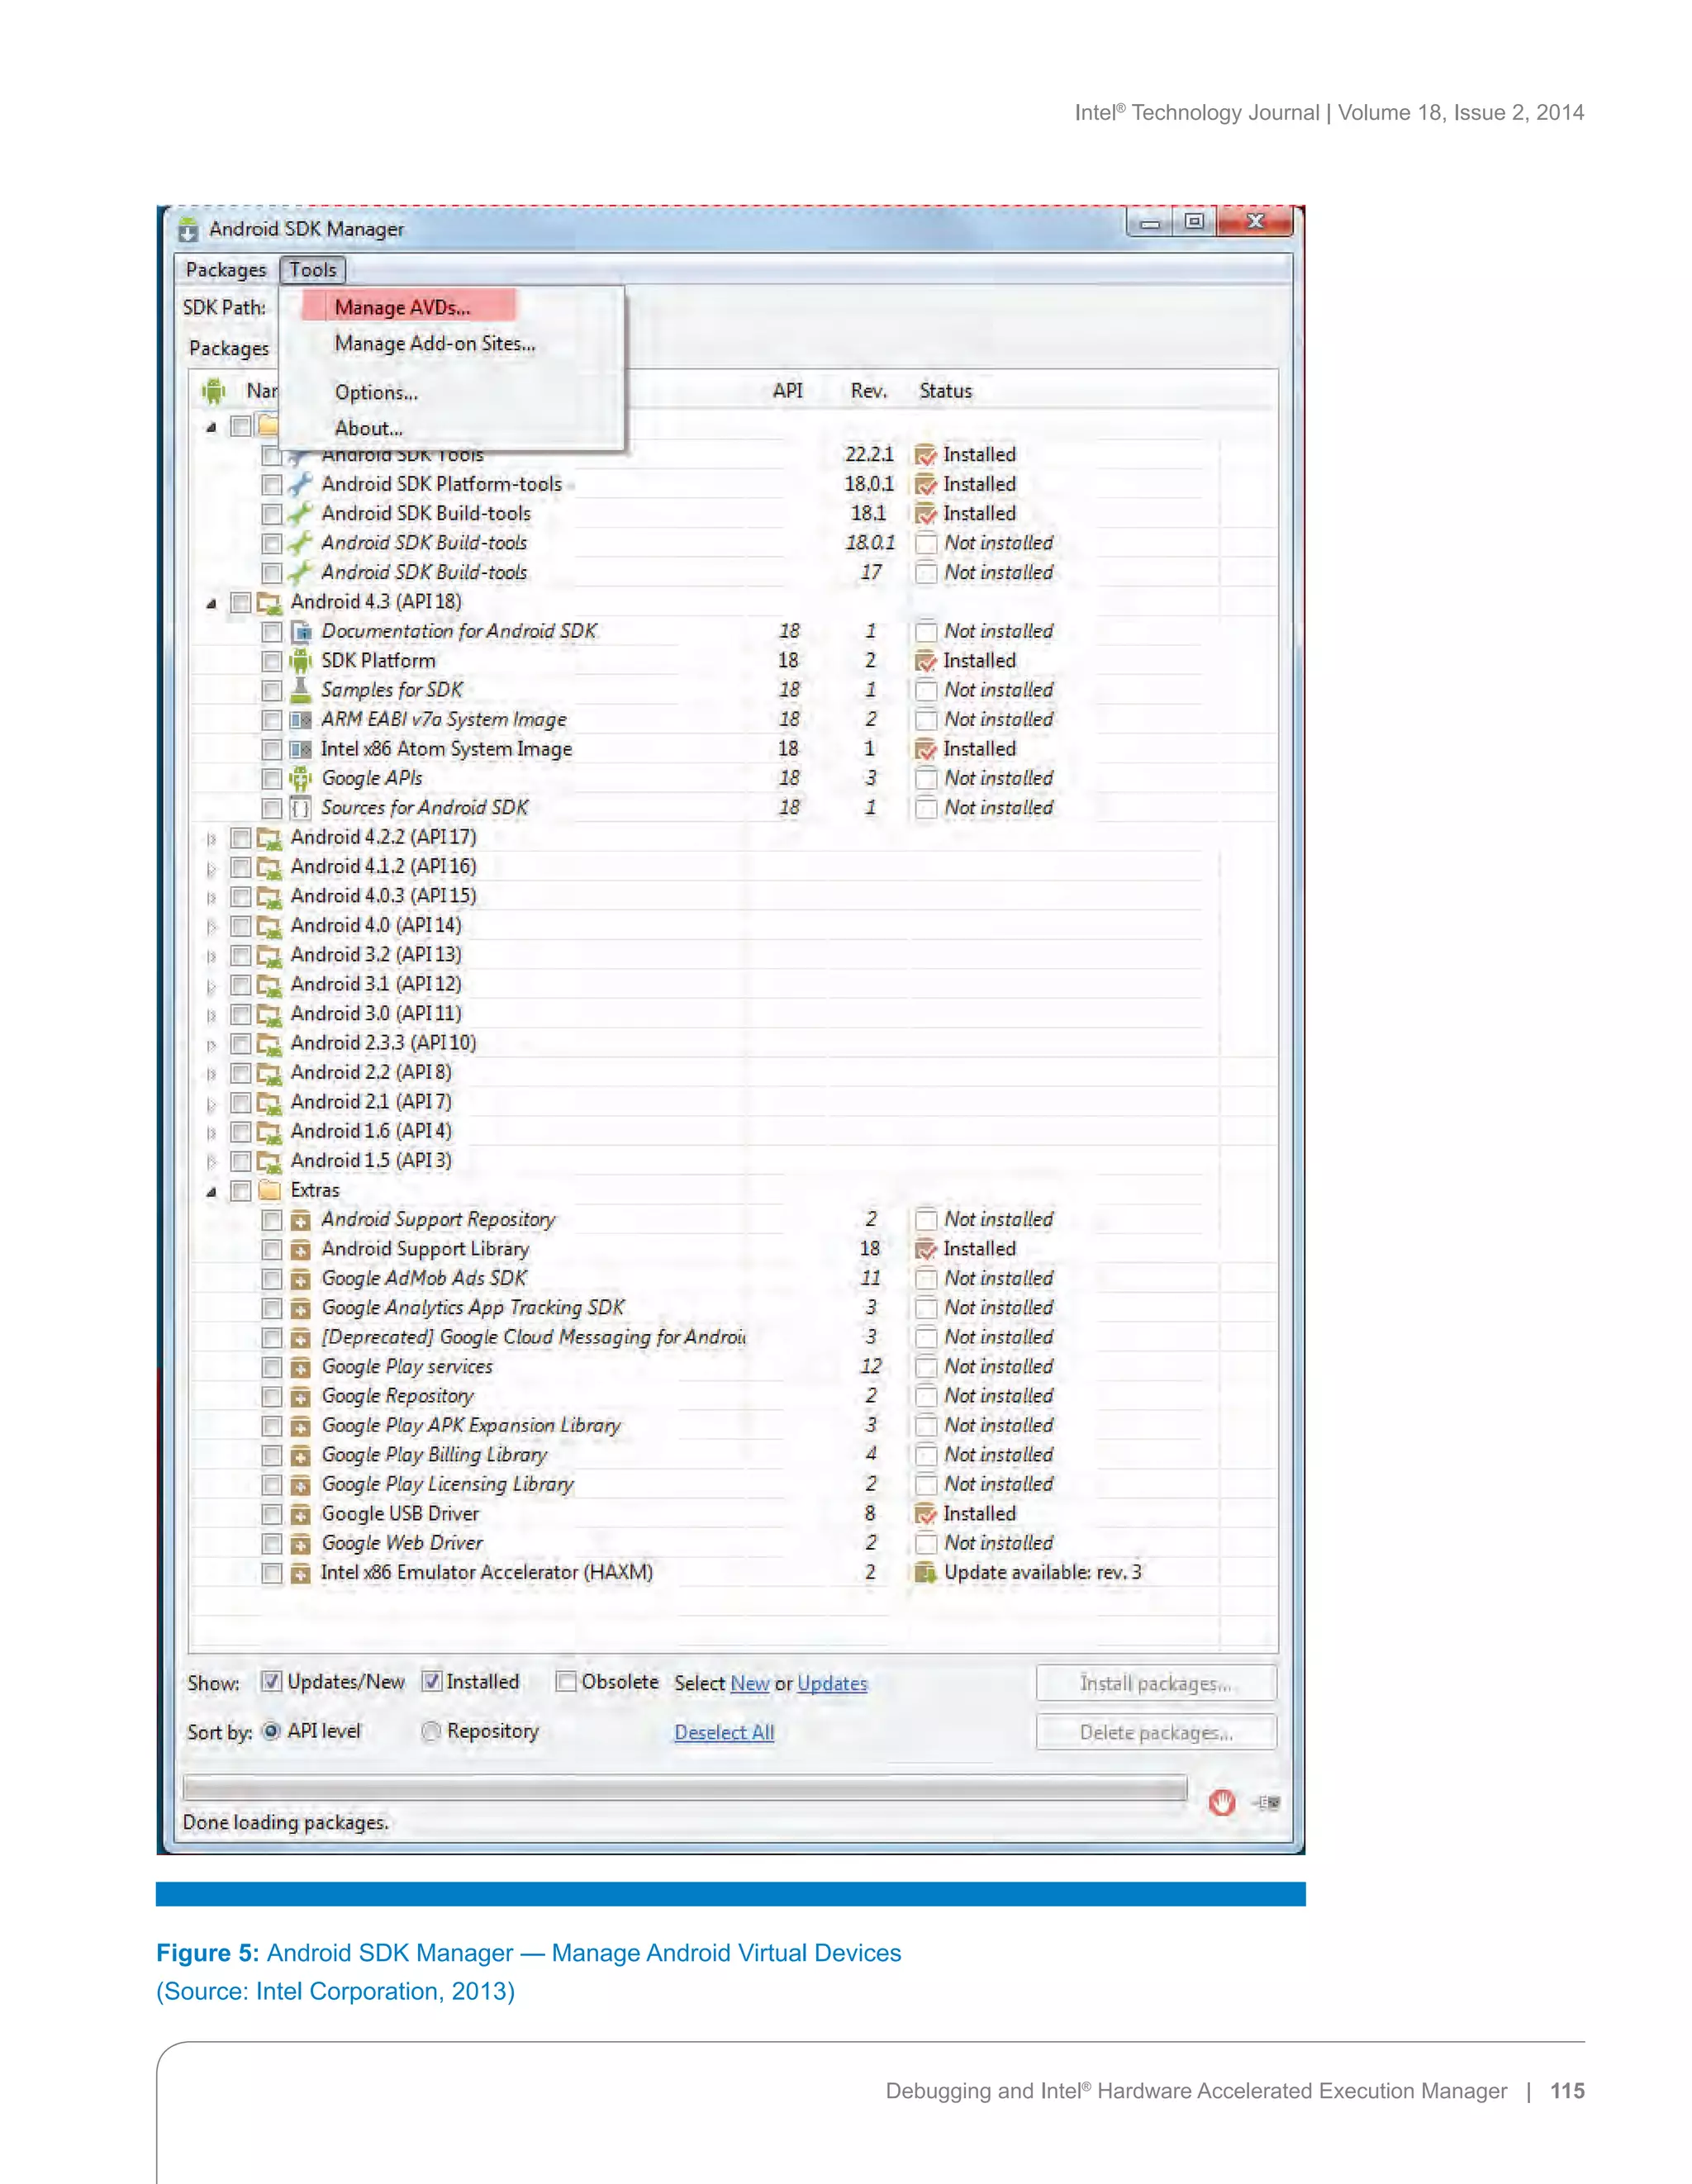
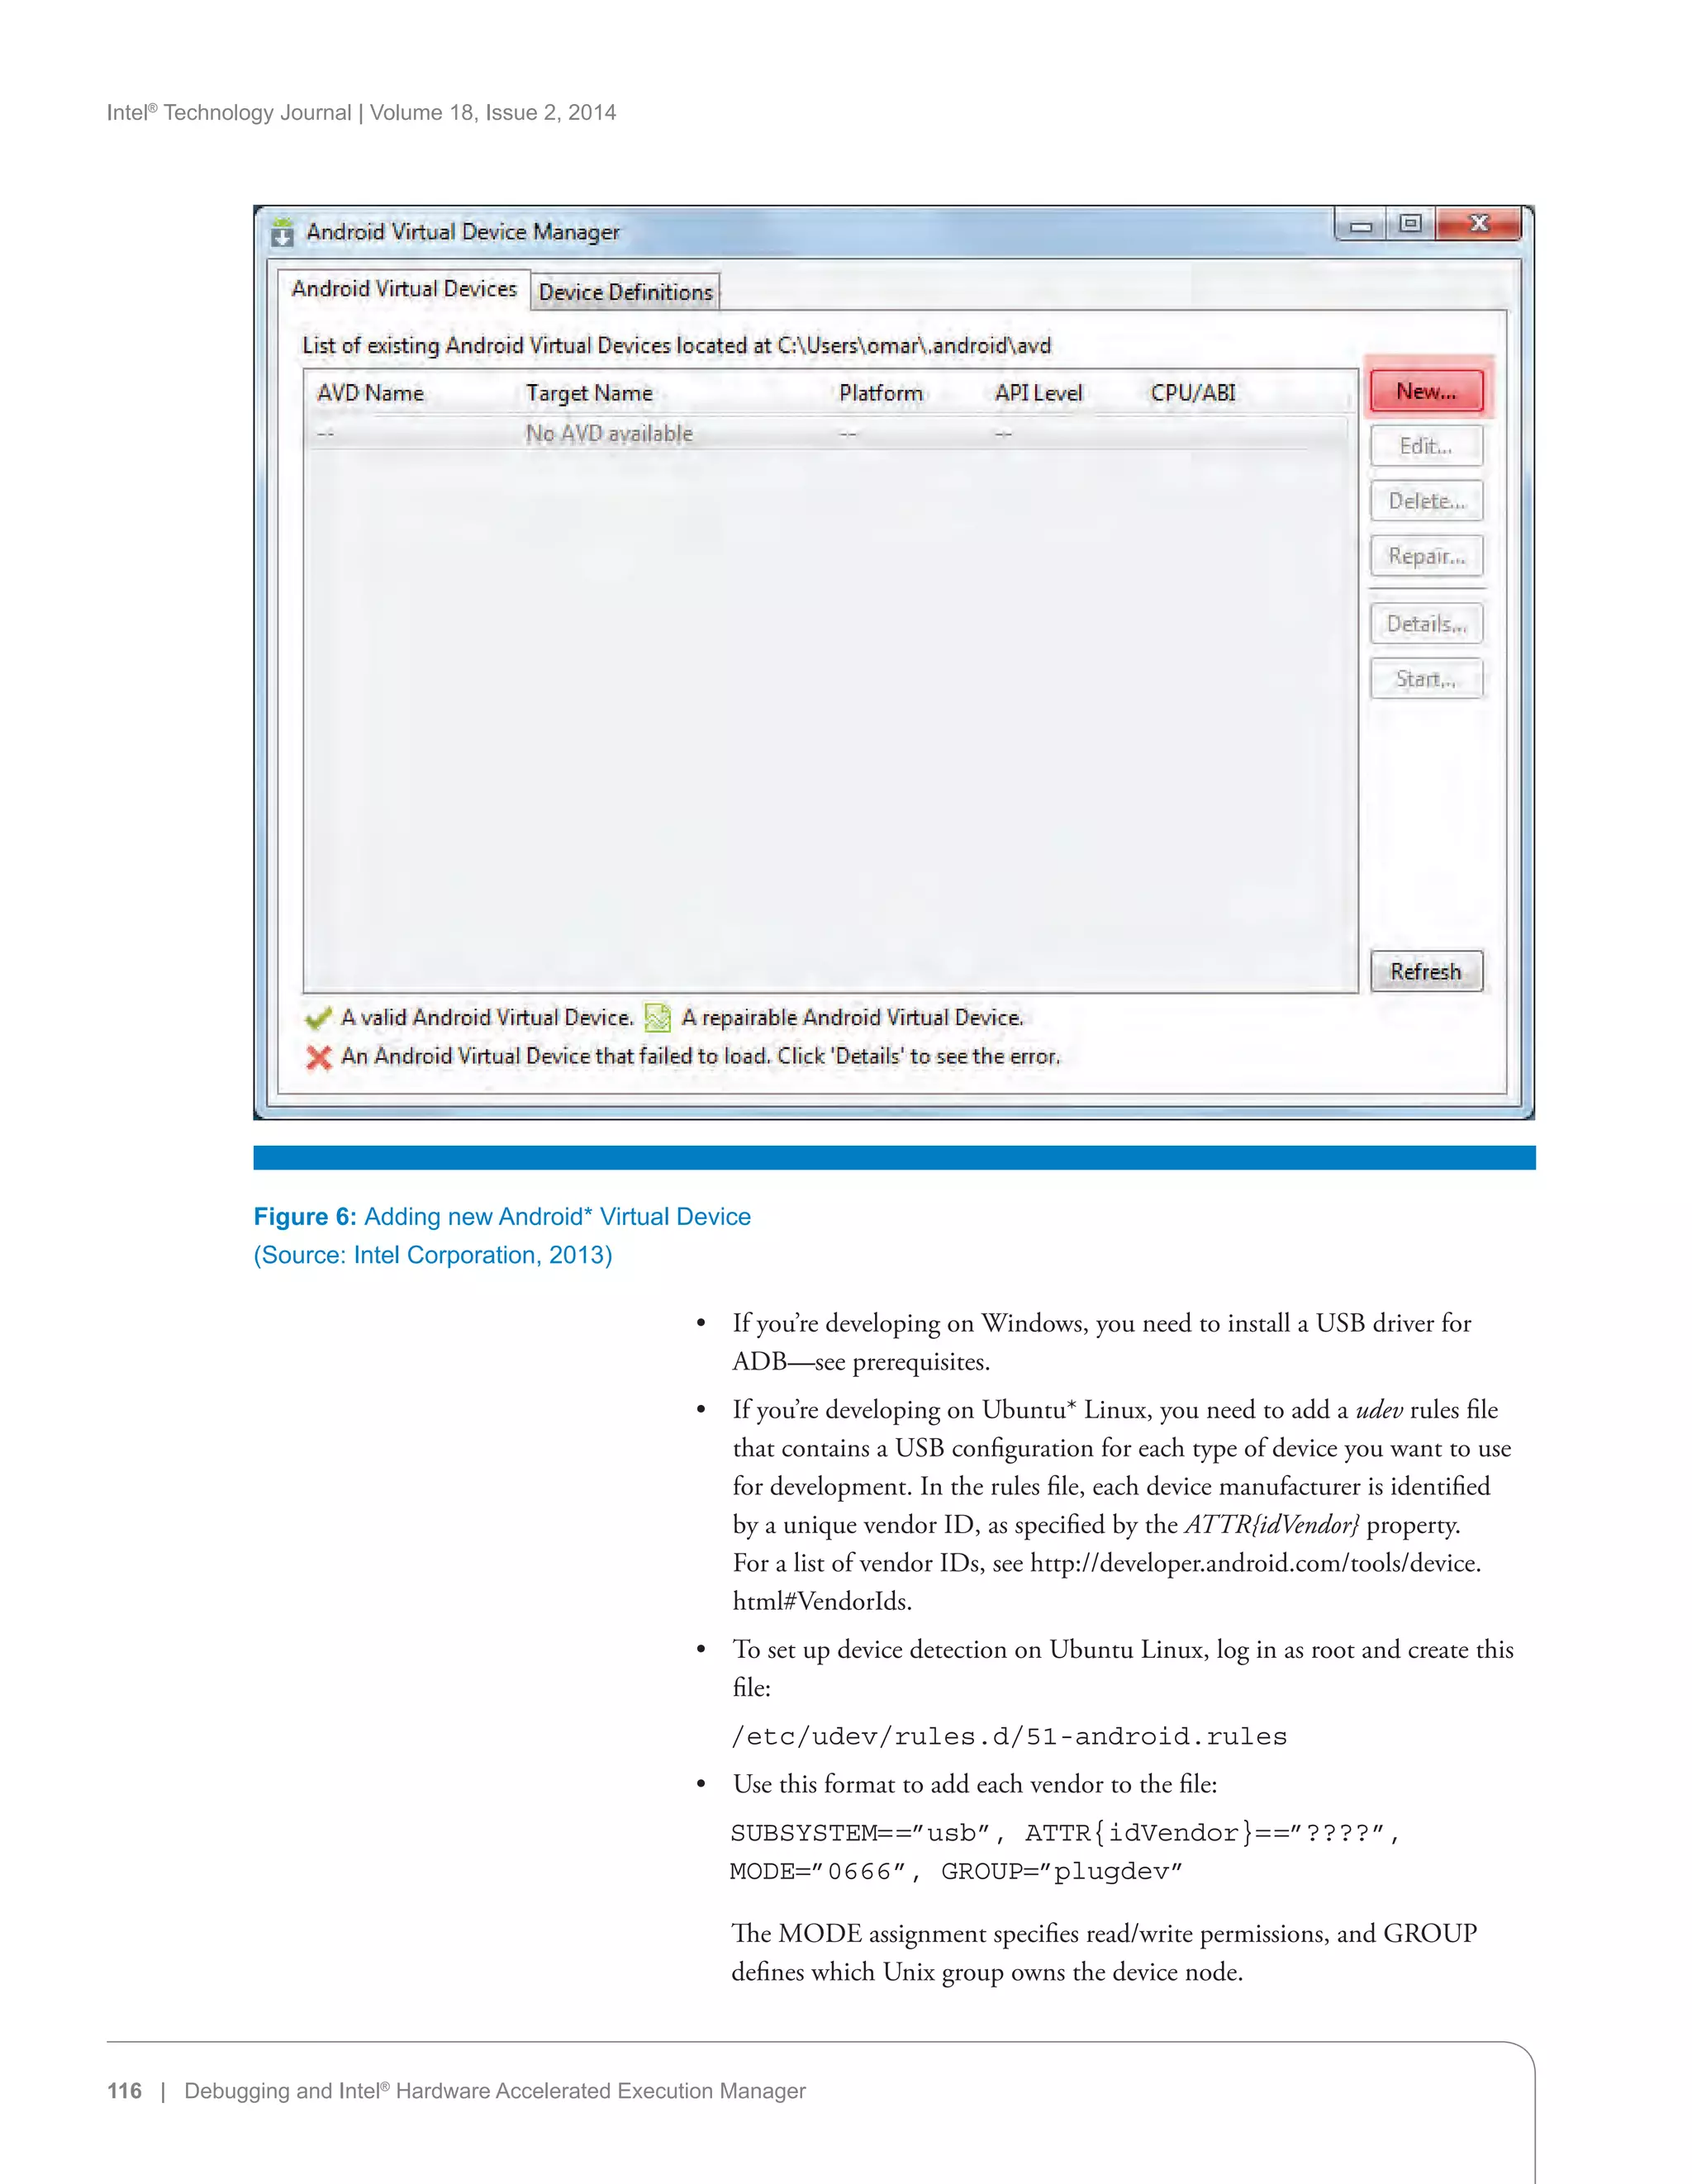


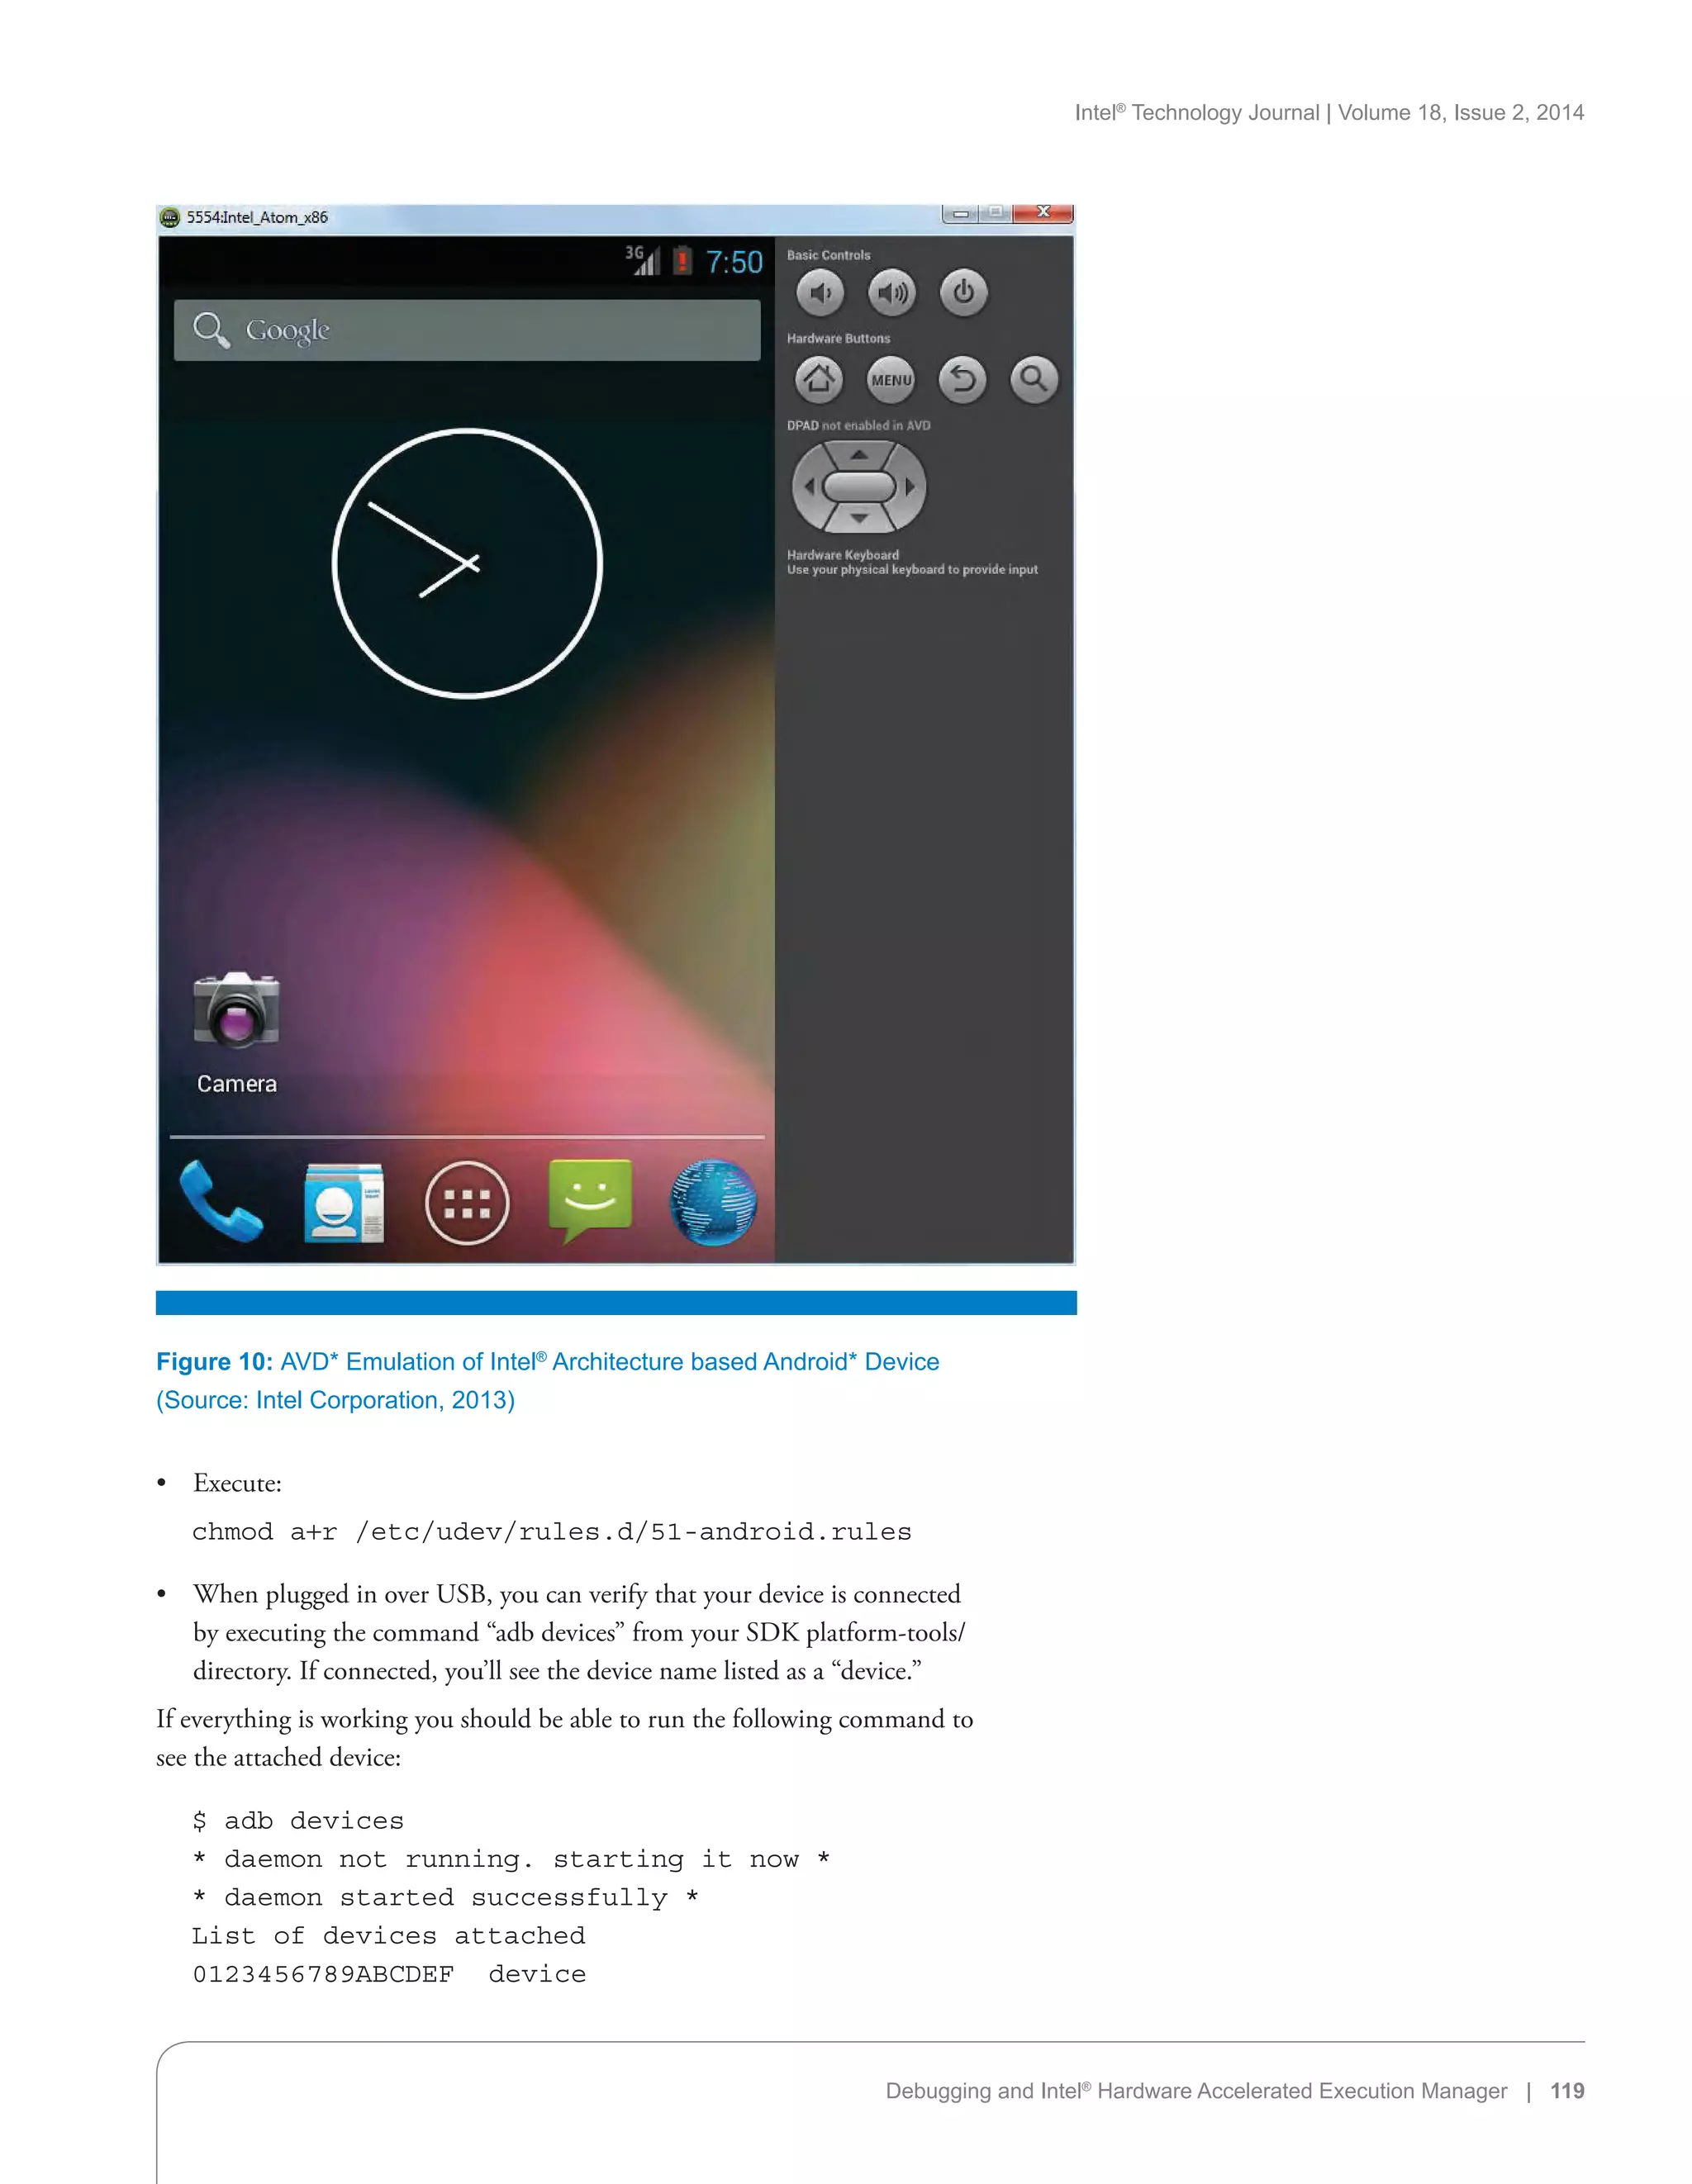

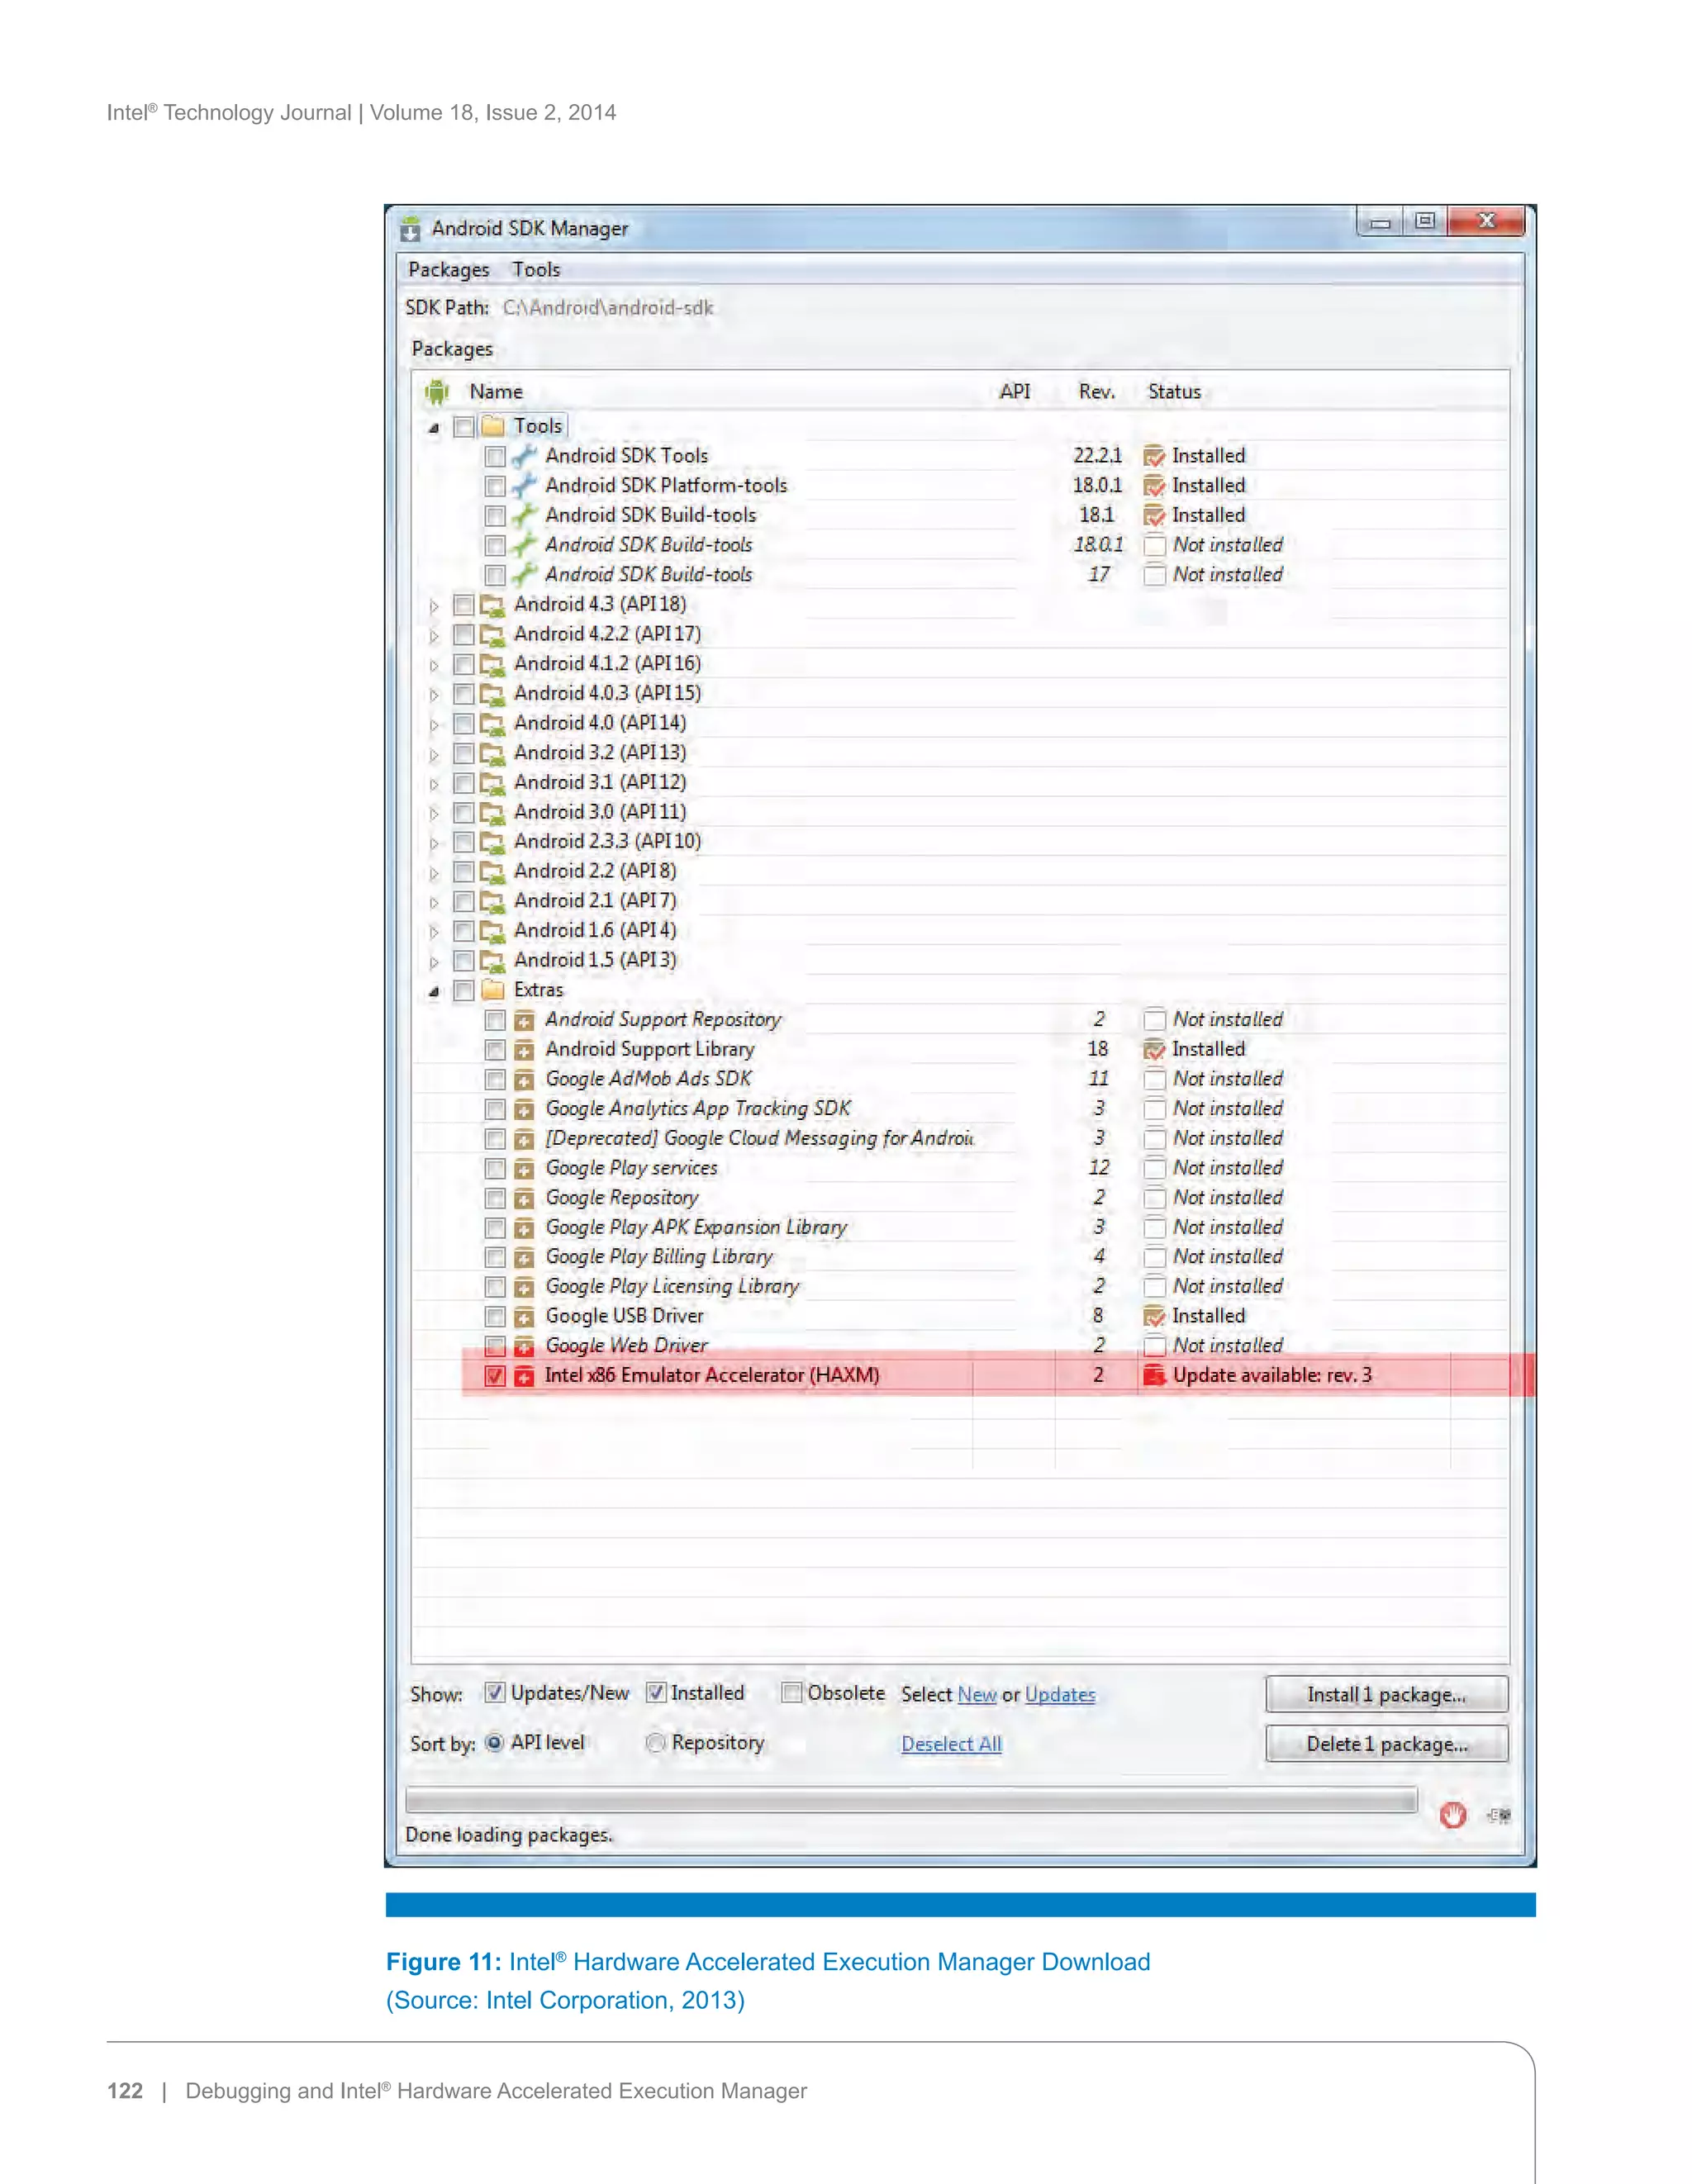


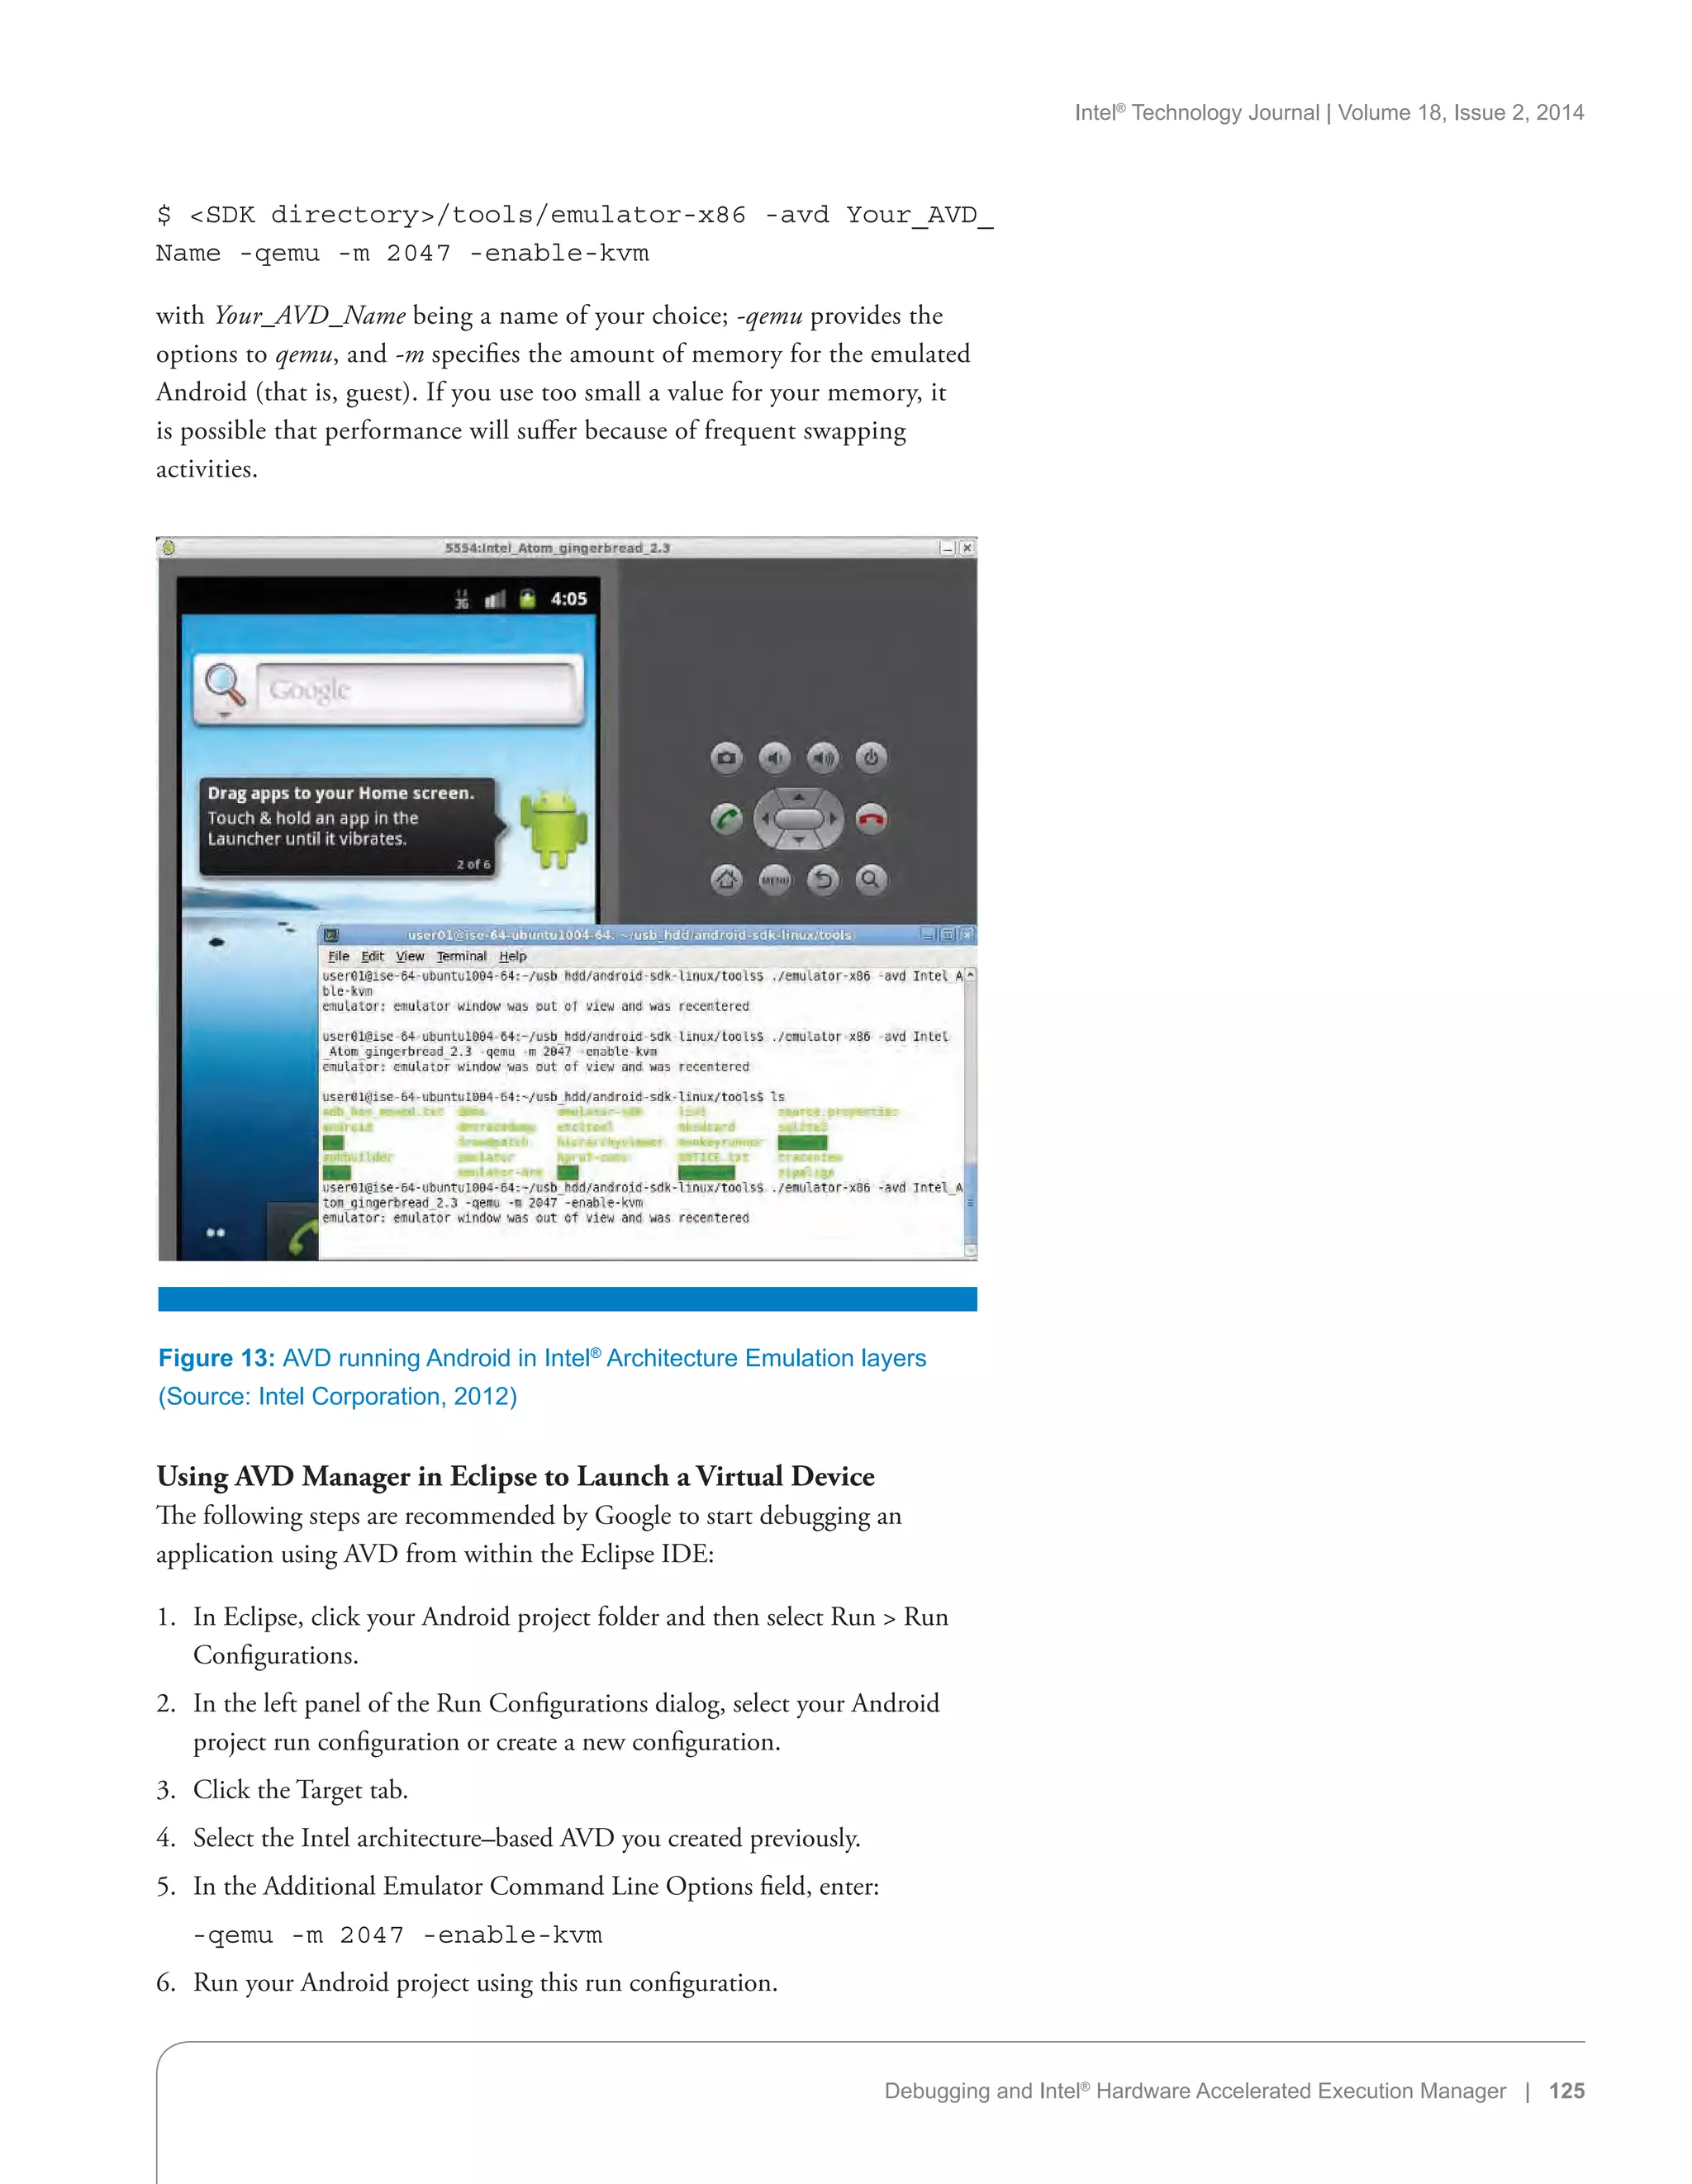
![Intel®
Technology Journal | Volume 18, Issue 2, 2014
126 | Debugging and Intel®
Hardware Accelerated Execution Manager
Debugging with GDB, the GNU Project Debugger
The Android NDK includes the GNU debugger (GDB), which allows you
to start, pause, examine, and alter a program. On Android devices and more
generally on embedded devices, GDB is configured in client/server mode.
The program runs on a device as a server and a remote client. The developer’s
workstation connects to it and sends debugging commands similar to a local
application. GDB itself is a command-line utility. Let us first look at its basic
usage model before looking at the Eclipse CDT integration as well.
When debugging with GDB, gdbserver running on the device is used to
handle debug communication, but you may still be using a an underlying
USB-to-Ethernet dongle driver with ADB to handle to communication
transport layer on which gdbserver communicates via TCP/IP with GDB
running on the development host.
There is a gdbclient application that sets up the debug communication
environment and launches gdbserver on the debuggee device.
usage: gdbclient EXECUTABLE :PORT [PROG_PATH]
EXECUTABLE executable name (default app_process)
PORT connection port (default :1234)
PROG_PATH executable full path on target (ex /
system/bin/mediaserver)
If PROG_PATH is set, gdclient tries to launch gdbserver and attach it to the
running PROG_PATH.
To launch gdbserver explicitly, the following command can be used:
# gdbserver :1234 --attach 269
Attached; pid = 269
Listening on port 1234
The step-by-step debug session launch instructions below illustrate how ADB
is still underlying the debug communication even if GDB and not ADT or
DDMS are used for debug. Let us assume that port 1234 is being used.
Launch process:
gdbserver :1234 /system/bin/executable
or attach to an existing process:
gdbserver :1234 --attach pid
On your workstation, forward port 1234 to the device with adb:
adb forward tcp:1234 tcp:1234
Start a special version of gdb that lives in the “prebuilt” area of the source tree:
prebuilt/Linux/toolchain-eabi-4.x.x/bin/i686-
android-linux-gdb (for Linux)
prebuilt/darwin-x86/toolchain-eabi-4.x.x/bin/i686-
android-linux-gdb (for Darwin)](https://image.slidesharecdn.com/c1e98a76-6293-4a30-9873-abe8040257f9-160127191746/75/2014-vol18-iss-2-intel-technology-journal-126-2048.jpg)


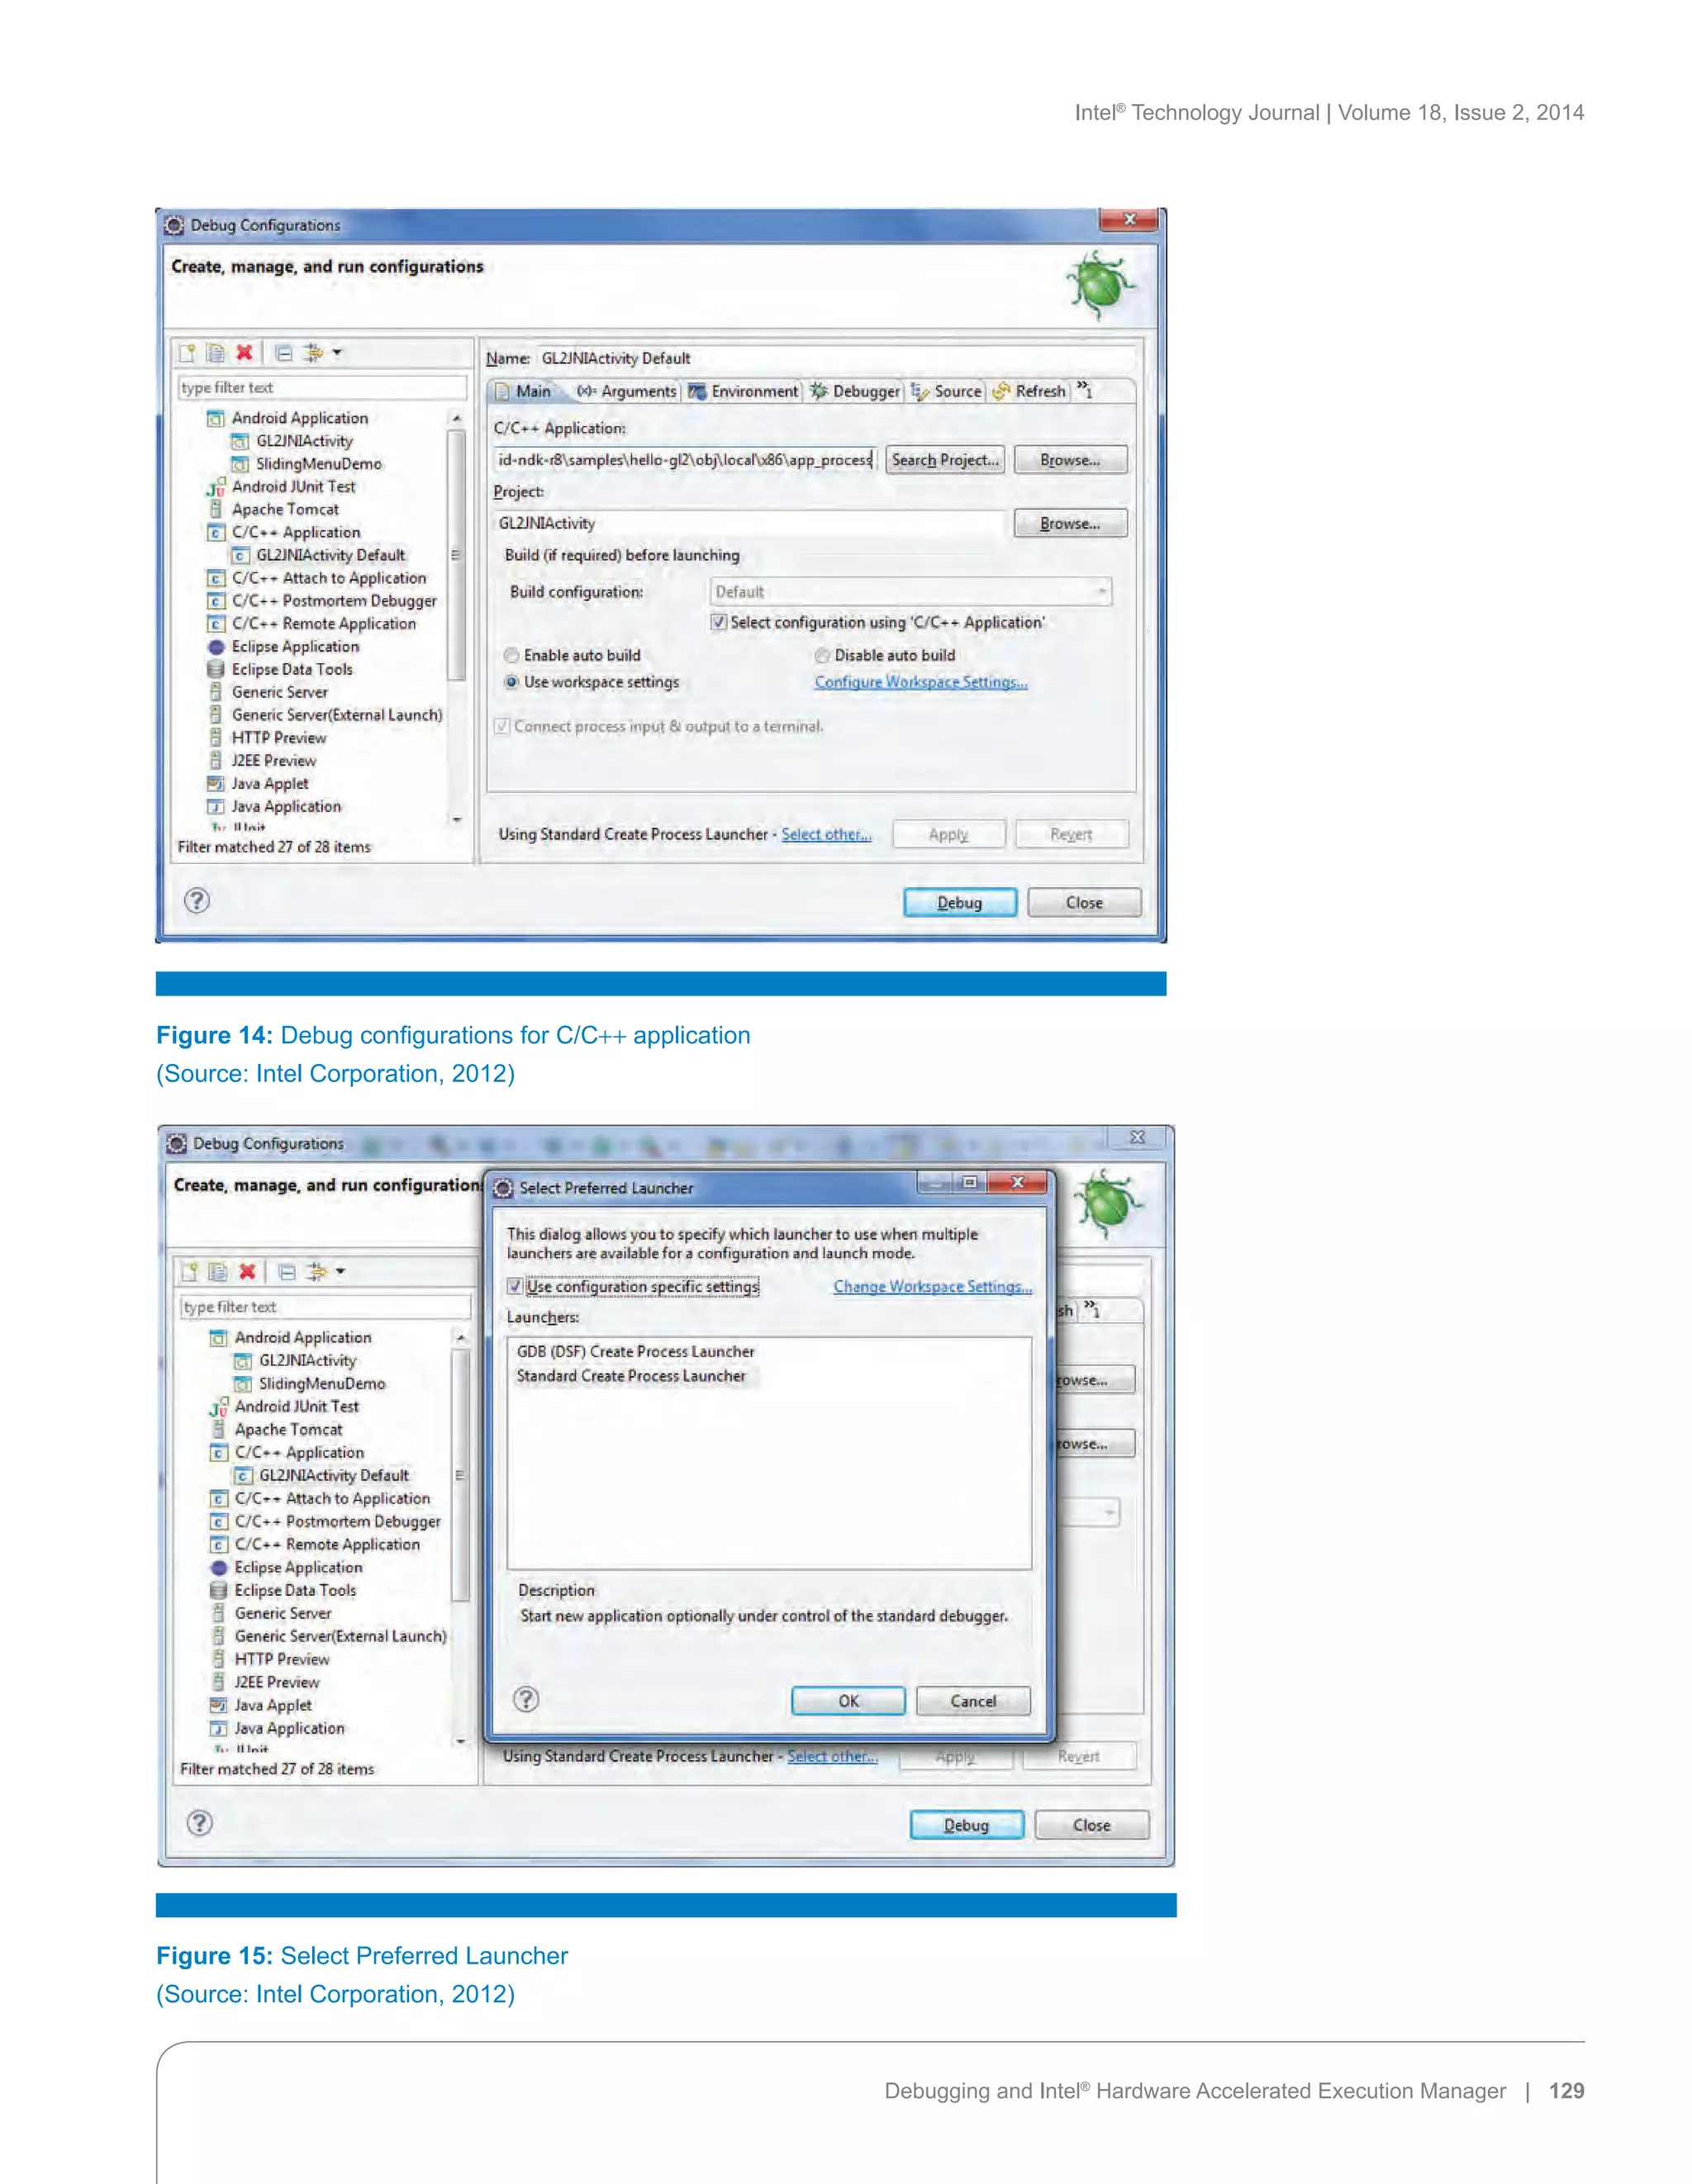


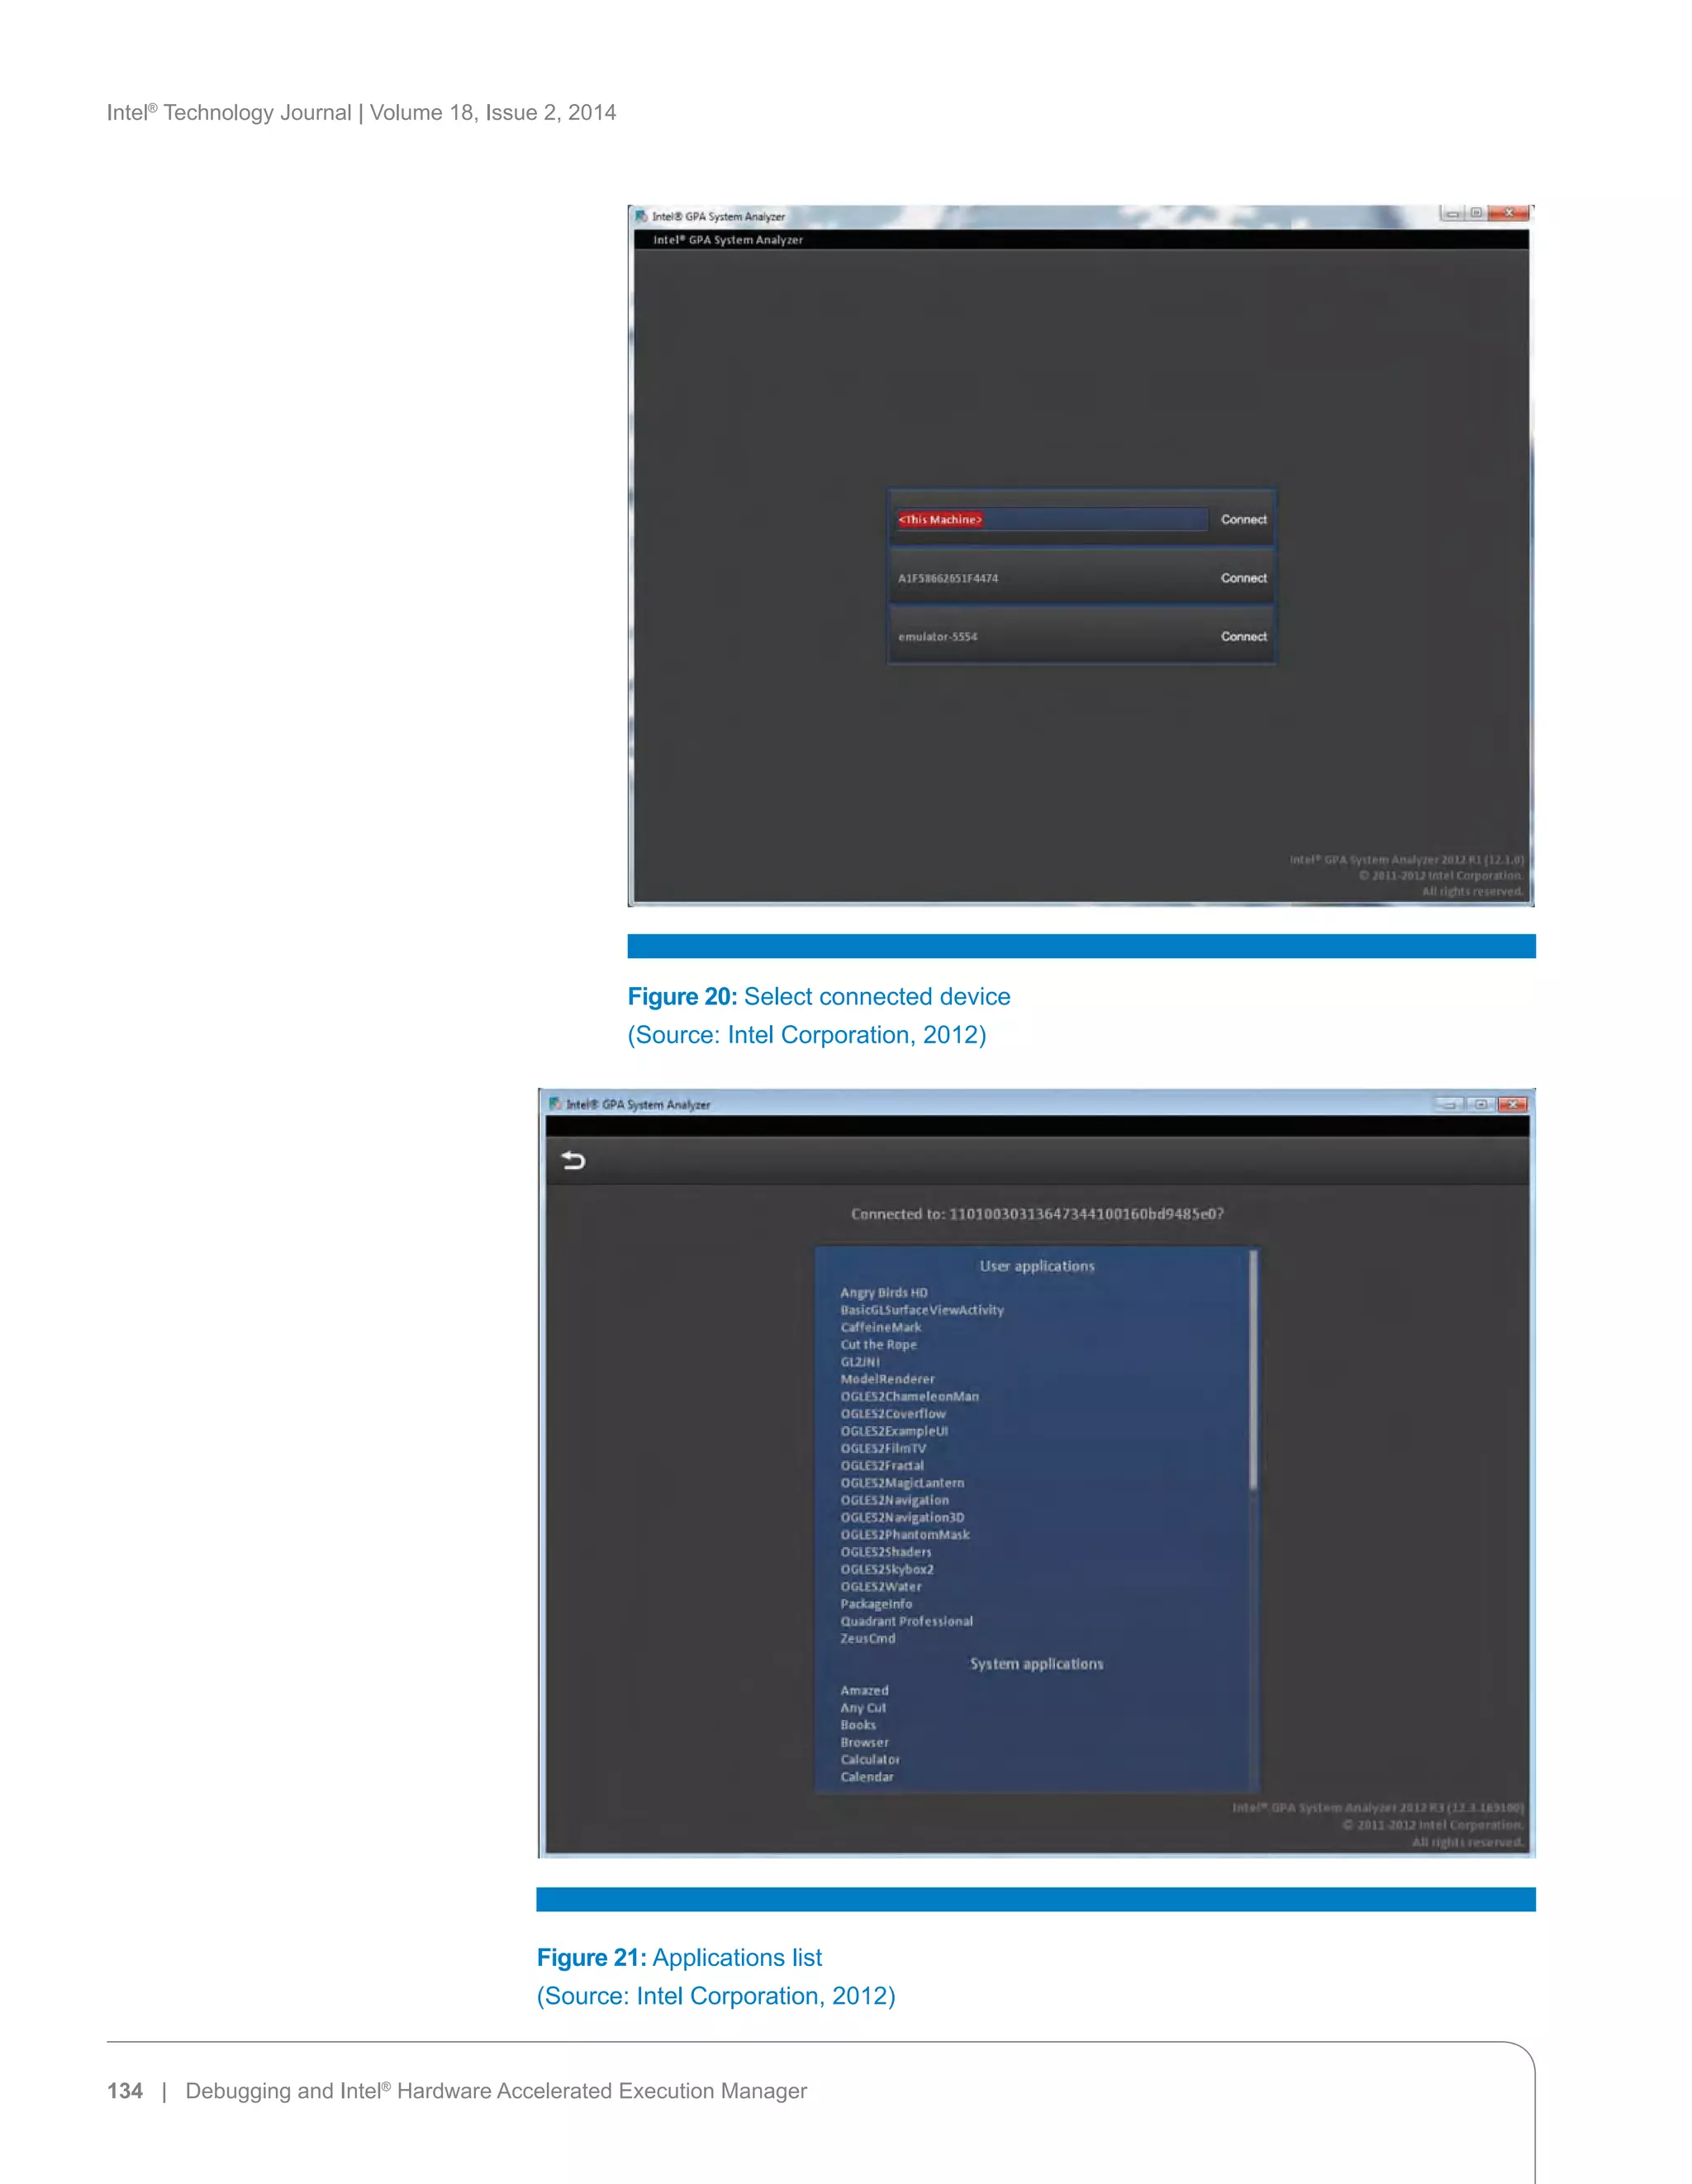

![Intel®
Technology Journal | Volume 18, Issue 2, 2014
136 | Debugging and Intel®
Hardware Accelerated Execution Manager
JTAG Debugging
For true firmware, OS level system and device driver debug, using a JTAG
interface is the most commonly used method in the embedded intelligent
systems world. The Joint Test Action Group (JTAG) IEEE 1149.1 standard
defines a “Standard Test Access Port and Boundary-Scan Architecture for test
access ports used for testing printed circuit boards.” This standard is commonly
simply referred to as the JTAG debug interface. From its beginnings as a
standard for circuit board testing it has developed into the de facto interface
standard for OS independent and OS system level platform debug.
More background information on JTAG and its usage in modern system
software stack debugging is available in an article by Randy Johnson and
Stewart Christie.[6]
From the OEM’s perspective and that of their partner application and driver
developers, understanding the interaction between the driver and software
stack components running on the different parts of the system-on-chip (SoC)
integrated intelligent system or smartphone form factor device is critical for
determining platform stability. From a silicon validator’s perspective, the low
level software stack provides the test environment that exposes the kind of
stress factors the platform will be exposed to in real-world use cases. In short,
modern SoCs require understanding the complete package and its complex
real-world interactions, not just positive unit test results for individual
hardware components. This is the level of insight a JTAG-based system
software debug approach can provide. This can be achieved by merging the in-
depth hardware awareness JTAG inherently provides with the ability to export
state information of the Android OS running on the target.
Especially for device driver debug, it is important to understand both the exact
state of the peripheral device on the chipset and the interaction of the device
driver with the OS layer and the rest of the software stack.
If you are looking at Android from the perspective of system debugging,
looking at device drivers and the OS kernel, it is really just a specialized branch
of Linux. Thus it can be treated like any 2.6.3x or higher Linux.
The Intel® Atom™ Processor Z2460 supports IEEE-1149.1 and IEEE-1149.7
(JTAG) Boundary Scan and MPI Parallel Trace Interface (PTI) as well as
Branch Trace Storage (BTS) based instruction tracing through Intel’s JTAG-
compliant eXtended Debug Port (XDP).
Various JTAG vendors offer system debug solutions with Android support
including:
•• Wind River (http://www.windriver.com/products/JTAG-debugging/)
•• Lauterbach (http://www.lauterbach.com)
•• Intel (http://software.intel.com/en-us/articles/embedded-development-
tools/)
“…for device driver debug, it is
important to understand both the
exact state of the peripheral device on
the chipset and the interaction of the
device driver with the OS layer and
the rest of the software stack.”](https://image.slidesharecdn.com/c1e98a76-6293-4a30-9873-abe8040257f9-160127191746/75/2014-vol18-iss-2-intel-technology-journal-136-2048.jpg)
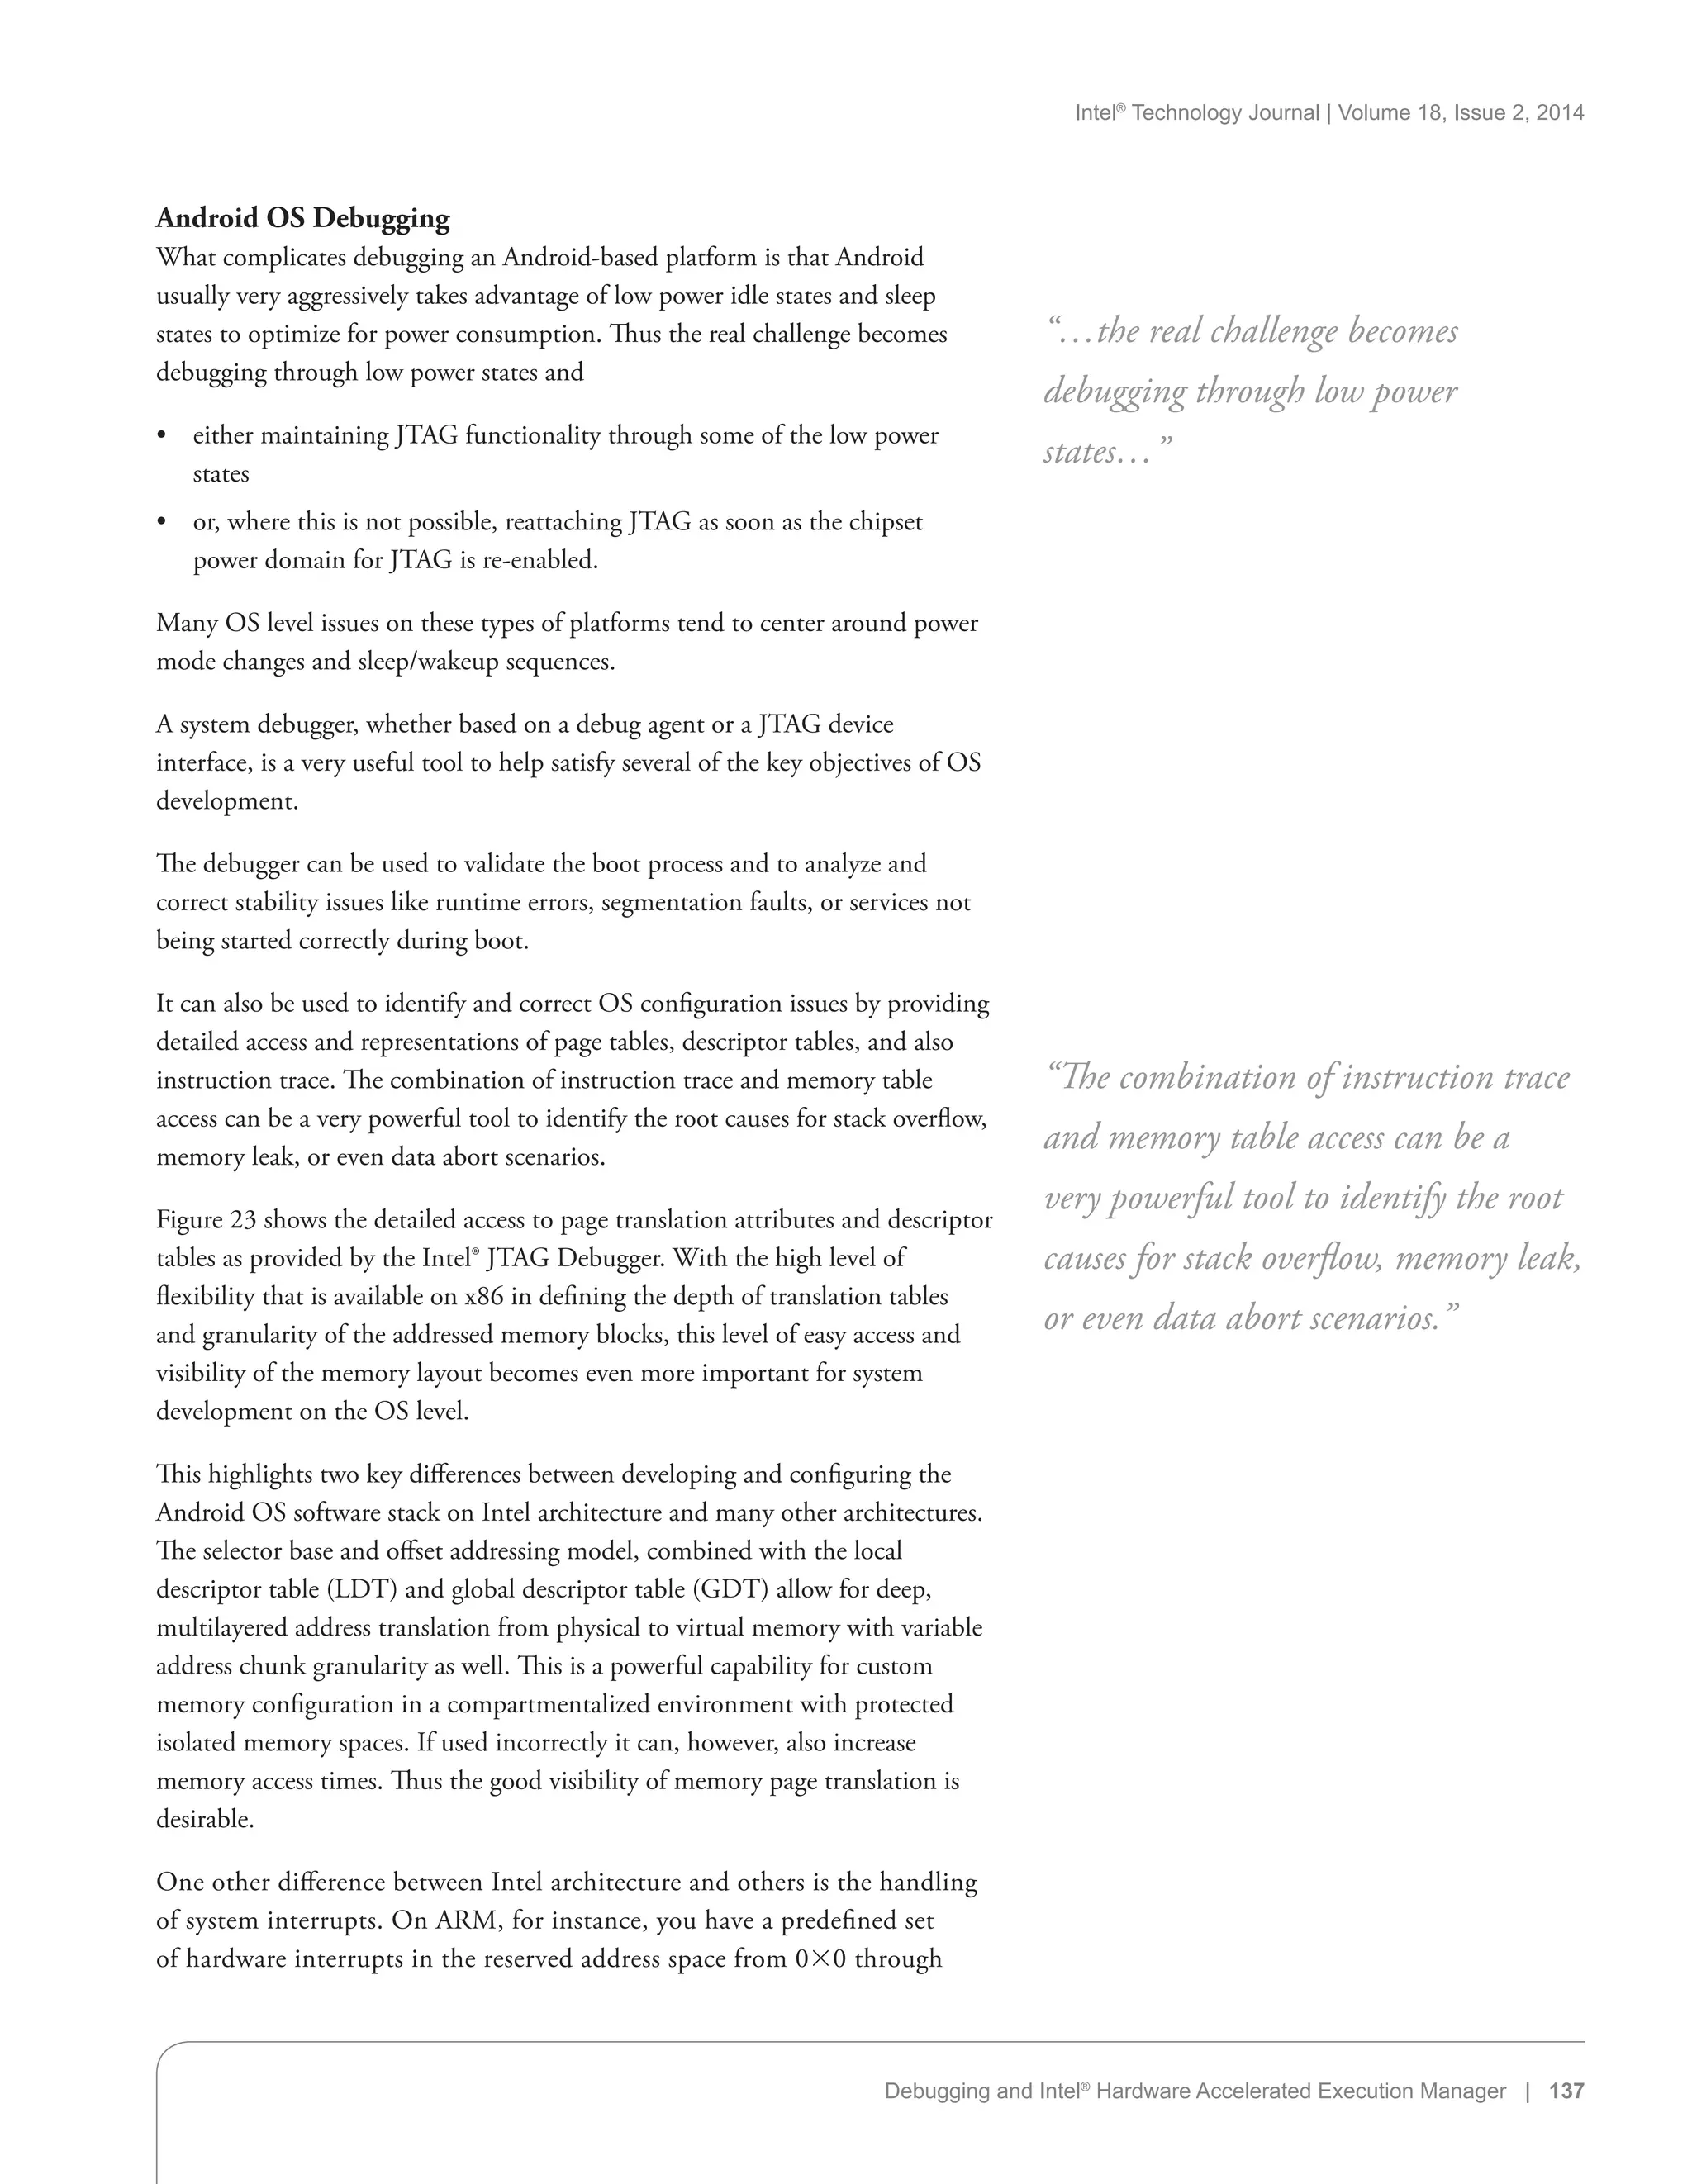
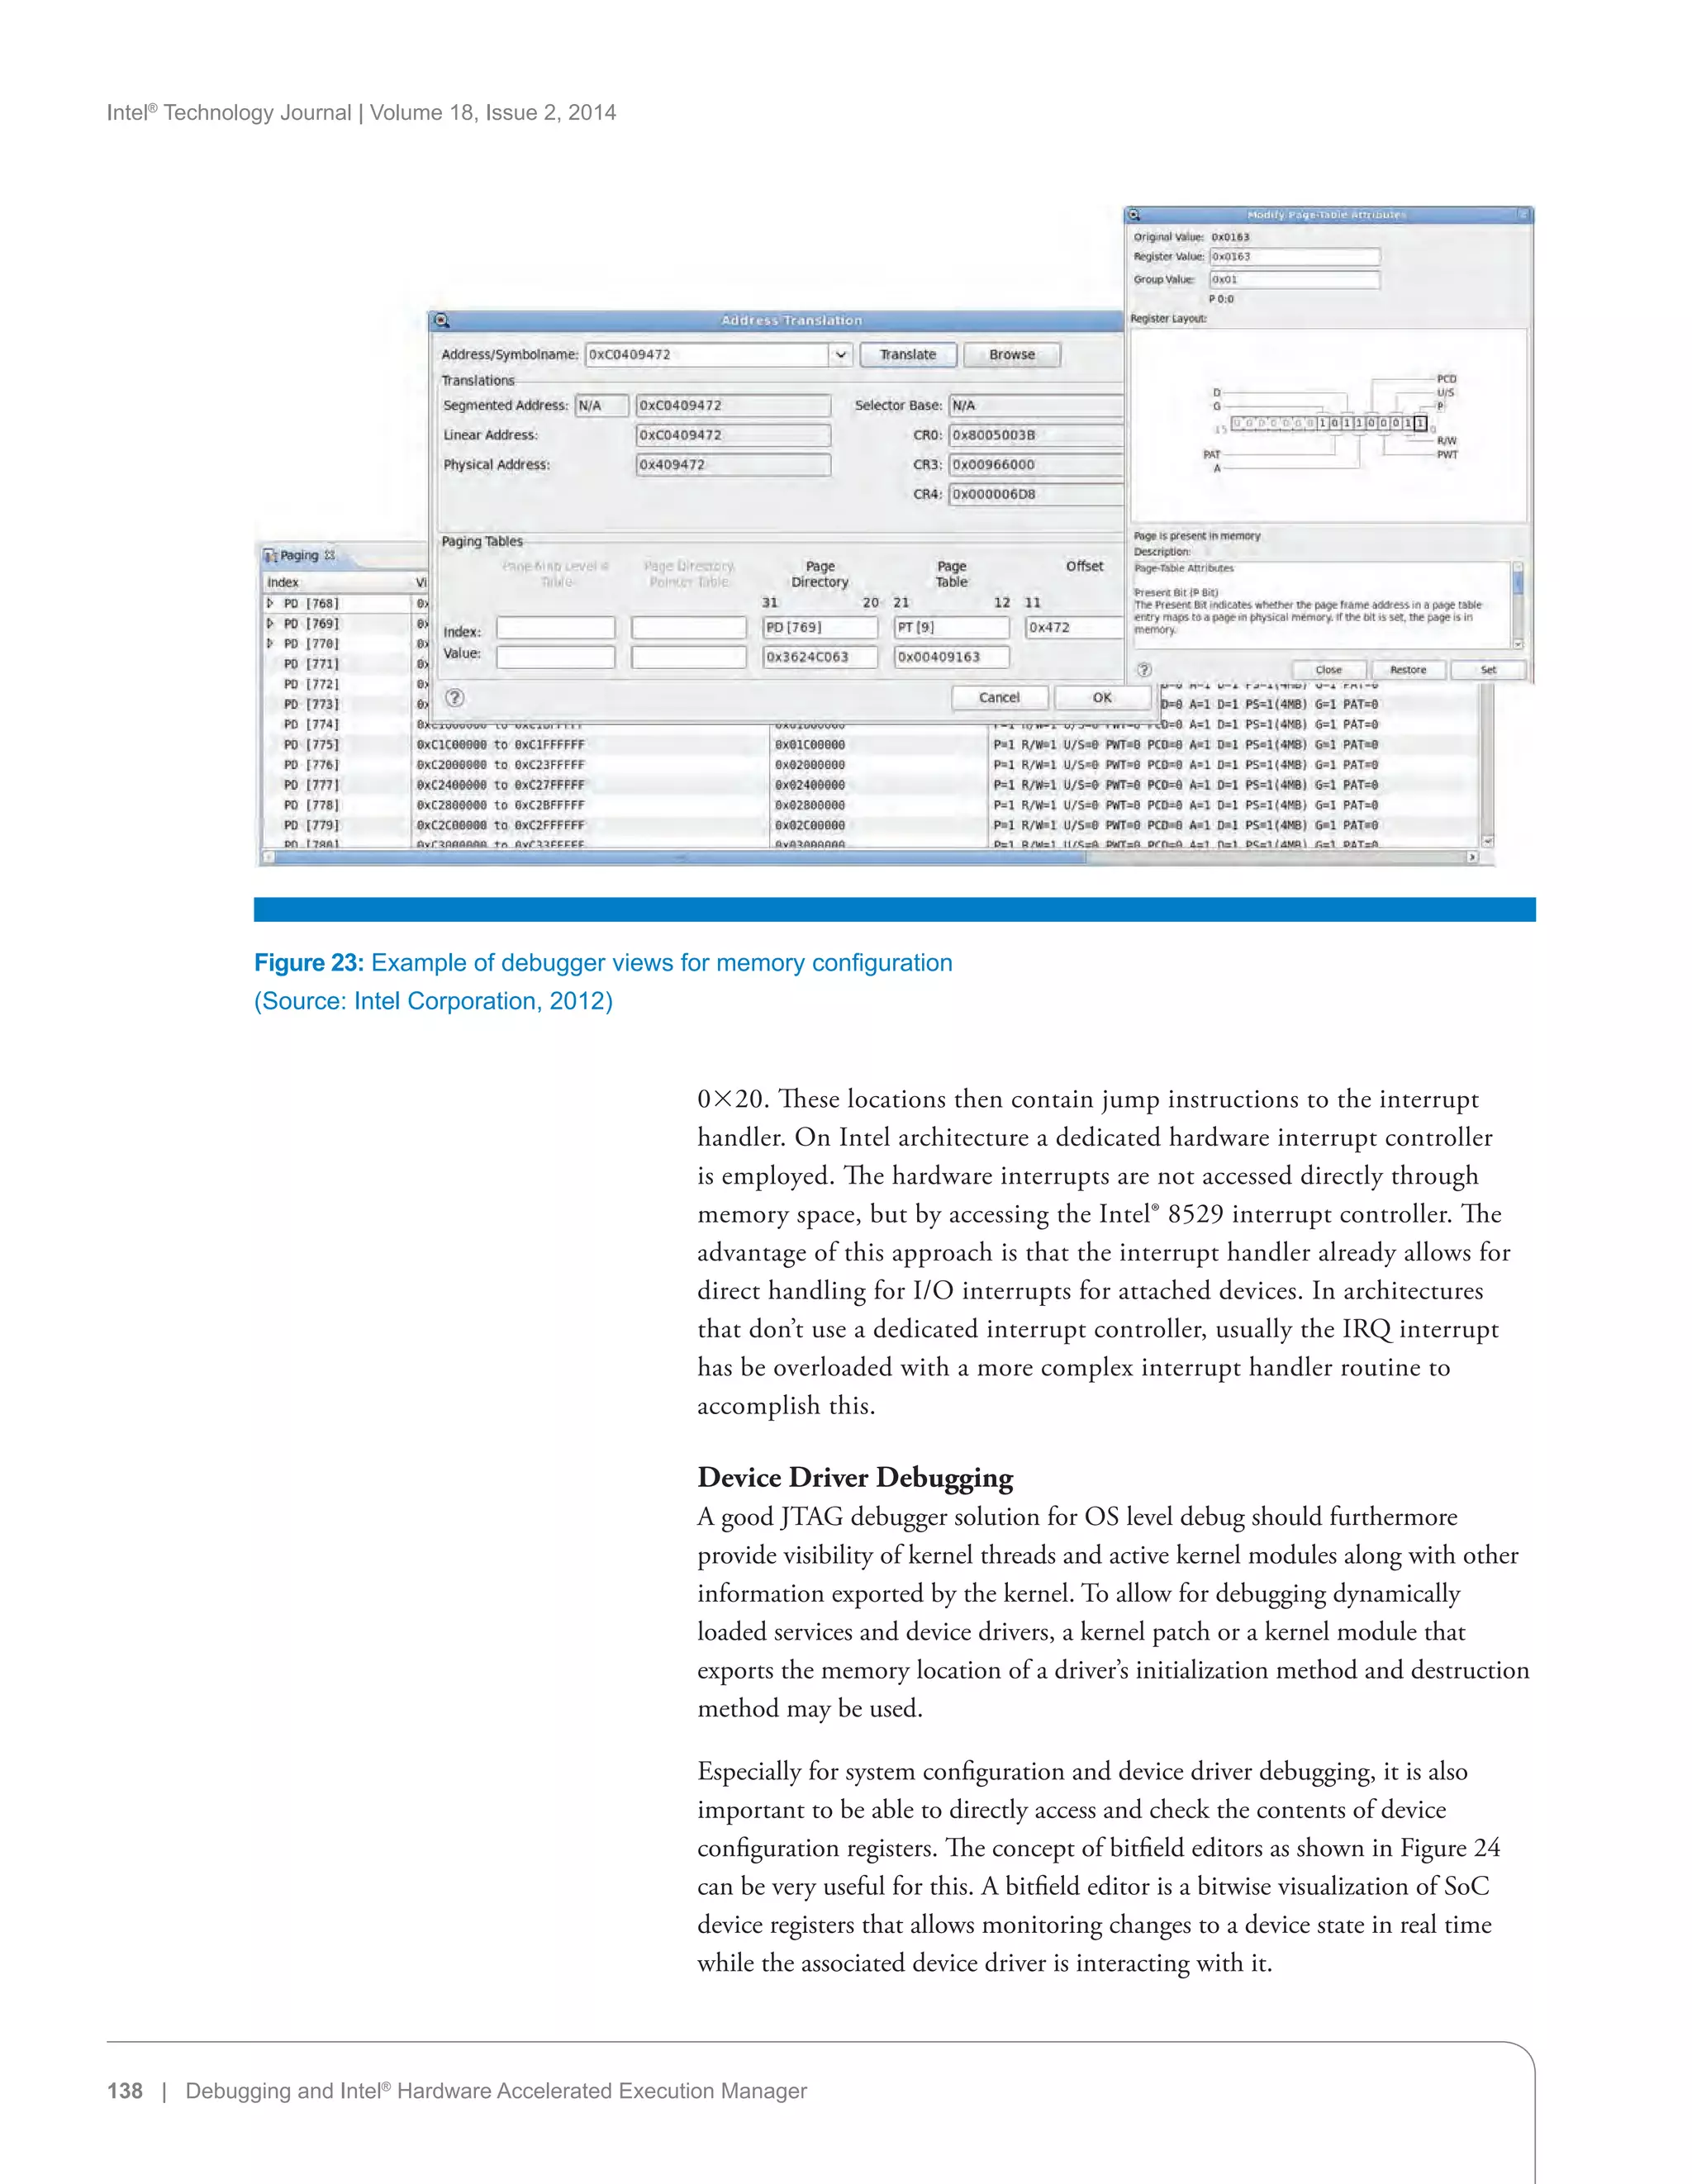


![Intel®
Technology Journal | Volume 18, Issue 2, 2014
146 | Debugging and Intel®
Hardware Accelerated Execution Manager
tools can diagnose most of the common system failures automatically. In short,
it speeds up the development cycle on complex Intel Atom processor–based
SoC designs by reducing the time it takes the developer to understand issues
that occur in the data exchanges and handshake between all of the system
components.
Summary
In this article we went over the configuration and installation details of the
necessary drivers and debug tools. In addition we highlighted some of the
underlying architectural differences that may impact debug, but usually only for
those developers who are interested in development very close to the system layer.
As we have seen in our overview of available debug solutions and debug
configurations for Android running on systems based on Intel architecture,
there is a full set of debug environments available covering the needs of the
Java application developer, the native C/C++ code developer, and the system
software stack developer.
Debugging on Intel architecture is supported with the standard Android SDK
and Android NDK tool sets provided by Google. In addition Intel as well as
other ecosystem players provide debug solutions that expand on these available
debug tools and provide solutions for system software stack debug as well as
graphics performance debug.
If you are familiar debugging and developing for Android running on ARM
architecture the same debug methods apply for Intel architecture as well.
The available debug tools and development tools infrastructure is based on
the Android SDK and extended by solutions from Intel as well as ecosystem
partners that are often also familiar from ARM. Thus there should be few
surprises debugging software on Android devices based on an Intel Atom
processor versus devices based on ARM.
References
[1] Intel® USB Driver for Android* Devices http://software.intel.com/
en-us/articles/installation-instructions-for-intel-android-usb-driver
[2] Intel® Hardware Accelerated Execution Manager http://software.
intel.com/en-us/articles/intel-hardware-accelerated-execution-
manager/
[3] Android Developers Web site http://developer.android.com
[4] Remote Application Debug on Android* OS http://software.intel.
com/en-us/articles/application-debug-android/
[5] Debugging Android* OS running on Intel® Atom™ Processor via
JTAG http://software.intel.com/en-us/articles/debugging-android-
atom-jtag/
“…Intel as well as other ecosystem
players provide debug solutions that
expand on these available debug
tools and provide solutions for system
software stack debug as well as
graphics performance debug.”](https://image.slidesharecdn.com/c1e98a76-6293-4a30-9873-abe8040257f9-160127191746/75/2014-vol18-iss-2-intel-technology-journal-146-2048.jpg)
![Intel®
Technology Journal | Volume 18, Issue 2, 2014
Debugging and Intel®
Hardware Accelerated Execution Manager | 147
[6] Randy Johnson and Stewart Christie. “JTAG 101; IEEE 1149.x
and Software Debug” (http://download.intel.com/design/intarch/
papers/321095.pdf).
Author Biography
Omar A. Rodriguez is a software engineer in the Intel Software and Services
Group, where he supports mobile games/graphics in the Personal Form Factors
team. He holds a BS in Computer Science from Arizona State University.
Omar is not the lead guitarist for the Mars Volta.](https://image.slidesharecdn.com/c1e98a76-6293-4a30-9873-abe8040257f9-160127191746/75/2014-vol18-iss-2-intel-technology-journal-147-2048.jpg)

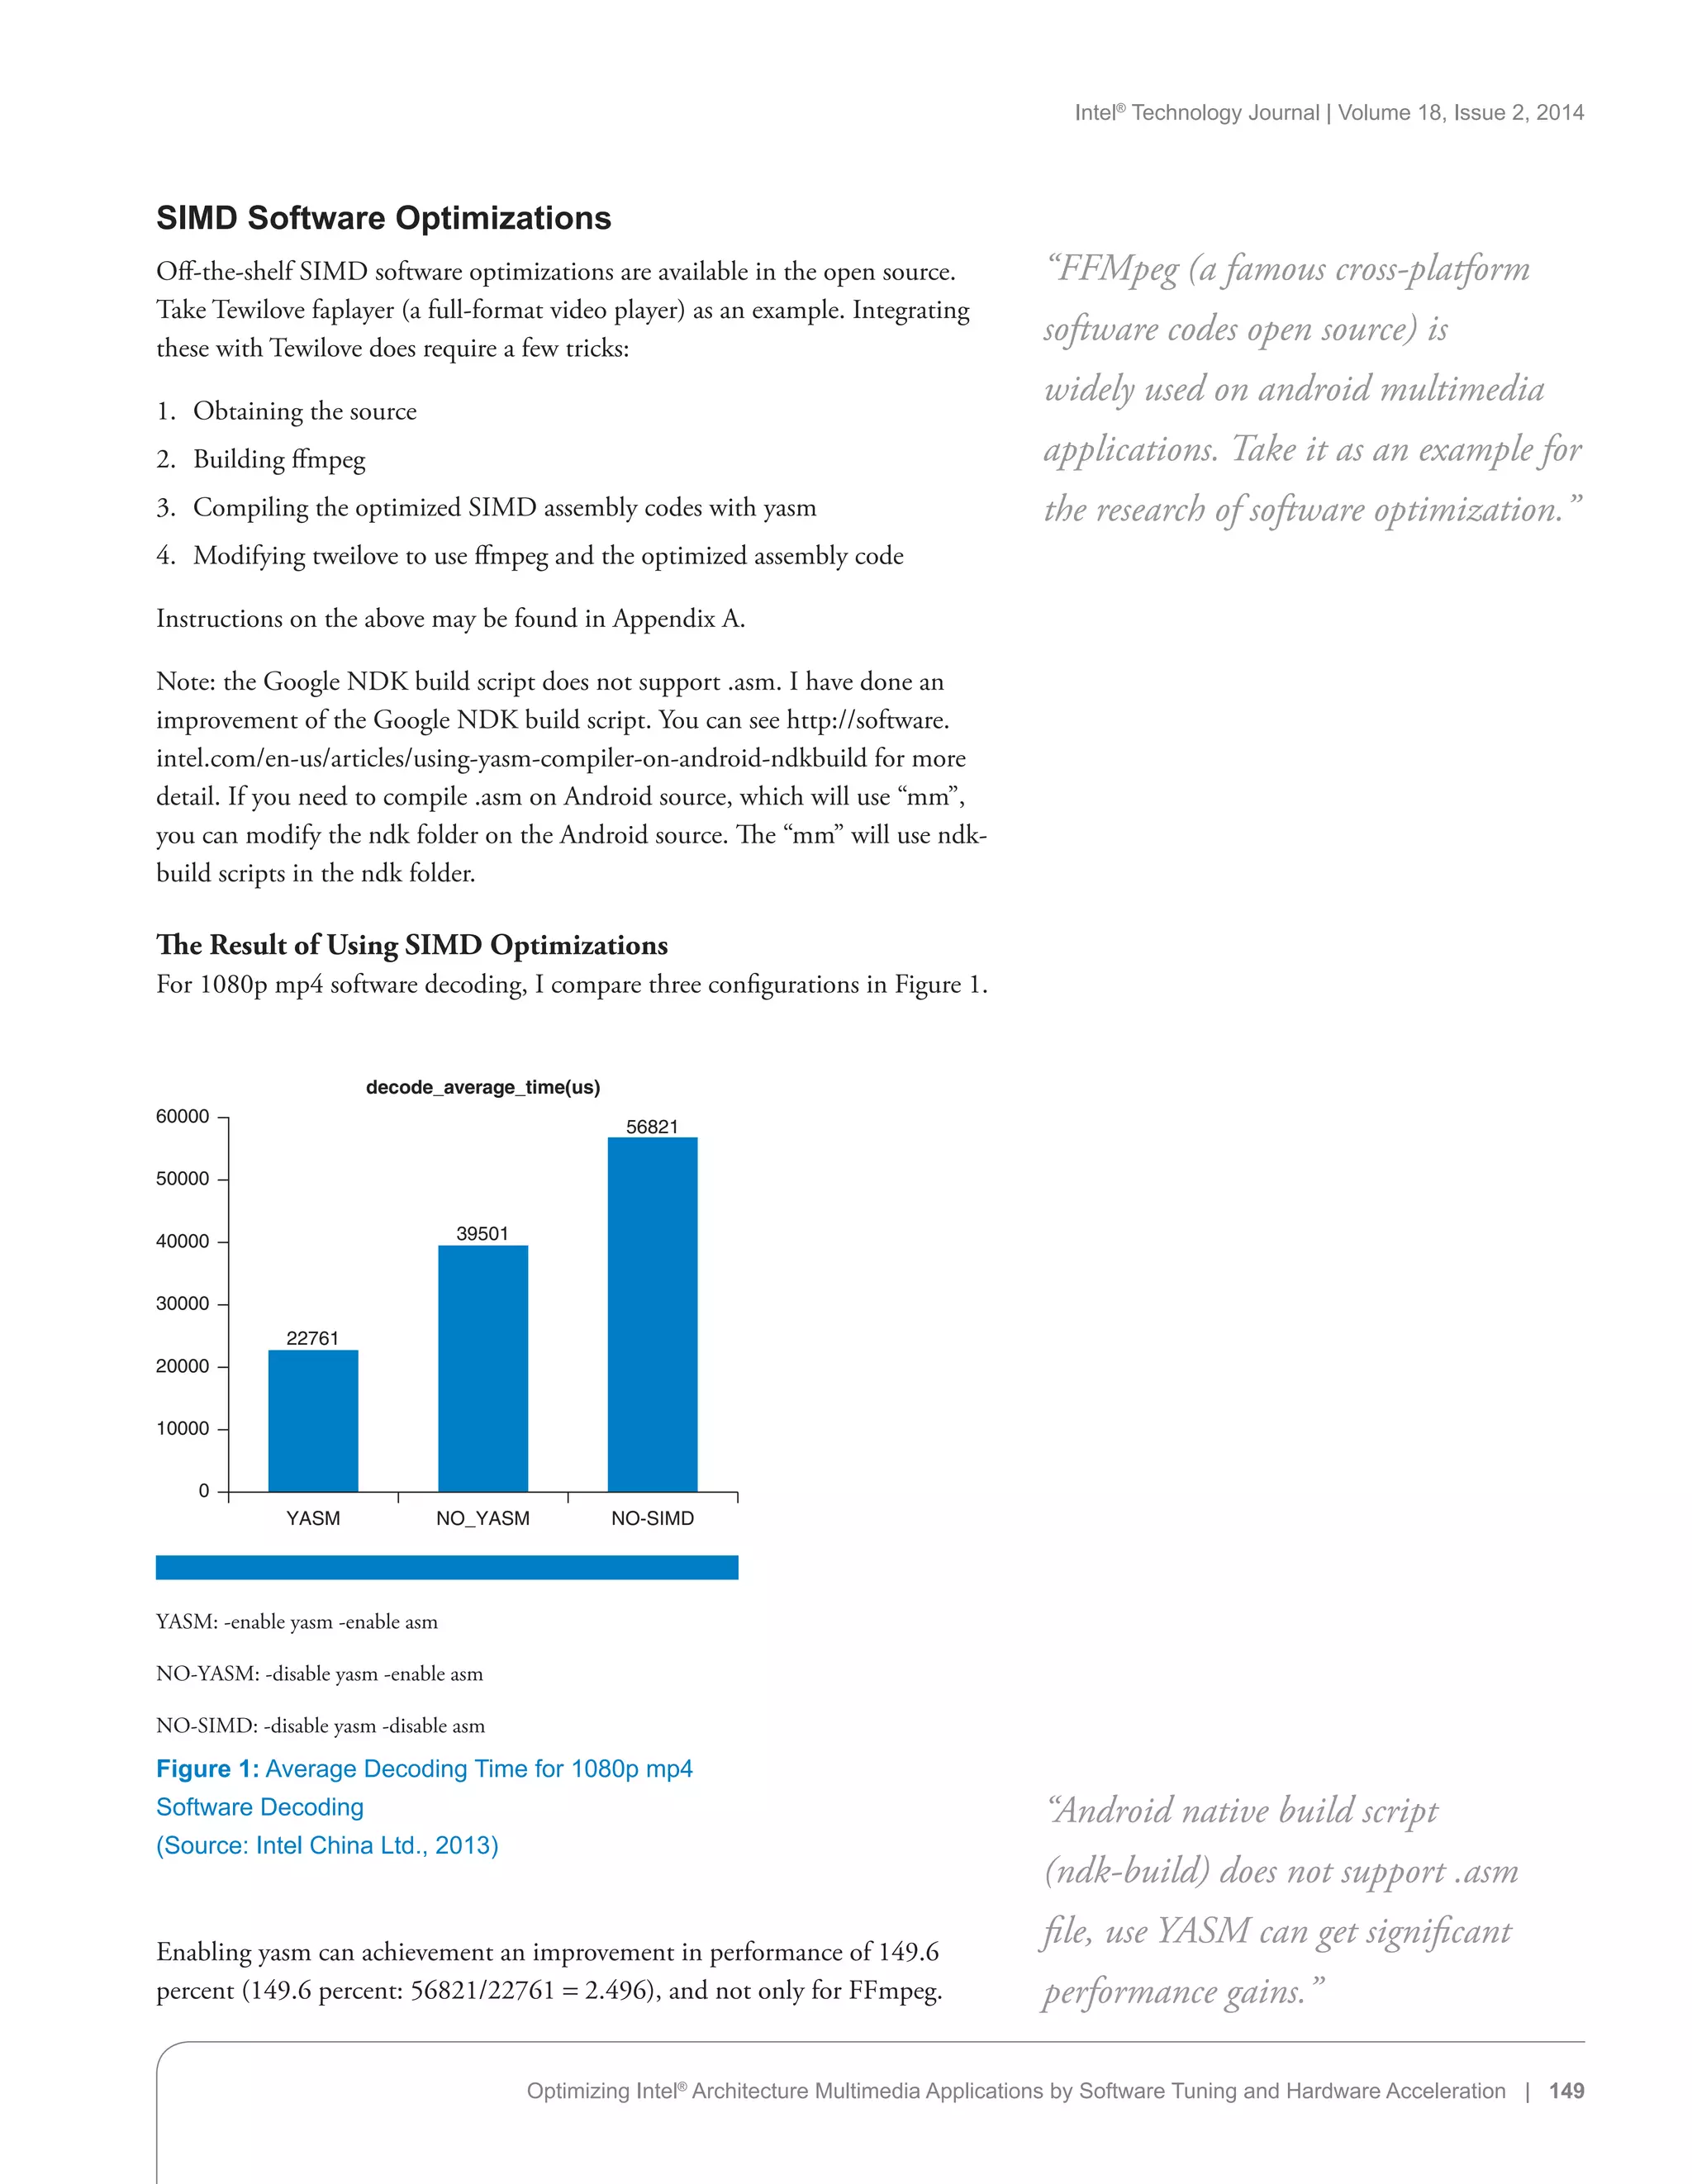
![Intel®
Technology Journal | Volume 18, Issue 2, 2014
150 | Optimizing Intel® Architecture Multimedia Applications by Software Tuning and Hardware Acceleration
Actually, nearly all open source needs Yasm to achieve the best performance,
including, for example, Vp8 and x264. With the help of yasm, a small change
on makefile can get a significant improvement. Yasm is useful when porting
from traditional PC code to Android Intel architecture code.
Use SSE (SIMD Technology) to Optimize Color
Space Transformation
We usually must do color space transformation, because video is generally YUV
format, but an LCD screen is RGB format, and camera output is generally
nv21 format. All these must do color space transformation. FFmpeg provides
the swscale function to do this transformation. But for large size pictures, color
space transformation will consume many more CPU resources, as you can see
in Table 1: SSE optimization can get 6 to 16x performance improvement! It’s
amazing!
“SSE optimization can get 6x to 16x
performance improvement on color
space transformation”
3040*1824 NV21-RGB888 SWS_BILINEAR SWS_FAST_BILINEAR
Not using yasm 425 ms 158 ms
Using yasm 179 ms 155 ms
Using fast SSE NV21-RGB888 27 ms 27 ms
Table 1: SSE Optimization for NV21 to RGB Transformation
(Source: Intel China Ltd., 2013)
SSE (SIMD technology) is the most important optimization technology on
x86 Android (ARM has NEON—it is also an SIMD technology), especially for
multimedia apps.
What Is SIMD?
Single instruction, multiple data (SIMD)[3]
describes a class of computers with
multiple processing elements that perform the same operation on multiple data
points simultaneously. Most modern CPU designs include SIMD instructions
in order to improve the performance of multimedia use. Intel®
Atom™ processor
code name Medfield supports MMX™, MMX2, Intel® SSE, SSE2, SSE3,
SSSE3, but SSE4 and Intel® AVX are not supported. You can also dynamically
check SIMD supporting runtime, reference cpuid on FFmpeg 1.0 (function
ff_get_cpu_flags_x86 on cpu.c).
There are three ways to implement SIMD code:
1. C/C++ language-level (intrinsic functions), defined with emmintrin.h.
Few open-source libraries use it as yet, except WEBP. If SIMD code is
implemented in this way, it’s easy adapting to all hardware platforms. (That
is to say, you can change it to NEON code if on the ARM platform.)
2. Inline assembler (the most widely used). It doesn’t require separate assembly
and link steps and is more convenient than a separate assembler.
“Single Instruction stream, Multiple
Data streams (SIMD) computing
first entered the personal computing
world in the form of Intel's neglected
addition to the x86 instruction set. ”](https://image.slidesharecdn.com/c1e98a76-6293-4a30-9873-abe8040257f9-160127191746/75/2014-vol18-iss-2-intel-technology-journal-150-2048.jpg)
![Intel®
Technology Journal | Volume 18, Issue 2, 2014
Optimizing Intel®
Architecture Multimedia Applications by Software Tuning and Hardware Acceleration | 151
3. Separate assembler. It has many styles (NASM, TASM, MASM…), and the
file extension: .s , .asm. (Assembler with the file extension .asm cannot be
compiled by the Android NDK; you must use the patch that I provided in
the section “How to Use Yasm”).
How the SIMD Works
The core idea of SIMD is to improve the short data parallelism. For example, if
you want to add two 8-bit integer arrays, generic C code looks like this:
Int s[16];
for(int i=0;i16;i++){
S[i]=data1[i]+data2[i]; //ensure s[i] is 0~255
}
But if you use SSE, you just need
movups data1,xmm1
movups data2,xmm2
paddusb xmm1,xmm2
movntq xmm2,S
With the one instruction paddusb, it can do 16 add operations at the same
time. It sounds good, but actually it has limitations. All data must be well
organized, and the algorithm can be vectorized. But even though it has
limitations, it indeed improves the performance, especially for multimedia
applications.
SIMD has five types of instructions:
1. Data Movement: such as movd, movq, and movups
2. Boolean Logic: psllw, psrlw
3. Math: paddb, pmulhw
4. Comparisons: pcmpeqb
5. Data Packing: packssdw, punpcklbw, and pshufb
Data packing is the most difficult part for SIMD. The data packing
instructions are illustrated in Figure 2, Figure 3, and Figure 4.
“The core idea of SIMD is to improve
the short data parallelism.”
“The limitation is SIMD short data
must be well organized, and the
algorithm can be vectorized, that is
especially suitable for multimedia
applications.”
Figure 2: Punpcklbw
(Source: Intel China Ltd., 2013)
Y7 Y6 Y5 Y4 Y3 Y2 Y1 Y0 X7 X6 X5 X4 X3 X2 X1 X0 DESTSRC
Y3 X3 Y2 X2 Y1 X1 Y0 X0DEST](https://image.slidesharecdn.com/c1e98a76-6293-4a30-9873-abe8040257f9-160127191746/75/2014-vol18-iss-2-intel-technology-journal-151-2048.jpg)


![Intel®
Technology Journal | Volume 18, Issue 2, 2014
154 | Optimizing Intel®
Architecture Multimedia Applications by Software Tuning and Hardware Acceleration
YUVBuffer+=8;
}
}
//.. the same as UV
}
multi_two(BYTE * _RGBBuffer, BYTE * _YUVBuffer)
{
RGBBuffer = _ RGBBuffer;
YUVBuffer = _ YUVBuffer;
}
private:
BYTE * RGBBuffer;
BYTE * YUVBuffer;
};
void YUV2RGB(BYTE * YUVBuffer, BYTE * RGBBuffer)
{
tbb::parallel_for(tbb::blocked_rangesize_t(0,
height/2), multi_two(YUVBuffer , RGBBuffer ));
//if using MMX, remember to add emms after all
parallel computing finish
//__asm__ volatile(emms);
}
The parallel_for function has the simplest usage for Intel TBB. You must
create a class that has the function name “operator”, and then pass this class
as a parameter. The blocked range is important to Intel TBB. Intel TBB will
split the whole operation into several task ranges from range.begin() to range.
end(). So if you set the range as [0,4], you can get four logs, which may
be [2,3], [0,1], [3,4], and [1,2]. Generally, we set the task range from 0 to
height/2 (for UV, height is Y height/2). Note: the task is not threaded. Intel
TBB will create a thread pool according to the CPU core number and will
distribute these tasks into running threads (from the thread pool). So Intel
TBB will try splitting tasks evenly into each thread (each thread binding
into each CPU core), and get the best performance compared to multi-
thread.
Intel® TBB vs. Multi-Thread
I have done a demo for comparing Intel TBB and multi-thread. I split a single
thread like this:
pthread_create(m_StreamingThread1, NULL,
streamingThreadProc1, NULL);
pthread_create(m_StreamingThread2, NULL,
streamingThreadProc2, NULL);
pthread_create(m_StreamingThread3, NULL,
streamingThreadProc3, NULL);
“TBB lets you easily write parallel
C++ programs that take full
advantage of multicore performance”
“Use TBB or just thread, that is a
question.”](https://image.slidesharecdn.com/c1e98a76-6293-4a30-9873-abe8040257f9-160127191746/75/2014-vol18-iss-2-intel-technology-journal-154-2048.jpg)
![Intel®
Technology Journal | Volume 18, Issue 2, 2014
Optimizing Intel®
Architecture Multimedia Applications by Software Tuning and Hardware Acceleration | 155
pthread_create(m_StreamingThread4, NULL,
streamingThreadProc4, NULL);
void* status;
pthread_join(m_StreamingThread1,status); //
wait thread1 finish
pthread_join(m_StreamingThread2,status); //
wait thread2 finish
pthread_join(m_StreamingThread3,status); //
wait thread3 finish
pthread_join(m_StreamingThread4,status); //
wait thread4 finish
When no other thread is running, the time for Intel TBB and multi-
thread is nearly the same. But when I add some dummy threads that
just wait 200 ms, things change. Multi-thread will be slower even than
a single thread, but Intel TBB is still good. The reason is you assume all
threads will be finished at the same time. But actually some other threads
will block the four threads running, so that the total finish time will be the
slowest.
The test result is shown in Table 4 (each step adds two dummy threads; the
dummy thread is just waiting 10 ms).
“Multi-thread may be slower even
than a single thread in some case
while TBB not. TBB is a good choice
for multi-core optimization”
STEP Multi-Thread Intel® TBB
1 296 ms 272 ms
2 316 ms 280 ms
3 341 ms 292 ms
4 363 ms 298 ms
5 457 ms 310 ms
Table 4: Comparison for Multi-Thread and Intel®
TBB
(Source: Intel China Ltd., 2013)
With the improvement of the x86 SOC, I believe embedded CPUs will
more and more approach the traditional PC CPU. If Intel® Streaming SIMD
Extensions 4 (Intel® SSE4) and Intel® Advanced Vector Extensions (Intel® AVX)
can be included on the SOC, you will be able to achieve a greater performance
improvement when developing multimedia apps.
Using the Integration Layer (IL)
to Do Hardware Encoding
OpenMax[4]
is a multimedia application standard which is launched by
NVIDIA and Khronos* in 2006. It is a free, cross-platform software abstract
layer for multimedia acceleration. It has three layers: the application layer (AL),
the integration layer (IL), and the development layer (DL). The IL has become](https://image.slidesharecdn.com/c1e98a76-6293-4a30-9873-abe8040257f9-160127191746/75/2014-vol18-iss-2-intel-technology-journal-155-2048.jpg)
![Intel®
Technology Journal | Volume 18, Issue 2, 2014
156 | Optimizing Intel®
Architecture Multimedia Applications by Software Tuning and Hardware Acceleration
the de facto standard multimedia framework and also has been accepted as an
Android multimedia framework.
Before Android 4.1, Google had not exposed any hardware codec interface to
developers, so a large number of multimedia apps have had to use FFmpeg,
x264, and vp8 as software video codecs. Especially for video encoding, software
encoding uses most of the CPU resources (640*480 h264 encoding will occupy
nearly 90 percent of the CPU’s resources for an ARM v9 1.2G dual-core). In
fact, developers can use the OpenMax Integration Layer (IL) to get the hardware
encoder interface. Here I must clarify that both ARM and Intel architecture can
use this method to do hardware encoding, but it will meet with compatibility
issues. The OpenMax IL is implemented by various vendors and Google
does not guarantee its compatibility, so it’s hard to ensure working well on all
Android systems. For Android on Intel architecture, with only one vendor, it
would have no compatibility issue.
How to Get the OMX-IL Interface on Android on
Intel Architecture
Libwrs_omxil_core_pvwrapped.so is the OMX-IL interface layer on the Intel
Atom processor code name clover trail. Developers can load this as follows to
get some of the OMX-IL interface.
pf_init = dlsym( dll_handle, OMX_Init );
pf_deinit = dlsym( dll_handle, OMX_Deinit );
pf_get_handle = dlsym( dll_handle, OMX_GetHandle );
pf_free_handle = dlsym( dll_handle, OMX_
“Developers can use the OpenMax
Integration Layer (IL) to get the
hardware codec interface without
compatibility guarantee.”
Figure 5: OpenMax Structure Block[4]
(Source: Khronos* (http://www.khronos.org/openmax), 2006)](https://image.slidesharecdn.com/c1e98a76-6293-4a30-9873-abe8040257f9-160127191746/75/2014-vol18-iss-2-intel-technology-journal-156-2048.jpg)
![Intel®
Technology Journal | Volume 18, Issue 2, 2014
158 | Optimizing Intel®
Architecture Multimedia Applications by Software Tuning and Hardware Acceleration
After allocating the OMX buffer and calling OMX_SendCommand to set
the OMX_StateExecuting state, you can use FillThisBuffer, EmptyThisBuffer,
and their callback functions to do hardware encoding. Figure 6 is the call
sequence.
Call FillThisBuffer to fill one raw picture into the OMX local buffer and
call EmptyThisBuffer to make the OMX component do the hardware
encoding; when finished encoding or when the local output buffer is full,
the OMX component will call OnEmptyThisBufferDone to tell the client
to do EmptyThisBuffer again. So one FillThisBuffer may make several
OnEmptyThisBufferDone to be called. If the OMX component finds the input
buffer is empty, it will call OnFillThisBufferDone to tell the client to fill more
buffers.
Using Hardware Encoder to Improve a Video Recorder
Now, let us try using a hardware video encoder to implement a special effects
video recorder. The design is to get data from the camera and add a mark
to the camera preview image. When doing recoding, the mark should be
recorded into the video file. It sounds like a simple design, but before Android
4.1, without compatibility issues, you could only choose a software encoder
(FFmpeg or x264), which would waste lots of CPU resources. (Starting
with Android 4.1, a new class MediaCodec has been introduced; it’s the
same as OMX-IL, but implemented by Google, and Google guarantees its
compatibility).
I have tried developing this demo and doing a test. The recorder file format is
MP4 (encoder: MPEG-4).
“Hardware encoder can get best
performance according to software
encoder. Screen projection (4.2 has
Miracst) and self-defined video
recorder can be done by hardware
encoder”
Figure 6: OpenMax IL API Component Architecture[5]
(Source: OpenMAX IL 1.1.2 Specification, 2008)
IL Client
or Other
Component
Port
Callbacks Port
Callbacks
and Calls
Command
Queue
Configuration
Structures
Commands
Parameter/
Configuration
SET/GET
Component
Handle
Port A
Input
Port B
Output
Port A Buffer
Header
Pointer
Queue
Port B Buffer
Header
Pointer
QueueComponent Event
Handler
IL Client
Event
Handler
Buffer Sent](https://image.slidesharecdn.com/c1e98a76-6293-4a30-9873-abe8040257f9-160127191746/75/2014-vol18-iss-2-intel-technology-journal-158-2048.jpg)
![Intel®
Technology Journal | Volume 18, Issue 2, 2014
Optimizing Intel®
Architecture Multimedia Applications by Software Tuning and Hardware Acceleration | 159
1024 ë 576 Video recorder Frequency CPU usage Total Resource
1024 × 576 preview 600 MHz 35% 35% × 600/1600 = 13.125%
Hardware encoder without sound 600 MHz 45% 45% × 600/1600 = 16.875%
Software encoder without sound 1600 MHz 50% 50% × 1600/1600 = 50%
Table 5: Comparison for Software and Hardware Video Recodring
(Source: Intel China Ltd., 2013)
If using a hardware encoder, total CPU resources just need 3.7 percent
(hardware encoding – preview), while a software encoder will need 46.9
percent (the size is just 1024×576). If you want 1080P video recording, the
software solution is impossible! The results of the test are shown in Table 5.
Figure 7: OpenMax Data Flow[5]
(Source: OpenMAX IL 1.1.2 Specification, 2008)
1.0 The application provides an empty
buffer for component A’s output port.
1.1 This is actually a macro.
2.0 The application passes one buffer for
component A’s input port (push model).
2.1 This is a macro, so it gets
called directly to component A.
2.2 When component A has an output
buffer available, it will issue a callback
(pull model).
2.3 When the application is done with
the output buffer, it will send it back to
the component to be filled in again.
2.4 Macro.
2.5 Component A has finished
processing the input buffer and signals
it to the application via callback.
1.0 OMX_FillThisBuffer
(pHandle,1,pBufferOut)
1.1 FillThisBuffer
(pHandle,1,pBufferOut)
2.4 FillThisBuffer
(nPortindex,hComponent,pBuffer)
2.3 OMX_FillThisBuffer
(pHandle,1,pBufferOut)
2.0 OMX_EmptyThisBuffer
(pHandle,0,pBufferIn)
2.2 FillBufferDone
(pBufferOut)
2.5 EmptyBufferDone
(pBufferIn)
2.1 EmptyThisBuffer
(pHandle,0,pBuffer)
ILClient
:OMXCallback
ILCore
A
:OMXComponent
Using a Powerful Media API: MediaCodec
on Jelly Bean
Android has a great media library allowing all sorts of things. Until recently
though, there was no way to encode and decode audio/video, which gives
developers the ability to do almost anything. Fortunately, the Jelly Bean release](https://image.slidesharecdn.com/c1e98a76-6293-4a30-9873-abe8040257f9-160127191746/75/2014-vol18-iss-2-intel-technology-journal-159-2048.jpg)
![Intel®
Technology Journal | Volume 18, Issue 2, 2014
160 | Optimizing Intel®
Architecture Multimedia Applications by Software Tuning and Hardware Acceleration
introduced the android.media.MediaCodec API. The API is designed following
the same principles and architecture of OpenMAX (a well-known standard in
the media industry), transitioning from a pure high level media player to the
encoder/decoder level.
Sample Code: Video Decoder
This sample code shows how to implement a decoder. It uses two classes,
MediaCodec and MediaExtractor. MediaExtractor facilitates extraction of
demuxed, typically encoded, media data from a data source. MediaCodec, of
course, is used as a low level codec.
First, you should use MediaExtractor to get the media format
MediaExtractor extractor = new MediaExtractor();
extractor.setDataSource(sampleFD
.getFileDescriptor (),sampleFD.getStartOffset(),
sampleFD.getLength());
MediaFormat format = extractor.getTrackFormat(0);
Second, you can create MediaCodec and configure it.
MediaCodec codec;
ByteBuffer[] codecInputBuffers;
ByteBuffer[] codecOutputBuffers;
MediaCodec codec = MediaCodec
.createByCodecName(name);
codec.configure(format, null,null,0); //if no
display, set surface to null, otherwise, it better
to set the surface to get best performance.
codec.start();
Finally, do decoding. Like OMX-IL, it has two ports. You should call
dequeueInputBuffer to send decoding buffer to MediaCodec and call
dequeueOutputBuffer to receive the outside buffer.
int inputBufIndex = codec
.dequeueInputBuffer(TIMEOUT_US);
if (inputBufIndex = 0) {
ByteBuffer dstBuf = codecInputBuffers
[inputBufIndex];
int sampleSize = extractor
.readSampleData(dstBuf, 0);
long presentationTimeUs = 0;
if (sampleSize 0) {
sawInputEOS = true; sampleSize = 0;
} else {
presentationTimeUs =
extractor.getSampleTime();
}
“MediaCodec (Android 4.1 new
API) provides a simple way to access
build-in codecs. MediaCodec support
pipeline on Android 4.3, Adaptive
playback (enabling seamless change in
resolution during playback) and image
post processing on Android 4.4.”](https://image.slidesharecdn.com/c1e98a76-6293-4a30-9873-abe8040257f9-160127191746/75/2014-vol18-iss-2-intel-technology-journal-160-2048.jpg)
![Intel®
Technology Journal | Volume 18, Issue 2, 2014
Optimizing Intel®
Architecture Multimedia Applications by Software Tuning and Hardware Acceleration | 161
codec.queueInputBuffer(inputBufIndex, 0,
sampleSize,
presentationTimeUs,
sawInputEOS ?
MediaCodec.BUFFER_FLAG_END_OF_STREAM : 0);
if(!sawInputEOS){
extractor.advance();
}
}
final int res = codec.dequeueOutputBuffer(info,
TIMEOUT_US);
if(res = 0){
int outputBufIndex = res;
ByteBuffer buf =
codecOutputBuffers[outputBufIndex];
codec.releaseOutputBuffer(outputBufIndex,
false);
//set true ,if need rendering
if((info.flags
MediaCodec.BUFFER_FLAG_END_OF_STREAM) != 0){
sawOutputEOS = true;
}
} else if(res == MediaCodec.INFO_OUTPUT_BUFFERS_
CHANGED){
codecOutputBuffers = codec.
getOutputBuffers();
} else if(res == MediaCodec.INFO_OUTPUT_FORMAT_
CHANGED){
final MediaFormat offormat =
codec.getOutputFormat();
}
Using MediaCodec in NDK
MediaCodec is a Java layer class, while we must do decoding (or encoding) in
C code, which is in the NDK layer. So it is important to call the Java class in
NDK. This can be done by using the JNI function FindClass.
Sample code for FindClass is shown below:
jclass audio_record_class =
jni_env-FindClass(android/media/AudioRecord);
int size = jni_env-CallStaticIntMethod(audio_
record_class
,jni_env-GetStaticMethodID(audio_record_
class,getMinBufferSize, (III)I)
,prefered_rate
“MediaCodec is low-level codec,
according to Mediaplayer,
synchronization of video and audio is
done by you.”
“You can call MediaCodec from
native layer. This can be done by using
the JNI function FindClass”](https://image.slidesharecdn.com/c1e98a76-6293-4a30-9873-abe8040257f9-160127191746/75/2014-vol18-iss-2-intel-technology-journal-161-2048.jpg)

![Intel®
Technology Journal | Volume 18, Issue 2, 2014
Optimizing Intel®
Architecture Multimedia Applications by Software Tuning and Hardware Acceleration | 163
with a surface. That can be done by adding GraphicBuffer in ACodec::PortDescription.
ACodec uses class PortDescription to pass the buffer to MediaCodec. The original
design will hide GraphicBuffer so that the MediaCodec can’t get buffer information of
NativeWindow (NativeWindow is the internal call for surface).
The two functions added in NativeMediaCodec are:
status_t LocalMediaCodec::GetOutputInfo(
size_t index,
uint8_t** pbuf,
uint32_t *width,
uint32_t *height,
uint32_t *stride,
int32_t *format,
bool *needunlock) {
BufferInfo *info = mPortBuffers[kPortIndexOutput].editItemAt(index);
if(info-mGraphicBuffer!=NULL){
*width = info-mGraphicBuffer-getWidth();
*height = info-mGraphicBuffer-getHeight();
*stride = info-mGraphicBuffer-getStride();
*format = info-mGraphicBuffer-getPixelFormat();
info-mGraphicBuffer-lock(GraphicBuffer::USAGE_SW_READ_
OFTEN|GraphicBuffer::USAGE_SW_WRITE_OFTEN,(void**)pbuf);
*needunlock = true;
}
else
{
*pbuf = mPortBuffers[kPortIndexOutput].itemAt(index).mData-base();
mOutputFormat-findInt32(“color-format”, format);
mOutputFormat-findInt32(“width”, (int32_t*)width);
mOutputFormat-findInt32(“height”, (int32_t*)height);
*stride = *width;
*needunlock = false;
}
return OK;
}
status_t LocalMediaCodec::UnLockBuffer(size_t index)
{
BufferInfo *info = mPortBuffers[kPortIndexOutput].editItemAt(index);
if(info-mGraphicBuffer!=NULL){
info-mGraphicBuffer-unlock();
}
return OK;
}
“Surface image reader is added on
Android 4.4. It is useful for video
processing with CPU. The author has
implemented a NativeMediaCodec
which has the same function as Surface
image reader on Android 4.2.”](https://image.slidesharecdn.com/c1e98a76-6293-4a30-9873-abe8040257f9-160127191746/75/2014-vol18-iss-2-intel-technology-journal-163-2048.jpg)


![Intel®
Technology Journal | Volume 18, Issue 2, 2014
166 | Optimizing Intel®
Architecture Multimedia Applications by Software Tuning and Hardware Acceleration
ability even before Android 4.1, and with hardware improvements, hardware
acceleration can give better and better effects.
References
[1] VideoLAN: A project and a non-profit organization composed
of volunteers, developing and promoting free, open-source
multimedia solutions. URL: http://www.videolan.org/vlc/
[2] FFMPEG: a complete, cross-platform solution to record, convert
and stream audio and video. URL: http://ffmpeg.org/
[3] Intel Architecture Software Developer’s Manual, Volume 2:
Instruction Set Reference Manual, Intel Corporation (Order
Number 243191)
[4] OpenMAX: OpenMAX™ is a royalty-free, cross-platform
multimedia API. URL: http://www.khronos.org/openmax/
[5] OpenMAX IL 1.1.2 Specification, 2008
Appendix A
How to compile tewilove_faplayer x86 version:
1. Modify vlc_fixups.h, delete __cplusplus; it will lead to a compiling
problem.
2. Modify jnivlcconfig.h, and add the macro defined as follows:
#define CAN_COMPILE_MMX 1
#define CAN_COMPILE_MMXEXT 1
#define CAN_COMPILE_SSE 1
#define CAN_COMPILE_SSE2 1
#define asm __asm__
Solution by author (app layer) OMX-IL OMX-AL MediaCodec
2.3 audio
2.3 video decode
2.3 video encode Codec(Intel architecture only)
4.0 audio Player (NDK only)
4.0 video decode Player (NDK only)
4.0 video encode Codec (Intel architecture only)
4.1–4.2 audio Codec
4.1–4.2 video decode Codec
4.1–4.2 video encode Codec (Intel architecture only) Codec
Table 6: Summary of the usage of OpenMax
(Source: Intel China Ltd., 2013)](https://image.slidesharecdn.com/c1e98a76-6293-4a30-9873-abe8040257f9-160127191746/75/2014-vol18-iss-2-intel-technology-journal-166-2048.jpg)


![Intel®
Technology Journal | Volume 18, Issue 2, 2014
Optimizing Intel®
Architecture Multimedia Applications by Software Tuning and Hardware Acceleration | 169
#define MOVD movq
#define MOVQ movups
#define MOVNTQ movntps
#define SFENCE sfence
#define SIMD8 16
#else
#if HAVE_MMX2
#define MM1 %mm
#define MM %%mm
#define MOVD movd
#define MOVQ movq
#define MOVNTQ movntq
#define SFENCE sfence
#define SIMD8 8
#endif
4. MMX uses the mm register while SSE uses the xmm register. Because SSE
has 128-bit data length (16 bytes), the data offset is 16 when using SSE
(SIMD8 is 16).
5. RGB_PACK24 must be rewritten due to the different data length.
DECLARE_ASM_CONST(16, uint8_t, rmask1[16]) =
{0x00,0x80,0x80,0x01,0x80,0x80,0x02,0x80,0x80,0x03,
0x80,0x80,0x04,0x80,0x80,0x05};
. . .
MOVQ MMred, MM5 n
pshufb MANGLE(rmask1), MM5 n
MOVNTQ MM5, (%1) n
I just copy the key code. Here I use pshufb; the key idea is using pshufb
to put each R, G, and B value to right place, and use por to get RGB888
data.
Appendix C
The following is the code for a cross-compile script:
#!/bin/bash
HOSTCONF=x86
BUILDCONF=i686-pc-linux-gnu
NDK=$ANDROID_NDK_ROOT
TOOLCHAIN=$NDK/toolchains/x86-4.4.3/prebuilt/
linux-x86
PLATFORM=$NDK/platforms/android-14/arch-x86
PREFIX=/home/lym/libjpeg-turbo-1.2.1/android/x86
ELF=$TOOLCHAIN/i686-android-linux/lib/ldscripts/
elf_i386.x](https://image.slidesharecdn.com/c1e98a76-6293-4a30-9873-abe8040257f9-160127191746/75/2014-vol18-iss-2-intel-technology-journal-169-2048.jpg)


![Intel®
Technology Journal | Volume 18, Issue 2, 2014
Introduction to Graphics and Media Resources in Android* | 173
OpenGL ES 2.0 is the predominate graphics API, but the story doesn’t end
here. OpenGL ES 3.0 was just released and it brings the possibility of even
more complex and visually impressive techniques.
Major Mobile GPU Designs
There are currently two major designs being used by mobile GPUs: deferred
and immediate. Deferred mode GPUs wait until all commands for an
individual frame are submitted before processing the work. An immediate
mode GPU starts working on commands as soon as they are ready. Table 1
shows major GPU vendors and their GPU design type.
“There are currently two major designs
being used by mobile GPUs: deferred
and immediate.”
GPU Type
Intel® HD Graphics Immediate
AMD Radeon* Immediate
NVIDIA GeForce* Immediate
NVIDIA Tegra* Immediate
Qualcomm Adreno* Immediate/Deferred
Imagination Technologies PowerVR* Deferred
ARM Mali* Deferred
Table 1: Major GPU Vendors and Their GPU Design Types
(Source: Intel Corporation, 2013)
Advantages of Deferred Mode GPUs
A deferred mode GPU has several major advantages. First, data sent to the
GPU can be better organized. This can result in significantly decreased
memory bandwidth. Memory usage is a major consumer of power, so limiting
memory bandwidth will result in significant power gains.
Since all the data to render the frame is known, the work can be easily divide
into smaller chunks. PowerVR is actually referred to as a deferred tile-based
render. This is because the GPU collects all the commands/data to generate
a frame and then divides the work into small tiles. A tile is just a square
collection of pixels. This collection of pixels is designed to fit into very high-
speed caches. If you want to learn more about all the advantages of PowerVR’s
design, please refer to their documentation.[1]
Deferred rendering does have several limitations. The internal memory and
cache on the GPU can only be so big. If a frame has too much data to be
rendered, the work needs to be divided among multiple rendering passes. This
redundancy results in a lot of overhead and wasted operations. A lot of the
optimization tricks for deferred mode GPUs involve avoiding these “glass jaws.”
A Note about Defining “Deferred”
The term deferred is very overloaded in computer graphics. There are many
terms like deferred mode GPUs, deferred renders, deferred shading, deferred
lighting, and deferred rasterization. To make it even more challenging, the
definitions are not consistent and must be taken in context. Don’t confuse a](https://image.slidesharecdn.com/c1e98a76-6293-4a30-9873-abe8040257f9-160127191746/75/2014-vol18-iss-2-intel-technology-journal-173-2048.jpg)
![Intel®
Technology Journal | Volume 18, Issue 2, 2014
174 | Introduction to Graphics and Media Resources in Android*
deferred mode GPU with deferred rendering techniques. In general, deferred
rendering techniques refer to accumulating scene data into a g-buffer and
applying lighting/shading in screen space.
Advantages of Immediate Mode GPUs
Immediate mode GPUs have been the predominant desktop design for
decades. A lot of rendering techniques, tricks, and optimizations have been
designed around immediate mode rendering. As such, immediate mode GPUs
have become very complex and capable.
Since an immediate mode rendering starts processing commands as soon as
they are ready, simple tasks can be completed more quickly and efficiently on
immediate mode GPUs. Furthermore, they don’t run into as many “glass jaws”
based on the amount of data passed to the GPU.
However, the years of design for immediate mode GPUs targeted desktops
with massive power supplies. This has resulted in designs that maximized
performance at the cost of power. This is why deferred mode renders have
dominated the mobile market. But research and development in immediate
mode GPUs have been driving down power utilization rapidly; this can be seen
in Intel HD Graphics included in Intel® Core™ processors.
The Intel Graphics Developer’s Guide provides the best information for target
Intel® HD Graphics.[2]
Understanding OpenGL ES
The standard API for 3D graphics on Android is OpenGL ES, which is the
most widely used 3D graphics API on all mobile devices today. Android
uses OpenGL ES to accelerate both 2D and 3D graphics. In early releases of
Android, OpenGL ES acceleration was somewhat optional, but as Android has
evolved and screen sizes have grown, accelerated OpenGL ES has become an
essential part of the Android graphics system.
There are several major versions of OpenGL ES. OpenGL ES 1.0 and 1.1 have
always been supported in Android. OpenGL ES 2.0 was added in Android 2.2.
OpenGL ES 3.0 was just recently added with Android 4.3. Today, Android
developers can choose to use any version.
Extensions to OpenGL ES
The OpenGL ES feature set is required to be mostly the same across platforms
by the Khronos standard documents that define OpenGL ES 1.1, 2.0, and
3.0. That is the purpose of a standardized API. However, GPU developers
are permitted to expose special features of their GPU through extensions to
OpenGL ES. Khronos maintains an official online registry for OpenGL ES
extensions.[3]
The most important extensions to OpenGL ES are available on most
Android platforms, such as support for compressed textures and direct texture
“A lot of rendering techniques, tricks,
and optimizations have been designed
around immediate mode rendering.
As such, immediate mode GPUs have
become very complex and capable.”
“…as Android has evolved and screen
sizes have grown, accelerated OpenGL
ES has become an essential part of the
Android graphics system.”](https://image.slidesharecdn.com/c1e98a76-6293-4a30-9873-abe8040257f9-160127191746/75/2014-vol18-iss-2-intel-technology-journal-174-2048.jpg)
![Intel®
Technology Journal | Volume 18, Issue 2, 2014
Introduction to Graphics and Media Resources in Android* | 175
streaming, but many different formats for compressed textures are in use today
with OpenGL ES.
Compressing textures is an important technique for 3D applications to reduce
their memory requirements and improve performance, but the various formats
in use are defined only by extensions and therefore vary for each platform.
The most widely supported format is Ericsson Texture Compression (ETC1_
RGB8), but it only supports 8-bit-per-pixel precision and has no support for
per-pixel alpha.
Android applications should never assume that any particular extension to
OpenGL ES is available on any particular device. Instead, well-behaved apps will
query OpenGL ES for a list of available extensions at runtime. The extension
lists can be obtained from the OpenGL ES and EGL drivers with these calls:
glGetString(GL_EXTENSIONS);
eglQueryString(eglGetCurrentDisplay(), EGL_
EXTENSIONS);
Realtech VR’s OpenGL Extensions Viewer app is a useful tool that will
perform this query and display the returned list for any Android device.[4]
The OpenGL ES extensions that are available for Android vary significantly
based upon the GPU, not because of differences in the CPU architecture. For
example, the PowerVR supports exclusive extensions to OpenGL ES such as:
glFramebufferTexture2DMultisampleIMG()
glRenderbufferStorageMultisampleIMG()
Of course, using these exclusive extensions will limit the portability of your
application to Android devices with PowerVR cores. As extensions become
popular, more and more GPU companies will adopt them. If an extension is
generally supported by most GPUs, it will often be added to the next OpenGL
ES specification.
Accessing OpenGL ES through the Android SDK
The Android SDK offers the easiest way to use OpenGL ES in your Android
application by using the GLSurfaceView class. This class handles most of the
initialization of the EGL, threading, and allocating a surface that OpenGL ES
can render to and that Android can display. OpenGL ES can also render to a
TextureView object that has some additional capabilities, like transformations
and alpha blending, but requires more code to set up and use. The Android
SDK provides support for OpenGL ES through bindings for Java* in these
packages from Google and Khronos:
•• javax.microedition.khronos.egl: The Khronos standard implementation
•• javax.microedition.khronos.opengles: The Khronos standard
implementation
•• android.opengl: Android’s API updated to provide better performance
“Compressing textures is an important
technique for 3D applications to
reduce their memory requirements and
improve performance,…”
“As extensions become popular, more
and more GPU companies will adopt
them.”](https://image.slidesharecdn.com/c1e98a76-6293-4a30-9873-abe8040257f9-160127191746/75/2014-vol18-iss-2-intel-technology-journal-175-2048.jpg)
![Intel®
Technology Journal | Volume 18, Issue 2, 2014
176 | Introduction to Graphics and Media Resources in Android*
The three versions of the OpenGL ES API that can be used today on Android
are: 1.1, 2.0, and 3.0. OpenGL ES 1.0 was superseded by 1.1. OpenGL ES 2.0
offers greater flexibility through shader programming, but is not compatible
with legacy code written for OpenGL ES 1.1. Table 2 summarizes the versions
of the OpenGL ES API that can be used for application development and the
classes that define them for Android.
OpenGL ES 1.0 android.opengl.GLES10
OpenGL ES 1.0 android.opengl.GLES10Ext
OpenGL ES 1.1 android.opengl.GLES11
OpenGL ES 1.1 android.opengl.GLES11Ext
OpenGL ES 2.0 android.opengl.GLES20
OpenGL ES 3.0 android.opengl.GLES30
Table 2: OpenGL ES Support Classes in Android
(Source: Intel Corporation, 2013)
The Intel Atom processor platform for Android provides full support for
applications that use any of these versions of OpenGL ES through either the
SDK or the NDK (OpenGL ES 3.0 requires a device with Android 4.3 or
newer).
Accessing OpenGL ES through the Android NDK
The Native Development Kit (NDK) was developed by Google to help
developers achieve better performance in their Android applications by
bypassing the Dalvik VM and running C/C+ + code natively. Google decided
to make the NDK available to all Android developers because it simplifies the
process of porting existing applications written in C/C+ + and allows the best
possible performance in applications that need it the most, like 3D games.
The Android NDK supports all versions of OpenGL ES and provides several
example apps. Most applications using OpenGL ES are written in C/C+ +, and
the NDK provides a mechanism for combining C/C+ + code with an Android
framework, which is based on Java. This is called the Java Native Interface
(JNI) and it’s becoming the dominate approach for implementing apps that
require fast graphics on Android. The NDK supports the JNI for Intel Atom
processors beginning with release r6b.[5]
Accessing OpenGL ES through RenderScript
RenderScript was first introduced in Android 3.0. It is another technology that
Google developed to help accelerate computationally intensive algorithms,
including graphics, by bypassing the Dalvik VM. But, unlike the NDK,
RenderScript code is compiled at runtime on the Android device. RenderScript
is designed to exploit multiple processors, but it initially only utilizes the
processing cores available on the CPU. As of Android 4.2, RenderScript has
been improved to utilize the GPU in addition to the CPU.
RenderScript abstracts the hardware it runs on so that app developers need
not be concerned about the CPU and GPU architecture or even how many
“The Intel Atom processor platform
for Android provides full support
for applications that use any of these
versions of OpenGL ES through either
the SDK or the NDK…”
“RenderScript is designed to exploit
multiple processors,…”](https://image.slidesharecdn.com/c1e98a76-6293-4a30-9873-abe8040257f9-160127191746/75/2014-vol18-iss-2-intel-technology-journal-176-2048.jpg)
![Intel®
Technology Journal | Volume 18, Issue 2, 2014
Introduction to Graphics and Media Resources in Android* | 177
processors are actually available. RenderScript is a new language based on C99
with support for OpenGL ES built in. RenderScript’s abstraction guarantees
that it will run on any Android device, including Intel Atom processors.[6]
Optimizing for Intel GPUs
As shown in Table 3, Intel Atom processors designed for Android use either
PowerVR GPUs or Intel HD Graphics.
Optimizing for PowerVR
It’s important to refer to Imagination Technologies’ documentation on
PowerVR. General optimization tips and tricks provided by Imagination
Technologies are just as important on Intel platforms as other platforms with
PowerVR.
To get a good understanding of the PowerVR hardware, please review
Imaginations Technologies’ architecture guide.[7]
To get a good understanding of how to optimize for PowerVR hardware, please
review Imaginations Technologies’ developer recommendations.[8]
Pay close attention to the “golden rules.”
Optimizing for Intel® HD Graphics
The Intel Graphics Developer’s Guide provides the best information on
optimizing for Intel HD Graphics.[9]
When targeting mobile GPUs, the optimization advice is very similar between
platforms. In most cases, the optimizations suggests for PowerVR and Intel
HD Graphics are very inclusive.
There are numerous tools, case studies, article, and tech samples for Intel HD
Graphics available on the Visual Computing Source.[10]
Intel® Graphics Performance Analyzer
The Intel® Graphics Performance Analyzers (Intel® GPA) suite is a set
of powerful graphics and gaming analysis tools. It helps save valuable
optimization time by quickly providing actionable data to help developers
find performance opportunities from the system level down to the individual
draw call.
To download a free copy of Intel GPA, browse to the Intel GPA homepage.[11]
“The Intel Graphics Developer’s Guide
provides the best information on
optimizing for Intel HD Graphics.”
Intel® Atom™ Processor Series GPU Core
Z2760 PowerVR SGX 545
Z2560/Z2580 PowerVR SGX 544MP2
Bay Trail Intel® HD Graphics (Gen 7)
Table 3: Intel Atom Processors Designed for Android Use and Their GPUs.
(More details about individual processors can be found at ark.intel.com.)
(Source: Intel Corporation, 2013)](https://image.slidesharecdn.com/c1e98a76-6293-4a30-9873-abe8040257f9-160127191746/75/2014-vol18-iss-2-intel-technology-journal-177-2048.jpg)

![Intel®
Technology Journal | Volume 18, Issue 2, 2014
180 | Introduction to Graphics and Media Resources in Android*
rect x =50 y =20 width=150 height=150
style =fill: red;
stroke: yellow; stroke-width: 5; opacity: 0.5 /
/svg
•• Circle circle
svg
circle cx =100 cy =50 r =40 stroke =black
stroke-width =2 fill =red /
/svg
•• Ellipse ellipse
•• Line line
•• Polyline polyline
•• Polygon polygon
•• Path path
svg xmlns =http://www.w3.org/2000/svg
version =1.1
path d =M150 0 L75 200 L225 200 Z /
/svg
SVG Library Integration
Create a file named svgandroid.xml to describe svgandroid.jar. Place
svgandroid.jar in /system/framework folder and svgandroid.xml in the /
etc/permissions folder. Applications will discover the svgandroid.jar library
through svgandroid.xml.
Put the following code into the svgandroid.xml:
?xml version =1.0 encoding=utf-8
permissions
libraryname =svgandroid
file =/system/framework/svgandroid.jar/
/permissions
Use the use-library declaration in the AndroidManifest.xml file.
This method loads the svgandroid packages. They will not be loaded
automatically.
uses-library android:name =svgandroid
android:required=true /
Set android:required=“true”. The Android system would not permit an
application on a device without this library.
If this application is installed on Android devices without this library, the
following error message occurs:
Failure [INSTALL_FAILED_MISSING_SHARED_LIBRARY]](https://image.slidesharecdn.com/c1e98a76-6293-4a30-9873-abe8040257f9-160127191746/75/2014-vol18-iss-2-intel-technology-journal-180-2048.jpg)

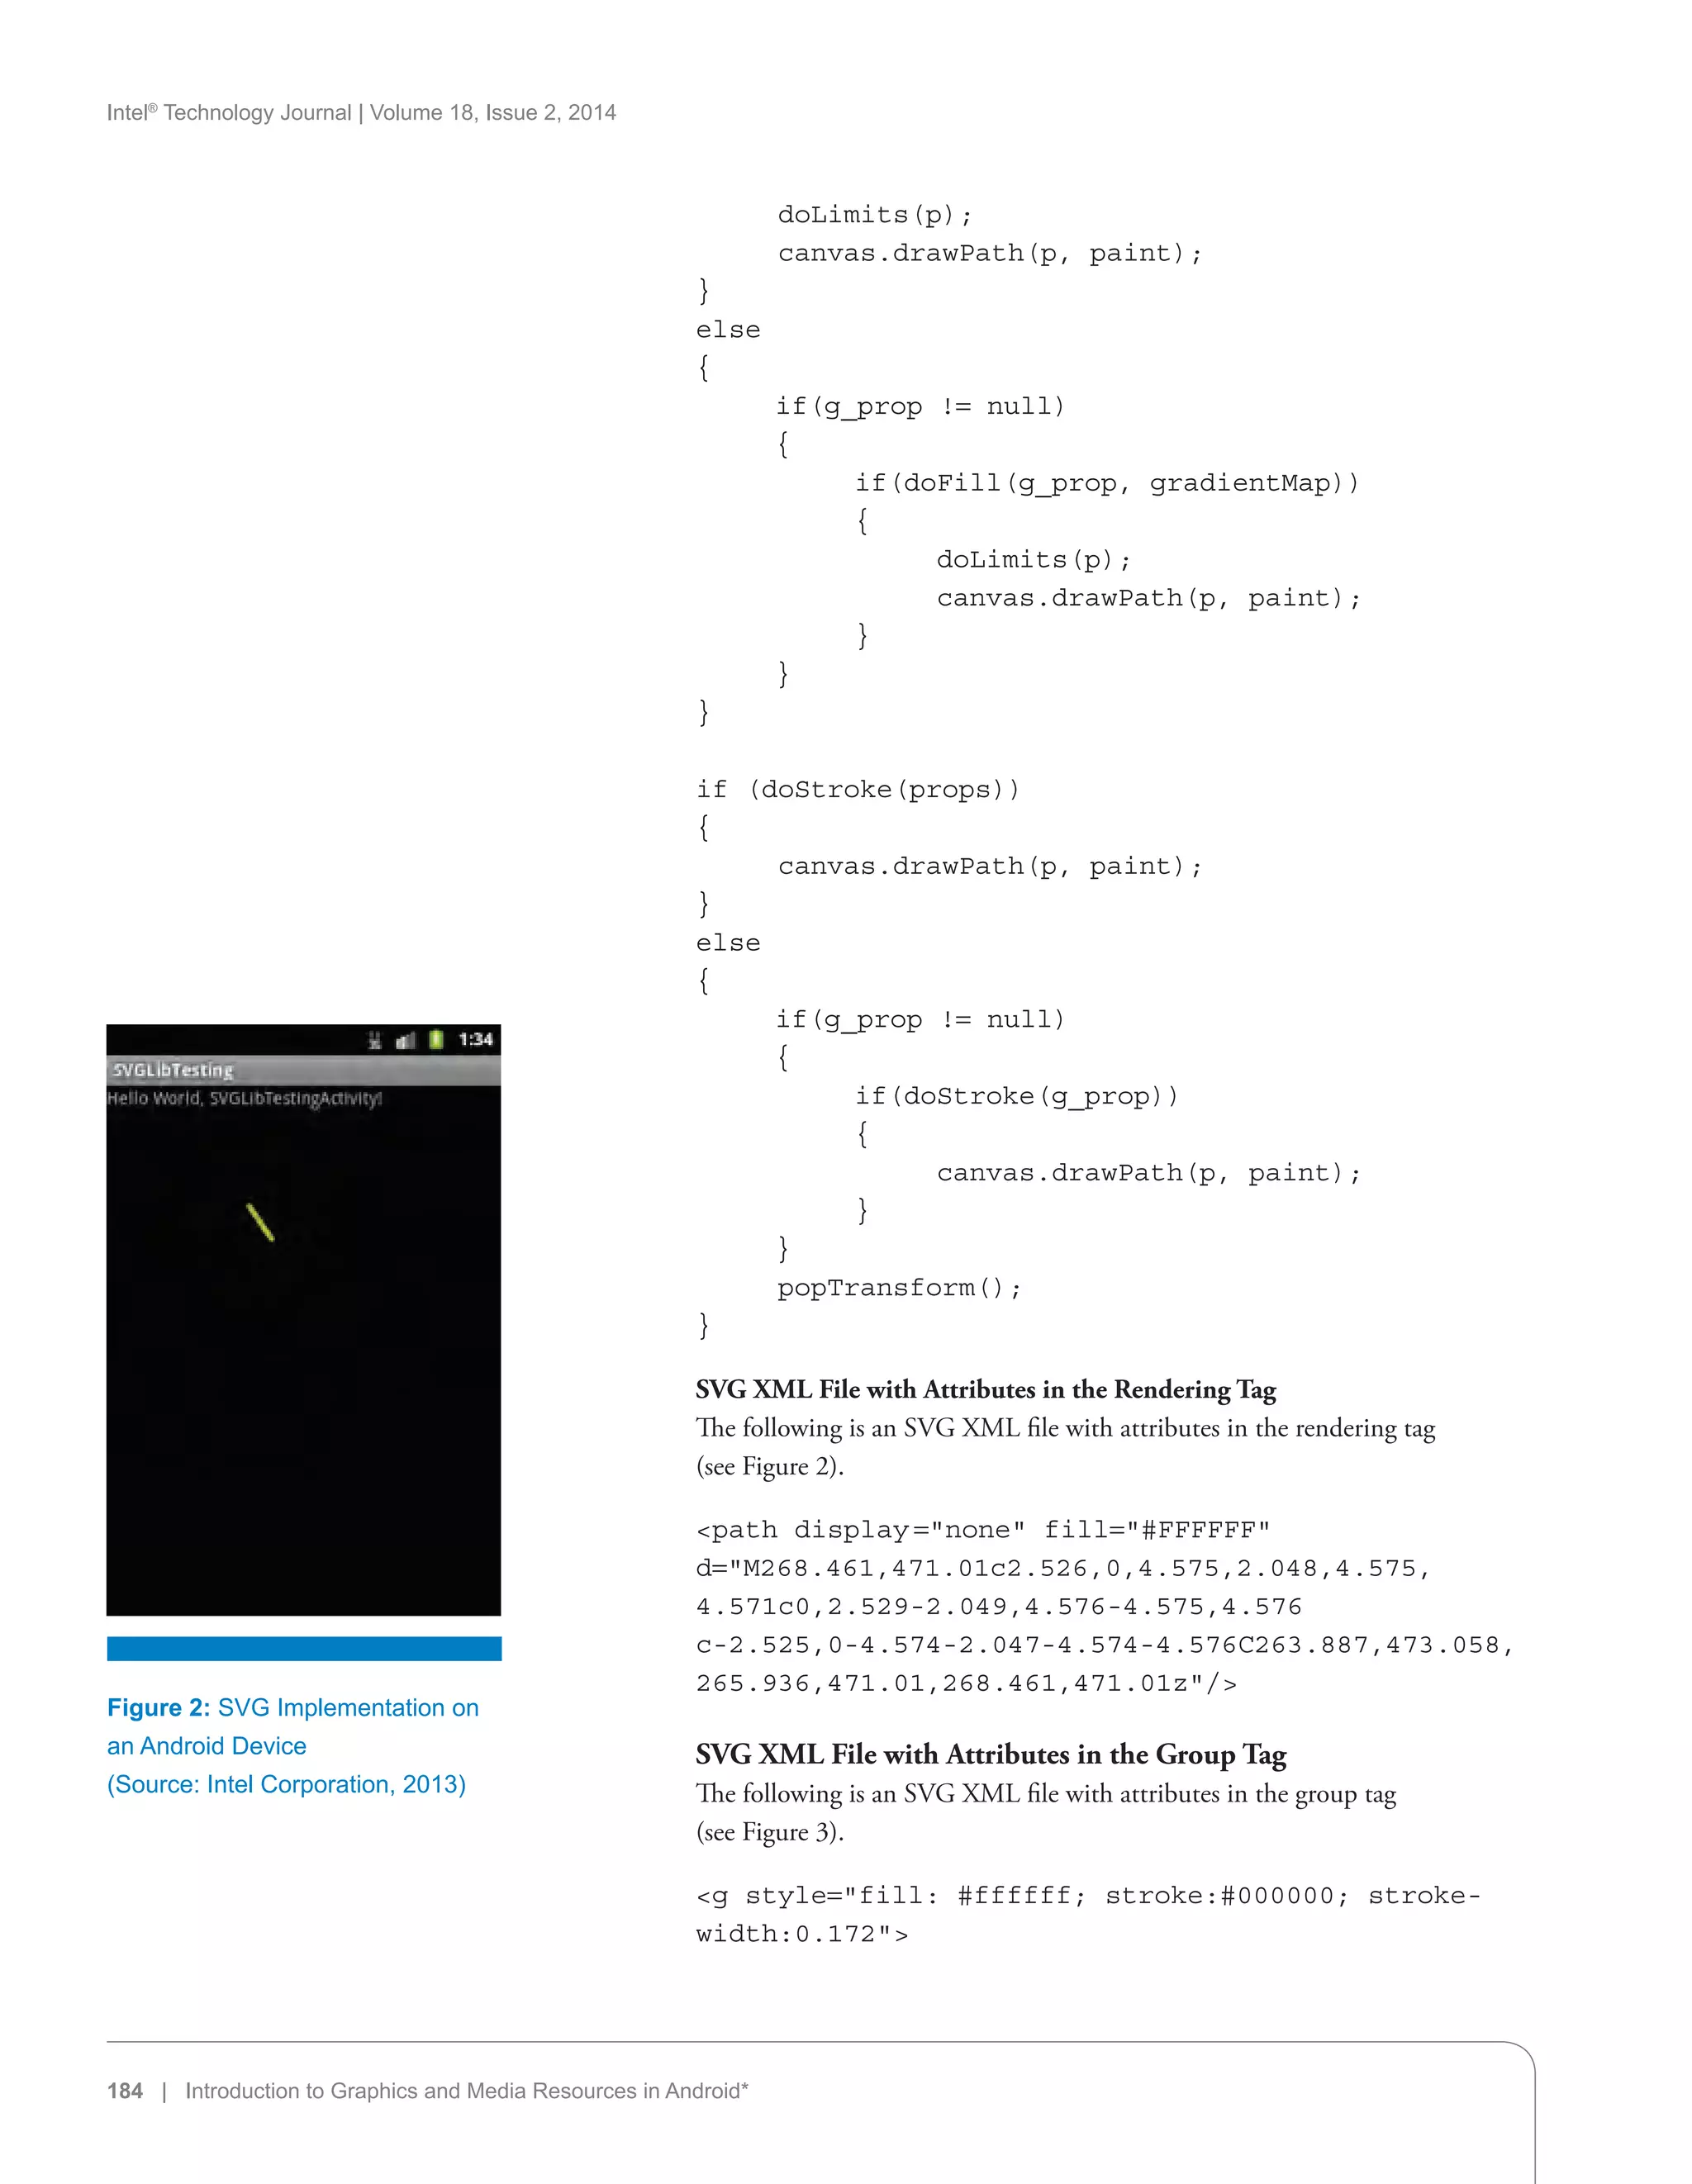
![Intel®
Technology Journal | Volume 18, Issue 2, 2014
Introduction to Graphics and Media Resources in Android* | 185
path d=M-122.304 84.285C-122.304 84.285 -122.203
86.179 -123.027 86.16C-123.851 86.141 -140.305
38.066 -160.833 40.309C-160.833 40.309 -143.05
32.956 -122.304 84.285z/
/g
Conclusion
This article provided a brief overview of mobile GPUs and how to best
optimize for GPUs included with Intel Atom processors. To create intuitive,
responsive, and engaging apps, it’s important to understand and master
graphical acceleration on Android.
References
[1] http://www.imgtec.com/powervr/insider/docs/POWERVR%20
Series5%20Graphics.SGX%20architecture%20guide%20for%20
developers.1.0.8.External.pdf
[2] http://software.intel.com/articles/intel-graphics-developers-guides
[3] http://www.khronos.org/registry/gles
[4] https://play.google.com/store/apps/details?id=com.realtechvr.
glview
[5] http://developer.android.com/sdk/ndk/index.html
[6] http://android-developers.blogspot.com/2011/02/introducing-
renderscript.html
[7] http://www.imgtec.com/powervr/insider/powervr-login.asp?
doc=PowerVRSeries5SGXArchitectureGuideforDevelopers
[8] http://www.imgtec.com/powervr/insider/powervr-login.asp?
doc=PowerVRPerformanceRecommendations
[9] http://software.intel.com/articles/intel-graphics-developers-guides
[10] http://software.intel.com/vcsource
[11] http://www.intel.com/software/gpa/
Author Biographies
Orion Granatir works as a senior software engineer in Intel’s Personal Form
Factor team, a fancy name for “Orion works on mobile video games at Intel.”
Most of his current work focuses on optimizing for the latest Intel technology
(Intel Atom, Intel SSE/AVX, multithreading, processor graphics, and so on).
While in this role, Orion has presented at GDC 2008, Gamefest 2008, GDC
Online 2008, GDC 2009, GDC 2010, GDC 2012, GDC 2013, and IDF.
Figure 3: SVG Implementation
on an Android Device
(Source: Intel Corporation,
2013)](https://image.slidesharecdn.com/c1e98a76-6293-4a30-9873-abe8040257f9-160127191746/75/2014-vol18-iss-2-intel-technology-journal-185-2048.jpg)


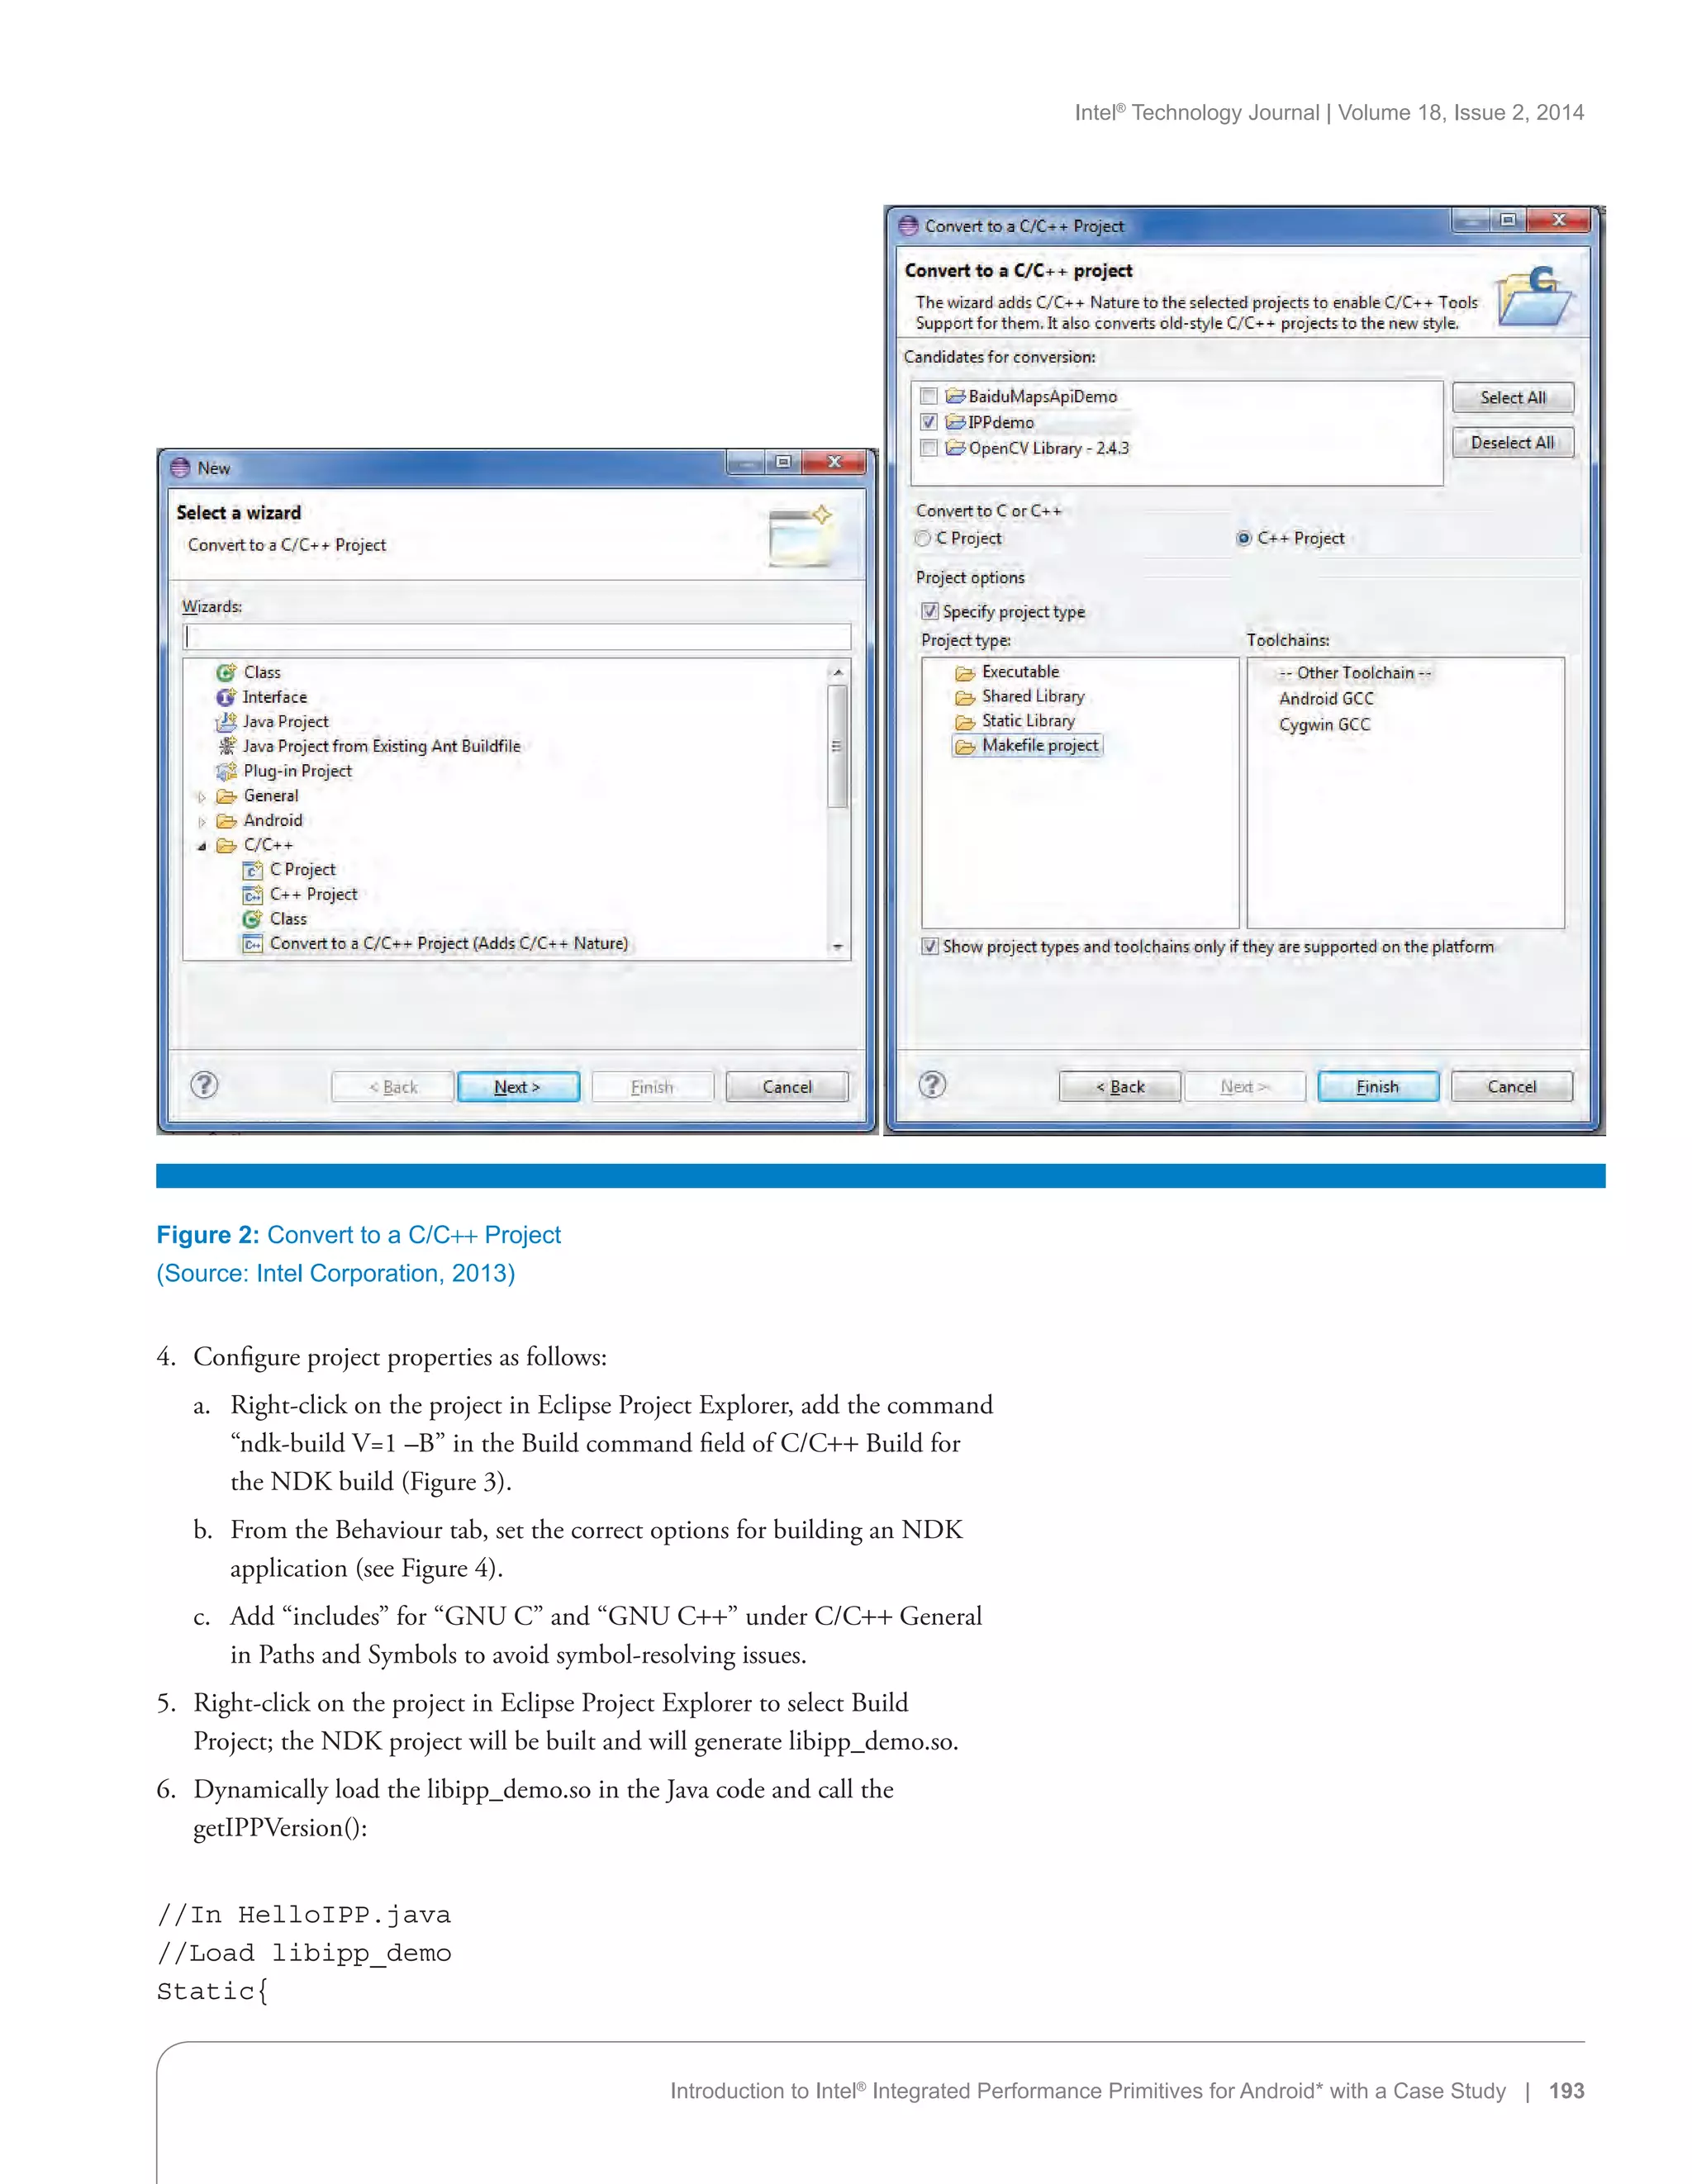

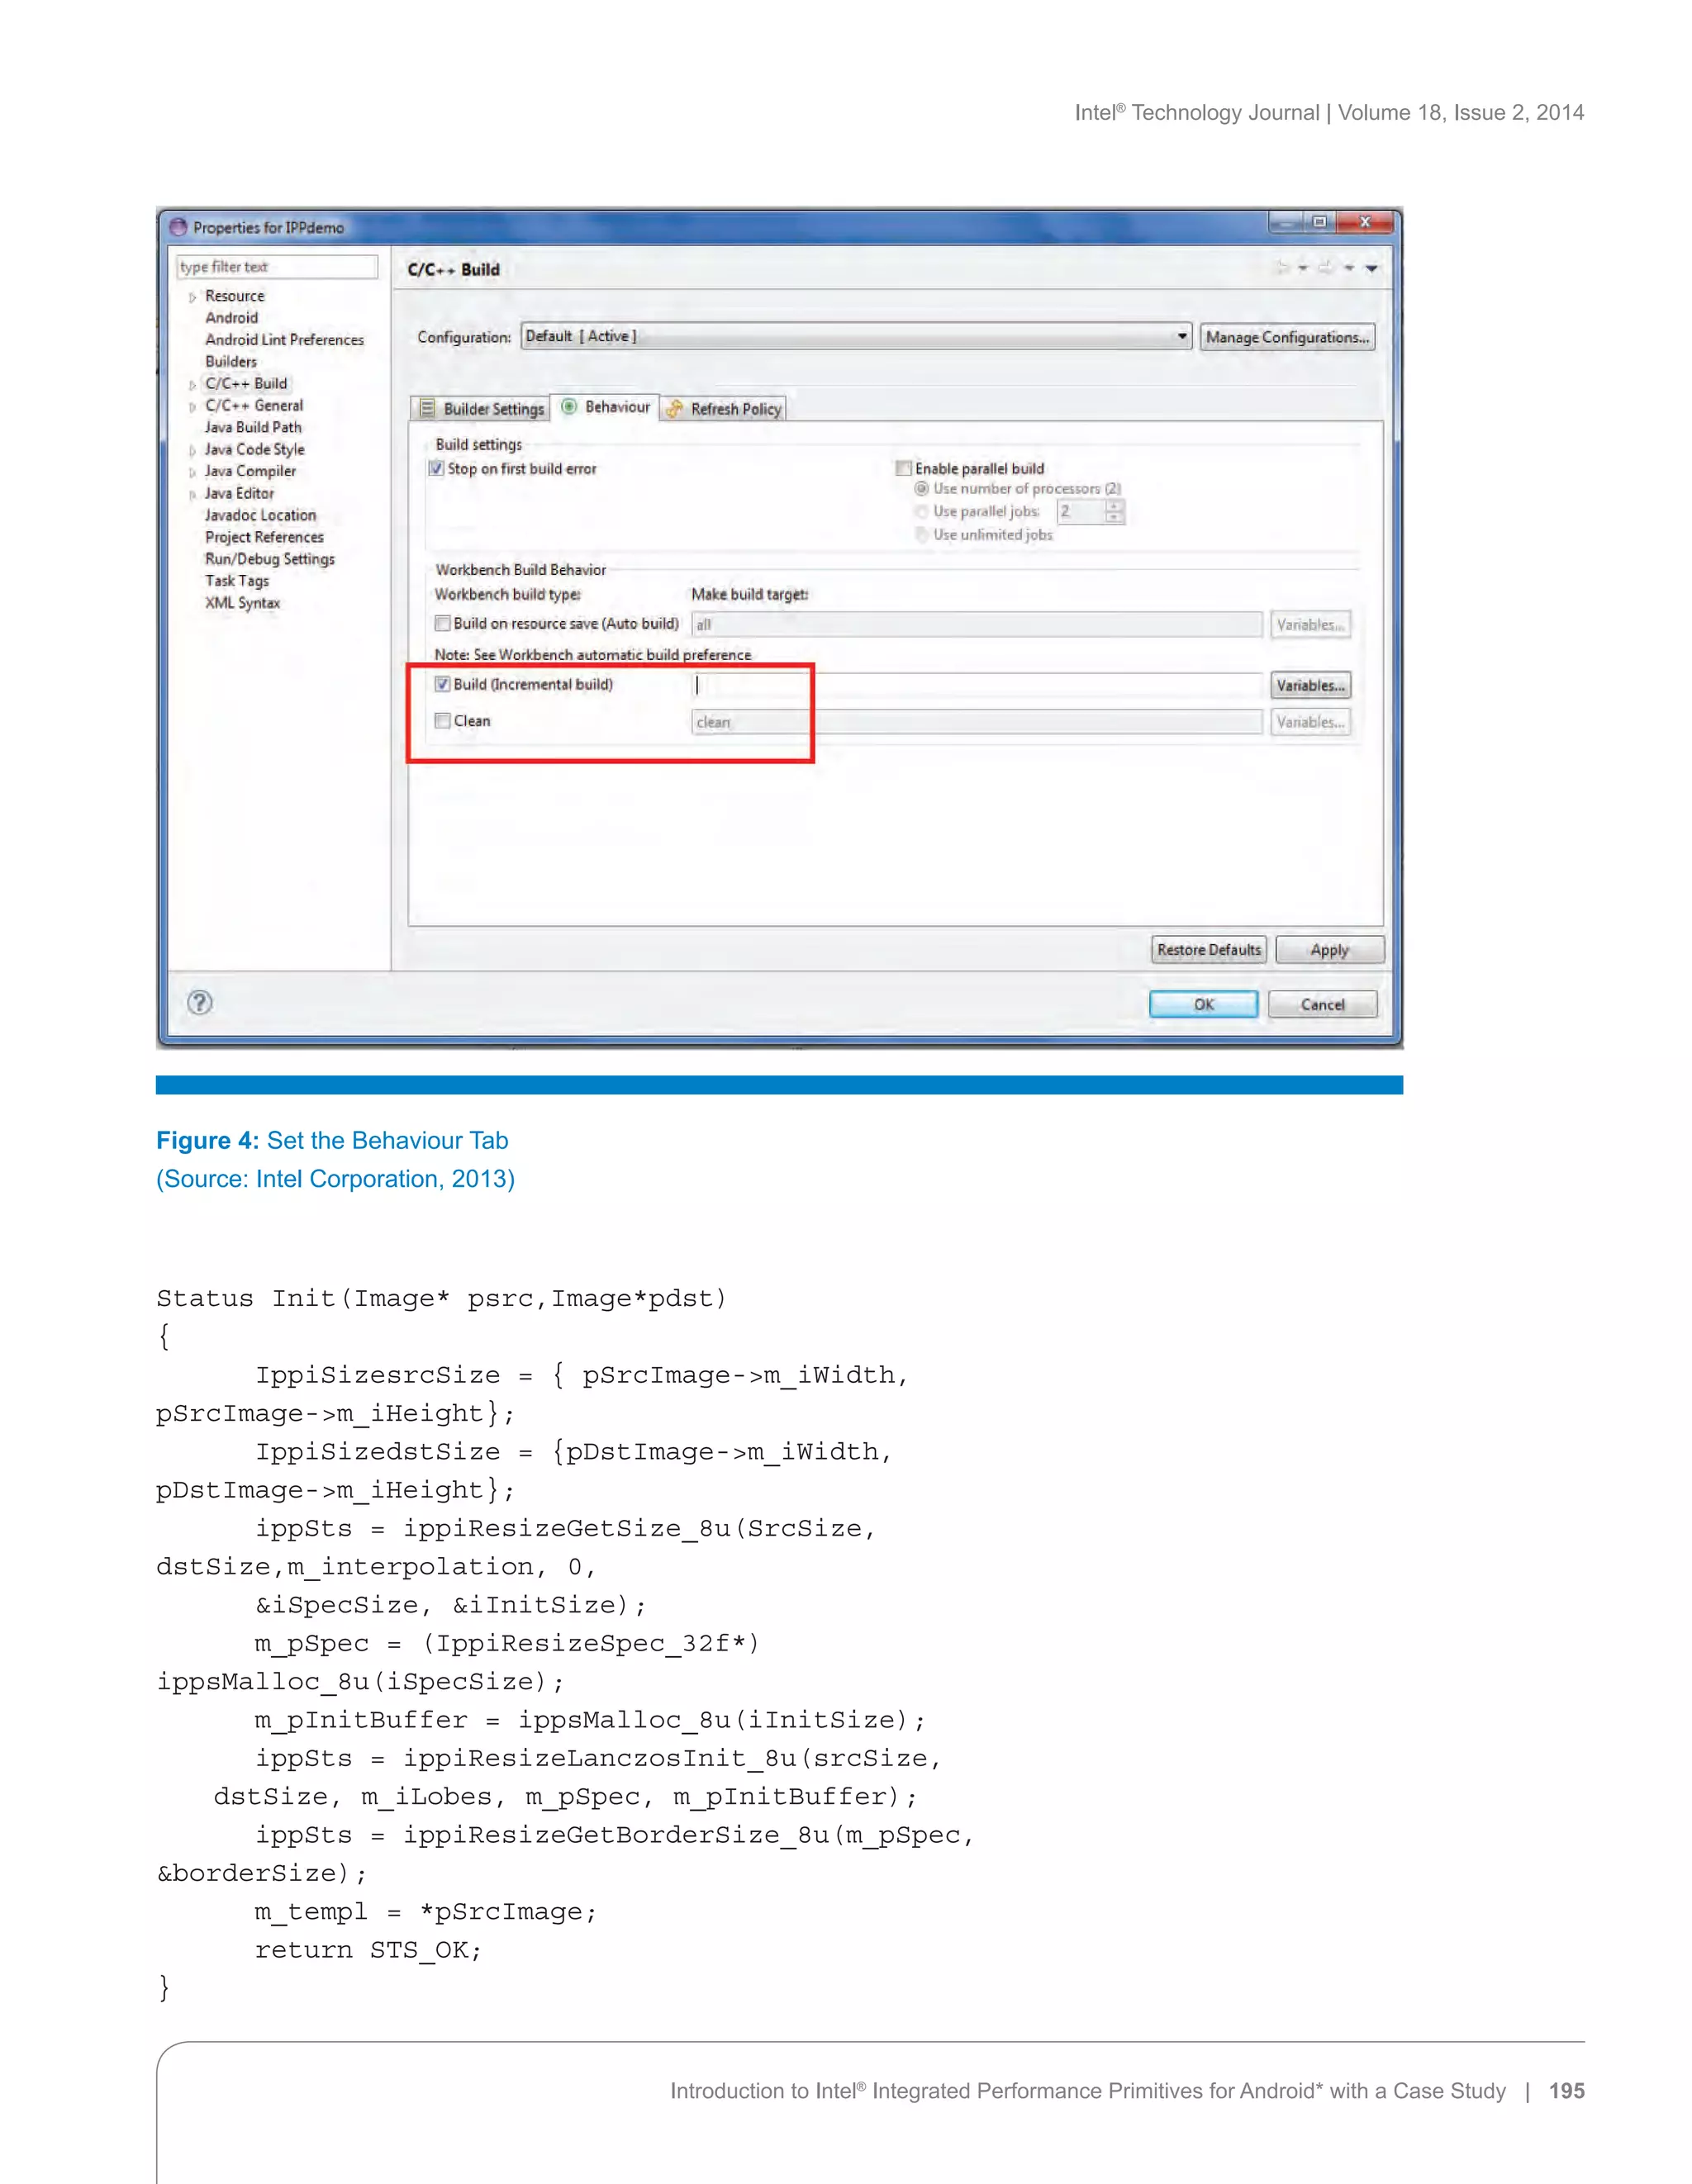


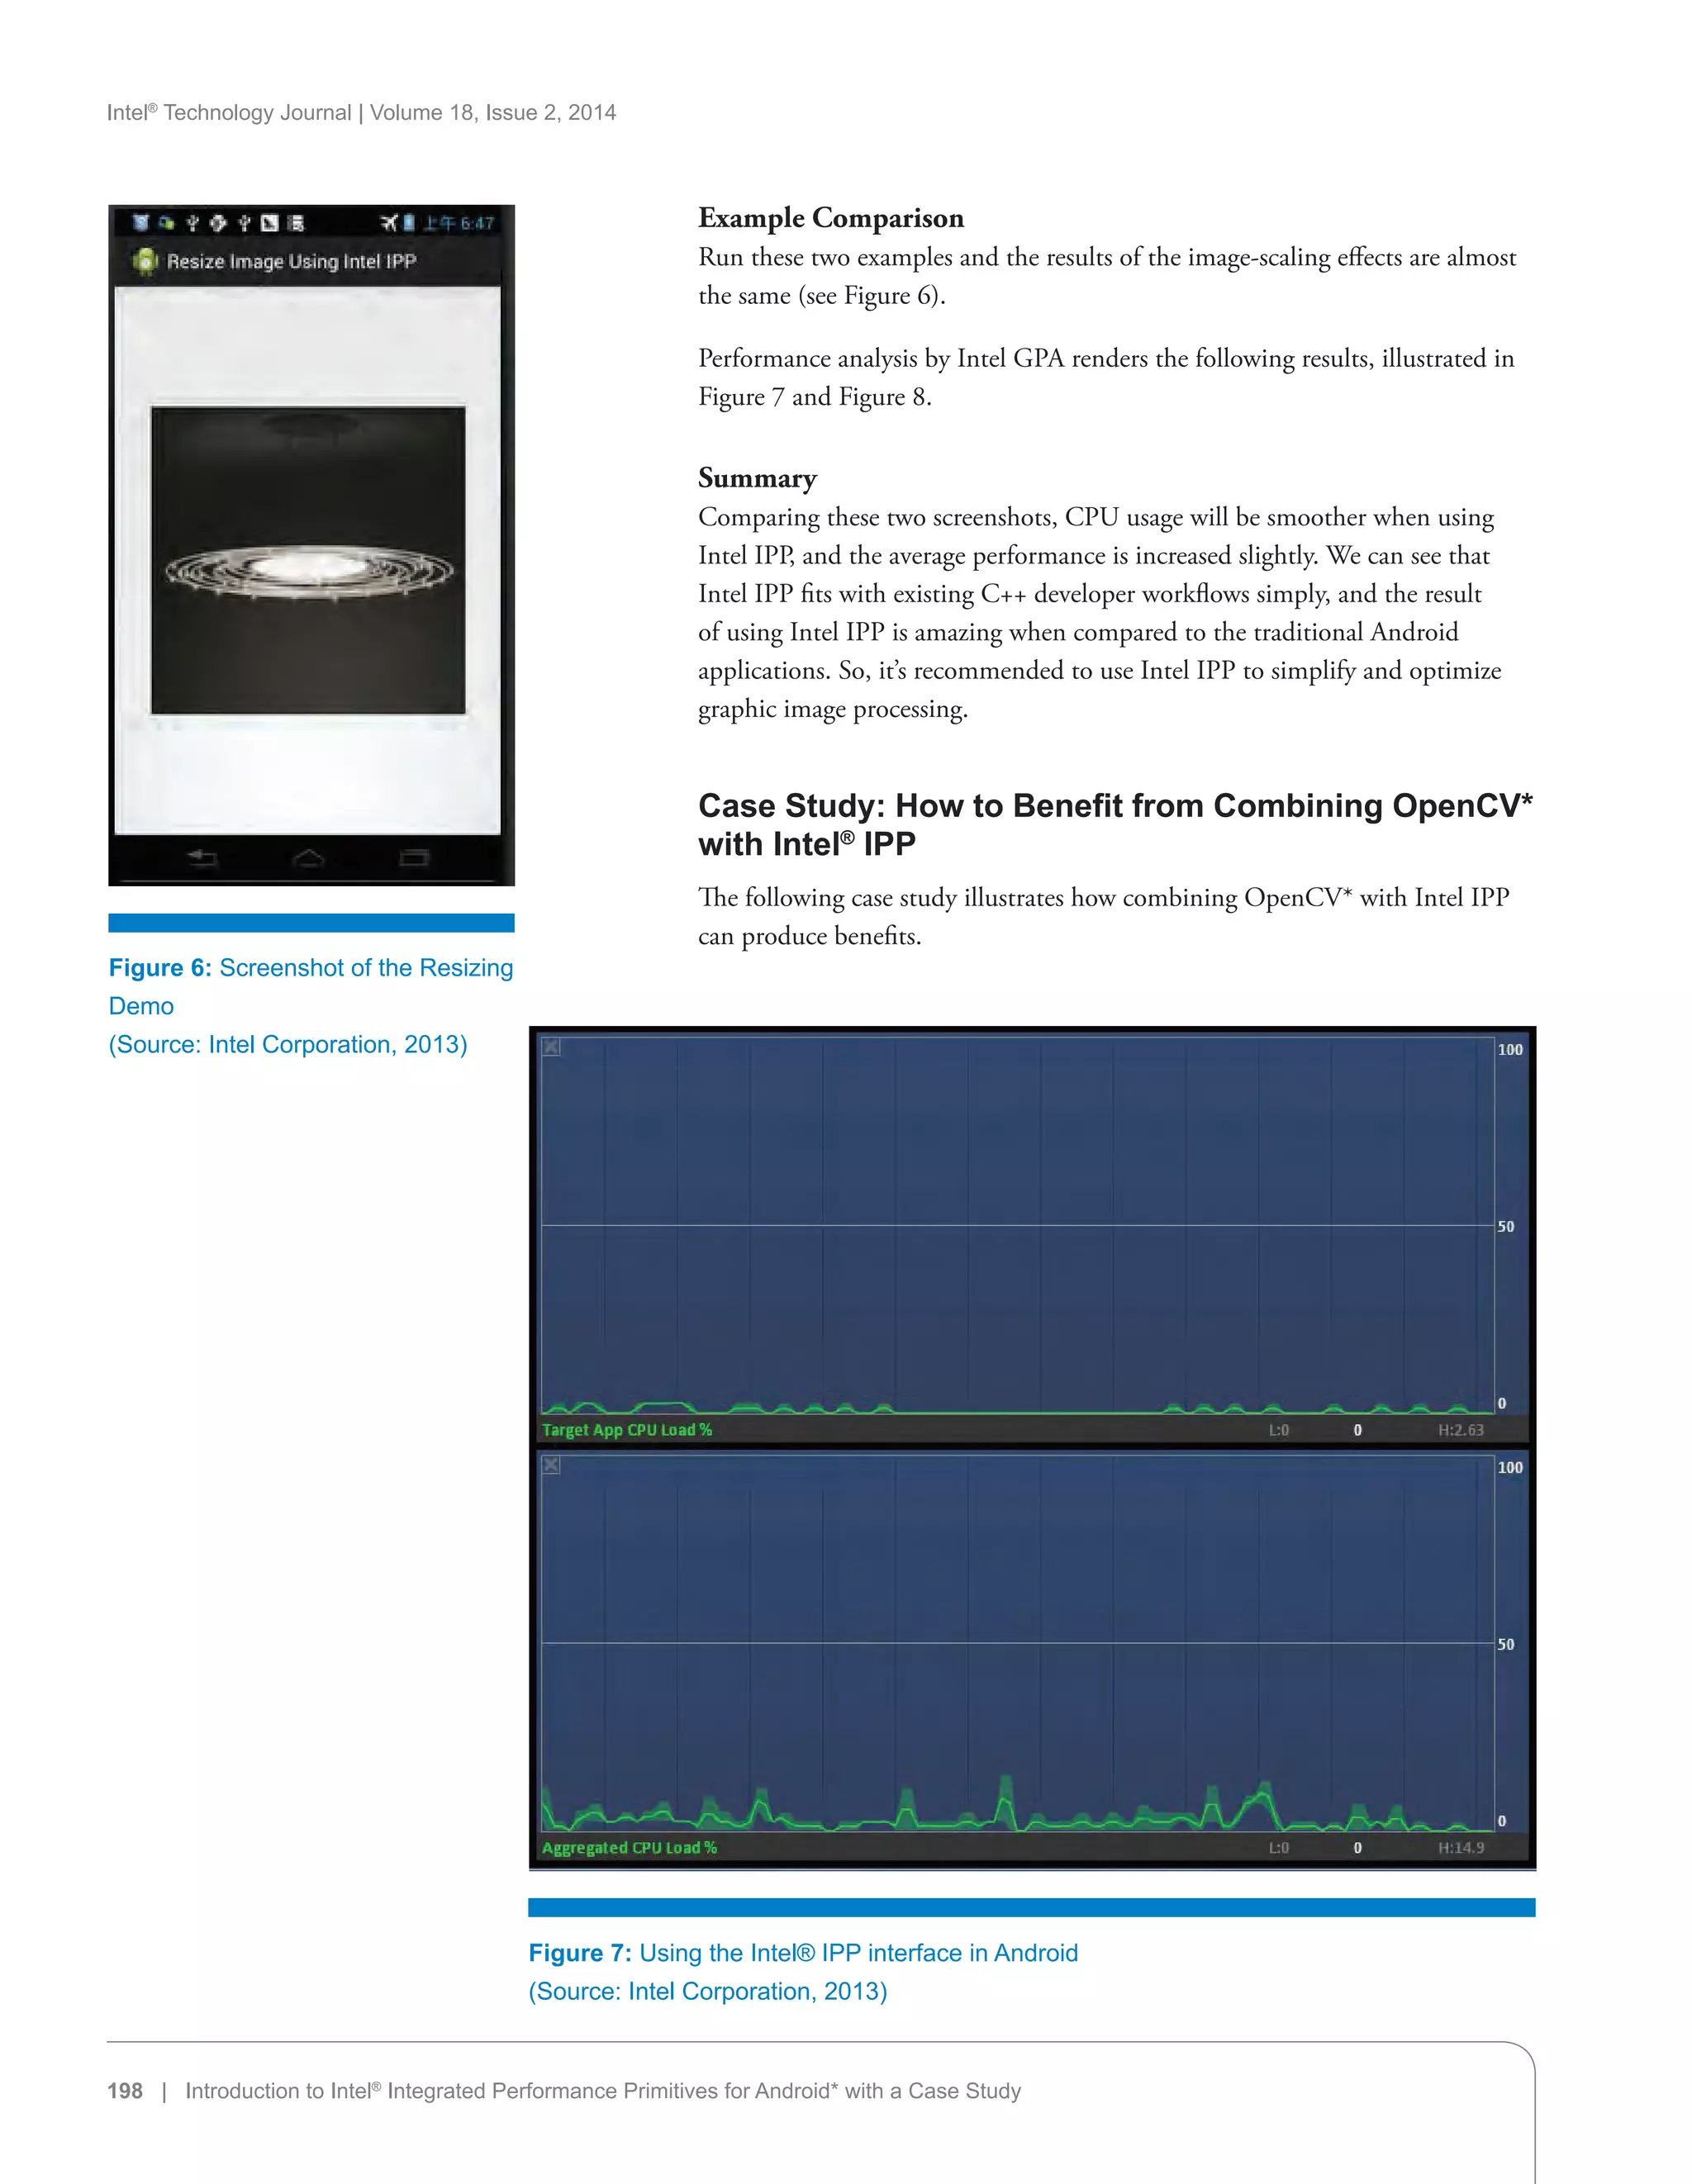

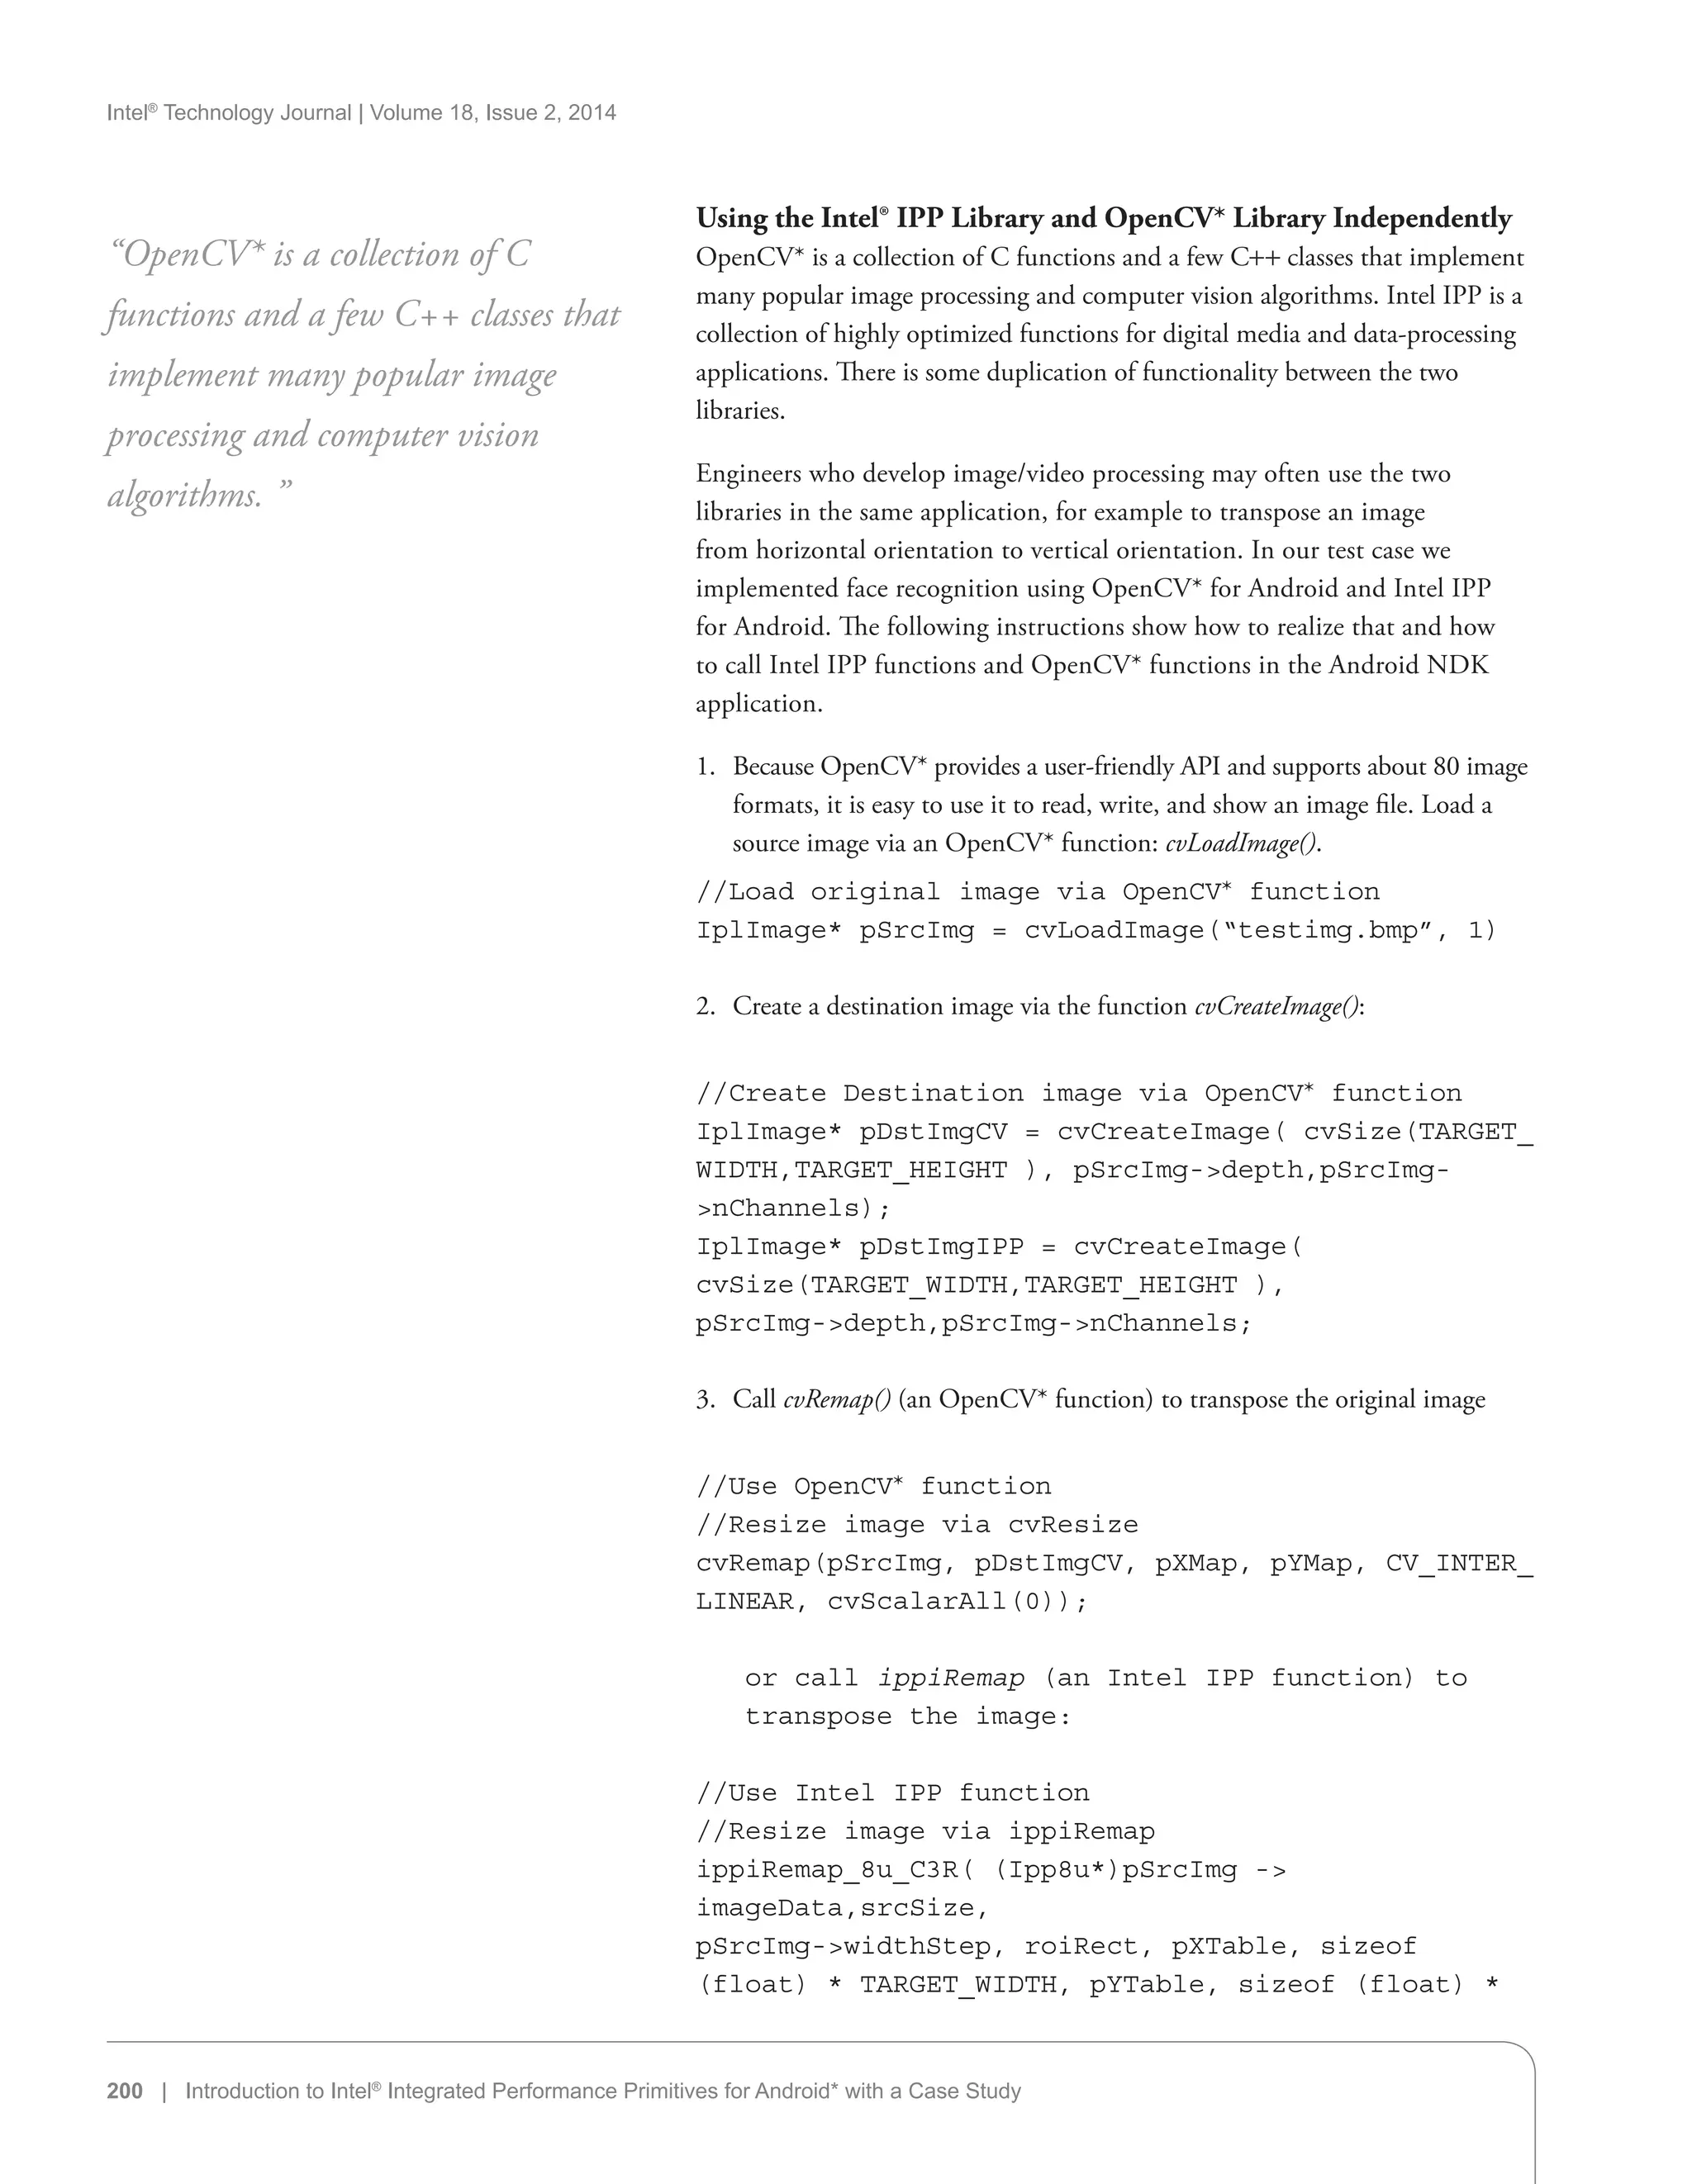
![Intel®
Technology Journal | Volume 18, Issue 2, 2014
Introduction to Intel®
Integrated Performance Primitives for Android* with a Case Study | 201
TARGET_HEIGHT, (Ipp8u*) pDstImgIPP - imageData,
pDstImgIPP - widthStep, dstSize, IPPI_INTER_NN);
4. Use an ASM algorithm to realize face recognition:
//Implement ASM algorithm via OpenCV function
faceCascade.detectMultiScale(pDstImgIPP,faces,
1.2, 2, CV_HAAR_FIND_BIGGEST_OBJECT|CV_HAAR_DO_
ROUGH_SEARCH|CV_HAAR_SCALE_IMAGE, Size(30, 30));
asmModel.fitAll(pDstImgIPP, faces, 0);
5. Link the required static libraries to the Android NDK project in Android.
mk:
OpenCV*
//Link OpenCV* Static library
//Android.mk
OPENCV_LIB_TYPE :=STATIC
include ../../sdk/native/jni/OpenCV.mk
Intel IPP
// Link IPP Static library
// Android.mk
LOCAL_STATIC_LIBRARIES :=
lbippi.a
lippcv.a
lbipps.a
lbippcore.a
6. Build and run the face recognition applications; they work well on Android
(see Figure 9).
Summary
Developing image/video processing can easily use both OpenCV* libraries
and Intel IPP libraries in the same Android NDK application. In this face
recognition example, OpenCV* is used to combine with Intel IPP through
several simple APIs. The result is acceptable and brings a slight performance
improvement. It’s easy to take advantage of the strength of Intel IPP in
OpenCV-based applications on Android.
References
[1] Intel® Integrated Performance Primitives – Documentation: How
to use IPP to develop the program. URL: http://software.Intel
.com/en-us/articles/Intel-integrated-performance-primitives-
documentation.
[2] What’s New in Intel® Integrated Performance Primitives (Intel®
IPP) 8.0. URL:http://software.Intel.com/en-us/articles/Intel-ipp-
80-library-whats-new/
Figure 9: OpenCV Demo Screenshot
on Android
(Source: Intel Corporation, 2013)](https://image.slidesharecdn.com/c1e98a76-6293-4a30-9873-abe8040257f9-160127191746/75/2014-vol18-iss-2-intel-technology-journal-201-2048.jpg)
![Intel®
Technology Journal | Volume 18, Issue 2, 2014
202 | Introduction to Intel®
Integrated Performance Primitives for Android* with a Case Study
[3] Beacon Mountain: Beacon Mountain provides productivity-
oriented design, coding, and debugging tools for native apps
targeting Android-based ARM and Intel® architecture -based
devices. URL: www.intel.com/software/BeaconMountain
[4] Intel® Integrated Performance Primitives Reference Manual
Document Number: A70805-036US.
[5] Using Intel® IPP with OpenCV: This document shows how to
use Intel® IPP with the latest OpenCV as well as how to integrate
Intel® IPP into OpenCV. URL: http://software.Intel.com/en-us/
articles/using-Intel-ipp-with-opencv-21
[6] Beginning with the Android NDK: This document shows how to
develop with the Android NDK using C++ (a Chinese blog). URL:
http://www.cnblogs.com/hibraincol/archive/2011/05/30/2063847.
html
Author Biography
Zhen Zhou earned an MSc degree in software engineering from Shanghai
Jiaotong University. He joined Intel in 2011 as an application engineer in
the Developer Relations Division Mobile Enabling Team. He worked with
internal stakeholders and external ISVs, SPs, and carriers in the new usage
model initiative and prototype development on the Intel Atom processor,
traditional Intel architecture and embedded Intel architecture platforms, to
extend the Intel architecture computing power and ecosystem from the PC
screen to mobile in handheld devices, tablets, and consumer devices. Zhen can
be reached at zhen.zhou@intel.com.](https://image.slidesharecdn.com/c1e98a76-6293-4a30-9873-abe8040257f9-160127191746/75/2014-vol18-iss-2-intel-technology-journal-202-2048.jpg)