SlideShare a Scribd company logo
1 of 34
Download to read offline
2008 STEERING
Power Steering - Ranger
SPECIFICATIONS
MATERIAL SPECIFICATIONS
a Capacities listed are average system capacities and may vary.
TORQUE SPECIFICATIONS
DESCRIPTION & OPERATION
POWER STEERING
The power steering system consists of the following components:
 Power steering pump
 Power steering fluid reservoir
 Power steering pressure and return lines/hoses
Item Specification Fill Capacity
MERCON® V Automatic
Transmission Fluid
XT-5-QM (or XT-5-QMC) (US);
CXT-5-LM12 (Canada)
MERCON® V 1L (2.1 pt)a
Premium Long-Life Grease
XG-1-C or XG-1-K (US); CXG-1-
C (Canada)
ESA-M1C75-B -
Description Nm lb-ft
Inner tie rod 100 74
Lower steering column shaft-to-steering gear bolt 55 41
Outer tie-rod end nut 80 59
Power steering fluid cooler nuts 40 30
Power steering fluid reservoir bolts 14 10
Power steering fluid reservoir nut (3.0L) 14 10
Pressure line-to-pump fitting 65 48
Power steering pump bolts (2.3L) 23 17
Power steering pump bolts (3.0L and 4.0L) 25 18
Power steering pump pulley bolts (3.0L and 4.0L) 25 18
Steering gear nuts 150 111
Steering line clamp plate nut 35 26
Tie-rod jam nut 80 59
2008 Ford Ranger
2008 STEERING Power Steering - Ranger
2008 Ford Ranger
2008 STEERING Power Steering - Ranger
Microsoft
Wednesday, November 11, 2009 11:21:15 AM Page 1 © 2005 Mitchell Repair Information Company, LLC.
Microsoft
Wednesday, November 11, 2009 11:21:20 AM Page 1 © 2005 Mitchell Repair Information Company, LLC.
 Power steering fluid cooler
 Power steering gear
 Inner tie rod
The power steering system uses a vane-type pump to move the fluid from the reservoir to the steering gear and
through the rest of the steering hydraulic system. The power steering pump is mounted to the engine and driven
by the engine accessory drive belt. Power steering fluid flows into the pump from the reservoir. The power
steering fluid is then trapped between the pump vanes and moved to the high-pressure side of the pump creating
a flow of fluid. The restriction of this flow by the steering gear creates the pressure that provides the steering
assist. A combined pressure relief/flow valve is built into the pump to control the maximum pressure and flow
provided to the steering system. This action prevents damage to the system and provides the correct level of
assist during all engine speeds. While under pressure, the power steering fluid flows through the high-pressure
power steering line to the steering gear. The fluid exits the gear and flows through the return line, cooler and
finally to the reservoir. The reservoir slows the fluid, allows air to escape and filters the fluid before returning it
to the pump.
DIAGNOSTIC TESTS
POWER STEERING
Refer to STEERING SYSTEM - GENERAL INFORMATION article.
REMOVAL & INSTALLATION
POWER STEERING FLUID RESERVOIR - 2.3L & 4.0L
Material
Item Specification
MERCON® V Automatic Transmission Fluid
XT-5-QM (or XT-5-QMC) (US); CXT-5-LM12
(Canada)
MERCON® V
2008 Ford Ranger
2008 STEERING Power Steering - Ranger
Microsoft
Wednesday, November 11, 2009 11:21:15 AM Page 2 © 2005 Mitchell Repair Information Company, LLC.
Fig. 1: Identifying Power Steering Fluid Reservoir - 2.3L With Torque Specifications
Courtesy of FORD MOTOR CO.
Item Part Number Description
1 W503924
Power steering fluid reservoir bolts (3
required)
2 3R700 Power steering fluid reservoir
3 3A713 Return hose
4 3659 Power steering pump supply hose
2008 Ford Ranger
2008 STEERING Power Steering - Ranger
Microsoft
Wednesday, November 11, 2009 11:21:15 AM Page 3 © 2005 Mitchell Repair Information Company, LLC.
Fig. 2: Exploded View Of Power Steering Fluid Reservoir - 4.0L Engine With Torque Specifications
Courtesy of FORD MOTOR CO.
REMOVAL & INSTALLATION
Item Part Number Description
1 3659 Power steering pump supply hose
2 3A005 Return hose
3 N606678
Power steering fluid reservoir bolts (2
required)
4 3R700 Power steering fluid reservoir
CAUTION: While repairing the power steering system, care should be taken to
prevent the entry of foreign material or failure of the power steering
2008 Ford Ranger
2008 STEERING Power Steering - Ranger
Microsoft
Wednesday, November 11, 2009 11:21:15 AM Page 4 © 2005 Mitchell Repair Information Company, LLC.
All vehicles
1. Using a suitable suction device, remove the power steering fluid from the reservoir.
2. Compress the clamp and disconnect the return hose.
3. Compress the clamp and disconnect the power steering pump supply hose.
2.3L engines
4. Remove the 3 bolts and the power steering fluid reservoir.
 To install, tighten to 14 Nm (10 lb-ft).
4.0L engines
5. Remove the 2 bolts and the power steering fluid reservoir.
 To install, tighten to 14 Nm (10 lb-ft).
All vehicles
6. To install, reverse the removal procedure.
7. Fill the power steering system. For additional information, refer to STEERING SYSTEM - GENERAL
INFORMATION article.
POWER STEERING FLUID RESERVOIR - 3.0L
Material
components may result.
CAUTION: Do not allow power steering fluid to contact the engine accessory
drive belt or the belt may be damaged.
Item Specification
MERCON® V Automatic Transmission Fluid
XT-5-QM (or XT-5-QMC) (US); CXT-5-LM12
(Canada)
MERCON® V
2008 Ford Ranger
2008 STEERING Power Steering - Ranger
Microsoft
Wednesday, November 11, 2009 11:21:15 AM Page 5 © 2005 Mitchell Repair Information Company, LLC.
Fig. 3: Exploded View Of Power Steering Fluid Reservoir - 3.0L Engine With Torque Specifications
Courtesy of FORD MOTOR CO.
REMOVAL & INSTALLATION
Item Part Number Description
1 W503923
Power steering fluid reservoir bolts (2
required)
2 W520101 Power steering fluid reservoir nut
3 3R700 Power steering fluid reservoir
4 CS7617 Power steering pump supply hose
5 3F731 Return hose
CAUTION: While repairing the power steering system, care should be taken to
2008 Ford Ranger
2008 STEERING Power Steering - Ranger
Microsoft
Wednesday, November 11, 2009 11:21:15 AM Page 6 © 2005 Mitchell Repair Information Company, LLC.
1. Using a suitable suction device, remove the power steering fluid from the reservoir.
2. Compress the clamp and disconnect the return hose.
3. Compress the clamp and disconnect the power steering pump supply hose.
4. Remove the power steering fluid reservoir nut.
 To install, tighten to 14 Nm (10 lb-ft).
5. Remove the 2 bolts and the power steering fluid reservoir.
 To install, tighten to 14 Nm (10 lb-ft).
6. To install, reverse the removal procedure.
7. Fill the power steering system. For additional information, refer to STEERING SYSTEM - GENERAL
INFORMATION article.
POWER STEERING PUMP - 2.3L
Special Tools
Material
prevent the entry of foreign material or failure of the power steering
components may result.
CAUTION: Do not allow power steering fluid to contact the engine accessory
drive belt or the belt may be damaged.
Illustration Tool Name Tool Number
Installer Set, Teflon® Seal
211-D027 (D90P-3517-A) or
equivalent
Item Specification
MERCON® V Automatic Transmission Fluid
XT-5-QM (or XT-5-QMC) (US); CXT-5-LM12
(Canada)
MERCON® V
2008 Ford Ranger
2008 STEERING Power Steering - Ranger
Microsoft
Wednesday, November 11, 2009 11:21:15 AM Page 7 © 2005 Mitchell Repair Information Company, LLC.
Fig. 4: Identifying Power Steering Pump - 2.3L With Torque Specifications
Courtesy of FORD MOTOR CO.
REMOVAL & INSTALLATION
1. Using a suitable suction device, remove the power steering fluid from the reservoir.
2. Remove the power steering pump pulley. For additional information, refer to Power Steering Pump
Pulley - 2.3L.
3. Compress the clamp and disconnect the power steering pump supply hose.
Item Part Number Description
1 3A719 Pressure line-to-pump fitting
2 W705952 Power steering pump bolt (4 required)
3 C56697 Power steering pump supply hose
4 3A674 Power steering pump
5 N803257 Teflon® seal
CAUTION: While repairing the power steering system, care should be taken to
prevent the entry of foreign material or failure of the power steering
components may result.
CAUTION: Do not allow power steering fluid to contact the accessory drive belt
or the belt may be damaged.
2008 Ford Ranger
2008 STEERING Power Steering - Ranger
Microsoft
Wednesday, November 11, 2009 11:21:15 AM Page 8 © 2005 Mitchell Repair Information Company, LLC.
4. Disconnect the pressure line-to-pump fitting.
 Remove and discard the Teflon® seal.
 To install, tighten to 65 Nm (48 lb-ft).
5. Remove the 4 power steering pump bolts and the power steering pump.
 To install, tighten to 23 Nm (17 lb-ft).
6. To install, reverse the removal procedure.
 Using the special tool, install a new Teflon® seal on the pressure line-to-pump fitting.
 Fill the power steering system. For additional information, refer to STEERING SYSTEM -
GENERAL INFORMATION article.
Fig. 5: Installing Teflon(R) Seal Using Special Tool
Courtesy of FORD MOTOR CO.
POWER STEERING PUMP - 3.0L
Special Tools
Material
CAUTION: A new Teflon® seal must be installed any time the pressure line
fitting is disconnected from the power steering pump or a fluid leak
may occur.
Illustration Tool Name Tool Number
Installer Set, Teflon® Seal
211-D027 (D90P-3517-A) or
equivalent
Item Specification
MERCON® V Automatic Transmission Fluid
XT-5-QM (or XT-5-QMC) (US); CXT-5-LM12
(Canada)
MERCON® V
2008 Ford Ranger
2008 STEERING Power Steering - Ranger
Microsoft
Wednesday, November 11, 2009 11:21:15 AM Page 9 © 2005 Mitchell Repair Information Company, LLC.
Fig. 6: Exploded View Of Power Steering Pump - 3.0L Engine With Torque Specifications
Courtesy of FORD MOTOR CO.
REMOVAL & INSTALLATION
1. Using a suitable suction device, remove the power steering fluid from the reservoir.
2. Remove the power steering pump pulley. For additional information, refer to Power Steering Pump
Pulley - 3.0L, 4.0L.
3. Disconnect the pressure line-to-pump fitting.
Item Part Number Description
1 N605784 Power steering pump bolt (3 required)
2 3R700 Power steering fluid reservoir
3 CS7617 Power steering pump supply hose
4 3A674 Power steering pump
5 N803257 Teflon® seal
6 3A719 Pressure line-to-pump fitting
CAUTION: While repairing the power steering system, care should be taken to
prevent the entry of foreign material or failure of the power steering
components may result.
CAUTION: Do not allow power steering fluid to contact the engine accessory
drive belt or the belt may be damaged.
2008 Ford Ranger
2008 STEERING Power Steering - Ranger
Microsoft
Wednesday, November 11, 2009 11:21:16 AM Page 10 © 2005 Mitchell Repair Information Company, LLC.
 Remove and discard the Teflon® seal.
 To install, tighten to 65 Nm (48 lb-ft).
4. Compress the clamp and disconnect the power steering pump supply hose.
5. Remove the 3 bolts and the power steering pump.
 To install, tighten to 25 Nm (18 lb-ft).
6. To install, reverse the removal procedure.
 Using the special tool, install a new Teflon® seal on the pressure line-to-pump fitting.
 Fill the power steering system. For additional information, refer to STEERING SYSTEM -
GENERAL INFORMATION article.
Fig. 7: Installing Teflon(R) Seal Using Special Tool
Courtesy of FORD MOTOR CO.
POWER STEERING PUMP - 4.0L
Special Tools
Material
CAUTION: A new Teflon® seal must be installed any time the pressure line
fitting is disconnected from the power steering pump or a fluid leak
may occur.
Illustration Tool Name Tool Number
Installer Set, Teflon® Seal
211-D027 (D90P-3517-A) or
equivalent
Item Specification
MERCON® V Automatic Transmission Fluid
XT-5-QM (or XT-5-QMC) (US); CXT-5-LM12
(Canada)
MERCON® V
2008 Ford Ranger
2008 STEERING Power Steering - Ranger
Microsoft
Wednesday, November 11, 2009 11:21:16 AM Page 11 © 2005 Mitchell Repair Information Company, LLC.
Fig. 8: Exploded View Of Power Steering Pump - 4.0L With Torque Specifications
Courtesy of FORD MOTOR CO.
REMOVAL & INSTALLATION
1. Using a suitable suction device, remove the power steering fluid from the reservoir.
2. Remove the engine cooling fan. For additional information, refer to ENGINE COOLING article.
3. Remove the power steering pump pulley. For additional information, refer to Power Steering Pump
Pulley - 3.0L, 4.0L.
Item Part Number Description
1 3A719 Pressure line-to-pump fitting
2 3659 Power steering pump supply hose
3 W700839 Power steering pump bolt (3 required)
4 3A674 Power steering pump
5 N803257 Teflon® seal
CAUTION: While repairing the power steering system, care should be taken to
prevent the entry of foreign material or failure of the power steering
components may result.
CAUTION: Do not allow power steering fluid to contact the accessory drive belt
or the belt may be damaged.
2008 Ford Ranger
2008 STEERING Power Steering - Ranger
Microsoft
Wednesday, November 11, 2009 11:21:16 AM Page 12 © 2005 Mitchell Repair Information Company, LLC.
4. Compress the clamp and disconnect the power steering pump supply hose from the power steering fluid
reservoir.
5. Disconnect the pressure line-to-pump fitting.
 To install, tighten to 65 Nm (48 lb-ft).
6. Compress the clamp and disconnect the power steering pump supply hose from the power steering pump.
7. Remove the 3 bolts and the power steering pump.
 Tighten to 25 Nm (18 lb-ft).
8. To install, reverse removal procedure.
 Using the special tool, install a new Teflon® seal on the pressure line-to-pump fitting.
 Fill the power steering system. For additional information, refer to STEERING SYSTEM -
GENERAL INFORMATION article.
Fig. 9: Installing Teflon(R) Seal Using Special Tool
Courtesy of FORD MOTOR CO.
POWER STEERING PUMP PULLEY - 2.3L
Special Tools
CAUTION: A new Teflon® seal must be installed any time the pressure line is
disconnected from the power steering pump or a fluid leak may
occur.
Illustration Tool Name Tool Number
Remover, Power Steering Pump
Pulley
211-016 (T69L-10300-B)
Installer, Power Steering Pump
Pulley
211-185 (T91P-3A733-A)
2008 Ford Ranger
2008 STEERING Power Steering - Ranger
Microsoft
Wednesday, November 11, 2009 11:21:16 AM Page 13 © 2005 Mitchell Repair Information Company, LLC.
Fig. 10: Identifying Power Steering Pump Pulley - 2.3L
Courtesy of FORD MOTOR CO.
REMOVAL
1. Remove the air cleaner outlet pipe. For additional information, refer to INTAKE AIR DISTRIBUTION
& FILTERING article.
2. Rotate the accessory drive belt tensioner counterclockwise and position the accessory drive belt aside.
Item Part Number Description
1 3D673 Power steering pump pulley
2 8620 Accessory drive belt
2008 Ford Ranger
2008 STEERING Power Steering - Ranger
Microsoft
Wednesday, November 11, 2009 11:21:16 AM Page 14 © 2005 Mitchell Repair Information Company, LLC.
Fig. 11: Locating Accessory Drive Belt Tensioner
Courtesy of FORD MOTOR CO.
3. Using the special tool, remove the power steering pump pulley.
Fig. 12: Removing Pulley Using Special Tool (211-016)
Courtesy of FORD MOTOR CO.
INSTALLATION
1. Using the special tool, install the power steering pump pulley.
CAUTION: Do not install a power steering pump pulley that has been removed
and installed twice or pulley failure and/or pump damage may occur.
Inspect the pulley for paint marks in the web area near the hub. If
there are 2 paint marks, discard the pulley and install a new one. If
there is 1 paint mark or no paint marks, use a paint pencil to mark the
web area of the pulley near the hub.
2008 Ford Ranger
2008 STEERING Power Steering - Ranger
Microsoft
Wednesday, November 11, 2009 11:21:16 AM Page 15 © 2005 Mitchell Repair Information Company, LLC.
Fig. 13: Installing Pulley Using Special Tool (211-185)
Courtesy of FORD MOTOR CO.
2. Rotate the tensioner counterclockwise and position the belt on the power steering pump pulley.
Fig. 14: Locating Accessory Drive Belt Tensioner
Courtesy of FORD MOTOR CO.
3. Install the air cleaner outlet pipe. For additional information, refer to INTAKE AIR DISTRIBUTION &
FILTERING article.
POWER STEERING PUMP PULLEY - 3.0L, 4.0L
NOTE: For additional information on accessory drive belt routing, refer to
ACCESSORY DRIVE article.
2008 Ford Ranger
2008 STEERING Power Steering - Ranger
Microsoft
Wednesday, November 11, 2009 11:21:16 AM Page 16 © 2005 Mitchell Repair Information Company, LLC.
Fig. 15: Identifying Power Steering Pump Pulley - 3.0L, 4.0L With Torque Specifications
Courtesy of FORD MOTOR CO.
REMOVAL & INSTALLATION
1. Loosen the power steering pump pulley bolts.
2. Rotate the accessory drive belt tensioner counterclockwise and position the accessory drive belt aside.
3. Remove the 3 bolts and the power steering pump pulley.
 To install, tighten to 25 Nm (18 lb-ft).
4. To install, reverse the removal procedure.
INNER TIE ROD
Item Part Number Description
1 N605784
Power steering pump pulley bolts (3
required)
2 3A733 Power steering pump pulley
3 8620 Accessory drive belt
NOTE: 4.0L engine shown in illustration, 3.0L engine similar.
NOTE: For additional information on accessory drive belt routing, refer to
ACCESSORY DRIVE article.
2008 Ford Ranger
2008 STEERING Power Steering - Ranger
Microsoft
Wednesday, November 11, 2009 11:21:16 AM Page 17 © 2005 Mitchell Repair Information Company, LLC.
Special Tools
Material
Fig. 16: Identifying Inner Tie Rod With Torque Specifications
Courtesy of FORD MOTOR CO.
Illustration Tool Name Tool Number
Inner Tie-Rod Socket Tool 211-D029 or equivalent
Tie-Rod End Separator
211-105 (T85M-3395-A) or
equivalent
Item Specification
Premium Long-Life Grease
XG-1-C or XG-1-K (US); CXG-1-C (Canada)
ESA-M1C75-B
Item Part Number Description
1 N803637
Tie-rod jam nut (part of 3280) (2
required)
2008 Ford Ranger
2008 STEERING Power Steering - Ranger
Microsoft
Wednesday, November 11, 2009 11:21:16 AM Page 18 © 2005 Mitchell Repair Information Company, LLC.
REMOVAL & INSTALLATION
Coil spring suspension vehicles
1. Remove the wheel and tire. For additional information, refer to WHEELS & TIRES article.
2. Loosen the tie-rod jam nuts.
 To install, tighten to 80 Nm (59 lb-ft).
3. Remove the outer tie-rod end cotter pin and nut.
 Discard the cotter pin.
 To install, tighten to 80 Nm (59 lb-ft).
4. Using the special tool, disconnect the outer tie-rod end.
2 N800895 Outer tie-rod end nut (2 required)
3 3290 Outer tie-rod end (2 required)
4 3K745 Outer bellows boot clamp (2 required)
5 3C650A Inner bellows boot clamp (2 required)
6 3K661 Steering gear bellows boot (2 required)
7 3280 Inner tie rod (2 required)
8 N642569 Cotter pin (2 required)
CAUTION: The boots and clamps are designed to provide an airtight seal and protect
the internal components of the steering gear. If the seal is not airtight, the
vacuum generated during turning may draw water and foreign material
into the gear and damage internal components. Zip ties do not produce an
airtight seal and must not be used.
CAUTION: The inner ball joint grease is not compatible with water. Water and foreign
material trapped in the grease may damage the joint.
CAUTION: If present, the orientation of the vent tubes must be noted so the boots
and vent tubes may be installed in their original locations. Incorrect
venting may lead to internal component damage.
CAUTION: Do not damage the tie-rod end boot when installing the special tool.
2008 Ford Ranger
2008 STEERING Power Steering - Ranger
Microsoft
Wednesday, November 11, 2009 11:21:16 AM Page 19 © 2005 Mitchell Repair Information Company, LLC.
Fig. 17: Identifying Special Tool On Tie-Rod End
Courtesy of FORD MOTOR CO.
5. Remove the outer tie-rod end.
6. Remove the tie-rod jam nut.
7. Remove the inner and outer bellows boot clamps.
8. Remove the bellows boot.
9. Using the special tool, remove the inner tie rod.
 To install, tighten to 100 Nm (74 lb-ft).
NOTE: Count and record the number of times the outer tie-rod end turns for
assembly reference.
NOTE: If repairing the RH side, it will be necessary to pull back the LH inner
bellows boot to hold the steering gear.
CAUTION: Place the steering gear at the center position. Use a 21 mm (0.82 in)
crowfoot on the flat of the rack gear to resist rotation and to prevent
damage during removal and installation of the inner tie rod.
NOTE: The help of an assistant may be needed for removal of the RH inner tie
rod.
2008 Ford Ranger
2008 STEERING Power Steering - Ranger
Microsoft
Wednesday, November 11, 2009 11:21:16 AM Page 20 © 2005 Mitchell Repair Information Company, LLC.
Fig. 18: Inner Tie Rod And Special Tool
Courtesy of FORD MOTOR CO.
Torsion bar suspension vehicles
10. Loosen the tie-rod jam nut.
 To install, tighten to 80 Nm (59 lb-ft).
11. Remove the steering gear. For additional information, refer to Steering Gear - Rear Wheel Drive
(RWD) or Steering Gear - Four Wheel Drive (4WD).
12. Remove the outer tie-rod end and jam nut.
13. Remove the inner and outer bellows boot clamps.
14. Using the special tool, remove the inner tie rod.
 To install, tighten to 100 Nm (74 lb-ft).
Fig. 19: Locating Inner Tie Rod
Courtesy of FORD MOTOR CO.
All vehicles
NOTE: Count and record the number of times the outer tie-rod end turns for
assembly reference.
NOTE: If repairing the RH side, it will be necessary to pull back the LH inner
bellows boot to hold the steering gear.
CAUTION: Place the steering gear at the center position. Use a 21 mm (0.82 in)
crowfoot on the flat of the rack gear to resist rotation and to prevent
damage during removal and installation of the inner tie rod.
NOTE: The help of an assistant may be needed for removal of the RH inner tie
rod.
2008 Ford Ranger
2008 STEERING Power Steering - Ranger
Microsoft
Wednesday, November 11, 2009 11:21:16 AM Page 21 © 2005 Mitchell Repair Information Company, LLC.
15. Thoroughly clean and inspect all the parts to be reused. Install new parts as necessary.
16. Check that the bellows boot seal is positioned correctly over the steering gear housing bead at the large
inside diameter (ID) and is in the inner tie-rod groove at the small ID.
 Check that the bellows boot seal is not twisted and the breather tube is securely inserted into the
breather nipple at both bellows boots.
17. To install, reverse the removal procedure.
18. Check and if necessary adjust the front toe. For additional information, refer to SUSPENSION SYSTEM
- GENERAL INFORMATION article.
POWER STEERING FLUID COOLER
Material
CAUTION: Thoroughly remove any dirt or foreign material that is present. This
material is extremely harmful to the steering gear.
NOTE: Lubricate the inner tie rod inside groove with steering gear grease where
the bellows boot is clamped.
Item Specification
MERCON® V Automatic Transmission Fluid
XT-5-QM (or XT-5-QMC) (US); CXT-5-LM12
(Canada)
MERCON® V
2008 Ford Ranger
2008 STEERING Power Steering - Ranger
Microsoft
Wednesday, November 11, 2009 11:21:16 AM Page 22 © 2005 Mitchell Repair Information Company, LLC.
Fig. 20: Identifying Power Steering Fluid Cooler With Torque Specifications
Courtesy of FORD MOTOR CO.
REMOVAL & INSTALLATION
1. With the vehicle in NEUTRAL, position it on a hoist. For additional information, refer to JACKING &
LIFTING article.
2. Remove the 2 power steering fluid cooler nuts.
 To install, tighten to 40 Nm (30 lb-ft).
3. Compress the clamps and disconnect the 2 power steering fluid cooler hoses.
4. To install, reverse the removal procedure.
 Fill the power steering system. For additional information, refer to STEERING SYSTEM -
GENERAL INFORMATION article.
STEERING GEAR - REAR WHEEL DRIVE (RWD)
Special Tools
Item Part Number Description
1 3A713B Power steering fluid cooler hose
2 3A713A Power steering fluid cooler hose
3 N800169
Power steering fluid cooler nuts (2
required)
4 3F780 Power steering fluid cooler
CAUTION: While repairing the power steering system, care should be taken to
prevent the entry of foreign material or failure of the power steering
components may result.
Illustration Tool Name Tool Number
Remover, Tie-Rod End
211-001 (TOOL-3290-D) or
equivalent
2008 Ford Ranger
2008 STEERING Power Steering - Ranger
Microsoft
Wednesday, November 11, 2009 11:21:16 AM Page 23 © 2005 Mitchell Repair Information Company, LLC.
Fig. 21: Identifying Steering Gear - Rear Wheel Drive (RWD) With Torque Specifications
Courtesy of FORD MOTOR CO.
Item Part Number Description
1 W520413 Steering line clamp plate nut
2 3A713 Return line
3 3A719 Pressure line
4 N803256 O-ring seal
5 N803257 O-ring seal
6 N811762 Steering gear studs (2 required)
7 N803942
Lower steering column shaft-to-steering
gear bolt
8 3504 Steering gear
9 N808265 Steering gear nuts (2 required)
2008 Ford Ranger
2008 STEERING Power Steering - Ranger
Microsoft
Wednesday, November 11, 2009 11:21:16 AM Page 24 © 2005 Mitchell Repair Information Company, LLC.
REMOVAL & INSTALLATION
All vehicles
1. Remove the front wheels and tires. For additional information, refer to WHEELS & TIRES article.
2. Place the steering wheel in the straight-ahead position and remove the ignition key.
 Rotate the steering wheel until the steering column locks into position.
3.0L and 4.0L engines
3. Remove the power steering fluid cooler. For additional information, refer to Power Steering Fluid
Cooler.
All vehicles
4. Remove the outer tie-rod end cotter pins and nuts.
 Discard the cotter pins.
 To install, tighten to 80 Nm (59 lb-ft).
5. Using special tool, separate the outer tie-rod ends from the wheel spindles.
10 N642569 Cotter pin (2 required)
11 N800895 Outer tie-rod end nut (2 required)
CAUTION: When repairing the power steering system, care should be taken to
prevent the entry of foreign material or failure of the power steering
components may result.
CAUTION: Do not damage the tie-rod boot when installing the special tool.
NOTE: Remove the adapter from the ball end of the special tool. Apply a small
amount of grease to the tie-rod end stud and the ball of the special tool.
2008 Ford Ranger
2008 STEERING Power Steering - Ranger
Microsoft
Wednesday, November 11, 2009 11:21:16 AM Page 25 © 2005 Mitchell Repair Information Company, LLC.
Fig. 22: Separating Outer Tie Rods From Wheel Knuckles
Courtesy of FORD MOTOR CO.
6. Remove the lower steering column shaft-to-steering gear bolt and disconnect the lower steering column
shaft from the gear.
 Discard the bolt.
 To install, tighten to 55 Nm (41 lb-ft).
7. Remove the steering line clamp plate nut and disconnect the pressure and return lines.
 Discard the O-ring seals.
 To install, tighten to 35 Nm (26 lb-ft).
8. Plug or cap the return line, pressure line and the steering gear ports to prevent the entry of dirt.
9. Remove the 2 steering gear nuts and the 2 steering gear studs.
 To install, tighten to 150 Nm (111 lb-ft).
10. Remove the steering gear.
11. If necessary, remove the outer tie-rod ends.
12. To install, reverse the removal procedure.
 Install new power steering line O-ring seals.
13. Fill the power steering system. For additional information, refer to STEERING SYSTEM - GENERAL
INFORMATION article.
14. Check and, if necessary, adjust the front toe.
STEERING GEAR - FOUR WHEEL DRIVE (4WD)
Special Tools
CAUTION: Do not allow the steering column to rotate while the steering column
shaft is disconnected from the steering gear or damage to the
clockspring may result. If there is evidence that the steering column
has rotated, the clockspring must be removed and recentered. For
additional information, refer to SUPPLEMENTAL RESTRAINT
SYSTEM article.
CAUTION: Hold the tops of the steering gear studs to avoid damaging the
steering gear fluid transfer tubes.
CAUTION: New O-ring seals must be installed any time the power steering lines
are disconnected from the steering gear or a fluid leak may occur.
Illustration Tool Name Tool Number
2008 Ford Ranger
2008 STEERING Power Steering - Ranger
Microsoft
Wednesday, November 11, 2009 11:21:16 AM Page 26 © 2005 Mitchell Repair Information Company, LLC.
Fig. 23: Identifying Steering Gear - Four Wheel Drive (4WD) With Torque Specifications
Courtesy of FORD MOTOR CO.
Remover, Tie-Rod End
211-001 (TOOL-3290-D) or
equivalent
Item Part Number Description
1 W520413 Steering line clamp plate nut
2 3A713 Return line
3 3A719 Pressure line
4 N803256 O-ring seal
2008 Ford Ranger
2008 STEERING Power Steering - Ranger
Microsoft
Wednesday, November 11, 2009 11:21:16 AM Page 27 © 2005 Mitchell Repair Information Company, LLC.
REMOVAL
All vehicles
1. Remove the front wheels and tires. For additional information, refer to WHEELS & TIRES article.
2. Place the steering wheel in the straight-ahead position and remove the ignition key.
 Rotate the steering wheel until the steering column locks into position.
3.0L and 4.0L engines
3. Remove the power steering fluid cooler. For additional information, refer to Power Steering Fluid
Cooler.
All vehicles
4. Loosen the tie-rod jam nuts.
5. Remove the outer tie-rod end cotter pins and nuts.
 Discard the cotter pins.
6. Using the special tool, separate the outer tie-rod ends from the wheel knuckles.
5 N803257 O-ring seal
6 N811762 Steering gear studs (2 required)
7 N803942
Lower steering column shaft-to-steering
gear bolt
8 3504 Steering gear
9 N803637
Tie rod jam nut (part of 3280) (2
required)
10 N808265 Steering gear nuts (2 required)
11 3290 Outer tie-rod end (2 required)
12 N642569 Cotter pin (2 required)
13 N800895 Outer tie-rod end nut (2 required)
CAUTION: When repairing the power steering system, care should be taken to
prevent the entry of foreign material or failure of the power steering
components may result.
CAUTION: Do not damage the tie-rod boot when installing the special tool.
NOTE: Remove the adapter from the ball end of the special tool. Apply a small
amount of grease to the tie-rod end stud and the ball of the special tool.
2008 Ford Ranger
2008 STEERING Power Steering - Ranger
Microsoft
Wednesday, November 11, 2009 11:21:16 AM Page 28 © 2005 Mitchell Repair Information Company, LLC.
Fig. 24: Separating Outer Tie Rods From Wheel Knuckles
Courtesy of FORD MOTOR CO.
7. Remove the outer tie-rod ends.
 Count and record the number of turns required to remove the outer tie-rod end.
8. Remove the stabilizer bar and link. For additional information, refer to FRONT SUSPENSION - FOUR
WHEEL DRIVE (4WD) article.
9. Remove the lower steering column shaft-to-steering gear bolt and disconnect the shaft from the steering
gear.
 Discard the bolt.
10. Remove the steering line clamp plate nut and disconnect the pressure and return lines.
 Discard the O-ring seals.
11. Remove the 2 steering gear nuts and steering gear studs.
12. Rotate the steering gear control valve housing toward the front of the vehicle.
CAUTION: Do not allow the steering column to rotate while the steering column
shaft is disconnected from the steering gear or damage to the
clockspring may result. If there is evidence that the steering column
has rotated, the clockspring must be removed and recentered. For
additional information, refer to SUPPLEMENTAL RESTRAINT
SYSTEM article.
CAUTION: Hold the tops of the steering gear studs to avoid damaging the
steering gear fluid transfer tubes.
2008 Ford Ranger
2008 STEERING Power Steering - Ranger
Microsoft
Wednesday, November 11, 2009 11:21:16 AM Page 29 © 2005 Mitchell Repair Information Company, LLC.
Fig. 25: Rotating Steering Gear Control Valve Housing Toward Front Of Vehicle
Courtesy of FORD MOTOR CO.
13. Turn the steering gear input shaft to the right until the stop is reached.
14. Move the steering gear as far to the RH side of the vehicle as possible.
Fig. 26: Moving Steering Gear As Far To RH Side Of Vehicle As Possible
Courtesy of FORD MOTOR CO.
15. Move the LH inner tie rod forward to clear the frame crossmember.
Fig. 27: Locating LH Inner Tie Rod
Courtesy of FORD MOTOR CO.
16. Remove the steering gear.
2008 Ford Ranger
2008 STEERING Power Steering - Ranger
Microsoft
Wednesday, November 11, 2009 11:21:16 AM Page 30 © 2005 Mitchell Repair Information Company, LLC.
Fig. 28: Removing Steering Gear
Courtesy of FORD MOTOR CO.
INSTALLATION
All vehicles
1. Turn the steering gear input shaft to the right until the stop is reached. Count and record the number of
turns required.
2. Install the steering gear into the RH opening of the crossmember.
Fig. 29: Installing Steering Gear Into RH Opening Of Crossmember
Courtesy of FORD MOTOR CO.
CAUTION: Handle the steering gear with caution to avoid damage to fluid
transfer tubes and to avoid dimples in the steering gear bellows boot.
NOTE: Make sure the steering gear input shaft is turned to the left until the stop is
reached.
NOTE: Make sure the steering gear control valve housing is turned toward the
front of the vehicle.
CAUTION: Take care not to scuff or tear the steering gear bellows boots.
2008 Ford Ranger
2008 STEERING Power Steering - Ranger
Microsoft
Wednesday, November 11, 2009 11:21:16 AM Page 31 © 2005 Mitchell Repair Information Company, LLC.
3. Move the steering gear as far to the RH side of the vehicle as possible.
Fig. 30: Moving Steering Gear As Far To RH Side Of Vehicle As Possible
Courtesy of FORD MOTOR CO.
4. Move the LH inner tie rod into the opening in the crossmember and move the steering gear into position.
Fig. 31: Locating LH Inner Tie Rod
Courtesy of FORD MOTOR CO.
5. To place the steering gear in the straight-ahead position, turn the steering gear input shaft to the left by
1/2 the number of turns previously recorded.
6. Rotate the steering gear control valve housing toward the rear of the vehicle.
Fig. 32: Rotating Steering Gear Control Valve Housing Toward Rear Of Vehicle
Courtesy of FORD MOTOR CO.
7. Install the 2 steering gear studs.
2008 Ford Ranger
2008 STEERING Power Steering - Ranger
Microsoft
Wednesday, November 11, 2009 11:21:16 AM Page 32 © 2005 Mitchell Repair Information Company, LLC.
8. Install the 2 steering gear nuts.
 Tighten to 150 Nm (111 lb-ft).
9. Position the pressure and return lines and install the steering line clamp plate nut.
 Tighten to 35 Nm (26 lb-ft).
10. Connect the steering column shaft to the steering gear and install a new bolt.
 Tighten to 55 Nm (41 lb-ft).
11. Install the stabilizer bar and link. For additional information, refer to FRONT SUSPENSION - FOUR
WHEEL DRIVE (4WD) article.
12. Install the outer tie-rod ends.
 Rotate the outer tie-rod ends the number of turns recorded during removal.
13. Position the outer tie-rod ends and install the nuts and new cotter pins.
 Check that the brake disc shields are not bent and are not in contact with the outer tie-rod end
boots.
 Tighten to 80 Nm (59 lb-ft).
3.0L and 4.0L engines
14. Install the power steering fluid cooler. For additional information, refer to Power Steering Fluid Cooler.
All vehicles
15. Tighten the tie-rod jam nuts.
 Tighten to 80 Nm (59 lb-ft).
16. Fill the power steering system. For additional information, refer to STEERING SYSTEM - GENERAL
INFORMATION article.
17. Check and, if necessary, adjust the front toe. For additional information, refer to SUSPENSION
SYSTEM - GENERAL INFORMATION article.
CAUTION: Hold the tops of the steering gear studs to avoid damaging the
steering gear fluid transfer tubes.
CAUTION: New O-rings must be installed any time the lines are disconnected
from the steering gear or a fluid leak may occur.
CAUTION: Do not allow the steering column to rotate while the steering column
shaft is disconnected from the steering gear or damage to the
clockspring may result. If there is evidence that the steering column
has rotated, the clockspring must be removed and re-centered. For
additional information, refer to SUPPLEMENTAL RESTRAINT
SYSTEM article.
2008 Ford Ranger
2008 STEERING Power Steering - Ranger
Microsoft
Wednesday, November 11, 2009 11:21:16 AM Page 33 © 2005 Mitchell Repair Information Company, LLC.
Thank you very much
for your reading.
Please Click Here
Then Get More
Information.

More Related Content

What's hot

Caterpillar engine speed timing sensor circuit test
Caterpillar engine speed timing sensor circuit  testCaterpillar engine speed timing sensor circuit  test
Caterpillar engine speed timing sensor circuit testnoelsalazar
 
Volvo g930 b motor grader service repair manual
Volvo g930 b motor grader service repair manualVolvo g930 b motor grader service repair manual
Volvo g930 b motor grader service repair manualfjsekkskem
 
40627672 diagrama-de-frenos
40627672 diagrama-de-frenos40627672 diagrama-de-frenos
40627672 diagrama-de-frenosMiguel Ticuna
 
Motor serie 60 detroit.pdf
Motor serie 60 detroit.pdfMotor serie 60 detroit.pdf
Motor serie 60 detroit.pdfEDUARDO COLIN
 
02 mr 04_techtrakkerstraliscajasca (1),despiece caja zf
02 mr 04_techtrakkerstraliscajasca (1),despiece caja zf02 mr 04_techtrakkerstraliscajasca (1),despiece caja zf
02 mr 04_techtrakkerstraliscajasca (1),despiece caja zfManuel Diaz Matos
 
Esquema elétrico renault master 2.5
Esquema elétrico renault master 2.5Esquema elétrico renault master 2.5
Esquema elétrico renault master 2.5Junior Iung
 
Manual servicio-diferencial-r770-camiones-scania
Manual servicio-diferencial-r770-camiones-scaniaManual servicio-diferencial-r770-camiones-scania
Manual servicio-diferencial-r770-camiones-scaniaroberto rincon robles
 
Manual scania-edc-inyectores-bomba (1)
Manual scania-edc-inyectores-bomba (1)Manual scania-edc-inyectores-bomba (1)
Manual scania-edc-inyectores-bomba (1)Fredy Muñoz
 
MANUAL ENGINE 1/2KD-FTV TOYOTA SISTEMA COMNON RAIL
MANUAL ENGINE 1/2KD-FTV TOYOTA SISTEMA COMNON RAILMANUAL ENGINE 1/2KD-FTV TOYOTA SISTEMA COMNON RAIL
MANUAL ENGINE 1/2KD-FTV TOYOTA SISTEMA COMNON RAILInês Krug
 
Volvo g930 motor grader service repair manual
Volvo g930 motor grader service repair manualVolvo g930 motor grader service repair manual
Volvo g930 motor grader service repair manualfjsekkskem
 
Sistema de lubricacion y refrigeracion del motor
Sistema de lubricacion y refrigeracion del motorSistema de lubricacion y refrigeracion del motor
Sistema de lubricacion y refrigeracion del motorcildaisabel
 
Presentación filtros y mantenimiento wabco
Presentación filtros y mantenimiento wabcoPresentación filtros y mantenimiento wabco
Presentación filtros y mantenimiento wabcoJonathan Ortiz
 
Cummins 4 bt parts manual
Cummins 4 bt parts manualCummins 4 bt parts manual
Cummins 4 bt parts manualArvind Negi
 
Codigos de falla todos
Codigos de falla todosCodigos de falla todos
Codigos de falla todosfhgrthdgtrs
 
Workshop manual 320_420_620_634
Workshop manual 320_420_620_634Workshop manual 320_420_620_634
Workshop manual 320_420_620_634Lincon Fernandes
 

What's hot (20)

Caterpillar engine speed timing sensor circuit test
Caterpillar engine speed timing sensor circuit  testCaterpillar engine speed timing sensor circuit  test
Caterpillar engine speed timing sensor circuit test
 
TORQUES MOTORES VARIOS.pdf
TORQUES MOTORES VARIOS.pdfTORQUES MOTORES VARIOS.pdf
TORQUES MOTORES VARIOS.pdf
 
Volvo g930 b motor grader service repair manual
Volvo g930 b motor grader service repair manualVolvo g930 b motor grader service repair manual
Volvo g930 b motor grader service repair manual
 
40627672 diagrama-de-frenos
40627672 diagrama-de-frenos40627672 diagrama-de-frenos
40627672 diagrama-de-frenos
 
Motor serie 60 detroit.pdf
Motor serie 60 detroit.pdfMotor serie 60 detroit.pdf
Motor serie 60 detroit.pdf
 
Manual de sintomas e falhas
Manual de sintomas e falhasManual de sintomas e falhas
Manual de sintomas e falhas
 
02 mr 04_techtrakkerstraliscajasca (1),despiece caja zf
02 mr 04_techtrakkerstraliscajasca (1),despiece caja zf02 mr 04_techtrakkerstraliscajasca (1),despiece caja zf
02 mr 04_techtrakkerstraliscajasca (1),despiece caja zf
 
Esquema elétrico renault master 2.5
Esquema elétrico renault master 2.5Esquema elétrico renault master 2.5
Esquema elétrico renault master 2.5
 
Manual servicio-diferencial-r770-camiones-scania
Manual servicio-diferencial-r770-camiones-scaniaManual servicio-diferencial-r770-camiones-scania
Manual servicio-diferencial-r770-camiones-scania
 
Manual scania-edc-inyectores-bomba (1)
Manual scania-edc-inyectores-bomba (1)Manual scania-edc-inyectores-bomba (1)
Manual scania-edc-inyectores-bomba (1)
 
Despiece scania
Despiece scaniaDespiece scania
Despiece scania
 
MANUAL ENGINE 1/2KD-FTV TOYOTA SISTEMA COMNON RAIL
MANUAL ENGINE 1/2KD-FTV TOYOTA SISTEMA COMNON RAILMANUAL ENGINE 1/2KD-FTV TOYOTA SISTEMA COMNON RAIL
MANUAL ENGINE 1/2KD-FTV TOYOTA SISTEMA COMNON RAIL
 
Volvo g930 motor grader service repair manual
Volvo g930 motor grader service repair manualVolvo g930 motor grader service repair manual
Volvo g930 motor grader service repair manual
 
Motor Scania DC 9
Motor Scania DC 9 Motor Scania DC 9
Motor Scania DC 9
 
Sistema de lubricacion y refrigeracion del motor
Sistema de lubricacion y refrigeracion del motorSistema de lubricacion y refrigeracion del motor
Sistema de lubricacion y refrigeracion del motor
 
Presentación filtros y mantenimiento wabco
Presentación filtros y mantenimiento wabcoPresentación filtros y mantenimiento wabco
Presentación filtros y mantenimiento wabco
 
Cummins 4 bt parts manual
Cummins 4 bt parts manualCummins 4 bt parts manual
Cummins 4 bt parts manual
 
Maxxforce Euro v Agrale
Maxxforce Euro v Agrale Maxxforce Euro v Agrale
Maxxforce Euro v Agrale
 
Codigos de falla todos
Codigos de falla todosCodigos de falla todos
Codigos de falla todos
 
Workshop manual 320_420_620_634
Workshop manual 320_420_620_634Workshop manual 320_420_620_634
Workshop manual 320_420_620_634
 

Similar to 2007 FORD RANGER Service Repair Manual

2001 ford windstar service repair manual
2001 ford windstar service repair manual2001 ford windstar service repair manual
2001 ford windstar service repair manualfjskkedmmem
 
1999 FORD WINDSTAR Service Repair Manual
1999 FORD WINDSTAR Service Repair Manual1999 FORD WINDSTAR Service Repair Manual
1999 FORD WINDSTAR Service Repair Manual局万 jdhnj
 
1999 FORD WINDSTAR Service Repair Manual
1999 FORD WINDSTAR Service Repair Manual1999 FORD WINDSTAR Service Repair Manual
1999 FORD WINDSTAR Service Repair Manual雨 微
 
1999 ford windstar service repair manual
1999 ford windstar service repair manual1999 ford windstar service repair manual
1999 ford windstar service repair manualfsjekdmemmd
 
2003 ford windstar service repair manual
2003 ford windstar service repair manual2003 ford windstar service repair manual
2003 ford windstar service repair manualfjskekdmmme
 
2000 ford windstar service repair manual
2000 ford windstar service repair manual2000 ford windstar service repair manual
2000 ford windstar service repair manualfjskedmmem
 
2003 FORD WINDSTAR Service Repair Manual
2003 FORD WINDSTAR Service Repair Manual2003 FORD WINDSTAR Service Repair Manual
2003 FORD WINDSTAR Service Repair Manualhdnjn kmdjm
 
2003 FORD WINDSTAR Service Repair Manual
2003 FORD WINDSTAR Service Repair Manual2003 FORD WINDSTAR Service Repair Manual
2003 FORD WINDSTAR Service Repair Manualjksnendmmd
 
2009 arctic cat prowler xtz 1000 service repair manual
2009 arctic cat prowler xtz 1000 service repair manual2009 arctic cat prowler xtz 1000 service repair manual
2009 arctic cat prowler xtz 1000 service repair manualfjsekdemmd
 

Similar to 2007 FORD RANGER Service Repair Manual (9)

2001 ford windstar service repair manual
2001 ford windstar service repair manual2001 ford windstar service repair manual
2001 ford windstar service repair manual
 
1999 FORD WINDSTAR Service Repair Manual
1999 FORD WINDSTAR Service Repair Manual1999 FORD WINDSTAR Service Repair Manual
1999 FORD WINDSTAR Service Repair Manual
 
1999 FORD WINDSTAR Service Repair Manual
1999 FORD WINDSTAR Service Repair Manual1999 FORD WINDSTAR Service Repair Manual
1999 FORD WINDSTAR Service Repair Manual
 
1999 ford windstar service repair manual
1999 ford windstar service repair manual1999 ford windstar service repair manual
1999 ford windstar service repair manual
 
2003 ford windstar service repair manual
2003 ford windstar service repair manual2003 ford windstar service repair manual
2003 ford windstar service repair manual
 
2000 ford windstar service repair manual
2000 ford windstar service repair manual2000 ford windstar service repair manual
2000 ford windstar service repair manual
 
2003 FORD WINDSTAR Service Repair Manual
2003 FORD WINDSTAR Service Repair Manual2003 FORD WINDSTAR Service Repair Manual
2003 FORD WINDSTAR Service Repair Manual
 
2003 FORD WINDSTAR Service Repair Manual
2003 FORD WINDSTAR Service Repair Manual2003 FORD WINDSTAR Service Repair Manual
2003 FORD WINDSTAR Service Repair Manual
 
2009 arctic cat prowler xtz 1000 service repair manual
2009 arctic cat prowler xtz 1000 service repair manual2009 arctic cat prowler xtz 1000 service repair manual
2009 arctic cat prowler xtz 1000 service repair manual
 

Recently uploaded

Rockwell Automation 2711R PanelView 800 HMI
Rockwell Automation 2711R PanelView 800 HMIRockwell Automation 2711R PanelView 800 HMI
Rockwell Automation 2711R PanelView 800 HMIAsteam Techno
 
FULL ENJOY - 9953040155 Call Girls in Sector 61 | Noida
FULL ENJOY - 9953040155 Call Girls in Sector 61 | NoidaFULL ENJOY - 9953040155 Call Girls in Sector 61 | Noida
FULL ENJOY - 9953040155 Call Girls in Sector 61 | NoidaMalviyaNagarCallGirl
 
꧁༒☬ 7042364481 (Call Girl) In Dwarka Delhi Escort Service In Delhi Ncr☬༒꧂
꧁༒☬ 7042364481 (Call Girl) In Dwarka Delhi Escort Service In Delhi Ncr☬༒꧂꧁༒☬ 7042364481 (Call Girl) In Dwarka Delhi Escort Service In Delhi Ncr☬༒꧂
꧁༒☬ 7042364481 (Call Girl) In Dwarka Delhi Escort Service In Delhi Ncr☬༒꧂Hot Call Girls In Sector 58 (Noida)
 
Night 7k to 12k Low Rate Call Girls Ahmedabad 👉 BOOK NOW 8617697112 👈 ♀️ nigh...
Night 7k to 12k Low Rate Call Girls Ahmedabad 👉 BOOK NOW 8617697112 👈 ♀️ nigh...Night 7k to 12k Low Rate Call Girls Ahmedabad 👉 BOOK NOW 8617697112 👈 ♀️ nigh...
Night 7k to 12k Low Rate Call Girls Ahmedabad 👉 BOOK NOW 8617697112 👈 ♀️ nigh...Call girls in Ahmedabad High profile
 
VIP Mumbai Call Girls Thakur village Just Call 9920874524 with A/C Room Cash ...
VIP Mumbai Call Girls Thakur village Just Call 9920874524 with A/C Room Cash ...VIP Mumbai Call Girls Thakur village Just Call 9920874524 with A/C Room Cash ...
VIP Mumbai Call Girls Thakur village Just Call 9920874524 with A/C Room Cash ...Garima Khatri
 
Delhi Call Girls Saket 9711199171 ☎✔👌✔ Whatsapp Hard And Sexy Vip Call
Delhi Call Girls Saket 9711199171 ☎✔👌✔ Whatsapp Hard And Sexy Vip CallDelhi Call Girls Saket 9711199171 ☎✔👌✔ Whatsapp Hard And Sexy Vip Call
Delhi Call Girls Saket 9711199171 ☎✔👌✔ Whatsapp Hard And Sexy Vip Callshivangimorya083
 
VIP Kolkata Call Girl Kasba 👉 8250192130 Available With Room
VIP Kolkata Call Girl Kasba 👉 8250192130  Available With RoomVIP Kolkata Call Girl Kasba 👉 8250192130  Available With Room
VIP Kolkata Call Girl Kasba 👉 8250192130 Available With Roomdivyansh0kumar0
 
(COD) ̄Young Call Girls In Dwarka , New Delhi꧁❤ 7042364481❤꧂ Escorts Service i...
(COD) ̄Young Call Girls In Dwarka , New Delhi꧁❤ 7042364481❤꧂ Escorts Service i...(COD) ̄Young Call Girls In Dwarka , New Delhi꧁❤ 7042364481❤꧂ Escorts Service i...
(COD) ̄Young Call Girls In Dwarka , New Delhi꧁❤ 7042364481❤꧂ Escorts Service i...Hot Call Girls In Sector 58 (Noida)
 
83778-77756 ( HER.SELF ) Brings Call Girls In Laxmi Nagar
83778-77756 ( HER.SELF ) Brings Call Girls In Laxmi Nagar83778-77756 ( HER.SELF ) Brings Call Girls In Laxmi Nagar
83778-77756 ( HER.SELF ) Brings Call Girls In Laxmi Nagardollysharma2066
 
Hyundai World Rally Team in action at 2024 WRC
Hyundai World Rally Team in action at 2024 WRCHyundai World Rally Team in action at 2024 WRC
Hyundai World Rally Team in action at 2024 WRCHyundai Motor Group
 
The 10th anniversary, Hyundai World Rally Team's amazing journey
The 10th anniversary, Hyundai World Rally Team's amazing journeyThe 10th anniversary, Hyundai World Rally Team's amazing journey
The 10th anniversary, Hyundai World Rally Team's amazing journeyHyundai Motor Group
 
Dubai Call Girls Size E6 (O525547819) Call Girls In Dubai
Dubai Call Girls  Size E6 (O525547819) Call Girls In DubaiDubai Call Girls  Size E6 (O525547819) Call Girls In Dubai
Dubai Call Girls Size E6 (O525547819) Call Girls In Dubaikojalkojal131
 
Transformative journey for Automotive Components Manufacturers- D&V Business ...
Transformative journey for Automotive Components Manufacturers- D&V Business ...Transformative journey for Automotive Components Manufacturers- D&V Business ...
Transformative journey for Automotive Components Manufacturers- D&V Business ...D&V Business Consulting
 
UNIT-II-ENGINE AUXILIARY SYSTEMS &TURBOCHARGER
UNIT-II-ENGINE AUXILIARY SYSTEMS &TURBOCHARGERUNIT-II-ENGINE AUXILIARY SYSTEMS &TURBOCHARGER
UNIT-II-ENGINE AUXILIARY SYSTEMS &TURBOCHARGERDineshKumar4165
 
Electronic Vehicle (EV) Industry Challenges
Electronic Vehicle (EV) Industry ChallengesElectronic Vehicle (EV) Industry Challenges
Electronic Vehicle (EV) Industry Challengesmarketingmangosemi
 
ENJOY Call Girls In Okhla Vihar Delhi Call 9654467111
ENJOY Call Girls In Okhla Vihar Delhi Call 9654467111ENJOY Call Girls In Okhla Vihar Delhi Call 9654467111
ENJOY Call Girls In Okhla Vihar Delhi Call 9654467111Sapana Sha
 
UNOSAFE ELEVATOR PRIVATE LTD BANGALORE BROUCHER
UNOSAFE ELEVATOR PRIVATE LTD BANGALORE BROUCHERUNOSAFE ELEVATOR PRIVATE LTD BANGALORE BROUCHER
UNOSAFE ELEVATOR PRIVATE LTD BANGALORE BROUCHERunosafeads
 
Alia +91-9537192988-Experience the Unmatchable Pleasure with Model Ahmedabad ...
Alia +91-9537192988-Experience the Unmatchable Pleasure with Model Ahmedabad ...Alia +91-9537192988-Experience the Unmatchable Pleasure with Model Ahmedabad ...
Alia +91-9537192988-Experience the Unmatchable Pleasure with Model Ahmedabad ...Niya Khan
 
Beautiful Vip Call Girls Punjabi Bagh 9711199012 Call /Whatsapps
Beautiful Vip  Call Girls Punjabi Bagh 9711199012 Call /WhatsappsBeautiful Vip  Call Girls Punjabi Bagh 9711199012 Call /Whatsapps
Beautiful Vip Call Girls Punjabi Bagh 9711199012 Call /Whatsappssapnasaifi408
 

Recently uploaded (20)

Rockwell Automation 2711R PanelView 800 HMI
Rockwell Automation 2711R PanelView 800 HMIRockwell Automation 2711R PanelView 800 HMI
Rockwell Automation 2711R PanelView 800 HMI
 
FULL ENJOY - 9953040155 Call Girls in Sector 61 | Noida
FULL ENJOY - 9953040155 Call Girls in Sector 61 | NoidaFULL ENJOY - 9953040155 Call Girls in Sector 61 | Noida
FULL ENJOY - 9953040155 Call Girls in Sector 61 | Noida
 
꧁༒☬ 7042364481 (Call Girl) In Dwarka Delhi Escort Service In Delhi Ncr☬༒꧂
꧁༒☬ 7042364481 (Call Girl) In Dwarka Delhi Escort Service In Delhi Ncr☬༒꧂꧁༒☬ 7042364481 (Call Girl) In Dwarka Delhi Escort Service In Delhi Ncr☬༒꧂
꧁༒☬ 7042364481 (Call Girl) In Dwarka Delhi Escort Service In Delhi Ncr☬༒꧂
 
Night 7k to 12k Low Rate Call Girls Ahmedabad 👉 BOOK NOW 8617697112 👈 ♀️ nigh...
Night 7k to 12k Low Rate Call Girls Ahmedabad 👉 BOOK NOW 8617697112 👈 ♀️ nigh...Night 7k to 12k Low Rate Call Girls Ahmedabad 👉 BOOK NOW 8617697112 👈 ♀️ nigh...
Night 7k to 12k Low Rate Call Girls Ahmedabad 👉 BOOK NOW 8617697112 👈 ♀️ nigh...
 
VIP Mumbai Call Girls Thakur village Just Call 9920874524 with A/C Room Cash ...
VIP Mumbai Call Girls Thakur village Just Call 9920874524 with A/C Room Cash ...VIP Mumbai Call Girls Thakur village Just Call 9920874524 with A/C Room Cash ...
VIP Mumbai Call Girls Thakur village Just Call 9920874524 with A/C Room Cash ...
 
Delhi Call Girls Saket 9711199171 ☎✔👌✔ Whatsapp Hard And Sexy Vip Call
Delhi Call Girls Saket 9711199171 ☎✔👌✔ Whatsapp Hard And Sexy Vip CallDelhi Call Girls Saket 9711199171 ☎✔👌✔ Whatsapp Hard And Sexy Vip Call
Delhi Call Girls Saket 9711199171 ☎✔👌✔ Whatsapp Hard And Sexy Vip Call
 
VIP Kolkata Call Girl Kasba 👉 8250192130 Available With Room
VIP Kolkata Call Girl Kasba 👉 8250192130  Available With RoomVIP Kolkata Call Girl Kasba 👉 8250192130  Available With Room
VIP Kolkata Call Girl Kasba 👉 8250192130 Available With Room
 
(COD) ̄Young Call Girls In Dwarka , New Delhi꧁❤ 7042364481❤꧂ Escorts Service i...
(COD) ̄Young Call Girls In Dwarka , New Delhi꧁❤ 7042364481❤꧂ Escorts Service i...(COD) ̄Young Call Girls In Dwarka , New Delhi꧁❤ 7042364481❤꧂ Escorts Service i...
(COD) ̄Young Call Girls In Dwarka , New Delhi꧁❤ 7042364481❤꧂ Escorts Service i...
 
83778-77756 ( HER.SELF ) Brings Call Girls In Laxmi Nagar
83778-77756 ( HER.SELF ) Brings Call Girls In Laxmi Nagar83778-77756 ( HER.SELF ) Brings Call Girls In Laxmi Nagar
83778-77756 ( HER.SELF ) Brings Call Girls In Laxmi Nagar
 
Hyundai World Rally Team in action at 2024 WRC
Hyundai World Rally Team in action at 2024 WRCHyundai World Rally Team in action at 2024 WRC
Hyundai World Rally Team in action at 2024 WRC
 
The 10th anniversary, Hyundai World Rally Team's amazing journey
The 10th anniversary, Hyundai World Rally Team's amazing journeyThe 10th anniversary, Hyundai World Rally Team's amazing journey
The 10th anniversary, Hyundai World Rally Team's amazing journey
 
Dubai Call Girls Size E6 (O525547819) Call Girls In Dubai
Dubai Call Girls  Size E6 (O525547819) Call Girls In DubaiDubai Call Girls  Size E6 (O525547819) Call Girls In Dubai
Dubai Call Girls Size E6 (O525547819) Call Girls In Dubai
 
Transformative journey for Automotive Components Manufacturers- D&V Business ...
Transformative journey for Automotive Components Manufacturers- D&V Business ...Transformative journey for Automotive Components Manufacturers- D&V Business ...
Transformative journey for Automotive Components Manufacturers- D&V Business ...
 
UNIT-II-ENGINE AUXILIARY SYSTEMS &TURBOCHARGER
UNIT-II-ENGINE AUXILIARY SYSTEMS &TURBOCHARGERUNIT-II-ENGINE AUXILIARY SYSTEMS &TURBOCHARGER
UNIT-II-ENGINE AUXILIARY SYSTEMS &TURBOCHARGER
 
Electronic Vehicle (EV) Industry Challenges
Electronic Vehicle (EV) Industry ChallengesElectronic Vehicle (EV) Industry Challenges
Electronic Vehicle (EV) Industry Challenges
 
ENJOY Call Girls In Okhla Vihar Delhi Call 9654467111
ENJOY Call Girls In Okhla Vihar Delhi Call 9654467111ENJOY Call Girls In Okhla Vihar Delhi Call 9654467111
ENJOY Call Girls In Okhla Vihar Delhi Call 9654467111
 
UNOSAFE ELEVATOR PRIVATE LTD BANGALORE BROUCHER
UNOSAFE ELEVATOR PRIVATE LTD BANGALORE BROUCHERUNOSAFE ELEVATOR PRIVATE LTD BANGALORE BROUCHER
UNOSAFE ELEVATOR PRIVATE LTD BANGALORE BROUCHER
 
Call Girls In Kirti Nagar 📱 9999965857 🤩 Delhi 🫦 HOT AND SEXY VVIP 🍎 SERVICE
Call Girls In Kirti Nagar 📱  9999965857  🤩 Delhi 🫦 HOT AND SEXY VVIP 🍎 SERVICECall Girls In Kirti Nagar 📱  9999965857  🤩 Delhi 🫦 HOT AND SEXY VVIP 🍎 SERVICE
Call Girls In Kirti Nagar 📱 9999965857 🤩 Delhi 🫦 HOT AND SEXY VVIP 🍎 SERVICE
 
Alia +91-9537192988-Experience the Unmatchable Pleasure with Model Ahmedabad ...
Alia +91-9537192988-Experience the Unmatchable Pleasure with Model Ahmedabad ...Alia +91-9537192988-Experience the Unmatchable Pleasure with Model Ahmedabad ...
Alia +91-9537192988-Experience the Unmatchable Pleasure with Model Ahmedabad ...
 
Beautiful Vip Call Girls Punjabi Bagh 9711199012 Call /Whatsapps
Beautiful Vip  Call Girls Punjabi Bagh 9711199012 Call /WhatsappsBeautiful Vip  Call Girls Punjabi Bagh 9711199012 Call /Whatsapps
Beautiful Vip Call Girls Punjabi Bagh 9711199012 Call /Whatsapps
 

2007 FORD RANGER Service Repair Manual

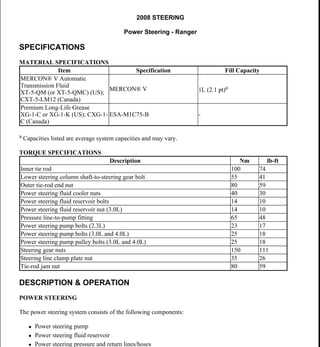
  • 1. 2008 STEERING Power Steering - Ranger SPECIFICATIONS MATERIAL SPECIFICATIONS a Capacities listed are average system capacities and may vary. TORQUE SPECIFICATIONS DESCRIPTION & OPERATION POWER STEERING The power steering system consists of the following components:  Power steering pump  Power steering fluid reservoir  Power steering pressure and return lines/hoses Item Specification Fill Capacity MERCON® V Automatic Transmission Fluid XT-5-QM (or XT-5-QMC) (US); CXT-5-LM12 (Canada) MERCON® V 1L (2.1 pt)a Premium Long-Life Grease XG-1-C or XG-1-K (US); CXG-1- C (Canada) ESA-M1C75-B - Description Nm lb-ft Inner tie rod 100 74 Lower steering column shaft-to-steering gear bolt 55 41 Outer tie-rod end nut 80 59 Power steering fluid cooler nuts 40 30 Power steering fluid reservoir bolts 14 10 Power steering fluid reservoir nut (3.0L) 14 10 Pressure line-to-pump fitting 65 48 Power steering pump bolts (2.3L) 23 17 Power steering pump bolts (3.0L and 4.0L) 25 18 Power steering pump pulley bolts (3.0L and 4.0L) 25 18 Steering gear nuts 150 111 Steering line clamp plate nut 35 26 Tie-rod jam nut 80 59 2008 Ford Ranger 2008 STEERING Power Steering - Ranger 2008 Ford Ranger 2008 STEERING Power Steering - Ranger Microsoft Wednesday, November 11, 2009 11:21:15 AM Page 1 © 2005 Mitchell Repair Information Company, LLC. Microsoft Wednesday, November 11, 2009 11:21:20 AM Page 1 © 2005 Mitchell Repair Information Company, LLC.
  • 2.  Power steering fluid cooler  Power steering gear  Inner tie rod The power steering system uses a vane-type pump to move the fluid from the reservoir to the steering gear and through the rest of the steering hydraulic system. The power steering pump is mounted to the engine and driven by the engine accessory drive belt. Power steering fluid flows into the pump from the reservoir. The power steering fluid is then trapped between the pump vanes and moved to the high-pressure side of the pump creating a flow of fluid. The restriction of this flow by the steering gear creates the pressure that provides the steering assist. A combined pressure relief/flow valve is built into the pump to control the maximum pressure and flow provided to the steering system. This action prevents damage to the system and provides the correct level of assist during all engine speeds. While under pressure, the power steering fluid flows through the high-pressure power steering line to the steering gear. The fluid exits the gear and flows through the return line, cooler and finally to the reservoir. The reservoir slows the fluid, allows air to escape and filters the fluid before returning it to the pump. DIAGNOSTIC TESTS POWER STEERING Refer to STEERING SYSTEM - GENERAL INFORMATION article. REMOVAL & INSTALLATION POWER STEERING FLUID RESERVOIR - 2.3L & 4.0L Material Item Specification MERCON® V Automatic Transmission Fluid XT-5-QM (or XT-5-QMC) (US); CXT-5-LM12 (Canada) MERCON® V 2008 Ford Ranger 2008 STEERING Power Steering - Ranger Microsoft Wednesday, November 11, 2009 11:21:15 AM Page 2 © 2005 Mitchell Repair Information Company, LLC.
  • 3. Fig. 1: Identifying Power Steering Fluid Reservoir - 2.3L With Torque Specifications Courtesy of FORD MOTOR CO. Item Part Number Description 1 W503924 Power steering fluid reservoir bolts (3 required) 2 3R700 Power steering fluid reservoir 3 3A713 Return hose 4 3659 Power steering pump supply hose 2008 Ford Ranger 2008 STEERING Power Steering - Ranger Microsoft Wednesday, November 11, 2009 11:21:15 AM Page 3 © 2005 Mitchell Repair Information Company, LLC.
  • 4. Fig. 2: Exploded View Of Power Steering Fluid Reservoir - 4.0L Engine With Torque Specifications Courtesy of FORD MOTOR CO. REMOVAL & INSTALLATION Item Part Number Description 1 3659 Power steering pump supply hose 2 3A005 Return hose 3 N606678 Power steering fluid reservoir bolts (2 required) 4 3R700 Power steering fluid reservoir CAUTION: While repairing the power steering system, care should be taken to prevent the entry of foreign material or failure of the power steering 2008 Ford Ranger 2008 STEERING Power Steering - Ranger Microsoft Wednesday, November 11, 2009 11:21:15 AM Page 4 © 2005 Mitchell Repair Information Company, LLC.
  • 5. All vehicles 1. Using a suitable suction device, remove the power steering fluid from the reservoir. 2. Compress the clamp and disconnect the return hose. 3. Compress the clamp and disconnect the power steering pump supply hose. 2.3L engines 4. Remove the 3 bolts and the power steering fluid reservoir.  To install, tighten to 14 Nm (10 lb-ft). 4.0L engines 5. Remove the 2 bolts and the power steering fluid reservoir.  To install, tighten to 14 Nm (10 lb-ft). All vehicles 6. To install, reverse the removal procedure. 7. Fill the power steering system. For additional information, refer to STEERING SYSTEM - GENERAL INFORMATION article. POWER STEERING FLUID RESERVOIR - 3.0L Material components may result. CAUTION: Do not allow power steering fluid to contact the engine accessory drive belt or the belt may be damaged. Item Specification MERCON® V Automatic Transmission Fluid XT-5-QM (or XT-5-QMC) (US); CXT-5-LM12 (Canada) MERCON® V 2008 Ford Ranger 2008 STEERING Power Steering - Ranger Microsoft Wednesday, November 11, 2009 11:21:15 AM Page 5 © 2005 Mitchell Repair Information Company, LLC.
  • 6. Fig. 3: Exploded View Of Power Steering Fluid Reservoir - 3.0L Engine With Torque Specifications Courtesy of FORD MOTOR CO. REMOVAL & INSTALLATION Item Part Number Description 1 W503923 Power steering fluid reservoir bolts (2 required) 2 W520101 Power steering fluid reservoir nut 3 3R700 Power steering fluid reservoir 4 CS7617 Power steering pump supply hose 5 3F731 Return hose CAUTION: While repairing the power steering system, care should be taken to 2008 Ford Ranger 2008 STEERING Power Steering - Ranger Microsoft Wednesday, November 11, 2009 11:21:15 AM Page 6 © 2005 Mitchell Repair Information Company, LLC.
  • 7. 1. Using a suitable suction device, remove the power steering fluid from the reservoir. 2. Compress the clamp and disconnect the return hose. 3. Compress the clamp and disconnect the power steering pump supply hose. 4. Remove the power steering fluid reservoir nut.  To install, tighten to 14 Nm (10 lb-ft). 5. Remove the 2 bolts and the power steering fluid reservoir.  To install, tighten to 14 Nm (10 lb-ft). 6. To install, reverse the removal procedure. 7. Fill the power steering system. For additional information, refer to STEERING SYSTEM - GENERAL INFORMATION article. POWER STEERING PUMP - 2.3L Special Tools Material prevent the entry of foreign material or failure of the power steering components may result. CAUTION: Do not allow power steering fluid to contact the engine accessory drive belt or the belt may be damaged. Illustration Tool Name Tool Number Installer Set, Teflon® Seal 211-D027 (D90P-3517-A) or equivalent Item Specification MERCON® V Automatic Transmission Fluid XT-5-QM (or XT-5-QMC) (US); CXT-5-LM12 (Canada) MERCON® V 2008 Ford Ranger 2008 STEERING Power Steering - Ranger Microsoft Wednesday, November 11, 2009 11:21:15 AM Page 7 © 2005 Mitchell Repair Information Company, LLC.
  • 8. Fig. 4: Identifying Power Steering Pump - 2.3L With Torque Specifications Courtesy of FORD MOTOR CO. REMOVAL & INSTALLATION 1. Using a suitable suction device, remove the power steering fluid from the reservoir. 2. Remove the power steering pump pulley. For additional information, refer to Power Steering Pump Pulley - 2.3L. 3. Compress the clamp and disconnect the power steering pump supply hose. Item Part Number Description 1 3A719 Pressure line-to-pump fitting 2 W705952 Power steering pump bolt (4 required) 3 C56697 Power steering pump supply hose 4 3A674 Power steering pump 5 N803257 Teflon® seal CAUTION: While repairing the power steering system, care should be taken to prevent the entry of foreign material or failure of the power steering components may result. CAUTION: Do not allow power steering fluid to contact the accessory drive belt or the belt may be damaged. 2008 Ford Ranger 2008 STEERING Power Steering - Ranger Microsoft Wednesday, November 11, 2009 11:21:15 AM Page 8 © 2005 Mitchell Repair Information Company, LLC.
  • 9. 4. Disconnect the pressure line-to-pump fitting.  Remove and discard the Teflon® seal.  To install, tighten to 65 Nm (48 lb-ft). 5. Remove the 4 power steering pump bolts and the power steering pump.  To install, tighten to 23 Nm (17 lb-ft). 6. To install, reverse the removal procedure.  Using the special tool, install a new Teflon® seal on the pressure line-to-pump fitting.  Fill the power steering system. For additional information, refer to STEERING SYSTEM - GENERAL INFORMATION article. Fig. 5: Installing Teflon(R) Seal Using Special Tool Courtesy of FORD MOTOR CO. POWER STEERING PUMP - 3.0L Special Tools Material CAUTION: A new Teflon® seal must be installed any time the pressure line fitting is disconnected from the power steering pump or a fluid leak may occur. Illustration Tool Name Tool Number Installer Set, Teflon® Seal 211-D027 (D90P-3517-A) or equivalent Item Specification MERCON® V Automatic Transmission Fluid XT-5-QM (or XT-5-QMC) (US); CXT-5-LM12 (Canada) MERCON® V 2008 Ford Ranger 2008 STEERING Power Steering - Ranger Microsoft Wednesday, November 11, 2009 11:21:15 AM Page 9 © 2005 Mitchell Repair Information Company, LLC.
  • 10. Fig. 6: Exploded View Of Power Steering Pump - 3.0L Engine With Torque Specifications Courtesy of FORD MOTOR CO. REMOVAL & INSTALLATION 1. Using a suitable suction device, remove the power steering fluid from the reservoir. 2. Remove the power steering pump pulley. For additional information, refer to Power Steering Pump Pulley - 3.0L, 4.0L. 3. Disconnect the pressure line-to-pump fitting. Item Part Number Description 1 N605784 Power steering pump bolt (3 required) 2 3R700 Power steering fluid reservoir 3 CS7617 Power steering pump supply hose 4 3A674 Power steering pump 5 N803257 Teflon® seal 6 3A719 Pressure line-to-pump fitting CAUTION: While repairing the power steering system, care should be taken to prevent the entry of foreign material or failure of the power steering components may result. CAUTION: Do not allow power steering fluid to contact the engine accessory drive belt or the belt may be damaged. 2008 Ford Ranger 2008 STEERING Power Steering - Ranger Microsoft Wednesday, November 11, 2009 11:21:16 AM Page 10 © 2005 Mitchell Repair Information Company, LLC.
  • 11.  Remove and discard the Teflon® seal.  To install, tighten to 65 Nm (48 lb-ft). 4. Compress the clamp and disconnect the power steering pump supply hose. 5. Remove the 3 bolts and the power steering pump.  To install, tighten to 25 Nm (18 lb-ft). 6. To install, reverse the removal procedure.  Using the special tool, install a new Teflon® seal on the pressure line-to-pump fitting.  Fill the power steering system. For additional information, refer to STEERING SYSTEM - GENERAL INFORMATION article. Fig. 7: Installing Teflon(R) Seal Using Special Tool Courtesy of FORD MOTOR CO. POWER STEERING PUMP - 4.0L Special Tools Material CAUTION: A new Teflon® seal must be installed any time the pressure line fitting is disconnected from the power steering pump or a fluid leak may occur. Illustration Tool Name Tool Number Installer Set, Teflon® Seal 211-D027 (D90P-3517-A) or equivalent Item Specification MERCON® V Automatic Transmission Fluid XT-5-QM (or XT-5-QMC) (US); CXT-5-LM12 (Canada) MERCON® V 2008 Ford Ranger 2008 STEERING Power Steering - Ranger Microsoft Wednesday, November 11, 2009 11:21:16 AM Page 11 © 2005 Mitchell Repair Information Company, LLC.
  • 12. Fig. 8: Exploded View Of Power Steering Pump - 4.0L With Torque Specifications Courtesy of FORD MOTOR CO. REMOVAL & INSTALLATION 1. Using a suitable suction device, remove the power steering fluid from the reservoir. 2. Remove the engine cooling fan. For additional information, refer to ENGINE COOLING article. 3. Remove the power steering pump pulley. For additional information, refer to Power Steering Pump Pulley - 3.0L, 4.0L. Item Part Number Description 1 3A719 Pressure line-to-pump fitting 2 3659 Power steering pump supply hose 3 W700839 Power steering pump bolt (3 required) 4 3A674 Power steering pump 5 N803257 Teflon® seal CAUTION: While repairing the power steering system, care should be taken to prevent the entry of foreign material or failure of the power steering components may result. CAUTION: Do not allow power steering fluid to contact the accessory drive belt or the belt may be damaged. 2008 Ford Ranger 2008 STEERING Power Steering - Ranger Microsoft Wednesday, November 11, 2009 11:21:16 AM Page 12 © 2005 Mitchell Repair Information Company, LLC.
  • 13. 4. Compress the clamp and disconnect the power steering pump supply hose from the power steering fluid reservoir. 5. Disconnect the pressure line-to-pump fitting.  To install, tighten to 65 Nm (48 lb-ft). 6. Compress the clamp and disconnect the power steering pump supply hose from the power steering pump. 7. Remove the 3 bolts and the power steering pump.  Tighten to 25 Nm (18 lb-ft). 8. To install, reverse removal procedure.  Using the special tool, install a new Teflon® seal on the pressure line-to-pump fitting.  Fill the power steering system. For additional information, refer to STEERING SYSTEM - GENERAL INFORMATION article. Fig. 9: Installing Teflon(R) Seal Using Special Tool Courtesy of FORD MOTOR CO. POWER STEERING PUMP PULLEY - 2.3L Special Tools CAUTION: A new Teflon® seal must be installed any time the pressure line is disconnected from the power steering pump or a fluid leak may occur. Illustration Tool Name Tool Number Remover, Power Steering Pump Pulley 211-016 (T69L-10300-B) Installer, Power Steering Pump Pulley 211-185 (T91P-3A733-A) 2008 Ford Ranger 2008 STEERING Power Steering - Ranger Microsoft Wednesday, November 11, 2009 11:21:16 AM Page 13 © 2005 Mitchell Repair Information Company, LLC.
  • 14. Fig. 10: Identifying Power Steering Pump Pulley - 2.3L Courtesy of FORD MOTOR CO. REMOVAL 1. Remove the air cleaner outlet pipe. For additional information, refer to INTAKE AIR DISTRIBUTION & FILTERING article. 2. Rotate the accessory drive belt tensioner counterclockwise and position the accessory drive belt aside. Item Part Number Description 1 3D673 Power steering pump pulley 2 8620 Accessory drive belt 2008 Ford Ranger 2008 STEERING Power Steering - Ranger Microsoft Wednesday, November 11, 2009 11:21:16 AM Page 14 © 2005 Mitchell Repair Information Company, LLC.
  • 15. Fig. 11: Locating Accessory Drive Belt Tensioner Courtesy of FORD MOTOR CO. 3. Using the special tool, remove the power steering pump pulley. Fig. 12: Removing Pulley Using Special Tool (211-016) Courtesy of FORD MOTOR CO. INSTALLATION 1. Using the special tool, install the power steering pump pulley. CAUTION: Do not install a power steering pump pulley that has been removed and installed twice or pulley failure and/or pump damage may occur. Inspect the pulley for paint marks in the web area near the hub. If there are 2 paint marks, discard the pulley and install a new one. If there is 1 paint mark or no paint marks, use a paint pencil to mark the web area of the pulley near the hub. 2008 Ford Ranger 2008 STEERING Power Steering - Ranger Microsoft Wednesday, November 11, 2009 11:21:16 AM Page 15 © 2005 Mitchell Repair Information Company, LLC.
  • 16. Fig. 13: Installing Pulley Using Special Tool (211-185) Courtesy of FORD MOTOR CO. 2. Rotate the tensioner counterclockwise and position the belt on the power steering pump pulley. Fig. 14: Locating Accessory Drive Belt Tensioner Courtesy of FORD MOTOR CO. 3. Install the air cleaner outlet pipe. For additional information, refer to INTAKE AIR DISTRIBUTION & FILTERING article. POWER STEERING PUMP PULLEY - 3.0L, 4.0L NOTE: For additional information on accessory drive belt routing, refer to ACCESSORY DRIVE article. 2008 Ford Ranger 2008 STEERING Power Steering - Ranger Microsoft Wednesday, November 11, 2009 11:21:16 AM Page 16 © 2005 Mitchell Repair Information Company, LLC.
  • 17. Fig. 15: Identifying Power Steering Pump Pulley - 3.0L, 4.0L With Torque Specifications Courtesy of FORD MOTOR CO. REMOVAL & INSTALLATION 1. Loosen the power steering pump pulley bolts. 2. Rotate the accessory drive belt tensioner counterclockwise and position the accessory drive belt aside. 3. Remove the 3 bolts and the power steering pump pulley.  To install, tighten to 25 Nm (18 lb-ft). 4. To install, reverse the removal procedure. INNER TIE ROD Item Part Number Description 1 N605784 Power steering pump pulley bolts (3 required) 2 3A733 Power steering pump pulley 3 8620 Accessory drive belt NOTE: 4.0L engine shown in illustration, 3.0L engine similar. NOTE: For additional information on accessory drive belt routing, refer to ACCESSORY DRIVE article. 2008 Ford Ranger 2008 STEERING Power Steering - Ranger Microsoft Wednesday, November 11, 2009 11:21:16 AM Page 17 © 2005 Mitchell Repair Information Company, LLC.
  • 18. Special Tools Material Fig. 16: Identifying Inner Tie Rod With Torque Specifications Courtesy of FORD MOTOR CO. Illustration Tool Name Tool Number Inner Tie-Rod Socket Tool 211-D029 or equivalent Tie-Rod End Separator 211-105 (T85M-3395-A) or equivalent Item Specification Premium Long-Life Grease XG-1-C or XG-1-K (US); CXG-1-C (Canada) ESA-M1C75-B Item Part Number Description 1 N803637 Tie-rod jam nut (part of 3280) (2 required) 2008 Ford Ranger 2008 STEERING Power Steering - Ranger Microsoft Wednesday, November 11, 2009 11:21:16 AM Page 18 © 2005 Mitchell Repair Information Company, LLC.
  • 19. REMOVAL & INSTALLATION Coil spring suspension vehicles 1. Remove the wheel and tire. For additional information, refer to WHEELS & TIRES article. 2. Loosen the tie-rod jam nuts.  To install, tighten to 80 Nm (59 lb-ft). 3. Remove the outer tie-rod end cotter pin and nut.  Discard the cotter pin.  To install, tighten to 80 Nm (59 lb-ft). 4. Using the special tool, disconnect the outer tie-rod end. 2 N800895 Outer tie-rod end nut (2 required) 3 3290 Outer tie-rod end (2 required) 4 3K745 Outer bellows boot clamp (2 required) 5 3C650A Inner bellows boot clamp (2 required) 6 3K661 Steering gear bellows boot (2 required) 7 3280 Inner tie rod (2 required) 8 N642569 Cotter pin (2 required) CAUTION: The boots and clamps are designed to provide an airtight seal and protect the internal components of the steering gear. If the seal is not airtight, the vacuum generated during turning may draw water and foreign material into the gear and damage internal components. Zip ties do not produce an airtight seal and must not be used. CAUTION: The inner ball joint grease is not compatible with water. Water and foreign material trapped in the grease may damage the joint. CAUTION: If present, the orientation of the vent tubes must be noted so the boots and vent tubes may be installed in their original locations. Incorrect venting may lead to internal component damage. CAUTION: Do not damage the tie-rod end boot when installing the special tool. 2008 Ford Ranger 2008 STEERING Power Steering - Ranger Microsoft Wednesday, November 11, 2009 11:21:16 AM Page 19 © 2005 Mitchell Repair Information Company, LLC.
  • 20. Fig. 17: Identifying Special Tool On Tie-Rod End Courtesy of FORD MOTOR CO. 5. Remove the outer tie-rod end. 6. Remove the tie-rod jam nut. 7. Remove the inner and outer bellows boot clamps. 8. Remove the bellows boot. 9. Using the special tool, remove the inner tie rod.  To install, tighten to 100 Nm (74 lb-ft). NOTE: Count and record the number of times the outer tie-rod end turns for assembly reference. NOTE: If repairing the RH side, it will be necessary to pull back the LH inner bellows boot to hold the steering gear. CAUTION: Place the steering gear at the center position. Use a 21 mm (0.82 in) crowfoot on the flat of the rack gear to resist rotation and to prevent damage during removal and installation of the inner tie rod. NOTE: The help of an assistant may be needed for removal of the RH inner tie rod. 2008 Ford Ranger 2008 STEERING Power Steering - Ranger Microsoft Wednesday, November 11, 2009 11:21:16 AM Page 20 © 2005 Mitchell Repair Information Company, LLC.
  • 21. Fig. 18: Inner Tie Rod And Special Tool Courtesy of FORD MOTOR CO. Torsion bar suspension vehicles 10. Loosen the tie-rod jam nut.  To install, tighten to 80 Nm (59 lb-ft). 11. Remove the steering gear. For additional information, refer to Steering Gear - Rear Wheel Drive (RWD) or Steering Gear - Four Wheel Drive (4WD). 12. Remove the outer tie-rod end and jam nut. 13. Remove the inner and outer bellows boot clamps. 14. Using the special tool, remove the inner tie rod.  To install, tighten to 100 Nm (74 lb-ft). Fig. 19: Locating Inner Tie Rod Courtesy of FORD MOTOR CO. All vehicles NOTE: Count and record the number of times the outer tie-rod end turns for assembly reference. NOTE: If repairing the RH side, it will be necessary to pull back the LH inner bellows boot to hold the steering gear. CAUTION: Place the steering gear at the center position. Use a 21 mm (0.82 in) crowfoot on the flat of the rack gear to resist rotation and to prevent damage during removal and installation of the inner tie rod. NOTE: The help of an assistant may be needed for removal of the RH inner tie rod. 2008 Ford Ranger 2008 STEERING Power Steering - Ranger Microsoft Wednesday, November 11, 2009 11:21:16 AM Page 21 © 2005 Mitchell Repair Information Company, LLC.
  • 22. 15. Thoroughly clean and inspect all the parts to be reused. Install new parts as necessary. 16. Check that the bellows boot seal is positioned correctly over the steering gear housing bead at the large inside diameter (ID) and is in the inner tie-rod groove at the small ID.  Check that the bellows boot seal is not twisted and the breather tube is securely inserted into the breather nipple at both bellows boots. 17. To install, reverse the removal procedure. 18. Check and if necessary adjust the front toe. For additional information, refer to SUSPENSION SYSTEM - GENERAL INFORMATION article. POWER STEERING FLUID COOLER Material CAUTION: Thoroughly remove any dirt or foreign material that is present. This material is extremely harmful to the steering gear. NOTE: Lubricate the inner tie rod inside groove with steering gear grease where the bellows boot is clamped. Item Specification MERCON® V Automatic Transmission Fluid XT-5-QM (or XT-5-QMC) (US); CXT-5-LM12 (Canada) MERCON® V 2008 Ford Ranger 2008 STEERING Power Steering - Ranger Microsoft Wednesday, November 11, 2009 11:21:16 AM Page 22 © 2005 Mitchell Repair Information Company, LLC.
  • 23. Fig. 20: Identifying Power Steering Fluid Cooler With Torque Specifications Courtesy of FORD MOTOR CO. REMOVAL & INSTALLATION 1. With the vehicle in NEUTRAL, position it on a hoist. For additional information, refer to JACKING & LIFTING article. 2. Remove the 2 power steering fluid cooler nuts.  To install, tighten to 40 Nm (30 lb-ft). 3. Compress the clamps and disconnect the 2 power steering fluid cooler hoses. 4. To install, reverse the removal procedure.  Fill the power steering system. For additional information, refer to STEERING SYSTEM - GENERAL INFORMATION article. STEERING GEAR - REAR WHEEL DRIVE (RWD) Special Tools Item Part Number Description 1 3A713B Power steering fluid cooler hose 2 3A713A Power steering fluid cooler hose 3 N800169 Power steering fluid cooler nuts (2 required) 4 3F780 Power steering fluid cooler CAUTION: While repairing the power steering system, care should be taken to prevent the entry of foreign material or failure of the power steering components may result. Illustration Tool Name Tool Number Remover, Tie-Rod End 211-001 (TOOL-3290-D) or equivalent 2008 Ford Ranger 2008 STEERING Power Steering - Ranger Microsoft Wednesday, November 11, 2009 11:21:16 AM Page 23 © 2005 Mitchell Repair Information Company, LLC.
  • 24. Fig. 21: Identifying Steering Gear - Rear Wheel Drive (RWD) With Torque Specifications Courtesy of FORD MOTOR CO. Item Part Number Description 1 W520413 Steering line clamp plate nut 2 3A713 Return line 3 3A719 Pressure line 4 N803256 O-ring seal 5 N803257 O-ring seal 6 N811762 Steering gear studs (2 required) 7 N803942 Lower steering column shaft-to-steering gear bolt 8 3504 Steering gear 9 N808265 Steering gear nuts (2 required) 2008 Ford Ranger 2008 STEERING Power Steering - Ranger Microsoft Wednesday, November 11, 2009 11:21:16 AM Page 24 © 2005 Mitchell Repair Information Company, LLC.
  • 25. REMOVAL & INSTALLATION All vehicles 1. Remove the front wheels and tires. For additional information, refer to WHEELS & TIRES article. 2. Place the steering wheel in the straight-ahead position and remove the ignition key.  Rotate the steering wheel until the steering column locks into position. 3.0L and 4.0L engines 3. Remove the power steering fluid cooler. For additional information, refer to Power Steering Fluid Cooler. All vehicles 4. Remove the outer tie-rod end cotter pins and nuts.  Discard the cotter pins.  To install, tighten to 80 Nm (59 lb-ft). 5. Using special tool, separate the outer tie-rod ends from the wheel spindles. 10 N642569 Cotter pin (2 required) 11 N800895 Outer tie-rod end nut (2 required) CAUTION: When repairing the power steering system, care should be taken to prevent the entry of foreign material or failure of the power steering components may result. CAUTION: Do not damage the tie-rod boot when installing the special tool. NOTE: Remove the adapter from the ball end of the special tool. Apply a small amount of grease to the tie-rod end stud and the ball of the special tool. 2008 Ford Ranger 2008 STEERING Power Steering - Ranger Microsoft Wednesday, November 11, 2009 11:21:16 AM Page 25 © 2005 Mitchell Repair Information Company, LLC.
  • 26. Fig. 22: Separating Outer Tie Rods From Wheel Knuckles Courtesy of FORD MOTOR CO. 6. Remove the lower steering column shaft-to-steering gear bolt and disconnect the lower steering column shaft from the gear.  Discard the bolt.  To install, tighten to 55 Nm (41 lb-ft). 7. Remove the steering line clamp plate nut and disconnect the pressure and return lines.  Discard the O-ring seals.  To install, tighten to 35 Nm (26 lb-ft). 8. Plug or cap the return line, pressure line and the steering gear ports to prevent the entry of dirt. 9. Remove the 2 steering gear nuts and the 2 steering gear studs.  To install, tighten to 150 Nm (111 lb-ft). 10. Remove the steering gear. 11. If necessary, remove the outer tie-rod ends. 12. To install, reverse the removal procedure.  Install new power steering line O-ring seals. 13. Fill the power steering system. For additional information, refer to STEERING SYSTEM - GENERAL INFORMATION article. 14. Check and, if necessary, adjust the front toe. STEERING GEAR - FOUR WHEEL DRIVE (4WD) Special Tools CAUTION: Do not allow the steering column to rotate while the steering column shaft is disconnected from the steering gear or damage to the clockspring may result. If there is evidence that the steering column has rotated, the clockspring must be removed and recentered. For additional information, refer to SUPPLEMENTAL RESTRAINT SYSTEM article. CAUTION: Hold the tops of the steering gear studs to avoid damaging the steering gear fluid transfer tubes. CAUTION: New O-ring seals must be installed any time the power steering lines are disconnected from the steering gear or a fluid leak may occur. Illustration Tool Name Tool Number 2008 Ford Ranger 2008 STEERING Power Steering - Ranger Microsoft Wednesday, November 11, 2009 11:21:16 AM Page 26 © 2005 Mitchell Repair Information Company, LLC.
  • 27. Fig. 23: Identifying Steering Gear - Four Wheel Drive (4WD) With Torque Specifications Courtesy of FORD MOTOR CO. Remover, Tie-Rod End 211-001 (TOOL-3290-D) or equivalent Item Part Number Description 1 W520413 Steering line clamp plate nut 2 3A713 Return line 3 3A719 Pressure line 4 N803256 O-ring seal 2008 Ford Ranger 2008 STEERING Power Steering - Ranger Microsoft Wednesday, November 11, 2009 11:21:16 AM Page 27 © 2005 Mitchell Repair Information Company, LLC.
  • 28. REMOVAL All vehicles 1. Remove the front wheels and tires. For additional information, refer to WHEELS & TIRES article. 2. Place the steering wheel in the straight-ahead position and remove the ignition key.  Rotate the steering wheel until the steering column locks into position. 3.0L and 4.0L engines 3. Remove the power steering fluid cooler. For additional information, refer to Power Steering Fluid Cooler. All vehicles 4. Loosen the tie-rod jam nuts. 5. Remove the outer tie-rod end cotter pins and nuts.  Discard the cotter pins. 6. Using the special tool, separate the outer tie-rod ends from the wheel knuckles. 5 N803257 O-ring seal 6 N811762 Steering gear studs (2 required) 7 N803942 Lower steering column shaft-to-steering gear bolt 8 3504 Steering gear 9 N803637 Tie rod jam nut (part of 3280) (2 required) 10 N808265 Steering gear nuts (2 required) 11 3290 Outer tie-rod end (2 required) 12 N642569 Cotter pin (2 required) 13 N800895 Outer tie-rod end nut (2 required) CAUTION: When repairing the power steering system, care should be taken to prevent the entry of foreign material or failure of the power steering components may result. CAUTION: Do not damage the tie-rod boot when installing the special tool. NOTE: Remove the adapter from the ball end of the special tool. Apply a small amount of grease to the tie-rod end stud and the ball of the special tool. 2008 Ford Ranger 2008 STEERING Power Steering - Ranger Microsoft Wednesday, November 11, 2009 11:21:16 AM Page 28 © 2005 Mitchell Repair Information Company, LLC.
  • 29. Fig. 24: Separating Outer Tie Rods From Wheel Knuckles Courtesy of FORD MOTOR CO. 7. Remove the outer tie-rod ends.  Count and record the number of turns required to remove the outer tie-rod end. 8. Remove the stabilizer bar and link. For additional information, refer to FRONT SUSPENSION - FOUR WHEEL DRIVE (4WD) article. 9. Remove the lower steering column shaft-to-steering gear bolt and disconnect the shaft from the steering gear.  Discard the bolt. 10. Remove the steering line clamp plate nut and disconnect the pressure and return lines.  Discard the O-ring seals. 11. Remove the 2 steering gear nuts and steering gear studs. 12. Rotate the steering gear control valve housing toward the front of the vehicle. CAUTION: Do not allow the steering column to rotate while the steering column shaft is disconnected from the steering gear or damage to the clockspring may result. If there is evidence that the steering column has rotated, the clockspring must be removed and recentered. For additional information, refer to SUPPLEMENTAL RESTRAINT SYSTEM article. CAUTION: Hold the tops of the steering gear studs to avoid damaging the steering gear fluid transfer tubes. 2008 Ford Ranger 2008 STEERING Power Steering - Ranger Microsoft Wednesday, November 11, 2009 11:21:16 AM Page 29 © 2005 Mitchell Repair Information Company, LLC.
  • 30. Fig. 25: Rotating Steering Gear Control Valve Housing Toward Front Of Vehicle Courtesy of FORD MOTOR CO. 13. Turn the steering gear input shaft to the right until the stop is reached. 14. Move the steering gear as far to the RH side of the vehicle as possible. Fig. 26: Moving Steering Gear As Far To RH Side Of Vehicle As Possible Courtesy of FORD MOTOR CO. 15. Move the LH inner tie rod forward to clear the frame crossmember. Fig. 27: Locating LH Inner Tie Rod Courtesy of FORD MOTOR CO. 16. Remove the steering gear. 2008 Ford Ranger 2008 STEERING Power Steering - Ranger Microsoft Wednesday, November 11, 2009 11:21:16 AM Page 30 © 2005 Mitchell Repair Information Company, LLC.
  • 31. Fig. 28: Removing Steering Gear Courtesy of FORD MOTOR CO. INSTALLATION All vehicles 1. Turn the steering gear input shaft to the right until the stop is reached. Count and record the number of turns required. 2. Install the steering gear into the RH opening of the crossmember. Fig. 29: Installing Steering Gear Into RH Opening Of Crossmember Courtesy of FORD MOTOR CO. CAUTION: Handle the steering gear with caution to avoid damage to fluid transfer tubes and to avoid dimples in the steering gear bellows boot. NOTE: Make sure the steering gear input shaft is turned to the left until the stop is reached. NOTE: Make sure the steering gear control valve housing is turned toward the front of the vehicle. CAUTION: Take care not to scuff or tear the steering gear bellows boots. 2008 Ford Ranger 2008 STEERING Power Steering - Ranger Microsoft Wednesday, November 11, 2009 11:21:16 AM Page 31 © 2005 Mitchell Repair Information Company, LLC.
  • 32. 3. Move the steering gear as far to the RH side of the vehicle as possible. Fig. 30: Moving Steering Gear As Far To RH Side Of Vehicle As Possible Courtesy of FORD MOTOR CO. 4. Move the LH inner tie rod into the opening in the crossmember and move the steering gear into position. Fig. 31: Locating LH Inner Tie Rod Courtesy of FORD MOTOR CO. 5. To place the steering gear in the straight-ahead position, turn the steering gear input shaft to the left by 1/2 the number of turns previously recorded. 6. Rotate the steering gear control valve housing toward the rear of the vehicle. Fig. 32: Rotating Steering Gear Control Valve Housing Toward Rear Of Vehicle Courtesy of FORD MOTOR CO. 7. Install the 2 steering gear studs. 2008 Ford Ranger 2008 STEERING Power Steering - Ranger Microsoft Wednesday, November 11, 2009 11:21:16 AM Page 32 © 2005 Mitchell Repair Information Company, LLC.
  • 33. 8. Install the 2 steering gear nuts.  Tighten to 150 Nm (111 lb-ft). 9. Position the pressure and return lines and install the steering line clamp plate nut.  Tighten to 35 Nm (26 lb-ft). 10. Connect the steering column shaft to the steering gear and install a new bolt.  Tighten to 55 Nm (41 lb-ft). 11. Install the stabilizer bar and link. For additional information, refer to FRONT SUSPENSION - FOUR WHEEL DRIVE (4WD) article. 12. Install the outer tie-rod ends.  Rotate the outer tie-rod ends the number of turns recorded during removal. 13. Position the outer tie-rod ends and install the nuts and new cotter pins.  Check that the brake disc shields are not bent and are not in contact with the outer tie-rod end boots.  Tighten to 80 Nm (59 lb-ft). 3.0L and 4.0L engines 14. Install the power steering fluid cooler. For additional information, refer to Power Steering Fluid Cooler. All vehicles 15. Tighten the tie-rod jam nuts.  Tighten to 80 Nm (59 lb-ft). 16. Fill the power steering system. For additional information, refer to STEERING SYSTEM - GENERAL INFORMATION article. 17. Check and, if necessary, adjust the front toe. For additional information, refer to SUSPENSION SYSTEM - GENERAL INFORMATION article. CAUTION: Hold the tops of the steering gear studs to avoid damaging the steering gear fluid transfer tubes. CAUTION: New O-rings must be installed any time the lines are disconnected from the steering gear or a fluid leak may occur. CAUTION: Do not allow the steering column to rotate while the steering column shaft is disconnected from the steering gear or damage to the clockspring may result. If there is evidence that the steering column has rotated, the clockspring must be removed and re-centered. For additional information, refer to SUPPLEMENTAL RESTRAINT SYSTEM article. 2008 Ford Ranger 2008 STEERING Power Steering - Ranger Microsoft Wednesday, November 11, 2009 11:21:16 AM Page 33 © 2005 Mitchell Repair Information Company, LLC.
  • 34. Thank you very much for your reading. Please Click Here Then Get More Information.