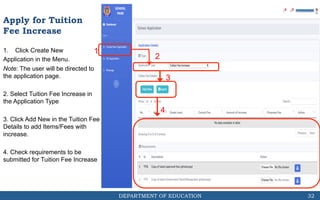
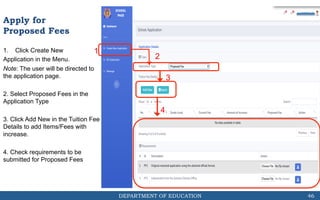
DepEd Regional Office 1
e-Application for Private Schools
and Records Management
User Manual
DEPARTMENT OF EDUCATION
SCHOOL ACCOUNT MODULE
2
DEPARTMENT OF EDUCATION
Table of Contents
3
Topic Page
Background of the System 3
School Login Page 5
School Registration 8
School Main Page 10
How to Apply for Government Recognition? 12
How to Apply for Government Permit? 18
How to Apply for Renewal Government Permit? 24
How to Apply for Tuition Fee Increase? 30
How to Apply for No Tuition Fee Increase? 37
How to Apply for Proposed Fees? 44
How to Apply for Government Permit Senior High School? 51
How to Apply for Special Order 56
What to do on the Returned/Complied Applications with Deficiencies? 61
DEPARTMENT OF EDUCATION
Background
• The use of E-APS-RM will be in support to the strategic goal
of the Department of Education – “Modernizing Education
Management and Governance”.
• Through this information system, DepEd Region 1 will be able
to automate core systems and processes that would improve
service delivery of the programs of the Department
• The Department will contribute to the improvement of
education governance guided by the principle of governance
transparency and accountability
4
DEPARTMENT OF EDUCATION
School’s Login Page
5
DEPARTMENT OF EDUCATION
Directing Address
1. Go to the URL
deped.ro1apps.com
2. Click Go to School Login link.
This will redirect you to the
School
The user will be redirected to
deped.ro1apps.com/school
2
1
6
DEPARTMENT OF EDUCATION
Privacy Notice
The system will show the Privacy Notice
that contains the following:
(1) who is the entity in control of the
processing (i.e., Personal Information
Controller, or PIC);
(2) What data are being collected or
generated;
(3) what is the purpose of the processing;
(4) who has access to the data;
(5) with whom are the data shared, if at
all; and
(6) how long will the data be retained.
(7) rights of the data subject
1
7
DEPARTMENT OF EDUCATION
Login
1. Input username and password.
2. Click on Login button. The
system will check if the credentials
is for the authorized user.
3. If not yet registered, click on
Register School.
4. The user can reset password
using the Reset Password link
1
2
3
4
8
DEPARTMENT OF EDUCATION
School Registration
9
DEPARTMENT OF EDUCATION
Register School
1. Input needed School information.
Click on view button to see
the list of schools
2. Input your preferred login
credentials
3. Click on Save Button
Note: The user needs to wait for the
system administrator to verify and
activate your account.
1
2
3
10
DEPARTMENT OF EDUCATION
School’s Main Page
11
DEPARTMENT OF EDUCATION
1. Menu to Create
New Application, SO
Application, or read
Messages.
2. Dashboard with the
Timeline of a selected
application (click on a
certain application to
view the Timeline)
3. List of submitted
applications and with
the indicated status
12
1
2
3
THE SCHOOL’S
PAGE SHOWS THE
FF:
DEPARTMENT OF EDUCATION
How to Apply for
Government Recognition?
13
DEPARTMENT OF EDUCATION
1. Click New Application in the
Menu.
Note: The user will be directed to
the application page.
2. Select Government Recognition
in the Application Type
3. Choose the course applied for
the Government Recognition.
4. Check requirements to be
submitted for Government
Recognition.
1
14
2
3
Apply for
Government
Recognition
4
DEPARTMENT OF EDUCATION
5. Click the button
to select a file in your computer
directory
6. Click the Upload button
and wait for the file to be uploaded
in the server. The file type required
for uploading are PDF files.
7. It will generate a name for the
uploaded file. (i.e. GR1_52_15.pdf)
Note: The user can view the
uploaded file by clicking the File
Name with blue font color. Files can
still be changed until the application
is submitted.
5 6
7
15
Apply for
Government
Recognition
DEPARTMENT OF EDUCATION
6.1. Upload percentage status
widget will be shown
6.2. A widget indicating uploading is
successful will be shown
6.1
6.2
16
Apply for
Government
Recognition
DEPARTMENT OF EDUCATION
8. The user needs to upload files
for all of the requirements for the
button to be activated.
9. Click button for the
application to be submitted to the
Division Office.
8
9
17
Apply for
Government
Recognition
DEPARTMENT OF EDUCATION
10. A notification widget will be
show indicating that the submission
of the application has been
successful.
Note: Once submitted, the user
cannot make changes on the
application unless returned by the
Division/Regional EPS.
10
18
Apply for
Government
Recognition
DEPARTMENT OF EDUCATION
How to Apply for
Government Permit
19
DEPARTMENT OF EDUCATION
1. Click New Application in the
Menu.
Note: The user will be directed to
the application page.
2. Select Government Permit in the
Application Type
3. Determine whether New or
Additional.
4. Choose the course/grade level
applied for the Government Permit.
5. Check requirements to be
submitted for Government Permit.
1
20
2 3
Apply for
Government
Permit
4
5
DEPARTMENT OF EDUCATION
6. Click the button
to select a file in your computer
directory
7. Click the Upload button
and wait for the file to be uploaded
in the server. The file type required
for uploading are PDF files.
8. It will generate a name for the
uploaded file. (i.e. GP1_52_15.pdf)
Note: The user can view the
uploaded file by clicking the File
Name with blue font color. Files can
still be changed until the application
is submitted.
6 7
8
21
Apply for
Government
Permit
DEPARTMENT OF EDUCATION
7.1. Upload percentage status
widget will be shown
7.2. A widget indicating uploading is
successful will be shown
7.1
7.2
22
Apply for
Government
Permit
DEPARTMENT OF EDUCATION
9. The user needs to upload files
for all of the requirements for the
button to be activated.
10. Click button for the
application to be submitted to the
Division Office.
9
10
23
Apply for
Government
Permit
DEPARTMENT OF EDUCATION
11. A notification widget will be
show indicating that the submission
of the application has been
successful.
Note: Once submitted, the user
cannot make changes on the
application unless returned by the
Division/Regional EPS.
11
24
Apply for
Government
Permit
DEPARTMENT OF EDUCATION
How to Apply for Renewal
of Government Permit
25
DEPARTMENT OF EDUCATION
1. Click Create New
Application in the Menu.
Note: The user will be directed to
the application page.
2. Select Renewal Government
Permit in the Application Type
3. Choose the course applied for
the Renewal Government Permit.
4. Check requirements to be
submitted for Renewal Government
Permit
1
26
2
3
Apply for Renewal
of Government
Permit
4
DEPARTMENT OF EDUCATION
5. Click the button
to select a file in your computer
directory
6. Click the Upload button
and wait for the file to be uploaded
in the server. The file type required
for uploading are PDF files.
7. It will generate a name for the
uploaded file. (i.e.
RGP1_52_15.pdf)
Note: The user can view the
uploaded file by clicking the File
Name with blue font color. Files can
still be changed until the application
is submitted.
5 6
7
27
Apply for Renewal
of Government
Permit
DEPARTMENT OF EDUCATION
6.1. Upload percentage status
widget will be shown
6.2. A widget indicating uploading is
successful will be shown
6.1
6.2
28
Apply for Renewal
of Government
Permit
DEPARTMENT OF EDUCATION
8. The user needs to upload files
for all of the requirements for the
button to be activated.
9. Click button for the
application to be submitted to the
Division Office.
8
9
29
Apply for Renewal
of Government
Permit
DEPARTMENT OF EDUCATION
10. A notification widget will be
show indicating that the submission
of the application has been
successful.
Note: Once submitted, the user
cannot make changes on the
application unless returned by the
Division/Regional EPS.
10
30
Apply for Renewal
of Government
Permit
DEPARTMENT OF EDUCATION
How to Apply for
Tuition Fee Increase
31
DEPARTMENT OF EDUCATION
1. Click Create New
Application in the Menu.
Note: The user will be directed to
the application page.
2. Select Tuition Fee Increase in
the Application Type
3. Click Add New in the Tuition Fee
Details to add Items/Fees with
increase.
4. Check requirements to be
submitted for Tuition Fee Increase
1
32
2
3
Apply for Tuition
Fee Increase
4
DEPARTMENT OF EDUCATION
5. Upon clicking the Add New
button, a message box will prompt
the user to input the name of the
Item/Fee, Grade Level, Current Fee
and Amount Increase. The
Proposed Fee will be automatically
calculated.
6. Click the Save Changes button
to add the increase in a certain
item.
Note: Repeat steps 5 and 6 for
additional Items/Fees.
5
6
33
Apply for Tuition
Fee Increase
DEPARTMENT OF EDUCATION
7. The user can view all added fees
applied for increase
8. Click the Export button to create
and export the fees to an excel file
7
8
34
Apply for Tuition
Fee Increase
DEPARTMENT OF EDUCATION
9. Click the button
to select a file in your computer
directory
10. Click the Upload button
and wait for the file to be uploaded
in the server. The file type required
for uploading are PDF files.
11. It will generate a name for the
uploaded file. (i.e. TR6_1_15.pdf)
Note: The user can view the
uploaded file by clicking the File
Name with blue font color. Files can
still be changed until the application
is submitted.
9 10
11
35
Apply for Tuition
Fee Increase
DEPARTMENT OF EDUCATION
10.1. Upload percentage status
widget will be shown
10.2. A widget indicating uploading
is successful will be shown
10.1
10.2
36
Apply for Tuition
Fee Increase
DEPARTMENT OF EDUCATION
12. The user needs to upload files
for all of the requirements for the
button to be activated.
13. Click button for the
application to be submitted to the
Division Office.
12
13
37
Apply for Tuition
Fee Increase
DEPARTMENT OF EDUCATION
How to Apply for No
Tuition Fee Increase
38
DEPARTMENT OF EDUCATION
1. Click Create New
Application in the Menu.
Note: The user will be directed to the
application page.
2. Select No Tuition Fee Increase in
the Application Type
Note: For the first implementation of
the system, the schools need to
provide the existing fees.
3. Click Add New in the Tuition Fee
Details to add Items/Fees with
increase.
4. Check requirements to be
submitted for No Tuition Fee Increase
1
39
2
3
Apply for No
Tuition Fee
Increase
4
DEPARTMENT OF EDUCATION
5. Upon clicking the Add New
button, a message box will prompt
the user to input the name of the
Item/Fee, Grade Level, Current Fee
and Amount Increase. The
Proposed Fee will be automatically
calculated.
6. Click the Save Changes button
to add the increase in a certain
item.
Note: Repeat steps 5 and 6 for
additional Items/Fees.
5
6
40
Apply for No
Tuition Fee
Increase
DEPARTMENT OF EDUCATION
7. The user can view all added fees
applied for increase
8. Click the Export button to create
and export the fees to an excel file
7
8
41
Apply for No
Tuition Fee
Increase
DEPARTMENT OF EDUCATION
9. Click the button
to select a file in your computer
directory
10. Click the Upload button
and wait for the file to be uploaded
in the server. The file type required
for uploading are PDF files.
11. It will generate a name for the
uploaded file. (i.e. NTR6_1_15.pdf)
Note: The user can view the
uploaded file by clicking the File
Name with blue font color. Files can
still be changed until the application
is submitted.
9 10
11
42
Apply for No
Tuition Fee
Increase
DEPARTMENT OF EDUCATION
10.1. Upload percentage status
widget will be shown
10.2. A widget indicating uploading
is successful will be shown
10.1
10.2
43
Apply for No
Tuition Fee
Increase
DEPARTMENT OF EDUCATION
12. The user needs to upload files
for all of the requirements for the
button to be activated.
13. Click button for the
application to be submitted to the
Division Office.
12
13
44
Apply for No
Tuition Fee
Increase
DEPARTMENT OF EDUCATION
How to Apply for
Proposed Fees
45
DEPARTMENT OF EDUCATION
1. Click Create New
Application in the Menu.
Note: The user will be directed to
the application page.
2. Select Proposed Fees in the
Application Type
3. Click Add New in the Tuition Fee
Details to add Items/Fees with
increase.
4. Check requirements to be
submitted for Proposed Fees
1
46
2
3
Apply for
Proposed Fees
4
DEPARTMENT OF EDUCATION
5. Upon clicking the Add New
button, a message box will prompt
the user to input the name of the
Item/Fee, Grade Level, Current Fee
and Amount Increase. The
Proposed Fee will be automatically
calculated.
6. Click the Save Changes button
to add the increase in a certain
item.
Note: Repeat steps 5 and 6 for
additional Items/Fees.
5
6
47
Apply for
Proposed Fees
DEPARTMENT OF EDUCATION
7. The user can view all added fees
applied for increase
8. Click the Export button to create
and export the fees to an excel file
7
8
48
Apply for
Proposed Fees
DEPARTMENT OF EDUCATION
9. Click the button
to select a file in your computer
directory
10. Click the Upload button
and wait for the file to be uploaded
in the server. The file type required
for uploading are PDF files.
11. It will generate a name for the
uploaded file. (i.e. PF1_3_15.pdf)
Note: The user can view the
uploaded file by clicking the File
Name with blue font color. Files can
still be changed until the application
is submitted.
9 10
11
49
Apply for
Proposed Fees
DEPARTMENT OF EDUCATION
10.1. Upload percentage status
widget will be shown
10.2. A widget indicating uploading
is successful will be shown
10.1
10.2
50
Apply for
Proposed Fees
DEPARTMENT OF EDUCATION
12. The user needs to upload files
for all of the requirements for the
button to be activated.
13. Click button for the
application to be submitted to the
Division Office.
12
13
51
Apply for
Proposed Fees
DEPARTMENT OF EDUCATION
How to Apply for
Government Permit for SHS
52
DEPARTMENT OF EDUCATION
1. Click Create New
Application in the Menu.
Note: The user will be directed to
the application page.
2. Select Government Permit SHS
Application in the Application Type
3. Select the Track and Strand
applied for.
4. Check requirements to be
submitted for Proposed Fees
1
53
2
3
Apply for
Government
Permit for SHS
4
DEPARTMENT OF EDUCATION
5. Click the button
to select a file in your computer
directory
6. Click the Upload button
and wait for the file to be uploaded
in the server. The file type required
for uploading are PDF files.
7. It will generate a name for the
uploaded file. (i.e. SHS1_4_15.pdf)
Note: The user can view the
uploaded file by clicking the File
Name with blue font color. Files can
still be changed until the application
is submitted.
5 6
7
54
Apply for
Government
Permit for SHS
DEPARTMENT OF EDUCATION
6.1. Upload percentage status
widget will be shown
6.2. A widget indicating uploading is
successful will be shown
6.1
6.2
55
Apply for
Government
Permit for SHS
DEPARTMENT OF EDUCATION
12. The user needs to upload files
for all of the requirements for the
button to be activated.
13. Click button for the
application to be submitted to the
Division Office.
8
9
56
Apply for
Government
Permit for SHS
DEPARTMENT OF EDUCATION
SO Application
57
DEPARTMENT OF EDUCATION
APPLY FOR
SPECIAL ORDER
1. Click on the SO
Application Menu
2. Input Number of
Students
3. Browse and choose
excel file to be uploaded
4. Click Submit button to
upload and submit the
application
5. A widget indicating
uploading and
submission is successful
will be shown
1 2
3
4
5
58
DEPARTMENT OF EDUCATION
What to do on Returned/
Complied Applications with
Deficiencies?
59
DEPARTMENT OF EDUCATION
Comply To
Deficiencies
1. A certain application that was
verified by the Division Office
or Regional Office with
deficiencies will have a
Returned Status.
2. Click on the view button
to check on the deficiencies of
a certain application
Note: The school needs to upload a
new file that complies with the
remarks/comments.
1 2
60
DEPARTMENT OF EDUCATION
Comply To
Deficiencies
The school needs to upload a new file
that complies with the remarks/
comments.
3. Check on the requirements with
remarks/comments/with deficiency.
4. Click the button to
select a file in your computer directory
5. Click the Upload button and
wait for the file to be uploaded in the
server. The file type required for
uploading are PDF files.
6. It will generate a name for the
uploaded file. (i.e. GP7_49.pdf)
3 4 5
6
61
DEPARTMENT OF EDUCATION
Comply To
Deficiencies
7. The user needs to upload files
for all of the deficient requirements
returned by the Division/Regional
Office for the button to be
activated.
8. Click button for the
application to be resubmitted to the
Division/Regional Office.
7
8
62
DEPARTMENT OF EDUCATION
COMPLY TO
DEFICIENCIES
9. The Status of application
of be changed to Validation
9
63

1DepEd eAPS - School Module User Manual - Per Transaction.pdf

  • 1.
    DepEd Regional Office1 e-Application for Private Schools and Records Management User Manual
  • 2.
  • 3.
    DEPARTMENT OF EDUCATION Tableof Contents 3 Topic Page Background of the System 3 School Login Page 5 School Registration 8 School Main Page 10 How to Apply for Government Recognition? 12 How to Apply for Government Permit? 18 How to Apply for Renewal Government Permit? 24 How to Apply for Tuition Fee Increase? 30 How to Apply for No Tuition Fee Increase? 37 How to Apply for Proposed Fees? 44 How to Apply for Government Permit Senior High School? 51 How to Apply for Special Order 56 What to do on the Returned/Complied Applications with Deficiencies? 61
  • 4.
    DEPARTMENT OF EDUCATION Background •The use of E-APS-RM will be in support to the strategic goal of the Department of Education – “Modernizing Education Management and Governance”. • Through this information system, DepEd Region 1 will be able to automate core systems and processes that would improve service delivery of the programs of the Department • The Department will contribute to the improvement of education governance guided by the principle of governance transparency and accountability 4
  • 5.
  • 6.
    DEPARTMENT OF EDUCATION DirectingAddress 1. Go to the URL deped.ro1apps.com 2. Click Go to School Login link. This will redirect you to the School The user will be redirected to deped.ro1apps.com/school 2 1 6
  • 7.
    DEPARTMENT OF EDUCATION PrivacyNotice The system will show the Privacy Notice that contains the following: (1) who is the entity in control of the processing (i.e., Personal Information Controller, or PIC); (2) What data are being collected or generated; (3) what is the purpose of the processing; (4) who has access to the data; (5) with whom are the data shared, if at all; and (6) how long will the data be retained. (7) rights of the data subject 1 7
  • 8.
    DEPARTMENT OF EDUCATION Login 1.Input username and password. 2. Click on Login button. The system will check if the credentials is for the authorized user. 3. If not yet registered, click on Register School. 4. The user can reset password using the Reset Password link 1 2 3 4 8
  • 9.
  • 10.
    DEPARTMENT OF EDUCATION RegisterSchool 1. Input needed School information. Click on view button to see the list of schools 2. Input your preferred login credentials 3. Click on Save Button Note: The user needs to wait for the system administrator to verify and activate your account. 1 2 3 10
  • 11.
  • 12.
    DEPARTMENT OF EDUCATION 1.Menu to Create New Application, SO Application, or read Messages. 2. Dashboard with the Timeline of a selected application (click on a certain application to view the Timeline) 3. List of submitted applications and with the indicated status 12 1 2 3 THE SCHOOL’S PAGE SHOWS THE FF:
  • 13.
    DEPARTMENT OF EDUCATION Howto Apply for Government Recognition? 13
  • 14.
    DEPARTMENT OF EDUCATION 1.Click New Application in the Menu. Note: The user will be directed to the application page. 2. Select Government Recognition in the Application Type 3. Choose the course applied for the Government Recognition. 4. Check requirements to be submitted for Government Recognition. 1 14 2 3 Apply for Government Recognition 4
  • 15.
    DEPARTMENT OF EDUCATION 5.Click the button to select a file in your computer directory 6. Click the Upload button and wait for the file to be uploaded in the server. The file type required for uploading are PDF files. 7. It will generate a name for the uploaded file. (i.e. GR1_52_15.pdf) Note: The user can view the uploaded file by clicking the File Name with blue font color. Files can still be changed until the application is submitted. 5 6 7 15 Apply for Government Recognition
  • 16.
    DEPARTMENT OF EDUCATION 6.1.Upload percentage status widget will be shown 6.2. A widget indicating uploading is successful will be shown 6.1 6.2 16 Apply for Government Recognition
  • 17.
    DEPARTMENT OF EDUCATION 8.The user needs to upload files for all of the requirements for the button to be activated. 9. Click button for the application to be submitted to the Division Office. 8 9 17 Apply for Government Recognition
  • 18.
    DEPARTMENT OF EDUCATION 10.A notification widget will be show indicating that the submission of the application has been successful. Note: Once submitted, the user cannot make changes on the application unless returned by the Division/Regional EPS. 10 18 Apply for Government Recognition
  • 19.
    DEPARTMENT OF EDUCATION Howto Apply for Government Permit 19
  • 20.
    DEPARTMENT OF EDUCATION 1.Click New Application in the Menu. Note: The user will be directed to the application page. 2. Select Government Permit in the Application Type 3. Determine whether New or Additional. 4. Choose the course/grade level applied for the Government Permit. 5. Check requirements to be submitted for Government Permit. 1 20 2 3 Apply for Government Permit 4 5
  • 21.
    DEPARTMENT OF EDUCATION 6.Click the button to select a file in your computer directory 7. Click the Upload button and wait for the file to be uploaded in the server. The file type required for uploading are PDF files. 8. It will generate a name for the uploaded file. (i.e. GP1_52_15.pdf) Note: The user can view the uploaded file by clicking the File Name with blue font color. Files can still be changed until the application is submitted. 6 7 8 21 Apply for Government Permit
  • 22.
    DEPARTMENT OF EDUCATION 7.1.Upload percentage status widget will be shown 7.2. A widget indicating uploading is successful will be shown 7.1 7.2 22 Apply for Government Permit
  • 23.
    DEPARTMENT OF EDUCATION 9.The user needs to upload files for all of the requirements for the button to be activated. 10. Click button for the application to be submitted to the Division Office. 9 10 23 Apply for Government Permit
  • 24.
    DEPARTMENT OF EDUCATION 11.A notification widget will be show indicating that the submission of the application has been successful. Note: Once submitted, the user cannot make changes on the application unless returned by the Division/Regional EPS. 11 24 Apply for Government Permit
  • 25.
    DEPARTMENT OF EDUCATION Howto Apply for Renewal of Government Permit 25
  • 26.
    DEPARTMENT OF EDUCATION 1.Click Create New Application in the Menu. Note: The user will be directed to the application page. 2. Select Renewal Government Permit in the Application Type 3. Choose the course applied for the Renewal Government Permit. 4. Check requirements to be submitted for Renewal Government Permit 1 26 2 3 Apply for Renewal of Government Permit 4
  • 27.
    DEPARTMENT OF EDUCATION 5.Click the button to select a file in your computer directory 6. Click the Upload button and wait for the file to be uploaded in the server. The file type required for uploading are PDF files. 7. It will generate a name for the uploaded file. (i.e. RGP1_52_15.pdf) Note: The user can view the uploaded file by clicking the File Name with blue font color. Files can still be changed until the application is submitted. 5 6 7 27 Apply for Renewal of Government Permit
  • 28.
    DEPARTMENT OF EDUCATION 6.1.Upload percentage status widget will be shown 6.2. A widget indicating uploading is successful will be shown 6.1 6.2 28 Apply for Renewal of Government Permit
  • 29.
    DEPARTMENT OF EDUCATION 8.The user needs to upload files for all of the requirements for the button to be activated. 9. Click button for the application to be submitted to the Division Office. 8 9 29 Apply for Renewal of Government Permit
  • 30.
    DEPARTMENT OF EDUCATION 10.A notification widget will be show indicating that the submission of the application has been successful. Note: Once submitted, the user cannot make changes on the application unless returned by the Division/Regional EPS. 10 30 Apply for Renewal of Government Permit
  • 31.
    DEPARTMENT OF EDUCATION Howto Apply for Tuition Fee Increase 31
  • 32.
    DEPARTMENT OF EDUCATION 1.Click Create New Application in the Menu. Note: The user will be directed to the application page. 2. Select Tuition Fee Increase in the Application Type 3. Click Add New in the Tuition Fee Details to add Items/Fees with increase. 4. Check requirements to be submitted for Tuition Fee Increase 1 32 2 3 Apply for Tuition Fee Increase 4
  • 33.
    DEPARTMENT OF EDUCATION 5.Upon clicking the Add New button, a message box will prompt the user to input the name of the Item/Fee, Grade Level, Current Fee and Amount Increase. The Proposed Fee will be automatically calculated. 6. Click the Save Changes button to add the increase in a certain item. Note: Repeat steps 5 and 6 for additional Items/Fees. 5 6 33 Apply for Tuition Fee Increase
  • 34.
    DEPARTMENT OF EDUCATION 7.The user can view all added fees applied for increase 8. Click the Export button to create and export the fees to an excel file 7 8 34 Apply for Tuition Fee Increase
  • 35.
    DEPARTMENT OF EDUCATION 9.Click the button to select a file in your computer directory 10. Click the Upload button and wait for the file to be uploaded in the server. The file type required for uploading are PDF files. 11. It will generate a name for the uploaded file. (i.e. TR6_1_15.pdf) Note: The user can view the uploaded file by clicking the File Name with blue font color. Files can still be changed until the application is submitted. 9 10 11 35 Apply for Tuition Fee Increase
  • 36.
    DEPARTMENT OF EDUCATION 10.1.Upload percentage status widget will be shown 10.2. A widget indicating uploading is successful will be shown 10.1 10.2 36 Apply for Tuition Fee Increase
  • 37.
    DEPARTMENT OF EDUCATION 12.The user needs to upload files for all of the requirements for the button to be activated. 13. Click button for the application to be submitted to the Division Office. 12 13 37 Apply for Tuition Fee Increase
  • 38.
    DEPARTMENT OF EDUCATION Howto Apply for No Tuition Fee Increase 38
  • 39.
    DEPARTMENT OF EDUCATION 1.Click Create New Application in the Menu. Note: The user will be directed to the application page. 2. Select No Tuition Fee Increase in the Application Type Note: For the first implementation of the system, the schools need to provide the existing fees. 3. Click Add New in the Tuition Fee Details to add Items/Fees with increase. 4. Check requirements to be submitted for No Tuition Fee Increase 1 39 2 3 Apply for No Tuition Fee Increase 4
  • 40.
    DEPARTMENT OF EDUCATION 5.Upon clicking the Add New button, a message box will prompt the user to input the name of the Item/Fee, Grade Level, Current Fee and Amount Increase. The Proposed Fee will be automatically calculated. 6. Click the Save Changes button to add the increase in a certain item. Note: Repeat steps 5 and 6 for additional Items/Fees. 5 6 40 Apply for No Tuition Fee Increase
  • 41.
    DEPARTMENT OF EDUCATION 7.The user can view all added fees applied for increase 8. Click the Export button to create and export the fees to an excel file 7 8 41 Apply for No Tuition Fee Increase
  • 42.
    DEPARTMENT OF EDUCATION 9.Click the button to select a file in your computer directory 10. Click the Upload button and wait for the file to be uploaded in the server. The file type required for uploading are PDF files. 11. It will generate a name for the uploaded file. (i.e. NTR6_1_15.pdf) Note: The user can view the uploaded file by clicking the File Name with blue font color. Files can still be changed until the application is submitted. 9 10 11 42 Apply for No Tuition Fee Increase
  • 43.
    DEPARTMENT OF EDUCATION 10.1.Upload percentage status widget will be shown 10.2. A widget indicating uploading is successful will be shown 10.1 10.2 43 Apply for No Tuition Fee Increase
  • 44.
    DEPARTMENT OF EDUCATION 12.The user needs to upload files for all of the requirements for the button to be activated. 13. Click button for the application to be submitted to the Division Office. 12 13 44 Apply for No Tuition Fee Increase
  • 45.
    DEPARTMENT OF EDUCATION Howto Apply for Proposed Fees 45
  • 46.
    DEPARTMENT OF EDUCATION 1.Click Create New Application in the Menu. Note: The user will be directed to the application page. 2. Select Proposed Fees in the Application Type 3. Click Add New in the Tuition Fee Details to add Items/Fees with increase. 4. Check requirements to be submitted for Proposed Fees 1 46 2 3 Apply for Proposed Fees 4
  • 47.
    DEPARTMENT OF EDUCATION 5.Upon clicking the Add New button, a message box will prompt the user to input the name of the Item/Fee, Grade Level, Current Fee and Amount Increase. The Proposed Fee will be automatically calculated. 6. Click the Save Changes button to add the increase in a certain item. Note: Repeat steps 5 and 6 for additional Items/Fees. 5 6 47 Apply for Proposed Fees
  • 48.
    DEPARTMENT OF EDUCATION 7.The user can view all added fees applied for increase 8. Click the Export button to create and export the fees to an excel file 7 8 48 Apply for Proposed Fees
  • 49.
    DEPARTMENT OF EDUCATION 9.Click the button to select a file in your computer directory 10. Click the Upload button and wait for the file to be uploaded in the server. The file type required for uploading are PDF files. 11. It will generate a name for the uploaded file. (i.e. PF1_3_15.pdf) Note: The user can view the uploaded file by clicking the File Name with blue font color. Files can still be changed until the application is submitted. 9 10 11 49 Apply for Proposed Fees
  • 50.
    DEPARTMENT OF EDUCATION 10.1.Upload percentage status widget will be shown 10.2. A widget indicating uploading is successful will be shown 10.1 10.2 50 Apply for Proposed Fees
  • 51.
    DEPARTMENT OF EDUCATION 12.The user needs to upload files for all of the requirements for the button to be activated. 13. Click button for the application to be submitted to the Division Office. 12 13 51 Apply for Proposed Fees
  • 52.
    DEPARTMENT OF EDUCATION Howto Apply for Government Permit for SHS 52
  • 53.
    DEPARTMENT OF EDUCATION 1.Click Create New Application in the Menu. Note: The user will be directed to the application page. 2. Select Government Permit SHS Application in the Application Type 3. Select the Track and Strand applied for. 4. Check requirements to be submitted for Proposed Fees 1 53 2 3 Apply for Government Permit for SHS 4
  • 54.
    DEPARTMENT OF EDUCATION 5.Click the button to select a file in your computer directory 6. Click the Upload button and wait for the file to be uploaded in the server. The file type required for uploading are PDF files. 7. It will generate a name for the uploaded file. (i.e. SHS1_4_15.pdf) Note: The user can view the uploaded file by clicking the File Name with blue font color. Files can still be changed until the application is submitted. 5 6 7 54 Apply for Government Permit for SHS
  • 55.
    DEPARTMENT OF EDUCATION 6.1.Upload percentage status widget will be shown 6.2. A widget indicating uploading is successful will be shown 6.1 6.2 55 Apply for Government Permit for SHS
  • 56.
    DEPARTMENT OF EDUCATION 12.The user needs to upload files for all of the requirements for the button to be activated. 13. Click button for the application to be submitted to the Division Office. 8 9 56 Apply for Government Permit for SHS
  • 57.
  • 58.
    DEPARTMENT OF EDUCATION APPLYFOR SPECIAL ORDER 1. Click on the SO Application Menu 2. Input Number of Students 3. Browse and choose excel file to be uploaded 4. Click Submit button to upload and submit the application 5. A widget indicating uploading and submission is successful will be shown 1 2 3 4 5 58
  • 59.
    DEPARTMENT OF EDUCATION Whatto do on Returned/ Complied Applications with Deficiencies? 59
  • 60.
    DEPARTMENT OF EDUCATION ComplyTo Deficiencies 1. A certain application that was verified by the Division Office or Regional Office with deficiencies will have a Returned Status. 2. Click on the view button to check on the deficiencies of a certain application Note: The school needs to upload a new file that complies with the remarks/comments. 1 2 60
  • 61.
    DEPARTMENT OF EDUCATION ComplyTo Deficiencies The school needs to upload a new file that complies with the remarks/ comments. 3. Check on the requirements with remarks/comments/with deficiency. 4. Click the button to select a file in your computer directory 5. Click the Upload button and wait for the file to be uploaded in the server. The file type required for uploading are PDF files. 6. It will generate a name for the uploaded file. (i.e. GP7_49.pdf) 3 4 5 6 61
  • 62.
    DEPARTMENT OF EDUCATION ComplyTo Deficiencies 7. The user needs to upload files for all of the deficient requirements returned by the Division/Regional Office for the button to be activated. 8. Click button for the application to be resubmitted to the Division/Regional Office. 7 8 62
  • 63.
    DEPARTMENT OF EDUCATION COMPLYTO DEFICIENCIES 9. The Status of application of be changed to Validation 9 63