

Recommended
Recommended
More Related Content
What's hot
What's hot (20)
Similar to 1. how to draw cars fast and easy
Similar to 1. how to draw cars fast and easy (20)
Recently uploaded
Recently uploaded (20)
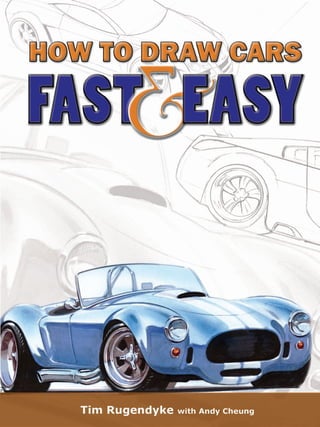
1. how to draw cars fast and easy
- 2. Contents How to Draw Cars Fast and Easy ii ©2009. How-To-Draw-Cars.com Contents Introduction................................................................................................... 1 Purpose of the Book 2 Format of the Book 2 Mindset and Expectations 2 What Are The Principles of Drawing Cars? 3 Frequently Asked Questions 7 Getting Started............................................................................................ 13 How To Get Started Drawing Cars 14 Tips for Getting started 15 Quick Drawing Examples 16 Using Underlays – How To Draw Cars Quickly And Easily Without Always Rubbing Out 18 Tools and Equipment. ................................................................................. 20 Tools and Equipment 21 Paper 21 Pens/Pencils 22 Markers 25 Mixed Media 27 Guides and Templates 27 Full Media Examples 30 Copying and Tracing. .................................................................................. 31 Copying and Tracing 32 Transferring 32 Tracing 33 Copying vs Drawing from Scratch 33 Using a Grid 34 Side Views. .................................................................................................... 35 Perspective................................................................................................... 44 Introduction 45 Single-point Perspective 45 Two-Point Perspective 46 Horizon Lines 47 Why Is Perspective So Important? 48 Perspective Grids – How To Draw Equal Size Boxes in Perspective 49 Common Mistakes in Perspective 51 Checking Your Perspective 52
- 3. Contents How to Draw Cars Fast and Easy iii ©2009. How-To-Draw-Cars.com Ellipses. .......................................................................................................... 53 Perspective Tutorials. ................................................................................. 59 Single-Point Perspective Tutorial 60 Two-Point Perspective Tutorial #1 – ¾ Front Above Eye Level View 69 Two-Point Perspective Tutorial #2 – ¾ Front Eye Level View 80 Two-Point Perspective Tutorial #3 – ¾ Rear Above Eye Level View 89 Constructing the Perspective 97 Drawing Turned Wheels and Opened Doors 98 Proportion..................................................................................................... 99 Introduction 100 Working Out the Proportions 102 Box Design 104 One-Box 104 Two-Box 105 Three-Box 107 Adding Color............................................................................................... 109 Adding Color Tutorial 110 Gallery. ......................................................................................................... 122 Drawing Gallery 123
- 4. Copyright How to Draw Cars Fast and Easy iv ©2009. How-To-Draw-Cars.com Copyright ©2009. How-To-Draw-Cars.com. All rights reserved. You may not copy, reproduce, post or forward this document in any format.
- 6. Introduction How to Draw Cars Fast and Easy ©2009. How-To-Draw-Cars.com Purpose of the Book The purpose of this book is to give anyone a guide to drawing cars, no matter what their previous car drawing experience is. Therefore, if you have never drawn a car in your life, this will be your starting point. Alternatively, if you have been drawing cars for years, this book will give you tips on how to improve and fix aspects of your drawing that you’ve always wondered about. I guess every car fanatic wants to draw cars at some stage – whether they’re hot rods, tuner-type cars, or whatever. I hope this will give you some good direction on improving your car drawings, getting the angles right, getting the wheels right, and answering a few of those questions that you have always wondered about. Format of the Book The book will cover the fundamentals of car drawing and provide instructions on how to deal with different angles and perspectives, how to get them looking right, and how to use your own creativity to get the result that you want. The detailed step- by-step tutorials and background theory to the fundamentals will get you drawing with ease within the shortest period of time. Mindset and Expectations You obviously need an interest in cars, but do not expect to be a master first up. Start with realistic expectations. Cars are something that everyone has an opinion on and when it comes to drawing cars, it is really doing whatever interests you. Be free. Loosen up. Mess up your hair a bit before you start. The important things are to never be afraid of it and to not compare where you are at with other people because it is your own drawing. This way, you will be able to enjoy what you are doing. . Learning how to draw cars takes lots of practice, but you should enjoy what you are doing. That is the main thing, enjoy it and do not be afraid of it.
- 7. Introduction How to Draw Cars Fast and Easy ©2009. How-To-Draw-Cars.com What Are The Principles of Drawing Cars? The key things to consider when drawing cars are: Angle. Which way are you looking at the car – from the rear, from the front ¾, from up high or down low? The angle needs to be decided fairly early on before you start drawing. Figure 1 Figure 2 In Figure 1, we are looking at the Charger from the rear at a height slightly above eye level. While in Figure 2, the Mustang is drawn at eye level viewed from the front �� ¾ angle� .
- 8. Introduction How to Draw Cars Fast and Easy ©2009. How-To-Draw-Cars.com Perspective. This will make the drawing look 3D rather than flat. Everything we look at in the world is in perspective. Perspective helps achieve the angle we are looking at. Figure 3 You’ll notice in Figure 3 the perspective drawing enables you to convey many details on the car you wouldn’t see in a 2D drawing which then brings the car to life. Figure 4 Figure 4 is a side on perspective view which has a totally different feel to Figure 3. Its not as dynamic as it looks like its still in time while the drawing above looks like the car is in motion.
- 9. Introduction How to Draw Cars Fast and Easy ©2009. How-To-Draw-Cars.com Proportion. This helps determine the type of car we are drawing, whether it’s a sports car, a large family sedan, a van, etc. Sports car� �������� ��� ��������������������� (Figure 5)���������������������� – shorter wheelbase, lower roof, bigger wheels, lower profile tires. Family Sedan – longer wheel base, bigger cabin space, longer overhangs, etc. Small hatchback (Figure 6) – large cabin area, small engine area, small wheels. Figure 5 Figure 6
- 10. Introduction How to Draw Cars Fast and Easy ©2009. How-To-Draw-Cars.com Stance. How the car sits on the road – low and sleek; high and agile; sits level; raised at the back. Low front looks fast and aggressive. Big wheels pushed out to the extremities looks tough and muscular. High nose looks regal. Figure 7 Figure 7 shows a 40 Ford Lowboy hot rod. It has got a very laid-back angle to it, sitting nice and low in the road with the front end slightly raised. It has this very cruisey look. Figure 8 In Figure 8, the Shelby Cobra is very muscle-bound – it has big wheel arches to take those big tires underneath. It has bulges all around it, indicating a big engine underneath. It sits with the nose slightly lower than the back so it assumes an aggressive stance. Since it looks muscle-bound, it seems like it is ready to pounce.
- 11. Introduction How to Draw Cars Fast and Easy ©2009. How-To-Draw-Cars.com Frequently Asked Questions Are cars quite technical to draw? Cars are quite complex objects to draw, and learning how to draw them takes lots of practice. They have specific lines, shapes, and rules that apply to them. There are many different profiles and many subtle curves. The early Jaguars have very subtle, smooth-flowing curves, whereas your modern Cadillacs have very sharp ‘angular’ lines. There are lots of different angles and shapes to pull together to get cars looking right. You also have the whole thing of wheels. This is probably the biggest stumbling block for most people. Getting the wheels right at their correct angles and getting the ellipses right are critical and are actually quite a challenge. Adding to their complexity are the reflections you need to bring in – different surfaces like glass; being able to see through the glass; replicating the high-gloss paint finishes, metallic paint, and chrome; dealing with reflectors and headlights – all these different influences. There are quite a lot of different textures, shapes, and elements to be dealt with in drawing cars. This is what makes them complex. Do I have to add a lot of detail to my drawings? Adding detail depends on what you are setting out to achieve. You can add as much or as little detail as you like. A quick sketch showing overall form and flavor needs little detail, whereas a technical illustration – where every detail on the car needs to be shown – needs lots of detail. Drawing a hot rod with an open engine and lots of chrome needs lots of detail. Drawing a car with a very smooth, clean surface like a Porsche needs less detail. If you like the challenge of adding in a lot of detail and if that is what you are into, then go for it. Other people like to go for more of an impressionist type (Figure 9) of approach by doing an atmospheric-type drawing or giving a flavor of the shape, reflection, or form, which does not actually require too much detail at all. Therefore, it is really up to the individual whether they want to add a lot of detail or to stop at something light.
- 12. Introduction How to Draw Cars Fast and Easy ©2009. How-To-Draw-Cars.com Figure 9 Drawing Detail Examples Following are two illustrations that highlight the different levels of detail. One is of a cutaway, which includes a lot of detail. This uses a technique similar to a technical illustration approach, where a lot of detail is shown and defined. The other is a very simple sketch with a basic outline shape – maybe a headlight graphic, a grille graphic, the position of the wheels – and that is about it. It is more of an atmospheric type or an impressionist type drawing. Figure 10 The cutaway in Figure 10 is a very technical illustration. It started as a cross sectional on the drawing board with lots of technical details and that print was rendered up. There was an effort to show as much detail of the suspension, engine, and gearbox as possible.
- 13. Introduction How to Draw Cars Fast and Easy ©2009. How-To-Draw-Cars.com Figure 11 The drawing of the orange car (Figure 11) looks like a modern-day impression of a Plymouth Barracuda., so let’s just call it a Cuda. The drawing of the Cuda appears like quite an elaborate drawing with the use of the markers and the use of color and highlights, but if you get in closely and look at the actual drawn detail, it is quite light on. There is not a lot of detail in the grille. There is actually not a lot of detail like badging and fine detail in the bodywork. The shape and form is described more through the use of color, as well as some appropriately placed highlights and little splashes of wet paint, than the use of line drawing. It is a drawing that is very quick and very loose and probably took under an hour to do. The use of color and the placement of highlights and lowlights are what bring out the form. So it is not too detailed, but it appears as though it is. Will previous drawing experience be of benefit in drawing cars? Previous experience always helps. Practice always helps too, but you know you have to start somewhere. Everyone has drawn his or her first car at some stage, so if you have never drawn a car before, you know you need to start somewhere. Here is a good place to start. If you have been drawing for years, you will know that every time you draw a car, you learn something new. When you get that little bit of extra practice in, the next time you draw a car, you know something else about it – such as what to avoid or what else to try.
- 14. Introduction How to Draw Cars Fast and Easy 10 ©2009. How-To-Draw-Cars.com I have no drawing experience, but can I learn to draw cars? As previously mentioned, anyone can learn with practice and interest. You have to be interested in it. If not, you are not going to want to do it so there is no real point in attempting. But certainly, if you have never drawn a car and you are interested, you can learn how to draw cars. Constant practice, though, helps you become good at it eventually.
- 15. Introduction How to Draw Cars Fast and Easy 11 ©2009. How-To-Draw-Cars.com Take a look at the series of drawings that I have done throughout the years of my life. I think that the first one was done when I was about 7 or 8, and the next one again about 8 or 9 through age 12, up to the 40 Ford delivery van I did when I was about 14. At around this time, I was starting to learn about tone and color – adding tone and shading. I think I learned this from my big brother. He was a pioneer and I was always following in his steps.
- 16. Introduction How to Draw Cars Fast and Easy 12 ©2009. How-To-Draw-Cars.com At age 15, I learned how to do chrome and also started doing my own little designs, drawing a big turbo V8, for instance, with little wire front wheels. By age 16 I learned to use new mediums such as watercolor, and it’s apparent that the shading, the drawing of the wheels, and other techniques were becoming a bit more competent. So, as you can see, I have been drawing cars all my life. I also went through a phase when everything I was drawing was trucks. Back then, I tried to finish exams early so that I could draw cars during the time that was left of the exam. It involves a lifetime of development, as it’s all about practice…and more practice.
- 17. ©2009. How-To-Draw-Cars.com Chapter 2 Getting Started
- 18. Getting Started How to Draw Cars Fast and Easy 14 ©2009. How-To-Draw-Cars.com How To Get Started Drawing Cars You need materials to draw with, which we will cover a little bit later, further on down, but for now, set up the whole environment that you want to draw in. It is good to set yourself up in a comfortable place. I like to draw on a good solid surface – a good table with a horizontal surface that does not rock or move around. You also need good lighting. I find that good, all-around lighting is very useful. Not just light that comes from one direction – because I often find that my hand will cast shadows over the drawing if the light is just coming from only one direction and I cannot actually see what I am drawing. The paper that you draw on is not as important, but I have my preferences. We will cover that a little bit later. What’s important is understanding good drawing technique. The first thing that I always tell people is to not be afraid of the paper. Some are too scared to put down a line for the fear that it might the wrong line, but I would say, “No, do not be afraid of that. Just get your lines down there, and if they’re not right, you can go over them again and get the right lines. You can trace back over your drawings. You need to loosen up.” Big arm movements; big, free scribbles are good; not little ‘chicken scratches,’ as one of my lecturers used to call them. When you are drawing big arcs, move your arm from the elbow. You must also practice drawing circles and ellipses.
- 19. Getting Started How to Draw Cars Fast and Easy 15 ©2009. How-To-Draw-Cars.com On the other hand, when you are drawing small arcs, move your hand from the wrist. In addition, do not be afraid to move the paper around. This is so your hand can move at a comfortable angle to keep you from moving your body around the paper. You should move the paper around to what is a comfortable angle for you to draw at. Tips for Getting started Enjoy yourself, do not be afraid of it, and use each drawing as a learning experience for the next drawing. Do not be worried if you make mistakes, you can always trace over it or redraw the line to get it looking a little bit better.
- 20. Getting Started How to Draw Cars Fast and Easy 16 ©2009. How-To-Draw-Cars.com Quick Drawing Examples The drawing above is of a 32-style Highboy hot rod using exactly the same technique as in the bonus Quick Start Guide – drawing in that baseline, drawing in your two ellipses for the wheels that are in view, then drawing the other extreme outside line of the wheel. Notice how everything works symmetrically off a centerline and how the shapes are meshed. The hot rod also has a lot of sketchy lines around it. Put in some heavy marker lines and color, plus some highlights and other details to really bring out the quick drawing’s shape. Remember the Cuda? The same technique was used. Draw in that baseline. Next, draw in those first two ellipses as your wheels that are in view, then draw in the horizontal line for the height of the bumper bar. Now work across to the right- hand side of the vehicle, draw in that right-hand side front wheel, then work up the bonnet, the windscreen, the overall outline, and then again begin to just sketch in the details – the doors, the side window, the headlights – and work it up from there.
- 21. Getting Started How to Draw Cars Fast and Easy 17 ©2009. How-To-Draw-Cars.com Quick drawing tips: Choose the type of car that interests you. Copy pictures out of books, paying attention to where the lines are going, the angle of the car, the angle of the wheels, and the proportions. To get started, you can use photos of cars as an underlay and trace over them to get started. Add your own features such as spoilers and fog lamps. You can change the entire design/styling, but keep the same proportions. Draw what you are actually seeing, not what you think you see. Drawing simple side views is easier because you don’t have to worry about perspective or getting ellipses for wheels right. • • • • • •
- 22. Getting Started How to Draw Cars Fast and Easy 18 ©2009. How-To-Draw-Cars.com Using Underlays – How To Draw Cars Quickly And Easily Without Always Rubbing Out Few illustrators do an entire car drawing in one go. They usually do an initial rough sketch to work out the angles and proportions with lots of quick sketchy lines. They then use that as an underlay and trace over it onto a fresh piece of paper, drawing much neater lines. Draw construction lines lightly in pencil, sketching in until they look right, then firm in the lines that you are happy with in darker pencil or ink. You don’t need to worry about drawing lines that are not correct because you can always go over them. For my finished drawings, I always do it in 2 or 3 stages with a very loose sketch to begin with, working up to the finished rendering. The following two illustrations to demonstrate this technique. One is the sharp-looking, finished racecar rendering with all the markers and all the multimedia, including all the highlights and clean lines. The other is the initial sketch that I did and which was used as the underlay. Note that it’s very sketchy, very loose – and the lines that were in the wrong place are still used. Underlay Sketch
- 23. Getting Started How to Draw Cars Fast and Easy 19 ©2009. How-To-Draw-Cars.com Finished Rendering
- 24. ©2009. How-To-Draw-Cars.com Chapter 3 Tools and Equipment
- 25. Tools and Equipment How to Draw Cars Fast and Easy 21 ©2009. How-To-Draw-Cars.com Tools and Equipment The thing to remember with tools and equipment is whatever works for you. Different people like to draw with different tools, and if you have had previous art experience, you would know that the most effective tools are the ones you’re most comfortable using. Paper Over the years, I have found myself using the simplest type of paper – what is known as bond paper, or the type used in photocopiers. It’s a good, all-around type of cheap paper and works quite well for all the mediums that I sketch with. It’s ‘strong’ as well and the grain doesn’t rub up when you work on it too hard. There are types of paper whose pulp, when worked on too hard, run up and becomes furry, making drawing inconvenient. Bond paper works pretty well all around and you can also see through it a bit, which means that it can even be used for tracing. However, it is prone to what is known as ‘marker bleed.’ A type of paper called Marker Pad solves this problem because it prevents markers from bleeding as you lay the colors down. However, this paper is more expensive and not as strong as Bond paper.
- 26. Tools and Equipment How to Draw Cars Fast and Easy 22 ©2009. How-To-Draw-Cars.com Pens/Pencils The main mediums I like to sketch with are: Ballpoint pens. They deliver the ink quickly enough when you are sketching and moving rapidly. Outline-type pens. The Artline 200-type pens with plastic nibs on the end work well for outlines, such as tracing with circle and ellipse guides. However, they are not recommended for quick sketching because they do not deliver the ink quickly enough. Colored pencils. A blue- or sepia-colored pencil offers nice, soft sketches and can be used to make both soft lines and dark, heavy lines. They’re also good for shading and for fade-out effects when smudged. The downside to using colored pencils is that they blunt too easily. Clutch pencils. Blue leads give a nice, soft look to your drawings, can give you nice fine lines, and can also be smudged. They break a little too often, though, so expect to find little bits of broken lead flying off across the room. You can simply push out the lead a little bit more when you need it, though.
- 27. Tools and Equipment How to Draw Cars Fast and Easy 23 ©2009. How-To-Draw-Cars.com Examples Figures 1 and 2 are illustrations demonstrating the use of pens. These drawings are loose and sketchy, but pens give you the freedom to press hard and light to achieve both dark lines and light lines. You can use a variety of thicker pens like a black marker to really punch out the lines and give some heavier definition. Figure 1 Figure 2 In contrast, the sepia-colored pencil sketch (Figure 3) has nice, soft lines, and again, just by pushing hard on the pencil, you can get some quite heavy lines and dark shading.
- 28. Tools and Equipment How to Draw Cars Fast and Easy 24 ©2009. How-To-Draw-Cars.com Figure 3 Figure 4 contains sketches of pickup trucks that were done with a blue lead clutch pencil. You can press reasonably hard and get nice heavy shading or press lightly and get some nice, soft lines and shading as well. Figure 4
- 29. Tools and Equipment How to Draw Cars Fast and Easy 25 ©2009. How-To-Draw-Cars.com Markers I use markers for laying down color and heavier lines. You can go over your initial lines with markers and they get slightly darker each time you do so, up to a point, of course. This is when you have fully saturated the paper and it will not take any more color. You can use one marker and get a little bit of tone going, then go over it to get a bit of a shadow going – the same area a couple of times, with the same marker. Markers give good, solid color; work quickly; and allow you to perform a variety of techniques. Marker brands: Pantone markers. They have a good range of colors, and come with three different nibs: a fat, wedge-type nib; a thinner, felt-tip nib; and a really fine pen-like nib. That gives you three line thickness options for when you are sketching. These are available only at special art stores and are certainly expensive, so you need to be careful with the colors that you choose. Copic markers. They come with two nib thicknesses, which both lay down nicely.
- 30. Tools and Equipment How to Draw Cars Fast and Easy 26 ©2009. How-To-Draw-Cars.com Buying Markers The advantage of using markers is that you can buy refill bottles for refilling the ink when they run dry. It’s much cheaper to buy the refill bottles, and by doing so, your markers can last forever. Stock up on a variety of cool grays of either the Pantone or the Copic. You don’t have to buy every gray; they go from cool gray number 1 up to cool gray number 11. Start with buying number 3 and add to your set by buying every second one – that is, numbers 3, 5, 7, 9, and 11. These should be sufficient to cover whatever you need to do. Invest in a few colors as well, such as a few different blues and a few different reds. For black, I just use the cheap supermarket brands like Sharpie or Artline.
- 31. Tools and Equipment How to Draw Cars Fast and Easy 27 ©2009. How-To-Draw-Cars.com Mixed Media Once you have had some practice, you can then move up to the higher level of rendering – that is, finishing them off for a more vibrant and realistic look. You can use colored pencils for adding shading and tone. They’re great for beefing up and bringing out reflections. I also use what is known as pastels, which give a very nice, soft shading. They are used in conjunction with makeup removers or cotton wool balls and the technique of using them will be demonstrated later in the book. A good white pencil is indispensable for bringing out highlights along edges, cut lines, wheels, and so forth. Use white paint, also known as gouache or poster paint, to strengthen the highlights. The gouache is applied with a nice fine paintbrush. It can be used to dot around little highlights and to paint in little white lines on your rendering. Guides and Templates As opposed to the loose, sketchy-type drawing, which you could do from start to finish using only the freehand technique, tight drawings require a variety of guides for its smooth lines.
- 32. Tools and Equipment How to Draw Cars Fast and Easy 28 ©2009. How-To-Draw-Cars.com Ellipse Guides Get a good set of ellipse guides, which would help you draw ellipses for the wheels. They come in a variety of angles going from about 5 degrees up to 80 degrees. My set only goes from 10 degrees up to 60 degrees, but you can buy them from 5 to 80 degrees, and that gives you ellipse angles through that range. We will talk about ellipses later on in the book. French Curves I also have a series of curves, or what are known as French Curves, and they have ever-varying curves, so that rather than trying to freehand-sketch the smooth bonnet line or roofline, you can find the appropriate curve on your French Curve and use
- 33. Tools and Equipment How to Draw Cars Fast and Easy 29 ©2009. How-To-Draw-Cars.com that to trace around it to give you a nice, smooth line. I have them where the curves are quite tight, but I also have some very broad open curves that work like a ruler but in this case, they work like rulers for curved lines.
- 34. Tools and Equipment How to Draw Cars Fast and Easy 30 ©2009. How-To-Draw-Cars.com Full Media Examples Full media rendering involves the use of everything we have discussed so far – the marker, the pastel, the colored pencil, the white gouache, plus the ellipse guides and the French curves. It is virtually the whole kit and caboodle coming into one rendering. In the following illustrations, you can see that the details are defined using the markers, the pastels, and the colored pencils, while a few extra highlights here and there to show the sparkle were added with white pencil and white gouache using a paint brush.
- 35. ©2009. How-To-Draw-Cars.com Chapter 4 Copying and Tracing
- 36. Copying and Tracing How to Draw Cars Fast and Easy 32 ©2009. How-To-Draw-Cars.com Copying and Tracing Copying and tracing is a very good way to practice – if you want to draw a hot rod and have a particular car in mind, for instance, rather than struggling with trying to get the proportions right for a particular body style, you can simply copy and trace the original drawing. After nailing down the outline, you can then add your own wheel design, chop the top, or do whatever you would like to modify it and come up with your own drawing. Below, you will learn about a variety of ways to trace a vehicle from drawings or pictures in magazines or newspapers. Transferring I used to do this technique as a kid when I wanted to draw a copy of something I’ve seen on a magazine or newspaper. Here are the steps: Get a sheet of tracing paper, lay it down over the drawing or over the photograph that you would like to trace, and just trace the outline of the vehicle with a soft lead pencil. Once you have finished tracing it, take your piece of tracing paper and turn it over, laying it upside down on the piece of paper on which you want to transfer the image. With the same pencil, trace over the lines that you have just traced off of the picture, pushing down onto the white piece of paper. By doing this, the lead is pushed from the underside of the paper down onto the white paper. After the lead has been transferred from the underside of the tracing paper onto the white paper, remove the tracing paper and you are now left with a faint outline on your fresh white piece of paper. What happens is that you actually end up with a reverse picture of what was in the magazine or the photo that you have traced off. I used to be happy to deal with that when I was doing my own drawings – it was still the same type of car, only it went the other way. You can avoid that by doing this procedure: Once you have traced the vehicle, you draw all over the backside of the tracing paper that you have just traced onto, and then you face that down onto the white paper to transfer the lead. You 1. 2. 3. 4.
- 37. Copying and Tracing How to Draw Cars Fast and Easy 33 ©2009. How-To-Draw-Cars.com basically go over the lines again to transfer the lead from the pencil back on to the white paper. Tracing If you have access to a light box, you can easily trace an image onto fresh paper. A light box utilizes light shining from behind the image that you are tracing to help you see the lines. Just place your piece of paper over the image that you are tracing; the light shining from behind brings out everything and it is easier to see what you need to trace. The problem with this is you cannot do it directly out of a magazine because magazine pages are printed both sides – making the image seem confusing. You therefore need to photocopy the image first, so the underside of the image is just white. If you do not have access to a light box, you can sticky tape the image that you want to trace onto a window so that the light shining through it from outside allows you to see the image underneath. It works like a light box, but natural light is used instead. You can also use a ‘modified’ light box by shining a light up through a glass coffee table. For some examples of traced drawings, refer to the “Gallery” chapter. Copying vs Drawing from Scratch Copying is a good way to learn how the angles of cars go and how it all works together without actually tracing. It’s like using your own devices a little bit and hoping to learn where everything goes on the car by just copying it out directly. The important thing about copying is drawing what you actually see rather than drawing what you think you see. Often we go a little bit off on our own tangent, drawing what we think should be there and ignoring what is actually there. So when you are copying, pay careful attention to the actual details that are there and use reference points – like the size of the wheels – to determine where everything should go and how one thing relates to everything else.
- 38. Copying and Tracing How to Draw Cars Fast and Easy 34 ©2009. How-To-Draw-Cars.com So if the wheels are a defined size, you can measure the length of the vehicle by the number of wheels to draw – get the correct distance between the front and rear wheel, the height, etc. You can measure this roughly, like the car might be “3 wheels high” or “2-1/2 wheels high,” and that helps determine if you know where everything is in relation to each other. In other words, it gives you a reference point to start with. Using a Grid Another method you can do is, on a piece of tracing paper, draw up a grid –say, 1 cm x 1 cm squares – and lay that grid over a photograph. Then, on your piece of paper, draw up the same grid very lightly, and then you can copy each square at a time, and work it out that way. You trace each square as it appears on the original photograph, you copy that, just that square – onto your piece of paper, and then you do it square by square and hopefully, at the end, they all line up and come together. Certainly, copying and tracing are effective ways of getting the basics down for the car that you want to draw without trying to struggle with perspectives and proportions. But I also found that if you want to come up with your own designs, such as of a sports car or a family sedan, you could find a photo of an existing car with similar proportions and perspective, and then change the design completely.
- 40. Side Views How to Draw Cars Fast and Easy 36 ©2009. How-To-Draw-Cars.com In the Quick Start Guide, we showed the approach of making quick drawings – putting in the baseline, drawing in the first two wheels, and then taking it from there. The same goes for side views. Step 1 Always start by just drawing in the horizontal ground line, and then drawing in the two wheels. You’ll know how to space the wheels by drawing a line of five circles, with the first circle being the front wheel and the fifth circle being the rear wheel. If it is a sports car, it might be a little bit shorter. If it is a big station wagon or something as big, or a limousine perhaps, it will be a little bit longer. In the following illustrations, we intend to draw a sports car, so it works out at about 4-1/2 wheels long. So the first stage is to draw in that ground line and your two wheels. Generally, I try and draw my wheels freehand when I am moving quickly, but if I am out of practice, I use a template to help them become nice and round. Here, I used a template to beef up the shape and pull out the actual roundness of the wheels. As kids we used coins and those pop-off bottle tops because they give a big, chunky tread pattern around the side, but it is good to just practice drawing circles so you do not have to struggle with it.
- 41. Side Views How to Draw Cars Fast and Easy 37 ©2009. How-To-Draw-Cars.com Step 2 Now that we’ve got our ground line and our wheels down, you can then begin to draw the profile of the vehicle. This step could involve a very quick flick of a line to see what evolves. If you are drawing a particular type of vehicle, you should be a bit more careful, as this already roughly determines the height of the vehicle. Know the amount of overhang at the front and the rear, and just draw in that profile.
- 42. Side Views How to Draw Cars Fast and Easy 38 ©2009. How-To-Draw-Cars.com Step 3 At this point, I’ve begun to draw in the side window. It defines that window sill line and the side window. As this is being drawn, I actually have a particular car in mind – a Nissan 350Z, and I’ve already researched photos of it to get a reference on how the roofline goes, and to get the shape and the other details right. However, I have ‘cheated’ a bit on the wheel size, because I wanted it to look aggressive and racy. Thus, the wheel sizes are a little bit bigger than on the standard car, and the wheel arches go a little bit higher. It all boils down to stance – overall, it looks like it is sitting nice and low and ready to race.
- 43. Side Views How to Draw Cars Fast and Easy 39 ©2009. How-To-Draw-Cars.com Step 4 Here, you put in the wheels, the headlight, the taillight, the arches, and the mirror. In other words, I have just begun to work in more of the parts. I’ve put those big wheel flares and headlights in. Notice that the headlights are not drawn right to the edge of the outline. That is because bonnets and the front ends of cars, particularly modern cars, always have a big curved shape. So the centerline is really usually sitting higher than the outside line. The headlights, therefore, should sit a bit inboard of the centerline or a bit below the centerline to indicate that curve. The same thing applies to the taillight; it is drawn back a little bit from the outside line of the rear end. This is because the rear end has that big curve going across it, and this helps indicate that the car is not a square box, but is made up of lots of curves.
- 44. Side Views How to Draw Cars Fast and Easy 40 ©2009. How-To-Draw-Cars.com Step 5 Once we have keyed in those defining details of the Nissan 350Z – the side window and the shape of the headlights and the taillights, all of which help to make it look like a 350Z – we can now start adding in our own little details such as the nonstandard side air outlet, the air inlets on the air dam, and a few other little details like the indicator and the front spoiler. The overall shape of the car is now blocked out.
- 45. Side Views How to Draw Cars Fast and Easy 41 ©2009. How-To-Draw-Cars.com Step 6 This step just involves adding even more detail. I have decided to put a big spoiler on the back, which makes it look very much like a racing car. I now have the side exhaust, and I’ve also drawn in the rims. At this stage, the drawing is still very two- dimensional although I’ve practically got all the details in by now.
- 46. Side Views How to Draw Cars Fast and Easy 42 ©2009. How-To-Draw-Cars.com Step 7 In this step we are aiming to give the side view a little bit of a 3-dimensional look. To achieve this, it is as though the viewer is standing level with the front wheel and looking along the side of the car, and by the time that you get to the rear wheel, you will begin to see appearing underneath, a little bit of the rear wheel on the other side. I have drawn the inner circle of the rim offset from the outer part and likewise offset towards the front to help establish the rim’s depth as I actually wanted it to be a deep-dish rim. Furthermore, towards the rear of the vehicle on the spoiler, I have drawn in just the other side of the spoiler. Just by drawing in these details, the side view all of a sudden acquires a little bit of dimension. If you look through the window, particularly at the back of the side window there, you can also see that I have drawn in just a little bit of the window on the other side of the car. This again helps to emphasize that bit of dimension and perspective. These very simple techniques are very easy to do but they just add so much to the drawing. It gives the drawing so much life; it is no longer just a boring side view, but almost a perspective view.
- 47. Side Views How to Draw Cars Fast and Easy 43 ©2009. How-To-Draw-Cars.com Step 8 Once you’ve got that initial outline, you can then decide whether to use this sketch as an underlay – tracing over it again much more neatly, using your circle guides and your French curves and so forth – or you can just go ahead and add a little bit more tone, color in the wheels, and wheel blacks. Later on in the book, we will discuss how to work with shading to indicate chrome, but for this one, I have just finished with the base sketch by adding a little bit of black here and there and by punching out the lines with some heavier lines just to define the shape.
- 49. Perspective How to Draw Cars Fast and Easy 45 ©2009. How-To-Draw-Cars.com Introduction When you are out in the world, everything that you look at is seen in perspective. It is what gives objects a 3D look. When you are looking down a road, telegraph poles in the distance get smaller and smaller the further away they are. Generally, things also appear to get closer together the further away they are. Perspective is how objects appear to us, allowing for the effect of their distance from us. There are two main types of perspective: Single-point perspective Two-point perspective. There is actually a third one – the three-point perspective, which is mainly used in the architectural industry. It is akin to looking up at a skyscraper, when that point of perspective is up in the sky – but we will not deal with that in this book. Single-point Perspective The single-point perspective (or one-point perspective) becomes evident when you are standing directly in front of something, such as when you’re in the middle of the road. As the road gets further away, the two outside lines of the road converge to a single point on the horizon line. The heights of the telegraph poles converge to a single point on the horizon line and they get closer together the further away they get. Single-point perspective is where all of the perspective lines converge to a • •
- 50. Perspective How to Draw Cars Fast and Easy 46 ©2009. How-To-Draw-Cars.com single point on the horizon line. As you can see in the illustration, it is as though we are standing in the middle of the road. The white lines in the center of the road converge or go straight up to that single point on the horizon line. The height of the telegraph poles all converge to that single point on the horizon line. Even the lines of the truck are converging down to that single point on the horizon line. And that single point is what’s called the vanishing point. Two-Point Perspective In drawing, there are times when the single-point perspective no longer works. This is where the two-point perspective comes into play. It is more of a 3/4 view – that is, if you are standing off the front 3/4 corner panel of a car, looking at a bit of the front and a bit of the side at the same time, all of the lines of the front end converge off to a vanishing point on the horizon line, while all the lines at the side of the car converge off to another vanishing point on the horizon line. Observe the illustration of the two-point perspective of a church on the side of the road. It is now as though we are standing on the side of the road, as opposed to in the middle of the road – and there are two vanishing points on the horizon line at each extremity of the drawing. Observe the front of the church. All the lines converge off to the left hand vanishing point, while at the church’s side, all the lines converge off to the right hand vanishing point.
- 51. Perspective How to Draw Cars Fast and Easy 47 ©2009. How-To-Draw-Cars.com Similarly, with the truck, note that the lines on the road and the pedestrian crossing go off to the left-hand vanishing point and the lines of the road go off to the right- hand vanishing point. These illustrate the basics of two-point perspective. Horizon Lines Perspective also helps you determine the height of where you are standing in relation to the horizon line. We can say that the horizon line is always at eye level. How is this so? Let’s say you are standing on top of a tall building. The horizon line will be directly in line with your eyes, and that is what is known as a high horizon line. On the other hand, if you are lying on the ground, and if we refer to the horizon line as an imaginary line at eye level, then we now have a very low horizon line. In the illustration of the three vans, the top van is on what is known as an eye-level horizon line. So, it is as though you are standing in front of the van. The horizon line is in line with your eyes and you are looking at the van from a standing position. With eye-level horizon lines, the perspective lines go above and below the horizon line. The second van is drawn from a very low horizon line. It is as though you are lying on the ground in front of the van, looking up at the van. Again, the horizon line is
- 52. Perspective How to Draw Cars Fast and Easy 48 ©2009. How-To-Draw-Cars.com directly level with your eyes, but since you are looking up at the van, most of the perspective lines are above the horizon line. In the third drawing, it’s as though you are standing on the ladder or in a tree, looking down at the van. The horizon line is in line with your eyes, and again, since you are up high, the horizon line is also up high and all the perspective lines are drawn in below the horizon line. The horizon line is basically the horizontal line across a drawing whose placement establishes where we seem to be looking from. So in one-point perspective, you just have one vanishing point on the horizon line; and in two-point perspective, you have two vanishing points at the left and right sides of the horizon line. Why Is Perspective So Important? Perspective is important because that is what gives us a 3-dimensional look. As everything that you look at in the world has perspective, this element really helps in drawing cars because it tells us a lot about any given object. It is so important to get it right because since we look at everything in perspective, our brains are used to the proper perspectives. Hence, the drawing does not look right when things are out of perspective. Usually, a beginner may not know exactly what is wrong with it, but it’s just that something looks odd. Those who aren’t even into drawing can clearly see that a drawing looks odd, but they can’t really put their finger on it. In many cases, the culprit is ‘wrong perspective.’
- 53. Perspective How to Draw Cars Fast and Easy 49 ©2009. How-To-Draw-Cars.com Perspective Grids – How To Draw Equal Size Boxes in Perspective If everything gets smaller and closer together the further away they are from the viewer, then how do we draw equally size boxes correctly in perspective? I’ll show you using simple geometry. Here I have drawn a square. Through the middle of the square I have drawn two diagonal lines joining each corner of the square and this gives us the centre point of the square. From that centre point I draw a horizontal line out to the right of the square (drawn in blue). If we draw another line (shown in red) from the top left hand corner of the square, through where the blue line intersects with the right hand side of the square, and down to extended base line of the square, that will give us the starting point for another equally sized square next to the first one I drew. So now we have two equally sized squares side by side.
- 54. Perspective How to Draw Cars Fast and Easy 50 ©2009. How-To-Draw-Cars.com We can now transfer this geometry into our perspective drawing and follow the same procedure. In your chosen line of perspective, draw lightly in pencil your first square and then draw in two diagonal lines from each corner point of the square. Then from the intersecting point of those two lines (which is the centre point of the square), draw a line out to the vanishing point of your drawing. Now you can draw a line from the opposite top corner of the first square, through the intersecting point of the middle line and the back edge of the square and down to the base line that projects to the vanishing point (the line drawn in red). This point gives us the width of the second square. You can continue repeating this right out to the vanishing point with each square getting progressively smaller. This technique is particularly useful when laying out the initial box proportion of a car drawing.
- 55. Perspective How to Draw Cars Fast and Easy 51 ©2009. How-To-Draw-Cars.com Common Mistakes in Perspective It is important to understand the many basic rules of perspective. If you break those rules, your drawing is not going to be correct. Here we have several illustrations of common mistakes in perspective. One illustration has the wrong vanishing point. As mentioned earlier, the vanishing points are always on the horizon line, and this is true for two-point perspective drawings. So to have one vanishing point on the horizon line and then the other vanishing point short of the horizon line is incorrect (3). Those converging lines must always go to a vanishing point on the horizon line ����������������������� (4)�������������������� , and the vanishing points should always be behind the product or object. There is never a vanishing point in front of the object (1). In addition, when you draw your converging lines from the vanishing point from the other side of the page, the meeting angle should never be less than 90 degrees. In the upper-right example (2), the internal angle is less than 90 degrees – making the perspective too distorted. It is as if you are looking through a fish-eye lens. Sometimes people do what is known as ‘forced perspectives’ – you can sometimes get away with that, but generally, that angle should not be less than 90 degrees. 1 1 2 2 3 3 4 4
- 56. Perspective How to Draw Cars Fast and Easy 52 ©2009. How-To-Draw-Cars.com Checking Your Perspective One thing that I always do is take the picture that I am drawing into the bathroom and hold it up to the mirror. This way, you see the picture from a completely different angle. You are actually looking at it in reverse, because when you are drawing a car, you get used to looking at it a particular way and you get fooled into believing that it looks right. I often find that when I hold it up in the mirror, it highlights a whole lot of mistakes that I have made, such as wheels that are not at the right angle or perspective that is a bit out. Therefore, it’s a good thing to constantly check your drawing with a mirror.
- 58. Ellipses How to Draw Cars Fast and Easy 54 ©2009. How-To-Draw-Cars.com One of the key features of cars is the wheels, and getting them to look right is quite important to the success of any car drawing. If the wheels look like they are bent or out of line, the whole thing will look odd, a bit wobbly, and unusual. It is one thing that many people have the most trouble dealing with, so I’m going to give a few basic tips on how to get them to look right. To draw wheels on a car in perspective, you are basically drawing ellipses, and ellipses have two axes on them: one that runs cross ways, which is called the minor axis; and one that runs long ways, which is called the major axis. The thing that most people get wrong is where they place the minor axis. It should always be in the line of perspective and should always go out to the vanishing point. The major axis is always perpendicular to the minor axis. Figure 1 In Figure 1, the minor axis (in blue) goes out to the vanishing point while the major axis (in red) is perpendicular to the minor axis. When you buy ellipse guides, they always have marks indicating these axes on them. When you are drawing ellipses in place, you can draw your construction lines and then line up your ellipse guides to those construction lines.
- 59. Ellipses How to Draw Cars Fast and Easy 55 ©2009. How-To-Draw-Cars.com Figure 2 Figure 2 shows how ellipses work in a perspective drawing. If you are drawing a front 3/4 view, you can see the ellipses heading off to the right-hand side vanishing point, indicating the wheels down the side of the car. As those ellipses get further away from the viewer, they get thinner. The closer an ellipse is to the viewer, the fatter it is, and the further away it is towards the vanishing point, the thinner it gets. On those ellipses heading out to the right-hand side, all the minor axes are going to the left hand vanishing point. The minor axes always converge out to that vanishing point. The series of ellipses drawn out to the left-hand side of the diagram represent the wheels on the other side of the car. As they get further away from the viewer, they become fatter.
- 60. Ellipses How to Draw Cars Fast and Easy 56 ©2009. How-To-Draw-Cars.com Figure 3 Another thing to keep in mind when drawing ellipses on the topside or on the top surfaces of a car or an object is that they are always drawn so the major axis is horizontal and the minor axis is vertical. The closer the ellipses are to the horizon line, the thinner they are; and the further away they get from the horizon line, the fatter they become.
- 61. Ellipses How to Draw Cars Fast and Easy 57 ©2009. How-To-Draw-Cars.com Figure 4 In Figure 4, I have drawn some cylinders to indicate common mistakes in drawing ellipses, where the rules applying to the minor and major axes are ignored. The best way for you to satisfy your own curiosity is to get something like a toilet roll or a cylinder. Hold it up in front of you, rotate the cylinder around, and just watch what the circle on the end of the cylinder does as you move it around. You will see that it always moves with the center axis of the cylinder. You can think of the minor axis as kind of the axle of the car; it is the string that joins the two wheels together. Going back to the illustration, you can see the correct way and the incorrect way of drawing horizontal ellipses. The correct way has the minor axis vertical and the major axis horizontal. If you draw the major axis in the line of perspective going out to the vanishing point, that is completely incorrect and it makes the cylinder look distorted. If you are drawing injection stacks through the bonnet of a hot rod, you would need to draw all the tops of the injection stacks with the major axis horizontal for it to look correct.
- 62. Ellipses How to Draw Cars Fast and Easy 58 ©2009. How-To-Draw-Cars.com Figure 5 In Figure 5, where the cylinders are on their side, you can see the correct way is to have the minor axis going out to the vanishing point and the major axis perpendicular to the minor axis. You can see the sketch where the major axis is drawn at an angle vertically to the minor axis. It looks incorrect and distorted. If that was a wheel drawn on your car, the wheel would look incorrect and out of place. Key points for cylinders or wheels: For wheels, the minor axis always goes out to the vanishing point and the major axis is always perpendicular to that. And for cylinders standing on their end, the major axis is always horizontal, while the minor axis is always vertical.
- 63. ©2009. How-To-Draw-Cars.com Chapter 8 Perspective Tutorials
- 64. Perspective Tutorials How to Draw Cars Fast and Easy 60 ©2009. How-To-Draw-Cars.com Single-Point Perspective Tutorial Let us now do a tutorial on drawing a car in single-point perspective. Single-point perspective works best for when you are standing dead side on to a car or if you are standing dead front on to a car. We are now going to draw a Hummer as if we’re standing from the side of the car – both standing above and beside it. This means we will see all of the side and a little bit of the roof. Step 1 So the starting point is to draw in your horizon line nice and high up the page and indicate the vanishing point with a small cross. Towards the lower part of the page, begin to sketch a loose side profile of a Hummer pickup truck. It is fairly boxy and simple, and you can draw in the mudguards, the windows and other elements.
- 65. Perspective Tutorials How to Draw Cars Fast and Easy 61 ©2009. How-To-Draw-Cars.com Step 2 Pick some of the key points of the side view and project them back to the vanishing point. Take your ruler and put it on the leading edge of the bonnet. Draw a line from that leading edge back to the vanishing point. Do the same for the bottom of the windscreen and the top of the windscreen. Repeat the process for the other key points.
- 66. Perspective Tutorials How to Draw Cars Fast and Easy 62 ©2009. How-To-Draw-Cars.com Step 3 Now that we’ve got those perspective lines in place, we can now draw the back edge of the vehicle. This is actually the top edge of the other side of the vehicle. Pick a point and draw lines parallel to the front edge, stopping at points where they intersect with those converging perspective lines. Be careful not to make the body look too wide. You now have the body of the Hummer blocked out with an almost three-dimensional look.
- 67. Perspective Tutorials How to Draw Cars Fast and Easy 63 ©2009. How-To-Draw-Cars.com Step 4 We now begin to draw in the wheels. To do this, I draw in a line, which represents the axle line. These are lines going from the center of the mudguards and projecting back to the vanishing point. You can now sketch in your ellipses to indicate the front face of the wheel, and then a second, half ellipse back from the front face of the wheel. Again, join those two ellipses with lines, with shorter lines that converge back to the vanishing point. These would round out your wheels and would have them matched up. Drawing in those axles and having them converge at the vanishing point creates the minor axis of the ellipse. From that, you can draw in your major axis, which always goes perpendicular to the minor axis, and draw in a fairly open ellipse. If you have ellipse guides, it might be something like a 65-degree ellipse. If you don’t, just draw freehand a fairly open ellipse.
- 68. Perspective Tutorials How to Draw Cars Fast and Easy 64 ©2009. How-To-Draw-Cars.com Step 5 You can now see that we have the overall shape and the body of the vehicle massed out. We can begin to draw in some of the other details. We can add more of the door detail and some of the bonnet cut lines. Notice the little scoop on the bonnet – you can see that where the scoop is, the horizontal line converges back to that vanishing point. Every line that you draw, on the roof, on the back, or on the topside of the bonnet – all of those lines going across the vehicle should converge back to the vanishing point.
- 69. Perspective Tutorials How to Draw Cars Fast and Easy 65 ©2009. How-To-Draw-Cars.com Step 6 This step requires us to pay more attention to the wheels by adding more detail. In the previous step, we drew in the outside shape of the rims on the wheels. Now draw a fairly open ellipse and keep that minor axis perpendicular to the major axis. Draw in a slightly smaller ellipse that matches the outside one. We are now going to give the rims a little bit of depth. Again, we draw in a fairly open ellipse along that same minor axis line – which is going back to the vanishing point – but slightly offset to the outside rim ellipse that we drew in Step 5. You will notice that the two ellipses that we have drawn for the rims collide at the top of the wheels, but then at the bottom of the wheel there is a little gap opened up. That gives the rims a 3D look and shows that they have a little bit of a dish in them.
- 70. Perspective Tutorials How to Draw Cars Fast and Easy 66 ©2009. How-To-Draw-Cars.com Step 7 In Step 6, I have drawn in a small circle on the back face of the rim, to indicate the center hub of the rims. Now we can begin to sketch in the spokes of the rim. This is a simple six-spoke design where you just draw three lines across the rim going through the center point to indicate the spokes, and then continue filling out the spoke details by giving them thickness. Just ensure that everything is working in line with that vanishing point and on the correct axis of the wheels there. At this point, it is a fairly well-sketched outline drawing where everything is in the correct line or perspective, and it is slowly acquiring the 3D look. I have also begun to draw in a shadow line on the underside of the vehicle. Keep in mind that all those lines must converge back to that vanishing point.
- 71. Perspective Tutorials How to Draw Cars Fast and Easy 67 ©2009. How-To-Draw-Cars.com Step 8 I have brought out some of the lines by drawing in heavier lines. Heavier black was used to color in the tires, the area under the mudguards, the shadows, and the reflection line through the window. I also added a little bit of grey marker just to pull out the roof racks and that little spoiler across the top of the vehicle. I did the same with the front bumper bar, plus I pulled out other details using simple color. Again, at this point, you can decide whether to use this as an underlay and retrace it, fixing up some of the little things that you might not be happy with; or as I have done, scan it into PhotoShop and then add some color and tone just to finish it off. You now have a quick one-point perspective.
- 72. Perspective Tutorials How to Draw Cars Fast and Easy 68 ©2009. How-To-Draw-Cars.com As I mentioned earlier in this lesson, the other views that this is useful for are dead front on views or dead back on views, where again, you draw in the front of the vehicle and then converge all of those lines back to a vanishing point to indicate the bonnet and the roof line and so forth.
- 73. Perspective Tutorials How to Draw Cars Fast and Easy 69 ©2009. How-To-Draw-Cars.com Two-Point Perspective Tutorial #1 – ¾ Front Above Eye Level View For this two-point perspective, we are going to choose a high horizon line so it is as though we standing on a ladder looking at the vehicle, or just standing at a point higher than the vehicle. I am going to do a car of my own design here, because I always find that easier, not to have to struggle with the exact proportions, and the lines and shapes of an existing car. I find that I never actually draw in a set horizon line and draw in the two vanishing points for drawing two-point perspective cars because to fit onto a page with a realistic-looking perspective, you’ll end up with a very small drawing in the bottom corner of the page once you have all of your lines converging. With experience, you get a feel of how the lines are supposed to converge without having to actually draw in a horizon line and mark your vanishing points.
- 74. Perspective Tutorials How to Draw Cars Fast and Easy 70 ©2009. How-To-Draw-Cars.com Step 1 In this drawing, I have ‘guesstimated’ where all the perspective lines go. With practice, you can do the same. I have determined the angle I want to draw by drawing in the baseline first, which is forming the road line down the side of the vehicle and then drawing in the line which determines the angle of the front of the vehicle. This same line would go out to the other imaginary vanishing point. I have also drawn in the top belt line, which determines the overall proportion of the box of the car; plus the back line, which goes out to the other imaginary vanishing point to indicate the back edge of the car.
- 75. Perspective Tutorials How to Draw Cars Fast and Easy 71 ©2009. How-To-Draw-Cars.com Step 2 You can now put in the wheels. Note that I have drawn in the minor axis, which goes out to that imaginary vanishing point. I also used a minor axis for the front wheel and another minor axis for the rear wheel, drawing in my ellipses according to those axes. The front wheel is a bit more open because it is closer to the viewer, and the rear ellipse is a bit thinner because it is farther away from the viewer. I have also just begun to lightly sketch in the roofline and the side window. These help to determine the shape and the proportion of the car. You can see that belt line as it rises up over the rear wheel, somewhat defines the shape.
- 76. Perspective Tutorials How to Draw Cars Fast and Easy 72 ©2009. How-To-Draw-Cars.com Step 3 From the points that I plotted in for the roof line and the side window in Stage 2, I have once more projected lines to the imaginary vanishing point, which is out beyond the page limit. From those I have begun to sketch in the back edge of the car. You can begin to see the shape of the car developing further as we get an almost three-dimensional block massed out.
- 77. Perspective Tutorials How to Draw Cars Fast and Easy 73 ©2009. How-To-Draw-Cars.com Step 4 I am now further defining the shape with the headlights and a crease line that runs up across the bonnet, and sketched in the shape of the window. You can see the top edge and the bottom edge of the windscreen I have put a curve into, but at the extremities of the windscreen, on the far left and far right hand side, they both meet at that projection line that is going back to the vanishing point. The windscreen looks as though it is in the correct perspective. The front end of the car has a curve across it as well, but you can see the very top tip of the headlights there both meet on that same perspective line going back to the vanishing point. Here, I started to sketch out the wheel flares, which helps to define the shape of the vehicle more. You can also see the rear window put in place; again, all going back to that same imaginary vanishing point.
- 78. Perspective Tutorials How to Draw Cars Fast and Easy 74 ©2009. How-To-Draw-Cars.com Step 5 I’m continuing to add in some of the details – the side air vent, a little air exit scoop past the front wheel, the grille detail, more headlight detail, the taillights – but always be mindful of the perspective. Be aware of where the perspective lines are going and ensure that all the points on one side of the vehicle correspond with their mirrored points on the other side in the correct perspective lines.
- 79. Perspective Tutorials How to Draw Cars Fast and Easy 75 ©2009. How-To-Draw-Cars.com Step 6 In this step, we will also begin to add in more of the wheel detail. Again, using the same technique as we used in the one-point perspective Hummer example, draw in a second ellipse further along that minor axis just to indicate the depth of the wheel, and draw in a smaller circle for the center hub. Always follow the minor axis, which projects back to the vanishing point.
- 80. Perspective Tutorials How to Draw Cars Fast and Easy 76 ©2009. How-To-Draw-Cars.com Step 7 I have started to sketch in the six-spoke design – very much two-dimensional at this stage. The six spokes are all going into the middle of the center hub, which was drawn in Step 6. The rear wheel is a little bit deeper, indicating that it is fatter than the front wheel. The internal ellipse of the rear wheel has more of an offset than the front wheel to show that it is a little bit deeper.
- 81. Perspective Tutorials How to Draw Cars Fast and Easy 77 ©2009. How-To-Draw-Cars.com Step 8 I have begun to give the spokes dimension. In the previous step, they look paper thin, but now they have some thickness. This is done by drawing a heavier line inside the spoke lines so that they now have a return edge on them, giving them a three dimensional look. The wheels and the overall shape and look of the vehicle are really beginning to come together now.
- 82. Perspective Tutorials How to Draw Cars Fast and Easy 78 ©2009. How-To-Draw-Cars.com Step 9 I have taken some curves and I have made some of the outside lines a little bit thicker using heavier lines, which help to punch out the defining lines of the vehicle and to emphasize its overall design. I have begun to color in black the openings in the grille, the openings in the wheels, and the side vent openings. These define the esign and those big openings at the front make some strong, bold statements.
- 83. Perspective Tutorials How to Draw Cars Fast and Easy 79 ©2009. How-To-Draw-Cars.com Step 10 At this point you can decide whether you want to trace over it again and fix some of the lines that you were not quite happy with, or whether you are happy to stop there. What I have done is I laid down a little bit of marker first to add some tone before scanning it into PhotoShop. I then used some PhotoShop techniques to add some stronger tone, add a background, and to give it a bit of a reflection underneath the wheels.
- 84. Perspective Tutorials How to Draw Cars Fast and Easy 80 ©2009. How-To-Draw-Cars.com Two-Point Perspective Tutorial #2 – ¾ Front Eye Level View We will now do a second two-point perspective. This one is going to be a front 3/4 view set at eye level, and this is rather a development of what we did in the bonus Quick Start Guide of doing the flat-type perspective. I find it’s the easiest perspective to do because everything is more or less horizontal or very shallow in its perspective lines and the way they converge. Step 1 Draw in the horizontal baseline and draw in the two ellipses to indicate the two wheels that will be in view.
- 85. Perspective Tutorials How to Draw Cars Fast and Easy 81 ©2009. How-To-Draw-Cars.com Step 2 Draw in a second horizontal line about 3/4 of the way up the front wheel, which will give us a bumper line height. I have also drawn in the lower edge of the car – the bottom of the rocker panels and the bottom of the front end. The flares, a distinctive feature of this new 2006 Mustang that we’re working on, are now added.
- 86. Perspective Tutorials How to Draw Cars Fast and Easy 82 ©2009. How-To-Draw-Cars.com Step 3 This car has a very distinctive shape across the front. We will now draw in that shape, which helps determine the width of the vehicle and where we can start projecting the bonnet lines from. After we have drawn in the front grille area, we will also draw the outside edge of the air dam, which defines the width of the vehicle.
- 87. Perspective Tutorials How to Draw Cars Fast and Easy 83 ©2009. How-To-Draw-Cars.com Step 4 Working back from the grille area, I have drawn in the top hip line across the top of the bonnet and have begun to sketch in the roof line. In this step we are building up the overall shape of the vehicle.
- 88. Perspective Tutorials How to Draw Cars Fast and Easy 84 ©2009. How-To-Draw-Cars.com Step 5 We now add in more detail. I have added in the center part of the grille, the headlights, and the lower part of the air dam detail. There is quite a distinctive accent line that goes about 1/3 of the door height through the middle of the Mustang. The back edge comes to a sharp point and helps define the distinctive ‘wedgy’ body shape of the new Mustang. The side window is drawn in lightly until I am satisfied with the lines.
- 89. Perspective Tutorials How to Draw Cars Fast and Easy 85 ©2009. How-To-Draw-Cars.com Step 6 I have begun to make the lines a bit heavier and more permanent, as well as added in some further detail. I have decided to give this drawing a racing car-type feel to it, so I put a shade tape, which racing cars often have, across the top of the windscreen. I have also added a rear spoiler and opened up the brake ducts and the air vents as well. Some of the lines were made a little bit more permanent at this stage.
- 90. Perspective Tutorials How to Draw Cars Fast and Easy 86 ©2009. How-To-Draw-Cars.com Step 7 We are now going for a seven-spoke racecar-type wheel with a center knock-off hub. I have begun to lightly sketch in the seven spokes, spacing them out equally around the center of the hub just by eyeballing it. I also gave the spokes thickness in this step, as well as defined some more of the body lines and details.
- 91. Perspective Tutorials How to Draw Cars Fast and Easy 87 ©2009. How-To-Draw-Cars.com Step 8 Here we develop the detail – adding in the side vents and some of the interior detail, which you would see through the windows. I have taken the approach of just doing silhouettes of the interior detail; you can see the seat silhouetted with some of the roll cage detail.
- 92. Perspective Tutorials How to Draw Cars Fast and Easy 88 ©2009. How-To-Draw-Cars.com Step 9 This is the point where the sketch is already somewhat defined, and you can again decide what to do with it and how far you want to go. Here, I have gone further by adding some black to define the tires and punching out the grille detail and the headlights, as well as putting in a little bit of simple grey marker to pull out some of the interior details. As well, I put in details on the side part such as the door handle. This is a very simple eye-level perspective view on which I have not really drawn any projection lines going back to any vanishing points; but at the end of the day, the results are quite believable.
- 93. Perspective Tutorials How to Draw Cars Fast and Easy 89 ©2009. How-To-Draw-Cars.com Two-Point Perspective Tutorial #3 – ¾ Rear Above Eye Level View Step 1 For the third two-point perspective tutorial, we are going to do a review of a classic ‘60s car – the Dodge Charger, Dukes of Hazzard style – and its body shape is quite blocky, so we are going to do a slightly above eye level rear ¾ view. The starting point I have chosen here is to actually draw out a box in perspective. You can see all the lines across the rear of the vehicle going back to the vanishing point on the left hand side, and the lines on the right hand side of the vehicle all going back to the right-hand side vanishing point.
- 94. Perspective Tutorials How to Draw Cars Fast and Easy 90 ©2009. How-To-Draw-Cars.com Step 2 Over the box, I have roughed out the shape of the rear end of the vehicle, putting a little bit of curve across the top to indicate the spoiler lip that the Charger has. Observe the raised hip that I’ve drawn down the side of the vehicle, using the lines of the box that I drew in Step 1 as a guide to keep the perspective lines going. I have sketched out the mudguards for the wheels, referenced to that side of the box. I have also begun to draw in the roof and the side window, which help me determine the roofline and the back edge of the roofline.
- 95. Perspective Tutorials How to Draw Cars Fast and Easy 91 ©2009. How-To-Draw-Cars.com Step 3 From those key points of the roofline, I have projected lines, which go back out to that left-hand side vanishing point: the line at the base of the rear window, the line at the top of the rear window, and the line from the top of the windscreen. All of those lines across the bonnet, the roof, and the boot project out to the vanishing point on the left hand side.
- 96. Perspective Tutorials How to Draw Cars Fast and Easy 92 ©2009. How-To-Draw-Cars.com Step 4 Now that we have got those lines going out there, we can plot the edge, which indicates the other side of the vehicle. Plot the top line across the boot, then up over the roof, and a little bit of the bonnet at the front. All of a sudden, we’ve got the 3D block of the body is massed out. The Charger has that recessed rear window, so to get that in, I have dropped a line down from its top edge and added a different angle to get the side fin. I have developed the bottom edge of the rear window by again projecting a line out to that left hand side vanishing point.
- 97. Perspective Tutorials How to Draw Cars Fast and Easy 93 ©2009. How-To-Draw-Cars.com Step 5 I have begun to put in the wheels, going for a very low pro touring-type look for this sketch. I have put in the minor axes first; the axle of the vehicle going between the wheels and again the minor axis projects out to the vanishing point on the left hand side of the vehicle on the horizon line. I should emphasize that it is always on the horizon line. Again, the same goes for the front wheel; put in the minor axis, which projects out to the vanishing point on the horizon line, and then draw in the ellipses the low profile tires. The lines to indicate the width of the tires all go out to the vanishing point on the left-hand side. All the lines indicating the width, or going across the vehicle, always go out to that vanishing point on the left hand side, whereas the lines down the side of the vehicle indicating the length of the vehicle always go out to the vanishing point on the right hand side. This way, everything is kept in perspective.
- 98. Perspective Tutorials How to Draw Cars Fast and Easy 94 ©2009. How-To-Draw-Cars.com Step 6 Begin to add in some of the details such as the bumper bar and remember to project the lines out to the vanishing point at the left hand side of the vehicle. The tail lights are in themselves little ellipses, so you can draw in quick minor axes and then draw in your ellipses on those axes to get the taillights. Other details you can put in are the mirror on the side, some of the door detail, and the ground line, which will later be colored in to indicate the shadow line that helps to indicate how low the vehicle is sitting. Here, I have also done the offset of the rims to indicate their depths. As you can see, the front rim is not quite as deep as the rear rim. The rear rim has greater offset to indicate greater depth.
- 99. Perspective Tutorials How to Draw Cars Fast and Easy 95 ©2009. How-To-Draw-Cars.com Step 7 I have drawn in the center and spokes of the rim, beginning to define some of the interior details, which will be silhouetted through the windows. I’ve also strengthened some of the lines to cement the sketch and lock it into place.
- 100. Perspective Tutorials How to Draw Cars Fast and Easy 96 ©2009. How-To-Draw-Cars.com Step 8 Similar to what I have done in the previous drawings, I have colored in the shadows, ensuring that they are also kept in the line of perspective. Color in the black around the tail lights to define them, put a reflection of a horizon line through the side window, and silhouette some of the interior details through the rear window. I have also added some of the chrome detail, and we will be covering how to do chrome later in the book.
- 101. Perspective Tutorials How to Draw Cars Fast and Easy 97 ©2009. How-To-Draw-Cars.com Constructing the Perspective The problem with drawing horizon lines and vanishing points to get the perspective right is that sometimes it becomes impractical. As I was preparing the tutorial for the rear ¾ view Charger I did an initial sketch on A3 paper where I actually drew in the horizon line, two vanishing points and constructed the first stage cube. I ended up with a little sketch down the bottom corner of the page which made it difficult to draw in any detail because it was so small. I thought to myself “OK, this isn’t working” and resorted back to my usual approach – I eyeballed in the construction lines without drawing in the horizon line and vanishing points. The ability to do this comes with experience and practice. Also over time I have developed a repertoire of angles that I feel comfortable with and don’t have to think too hard about. However until you get to this stage it is important to follow the procedure that we have just discussed about perspective. It may mean taping the page to the table and marking the vanishing points somewhere off the page so you can get a decent sized drawing on the page. Also you could draw up a series of standard underlays with the correct perspective already in place that you can sketch over the top of. You cant ignore perspective when drawing cars. The other aspect of constructing the perspective boxes is getting the proportions rights. For the Charger, I was aiming for a long, wide and sleek vehicle. So accordingly, the first stage construction box reflected this. To help get this right you can use the height of the rear leading edge as a reference dimension and then count that dimension along the side of the box until you get the right length. For example in the original sketch the leading edge of the box was 45mm high. The box was 220mm long which is just under 5 times the height reference dimension we used.
- 102. Perspective Tutorials How to Draw Cars Fast and Easy 98 ©2009. How-To-Draw-Cars.com Drawing Turned Wheels and Opened Doors We will start off with drawing wheels as though they are turned. When you are drawing your wheels on a car; the good thing is that if the front wheel is not quite in the correct perspective, you can get away with it because it will look turned. However, the rear wheel always has to be in the correct line of perspective. That one is fixed and always has to look right. One thing you can do is to deliberately make the wheels turned; to do this, simply draw in a fatter ellipse or a thinner ellipse instead of the ellipse that you think is the correct one. It is very easy to make the front wheel look turned, particularly when doing the eye line level perspective, where all of the perspective lines are pretty much horizontal – you can just draw in a fatter ellipse. If the wheel is turned away from you, or if you want the wheel to look as though it is turned towards you and you are looking more directly at the front wheel’s tread pattern, just draw in a thinner ellipse and that will make it look turned. In the tutorial for the high point perspective, that minor axis will change direction a little bit to get your wheels looking as though they are turned. You need to draw that minor axis to another vanishing point. And then again, it is just a case of drawing in a thinner or a fatter ellipse to make the wheel look turned. Basically, it is another box at a different angle to the rest of the car, so it will have its own vanishing points. The same principle applies to the door. What you are doing is taking a part of the car and moving it out at a different angle to the rest of the car such that the door will start off with its own box going out to its own vanishing point. Going back to the high two point perspective tutorial: If you were to swing or draw a line from the leading edge of the door out at a different angle to the rest of the car, that line would project out to the same horizon line, but it would project to a different vanishing point. And then when you are sketching the rest of the door, its bottom half would project out from the leading edge of the door line in the front mudguard, and the bottom edge of the door would project out to that same vanishing point of the top edge of the door. You need to start sketching in a box going out to those new vanishing points, so it is basically two objects joined together effectively.
- 104. Proportion How to Draw Cars Fast and Easy 100 ©2009. How-To-Draw-Cars.com Introduction Proportion is what helps determine what type of car you are drawing – whether it is a sports car, a large family sedan, a van, or a small, city type car. Proportion is a factor of how high and how long the car is; how long the bonnet is compared to the cabin space of the car; how low and sleek it is, or how high off the ground it is. There are a few influences on proportion and probably the main one is the cabin space. Cars are all designed to fit people in them, and fit them reasonably comfortably. Some cars might have more leg room in the back for passengers; some could be a little tighter; some do not have any back seat at all; but cabin space is common across the whole scope of car types, and there should always be a space for the driver and the passenger to fit into. A large car might have that bigger cabin space but may also have a longer hood to accommodate a bigger engine. It may also have a longer trunk for more luggage space. This is the typical proportion for a family car. Small city cars such as little front-wheel drive, four-cylinder hatchbacks – they still have that cabin space, but the overhangs (the hood and the trunk) are very short.
- 105. Proportion How to Draw Cars Fast and Easy 101 ©2009. How-To-Draw-Cars.com The wheels may appear slightly smaller in relation to the cabin space, whereas bigger cars have bigger wheels. Sports cars are designed to have a very low center of gravity, so they have the driver sitting very close to the ground. The roof height is much lower than your family sedan, the wheels are bigger, and they come a lot closer to the roof height. Sports cars have what we call low and sleek proportions. Proportion also helps put a car into a particular era or region of the world.
- 106. Proportion How to Draw Cars Fast and Easy 102 ©2009. How-To-Draw-Cars.com Working Out the Proportions When it comes to wheelbase, whether it is a big car or a small car or a sports car, you can begin to separate the wheels by drawing out five wheels long. That is a typical wheelbase, when it comes to its length compared to the height of the wheels. If it is a bigger limousine, that five-wheel length may get a little bit longer. On the other hand, if it is a shorter, smaller car, it may get a little bit shorter. If it is a sports car or a two-door car, that wheelbase might be a little bit closer together. As a very loose guide, you could use five wheels long as a basis for getting the wheelbase. When it comes to the height of the car – like the height of the roof compared to the height of the door – generally, you could break those two heights up, as the door height is 2/3 and the roof height is 1/3 of the total height of the body. Back in the ‘80s, that proportion changed a little bit. They had bigger side windows and slightly lower door lines. Currently, higher door lines with lower rooflines are the rage. If you are drawing a top-chopped hot rod, the roofline can be very low; but as a starting point, until you get a feel of it, you could break it up into 2/3 and 1/3.
- 107. Proportion How to Draw Cars Fast and Easy 103 ©2009. How-To-Draw-Cars.com
- 108. Proportion How to Draw Cars Fast and Easy 104 ©2009. How-To-Draw-Cars.com Box Design When drawing cars, the types of cars are typically split up into three categories: One-box design Two-box design Three-box design. One-Box This is like taking a single block of wood, to give you just one box. It covers vehicles like people movers or little transit vans. Convertibles might also come into the one box category because it is just one flat box with a windscreen coming out of it. • • •
- 109. Proportion How to Draw Cars Fast and Easy 105 ©2009. How-To-Draw-Cars.com Two-Box This is as though you have got two boxes stacked on top of each other – a smaller box stacked onto a bigger box. Cars that fit into this category are things like SUVs and hatchbacks – cars without a trunk, essentially.
- 110. Proportion How to Draw Cars Fast and Easy 106 ©2009. How-To-Draw-Cars.com
- 111. Proportion How to Draw Cars Fast and Easy 107 ©2009. How-To-Draw-Cars.com Three-Box The third category is a three-box design, and this is as though you have got two boxes stacked side by side on the ground, with a third box put on top of them. This category essentially covers the sedan-type cars with a trunk.
- 112. Proportion How to Draw Cars Fast and Easy 108 ©2009. How-To-Draw-Cars.com Car designers split cars up into those three categories, and before you start sketching in the body details, you can use those boxes as a very loose guide for setting up your perspective views.
- 114. Adding Color How to Draw Cars Fast and Easy 110 ©2009. How-To-Draw-Cars.com Adding Color Tutorial For this tutorial, I am going to take the sketch of the sports car that I used in the section on Proportion, and I am going to develop that into a more finished color rendering. Step 1 The starting point I have taken here is to use that first sketch as an underlay and then to trace over that using ellipse guides and curves. As mentioned earlier in the material section, curves are really like rulers, but they are for drawing curved lines instead of straight lines. So what I do is move my French curve around the drawing, finding curves that match the line that I want to draw, and then tracing that line using the curve as a guide. On my circle template, I find the appropriate-sized circles and trace them onto the drawing. After a little while of doing this – finding the right curves, using my ruler for straight lines, using the circle guide – I come up with a fairly simple drawing, but with much neater lines.
- 115. Adding Color How to Draw Cars Fast and Easy 111 ©2009. How-To-Draw-Cars.com You will notice that I have not drawn in every single line. That is because I will be using the color to determine some of the lines, and I do not want a black line outlining all of my color. So I have just drawn in the major outline, cut lines, and shapes of the wheels, but have not drawn in any reflection lines just yet.
- 116. Adding Color How to Draw Cars Fast and Easy 112 ©2009. How-To-Draw-Cars.com Step 2 The first thing I always do is to get my black marker and color in the black for the tires and any openings, such as the air vents. However, I also often get a lead pencil or a blue pencil and lightly sketch in where I want my reflections to go, just to give some kind of a guide and to test out and develop where I want the reflections to go. Step 3 For the next stage, I draw in what is known as the core of the reflection. So I get my marker and color in below that character line through the side of the body. The character line is really what catches the reflection of the horizon. So, I put down a solid core of color first.
- 117. Adding Color How to Draw Cars Fast and Easy 113 ©2009. How-To-Draw-Cars.com Step 4 Next, we are going to render in the windows, and to do this, I use a cool gray 11 for the core reflection below the horizon line, and color that all in. You can put a few little streaks there just to add a little bit of life to the drawing. Step 5 I then take my black marker and begin to draw in some of the interior details. With it, just below that horizon line that we drew in with the gray marker, I draw in the seats, the B-pillar on the other side of the car, and the C-pillar on the other side of the car. Next, I’ll add the window sill line in black, just in that dark gray area. Above that area, use a cool gray 4 or 5 marker, and continue those details: the top of the seat and the top half of the B-pillar in the cool gray 5 inside the window. That’s as though you can just see a little bit of what is happening on the other side of the car through the window.
- 118. Adding Color How to Draw Cars Fast and Easy 114 ©2009. How-To-Draw-Cars.com Step 6 For the next step, I have put in a little bit of extra detail using the markers, coloring the air vents in the side a dark gray, and adding a little bit of red for the taillight. In have blocked in a little bit of detail in the headlight and there is also an air scoop in the air dam that you can just see. I treat the headlights as though they are chromed convex shapes. So the top half of the concave shape in the light reflects the ground tone, and then the bottom half reflects a little bit of a sky tone. Step 7 Next, I will add in the reflections of the sky tones in a body color, and I use pastels to do this. The technique I use is to grab my pastel stick and, using a scalpel, scrape off a little pile of powder from it onto a separate piece of paper.
- 119. Adding Color How to Draw Cars Fast and Easy 115 ©2009. How-To-Draw-Cars.com Here I am using red, but because the red is a little bit deeper, I have chosen to mix in just a little bit of blue. So I get my blue pastel stick and scrape a little bit of blue into the pile of red and mix them together. From that, I grab one of the make-up remover pads that I have, and dip that in the pastel and get a good amount on the pad, which I wipe across the drawing. You can see in the picture above, I have gone right across the drawing in a big sweeping movement to get a nice smooth finish. If you do it in little dabs, you get a blotchy finish, whereas for this one, we want a nice, smooth finish – just one big arm movement right across the drawing.
- 120. Adding Color How to Draw Cars Fast and Easy 116 ©2009. How-To-Draw-Cars.com Step 8 The good thing about pastel is that you can rub it out again. I actually want blue for the sky reflection on the window. So I take my eraser and erase out from the window space the pastel that I have just put down.
- 121. Adding Color How to Draw Cars Fast and Easy 117 ©2009. How-To-Draw-Cars.com Step 9 The next step is to get a blue pastel and scrape it into a pile. Get a fresh make-up remover, or just use the back side of the used one, turning it inside out, and then you can wipe blue across the top of the window to indicate the sky reflections. Also put in a little blue on the bottom side of the rims to indicate a little bit of sky tone, and to produce something like a metal finish.
- 122. Color How to Draw Cars Fast and Easy 118 ©2009. How-To-Draw-Cars.com Step 10 What I do next is get my eraser and start erasing the top edges of the various surfaces. This gives the effect of a highlight on those top edges. With the sharp edge of your eraser, you can scrape through little arbitrary reflections going through the glass or the body. Also, you can use your French curves and drag the edge of your eraser along to get a slightly smoother and sharper line. I have now rubbed out all the excess pastel from around the front of the vehicle just to clean that up and to bring out the shape of the car.
- 123. Color How to Draw Cars Fast and Easy 119 ©2009. How-To-Draw-Cars.com Step 11 We will now work on the rims. Put in the reflections of the ground tones in the top half of the rim just using gray markers. I have used two here – a cool gray 7 for the main body of that reflection, and just a little bit of cool gray 9 around the lip of the rim, just to give it a little bit of depth. Step 12 Next, I have begun to put in the detail of the rims – the design where I have used the negative space to create a 5-spoke look – and put in straight black for the openings in the rim and a few little detail lines to indicate the blades lifted off the rim. So that is the main rendering massed out, with the main color blocks put in. The final stages are really just tidying up and helping to finish off the rendering.
- 124. Color How to Draw Cars Fast and Easy 120 ©2009. How-To-Draw-Cars.com Step 13 What I normally do with all that pastel smudged behind is I just put a big, black background. This helps to cover up all that smudged pastel, as well as really define the outside line of the vehicle and lift it off the page. You can also cut out the entire car and paste it down on a fresh piece of paper; but if you are pressed for time, I find the quickest way is to just put a big, heavy, black background in. It really punches it out off the page. Here, I am getting my white pencil and starting to pick out some highlights around the door, on the door trim, across the top of the window, and around some of the edges on the rims. With the white pencil, I am also picking out little details around the taillight and the leading edges of the blades in the side air vent.
- 125. Color How to Draw Cars Fast and Easy 121 ©2009. How-To-Draw-Cars.com Step 14 It is nearly finished, but the final stage is getting the white gouache paint with my paint brush and beginning to beef up some of those highlights that I created with the white pencil – just to give them more intensity and to pick them out. To me, this stage is where the drawing really comes alive. Put in a little bit of tone around the ground to give it some movement and energy. Add a few little squiggles here and there to get your signature on it.
- 127. Gallery How to Draw Cars Fast and Easy 123 ©2009. How-To-Draw-Cars.com Drawing Gallery In this chapter, I have included a wide range of drawings with a brief description on how I went about drawing them. Cutaway View For this cutaway I did 4 rounds of underlays. First, was the initial sketch of the car. Second, was a refined sketch of the car correcting some of the perspective. Third, was another sketch of the car with the internal details sketched in. Forth, was the final rendering. The small view in the top corner was done separately and pasted on the page when it was all finished.
- 128. Gallery How to Draw Cars Fast and Easy 124 ©2009. How-To-Draw-Cars.com Side View This side view shows a little bit of perspective towards the rear end by offsetting the rear wheel centre hub and drawing in the other side of the rear wing. The graphics were drawn in first with markers and white highlights laid in over the top. Racecar Transporter This sketch was used to develop a concept for graphics on a racecar transporter. The actual drawing of the truck was done very quickly and without much attention to detail. The graphics were drawn in first and a white highlight laid over the top with white pencil.
- 129. Gallery How to Draw Cars Fast and Easy 125 ©2009. How-To-Draw-Cars.com Ford Laser I used to own a red Ford Laser like this and would trace photos of it to add my own personal restyling such as the spoiler kit and wheels. On this one I used colored pencil for the soft tones in the body. Here is another concept for the Laser – perhaps a little harder to recognize.
- 130. Gallery How to Draw Cars Fast and Easy 126 ©2009. How-To-Draw-Cars.com Mazda Miata The body of this Miata was traced off a photograph and a more aggressive body kit added. The line drawing was scanned into Adobe Photoshop and rendered in Photoshop.
- 131. Gallery How to Draw Cars Fast and Easy 127 ©2009. How-To-Draw-Cars.com Concept Cars This concept car rendering illustrates the classic approach to reflections. Note the centre line down the hood and that the other side of the car is much shorter, indicating the sharp angle across the front. This drawing was created using the technique described in the Quick Start Guide. Note the big sweeps of pastel over the body with black background covering over the excess pastel.
- 132. Gallery How to Draw Cars Fast and Easy 128 ©2009. How-To-Draw-Cars.com This is my guess at a speedcar of the future. I used the same underlay for both views to make sure all the proportions turned out the same – I reduced in on the photocopier for the smaller view. Each view and the backgrounds were created separately and then all the elements pasted down on pasteboard.