Measurement of soil conductivity
•Download as DOC, PDF•
0 likes•399 views


Recommended
More Related Content
Similar to Measurement of soil conductivity
More from Sussex County Amateur Radio Club Inc.
More from Sussex County Amateur Radio Club Inc. (7)
Measurement of soil conductivity
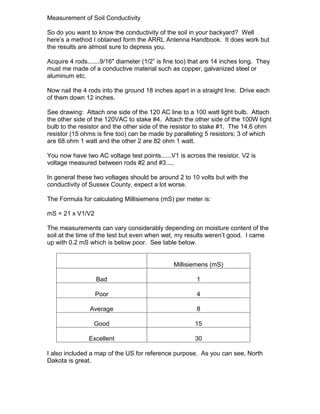
- 1. Measurement of Soil Conductivity So do you want to know the conductivity of the soil in your backyard? Well here’s a method I obtained form the ARRL Antenna Handbook. It does work but the results are almost sure to depress you. Acquire 4 rods.......9/16" diameter (1/2” is fine too) that are 14 inches long. They must me made of a conductive material such as copper, galvanized steel or aluminum etc. Now nail the 4 rods into the ground 18 inches apart in a straight line. Drive each of them down 12 inches. See drawing: Attach one side of the 120 AC line to a 100 watt light bulb. Attach the other side of the 120VAC to stake #4. Attach the other side of the 100W light bulb to the resistor and the other side of the resistor to stake #1. The 14.6 ohm resistor (15 ohms is fine too) can be made by paralleling 5 resistors; 3 of which are 68 ohm 1 watt and the other 2 are 82 ohm 1 watt. You now have two AC voltage test points......V1 is across the resistor. V2 is voltage measured between rods #2 and #3..... In general these two voltages should be around 2 to 10 volts but with the conductivity of Sussex County, expect a lot worse. The Formula for calculating Millisiemens (mS) per meter is: mS = 21 x V1/V2 The measurements can vary considerably depending on moisture content of the soil at the time of the test but even when wet, my results weren’t good. I came up with 0.2 mS which is below poor. See table below. Millisiemens (mS) Bad 1 Poor 4 Average 8 Good 15 Excellent 30 I also included a map of the US for reference purpose. As you can see, North Dakota is great.
- 2. Note: That the light bulb will not light unless the conductivity is good to excellent. Note: If you run an A/C extension cord to a outdoor ground fault outlet, it will trip the outlet.