From Hardware To Live
•
0 likes•282 views

Rough draft of a lesson for the digital audio workstation Ableton Live. Transfer your existing skills from your hardware based studio to the Ableton Live interface

Recommended
More Related Content
Similar to From Hardware To Live
Similar to From Hardware To Live (20)
Recently uploaded
Recently uploaded (20)
From Hardware To Live
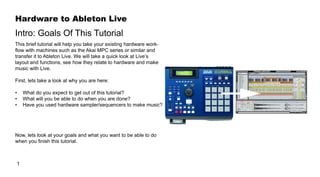
- 1. Hardware to Ableton Live 1 Intro: Goals Of This Tutorial This brief tutorial will help you take your existing hardware work- flow with machines such as the Akai MPC series or similar and transfer it to Ableton Live. We will take a quick look at Live’s layout and functions, see how they relate to hardware and make music with Live. First, lets take a look at why you are here: • What do you expect to get out of this tutorial? • What will you be able to do when you are done? • Have you used hardware sampler/sequencers to make music? Now, lets look at your goals and what you want to be able to do when you finish this tutorial.
- 2. Hardware to Ableton Live 2 Your Goals By the end of this tutorial you will be able to: 1. Create a Live Set with midi and audio tracks 2. Load your sounds/samples into Ableton Live 3. Record musical parts to different tracks 4. Create patterns using copy/paste 5. Create a basic arrangement 6. Export your work to a single WAV or AIFF file But then what?? (long term goals) Think about what you would like to get out of using Ableton Live Musical goals (to compose and arrange a song in two hours) Technical goals (to control ableton using my breath) Enter your goal(s) here:
- 3. Hardware to Ableton Live 3 Using Hardware This tutorial is written assuming that you have had substantial experience making/sequencing music using a hardware sam- pler/sequencer such as an Akai MPC series or similar piece. Everyone approaches making music differently, but we will as- sume that the basic tasks for making a tune are: 1. Record or import your sounds 2. Assign sounds to pads/banks 3. Set tempo and metronome, 4. Set loop and save sequence 5. Select track and record part (repeat as needed) 6. Copy and paste pattern to create a rough arrangement 7. Do the math - Add the honey Lets take a peek at Live’s main layouts next.t
- 4. Hardware to Ableton Live 4 Live Layout: Two Views Lets look at the basic layout of Ableton Live. There are two maint views: Arrangement and Session. Arrangement view shows your tracks in a typical left-to-right timeline style. (See image on right) Session view shows your tracks vertically and has slots where you can add a sound file of virtually any format. This unique layout allows you to ‘jam’ with your sounds in a very flexible and fun way. Device Browser use the browser to look through the live sound library and find your own sounds on any connected drive. Clip view edit your (midi and audio) clips and loops here (click <shift+tab> to see the effects window) Next, lets see what you need to know to complete this tutorial. Arrangement Session
- 5. Hardware to Ableton Live 5 This tutorial is short and assumes: that you have made music before and know important basics about music theory and composition: Meter (Bars/beats) Tempo loops/patterns Arrangement On the technical side you should be comfortable with: Digital multitrack recording concepts (patterns, tracks, etc) Midi/controllers What you should know Multitracking Meter
- 6. Hardware to Ableton Live 6 Now lets take a closer look at Live’s interface A. Tempo, Meter and Metronome B. Tracks, double click area, C. Instruments/Sound Library/Browser -Patches D. Map To Controller Practice Using the image on the right, Click on the following areas: 1. Time Signature 2. A Midi Track 3. The plugins window Part One: Ableton Quick Start A C B
- 7. Hardware to Ableton Live 7 Now lets get the party started. Open Live on your machine. Lets practice creating a Live set and setting the tempo: 1. From the File menu click New Live Set 2. On the upper left hand control bar find the Tempo box and en- ter the tempo for your piece The default Live Set opens with x tracks. Lets create a few more: 3. From the Create menu click Insert Audio Track 4. Now click Insert MIDI Track In the next slide we will add instruments and/or sounds to these tracks. Part Two: Set Up New Set New Track
- 8. Hardware to Ableton Live 8 Lets take a look at the Live Device Browser. This is where all of your instruments and patches (sounds) are located. Patches are organized by category. right: take a look To select a patch do one of the following: A. Click and drag a patch onto a MIDI track B. Double click and drag a patch to the device drop area (this v the most efficient if you are starting with a blank set) Lets add some samples and/or sounds to the set A. load sound in session view from browser Next, Lets map these track and sounds to your controller.... If you don’t have a dedicated controller/keyboard/etc. you will see how to use your com- puter keyboard to play notes and/or trigger sounds. Part Two: Set Up - Instruments
- 9. Hardware to Ableton Live 9 First, lets check our MIDI Preferences to make sure Live is ‘see- ing’ our controller. 1 2 3 MIDI map mode Keyboard map mode Tip - Click the keyboard icon in the upper right to turn computer keyboard mode on and use your computers keyboard to play notes or trigger sounds. Keep this in your back pocket. It comes in handy in a pinch. Mapping sounds to your keyboard/controller MIDI map mode Preferences - MIDI Add image
- 10. Hardware to Ableton Live 10 If you have Live, switch over and go through the procedures we covered: • open and name a new set, SAVE, Create tracks (audio, midi) Add sounds, instruments If you do NOT have Live, find the correct buttons in the images to the right. MAKE IMAGES INTERACTIVITY Now we can move on to part four and make some music. Practice...
- 11. Hardware to Ableton Live 11 1. Create Live Set and set Meter and Tempo. 2. Create tracks 3. Add instruments and sounds 4. Map controller 5. Play/hear music Flowchart image - image + instructions as caption We are all set up. Now let’s Jam and record some parts! (To keep things quick and easy, we’ll work with 1 or 2 bar loops) Part Three: Create a Live set to work with 1 2 43
- 12. Hardware to Ableton Live 12 Rhythm/loop Lets get a foundation going. If you are starting with a sample loop, lets get it looping: import/drag your sound from the browser onto a clip get your sample playing in loop/warp mode. tip: make sure sample tempo and Live Set tempo match. (make sure bars are set to a whole number 1 or 2) Drums Add some drums. Start with one of the following A. Load a preset drum kit, create midi clip, input pattern(s) B. loop a drum break - Slice to midi Ok. Now lets make music
- 13. Hardware to Ableton Live 13 Melody/idea/loops Bassline activate the bass track, find register/octave that sounds right jam on the groove record a jam in arrangement view or a loop in the clip window Ok. Now lets make music
- 14. Hardware to Ableton Live 14 Harmony Ok. Now lets make music
- 15. Hardware to Ableton Live 15 Arrangement/patterns/songs Ok. Now lets make music
- 16. Hardware to Ableton Live 16 Mix your tracks, sounds, etc Set your level/volume for each track Add an EQ8, effect Export your song File>Export Audio Command>Choose format>Select folder WAV vs AIFF MP3 - Live does not export mp3. no sweat, use another program or website to convert your wav/aiff to mp3. Ok. Now lets make music Export command Mix Export dialog
- 17. 17 Hardware to Ableton Live Lets hear it. • Play your piece for friends/family. • Send/post to online friends, networks, boards. Feedback - good feedback - is hard to find. Make it sound right to you. If you do not have Live right now: Play with the images to the right and see if you remember where to click on the interface. To take a quick survey, click on the survey image on the right Can you work musically in Live as you do your gear? How long before you expect to? What is your fave part of Live Did you get bored at any part during the tutorial? longer/more info, shorter/less info. open comments Thank you. Send us feedback. tutorial_feedback@probe-4.com Assessment. Survey.