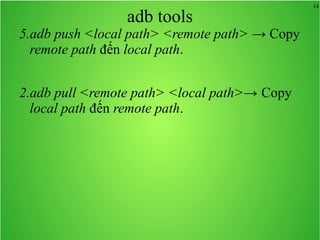
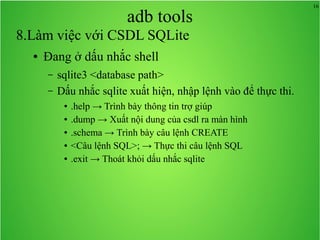
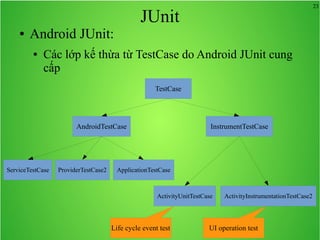
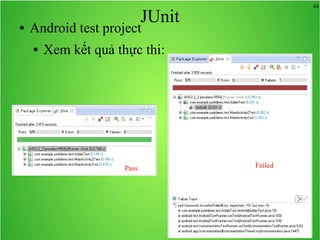
1
ANDROID NÂNG CAOANDROID NÂNG CAO
Bài 6:
Multi ThemeMulti Theme
adb tooladb tool
JUnitJUnit
2
Nội dung bài học
● Multi theme.
● adb tool.
● JUnit.
3
Nội dung bài học
● Multi theme.
● adb tool.
● JUnit.
4
Multi Theme
● Có nhiều cách để hỗ trợ nhiều theme cho
chương trình Android. Phần này sẽ giới thiệu
một phương pháp đã thực hiện trong một dự án.
Các phương pháp khác xem ở phần “Tham
khảo”.
● Phương pháp này tổ chức bằng cách sau:
● Hình ảnh (image) của một theme được tổ chức trong
một tập tin zip (nén) có cấu trúc như cấu trúc
Android (có chứa các thư mục ldpi, mdpi, hdpi).
● Màu sắc được khai báo trong một tập tin dạng CSV
hay XML.
5
Multi Theme
● Phương pháp này tổ chức bằng cách sau:
● Tên của tập tin định nghĩa màu sắc và tập tin hình
ảnh được qui định ở tập tin cấu hình xml
(config.xml).
assets
config.xml
ThemeA.xml
ThemeB.xml
ThemeA-mdpi.zip
ThemeA-ldpi.zip
ThemeA-hdpi.zip
ThemeA-xdpi.zip
6
Multi Theme
● Phương pháp này tổ chức bằng cách sau:
● File config.xml có thể có nội dung như sau:
<themes>
<theme>
<id>1</id>
<name>Blue</name>
<description>Mo ta ve theme o day</description>
<img>ThemeA.zip</img>
<color>ThemeA.xml</color>
</theme>
<theme>
<id>2</id>
<name>White</name>
<description>Mo ta ve theme o day</description>
<img>ThemeB.zip</img>
<color>ThemeB.xml</color>
</theme>
</themes>
7
Multi Theme
● Phương pháp này tổ chức bằng cách sau:
● Sơ đồ class
8
Multi Theme
● Phương pháp này tổ chức bằng cách sau:
● Lược đồ tuần tự
9
Nội dung bài học
● Tham khảo:
●
Sanjay Sharma,
How to create and set multiple theme of a android application ?
● Matthias, Understanding Android Themes And Styles
● Styles and Themes
10
Nội dung bài học
● Multi theme.
● adb tool.
● JUnit.
11
adb tool
● Giới thiệu về adb tool:
 adb tool là một công cụ được cung cấp kèm theo
SDK dùng để quản lý trạng thái của các thiết bị cũng
như emulator.
 adb tool sử dụng giao diện dòng lệnh (command
line) để giao tiếp với người dùng.
 Chúng ta nên thêm thư mục <SDK>/tools vào đường
dẫn PATH để có thể truy xuất adb được dễ dàng hơn.
12
adb tools
1.adb -help → Thông tin trợ giúp (help) của adb
được trình bày
2.adb devices → Liệt kê danh sách những
emulator hay thiết bị thật đang hoạt động.
13
adb tools
3.adb uninstall <package name> → Gỡ bỏ một
ứng dụng có tên package là <package name>
khỏi emaulator hoặc thiết bị.
2.adb install <apk path>→ Cài đặt ứng dụng
trong tập tin apk tại <apk path>lên emulator hay
thiết bị.
14
adb tools
5.adb push <local path> <remote path> → Copy
remote path đến local path.
2.adb pull <remote path> <local path>→ Copy
local path đến remote path.
15
adb tools
7.adb shell → Kết nối với thiết bị và launch
shell. Sau khi dấu nhắc shell xuất hiện, chúng ta
có thể sử dụng các lệnh shell như ls, cd, pwd,
rm:
● ls: Trình bày thông tin về tập tin hoặc thư mục.
● cd <path>: Chuyển thư mục hiện tại về thư mục path.
● pwd: Trình bày thư mục hiện tại.
● rm <file>: Xoá tập tin file.
16
adb tools
8.Làm việc với CSDL SQLite
● Đang ở dấu nhắc shell
– sqlite3 <database path>
– Dấu nhắc sqlite xuất hiện, nhập lệnh vào để thực thi.
● .help → Trình bày thông tin trợ giúp
● .dump → Xuất nội dung của csdl ra màn hình
● .schema → Trình bày câu lệnh CREATE
● <Câu lệnh SQL>; → Thực thi câu lệnh SQL
● .exit → Thoát khỏi dấu nhắc sqlite
17
Nội dung bài học
● Multi theme.
● adb tool.
● JUnit.
18
JUnit
● Giới thiệu JUnit
● Android JUnit
● Sample code
● Android test project
19
JUnit
● Giới thiệu JUnit
● Android JUnit
● Sample code
● Android test project
20
JUnit
● Giới thiệu JUnit:
● JUnit là một framework dùng để phát triển
unit test cho các chương trình Java.
● JUnit được dùng để phát triển test code cho
việc xác nhận lại các hành vi của chương trình
cần test là đúng như mong đợi hay không.
Quá trình kiểm tra được tiến hành thông qua
việc thực thi test code.
● Quá trình test có thể tiến hành nhiều lần một
cách tự động do đó đảm bảo chất lượng cho
chương trình cần test.
21
JUnit
● Giới thiệu JUnit
● Android JUnit
● Sample code
● Android test project
22
JUnit
● Android JUnit:
● Android JUnit là bản customize từ JUnit 3.
● Android JUnit cho phép phát sinh các thao tác trên
giao diện người dùng và các sự kiện trong chu trình
sống của Activity (onCreate, onResume, onPause,
…).
● JUnit thực thi trên JVM của máy phát triển; Android
JUnit Runner tiến hành việc test bằng cách cài đặt và
thực thi chương trình test trên Emulator hay thiết bị
thật.
● Để hiện thực code test chúng ta cần kế thừa từ lớp
junit.framework.TestCase. Tuy nhiên trong Android
JUnit đã chuẩn bị sẵn các lớp kế thừa cho các mục
đích đặc biệt
23
JUnit
● Android JUnit:
● Các lớp kế thừa từ TestCase do Android JUnit cung
cấp
TestCase
AndroidTestCase InstrumentTestCase
ServiceTestCase ProviderTestCase2 ApplicationTestCase
ActivityUnitTestCase ActivityInstrumentationTestCase2
Life cycle event test UI operation test
24
JUnit
● Giới thiệu JUnit
● Android JUnit
● Sample code
● Android test project
25
JUnit
● Sample code:
● Junit:Giả sử chúng ta muốn test đoạn code sau
đây:
public class Adder{
public int add(int addend1, int addend2){
return addend1+addend2;
}
}
26
JUnit
● Sample code:
● JUnit:
● Test code:
import junit.framework.TestCase;
public class AdderTest extends TestCase { … 
private Adder adder = null;
protected void setUp() throws Exception { … 
super.setUp();
adder = new Adder();
}
protected void tearDown() throws Exception { … 
super.tearDown();
}
public void testAdd(){ …
int actual = adder.add(4, 5);
assertEquals(9, actual); …
}
}
27
JUnit
● Sample code:
● JUnit:
1. Thừa kế từ lớp junit.framework.TestCase. Tên lớp thường đặt
bằng cách thêm chữ Test vào sau tên của lớp cần test.
2. Phương thức setUp sẽ được thực thi trước tiên. Phương thức này
là nơi để chuẩn bị cho test case như chuẩn bị dữ liệu, khởi tạo
biến, …
3. Phương thức tearDown sẽ được thực thi sau khi test case kết thúc.
Dọn dẹp như xoá các lưu trữ tạm thời, đóng file đã mở, …
4. Tên của phương thức test có dạng testXXX. Phương thức này
không có tham số và là phương thức “public void”
5. assertEquals là phương thức dùng để xác nhận lại hành vi của
code cần test. Tham số thứ nhất là kết quả mong đợi; tham số thứ
2 là kết quả thật sự. Nếu như hai giá trị này giống nhau thì test
“PASS”, ngược lại thì test “FAILED” (ngoài ra còn có assertTrue,
assertFalse, ...)
28
JUnit
● Sample code:
● Android Junit:
● Ví dụ ActivityInstrumentationTestcase2
public class MainActivityTest
extends ActivityInstrumentationTestCase2<MainActivity> {
//public MainActivityTest(){
// super("com.example.junitdemo",MainActivity.class);
//}
public MainActivityTest(){
super(MainActivity.class);
}
public void test0InputTextField(){
EditText edtTest = (EditText)getActivity().findViewById(com.example.junitdemo.R.id.edtTestId);
edtTest.requestFocus();
sendKeys(KeyEvent.KEYCODE_T,
KeyEvent.KEYCODE_E,
KeyEvent.KEYCODE_S,
KeyEvent.KEYCODE_T);
assertEquals("test", edtTest.getText().toString());
}
}
Activity cần test
Class của Activity cần test
Gửi các key event
29
JUnit
● Sample code:
● Android Junit:
● Ví dụ ActivityInstrumentationTestcase2
public class MainActivityTest
extends ActivityInstrumentationTestCase2<MainActivity> {
public void test1PressOnButton(){
final EditText edtTest = (EditText)getActivity().
findViewById(com.example.junitdemo.R.id.edtTestId);
final Button btnGetResult = (Button)getActivity().
findViewById(com.example.junitdemo.R.id.btnGetResultId);
TextView lblResultValue = (TextView)getActivity().
findViewById(com.example.junitdemo.R.id.lblResultValue);
getActivity().runOnUiThread(new Runnable() {
public void run() {
edtTest.setText("xyz");
btnGetResult.performClick();
}});
getInstrumentation().waitForIdleSync();
assertEquals("xyz",lblResultValue.getText().toString());
}
}
Yêu cầu thực thi trên UI thread
Click nút “Get Result”
Chờ chuyển từ UI thread qua
30
JUnit
● Sample code:
● Android Junit:
● Ví dụ ActivityInstrumentationTestcase2
public class MainActivityTest
extends ActivityInstrumentationTestCase2<MainActivity> {
public void test2GoButton(){
ActivityMonitor monitor =
new ActivityMonitor("com.example.junitdemo.MainActivity2", null, false);
getInstrumentation().addMonitor(monitor);
final Button btnGo = (Button)getActivity().findViewById(com.example.junitdemo.R.id.btnGoId);
final String hello = getActivity().getString(com.example.junitdemo.R.string.hello_world);
getActivity().runOnUiThread(new Runnable() {
public void run() {
btnGo.performClick();
}});
Activity m2Activity = getInstrumentation().waitForMonitor(monitor);
assertTrue(m2Activity!=null);
TextView lblHello =(TextView) m2Activity.findViewById(com.example.junitdemo.R.id.lblHello);
assertEquals(hello,lblHello.getText().toString());
m2Activity.finish();
}}
Giám sát Activity sẽ chuyển đến
Truy xuất Activity vừa chuyển đến
31
JUnit
● Sample code:
● Android Junit:
● Ví dụ ActivityUnitTestCase
public class MainActivity2Test extends ActivityUnitTestCase<MainActivity2> {
public MainActivity2Test() {
super(MainActivity2.class);
}
public void testSendResumeEvent() throws Exception {
Intent intent = new Intent(Intent.ACTION_MAIN);
startActivity(intent, null, null);
getInstrumentation().callActivityOnResume(getActivity());
}
}
Activity cần test
Run onResume
32
Bài tập 10
● Viết unit test cho các service demo ở Bài học số
1, content provider ở bài học số 4.
33
JUnit
● Giới thiệu JUnit
● Android JUnit
● Sample code
● Android test project
34
JUnit
● Android test project
● Tạo JUnit project:
● Trong Eclipse, chọn File > New > Other:
35
JUnit
● Android test project
● Tạo JUnit project:
● Chọn “Android Test Project” trong nhóm
“Android” sau đó chọn nút “Next”:
36
JUnit
● Android test project
● Tạo JUnit project:
● Nhập tên của project test, chọn nút “Next”:
37
JUnit● Android test project
● Tạo JUnit project:
● Mặc định dự án cần test được chọn sẵn khi
“An existing Android project” được chọn,
do đó chỉ cần nhất nút “Next”:
38
JUnit● Android test project
● Tạo JUnit project:
● Chọn build target, chọn nút “Finish”:
39
JUnit● Android test project
● Tạo Test case: Để tạo test case:
● File > New > Other
● Trong mục Junit, chọn JUnit Test Case, nhấn nút “Next”
40
JUnit● Android test project
● Tạo Test case:
● Chọn “New JUnit3 test”, nhập “Name”, “Superclass”,
nhấn nút “Finish”
41
JUnit● Android test project
● Tạo Test case:
● Chọn “New JUnit3 test”, nhập “Name”, “Superclass”,
nhấn nút “Finish”
42
JUnit● Android test project
● Tạo Test case:
● ADT tự động thêm vào Android Manifest các dòng màu
đen sau đây:
<instrumentation
android:name="android.test.InstrumentationTestRunner"
android:targetPackage="com.example.junitdemo" />
<application
android:icon="@drawable/ic_launcher"
android:label="@string/app_name" >
<uses-library android:name="android.test.runner" />
</application>
43
JUnit● Android test project
● Thực thi Test case:
Ấn chuột phải vào tên test project,
Chọn Run As > Android JUnit Test
44
JUnit● Android test project
● Xem kết quả thực thi:
Pass Failed
Nguyen Huu Phuoc, MEng.
●  Blog:http://folami.nghelong.com
●  Website http://phuocnh.nghelong.com

Android Nâng cao-Bài 6-Multi theme-adb tool-jUnit

  • 1.
    1 ANDROID NÂNG CAOANDROIDNÂNG CAO Bài 6: Multi ThemeMulti Theme adb tooladb tool JUnitJUnit
  • 2.
    2 Nội dung bàihọc ● Multi theme. ● adb tool. ● JUnit.
  • 3.
    3 Nội dung bàihọc ● Multi theme. ● adb tool. ● JUnit.
  • 4.
    4 Multi Theme ● Cónhiều cách để hỗ trợ nhiều theme cho chương trình Android. Phần này sẽ giới thiệu một phương pháp đã thực hiện trong một dự án. Các phương pháp khác xem ở phần “Tham khảo”. ● Phương pháp này tổ chức bằng cách sau: ● Hình ảnh (image) của một theme được tổ chức trong một tập tin zip (nén) có cấu trúc như cấu trúc Android (có chứa các thư mục ldpi, mdpi, hdpi). ● Màu sắc được khai báo trong một tập tin dạng CSV hay XML.
  • 5.
    5 Multi Theme ● Phươngpháp này tổ chức bằng cách sau: ● Tên của tập tin định nghĩa màu sắc và tập tin hình ảnh được qui định ở tập tin cấu hình xml (config.xml). assets config.xml ThemeA.xml ThemeB.xml ThemeA-mdpi.zip ThemeA-ldpi.zip ThemeA-hdpi.zip ThemeA-xdpi.zip
  • 6.
    6 Multi Theme ● Phươngpháp này tổ chức bằng cách sau: ● File config.xml có thể có nội dung như sau: <themes> <theme> <id>1</id> <name>Blue</name> <description>Mo ta ve theme o day</description> <img>ThemeA.zip</img> <color>ThemeA.xml</color> </theme> <theme> <id>2</id> <name>White</name> <description>Mo ta ve theme o day</description> <img>ThemeB.zip</img> <color>ThemeB.xml</color> </theme> </themes>
  • 7.
    7 Multi Theme ● Phươngpháp này tổ chức bằng cách sau: ● Sơ đồ class
  • 8.
    8 Multi Theme ● Phươngpháp này tổ chức bằng cách sau: ● Lược đồ tuần tự
  • 9.
    9 Nội dung bàihọc ● Tham khảo: ● Sanjay Sharma, How to create and set multiple theme of a android application ? ● Matthias, Understanding Android Themes And Styles ● Styles and Themes
  • 10.
    10 Nội dung bàihọc ● Multi theme. ● adb tool. ● JUnit.
  • 11.
    11 adb tool ● Giớithiệu về adb tool:  adb tool là một công cụ được cung cấp kèm theo SDK dùng để quản lý trạng thái của các thiết bị cũng như emulator.  adb tool sử dụng giao diện dòng lệnh (command line) để giao tiếp với người dùng.  Chúng ta nên thêm thư mục <SDK>/tools vào đường dẫn PATH để có thể truy xuất adb được dễ dàng hơn.
  • 12.
    12 adb tools 1.adb -help→ Thông tin trợ giúp (help) của adb được trình bày 2.adb devices → Liệt kê danh sách những emulator hay thiết bị thật đang hoạt động.
  • 13.
    13 adb tools 3.adb uninstall<package name> → Gỡ bỏ một ứng dụng có tên package là <package name> khỏi emaulator hoặc thiết bị. 2.adb install <apk path>→ Cài đặt ứng dụng trong tập tin apk tại <apk path>lên emulator hay thiết bị.
  • 14.
    14 adb tools 5.adb push<local path> <remote path> → Copy remote path đến local path. 2.adb pull <remote path> <local path>→ Copy local path đến remote path.
  • 15.
    15 adb tools 7.adb shell→ Kết nối với thiết bị và launch shell. Sau khi dấu nhắc shell xuất hiện, chúng ta có thể sử dụng các lệnh shell như ls, cd, pwd, rm: ● ls: Trình bày thông tin về tập tin hoặc thư mục. ● cd <path>: Chuyển thư mục hiện tại về thư mục path. ● pwd: Trình bày thư mục hiện tại. ● rm <file>: Xoá tập tin file.
  • 16.
    16 adb tools 8.Làm việcvới CSDL SQLite ● Đang ở dấu nhắc shell – sqlite3 <database path> – Dấu nhắc sqlite xuất hiện, nhập lệnh vào để thực thi. ● .help → Trình bày thông tin trợ giúp ● .dump → Xuất nội dung của csdl ra màn hình ● .schema → Trình bày câu lệnh CREATE ● <Câu lệnh SQL>; → Thực thi câu lệnh SQL ● .exit → Thoát khỏi dấu nhắc sqlite
  • 17.
    17 Nội dung bàihọc ● Multi theme. ● adb tool. ● JUnit.
  • 18.
    18 JUnit ● Giới thiệuJUnit ● Android JUnit ● Sample code ● Android test project
  • 19.
    19 JUnit ● Giới thiệuJUnit ● Android JUnit ● Sample code ● Android test project
  • 20.
    20 JUnit ● Giới thiệuJUnit: ● JUnit là một framework dùng để phát triển unit test cho các chương trình Java. ● JUnit được dùng để phát triển test code cho việc xác nhận lại các hành vi của chương trình cần test là đúng như mong đợi hay không. Quá trình kiểm tra được tiến hành thông qua việc thực thi test code. ● Quá trình test có thể tiến hành nhiều lần một cách tự động do đó đảm bảo chất lượng cho chương trình cần test.
  • 21.
    21 JUnit ● Giới thiệuJUnit ● Android JUnit ● Sample code ● Android test project
  • 22.
    22 JUnit ● Android JUnit: ●Android JUnit là bản customize từ JUnit 3. ● Android JUnit cho phép phát sinh các thao tác trên giao diện người dùng và các sự kiện trong chu trình sống của Activity (onCreate, onResume, onPause, …). ● JUnit thực thi trên JVM của máy phát triển; Android JUnit Runner tiến hành việc test bằng cách cài đặt và thực thi chương trình test trên Emulator hay thiết bị thật. ● Để hiện thực code test chúng ta cần kế thừa từ lớp junit.framework.TestCase. Tuy nhiên trong Android JUnit đã chuẩn bị sẵn các lớp kế thừa cho các mục đích đặc biệt
  • 23.
    23 JUnit ● Android JUnit: ●Các lớp kế thừa từ TestCase do Android JUnit cung cấp TestCase AndroidTestCase InstrumentTestCase ServiceTestCase ProviderTestCase2 ApplicationTestCase ActivityUnitTestCase ActivityInstrumentationTestCase2 Life cycle event test UI operation test
  • 24.
    24 JUnit ● Giới thiệuJUnit ● Android JUnit ● Sample code ● Android test project
  • 25.
    25 JUnit ● Sample code: ●Junit:Giả sử chúng ta muốn test đoạn code sau đây: public class Adder{ public int add(int addend1, int addend2){ return addend1+addend2; } }
  • 26.
    26 JUnit ● Sample code: ●JUnit: ● Test code: import junit.framework.TestCase; public class AdderTest extends TestCase { …  private Adder adder = null; protected void setUp() throws Exception { …  super.setUp(); adder = new Adder(); } protected void tearDown() throws Exception { …  super.tearDown(); } public void testAdd(){ … int actual = adder.add(4, 5); assertEquals(9, actual); … } }
  • 27.
    27 JUnit ● Sample code: ●JUnit: 1. Thừa kế từ lớp junit.framework.TestCase. Tên lớp thường đặt bằng cách thêm chữ Test vào sau tên của lớp cần test. 2. Phương thức setUp sẽ được thực thi trước tiên. Phương thức này là nơi để chuẩn bị cho test case như chuẩn bị dữ liệu, khởi tạo biến, … 3. Phương thức tearDown sẽ được thực thi sau khi test case kết thúc. Dọn dẹp như xoá các lưu trữ tạm thời, đóng file đã mở, … 4. Tên của phương thức test có dạng testXXX. Phương thức này không có tham số và là phương thức “public void” 5. assertEquals là phương thức dùng để xác nhận lại hành vi của code cần test. Tham số thứ nhất là kết quả mong đợi; tham số thứ 2 là kết quả thật sự. Nếu như hai giá trị này giống nhau thì test “PASS”, ngược lại thì test “FAILED” (ngoài ra còn có assertTrue, assertFalse, ...)
  • 28.
    28 JUnit ● Sample code: ●Android Junit: ● Ví dụ ActivityInstrumentationTestcase2 public class MainActivityTest extends ActivityInstrumentationTestCase2<MainActivity> { //public MainActivityTest(){ // super("com.example.junitdemo",MainActivity.class); //} public MainActivityTest(){ super(MainActivity.class); } public void test0InputTextField(){ EditText edtTest = (EditText)getActivity().findViewById(com.example.junitdemo.R.id.edtTestId); edtTest.requestFocus(); sendKeys(KeyEvent.KEYCODE_T, KeyEvent.KEYCODE_E, KeyEvent.KEYCODE_S, KeyEvent.KEYCODE_T); assertEquals("test", edtTest.getText().toString()); } } Activity cần test Class của Activity cần test Gửi các key event
  • 29.
    29 JUnit ● Sample code: ●Android Junit: ● Ví dụ ActivityInstrumentationTestcase2 public class MainActivityTest extends ActivityInstrumentationTestCase2<MainActivity> { public void test1PressOnButton(){ final EditText edtTest = (EditText)getActivity(). findViewById(com.example.junitdemo.R.id.edtTestId); final Button btnGetResult = (Button)getActivity(). findViewById(com.example.junitdemo.R.id.btnGetResultId); TextView lblResultValue = (TextView)getActivity(). findViewById(com.example.junitdemo.R.id.lblResultValue); getActivity().runOnUiThread(new Runnable() { public void run() { edtTest.setText("xyz"); btnGetResult.performClick(); }}); getInstrumentation().waitForIdleSync(); assertEquals("xyz",lblResultValue.getText().toString()); } } Yêu cầu thực thi trên UI thread Click nút “Get Result” Chờ chuyển từ UI thread qua
  • 30.
    30 JUnit ● Sample code: ●Android Junit: ● Ví dụ ActivityInstrumentationTestcase2 public class MainActivityTest extends ActivityInstrumentationTestCase2<MainActivity> { public void test2GoButton(){ ActivityMonitor monitor = new ActivityMonitor("com.example.junitdemo.MainActivity2", null, false); getInstrumentation().addMonitor(monitor); final Button btnGo = (Button)getActivity().findViewById(com.example.junitdemo.R.id.btnGoId); final String hello = getActivity().getString(com.example.junitdemo.R.string.hello_world); getActivity().runOnUiThread(new Runnable() { public void run() { btnGo.performClick(); }}); Activity m2Activity = getInstrumentation().waitForMonitor(monitor); assertTrue(m2Activity!=null); TextView lblHello =(TextView) m2Activity.findViewById(com.example.junitdemo.R.id.lblHello); assertEquals(hello,lblHello.getText().toString()); m2Activity.finish(); }} Giám sát Activity sẽ chuyển đến Truy xuất Activity vừa chuyển đến
  • 31.
    31 JUnit ● Sample code: ●Android Junit: ● Ví dụ ActivityUnitTestCase public class MainActivity2Test extends ActivityUnitTestCase<MainActivity2> { public MainActivity2Test() { super(MainActivity2.class); } public void testSendResumeEvent() throws Exception { Intent intent = new Intent(Intent.ACTION_MAIN); startActivity(intent, null, null); getInstrumentation().callActivityOnResume(getActivity()); } } Activity cần test Run onResume
  • 32.
    32 Bài tập 10 ●Viết unit test cho các service demo ở Bài học số 1, content provider ở bài học số 4.
  • 33.
    33 JUnit ● Giới thiệuJUnit ● Android JUnit ● Sample code ● Android test project
  • 34.
    34 JUnit ● Android testproject ● Tạo JUnit project: ● Trong Eclipse, chọn File > New > Other:
  • 35.
    35 JUnit ● Android testproject ● Tạo JUnit project: ● Chọn “Android Test Project” trong nhóm “Android” sau đó chọn nút “Next”:
  • 36.
    36 JUnit ● Android testproject ● Tạo JUnit project: ● Nhập tên của project test, chọn nút “Next”:
  • 37.
    37 JUnit● Android testproject ● Tạo JUnit project: ● Mặc định dự án cần test được chọn sẵn khi “An existing Android project” được chọn, do đó chỉ cần nhất nút “Next”:
  • 38.
    38 JUnit● Android testproject ● Tạo JUnit project: ● Chọn build target, chọn nút “Finish”:
  • 39.
    39 JUnit● Android testproject ● Tạo Test case: Để tạo test case: ● File > New > Other ● Trong mục Junit, chọn JUnit Test Case, nhấn nút “Next”
  • 40.
    40 JUnit● Android testproject ● Tạo Test case: ● Chọn “New JUnit3 test”, nhập “Name”, “Superclass”, nhấn nút “Finish”
  • 41.
    41 JUnit● Android testproject ● Tạo Test case: ● Chọn “New JUnit3 test”, nhập “Name”, “Superclass”, nhấn nút “Finish”
  • 42.
    42 JUnit● Android testproject ● Tạo Test case: ● ADT tự động thêm vào Android Manifest các dòng màu đen sau đây: <instrumentation android:name="android.test.InstrumentationTestRunner" android:targetPackage="com.example.junitdemo" /> <application android:icon="@drawable/ic_launcher" android:label="@string/app_name" > <uses-library android:name="android.test.runner" /> </application>
  • 43.
    43 JUnit● Android testproject ● Thực thi Test case: Ấn chuột phải vào tên test project, Chọn Run As > Android JUnit Test
  • 44.
    44 JUnit● Android testproject ● Xem kết quả thực thi: Pass Failed
  • 45.
    Nguyen Huu Phuoc,MEng. ●  Blog:http://folami.nghelong.com ●  Website http://phuocnh.nghelong.com