Beginners Guide to TikTok for Search - Rachel Pearson - We are Tilt __ Bright...
Thrustmaster gamepad
1. THRUSTMASTER ®
QUICK INSTALL
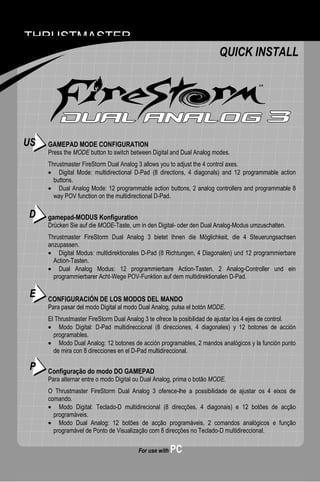
US GAMEPAD MODE CONFIGURATION
Press the MODE button to switch between Digital and Dual Analog modes.
Thrustmaster FireStorm Dual Analog 3 allows you to adjust the 4 control axes.
• Digital Mode: multidirectional D-Pad (8 directions, 4 diagonals) and 12 programmable action
buttons.
• Dual Analog Mode: 12 programmable action buttons, 2 analog controllers and programmable 8
way POV function on the multidirectional D-Pad.
D gamepad-MODUS Konfiguration
Drücken Sie auf die MODE-Taste, um in den Digital- oder den Dual Analog-Modus umzuschalten.
Thrustmaster FireStorm Dual Analog 3 bietet Ihnen die Möglichkeit, die 4 Steuerungsachsen
anzupassen.
• Digital Modus: multidirektionales D-Pad (8 Richtungen, 4 Diagonalen) und 12 programmierbare
Action-Tasten.
• Dual Analog Modus: 12 programmierbare Action-Tasten, 2 Analog-Controller und ein
programmierbarer Acht-Wege POV-Funktion auf dem multidirektionalen D-Pad.
E CONFIGURACIÓN DE LOS MODOS DEL MANDO
Para pasar del modo Digital al modo Dual Analog, pulsa el botón MODE.
El Thrustmaster FireStorm Dual Analog 3 te ofrece la posibilidad de ajustar los 4 ejes de control.
• Modo Digital: D-Pad multidireccional (8 direcciones, 4 diagonales) y 12 botones de acción
programables.
• Modo Dual Analog: 12 botones de acción programables, 2 mandos analógicos y la función punto
de mira con 8 direcciones en el D-Pad multidireccional.
P Configuração do modo DO GAMEPAD
Para alternar entre o modo Digital ou Dual Analog, prima o botão MODE.
O Thrustmaster FireStorm Dual Analog 3 oferece-lhe a possibilidade de ajustar os 4 eixos de
comando.
• Modo Digital: Teclado-D multidirecional (8 direcções, 4 diagonais) e 12 botões de acção
programáveis.
• Modo Dual Analog: 12 botões de acção programáveis, 2 comandos analógicos e função
programável de Ponto de Visualização com 8 direcções no Teclado-D multidireccional.
For use with PC
3. US PC Setup
1. With your computer switched on and Windows running, plug your gamepad’s USB connector into
one of the USB ports located at the back of your PC. Windows XP, 2000, Me and 98 will
automatically detect the new hardware peripheral (if you are connecting a USB peripheral device
for the first time, Windows may ask you for the Windows CD-ROM during installation to install the
required system files). Under Windows 98: the Add New Hardware Wizard will find the
appropriate driver for you: simply click on Next and follow the on-screen instructions to complete
the installation. Under Windows XP/2000/Me: installation of the drivers for the gamepad is carried
out automatically.
D HARDWARE-INSTALLATION
1. Lassen Sie den Rechner im Windows-Betrieb laufen und stecken Sie den USB-Stecker des
Gamepads in einen freien USB-Anschluss Ihres PCs (meist auf der Rückseite). Windows XP, 2000,
Me und 98 wird automatisch erkennen, dass neue Hardware angeschlossen wurde. Wenn zum
ersten Mal ein USB-Gerät installiert wird, wird Windows nach der Windows-CD fragen, um die
entsprechenden USB-Dateien zu kopieren. Windows 98: der Hardware-Assistent sucht
automatisch den entsprechenden Treiber für die neue Hardware. Klicken Sie dazu einfach auf
Weiter. Folgen Sie den Anweisungen auf dem Bildschirm, um die Installation durchzuführen.
Windows XP/2000/Me: Die Installation der Treiber geschieht in der Regel vollkommen automatisch.
E INSTALACIÓN EN PC
1. Con tu ordenador encendido y Windows corriendo, enchufa el conector USB de tu gamepad en
uno de los puertos USB situados en la parte trasera de tu PC. Windows XP, 2000, Me o 98
detectarán automáticamente el nuevo periférico (si ésta es la primera vez que conectas un
periférico USB es posible que, durante la instalación, Windows te pida que introduzcas el CD-ROM
de Windows para instalar los archivos de sistema necesarios). Bajo Windows 98: el Asistente
para agregar nuevo hardware encontrará los controladores adecuados para tu caso:
simplemente haz clic en Siguiente y sigue las instrucciones que aparecerán en pantalla para
completar la instalación. Bajo Windows XP/2000/Me: la instalación de los controladores del
gamepad se lleva a cabo de forma automática.
P iNSTALAÇÃO EM PC
1. Com o computador ligado e o Windows a funcionar, ligue o conector USB do gamepad a uma
das portas USB situadas na retaguarda do PC. Os Windows XP, 2000, Me ou 98 detectarão
automaticamente o novo periférico (se estiver a ligar um periférico USB pela primeira vez, é
possível que durante a instalação o Windows lhe peça para introduzir o CD-ROM Windows a fim
de instalar os ficheiros do sistema necessários). No Windows 98: o Assistente para adicionar
novo hardware irá procurar para si o controlador adequado. Limite-se a clicar em Avançar. Siga
as instruções que surgirem no ecrã para completar a instalação. No Windows XP/2000/Me: a
instalação dos controladores para o gamepad é efectuada automaticamente.
Para utilizar con PC
4. 2. To ensure that the gamepad has been properly connected, click on Start/Settings/Control Panel,
US then double-click on the Game Controllers icon. If the gamepad has been installed correctly, it will
appear in the list of game controllers with OK status.
3. Click on Properties to test your gamepad.
The intuitive Thrustmapper programming interface, which will enable you to create your own gaming
presets, can be downloaded from Thrustmaster’s website (www.thrustmaster.com). Simply follow the
on-screen instructions. When Windows restarts, right-click on the Thrustmapper taskbar utility icon in
the Windows taskbar and then select Thrustmapper. For details on how to use the application, please
refer to the online manual.
D 2. Um sicherzugehen, dass das Gamepad ordnungsgemäß angeschlossen ist, klicken Sie auf
Start/Einstellungen/Systemsteuerung und doppelklicken dort auf das Symbol Gamecontroller.
Wenn das Gamepad korrekt mit dem PC verbunden ist, wird es in der Liste der Gamecontroller mit
dem Status OK angezeigt.
3. Klicken Sie auf Eigenschaften, um Ihren Controller zu testen.
Die intuitive Thrustmapper Programmieroberfläche, die es Ihnen erlaubt, eigene Voreinstellungen
einzurichten, kann auf der Thrustmaster Webseite heruntergeladen werden
(www.thrustmaster.com). Folgen Sie den Anweisungen auf dem Bildschirm, um die Installation
durchzuführen. Wenn Windows startet, klicken Sie mit der rechten Maustaste auf das Symbol
Thrustmapper in der Taskleiste und wählen Sie dort Thrustmapper. Für Details, wie Sie diese
Anwendung verwenden, lesen Sie bitte das Online-Handbuch.
E 2. Para asegurarte de que el mando ha sido instalado correctamente, haz clic en
Inicio/Configuración/Panel de control, y después haz doble clic en el icono Dispositivos de
juego. Si el gamepad ha sido instalado correctamente, aparecerá en la lista de mandos de juego
con el estado OK.
3. Haz clic en Propiedades para probar tu gamepad.
El intuitivo interface de programación Thrustmapper, que te permite crear tus propias configuraciones
de juegos, puede ser descargado desde la página web de Thrustmaster (www.thrustmaster.com).
Simplemente sigue las instrucciones en pantalla. Al reiniciar Windows, hacer clic derecho en el icono
de la utilidad barra de tareas Thrustmapper en la barra de tareas de Windows y después seleccionar
Thrustmapper. Para más detalles sobre cómo utilizar la aplicación, por favor consulta el manual on-
line.
P 2. A fim de se assegurar de que o gamepad foi convenientemente conectado, clique em
Iniciar/Configurações/Painel de controlo, e depois faça duplo clique no ícone Controladores de
jogos. Se o gamepad tiver sido correctamente instalado, aparecerá na lista dos controladores de
jogos com o estado OK.
3. Clique em Propriedades para testar o seu gamepad.
O download da interface de programação intuitiva Thrustmapper, que lhe permitirá criar as suas
próprias pré-definições para os jogos, poderá ser feito no site da Thrustmaster
(www.thrustmaster.com). Siga as instruções visualizadas no ecrã. Ao reiniciar o Windows, fazer
duplo clique no ícone do utilitário Thrustmapper situado na barra de tarefas do Windows e
seleccionar em seguida Thrustmapper. Para mais detalhes sobre como utilizar a aplicação por favor
veja o manual online.
Para a PC
5. THRUSTMASTER ®
QUICK INSTALL
F
configuration des MODES de la manette
Pour passer du mode Digital au mode Dual Analog, appuyez sur le bouton MODE.
Thrustmaster FireStorm Dual Analog 3 vous offre la possibilité de régler les 4 axes de contrôle.
• Mode Digital : croix multidirectionnelle (8 directions, 4 diagonales) et 12 boutons d’action
programmables.
• Mode Dual Analog : 12 boutons d’action programmables, 2 sticks analogiques et fonction
chapeau chinois 8 directions programmable sur la croix multidirectionnelle.
I
Configurazione della modalità d’uso del gamepad
Per passare dalla modalità Digital a quella Dual Analog (e viceversa), premete il pulsante MODE.
Thrustmaster FireStorm Dual Analog 3 vi offre la possibilità di regolare il controllo del movimento
lungo i 4 assi.
• Modalità Digital: D-Pad multidirezionale (8 direzioni, 4 diagonali) e 12 pulsanti azione
programmabili.
• Modalità Dual Analog: 12 pulsanti azione programmabili, 2 stick analogici e 8 diverse funzioni
programmabili generate dal D-Pad multidirezionale.
NL
Configuratie van de gamepad MODus
Druk op de MODE knop in om van Digital naar Dual Analog modus te schakelen (of vice versa).
Thrustmaster FireStorm Dual Analog 3 geeft u de mogelijkheid om de 4 control assen aan te passen.
• Digital Modus: D-Pad met meerdere richtingen (8 in het totaal waarvan 4 diagonaal) en 12
programmeerbare actie knoppen.
• Dual Analog Modus: 12 programmeerbare actie knoppen, 2 analoge mini-sticks en
programmeerbare POV functie met 8-richtingen te programmeren op het D-Pad.
6. F caractéristiques I caratteristiche tecniche
NL
techniques technische kenmerken
1. Pulsanti azione
1. Boutons 1. Actie knoppen
2. 2 stick
d’action 2. 2 analoge mini-
analogici / pulsanti azione
2. 2 sticks sticks / actie knoppen
3. D-Pad
analogiques / boutons 3. D-Pad
4. Pulsante
d’action 4. MODE knop
MODE
3. Croix
multidirectionnelle
4. Bouton MODE
Voor de PC (Windows 98 of hoger)
Pour PC (Windows 98 ou Per PC (Windows 98 o superiore)
uitgerust met een USB poort.
supérieur) équipés d’un port USB. dotati di porte USB.
In het geval van een storing tijdens
En cas de mauvais fonctionnement In caso di malfunzionamento
het gebruik door statische
dû à une émission électrostatique, dovuto ad una emissione
elektriciteit, stop de game en
quittez le jeu et débranchez le elettrostatica, spegnere il gioco e
koppel de accessoire los van de
périphérique de votre ordinateur. scollegare l’unita dal computer. Per
computer. Sluit de accessoire weer
Pour rejouer, rebranchez le riprendere a giocare, ricollegare la
aan en herstart de game om verder
périphérique et relancez le jeu. periferica e rilanciare il gioco.
te spelen.
Pour PC
7. INSTALLATION SOUS PC
F 1. Allumez votre ordinateur et démarrez Windows, reliez le connecteur USB de votre contrôleur à un des
ports USB situés au dos de votre unité centrale. Windows XP, 2000, Me ou 98 détectera
automatiquement le nouveau périphérique (si vous branchez un périphérique USB pour la première
fois, il est possible que, pendant l’installation, Windows vous demande d’insérer le CD-ROM Windows
afin d’installer les fichiers système nécessaires). Sous Windows 98 : l’Assistant Ajout de nouveau
matériel se charge de rechercher pour vous les pilotes appropriés. Cliquez sur Suivant. Suivez les
instructions portées à l’écran pour terminer l’installation. Sous Windows XP/2000/Me : l’installation est
automatique.
2. Pour vous assurer que la manette est correctement branchée, cliquez sur Démarrer/Paramètres/
Panneau de configuration, puis double-cliquez sur l’icône Contrôleurs de jeu. Si votre manette est
correctement installée, son nom doit apparaître dans la liste des contrôleurs de jeu avec l’état OK.
3. Cliquez sur Propriétés pour tester votre manette.
INSTALLAZIONE SU SISTEMI PC
I 1. A computer acceso e Windows operative, collega il connettore USB del tuo gamepad ad una delle
porte USB poste sul retro del tuo PC. Windows XP, 2000, Me o 98 rileverà automaticamente la
presenza di una nuova periferica (se si tratta della prima volta in cui stai collegando al tuo PC una
periferica di tipo USB, Windows, durante la procedura di installazione, potrebbe chiederti di inserire il
CD-ROM di Windows nell’apposita unità, al fine di installare i necessari file di sistema). In Windows
98: l’Installazione guidata Nuovo hardware troverà i driver adatti. Fai semplicemente clic su Avanti.
Segui le istruzioni a video per completare l’installazione. In Windows XP/2000/Me: l’installazione dei
driver è automatica.
2. Per assicurarti che il gamepad sia stato correttamente connesso clicca su Start / Impostazioni /
Pannello di controllo, seguito da un doppio-click sull’icona Periferiche di gioco. Se il gamepad è
stato installato correttamente apparirà nella lista delle periferiche di gioco con lo stato OK.
3. Fai click su Proprietà per testare il corretto funzionamento del tuo gamepad.
PC SETUP
NL 1. Met de computer aan en Windows opgestart, sluit de gamepad aan op een USB port aan de
achterkant van de computer. Windows XP, 2000, Me of 98 zal automatisch de hardware detecteren
(als dit de eerste keer is dat er USB randapparatuur wordt aangesloten kan Windows tijdens de
installatie vragen om de Windows CD-ROM om de vereiste systeem bestanden te installeren).
Windows 98: de Wizard Nieuwe hardware zal de juiste drivers vinden. Klik op Volgende. Volg de
instructies op het scherm om de installatie te voltooien. Windows XP/2000/Me: de installatie van de
gamepad drivers wordt automatisch uitgevoerd.
2. Om te controleren of de gamepad goed is aangesloten, klik op Start / Instellingen /
Configuratiescherm en dubbelklik op het Spelbesturingen icoon. Als de gamepad correct is
geïnstalleerd verschijnt hij in de lijst met besturingen met de status OK.
3. Klik op Eigenschappen om de gamepad te testen.
Per PC