Call Girls In {{Laxmi Nagar Delhi}} 9667938988 Indian Russian High Profile Es...
1 d%20engine%20mechanical%2045 73
1. 1D-45 Engine Mechanical:
Cam Chain Tension Adjuster Inspection
B815H11406043
The cam chain tension adjuster is maintained at the
proper tension by an automatically adjusted.
1) Remove the cam chain tension adjuster. Refer to
“Engine Top Side Disassembly (Page 1D-27)”.
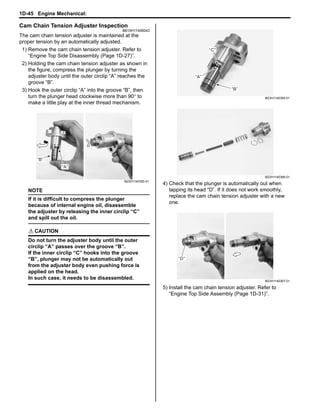
2) Holding the cam chain tension adjuster as shown in
the figure, compress the plunger by turning the
adjuster body until the outer circlip “A” reaches the
groove “B”.
3) Hook the outer circlip “A” into the groove “B”, then
turn the plunger head clockwise more than 90° to
make a little play at the inner thread mechanism.
NOTE
If it is difficult to compress the plunger
because of internal engine oil, disassemble
the adjuster by releasing the inner circlip “C”
and spill out the oil.
! CAUTION
Do not turn the adjuster body until the outer
circlip “A” passes over the groove “B”.
If the inner circlip “C” hooks into the groove
“B”, plunger may not be automatically out
from the adjuster body even pushing force is
applied on the head.
In such case, it needs to be disassembled.
4) Check that the plunger is automatically out when
tapping its head “D”. If it does not work smoothly,
replace the cam chain tension adjuster with a new
one.
5) Install the cam chain tension adjuster. Refer to
“Engine Top Side Assembly (Page 1D-31)”.
“A”
“B”
I823H1140355-01
“B”
“A”
“C”
I823H1140365-01
I823H1140366-01
“D”
I823H1140367-01
2. Engine Mechanical: 1D-46
Cam Chain Guide Removal and Installation
B815H11406023
Removal
1) Remove the cylinder head cover. Refer to “Engine
Top Side Disassembly (Page 1D-27)”.
2) Remove the cam chain guide No. 2 (1).
3) Remove the cylinder head. Refer to “Engine Top
Side Disassembly (Page 1D-27)” and “Engine
Bottom Side Disassembly (Page 1D-63)”.
4) Remove the cam chain guide No. 1 (2).
Installation
Install the cam chain guides in the reverse order of
removal.
Cam Chain Guide Inspection
B815H11406024
Inspect the cam chain guide in the following procedures:
1) Remove the cam chain guides. Refer to “Cam Chain
Guide Removal and Installation (Page 1D-46)”.
2) Check the contacting surface of the cam chain
guides. If it is worn or damaged, replace it with a new
one.
3) Install the cam chain guides. Refer to “Cam Chain
Guide Removal and Installation (Page 1D-46)”.
Cam Chain Tensioner Inspection
B815H11406025
Inspect the cam chain tensioner in the following
procedures:
1) Remove the cylinder. Refer to “Engine Top Side
Disassembly (Page 1D-27)”.
2) Remove the starter clutch. Refer to “Starter Torque
Limiter / Starter Clutch Removal and Installation in
Section 1I (Page 1I-10)”.
3) Remove the cam chain tensioner (1).
1
I823H1140104-01
2
I823H1140105-01
I823H1140106-01
1
I823H1140107-02
3. 1D-47 Engine Mechanical:
4) Check the contacting surface of the cam chain
tensioner. If it is worn or damaged, replace it with a
new one.
5) Install the cam chain tensioner.
6) Reinstall the starter clutch. Refer to “Starter Torque
Limiter / Starter Clutch Removal and Installation in
Section 1I (Page 1I-10)”.
7) Install the cylinder. Refer to “Engine Top Side
Disassembly (Page 1D-27)”.
Cylinder Head Disassembly and Assembly
B815H11406026
Refer to “Engine Top Side Disassembly (Page 1D-27)”.
Refer to “Engine Top Side Assembly (Page 1D-31)”.
! CAUTION
Identify the position of each removed part.
Organize the parts in their respective groups
(i.e., intake, exhaust, No. 1 or No. 2) so that
they can be installed in their original
locations.
Disassembly
1) Remove the tappet (1) and shim (2) by fingers or
magnetic hand.
2) Insert the special tool (A) between the valve spring
and cylinder head.
3) Using the special tools, compress the valve spring
and remove the two cotter halves (3) from the valve
stem.
! CAUTION
Be careful not to damage the tappet sliding
surface with the special tool.
Special tool
(A): 09919–28620 (Sleeve protector)
(B): 09916–14522 (Valve spring compressor
attachment)
(C): 09916–14510 (Valve lifter)
: 09916–84511 (Tweezers)
I823H1140108-01
1 2
I823H1140109-01
3
(A)
(B)
I823H1140111-01
(C)
I823H1140110-01
4. Engine Mechanical: 1D-48
4) Remove the valve spring retainer (4) and valve
spring (5).
5) Pull out the valve (6) from the combustion chamber
side.
6) Remove the oil seal (7) and spring seat (8).
7) Remove the other valves in the same manner as
described previously.
8) Remove the ECT sensor (9).
9) Remove the thermostat cover (10).
10) Remove the thermostat (11).
11) Remove the intake pipes (12).
12) Remove the water bypass union (13).
13) Remove the oil gallery plug (14).
14) Remove the cylinder head plug (15).
5
4 6
I823H1140112-01
7
8
I823H1140113-01
9
I823H1140114-01
10
11
I823H1140115-01
12
I823H1140116-01
13
I823H1140117-01
14
15
I823H1140118-02
5. 1D-49 Engine Mechanical:
Assembly
Assembly is in the reverse order of disassembly. Pay
attention to the following points:
• Tighten the cam chain tension adjuster service cap (1)
and oil gallery plug (2) to the specified torque.
! CAUTION
Replace the gaskets with new ones.
Tightening torque
Cam chain tension adjuster service cap (a): 23
N·m (2.3 kgf-m, 16.5 lbf-ft)
Oil gallery plug (Cylinder head) (b): 10 N·m (1.0
kgf-m, 7.0 lbf-ft)
• Apply bond to the thread part of the water bypass
union (3) and tighten it to the specified torque.
: Sealant 99000–31140 (SUZUKI BOND
No.1207B or equivalent)
Tightening torque
Water bypass union (c): 14 N·m (1.4 kgf-m, 10.0
lbf-ft)
• After aligning the boss “A” on the cylinder head with
the slit on the intake pipe, install the intake pipes.
1 (a)
2 (b)
I823H1140119-02
3 (c)
I823H1140296-02
“A”
I823H1140120-01
6. Engine Mechanical: 1D-50
• Set the clamp screws as shown in the figure.
• Install the thermostat.
“D” “E”
“a” “a” “a” “a”
NOTE
The air bleeder hole “F” of the thermostat
faces upside.
• Tighten the thermostat cover bolts (4) to the specified
torque.
Tightening torque
Thermostat cover bolt (d): 10 N·m (1.0 kgf-m, 7.0
lbf-ft)
• Tighten the ECT sensor (5) to the specified torque.
Tightening torque
Engine coolant temperature sensor (e): 18 N·m (
1.8 kgf-m, 13.0 lbf-ft)
! CAUTION
• Take special care when handling the
temperature sensor. It may cause damage
if it gets a sharp impact.
• Replace a gasket with a new one.
“B”
“C”
I823H1140121-03
“B”: Upper “C”: Lower “D”: Left “E”: Right “a”: 45°
“F”
4 (d)
I823H1140122-04
5 (e)
I823H1140123-03
7. 1D-51 Engine Mechanical:
• Install the valve spring seat.
• Apply molybdenum oil solution to the oil seal (6), and
press-fit it into the position.
M/O: Molybdenum oil (MOLYBDENUM OIL
SOLUTION)
! CAUTION
Do not reuse the removed oil seal.
6
• Insert the valve, with its stem coated with
molybdenum oil solution all around and along the full
stem length without any break.
! CAUTION
When inserting the valve, take care not to
damage the lip of the oil seal.
M/O: Molybdenum oil (MOLYBDENUM OIL
SOLUTION)
• Install the valve spring with the small-pitch portion “G”
facing cylinder head.
• Put on the valve spring retainer (7), and using the
special tools, press down the spring, fit the cotter
halves to the stem end, and release the lifter to allow
the cotter halves to wedge in between retainer and
stem.
! CAUTION
• Be sure to restore each spring and valve to
their original positions.
• Be careful not to damage the valve and
valve stem when handling them.
• Be careful not to damage the tappet sliding
surface with the special tool.
Special tool
(A): 09916–14510 (Valve lifter)
(B): 09916–14522 (Valve spring compressor
attachment)
(C): 09919–28620 (Sleeve protector)
: 09916–84511 (Tweezers)
“I” “H”
“G”: Small-pitch portion “I”: Upward
H”: Large-pitch portion “J”: Paint
I815H1140132-01
I705H1140165-01
“G”
“J”
I823H1140304-02
(A)
I823H1140125-01
(C)
(B)
7
I823H1140126-04
8. Engine Mechanical: 1D-52
• Be sure that the rounded lip “K” of the cotter fits
snugly into the groove “L” in the stem end.
“K”
8
9
“L”
• Install the other valves and springs in the same
manner as described previously.
• Install the tappet shims and the tappets to their
original positions.
NOTE
• Apply engine oil to the stem end, shim and
tappet before fitting them.
• When seating the tappet shim, be sure the
figure printed surface faces the tappet.
Cylinder Head Related Parts Inspection
B815H11406027
Refer to “Cylinder Head Disassembly and Assembly
(Page 1D-47)”.
Cylinder Head Distortion
1) Decarbonize the combustion chambers.
2) Check the gasket surface of the cylinder head for
distortion. Use a straightedge and thickness gauge.
Take clearance readings at several places. If
readings exceed the service limit, replace the
cylinder head.
Special tool
: 09900–20803 (Thickness gauge)
Cylinder head distortion
Service limit: 0.20 mm (0.008 in)
Valve Stem Runout
Support the valve using V-blocks, as shown in the figure,
and check its runout using the dial gauge. If the runout
exceeds the service limit, replace the valve.
Special tool
(A): 09900–20607 (Dial gauge (1/100 mm, 10
mm))
(B): 09900–20701 (Magnetic stand)
(C): 09900–21304 (V-block (100 mm))
Valve stem runout (IN. & EX.)
Service limit: 0.05 mm (0.002 in)
8. Valve spring retainer 9. Cotter
I823H1140127-04
I823H1140128-01
I823H1140129-01
(A)
(C)
(B)
I649G1140231-03
9. 1D-53 Engine Mechanical:
Valve Head Radial Runout
Place the dial gauge at a right angle to the valve head
face and measure the valve head radial runout. If it
measures more than the service limit, replace the valve.
Special tool
(A): 09900–20607 (Dial gauge (1/100 mm, 10
mm))
(B): 09900–20701 (Magnetic stand)
(C): 09900–21304 (V-block (100 mm))
Valve head radial runout (IN. & EX.)
Service limit: 0.03 mm (0.001 in)
Valve Stem and Valve Face Wear Condition
• Visually inspect each valve stem and valve face for
wear and pitting. If it is worn or damaged, replace the
valve with a new one.
Valve Stem Deflection
Lift the valve about 10 mm (0.39 in) from the valve seat.
Measure the valve stem deflection in two directions, “X”
and “Y”, perpendicular to each other. Position the dial
gauge as shown. If the deflection exceeds the service
limit, then determine whether the valve or the guide
should be replaced with a new one.
Special tool
(A): 09900–20607 (Dial gauge (1/100 mm, 10
mm))
(B): 09900–20701 (Magnetic stand)
Valve stem deflection (IN. & EX.)
Service limit: 0.25 mm (0.010 in) (A)
(B)
(C)
I649G1140232-03
I823H1140130-01
(A)
(B)
Y X
I823H1140131-01
10. Engine Mechanical: 1D-54
Valve Stem Wear
Measure the valve stem O.D. using the micrometer. If it
is out of specification, replace the valve with a new one.
If the valve stem O.D. is within specification but the valve
stem deflection is not, replace the valve guide. After
replacing the valve or valve guide, recheck the
deflection.
Special tool
(A): 09900–20205 (Micrometer (0 – 25 mm))
Valve stem O.D.
Standard (IN.): 4.975 – 4.990 mm (0.1959 – 0.1965 in)
Standard (EX.): 4.955 – 4.970 mm (0.1951 – 0.1957 in)
NOTE
If valve guides have to be removed for
replacement after inspecting related parts,
carry out the steps shown in valve guide
replacement. Refer to “Valve Guide
Replacement (Page 1D-56)”.
Valve Spring
The force of the coil spring keeps the valve seat tight. A
weakened spring results in reduced engine power output
and often accounts for the chattering noise coming from
the valve mechanism.
Check the valve springs for proper strength by
measuring their free length and also by the force
required to compress them. If the spring length is less
than the service limit or if the force required to compress
the spring does not fall within the specified range,
replace the valve spring.
Special tool
(A): 09900–20102 (Vernier calipers (1/20 mm,
200 mm))
Valve spring free length (IN. & EX.)
Service limit: 42.3 mm (1.67 in)
Valve spring tension (IN. & EX.)
Standard: Approx. 137 N (14.0 kgf, 30.8 Ibs)/36.6 mm
(1.44 in)
(A)
I718H1140122-01
Tension “a” Length “b”
Approx. 137 N
36.6 mm
(14.0 kgf, 30.8 lbs)
(1.44 in)
(A)
I649G1140237-03
“a”
“b”
I649G1140238-03
11. 1D-55 Engine Mechanical:
Valve Seat Width
1) Visually check for valve seat width on each valve
face. If the valve face has worn abnormally, replace
the valve.
2) Coat the valve seat with a red lead (Prussian Blue)
and set the valve in place.
! CAUTION
Do not use lapping compound.
3) Rotate the valve with light pressure.
Special tool
(A): 09916–10911 (Valve lapper set)
4) Check that the transferred red lead (blue) on the
valve face is uniform all around and in center of the
valve face.
If the seat width “a” measured exceeds the standard
value, or seat width is not uniform reface the seat
using the seat cutter. Refer to “Valve Seat Repair
(Page 1D-57)”.
Valve seat width “a” (IN. & EX.)
Standard: 0.9 – 1.1 mm (0.035 – 0.043 in)
Valve Seat Sealing Condition
1) Clean and assemble the cylinder head and valve
components.
2) Fill the intake and exhaust ports with gasoline to
check for leaks. If any leaks occur, inspect the valve
seat and face for burrs or other things that could
prevent the valve from sealing. Refer to “Valve Seat
Repair (Page 1D-57)”.
! WARNING
Always use extreme caution when handling
gasoline.
NOTE
After servicing the valve seats, be sure to
check the valve clearance after the cylinder
head has been reinstalled. Refer to “Valve
Clearance Inspection and Adjustment in
Section 0B (Page 0B-4)”.
(A)
I823H1140132-01
“a”
I649G1140246-02
I823H1140133-01
12. Engine Mechanical: 1D-56
Valve Guide Replacement
B815H11406028
1) Remove the cylinder head. Refer to “Engine Top
Side Disassembly (Page 1D-27)”.
2) Remove the valves. Refer to “Cylinder Head
Disassembly and Assembly (Page 1D-47)”.
3) Using the valve guide remover, drive the valve guide
out toward the intake or exhaust camshaft side.
Special tool
(A): 09916–44310 (Valve guide remover/
installer)
NOTE
• Discard the removed valve guide sub-assemblies.
• Only oversized valve guides are available
as replacement parts. (Part No. 11115-
15H70)
4) Refinish the valve guide holes in the cylinder head
using the reamer and handle.
! CAUTION
When refinishing or removing the reamer
from the valve guide hole, always turn it
clockwise.
Special tool
(B): 09916–34580 (Valve guide reamer (10.8
mm))
(C): 09916–34542 (Reamer handle)
5) Cool down the new valve guides in a freezer for
about one hour and heat the cylinder head to 100 –
150 °C (212 – 302 °F) with a hot plate.
! CAUTION
Do not use a burner to heat the valve guide
hole to prevent cylinder head distortion.
6) Apply engine oil to each valve guide and valve guide
hole.
7) Drive the guide into the guide hole using the valve
guide installer.
! CAUTION
Failure to oil the valve guide hole before
driving the new guide into place may result in
a damaged guide or head.
Special tool
(A): 09916–44310 (Valve guide remover/
installer)
(D): 09916–53350 (Attachment)
(A)
I823H1140134-01
(C)
(B)
I823H1140135-01
“a”
(A)
(D)
1
1. Cylinder head “a”: 18.0 mm (0.71 in)
I718H1140127-01
(A)
(D)
I823H1140136-01
13. 1D-57 Engine Mechanical:
8) After installing the valve guides, refinish their guiding
bores using the reamer. Be sure to clean and oil the
guides after reaming.
NOTE
• Be sure to cool down the cylinder head to
ambient air temperature.
• Insert the reamer from the combustion
chamber and always turn the reamer
handle clockwise.
Special tool
(C): 09916–34542 (Reamer handle)
(E): 09916–34570 (Valve guide reamer (5.0
mm))
9) Reassemble the cylinder head. Refer to “Cylinder
Head Disassembly and Assembly (Page 1D-47)”.
10) Install the cylinder head assembly. Refer to “Engine
Top Side Assembly (Page 1D-31)”.
Valve Seat Repair
B815H11406029
The valve seats (1) for both the intake and exhaust
valves are machined to three different angles. The seat
contact surface is cut at 45°.
45q
60q
1
45q
1
! CAUTION
• The valve seat contact area must be
inspected after each cut.
• Do not use lapping compound after the
final cut is made. The finished valve seat
should have a velvety smooth finish but
not a highly polished or shiny finish. This
will provide a soft surface for the final
seating of the valve which will occur
during the first few seconds of engine
operation.
• The titanium valves are coated with an
oxidized membrane treatment to resist
wear but the membrane tend to removed if
lapped after valve seat servicing.
NOTE
After servicing the valve seats, be sure to
check the valve clearance after the cylinder
head has been reinstalled. Refer to “Valve
Clearance Inspection and Adjustment in
Section 0B (Page 0B-4)”.
(C)
(E)
I823H1140137-01
Intake Exhaust
Seat angle 30°/45°/60° 15°/45°/60°
Seat width 0.9 – 1.1 mm
(0.035 – 0.043 in) ←
Valve
diameter
33 mm
(1.30 in)
27.5 mm
(1.08 in)
Valve guide
I.D.
5.000 – 5.012 mm
(0.1969 – 0.1973 in) ←
15q
60q
30q
IN. EX.
I823H1140138-01
14. Engine Mechanical: 1D-58
Cylinder Disassembly and Assembly
B815H11406030
Refer to “Engine Top Side Disassembly (Page 1D-27)”.
Refer to “Engine Top Side Assembly (Page 1D-31)”.
Disassembly
1) Remove the water inlet connector (1).
2) Remove the water jacket plugs (2).
Assembly
Assembly is in the reverse order of disassembly. Pay
attention to the following points:
• Apply engine coolant to O-rings of water jacket plugs.
! CAUTION
Replace the O-rings with new ones.
• Tighten the water jacket plugs (1) to the specified
torque.
Tightening torque
Water jacket plug (a): 11 N·m (1.1 kgf-m, 8.0 lbf-ft)
• Apply engine coolant to O-ring of water inlet
connector.
! CAUTION
Replace the O-ring with a new one.
• Tighten the water inlet connector bolts (2) to the
specified torque.
Tightening torque
Water inlet connector bolt (b): 10 N·m (1.0 kgf-m,
7.0 lbf-ft)
1
I823H1140139-01
2
2
I823H1140140-01
1 (a)
1 (a)
I823H1140141-02
I823H1140142-01
2 (b)
I823H1140143-03
15. 1D-59 Engine Mechanical:
Cylinder Inspection
B815H11406031
Refer to “Engine Top Side Disassembly (Page 1D-27)”.
Refer to “Engine Top Side Assembly (Page 1D-31)”.
Cylinder Distortion
Check the gasket surface of the cylinder for distortion.
Use a straightedge and thickness gauge. Take clearance
readings at several places. If any reading exceeds the
service limit, replace the cylinder.
Special tool
: 09900–20803 (Thickness gauge)
Cylinder distortion
Service limit: 0.20 mm (0.008 in)
Cylinder Bore
Measure the cylinder bore diameter at six places. If any
one of the measurements exceed the limit, overhaul the
cylinder and replace the piston with an oversize piston.
The remaining cylinders must also be rebored
accordingly; otherwise, the imbalance might cause
excessive vibration.
Special tool
(A): 09900–20530 (Cylinder gauge set)
Cylinder bore
Standard: 81.000 – 81.015 mm (3.1890 – 3.1896 in)
Piston-to-cylinder Clearance
Refer to “Piston and Piston Ring Inspection (Page 1D-
61)”.
I823H1140144-01
(A)
I823H1140145-02
I823H1140146-02
16. Engine Mechanical: 1D-60
Piston Ring Removal and Installation
B815H11406032
Removal
1) Draw out the piston pin and remove the piston. Refer
to “Engine Top Side Disassembly (Page 1D-27)”.
2) Carefully spread the ring opening with your thumbs
and then push up the opposite side of the 1st ring to
remove it.
NOTE
Do not expand the piston ring excessively
since it is apt to be broken down.
3) Remove the 2nd ring and oil ring in the same
manner.
Installation
NOTE
• When installing the piston ring, be careful
not to damage the piston.
• Do not expand the piston ring excessively
since it is apt to be broken down.
1) Install the piston rings in the order of the oil ring,
second ring and top ring.
a) The first member to go into the oil ring groove is
the spacer (1).
After placing the spacer, fit the two side rails (2).
! CAUTION
When installing the spacer, be careful not to
allow its two ends to overlap in the groove.
“A”
A
“B”
B
b) Install the 2nd ring (3) and 1st ring (4) to piston.
NOTE
1st ring (4) and 2nd ring (3) differ in shape.
NOTE
Face the side with the stamped mark upward
when assembling.
I823H1140303-01
2
1
2
I718H1140143-02
“A”: INCORRECT “B”: CORRECT
I705H1140170-02
4
3
I823H1140147-01
2T
I823H1140148-03
17. 1D-61 Engine Mechanical:
2) Position the gaps of the three rings and side rails as
shown. Before inserting piston into the cylinder,
check that the gaps are so located.
“C”
“D”
3) Install each piston and piston pin. Refer to “Engine
Top Side Assembly (Page 1D-31)”.
Piston and Piston Ring Inspection
B815H11406033
Refer to “Piston Ring Removal and Installation
(Page 1D-60)”.
Piston Diameter
Measure the piston diameter using the micrometer at 15
mm (0.6 in) “a” from the skirt end. If the piston diameter
is less than the service limit, replace the piston.
Special tool
(A): 09900–20204 (Micrometer (75 – 100 mm))
Piston diameter
Service limit: 80.880 mm (3.1842 in)
Piston-to-cylinder Clearance
Subtract the piston diameter from the cylinder bore
diameter. If the piston-to-cylinder clearance exceeds the
service limit, replace both the cylinder and the piston.
Piston-to-cylinder clearance
Service limit: 0.120 mm (0.0047 in)
Piston Ring-to-groove Clearance
Measure the side clearances of the 1st and 2nd piston
rings using the thickness gauge. If any of the clearances
exceed the limit, replace both the piston and piston
rings.
Special tool
(A): 09900–20803 (Thickness gauge)
(B): 09900–20205 (Micrometer (0 – 25 mm))
Piston ring-to-groove clearance
Service limit (1st): 0.180 mm (0.0071 in)
Service limit (2nd): 0.150 mm (0.0059 in)
Piston ring groove width
“a”: Standard (1st): 0.83 – 0.85 mm (0.0327 – 0.0335
in)
“b”: Standard (1st): 1.30 – 1.32 mm (0.0512 – 0.0520
in)
Standard (2nd): 1.01 – 1.03 mm (0.0398 – 0.0406 in)
Standard (Oil): 2.01 – 2.03 mm (0.0791 – 0.0799 in)
“C”: 1st ring and upper side rail
“D”: Spacer
“E”: 2nd ring and lower side rail
“E”
I823H1140573-02
“a”
I823H1140149-01
(A)
I649G1140262-03
(A)
I649G1140263-03
“a”
“b”
I823H1140580-02
18. Engine Mechanical: 1D-62
Piston ring thickness
Standard (1st): 0.76 – 0.81 mm (0.0299 – 0.0319 in)
Standard (1st): 1.08 – 1.10 mm (0.0425 – 0.0433 in)
Standard (2nd): 0.97 – 0.99 mm (0.0382 – 0.0390 in)
Piston Ring Free End Gap and Piston Ring End Gap
Measure the piston ring free end gap using vernier
calipers. Next, fit the piston ring squarely into the
cylinder and measure the piston ring end gap using the
thickness gauge. If any of the measurements exceed the
service limit, replace the piston ring with a new one.
Special tool
(A): 09900–20102 (Vernier calipers (1/20 mm,
200 mm))
Piston ring free end gap
Service limit (1st): 5.2 mm (0.20 in)
Service limit (2nd): 7.2 mm (0.28 in)
Special tool
(B): 09900–20803 (Thickness gauge)
Piston ring end gap
Service limit (1st): 0.50 mm (0.020 in)
Service limit (2nd): 0.50 mm (0.020 in)
Piston Pin and Pin Bore
Measure the piston pin bore inside diameter using the
small bore gauge. If either is out of specification or the
difference between these measurements surpass limits,
replace the piston.
Special tool
(A): 09900–20602 (Dial gauge (1/1000 mm, 1
mm))
(B): 09900–22403 (Small bore gauge (18 – 35
mm))
Piston pin bore
Service limit: 18.030 mm (0.7098 in)
Measure the piston pin outside diameter at three
positions using the micrometer. If any of the
measurements are out of specification, replace the
piston pin.
Special tool
(C): 09900–20205 (Micrometer (0 – 25 mm))
Piston pin O.D.
Service limit: 17.980 mm (0.7079 in)
(B)
I649G1140264-03
(A)
I649G1140265-03
(B)
I823H1140151-01
(A)
(B)
I649G1140267-03
(C)
I649G1140268-03
19. 1D-63 Engine Mechanical:
Engine Bottom Side Disassembly
B815H11406034
NOTE
The crankcase must be separated to service
the crankshaft and conrod.
1) Remove the engine assembly from the frame. Refer
to “Engine Assembly Removal (Page 1D-19)”.
2) Remove the engine top side. Refer to “Engine Top
Side Disassembly (Page 1D-27)”.
Crankcase Breather (PCV) Hose
Disconnect the crankcase breather (PCV) hose (1).
Crankcase Breather (PCV) Hose Cover
1) Remove the reed valve cover (1).
2) Remove the reed valve (2).
3) Remove the crankcase breather (PCV) cover (3).
Starter Motor
Remove the starter motor (1).
1
I815H1140055-01
1
I823H1140153-01
2
I823H1140154-01
3
I823H1140155-01
1
I823H1140156-01
20. Engine Mechanical: 1D-64
Starter Torque Limiter
Remove the starter torque limiter (1) and starter idle gear
(2). Refer to “Starter Torque Limiter / Starter Clutch
Removal and Installation in Section 1I (Page 1I-10)”.
NOTE
Do not remove the starter clutch for clutch
disassembly.
Clutch
Remove the clutch component parts (1). Refer to “Clutch
Removal in Section 5C (Page 5C-14)”.
Oil Pump
1) Remove the snap ring (1).
2) Remove the oil pump driven gear (2).
NOTE
Take care not to drop the snap ring (1), pin (3)
or washer (4) into the crankcase.
3) Remove the pin (3) and washer (4).
4) Remove the oil pump (5).
1
2
I815H1140056-01
1
I823H1140158-04
1
2
I823H1140159-01
3
4
I823H1140160-01
5
I823H1140161-01
21. 1D-65 Engine Mechanical:
Gear Position Switch
1) Remove the gear position switch lead wire clamps.
2) Remove the gear position switch (1).
Starter Clutch
Remove the starter clutch (1). Refer to “Starter Torque
Limiter / Starter Clutch Removal and Installation in
Section 1I (Page 1I-10)”.
Cam Chain
Remove the cam chain (1) and cam chain drive sprocket
(2).
Cam Chain Tensioner
Remove the cam chain tensioner (1).
Generator
Remove the generator component parts (1). Refer to
“Generator Removal and Installation in Section 1J
(Page 1J-6)”.
Water Pump
Remove the water pump (1).
1
I823H1140162-01
1
I823H1140163-01
2
1
I823H1140164-02
1
I823H1140165-01
1
I815H1140130-01
1
I823H1140167-01
22. Engine Mechanical: 1D-66
Gearshift System
1) Remove the gearshift cover (1).
2) Remove the gasket (2) and dowel pins.
3) Remove the gearshift shaft assembly (3) with the
washers (4).
4) Remove the gearshift cam plate bolt (5).
5) Remove the gearshift cam plate (6).
6) Remove the gearshift cam stopper (7) and gearshift
arm stopper (8).
Oil Filter
Remove the oil filter (1) using the special tool.
Special tool
(A): 09915–40610 (Oil filter wrench)
1
I823H1140168-01
2
I823H1140169-01
3
4
I823H1140170-01
5
6
I823H1140171-01
7
8
I815H1140057-01
(A)
1
I823H1140173-02
23. 1D-67 Engine Mechanical:
Oil Pipe
1) Remove the oil pipe (1).
2) Remove the cushion (2).
Oil Pressure Switch
Remove the oil pressure switch (1).
Oil Pan
1) Remove the oil pan (1).
2) Remove the gasket (2).
Oil Pressure Regulator
Remove the oil pressure regulator (1).
Oil Strainer
1) Remove the oil strainer (1).
2) Remove the O-ring (2).
Breather Pipe
Remove the breather pipe (1).
1
2
I823H1140175-01
1
I815H1140059-01
1
I823H1140176-02
2
I823H1140177-01
1
I823H1140178-01
1
I815H1140120-01
2
I823H1140180-01
1
I823H1140181-01
24. Engine Mechanical: 1D-68
Crank Balancer
1) Remove the oil separator (1).
2) Remove the balancer shaft arm (2).
3) Remove the balancer shaft (3).
4) Remove the crank balancer assembly (4) with the
washers (5).
Crankcase
1) Remove the crankcase bolts.
NOTE
Loosen the crankcase bolts diagonally and
the smaller sizes first.
2) Remove the crankshaft journal bolts.
NOTE
Loosen the crankshaft journal bolts in the
descending order of the numbers on the
crankcase.
1
I823H1140182-01
2
I823H1140183-02
3
I823H1140184-01
4
5
I823H1140185-01
I823H1140186-02
I815H1140060-01
3 1
5
2
6
7
8
9
4 10
I823H1140290-02
25. 1D-69 Engine Mechanical:
3) Make sure that all of the bolts are removed. Then,
tap the sides of the lower crankcase using a plastic
hammer to separate the upper and lower crankcase
halves and then lift the lower crankcase off of the
upper crankcase.
4) Remove the dowel pins.
Crankshaft / Conrod
1) Remove the crankshaft assembly (1) from the upper
crankcase.
2) Remove the thrust bearings (2).
NOTE
Remove the conrod if necessary. Refer to
“Conrod Removal and Installation (Page 1D-
89)”.
Transmission
Remove the transmission component. Refer to
“Transmission Removal in Section 5B (Page 5B-3)”.
Oil Jet
1) Remove the piston cooling oil jets (1) from the upper
crankcase.
2) Remove the oil jet (2) (for transmission oil spray)
from the upper crankcase.
I823H1140188-01
1
2
I823H1140189-01
I823H1140190-01
1
I823H1140191-01
2
I823H1140192-01
26. Engine Mechanical: 1D-70
3) Remove the oil jet (3) (for generator) from the upper
crankcase.
4) Remove the oil jet (4) (for transmission) from the
lower crankcase.
5) Remove the oil gallery jet (5) from the lower
crankcase.
Crankshaft Journal Bearing
Remove the crankshaft journal bearings, upper and
lower.
! CAUTION
• When removing the crankshaft journal
bearings, be careful not to scratch the
crankcase and the crankshaft journal
bearings.
• Do not touch the bearing surfaces with
your hands. Grasp the bearings by their
edges.
NOTE
• Do not remove the crankshaft journal
bearings unless absolutely necessary.
• Make a note of where the crankshaft
journal bearings are removed from so that
they can be reinstalled in their original
positions.
3
I823H1140193-01
4
I823H1140194-01
5
I823H1140195-01
I823H1140196-01
I823H1140197-01
27. 1D-71 Engine Mechanical:
Oil Gallery Plug
1) Remove the oil gallery plug (M6) (1), (M14) (2),
(M14) (3) and (M6) (4) from the upper crankcase.
2) Remove the oil gallery plugs (M6) (5), (M8) (6),
(M10) (7), (M6) (8) and (M16) (9) from the lower
crankcase.
Bearing
Remove the bearings if necessary. Refer to “Gearshift
Shaft Oil Seal / Bearing Removal and Installation in
Section 5B (Page 5B-17)”.
Engine Bottom Side Assembly
B815H11406035
Assemble the engine bottom side in the reverse order of
disassembly. Pay attention to the following points:
NOTE
Apply engine oil to each running and sliding
part before reassembling.
Oil Seal / Bearing
• Install the oil bearings. Refer to “Gearshift Shaft Oil
Seal / Bearing Removal and Installation in Section 5B
(Page 5B-17)”.
Oil Gallery Plug
• Tighten each plug to the specified torque.
! CAUTION
Replace the gaskets with new ones.
1
I823H1140198-01
2 3
I823H1140199-01
4
I823H1140200-01
5
I823H1140201-01
6
7 8
9
I823H1140202-01
28. Engine Mechanical: 1D-72
Tightening torque
Oil gallery plug (M6) and (M8) (a): 10 N·m (1.0 kgf-m,
7.0 lbf-ft)
Oil gallery plug (M10) (b): 18 N·m (1.8 kgf-m, 13.0
lbf-ft)
Oil gallery plug (M14) (c): 23 N·m (2.3 kgf-m, 16.5
lbf-ft)
Oil gallery plug (M16) (d): 35 N·m (3.5 kgf-m, 25.5
lbf-ft)
Crankshaft Journal Bearing
• When fitting the crankshaft journal bearings to the
upper and lower crankcases, be sure to fix the stopper
part “A” first and press the other end.
! CAUTION
Do not touch the bearing surfaces with your
hands. Grasp by the edge of the bearing
shell.
NOTE
Inspect and select the crankshaft journal
bearing if necessary. Refer to “Crankshaft
Journal Bearing Inspection and Selection
(Page 1D-94)”.
(a)
(b) (a)
(d)
I823H1140203-01
(a)
I823H1140204-01
(a)
I823H1140205-01
(c) (c)
I823H1140206-01
(a)
I823H1140207-01
“A”
I823H1140208-02
29. 1D-73 Engine Mechanical:
Oil Jet
• Fit the new O-rings (1) to each piston cooling oil jet
and apply engine oil to them.
! CAUTION
Use the new O-rings to prevent oil pressure
leakage.
NOTE
Be sure to face the oil hole “A” of each piston
cooling oil jet to the top when installing them.
• Install each piston cooling oil jet.
NOTE
Apply a small quantity of thread lock to the
bolts and tighten them to the specified
torque.
: Thread lock cement 99000–32110
(THREAD LOCK CEMENT SUPER 1322 or
equivalent)
Tightening torque
Piston cooling oil jet bolt (a): 10 N·m (1.0 kgf-m,
7.0 lbf-ft)
• Install the oil jets (for transmission (2) and oil spray
(3)).
• Install the oil jets (for generator (4)) onto the upper
crankcase and tighten it to the specified torque.
Tightening torque
Oil jet (For generator) (b): 5 N·m (0.5 kgf-m, 3.5
lbf-ft)
Transmission
• Install the transmission. Refer to “Transmission
Installation in Section 5B (Page 5B-4)”.
1
“A”
I823H1140209-01
(a)
I823H1140210-04
2 3
I823H1140211-01
4 (b)
I823H1140212-02
I823H1140305-01