SlideShare a Scribd company logo
1 of 58
Download to read offline
ARTICLE BEGINNING
STEERING SYSTEM
PRECAUTION
Care must be taken to replace parts properly because they could affect the performance of the
steering system and result in a driving hazard.
The PRIUS is equipped with SRS (Supplemental Restraint System) such as the driver AIRBAG and
passenger AIRBAG. Failure to carry out service operation in the correct sequence could cause the
SRS to unexpectedly deploy during servicing, possibly leading to a serious accident. Before servicing
(including removal or installation of parts, inspection or replacement), be sure to read the
precautionary notices in the AIR BAG RESTRAINT SYSTEMS article.
TROUBLESHOOTING
PROBLEM SYMPTOMS TABLE
Use the table below to help you find the cause of the problem. The numbers indicate the priority of the likely
cause of the problem. Check each part in the order shown. If necessary, repair or replace these parts.
PROBLEM SYMPTOMS
Symptom/Suspect Area See
Hard Steering
Tires (Improperly Inflated) Check Tire Pressure
Front Wheel Alignment (Incorrect) SPECIFICATIONS &
PROCEDURES
Steering System Joints (Worn) Check Steering System Joints
Suspension Arm Ball Joints (Worn) BALL JOINT
INSPECTION
Steering Column (Binding) Check Steering Column
Electric Power Steering Gear ELECTRIC POWER
STEERING GEAR
Poor Return
Tires (Improperly Inflated) Check Tire Pressure
Front Wheel Alignment (Incorrect) SPECIFICATIONS &
PROCEDURES
Steering Column (Binding) Check Steering Column
Electric Power Steering Gear ELECTRIC POWER
STEERING GEAR
Excessive Play
Steering System Joints (Worn) Check Steering System Joints
Suspension Arm Ball Joints (Worn) BALL JOINT
INSPECTION
Intermediate Shaft, Sliding Yoke (Worn) Check Intermediate Shaft,
Sliding Yoke
Front Wheel Bearing (Worn) WHEEL BEARING
INSPECTION
Electric Power Steering Gear ELECTRIC POWER
STEERING GEAR
Página 1 de 58STEERING SYSTEM -2002 Toyota Prius
27/02/2013http://ondemand5.com/mric/common/asp/printart.aspx
STEERING WHEEL
INSPECTION
Step 1 - Check Steering Wheel Freeplay
a. Stop the vehicle and face the tires straight ahead.
b. Rock the steering wheel gently up and down with a finger lightly, check the steering wheel freeplay.
Fig. 1: Checking Steering Wheel Free Play
Courtesy of TOYOTA MOTOR SALES, U.S.A., INC.
Maximum freeplay: 30 mm (1.18 in.) .
Abnormal Noise
Steering System Joints (Worn) Check Steering System Joints
Electric Power Steering Gear ELECTRIC POWER
STEERING GEAR
NOTE: When the problem occurs on the electric motor power steering system, refer to
ELECTRIC MOTOR POWER STEERING .
Página 2 de 58STEERING SYSTEM -2002 Toyota Prius
27/02/2013http://ondemand5.com/mric/common/asp/printart.aspx
Step 2 - Check Steering Effort
a. Center the steering wheel.
b. Remove the steering wheel pad. See STEP 1 - REMOVE STEERING WHEEL PAD .
c. Start the engine and run it at idle.
Fig. 2: Determining Steering Wheel Effort
Courtesy of TOYOTA MOTOR SALES, U.S.A., INC.
d. Measure the steering effort in both directions.
Steering effort (Reference): 6.5 N.m (65 kgf.cm, 58 in.lbf).
NOTE: Take the tire type, pressure and contact surface into consideration before
making your diagnosis.
Página 3 de 58STEERING SYSTEM -2002 Toyota Prius
27/02/2013http://ondemand5.com/mric/common/asp/printart.aspx
e. Install the steering wheel set nut.
Torque: 50 N.m (510 kgf.cm, 37 ft.lbf)
f. Install the steering wheel pad. See Step 18 - Install Steering Wheel Pad .
REPAIR PROCEDURES
Step 1 - Inspect Steering Wheel Off Center
a. Apply masking tape on the top center of the steering wheel and steering column upper cover.
NOTE: This is the repair procedure for steering off center.
Página 4 de 58STEERING SYSTEM -2002 Toyota Prius
27/02/2013http://ondemand5.com/mric/common/asp/printart.aspx
Fig. 3: Identifying Masking Tape Applications Points
Courtesy of TOYOTA MOTOR SALES, U.S.A., INC.
b. Drive the vehicle in a straight line for 100 meters at a constant speed of 35 mph (56 km/h), and hold the
steering wheel to maintain the course.
c. Draw a line on the masking tape as shown in Fig. 4 .
Fig. 4: Marking Applied Masking Tape
Courtesy of TOYOTA MOTOR SALES, U.S.A., INC.
d. Turn the steering wheel to its straight position.
NOTE: Refer to the upper surface of the steering wheel, steering spoke and SRS
AIRBAG line for the straight position.
Página 5 de 58STEERING SYSTEM -2002 Toyota Prius
27/02/2013http://ondemand5.com/mric/common/asp/printart.aspx
e. Draw a new line on the masking tape of the steering wheel as shown in Fig. 5 .
Fig. 5: Marking Angular Calculation Line
Courtesy of TOYOTA MOTOR SALES, U.S.A., INC.
f. Measure the distance between the 2 lines on the masking tape of the steering wheel.
g. Convert the measured distance to steering angle.
Measured distance 1 mm (0.04 in.) = Steering angle approximately 1 deg.
NOTE: Make a record of the steering angle.
Página 6 de 58STEERING SYSTEM -2002 Toyota Prius
27/02/2013http://ondemand5.com/mric/common/asp/printart.aspx
Step 2 - Adjust Steering Angle
a. Draw a line on the RH and LH tie rod and rack ends where it can easily be seen.
Fig. 6: Marking & Measuring Tie Rod Ends
Courtesy of TOYOTA MOTOR SALES, U.S.A., INC.
b. Using a paper gauge, measure the distance from RH and LH tie rod ends to the rack end screws.
c. Remove the RH and LH boot clips from the rack boots.
NOTE: Measure the RH side and LH side.
Make a note of the measured values.
Página 7 de 58STEERING SYSTEM -2002 Toyota Prius
27/02/2013http://ondemand5.com/mric/common/asp/printart.aspx
Fig. 7: Identifying Boot Clips & Tie Rod End Lock Nuts
Courtesy of TOYOTA MOTOR SALES, U.S.A., INC.
d. Loosen the RH and LH lock nuts.
e. Turn the RH and LH rack end by the same amount (but in different directions) according to the steering
angle.
1 turn 360 deg. of rack end (1.5 mm (0.059 in.) horizontal movement) = 12 deg. of steering angle
f. Tighten the RH and LH lock nuts.
Torque: 56 N.m (570 kgf.cm, 41 ft.lbf)
g. Install the RH and LH boot clips.
TILT STEERING COLUMN
COMPONENTS
NOTE: Make sure that the difference in length between RH and LH tie rod ends and
rack end screws are within 1.5 mm (0.059 in.).
Página 8 de 58STEERING SYSTEM -2002 Toyota Prius
27/02/2013http://ondemand5.com/mric/common/asp/printart.aspx
Fig. 8: Identifying Tilt Steering Column Related Components
Courtesy of TOYOTA MOTOR SALES, U.S.A., INC.
Página 9 de 58STEERING SYSTEM -2002 Toyota Prius
27/02/2013http://ondemand5.com/mric/common/asp/printart.aspx
Fig. 9: Exploded View Tilt Steering Column
Courtesy of TOYOTA MOTOR SALES, U.S.A., INC.
REMOVAL
Step 1 - Remove Steering Wheel Pad
Página 10 de 58STEERING SYSTEM -2002 Toyota Prius
27/02/2013http://ondemand5.com/mric/common/asp/printart.aspx
a. Place the front wheels facing straight ahead.
b. Using a Torx socket wrench, loosen the 2 Torx screws until the groove along the screw circumference
catches on the screw case.
Fig. 10: Locating Steering Pad Torx Screws
Courtesy of TOYOTA MOTOR SALES, U.S.A., INC.
c. Pull out the wheel pad from the steering wheel and disconnect the AIRBAG connector.
NOTE: If the AIRBAG connector is disconnected with the ignition switch at ON, DTCs will
be recorded.
Página 11 de 58STEERING SYSTEM -2002 Toyota Prius
27/02/2013http://ondemand5.com/mric/common/asp/printart.aspx
Fig. 11: Locating Air Bag Connector & Identifying Safe Air Bag Handling Procedures
Courtesy of TOYOTA MOTOR SALES, U.S.A., INC.
Página 12 de 58STEERING SYSTEM -2002 Toyota Prius
27/02/2013http://ondemand5.com/mric/common/asp/printart.aspx
d. Disconnect the connector.
Step 2 - Remove Steering Wheel
a. Remove the steering wheel set nut.
b. Place matchmarks on the steering wheel and main shaft assembly.
Fig. 12: Matchmarking Steering Wheel & Main Shaft
Courtesy of TOYOTA MOTOR SALES, U.S.A., INC.
c. Using SST, remove the steering wheel.
SST 09950-50013 (09951-05010, 09952-05010, 09953-05020, 09954-05021).
Step 3 - Remove Lower Instrument Finish Panel
a. Remove the 2 screws and disconnect hood lock release lever.
WARNING: When storing the wheel pad, keep the upper surface of the pad
facing upward.
Never disassemble the wheel pad.
NOTE: When removing the wheel pad, take care not to pull the AIRBAG wire
harness.
Página 13 de 58STEERING SYSTEM -2002 Toyota Prius
27/02/2013http://ondemand5.com/mric/common/asp/printart.aspx
b. Remove the screw and bolt.
c. Disconnect the connectors and DLC3, and remove the lower instrument finish panel.
Step 4 - Remove Upper & Lower Column Covers
a. Remove the 3 screws and lower column cover.
b. Remove the screw and upper column cover.
Step 5 - Remove Combination Switch With Spiral Cable
a. Disconnect the connectors.
b. Disconnect the AIRBAG connector.
c. Remove the 3 screws and combination switch with spiral cable.
Step 6 - Remove Spiral Cable
See COMPONENTS .
Step 7 - Disconnect Transmission Control Cable
Fig. 13: Identifying Transmission Control Cable Mounting Bolt & Clip
NOTE: Do not disassemble the spiral cable or apply oil to it.
Página 14 de 58STEERING SYSTEM -2002 Toyota Prius
27/02/2013http://ondemand5.com/mric/common/asp/printart.aspx
Courtesy of TOYOTA MOTOR SALES, U.S.A., INC.
Step 8 - Remove Shift Lever Assembly
See STEP 6 - REMOVE SHIFT LEVER ASSEMBLY .
Step 9 - Disconnect Column Hole Cover
Remove the 3 clips and disconnect the column hole cover.
Step 10 - Remove Shift Lock Computer Sub-Assembly
Remove the screw and shift lock computer sub-assembly.
Step 11 - Disconnect No. 2 Intermediate Shaft Assembly
a. Place matchmarks on the No. 2 intermediate shaft assembly and control valve shaft.
Fig. 14: Locating No. 2 Intermediate Shaft Matchmarks & Identifying Bolts A & B
Courtesy of TOYOTA MOTOR SALES, U.S.A., INC.
b. Loosen the bolt "A" and remove the bolt "B", then disconnect the No. 2 intermediate shaft assembly from
the control valve shaft.
Página 15 de 58STEERING SYSTEM -2002 Toyota Prius
27/02/2013http://ondemand5.com/mric/common/asp/printart.aspx
Step 12 - Remove Instrument Finish Panel
Remove the 3 screws and instrument finish panel.
Step 13 - Remove Steering Column Assembly
a. Disconnect the connectors.
b. Remove the 2 bolts, 2 nuts and steering column assembly.
Step 14 - Remove No. 2 Intermediate Shaft Assembly
Remove the bolt and No. 2 intermediate shaft assembly from the sliding yoke.
Step 15 - Remove Sliding Yoke
Remove the bolt and sliding yoke from the main shaft assembly.
Step 16 - Remove Column Hole Cover
Step 17 - Remove Main Shaft Lower Dust Seal
a. Remove the 2 nuts and parking brake cable bracket.
Página 16 de 58STEERING SYSTEM -2002 Toyota Prius
27/02/2013http://ondemand5.com/mric/common/asp/printart.aspx
Fig. 15: Locating Parking Brake Cable Bracket Mounting Nuts
Courtesy of TOYOTA MOTOR SALES, U.S.A., INC.
b. Remove the 2 bolts and disconnect the accelerator pedal.
c. Remove the 3 nuts and main shaft lower dust seal.
DISASSEMBLY
1. Remove the screw and transponder key coil.
2. Remove column upper bracket and column upper clamp :
a. Using a centering punch, mark the center of the 2 tapered-head bolts.
b. Using a 3 - 4 mm (0.12 - 0.16 in.) drill, drill into the 2 bolts.
NOTE: When using a vise, do not overtighten it.
Página 17 de 58STEERING SYSTEM -2002 Toyota Prius
27/02/2013http://ondemand5.com/mric/common/asp/printart.aspx
Fig. 16: Extracting Column Upper Bracket & Clamp Bolts
Courtesy of TOYOTA MOTOR SALES, U.S.A., INC.
c. Using a screw extractor, remove the 2 bolts, column upper bracket and column upper clamp.
3. Remove tilt steering support :
a. Remove the look nut.
b. Remove the washer, steering pawl set bolt and tilt steering support.
c. Remove the 2 No. 1 tilt steering support collars.
4. Remove 2 energy absorbing plates :
a. Using pliers, remove the 2 energy absorbing clips.
Página 18 de 58STEERING SYSTEM -2002 Toyota Prius
27/02/2013http://ondemand5.com/mric/common/asp/printart.aspx
Fig. 17: Identifying Energy Absorbing Clips
Courtesy of TOYOTA MOTOR SALES, U.S.A., INC.
b. Remove the 2 energy absorbing plates, 2 energy absorbing guides, and 2 break away capsules.
5. Using a screw driver, remove the torsion spring .
Página 19 de 58STEERING SYSTEM -2002 Toyota Prius
27/02/2013http://ondemand5.com/mric/common/asp/printart.aspx
Fig. 18: Locating & Removing Torsion Spring
Courtesy of TOYOTA MOTOR SALES, U.S.A., INC.
6. Remove tilt lever and break away bracket :
NOTE: This bolt is left-handed one.
Página 20 de 58STEERING SYSTEM -2002 Toyota Prius
27/02/2013http://ondemand5.com/mric/common/asp/printart.aspx
Fig. 19: Removing Tilt Lever Lock Bolt & No. 1 Tilt Steering Support Reinforce
Courtesy of TOYOTA MOTOR SALES, U.S.A., INC.
a. Remove No. 2 tilt lever lock bolt and No. 1 tilt steering support reinforce.
NOTE: This bolt is left-handed one.
Página 21 de 58STEERING SYSTEM -2002 Toyota Prius
27/02/2013http://ondemand5.com/mric/common/asp/printart.aspx
Fig. 20: Locating & Removing Tilt Steering Adjust Nut
Courtesy of TOYOTA MOTOR SALES, U.S.A., INC.
b. Remove the tilt steering adjusting nut, tilt lever, tilt sub lever, tilt lever lock bolt and break away
bracket.
7. Remove main shaft assembly and main shaft bushing :
a. Using a snap ring expander, remove the snap ring on the upper side.
b. Using a brass bar and a hammer, tap out the main shaft assembly with the main shaft bushing.
Página 22 de 58STEERING SYSTEM -2002 Toyota Prius
27/02/2013http://ondemand5.com/mric/common/asp/printart.aspx
Fig. 21: Removing Main Shaft Assembly & Bushing
Courtesy of TOYOTA MOTOR SALES, U.S.A., INC.
c. Remove the main shaft bushing.
d. Using a snap ring expander, remove the snap ring on the lower side.
INSPECTION
1. Inspect steering lock operation :
Check that the steering lock mechanism operates properly.
Página 23 de 58STEERING SYSTEM -2002 Toyota Prius
27/02/2013http://ondemand5.com/mric/common/asp/printart.aspx
Fig. 22: Verifying Steering Lock Operation
Courtesy of TOYOTA MOTOR SALES, U.S.A., INC.
2. If necessary, replace key cylinder :
a. Place the ignition key at the ACC position.
b. Push down the stop pin with a screwdriver, and pull out the key cylinder.
Página 24 de 58STEERING SYSTEM -2002 Toyota Prius
27/02/2013http://ondemand5.com/mric/common/asp/printart.aspx
Fig. 23: Removing Key Cylinder
Courtesy of TOYOTA MOTOR SALES, U.S.A., INC.
c. Install a new key cylinder.
3. Inspect ignition switch . See STEP 1 - INSPECT IGNITION SWITCH CONTINUITY .
4. IF NECESSARY, REPLACE IGNITION SWITCH
a. Remove the 2 screws and ignition switch.
b. Install a new ignition switch with the 2 screws.
5. Inspect key unlock warning switch . See STEP 2 - INSPECT KEY UNLOCK WARNING SWITCH
CONTINUITY .
6. If necessary, replace key unlock warning switch :
a. Slide the key unlock warning switch out of the column upper bracket.
b. Slide a new key unlock warning switch in the column upper bracket.
7. Inspect key interlock solenoid . See STEP 4 - INSPECT KEY INTERLOCK SOLENOID .
8. If necessary, replace key interlock solenoid :
a. Remove the 2 screws and key interlock solenoid.
b. Install a new key interlock solenoid with the 2 screws.
9. Inspect transponder key coil . See step 1 of HYBRID VEHICLE IMMOBILIZER SYSTEM
INSPECTION .
10. If necessary, replace transponder key coil .
11. Inspect bearing :
NOTE: Make sure the key is at the ACC position.
Página 25 de 58STEERING SYSTEM -2002 Toyota Prius
27/02/2013http://ondemand5.com/mric/common/asp/printart.aspx
Check the bearing rotation condition and check for abnormal noise.
Fig. 24: Verifying Proper Bearing Condition
Courtesy of TOYOTA MOTOR SALES, U.S.A., INC.
If faulty, replace the steering column upper tube sub-assembly.
REASSEMBLY
1. Coat parts indicated by arrows with molybdenum disulfide lithium base grease . See Fig. 9 .
2. Install main shaft assembly :
a. Using a snap ring expander, install a new snap ring on the lower side.
b. Install the main shaft assembly.
c. Using a snap ring expander, install a new snap ring on the upper side.
3. Install main shaft busing :
NOTE: When using a vise, do not overtighten it.
Página 26 de 58STEERING SYSTEM -2002 Toyota Prius
27/02/2013http://ondemand5.com/mric/common/asp/printart.aspx
a. Coat a new bushing with molybdenum disulfide lithium base grease.
b. Using SST and a hammer, tap in the main shaft bushing. SST 09608-06041.
Fig. 25: Installing Main Shaft Bushing
Courtesy of TOYOTA MOTOR SALES, U.S.A., INC.
4. Install break away bracket and tilt lever :
NOTE: Align the holes in the break away bracket with the projections of the tilt
lever lock bolt and tilt sub lever.
Página 27 de 58STEERING SYSTEM -2002 Toyota Prius
27/02/2013http://ondemand5.com/mric/common/asp/printart.aspx
Fig. 26: Locating & Installing Tilt Steering Adjust Nut
Courtesy of TOYOTA MOTOR SALES, U.S.A., INC.
a. Install break away bracket, tilt lever lock bolt, tilt sub lever and tilt lever.
b. Install the tilt steering adjusting nut by rotating it counterclockwise.
Torque: 13 N.m (130 kgf.cm, 9 ft.lbf) .
NOTE: Align the No. 1 support reinforce with the nut to eliminate looseness by
turning the No. 1 support reinforce counterclockwise a little, then
torque the No. 2 tilt lever lock bolt.
Página 28 de 58STEERING SYSTEM -2002 Toyota Prius
27/02/2013http://ondemand5.com/mric/common/asp/printart.aspx
Fig. 27: Installing Tilt Lever Lock Bolt & No. 1 Tilt Steering Support Reinforce
Courtesy of TOYOTA MOTOR SALES, U.S.A., INC.
c. Install the No. 1 tilt steering support reinforce with the No. 2 tilt lever lock bolt by turning it
counterclockwise.
Torque: 5.4 N.m (55 kgf.cm, 48 in.lbf) .
5. Install torsion spring .
Página 29 de 58STEERING SYSTEM -2002 Toyota Prius
27/02/2013http://ondemand5.com/mric/common/asp/printart.aspx
Fig. 28: Identifying Torsion Spring
Courtesy of TOYOTA MOTOR SALES, U.S.A., INC.
6. Install 2 energy absorbing plates :
a. Install the 2 break away capsules, 2 energy absorbing guides and 2 energy absorbing plates.
Página 30 de 58STEERING SYSTEM -2002 Toyota Prius
27/02/2013http://ondemand5.com/mric/common/asp/printart.aspx
Fig. 29: Identifying Energy Absorbing Clip
Courtesy of TOYOTA MOTOR SALES, U.S.A., INC.
b. Install the 2 new energy absorbing clips.
7. Install tilt steering support :
a. Install the 2 No. 1 tilt steering support collars.
b. Install the tilt steering support, steering pawl set bolt, washer.
c. Install the lock nut.
Torque: 9.5 N.m (100 kgf.cm, 87 in.lbf)
8. Install column upper bracket and column upper clamp :
a. Install the column upper bracket and column upper clamp with 2 new tapered-head bolts.
b. Tighten the 2 tapered-head bolts until the bolt heads break off.
Página 31 de 58STEERING SYSTEM -2002 Toyota Prius
27/02/2013http://ondemand5.com/mric/common/asp/printart.aspx
Fig. 30: Installing Tapered-Head Bolts
Courtesy of TOYOTA MOTOR SALES, U.S.A., INC.
INSTALLATION
Step 1 - Install Main Shaft Lower Dust Seal
a. Install the main shaft lower dust seal with the 3 nuts.
Torque: 4.9 N.m (50 kgf.cm, 43 in.lbf)
b. Connect the accelerator pedal with the 2 bolts.
c. Install the parking brake cable bracket with the 2 nuts.
Página 32 de 58STEERING SYSTEM -2002 Toyota Prius
27/02/2013http://ondemand5.com/mric/common/asp/printart.aspx
Fig. 31: Locating Parking Brake Cable Bracket Mounting Nuts
Courtesy of TOYOTA MOTOR SALES, U.S.A., INC.
Step 2 - Install Column Hole Cover
Step 3 - Install Sliding Yoke
Install the sliding yoke to the main shaft assembly with the bolt.
Torque: 35 N.m (360 kgf.cm, 26 ft.lbf) .
Step 4 - Install No. 2 Intermediate Shaft Assembly
Temporarily install the No. 2 intermediate shaft assembly to the sliding yoke with the bolt.
Step 5 - Install Steering Column Assembly
a. Install the steering column assembly with the 2 bolts and 2 nuts.
Torque: 25 N.m (260 kgf.cm, 19 ft.lbf) .
b. Connect the connectors.
Página 33 de 58STEERING SYSTEM -2002 Toyota Prius
27/02/2013http://ondemand5.com/mric/common/asp/printart.aspx
Step 6 - Install Instrument Finish Panel
Install the instrument finish panel with the 3 screws.
Step 7 - Connect No. 2 Intermediate Shaft Assembly
a. Align the matchmarks on the No. 2 intermediate shaft assembly and control valve shaft.
Fig. 32: Locating No. 2 Intermediate Shaft Matchmarks & Identifying Bols A & B
Courtesy of TOYOTA MOTOR SALES, U.S.A., INC.
b. Install the bolt "B" and torque the bolt "A".
Torque: 35 N.m (360 kgf.cm, 26 ft.lbf) .
Step 8 - Install Shift Lock Computer Sub-Assembly
Install the shift lock computer sub-assembly with the screw.
Step 9 - Connect Column Hole Cover
Connect the column hole cover with the 3 clips.
Página 34 de 58STEERING SYSTEM -2002 Toyota Prius
27/02/2013http://ondemand5.com/mric/common/asp/printart.aspx
Step 10 - Install Shift Lever Assembly
See STEP 1 - INSTALL SHIFT LEVER ASSEMBLY .
Step 11 - Connect Transmission Control Cable
Fig. 33: Identifying Transmission Control Cable Mounting Bolt & Clip
Courtesy of TOYOTA MOTOR SALES, U.S.A., INC.
Step 12 - Install Spiral Cable
See COMPONENTS .
Step 13 - Install Combination Switch With Spiral Cable
a. Install the combination switch with spiral cable with the 3 screws.
b. Connect the AIRBAG connector.
c. Connect the connectors.
Step 14 - Install Upper & Lower Column Covers
a. Install the upper column cover with the screw.
b. Install the lower column cover with the 3 screws.
Página 35 de 58STEERING SYSTEM -2002 Toyota Prius
27/02/2013http://ondemand5.com/mric/common/asp/printart.aspx
Step 15 - Install Lower Instrument Finish Panel
a. Connect the connectors and DLC3 and install the lower instrument finish panel.
b. Install the screw and bolt.
c. Connect the hood lock release lever with the 2 screws.
Step 16 - Center Spiral Cable
a. Check that the front wheels are facing straight ahead.
b. Turn the cable counterclockwise by hand until it becomes harder to turn.
c. Then rotate the cable clockwise about 2.5 turns to align the marks.
Fig. 34: Locating Spiral Cable To Steering Column Alignment Marks
Courtesy of TOYOTA MOTOR SALES, U.S.A., INC.
Step 17 - Install Steering Wheel
a. Align the matchmarks on the steering wheel and main shaft assembly.
NOTE: The cable will rotate about 2.5 turns to either left or right of the center.
Página 36 de 58STEERING SYSTEM -2002 Toyota Prius
27/02/2013http://ondemand5.com/mric/common/asp/printart.aspx
b. Install the steering wheel set nut.
Torque: 50 N.m (510 kgf.cm, 37 ft.lbf)
Step 18 - Install Steering Wheel Pad
a. Connect the connector.
b. Connect the AIRBAG connector.
c. Install the steering wheel pad after confirming that the circumference groove of the Torx screws is caught
on the screw case.
d. Using a Torx socket wrench, torque the 2 screws.
Fig. 35: Locating Steering Pad Torx Screws
Courtesy of TOYOTA MOTOR SALES, U.S.A., INC.
Torque: 8.8 N.m (90 kgf.cm, 78 in.lbf) .
NOTE: Never use AIRBAG parts from another vehicle. When replacing parts,
replace with new ones.
Make sure the wheel pad is installed with the specified torque.
If the wheel pad has been dropped, or there are cracks, dents or other
defects in the case or connector, replace the wheel pad with a new one.
When installing the wheel pad, take care that the wirings do not interfere
with other parts and that they are not pinched between other parts.
Página 37 de 58STEERING SYSTEM -2002 Toyota Prius
27/02/2013http://ondemand5.com/mric/common/asp/printart.aspx
Step 19 - Check Steering Wheel Center Point
Step 20 - Perform Calibration Of Torque Sensor Zero Point
See STEP 3 - CALIBRATION OF TORQUE SENSOR ZERO POINT under PRE-CHECK .
ELECTRIC POWER STEERING GEAR
COMPONENTS
Página 38 de 58STEERING SYSTEM -2002 Toyota Prius
27/02/2013http://ondemand5.com/mric/common/asp/printart.aspx
Fig. 36: Locating Electric Power Steering Gear Related Components
Courtesy of TOYOTA MOTOR SALES, U.S.A., INC.
Fig. 37: Exploded View Of Steering Gear Assembly
Página 39 de 58STEERING SYSTEM -2002 Toyota Prius
27/02/2013http://ondemand5.com/mric/common/asp/printart.aspx
Courtesy of TOYOTA MOTOR SALES, U.S.A., INC.
REMOVAL
Step 1 - Place Front Wheels Facing Straight Ahead
Step 2 - Remove steering wheel pad
See STEP 1 - REMOVE STEERING WHEEL PAD .
Step 3 - Remove Steering Wheel
See STEP 2 - REMOVE STEERING WHEEL .
Step 4 - Remove RH & LH Engine Under Covers
Step 5 - Disconnect Tie Rod Ends
Disconnect RH AND LH TIE ROD ENDS .
Step 6 - Disconnect Stabilizer Bar
See STABILIZER BAR .
Step 7 - Disconnect Lower Suspension Arm From Lower Ball Joint
See BALL JOINTS .
Step 8 - Disconnect 2 Connectors & EMPS Bracket
a. Disconnect the 2 connectors.
b. Disconnect the 2 clamps.
c. Remove the bolt and disconnect the earth wire.
Tips Click a link to view tip
Tech1 Tip: 2002 toyota prius "ps light on info center
NOTE: Remove the steering wheel assembly before the steering gear removal, because
there is possibility of breaking of the spiral cable.
Página 40 de 58STEERING SYSTEM -2002 Toyota Prius
27/02/2013http://ondemand5.com/mric/common/asp/printart.aspx
Fig. 38: Locating EMPS Bracket Mounting Bolts & Ground Wire
Courtesy of TOYOTA MOTOR SALES, U.S.A., INC.
d. Remove the 2 bolts and EMPS bracket.
Step 9 - Disconnect No. 2 Intermediate Shaft Assembly
a. Place the matchmarks on the No. 2 intermediate shaft assembly and control valve shaft.
b. Loosen the bolt "A" and remove the bolt "B" then disconnect the No. 2 intermediate shaft assembly from
the control valve shaft.
Página 41 de 58STEERING SYSTEM -2002 Toyota Prius
27/02/2013http://ondemand5.com/mric/common/asp/printart.aspx
Fig. 39: Locating No. 2 Intermediate Shaft Matchmarks & Identifying Bols A & B
Courtesy of TOYOTA MOTOR SALES, U.S.A., INC.
Step 10 - Disconnect Torque Rod
Disconnect TORQUE ROD
Step 11 - Remove Suspension Member & Electric Power Steering Gear Assembly
Remove SUSPENSION MEMBER AND ELECTRIC POWER STEERING GEAR ASSEMBLY
Step 12 - Remove Electric Power Steering Gear Assembly
a. Remove the stabilizer bar. See STABILIZER BAR .
b. Remove the 4 bolts and electric power steering gear assembly from the front suspension member.
NOTE: For torque rod location, see Fig. 36 .
NOTE: For suspension member location, see Fig. 36 .
Página 42 de 58STEERING SYSTEM -2002 Toyota Prius
27/02/2013http://ondemand5.com/mric/common/asp/printart.aspx
Fig. 40: Locating Electric Power Steering Gear To Suspension Member Mounting Bolts
Courtesy of TOYOTA MOTOR SALES, U.S.A., INC.
c. Remove the bracket and grommet from the electric power steering gear assembly.
DISASSEMBLY
1. Using SST, secure the electric power steering gear assembly in a vise. SST 09612-00012.
NOTE: When using a vise, do not overtighten it.
Página 43 de 58STEERING SYSTEM -2002 Toyota Prius
27/02/2013http://ondemand5.com/mric/common/asp/printart.aspx
Fig. 41: Identifying SST 09612-00012
Courtesy of TOYOTA MOTOR SALES, U.S.A., INC.
2. Remove RH and LH tie rod ends and lock nuts :
a. Place matchmarks on the tie rod end, lock nut and rock end.
Página 44 de 58STEERING SYSTEM -2002 Toyota Prius
27/02/2013http://ondemand5.com/mric/common/asp/printart.aspx
Fig. 42: Identifying Tie Rod Ends Matchmarks
Courtesy of TOYOTA MOTOR SALES, U.S.A., INC.
b. Loosen the lock nut and remove the tie rod end and lock nut.
c. Employ the same manner described above to the other side.
3. Remove RH and LH clamps, clips and rack boots :
a. Remove the clamp, clip and rack boot.
Mark the RH and LH rack boots.
b. Employ the same manner described above to the other side.
4. REMOVE RH AND LH RACK ENDS CLAW WASHERS
CAUTION: Be careful not to damage the boot.
NOTE: Avoid any impact on the steering rack.
Página 45 de 58STEERING SYSTEM -2002 Toyota Prius
27/02/2013http://ondemand5.com/mric/common/asp/printart.aspx
Fig. 43: Unstaking Claw Washer
Courtesy of TOYOTA MOTOR SALES, U.S.A., INC.
a. Using a screwdriver and a hammer, unstake the washer.
NOTE: Use SST 09922 - 10010 in the direction shown in Fig. 44 .
Mark the RH and LH rack ends.
Página 46 de 58STEERING SYSTEM -2002 Toyota Prius
27/02/2013http://ondemand5.com/mric/common/asp/printart.aspx
Fig. 44: Removing Rack End
Courtesy of TOYOTA MOTOR SALES, U.S.A., INC.
b. Using a spanner, hold the steering rack steadily and using SST, remove the rack end. SST 09922 -
10010.
c. Remove the claw washer.
d. Employ the same manner described above to the other side.
5. Remove the bolt and earth wire.
REASSEMBLY
1. Install the earth wire with the bolt.
Torque: 5.5 N.m (60 kgf.cm, 52 in.lbf)
2. Install RH and LH claw washers and rack ends :
NOTE: When using a vise, do not overtighten it.
NOTE: Align the claws of the claw washer with the steering rack grooves.
Página 47 de 58STEERING SYSTEM -2002 Toyota Prius
27/02/2013http://ondemand5.com/mric/common/asp/printart.aspx
Fig. 45: Installing Claw Washer & Rack End
Courtesy of TOYOTA MOTOR SALES, U.S.A., INC.
a. Install a new claw washer and temporarily install the rack end.
NOTE: Use a torque wrench with a fulcrum length of 380 mm (14.96 in.).
Use SST 09922 - 10010 in the direction shown in Fig. 46 .
Página 48 de 58STEERING SYSTEM -2002 Toyota Prius
27/02/2013http://ondemand5.com/mric/common/asp/printart.aspx
Fig. 46: Torquing Rack End
Courtesy of TOYOTA MOTOR SALES, U.S.A., INC.
b. Using a spanner, hold the steering rack steadily and using SST, torque the rack end. SST 09922 -
10010.
Torque: 62 N.m (630 kgf.cm, 46 ft.lbf) .
CAUTION: Avoid any impact on the steering rack.
Página 49 de 58STEERING SYSTEM -2002 Toyota Prius
27/02/2013http://ondemand5.com/mric/common/asp/printart.aspx
Fig. 47: Staking Claw Washer
Courtesy of TOYOTA MOTOR SALES, U.S.A., INC.
c. Using a brass bar and a hammer, stake the claw washer.
d. Employ the same manner described above to the other side.
3. Install RH and LH rack boots, clips and clamps :
a. Ensure that the steering rack hole is not clogged with grease.
b. Install the boot, clip and clamp.
c. Employ the same manner described above to the other side.
4. Install RH and LH tie rod ends and lock nut :
a. Screw the lock nut and tie rod end onto the rack end and the matchmarks aligned.
CAUTION: If the hole is clogged, the pressure inside the boot will change
after it is assembled and the steering wheel is turned.
CAUTION: Be careful not to damage or twist the boot.
Página 50 de 58STEERING SYSTEM -2002 Toyota Prius
27/02/2013http://ondemand5.com/mric/common/asp/printart.aspx
Fig. 48: Identifying Tie Rod Ends Matchmarks
Courtesy of TOYOTA MOTOR SALES, U.S.A., INC.
b. After adjusting toe-in, torque the nut. See SPECIFICATIONS & PROCEDURES .
c. Employ the same manner described above to the other side.
INSTALLATION
Step 1 - Install Electric Power Steering Gear Assembly
NOTE: Install the bracket with the inscribed mark facing to the front of the vehicle.
Página 51 de 58STEERING SYSTEM -2002 Toyota Prius
27/02/2013http://ondemand5.com/mric/common/asp/printart.aspx
Fig. 49: Identifying Inscribed Mark & Installation Direction Of Bracket
Courtesy of TOYOTA MOTOR SALES, U.S.A., INC.
Página 52 de 58STEERING SYSTEM -2002 Toyota Prius
27/02/2013http://ondemand5.com/mric/common/asp/printart.aspx
Fig. 50: Locating Electric Power Steering Gear To Suspension Member Mounting Bolts
Courtesy of TOYOTA MOTOR SALES, U.S.A., INC.
a. Install the grommet and bracket to the electric power steering gear assembly.
b. Install the electric power steering gear assembly with the 4 new bolts to the front suspension member.
Torque: 83 N.m (850 kgf.cm, 61 ft.lbf)
c. Install the STABILIZER BAR .
d. To prevent the main shaft lower dust seal from damaging, wind vinyl tape on the serrated part of the control
valve shaft.
Página 53 de 58STEERING SYSTEM -2002 Toyota Prius
27/02/2013http://ondemand5.com/mric/common/asp/printart.aspx
Fig. 51: Identifying Control Valve Shaft Serrations
Courtesy of TOYOTA MOTOR SALES, U.S.A., INC.
e. Turn over the main shaft lower dust seal from the engine compartment side to the cab.
Página 54 de 58STEERING SYSTEM -2002 Toyota Prius
27/02/2013http://ondemand5.com/mric/common/asp/printart.aspx
Fig. 52: Determining Engine Compartment & Cab Side Of Main Shaft Lower Seal
Courtesy of TOYOTA MOTOR SALES, U.S.A., INC.
Step 2 - Install Suspension Member & Electric Power Steering Gear Assembly
Install SUSPENSION MEMBER AND ELECTRIC POWER STEERING GEAR ASSEMBLY .
Step 3 - Connect Torque Rod
Connect TORQUE ROD .
Step 4 - Connect EMPS Bracket & 2 Connectors
a. Connect the EMPS bracket with the 2 bolts.
NOTE: For torque rod location, see Fig. 36 .
Página 55 de 58STEERING SYSTEM -2002 Toyota Prius
27/02/2013http://ondemand5.com/mric/common/asp/printart.aspx
Fig. 53: Locating EMPS Bracket Mounting Bolts & Ground Wire
Courtesy of TOYOTA MOTOR SALES, U.S.A., INC.
Torque: 5.5 N.m (60 kgf.cm, 52 in.lbf)
b. Connect the earth wire with the bolt.
Torque: 5.5 N.m (60 kgf.cm, 52 in.lbf)
c. Connect the 2 clamps.
d. Connect the 2 connectors.
Step 5 - Connect Lower Suspension Arm To Lower Ball Joint
See BALL JOINTS .
Step 6 - Connect Stabilizer Bar
See STABILIZER BAR .
Step 7 - Connect No. 2 Intermediate Shaft Assembly
Página 56 de 58STEERING SYSTEM -2002 Toyota Prius
27/02/2013http://ondemand5.com/mric/common/asp/printart.aspx
a. Put the dust seal back to the engine compartment side.
b. Remove the vinyl tape from the serrated part of the control valve shaft.
c. Align the matchmarks on the No. 2 intermediate shaft assembly and control valve shaft.
d. Install the bolt "B" and torque the bolt "A".
Fig. 54: Locating No. 2 Intermediate Shaft Matchmarks & Identifying Bols A & B
Courtesy of TOYOTA MOTOR SALES, U.S.A., INC.
Torque: 35 N.m (360 kgf.cm, 22 ft.lbf)
Step 8 - Connect Tie Rod Ends
Connect RH AND LH TIE ROD ENDS .
Step 9 - Place Front Wheels Facing Straight Ahead
Step 10 - Center Spiral Cable
See STEP 16 - CENTER SPIRAL CABLE .
Step 11 - Install Steering Wheel
NOTE: Do it with the front of the vehicle jacked up.
Página 57 de 58STEERING SYSTEM -2002 Toyota Prius
27/02/2013http://ondemand5.com/mric/common/asp/printart.aspx
a. Align the matchmarks on the steering wheel and steering column main shaft.
b. Temporarily tighten the steering wheel set nut.
Step 12 - Check Steering Wheel Center Point
Step 13 - Torque Steering Wheel Set Nut
Torque: 50 N.m (510 kgf.cm, 37 ft.lbf) .
Step 14 - Install Steering Wheel Pad
See STEP 18 - INSTALL STEERING WHEEL PAD .
Step 15 - Check Front Wheel Alignment
Step 16 - Perform Calibration Of Torque Sensor Zero Point
See STEP 3 - CALIBRATION OF TORQUE SENSOR ZERO POINT under PRE-CHECK .
© 2008 Mitchell Repair Information Co., LLC.
Página 58 de 58STEERING SYSTEM -2002 Toyota Prius
27/02/2013http://ondemand5.com/mric/common/asp/printart.aspx

More Related Content

What's hot

Air springs of indian railway coaches
Air springs of indian railway coachesAir springs of indian railway coaches
Air springs of indian railway coachesSrinivasaRao Guduru
 
Bosch catálogo diesel injeção eletronico 2016
Bosch catálogo diesel injeção eletronico 2016Bosch catálogo diesel injeção eletronico 2016
Bosch catálogo diesel injeção eletronico 2016LEODECIO BELO OLIVEIRA
 
Manual de serviço cb450 cabecote
Manual de serviço cb450 cabecoteManual de serviço cb450 cabecote
Manual de serviço cb450 cabecoteThiago Huari
 
CONOCIMIENTOS BASICO LLANTAS
CONOCIMIENTOS BASICO LLANTASCONOCIMIENTOS BASICO LLANTAS
CONOCIMIENTOS BASICO LLANTASreptell
 
Mantenimiento carroceria
Mantenimiento carroceriaMantenimiento carroceria
Mantenimiento carroceriaMargarita Nilo
 
Limited slip differential
Limited slip differentialLimited slip differential
Limited slip differentialSanket Kulkarni
 
PERFORMANCE EVALUATION OF LEANING REVERSE TRIKE
PERFORMANCE EVALUATION OF LEANING REVERSE TRIKEPERFORMANCE EVALUATION OF LEANING REVERSE TRIKE
PERFORMANCE EVALUATION OF LEANING REVERSE TRIKEJournal For Research
 
Manual do propietário cg125 fan job ks (2006) d2203-man-0471
Manual do propietário cg125 fan job ks (2006)   d2203-man-0471Manual do propietário cg125 fan job ks (2006)   d2203-man-0471
Manual do propietário cg125 fan job ks (2006) d2203-man-0471Thiago Huari
 
Steering system ppt
Steering system pptSteering system ppt
Steering system pptVishu Sharma
 
Hydraulic Braking System
Hydraulic Braking SystemHydraulic Braking System
Hydraulic Braking SystemShubham Thakur
 
012 Clutches & Bands
012 Clutches & Bands012 Clutches & Bands
012 Clutches & BandsRob Holt
 
Automobile Engineering.ppt
Automobile Engineering.pptAutomobile Engineering.ppt
Automobile Engineering.pptshohrabalam3
 

What's hot (20)

manual basico
manual basicomanual basico
manual basico
 
Tabela de torque
Tabela de torqueTabela de torque
Tabela de torque
 
Air springs of indian railway coaches
Air springs of indian railway coachesAir springs of indian railway coaches
Air springs of indian railway coaches
 
Bosch catálogo diesel injeção eletronico 2016
Bosch catálogo diesel injeção eletronico 2016Bosch catálogo diesel injeção eletronico 2016
Bosch catálogo diesel injeção eletronico 2016
 
Suspension system of an Automobile
Suspension system of an AutomobileSuspension system of an Automobile
Suspension system of an Automobile
 
Manual de serviço cb450 cabecote
Manual de serviço cb450 cabecoteManual de serviço cb450 cabecote
Manual de serviço cb450 cabecote
 
CONOCIMIENTOS BASICO LLANTAS
CONOCIMIENTOS BASICO LLANTASCONOCIMIENTOS BASICO LLANTAS
CONOCIMIENTOS BASICO LLANTAS
 
Mantenimiento carroceria
Mantenimiento carroceriaMantenimiento carroceria
Mantenimiento carroceria
 
06 elementos del motor yonatan smith
06 elementos del motor yonatan smith06 elementos del motor yonatan smith
06 elementos del motor yonatan smith
 
Chap21
Chap21Chap21
Chap21
 
Alignment for car
Alignment for carAlignment for car
Alignment for car
 
Limited slip differential
Limited slip differentialLimited slip differential
Limited slip differential
 
Propeller shaft
Propeller shaftPropeller shaft
Propeller shaft
 
PERFORMANCE EVALUATION OF LEANING REVERSE TRIKE
PERFORMANCE EVALUATION OF LEANING REVERSE TRIKEPERFORMANCE EVALUATION OF LEANING REVERSE TRIKE
PERFORMANCE EVALUATION OF LEANING REVERSE TRIKE
 
Manual do propietário cg125 fan job ks (2006) d2203-man-0471
Manual do propietário cg125 fan job ks (2006)   d2203-man-0471Manual do propietário cg125 fan job ks (2006)   d2203-man-0471
Manual do propietário cg125 fan job ks (2006) d2203-man-0471
 
Brochure_BIW
Brochure_BIWBrochure_BIW
Brochure_BIW
 
Steering system ppt
Steering system pptSteering system ppt
Steering system ppt
 
Hydraulic Braking System
Hydraulic Braking SystemHydraulic Braking System
Hydraulic Braking System
 
012 Clutches & Bands
012 Clutches & Bands012 Clutches & Bands
012 Clutches & Bands
 
Automobile Engineering.ppt
Automobile Engineering.pptAutomobile Engineering.ppt
Automobile Engineering.ppt
 

Similar to Prius Steering System Troubleshooting Guide

2006 toyota sequoia service repair manual
2006 toyota sequoia service repair manual2006 toyota sequoia service repair manual
2006 toyota sequoia service repair manualfhsejkdkmen
 
2002 toyota sequoia service repair manual
2002 toyota sequoia service repair manual2002 toyota sequoia service repair manual
2002 toyota sequoia service repair manualfjjfyjsekdmme
 
1997 toyota avalon service repair manual
1997 toyota avalon service repair manual1997 toyota avalon service repair manual
1997 toyota avalon service repair manualfujjsekfkksekm
 
1998 toyota avalon service repair manual
1998 toyota avalon service repair manual1998 toyota avalon service repair manual
1998 toyota avalon service repair manualfujsejfkskemem
 
1998 toyota avalon service repair manual
1998 toyota avalon service repair manual1998 toyota avalon service repair manual
1998 toyota avalon service repair manualfujjsefkksemmm
 
Caterpillar cat 140 h motor grader (prefix 5hm) service repair manual (5hm000...
Caterpillar cat 140 h motor grader (prefix 5hm) service repair manual (5hm000...Caterpillar cat 140 h motor grader (prefix 5hm) service repair manual (5hm000...
Caterpillar cat 140 h motor grader (prefix 5hm) service repair manual (5hm000...udjjfkkskemm
 
Caterpillar cat 160 h motor grader (prefix 3gm) service repair manual (3gm000...
Caterpillar cat 160 h motor grader (prefix 3gm) service repair manual (3gm000...Caterpillar cat 160 h motor grader (prefix 3gm) service repair manual (3gm000...
Caterpillar cat 160 h motor grader (prefix 3gm) service repair manual (3gm000...jfjkskemem
 
Caterpillar cat 140 h motor grader (prefix 5hm) service repair manual (5hm000...
Caterpillar cat 140 h motor grader (prefix 5hm) service repair manual (5hm000...Caterpillar cat 140 h motor grader (prefix 5hm) service repair manual (5hm000...
Caterpillar cat 140 h motor grader (prefix 5hm) service repair manual (5hm000...fusefjskekkmem
 
Caterpillar cat 140 h motor grader (prefix 5hm) service repair manual (5hm000...
Caterpillar cat 140 h motor grader (prefix 5hm) service repair manual (5hm000...Caterpillar cat 140 h motor grader (prefix 5hm) service repair manual (5hm000...
Caterpillar cat 140 h motor grader (prefix 5hm) service repair manual (5hm000...fjjskekdmmme
 
Caterpillar cat 140 h motor grader (prefix 5hm) service repair manual (5hm000...
Caterpillar cat 140 h motor grader (prefix 5hm) service repair manual (5hm000...Caterpillar cat 140 h motor grader (prefix 5hm) service repair manual (5hm000...
Caterpillar cat 140 h motor grader (prefix 5hm) service repair manual (5hm000...fjjskekertsmemm
 
Caterpillar cat 140 h motor grader (prefix 5hm) service repair manual (5hm000...
Caterpillar cat 140 h motor grader (prefix 5hm) service repair manual (5hm000...Caterpillar cat 140 h motor grader (prefix 5hm) service repair manual (5hm000...
Caterpillar cat 140 h motor grader (prefix 5hm) service repair manual (5hm000...fjkskekxsdcmdmme
 
Caterpillar cat 140 h motor grader (prefix 5hm) service repair manual (5hm000...
Caterpillar cat 140 h motor grader (prefix 5hm) service repair manual (5hm000...Caterpillar cat 140 h motor grader (prefix 5hm) service repair manual (5hm000...
Caterpillar cat 140 h motor grader (prefix 5hm) service repair manual (5hm000...fujsjexswfksekmfm
 
Caterpillar cat 140 h motor grader (prefix 5hm) service repair manual (5hm000...
Caterpillar cat 140 h motor grader (prefix 5hm) service repair manual (5hm000...Caterpillar cat 140 h motor grader (prefix 5hm) service repair manual (5hm000...
Caterpillar cat 140 h motor grader (prefix 5hm) service repair manual (5hm000...fujsefkskekmm
 
Caterpillar cat 140 h motor grader (prefix 5hm) service repair manual (5hm000...
Caterpillar cat 140 h motor grader (prefix 5hm) service repair manual (5hm000...Caterpillar cat 140 h motor grader (prefix 5hm) service repair manual (5hm000...
Caterpillar cat 140 h motor grader (prefix 5hm) service repair manual (5hm000...fujsjejfskekmm
 
Caterpillar cat 140 h motor grader (prefix 5hm) service repair manual (5hm000...
Caterpillar cat 140 h motor grader (prefix 5hm) service repair manual (5hm000...Caterpillar cat 140 h motor grader (prefix 5hm) service repair manual (5hm000...
Caterpillar cat 140 h motor grader (prefix 5hm) service repair manual (5hm000...fujjskeksmem
 
Caterpillar cat 140 h motor grader (prefix 5hm) service repair manual (5hm000...
Caterpillar cat 140 h motor grader (prefix 5hm) service repair manual (5hm000...Caterpillar cat 140 h motor grader (prefix 5hm) service repair manual (5hm000...
Caterpillar cat 140 h motor grader (prefix 5hm) service repair manual (5hm000...ufjjsejklemd
 

Similar to Prius Steering System Troubleshooting Guide (16)

2006 toyota sequoia service repair manual
2006 toyota sequoia service repair manual2006 toyota sequoia service repair manual
2006 toyota sequoia service repair manual
 
2002 toyota sequoia service repair manual
2002 toyota sequoia service repair manual2002 toyota sequoia service repair manual
2002 toyota sequoia service repair manual
 
1997 toyota avalon service repair manual
1997 toyota avalon service repair manual1997 toyota avalon service repair manual
1997 toyota avalon service repair manual
 
1998 toyota avalon service repair manual
1998 toyota avalon service repair manual1998 toyota avalon service repair manual
1998 toyota avalon service repair manual
 
1998 toyota avalon service repair manual
1998 toyota avalon service repair manual1998 toyota avalon service repair manual
1998 toyota avalon service repair manual
 
Caterpillar cat 140 h motor grader (prefix 5hm) service repair manual (5hm000...
Caterpillar cat 140 h motor grader (prefix 5hm) service repair manual (5hm000...Caterpillar cat 140 h motor grader (prefix 5hm) service repair manual (5hm000...
Caterpillar cat 140 h motor grader (prefix 5hm) service repair manual (5hm000...
 
Caterpillar cat 160 h motor grader (prefix 3gm) service repair manual (3gm000...
Caterpillar cat 160 h motor grader (prefix 3gm) service repair manual (3gm000...Caterpillar cat 160 h motor grader (prefix 3gm) service repair manual (3gm000...
Caterpillar cat 160 h motor grader (prefix 3gm) service repair manual (3gm000...
 
Caterpillar cat 140 h motor grader (prefix 5hm) service repair manual (5hm000...
Caterpillar cat 140 h motor grader (prefix 5hm) service repair manual (5hm000...Caterpillar cat 140 h motor grader (prefix 5hm) service repair manual (5hm000...
Caterpillar cat 140 h motor grader (prefix 5hm) service repair manual (5hm000...
 
Caterpillar cat 140 h motor grader (prefix 5hm) service repair manual (5hm000...
Caterpillar cat 140 h motor grader (prefix 5hm) service repair manual (5hm000...Caterpillar cat 140 h motor grader (prefix 5hm) service repair manual (5hm000...
Caterpillar cat 140 h motor grader (prefix 5hm) service repair manual (5hm000...
 

Recently uploaded

Tableaux 9ème étape circuit fédéral 2024
Tableaux 9ème étape circuit fédéral 2024Tableaux 9ème étape circuit fédéral 2024
Tableaux 9ème étape circuit fédéral 2024HechemLaameri
 
JORNADA 5 LIGA MURO 2024INSUGURACION.pdf
JORNADA 5 LIGA MURO 2024INSUGURACION.pdfJORNADA 5 LIGA MURO 2024INSUGURACION.pdf
JORNADA 5 LIGA MURO 2024INSUGURACION.pdfArturo Pacheco Alvarez
 
CALL ON ➥8923113531 🔝Call Girls Chinhat Lucknow best sexual service
CALL ON ➥8923113531 🔝Call Girls Chinhat Lucknow best sexual serviceCALL ON ➥8923113531 🔝Call Girls Chinhat Lucknow best sexual service
CALL ON ➥8923113531 🔝Call Girls Chinhat Lucknow best sexual serviceanilsa9823
 
Croatia vs Italy Euro Cup 2024 Three pitfalls for Spalletti’s Italy in Group ...
Croatia vs Italy Euro Cup 2024 Three pitfalls for Spalletti’s Italy in Group ...Croatia vs Italy Euro Cup 2024 Three pitfalls for Spalletti’s Italy in Group ...
Croatia vs Italy Euro Cup 2024 Three pitfalls for Spalletti’s Italy in Group ...Eticketing.co
 
08448380779 Call Girls In Karol Bagh Women Seeking Men
08448380779 Call Girls In Karol Bagh Women Seeking Men08448380779 Call Girls In Karol Bagh Women Seeking Men
08448380779 Call Girls In Karol Bagh Women Seeking MenDelhi Call girls
 
JORNADA 4 LIGA MURO 2024TUXTEPEC1234.pdf
JORNADA 4 LIGA MURO 2024TUXTEPEC1234.pdfJORNADA 4 LIGA MURO 2024TUXTEPEC1234.pdf
JORNADA 4 LIGA MURO 2024TUXTEPEC1234.pdfArturo Pacheco Alvarez
 
Albania Vs Spain Albania is Loaded with Defensive Talent on their Roster.docx
Albania Vs Spain Albania is Loaded with Defensive Talent on their Roster.docxAlbania Vs Spain Albania is Loaded with Defensive Talent on their Roster.docx
Albania Vs Spain Albania is Loaded with Defensive Talent on their Roster.docxWorld Wide Tickets And Hospitality
 
CALL ON ➥8923113531 🔝Call Girls Saharaganj Lucknow best Female service 🦺
CALL ON ➥8923113531 🔝Call Girls Saharaganj Lucknow best Female service  🦺CALL ON ➥8923113531 🔝Call Girls Saharaganj Lucknow best Female service  🦺
CALL ON ➥8923113531 🔝Call Girls Saharaganj Lucknow best Female service 🦺anilsa9823
 
TAM Sports_IPL 17 Till Match 37_Celebrity Endorsement _Report.pdf
TAM Sports_IPL 17 Till Match 37_Celebrity Endorsement _Report.pdfTAM Sports_IPL 17 Till Match 37_Celebrity Endorsement _Report.pdf
TAM Sports_IPL 17 Till Match 37_Celebrity Endorsement _Report.pdfSocial Samosa
 
Who Is Emmanuel Katto Uganda? His Career, personal life etc.
Who Is Emmanuel Katto Uganda? His Career, personal life etc.Who Is Emmanuel Katto Uganda? His Career, personal life etc.
Who Is Emmanuel Katto Uganda? His Career, personal life etc.Marina Costa
 
Jankipuram / Call Girls Lucknow | Whatsapp No 🫗 8923113531 🎳 VIP Escorts Serv...
Jankipuram / Call Girls Lucknow | Whatsapp No 🫗 8923113531 🎳 VIP Escorts Serv...Jankipuram / Call Girls Lucknow | Whatsapp No 🫗 8923113531 🎳 VIP Escorts Serv...
Jankipuram / Call Girls Lucknow | Whatsapp No 🫗 8923113531 🎳 VIP Escorts Serv...gurkirankumar98700
 
Spain Vs Italy 20 players confirmed for Spain's Euro 2024 squad, and three po...
Spain Vs Italy 20 players confirmed for Spain's Euro 2024 squad, and three po...Spain Vs Italy 20 players confirmed for Spain's Euro 2024 squad, and three po...
Spain Vs Italy 20 players confirmed for Spain's Euro 2024 squad, and three po...World Wide Tickets And Hospitality
 
大学学位办理《原版美国USD学位证书》圣地亚哥大学毕业证制作成绩单修改
大学学位办理《原版美国USD学位证书》圣地亚哥大学毕业证制作成绩单修改大学学位办理《原版美国USD学位证书》圣地亚哥大学毕业证制作成绩单修改
大学学位办理《原版美国USD学位证书》圣地亚哥大学毕业证制作成绩单修改atducpo
 
🔝|97111༒99012🔝 Call Girls In {Delhi} Cr Park ₹5.5k Cash Payment With Room De...
🔝|97111༒99012🔝 Call Girls In  {Delhi} Cr Park ₹5.5k Cash Payment With Room De...🔝|97111༒99012🔝 Call Girls In  {Delhi} Cr Park ₹5.5k Cash Payment With Room De...
🔝|97111༒99012🔝 Call Girls In {Delhi} Cr Park ₹5.5k Cash Payment With Room De...Diya Sharma
 
Atlanta Dream Exec Dan Gadd on Driving Fan Engagement and Growth, Serving the...
Atlanta Dream Exec Dan Gadd on Driving Fan Engagement and Growth, Serving the...Atlanta Dream Exec Dan Gadd on Driving Fan Engagement and Growth, Serving the...
Atlanta Dream Exec Dan Gadd on Driving Fan Engagement and Growth, Serving the...Neil Horowitz
 
VIP Kolkata Call Girl Liluah 👉 8250192130 Available With Room
VIP Kolkata Call Girl Liluah 👉 8250192130  Available With RoomVIP Kolkata Call Girl Liluah 👉 8250192130  Available With Room
VIP Kolkata Call Girl Liluah 👉 8250192130 Available With Roomdivyansh0kumar0
 
08448380779 Call Girls In IIT Women Seeking Men
08448380779 Call Girls In IIT Women Seeking Men08448380779 Call Girls In IIT Women Seeking Men
08448380779 Call Girls In IIT Women Seeking MenDelhi Call girls
 
ppt on Myself, Occupation and my Interest
ppt on Myself, Occupation and my Interestppt on Myself, Occupation and my Interest
ppt on Myself, Occupation and my InterestNagaissenValaydum
 

Recently uploaded (20)

Tableaux 9ème étape circuit fédéral 2024
Tableaux 9ème étape circuit fédéral 2024Tableaux 9ème étape circuit fédéral 2024
Tableaux 9ème étape circuit fédéral 2024
 
JORNADA 5 LIGA MURO 2024INSUGURACION.pdf
JORNADA 5 LIGA MURO 2024INSUGURACION.pdfJORNADA 5 LIGA MURO 2024INSUGURACION.pdf
JORNADA 5 LIGA MURO 2024INSUGURACION.pdf
 
CALL ON ➥8923113531 🔝Call Girls Chinhat Lucknow best sexual service
CALL ON ➥8923113531 🔝Call Girls Chinhat Lucknow best sexual serviceCALL ON ➥8923113531 🔝Call Girls Chinhat Lucknow best sexual service
CALL ON ➥8923113531 🔝Call Girls Chinhat Lucknow best sexual service
 
Croatia vs Italy Euro Cup 2024 Three pitfalls for Spalletti’s Italy in Group ...
Croatia vs Italy Euro Cup 2024 Three pitfalls for Spalletti’s Italy in Group ...Croatia vs Italy Euro Cup 2024 Three pitfalls for Spalletti’s Italy in Group ...
Croatia vs Italy Euro Cup 2024 Three pitfalls for Spalletti’s Italy in Group ...
 
08448380779 Call Girls In Karol Bagh Women Seeking Men
08448380779 Call Girls In Karol Bagh Women Seeking Men08448380779 Call Girls In Karol Bagh Women Seeking Men
08448380779 Call Girls In Karol Bagh Women Seeking Men
 
JORNADA 4 LIGA MURO 2024TUXTEPEC1234.pdf
JORNADA 4 LIGA MURO 2024TUXTEPEC1234.pdfJORNADA 4 LIGA MURO 2024TUXTEPEC1234.pdf
JORNADA 4 LIGA MURO 2024TUXTEPEC1234.pdf
 
Albania Vs Spain Albania is Loaded with Defensive Talent on their Roster.docx
Albania Vs Spain Albania is Loaded with Defensive Talent on their Roster.docxAlbania Vs Spain Albania is Loaded with Defensive Talent on their Roster.docx
Albania Vs Spain Albania is Loaded with Defensive Talent on their Roster.docx
 
CALL ON ➥8923113531 🔝Call Girls Saharaganj Lucknow best Female service 🦺
CALL ON ➥8923113531 🔝Call Girls Saharaganj Lucknow best Female service  🦺CALL ON ➥8923113531 🔝Call Girls Saharaganj Lucknow best Female service  🦺
CALL ON ➥8923113531 🔝Call Girls Saharaganj Lucknow best Female service 🦺
 
TAM Sports_IPL 17 Till Match 37_Celebrity Endorsement _Report.pdf
TAM Sports_IPL 17 Till Match 37_Celebrity Endorsement _Report.pdfTAM Sports_IPL 17 Till Match 37_Celebrity Endorsement _Report.pdf
TAM Sports_IPL 17 Till Match 37_Celebrity Endorsement _Report.pdf
 
Who Is Emmanuel Katto Uganda? His Career, personal life etc.
Who Is Emmanuel Katto Uganda? His Career, personal life etc.Who Is Emmanuel Katto Uganda? His Career, personal life etc.
Who Is Emmanuel Katto Uganda? His Career, personal life etc.
 
Call Girls In RK Puram 📱 9999965857 🤩 Delhi 🫦 HOT AND SEXY VVIP 🍎 SERVICE
Call Girls In RK Puram 📱  9999965857  🤩 Delhi 🫦 HOT AND SEXY VVIP 🍎 SERVICECall Girls In RK Puram 📱  9999965857  🤩 Delhi 🫦 HOT AND SEXY VVIP 🍎 SERVICE
Call Girls In RK Puram 📱 9999965857 🤩 Delhi 🫦 HOT AND SEXY VVIP 🍎 SERVICE
 
Jankipuram / Call Girls Lucknow | Whatsapp No 🫗 8923113531 🎳 VIP Escorts Serv...
Jankipuram / Call Girls Lucknow | Whatsapp No 🫗 8923113531 🎳 VIP Escorts Serv...Jankipuram / Call Girls Lucknow | Whatsapp No 🫗 8923113531 🎳 VIP Escorts Serv...
Jankipuram / Call Girls Lucknow | Whatsapp No 🫗 8923113531 🎳 VIP Escorts Serv...
 
Spain Vs Italy 20 players confirmed for Spain's Euro 2024 squad, and three po...
Spain Vs Italy 20 players confirmed for Spain's Euro 2024 squad, and three po...Spain Vs Italy 20 players confirmed for Spain's Euro 2024 squad, and three po...
Spain Vs Italy 20 players confirmed for Spain's Euro 2024 squad, and three po...
 
大学学位办理《原版美国USD学位证书》圣地亚哥大学毕业证制作成绩单修改
大学学位办理《原版美国USD学位证书》圣地亚哥大学毕业证制作成绩单修改大学学位办理《原版美国USD学位证书》圣地亚哥大学毕业证制作成绩单修改
大学学位办理《原版美国USD学位证书》圣地亚哥大学毕业证制作成绩单修改
 
Call Girls 🫤 Malviya Nagar ➡️ 9999965857 ➡️ Delhi 🫦 Russian Escorts FULL ENJOY
Call Girls 🫤 Malviya Nagar ➡️ 9999965857  ➡️ Delhi 🫦  Russian Escorts FULL ENJOYCall Girls 🫤 Malviya Nagar ➡️ 9999965857  ➡️ Delhi 🫦  Russian Escorts FULL ENJOY
Call Girls 🫤 Malviya Nagar ➡️ 9999965857 ➡️ Delhi 🫦 Russian Escorts FULL ENJOY
 
🔝|97111༒99012🔝 Call Girls In {Delhi} Cr Park ₹5.5k Cash Payment With Room De...
🔝|97111༒99012🔝 Call Girls In  {Delhi} Cr Park ₹5.5k Cash Payment With Room De...🔝|97111༒99012🔝 Call Girls In  {Delhi} Cr Park ₹5.5k Cash Payment With Room De...
🔝|97111༒99012🔝 Call Girls In {Delhi} Cr Park ₹5.5k Cash Payment With Room De...
 
Atlanta Dream Exec Dan Gadd on Driving Fan Engagement and Growth, Serving the...
Atlanta Dream Exec Dan Gadd on Driving Fan Engagement and Growth, Serving the...Atlanta Dream Exec Dan Gadd on Driving Fan Engagement and Growth, Serving the...
Atlanta Dream Exec Dan Gadd on Driving Fan Engagement and Growth, Serving the...
 
VIP Kolkata Call Girl Liluah 👉 8250192130 Available With Room
VIP Kolkata Call Girl Liluah 👉 8250192130  Available With RoomVIP Kolkata Call Girl Liluah 👉 8250192130  Available With Room
VIP Kolkata Call Girl Liluah 👉 8250192130 Available With Room
 
08448380779 Call Girls In IIT Women Seeking Men
08448380779 Call Girls In IIT Women Seeking Men08448380779 Call Girls In IIT Women Seeking Men
08448380779 Call Girls In IIT Women Seeking Men
 
ppt on Myself, Occupation and my Interest
ppt on Myself, Occupation and my Interestppt on Myself, Occupation and my Interest
ppt on Myself, Occupation and my Interest
 

Prius Steering System Troubleshooting Guide

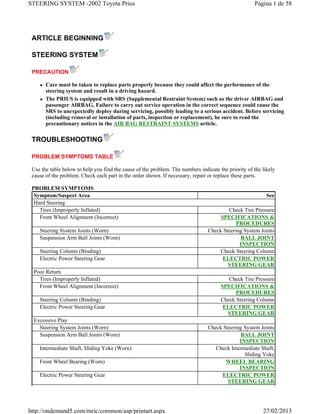
  • 1. ARTICLE BEGINNING STEERING SYSTEM PRECAUTION Care must be taken to replace parts properly because they could affect the performance of the steering system and result in a driving hazard. The PRIUS is equipped with SRS (Supplemental Restraint System) such as the driver AIRBAG and passenger AIRBAG. Failure to carry out service operation in the correct sequence could cause the SRS to unexpectedly deploy during servicing, possibly leading to a serious accident. Before servicing (including removal or installation of parts, inspection or replacement), be sure to read the precautionary notices in the AIR BAG RESTRAINT SYSTEMS article. TROUBLESHOOTING PROBLEM SYMPTOMS TABLE Use the table below to help you find the cause of the problem. The numbers indicate the priority of the likely cause of the problem. Check each part in the order shown. If necessary, repair or replace these parts. PROBLEM SYMPTOMS Symptom/Suspect Area See Hard Steering Tires (Improperly Inflated) Check Tire Pressure Front Wheel Alignment (Incorrect) SPECIFICATIONS & PROCEDURES Steering System Joints (Worn) Check Steering System Joints Suspension Arm Ball Joints (Worn) BALL JOINT INSPECTION Steering Column (Binding) Check Steering Column Electric Power Steering Gear ELECTRIC POWER STEERING GEAR Poor Return Tires (Improperly Inflated) Check Tire Pressure Front Wheel Alignment (Incorrect) SPECIFICATIONS & PROCEDURES Steering Column (Binding) Check Steering Column Electric Power Steering Gear ELECTRIC POWER STEERING GEAR Excessive Play Steering System Joints (Worn) Check Steering System Joints Suspension Arm Ball Joints (Worn) BALL JOINT INSPECTION Intermediate Shaft, Sliding Yoke (Worn) Check Intermediate Shaft, Sliding Yoke Front Wheel Bearing (Worn) WHEEL BEARING INSPECTION Electric Power Steering Gear ELECTRIC POWER STEERING GEAR Página 1 de 58STEERING SYSTEM -2002 Toyota Prius 27/02/2013http://ondemand5.com/mric/common/asp/printart.aspx
  • 2. STEERING WHEEL INSPECTION Step 1 - Check Steering Wheel Freeplay a. Stop the vehicle and face the tires straight ahead. b. Rock the steering wheel gently up and down with a finger lightly, check the steering wheel freeplay. Fig. 1: Checking Steering Wheel Free Play Courtesy of TOYOTA MOTOR SALES, U.S.A., INC. Maximum freeplay: 30 mm (1.18 in.) . Abnormal Noise Steering System Joints (Worn) Check Steering System Joints Electric Power Steering Gear ELECTRIC POWER STEERING GEAR NOTE: When the problem occurs on the electric motor power steering system, refer to ELECTRIC MOTOR POWER STEERING . Página 2 de 58STEERING SYSTEM -2002 Toyota Prius 27/02/2013http://ondemand5.com/mric/common/asp/printart.aspx
  • 3. Step 2 - Check Steering Effort a. Center the steering wheel. b. Remove the steering wheel pad. See STEP 1 - REMOVE STEERING WHEEL PAD . c. Start the engine and run it at idle. Fig. 2: Determining Steering Wheel Effort Courtesy of TOYOTA MOTOR SALES, U.S.A., INC. d. Measure the steering effort in both directions. Steering effort (Reference): 6.5 N.m (65 kgf.cm, 58 in.lbf). NOTE: Take the tire type, pressure and contact surface into consideration before making your diagnosis. Página 3 de 58STEERING SYSTEM -2002 Toyota Prius 27/02/2013http://ondemand5.com/mric/common/asp/printart.aspx
  • 4. e. Install the steering wheel set nut. Torque: 50 N.m (510 kgf.cm, 37 ft.lbf) f. Install the steering wheel pad. See Step 18 - Install Steering Wheel Pad . REPAIR PROCEDURES Step 1 - Inspect Steering Wheel Off Center a. Apply masking tape on the top center of the steering wheel and steering column upper cover. NOTE: This is the repair procedure for steering off center. Página 4 de 58STEERING SYSTEM -2002 Toyota Prius 27/02/2013http://ondemand5.com/mric/common/asp/printart.aspx
  • 5. Fig. 3: Identifying Masking Tape Applications Points Courtesy of TOYOTA MOTOR SALES, U.S.A., INC. b. Drive the vehicle in a straight line for 100 meters at a constant speed of 35 mph (56 km/h), and hold the steering wheel to maintain the course. c. Draw a line on the masking tape as shown in Fig. 4 . Fig. 4: Marking Applied Masking Tape Courtesy of TOYOTA MOTOR SALES, U.S.A., INC. d. Turn the steering wheel to its straight position. NOTE: Refer to the upper surface of the steering wheel, steering spoke and SRS AIRBAG line for the straight position. Página 5 de 58STEERING SYSTEM -2002 Toyota Prius 27/02/2013http://ondemand5.com/mric/common/asp/printart.aspx
  • 6. e. Draw a new line on the masking tape of the steering wheel as shown in Fig. 5 . Fig. 5: Marking Angular Calculation Line Courtesy of TOYOTA MOTOR SALES, U.S.A., INC. f. Measure the distance between the 2 lines on the masking tape of the steering wheel. g. Convert the measured distance to steering angle. Measured distance 1 mm (0.04 in.) = Steering angle approximately 1 deg. NOTE: Make a record of the steering angle. Página 6 de 58STEERING SYSTEM -2002 Toyota Prius 27/02/2013http://ondemand5.com/mric/common/asp/printart.aspx
  • 7. Step 2 - Adjust Steering Angle a. Draw a line on the RH and LH tie rod and rack ends where it can easily be seen. Fig. 6: Marking & Measuring Tie Rod Ends Courtesy of TOYOTA MOTOR SALES, U.S.A., INC. b. Using a paper gauge, measure the distance from RH and LH tie rod ends to the rack end screws. c. Remove the RH and LH boot clips from the rack boots. NOTE: Measure the RH side and LH side. Make a note of the measured values. Página 7 de 58STEERING SYSTEM -2002 Toyota Prius 27/02/2013http://ondemand5.com/mric/common/asp/printart.aspx
  • 8. Fig. 7: Identifying Boot Clips & Tie Rod End Lock Nuts Courtesy of TOYOTA MOTOR SALES, U.S.A., INC. d. Loosen the RH and LH lock nuts. e. Turn the RH and LH rack end by the same amount (but in different directions) according to the steering angle. 1 turn 360 deg. of rack end (1.5 mm (0.059 in.) horizontal movement) = 12 deg. of steering angle f. Tighten the RH and LH lock nuts. Torque: 56 N.m (570 kgf.cm, 41 ft.lbf) g. Install the RH and LH boot clips. TILT STEERING COLUMN COMPONENTS NOTE: Make sure that the difference in length between RH and LH tie rod ends and rack end screws are within 1.5 mm (0.059 in.). Página 8 de 58STEERING SYSTEM -2002 Toyota Prius 27/02/2013http://ondemand5.com/mric/common/asp/printart.aspx
  • 9. Fig. 8: Identifying Tilt Steering Column Related Components Courtesy of TOYOTA MOTOR SALES, U.S.A., INC. Página 9 de 58STEERING SYSTEM -2002 Toyota Prius 27/02/2013http://ondemand5.com/mric/common/asp/printart.aspx
  • 10. Fig. 9: Exploded View Tilt Steering Column Courtesy of TOYOTA MOTOR SALES, U.S.A., INC. REMOVAL Step 1 - Remove Steering Wheel Pad Página 10 de 58STEERING SYSTEM -2002 Toyota Prius 27/02/2013http://ondemand5.com/mric/common/asp/printart.aspx
  • 11. a. Place the front wheels facing straight ahead. b. Using a Torx socket wrench, loosen the 2 Torx screws until the groove along the screw circumference catches on the screw case. Fig. 10: Locating Steering Pad Torx Screws Courtesy of TOYOTA MOTOR SALES, U.S.A., INC. c. Pull out the wheel pad from the steering wheel and disconnect the AIRBAG connector. NOTE: If the AIRBAG connector is disconnected with the ignition switch at ON, DTCs will be recorded. Página 11 de 58STEERING SYSTEM -2002 Toyota Prius 27/02/2013http://ondemand5.com/mric/common/asp/printart.aspx
  • 12. Fig. 11: Locating Air Bag Connector & Identifying Safe Air Bag Handling Procedures Courtesy of TOYOTA MOTOR SALES, U.S.A., INC. Página 12 de 58STEERING SYSTEM -2002 Toyota Prius 27/02/2013http://ondemand5.com/mric/common/asp/printart.aspx
  • 13. d. Disconnect the connector. Step 2 - Remove Steering Wheel a. Remove the steering wheel set nut. b. Place matchmarks on the steering wheel and main shaft assembly. Fig. 12: Matchmarking Steering Wheel & Main Shaft Courtesy of TOYOTA MOTOR SALES, U.S.A., INC. c. Using SST, remove the steering wheel. SST 09950-50013 (09951-05010, 09952-05010, 09953-05020, 09954-05021). Step 3 - Remove Lower Instrument Finish Panel a. Remove the 2 screws and disconnect hood lock release lever. WARNING: When storing the wheel pad, keep the upper surface of the pad facing upward. Never disassemble the wheel pad. NOTE: When removing the wheel pad, take care not to pull the AIRBAG wire harness. Página 13 de 58STEERING SYSTEM -2002 Toyota Prius 27/02/2013http://ondemand5.com/mric/common/asp/printart.aspx
  • 14. b. Remove the screw and bolt. c. Disconnect the connectors and DLC3, and remove the lower instrument finish panel. Step 4 - Remove Upper & Lower Column Covers a. Remove the 3 screws and lower column cover. b. Remove the screw and upper column cover. Step 5 - Remove Combination Switch With Spiral Cable a. Disconnect the connectors. b. Disconnect the AIRBAG connector. c. Remove the 3 screws and combination switch with spiral cable. Step 6 - Remove Spiral Cable See COMPONENTS . Step 7 - Disconnect Transmission Control Cable Fig. 13: Identifying Transmission Control Cable Mounting Bolt & Clip NOTE: Do not disassemble the spiral cable or apply oil to it. Página 14 de 58STEERING SYSTEM -2002 Toyota Prius 27/02/2013http://ondemand5.com/mric/common/asp/printart.aspx
  • 15. Courtesy of TOYOTA MOTOR SALES, U.S.A., INC. Step 8 - Remove Shift Lever Assembly See STEP 6 - REMOVE SHIFT LEVER ASSEMBLY . Step 9 - Disconnect Column Hole Cover Remove the 3 clips and disconnect the column hole cover. Step 10 - Remove Shift Lock Computer Sub-Assembly Remove the screw and shift lock computer sub-assembly. Step 11 - Disconnect No. 2 Intermediate Shaft Assembly a. Place matchmarks on the No. 2 intermediate shaft assembly and control valve shaft. Fig. 14: Locating No. 2 Intermediate Shaft Matchmarks & Identifying Bolts A & B Courtesy of TOYOTA MOTOR SALES, U.S.A., INC. b. Loosen the bolt "A" and remove the bolt "B", then disconnect the No. 2 intermediate shaft assembly from the control valve shaft. Página 15 de 58STEERING SYSTEM -2002 Toyota Prius 27/02/2013http://ondemand5.com/mric/common/asp/printart.aspx
  • 16. Step 12 - Remove Instrument Finish Panel Remove the 3 screws and instrument finish panel. Step 13 - Remove Steering Column Assembly a. Disconnect the connectors. b. Remove the 2 bolts, 2 nuts and steering column assembly. Step 14 - Remove No. 2 Intermediate Shaft Assembly Remove the bolt and No. 2 intermediate shaft assembly from the sliding yoke. Step 15 - Remove Sliding Yoke Remove the bolt and sliding yoke from the main shaft assembly. Step 16 - Remove Column Hole Cover Step 17 - Remove Main Shaft Lower Dust Seal a. Remove the 2 nuts and parking brake cable bracket. Página 16 de 58STEERING SYSTEM -2002 Toyota Prius 27/02/2013http://ondemand5.com/mric/common/asp/printart.aspx
  • 17. Fig. 15: Locating Parking Brake Cable Bracket Mounting Nuts Courtesy of TOYOTA MOTOR SALES, U.S.A., INC. b. Remove the 2 bolts and disconnect the accelerator pedal. c. Remove the 3 nuts and main shaft lower dust seal. DISASSEMBLY 1. Remove the screw and transponder key coil. 2. Remove column upper bracket and column upper clamp : a. Using a centering punch, mark the center of the 2 tapered-head bolts. b. Using a 3 - 4 mm (0.12 - 0.16 in.) drill, drill into the 2 bolts. NOTE: When using a vise, do not overtighten it. Página 17 de 58STEERING SYSTEM -2002 Toyota Prius 27/02/2013http://ondemand5.com/mric/common/asp/printart.aspx
  • 18. Fig. 16: Extracting Column Upper Bracket & Clamp Bolts Courtesy of TOYOTA MOTOR SALES, U.S.A., INC. c. Using a screw extractor, remove the 2 bolts, column upper bracket and column upper clamp. 3. Remove tilt steering support : a. Remove the look nut. b. Remove the washer, steering pawl set bolt and tilt steering support. c. Remove the 2 No. 1 tilt steering support collars. 4. Remove 2 energy absorbing plates : a. Using pliers, remove the 2 energy absorbing clips. Página 18 de 58STEERING SYSTEM -2002 Toyota Prius 27/02/2013http://ondemand5.com/mric/common/asp/printart.aspx
  • 19. Fig. 17: Identifying Energy Absorbing Clips Courtesy of TOYOTA MOTOR SALES, U.S.A., INC. b. Remove the 2 energy absorbing plates, 2 energy absorbing guides, and 2 break away capsules. 5. Using a screw driver, remove the torsion spring . Página 19 de 58STEERING SYSTEM -2002 Toyota Prius 27/02/2013http://ondemand5.com/mric/common/asp/printart.aspx
  • 20. Fig. 18: Locating & Removing Torsion Spring Courtesy of TOYOTA MOTOR SALES, U.S.A., INC. 6. Remove tilt lever and break away bracket : NOTE: This bolt is left-handed one. Página 20 de 58STEERING SYSTEM -2002 Toyota Prius 27/02/2013http://ondemand5.com/mric/common/asp/printart.aspx
  • 21. Fig. 19: Removing Tilt Lever Lock Bolt & No. 1 Tilt Steering Support Reinforce Courtesy of TOYOTA MOTOR SALES, U.S.A., INC. a. Remove No. 2 tilt lever lock bolt and No. 1 tilt steering support reinforce. NOTE: This bolt is left-handed one. Página 21 de 58STEERING SYSTEM -2002 Toyota Prius 27/02/2013http://ondemand5.com/mric/common/asp/printart.aspx
  • 22. Fig. 20: Locating & Removing Tilt Steering Adjust Nut Courtesy of TOYOTA MOTOR SALES, U.S.A., INC. b. Remove the tilt steering adjusting nut, tilt lever, tilt sub lever, tilt lever lock bolt and break away bracket. 7. Remove main shaft assembly and main shaft bushing : a. Using a snap ring expander, remove the snap ring on the upper side. b. Using a brass bar and a hammer, tap out the main shaft assembly with the main shaft bushing. Página 22 de 58STEERING SYSTEM -2002 Toyota Prius 27/02/2013http://ondemand5.com/mric/common/asp/printart.aspx
  • 23. Fig. 21: Removing Main Shaft Assembly & Bushing Courtesy of TOYOTA MOTOR SALES, U.S.A., INC. c. Remove the main shaft bushing. d. Using a snap ring expander, remove the snap ring on the lower side. INSPECTION 1. Inspect steering lock operation : Check that the steering lock mechanism operates properly. Página 23 de 58STEERING SYSTEM -2002 Toyota Prius 27/02/2013http://ondemand5.com/mric/common/asp/printart.aspx
  • 24. Fig. 22: Verifying Steering Lock Operation Courtesy of TOYOTA MOTOR SALES, U.S.A., INC. 2. If necessary, replace key cylinder : a. Place the ignition key at the ACC position. b. Push down the stop pin with a screwdriver, and pull out the key cylinder. Página 24 de 58STEERING SYSTEM -2002 Toyota Prius 27/02/2013http://ondemand5.com/mric/common/asp/printart.aspx
  • 25. Fig. 23: Removing Key Cylinder Courtesy of TOYOTA MOTOR SALES, U.S.A., INC. c. Install a new key cylinder. 3. Inspect ignition switch . See STEP 1 - INSPECT IGNITION SWITCH CONTINUITY . 4. IF NECESSARY, REPLACE IGNITION SWITCH a. Remove the 2 screws and ignition switch. b. Install a new ignition switch with the 2 screws. 5. Inspect key unlock warning switch . See STEP 2 - INSPECT KEY UNLOCK WARNING SWITCH CONTINUITY . 6. If necessary, replace key unlock warning switch : a. Slide the key unlock warning switch out of the column upper bracket. b. Slide a new key unlock warning switch in the column upper bracket. 7. Inspect key interlock solenoid . See STEP 4 - INSPECT KEY INTERLOCK SOLENOID . 8. If necessary, replace key interlock solenoid : a. Remove the 2 screws and key interlock solenoid. b. Install a new key interlock solenoid with the 2 screws. 9. Inspect transponder key coil . See step 1 of HYBRID VEHICLE IMMOBILIZER SYSTEM INSPECTION . 10. If necessary, replace transponder key coil . 11. Inspect bearing : NOTE: Make sure the key is at the ACC position. Página 25 de 58STEERING SYSTEM -2002 Toyota Prius 27/02/2013http://ondemand5.com/mric/common/asp/printart.aspx
  • 26. Check the bearing rotation condition and check for abnormal noise. Fig. 24: Verifying Proper Bearing Condition Courtesy of TOYOTA MOTOR SALES, U.S.A., INC. If faulty, replace the steering column upper tube sub-assembly. REASSEMBLY 1. Coat parts indicated by arrows with molybdenum disulfide lithium base grease . See Fig. 9 . 2. Install main shaft assembly : a. Using a snap ring expander, install a new snap ring on the lower side. b. Install the main shaft assembly. c. Using a snap ring expander, install a new snap ring on the upper side. 3. Install main shaft busing : NOTE: When using a vise, do not overtighten it. Página 26 de 58STEERING SYSTEM -2002 Toyota Prius 27/02/2013http://ondemand5.com/mric/common/asp/printart.aspx
  • 27. a. Coat a new bushing with molybdenum disulfide lithium base grease. b. Using SST and a hammer, tap in the main shaft bushing. SST 09608-06041. Fig. 25: Installing Main Shaft Bushing Courtesy of TOYOTA MOTOR SALES, U.S.A., INC. 4. Install break away bracket and tilt lever : NOTE: Align the holes in the break away bracket with the projections of the tilt lever lock bolt and tilt sub lever. Página 27 de 58STEERING SYSTEM -2002 Toyota Prius 27/02/2013http://ondemand5.com/mric/common/asp/printart.aspx
  • 28. Fig. 26: Locating & Installing Tilt Steering Adjust Nut Courtesy of TOYOTA MOTOR SALES, U.S.A., INC. a. Install break away bracket, tilt lever lock bolt, tilt sub lever and tilt lever. b. Install the tilt steering adjusting nut by rotating it counterclockwise. Torque: 13 N.m (130 kgf.cm, 9 ft.lbf) . NOTE: Align the No. 1 support reinforce with the nut to eliminate looseness by turning the No. 1 support reinforce counterclockwise a little, then torque the No. 2 tilt lever lock bolt. Página 28 de 58STEERING SYSTEM -2002 Toyota Prius 27/02/2013http://ondemand5.com/mric/common/asp/printart.aspx
  • 29. Fig. 27: Installing Tilt Lever Lock Bolt & No. 1 Tilt Steering Support Reinforce Courtesy of TOYOTA MOTOR SALES, U.S.A., INC. c. Install the No. 1 tilt steering support reinforce with the No. 2 tilt lever lock bolt by turning it counterclockwise. Torque: 5.4 N.m (55 kgf.cm, 48 in.lbf) . 5. Install torsion spring . Página 29 de 58STEERING SYSTEM -2002 Toyota Prius 27/02/2013http://ondemand5.com/mric/common/asp/printart.aspx
  • 30. Fig. 28: Identifying Torsion Spring Courtesy of TOYOTA MOTOR SALES, U.S.A., INC. 6. Install 2 energy absorbing plates : a. Install the 2 break away capsules, 2 energy absorbing guides and 2 energy absorbing plates. Página 30 de 58STEERING SYSTEM -2002 Toyota Prius 27/02/2013http://ondemand5.com/mric/common/asp/printart.aspx
  • 31. Fig. 29: Identifying Energy Absorbing Clip Courtesy of TOYOTA MOTOR SALES, U.S.A., INC. b. Install the 2 new energy absorbing clips. 7. Install tilt steering support : a. Install the 2 No. 1 tilt steering support collars. b. Install the tilt steering support, steering pawl set bolt, washer. c. Install the lock nut. Torque: 9.5 N.m (100 kgf.cm, 87 in.lbf) 8. Install column upper bracket and column upper clamp : a. Install the column upper bracket and column upper clamp with 2 new tapered-head bolts. b. Tighten the 2 tapered-head bolts until the bolt heads break off. Página 31 de 58STEERING SYSTEM -2002 Toyota Prius 27/02/2013http://ondemand5.com/mric/common/asp/printart.aspx
  • 32. Fig. 30: Installing Tapered-Head Bolts Courtesy of TOYOTA MOTOR SALES, U.S.A., INC. INSTALLATION Step 1 - Install Main Shaft Lower Dust Seal a. Install the main shaft lower dust seal with the 3 nuts. Torque: 4.9 N.m (50 kgf.cm, 43 in.lbf) b. Connect the accelerator pedal with the 2 bolts. c. Install the parking brake cable bracket with the 2 nuts. Página 32 de 58STEERING SYSTEM -2002 Toyota Prius 27/02/2013http://ondemand5.com/mric/common/asp/printart.aspx
  • 33. Fig. 31: Locating Parking Brake Cable Bracket Mounting Nuts Courtesy of TOYOTA MOTOR SALES, U.S.A., INC. Step 2 - Install Column Hole Cover Step 3 - Install Sliding Yoke Install the sliding yoke to the main shaft assembly with the bolt. Torque: 35 N.m (360 kgf.cm, 26 ft.lbf) . Step 4 - Install No. 2 Intermediate Shaft Assembly Temporarily install the No. 2 intermediate shaft assembly to the sliding yoke with the bolt. Step 5 - Install Steering Column Assembly a. Install the steering column assembly with the 2 bolts and 2 nuts. Torque: 25 N.m (260 kgf.cm, 19 ft.lbf) . b. Connect the connectors. Página 33 de 58STEERING SYSTEM -2002 Toyota Prius 27/02/2013http://ondemand5.com/mric/common/asp/printart.aspx
  • 34. Step 6 - Install Instrument Finish Panel Install the instrument finish panel with the 3 screws. Step 7 - Connect No. 2 Intermediate Shaft Assembly a. Align the matchmarks on the No. 2 intermediate shaft assembly and control valve shaft. Fig. 32: Locating No. 2 Intermediate Shaft Matchmarks & Identifying Bols A & B Courtesy of TOYOTA MOTOR SALES, U.S.A., INC. b. Install the bolt "B" and torque the bolt "A". Torque: 35 N.m (360 kgf.cm, 26 ft.lbf) . Step 8 - Install Shift Lock Computer Sub-Assembly Install the shift lock computer sub-assembly with the screw. Step 9 - Connect Column Hole Cover Connect the column hole cover with the 3 clips. Página 34 de 58STEERING SYSTEM -2002 Toyota Prius 27/02/2013http://ondemand5.com/mric/common/asp/printart.aspx
  • 35. Step 10 - Install Shift Lever Assembly See STEP 1 - INSTALL SHIFT LEVER ASSEMBLY . Step 11 - Connect Transmission Control Cable Fig. 33: Identifying Transmission Control Cable Mounting Bolt & Clip Courtesy of TOYOTA MOTOR SALES, U.S.A., INC. Step 12 - Install Spiral Cable See COMPONENTS . Step 13 - Install Combination Switch With Spiral Cable a. Install the combination switch with spiral cable with the 3 screws. b. Connect the AIRBAG connector. c. Connect the connectors. Step 14 - Install Upper & Lower Column Covers a. Install the upper column cover with the screw. b. Install the lower column cover with the 3 screws. Página 35 de 58STEERING SYSTEM -2002 Toyota Prius 27/02/2013http://ondemand5.com/mric/common/asp/printart.aspx
  • 36. Step 15 - Install Lower Instrument Finish Panel a. Connect the connectors and DLC3 and install the lower instrument finish panel. b. Install the screw and bolt. c. Connect the hood lock release lever with the 2 screws. Step 16 - Center Spiral Cable a. Check that the front wheels are facing straight ahead. b. Turn the cable counterclockwise by hand until it becomes harder to turn. c. Then rotate the cable clockwise about 2.5 turns to align the marks. Fig. 34: Locating Spiral Cable To Steering Column Alignment Marks Courtesy of TOYOTA MOTOR SALES, U.S.A., INC. Step 17 - Install Steering Wheel a. Align the matchmarks on the steering wheel and main shaft assembly. NOTE: The cable will rotate about 2.5 turns to either left or right of the center. Página 36 de 58STEERING SYSTEM -2002 Toyota Prius 27/02/2013http://ondemand5.com/mric/common/asp/printart.aspx
  • 37. b. Install the steering wheel set nut. Torque: 50 N.m (510 kgf.cm, 37 ft.lbf) Step 18 - Install Steering Wheel Pad a. Connect the connector. b. Connect the AIRBAG connector. c. Install the steering wheel pad after confirming that the circumference groove of the Torx screws is caught on the screw case. d. Using a Torx socket wrench, torque the 2 screws. Fig. 35: Locating Steering Pad Torx Screws Courtesy of TOYOTA MOTOR SALES, U.S.A., INC. Torque: 8.8 N.m (90 kgf.cm, 78 in.lbf) . NOTE: Never use AIRBAG parts from another vehicle. When replacing parts, replace with new ones. Make sure the wheel pad is installed with the specified torque. If the wheel pad has been dropped, or there are cracks, dents or other defects in the case or connector, replace the wheel pad with a new one. When installing the wheel pad, take care that the wirings do not interfere with other parts and that they are not pinched between other parts. Página 37 de 58STEERING SYSTEM -2002 Toyota Prius 27/02/2013http://ondemand5.com/mric/common/asp/printart.aspx
  • 38. Step 19 - Check Steering Wheel Center Point Step 20 - Perform Calibration Of Torque Sensor Zero Point See STEP 3 - CALIBRATION OF TORQUE SENSOR ZERO POINT under PRE-CHECK . ELECTRIC POWER STEERING GEAR COMPONENTS Página 38 de 58STEERING SYSTEM -2002 Toyota Prius 27/02/2013http://ondemand5.com/mric/common/asp/printart.aspx
  • 39. Fig. 36: Locating Electric Power Steering Gear Related Components Courtesy of TOYOTA MOTOR SALES, U.S.A., INC. Fig. 37: Exploded View Of Steering Gear Assembly Página 39 de 58STEERING SYSTEM -2002 Toyota Prius 27/02/2013http://ondemand5.com/mric/common/asp/printart.aspx
  • 40. Courtesy of TOYOTA MOTOR SALES, U.S.A., INC. REMOVAL Step 1 - Place Front Wheels Facing Straight Ahead Step 2 - Remove steering wheel pad See STEP 1 - REMOVE STEERING WHEEL PAD . Step 3 - Remove Steering Wheel See STEP 2 - REMOVE STEERING WHEEL . Step 4 - Remove RH & LH Engine Under Covers Step 5 - Disconnect Tie Rod Ends Disconnect RH AND LH TIE ROD ENDS . Step 6 - Disconnect Stabilizer Bar See STABILIZER BAR . Step 7 - Disconnect Lower Suspension Arm From Lower Ball Joint See BALL JOINTS . Step 8 - Disconnect 2 Connectors & EMPS Bracket a. Disconnect the 2 connectors. b. Disconnect the 2 clamps. c. Remove the bolt and disconnect the earth wire. Tips Click a link to view tip Tech1 Tip: 2002 toyota prius "ps light on info center NOTE: Remove the steering wheel assembly before the steering gear removal, because there is possibility of breaking of the spiral cable. Página 40 de 58STEERING SYSTEM -2002 Toyota Prius 27/02/2013http://ondemand5.com/mric/common/asp/printart.aspx
  • 41. Fig. 38: Locating EMPS Bracket Mounting Bolts & Ground Wire Courtesy of TOYOTA MOTOR SALES, U.S.A., INC. d. Remove the 2 bolts and EMPS bracket. Step 9 - Disconnect No. 2 Intermediate Shaft Assembly a. Place the matchmarks on the No. 2 intermediate shaft assembly and control valve shaft. b. Loosen the bolt "A" and remove the bolt "B" then disconnect the No. 2 intermediate shaft assembly from the control valve shaft. Página 41 de 58STEERING SYSTEM -2002 Toyota Prius 27/02/2013http://ondemand5.com/mric/common/asp/printart.aspx
  • 42. Fig. 39: Locating No. 2 Intermediate Shaft Matchmarks & Identifying Bols A & B Courtesy of TOYOTA MOTOR SALES, U.S.A., INC. Step 10 - Disconnect Torque Rod Disconnect TORQUE ROD Step 11 - Remove Suspension Member & Electric Power Steering Gear Assembly Remove SUSPENSION MEMBER AND ELECTRIC POWER STEERING GEAR ASSEMBLY Step 12 - Remove Electric Power Steering Gear Assembly a. Remove the stabilizer bar. See STABILIZER BAR . b. Remove the 4 bolts and electric power steering gear assembly from the front suspension member. NOTE: For torque rod location, see Fig. 36 . NOTE: For suspension member location, see Fig. 36 . Página 42 de 58STEERING SYSTEM -2002 Toyota Prius 27/02/2013http://ondemand5.com/mric/common/asp/printart.aspx
  • 43. Fig. 40: Locating Electric Power Steering Gear To Suspension Member Mounting Bolts Courtesy of TOYOTA MOTOR SALES, U.S.A., INC. c. Remove the bracket and grommet from the electric power steering gear assembly. DISASSEMBLY 1. Using SST, secure the electric power steering gear assembly in a vise. SST 09612-00012. NOTE: When using a vise, do not overtighten it. Página 43 de 58STEERING SYSTEM -2002 Toyota Prius 27/02/2013http://ondemand5.com/mric/common/asp/printart.aspx
  • 44. Fig. 41: Identifying SST 09612-00012 Courtesy of TOYOTA MOTOR SALES, U.S.A., INC. 2. Remove RH and LH tie rod ends and lock nuts : a. Place matchmarks on the tie rod end, lock nut and rock end. Página 44 de 58STEERING SYSTEM -2002 Toyota Prius 27/02/2013http://ondemand5.com/mric/common/asp/printart.aspx
  • 45. Fig. 42: Identifying Tie Rod Ends Matchmarks Courtesy of TOYOTA MOTOR SALES, U.S.A., INC. b. Loosen the lock nut and remove the tie rod end and lock nut. c. Employ the same manner described above to the other side. 3. Remove RH and LH clamps, clips and rack boots : a. Remove the clamp, clip and rack boot. Mark the RH and LH rack boots. b. Employ the same manner described above to the other side. 4. REMOVE RH AND LH RACK ENDS CLAW WASHERS CAUTION: Be careful not to damage the boot. NOTE: Avoid any impact on the steering rack. Página 45 de 58STEERING SYSTEM -2002 Toyota Prius 27/02/2013http://ondemand5.com/mric/common/asp/printart.aspx
  • 46. Fig. 43: Unstaking Claw Washer Courtesy of TOYOTA MOTOR SALES, U.S.A., INC. a. Using a screwdriver and a hammer, unstake the washer. NOTE: Use SST 09922 - 10010 in the direction shown in Fig. 44 . Mark the RH and LH rack ends. Página 46 de 58STEERING SYSTEM -2002 Toyota Prius 27/02/2013http://ondemand5.com/mric/common/asp/printart.aspx
  • 47. Fig. 44: Removing Rack End Courtesy of TOYOTA MOTOR SALES, U.S.A., INC. b. Using a spanner, hold the steering rack steadily and using SST, remove the rack end. SST 09922 - 10010. c. Remove the claw washer. d. Employ the same manner described above to the other side. 5. Remove the bolt and earth wire. REASSEMBLY 1. Install the earth wire with the bolt. Torque: 5.5 N.m (60 kgf.cm, 52 in.lbf) 2. Install RH and LH claw washers and rack ends : NOTE: When using a vise, do not overtighten it. NOTE: Align the claws of the claw washer with the steering rack grooves. Página 47 de 58STEERING SYSTEM -2002 Toyota Prius 27/02/2013http://ondemand5.com/mric/common/asp/printart.aspx
  • 48. Fig. 45: Installing Claw Washer & Rack End Courtesy of TOYOTA MOTOR SALES, U.S.A., INC. a. Install a new claw washer and temporarily install the rack end. NOTE: Use a torque wrench with a fulcrum length of 380 mm (14.96 in.). Use SST 09922 - 10010 in the direction shown in Fig. 46 . Página 48 de 58STEERING SYSTEM -2002 Toyota Prius 27/02/2013http://ondemand5.com/mric/common/asp/printart.aspx
  • 49. Fig. 46: Torquing Rack End Courtesy of TOYOTA MOTOR SALES, U.S.A., INC. b. Using a spanner, hold the steering rack steadily and using SST, torque the rack end. SST 09922 - 10010. Torque: 62 N.m (630 kgf.cm, 46 ft.lbf) . CAUTION: Avoid any impact on the steering rack. Página 49 de 58STEERING SYSTEM -2002 Toyota Prius 27/02/2013http://ondemand5.com/mric/common/asp/printart.aspx
  • 50. Fig. 47: Staking Claw Washer Courtesy of TOYOTA MOTOR SALES, U.S.A., INC. c. Using a brass bar and a hammer, stake the claw washer. d. Employ the same manner described above to the other side. 3. Install RH and LH rack boots, clips and clamps : a. Ensure that the steering rack hole is not clogged with grease. b. Install the boot, clip and clamp. c. Employ the same manner described above to the other side. 4. Install RH and LH tie rod ends and lock nut : a. Screw the lock nut and tie rod end onto the rack end and the matchmarks aligned. CAUTION: If the hole is clogged, the pressure inside the boot will change after it is assembled and the steering wheel is turned. CAUTION: Be careful not to damage or twist the boot. Página 50 de 58STEERING SYSTEM -2002 Toyota Prius 27/02/2013http://ondemand5.com/mric/common/asp/printart.aspx
  • 51. Fig. 48: Identifying Tie Rod Ends Matchmarks Courtesy of TOYOTA MOTOR SALES, U.S.A., INC. b. After adjusting toe-in, torque the nut. See SPECIFICATIONS & PROCEDURES . c. Employ the same manner described above to the other side. INSTALLATION Step 1 - Install Electric Power Steering Gear Assembly NOTE: Install the bracket with the inscribed mark facing to the front of the vehicle. Página 51 de 58STEERING SYSTEM -2002 Toyota Prius 27/02/2013http://ondemand5.com/mric/common/asp/printart.aspx
  • 52. Fig. 49: Identifying Inscribed Mark & Installation Direction Of Bracket Courtesy of TOYOTA MOTOR SALES, U.S.A., INC. Página 52 de 58STEERING SYSTEM -2002 Toyota Prius 27/02/2013http://ondemand5.com/mric/common/asp/printart.aspx
  • 53. Fig. 50: Locating Electric Power Steering Gear To Suspension Member Mounting Bolts Courtesy of TOYOTA MOTOR SALES, U.S.A., INC. a. Install the grommet and bracket to the electric power steering gear assembly. b. Install the electric power steering gear assembly with the 4 new bolts to the front suspension member. Torque: 83 N.m (850 kgf.cm, 61 ft.lbf) c. Install the STABILIZER BAR . d. To prevent the main shaft lower dust seal from damaging, wind vinyl tape on the serrated part of the control valve shaft. Página 53 de 58STEERING SYSTEM -2002 Toyota Prius 27/02/2013http://ondemand5.com/mric/common/asp/printart.aspx
  • 54. Fig. 51: Identifying Control Valve Shaft Serrations Courtesy of TOYOTA MOTOR SALES, U.S.A., INC. e. Turn over the main shaft lower dust seal from the engine compartment side to the cab. Página 54 de 58STEERING SYSTEM -2002 Toyota Prius 27/02/2013http://ondemand5.com/mric/common/asp/printart.aspx
  • 55. Fig. 52: Determining Engine Compartment & Cab Side Of Main Shaft Lower Seal Courtesy of TOYOTA MOTOR SALES, U.S.A., INC. Step 2 - Install Suspension Member & Electric Power Steering Gear Assembly Install SUSPENSION MEMBER AND ELECTRIC POWER STEERING GEAR ASSEMBLY . Step 3 - Connect Torque Rod Connect TORQUE ROD . Step 4 - Connect EMPS Bracket & 2 Connectors a. Connect the EMPS bracket with the 2 bolts. NOTE: For torque rod location, see Fig. 36 . Página 55 de 58STEERING SYSTEM -2002 Toyota Prius 27/02/2013http://ondemand5.com/mric/common/asp/printart.aspx
  • 56. Fig. 53: Locating EMPS Bracket Mounting Bolts & Ground Wire Courtesy of TOYOTA MOTOR SALES, U.S.A., INC. Torque: 5.5 N.m (60 kgf.cm, 52 in.lbf) b. Connect the earth wire with the bolt. Torque: 5.5 N.m (60 kgf.cm, 52 in.lbf) c. Connect the 2 clamps. d. Connect the 2 connectors. Step 5 - Connect Lower Suspension Arm To Lower Ball Joint See BALL JOINTS . Step 6 - Connect Stabilizer Bar See STABILIZER BAR . Step 7 - Connect No. 2 Intermediate Shaft Assembly Página 56 de 58STEERING SYSTEM -2002 Toyota Prius 27/02/2013http://ondemand5.com/mric/common/asp/printart.aspx
  • 57. a. Put the dust seal back to the engine compartment side. b. Remove the vinyl tape from the serrated part of the control valve shaft. c. Align the matchmarks on the No. 2 intermediate shaft assembly and control valve shaft. d. Install the bolt "B" and torque the bolt "A". Fig. 54: Locating No. 2 Intermediate Shaft Matchmarks & Identifying Bols A & B Courtesy of TOYOTA MOTOR SALES, U.S.A., INC. Torque: 35 N.m (360 kgf.cm, 22 ft.lbf) Step 8 - Connect Tie Rod Ends Connect RH AND LH TIE ROD ENDS . Step 9 - Place Front Wheels Facing Straight Ahead Step 10 - Center Spiral Cable See STEP 16 - CENTER SPIRAL CABLE . Step 11 - Install Steering Wheel NOTE: Do it with the front of the vehicle jacked up. Página 57 de 58STEERING SYSTEM -2002 Toyota Prius 27/02/2013http://ondemand5.com/mric/common/asp/printart.aspx
  • 58. a. Align the matchmarks on the steering wheel and steering column main shaft. b. Temporarily tighten the steering wheel set nut. Step 12 - Check Steering Wheel Center Point Step 13 - Torque Steering Wheel Set Nut Torque: 50 N.m (510 kgf.cm, 37 ft.lbf) . Step 14 - Install Steering Wheel Pad See STEP 18 - INSTALL STEERING WHEEL PAD . Step 15 - Check Front Wheel Alignment Step 16 - Perform Calibration Of Torque Sensor Zero Point See STEP 3 - CALIBRATION OF TORQUE SENSOR ZERO POINT under PRE-CHECK . © 2008 Mitchell Repair Information Co., LLC. Página 58 de 58STEERING SYSTEM -2002 Toyota Prius 27/02/2013http://ondemand5.com/mric/common/asp/printart.aspx