1. GARRETT VNT / GT15 ~ 25 Turbocharger
Overhaul Instruction
Before you read this instruction, I have to say sorry my English is not that good to describe this
instruction well. If there is anything wrong or better words to describe this instruction, just email
me to Kansai_sport@hotmail.com
I would appreciate that.
Eiji Takada in Osaka, Japan
20070326
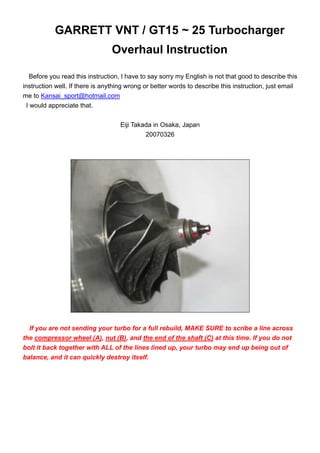
If you are not sending your turbo for a full rebuild, MAKE SURE to scribe a line across
the compressor wheel (A), nut (B), and the end of the shaft (C) at this time. If you do not
bolt it back together with ALL of the lines lined up, your turbo may end up being out of
balance, and it can quickly destroy itself.
2. Put an open-end wrench on the "nut" on the end of the turbine wheel, put a ratchet on
the nut on the compressor end of the shaft, and remove the nut. Be VERY careful of the
wheels, the blades can really tear your hands up. It is safest to wrap them in towels,
because if the nut breaks free and your hands hit either wheel.
Place the turbine blade "nut" in a vice, and either use a T-handle socket to remove the
compressor blade nut, or when using the ratchet, make sure to hold the socket so that the
ratchet is only twisting the nut, not placing any side load on the center shaft. Evidently it
is easy to bend the center shaft if you place too much of a side load on it when removing
the nut. When I removed the one in the picture, I was very careful to grab the ratchet at the
rotating end and put all the twisting force directly through the socket, without putting any
side load on the shaft.
4. Remove the 4 bolts and then you can see the seal plate with flinger set.
5. Here is flinger set with piston ring. This VNT / GT15~25 rebuild kit Kansai_Sport offers
goes with 3 different types of thrust flingers that can fit all the VNT / GT15~25
turbocharger.
6. Now, let’s see the inside of bearing housing
Remove the O-Ring and thrust bearing
7. Remove the lock nut and then you can see journal bearing and thrust ring…. Remove all
of them, too.
Before you install any new repair kit, please remove all the carbon as possible as you
can.
8. Here's a complete VNT / GT15~25 Rebuild kit you got from kansai_sport. This kit goes with 2
journal bearings and 3 types of flinger for all Garrett VNT / GT15~25 turbocharger.
9. Now, let’s see how we install new rebuild kit into bearing housing.
Install new journal bearing into bearing housing
Here is a lock nut
12. Let’s see how we assemble thrust flinger, piston ring and then press the set into seal plate
Press the piston ring (Comp. side) into flinger
Use a tool with sharp head to press piston ring and then push entire flinger set into seal plate
13. Shorter
Longer
Make sure the flinger can spin smoothly after you press the flinger set into seal
plate.
And be careful, there is 4 holes for bolts to lock the seal plate and bearing
housing, but there is shorter and longer distance between bolts.
14. Now, let’s see how to clean turbine shaft wheel and piston ring.
Remove the used piston ring and Polish up the shaft using 1200 grit sand paper to remove
surface varnish then polish it with some kind of metal polish. For best operation the turbo shaft
should shine with no scoring marks or dull spots. Rinse the shaft and exhaust wheel assembly
under water to get rid of all the polish. Clean the assembly again with lighter fluid or paint thinner
to get rid of any water or contaminants. Coat the assembly immediately (except the exhaust
wheel) with engine oil to prevent surface rust which forms almost instantly after cleaning.
15. The left one is the old turbine shaft and wheel with the piston ring in place. Please remove the
carbon and install a new piston ring.
16. Here shows a turbine wheel
with new piston ring
Here's the sealing ring and turbine wheel. that will close up when you put the shaft into the
bearing housing.
When you install turbine shaft wheel with piston ring into bearing housing, please make the
gap of piston ring toward oil feeding hole to reduce possibility of oil leaking.
17. Make sure “A”, “B”, “C” go back to original position as a line before you take
apart this CHRA