SlideShare a Scribd company logo
1 of 30
Download to read offline
ERP13-15VC (B888)
SERVICE MANUAL CONTENTS
SECTION
PART
NUMBER
YRM
NUMBER
REV
DATE
OPERATOR'S CAB........................................................................................................ 550025937 0100 YRM 1446 09/14
FRAME............................................................................................................................ 550038795 0100 YRM 1514 12/13
AC MOTOR REPAIR...................................................................................................... 550038796 0620 YRM 1515 12/13
LOAD AXLE.................................................................................................................... 550038797 1300 YRM 1516 12/13
STEERING SYSTEM...................................................................................................... 550038798 1600 YRM 1517 12/13
BRAKE SYSTEM............................................................................................................ 550038799 1800 YRM 1518 12/13
HYDRAULIC SYSTEM.................................................................................................... 550038800 1900 YRM 1519 05/14
HYDRAULIC CLEANLINESS PROCEDURES............................................................... 550073240 1900 YRM 1620 12/14
MAIN CONTROL VALVES............................................................................................. 550038801 2000 YRM 1520 05/14
CYLINDER REPAIR (MAST S/N A270, A271, A272, C661, C662, C663)..................... 550038802 2100 YRM 1521 05/14
WIRE HARNESS REPAIR.............................................................................................. 524223769 2200 YRM 1128 12/14
USER INTERFACE SUPERVISOR................................................................................. 524319497 2200 YRM 1335 09/14
USER INTERFACE SERVICE TECHNICIAN................................................................. 524319498 2200 YRM 1336 09/14
ELECTRICAL SYSTEM.................................................................................................. 550038805 2200 YRM 1524 09/14
INDUSTRIAL BATTERY................................................................................................. 524158040 2240 YRM 0001 09/14
MAST REPAIR (S/N A270, A271, A272, C661, C662, AND C663)............................... 550038806 4000 YRM 1525 02/14
METRIC AND INCH (SAE) FASTENERS....................................................................... 524150797 8000 YRM 0231 10/13
PERIODIC MAINTENANCE............................................................................................ 550038807 8000 YRM 1526 09/14
CAPACITIES AND SPECIFICATIONS........................................................................... 550038808 8000 YRM 1527 05/14
DIAGRAMS..................................................................................................................... 550038809 8000 YRM 1528 09/14
DIAGNOSTIC TROUBLESHOOTING MANUAL............................................................ 524319504 9000 YRM 1377 10/14
Service information for Cummins diesel engines can be ordered through the Hyster Literature Distribution Center.
PART NO. 550038790 (12/14)
General
This Service Manual describes how the cab operates
and includes replacement and repair instructions for
the following cab components (see Figure 1):
• Front, rear, and cab door window panels
• Windshield wipers
• Roof liner
• Roof top panel
• Cab doors
• Cab heater
• Weather panels
Some of the described components are options that
may not be present on each cab. The operation of the
various switches and controls can be found in the
Operating Manual.
1. FRONT WINDOW PANEL
2. DOOR WINDOW PANEL
3. WINDSHIELD WIPER
4. CAB DOOR
5. ROOF TOP PANEL
Figure 1. Operator's Cab
0100 YRM 1446 General
1
DISCHARGING THE CAPACITORS
WARNING
DO NOT make repairs or adjustments unless you
have been properly trained and authorized to do
so. Improper repairs and adjustments can create
dangerous operating conditions. DO NOT operate
a lift truck that needs repairs. Report the need for
repairs to your supervisor immediately. If repair is
necessary, attach a DO NOT OPERATE tag on the
steering wheel and disconnect the battery.
Disconnect the battery and allow the capacitors to
discharge before opening any compartment
covers or inspecting or repairing the electrical
system. DO NOT place tools on top of the battery.
If a tool causes a short circuit, the high current
flow from the battery can cause personal injury or
property damage.
Some checks and adjustments are performed with
the battery connected. DO NOT connect the
battery until the procedure instructs you to do so.
Never wear any metallic items on your fingers,
arms, or neck. Metal items can accidentally make
an electrical connection and cause injury.
Before performing any tests or adjustments, block
the lift truck to prevent unexpected movement.
The capacitor in the transistor controller(s) can
hold an electrical charge for about 10 seconds
after the battery is disconnected. To prevent an
electrical shock and personal injury, discharge
the capacitor(s) before inspecting or repairing any
component in the drive unit compartment. Make
certain that the battery has been disconnected.
DO NOT short across the motor controller
terminals with a screwdriver or jumper wire.
Make certain the Emergency-Disconnect switch
has not been activated. This will isolate the
controller and prevent the capacitors from
discharging properly. The proper way to
disconnect the battery is by separating the battery
connectors.
Before performing work on the cab, the capacitors
need to be discharged as described below:
1. Ensure the capacitors are discharged by
performing Step 2 through Step 6 below.
2. Turn the key or keyless switch to the OFF
position.
3. Disconnect the battery by separating the
connectors.
4. Block the drive wheels to prevent the lift truck
from moving.
5. Make sure the Emergency-Disconnect switch
HAS NOT been activated. If the Emergency-
Disconnect switch is activated, rotate the switch
to the right until it pops up.
6. Press horn button. Wait 30 seconds to be sure
capacitors are fully discharged.
Window Replacement
FRONT PANEL
Remove, Lift Truck Models ERP22-35VL
(ERP045-070VL) (A976), ERP40-50VM,
ERP50-55VM6 (ERP080-120VM, ERP100VML)
(A985), ERP15-20VT (ERP030-040VT) (G807),
and ERP16-20VF (ERP30-40VF) (A955)
WARNING
All windows installed in the cab are made of
safety glass. All replacement windows must be
made of the correct material and must be made
the correct thickness. Failure to have the correct
material or thickness may cause the glass to
break easily when struck and may cause personal
injury.
WARNING
Disconnect the battery before doing any work on
the electrical system. Serious injury to personnel
and/or damage to lift truck components can occur
if battery is not disconnected.
Discharge capacitors as directed in the General
section of this manual.
Window Replacement 0100 YRM 1446
2
NOTE: In Step 1 and Step 2 note placement of com-
ponents during removal to aid in installation.
1. Remove nut, bolt, and six washers from upper
right hand corner of front window. See Figure 2.
2. Remove nut cover, nut, five washers, and screw
from front window in five places. Remove front
window from overhead guard. See Figure 3.
NOTE: OVERHEAD GUARD NOT SHOWN FOR
CLARITY. WIPER KIT SHOWN NOT THE SAME ON
ALL LIFT TRUCK MODELS.
1. FRONT WINDOW
2. INSERT
3. WASHER
4. SCREW
5. NUT COVER
6. WIRE HARNESS
7. WIPER KIT
8. SWITCH
9. CAPSCREW
10. BOLT
11. NUT
12. BRACKET
Figure 2. Front Panel and Wiper
3. Remove and discard seal from front window. See
Figure 3.
NOTE: Perform Step 4 for the following lift truck mod-
els
• ERP22-35VL (ERP045-070VL) (A976)
• ERP40-50VM, ERP50-55VM6
(ERP080-120VM, ERP100VML) (A985)
4. Remove light brackets from overhead guard, if
equipped. See manual Electrical System
2200YRM1369 for procedures.
NOTE: OVERHEAD GUARD NOT SHOWN FOR
CLARITY.
1. FRONT WINDOW
2. SEAL
3. SCREW
4. WASHER
5. BRACKET
6. NUT
7. NUT COVER
8. LIGHT BRACKET
Figure 3. Front Panel Assembly
0100 YRM 1446 Window Replacement
3
Remove, Lift Truck Models ERP13VC,
ERP15VC (B888)
WARNING
All windows installed in the cab are made of
safety glass. All replacement windows must be
made of the correct material and must be made
the correct thickness. Failure to have the correct
material or thickness may cause the glass to
break easily when struck and may cause personal
injury.
WARNING
Disconnect the battery before doing any work on
the electrical system. Serious injury to personnel
and/or damage to lift truck components can occur
if battery is not disconnected.
Discharge capacitors as directed in the General
section of this manual.
1. Move wiper blades away from front panel.
2. Remove inserts, wheel nuts, capscrews, and grab
handle from mounting bracket on front panel
frame. See Figure 4.
3. If equipped, remove light brackets from top of
front panel frame. See Electrical System
2200YRM1524 for procedures.
4. Remove top two capscrews used to mount steer-
ing column. See Figure 5.
5. Remove six capscrews, nuts, front panel and front
panel frame from lift truck. See Figure 5.
Clean
WARNING
Compressed air can move particles so that they
cause injury to the user or to other personnel.
Make sure that the path of the compressed air is
away from all personnel. Wear protective goggles
or a face shield to prevent injury to the eyes.
1. Using compressed air, blow dirt and debris from
components as needed.
2. Using a lint free cloth, wipe down front window
and other components as needed.
Inspect
1. Inspect front window for damage and cracks, re-
place if damaged.
2. For lift truck models ERP13VC, ERP15VC
(B888), inspect front panel and steel frame for
damage and cracks, replace if damaged.
3. Inspect components and hardware for cracks and
defects. Replace as needed.
1. INSERT
2. WHEEL NUT
3. CAPSCREW
4. GRAB HANDLE
5. MOUNTING BRACKET
6. FRONT PANEL FRAME
Figure 4. Grab Handle, Remove and Install, Lift
Truck Models ERP13VC, ERP15VC (B888)
Window Replacement 0100 YRM 1446
4
1. CAPSCREW (FRONT PANEL AND FRAME)
2. NUT
3. CAPSCREW (STEERING COLUMN)
4. LIGHT BRACKET
5. FRONT PANEL
6. FRONT PANEL FRAME
Figure 5. Front Panel and Frame Components, Lift
Truck Models ERP13VC, ERP15VC (B888)
Install, Lift Truck Models ERP22-35VL
(ERP045-070VL) (A976), ERP40-50VM,
ERP50-55VM6 (ERP080-120VM, ERP100VML)
(A985), ERP15-20VT (ERP030-040VT) (G807),
and ERP16-20VF (ERP30-40VF) (A955)
1. Install seal on front window. See Figure 3.
NOTE: Perform Step 2 for the following lift truck mod-
els
• ERP22-35VL (ERP045-070VL) (A976)
• ERP40-50VM, ERP50-55VM6
(ERP080-120VM, ERP100VML) (A985)
2. Install light brackets on overhead guard, if equip-
ped. See section Electrical System
2200YRM1369 for procedures.
3. Install front window on overhead guard. Install two
washers, screw, two washers, bracket, washer,
nut, and nut cover on front window in five places.
See Figure 3.
4. Install two washers, bolt, four washers, and nut on
upper right hand corner of front window. See Fig-
ure 2.
Install, Lift Truck Models ERP13VC, ERP15VC
(B888)
1. Install grab handle to mounting bracket on front
panel frame using inserts, wheel nuts, and cap-
screws. See Figure 4.
NOTE: Apply liquid sealant, Yale P/N 501702902, to
capscrews prior to installation.
2. Install front panel and front panel frame to lift
truck with six capscrews and nuts. Tighten cap-
screws to 19 N•m (168 lbf in). See Figure 5.
3. Install top two capscrews for steering column.
See Figure 5.
4. If equipped, install light brackets from top of front
panel frame. See Electrical System
2200YRM1524 for procedures.
5. Push wiper blades into position on the front panel.
0100 YRM 1446 Window Replacement
5
REAR PANEL
Remove
1. Remove flange nut, cover, wiper arm, and wiper
blade from wiper motor. See Figure 6.
2. Disconnect wiring harness from wiper motor and
remove wiper motor from rear panel. See Fig-
ure 6.
3. Remove two screws and latch from overhead
guard legs in two places. See Figure 6.
4. Remove five capscrews and bracket from cab
body. See Figure 6.
5. Disconnect gas spring from lower ball stud in two
places. See Figure 7.
6. Remove cap, capscrew and washer from over-
head guard and rear panel in two places. Remove
rear panel from overhead guard. See Figure 6.
7. If damaged, remove ball stud from overhead
guard leg in two places. See Figure 7.
8. Remove nut cover, nut, four washers, and hinge
from rear panel in two places. See Figure 7.
9. Remove nut cover, nut, plate, washer, screw, and
cap from hinge. Repeat for second hinge. See
Figure 7.
10. Disconnect gas spring from upper ball stud on
knob in two places. See Figure 7.
11. Remove ball stud from knob in two places. See
Figure 7.
12. Remove screw, three washers, o-ring, and knob
from rear panel in two places. See Figure 7.
13. Remove nut cover, nut, and two washers from
connector on outside of rear panel. Repeat for op-
posite side. See Figure 7.
14. Remove plug, grip, nut, two washers, plug, con-
nector, and two washers from inside of rear panel.
Repeat for opposite side. See Figure 7.
15. Remove and discard seal from rear screen. See
Figure 7.
Clean
WARNING
Compressed air can move particles so that they
cause injury to the user or to other personnel.
Make sure that the path of the compressed air is
away from all personnel. Wear protective goggles
or a face shield to prevent injury to the eyes.
1. Using compressed air, blow dirt and debris from
components as needed.
2. Using a lint free cloth, wipe down rear screen and
other components as needed.
Inspect
1. Inspect components for cracks and defects. Re-
place as needed.
2. Inspect gas springs for proper travel and exten-
sion. Replace as necessary.
a. Extended length; 735 mm (28.9 in.).
b. Stroke length, 315 mm (12.4 in.).
c. Resistance, 150 N (33.7 lbf).
3. Inspect wiper blade for cracks and tearing. Re-
place as needed.
Install
1. Install seal on rear screen. See Figure 7.
2. Install two washers, connector, plug, two wash-
ers, nut, grip, and plug on inside of rear panel.
Repeat for opposite side. See Figure 7.
3. Install two washers, nut, and nut cover on con-
nector on outside of rear panel. Repeat for oppo-
site side. See Figure 7.
4. Install knob, O-ring, three washers, and screw on
rear screen in two places. See Figure 7.
5. Install ball stud on knob in two places. See Fig-
ure 7.
6. Connect gas spring to upper ball stud on knob in
two places. See Figure 7.
Window Replacement 0100 YRM 1446
6
NOTE: OVERHEAD GUARD NOT SHOWN FOR CLARITY.
1. REAR PANEL
2. CAP
3. CAPSCREW
4. WASHER
5. SCREW
6. WIRE HARNESS
7. SWITCH
8. WIPER MOTOR
9. WIPER BLADE
10. WIPER ARM
11. BRACKET
12. LATCH
13. COVER
14. FLANGE NUT
Figure 6. Rear Panel and Wiper Attachment
0100 YRM 1446 Window Replacement
7
NOTE: OVERHEAD GUARD NOT SHOWN FOR CLARITY.
1. REAR PANEL
2. SEAL
3. NUT COVER
4. PLATE
5. WASHER
6. HINGE
7. SCREW
8. NUT
9. BALL STUD
10. GAS SPRING
11. KNOB
12. O-RING
13. PLUG
14. GRIP
15. LATCH
16. CONNECTOR
17. BRACKET
18. CAP
Figure 7. Rear Panel Assembly
Window Replacement 0100 YRM 1446
8
7. Install plate, washer, screw, nut, nut cover, and
cap on hinge. Repeat for second hinge. See Fig-
ure 7.
8. Install washer, hinge, screw, three washers, nut,
and nut cover on rear panel in two places. See
Figure 7.
9. If removed, install ball stud on overhead guard leg
in two places. See Figure 7.
10. Install rear panel on overhead guard. Install
washer, capscrew, and cap on rear panel and
overhead guard in two places. See Figure 6.
11. Connect gas spring to two lower ball stud in two
places. See Figure 7.
12. Install bracket and five capscrews on cab body.
See Figure 6.
13. Install latch and two screws on overhead guard
legs in two places. See Figure 6.
14. Install rear wiper motor on rear panel and connect
wiring harness to rear wiper motor. See Figure 6.
15. If removed, install wiper blade on wiper arm. See
Figure 6.
16. Using a flange nut, install wiper arm and wiper
blade on wiper motor. See Figure 6.
DOOR WINDOW
Disassemble Window
NOTE: If repair to non-sliding window is necessary,
contact local glass repair shop.
NOTE: The following procedure applies to right and
left doors with sliding windows.
1. Remove window frame and window assembly
from door assembly. See Figure 8.
2. Remove two latches from two sliding windows.
See Figure 8.
3. Remove two sliding windows from window frame.
See Figure 8.
4. Remove and discard four guides from two sliding
windows. See Figure 8.
5. Remove and discard seal from rear of sliding win-
dow. See Figure 8.
6. Remove and discard five seals from window
frame. See Figure 8.
7. Remove and discard strip seal from window
frame. See Figure 8.
8. Remove and discard six clips from window frame.
See Figure 8.
9. Remove and discard edge protector from window
frame. See Figure 8.
Clean
WARNING
Compressed air can move particles so that they
cause injury to the user or to other personnel.
Make sure that the path of the compressed air is
away from all personnel. Wear protective goggles
or a face shield to prevent injury to the eyes.
1. Using compressed air, blow dirt and debris from
components as needed.
2. Using a lint free cloth, wipe down windows on
both doors and other components as needed.
Inspect
1. Inspect all components and hardware for cracks
and defects. Replace as needed.
2. Inspect latch assembly and hardware. Ensure
proper operation.
3. Inspect windows for chips and cracks. Replace as
necessary.
Assemble Window
NOTE: The following procedure applies to right and
left doors.
1. Install edge protector and six clips on window
frame. See Figure 8.
2. Install strip seal and five seals on window frame.
See Figure 8.
3. Install seal on rear of sliding window. See Fig-
ure 8.
4. Install four guides on two sliding windows. See
Figure 8.
0100 YRM 1446 Window Replacement
9
5. Install two sliding windows on window frame. See
Figure 8.
6. Install two latches to sliding windows. See Fig-
ure 8.
7. Install window frame and window assembly to
door assembly. See Figure 8.
NOTE: RIGHT-HAND SIDE SHOWN.
1. SLIDING WINDOW
2. SEAL
3. LATCH
4. STRIP SEAL
5. CLIP
6. WINDOW FRAME
7. EDGE PROTECTOR
8. GUIDE
Figure 8. Window Components
Window Replacement 0100 YRM 1446
10
Window Wipers Replacement
FRONT WIPER ASSEMBLY
NOTE: Lift truck models ERC22-35VG
(ERC045-070VG) (A968) are not equipped with wind-
shield wiper and motor.
Remove, Lift Truck Models ERP22-35VL
(ERP045-070VL) (A976), ERP40-50VM,
ERP50-55VM6 (ERP080-120VM, ERP100VML)
(A985), ERP15-20VT (ERP030-040VT) (G807),
and ERP16-20VF (ERP30-40VF) (A955)
1. Disconnect wire harness from wiper motor con-
nector.
See Figure 9 for lift truck models
• ERP22-35VL (ERP045-070VL) (A976)
See Figure 10 for lift truck models
• ERP15-20VT (ERP030-040VT) (G807)
• ERP16-20VF (ERP30-40VF) (A955)
See Figure 11 for lift truck models
• ERP40-50VM, ERP50-55VM6
(ERP080-120VM, ERP100VML) (A985)
2. Disconnect wire harness from washer pump con-
nector.
See Figure 9 for lift truck models
• ERP22-35VL (ERP045-070VL) (A976)
See Figure 10 for lift truck models
• ERP15-20VT (ERP030-040VT) (G807)
• ERP16-20VF (ERP30-40VF) (A955)
See Figure 11 for lift truck models
• ERP40-50VM, ERP50-55VM6
(ERP080-120VM, ERP100VML) (A985)
NOTE: Perform Step 3 and Step 4 for lift truck mod-
els ERP22-35VL (ERP045-070VL) (A976).
3. Disconnect hose (6) from connector (7). See Fig-
ure 9.
4. Remove two clamps (5), hose (6), and nozzle (4)
from wiper arm. Set aside for installation. See Fig-
ure 9.
NOTE: Perform Step 5 for the following lift truck mod-
els
• ERP15-20VT (ERP030-040VT) (G807)
• ERP16-20VF (ERP30-40VF) (A955)
5. Disconnect hose (15) from connector (11). See
Figure 10.
NOTE: Perform Step 6 and Step 7 for lift truck mod-
els ERP40-50VM, ERP50-55VM6 (ERP080-120VM,
ERP100VML) (A985).
6. Disconnect hose (17) from connector (7). See
Figure 11.
7. Disconnect hose from nozzle clip. Remove nozzle
clip and nozzle from wiper arm. See Figure 11.
8. Remove two flange nuts, wiper arms, and wiper
blade from wiper motor. See Figure 12.
9. Remove wiper blade from wiper arm.
See Figure 9 for lift truck models
• ERP22-35VL (ERP045-070VL) (A976)
See Figure 10 for lift truck models
• ERP15-20VT (ERP030-040VT) (G807)
• ERP16-20VF (ERP30-40VF) (A955)
See Figure 11 for lift truck models
• ERP40-50VM, ERP50-55VM6
(ERP080-120VM, ERP100VML) (A985)
10. Remove two nut covers, two nuts, two washers,
and wiper motor from lift truck. See Figure 12.
11. Disconnect hose from reservoir.
See Figure 9 for lift truck models
• ERP22-35VL (ERP045-070VL) (A976)
See Figure 10 for lift truck models
• ERP15-20VT (ERP030-040VT) (G807)
• ERP16-20VF (ERP30-40VF) (A955)
See Figure 11 for lift truck models
• ERP40-50VM, ERP50-55VM6
(ERP080-120VM, ERP100VML) (A985)
0100 YRM 1446 Window Wipers Replacement
11
1. WIPER MOTOR
2. WIPER ARM
3. WIPER BLADE
4. NOZZLE (CLIP)
5. CLAMP
6. HOSE
7. CONNECTOR (SPRAY NOZZLE)
8. HOSE
9. CHECK VALVE
10. BRACKET
11. RESERVOIR
12. WASHER
13. CAPSCREW
14. WASHER PUMP CONNECTOR
15. WIPER MOTOR CONNECTOR
Figure 9. Front Wiper Assembly for Lift Truck Models ERP22-35VL (ERP045-070VL) (A976)
Window Wipers Replacement 0100 YRM 1446
12
1. WIPER MOTOR
2. WIPER ARM
3. WIPER BLADE
4. RESERVOIR
5. CAP
6. CAPSCREW
7. WASHER
8. BRACKET
9. NUT
10. CHECK VALVE
11. CONNECTOR
12. CHECK VALVE CONNECTOR
13. HOSE
14. HOSE
15. HOSE
16. WIRING CONNECTOR
Figure 10. Front Wiper Assembly for Lift Truck Models ERP15-20VT (ERP030-040VT) (G807) and
ERP16-20VF (ERP30-40VF) (A955)
0100 YRM 1446 Window Wipers Replacement
13
Figure 11. Front Wiper Assembly for Lift Truck Models ERP40-50VM, ERP50-55VM6 (ERP080-120VM,
ERP100VML) (A985)
Window Wipers Replacement 0100 YRM 1446
14
Legend for Figure 11
1. CAPSCREW
2. WASHER
3. NUT
4. WIPER ARM
5. WIPER BLADE
6. WIPER MOTOR
7. CONNECTOR (SPRAY NOZZLE)
8. CAP
9. RESERVOIR BRACKET
10. WASHER RESERVOIR
11. CHECK VALVE
12. INSERT
13. SWITCH
14. FUSES
15. FUSES MOUNTING BRACKET
16. WIRE HARNESS
17. HOSE
18. NOZZLE CLIP
19. HOSE
20. WASHER PUMP CONNECTOR
1. WIPER MOTOR
2. WASHER
3. NUT
4. NUT COVER
5. WIPER ARM
6. FLANGE NUTS
7. WIPER BLADE
Figure 12. Wiper Attachment
0100 YRM 1446 Window Wipers Replacement
15
NOTE: Perform Step 12 and Step 13 for lift truck
models ERP22-35VL (ERP045-070VL) (A976).
12. Remove two capscrews, two washers, and reser-
voir from cowl.
13. Remove four capscrews, washers, and reservoir
from bracket. See Figure 9.
NOTE: Perform Step 14 for lift truck models
• ERP15-20VT (ERP030-040VT) (G807)
• ERP16-20VF (ERP30-40VF) (A955)
14. Remove three caps, three nuts, six washers,
three capscrews, reservoir, and bracket from
overhead guard leg. See Figure 10.
NOTE: Perform Step 15 and Step 16 for lift truck
models ERP40-50VM, ERP50-55VM6
(ERP080-120VM, ERP100VML) (A985).
15. Remove two capscrews, washers, nuts, and res-
ervoir from cowl. See Figure 11.
16. Remove caps, capscrews, washers, nuts, and
reservoir from bracket. See Figure 11.
17. Disconnect and remove check valve. Set aside for
installation.
See Figure 9 for lift truck models
• ERP22-35VL (ERP045-070VL) (A976)
See Figure 10 for lift truck models
• ERP15-20VT (ERP030-040VT) (G807)
• ERP16-20VF (ERP30-40VF) (A955)
See Figure 11 for lift truck models
• ERP40-50VM, ERP50-55VM6
(ERP080-120VM, ERP100VML) (A985)
NOTE: Perform Step 18 for lift truck models
ERP22-35VL (ERP045-070VL) (A976).
18. Disconnect and remove connector from hose (8).
Set hose aside for installation. See Figure 9.
NOTE: Perform Step 19 for lift truck models
• ERP15-20VT (ERP030-040VT) (G807)
• ERP16-20VF (ERP30-40VF) (A955)
19. Disconnect and remove connector (11) from hose
(13). Set aside for installation. See Figure 10.
NOTE: Perform Step 20 for lift truck models
ERP40-50VM, ERP50-55VM6 (ERP080-120VM,
ERP100VML) (A985).
20. Disconnect and remove connector (7) from hose
(19). See Figure 11.
Remove, Lift Truck Models ERP13VC,
ERP15VC (B888)
1. Disconnect wire harness from wiper motor con-
nector. See Figure 13.
2. Disconnect washer pump connector from washer
reservoir. See Figure 13.
3. Disconnect hose (19) from connector (14). See
Figure 13.
4. Disconnect hose from nozzle clip. Remove nozzle
clip and nozzle from wiper arm. See Figure 13.
5. Remove two flange nuts, wiper arms, and wiper
blade from wiper motor. See Figure 12.
6. Remove screw, nut, washer, and wiper blade
from wiper arm. See Figure 13.
7. Remove two nut covers, two nuts, two washers,
and wiper motor from lift truck. See Figure 12.
8. Disconnect hose from reservoir.
9. Remove two capscrews, washers, nuts, caps, and
reservoir from mounting bracket on right front
overhead guard leg.
10. Remove two capscrews, washers, nuts, caps, and
reservoir from reservoir mounting bracket. See
Figure 13.
11. Disconnect and remove check valve. Set aside for
installation.
12. Disconnect and remove connector (14) from hose
(16). See Figure 13.
Window Wipers Replacement 0100 YRM 1446
16
Clean
WARNING
Compressed air can move particles so that they
cause injury to the user or to other personnel.
Make sure that the path of the compressed air is
away from all personnel. Wear protective goggles
or a face shield to prevent injury to the yes.
1. Using compressed air, clean outside of wiper mo-
tor, reservoir and wiper arms.
Inspect
1. Inspect hoses for cracks and wear. Replace if
damaged.
2. Check washer reservoir for leaks by filling with
water and checking seams. Replace if leaking.
3. Inspect wiper blades for cracks and tearing. Re-
place as needed.
1. CAP
2. NUT
3. WASHER
4. CAPSCREW
5. WASHER RESERVOIR
6. WASHER RESERVOIR MOUNTING BRACKET
7. SCREW
8. WASHER PUMP CONNECTOR
9. SWITCH
10. NOZZLE CLIP
11. WIPER BLADE
12. WIPER ARM
13. WIPER MOTOR
14. CONNECTOR (SPRAY NOZZLE)
15. CHECK VALVE
16. HOSE
17. WIRE HARNESS
18. WIPER MOTOR CONNECTOR
19. HOSE
Figure 13. Front Wiper Assembly, Lift Truck Models ERP13VC, ERP15VC (B888)
0100 YRM 1446 Window Wipers Replacement
17
Install, Lift Truck Models ERP22-35VL
(ERP045-070VL) (A976), ERP40-50VM,
ERP50-55VM6 (ERP080-120VM, ERP100VML)
(A985), ERP15-20VT (ERP030-040VT) (G807),
and ERP16-20VF (ERP30-40VF) (A955)
NOTE: Perform Step 1 through Step 4 for lift truck
model ERP22-35VL (ERP045-070VL) (A976).
1. Connect hose (8) to connector. See Figure 9.
2. Connect check valve into hose (8). Connect hose
(8) to other end of check valve. See Figure 9.
3. Install reservoir, washers, and four capscrews on
bracket. See Figure 9.
4. Using two washers and two capscrews, install
reservoir on cowl.
NOTE: Perform Step 5 through Step 7 for lift truck
models
• ERP15-20VT (ERP030-040VT) (G807)
• ERP16-20VF (ERP30-40VF) (A955)
5. Connect hose (13) to connector (11). See Fig-
ure 10.
6. Connect check valve to hose (13). Connect hose
(14) to other end of check valve. See Figure 10.
7. Install bracket, pump, six washers, three cap-
screws, three nuts, and three caps on overhead
guard leg. See Figure 10.
NOTE: Perform Step 8 through Step 11 for lift truck
models ERP40-50VM (ERP080-100VM) (A985).
8. Connect hose (19) to connector (7). See Fig-
ure 11.
9. Connect check valve to hose.
10. Install reservoir to bracket using, four nuts, wash-
ers, capscrews, and caps. See Figure 11.
11. Using two nuts, washers, and capscrews, install
reservoir to cowl.
12. Connect hose to reservoir.
See Figure 9 for lift truck models
• ERP22-35VL (ERP045-070VL) (A976)
See Figure 10 for lift truck models
• ERP15-20VT (ERP030-040VT) (G807)
• ERP16-20VF (ERP30-40VF) (A955)
See Figure 11 for lift truck models
• ERP40-50VM, ERP50-55VM6
(ERP080-120VM, ERP100VML) (A985)
13. Using two washers, two nuts, and two caps, in-
stall wiper motor to lift truck. See Figure 12.
14. Install wiper blade on wiper arm.
See Figure 9 for lift truck models
• ERP22-35VL (ERP045-070VL) (A976)
See Figure 10 for lift truck models
• ERP15-20VT (ERP030-040VT) (G807)
• ERP16-20VF (ERP30-40VF) (A955)
See Figure 11 for lift truck models
• ERP40-50VM, ERP50-55VM6
(ERP080-120VM, ERP100VML) (A985)
15. Using two flange nuts, install wiper arm and wiper
blade on wiper motor.
See Figure 9 for lift truck models
• ERP22-35VL (ERP045-070VL) (A976)
See Figure 10 for lift truck models
• ERP15-20VT (ERP030-040VT) (G807)
• ERP16-20VF (ERP30-40VF) (A955)
See Figure 11 for lift truck models
• ERP40-50VM, ERP50-55VM6
(ERP080-120VM, ERP100VML) (A985)
NOTE: Perform Step 16 and Step 17 for lift truck
models ERP22-35VL (ERP045-070VL) (A976).
16. Install nozzle (4), hose (6), and two clamps (5) on
wiper arm. See Figure 9.
17. Connect hose (6) to connector (7). See Figure 9.
NOTE: Perform Step 18 for lift truck models
• ERP15-20VT (ERP030-040VT) (G807)
• ERP16-20VF (ERP30-40VF) (A955)
18. Connect hose (15) to connector (11). See Fig-
ure 10.
Window Wipers Replacement 0100 YRM 1446
18
NOTE: Perform Step 19 for lift truck models
ERP40-50VM, ERP50-55VM6 (ERP080-120VM,
ERP100VML) (A985).
19. Install nozzle clip and nozzle into wiper arm. Con-
nect hose (17) to nozzle. See Figure 11.
20. Connect wire harness to wiper motor connector.
See Figure 9 for lift truck models
• ERP22-35VL (A976)
See Figure 10 for lift truck models
• ERP15-20VT (ERP030-040VT) (G807)
• ERP16-20VF (ERP30-40VF) (A955)
See Figure 11 for lift truck models
• ERP40-50VM, ERP50-55VM6
(ERP080-120VM, ERP100VML) (A985)
21. Connect wire harness to washer pump connector.
See Figure 9 for lift truck models
• ERP22-35VL (ERP045-070VL) (A976)
See Figure 10 for lift truck models
• ERP15-20VT (ERP030-040VT) (G807)
• ERP16-20VF (ERP30-40VF) (A955)
See Figure 11 for lift truck models
• ERP40-50VM, ERP50-55VM6
(ERP080-120VM, ERP100VML) (A985)
Install, Lift Truck Models ERP13VC, ERP15VC
(B888)
1. Connect hose (16) to connector (14). See Fig-
ure 13.
2. Connect check valve to hose.
3. Install reservoir to mounting bracket using two
capscrews, nuts, washers, and caps. See Fig-
ure 13.
4. Using two capscrews, nuts, washers, and caps,
install reservoir and mounting bracket to right
overhead guard leg.
5. Connect hose to reservoir. See Figure 13.
6. Using two washers, two nuts, and two caps, in-
stall wiper motor to lift truck. See Figure 12.
7. Install wiper blade on wiper arm using screw,
washer, and nut. See Figure 13.
8. Using two flange nuts, install wiper arm and wiper
blade on wiper motor. See Figure 12.
9. Install nozzle clip and nozzle into wiper arm. Con-
nect hose (19) to nozzle. See Figure 13.
10. Connect hose (19) to connector (14). See Fig-
ure 13.
11. Connect washer pump to washer reservoir.
12. Connect wire harness to wiper motor. See Fig-
ure 13.
0100 YRM 1446 Window Wipers Replacement
19
Cab Component Repair
ROOF LINER
Remove
NOTE: Perform Step 1 for lift truck model
ERP22-35VL (ERP045-070VL) (A976).
1. Remove seven caps, seven capscrews, and
seven washers from roof liner. See Figure 14.
1. TOP PANEL
2. CAP
3. CAPSCREW
4. WASHER
5. ROOF LINER
6. DOME LIGHT
7. SCREW
Figure 14. Roof Liner for Lift Truck Model
ERP22-35VL (ERP045-070VL) (A976)
NOTE: Perform Step 2 for lift truck models
• ERP15-20VT (ERP030-040VT) (G807)
• ERP16-20VF (ERP30-40VF) (A955)
2. Remove seven capscrews and seven washers
from roof liner. See Figure 15.
1. TOP PANEL
2. CAPSCREW
3. WASHER
4. ROOF LINER
5. DOME LIGHT
6. SCREW
Figure 15. Roof Liner for Lift Truck Model
ERP15-20VT (ERP030-040VT) (G807) and
ERP16-20VF (ERP30-40VF) (A955)
NOTE: Perform Step 3 for lift truck models
ERP40-50VM, ERP50-55VM6 (ERP080-120VM,
ERP100VML) (A985).
3. Remove eight capscrews and eight washers from
roof liner. See Figure 16.
NOTE: Note position of wire harness and washer
hose through notched cutout in rear of roof liner.
4. Disconnect dome light harness and rear wiper
switch harness (if equipped).
Cab Component Repair 0100 YRM 1446
20
1. TOP PANEL
2. CAPSCREW
3. WASHER
4. ROOF LINER
5. DOME LIGHT
6. SCREW
Figure 16. Roof Liner for Lift Truck Models
ERP40-50VM, ERP50-55VM6 (ERP080-120VM,
ERP100VML) (A985)
5. Remove two screws and dome light from roof
liner.
See Figure 14 for truck models
• ERP22-35VL (ERP045-070VL) (A976)
See Figure 15 for truck models
• ERP15-20VT (ERP030-040VT) (G807)
• ERP16-20VF (ERP30-40VF) (A955)
See Figure 16 for lift truck models
• ERP40-50VM, ERP50-55VM6
(ERP080-120VM, ERP100VML) (A985)
6. Remove rear wiper switch from roof liner (if equip-
ped).
7. Remove roof liner from overhead guard.
Clean
WARNING
Compressed air can move particles so that they
cause injury to the user or to other personnel.
Make sure that the path of the compressed air is
away from all personnel. Wear protective goggles
or a face shield to prevent injury to the eyes.
1. Using compressed air, blow dirt and debris off of
roof liner.
2. Using a lint free cloth, wipe down overhead guard.
Inspect
1. Inspect roof liner for cracks and defects. Replace
as needed.
2. Inspect hardware for defects, replace as needed.
Install
1. Install roof liner on overhead guard.
2. Route wire harness and washer hose through
notched cut out in rear of roof liner as noted dur-
ing removal.
3. Install rear wiper switch to preformed cutout of
roof liner (if equipped).
4. Using two screws, install dome light on roof liner.
See Figure 14 for truck models
• ERP22-35VL (ERP045-070VL) (A976)
See Figure 15 for truck models
• ERP15-20VT (ERP030-040VT) (G807)
• ERP16-20VF (ERP30-40VF) (A955)
See Figure 16 for lift truck models
• ERP40-50VM, ERP50-55VM6
(ERP080-120VM, ERP100VML) (A985)
5. Connect dome light harness and rear wiper switch
harness, if equipped.
0100 YRM 1446 Cab Component Repair
21
NOTE: Perform Step 6 for lift truck model
ERP22-35VL (ERP045-070VL) (A976).
6. Install seven washers, seven capscrews, and
seven caps on roof liner. See Figure 14.
NOTE: Perform Step 7 for lift truck models
• ERP15-20VT (ERP030-040VT) (G807)
• ERP16-20VF (ERP30-40VF) (A955)
7. Install seven washers and seven capscrews on
roof liner. See Figure 15.
NOTE: Perform Step 8 for lift truck models
ERP40-50VM, ERP50-55VM6 (ERP080-120VM,
ERP100VML) (A985).
8. Install eight washers and eight capscrews on roof
liner. See Figure 16.
TOP PANEL
Remove, Lift Truck Models ERP22-35VL
(ERP045-070VL) (A976), ERP40-50VM,
ERP50-55VM6 (ERP080-120VM, ERP100VML)
(A985), ERP15-20VT (ERP030-040VT) (G807),
and ERP16-20VF (ERP30-40VF) (A955)
NOTE: Perform Step 1 for lift truck models
• ERP22-35VL (ERP045-070VL) (A976)
• ERP40-50VM, ERP50-55VM6
(ERP080-120VM, ERP100VML) (A985)
1. Disconnect front light wiring. See section Electri-
cal System 2200YRM1369, Lights, for proper
procedures.
WARNING
All windows installed in the cab are made of
safety glass. All replacement windows must be
made of the correct material and must be the cor-
rect thickness. Failure to use the correct material
or thickness may cause the glass to break easily
when struck and may cause personal injury.
NOTE: Due to use of glue and RTV sealer, replace-
ment of top screen is to be done only if damaged.
2. Remove and discard grommets from top panel
assembly. See Figure 17.
3. Remove four nuts, four washers, four capscrews,
and roof panel from top panel assembly. See Fig-
ure 17.
4. Remove and discard seal from screen. See Fig-
ure 17.
5. Remove two nuts, four washers, two hinges, and
pin from screen. See Figure 17.
6. Remove two nut covers, two nuts, two washers,
and plate from screen. See Figure 17.
7. Remove screw, spring, and grip from screen. See
Figure 17.
8. Remove two nut covers, two nuts, two washers,
and grip mounting plate from screen. See Fig-
ure 17.
Remove, Lift Truck Models ERP13VC,
ERP15VC (B888)
The top panel is attached to top of overhead guard
using adhesive tape and pressing it on. See Fig-
ure 18.
WARNING
All windows installed in the cab are made of
safety glass. All replacement windows must be
made of the correct material and must be the cor-
rect thickness. Failure to use the correct material
or thickness may cause the glass to break easily
when struck and may cause personal injury.
NOTE: Due to use of glue and adhesive tape, re-
placement of top screen is to be done only if dam-
aged.
1. Remove damaged top panel from lift truck. Pull
top panel from overhead guard, using a cutting
tool to remove glue and adhesive tape from over-
head guard as top panel is pulled from overhead
guard. See Figure 18.
Clean
WARNING
Compressed air can move particles so that they
cause injury to the user or to other personnel.
Make sure that the path of the compressed air is
away from all personnel. Wear protective goggles
or a face shield to prevent injury to the yes.
1. Using compressed air, blow dirt and debris from
all components as needed.
Cab Component Repair 0100 YRM 1446
22
Figure 17. Top Panel
0100 YRM 1446 Cab Component Repair
23
Legend for Figure 17
1. ROOF PANEL
2. TOP PANEL ASSEMBLY
3. GROMMET
4. SCREEN
5. PIN
6. HINGE
7. WASHER
8. NUT
9. PLATE
10. GRIP MOUNTING PLATE
11. NUT COVER
12. GRIP
13. SPRING
14. SCREW
15. SEAL
1. TOP PANEL ASSEMBLY
2. ADHESIVE TAPE
3. OVERHEAD GUARD
Figure 18. Top Panel, Lift Truck Models ERP13VC,
ERP15VC (B888)
2. Using warm soapy water, clean plastic, rubber,
and vinyl components. Wipe dry with a lint free
cloth.
3. For lift truck models ERP13VC, ERP15VC
(B888), clean top of overhead guard to remove
any glue residual from use of adhesive tape.
Inspect
1. Inspect hinges, rod, spring and grip for damage or
cracks. Replace as needed.
Install, Lift Truck Models ERP22-35VL
(ERP045-070VL) (A976), ERP40-50VM,
ERP50-55VM6 (ERP080-120VM, ERP100VML)
(A985), ERP15-20VT (ERP030-040VT) (G807),
and ERP16-20VF (ERP30-40VF) (A955)
1. Install grip mounting plate, two washers, two nuts,
and two nut covers on screen. See Figure 17.
2. Install grip, spring, and screw on screen. See Fig-
ure 17.
3. Install plate, two washers, two nuts, and two nut
covers on screen. See Figure 17.
4. Install pin, two hinges, four washers, and two nuts
on screen. See Figure 17.
5. Install seal on screen. See Figure 17.
6. Install roof panel, four washers, four capscrews,
and four nuts on top panel assembly. See Fig-
ure 17.
7. Install two grommets to top panel assembly. See
Figure 17.
NOTE: Perform Step 8 for lift truck models
• ERP22-35VL (ERP045-070VL) (A976)
• ERP40-50VM, ERP50-55VM6
(ERP080-120VM, ERP100VML) (A985)
8. Install front light wiring. See section Electrical
System 2200YRM1369, Lights, for proper proce-
dures.
Cab Component Repair 0100 YRM 1446
24
Install, Lift Truck Models ERP13VC, ERP15VC
(B888)
1. Ensure overhead guard is clean and free of old
adhesive tape and glue.
2. Peel off backing from adhesive tape and attach
adhesive tape to all four sides of overhead guard.
See Figure 18.
3. Position top panel above top of overhead guard.
See Figure 18.
4. Press top panel onto top perimeter of overhead
guard and adhesive tape, making sure all edges
are aligned correctly.
Cab Door Assembly
DOOR ASSEMBLY
Remove
Lift Truck Models ERP22-35VL
(ERP045-070VL) (A976) and ERP40-50VM,
ERP50-55VM6 (ERP080-120VM, ERP100VML)
(A985)
WARNING
The door assemblies are heavy, verify the lifting
device being used during repairs can lift the
weight of the parts and assembly.
1. Disconnect gas spring from top of door assembly.
See Figure 19.
2. Remove three capscrews from upper hinge. Re-
move three capscrews from lower hinge. See Fig-
ure 19.
3. Using a lifting device, remove door assembly from
lift truck and set aside.
4. Remove three caps, three bolts, four washers,
bolt, guard, striker, and block from front overhead
guard leg. See Figure 19.
5. Remove gas spring from overhead guard.
6. Remove two caps, two capscrews, two washers,
and bracket from overhead guard. See Figure 19.
7. Repeat Step 1 through Step 6 for opposite side.
Lift Truck Models ERP15-20VT
(ERP030-040VT) (G807) and ERP16-20VF
(ERP30-40VF) (A955)
WARNING
The door assemblies are heavy, verify the lifting
device being used during repairs can lift the
weight of the parts and assembly.
1. Disconnect gas spring from top of door assembly.
See Figure 20.
2. Remove two screws from mounting plate and
hinge in two places. Remove three bolts from
mounting plate and overhead guard leg in two
places. See Figure 20.
3. Using a lifting device, remove door assembly from
lift truck and set aside.
4. Remove two caps, two capscrews, two washers,
bolt, guard, bracket and block from front overhead
guard leg. See Figure 20.
5. Remove gas spring from overhead guard.
6. Remove two caps, two capscrews, two washers,
and bracket from overhead guard. See Figure 20.
7. Repeat Step 1 through Step 6 for opposite side.
0100 YRM 1446 Cab Door Assembly
25
1. DOOR ASSEMBLY (RH)
2. DOOR ASSEMBLY (LH)
3. HINGE (UPPER)
4. HINGE (LOWER)
5. BOLT
6. GUARD
7. BLOCK
8. STRIKER
9. BRACKET
10. GAS SPRING
11. NUT
12. BALL STUD
13. CAPSCREW
14. WASHER
15. CAP
Figure 19. Door Assembly for Lift Truck Model ERP22-35VL (ERP045-070VL) (A976) and ERP40-50VM,
ERP50-55VM6 (ERP080-120VM, ERP100VML) (A985)
Cab Door Assembly 0100 YRM 1446
26
Figure 20. Door Assembly for Lift Truck Model ERP15-20VT (ERP030-040VT) (G807) and ERP16-20VF
(ERP30-40VF) (A955)
0100 YRM 1446 Cab Door Assembly
27
Legend for Figure 20
1. DOOR ASSEMBLY
2. DOOR ASSEMBLY
3. MOUNTING PLATE
4. HINGE
5. GAS SPRING
6. BRACKET
7. BLOCK
8. GUARD
9. BOLT
10. SCREW
11. CAPSCREW
12. WASHER
13. CAP
14. CAP
Disassemble Left Door
NOTE: Perform Step 1 for lift truck models
• ERP22-35VL (ERP045-070VL) (A976)
• ERP40-50VM, ERP50-55VM6
(ERP080-120VM, ERP100VML) (A985)
1. Remove and discard two seals from door assem-
bly. See Figure 21.
NOTE: Perform Step 2 for lift truck models
• ERP15-20VT (ERP030-040VT) (G807)
• ERP16-20VF (ERP30-40VF) (A955)
NOTE: Lift truck models ERP15-20VT
(ERP030-040VT) (G807) and ERP16-20VF
(ERP30-40VF) (A955) have a one piece seal around
door assembly.
2. Remove and discard seal from door assembly.
See Figure 21.
3. Remove screw, washer, lock plate cover, and
plate from door assembly. See Figure 21.
4. Disconnect rod from latch. See Figure 21.
5. Remove screw, washer, door handle, tube, rod,
and lock from door assembly. See Figure 21.
6. Remove seven fasteners and door cover from
door assembly. See Figure 21.
7. Remove two screws and latch from door assem-
bly. See Figure 21.
8. Remove screw and plate from grip. See Fig-
ure 21.
9. Remove two screws, two washers, seal, and grip
from door assembly. See Figure 21.
Cab Door Assembly 0100 YRM 1446
28
Thank you very much
for your reading.
Please Click Here
Then Get More
Information.

More Related Content

Similar to Yale b888 erp13 vc lift truck service repair manual

Yale (f807) erp040 th lift truck service repair manual
Yale (f807) erp040 th lift truck service repair manualYale (f807) erp040 th lift truck service repair manual
Yale (f807) erp040 th lift truck service repair manualfhsjejkdm
 
Yale (f807) erp035 th lift truck service repair manual
Yale (f807) erp035 th lift truck service repair manualYale (f807) erp035 th lift truck service repair manual
Yale (f807) erp035 th lift truck service repair manualfdhjsekdme
 
Yale (f807) erp040 th lift truck service repair manual
Yale (f807) erp040 th lift truck service repair manualYale (f807) erp040 th lift truck service repair manual
Yale (f807) erp040 th lift truck service repair manualfjjsjeskkekem
 
Yale (f807) erp040 th lift truck service repair manual
Yale (f807) erp040 th lift truck service repair manualYale (f807) erp040 th lift truck service repair manual
Yale (f807) erp040 th lift truck service repair manualfhjsekfksemert
 
Yale (f807) erp040 th lift truck service repair manual
Yale (f807) erp040 th lift truck service repair manualYale (f807) erp040 th lift truck service repair manual
Yale (f807) erp040 th lift truck service repair manualjjfjsekksemm
 
Yale (f807) erp030 th lift truck service repair manual
Yale (f807) erp030 th lift truck service repair manualYale (f807) erp030 th lift truck service repair manual
Yale (f807) erp030 th lift truck service repair manualfjksekmdme
 
JCB 1THT Dumper Service Repair Manual Instant Download.pdf
JCB 1THT Dumper Service Repair Manual Instant Download.pdfJCB 1THT Dumper Service Repair Manual Instant Download.pdf
JCB 1THT Dumper Service Repair Manual Instant Download.pdfukdkksmmd
 
Jcb 1 tht dumper service repair manual
Jcb 1 tht dumper service repair manualJcb 1 tht dumper service repair manual
Jcb 1 tht dumper service repair manualufjjsjekkemd
 
Jcb 1 tht dumper service repair manual
Jcb 1 tht dumper service repair manualJcb 1 tht dumper service repair manual
Jcb 1 tht dumper service repair manualfjsjjekdkme
 
JCB 1THT Dumper Service Repair Manual Instant Download.pdf
JCB 1THT Dumper Service Repair Manual Instant Download.pdfJCB 1THT Dumper Service Repair Manual Instant Download.pdf
JCB 1THT Dumper Service Repair Manual Instant Download.pdfifkksem9didok
 
JCB 1THT Dumper Service Repair Manual Instant Download.pdf
JCB 1THT Dumper Service Repair Manual Instant Download.pdfJCB 1THT Dumper Service Repair Manual Instant Download.pdf
JCB 1THT Dumper Service Repair Manual Instant Download.pdff8soekmdmdm
 
Jcb 1 tht dumper service repair manual
Jcb 1 tht dumper service repair manualJcb 1 tht dumper service repair manual
Jcb 1 tht dumper service repair manualfujsjefkksekmm
 
Jcb 1 tht dumper service repair manual
Jcb 1 tht dumper service repair manualJcb 1 tht dumper service repair manual
Jcb 1 tht dumper service repair manualhhfjksekmm
 
JCB 1THT Dumper Service Repair Manual Instant Download.pdf
JCB 1THT Dumper Service Repair Manual Instant Download.pdfJCB 1THT Dumper Service Repair Manual Instant Download.pdf
JCB 1THT Dumper Service Repair Manual Instant Download.pdfzao908wangsa
 
2009 Nissan Versa Service Repair Manual.pdf
2009 Nissan Versa Service Repair Manual.pdf2009 Nissan Versa Service Repair Manual.pdf
2009 Nissan Versa Service Repair Manual.pdffusjekmdjdud3e
 
2009 Nissan Versa Service Repair Manual.pdf
2009 Nissan Versa Service Repair Manual.pdf2009 Nissan Versa Service Repair Manual.pdf
2009 Nissan Versa Service Repair Manual.pdff8suejjdkddmmd
 
2009 Nissan Versa Service Repair Manual.pdf
2009 Nissan Versa Service Repair Manual.pdf2009 Nissan Versa Service Repair Manual.pdf
2009 Nissan Versa Service Repair Manual.pdff8usejdkddmmd
 
2009 Nissan Versa Service Repair Manual.pdf
2009 Nissan Versa Service Repair Manual.pdf2009 Nissan Versa Service Repair Manual.pdf
2009 Nissan Versa Service Repair Manual.pdffjksekmmdm
 
2009 Nissan Versa Service Repair Manual.pdf
2009 Nissan Versa Service Repair Manual.pdf2009 Nissan Versa Service Repair Manual.pdf
2009 Nissan Versa Service Repair Manual.pdff8usjekdkdmmd
 

Similar to Yale b888 erp13 vc lift truck service repair manual (20)

Sr
SrSr
Sr
 
Yale (f807) erp040 th lift truck service repair manual
Yale (f807) erp040 th lift truck service repair manualYale (f807) erp040 th lift truck service repair manual
Yale (f807) erp040 th lift truck service repair manual
 
Yale (f807) erp035 th lift truck service repair manual
Yale (f807) erp035 th lift truck service repair manualYale (f807) erp035 th lift truck service repair manual
Yale (f807) erp035 th lift truck service repair manual
 
Yale (f807) erp040 th lift truck service repair manual
Yale (f807) erp040 th lift truck service repair manualYale (f807) erp040 th lift truck service repair manual
Yale (f807) erp040 th lift truck service repair manual
 
Yale (f807) erp040 th lift truck service repair manual
Yale (f807) erp040 th lift truck service repair manualYale (f807) erp040 th lift truck service repair manual
Yale (f807) erp040 th lift truck service repair manual
 
Yale (f807) erp040 th lift truck service repair manual
Yale (f807) erp040 th lift truck service repair manualYale (f807) erp040 th lift truck service repair manual
Yale (f807) erp040 th lift truck service repair manual
 
Yale (f807) erp030 th lift truck service repair manual
Yale (f807) erp030 th lift truck service repair manualYale (f807) erp030 th lift truck service repair manual
Yale (f807) erp030 th lift truck service repair manual
 
JCB 1THT Dumper Service Repair Manual Instant Download.pdf
JCB 1THT Dumper Service Repair Manual Instant Download.pdfJCB 1THT Dumper Service Repair Manual Instant Download.pdf
JCB 1THT Dumper Service Repair Manual Instant Download.pdf
 
Jcb 1 tht dumper service repair manual
Jcb 1 tht dumper service repair manualJcb 1 tht dumper service repair manual
Jcb 1 tht dumper service repair manual
 
Jcb 1 tht dumper service repair manual
Jcb 1 tht dumper service repair manualJcb 1 tht dumper service repair manual
Jcb 1 tht dumper service repair manual
 
JCB 1THT Dumper Service Repair Manual Instant Download.pdf
JCB 1THT Dumper Service Repair Manual Instant Download.pdfJCB 1THT Dumper Service Repair Manual Instant Download.pdf
JCB 1THT Dumper Service Repair Manual Instant Download.pdf
 
JCB 1THT Dumper Service Repair Manual Instant Download.pdf
JCB 1THT Dumper Service Repair Manual Instant Download.pdfJCB 1THT Dumper Service Repair Manual Instant Download.pdf
JCB 1THT Dumper Service Repair Manual Instant Download.pdf
 
Jcb 1 tht dumper service repair manual
Jcb 1 tht dumper service repair manualJcb 1 tht dumper service repair manual
Jcb 1 tht dumper service repair manual
 
Jcb 1 tht dumper service repair manual
Jcb 1 tht dumper service repair manualJcb 1 tht dumper service repair manual
Jcb 1 tht dumper service repair manual
 
JCB 1THT Dumper Service Repair Manual Instant Download.pdf
JCB 1THT Dumper Service Repair Manual Instant Download.pdfJCB 1THT Dumper Service Repair Manual Instant Download.pdf
JCB 1THT Dumper Service Repair Manual Instant Download.pdf
 
2009 Nissan Versa Service Repair Manual.pdf
2009 Nissan Versa Service Repair Manual.pdf2009 Nissan Versa Service Repair Manual.pdf
2009 Nissan Versa Service Repair Manual.pdf
 
2009 Nissan Versa Service Repair Manual.pdf
2009 Nissan Versa Service Repair Manual.pdf2009 Nissan Versa Service Repair Manual.pdf
2009 Nissan Versa Service Repair Manual.pdf
 
2009 Nissan Versa Service Repair Manual.pdf
2009 Nissan Versa Service Repair Manual.pdf2009 Nissan Versa Service Repair Manual.pdf
2009 Nissan Versa Service Repair Manual.pdf
 
2009 Nissan Versa Service Repair Manual.pdf
2009 Nissan Versa Service Repair Manual.pdf2009 Nissan Versa Service Repair Manual.pdf
2009 Nissan Versa Service Repair Manual.pdf
 
2009 Nissan Versa Service Repair Manual.pdf
2009 Nissan Versa Service Repair Manual.pdf2009 Nissan Versa Service Repair Manual.pdf
2009 Nissan Versa Service Repair Manual.pdf
 

More from jkemmd eudkms

Yamaha outboard 6 hp 2 cyl. (165cc) 2 stroke 1986 service repair manual
Yamaha outboard 6 hp 2 cyl. (165cc) 2 stroke 1986 service repair manualYamaha outboard 6 hp 2 cyl. (165cc) 2 stroke 1986 service repair manual
Yamaha outboard 6 hp 2 cyl. (165cc) 2 stroke 1986 service repair manualjkemmd eudkms
 
Yale c875 gdp30 vx lift truck service repair manual
Yale c875 gdp30 vx lift truck service repair manualYale c875 gdp30 vx lift truck service repair manual
Yale c875 gdp30 vx lift truck service repair manualjkemmd eudkms
 
Yale c814 erc erp18 aaf (erc030-040ah) lift truck service repair manual
Yale c814 erc erp18 aaf (erc030-040ah) lift truck service repair manualYale c814 erc erp18 aaf (erc030-040ah) lift truck service repair manual
Yale c814 erc erp18 aaf (erc030-040ah) lift truck service repair manualjkemmd eudkms
 
Yale b909 gdp80 vx9 lift truck service repair manual
Yale b909 gdp80 vx9 lift truck service repair manualYale b909 gdp80 vx9 lift truck service repair manual
Yale b909 gdp80 vx9 lift truck service repair manualjkemmd eudkms
 
Yale b875 gdp050 vx lift truck service repair manual
Yale b875 gdp050 vx lift truck service repair manualYale b875 gdp050 vx lift truck service repair manual
Yale b875 gdp050 vx lift truck service repair manualjkemmd eudkms
 
Yale b875 gdp25 vx lift truck service repair manual
Yale b875 gdp25 vx lift truck service repair manualYale b875 gdp25 vx lift truck service repair manual
Yale b875 gdp25 vx lift truck service repair manualjkemmd eudkms
 
Perkins new 1000 series models yj diesel engine service repair manual
Perkins new 1000 series models yj diesel engine service repair manualPerkins new 1000 series models yj diesel engine service repair manual
Perkins new 1000 series models yj diesel engine service repair manualjkemmd eudkms
 
PERKINS 1200 SERIES 1204F-E44TA AND 1204F-E44TTA INDUSTRIAL ENGINE(Model MU)S...
PERKINS 1200 SERIES 1204F-E44TA AND 1204F-E44TTA INDUSTRIAL ENGINE(Model MU)S...PERKINS 1200 SERIES 1204F-E44TA AND 1204F-E44TTA INDUSTRIAL ENGINE(Model MU)S...
PERKINS 1200 SERIES 1204F-E44TA AND 1204F-E44TTA INDUSTRIAL ENGINE(Model MU)S...jkemmd eudkms
 
BOBCAT S550 SKID STEER LOADER Service Repair Manual SN:A3NM11001 and Above
BOBCAT S550 SKID STEER LOADER Service Repair Manual SN:A3NM11001 and AboveBOBCAT S550 SKID STEER LOADER Service Repair Manual SN:A3NM11001 and Above
BOBCAT S550 SKID STEER LOADER Service Repair Manual SN:A3NM11001 and Abovejkemmd eudkms
 
BOBCAT S450 SKID STEER LOADER Service Repair Manual SN:AV9V11001 and Above
BOBCAT S450 SKID STEER LOADER Service Repair Manual SN:AV9V11001 and AboveBOBCAT S450 SKID STEER LOADER Service Repair Manual SN:AV9V11001 and Above
BOBCAT S450 SKID STEER LOADER Service Repair Manual SN:AV9V11001 and Abovejkemmd eudkms
 
2008 POLARIS 700 RMK 155 / 700 DRAGON RMK SNOWMOBILE Service Repair Manual
2008 POLARIS 700 RMK 155 / 700 DRAGON RMK SNOWMOBILE Service Repair Manual2008 POLARIS 700 RMK 155 / 700 DRAGON RMK SNOWMOBILE Service Repair Manual
2008 POLARIS 700 RMK 155 / 700 DRAGON RMK SNOWMOBILE Service Repair Manualjkemmd eudkms
 
2003 Yamaha XVZ1300 Royal Star Venture Service Repair Manual
2003 Yamaha XVZ1300 Royal Star Venture Service Repair Manual2003 Yamaha XVZ1300 Royal Star Venture Service Repair Manual
2003 Yamaha XVZ1300 Royal Star Venture Service Repair Manualjkemmd eudkms
 

More from jkemmd eudkms (12)

Yamaha outboard 6 hp 2 cyl. (165cc) 2 stroke 1986 service repair manual
Yamaha outboard 6 hp 2 cyl. (165cc) 2 stroke 1986 service repair manualYamaha outboard 6 hp 2 cyl. (165cc) 2 stroke 1986 service repair manual
Yamaha outboard 6 hp 2 cyl. (165cc) 2 stroke 1986 service repair manual
 
Yale c875 gdp30 vx lift truck service repair manual
Yale c875 gdp30 vx lift truck service repair manualYale c875 gdp30 vx lift truck service repair manual
Yale c875 gdp30 vx lift truck service repair manual
 
Yale c814 erc erp18 aaf (erc030-040ah) lift truck service repair manual
Yale c814 erc erp18 aaf (erc030-040ah) lift truck service repair manualYale c814 erc erp18 aaf (erc030-040ah) lift truck service repair manual
Yale c814 erc erp18 aaf (erc030-040ah) lift truck service repair manual
 
Yale b909 gdp80 vx9 lift truck service repair manual
Yale b909 gdp80 vx9 lift truck service repair manualYale b909 gdp80 vx9 lift truck service repair manual
Yale b909 gdp80 vx9 lift truck service repair manual
 
Yale b875 gdp050 vx lift truck service repair manual
Yale b875 gdp050 vx lift truck service repair manualYale b875 gdp050 vx lift truck service repair manual
Yale b875 gdp050 vx lift truck service repair manual
 
Yale b875 gdp25 vx lift truck service repair manual
Yale b875 gdp25 vx lift truck service repair manualYale b875 gdp25 vx lift truck service repair manual
Yale b875 gdp25 vx lift truck service repair manual
 
Perkins new 1000 series models yj diesel engine service repair manual
Perkins new 1000 series models yj diesel engine service repair manualPerkins new 1000 series models yj diesel engine service repair manual
Perkins new 1000 series models yj diesel engine service repair manual
 
PERKINS 1200 SERIES 1204F-E44TA AND 1204F-E44TTA INDUSTRIAL ENGINE(Model MU)S...
PERKINS 1200 SERIES 1204F-E44TA AND 1204F-E44TTA INDUSTRIAL ENGINE(Model MU)S...PERKINS 1200 SERIES 1204F-E44TA AND 1204F-E44TTA INDUSTRIAL ENGINE(Model MU)S...
PERKINS 1200 SERIES 1204F-E44TA AND 1204F-E44TTA INDUSTRIAL ENGINE(Model MU)S...
 
BOBCAT S550 SKID STEER LOADER Service Repair Manual SN:A3NM11001 and Above
BOBCAT S550 SKID STEER LOADER Service Repair Manual SN:A3NM11001 and AboveBOBCAT S550 SKID STEER LOADER Service Repair Manual SN:A3NM11001 and Above
BOBCAT S550 SKID STEER LOADER Service Repair Manual SN:A3NM11001 and Above
 
BOBCAT S450 SKID STEER LOADER Service Repair Manual SN:AV9V11001 and Above
BOBCAT S450 SKID STEER LOADER Service Repair Manual SN:AV9V11001 and AboveBOBCAT S450 SKID STEER LOADER Service Repair Manual SN:AV9V11001 and Above
BOBCAT S450 SKID STEER LOADER Service Repair Manual SN:AV9V11001 and Above
 
2008 POLARIS 700 RMK 155 / 700 DRAGON RMK SNOWMOBILE Service Repair Manual
2008 POLARIS 700 RMK 155 / 700 DRAGON RMK SNOWMOBILE Service Repair Manual2008 POLARIS 700 RMK 155 / 700 DRAGON RMK SNOWMOBILE Service Repair Manual
2008 POLARIS 700 RMK 155 / 700 DRAGON RMK SNOWMOBILE Service Repair Manual
 
2003 Yamaha XVZ1300 Royal Star Venture Service Repair Manual
2003 Yamaha XVZ1300 Royal Star Venture Service Repair Manual2003 Yamaha XVZ1300 Royal Star Venture Service Repair Manual
2003 Yamaha XVZ1300 Royal Star Venture Service Repair Manual
 

Recently uploaded

꧁༒☬ 7042364481 (Call Girl) In Dwarka Delhi Escort Service In Delhi Ncr☬༒꧂
꧁༒☬ 7042364481 (Call Girl) In Dwarka Delhi Escort Service In Delhi Ncr☬༒꧂꧁༒☬ 7042364481 (Call Girl) In Dwarka Delhi Escort Service In Delhi Ncr☬༒꧂
꧁༒☬ 7042364481 (Call Girl) In Dwarka Delhi Escort Service In Delhi Ncr☬༒꧂Hot Call Girls In Sector 58 (Noida)
 
Hyundai World Rally Team in action at 2024 WRC
Hyundai World Rally Team in action at 2024 WRCHyundai World Rally Team in action at 2024 WRC
Hyundai World Rally Team in action at 2024 WRCHyundai Motor Group
 
办理埃默里大学毕业证Emory毕业证原版一比一
办理埃默里大学毕业证Emory毕业证原版一比一办理埃默里大学毕业证Emory毕业证原版一比一
办理埃默里大学毕业证Emory毕业证原版一比一mkfnjj
 
Beautiful Vip Call Girls Punjabi Bagh 9711199012 Call /Whatsapps
Beautiful Vip  Call Girls Punjabi Bagh 9711199012 Call /WhatsappsBeautiful Vip  Call Girls Punjabi Bagh 9711199012 Call /Whatsapps
Beautiful Vip Call Girls Punjabi Bagh 9711199012 Call /Whatsappssapnasaifi408
 
The 10th anniversary, Hyundai World Rally Team's amazing journey
The 10th anniversary, Hyundai World Rally Team's amazing journeyThe 10th anniversary, Hyundai World Rally Team's amazing journey
The 10th anniversary, Hyundai World Rally Team's amazing journeyHyundai Motor Group
 
Digamma / CertiCon Company Presentation
Digamma / CertiCon Company  PresentationDigamma / CertiCon Company  Presentation
Digamma / CertiCon Company PresentationMihajloManjak
 
UNOSAFE ELEVATOR PRIVATE LTD BANGALORE BROUCHER
UNOSAFE ELEVATOR PRIVATE LTD BANGALORE BROUCHERUNOSAFE ELEVATOR PRIVATE LTD BANGALORE BROUCHER
UNOSAFE ELEVATOR PRIVATE LTD BANGALORE BROUCHERunosafeads
 
BLUE VEHICLES the kids picture show 2024
BLUE VEHICLES the kids picture show 2024BLUE VEHICLES the kids picture show 2024
BLUE VEHICLES the kids picture show 2024AHOhOops1
 
如何办理(UQ毕业证书)昆士兰大学毕业证毕业证成绩单原版一比一
如何办理(UQ毕业证书)昆士兰大学毕业证毕业证成绩单原版一比一如何办理(UQ毕业证书)昆士兰大学毕业证毕业证成绩单原版一比一
如何办理(UQ毕业证书)昆士兰大学毕业证毕业证成绩单原版一比一hnfusn
 
Digamma - CertiCon Team Skills and Qualifications
Digamma - CertiCon Team Skills and QualificationsDigamma - CertiCon Team Skills and Qualifications
Digamma - CertiCon Team Skills and QualificationsMihajloManjak
 
Not Sure About VW EGR Valve Health Look For These Symptoms
Not Sure About VW EGR Valve Health Look For These SymptomsNot Sure About VW EGR Valve Health Look For These Symptoms
Not Sure About VW EGR Valve Health Look For These SymptomsFifth Gear Automotive
 
VDA 6.3 Process Approach in Automotive Industries
VDA 6.3 Process Approach in Automotive IndustriesVDA 6.3 Process Approach in Automotive Industries
VDA 6.3 Process Approach in Automotive IndustriesKannanDN
 
UNIT-III-TRANSMISSION SYSTEMS REAR AXLES
UNIT-III-TRANSMISSION SYSTEMS REAR AXLESUNIT-III-TRANSMISSION SYSTEMS REAR AXLES
UNIT-III-TRANSMISSION SYSTEMS REAR AXLESDineshKumar4165
 
Vip Hot Call Girls 🫤 Mahipalpur ➡️ 9711199171 ➡️ Delhi 🫦 Whatsapp Number
Vip Hot Call Girls 🫤 Mahipalpur ➡️ 9711199171 ➡️ Delhi 🫦 Whatsapp NumberVip Hot Call Girls 🫤 Mahipalpur ➡️ 9711199171 ➡️ Delhi 🫦 Whatsapp Number
Vip Hot Call Girls 🫤 Mahipalpur ➡️ 9711199171 ➡️ Delhi 🫦 Whatsapp Numberkumarajju5765
 
꧁ ୨⎯Call Girls In Ashok Vihar, New Delhi **✿❀7042364481❀✿**Escorts ServiCes C...
꧁ ୨⎯Call Girls In Ashok Vihar, New Delhi **✿❀7042364481❀✿**Escorts ServiCes C...꧁ ୨⎯Call Girls In Ashok Vihar, New Delhi **✿❀7042364481❀✿**Escorts ServiCes C...
꧁ ୨⎯Call Girls In Ashok Vihar, New Delhi **✿❀7042364481❀✿**Escorts ServiCes C...Hot Call Girls In Sector 58 (Noida)
 
Hauz Khas Call Girls ☎ 7042364481 independent Escorts Service in delhi
Hauz Khas Call Girls ☎ 7042364481 independent Escorts Service in delhiHauz Khas Call Girls ☎ 7042364481 independent Escorts Service in delhi
Hauz Khas Call Girls ☎ 7042364481 independent Escorts Service in delhiHot Call Girls In Sector 58 (Noida)
 
Dubai Call Girls Size E6 (O525547819) Call Girls In Dubai
Dubai Call Girls  Size E6 (O525547819) Call Girls In DubaiDubai Call Girls  Size E6 (O525547819) Call Girls In Dubai
Dubai Call Girls Size E6 (O525547819) Call Girls In Dubaikojalkojal131
 
2024 WRC Hyundai World Rally Team’s i20 N Rally1 Hybrid
2024 WRC Hyundai World Rally Team’s i20 N Rally1 Hybrid2024 WRC Hyundai World Rally Team’s i20 N Rally1 Hybrid
2024 WRC Hyundai World Rally Team’s i20 N Rally1 HybridHyundai Motor Group
 

Recently uploaded (20)

꧁༒☬ 7042364481 (Call Girl) In Dwarka Delhi Escort Service In Delhi Ncr☬༒꧂
꧁༒☬ 7042364481 (Call Girl) In Dwarka Delhi Escort Service In Delhi Ncr☬༒꧂꧁༒☬ 7042364481 (Call Girl) In Dwarka Delhi Escort Service In Delhi Ncr☬༒꧂
꧁༒☬ 7042364481 (Call Girl) In Dwarka Delhi Escort Service In Delhi Ncr☬༒꧂
 
Hyundai World Rally Team in action at 2024 WRC
Hyundai World Rally Team in action at 2024 WRCHyundai World Rally Team in action at 2024 WRC
Hyundai World Rally Team in action at 2024 WRC
 
办理埃默里大学毕业证Emory毕业证原版一比一
办理埃默里大学毕业证Emory毕业证原版一比一办理埃默里大学毕业证Emory毕业证原版一比一
办理埃默里大学毕业证Emory毕业证原版一比一
 
Beautiful Vip Call Girls Punjabi Bagh 9711199012 Call /Whatsapps
Beautiful Vip  Call Girls Punjabi Bagh 9711199012 Call /WhatsappsBeautiful Vip  Call Girls Punjabi Bagh 9711199012 Call /Whatsapps
Beautiful Vip Call Girls Punjabi Bagh 9711199012 Call /Whatsapps
 
The 10th anniversary, Hyundai World Rally Team's amazing journey
The 10th anniversary, Hyundai World Rally Team's amazing journeyThe 10th anniversary, Hyundai World Rally Team's amazing journey
The 10th anniversary, Hyundai World Rally Team's amazing journey
 
Digamma / CertiCon Company Presentation
Digamma / CertiCon Company  PresentationDigamma / CertiCon Company  Presentation
Digamma / CertiCon Company Presentation
 
UNOSAFE ELEVATOR PRIVATE LTD BANGALORE BROUCHER
UNOSAFE ELEVATOR PRIVATE LTD BANGALORE BROUCHERUNOSAFE ELEVATOR PRIVATE LTD BANGALORE BROUCHER
UNOSAFE ELEVATOR PRIVATE LTD BANGALORE BROUCHER
 
BLUE VEHICLES the kids picture show 2024
BLUE VEHICLES the kids picture show 2024BLUE VEHICLES the kids picture show 2024
BLUE VEHICLES the kids picture show 2024
 
Hotel Escorts Sushant Golf City - 9548273370 Call Girls Service in Lucknow, c...
Hotel Escorts Sushant Golf City - 9548273370 Call Girls Service in Lucknow, c...Hotel Escorts Sushant Golf City - 9548273370 Call Girls Service in Lucknow, c...
Hotel Escorts Sushant Golf City - 9548273370 Call Girls Service in Lucknow, c...
 
如何办理(UQ毕业证书)昆士兰大学毕业证毕业证成绩单原版一比一
如何办理(UQ毕业证书)昆士兰大学毕业证毕业证成绩单原版一比一如何办理(UQ毕业证书)昆士兰大学毕业证毕业证成绩单原版一比一
如何办理(UQ毕业证书)昆士兰大学毕业证毕业证成绩单原版一比一
 
Digamma - CertiCon Team Skills and Qualifications
Digamma - CertiCon Team Skills and QualificationsDigamma - CertiCon Team Skills and Qualifications
Digamma - CertiCon Team Skills and Qualifications
 
Not Sure About VW EGR Valve Health Look For These Symptoms
Not Sure About VW EGR Valve Health Look For These SymptomsNot Sure About VW EGR Valve Health Look For These Symptoms
Not Sure About VW EGR Valve Health Look For These Symptoms
 
VDA 6.3 Process Approach in Automotive Industries
VDA 6.3 Process Approach in Automotive IndustriesVDA 6.3 Process Approach in Automotive Industries
VDA 6.3 Process Approach in Automotive Industries
 
UNIT-III-TRANSMISSION SYSTEMS REAR AXLES
UNIT-III-TRANSMISSION SYSTEMS REAR AXLESUNIT-III-TRANSMISSION SYSTEMS REAR AXLES
UNIT-III-TRANSMISSION SYSTEMS REAR AXLES
 
Vip Hot Call Girls 🫤 Mahipalpur ➡️ 9711199171 ➡️ Delhi 🫦 Whatsapp Number
Vip Hot Call Girls 🫤 Mahipalpur ➡️ 9711199171 ➡️ Delhi 🫦 Whatsapp NumberVip Hot Call Girls 🫤 Mahipalpur ➡️ 9711199171 ➡️ Delhi 🫦 Whatsapp Number
Vip Hot Call Girls 🫤 Mahipalpur ➡️ 9711199171 ➡️ Delhi 🫦 Whatsapp Number
 
꧁ ୨⎯Call Girls In Ashok Vihar, New Delhi **✿❀7042364481❀✿**Escorts ServiCes C...
꧁ ୨⎯Call Girls In Ashok Vihar, New Delhi **✿❀7042364481❀✿**Escorts ServiCes C...꧁ ୨⎯Call Girls In Ashok Vihar, New Delhi **✿❀7042364481❀✿**Escorts ServiCes C...
꧁ ୨⎯Call Girls In Ashok Vihar, New Delhi **✿❀7042364481❀✿**Escorts ServiCes C...
 
Call Girls In Kirti Nagar 📱 9999965857 🤩 Delhi 🫦 HOT AND SEXY VVIP 🍎 SERVICE
Call Girls In Kirti Nagar 📱  9999965857  🤩 Delhi 🫦 HOT AND SEXY VVIP 🍎 SERVICECall Girls In Kirti Nagar 📱  9999965857  🤩 Delhi 🫦 HOT AND SEXY VVIP 🍎 SERVICE
Call Girls In Kirti Nagar 📱 9999965857 🤩 Delhi 🫦 HOT AND SEXY VVIP 🍎 SERVICE
 
Hauz Khas Call Girls ☎ 7042364481 independent Escorts Service in delhi
Hauz Khas Call Girls ☎ 7042364481 independent Escorts Service in delhiHauz Khas Call Girls ☎ 7042364481 independent Escorts Service in delhi
Hauz Khas Call Girls ☎ 7042364481 independent Escorts Service in delhi
 
Dubai Call Girls Size E6 (O525547819) Call Girls In Dubai
Dubai Call Girls  Size E6 (O525547819) Call Girls In DubaiDubai Call Girls  Size E6 (O525547819) Call Girls In Dubai
Dubai Call Girls Size E6 (O525547819) Call Girls In Dubai
 
2024 WRC Hyundai World Rally Team’s i20 N Rally1 Hybrid
2024 WRC Hyundai World Rally Team’s i20 N Rally1 Hybrid2024 WRC Hyundai World Rally Team’s i20 N Rally1 Hybrid
2024 WRC Hyundai World Rally Team’s i20 N Rally1 Hybrid
 

Yale b888 erp13 vc lift truck service repair manual

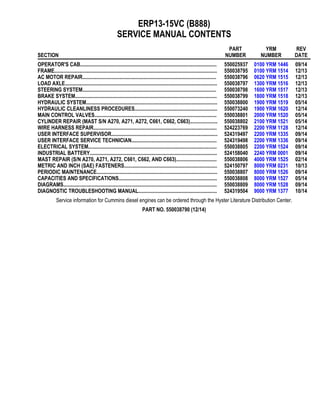
  • 1. ERP13-15VC (B888) SERVICE MANUAL CONTENTS SECTION PART NUMBER YRM NUMBER REV DATE OPERATOR'S CAB........................................................................................................ 550025937 0100 YRM 1446 09/14 FRAME............................................................................................................................ 550038795 0100 YRM 1514 12/13 AC MOTOR REPAIR...................................................................................................... 550038796 0620 YRM 1515 12/13 LOAD AXLE.................................................................................................................... 550038797 1300 YRM 1516 12/13 STEERING SYSTEM...................................................................................................... 550038798 1600 YRM 1517 12/13 BRAKE SYSTEM............................................................................................................ 550038799 1800 YRM 1518 12/13 HYDRAULIC SYSTEM.................................................................................................... 550038800 1900 YRM 1519 05/14 HYDRAULIC CLEANLINESS PROCEDURES............................................................... 550073240 1900 YRM 1620 12/14 MAIN CONTROL VALVES............................................................................................. 550038801 2000 YRM 1520 05/14 CYLINDER REPAIR (MAST S/N A270, A271, A272, C661, C662, C663)..................... 550038802 2100 YRM 1521 05/14 WIRE HARNESS REPAIR.............................................................................................. 524223769 2200 YRM 1128 12/14 USER INTERFACE SUPERVISOR................................................................................. 524319497 2200 YRM 1335 09/14 USER INTERFACE SERVICE TECHNICIAN................................................................. 524319498 2200 YRM 1336 09/14 ELECTRICAL SYSTEM.................................................................................................. 550038805 2200 YRM 1524 09/14 INDUSTRIAL BATTERY................................................................................................. 524158040 2240 YRM 0001 09/14 MAST REPAIR (S/N A270, A271, A272, C661, C662, AND C663)............................... 550038806 4000 YRM 1525 02/14 METRIC AND INCH (SAE) FASTENERS....................................................................... 524150797 8000 YRM 0231 10/13 PERIODIC MAINTENANCE............................................................................................ 550038807 8000 YRM 1526 09/14 CAPACITIES AND SPECIFICATIONS........................................................................... 550038808 8000 YRM 1527 05/14 DIAGRAMS..................................................................................................................... 550038809 8000 YRM 1528 09/14 DIAGNOSTIC TROUBLESHOOTING MANUAL............................................................ 524319504 9000 YRM 1377 10/14 Service information for Cummins diesel engines can be ordered through the Hyster Literature Distribution Center. PART NO. 550038790 (12/14)
  • 2. General This Service Manual describes how the cab operates and includes replacement and repair instructions for the following cab components (see Figure 1): • Front, rear, and cab door window panels • Windshield wipers • Roof liner • Roof top panel • Cab doors • Cab heater • Weather panels Some of the described components are options that may not be present on each cab. The operation of the various switches and controls can be found in the Operating Manual. 1. FRONT WINDOW PANEL 2. DOOR WINDOW PANEL 3. WINDSHIELD WIPER 4. CAB DOOR 5. ROOF TOP PANEL Figure 1. Operator's Cab 0100 YRM 1446 General 1
  • 3. DISCHARGING THE CAPACITORS WARNING DO NOT make repairs or adjustments unless you have been properly trained and authorized to do so. Improper repairs and adjustments can create dangerous operating conditions. DO NOT operate a lift truck that needs repairs. Report the need for repairs to your supervisor immediately. If repair is necessary, attach a DO NOT OPERATE tag on the steering wheel and disconnect the battery. Disconnect the battery and allow the capacitors to discharge before opening any compartment covers or inspecting or repairing the electrical system. DO NOT place tools on top of the battery. If a tool causes a short circuit, the high current flow from the battery can cause personal injury or property damage. Some checks and adjustments are performed with the battery connected. DO NOT connect the battery until the procedure instructs you to do so. Never wear any metallic items on your fingers, arms, or neck. Metal items can accidentally make an electrical connection and cause injury. Before performing any tests or adjustments, block the lift truck to prevent unexpected movement. The capacitor in the transistor controller(s) can hold an electrical charge for about 10 seconds after the battery is disconnected. To prevent an electrical shock and personal injury, discharge the capacitor(s) before inspecting or repairing any component in the drive unit compartment. Make certain that the battery has been disconnected. DO NOT short across the motor controller terminals with a screwdriver or jumper wire. Make certain the Emergency-Disconnect switch has not been activated. This will isolate the controller and prevent the capacitors from discharging properly. The proper way to disconnect the battery is by separating the battery connectors. Before performing work on the cab, the capacitors need to be discharged as described below: 1. Ensure the capacitors are discharged by performing Step 2 through Step 6 below. 2. Turn the key or keyless switch to the OFF position. 3. Disconnect the battery by separating the connectors. 4. Block the drive wheels to prevent the lift truck from moving. 5. Make sure the Emergency-Disconnect switch HAS NOT been activated. If the Emergency- Disconnect switch is activated, rotate the switch to the right until it pops up. 6. Press horn button. Wait 30 seconds to be sure capacitors are fully discharged. Window Replacement FRONT PANEL Remove, Lift Truck Models ERP22-35VL (ERP045-070VL) (A976), ERP40-50VM, ERP50-55VM6 (ERP080-120VM, ERP100VML) (A985), ERP15-20VT (ERP030-040VT) (G807), and ERP16-20VF (ERP30-40VF) (A955) WARNING All windows installed in the cab are made of safety glass. All replacement windows must be made of the correct material and must be made the correct thickness. Failure to have the correct material or thickness may cause the glass to break easily when struck and may cause personal injury. WARNING Disconnect the battery before doing any work on the electrical system. Serious injury to personnel and/or damage to lift truck components can occur if battery is not disconnected. Discharge capacitors as directed in the General section of this manual. Window Replacement 0100 YRM 1446 2
  • 4. NOTE: In Step 1 and Step 2 note placement of com- ponents during removal to aid in installation. 1. Remove nut, bolt, and six washers from upper right hand corner of front window. See Figure 2. 2. Remove nut cover, nut, five washers, and screw from front window in five places. Remove front window from overhead guard. See Figure 3. NOTE: OVERHEAD GUARD NOT SHOWN FOR CLARITY. WIPER KIT SHOWN NOT THE SAME ON ALL LIFT TRUCK MODELS. 1. FRONT WINDOW 2. INSERT 3. WASHER 4. SCREW 5. NUT COVER 6. WIRE HARNESS 7. WIPER KIT 8. SWITCH 9. CAPSCREW 10. BOLT 11. NUT 12. BRACKET Figure 2. Front Panel and Wiper 3. Remove and discard seal from front window. See Figure 3. NOTE: Perform Step 4 for the following lift truck mod- els • ERP22-35VL (ERP045-070VL) (A976) • ERP40-50VM, ERP50-55VM6 (ERP080-120VM, ERP100VML) (A985) 4. Remove light brackets from overhead guard, if equipped. See manual Electrical System 2200YRM1369 for procedures. NOTE: OVERHEAD GUARD NOT SHOWN FOR CLARITY. 1. FRONT WINDOW 2. SEAL 3. SCREW 4. WASHER 5. BRACKET 6. NUT 7. NUT COVER 8. LIGHT BRACKET Figure 3. Front Panel Assembly 0100 YRM 1446 Window Replacement 3
  • 5. Remove, Lift Truck Models ERP13VC, ERP15VC (B888) WARNING All windows installed in the cab are made of safety glass. All replacement windows must be made of the correct material and must be made the correct thickness. Failure to have the correct material or thickness may cause the glass to break easily when struck and may cause personal injury. WARNING Disconnect the battery before doing any work on the electrical system. Serious injury to personnel and/or damage to lift truck components can occur if battery is not disconnected. Discharge capacitors as directed in the General section of this manual. 1. Move wiper blades away from front panel. 2. Remove inserts, wheel nuts, capscrews, and grab handle from mounting bracket on front panel frame. See Figure 4. 3. If equipped, remove light brackets from top of front panel frame. See Electrical System 2200YRM1524 for procedures. 4. Remove top two capscrews used to mount steer- ing column. See Figure 5. 5. Remove six capscrews, nuts, front panel and front panel frame from lift truck. See Figure 5. Clean WARNING Compressed air can move particles so that they cause injury to the user or to other personnel. Make sure that the path of the compressed air is away from all personnel. Wear protective goggles or a face shield to prevent injury to the eyes. 1. Using compressed air, blow dirt and debris from components as needed. 2. Using a lint free cloth, wipe down front window and other components as needed. Inspect 1. Inspect front window for damage and cracks, re- place if damaged. 2. For lift truck models ERP13VC, ERP15VC (B888), inspect front panel and steel frame for damage and cracks, replace if damaged. 3. Inspect components and hardware for cracks and defects. Replace as needed. 1. INSERT 2. WHEEL NUT 3. CAPSCREW 4. GRAB HANDLE 5. MOUNTING BRACKET 6. FRONT PANEL FRAME Figure 4. Grab Handle, Remove and Install, Lift Truck Models ERP13VC, ERP15VC (B888) Window Replacement 0100 YRM 1446 4
  • 6. 1. CAPSCREW (FRONT PANEL AND FRAME) 2. NUT 3. CAPSCREW (STEERING COLUMN) 4. LIGHT BRACKET 5. FRONT PANEL 6. FRONT PANEL FRAME Figure 5. Front Panel and Frame Components, Lift Truck Models ERP13VC, ERP15VC (B888) Install, Lift Truck Models ERP22-35VL (ERP045-070VL) (A976), ERP40-50VM, ERP50-55VM6 (ERP080-120VM, ERP100VML) (A985), ERP15-20VT (ERP030-040VT) (G807), and ERP16-20VF (ERP30-40VF) (A955) 1. Install seal on front window. See Figure 3. NOTE: Perform Step 2 for the following lift truck mod- els • ERP22-35VL (ERP045-070VL) (A976) • ERP40-50VM, ERP50-55VM6 (ERP080-120VM, ERP100VML) (A985) 2. Install light brackets on overhead guard, if equip- ped. See section Electrical System 2200YRM1369 for procedures. 3. Install front window on overhead guard. Install two washers, screw, two washers, bracket, washer, nut, and nut cover on front window in five places. See Figure 3. 4. Install two washers, bolt, four washers, and nut on upper right hand corner of front window. See Fig- ure 2. Install, Lift Truck Models ERP13VC, ERP15VC (B888) 1. Install grab handle to mounting bracket on front panel frame using inserts, wheel nuts, and cap- screws. See Figure 4. NOTE: Apply liquid sealant, Yale P/N 501702902, to capscrews prior to installation. 2. Install front panel and front panel frame to lift truck with six capscrews and nuts. Tighten cap- screws to 19 N•m (168 lbf in). See Figure 5. 3. Install top two capscrews for steering column. See Figure 5. 4. If equipped, install light brackets from top of front panel frame. See Electrical System 2200YRM1524 for procedures. 5. Push wiper blades into position on the front panel. 0100 YRM 1446 Window Replacement 5
  • 7. REAR PANEL Remove 1. Remove flange nut, cover, wiper arm, and wiper blade from wiper motor. See Figure 6. 2. Disconnect wiring harness from wiper motor and remove wiper motor from rear panel. See Fig- ure 6. 3. Remove two screws and latch from overhead guard legs in two places. See Figure 6. 4. Remove five capscrews and bracket from cab body. See Figure 6. 5. Disconnect gas spring from lower ball stud in two places. See Figure 7. 6. Remove cap, capscrew and washer from over- head guard and rear panel in two places. Remove rear panel from overhead guard. See Figure 6. 7. If damaged, remove ball stud from overhead guard leg in two places. See Figure 7. 8. Remove nut cover, nut, four washers, and hinge from rear panel in two places. See Figure 7. 9. Remove nut cover, nut, plate, washer, screw, and cap from hinge. Repeat for second hinge. See Figure 7. 10. Disconnect gas spring from upper ball stud on knob in two places. See Figure 7. 11. Remove ball stud from knob in two places. See Figure 7. 12. Remove screw, three washers, o-ring, and knob from rear panel in two places. See Figure 7. 13. Remove nut cover, nut, and two washers from connector on outside of rear panel. Repeat for op- posite side. See Figure 7. 14. Remove plug, grip, nut, two washers, plug, con- nector, and two washers from inside of rear panel. Repeat for opposite side. See Figure 7. 15. Remove and discard seal from rear screen. See Figure 7. Clean WARNING Compressed air can move particles so that they cause injury to the user or to other personnel. Make sure that the path of the compressed air is away from all personnel. Wear protective goggles or a face shield to prevent injury to the eyes. 1. Using compressed air, blow dirt and debris from components as needed. 2. Using a lint free cloth, wipe down rear screen and other components as needed. Inspect 1. Inspect components for cracks and defects. Re- place as needed. 2. Inspect gas springs for proper travel and exten- sion. Replace as necessary. a. Extended length; 735 mm (28.9 in.). b. Stroke length, 315 mm (12.4 in.). c. Resistance, 150 N (33.7 lbf). 3. Inspect wiper blade for cracks and tearing. Re- place as needed. Install 1. Install seal on rear screen. See Figure 7. 2. Install two washers, connector, plug, two wash- ers, nut, grip, and plug on inside of rear panel. Repeat for opposite side. See Figure 7. 3. Install two washers, nut, and nut cover on con- nector on outside of rear panel. Repeat for oppo- site side. See Figure 7. 4. Install knob, O-ring, three washers, and screw on rear screen in two places. See Figure 7. 5. Install ball stud on knob in two places. See Fig- ure 7. 6. Connect gas spring to upper ball stud on knob in two places. See Figure 7. Window Replacement 0100 YRM 1446 6
  • 8. NOTE: OVERHEAD GUARD NOT SHOWN FOR CLARITY. 1. REAR PANEL 2. CAP 3. CAPSCREW 4. WASHER 5. SCREW 6. WIRE HARNESS 7. SWITCH 8. WIPER MOTOR 9. WIPER BLADE 10. WIPER ARM 11. BRACKET 12. LATCH 13. COVER 14. FLANGE NUT Figure 6. Rear Panel and Wiper Attachment 0100 YRM 1446 Window Replacement 7
  • 9. NOTE: OVERHEAD GUARD NOT SHOWN FOR CLARITY. 1. REAR PANEL 2. SEAL 3. NUT COVER 4. PLATE 5. WASHER 6. HINGE 7. SCREW 8. NUT 9. BALL STUD 10. GAS SPRING 11. KNOB 12. O-RING 13. PLUG 14. GRIP 15. LATCH 16. CONNECTOR 17. BRACKET 18. CAP Figure 7. Rear Panel Assembly Window Replacement 0100 YRM 1446 8
  • 10. 7. Install plate, washer, screw, nut, nut cover, and cap on hinge. Repeat for second hinge. See Fig- ure 7. 8. Install washer, hinge, screw, three washers, nut, and nut cover on rear panel in two places. See Figure 7. 9. If removed, install ball stud on overhead guard leg in two places. See Figure 7. 10. Install rear panel on overhead guard. Install washer, capscrew, and cap on rear panel and overhead guard in two places. See Figure 6. 11. Connect gas spring to two lower ball stud in two places. See Figure 7. 12. Install bracket and five capscrews on cab body. See Figure 6. 13. Install latch and two screws on overhead guard legs in two places. See Figure 6. 14. Install rear wiper motor on rear panel and connect wiring harness to rear wiper motor. See Figure 6. 15. If removed, install wiper blade on wiper arm. See Figure 6. 16. Using a flange nut, install wiper arm and wiper blade on wiper motor. See Figure 6. DOOR WINDOW Disassemble Window NOTE: If repair to non-sliding window is necessary, contact local glass repair shop. NOTE: The following procedure applies to right and left doors with sliding windows. 1. Remove window frame and window assembly from door assembly. See Figure 8. 2. Remove two latches from two sliding windows. See Figure 8. 3. Remove two sliding windows from window frame. See Figure 8. 4. Remove and discard four guides from two sliding windows. See Figure 8. 5. Remove and discard seal from rear of sliding win- dow. See Figure 8. 6. Remove and discard five seals from window frame. See Figure 8. 7. Remove and discard strip seal from window frame. See Figure 8. 8. Remove and discard six clips from window frame. See Figure 8. 9. Remove and discard edge protector from window frame. See Figure 8. Clean WARNING Compressed air can move particles so that they cause injury to the user or to other personnel. Make sure that the path of the compressed air is away from all personnel. Wear protective goggles or a face shield to prevent injury to the eyes. 1. Using compressed air, blow dirt and debris from components as needed. 2. Using a lint free cloth, wipe down windows on both doors and other components as needed. Inspect 1. Inspect all components and hardware for cracks and defects. Replace as needed. 2. Inspect latch assembly and hardware. Ensure proper operation. 3. Inspect windows for chips and cracks. Replace as necessary. Assemble Window NOTE: The following procedure applies to right and left doors. 1. Install edge protector and six clips on window frame. See Figure 8. 2. Install strip seal and five seals on window frame. See Figure 8. 3. Install seal on rear of sliding window. See Fig- ure 8. 4. Install four guides on two sliding windows. See Figure 8. 0100 YRM 1446 Window Replacement 9
  • 11. 5. Install two sliding windows on window frame. See Figure 8. 6. Install two latches to sliding windows. See Fig- ure 8. 7. Install window frame and window assembly to door assembly. See Figure 8. NOTE: RIGHT-HAND SIDE SHOWN. 1. SLIDING WINDOW 2. SEAL 3. LATCH 4. STRIP SEAL 5. CLIP 6. WINDOW FRAME 7. EDGE PROTECTOR 8. GUIDE Figure 8. Window Components Window Replacement 0100 YRM 1446 10
  • 12. Window Wipers Replacement FRONT WIPER ASSEMBLY NOTE: Lift truck models ERC22-35VG (ERC045-070VG) (A968) are not equipped with wind- shield wiper and motor. Remove, Lift Truck Models ERP22-35VL (ERP045-070VL) (A976), ERP40-50VM, ERP50-55VM6 (ERP080-120VM, ERP100VML) (A985), ERP15-20VT (ERP030-040VT) (G807), and ERP16-20VF (ERP30-40VF) (A955) 1. Disconnect wire harness from wiper motor con- nector. See Figure 9 for lift truck models • ERP22-35VL (ERP045-070VL) (A976) See Figure 10 for lift truck models • ERP15-20VT (ERP030-040VT) (G807) • ERP16-20VF (ERP30-40VF) (A955) See Figure 11 for lift truck models • ERP40-50VM, ERP50-55VM6 (ERP080-120VM, ERP100VML) (A985) 2. Disconnect wire harness from washer pump con- nector. See Figure 9 for lift truck models • ERP22-35VL (ERP045-070VL) (A976) See Figure 10 for lift truck models • ERP15-20VT (ERP030-040VT) (G807) • ERP16-20VF (ERP30-40VF) (A955) See Figure 11 for lift truck models • ERP40-50VM, ERP50-55VM6 (ERP080-120VM, ERP100VML) (A985) NOTE: Perform Step 3 and Step 4 for lift truck mod- els ERP22-35VL (ERP045-070VL) (A976). 3. Disconnect hose (6) from connector (7). See Fig- ure 9. 4. Remove two clamps (5), hose (6), and nozzle (4) from wiper arm. Set aside for installation. See Fig- ure 9. NOTE: Perform Step 5 for the following lift truck mod- els • ERP15-20VT (ERP030-040VT) (G807) • ERP16-20VF (ERP30-40VF) (A955) 5. Disconnect hose (15) from connector (11). See Figure 10. NOTE: Perform Step 6 and Step 7 for lift truck mod- els ERP40-50VM, ERP50-55VM6 (ERP080-120VM, ERP100VML) (A985). 6. Disconnect hose (17) from connector (7). See Figure 11. 7. Disconnect hose from nozzle clip. Remove nozzle clip and nozzle from wiper arm. See Figure 11. 8. Remove two flange nuts, wiper arms, and wiper blade from wiper motor. See Figure 12. 9. Remove wiper blade from wiper arm. See Figure 9 for lift truck models • ERP22-35VL (ERP045-070VL) (A976) See Figure 10 for lift truck models • ERP15-20VT (ERP030-040VT) (G807) • ERP16-20VF (ERP30-40VF) (A955) See Figure 11 for lift truck models • ERP40-50VM, ERP50-55VM6 (ERP080-120VM, ERP100VML) (A985) 10. Remove two nut covers, two nuts, two washers, and wiper motor from lift truck. See Figure 12. 11. Disconnect hose from reservoir. See Figure 9 for lift truck models • ERP22-35VL (ERP045-070VL) (A976) See Figure 10 for lift truck models • ERP15-20VT (ERP030-040VT) (G807) • ERP16-20VF (ERP30-40VF) (A955) See Figure 11 for lift truck models • ERP40-50VM, ERP50-55VM6 (ERP080-120VM, ERP100VML) (A985) 0100 YRM 1446 Window Wipers Replacement 11
  • 13. 1. WIPER MOTOR 2. WIPER ARM 3. WIPER BLADE 4. NOZZLE (CLIP) 5. CLAMP 6. HOSE 7. CONNECTOR (SPRAY NOZZLE) 8. HOSE 9. CHECK VALVE 10. BRACKET 11. RESERVOIR 12. WASHER 13. CAPSCREW 14. WASHER PUMP CONNECTOR 15. WIPER MOTOR CONNECTOR Figure 9. Front Wiper Assembly for Lift Truck Models ERP22-35VL (ERP045-070VL) (A976) Window Wipers Replacement 0100 YRM 1446 12
  • 14. 1. WIPER MOTOR 2. WIPER ARM 3. WIPER BLADE 4. RESERVOIR 5. CAP 6. CAPSCREW 7. WASHER 8. BRACKET 9. NUT 10. CHECK VALVE 11. CONNECTOR 12. CHECK VALVE CONNECTOR 13. HOSE 14. HOSE 15. HOSE 16. WIRING CONNECTOR Figure 10. Front Wiper Assembly for Lift Truck Models ERP15-20VT (ERP030-040VT) (G807) and ERP16-20VF (ERP30-40VF) (A955) 0100 YRM 1446 Window Wipers Replacement 13
  • 15. Figure 11. Front Wiper Assembly for Lift Truck Models ERP40-50VM, ERP50-55VM6 (ERP080-120VM, ERP100VML) (A985) Window Wipers Replacement 0100 YRM 1446 14
  • 16. Legend for Figure 11 1. CAPSCREW 2. WASHER 3. NUT 4. WIPER ARM 5. WIPER BLADE 6. WIPER MOTOR 7. CONNECTOR (SPRAY NOZZLE) 8. CAP 9. RESERVOIR BRACKET 10. WASHER RESERVOIR 11. CHECK VALVE 12. INSERT 13. SWITCH 14. FUSES 15. FUSES MOUNTING BRACKET 16. WIRE HARNESS 17. HOSE 18. NOZZLE CLIP 19. HOSE 20. WASHER PUMP CONNECTOR 1. WIPER MOTOR 2. WASHER 3. NUT 4. NUT COVER 5. WIPER ARM 6. FLANGE NUTS 7. WIPER BLADE Figure 12. Wiper Attachment 0100 YRM 1446 Window Wipers Replacement 15
  • 17. NOTE: Perform Step 12 and Step 13 for lift truck models ERP22-35VL (ERP045-070VL) (A976). 12. Remove two capscrews, two washers, and reser- voir from cowl. 13. Remove four capscrews, washers, and reservoir from bracket. See Figure 9. NOTE: Perform Step 14 for lift truck models • ERP15-20VT (ERP030-040VT) (G807) • ERP16-20VF (ERP30-40VF) (A955) 14. Remove three caps, three nuts, six washers, three capscrews, reservoir, and bracket from overhead guard leg. See Figure 10. NOTE: Perform Step 15 and Step 16 for lift truck models ERP40-50VM, ERP50-55VM6 (ERP080-120VM, ERP100VML) (A985). 15. Remove two capscrews, washers, nuts, and res- ervoir from cowl. See Figure 11. 16. Remove caps, capscrews, washers, nuts, and reservoir from bracket. See Figure 11. 17. Disconnect and remove check valve. Set aside for installation. See Figure 9 for lift truck models • ERP22-35VL (ERP045-070VL) (A976) See Figure 10 for lift truck models • ERP15-20VT (ERP030-040VT) (G807) • ERP16-20VF (ERP30-40VF) (A955) See Figure 11 for lift truck models • ERP40-50VM, ERP50-55VM6 (ERP080-120VM, ERP100VML) (A985) NOTE: Perform Step 18 for lift truck models ERP22-35VL (ERP045-070VL) (A976). 18. Disconnect and remove connector from hose (8). Set hose aside for installation. See Figure 9. NOTE: Perform Step 19 for lift truck models • ERP15-20VT (ERP030-040VT) (G807) • ERP16-20VF (ERP30-40VF) (A955) 19. Disconnect and remove connector (11) from hose (13). Set aside for installation. See Figure 10. NOTE: Perform Step 20 for lift truck models ERP40-50VM, ERP50-55VM6 (ERP080-120VM, ERP100VML) (A985). 20. Disconnect and remove connector (7) from hose (19). See Figure 11. Remove, Lift Truck Models ERP13VC, ERP15VC (B888) 1. Disconnect wire harness from wiper motor con- nector. See Figure 13. 2. Disconnect washer pump connector from washer reservoir. See Figure 13. 3. Disconnect hose (19) from connector (14). See Figure 13. 4. Disconnect hose from nozzle clip. Remove nozzle clip and nozzle from wiper arm. See Figure 13. 5. Remove two flange nuts, wiper arms, and wiper blade from wiper motor. See Figure 12. 6. Remove screw, nut, washer, and wiper blade from wiper arm. See Figure 13. 7. Remove two nut covers, two nuts, two washers, and wiper motor from lift truck. See Figure 12. 8. Disconnect hose from reservoir. 9. Remove two capscrews, washers, nuts, caps, and reservoir from mounting bracket on right front overhead guard leg. 10. Remove two capscrews, washers, nuts, caps, and reservoir from reservoir mounting bracket. See Figure 13. 11. Disconnect and remove check valve. Set aside for installation. 12. Disconnect and remove connector (14) from hose (16). See Figure 13. Window Wipers Replacement 0100 YRM 1446 16
  • 18. Clean WARNING Compressed air can move particles so that they cause injury to the user or to other personnel. Make sure that the path of the compressed air is away from all personnel. Wear protective goggles or a face shield to prevent injury to the yes. 1. Using compressed air, clean outside of wiper mo- tor, reservoir and wiper arms. Inspect 1. Inspect hoses for cracks and wear. Replace if damaged. 2. Check washer reservoir for leaks by filling with water and checking seams. Replace if leaking. 3. Inspect wiper blades for cracks and tearing. Re- place as needed. 1. CAP 2. NUT 3. WASHER 4. CAPSCREW 5. WASHER RESERVOIR 6. WASHER RESERVOIR MOUNTING BRACKET 7. SCREW 8. WASHER PUMP CONNECTOR 9. SWITCH 10. NOZZLE CLIP 11. WIPER BLADE 12. WIPER ARM 13. WIPER MOTOR 14. CONNECTOR (SPRAY NOZZLE) 15. CHECK VALVE 16. HOSE 17. WIRE HARNESS 18. WIPER MOTOR CONNECTOR 19. HOSE Figure 13. Front Wiper Assembly, Lift Truck Models ERP13VC, ERP15VC (B888) 0100 YRM 1446 Window Wipers Replacement 17
  • 19. Install, Lift Truck Models ERP22-35VL (ERP045-070VL) (A976), ERP40-50VM, ERP50-55VM6 (ERP080-120VM, ERP100VML) (A985), ERP15-20VT (ERP030-040VT) (G807), and ERP16-20VF (ERP30-40VF) (A955) NOTE: Perform Step 1 through Step 4 for lift truck model ERP22-35VL (ERP045-070VL) (A976). 1. Connect hose (8) to connector. See Figure 9. 2. Connect check valve into hose (8). Connect hose (8) to other end of check valve. See Figure 9. 3. Install reservoir, washers, and four capscrews on bracket. See Figure 9. 4. Using two washers and two capscrews, install reservoir on cowl. NOTE: Perform Step 5 through Step 7 for lift truck models • ERP15-20VT (ERP030-040VT) (G807) • ERP16-20VF (ERP30-40VF) (A955) 5. Connect hose (13) to connector (11). See Fig- ure 10. 6. Connect check valve to hose (13). Connect hose (14) to other end of check valve. See Figure 10. 7. Install bracket, pump, six washers, three cap- screws, three nuts, and three caps on overhead guard leg. See Figure 10. NOTE: Perform Step 8 through Step 11 for lift truck models ERP40-50VM (ERP080-100VM) (A985). 8. Connect hose (19) to connector (7). See Fig- ure 11. 9. Connect check valve to hose. 10. Install reservoir to bracket using, four nuts, wash- ers, capscrews, and caps. See Figure 11. 11. Using two nuts, washers, and capscrews, install reservoir to cowl. 12. Connect hose to reservoir. See Figure 9 for lift truck models • ERP22-35VL (ERP045-070VL) (A976) See Figure 10 for lift truck models • ERP15-20VT (ERP030-040VT) (G807) • ERP16-20VF (ERP30-40VF) (A955) See Figure 11 for lift truck models • ERP40-50VM, ERP50-55VM6 (ERP080-120VM, ERP100VML) (A985) 13. Using two washers, two nuts, and two caps, in- stall wiper motor to lift truck. See Figure 12. 14. Install wiper blade on wiper arm. See Figure 9 for lift truck models • ERP22-35VL (ERP045-070VL) (A976) See Figure 10 for lift truck models • ERP15-20VT (ERP030-040VT) (G807) • ERP16-20VF (ERP30-40VF) (A955) See Figure 11 for lift truck models • ERP40-50VM, ERP50-55VM6 (ERP080-120VM, ERP100VML) (A985) 15. Using two flange nuts, install wiper arm and wiper blade on wiper motor. See Figure 9 for lift truck models • ERP22-35VL (ERP045-070VL) (A976) See Figure 10 for lift truck models • ERP15-20VT (ERP030-040VT) (G807) • ERP16-20VF (ERP30-40VF) (A955) See Figure 11 for lift truck models • ERP40-50VM, ERP50-55VM6 (ERP080-120VM, ERP100VML) (A985) NOTE: Perform Step 16 and Step 17 for lift truck models ERP22-35VL (ERP045-070VL) (A976). 16. Install nozzle (4), hose (6), and two clamps (5) on wiper arm. See Figure 9. 17. Connect hose (6) to connector (7). See Figure 9. NOTE: Perform Step 18 for lift truck models • ERP15-20VT (ERP030-040VT) (G807) • ERP16-20VF (ERP30-40VF) (A955) 18. Connect hose (15) to connector (11). See Fig- ure 10. Window Wipers Replacement 0100 YRM 1446 18
  • 20. NOTE: Perform Step 19 for lift truck models ERP40-50VM, ERP50-55VM6 (ERP080-120VM, ERP100VML) (A985). 19. Install nozzle clip and nozzle into wiper arm. Con- nect hose (17) to nozzle. See Figure 11. 20. Connect wire harness to wiper motor connector. See Figure 9 for lift truck models • ERP22-35VL (A976) See Figure 10 for lift truck models • ERP15-20VT (ERP030-040VT) (G807) • ERP16-20VF (ERP30-40VF) (A955) See Figure 11 for lift truck models • ERP40-50VM, ERP50-55VM6 (ERP080-120VM, ERP100VML) (A985) 21. Connect wire harness to washer pump connector. See Figure 9 for lift truck models • ERP22-35VL (ERP045-070VL) (A976) See Figure 10 for lift truck models • ERP15-20VT (ERP030-040VT) (G807) • ERP16-20VF (ERP30-40VF) (A955) See Figure 11 for lift truck models • ERP40-50VM, ERP50-55VM6 (ERP080-120VM, ERP100VML) (A985) Install, Lift Truck Models ERP13VC, ERP15VC (B888) 1. Connect hose (16) to connector (14). See Fig- ure 13. 2. Connect check valve to hose. 3. Install reservoir to mounting bracket using two capscrews, nuts, washers, and caps. See Fig- ure 13. 4. Using two capscrews, nuts, washers, and caps, install reservoir and mounting bracket to right overhead guard leg. 5. Connect hose to reservoir. See Figure 13. 6. Using two washers, two nuts, and two caps, in- stall wiper motor to lift truck. See Figure 12. 7. Install wiper blade on wiper arm using screw, washer, and nut. See Figure 13. 8. Using two flange nuts, install wiper arm and wiper blade on wiper motor. See Figure 12. 9. Install nozzle clip and nozzle into wiper arm. Con- nect hose (19) to nozzle. See Figure 13. 10. Connect hose (19) to connector (14). See Fig- ure 13. 11. Connect washer pump to washer reservoir. 12. Connect wire harness to wiper motor. See Fig- ure 13. 0100 YRM 1446 Window Wipers Replacement 19
  • 21. Cab Component Repair ROOF LINER Remove NOTE: Perform Step 1 for lift truck model ERP22-35VL (ERP045-070VL) (A976). 1. Remove seven caps, seven capscrews, and seven washers from roof liner. See Figure 14. 1. TOP PANEL 2. CAP 3. CAPSCREW 4. WASHER 5. ROOF LINER 6. DOME LIGHT 7. SCREW Figure 14. Roof Liner for Lift Truck Model ERP22-35VL (ERP045-070VL) (A976) NOTE: Perform Step 2 for lift truck models • ERP15-20VT (ERP030-040VT) (G807) • ERP16-20VF (ERP30-40VF) (A955) 2. Remove seven capscrews and seven washers from roof liner. See Figure 15. 1. TOP PANEL 2. CAPSCREW 3. WASHER 4. ROOF LINER 5. DOME LIGHT 6. SCREW Figure 15. Roof Liner for Lift Truck Model ERP15-20VT (ERP030-040VT) (G807) and ERP16-20VF (ERP30-40VF) (A955) NOTE: Perform Step 3 for lift truck models ERP40-50VM, ERP50-55VM6 (ERP080-120VM, ERP100VML) (A985). 3. Remove eight capscrews and eight washers from roof liner. See Figure 16. NOTE: Note position of wire harness and washer hose through notched cutout in rear of roof liner. 4. Disconnect dome light harness and rear wiper switch harness (if equipped). Cab Component Repair 0100 YRM 1446 20
  • 22. 1. TOP PANEL 2. CAPSCREW 3. WASHER 4. ROOF LINER 5. DOME LIGHT 6. SCREW Figure 16. Roof Liner for Lift Truck Models ERP40-50VM, ERP50-55VM6 (ERP080-120VM, ERP100VML) (A985) 5. Remove two screws and dome light from roof liner. See Figure 14 for truck models • ERP22-35VL (ERP045-070VL) (A976) See Figure 15 for truck models • ERP15-20VT (ERP030-040VT) (G807) • ERP16-20VF (ERP30-40VF) (A955) See Figure 16 for lift truck models • ERP40-50VM, ERP50-55VM6 (ERP080-120VM, ERP100VML) (A985) 6. Remove rear wiper switch from roof liner (if equip- ped). 7. Remove roof liner from overhead guard. Clean WARNING Compressed air can move particles so that they cause injury to the user or to other personnel. Make sure that the path of the compressed air is away from all personnel. Wear protective goggles or a face shield to prevent injury to the eyes. 1. Using compressed air, blow dirt and debris off of roof liner. 2. Using a lint free cloth, wipe down overhead guard. Inspect 1. Inspect roof liner for cracks and defects. Replace as needed. 2. Inspect hardware for defects, replace as needed. Install 1. Install roof liner on overhead guard. 2. Route wire harness and washer hose through notched cut out in rear of roof liner as noted dur- ing removal. 3. Install rear wiper switch to preformed cutout of roof liner (if equipped). 4. Using two screws, install dome light on roof liner. See Figure 14 for truck models • ERP22-35VL (ERP045-070VL) (A976) See Figure 15 for truck models • ERP15-20VT (ERP030-040VT) (G807) • ERP16-20VF (ERP30-40VF) (A955) See Figure 16 for lift truck models • ERP40-50VM, ERP50-55VM6 (ERP080-120VM, ERP100VML) (A985) 5. Connect dome light harness and rear wiper switch harness, if equipped. 0100 YRM 1446 Cab Component Repair 21
  • 23. NOTE: Perform Step 6 for lift truck model ERP22-35VL (ERP045-070VL) (A976). 6. Install seven washers, seven capscrews, and seven caps on roof liner. See Figure 14. NOTE: Perform Step 7 for lift truck models • ERP15-20VT (ERP030-040VT) (G807) • ERP16-20VF (ERP30-40VF) (A955) 7. Install seven washers and seven capscrews on roof liner. See Figure 15. NOTE: Perform Step 8 for lift truck models ERP40-50VM, ERP50-55VM6 (ERP080-120VM, ERP100VML) (A985). 8. Install eight washers and eight capscrews on roof liner. See Figure 16. TOP PANEL Remove, Lift Truck Models ERP22-35VL (ERP045-070VL) (A976), ERP40-50VM, ERP50-55VM6 (ERP080-120VM, ERP100VML) (A985), ERP15-20VT (ERP030-040VT) (G807), and ERP16-20VF (ERP30-40VF) (A955) NOTE: Perform Step 1 for lift truck models • ERP22-35VL (ERP045-070VL) (A976) • ERP40-50VM, ERP50-55VM6 (ERP080-120VM, ERP100VML) (A985) 1. Disconnect front light wiring. See section Electri- cal System 2200YRM1369, Lights, for proper procedures. WARNING All windows installed in the cab are made of safety glass. All replacement windows must be made of the correct material and must be the cor- rect thickness. Failure to use the correct material or thickness may cause the glass to break easily when struck and may cause personal injury. NOTE: Due to use of glue and RTV sealer, replace- ment of top screen is to be done only if damaged. 2. Remove and discard grommets from top panel assembly. See Figure 17. 3. Remove four nuts, four washers, four capscrews, and roof panel from top panel assembly. See Fig- ure 17. 4. Remove and discard seal from screen. See Fig- ure 17. 5. Remove two nuts, four washers, two hinges, and pin from screen. See Figure 17. 6. Remove two nut covers, two nuts, two washers, and plate from screen. See Figure 17. 7. Remove screw, spring, and grip from screen. See Figure 17. 8. Remove two nut covers, two nuts, two washers, and grip mounting plate from screen. See Fig- ure 17. Remove, Lift Truck Models ERP13VC, ERP15VC (B888) The top panel is attached to top of overhead guard using adhesive tape and pressing it on. See Fig- ure 18. WARNING All windows installed in the cab are made of safety glass. All replacement windows must be made of the correct material and must be the cor- rect thickness. Failure to use the correct material or thickness may cause the glass to break easily when struck and may cause personal injury. NOTE: Due to use of glue and adhesive tape, re- placement of top screen is to be done only if dam- aged. 1. Remove damaged top panel from lift truck. Pull top panel from overhead guard, using a cutting tool to remove glue and adhesive tape from over- head guard as top panel is pulled from overhead guard. See Figure 18. Clean WARNING Compressed air can move particles so that they cause injury to the user or to other personnel. Make sure that the path of the compressed air is away from all personnel. Wear protective goggles or a face shield to prevent injury to the yes. 1. Using compressed air, blow dirt and debris from all components as needed. Cab Component Repair 0100 YRM 1446 22
  • 24. Figure 17. Top Panel 0100 YRM 1446 Cab Component Repair 23
  • 25. Legend for Figure 17 1. ROOF PANEL 2. TOP PANEL ASSEMBLY 3. GROMMET 4. SCREEN 5. PIN 6. HINGE 7. WASHER 8. NUT 9. PLATE 10. GRIP MOUNTING PLATE 11. NUT COVER 12. GRIP 13. SPRING 14. SCREW 15. SEAL 1. TOP PANEL ASSEMBLY 2. ADHESIVE TAPE 3. OVERHEAD GUARD Figure 18. Top Panel, Lift Truck Models ERP13VC, ERP15VC (B888) 2. Using warm soapy water, clean plastic, rubber, and vinyl components. Wipe dry with a lint free cloth. 3. For lift truck models ERP13VC, ERP15VC (B888), clean top of overhead guard to remove any glue residual from use of adhesive tape. Inspect 1. Inspect hinges, rod, spring and grip for damage or cracks. Replace as needed. Install, Lift Truck Models ERP22-35VL (ERP045-070VL) (A976), ERP40-50VM, ERP50-55VM6 (ERP080-120VM, ERP100VML) (A985), ERP15-20VT (ERP030-040VT) (G807), and ERP16-20VF (ERP30-40VF) (A955) 1. Install grip mounting plate, two washers, two nuts, and two nut covers on screen. See Figure 17. 2. Install grip, spring, and screw on screen. See Fig- ure 17. 3. Install plate, two washers, two nuts, and two nut covers on screen. See Figure 17. 4. Install pin, two hinges, four washers, and two nuts on screen. See Figure 17. 5. Install seal on screen. See Figure 17. 6. Install roof panel, four washers, four capscrews, and four nuts on top panel assembly. See Fig- ure 17. 7. Install two grommets to top panel assembly. See Figure 17. NOTE: Perform Step 8 for lift truck models • ERP22-35VL (ERP045-070VL) (A976) • ERP40-50VM, ERP50-55VM6 (ERP080-120VM, ERP100VML) (A985) 8. Install front light wiring. See section Electrical System 2200YRM1369, Lights, for proper proce- dures. Cab Component Repair 0100 YRM 1446 24
  • 26. Install, Lift Truck Models ERP13VC, ERP15VC (B888) 1. Ensure overhead guard is clean and free of old adhesive tape and glue. 2. Peel off backing from adhesive tape and attach adhesive tape to all four sides of overhead guard. See Figure 18. 3. Position top panel above top of overhead guard. See Figure 18. 4. Press top panel onto top perimeter of overhead guard and adhesive tape, making sure all edges are aligned correctly. Cab Door Assembly DOOR ASSEMBLY Remove Lift Truck Models ERP22-35VL (ERP045-070VL) (A976) and ERP40-50VM, ERP50-55VM6 (ERP080-120VM, ERP100VML) (A985) WARNING The door assemblies are heavy, verify the lifting device being used during repairs can lift the weight of the parts and assembly. 1. Disconnect gas spring from top of door assembly. See Figure 19. 2. Remove three capscrews from upper hinge. Re- move three capscrews from lower hinge. See Fig- ure 19. 3. Using a lifting device, remove door assembly from lift truck and set aside. 4. Remove three caps, three bolts, four washers, bolt, guard, striker, and block from front overhead guard leg. See Figure 19. 5. Remove gas spring from overhead guard. 6. Remove two caps, two capscrews, two washers, and bracket from overhead guard. See Figure 19. 7. Repeat Step 1 through Step 6 for opposite side. Lift Truck Models ERP15-20VT (ERP030-040VT) (G807) and ERP16-20VF (ERP30-40VF) (A955) WARNING The door assemblies are heavy, verify the lifting device being used during repairs can lift the weight of the parts and assembly. 1. Disconnect gas spring from top of door assembly. See Figure 20. 2. Remove two screws from mounting plate and hinge in two places. Remove three bolts from mounting plate and overhead guard leg in two places. See Figure 20. 3. Using a lifting device, remove door assembly from lift truck and set aside. 4. Remove two caps, two capscrews, two washers, bolt, guard, bracket and block from front overhead guard leg. See Figure 20. 5. Remove gas spring from overhead guard. 6. Remove two caps, two capscrews, two washers, and bracket from overhead guard. See Figure 20. 7. Repeat Step 1 through Step 6 for opposite side. 0100 YRM 1446 Cab Door Assembly 25
  • 27. 1. DOOR ASSEMBLY (RH) 2. DOOR ASSEMBLY (LH) 3. HINGE (UPPER) 4. HINGE (LOWER) 5. BOLT 6. GUARD 7. BLOCK 8. STRIKER 9. BRACKET 10. GAS SPRING 11. NUT 12. BALL STUD 13. CAPSCREW 14. WASHER 15. CAP Figure 19. Door Assembly for Lift Truck Model ERP22-35VL (ERP045-070VL) (A976) and ERP40-50VM, ERP50-55VM6 (ERP080-120VM, ERP100VML) (A985) Cab Door Assembly 0100 YRM 1446 26
  • 28. Figure 20. Door Assembly for Lift Truck Model ERP15-20VT (ERP030-040VT) (G807) and ERP16-20VF (ERP30-40VF) (A955) 0100 YRM 1446 Cab Door Assembly 27
  • 29. Legend for Figure 20 1. DOOR ASSEMBLY 2. DOOR ASSEMBLY 3. MOUNTING PLATE 4. HINGE 5. GAS SPRING 6. BRACKET 7. BLOCK 8. GUARD 9. BOLT 10. SCREW 11. CAPSCREW 12. WASHER 13. CAP 14. CAP Disassemble Left Door NOTE: Perform Step 1 for lift truck models • ERP22-35VL (ERP045-070VL) (A976) • ERP40-50VM, ERP50-55VM6 (ERP080-120VM, ERP100VML) (A985) 1. Remove and discard two seals from door assem- bly. See Figure 21. NOTE: Perform Step 2 for lift truck models • ERP15-20VT (ERP030-040VT) (G807) • ERP16-20VF (ERP30-40VF) (A955) NOTE: Lift truck models ERP15-20VT (ERP030-040VT) (G807) and ERP16-20VF (ERP30-40VF) (A955) have a one piece seal around door assembly. 2. Remove and discard seal from door assembly. See Figure 21. 3. Remove screw, washer, lock plate cover, and plate from door assembly. See Figure 21. 4. Disconnect rod from latch. See Figure 21. 5. Remove screw, washer, door handle, tube, rod, and lock from door assembly. See Figure 21. 6. Remove seven fasteners and door cover from door assembly. See Figure 21. 7. Remove two screws and latch from door assem- bly. See Figure 21. 8. Remove screw and plate from grip. See Fig- ure 21. 9. Remove two screws, two washers, seal, and grip from door assembly. See Figure 21. Cab Door Assembly 0100 YRM 1446 28
  • 30. Thank you very much for your reading. Please Click Here Then Get More Information.