SlideShare a Scribd company logo
1 of 20
Download to read offline
ESC030FA, ESC035FA, ESC040FA (A883)
SERVICE MANUAL CONTENTS
SECTION
PART
NUMBER
YRM
NUMBER
REV
DATE
FRAME............................................................................................................................ 524153631 0100 YRM 0994 02/02
DC MOTOR MAINTENANCE.......................................................................................... 524158039 0620 YRM 0294 03/08
MASTER DRIVE UNIT.................................................................................................... 524153630 0630 YRM 0993 12/01
STEERING SYSTEM...................................................................................................... 524153633 1600 YRM 0996 04/10
BRAKE SYSTEM............................................................................................................ 524153634 1800 YRM 0997 12/01
HYDRAULIC SYSTEM.................................................................................................... 524153635 1900 YRM 0998 09/06
TILT CYLINDERS........................................................................................................... 524153636 2100 YRM 0999 04/03
ELECTRICAL SYSTEM.................................................................................................. 524153632 2200 YRM 0995 01/07
INDUSTRIAL BATTERY................................................................................................. 524158040 2240 YRM 0001 09/14
MAST-DESCRIPTION..................................................................................................... 524153637 4000 YRM 1000 12/01
MAST-REPAIR................................................................................................................ 524153638 4500 YRM 1001 04/05
METRIC AND INCH (SAE) FASTENERS....................................................................... 524150797 8000 YRM 0231 10/13
PERIODIC MAINTENANCE............................................................................................ 524153627 8000 YRM 0991 02/10
DIAGRAMS..................................................................................................................... 524153629 8000 YRM 0992 06/10
CAPACITIES AND SPECIFICATIONS........................................................................... 524153639 8000 YRM 1002 02/07
PART NO. 524146758 (09/14)
100 YRM 994 Frame
General
This section has a description and service procedures for the parts of the frame. These parts include the overhead
guard, covers, and pads. The location for labels is also shown.
Frame
SIZE
The frame is a single weldment with mountings for over-
head guard, mast, and the transaxles. There is very
little repair required on the frame. Most repairs can be
done by removing the necessary system parts. See the
section for the system that has the part that must be re-
moved. The frame for these lift trucks come in two sizes,
short and long wheelbase.
Model Capacity
Wheel Base
Length
ESC030FA 1361 kg
(3000 lb)
1114 mm
(43.9 in.)
ESC035FA 1588 kg
(3500 lb)
1114 mm
(43.9 in.)
ESC035FA 1588 kg
(3500 lb)
1178 mm
(46.4 in.)
ESC040FA 1814 kg
(4000 lb)
1178 mm
(46.4 in.)
PAINTING INSTRUCTIONS
WARNING
Cleaning solvents can be flammable and toxic and
can cause skin irritation. Wear protection for eyes
and skin. Always use solvents and paints in an area
with ventilation. Do not use solvents or paints near
heat, fire, or electrical equipment that can make
sparks. When using cleaning solvents, always fol-
low the recommendations of the manufacturer.
NOTE: Protect all electronic controls and wiring from
heat and moisture produced by steam cleaning or
chemical solvents.
To paint lift trucks it is important to remove all the dirt
and any foreign material from the surface to be painted
prior to painting the surface.
1. Remove all dirt and grime from surface to be
painted. Clean area to be painted thoroughly using
solvent for painted surfaces. Do not use solvent on
new paint. Make sure all oil and grease is removed.
2. Use sandpaper to remove top surface of the paint
and rust from metal. All metal surfaces where paint
is removed must be painted. Use a primer. Apply
primer before applying final coat of paint.
CAUTION
Do not paint the pads, plastic covers, handles,
cables, electrical components, safety labels, mast
chains, hoses, or controls.
3. Protect all surfaces that will not be painted.
NOTE: Protect electrical components, wiring, and bat-
tery connector contacts from overspray.
4. Paint surfaces using correct color of paint. Fol-
low directions on container. Paint wheels, drive
axle hubs, hub caps, and axle shafts flanges black
(HCE-51). Paint forks red (HCE-53). Paint load
backrest yellow (HCE-117).
5. Install new safety labels. See Safety Labels
1
Covers and Pads 100 YRM 994
Covers and Pads
COVERS
WARNING
The covers are designed to protect the internal
parts of the lift truck. If a cover is damaged it
should be replaced, not repaired.
There are four covers that cover and protect all the in-
ternal parts of these lift trucks. They are the hydraulic,
electrical, upper, and lower steering covers. See Fig-
ure 1.
Remove
1. Move lift truck to safe, level area.
NOTE: The electrical and hydraulic covers can be re-
moved by hand and should never be removed with a
pry bar or screwdriver, as this will damage them.
2. Remove electrical cover by gently lifting it upward
with your hands and lifting it over battery disconnect
lever and control handle.
3. Remove hydraulic cover by gently pulling it away
from frame at top and then lifting it out of two slots
at bottom.
4. Remove upper steering cover by removing steering
control handle (refer to Steering Control Handle),
then remove two capscrews and washers that hold
cover to frame and lift upper steering cover off.
5. Remove floor mat.
6. Remove four capscrews and washers that hold floor
plate to vibration isolators.
7. Remove floor plate.
8. Remove five capscrews that hold shield to frame.
9. Remove two nuts that hold lower steering cover to
vibration isolators.
10. Remove two capscrews that hold lower steering
cover to frame.
11. Remove lower steering cover.
Install
WARNING
The covers are designed to protect the internal
parts of the lift truck. If a cover is damaged it
should be replaced, not repaired.
To install the covers, reverse the removal procedure.
PADS
There are four pads that cushion and protect the oper-
ator on these lift trucks. They are the top, bottom, hip,
and knee pads. The pads are designed to interlock and
should be removed in a certain order.
Remove
The top and bottom pads are both on the backrest and
are designed to cushion and support the operators
back.
1. Remove four capscrews that hold top pad to frame
and remove top pad.
2. Remove four capscrews that hold bottom pad to
frame and remove bottom pad.
WARNING
The battery is heavy and should be removed care-
fully to avoid causing damage or injury. Remove the
battery using a battery puller and stand.
3. Remove battery to gain access to four capscrews
that hold hip pad to frame.
4. Remove four capscrews that hold hip pad to frame
and remove hip pad.
NOTE: The knee pad can be removed without removing
the other pads first.
5. Remove two capscrews that hold knee pad to frame
and remove knee pad.
2
100 YRM 994 Covers and Pads
Install
WARNING
The pads are designed to protect the internal parts
of the lift truck and cushion the operator. If a pad is
damaged it should be replaced, not repaired.
To install the pads, reverse the removal procedure.
1. CAPSCREW
2. NUT
3. LOCKWASHER
4. FLOOR PLATE
5. FLOOR MAT
6. ISOLATOR
7. CAPSCREW
8. SHIELD
9. CAPSCREW
10. LOWER STEERING COVER
11. NUT
12. CAPSCREW
13. WASHER
Figure 1. Floor Plates and Covers
3
Overhead Guard 100 YRM 994
Overhead Guard
DESCRIPTION
The overhead guard is a single weldment that bolts to
the frame and is designed to protect the operator from
falling objects or a rollover accident. There are two
types of overhead guard: the standard guard "A" and
the low profile "B." The low profile is designed to allow
the lift truck access to low clearance areas. See Fig-
ure 2.
REMOVE
WARNING
The overhead guard is part of the operator protec-
tion system. Do not operate the lift truck without the
overhead guard correctly fastened to the lift truck.
1. Move lift truck to a safe, level area.
WARNING
Make sure the brake pedal is released and the brake
is applied. Put blocks on both sides (front and back)
of the drive tires to prevent movement of the lift
truck.
2. Put blocks under drive wheels to keep them from
rolling.
3. Turn ignition key OFF and disconnect battery.
4. Remove hydraulic cover for access to front mount-
ing hardware and remove upper steering cover for
access to any optional lighting fixture wiring con-
nectors. See Covers for instructions on how to re-
move covers.
5. If overhead guard has optional lighting fixtures,
identify and disconnect wiring before overhead
guard is removed.
WARNING
The overhead guard is heavy. Make sure the sling,
chain, eyebolts, and crane or lifting device has the
capacity to lift the overhead guard. The overhead
guard weighs up to 68 kg (150 lb).
6. Use a lifting device and have another person give
assistance to lift overhead guard from lift truck.
7. Remove two capscrews, washers, and nuts from
front supports of overhead guard.
8. Remove two capscrews from rear support of over-
head guard.
9. Remove overhead guard.
REPAIR
WARNING
Do not alter or tamper with the overhead guard.
Welding, heating, or drilling holes in the wrong
location can reduce the strength of the overhead
guard. Contact your dealer for Yale lift trucks
before welding or drilling holes in any part of the
overhead guard. If it is damaged, it should be
replaced, not repaired.
Do not weld on it or drill holes in it. If overhead guard
needs painting, use sandpaper to remove old paint and
paint it with recommended paint only.
INSTALL
WARNING
The overhead guard is heavy. Make sure the sling,
chain, eyebolts, and crane or lifting device has the
capacity to lift the overhead guard. The overhead
guard weighs up to 68 kg (150 lb).
1. Use a lifting device and have another person give
assistance to lift overhead guard to lift truck.
2. Align two front supports with bolt holes on front of
lift truck.
3. Install two capscrews, washers, and nuts to front
supports of overhead guard. Do not tighten nuts
until rear support is installed.
4. Align rear support with bolt holes on rear of lift truck.
5. Install two capscrews and torque them to 224 N•m
(165 lbf ft).
6. Torque front two nuts to 122 N•m (90 lbf ft).
7. If overhead guard has optional lighting fixtures,
identify and connect wiring.
8. Install any covers that were removed.
4
100 YRM 994 Overhead Guard
A. STANDARD GUARD B. LOW PROFILE GUARD
1. OVERHEAD GUARD
2. SOCKET HEAD CAPSCREW
3. PLUG
4. LOCK NUT
5. WASHER
6. CAPSCREW
Figure 2. Overhead Guard
5
Battery 100 YRM 994
Battery
BATTERY SIZES
WARNING
The battery must be within the weight range shown
on the nameplate for the lift truck or the truck may
become unstable when lifting a heavy load.
WARNING
To prevent damage to the lift truck or battery, the
battery must fit the battery compartment correctly.
Use spacers designed for the lift trucks to prevent
the battery from moving more than 13 mm (0.5 in.)
NOTE: The weight of the battery is a major part of the
counterweight system on an electric lift truck.
The lift trucks are designed to operate with 36 volt bat-
teries only.
Table 1. 3000 lb Capacity, 43.9-inch Wheel Base
Maximum Battery Compartment Size Typical Battery Size Battery Weight
Width Length Height Width Length Height Range
With
Spacers
965.2 mm
(38.00 in.)
393.7 mm
(15.50 in.)
855/966 kg
(1885/2130 lb)
Yes
400.0 mm
(15.75 in.)
939/1061 kg
(2070/2339 lb)
Yes
973.07 mm
(38.31 in.)
454.15 mm
(17.88 in.)
1050/1159 kg
(2315/2555 lb)
No
984.3 mm
(38.75 in.)
463.55 mm
(18.25 in.)
822.5 mm
(32.38 in.)
979.42 mm
(38.56 in.)
452.88 mm
(17.83 in.)
787.4 mm
(31.00 in.)
1082/1222 kg
(2385/2694 lb)
No
Table 2. 3500 lb Capacity, 43.9-inch Wheel Base
Maximum Battery Compartment Size
Typical Battery Size
Battery
Weight
Width Length Height Width Length Height Range
With
Spacers
973.07 mm
(38.31 in.)
454.15 mm
(17.88 in.)
1050/1159 kg
(2315/2555 lb)
No
984.3 mm
(38.75 in.)
463.55 mm
(18.25 in.)
822.5 mm
(32.38 in.)
979.42 mm
(38.56 in.)
452.88 mm
(17.83 in.)
787.4 mm
(31.00 in.)
1082/1222 kg
(2385/2694 lb)
No
6
100 YRM 994 Labels and Decals
Table 3. 3500 lb Capacity, 46.4-inch Wheel Base
Maximum Battery Compartment Size
Typical Battery Size
Battery
Weight
Width Length Height Width Length Height Range
With
Spacers
973.07 mm
(38.31 in.)
454.15 mm
(17.88 in.)
1050/1159 kg
(2315/2555 lb)
Yes
979.42 mm
(38.56 in.)
452.88 mm
(17.83 in.)
1082/1222 kg
(2385/2694 lb)
Yes
977.9 mm
(38.50 in.)
512.83 mm
(20.19 in.)
1152/1301 kg
(2540/2868 lb)
No
984.3 mm
(38.75 in.)
528.32 mm
(20.8 in.)
822.5 mm
(32.38 in.)
979.42 mm
(38.56 in.)
518.16 mm
(20.40 in.)
787.4 mm
(31.00 in.)
1224/1385 kg
(2698/3053 lb)
No
Table 4. 4000 lb Capacity, 46.4-inch Wheel Base
Maximum Battery Compartment Size
Typical Battery Size
Battery
Weight
Width Length Height Width Length Height Range
With
Spacers
977.9 mm
(38.50 in.)
512.83 mm
(20.19 in.)
1152/1301 kg
(2540/2868 lbf)
No
984.3 mm
(38.75 in.)
528.32 mm
(20.8 in.)
822.5 mm
(32.38 in.)
979.42 mm
(38.56 in.)
518.16 mm
(20.40 in.)
787.4 mm
(31.00 in.)
1224/1385 kg
(2698/3053 lbf)
No
Labels and Decals
SAFETY LABELS
WARNING
Safety labels are installed on the lift truck to give
information about operation and possible hazards.
It is important that all safety labels are installed on
the lift truck and can be read.
DO NOT add to or modify the lift truck. Any change
to the lift truck, the tires, or its equipment can
change the lifting capacity. The lift truck must be
rated as equipped and the nameplate must show
the new capacity rating. Contact your dealer for
Yale lift trucks for a replacement nameplate.
WARNING
Cleaning solvents can be inflammable and toxic
and can cause skin irritation. When using cleaning
solvents, always follow the recommendations of
the manufacturer.
If an adhesive plate or label must be replaced, use the
following procedure to install a new label or plate:
1. Clean area with an oil-free cleaner to remove all oil,
grease, and foreign matter. Wipe area until com-
pletely dry.
2. Carefully remove only the paper backing from ad-
hesive. Do not touch adhesive surface with hands
or remove front mask from label or plate face.
3. Exposed adhesive face must be free from all foreign
matter before positioning label or plate on surface.
4. Press label or plate down firmly, making sure all
corners are stuck down tight. Make sure all air is
removed from under label or plate and corners are
tight. Do not attempt to move label or plate once it
has been stuck down.
For correct placement of all labels and decals, refer to
Figure 3.
7
Labels and Decals 100 YRM 994
Figure 3. Label Locations
8
100 YRM 994 Labels and Decals
Legend for Figure 3
1. LABEL (YALE)
2. LABEL (MAST WARNING)
3. LABEL (MAST WARNING)
4. LABEL (PINCH POINT)
5. INSPECTION PLATE
6. NAMEPLATE
7. COVER
8. BASE (INFORMATION CASE)
9. COVER (INFORMATION CASE)
10. LABEL (PATENTS AND TRADEMARKS)
11. LABEL (WARNING)
12. LABEL (OPERATOR WARNING)
13. LABEL (BATTERY CONNECTOR CAUTION)
14. LABEL (HYDRAULIC OIL FILL)
15. DECAL (HANDLE FUNCTION)
16. LABEL (OPERATOR WARNING)
17. LABEL (YALE)
18. LABEL (FREEZER)
19. LABEL (COOLER)
9
620 YRM 294 Brush and Commutator Inspection
General
This section describes disassembly and assembly,
brush installation, inspection, and checks for mal-
functions of DC motors. Inspect the commutator and
brushes every 350 hours of operation. The commu-
tator is the rotating electric connection between the
armature and the electric power supplied by the bat-
tery. Brushes made of carbon compounds slide on
the rotating commutator and are the path for electricity
from the battery to the commutator and the armature.
The maintenance of the commutator and the brushes
is important to the good operation of a DC motor.
Traction motors and hydraulic pump motors are similar
in design. The hydraulic pump motors are smaller
than the traction motors, but the disassembly and
maintenance of these motors are similar. The cooling
fan in the traction motors is fastened to the armature
and can be removed from the armature. The cooling
fan can be removed during disassembly of the traction
motor.
The cooling fan in the hydraulic pump motors can be a
press fit on the armature shaft and is not easily removed
during disassembly of the motor. The armature and
cooling fan must be removed from the drive end of the
motor during disassembly.
The assembly and disassembly of the motor used for
the power steering pump is described in the Steering
System section. This motor is a permanent magnet
motor.
Brush and Commutator Inspection
HYDRAULIC PUMP MOTOR AND
TRACTION MOTOR
NOTE: When inspecting brush conditions and motor
commutator conditions for head damage or abnormal
wear, the battery maintenance and condition should be
eliminated as a cause first. See Industrial Battery
2240 YRM 1.
NOTE: The brushes and commutator can be inspected,
the brushes can be replaced, and Stoning the Commu-
tator can be done with the motor installed in the truck.
NOTE: Inspect the brushes and commutator every 350
hours for best operation and to prevent motor damage.
The hydraulic pump motor normally has more start cy-
cles than other motors, so it can have more wear and
possible damage.
NOTE: The following procedure is for inspecting the
brushes and commutator with the motor installed in the
lift truck. The same inspections can be done with the
motor removed. If the motor is removed, start at Step 3.
1. To rotate the commutator of the traction motor with-
out moving the truck, the drive wheels must be
raised. See Figure 1. Raise drive wheels so com-
mutator of the traction motor can be rotated without
moving lift truck. See How To Raise Drive Wheels
in the Operating Manual or the Periodic Mainte-
nance YRM section for your lift truck.
NOTE: For some models of lift trucks, the battery does
not need to be removed to access the electric motors.
Other models will require the removal of the battery be-
fore gaining access to the electric motors. To remove
the battery, either raise the hood panels or unfasten the
floor plate, depending on which motor needs to be ac-
cessed.
1. ARMATURE
(DRIVE) SHAFT
2. COOLING FAN
3. BRUSH COVER
Figure 1. Traction Motor
1
Brush and Commutator Inspection 620 YRM 294
2. Remove battery. See How to Remove Battery
in the Operating Manual or the Periodic Mainte-
nance YRM section for your lift truck. Remove ac-
cess plate to motors. If the battery in your lift truck
does not need removal for access to the motors, go
to Step 3.
WARNING
Compressed air can move particles so that they
cause injury to the user or to other personnel.
Make sure that the path of the compressed air is
away from all personnel. Wear protective goggles
or a face shield to prevent injury to the eyes.
NOTE: Vacuum cleaning, when possible, is the recom-
mendation of manufacturers of electric motors. The use
of compressed air can send dirt particles into the bear-
ings and other areas of the motor that can cause pos-
sible damage.
3. Remove brush covers at rear of motor. See Fig-
ure 2. Wear eye protection. Use a vacuum cleaner
or compressed air to remove dirt and brush dust
from commutator area.
Figure 2. Brush Cover Removal From Motor
4. Remove and inspect brushes for damage or uneven
wear. Replace all brushes if any brush is worn or
damaged. The brushes must be at least half their
original length. Move brush springs away from top
of each brush and pull brushes from their holders to
inspect surface that rides on commutator. See Fig-
ure 3. That surface must have the same shape as
the commutator and must not have cracks or de-
fects. Some brushes have wear sensor wires at-
tached, even if they are not connected to an indi-
cator. Replace these brushes if brushes are worn
enough to see sensor at commutator end of brush.
5. Inspect commutator surface. See Table 1 and Ta-
ble 2. Carefully rotate armature. DO NOT damage
commutator if you use a tool to rotate armature.
The commutator wears slowly in normal service.
The mica must be cut below the surface of the com-
mutator bars after a long service period or after a
commutator has been turned in a lathe.
A commutator that has been in service will have a
smooth and polished surface with a darker brown
color where it rotates under the brushes. A variation
of color on the commutator surface between light
brown and darker brown is normal. The surface
condition is the lubrication between the commutator
and the brushes. The brushes will wear rapidly if
this surface condition does not develop during the
first 6 to 10 hours of operation after a commutator
with a new surface is installed. If the commutator
has deep grooves, rough edges of the bars, or a
few bars that are black or raised above the others,
the motor must be removed for service.
6. Inspect white or gray insulation (mica) between
commutator bars. The mica must not touch the
brushes or the brushes will wear very rapidly.
7. To replace a brush set, remove screw that holds
brush wires to bus. Pull brush end of springs from
brushes, and pull brushes from holders. Lift brush
springs away from holders, and install new brushes
so brush commutator surface fully touches commu-
tator. Make sure the springs are pushing on each
brush. Install and tighten screws for brush wires
and bus connectors.
8. Carefully install brush covers so sparks are kept
inside motor housing. Install battery as described
in Operating Manual or the Periodic Maintenance
YRM section for your lift truck.
2
Thank you very much for
your reading. Please Click
Here. Then Get COMPLETE
MANUAL. NO WAITING
NOTE:
If there is no response to
click on the link above,
please download the PDF
document first and then
click on it.
620 YRM 294 Brush and Commutator Inspection
Figure 3. Brush Removal and Inspection
Legend for Figure 3
1. BRUSH
2. BRUSH SPRING
3. MICA
Table 1. Normal Commutator Surfaces
A light brown surface of the commutator where it
rotates on the brushes is a normal condition. The
surface of the commutator must be smooth.
Variations between light brown and dark brown colors
are also normal. The surface of the commutator must
be smooth.
3
Brush and Commutator Inspection 620 YRM 294
Table 1. Normal Commutator Surfaces (Continued)
A condition called slot bar marking is also normal
if the commutator surface is smooth. The variable
color occurs in a pattern according to the number of
conductors per slot.
A very dark surface is also a normal and an acceptable
condition if the commutator surface is smooth.
STEERING PUMP MOTOR
NOTE: Some electrical trucks use a steering pump mo-
tor. Refer to your truck model’s service manual for in-
structions on removal and installation of steering pump
motors.
1. Disconnect battery connector. Remove floor plate
from lift truck for access to steering pump motor.
Open hood for access to motor. Remove screws
that hold two brush cover plates to motor housing.
2. Inspect brushes and commutator as described
in previous paragraphs for traction and hydraulic
pump motors. The brush replacement procedure is
also the same, although there are only two brushes
for the steering pump motor. See Table 3.
3. Install brush covers and screws. Install floor plate
or close hood and connect battery connector.
NORMAL COMMUTATOR SURFACE
A commutator that has been in service will have a
smooth and polished surface with a darker brown color
where it rotates under the brushes. See Table 1. A
variation of color on the commutator surface between
light brown and darker brown is normal. This surface
condition is the lubrication between the commutator
and the brushes. The brushes will wear rapidly if this
surface condition does not develop during the first 6 to
10 hours of operation after a commutator with a new
surface is installed.
4
620 YRM 294 Brush and Commutator Inspection
COMMUTATOR PROBLEMS
Commutator and motor problems and are shown in Ta-
ble 2.
Table 2. Commutator Problems
Problem Possible Cause Illustration
Heavy streaks and fine
grooves indicate the
beginning of damage to
the commutator.
• Operation of the mo-
tor in dirty and abrasive
conditions.
• Continuous operation
of a motor with a light
load.
• Brush pressure is too
low.
• Worn brushes.
Grooves and lines
that have followed the
heavy streaks and fine
grooves shown above.
The armature must
be removed from the
motor so the commutator
can be repaired. A
commutator with this
condition will cause the
brushes to wear rapidly.
• Operation of the mo-
tor in dirty and abrasive
conditions.
• Continuous operation
of a motor with a light
load.
• Brush pressure is too
low.
• Worn brushes.
5
Brush and Commutator Inspection 620 YRM 294
Table 2. Commutator Problems (Continued)
Problem Possible Cause Illustration
Grooves that are the
width of the brushes.
• Operation of the mo-
tor in dirty and abrasive
conditions.
• Wrong type of brushes
for this motor and oper-
ation.
• Brush pressure is too
high.
A condition called copper
drag occurs when copper
from the commutator bar
is pulled into the slot
between the commutator
bars. This condition will
cause a short circuit
between the commutator
bars if it is not corrected.
The brushes will wear
rapidly.
• Operation of the mo-
tor in dirty and abrasive
conditions.
• Brush holder is not ad-
justed electrically cor-
rect for the motor.
• Wrong type of brushes
for this motor and oper-
ation.
• Brush pressure is
wrong (too high or too
low).
Electrical burns on
commutator bars on
opposite sides of the
commutator.
• Open armature wind-
ing.
• Motor has been
stalled.
6
620 YRM 294 Brush and Commutator Inspection
Table 2. Commutator Problems (Continued)
Problem Possible Cause Illustration
Copper wears rapidly
at the edge of the
commutator bars.
• Operation of the mo-
tor in dirty and abrasive
conditions.
• Wrong type of brushes
for this motor and oper-
ation.
1. Flashover causes
burning of the ends
of the commutator
bar.
2. Open circuit in wind-
ing causes deep
burning of adjacent
commutator bars.
3. Overheating causes
damage to varnish
insulation.
• Motor has been too
hot. Wrong lift truck
for the application.
• Motor has been
stalled.
• Open armature wind-
ing.
• Open field coil.
Brush and commutator
damage occurs when
the high commutator hits
and forces the brush up.
Arcing and burns occur
as the brush moves
back down to the normal
surface.
Check for loose or high
commutator bars.
• Motor has been
stalled. (High com-
mutator bars at each
brush position can
occur if the motor is
stalled.)
• Motor has been too
hot.
1. High commutator bars at each brush position can oc-
cur if the motor is stalled.
2. Rapid brush wear from high commutator bars.
7
Brush Replacement 620 YRM 294
Brush Replacement
1. Motor brushes must be replaced before they are
worn enough to damage the surface of the commu-
tator. Move the brush spring and remove a brush
from its brush holder. Install new brushes as a set
if length of any brush is worn to a minimum length.
See Table 3. If the brush lead is fastened to the
brush with a rivet, install a new set of brushes if it
is worn to within 3 mm (0.118 in.) of the rivet. If a
brush does not move easily in its holder, a new set
of brushes must be installed.
The lead wire for some brushes is installed directly
into the carbon compound of the brush. New
brushes must be installed before the lead wire cuts
a groove in the commutator. Install a new brush
set when a brush is worn to a short length.
Brushes are made to different specifications for mo-
tors used in different applications. Use only new
brushes approved by Yale Company for that motor.
Table 3. Brush Wear Replacement Guide
Brush Height
17 mm
(0.67 in.)
22 mm
(0.87 in.)
28 mm
(1.10 in.)
30 mm
(1.18 in.)
31 mm
(1.22 in.)
32 mm
(1.26 in.)
40 mm
(1.57 in.)
Wear
8 mm
(0.31 in.)
12 mm
(0.47 in.)
14 mm
(0.55 in.)
15 mm
(0.59 in.)
16 mm
(0.63 in.)
16 mm
(0.63 in.)
16 mm
(0.63 in.)
Worn Brush Height
9 mm
(0.35 in.)
10 mm
(0.39 in.)
14 mm
(0.55 in.)
15 mm
(0.59 in.)
15 mm
(0.59 in.)
16 mm
(0.63 in.)
20 mm
(0.79 in.)
NOTE: For some models of lift trucks, the battery does
not need to be removed to access the electric motors.
Other models will require the removal of the battery be-
fore gaining access to the electric motors.
2. Remove battery as necessary for your lift truck.
See How To Remove Battery in the Operating
Manual or the YRM section Periodic Maintenance
for your lift truck.
WARNING
Compressed air can move particles so they cause
injury to the user or to other personnel. Verify the
path of the compressed air is away from all person-
nel. Wear protective goggles of a face shield to pre-
vent injury to the eyes.
3. Remove access plate to motors. Remove brush
covers to motor. See Figure 2. Wear eye protec-
tion. Use a vacuum cleaner or compressed air to
remove dirt and brush dust from commutator area.
4. Make a note of the arrangement and connections
of the brush assembly. See Figure 4. The new
brushes must be installed in the same positions
from which the worn brushes were removed.
5. Loosen screw that fastens brush wire to its terminal.
Remove brush springs and brushes.
1. BRUSH HOLDER (4)
2. BRUSH MOUNTING PLATE
3. BRUSH SPRING (4)
4. BRUSH SET
Figure 4. Brush Assembly
8
620 YRM 294 Brush Replacement
6. Inspect brush holders for burns and damage. Make
sure brush holders are fastened tightly to brush
mounting plate at end of motor. Make sure new
brushes will move freely and smoothly in brush
holders. Check that brush mounting plate is hold-
ing brush holder so it does not move.
7. Connect new brush wire to its terminal mount.
NOTE: When new brushes must be installed, a recom-
mendation is to also install new brush springs. Dam-
age from heat can cause the brush springs to have the
wrong spring pressure.
8. Check brush springs for damage from heat and cor-
rosion. If brush springs are damaged, install new
brush springs. Check brush springs for approxi-
mately equal pressure.
Brush springs normally have a spring pressure of
approximately:
1.0 to 2.0 Newtons per each cm2
(1.5 to 3.0 lbf per each in2
) when measured with
a spring scale.
A brush for a traction motor has an area of approx-
imately:
5.33 × 1.27 cm = 6.8 cm2
(2.1 × 0.5 in. = 1.05 in2
).
Brush springs for the traction motor normally have
a spring force of approximately:
9.1 to 11.3 Newtons
(36 to 44 ozf) when measured with a spring scale
as shown in Figure 5.
A brush for a hydraulic pump motor has an area of
approximately:
4.42 × 0.95 cm = 4.21 cm2
(1.74 × 0.375 in. = 0.653 in2
).
Brush springs for the hydraulic pump motor nor-
mally have a spring force of approximately:
5.2 to 7.4 Newtons
(20 to 28 ozf) when measured with a spring scale
as shown in Figure 5.
NOTE: SOME MOTORS HAVE SPRINGS AS SHOWN
IN FIGURE 7 AND FIGURE 11. SOME SPRINGS ARE
IN PAIRS AT EACH BRUSH HOLDER.
1. SPRING SCALE
2. BRUSH IN BRUSH
HOLDER
3. COMMUTATOR
4. BRUSH SPRING
Figure 5. Brush Spring Pressure Check
WARNING
Wear eye protection. Raise the drive wheels. Oper-
ate the motor at low speed. Protect your fingers.
You are doing work close to moving parts of the
motor. Do not use a brush seater stone less than
60 mm (2.4 in.) in length.
NOTE: The brush springs used in motors made by Yale
have a constant force design. The force of the brush
spring against the brush stays almost constant as the
brush wears and becomes shorter in its brush holder.
NOTE: New brushes made by the manufacturer are
normally made to fit the surface of the commutator
when they are installed. This contact surface must be
checked when new brushes are installed. The contact
9

More Related Content

What's hot

YALE B875 GDP050VX LIFT TRUCK Service Repair Manual
YALE B875 GDP050VX LIFT TRUCK Service Repair ManualYALE B875 GDP050VX LIFT TRUCK Service Repair Manual
YALE B875 GDP050VX LIFT TRUCK Service Repair Manualjkmdm eksmd
 
Manual de serviço cg125 cg125 ml (1983) informac
Manual de serviço cg125 cg125 ml (1983) informacManual de serviço cg125 cg125 ml (1983) informac
Manual de serviço cg125 cg125 ml (1983) informacThiago Huari
 
Nxr 150 bros 2006
Nxr 150 bros 2006Nxr 150 bros 2006
Nxr 150 bros 2006Rafael Leon
 
YALE E879 GLC60VX LIFT TRUCK Service Repair Manual
YALE E879 GLC60VX LIFT TRUCK Service Repair ManualYALE E879 GLC60VX LIFT TRUCK Service Repair Manual
YALE E879 GLC60VX LIFT TRUCK Service Repair Manualjkmemm jkjsekmd
 
Yamaha g9 eh1 golf cart service repair manual
Yamaha g9 eh1 golf cart service repair manualYamaha g9 eh1 golf cart service repair manual
Yamaha g9 eh1 golf cart service repair manualfjskekxswesemm
 
Заняття 38_Лабораторна робота № 9.2
Заняття 38_Лабораторна робота № 9.2Заняття 38_Лабораторна робота № 9.2
Заняття 38_Лабораторна робота № 9.2Yor11
 
Manual de serviço nxr125 bros ks es 00 x6b-ksm-001 embreagem
Manual de serviço nxr125 bros ks es   00 x6b-ksm-001 embreagemManual de serviço nxr125 bros ks es   00 x6b-ksm-001 embreagem
Manual de serviço nxr125 bros ks es 00 x6b-ksm-001 embreagemThiago Huari
 
Volvo g940 motor grader service repair manual
Volvo g940 motor grader service repair manualVolvo g940 motor grader service repair manual
Volvo g940 motor grader service repair manualfjsekkskem
 
Catalogo Fotográfico de Peças de Ônibus Rodogiários Marcopolo Geração 6
Catalogo Fotográfico de Peças de Ônibus Rodogiários Marcopolo Geração 6Catalogo Fotográfico de Peças de Ônibus Rodogiários Marcopolo Geração 6
Catalogo Fotográfico de Peças de Ônibus Rodogiários Marcopolo Geração 6Marcopolo SA
 
Mr 342-trafic-1
Mr 342-trafic-1Mr 342-trafic-1
Mr 342-trafic-1ReZiak
 
Mr 342-trafic-8
Mr 342-trafic-8Mr 342-trafic-8
Mr 342-trafic-8ReZiak
 
Manual serviço c 100 biz - 00 x6b-gce-761 bateria
Manual serviço c 100 biz - 00 x6b-gce-761 bateriaManual serviço c 100 biz - 00 x6b-gce-761 bateria
Manual serviço c 100 biz - 00 x6b-gce-761 bateriaThiago Huari
 
Manual serviço biz125 ks es 00 x6b-kss-001 partida-eletrica
Manual serviço biz125 ks es   00 x6b-kss-001 partida-eletricaManual serviço biz125 ks es   00 x6b-kss-001 partida-eletrica
Manual serviço biz125 ks es 00 x6b-kss-001 partida-eletricaThiago Huari
 
Manual de serviço cr250 00 escape
Manual de serviço cr250 00 escapeManual de serviço cr250 00 escape
Manual de serviço cr250 00 escapeThiago Huari
 
Manual serviço biz125 ks es 00 x6b-kss-001 arvore-manivelas
Manual serviço biz125 ks es   00 x6b-kss-001 arvore-manivelasManual serviço biz125 ks es   00 x6b-kss-001 arvore-manivelas
Manual serviço biz125 ks es 00 x6b-kss-001 arvore-manivelasThiago Huari
 
Manual de serviço cg125 today cg125 titan cg125 cargo (1994) mskch941 p inf...
Manual de serviço cg125 today cg125 titan cg125 cargo (1994)   mskch941 p inf...Manual de serviço cg125 today cg125 titan cg125 cargo (1994)   mskch941 p inf...
Manual de serviço cg125 today cg125 titan cg125 cargo (1994) mskch941 p inf...Thiago Huari
 

What's hot (17)

Purpose & operation of conventional differential
Purpose & operation of conventional differentialPurpose & operation of conventional differential
Purpose & operation of conventional differential
 
YALE B875 GDP050VX LIFT TRUCK Service Repair Manual
YALE B875 GDP050VX LIFT TRUCK Service Repair ManualYALE B875 GDP050VX LIFT TRUCK Service Repair Manual
YALE B875 GDP050VX LIFT TRUCK Service Repair Manual
 
Manual de serviço cg125 cg125 ml (1983) informac
Manual de serviço cg125 cg125 ml (1983) informacManual de serviço cg125 cg125 ml (1983) informac
Manual de serviço cg125 cg125 ml (1983) informac
 
Nxr 150 bros 2006
Nxr 150 bros 2006Nxr 150 bros 2006
Nxr 150 bros 2006
 
YALE E879 GLC60VX LIFT TRUCK Service Repair Manual
YALE E879 GLC60VX LIFT TRUCK Service Repair ManualYALE E879 GLC60VX LIFT TRUCK Service Repair Manual
YALE E879 GLC60VX LIFT TRUCK Service Repair Manual
 
Yamaha g9 eh1 golf cart service repair manual
Yamaha g9 eh1 golf cart service repair manualYamaha g9 eh1 golf cart service repair manual
Yamaha g9 eh1 golf cart service repair manual
 
Заняття 38_Лабораторна робота № 9.2
Заняття 38_Лабораторна робота № 9.2Заняття 38_Лабораторна робота № 9.2
Заняття 38_Лабораторна робота № 9.2
 
Manual de serviço nxr125 bros ks es 00 x6b-ksm-001 embreagem
Manual de serviço nxr125 bros ks es   00 x6b-ksm-001 embreagemManual de serviço nxr125 bros ks es   00 x6b-ksm-001 embreagem
Manual de serviço nxr125 bros ks es 00 x6b-ksm-001 embreagem
 
Volvo g940 motor grader service repair manual
Volvo g940 motor grader service repair manualVolvo g940 motor grader service repair manual
Volvo g940 motor grader service repair manual
 
Catalogo Fotográfico de Peças de Ônibus Rodogiários Marcopolo Geração 6
Catalogo Fotográfico de Peças de Ônibus Rodogiários Marcopolo Geração 6Catalogo Fotográfico de Peças de Ônibus Rodogiários Marcopolo Geração 6
Catalogo Fotográfico de Peças de Ônibus Rodogiários Marcopolo Geração 6
 
Mr 342-trafic-1
Mr 342-trafic-1Mr 342-trafic-1
Mr 342-trafic-1
 
Mr 342-trafic-8
Mr 342-trafic-8Mr 342-trafic-8
Mr 342-trafic-8
 
Manual serviço c 100 biz - 00 x6b-gce-761 bateria
Manual serviço c 100 biz - 00 x6b-gce-761 bateriaManual serviço c 100 biz - 00 x6b-gce-761 bateria
Manual serviço c 100 biz - 00 x6b-gce-761 bateria
 
Manual serviço biz125 ks es 00 x6b-kss-001 partida-eletrica
Manual serviço biz125 ks es   00 x6b-kss-001 partida-eletricaManual serviço biz125 ks es   00 x6b-kss-001 partida-eletrica
Manual serviço biz125 ks es 00 x6b-kss-001 partida-eletrica
 
Manual de serviço cr250 00 escape
Manual de serviço cr250 00 escapeManual de serviço cr250 00 escape
Manual de serviço cr250 00 escape
 
Manual serviço biz125 ks es 00 x6b-kss-001 arvore-manivelas
Manual serviço biz125 ks es   00 x6b-kss-001 arvore-manivelasManual serviço biz125 ks es   00 x6b-kss-001 arvore-manivelas
Manual serviço biz125 ks es 00 x6b-kss-001 arvore-manivelas
 
Manual de serviço cg125 today cg125 titan cg125 cargo (1994) mskch941 p inf...
Manual de serviço cg125 today cg125 titan cg125 cargo (1994)   mskch941 p inf...Manual de serviço cg125 today cg125 titan cg125 cargo (1994)   mskch941 p inf...
Manual de serviço cg125 today cg125 titan cg125 cargo (1994) mskch941 p inf...
 

Similar to Service Manual Sections for ESC030FA, ESC035FA, ESC040FA Forklifts

Yale b888 erp13 vc lift truck service repair manual
Yale b888 erp13 vc lift truck service repair manualYale b888 erp13 vc lift truck service repair manual
Yale b888 erp13 vc lift truck service repair manualfjsefksemmm
 
Yale b888 erp13 vc lift truck service repair manual
Yale b888 erp13 vc lift truck service repair manualYale b888 erp13 vc lift truck service repair manual
Yale b888 erp13 vc lift truck service repair manualjkemmd eudkms
 
Yale b888 erp15 vc lift truck service repair manual
Yale b888 erp15 vc lift truck service repair manualYale b888 erp15 vc lift truck service repair manual
Yale b888 erp15 vc lift truck service repair manualfjjksekfksmem
 
Hyster c215 (w45 z) forklift service repair manual
Hyster c215 (w45 z) forklift service repair manualHyster c215 (w45 z) forklift service repair manual
Hyster c215 (w45 z) forklift service repair manualfusjefkskemme
 
Hyster c215 (w45 z) forklift service repair manual
Hyster c215 (w45 z) forklift service repair manualHyster c215 (w45 z) forklift service repair manual
Hyster c215 (w45 z) forklift service repair manualfusjfjsekemwer
 
Case ih stx440 tractor service repair manual
Case ih stx440 tractor service repair manualCase ih stx440 tractor service repair manual
Case ih stx440 tractor service repair manualfujsefkskemm
 
CASE IH STX450 Tractor Service Repair Manual.pdf
CASE IH STX450 Tractor Service Repair Manual.pdfCASE IH STX450 Tractor Service Repair Manual.pdf
CASE IH STX450 Tractor Service Repair Manual.pdffujskemdidk8u1
 
CASE IH STX440 Tractor Service Repair Manual.pdf
CASE IH STX440 Tractor Service Repair Manual.pdfCASE IH STX440 Tractor Service Repair Manual.pdf
CASE IH STX440 Tractor Service Repair Manual.pdffujskemdidk8u1
 
CASE IH STX275 Tractor Service Repair Manual.pdf
CASE IH STX275 Tractor Service Repair Manual.pdfCASE IH STX275 Tractor Service Repair Manual.pdf
CASE IH STX275 Tractor Service Repair Manual.pdffujskemdidk8u1
 
CASE IH STX325 Tractor Service Repair Manual.pdf
CASE IH STX325 Tractor Service Repair Manual.pdfCASE IH STX325 Tractor Service Repair Manual.pdf
CASE IH STX325 Tractor Service Repair Manual.pdffujskemdidk8u1
 
CASE IH STX375 Tractor Service Repair Manual.pdf
CASE IH STX375 Tractor Service Repair Manual.pdfCASE IH STX375 Tractor Service Repair Manual.pdf
CASE IH STX375 Tractor Service Repair Manual.pdffujskemdidk8u1
 
CASE IH STX440 Tractor Service Repair Manual.pdf
CASE IH STX440 Tractor Service Repair Manual.pdfCASE IH STX440 Tractor Service Repair Manual.pdf
CASE IH STX440 Tractor Service Repair Manual.pdffujskekdmd3e
 
CASE IH STX325 Tractor Service Repair Manual.pdf
CASE IH STX325 Tractor Service Repair Manual.pdfCASE IH STX325 Tractor Service Repair Manual.pdf
CASE IH STX325 Tractor Service Repair Manual.pdffujskekdmd3e
 
CASE IH STX375 Tractor Service Repair Manual.pdf
CASE IH STX375 Tractor Service Repair Manual.pdfCASE IH STX375 Tractor Service Repair Manual.pdf
CASE IH STX375 Tractor Service Repair Manual.pdffujskekdmd3e
 
CASE IH STX450 Tractor Service Repair Manual.pdf
CASE IH STX450 Tractor Service Repair Manual.pdfCASE IH STX450 Tractor Service Repair Manual.pdf
CASE IH STX450 Tractor Service Repair Manual.pdffujskekdmd3e
 
CASE IH STX275 Tractor Service Repair Manual.pdf
CASE IH STX275 Tractor Service Repair Manual.pdfCASE IH STX275 Tractor Service Repair Manual.pdf
CASE IH STX275 Tractor Service Repair Manual.pdffujskekdmd3e
 
CASE IH STX440 Tractor Service Repair Manual.pdf
CASE IH STX440 Tractor Service Repair Manual.pdfCASE IH STX440 Tractor Service Repair Manual.pdf
CASE IH STX440 Tractor Service Repair Manual.pdffjksekmmdmsx
 
CASE IH STX275 Tractor Service Repair Manual.pdf
CASE IH STX275 Tractor Service Repair Manual.pdfCASE IH STX275 Tractor Service Repair Manual.pdf
CASE IH STX275 Tractor Service Repair Manual.pdffjksekmmdmsx
 
CASE IH STX450 Tractor Service Repair Manual.pdf
CASE IH STX450 Tractor Service Repair Manual.pdfCASE IH STX450 Tractor Service Repair Manual.pdf
CASE IH STX450 Tractor Service Repair Manual.pdffjksekmmdmsx
 
CASE IH STX375 Tractor Service Repair Manual.pdf
CASE IH STX375 Tractor Service Repair Manual.pdfCASE IH STX375 Tractor Service Repair Manual.pdf
CASE IH STX375 Tractor Service Repair Manual.pdffjksekmmdmsx
 

Similar to Service Manual Sections for ESC030FA, ESC035FA, ESC040FA Forklifts (20)

Yale b888 erp13 vc lift truck service repair manual
Yale b888 erp13 vc lift truck service repair manualYale b888 erp13 vc lift truck service repair manual
Yale b888 erp13 vc lift truck service repair manual
 
Yale b888 erp13 vc lift truck service repair manual
Yale b888 erp13 vc lift truck service repair manualYale b888 erp13 vc lift truck service repair manual
Yale b888 erp13 vc lift truck service repair manual
 
Yale b888 erp15 vc lift truck service repair manual
Yale b888 erp15 vc lift truck service repair manualYale b888 erp15 vc lift truck service repair manual
Yale b888 erp15 vc lift truck service repair manual
 
Hyster c215 (w45 z) forklift service repair manual
Hyster c215 (w45 z) forklift service repair manualHyster c215 (w45 z) forklift service repair manual
Hyster c215 (w45 z) forklift service repair manual
 
Hyster c215 (w45 z) forklift service repair manual
Hyster c215 (w45 z) forklift service repair manualHyster c215 (w45 z) forklift service repair manual
Hyster c215 (w45 z) forklift service repair manual
 
Case ih stx440 tractor service repair manual
Case ih stx440 tractor service repair manualCase ih stx440 tractor service repair manual
Case ih stx440 tractor service repair manual
 
CASE IH STX450 Tractor Service Repair Manual.pdf
CASE IH STX450 Tractor Service Repair Manual.pdfCASE IH STX450 Tractor Service Repair Manual.pdf
CASE IH STX450 Tractor Service Repair Manual.pdf
 
CASE IH STX440 Tractor Service Repair Manual.pdf
CASE IH STX440 Tractor Service Repair Manual.pdfCASE IH STX440 Tractor Service Repair Manual.pdf
CASE IH STX440 Tractor Service Repair Manual.pdf
 
CASE IH STX275 Tractor Service Repair Manual.pdf
CASE IH STX275 Tractor Service Repair Manual.pdfCASE IH STX275 Tractor Service Repair Manual.pdf
CASE IH STX275 Tractor Service Repair Manual.pdf
 
CASE IH STX325 Tractor Service Repair Manual.pdf
CASE IH STX325 Tractor Service Repair Manual.pdfCASE IH STX325 Tractor Service Repair Manual.pdf
CASE IH STX325 Tractor Service Repair Manual.pdf
 
CASE IH STX375 Tractor Service Repair Manual.pdf
CASE IH STX375 Tractor Service Repair Manual.pdfCASE IH STX375 Tractor Service Repair Manual.pdf
CASE IH STX375 Tractor Service Repair Manual.pdf
 
CASE IH STX440 Tractor Service Repair Manual.pdf
CASE IH STX440 Tractor Service Repair Manual.pdfCASE IH STX440 Tractor Service Repair Manual.pdf
CASE IH STX440 Tractor Service Repair Manual.pdf
 
CASE IH STX325 Tractor Service Repair Manual.pdf
CASE IH STX325 Tractor Service Repair Manual.pdfCASE IH STX325 Tractor Service Repair Manual.pdf
CASE IH STX325 Tractor Service Repair Manual.pdf
 
CASE IH STX375 Tractor Service Repair Manual.pdf
CASE IH STX375 Tractor Service Repair Manual.pdfCASE IH STX375 Tractor Service Repair Manual.pdf
CASE IH STX375 Tractor Service Repair Manual.pdf
 
CASE IH STX450 Tractor Service Repair Manual.pdf
CASE IH STX450 Tractor Service Repair Manual.pdfCASE IH STX450 Tractor Service Repair Manual.pdf
CASE IH STX450 Tractor Service Repair Manual.pdf
 
CASE IH STX275 Tractor Service Repair Manual.pdf
CASE IH STX275 Tractor Service Repair Manual.pdfCASE IH STX275 Tractor Service Repair Manual.pdf
CASE IH STX275 Tractor Service Repair Manual.pdf
 
CASE IH STX440 Tractor Service Repair Manual.pdf
CASE IH STX440 Tractor Service Repair Manual.pdfCASE IH STX440 Tractor Service Repair Manual.pdf
CASE IH STX440 Tractor Service Repair Manual.pdf
 
CASE IH STX275 Tractor Service Repair Manual.pdf
CASE IH STX275 Tractor Service Repair Manual.pdfCASE IH STX275 Tractor Service Repair Manual.pdf
CASE IH STX275 Tractor Service Repair Manual.pdf
 
CASE IH STX450 Tractor Service Repair Manual.pdf
CASE IH STX450 Tractor Service Repair Manual.pdfCASE IH STX450 Tractor Service Repair Manual.pdf
CASE IH STX450 Tractor Service Repair Manual.pdf
 
CASE IH STX375 Tractor Service Repair Manual.pdf
CASE IH STX375 Tractor Service Repair Manual.pdfCASE IH STX375 Tractor Service Repair Manual.pdf
CASE IH STX375 Tractor Service Repair Manual.pdf
 

More from fjskeksemm

Yamaha outboard 40 veo, 40er service repair manual s 110760
Yamaha outboard 40 veo, 40er service repair manual s 110760  Yamaha outboard 40 veo, 40er service repair manual s 110760
Yamaha outboard 40 veo, 40er service repair manual s 110760 fjskeksemm
 
Yamaha g9 eg golf cart service repair manual
Yamaha g9 eg golf cart service repair manualYamaha g9 eg golf cart service repair manual
Yamaha g9 eg golf cart service repair manualfjskeksemm
 
Yamaha g1 golf car service repair manual
Yamaha g1 golf car service repair manualYamaha g1 golf car service repair manual
Yamaha g1 golf car service repair manualfjskeksemm
 
Yale c875 glp30 vx lift truck service repair manual
Yale c875 glp30 vx lift truck service repair manualYale c875 glp30 vx lift truck service repair manual
Yale c875 glp30 vx lift truck service repair manualfjskeksemm
 
Yale c814 erc erp20 aaf (erc030-040ah) lift truck service repair manual
Yale c814 erc erp20 aaf (erc030-040ah) lift truck service repair manualYale c814 erc erp20 aaf (erc030-040ah) lift truck service repair manual
Yale c814 erc erp20 aaf (erc030-040ah) lift truck service repair manualfjskeksemm
 
Yale b909 gdp80 vx9 lift truck service repair manual
Yale b909 gdp80 vx9 lift truck service repair manualYale b909 gdp80 vx9 lift truck service repair manual
Yale b909 gdp80 vx9 lift truck service repair manualfjskeksemm
 
Yale b875 glp25 vx lift truck service repair manual
Yale b875 glp25 vx lift truck service repair manualYale b875 glp25 vx lift truck service repair manual
Yale b875 glp25 vx lift truck service repair manualfjskeksemm
 
Yale (d875) gtp060 vx lift truck service repair manual
Yale (d875) gtp060 vx lift truck service repair manualYale (d875) gtp060 vx lift truck service repair manual
Yale (d875) gtp060 vx lift truck service repair manualfjskeksemm
 
Volvo l110 e wheel loader service repair manual
Volvo l110 e wheel loader service repair manualVolvo l110 e wheel loader service repair manual
Volvo l110 e wheel loader service repair manualfjskeksemm
 
Perkins 1600 series industrial engine ( xge ) service repair manual
Perkins 1600 series industrial engine ( xge ) service repair manualPerkins 1600 series industrial engine ( xge ) service repair manual
Perkins 1600 series industrial engine ( xge ) service repair manualfjskeksemm
 
Perkins 400 series 402 d 403d 404d industrial engine (model gp) service repai...
Perkins 400 series 402 d 403d 404d industrial engine (model gp) service repai...Perkins 400 series 402 d 403d 404d industrial engine (model gp) service repai...
Perkins 400 series 402 d 403d 404d industrial engine (model gp) service repai...fjskeksemm
 
New holland kobelco e215 b crawler excavator service repair manual
New holland kobelco e215 b crawler excavator service repair manualNew holland kobelco e215 b crawler excavator service repair manual
New holland kobelco e215 b crawler excavator service repair manualfjskeksemm
 
Kubota rotary mower service repair manual
Kubota rotary mower service repair manualKubota rotary mower service repair manual
Kubota rotary mower service repair manualfjskeksemm
 
Kioti daedong dk501 tractor service repair manual
Kioti daedong dk501 tractor service repair manualKioti daedong dk501 tractor service repair manual
Kioti daedong dk501 tractor service repair manualfjskeksemm
 
Kioti daedong ck30 h tractor service repair manual
Kioti daedong ck30 h tractor service repair manualKioti daedong ck30 h tractor service repair manual
Kioti daedong ck30 h tractor service repair manualfjskeksemm
 
Kioti daedong ck25 h tractor service repair manual
Kioti daedong ck25 h tractor service repair manualKioti daedong ck25 h tractor service repair manual
Kioti daedong ck25 h tractor service repair manualfjskeksemm
 
Kawasaki 90 z7b wheel loader parts catalogue manual
Kawasaki 90 z7b wheel loader parts catalogue manualKawasaki 90 z7b wheel loader parts catalogue manual
Kawasaki 90 z7b wheel loader parts catalogue manualfjskeksemm
 
Kawasaki 85 z7 wheel loader parts catalogue manual
Kawasaki 85 z7 wheel loader parts catalogue manualKawasaki 85 z7 wheel loader parts catalogue manual
Kawasaki 85 z7 wheel loader parts catalogue manualfjskeksemm
 
Kawasaki 80 z7b wheel loader operation and maintenance manual (serial no. 80c...
Kawasaki 80 z7b wheel loader operation and maintenance manual (serial no. 80c...Kawasaki 80 z7b wheel loader operation and maintenance manual (serial no. 80c...
Kawasaki 80 z7b wheel loader operation and maintenance manual (serial no. 80c...fjskeksemm
 
Kawasaki 80 z7b wheel loader equipment components parts catalogue manual (ser...
Kawasaki 80 z7b wheel loader equipment components parts catalogue manual (ser...Kawasaki 80 z7b wheel loader equipment components parts catalogue manual (ser...
Kawasaki 80 z7b wheel loader equipment components parts catalogue manual (ser...fjskeksemm
 

More from fjskeksemm (20)

Yamaha outboard 40 veo, 40er service repair manual s 110760
Yamaha outboard 40 veo, 40er service repair manual s 110760  Yamaha outboard 40 veo, 40er service repair manual s 110760
Yamaha outboard 40 veo, 40er service repair manual s 110760
 
Yamaha g9 eg golf cart service repair manual
Yamaha g9 eg golf cart service repair manualYamaha g9 eg golf cart service repair manual
Yamaha g9 eg golf cart service repair manual
 
Yamaha g1 golf car service repair manual
Yamaha g1 golf car service repair manualYamaha g1 golf car service repair manual
Yamaha g1 golf car service repair manual
 
Yale c875 glp30 vx lift truck service repair manual
Yale c875 glp30 vx lift truck service repair manualYale c875 glp30 vx lift truck service repair manual
Yale c875 glp30 vx lift truck service repair manual
 
Yale c814 erc erp20 aaf (erc030-040ah) lift truck service repair manual
Yale c814 erc erp20 aaf (erc030-040ah) lift truck service repair manualYale c814 erc erp20 aaf (erc030-040ah) lift truck service repair manual
Yale c814 erc erp20 aaf (erc030-040ah) lift truck service repair manual
 
Yale b909 gdp80 vx9 lift truck service repair manual
Yale b909 gdp80 vx9 lift truck service repair manualYale b909 gdp80 vx9 lift truck service repair manual
Yale b909 gdp80 vx9 lift truck service repair manual
 
Yale b875 glp25 vx lift truck service repair manual
Yale b875 glp25 vx lift truck service repair manualYale b875 glp25 vx lift truck service repair manual
Yale b875 glp25 vx lift truck service repair manual
 
Yale (d875) gtp060 vx lift truck service repair manual
Yale (d875) gtp060 vx lift truck service repair manualYale (d875) gtp060 vx lift truck service repair manual
Yale (d875) gtp060 vx lift truck service repair manual
 
Volvo l110 e wheel loader service repair manual
Volvo l110 e wheel loader service repair manualVolvo l110 e wheel loader service repair manual
Volvo l110 e wheel loader service repair manual
 
Perkins 1600 series industrial engine ( xge ) service repair manual
Perkins 1600 series industrial engine ( xge ) service repair manualPerkins 1600 series industrial engine ( xge ) service repair manual
Perkins 1600 series industrial engine ( xge ) service repair manual
 
Perkins 400 series 402 d 403d 404d industrial engine (model gp) service repai...
Perkins 400 series 402 d 403d 404d industrial engine (model gp) service repai...Perkins 400 series 402 d 403d 404d industrial engine (model gp) service repai...
Perkins 400 series 402 d 403d 404d industrial engine (model gp) service repai...
 
New holland kobelco e215 b crawler excavator service repair manual
New holland kobelco e215 b crawler excavator service repair manualNew holland kobelco e215 b crawler excavator service repair manual
New holland kobelco e215 b crawler excavator service repair manual
 
Kubota rotary mower service repair manual
Kubota rotary mower service repair manualKubota rotary mower service repair manual
Kubota rotary mower service repair manual
 
Kioti daedong dk501 tractor service repair manual
Kioti daedong dk501 tractor service repair manualKioti daedong dk501 tractor service repair manual
Kioti daedong dk501 tractor service repair manual
 
Kioti daedong ck30 h tractor service repair manual
Kioti daedong ck30 h tractor service repair manualKioti daedong ck30 h tractor service repair manual
Kioti daedong ck30 h tractor service repair manual
 
Kioti daedong ck25 h tractor service repair manual
Kioti daedong ck25 h tractor service repair manualKioti daedong ck25 h tractor service repair manual
Kioti daedong ck25 h tractor service repair manual
 
Kawasaki 90 z7b wheel loader parts catalogue manual
Kawasaki 90 z7b wheel loader parts catalogue manualKawasaki 90 z7b wheel loader parts catalogue manual
Kawasaki 90 z7b wheel loader parts catalogue manual
 
Kawasaki 85 z7 wheel loader parts catalogue manual
Kawasaki 85 z7 wheel loader parts catalogue manualKawasaki 85 z7 wheel loader parts catalogue manual
Kawasaki 85 z7 wheel loader parts catalogue manual
 
Kawasaki 80 z7b wheel loader operation and maintenance manual (serial no. 80c...
Kawasaki 80 z7b wheel loader operation and maintenance manual (serial no. 80c...Kawasaki 80 z7b wheel loader operation and maintenance manual (serial no. 80c...
Kawasaki 80 z7b wheel loader operation and maintenance manual (serial no. 80c...
 
Kawasaki 80 z7b wheel loader equipment components parts catalogue manual (ser...
Kawasaki 80 z7b wheel loader equipment components parts catalogue manual (ser...Kawasaki 80 z7b wheel loader equipment components parts catalogue manual (ser...
Kawasaki 80 z7b wheel loader equipment components parts catalogue manual (ser...
 

Recently uploaded

UNIT-III-TRANSMISSION SYSTEMS REAR AXLES
UNIT-III-TRANSMISSION SYSTEMS REAR AXLESUNIT-III-TRANSMISSION SYSTEMS REAR AXLES
UNIT-III-TRANSMISSION SYSTEMS REAR AXLESDineshKumar4165
 
Call me @ 9892124323 Call Girl in Andheri East With Free Home Delivery
Call me @ 9892124323 Call Girl in Andheri East With Free Home DeliveryCall me @ 9892124323 Call Girl in Andheri East With Free Home Delivery
Call me @ 9892124323 Call Girl in Andheri East With Free Home DeliveryPooja Nehwal
 
UNIT-1-VEHICLE STRUCTURE AND ENGINES.ppt
UNIT-1-VEHICLE STRUCTURE AND ENGINES.pptUNIT-1-VEHICLE STRUCTURE AND ENGINES.ppt
UNIT-1-VEHICLE STRUCTURE AND ENGINES.pptDineshKumar4165
 
Delhi Call Girls Saket 9711199171 ☎✔👌✔ Full night Service for more than 1 person
Delhi Call Girls Saket 9711199171 ☎✔👌✔ Full night Service for more than 1 personDelhi Call Girls Saket 9711199171 ☎✔👌✔ Full night Service for more than 1 person
Delhi Call Girls Saket 9711199171 ☎✔👌✔ Full night Service for more than 1 personshivangimorya083
 
UNOSAFE ELEVATOR PRIVATE LTD BANGALORE BROUCHER
UNOSAFE ELEVATOR PRIVATE LTD BANGALORE BROUCHERUNOSAFE ELEVATOR PRIVATE LTD BANGALORE BROUCHER
UNOSAFE ELEVATOR PRIVATE LTD BANGALORE BROUCHERunosafeads
 
꧁༒☬ 7042364481 (Call Girl) In Dwarka Delhi Escort Service In Delhi Ncr☬༒꧂
꧁༒☬ 7042364481 (Call Girl) In Dwarka Delhi Escort Service In Delhi Ncr☬༒꧂꧁༒☬ 7042364481 (Call Girl) In Dwarka Delhi Escort Service In Delhi Ncr☬༒꧂
꧁༒☬ 7042364481 (Call Girl) In Dwarka Delhi Escort Service In Delhi Ncr☬༒꧂Hot Call Girls In Sector 58 (Noida)
 
call girls in Jama Masjid (DELHI) 🔝 >༒9953330565🔝 genuine Escort Service 🔝✔️✔️
call girls in Jama Masjid (DELHI) 🔝 >༒9953330565🔝 genuine Escort Service 🔝✔️✔️call girls in Jama Masjid (DELHI) 🔝 >༒9953330565🔝 genuine Escort Service 🔝✔️✔️
call girls in Jama Masjid (DELHI) 🔝 >༒9953330565🔝 genuine Escort Service 🔝✔️✔️9953056974 Low Rate Call Girls In Saket, Delhi NCR
 
2024 WRC Hyundai World Rally Team’s i20 N Rally1 Hybrid
2024 WRC Hyundai World Rally Team’s i20 N Rally1 Hybrid2024 WRC Hyundai World Rally Team’s i20 N Rally1 Hybrid
2024 WRC Hyundai World Rally Team’s i20 N Rally1 HybridHyundai Motor Group
 
Dubai Call Girls Size E6 (O525547819) Call Girls In Dubai
Dubai Call Girls  Size E6 (O525547819) Call Girls In DubaiDubai Call Girls  Size E6 (O525547819) Call Girls In Dubai
Dubai Call Girls Size E6 (O525547819) Call Girls In Dubaikojalkojal131
 
call girls in G.T.B. Nagar (DELHI) 🔝 >༒9953330565🔝 genuine Escort Service 🔝✔️✔️
call girls in  G.T.B. Nagar (DELHI) 🔝 >༒9953330565🔝 genuine Escort Service 🔝✔️✔️call girls in  G.T.B. Nagar (DELHI) 🔝 >༒9953330565🔝 genuine Escort Service 🔝✔️✔️
call girls in G.T.B. Nagar (DELHI) 🔝 >༒9953330565🔝 genuine Escort Service 🔝✔️✔️9953056974 Low Rate Call Girls In Saket, Delhi NCR
 
( Best ) Genuine Call Girls In Mandi House =DELHI-| 8377087607
( Best ) Genuine Call Girls In Mandi House =DELHI-| 8377087607( Best ) Genuine Call Girls In Mandi House =DELHI-| 8377087607
( Best ) Genuine Call Girls In Mandi House =DELHI-| 8377087607dollysharma2066
 
John Deere 300 3029 4039 4045 6059 6068 Engine Operation and Service Manual
John Deere 300 3029 4039 4045 6059 6068 Engine Operation and Service ManualJohn Deere 300 3029 4039 4045 6059 6068 Engine Operation and Service Manual
John Deere 300 3029 4039 4045 6059 6068 Engine Operation and Service ManualExcavator
 
Beautiful Vip Call Girls Punjabi Bagh 9711199012 Call /Whatsapps
Beautiful Vip  Call Girls Punjabi Bagh 9711199012 Call /WhatsappsBeautiful Vip  Call Girls Punjabi Bagh 9711199012 Call /Whatsapps
Beautiful Vip Call Girls Punjabi Bagh 9711199012 Call /Whatsappssapnasaifi408
 
FULL ENJOY - 9953040155 Call Girls in Sector 61 | Noida
FULL ENJOY - 9953040155 Call Girls in Sector 61 | NoidaFULL ENJOY - 9953040155 Call Girls in Sector 61 | Noida
FULL ENJOY - 9953040155 Call Girls in Sector 61 | NoidaMalviyaNagarCallGirl
 
(COD) ̄Young Call Girls In Dwarka , New Delhi꧁❤ 7042364481❤꧂ Escorts Service i...
(COD) ̄Young Call Girls In Dwarka , New Delhi꧁❤ 7042364481❤꧂ Escorts Service i...(COD) ̄Young Call Girls In Dwarka , New Delhi꧁❤ 7042364481❤꧂ Escorts Service i...
(COD) ̄Young Call Girls In Dwarka , New Delhi꧁❤ 7042364481❤꧂ Escorts Service i...Hot Call Girls In Sector 58 (Noida)
 
VDA 6.3 Process Approach in Automotive Industries
VDA 6.3 Process Approach in Automotive IndustriesVDA 6.3 Process Approach in Automotive Industries
VDA 6.3 Process Approach in Automotive IndustriesKannanDN
 

Recently uploaded (20)

UNIT-III-TRANSMISSION SYSTEMS REAR AXLES
UNIT-III-TRANSMISSION SYSTEMS REAR AXLESUNIT-III-TRANSMISSION SYSTEMS REAR AXLES
UNIT-III-TRANSMISSION SYSTEMS REAR AXLES
 
Call me @ 9892124323 Call Girl in Andheri East With Free Home Delivery
Call me @ 9892124323 Call Girl in Andheri East With Free Home DeliveryCall me @ 9892124323 Call Girl in Andheri East With Free Home Delivery
Call me @ 9892124323 Call Girl in Andheri East With Free Home Delivery
 
UNIT-1-VEHICLE STRUCTURE AND ENGINES.ppt
UNIT-1-VEHICLE STRUCTURE AND ENGINES.pptUNIT-1-VEHICLE STRUCTURE AND ENGINES.ppt
UNIT-1-VEHICLE STRUCTURE AND ENGINES.ppt
 
Delhi Call Girls Saket 9711199171 ☎✔👌✔ Full night Service for more than 1 person
Delhi Call Girls Saket 9711199171 ☎✔👌✔ Full night Service for more than 1 personDelhi Call Girls Saket 9711199171 ☎✔👌✔ Full night Service for more than 1 person
Delhi Call Girls Saket 9711199171 ☎✔👌✔ Full night Service for more than 1 person
 
Call Girls in Shri Niwas Puri Delhi 💯Call Us 🔝9953056974🔝
Call Girls in  Shri Niwas Puri  Delhi 💯Call Us 🔝9953056974🔝Call Girls in  Shri Niwas Puri  Delhi 💯Call Us 🔝9953056974🔝
Call Girls in Shri Niwas Puri Delhi 💯Call Us 🔝9953056974🔝
 
UNOSAFE ELEVATOR PRIVATE LTD BANGALORE BROUCHER
UNOSAFE ELEVATOR PRIVATE LTD BANGALORE BROUCHERUNOSAFE ELEVATOR PRIVATE LTD BANGALORE BROUCHER
UNOSAFE ELEVATOR PRIVATE LTD BANGALORE BROUCHER
 
꧁༒☬ 7042364481 (Call Girl) In Dwarka Delhi Escort Service In Delhi Ncr☬༒꧂
꧁༒☬ 7042364481 (Call Girl) In Dwarka Delhi Escort Service In Delhi Ncr☬༒꧂꧁༒☬ 7042364481 (Call Girl) In Dwarka Delhi Escort Service In Delhi Ncr☬༒꧂
꧁༒☬ 7042364481 (Call Girl) In Dwarka Delhi Escort Service In Delhi Ncr☬༒꧂
 
call girls in Jama Masjid (DELHI) 🔝 >༒9953330565🔝 genuine Escort Service 🔝✔️✔️
call girls in Jama Masjid (DELHI) 🔝 >༒9953330565🔝 genuine Escort Service 🔝✔️✔️call girls in Jama Masjid (DELHI) 🔝 >༒9953330565🔝 genuine Escort Service 🔝✔️✔️
call girls in Jama Masjid (DELHI) 🔝 >༒9953330565🔝 genuine Escort Service 🔝✔️✔️
 
2024 WRC Hyundai World Rally Team’s i20 N Rally1 Hybrid
2024 WRC Hyundai World Rally Team’s i20 N Rally1 Hybrid2024 WRC Hyundai World Rally Team’s i20 N Rally1 Hybrid
2024 WRC Hyundai World Rally Team’s i20 N Rally1 Hybrid
 
Dubai Call Girls Size E6 (O525547819) Call Girls In Dubai
Dubai Call Girls  Size E6 (O525547819) Call Girls In DubaiDubai Call Girls  Size E6 (O525547819) Call Girls In Dubai
Dubai Call Girls Size E6 (O525547819) Call Girls In Dubai
 
call girls in G.T.B. Nagar (DELHI) 🔝 >༒9953330565🔝 genuine Escort Service 🔝✔️✔️
call girls in  G.T.B. Nagar (DELHI) 🔝 >༒9953330565🔝 genuine Escort Service 🔝✔️✔️call girls in  G.T.B. Nagar (DELHI) 🔝 >༒9953330565🔝 genuine Escort Service 🔝✔️✔️
call girls in G.T.B. Nagar (DELHI) 🔝 >༒9953330565🔝 genuine Escort Service 🔝✔️✔️
 
Indian Downtown Call Girls # 00971528903066 # Indian Call Girls In Downtown D...
Indian Downtown Call Girls # 00971528903066 # Indian Call Girls In Downtown D...Indian Downtown Call Girls # 00971528903066 # Indian Call Girls In Downtown D...
Indian Downtown Call Girls # 00971528903066 # Indian Call Girls In Downtown D...
 
( Best ) Genuine Call Girls In Mandi House =DELHI-| 8377087607
( Best ) Genuine Call Girls In Mandi House =DELHI-| 8377087607( Best ) Genuine Call Girls In Mandi House =DELHI-| 8377087607
( Best ) Genuine Call Girls In Mandi House =DELHI-| 8377087607
 
John Deere 300 3029 4039 4045 6059 6068 Engine Operation and Service Manual
John Deere 300 3029 4039 4045 6059 6068 Engine Operation and Service ManualJohn Deere 300 3029 4039 4045 6059 6068 Engine Operation and Service Manual
John Deere 300 3029 4039 4045 6059 6068 Engine Operation and Service Manual
 
Beautiful Vip Call Girls Punjabi Bagh 9711199012 Call /Whatsapps
Beautiful Vip  Call Girls Punjabi Bagh 9711199012 Call /WhatsappsBeautiful Vip  Call Girls Punjabi Bagh 9711199012 Call /Whatsapps
Beautiful Vip Call Girls Punjabi Bagh 9711199012 Call /Whatsapps
 
(NEHA) Call Girls Pushkar Booking Open 8617697112 Pushkar Escorts
(NEHA) Call Girls Pushkar Booking Open 8617697112 Pushkar Escorts(NEHA) Call Girls Pushkar Booking Open 8617697112 Pushkar Escorts
(NEHA) Call Girls Pushkar Booking Open 8617697112 Pushkar Escorts
 
Hotel Escorts Sushant Golf City - 9548273370 Call Girls Service in Lucknow, c...
Hotel Escorts Sushant Golf City - 9548273370 Call Girls Service in Lucknow, c...Hotel Escorts Sushant Golf City - 9548273370 Call Girls Service in Lucknow, c...
Hotel Escorts Sushant Golf City - 9548273370 Call Girls Service in Lucknow, c...
 
FULL ENJOY - 9953040155 Call Girls in Sector 61 | Noida
FULL ENJOY - 9953040155 Call Girls in Sector 61 | NoidaFULL ENJOY - 9953040155 Call Girls in Sector 61 | Noida
FULL ENJOY - 9953040155 Call Girls in Sector 61 | Noida
 
(COD) ̄Young Call Girls In Dwarka , New Delhi꧁❤ 7042364481❤꧂ Escorts Service i...
(COD) ̄Young Call Girls In Dwarka , New Delhi꧁❤ 7042364481❤꧂ Escorts Service i...(COD) ̄Young Call Girls In Dwarka , New Delhi꧁❤ 7042364481❤꧂ Escorts Service i...
(COD) ̄Young Call Girls In Dwarka , New Delhi꧁❤ 7042364481❤꧂ Escorts Service i...
 
VDA 6.3 Process Approach in Automotive Industries
VDA 6.3 Process Approach in Automotive IndustriesVDA 6.3 Process Approach in Automotive Industries
VDA 6.3 Process Approach in Automotive Industries
 

Service Manual Sections for ESC030FA, ESC035FA, ESC040FA Forklifts

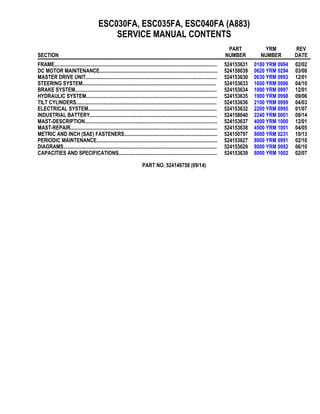
  • 1. ESC030FA, ESC035FA, ESC040FA (A883) SERVICE MANUAL CONTENTS SECTION PART NUMBER YRM NUMBER REV DATE FRAME............................................................................................................................ 524153631 0100 YRM 0994 02/02 DC MOTOR MAINTENANCE.......................................................................................... 524158039 0620 YRM 0294 03/08 MASTER DRIVE UNIT.................................................................................................... 524153630 0630 YRM 0993 12/01 STEERING SYSTEM...................................................................................................... 524153633 1600 YRM 0996 04/10 BRAKE SYSTEM............................................................................................................ 524153634 1800 YRM 0997 12/01 HYDRAULIC SYSTEM.................................................................................................... 524153635 1900 YRM 0998 09/06 TILT CYLINDERS........................................................................................................... 524153636 2100 YRM 0999 04/03 ELECTRICAL SYSTEM.................................................................................................. 524153632 2200 YRM 0995 01/07 INDUSTRIAL BATTERY................................................................................................. 524158040 2240 YRM 0001 09/14 MAST-DESCRIPTION..................................................................................................... 524153637 4000 YRM 1000 12/01 MAST-REPAIR................................................................................................................ 524153638 4500 YRM 1001 04/05 METRIC AND INCH (SAE) FASTENERS....................................................................... 524150797 8000 YRM 0231 10/13 PERIODIC MAINTENANCE............................................................................................ 524153627 8000 YRM 0991 02/10 DIAGRAMS..................................................................................................................... 524153629 8000 YRM 0992 06/10 CAPACITIES AND SPECIFICATIONS........................................................................... 524153639 8000 YRM 1002 02/07 PART NO. 524146758 (09/14)
  • 2. 100 YRM 994 Frame General This section has a description and service procedures for the parts of the frame. These parts include the overhead guard, covers, and pads. The location for labels is also shown. Frame SIZE The frame is a single weldment with mountings for over- head guard, mast, and the transaxles. There is very little repair required on the frame. Most repairs can be done by removing the necessary system parts. See the section for the system that has the part that must be re- moved. The frame for these lift trucks come in two sizes, short and long wheelbase. Model Capacity Wheel Base Length ESC030FA 1361 kg (3000 lb) 1114 mm (43.9 in.) ESC035FA 1588 kg (3500 lb) 1114 mm (43.9 in.) ESC035FA 1588 kg (3500 lb) 1178 mm (46.4 in.) ESC040FA 1814 kg (4000 lb) 1178 mm (46.4 in.) PAINTING INSTRUCTIONS WARNING Cleaning solvents can be flammable and toxic and can cause skin irritation. Wear protection for eyes and skin. Always use solvents and paints in an area with ventilation. Do not use solvents or paints near heat, fire, or electrical equipment that can make sparks. When using cleaning solvents, always fol- low the recommendations of the manufacturer. NOTE: Protect all electronic controls and wiring from heat and moisture produced by steam cleaning or chemical solvents. To paint lift trucks it is important to remove all the dirt and any foreign material from the surface to be painted prior to painting the surface. 1. Remove all dirt and grime from surface to be painted. Clean area to be painted thoroughly using solvent for painted surfaces. Do not use solvent on new paint. Make sure all oil and grease is removed. 2. Use sandpaper to remove top surface of the paint and rust from metal. All metal surfaces where paint is removed must be painted. Use a primer. Apply primer before applying final coat of paint. CAUTION Do not paint the pads, plastic covers, handles, cables, electrical components, safety labels, mast chains, hoses, or controls. 3. Protect all surfaces that will not be painted. NOTE: Protect electrical components, wiring, and bat- tery connector contacts from overspray. 4. Paint surfaces using correct color of paint. Fol- low directions on container. Paint wheels, drive axle hubs, hub caps, and axle shafts flanges black (HCE-51). Paint forks red (HCE-53). Paint load backrest yellow (HCE-117). 5. Install new safety labels. See Safety Labels 1
  • 3. Covers and Pads 100 YRM 994 Covers and Pads COVERS WARNING The covers are designed to protect the internal parts of the lift truck. If a cover is damaged it should be replaced, not repaired. There are four covers that cover and protect all the in- ternal parts of these lift trucks. They are the hydraulic, electrical, upper, and lower steering covers. See Fig- ure 1. Remove 1. Move lift truck to safe, level area. NOTE: The electrical and hydraulic covers can be re- moved by hand and should never be removed with a pry bar or screwdriver, as this will damage them. 2. Remove electrical cover by gently lifting it upward with your hands and lifting it over battery disconnect lever and control handle. 3. Remove hydraulic cover by gently pulling it away from frame at top and then lifting it out of two slots at bottom. 4. Remove upper steering cover by removing steering control handle (refer to Steering Control Handle), then remove two capscrews and washers that hold cover to frame and lift upper steering cover off. 5. Remove floor mat. 6. Remove four capscrews and washers that hold floor plate to vibration isolators. 7. Remove floor plate. 8. Remove five capscrews that hold shield to frame. 9. Remove two nuts that hold lower steering cover to vibration isolators. 10. Remove two capscrews that hold lower steering cover to frame. 11. Remove lower steering cover. Install WARNING The covers are designed to protect the internal parts of the lift truck. If a cover is damaged it should be replaced, not repaired. To install the covers, reverse the removal procedure. PADS There are four pads that cushion and protect the oper- ator on these lift trucks. They are the top, bottom, hip, and knee pads. The pads are designed to interlock and should be removed in a certain order. Remove The top and bottom pads are both on the backrest and are designed to cushion and support the operators back. 1. Remove four capscrews that hold top pad to frame and remove top pad. 2. Remove four capscrews that hold bottom pad to frame and remove bottom pad. WARNING The battery is heavy and should be removed care- fully to avoid causing damage or injury. Remove the battery using a battery puller and stand. 3. Remove battery to gain access to four capscrews that hold hip pad to frame. 4. Remove four capscrews that hold hip pad to frame and remove hip pad. NOTE: The knee pad can be removed without removing the other pads first. 5. Remove two capscrews that hold knee pad to frame and remove knee pad. 2
  • 4. 100 YRM 994 Covers and Pads Install WARNING The pads are designed to protect the internal parts of the lift truck and cushion the operator. If a pad is damaged it should be replaced, not repaired. To install the pads, reverse the removal procedure. 1. CAPSCREW 2. NUT 3. LOCKWASHER 4. FLOOR PLATE 5. FLOOR MAT 6. ISOLATOR 7. CAPSCREW 8. SHIELD 9. CAPSCREW 10. LOWER STEERING COVER 11. NUT 12. CAPSCREW 13. WASHER Figure 1. Floor Plates and Covers 3
  • 5. Overhead Guard 100 YRM 994 Overhead Guard DESCRIPTION The overhead guard is a single weldment that bolts to the frame and is designed to protect the operator from falling objects or a rollover accident. There are two types of overhead guard: the standard guard "A" and the low profile "B." The low profile is designed to allow the lift truck access to low clearance areas. See Fig- ure 2. REMOVE WARNING The overhead guard is part of the operator protec- tion system. Do not operate the lift truck without the overhead guard correctly fastened to the lift truck. 1. Move lift truck to a safe, level area. WARNING Make sure the brake pedal is released and the brake is applied. Put blocks on both sides (front and back) of the drive tires to prevent movement of the lift truck. 2. Put blocks under drive wheels to keep them from rolling. 3. Turn ignition key OFF and disconnect battery. 4. Remove hydraulic cover for access to front mount- ing hardware and remove upper steering cover for access to any optional lighting fixture wiring con- nectors. See Covers for instructions on how to re- move covers. 5. If overhead guard has optional lighting fixtures, identify and disconnect wiring before overhead guard is removed. WARNING The overhead guard is heavy. Make sure the sling, chain, eyebolts, and crane or lifting device has the capacity to lift the overhead guard. The overhead guard weighs up to 68 kg (150 lb). 6. Use a lifting device and have another person give assistance to lift overhead guard from lift truck. 7. Remove two capscrews, washers, and nuts from front supports of overhead guard. 8. Remove two capscrews from rear support of over- head guard. 9. Remove overhead guard. REPAIR WARNING Do not alter or tamper with the overhead guard. Welding, heating, or drilling holes in the wrong location can reduce the strength of the overhead guard. Contact your dealer for Yale lift trucks before welding or drilling holes in any part of the overhead guard. If it is damaged, it should be replaced, not repaired. Do not weld on it or drill holes in it. If overhead guard needs painting, use sandpaper to remove old paint and paint it with recommended paint only. INSTALL WARNING The overhead guard is heavy. Make sure the sling, chain, eyebolts, and crane or lifting device has the capacity to lift the overhead guard. The overhead guard weighs up to 68 kg (150 lb). 1. Use a lifting device and have another person give assistance to lift overhead guard to lift truck. 2. Align two front supports with bolt holes on front of lift truck. 3. Install two capscrews, washers, and nuts to front supports of overhead guard. Do not tighten nuts until rear support is installed. 4. Align rear support with bolt holes on rear of lift truck. 5. Install two capscrews and torque them to 224 N•m (165 lbf ft). 6. Torque front two nuts to 122 N•m (90 lbf ft). 7. If overhead guard has optional lighting fixtures, identify and connect wiring. 8. Install any covers that were removed. 4
  • 6. 100 YRM 994 Overhead Guard A. STANDARD GUARD B. LOW PROFILE GUARD 1. OVERHEAD GUARD 2. SOCKET HEAD CAPSCREW 3. PLUG 4. LOCK NUT 5. WASHER 6. CAPSCREW Figure 2. Overhead Guard 5
  • 7. Battery 100 YRM 994 Battery BATTERY SIZES WARNING The battery must be within the weight range shown on the nameplate for the lift truck or the truck may become unstable when lifting a heavy load. WARNING To prevent damage to the lift truck or battery, the battery must fit the battery compartment correctly. Use spacers designed for the lift trucks to prevent the battery from moving more than 13 mm (0.5 in.) NOTE: The weight of the battery is a major part of the counterweight system on an electric lift truck. The lift trucks are designed to operate with 36 volt bat- teries only. Table 1. 3000 lb Capacity, 43.9-inch Wheel Base Maximum Battery Compartment Size Typical Battery Size Battery Weight Width Length Height Width Length Height Range With Spacers 965.2 mm (38.00 in.) 393.7 mm (15.50 in.) 855/966 kg (1885/2130 lb) Yes 400.0 mm (15.75 in.) 939/1061 kg (2070/2339 lb) Yes 973.07 mm (38.31 in.) 454.15 mm (17.88 in.) 1050/1159 kg (2315/2555 lb) No 984.3 mm (38.75 in.) 463.55 mm (18.25 in.) 822.5 mm (32.38 in.) 979.42 mm (38.56 in.) 452.88 mm (17.83 in.) 787.4 mm (31.00 in.) 1082/1222 kg (2385/2694 lb) No Table 2. 3500 lb Capacity, 43.9-inch Wheel Base Maximum Battery Compartment Size Typical Battery Size Battery Weight Width Length Height Width Length Height Range With Spacers 973.07 mm (38.31 in.) 454.15 mm (17.88 in.) 1050/1159 kg (2315/2555 lb) No 984.3 mm (38.75 in.) 463.55 mm (18.25 in.) 822.5 mm (32.38 in.) 979.42 mm (38.56 in.) 452.88 mm (17.83 in.) 787.4 mm (31.00 in.) 1082/1222 kg (2385/2694 lb) No 6
  • 8. 100 YRM 994 Labels and Decals Table 3. 3500 lb Capacity, 46.4-inch Wheel Base Maximum Battery Compartment Size Typical Battery Size Battery Weight Width Length Height Width Length Height Range With Spacers 973.07 mm (38.31 in.) 454.15 mm (17.88 in.) 1050/1159 kg (2315/2555 lb) Yes 979.42 mm (38.56 in.) 452.88 mm (17.83 in.) 1082/1222 kg (2385/2694 lb) Yes 977.9 mm (38.50 in.) 512.83 mm (20.19 in.) 1152/1301 kg (2540/2868 lb) No 984.3 mm (38.75 in.) 528.32 mm (20.8 in.) 822.5 mm (32.38 in.) 979.42 mm (38.56 in.) 518.16 mm (20.40 in.) 787.4 mm (31.00 in.) 1224/1385 kg (2698/3053 lb) No Table 4. 4000 lb Capacity, 46.4-inch Wheel Base Maximum Battery Compartment Size Typical Battery Size Battery Weight Width Length Height Width Length Height Range With Spacers 977.9 mm (38.50 in.) 512.83 mm (20.19 in.) 1152/1301 kg (2540/2868 lbf) No 984.3 mm (38.75 in.) 528.32 mm (20.8 in.) 822.5 mm (32.38 in.) 979.42 mm (38.56 in.) 518.16 mm (20.40 in.) 787.4 mm (31.00 in.) 1224/1385 kg (2698/3053 lbf) No Labels and Decals SAFETY LABELS WARNING Safety labels are installed on the lift truck to give information about operation and possible hazards. It is important that all safety labels are installed on the lift truck and can be read. DO NOT add to or modify the lift truck. Any change to the lift truck, the tires, or its equipment can change the lifting capacity. The lift truck must be rated as equipped and the nameplate must show the new capacity rating. Contact your dealer for Yale lift trucks for a replacement nameplate. WARNING Cleaning solvents can be inflammable and toxic and can cause skin irritation. When using cleaning solvents, always follow the recommendations of the manufacturer. If an adhesive plate or label must be replaced, use the following procedure to install a new label or plate: 1. Clean area with an oil-free cleaner to remove all oil, grease, and foreign matter. Wipe area until com- pletely dry. 2. Carefully remove only the paper backing from ad- hesive. Do not touch adhesive surface with hands or remove front mask from label or plate face. 3. Exposed adhesive face must be free from all foreign matter before positioning label or plate on surface. 4. Press label or plate down firmly, making sure all corners are stuck down tight. Make sure all air is removed from under label or plate and corners are tight. Do not attempt to move label or plate once it has been stuck down. For correct placement of all labels and decals, refer to Figure 3. 7
  • 9. Labels and Decals 100 YRM 994 Figure 3. Label Locations 8
  • 10. 100 YRM 994 Labels and Decals Legend for Figure 3 1. LABEL (YALE) 2. LABEL (MAST WARNING) 3. LABEL (MAST WARNING) 4. LABEL (PINCH POINT) 5. INSPECTION PLATE 6. NAMEPLATE 7. COVER 8. BASE (INFORMATION CASE) 9. COVER (INFORMATION CASE) 10. LABEL (PATENTS AND TRADEMARKS) 11. LABEL (WARNING) 12. LABEL (OPERATOR WARNING) 13. LABEL (BATTERY CONNECTOR CAUTION) 14. LABEL (HYDRAULIC OIL FILL) 15. DECAL (HANDLE FUNCTION) 16. LABEL (OPERATOR WARNING) 17. LABEL (YALE) 18. LABEL (FREEZER) 19. LABEL (COOLER) 9
  • 11. 620 YRM 294 Brush and Commutator Inspection General This section describes disassembly and assembly, brush installation, inspection, and checks for mal- functions of DC motors. Inspect the commutator and brushes every 350 hours of operation. The commu- tator is the rotating electric connection between the armature and the electric power supplied by the bat- tery. Brushes made of carbon compounds slide on the rotating commutator and are the path for electricity from the battery to the commutator and the armature. The maintenance of the commutator and the brushes is important to the good operation of a DC motor. Traction motors and hydraulic pump motors are similar in design. The hydraulic pump motors are smaller than the traction motors, but the disassembly and maintenance of these motors are similar. The cooling fan in the traction motors is fastened to the armature and can be removed from the armature. The cooling fan can be removed during disassembly of the traction motor. The cooling fan in the hydraulic pump motors can be a press fit on the armature shaft and is not easily removed during disassembly of the motor. The armature and cooling fan must be removed from the drive end of the motor during disassembly. The assembly and disassembly of the motor used for the power steering pump is described in the Steering System section. This motor is a permanent magnet motor. Brush and Commutator Inspection HYDRAULIC PUMP MOTOR AND TRACTION MOTOR NOTE: When inspecting brush conditions and motor commutator conditions for head damage or abnormal wear, the battery maintenance and condition should be eliminated as a cause first. See Industrial Battery 2240 YRM 1. NOTE: The brushes and commutator can be inspected, the brushes can be replaced, and Stoning the Commu- tator can be done with the motor installed in the truck. NOTE: Inspect the brushes and commutator every 350 hours for best operation and to prevent motor damage. The hydraulic pump motor normally has more start cy- cles than other motors, so it can have more wear and possible damage. NOTE: The following procedure is for inspecting the brushes and commutator with the motor installed in the lift truck. The same inspections can be done with the motor removed. If the motor is removed, start at Step 3. 1. To rotate the commutator of the traction motor with- out moving the truck, the drive wheels must be raised. See Figure 1. Raise drive wheels so com- mutator of the traction motor can be rotated without moving lift truck. See How To Raise Drive Wheels in the Operating Manual or the Periodic Mainte- nance YRM section for your lift truck. NOTE: For some models of lift trucks, the battery does not need to be removed to access the electric motors. Other models will require the removal of the battery be- fore gaining access to the electric motors. To remove the battery, either raise the hood panels or unfasten the floor plate, depending on which motor needs to be ac- cessed. 1. ARMATURE (DRIVE) SHAFT 2. COOLING FAN 3. BRUSH COVER Figure 1. Traction Motor 1
  • 12. Brush and Commutator Inspection 620 YRM 294 2. Remove battery. See How to Remove Battery in the Operating Manual or the Periodic Mainte- nance YRM section for your lift truck. Remove ac- cess plate to motors. If the battery in your lift truck does not need removal for access to the motors, go to Step 3. WARNING Compressed air can move particles so that they cause injury to the user or to other personnel. Make sure that the path of the compressed air is away from all personnel. Wear protective goggles or a face shield to prevent injury to the eyes. NOTE: Vacuum cleaning, when possible, is the recom- mendation of manufacturers of electric motors. The use of compressed air can send dirt particles into the bear- ings and other areas of the motor that can cause pos- sible damage. 3. Remove brush covers at rear of motor. See Fig- ure 2. Wear eye protection. Use a vacuum cleaner or compressed air to remove dirt and brush dust from commutator area. Figure 2. Brush Cover Removal From Motor 4. Remove and inspect brushes for damage or uneven wear. Replace all brushes if any brush is worn or damaged. The brushes must be at least half their original length. Move brush springs away from top of each brush and pull brushes from their holders to inspect surface that rides on commutator. See Fig- ure 3. That surface must have the same shape as the commutator and must not have cracks or de- fects. Some brushes have wear sensor wires at- tached, even if they are not connected to an indi- cator. Replace these brushes if brushes are worn enough to see sensor at commutator end of brush. 5. Inspect commutator surface. See Table 1 and Ta- ble 2. Carefully rotate armature. DO NOT damage commutator if you use a tool to rotate armature. The commutator wears slowly in normal service. The mica must be cut below the surface of the com- mutator bars after a long service period or after a commutator has been turned in a lathe. A commutator that has been in service will have a smooth and polished surface with a darker brown color where it rotates under the brushes. A variation of color on the commutator surface between light brown and darker brown is normal. The surface condition is the lubrication between the commutator and the brushes. The brushes will wear rapidly if this surface condition does not develop during the first 6 to 10 hours of operation after a commutator with a new surface is installed. If the commutator has deep grooves, rough edges of the bars, or a few bars that are black or raised above the others, the motor must be removed for service. 6. Inspect white or gray insulation (mica) between commutator bars. The mica must not touch the brushes or the brushes will wear very rapidly. 7. To replace a brush set, remove screw that holds brush wires to bus. Pull brush end of springs from brushes, and pull brushes from holders. Lift brush springs away from holders, and install new brushes so brush commutator surface fully touches commu- tator. Make sure the springs are pushing on each brush. Install and tighten screws for brush wires and bus connectors. 8. Carefully install brush covers so sparks are kept inside motor housing. Install battery as described in Operating Manual or the Periodic Maintenance YRM section for your lift truck. 2
  • 13. Thank you very much for your reading. Please Click Here. Then Get COMPLETE MANUAL. NO WAITING NOTE: If there is no response to click on the link above, please download the PDF document first and then click on it.
  • 14. 620 YRM 294 Brush and Commutator Inspection Figure 3. Brush Removal and Inspection Legend for Figure 3 1. BRUSH 2. BRUSH SPRING 3. MICA Table 1. Normal Commutator Surfaces A light brown surface of the commutator where it rotates on the brushes is a normal condition. The surface of the commutator must be smooth. Variations between light brown and dark brown colors are also normal. The surface of the commutator must be smooth. 3
  • 15. Brush and Commutator Inspection 620 YRM 294 Table 1. Normal Commutator Surfaces (Continued) A condition called slot bar marking is also normal if the commutator surface is smooth. The variable color occurs in a pattern according to the number of conductors per slot. A very dark surface is also a normal and an acceptable condition if the commutator surface is smooth. STEERING PUMP MOTOR NOTE: Some electrical trucks use a steering pump mo- tor. Refer to your truck model’s service manual for in- structions on removal and installation of steering pump motors. 1. Disconnect battery connector. Remove floor plate from lift truck for access to steering pump motor. Open hood for access to motor. Remove screws that hold two brush cover plates to motor housing. 2. Inspect brushes and commutator as described in previous paragraphs for traction and hydraulic pump motors. The brush replacement procedure is also the same, although there are only two brushes for the steering pump motor. See Table 3. 3. Install brush covers and screws. Install floor plate or close hood and connect battery connector. NORMAL COMMUTATOR SURFACE A commutator that has been in service will have a smooth and polished surface with a darker brown color where it rotates under the brushes. See Table 1. A variation of color on the commutator surface between light brown and darker brown is normal. This surface condition is the lubrication between the commutator and the brushes. The brushes will wear rapidly if this surface condition does not develop during the first 6 to 10 hours of operation after a commutator with a new surface is installed. 4
  • 16. 620 YRM 294 Brush and Commutator Inspection COMMUTATOR PROBLEMS Commutator and motor problems and are shown in Ta- ble 2. Table 2. Commutator Problems Problem Possible Cause Illustration Heavy streaks and fine grooves indicate the beginning of damage to the commutator. • Operation of the mo- tor in dirty and abrasive conditions. • Continuous operation of a motor with a light load. • Brush pressure is too low. • Worn brushes. Grooves and lines that have followed the heavy streaks and fine grooves shown above. The armature must be removed from the motor so the commutator can be repaired. A commutator with this condition will cause the brushes to wear rapidly. • Operation of the mo- tor in dirty and abrasive conditions. • Continuous operation of a motor with a light load. • Brush pressure is too low. • Worn brushes. 5
  • 17. Brush and Commutator Inspection 620 YRM 294 Table 2. Commutator Problems (Continued) Problem Possible Cause Illustration Grooves that are the width of the brushes. • Operation of the mo- tor in dirty and abrasive conditions. • Wrong type of brushes for this motor and oper- ation. • Brush pressure is too high. A condition called copper drag occurs when copper from the commutator bar is pulled into the slot between the commutator bars. This condition will cause a short circuit between the commutator bars if it is not corrected. The brushes will wear rapidly. • Operation of the mo- tor in dirty and abrasive conditions. • Brush holder is not ad- justed electrically cor- rect for the motor. • Wrong type of brushes for this motor and oper- ation. • Brush pressure is wrong (too high or too low). Electrical burns on commutator bars on opposite sides of the commutator. • Open armature wind- ing. • Motor has been stalled. 6
  • 18. 620 YRM 294 Brush and Commutator Inspection Table 2. Commutator Problems (Continued) Problem Possible Cause Illustration Copper wears rapidly at the edge of the commutator bars. • Operation of the mo- tor in dirty and abrasive conditions. • Wrong type of brushes for this motor and oper- ation. 1. Flashover causes burning of the ends of the commutator bar. 2. Open circuit in wind- ing causes deep burning of adjacent commutator bars. 3. Overheating causes damage to varnish insulation. • Motor has been too hot. Wrong lift truck for the application. • Motor has been stalled. • Open armature wind- ing. • Open field coil. Brush and commutator damage occurs when the high commutator hits and forces the brush up. Arcing and burns occur as the brush moves back down to the normal surface. Check for loose or high commutator bars. • Motor has been stalled. (High com- mutator bars at each brush position can occur if the motor is stalled.) • Motor has been too hot. 1. High commutator bars at each brush position can oc- cur if the motor is stalled. 2. Rapid brush wear from high commutator bars. 7
  • 19. Brush Replacement 620 YRM 294 Brush Replacement 1. Motor brushes must be replaced before they are worn enough to damage the surface of the commu- tator. Move the brush spring and remove a brush from its brush holder. Install new brushes as a set if length of any brush is worn to a minimum length. See Table 3. If the brush lead is fastened to the brush with a rivet, install a new set of brushes if it is worn to within 3 mm (0.118 in.) of the rivet. If a brush does not move easily in its holder, a new set of brushes must be installed. The lead wire for some brushes is installed directly into the carbon compound of the brush. New brushes must be installed before the lead wire cuts a groove in the commutator. Install a new brush set when a brush is worn to a short length. Brushes are made to different specifications for mo- tors used in different applications. Use only new brushes approved by Yale Company for that motor. Table 3. Brush Wear Replacement Guide Brush Height 17 mm (0.67 in.) 22 mm (0.87 in.) 28 mm (1.10 in.) 30 mm (1.18 in.) 31 mm (1.22 in.) 32 mm (1.26 in.) 40 mm (1.57 in.) Wear 8 mm (0.31 in.) 12 mm (0.47 in.) 14 mm (0.55 in.) 15 mm (0.59 in.) 16 mm (0.63 in.) 16 mm (0.63 in.) 16 mm (0.63 in.) Worn Brush Height 9 mm (0.35 in.) 10 mm (0.39 in.) 14 mm (0.55 in.) 15 mm (0.59 in.) 15 mm (0.59 in.) 16 mm (0.63 in.) 20 mm (0.79 in.) NOTE: For some models of lift trucks, the battery does not need to be removed to access the electric motors. Other models will require the removal of the battery be- fore gaining access to the electric motors. 2. Remove battery as necessary for your lift truck. See How To Remove Battery in the Operating Manual or the YRM section Periodic Maintenance for your lift truck. WARNING Compressed air can move particles so they cause injury to the user or to other personnel. Verify the path of the compressed air is away from all person- nel. Wear protective goggles of a face shield to pre- vent injury to the eyes. 3. Remove access plate to motors. Remove brush covers to motor. See Figure 2. Wear eye protec- tion. Use a vacuum cleaner or compressed air to remove dirt and brush dust from commutator area. 4. Make a note of the arrangement and connections of the brush assembly. See Figure 4. The new brushes must be installed in the same positions from which the worn brushes were removed. 5. Loosen screw that fastens brush wire to its terminal. Remove brush springs and brushes. 1. BRUSH HOLDER (4) 2. BRUSH MOUNTING PLATE 3. BRUSH SPRING (4) 4. BRUSH SET Figure 4. Brush Assembly 8
  • 20. 620 YRM 294 Brush Replacement 6. Inspect brush holders for burns and damage. Make sure brush holders are fastened tightly to brush mounting plate at end of motor. Make sure new brushes will move freely and smoothly in brush holders. Check that brush mounting plate is hold- ing brush holder so it does not move. 7. Connect new brush wire to its terminal mount. NOTE: When new brushes must be installed, a recom- mendation is to also install new brush springs. Dam- age from heat can cause the brush springs to have the wrong spring pressure. 8. Check brush springs for damage from heat and cor- rosion. If brush springs are damaged, install new brush springs. Check brush springs for approxi- mately equal pressure. Brush springs normally have a spring pressure of approximately: 1.0 to 2.0 Newtons per each cm2 (1.5 to 3.0 lbf per each in2 ) when measured with a spring scale. A brush for a traction motor has an area of approx- imately: 5.33 × 1.27 cm = 6.8 cm2 (2.1 × 0.5 in. = 1.05 in2 ). Brush springs for the traction motor normally have a spring force of approximately: 9.1 to 11.3 Newtons (36 to 44 ozf) when measured with a spring scale as shown in Figure 5. A brush for a hydraulic pump motor has an area of approximately: 4.42 × 0.95 cm = 4.21 cm2 (1.74 × 0.375 in. = 0.653 in2 ). Brush springs for the hydraulic pump motor nor- mally have a spring force of approximately: 5.2 to 7.4 Newtons (20 to 28 ozf) when measured with a spring scale as shown in Figure 5. NOTE: SOME MOTORS HAVE SPRINGS AS SHOWN IN FIGURE 7 AND FIGURE 11. SOME SPRINGS ARE IN PAIRS AT EACH BRUSH HOLDER. 1. SPRING SCALE 2. BRUSH IN BRUSH HOLDER 3. COMMUTATOR 4. BRUSH SPRING Figure 5. Brush Spring Pressure Check WARNING Wear eye protection. Raise the drive wheels. Oper- ate the motor at low speed. Protect your fingers. You are doing work close to moving parts of the motor. Do not use a brush seater stone less than 60 mm (2.4 in.) in length. NOTE: The brush springs used in motors made by Yale have a constant force design. The force of the brush spring against the brush stays almost constant as the brush wears and becomes shorter in its brush holder. NOTE: New brushes made by the manufacturer are normally made to fit the surface of the commutator when they are installed. This contact surface must be checked when new brushes are installed. The contact 9