Flash photography for beginners. 4 tutorials with tips to get started.
•
0 likes•56 views

In this article, we will guide you through the basics of getting started with the Profoto A1X to create natural looking images with flash. We’ll take you all the way through the basics of how to set your camera Startpage /Profoto stories / and flash, to create soft and hard light, how to direct it for dierent purposes and finally how to use gels in a creative way.

Recommended
More Related Content
What's hot
What's hot (20)
Similar to Flash photography for beginners. 4 tutorials with tips to get started.
Similar to Flash photography for beginners. 4 tutorials with tips to get started. (20)
More from Janique Goff Madison
More from Janique Goff Madison (20)
Recently uploaded
Recently uploaded (20)
Flash photography for beginners. 4 tutorials with tips to get started.
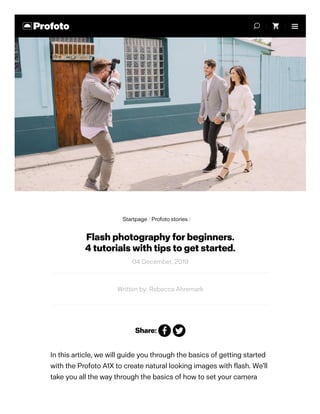
- 1. Flash photography for beginners. 4 tutorials with tips to get started. 04 December, 2019 Written by: Rebecca Ahremark Share: In this article, we will guide you through the basics of getting started with the Profoto A1X to create natural looking images with flash. We’ll take you all the way through the basics of how to set your camera Startpage/Profoto stories/
- 2. and flash, to create soft and hard light, how to direct it for di erent purposes and finally how to use gels in a creative way. We asked wedding and portrait photographer Paul Von Reiter to help us demonstrate this in four short video tutorials using the Profoto A1X. Tutorial tip 1 How to get started with flash How to get started with ashHow to get started with ash
- 3. Step 1. Always set your camera first Start by deciding what depth of field you want in your image by setting your aperture. This is your creative decision and shouldn’t be changed unless you actually want to change the depth of field in the image. For the image above, Paul wanted a shallow depth of field, so he chose an aperture of 2.0.
- 4. To avoid a typical “flashy look” (where the background is dark, and the subject is heavily lit by flash) you can let more of the ambient light into the picture by changing the shutter speed. In the image above, Paul exposed for the background to make sure that both the sky and water were well exposed and chose a shutter speed of 1/500 of a second. If you want to bring more light into the image but end up getting a shutter speed that is too slow, it will create motion blur. In this case, you can increase your ISO instead to work at a faster shutter speed. When you’ve decided on all your camera settings, it’s time to introduce flash. Step 2. Introducing flash / choosing between TTL and manual When should you use TTL and when should you use manual mode? Once again, this is up to you as the photographer, but we’ll give you some tips. TTL/Auto Mode TTL will communicate with the camera and automatically change the flash power level depending on the surrounding ambient light. This will help you get an even flash exposure no matter how the subject moves. th
- 5. Perfect for: When the subject is moving around: at events, on a busy wedding dance floor or when you want to capture a shot of a child running around, etc. When you want automatic settings and don’t want to worry about finding the right flash power Manual mode In manual mode, the flash power stays in the power setting that you’ve decided. Manual mode will put you, the photographer, in control, just like manual mode on your camera. Perfect for: When you don’t need to adjust for ambient light that changes constantly When the distance between the subject and the flash is constant The photographer who wants to be in full control of the settings Tips: If you want more or less flash light, you can adjust this using flash compensation in your camera (TTL mode) or by spinning the wheel on the Profoto A1X (manual mode) When you’ve exposed for the background using the settings in your camera and set your flash to the proper settings, it’s time to start shooting! Tutorial tip 2 How to create soft and hard light
- 6. How to create soft and hard lightHow to create soft and hard light
- 7. The short explanation Soft light is the term for when the shadow edges (the gradient between dark and bright) are wide. The softer the light, the less sharp the shadows will seem. Hard light is the opposite, with crisp and sharp shadows. A larger light source creates soft light and a small light source creates hard light. How to create soft light with the Profoto A1X Creating soft light with the Profoto A1X can be done in several ways. An easy option is to bounce it into a white wall or ceiling, which will reflect the light. But sometimes there is nothing to bounce into: the ceiling might be black or perhaps you’re shooting outside. In those situations, you can use some of the products below instead.
- 8. How to create hard light with the Profoto A1X Maybe you’ve noticed that shooting outside in direct sunlight creates hard and crisp shadows? The reason for this is that the sun is a small light source, seen from our distance. If you want to mimic the look you get from sunlight, using a small flash straight on your subject will create hard and crisp shadows, similar to those you get from the sun. Tutorial tip 3 How to direct on-camera flash
- 9. The Profoto A1X rotates 360 degrees, meaning that you can direct it in several ways. In the video above, Paul demonstrates three di erent ways you can direct the Profoto A1X to create di erent looks depending on the situation. Flash straight on subject How to direct on-camera ashHow to direct on-camera ash
- 10. Perfect for: Quick and easy portraits People in movement Fill light when you’re outside Tips Use TTL for automatic flash exposure when the subject is moving Flash into a ceiling Photo: Taylor Kinzie
- 11. Perfect for: Creating a softer light (because the light source becomes larger) When the location has a white ceiling (other colors may create unwanted color casts) Tips Add the Bounce Card on the Profoto A1X to get a catchlight in the model’s eyes Make sure that the flash is actually hitting the ceiling so the light will bounce back If it’s too high up, it’s better to change the direction of your flash Flash into a wall
- 12. Perfect for: Creating a softer light, when the ceiling is a color other than white Creating side light and some direction of the shadows Tips Make sure that the flash is actually hitting the wall. If it’s too far away, it’s better to change the position of the flash A Profoto Collapsible Reflector can also be used to create side light, if no wall is nearby Tutorial tip 4 How to be creative with gels
- 13. Congratulations, you have now learned how to set your camera and flash, how to create soft and hard light, and how to direct your flash in three di erent How to be creative with gelsHow to be creative with gels
- 14. ways. So, let’s get creative! As a natural-light photographer, you probably love the images you can create in golden hour and blue hour light. And no wonder, the light it provides is amazing. But as you probably know, natural light is unpredictable and can’t be controlled. With flash, you can recreate this look, no matter what time of day it is. Creating golden hour light The warm, orange light that appears right before the sun is about to set.
- 15. How to re-create it with flash Step 1 Place the Profoto A1X on a stand behind the model (in the video, Paul is using a Manfrotto Nano Pole stand) Photo: Paul Von Rieter
- 16. Step 2 Add the Profoto Clic Gel Full CTO on to the Profoto A1X to get a warm light in the background Step 3 Attach a remote, such as the Profoto Connect, in your camera’s hot shoe to wirelessly connect your camera and flash Tips Change the position of the flash to get the “sunlight” exactly where you want it Increase or decrease power if you think it’s too little or too much Creating blue hour light The cold, blue light that appears before sunrise in the morning and after sunset in the evening. Photo: Paul Von Rieter
- 17. How to re-create it with flash Step 1 Change the Kelvin setting (color temperature) to below 4000 in your camera to get a cooler background and to match the feeling of blue hour Step 2 Add a Profoto Clic Gel CTO on your Profoto A1X to get a neutral color in the model’s face For more tips and tricks on how to use flash, visit Profoto Academy Hope you enjoyed this quick introduction on how to get started with the Profoto A1X. If you want to see more tips and tricks on how to use flash for di erent purposes, check out Profoto Academy. Written by: Rebecca Ahremark Share: Products used in this story
- 18. Related stories Portrait Mira & Thilda create dreamy portraits in Marrakech with the Profoto
- 19. Connect and A1 03 May, 2019 Portrait Taking on portraits in Los Angeles with Paul Von Rieter and the Profoto A1X 04 December, 2019 Portrait Learn how to create characterful portraits with Hélène Pambrun and Profoto 26 August, 2019 Exclusive
- 20. Profoto Academy Learn how to create natural-looking light anytime, anywhere with Audrey Woulard and David Bicho Buy course Photo: Audrey Woulard
- 21. Email Country Subscribe Read more about how we handle personal information in our Privacy Policy. Profoto Newsletter Sign up for a mixture of product news and tips and tricks from leading photographers on how to shape light. example@email.com Philippines I approve Profoto’s Terms of Use. Support Camera About us Contact Careers Press Cookies | Privacy Policy | Terms of use | EDU | Finance Copyright (C) 1968-2019 Profoto AB All rights reserved.